Prerequisites
In order to set up SSO, you must:
Have an OpenAI plan with a Global Admin Console
Be a Global Admin
Before proceeding, please review our SSO Overview and User Management documentation pages to ensure you are familiar with our SSO architecture.
If you previously configured SSO for an API Platform organization or ChatGPT workspace, your SSO settings should already be available to configure at OpenAI Identity page. If the workspace or org for which you want to enable SSO is not shown in your Global Admin Console, please reach out to support@openai.com.
⚠️ Your users will be locked out if SSO is not set up correctly!
An incorrect setup can result in your users being locked out of orgs and workspaces where SSO is set to required. We recommend that you, as the global admin, maintain SSO as Optional in the Admin Portal.
During setup, keep two separate logged in windows open:
One logged in through an incognito window
One logged in through your standard browser
This allows you to test the login process and your SSO/Domain Verification setup on one window, and to revert the changes if needed via the second window.
Testing SSO
If you would like to test the setup process without risking an impact on your users, you can do so via the application here.
Completing a successful connection on this test application will not tie back to your production org, nor will it save the connection (so you can reuse the same parameters in your production instance once you're ready). This means that it is safe to use as a sandbox or playground while you familiarize yourself with the requirements and work out any missing prerequisites.
Enabling SSO
To get started, navigate to the OpenAI Identity page from the Global Admin Console. You can also reach that page from the link on the "Identity & Provisioning" page underneath your "Manage Workspace" settings in ChatGPT or the Identity tab in your API Platform organization settings.
Some of the examples below will showcase the setup in Okta, but the same logic should be applicable to all SAML IdP's.
Domain Verification
In order to enable SSO, we require that you first verify at least one domain.
Important: Remember to review the downstream impact that domain verification may have upon users with that domain.
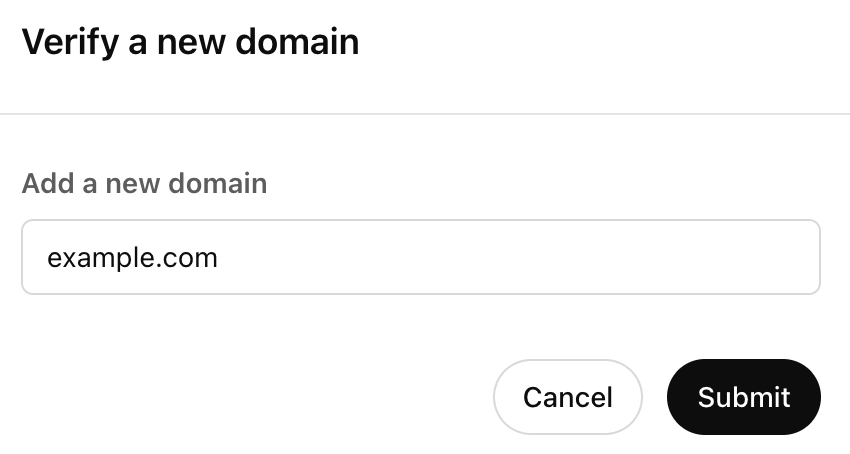
Click the "+ Add Domain" button and enter your DNS to get started:
Once submitted, we provide a key for you to verify ownership of your domain. Navigate to your DNS provider, and add a TXT record with the provided value:
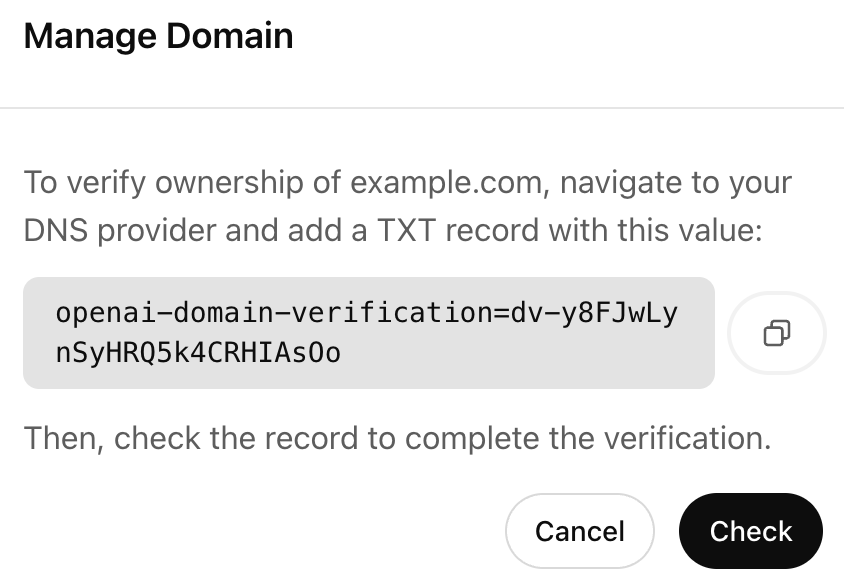
Your TXT record must be reachable via a DNS lookup in order for the verification check to succeed.
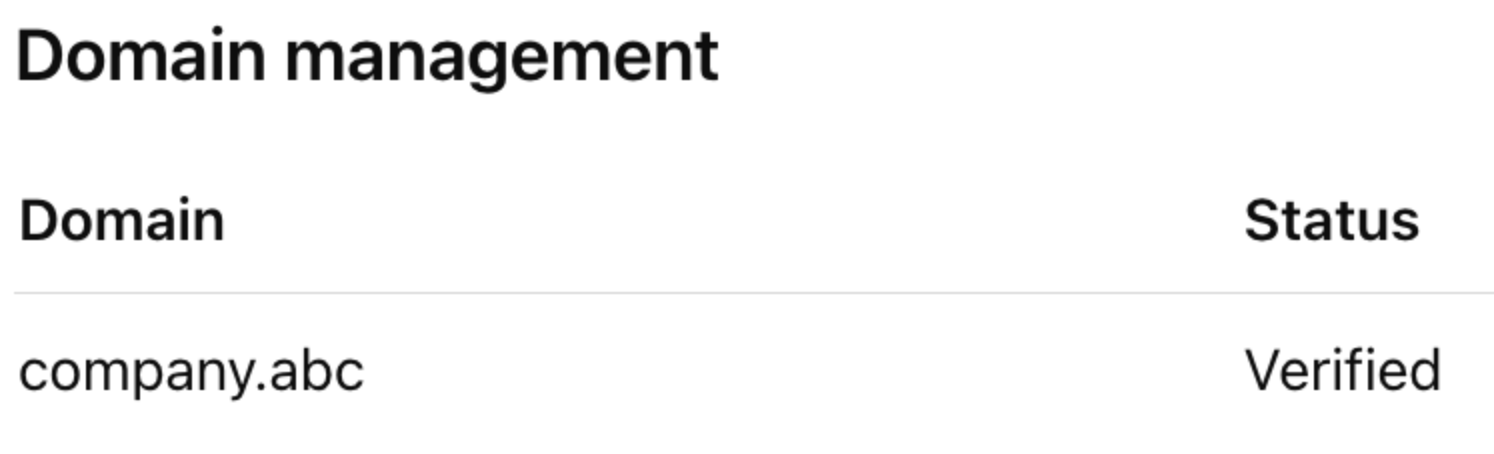
After completing this in your DNS provider, return to the setup page and click the "Check" button. If your domain ownership was validated successfully, you will see the status updated to "Verified."
You can add up to 99 verified domains per Admin Portal, and we provide a 7-day period for you to complete the verification check before marking a domain as expired. Domains can only be verified on a single Admin Portal. If you need to verify the same domain on an organization or workspace not in your Admin Portal, please contact Support.
Configuring Your Application
After successfully verifying your domain, you can proceed with the SSO setup by configuring your IdP application.
To get started, click the "Set up SSO" button:

Selecting your Identity Provider
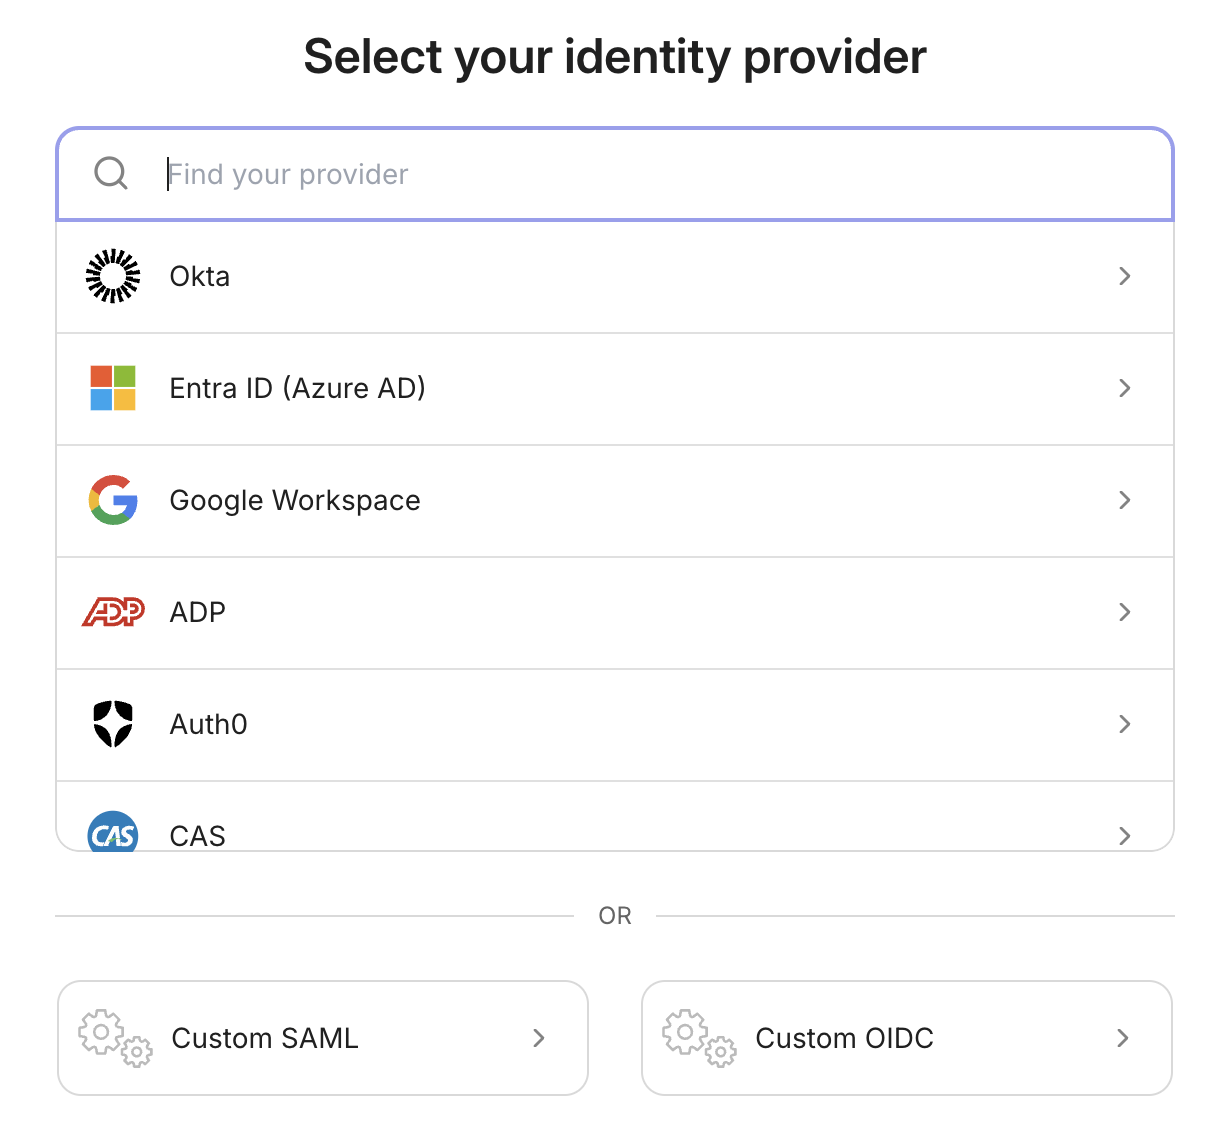
You have the option to select from a list of the most popular IdP's that natively support SAML integrations. If you do not see your IdP in the list, or if you would like to use an OIDC connection, you can choose the appropriate Custom connection button shown at the bottom:
Creating/Connecting the Application
You can now follow the step-by-step configuration wizard to help create and connect your IdP application with us. Depending upon the IdP you are using, your instructions may vary slightly, but the general setup remains the same:
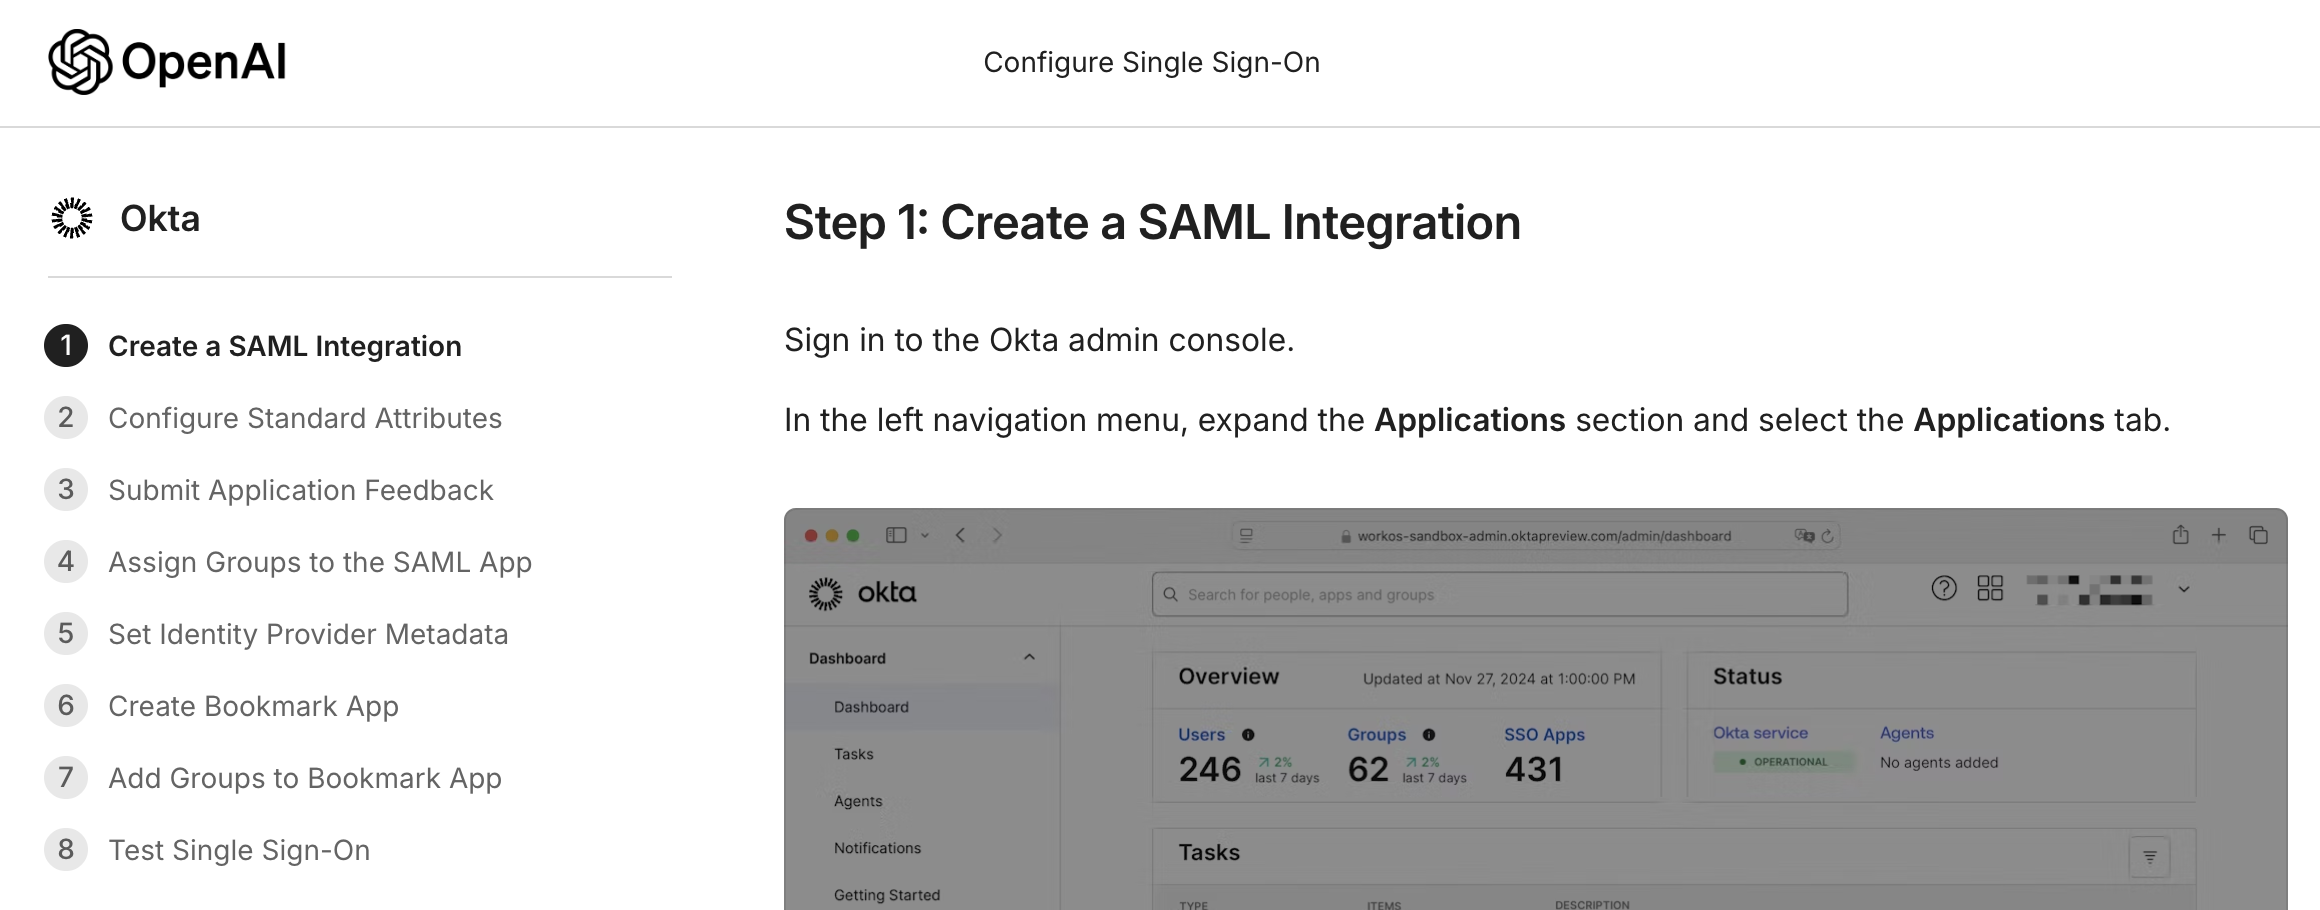
Note that the URL's provided in the creation step will be unique to your organization:
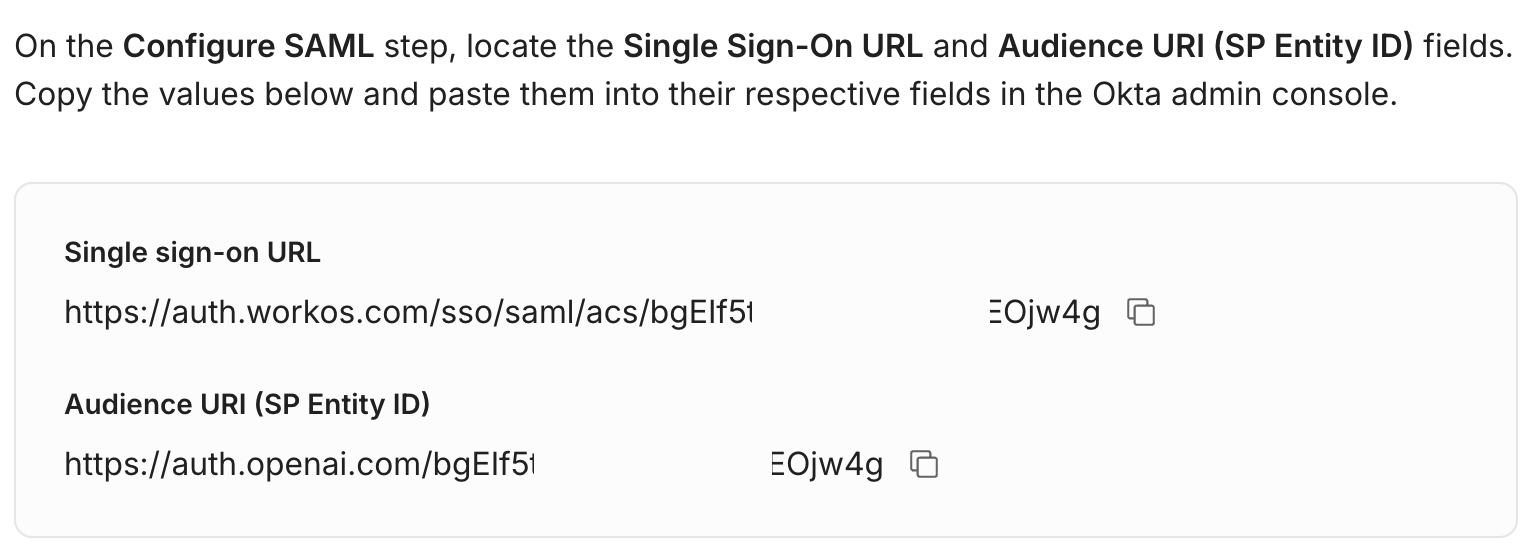
Important: If you choose to reset a healthy SSO connection, these URL values will change. When setting up SSO again, you will need to make sure to update them in your application accordingly.
Once you've completed the URL setup, you can proceed to defining the attribute mapping for users authenticated through your application.
Attribute Mapping
The attribute mapping you define in your SSO application ultimately determines which OpenAI accounts are authenticated and how your users appear in OpenAI products. Our current user model supports three properties:
Email Address (required in the SAML response, determines which account is accessed)
First Name (optional, but recommended)
Last Name (optional, but recommended)
Note: We do not support decrypting SAML Responses. Please ensure that you are not encrypting your response or assertion to guarantee we're able to correctly identify the attributes.
Depending on your IdP, the exact attribute mapping will vary. We recommend adhering to the exact mapping depicted for your IdP in the setup wizard, e.g. Okta would be:
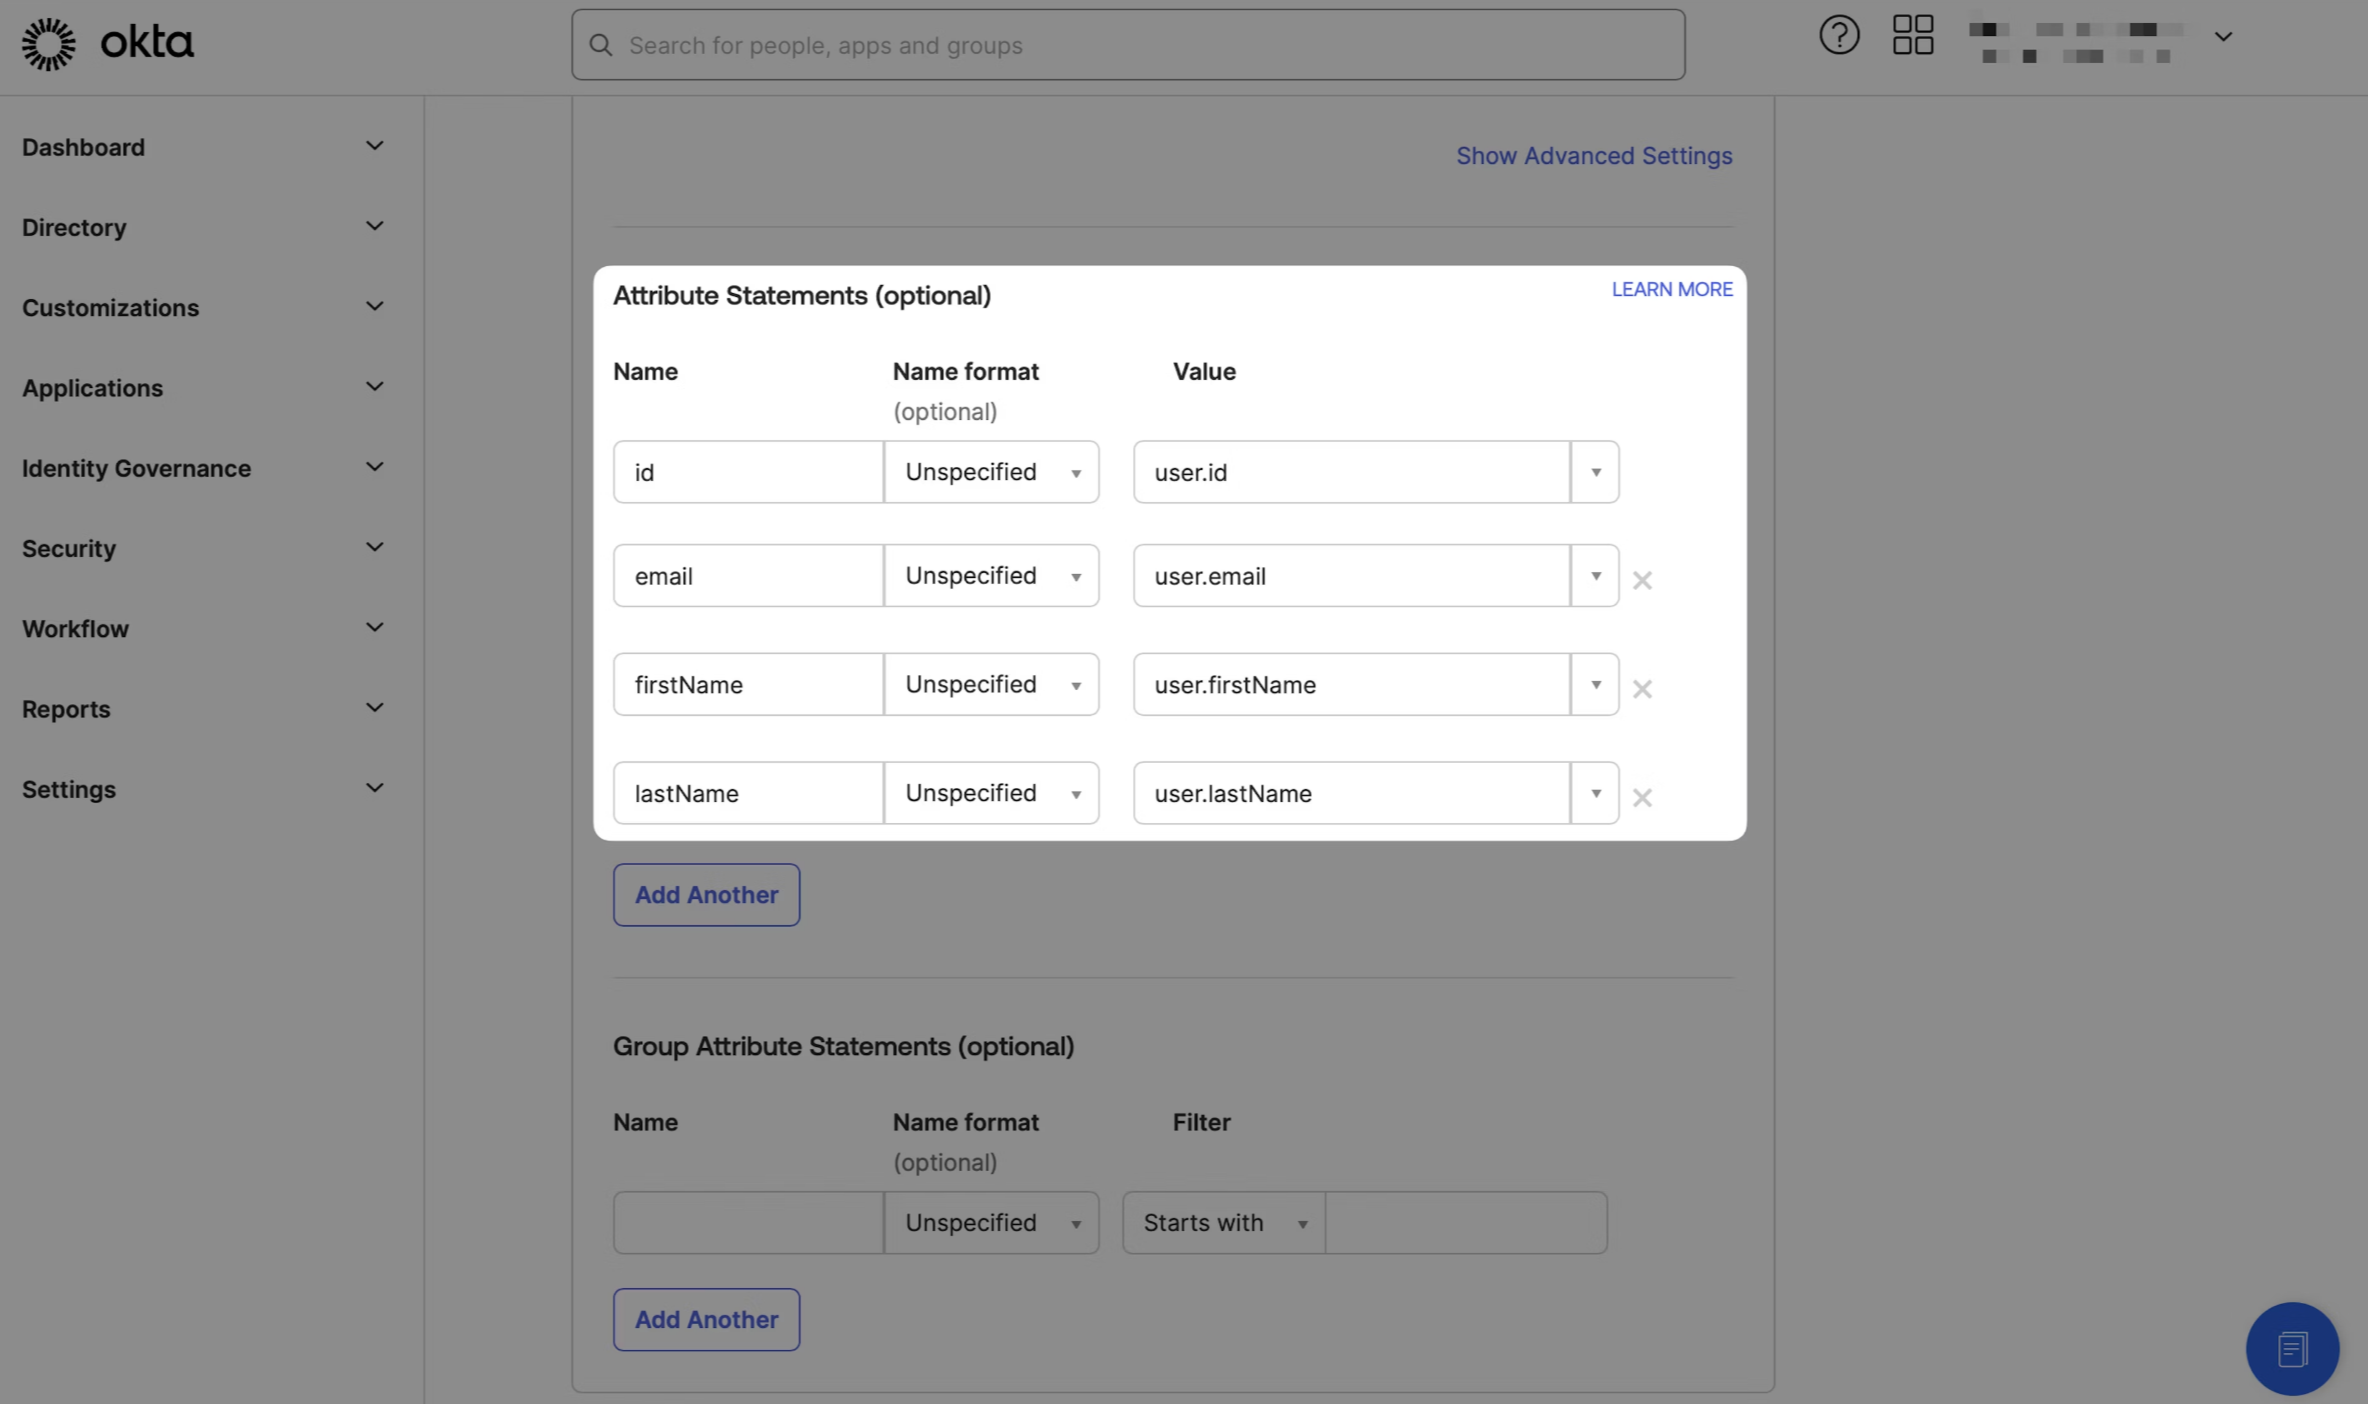
If you are seeing new users come through with their email addresses set to their display name, please review your attribute mapping and confirm that you are not encrypting your responses.
Alternatively, if new users are being asked to enter their name and birthday, this likely indicates we're not identifying a proper name value from your attribute response.
Email Changes
Occasionally, a user's email address may get updated in your IdP, e.g.
A legal name change following a marriage
Their company was acquired and they have a new domain
etc.
If this changes the value of the emailaddress claim in the SSO SAMLResponse, a different OpenAI user tied to the new email address will be accessed (and created if not previously existing) upon successful SSO. This user will need to be invited to the Org or Workspace separately from the original user.
Primary Email Addresses
In some cases, you may have users with multiple different email addresses. This is a common scenario in larger companies that have distributed mailing systems or for Edu customers with different schools, e.g.
In this situation, we recommend ensuring that your SAML response only includes a single email address in its attributes, as including multiple emails can cause confusion when we attempt to tie it to a new or existing user.
Additionally, if the users have a static email address (e.g. a UPN), we recommend utilizing this in your attribute mapping to ensure they will have a stable OpenAI user account that will not be impacted when their other email addresses may be changed.
Provision IdP Application Access
Once you have successfully created your attribute mapping, the wizard will walk you through the steps to provision access to the appropriate users via the desired groups.
Please review our recommendations on User Management for best practices.
Setting IdP Metadata
At this point in the setup, you have two separate options for defining your IdP's metadata: Dynamic Configuration and Manual Configuration.
Dynamic Configuration
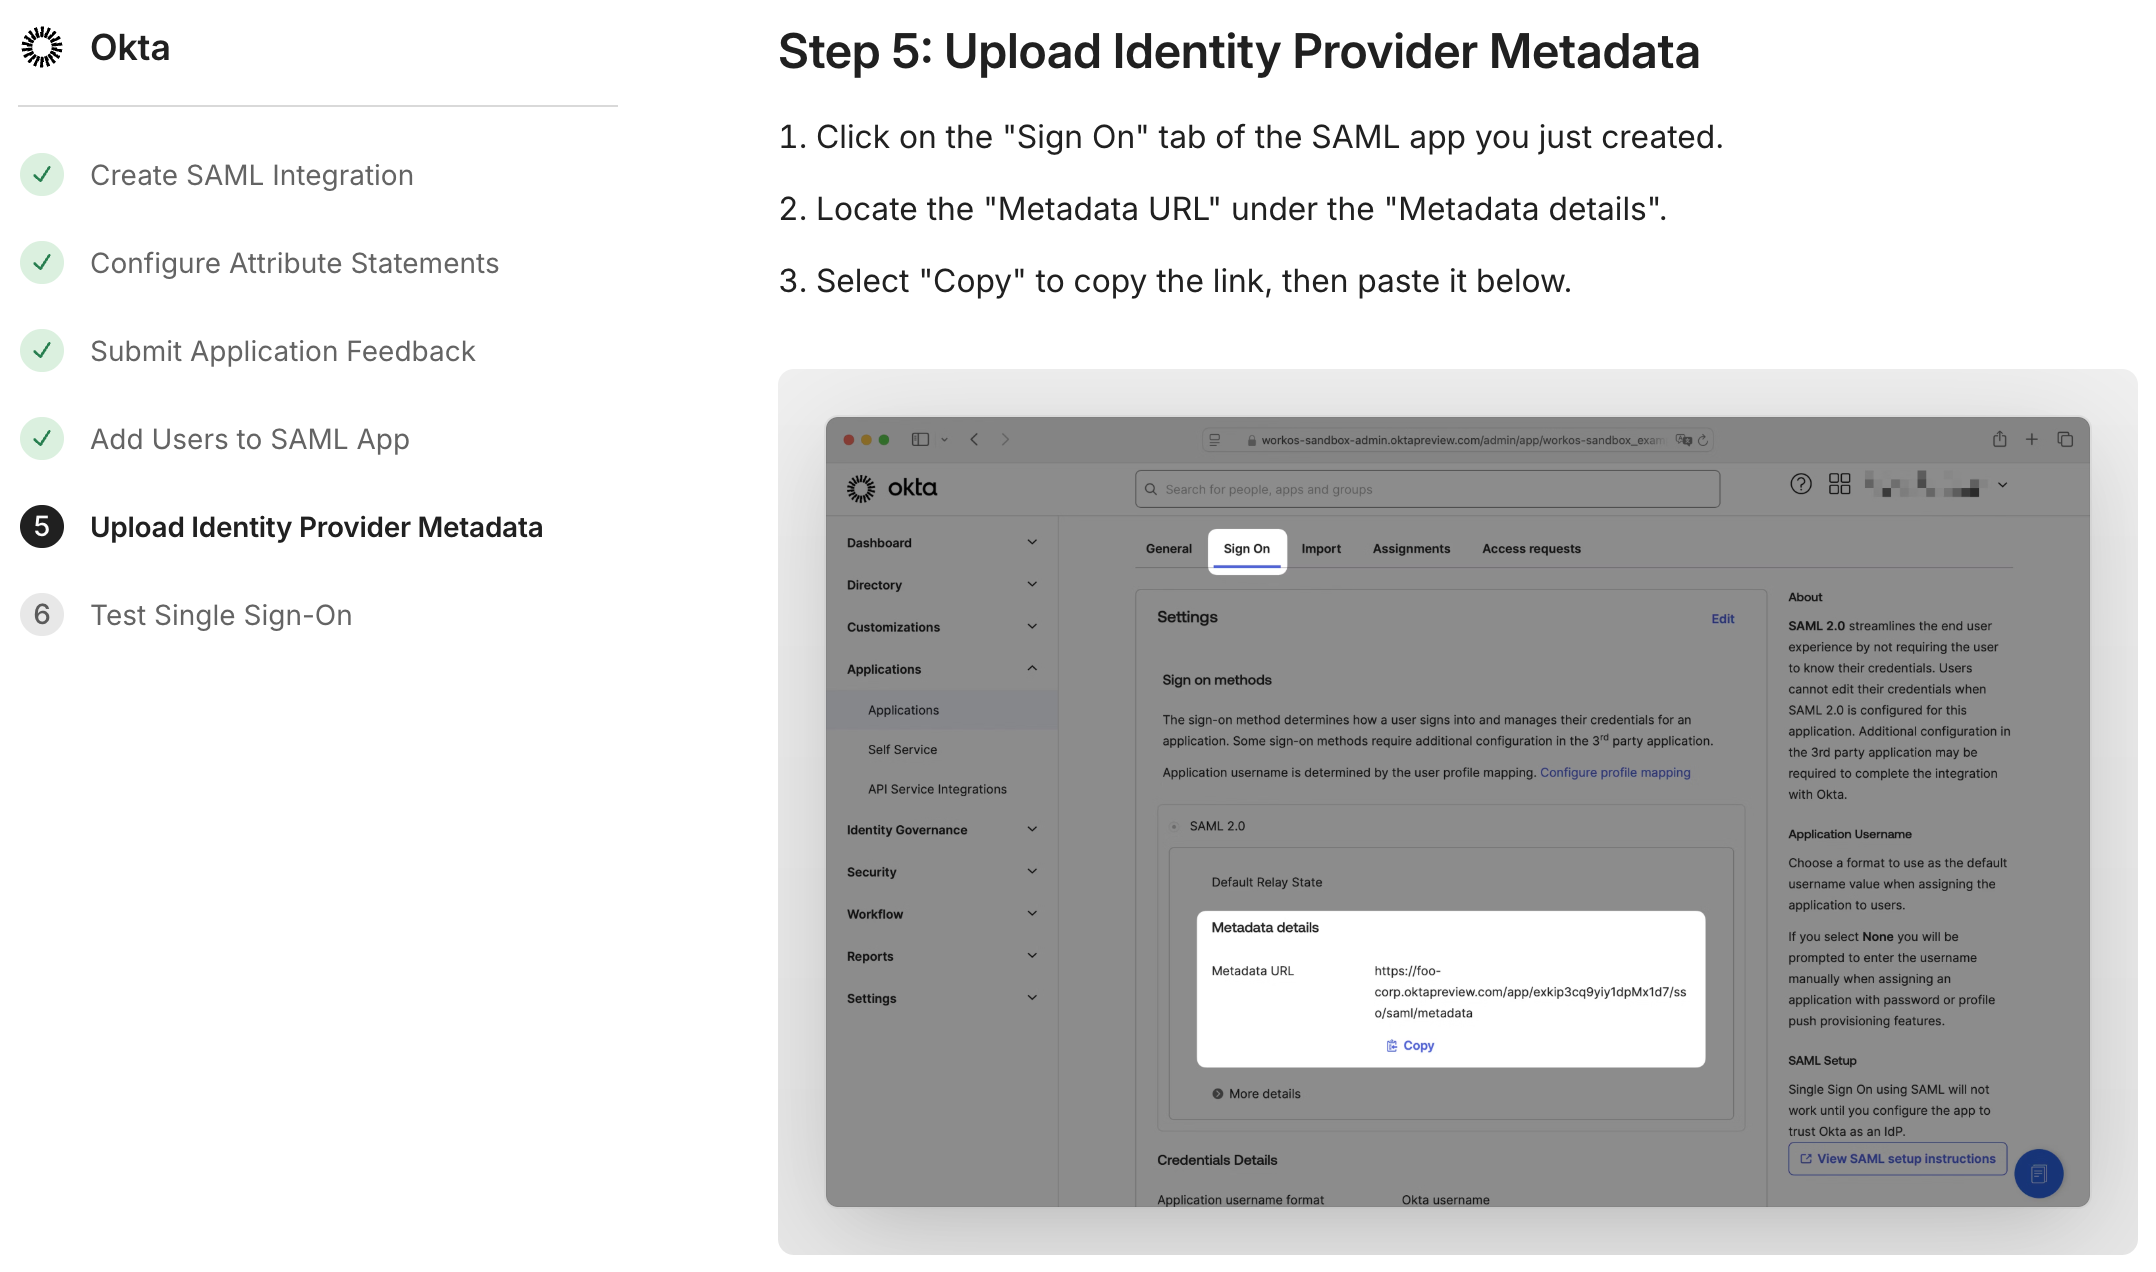
This is the recommended and most straightforward option. With Dynamic Configuration, you simply need to provide the Metadata URL (now populated by the SSO URL and Entity ID you configured earlier) associated with your application. The setup wizard will show you where you can find this in your IdP:
Manual Configuration
As the name implies, Manual Configuration requires a bit more work. Depending upon your IdP, you will need to enter the corresponding SSO URL and IdP issuer, along with an x.509 certificate:

IdP-Initiated Login
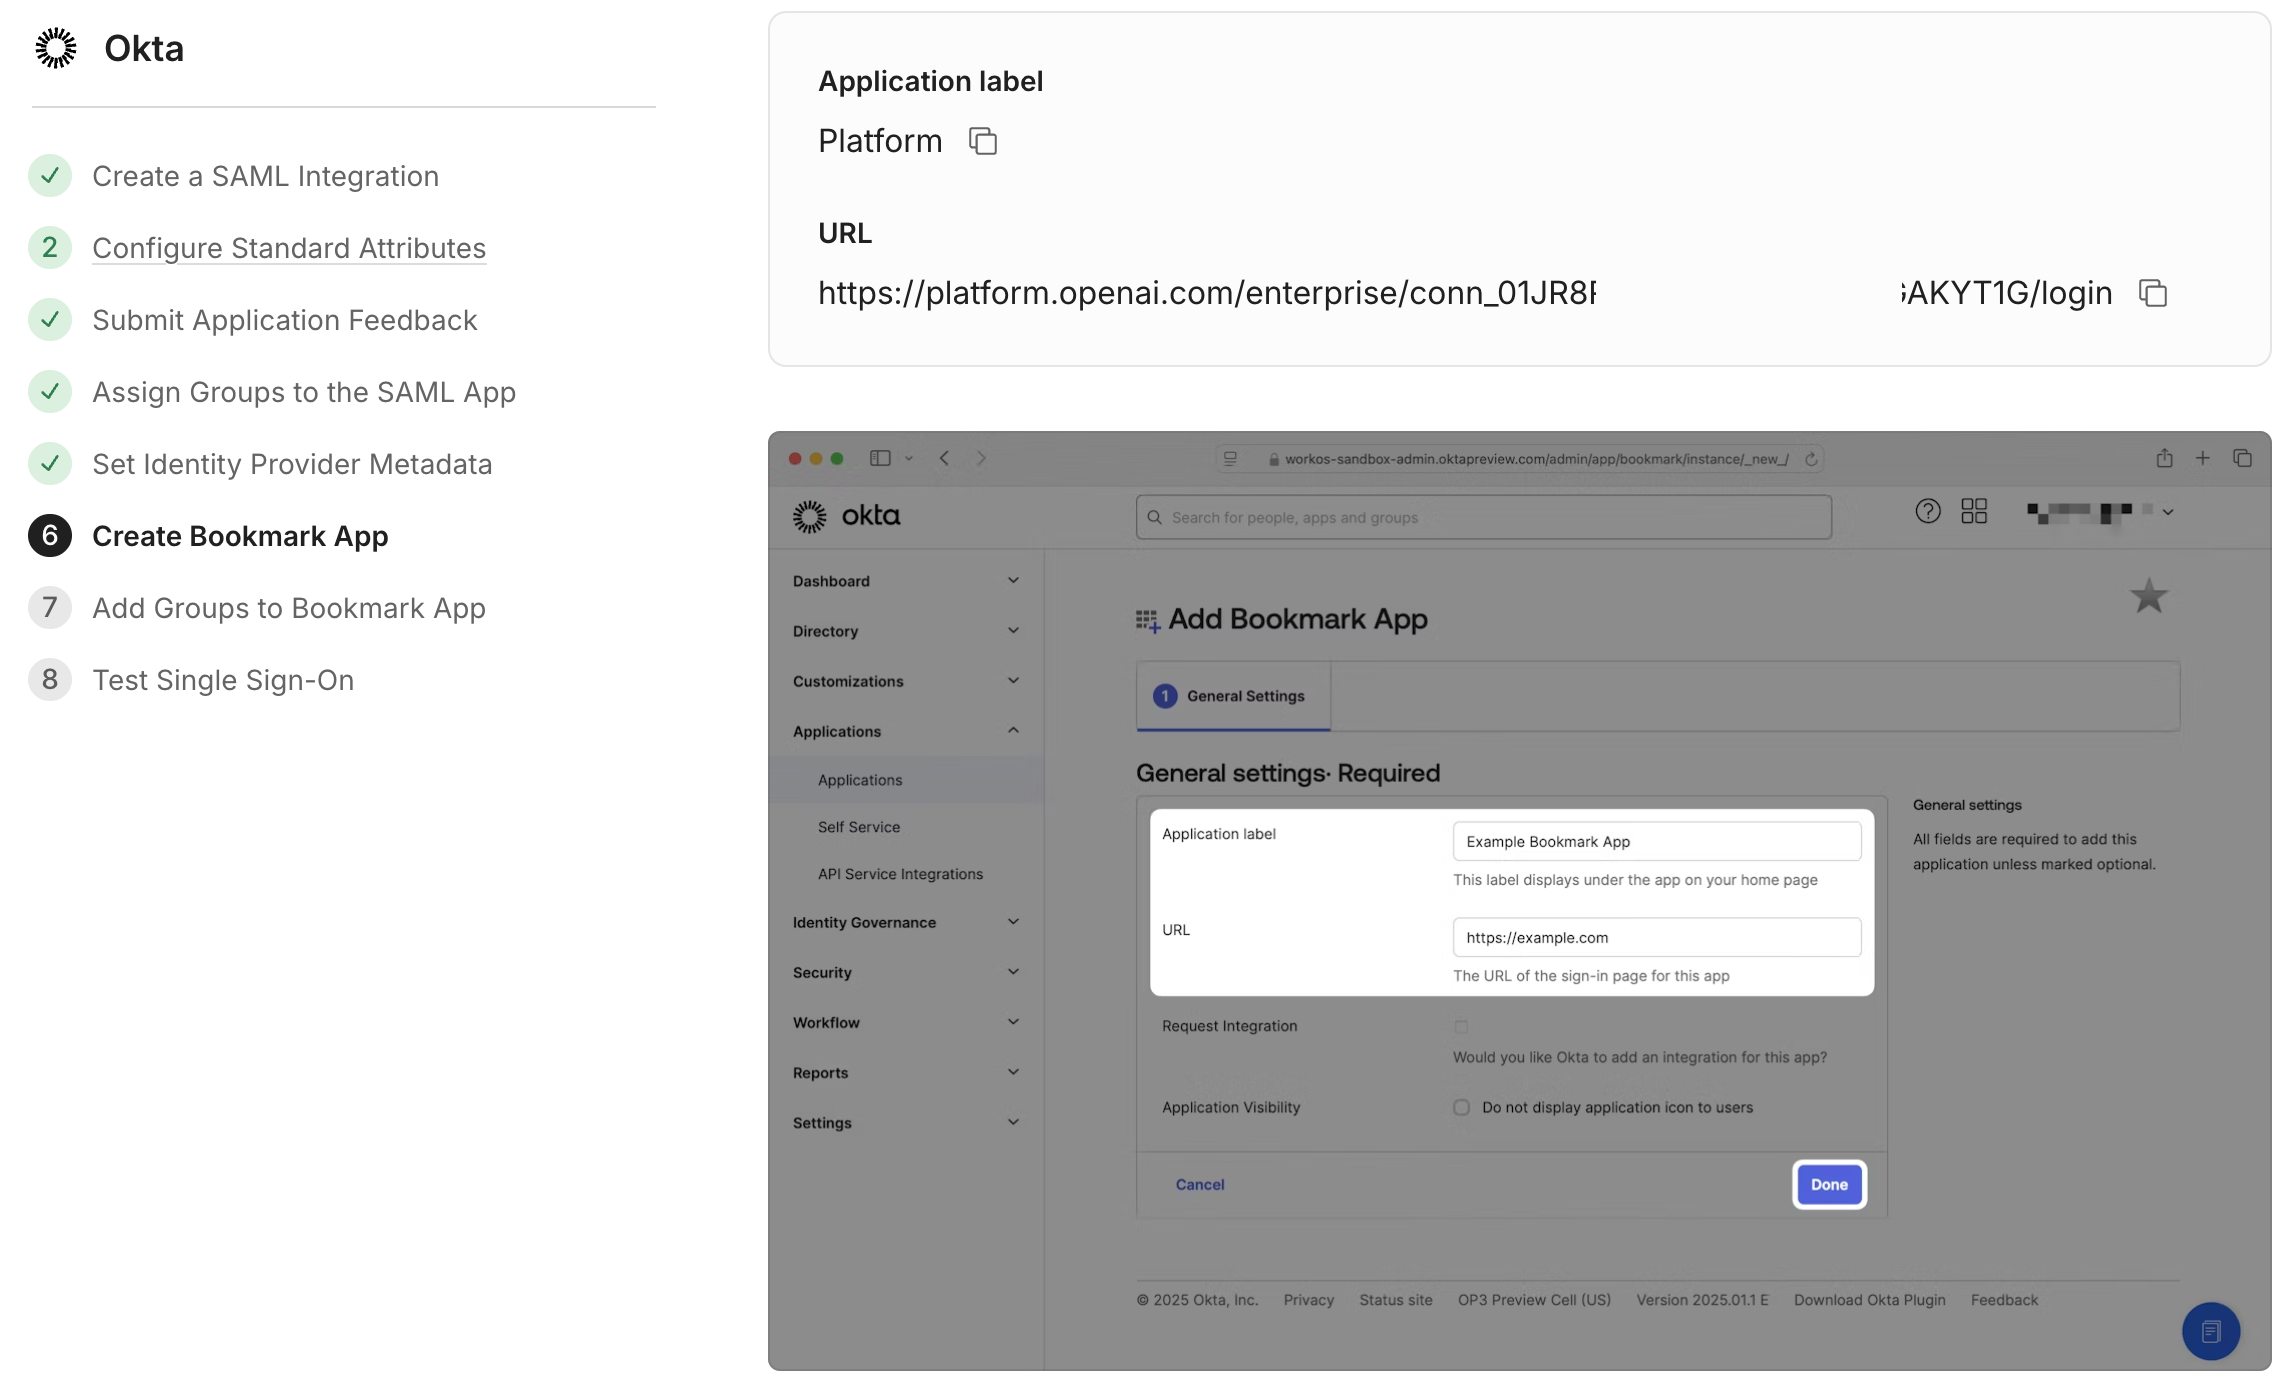
If you would like for your users to be able to click a tile on their dashboard and be automatically authenticated, you can configure IdP-initiated auth to your application as part of the setup process. While the exact process will vary depending upon your IdP, the general process will utilize a provided URL in the form of:
ChatGPT: https://chatgpt.com/auth/login?sso=true&connection=conn_0123abc
API Platform: https://platform.openai.com/enterprise/conn_01ABC02DEF/login
As an example, Okta will walk you through creating a new Bookmark Application with this URL:
Whereas Entra ID will allow you to enter the provided "Sign on URL" into the appropriate form:
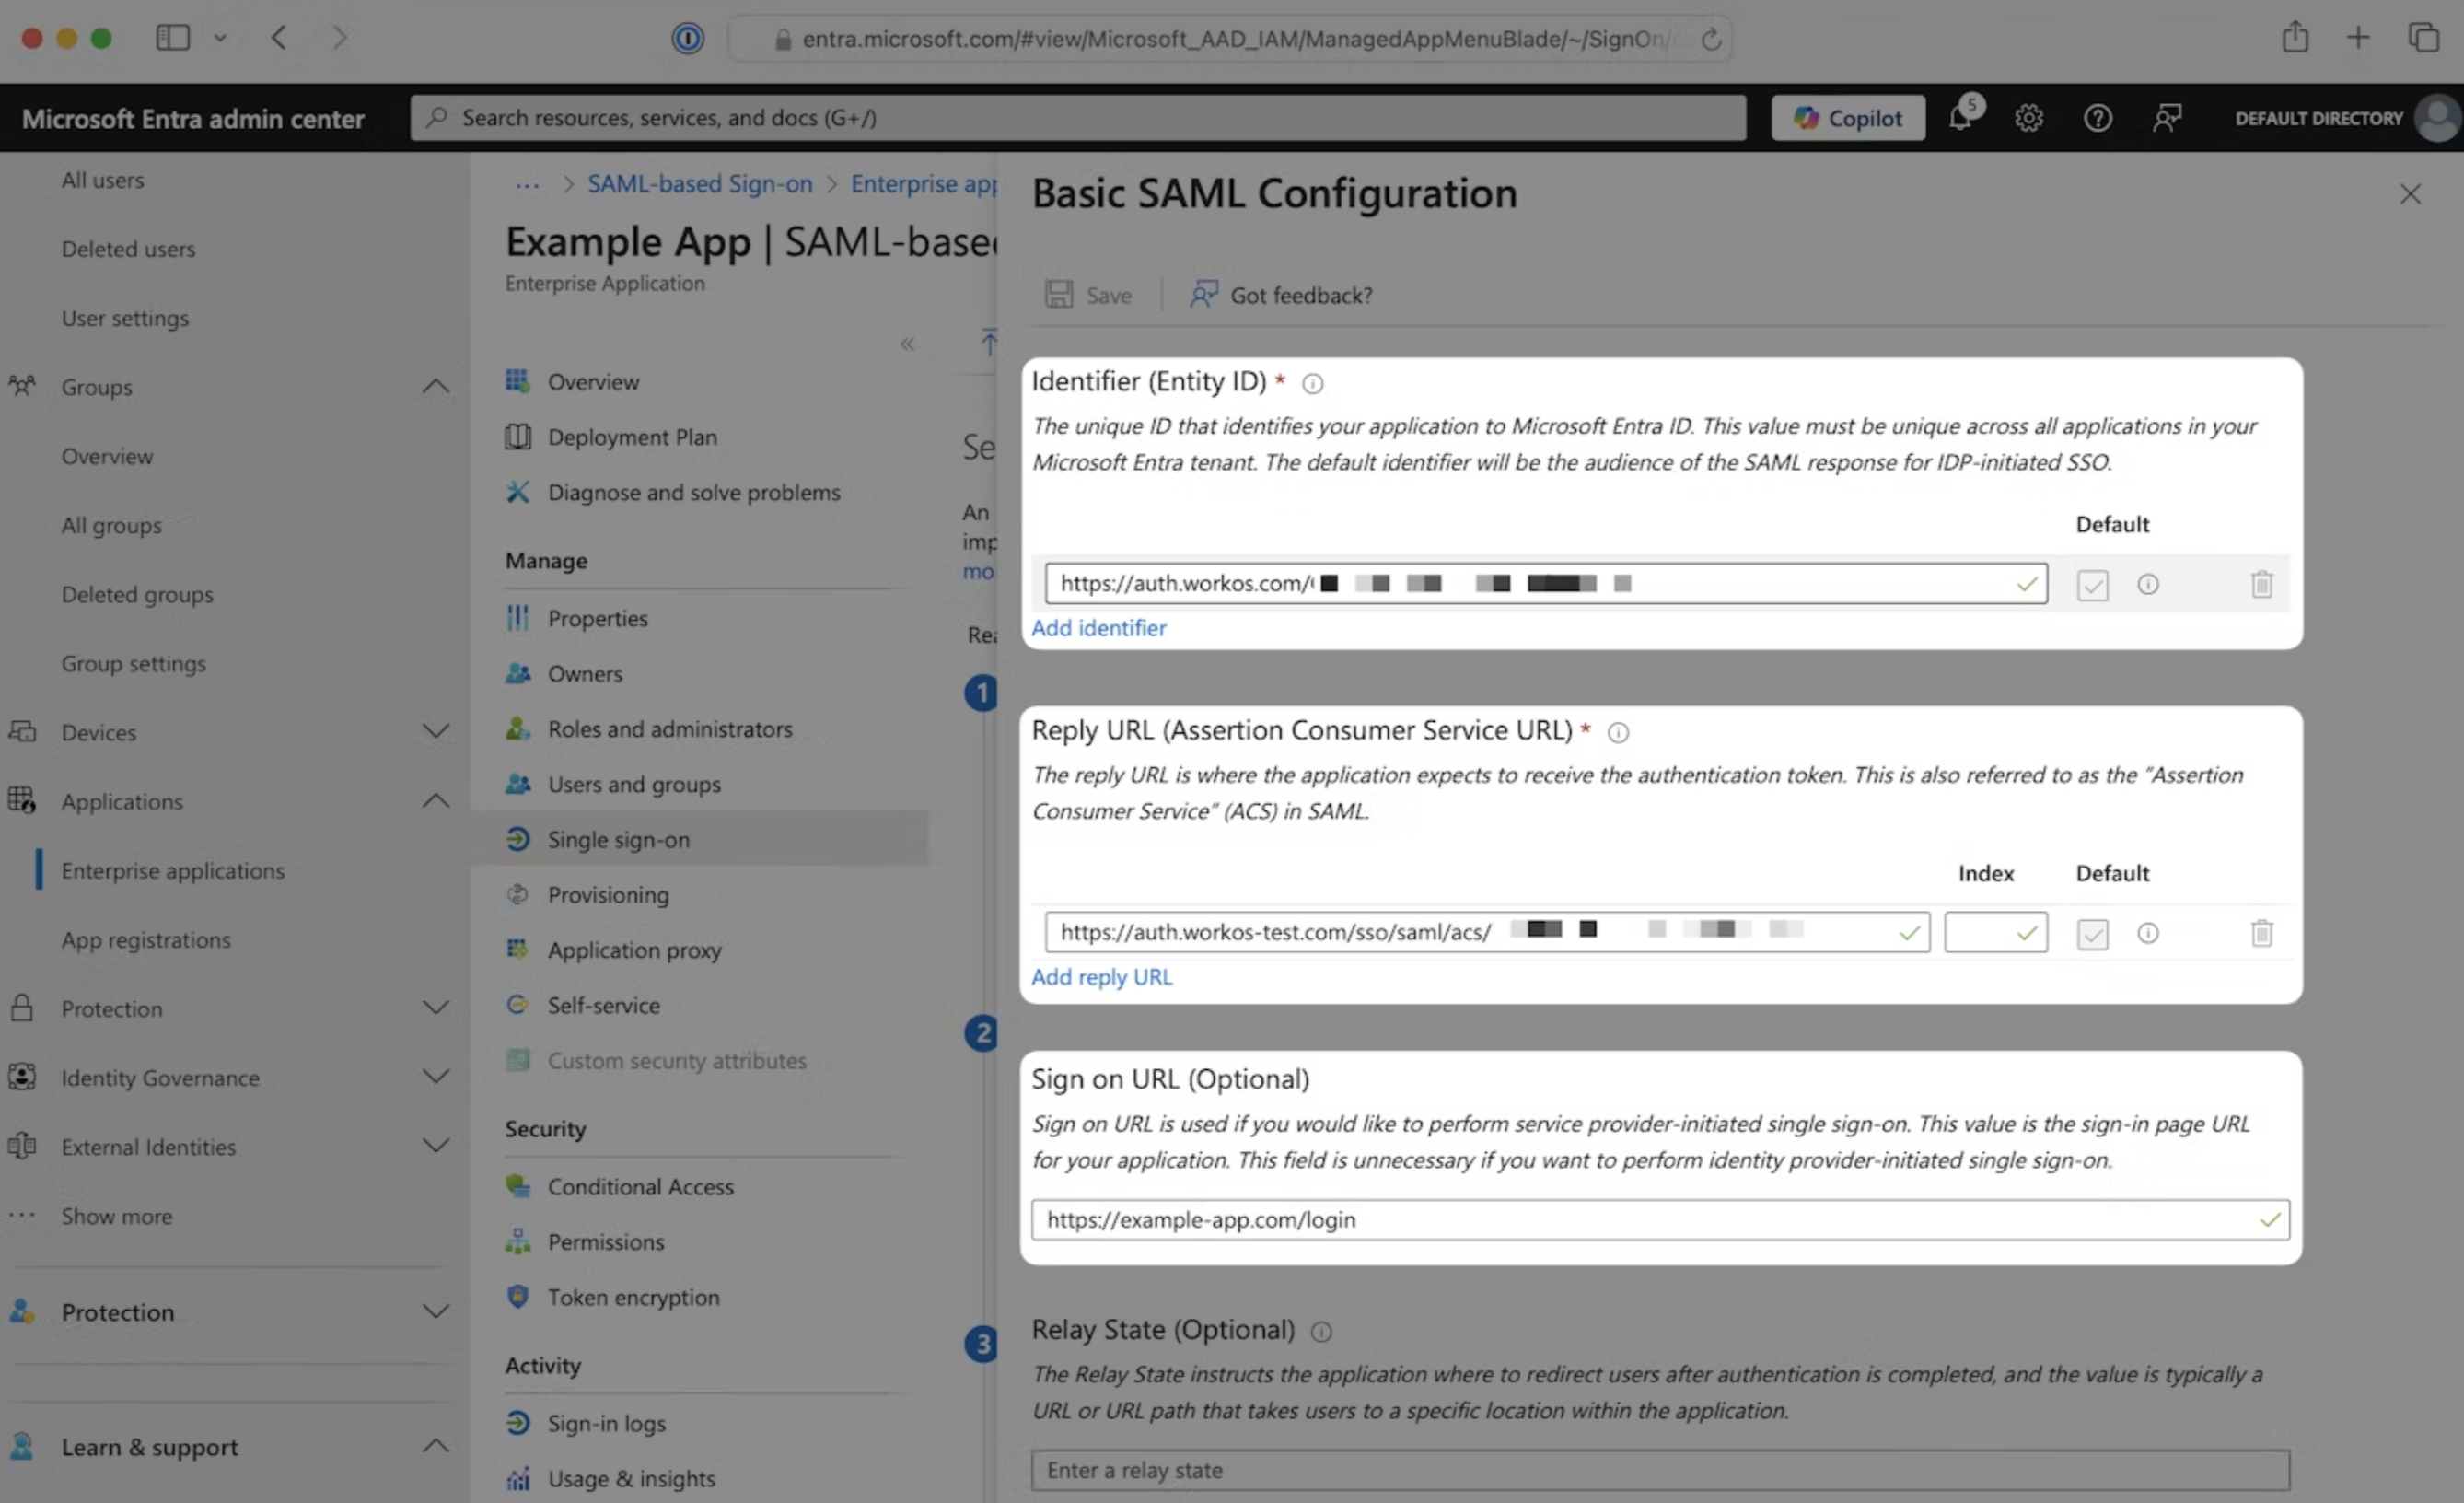
Important: If you choose to reset a healthy SSO connection, these URL values will change.
This means that when you configure the new connection, you will also need to update your Sign on URL accordingly, or else users will not be able to authenticate via their tiles.
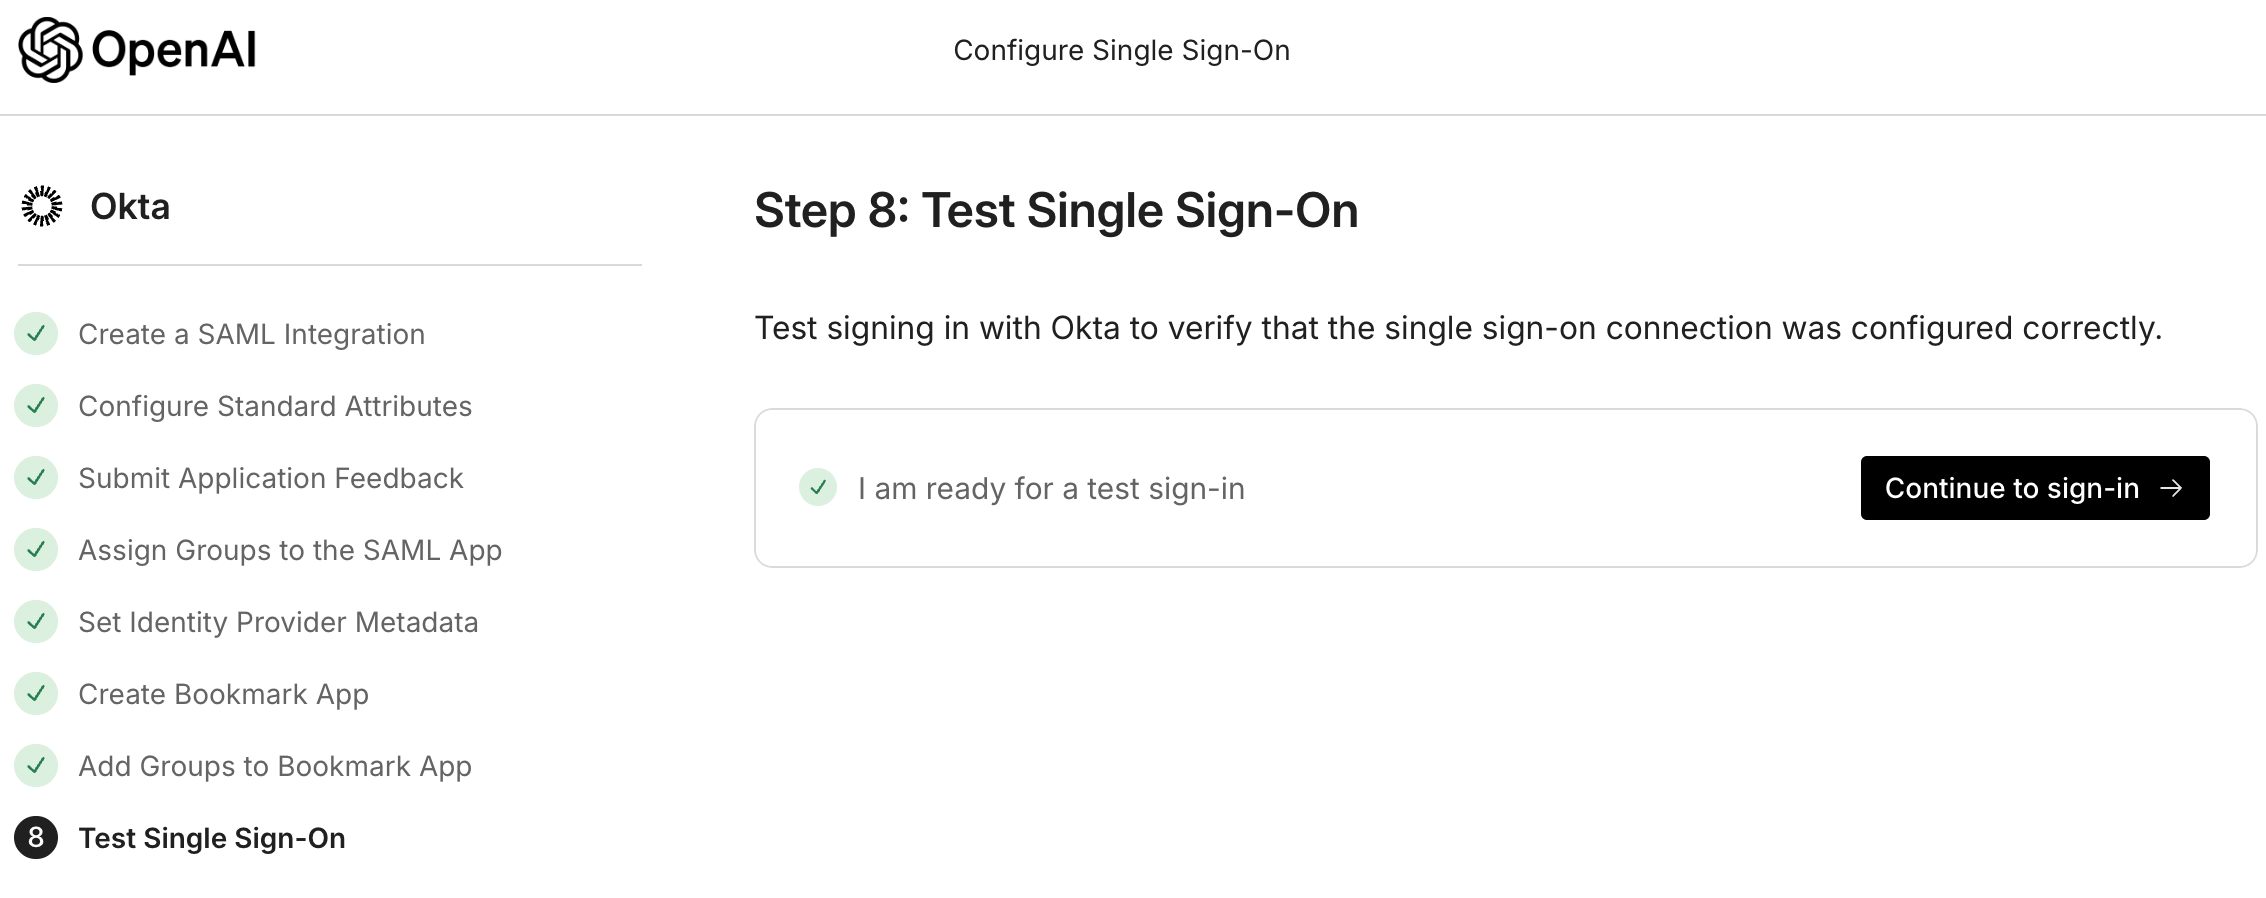
Completing Setup
Once you've configured your IdP's metadata, you can click "Continue" to proceed with setting up any optional bookmark apps. The final mandatory configuration step will be on the "Test Single Sign-On" page:
After hitting "Continue to sign-in," the wizard will attempt to test your new connection. If everything is successful, you will have effectively enabled SSO. You should now see this reflected on your configuration page:
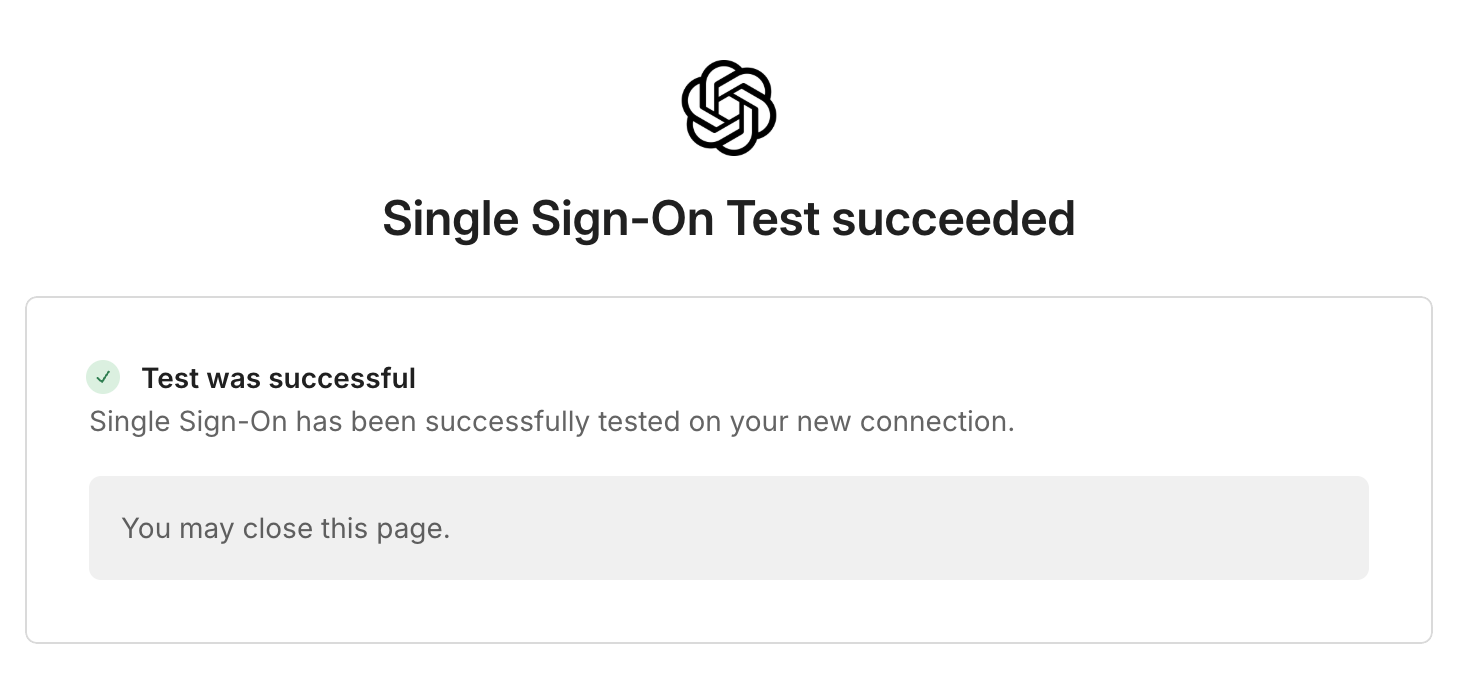
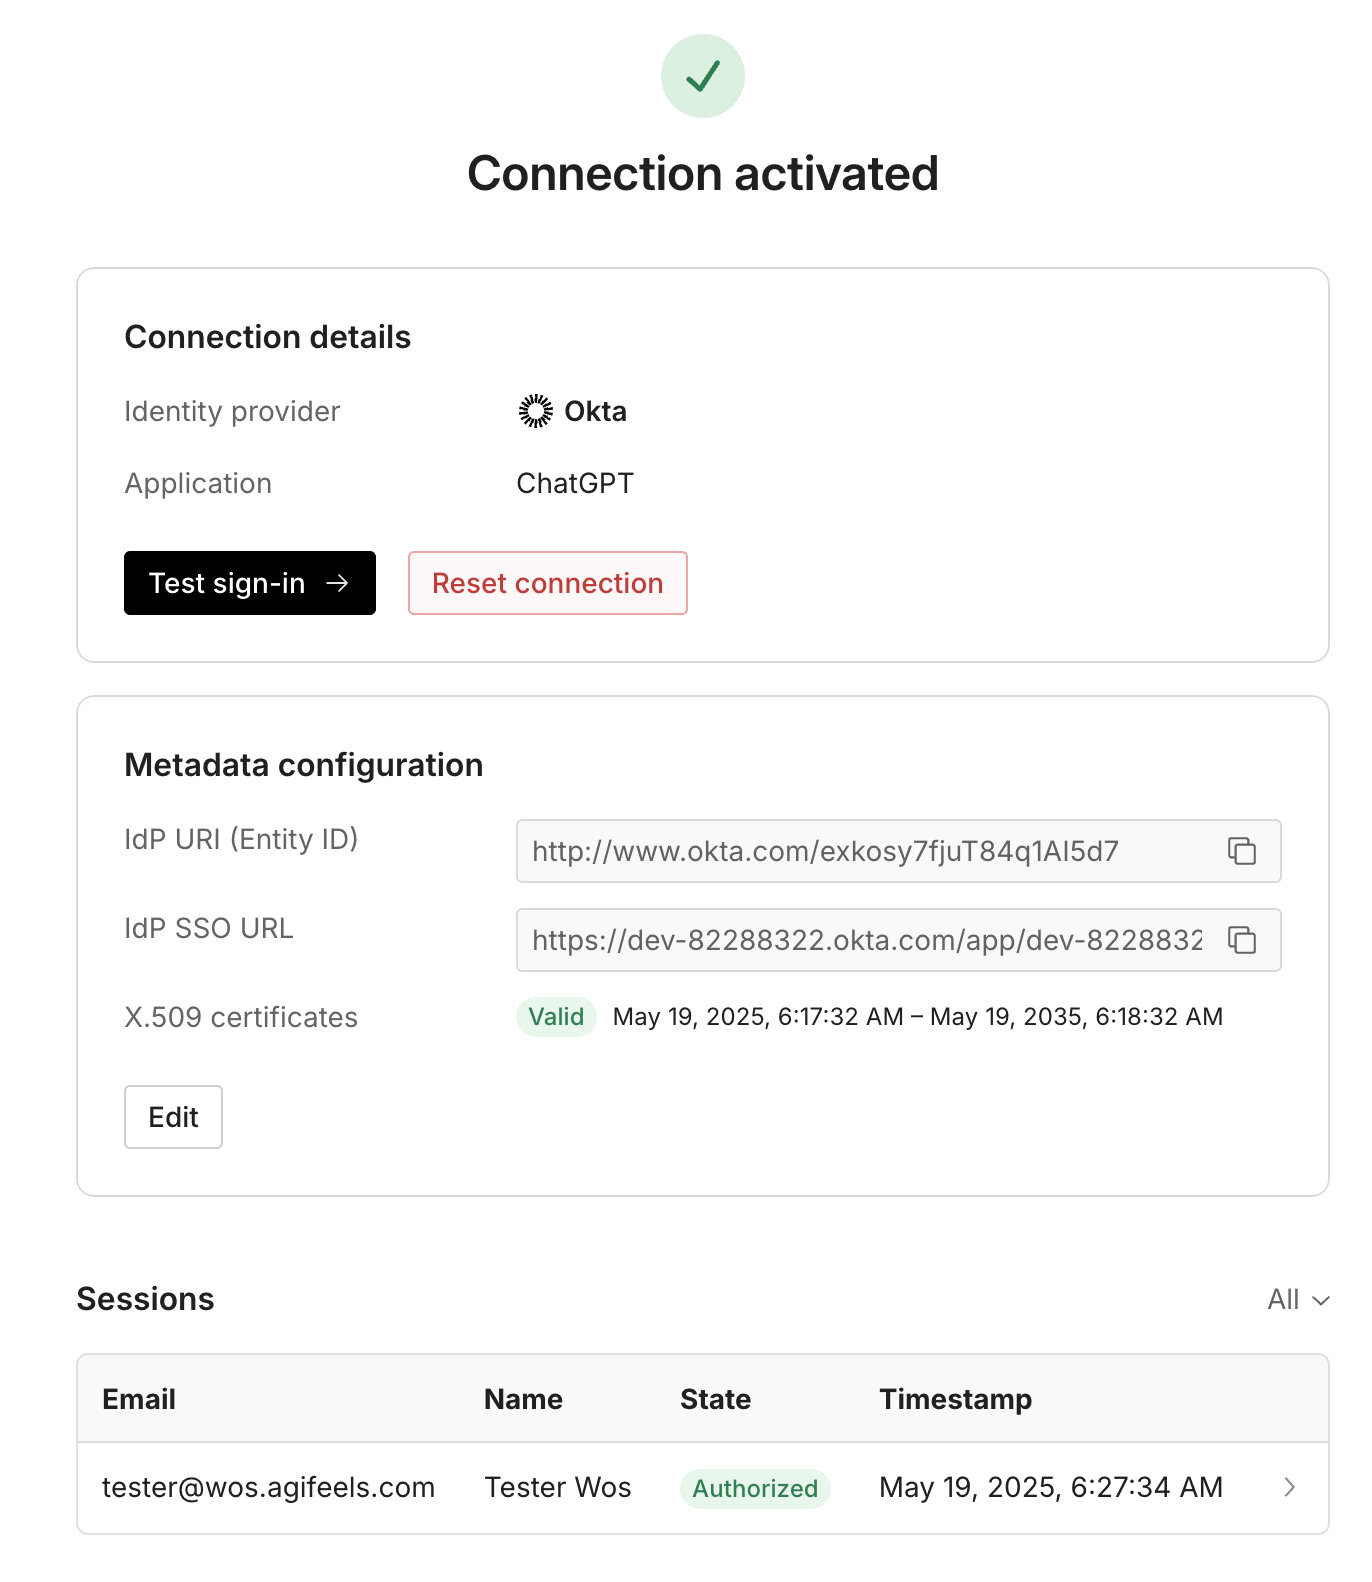
Users in your IdP group with corresponding accounts or invitations should now be able to login with SSO:
They can navigate to chatgpt.com or platform.openai.com, enter their email, and then authenticate after we forward them to their IdP
They can use the Bookmark Tile URL you (optionally) configured during the setup
If you find that your users are unable to authenticate successfully, and you run into trouble reverting the changes, please reach out to Support for immediate assistance.
Remember that enabling SSO on the API Platform applies the domain verification across all users with that domain. This means that, even if the users do not belong to your Enterprise organization, they will still be required to be part of your IdP group in order to access their personal organizations.
Troubleshooting Logins
If after enabling SSO, you're encountering issues logging in, you can review our FAQ and Troubleshooting page for assistance to identify common errors. If you don't find a sufficient answer there, please don't hesitate to reach out to Support.