
admin-managed setup ကို အသုံးပြု၍ သင့် Google Workspace ကို ChatGPT နှင့် ချိတ်ဆက်ရန် ပထမဦးစွာ Google ၏ admin consoles များတွင် access ကို စီစဉ်သတ်မှတ်ရပါမည်-
Google Drive၊ users နှင့် groups များအတွက် read-only access ပါသော service account တစ်ခုကို ဖန်တီးပါ။
ဤ service account ကို သင့် ChatGPT Workspace နှင့် ဆက်စပ်နေသော တူညီသည့် Google account အောက်တွင် ဖန်တီးရန် အလွန်အမင်း အကြံပြုပါသည်။ ChatGPT အလုပ်နေရာ ရှိ accounts များ၏ email domain သည် Google Workspace တွင် အသုံးပြုသော domain နှင့် မတူပါက သင့်အသုံးပြုသူများအတွက် ဤ connector ကို ဖွင့်ရန် သင် လိုက်နာရမည့် နောက်ထပ်အဆင့်များ ရှိပါသည်။
admin account တစ်ခုကို ဖန်တီးပါ၊ service account သည် ၎င်း၏ ကိုယ်စား လုပ်ဆောင်မည်ဖြစ်သည်။
ထို့နောက် ChatGPT admin console တွင် စနစ်တပ်ဆင်မှုကို အပြီးသတ်ပါ-
service account ၏ private key (Google မှ JSON ဖိုင်) ကို အပ်လုဒ်လုပ်ပါ
admin account ကို သတ်မှတ်ပါ (credentials မလိုအပ်ပါ)။
sync လုပ်မည့် ဖိုင်များကို ရွေးချယ်ပါ နှင့် connection ကို အသုံးပြုခွင့်ရမည့် အသုံးပြုသူများကို ရွေးချယ်ပါ။
ဤလမ်းညွှန်သည် ဤအဆင့် 6 ခုစလုံးကို တစ်ဆင့်ချင်း ရှင်းပြပေးထားသည်။
Service Account တစ်ခု စနစ်တပ်ဆင်ခြင်း
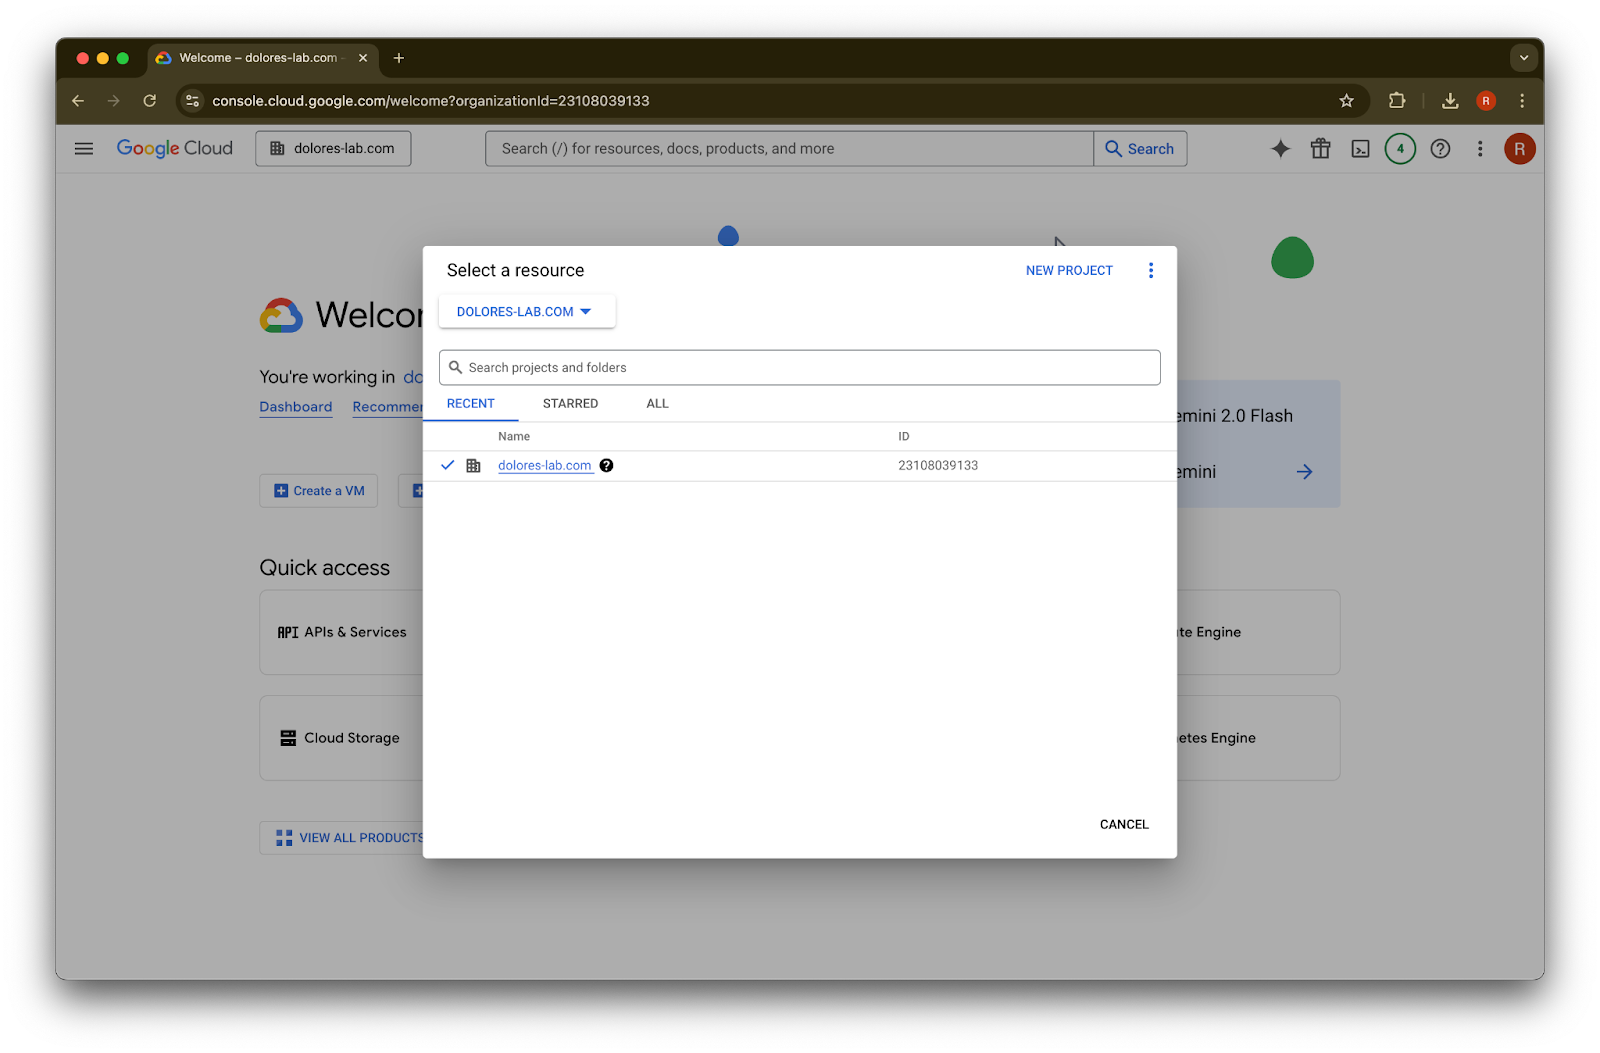
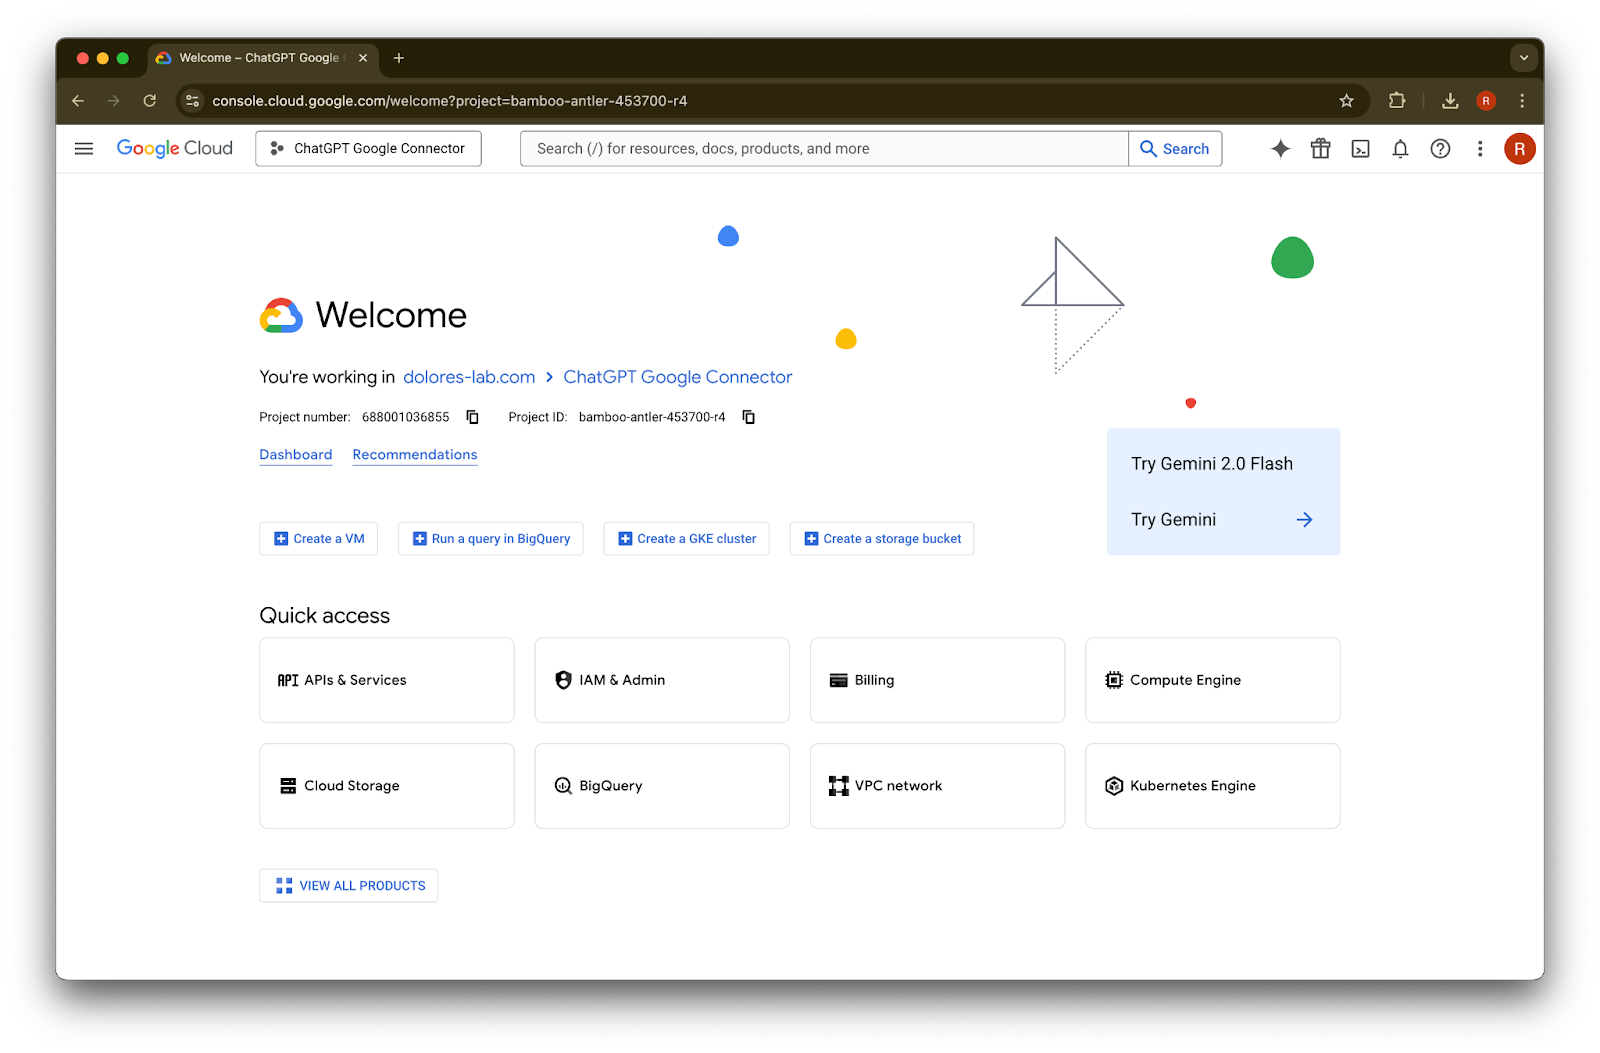
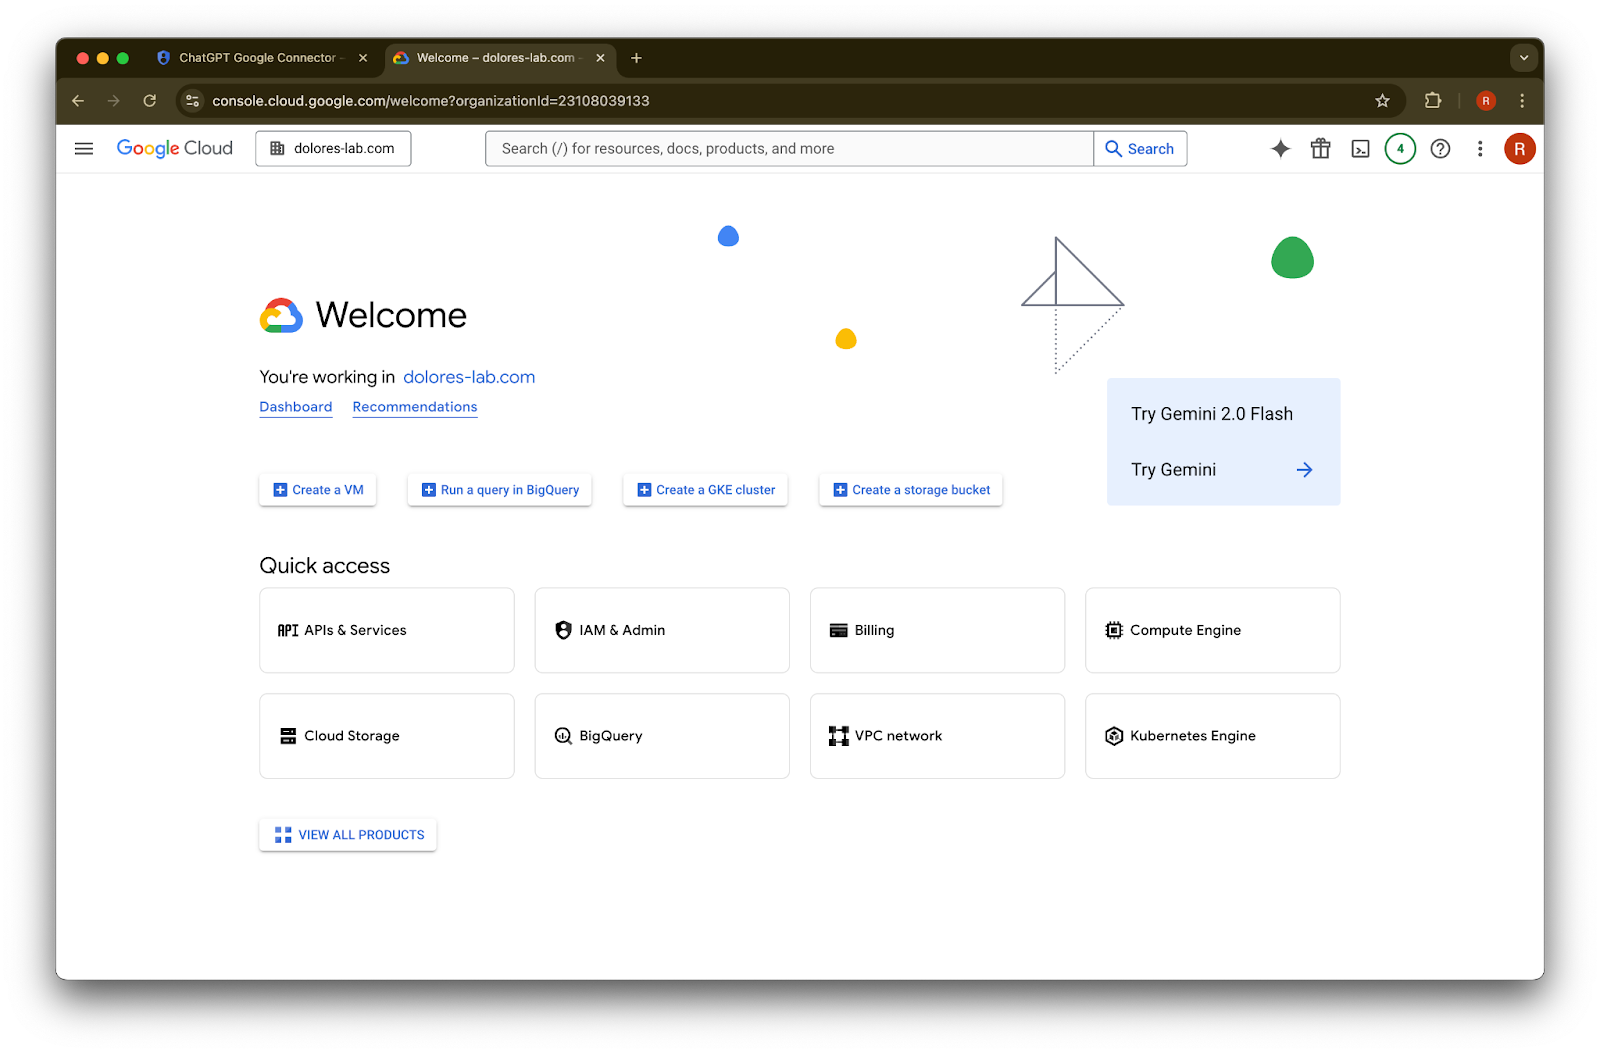
console.cloud.google.com သို့ သွားပါ။
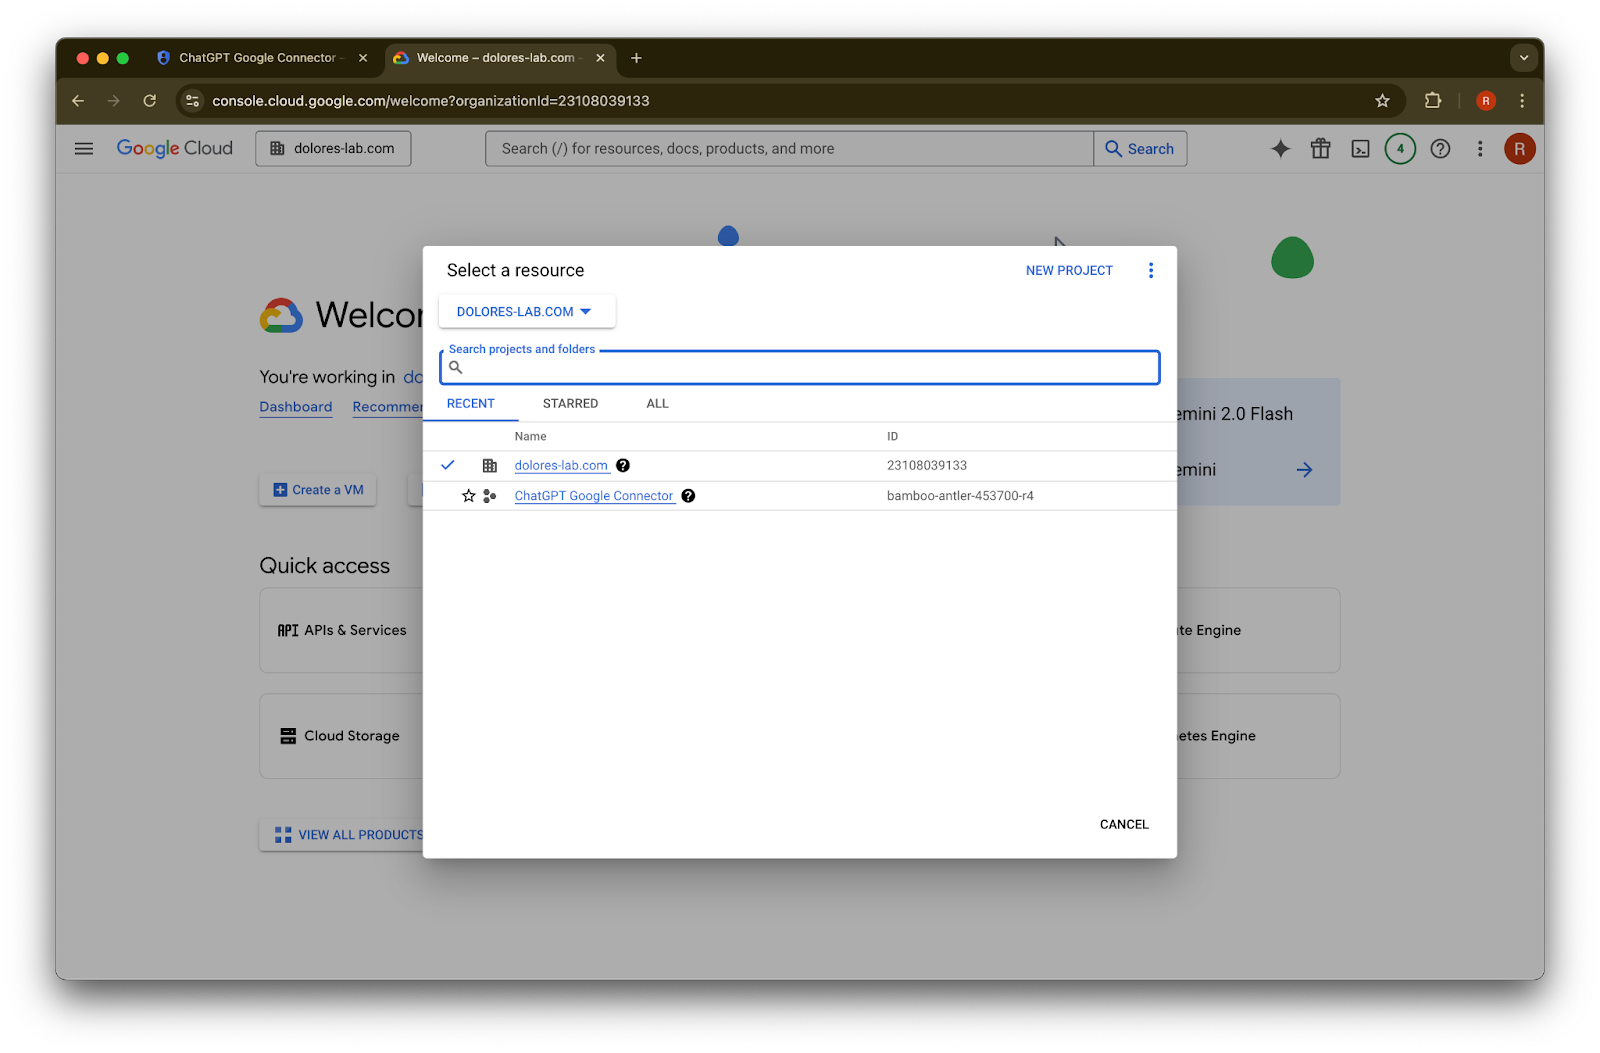
projects dropdown ကို နှိပ်ပါ။Imageသင်၏ ChatGPT အလုပ်နေရာ နှင့် ဆက်စပ်သော Google workspace တူညီသောအကောင့်ဖြင့် လော့ဂ်အင်ဝင်ထားကြောင်း သေချာစေပါ (သင့် ChatGPT အလုပ်နေရာ နှင့် ဆက်စပ်သော Google workspace မရှိပါက၊ သို့မဟုတ် နှစ်ဖက် email များ မတူပါက နောက်ထပ်အဆင့်များကို လိုက်နာရန် လိုအပ်မည်ဖြစ်သည်၊ မဟုတ်ပါက သင့်အသုံးပြုသူများ Google Drive synced connectors ကို အသုံးမပြုနိုင်နိုင်ပါ)။
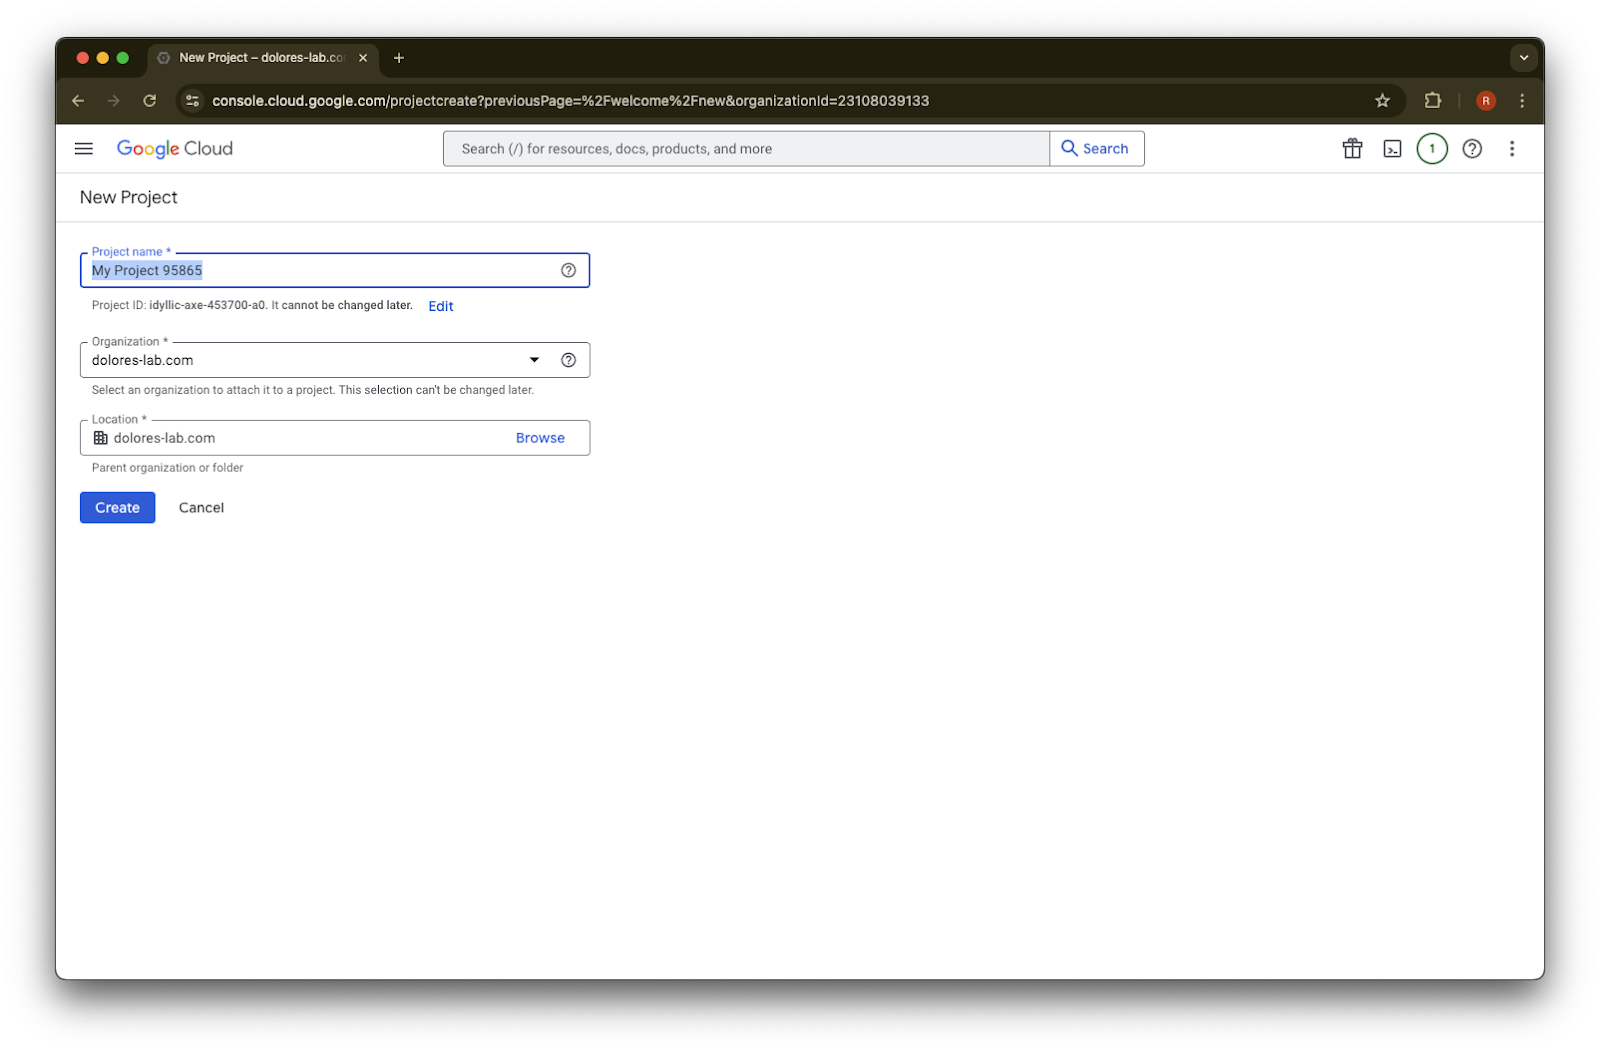
New Project ကို ရွေးချယ်ပါ
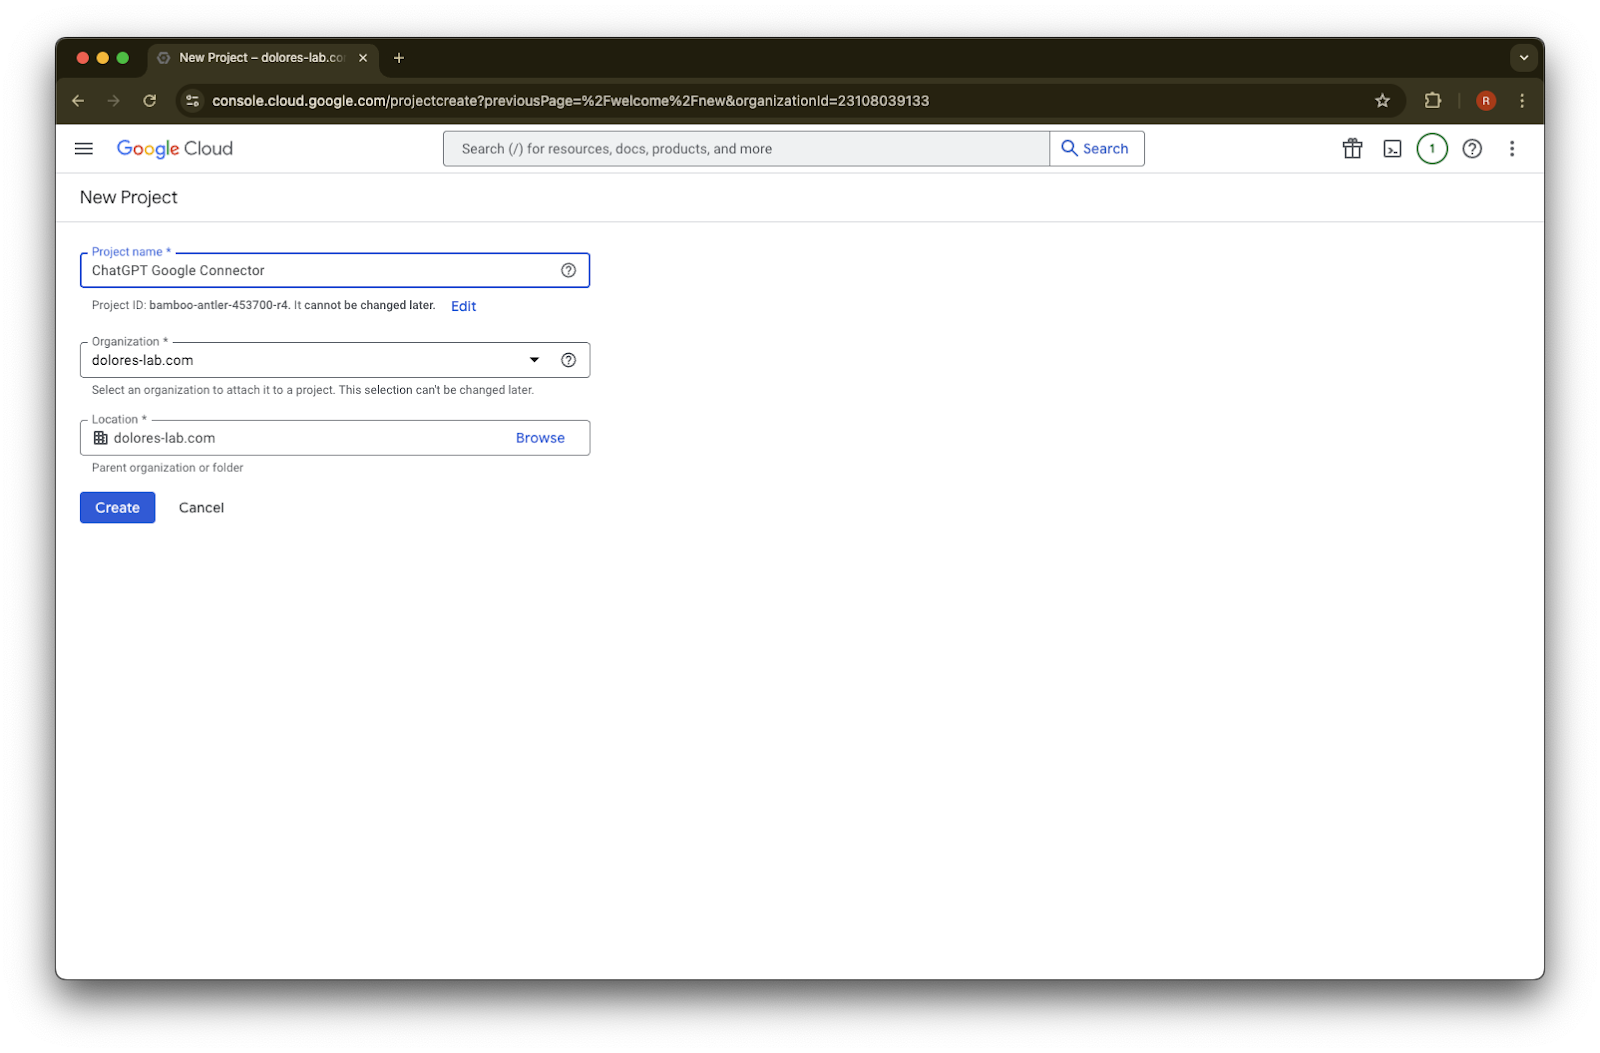
Project Name ကို ထည့်ပါ
project ကို ဖန်တီးပါ
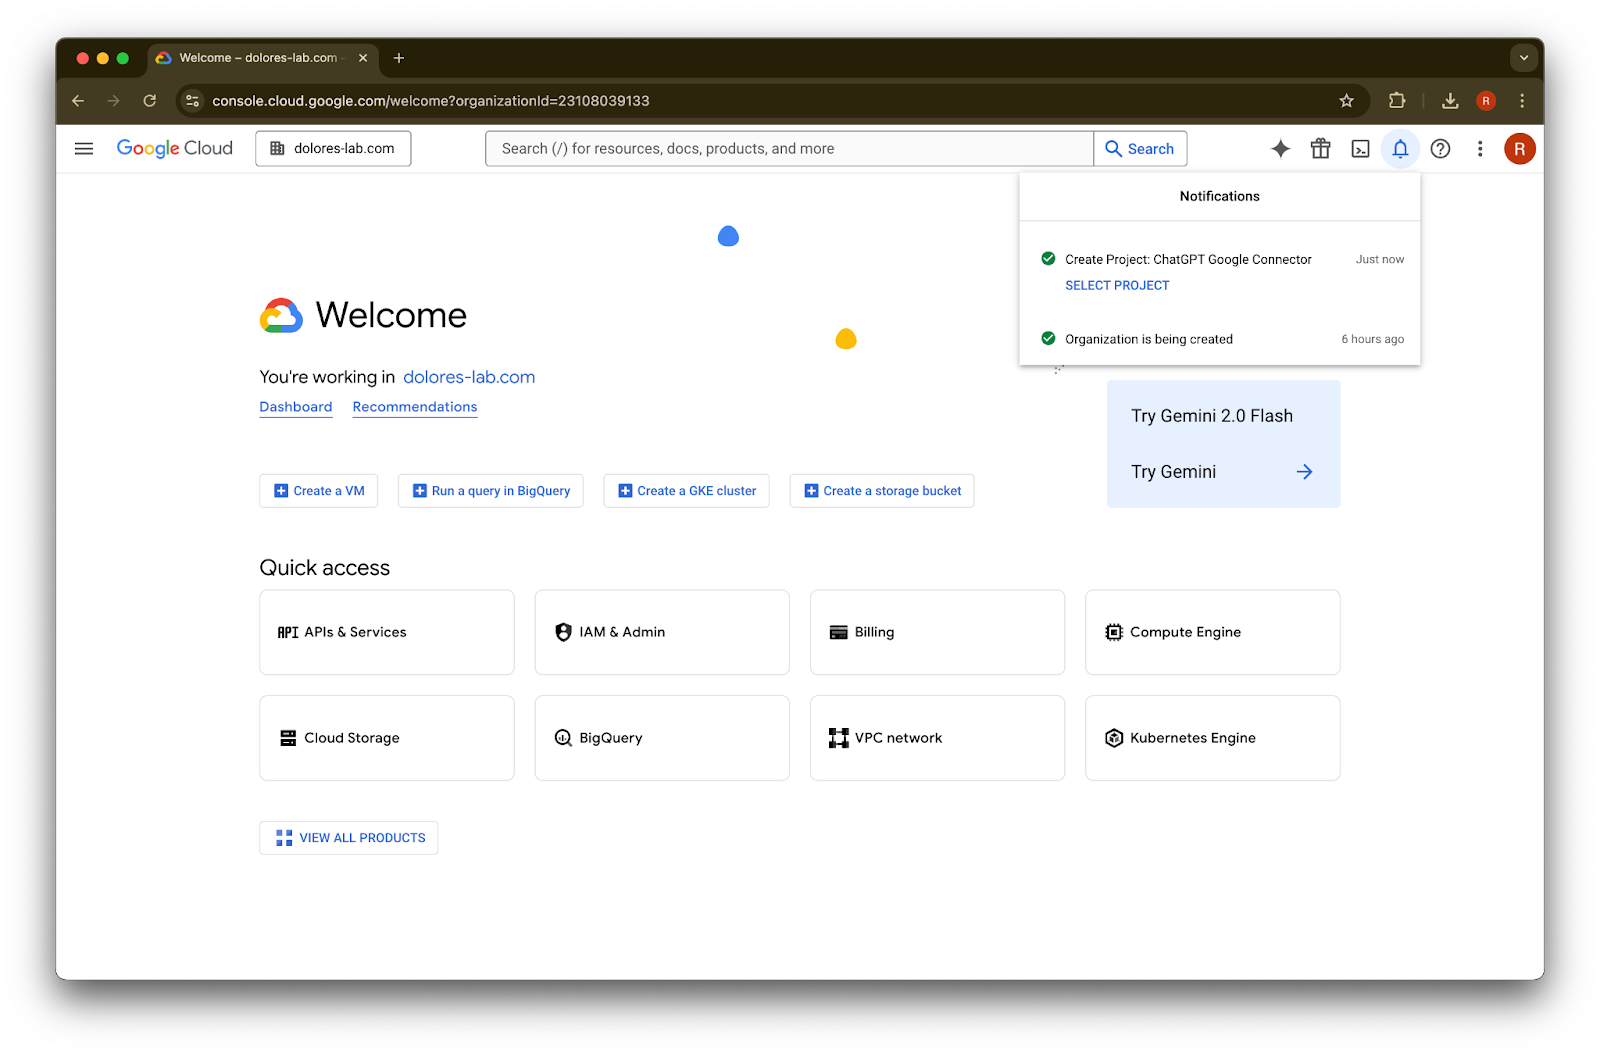
project ဖန်တီးပြီးသည်အထိ စောင့်ပြီးနောက် Select Project ကို နှိပ်ပါ
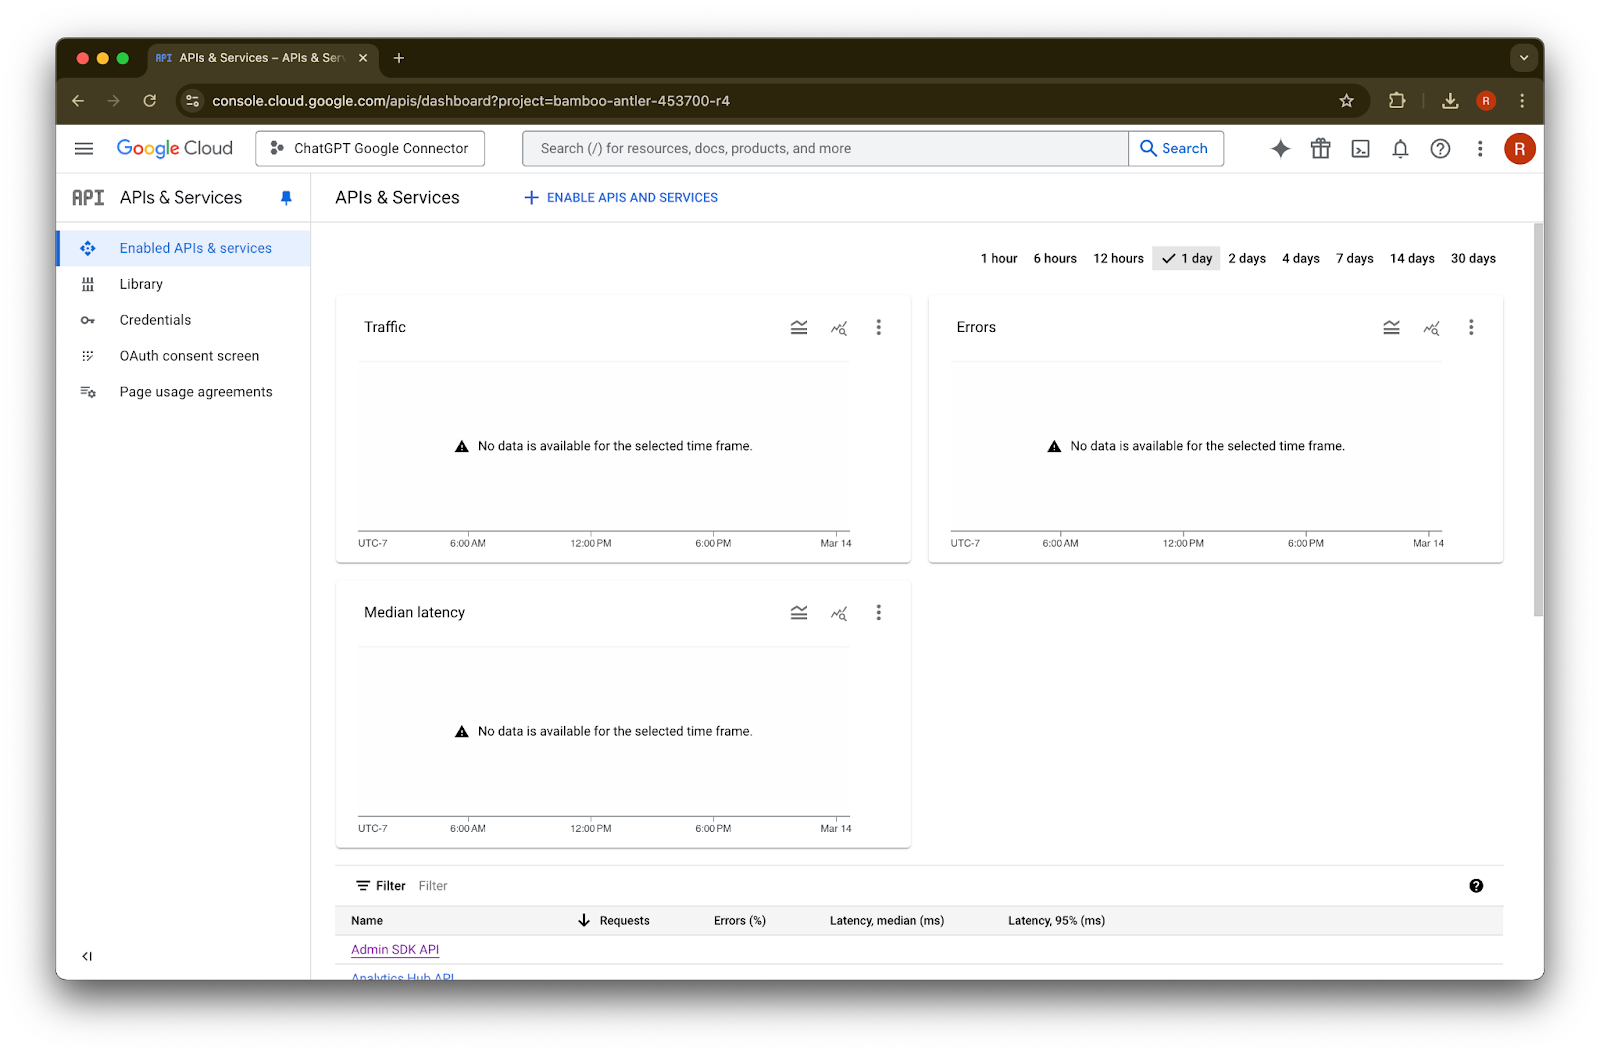
APIs & Services ကို နှိပ်ပါ
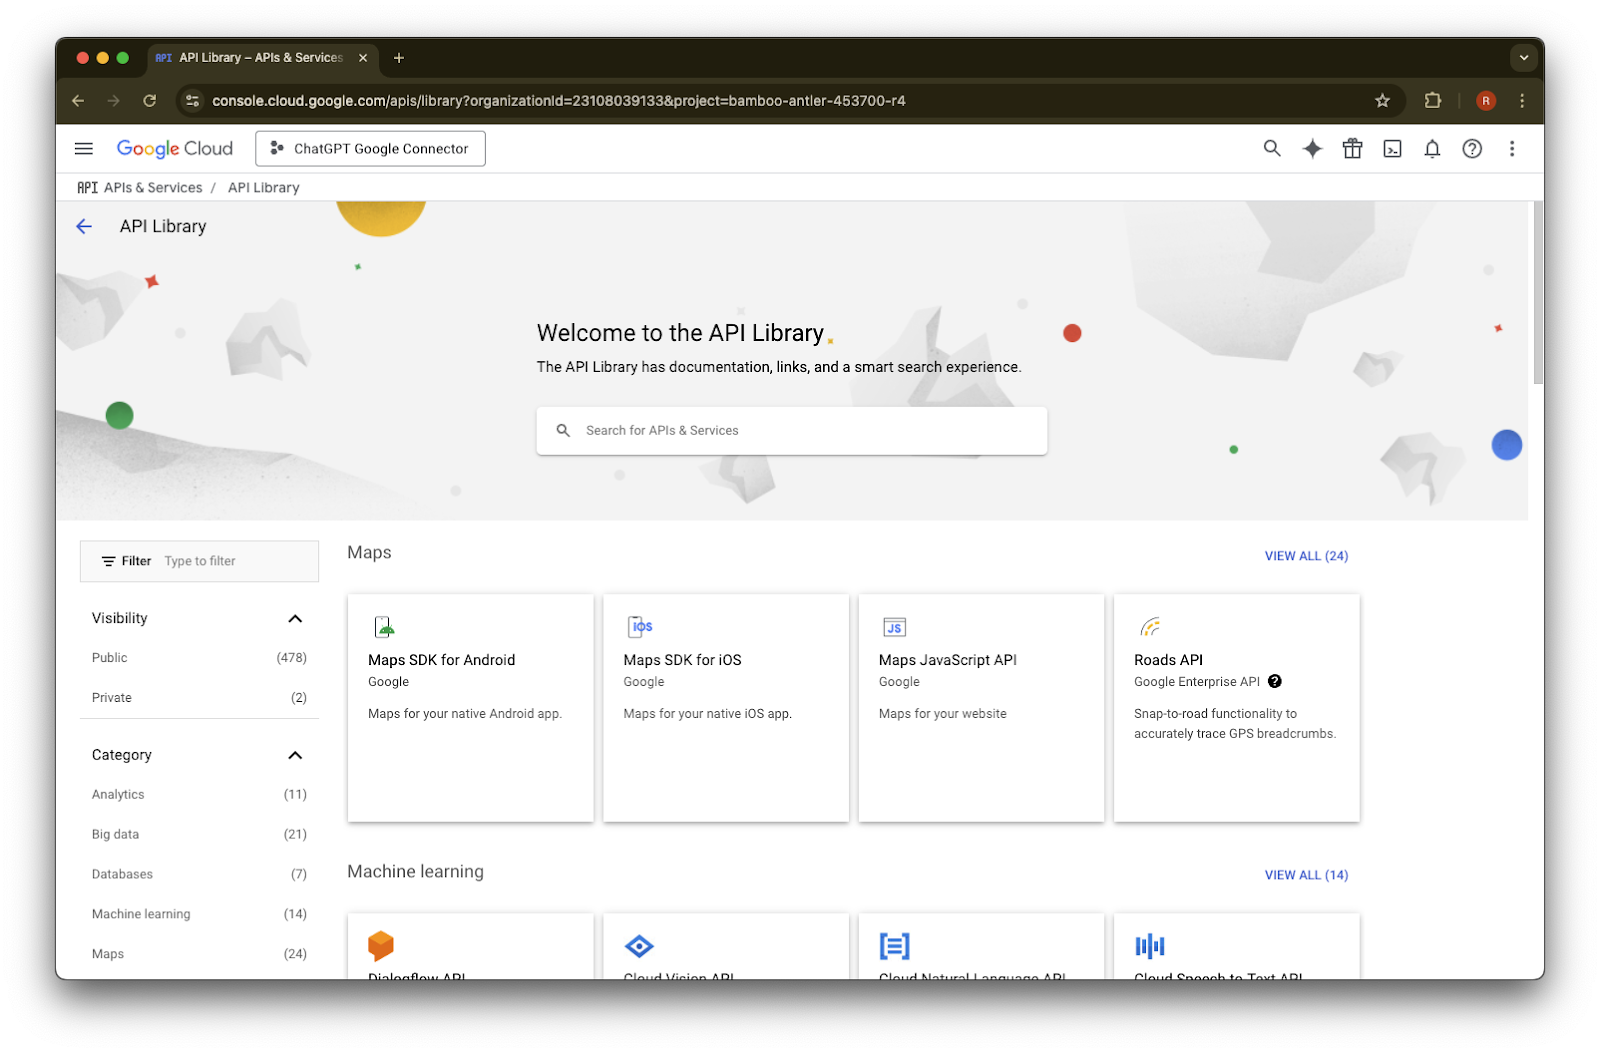
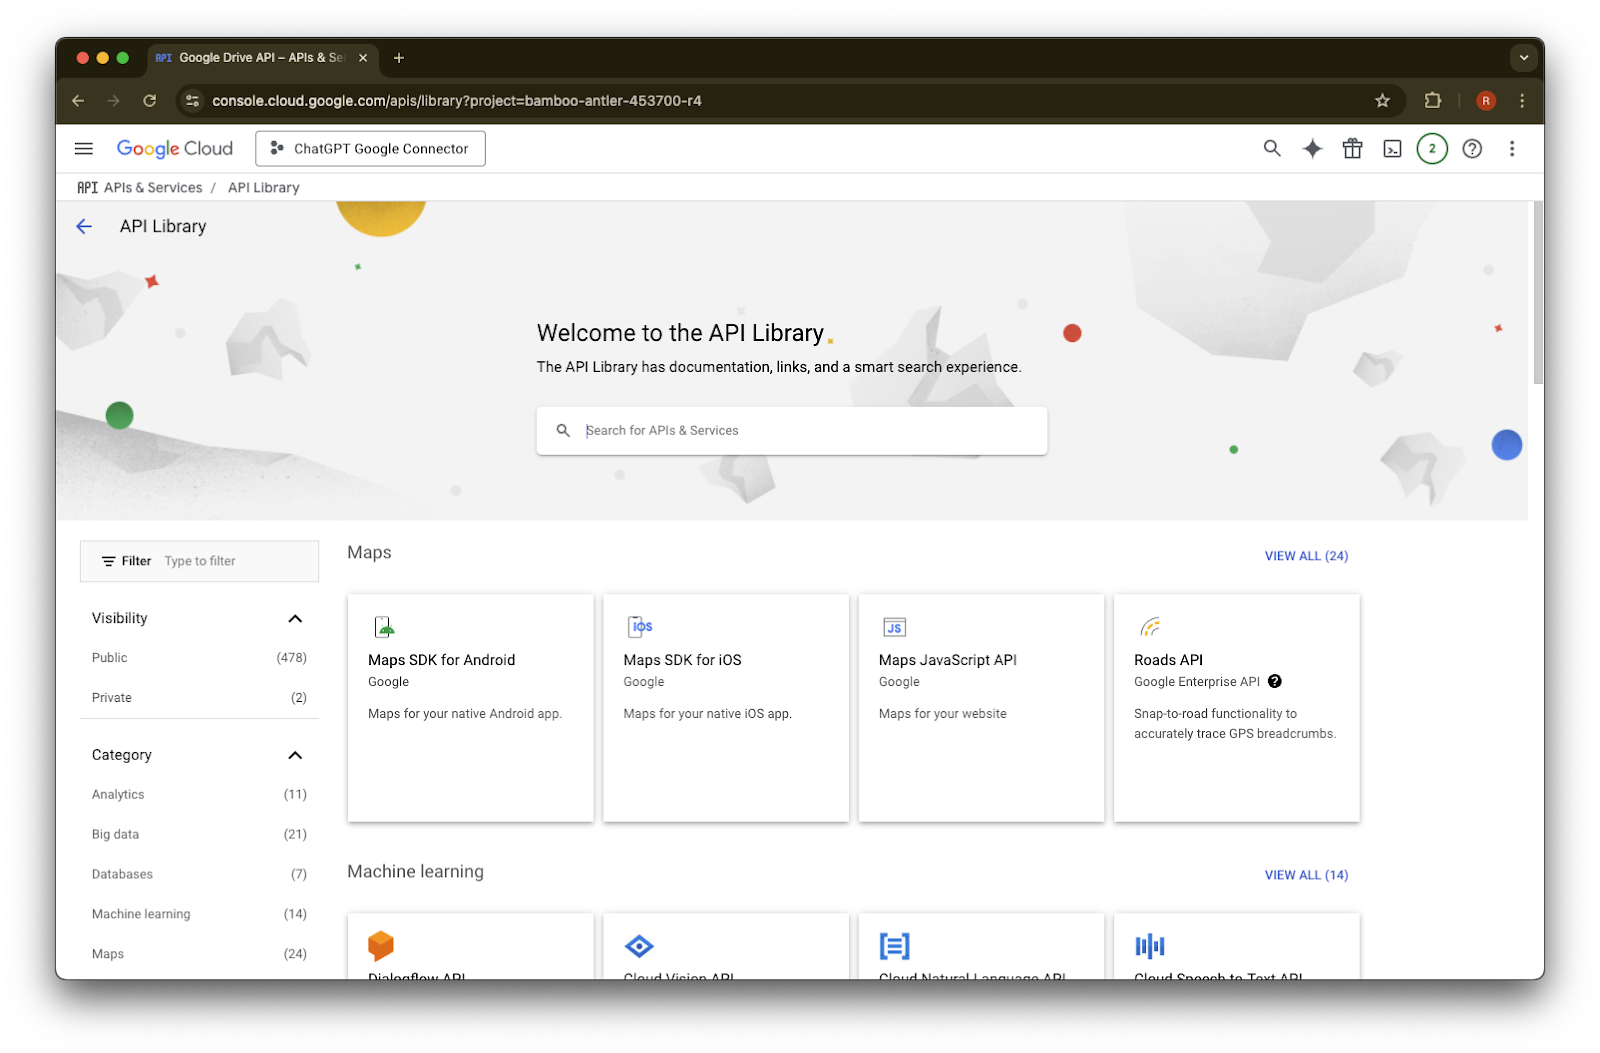
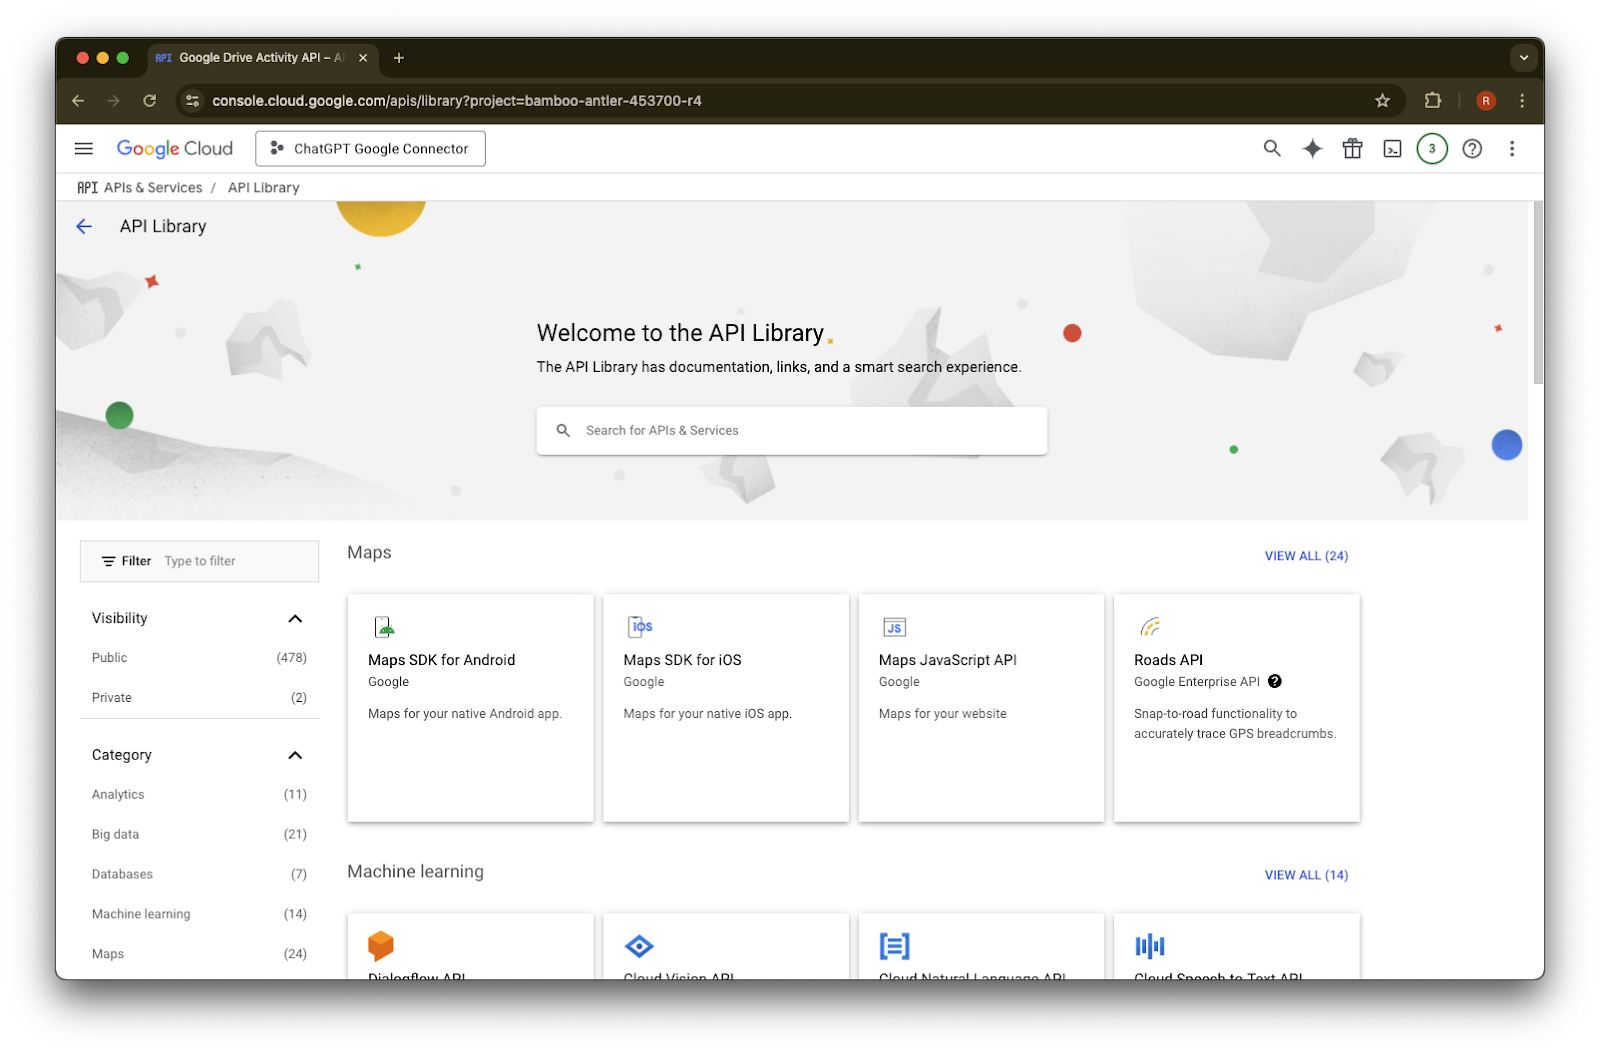
Library ကို နှိပ်ပါ
ယခု ကျွန်ုပ်တို့ API သုံးခုကို ထည့်မည်ဖြစ်ပြီး ၎င်းတို့ကို ရှာရန် search box ကို အသုံးပြုမည်ဖြစ်သည်
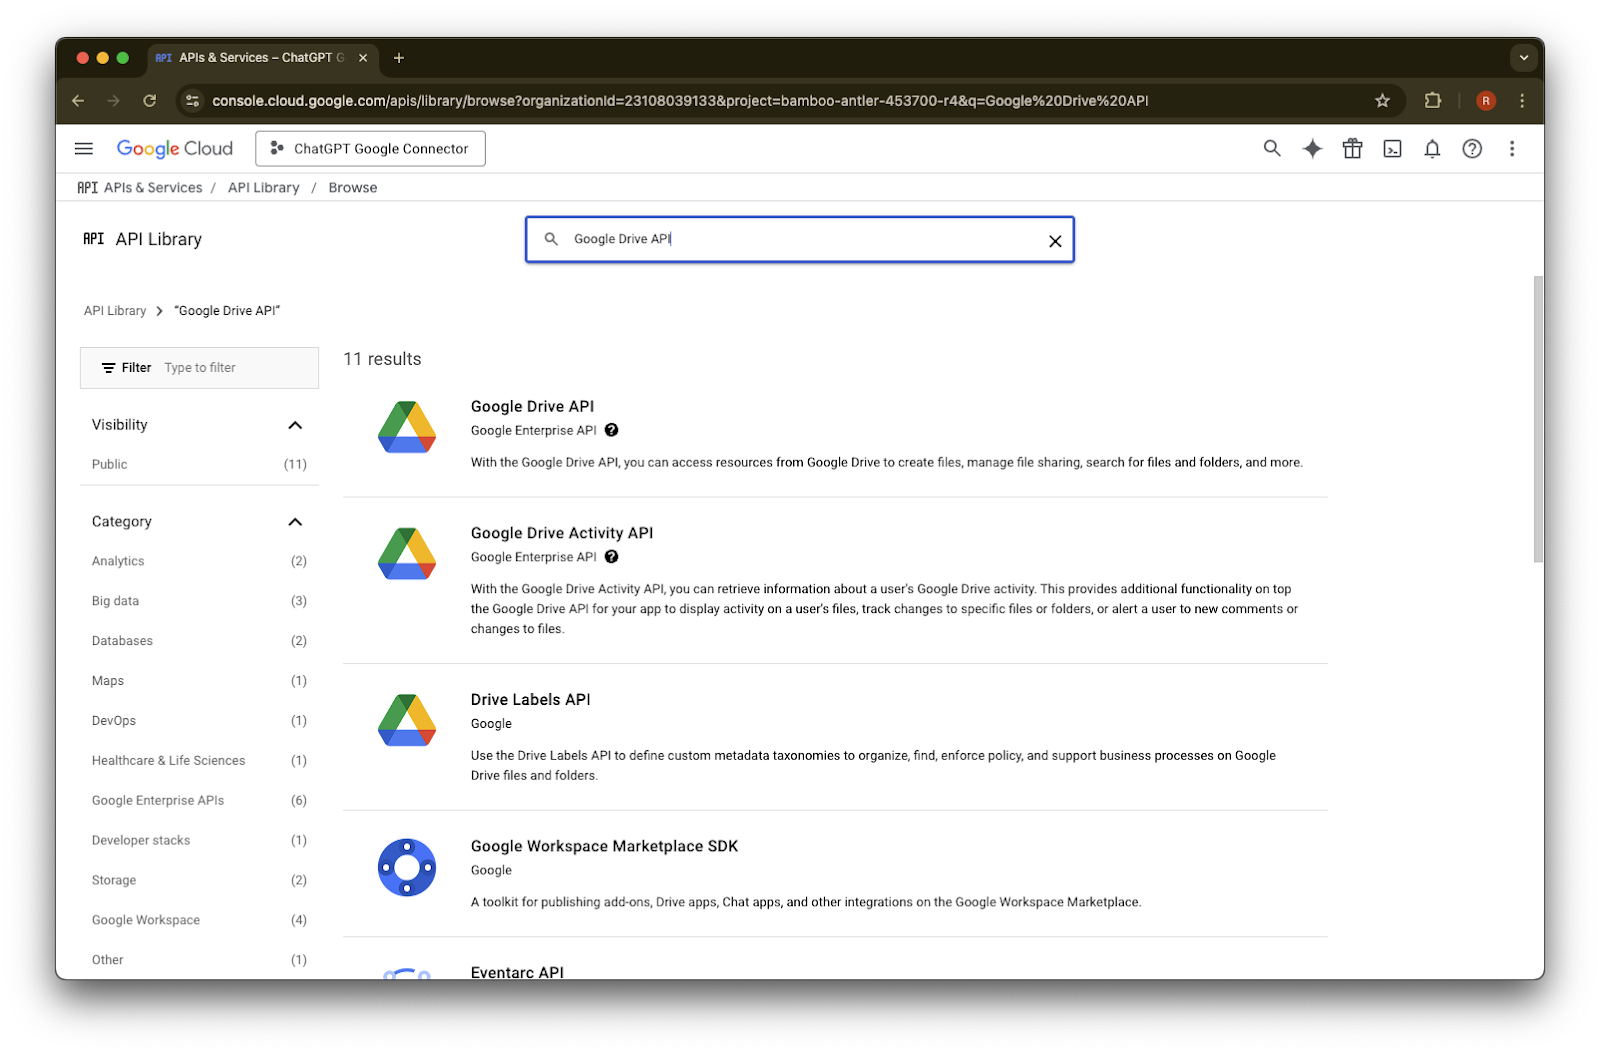
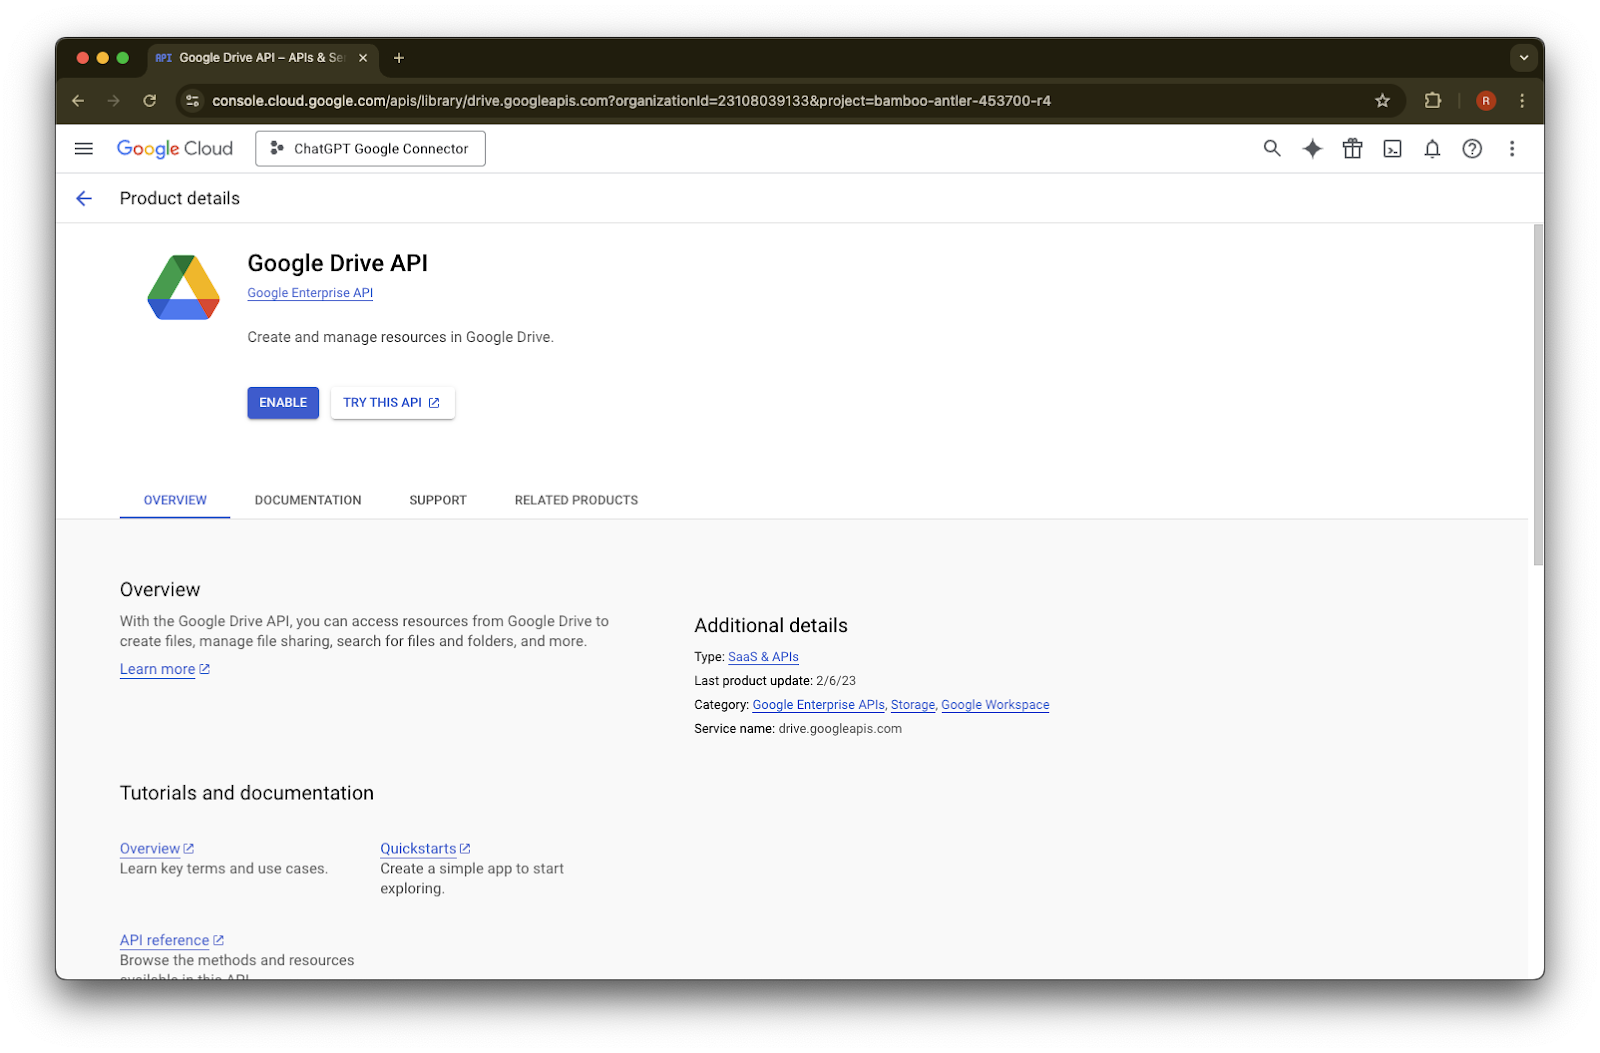
Google Drive API ကို ရှာပြီး ရွေးချယ်ပါ
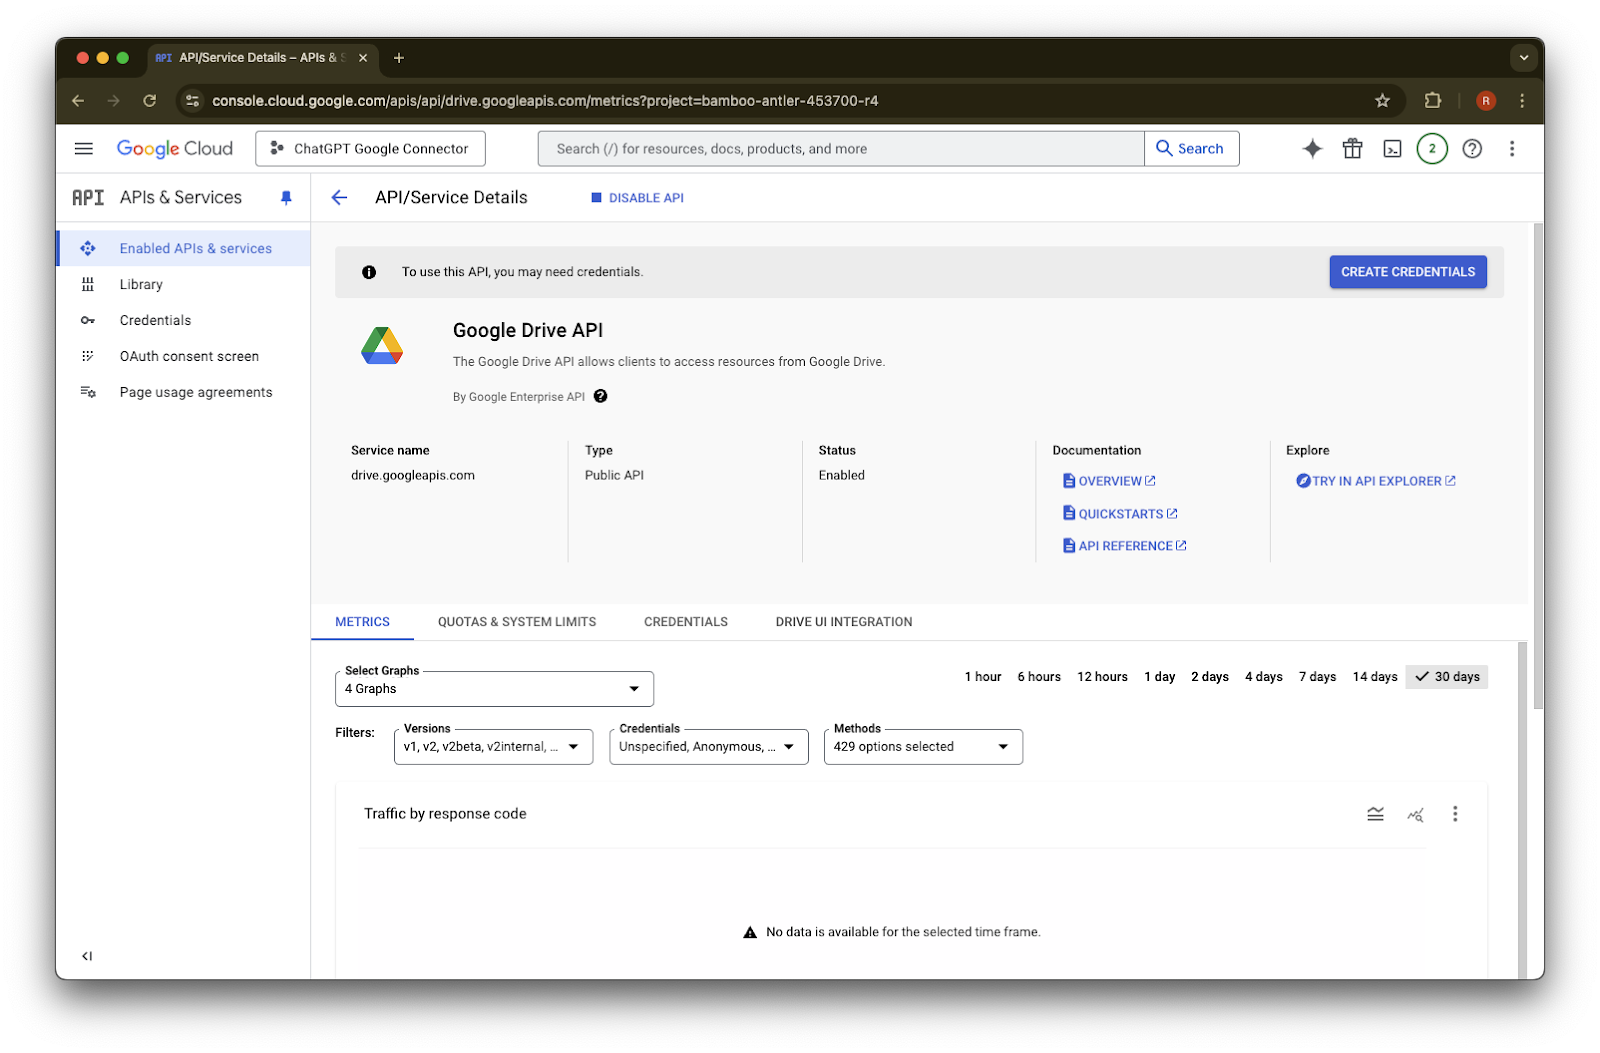
Enable ကို နှိပ်ပါ
Library ကို နှိပ်ပါ
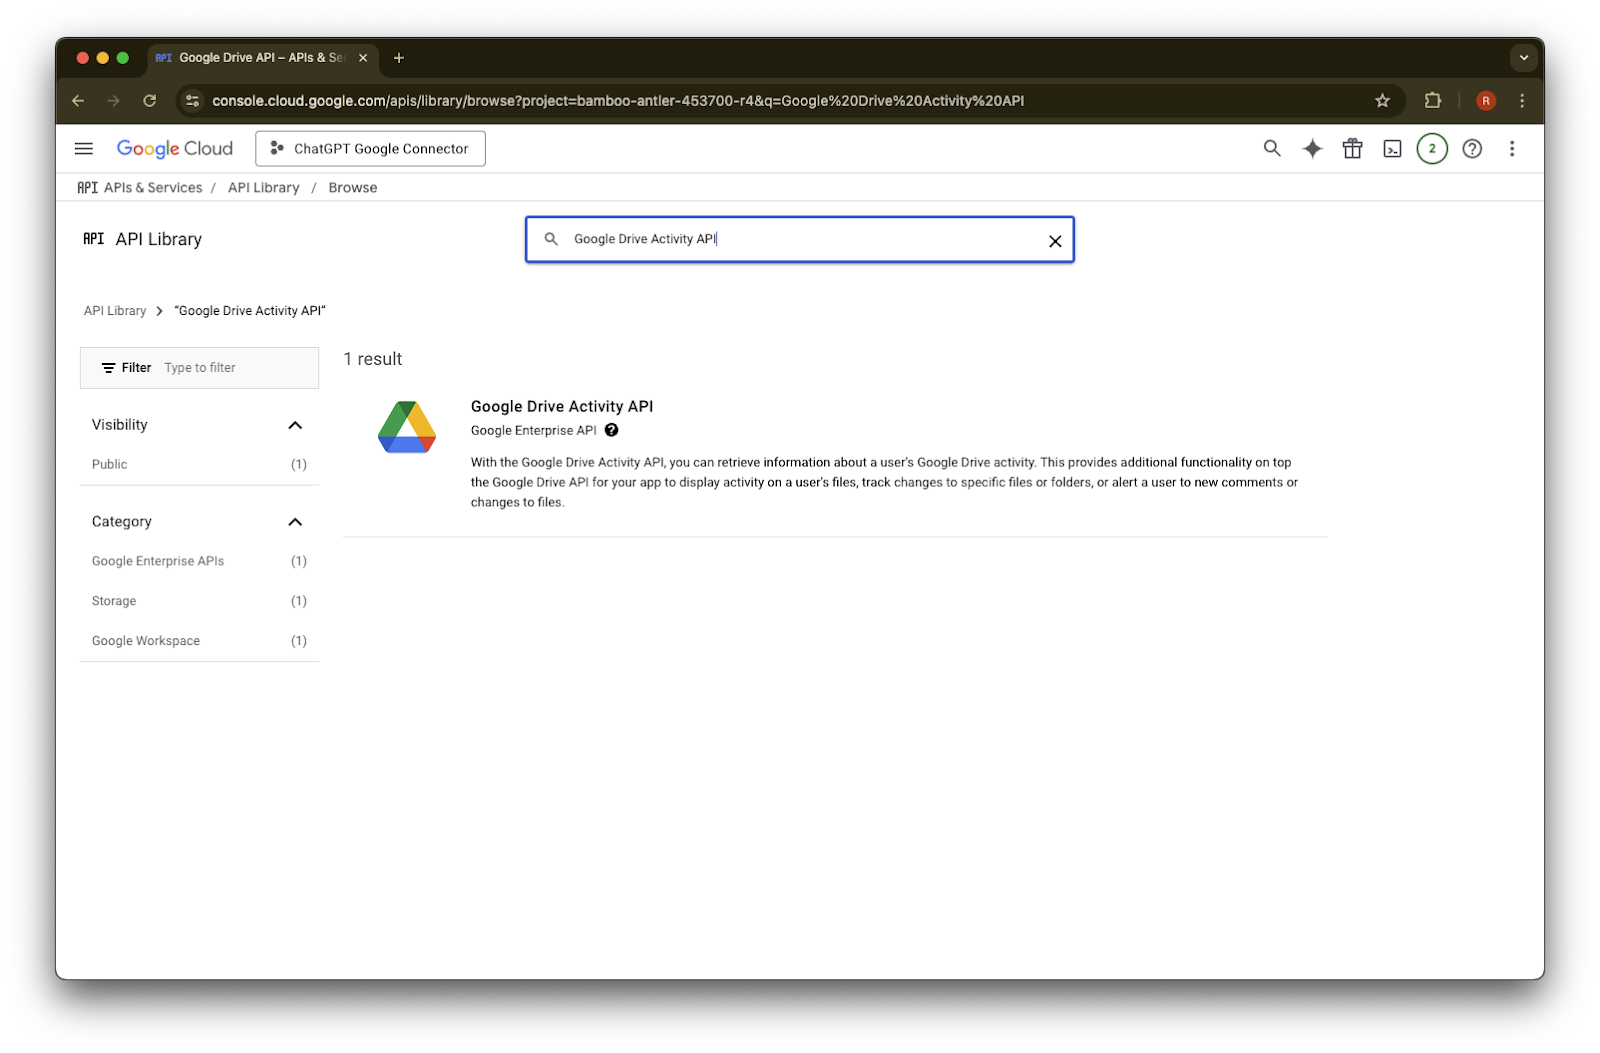
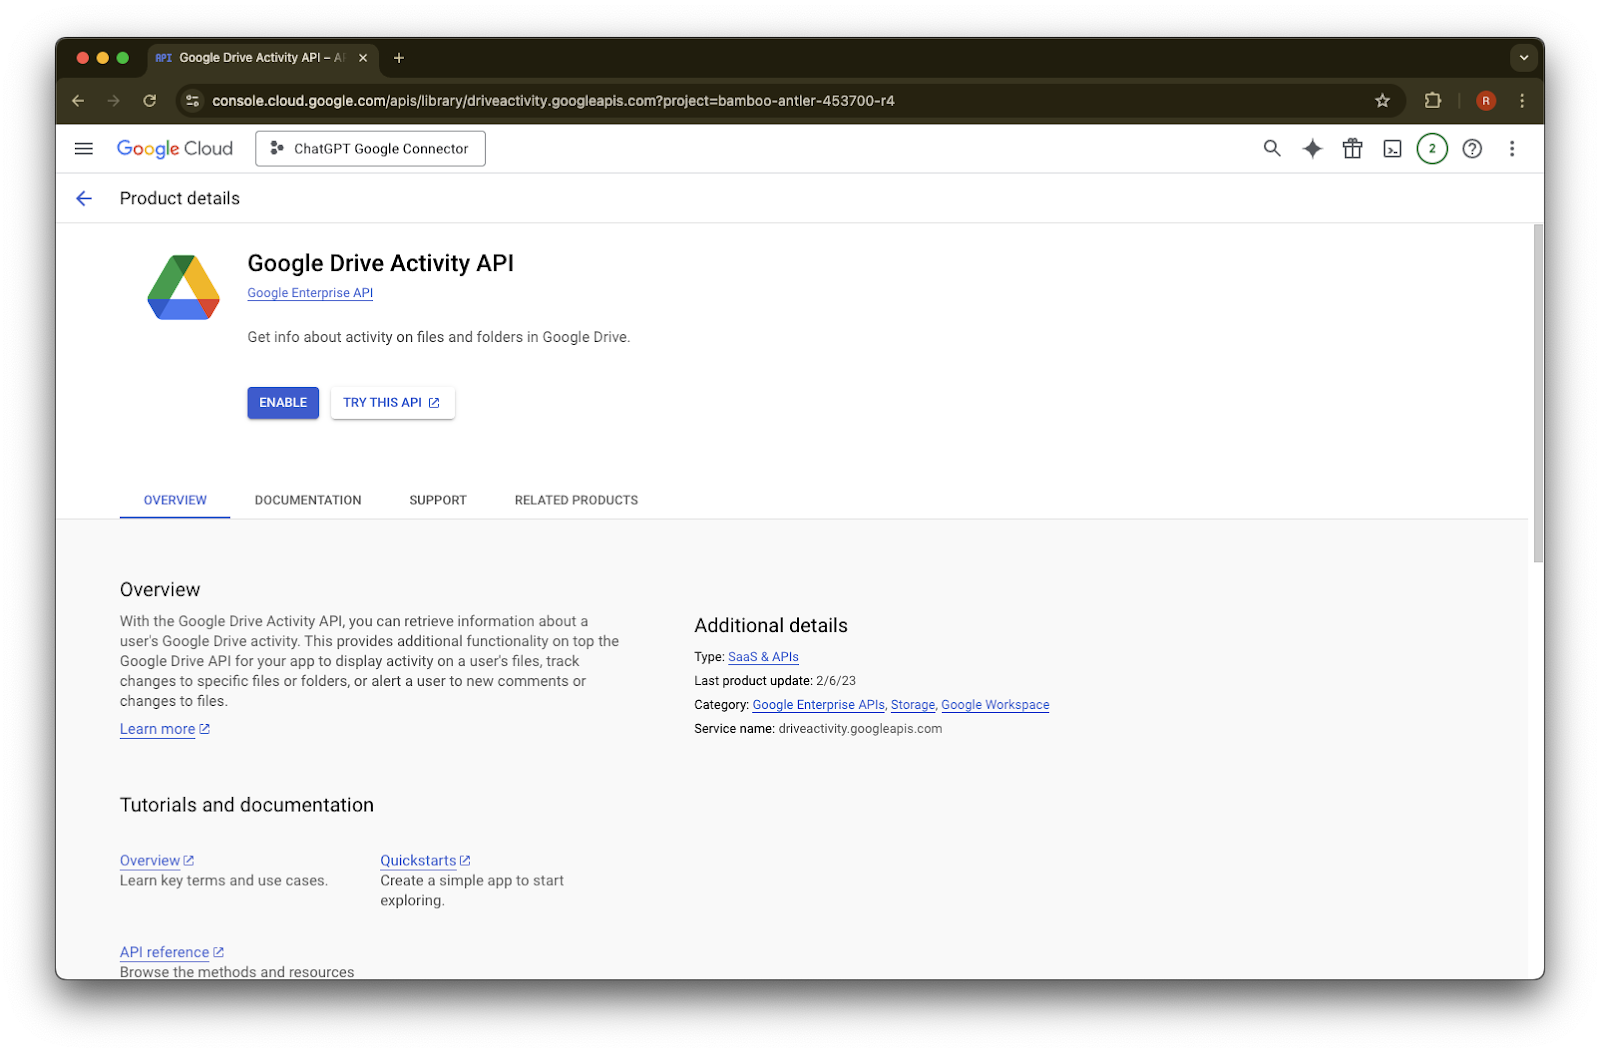
Google Drive Activity ကို ရှာပါ
Google Drive Activity API ကို ရွေးချယ်ပါ
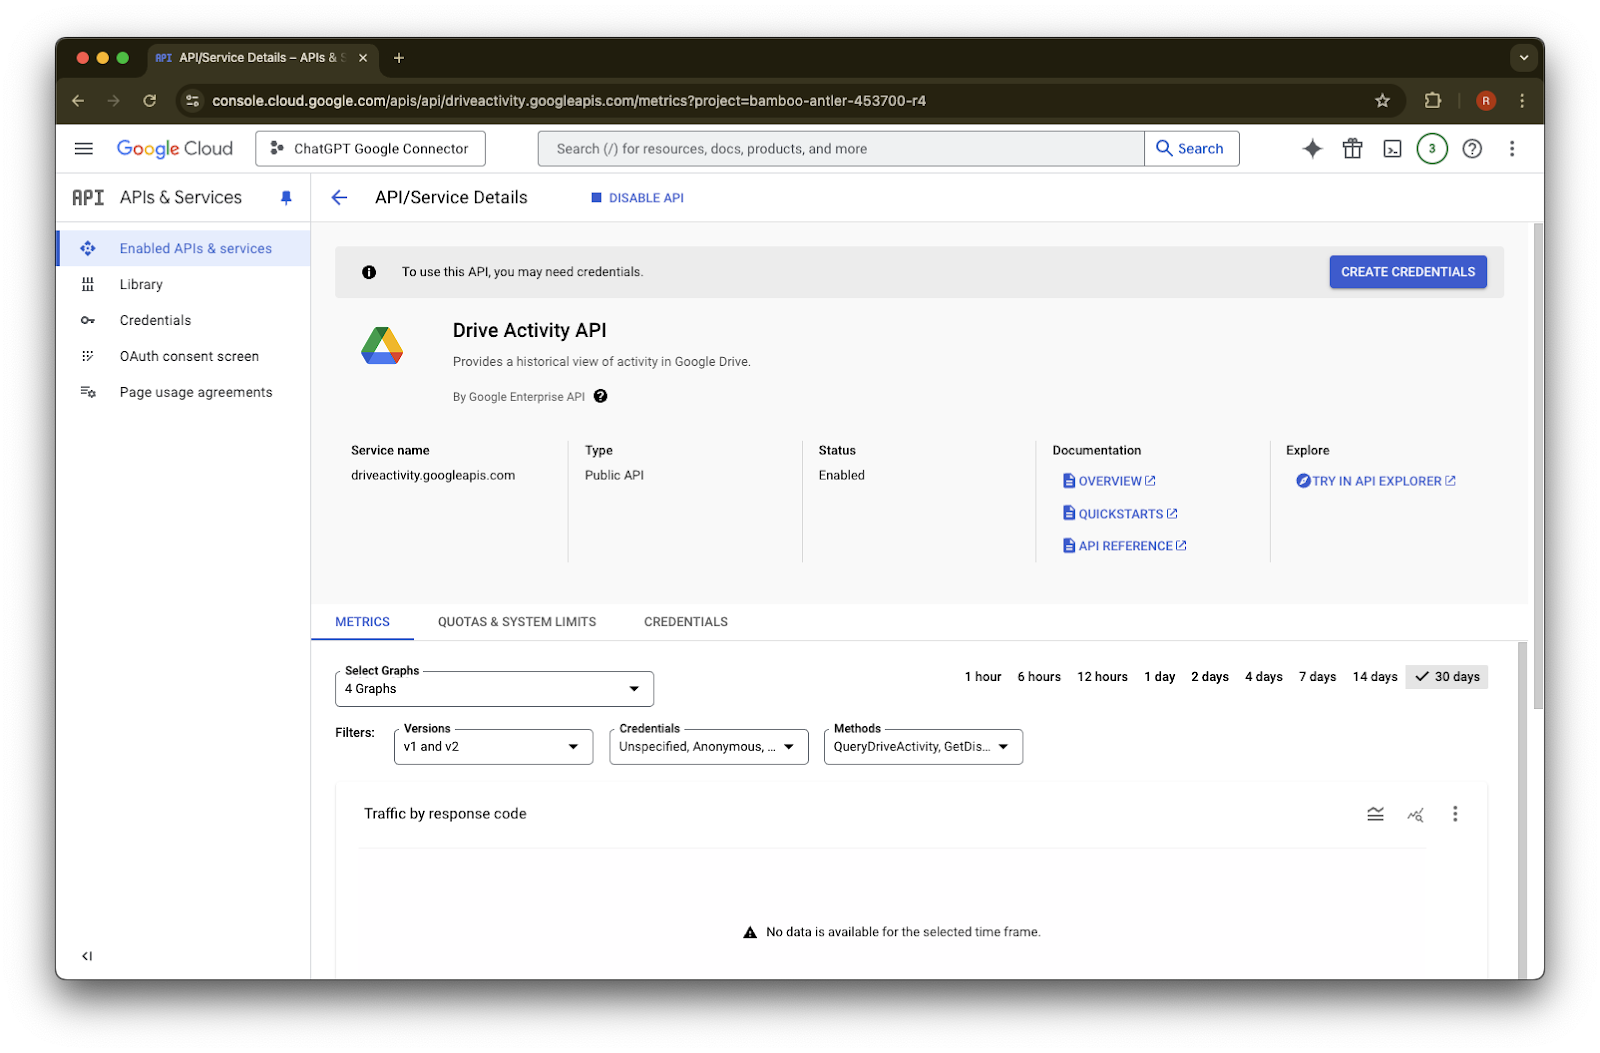
Enable ကို နှိပ်ပါ
Library ကို နှိပ်ပါ
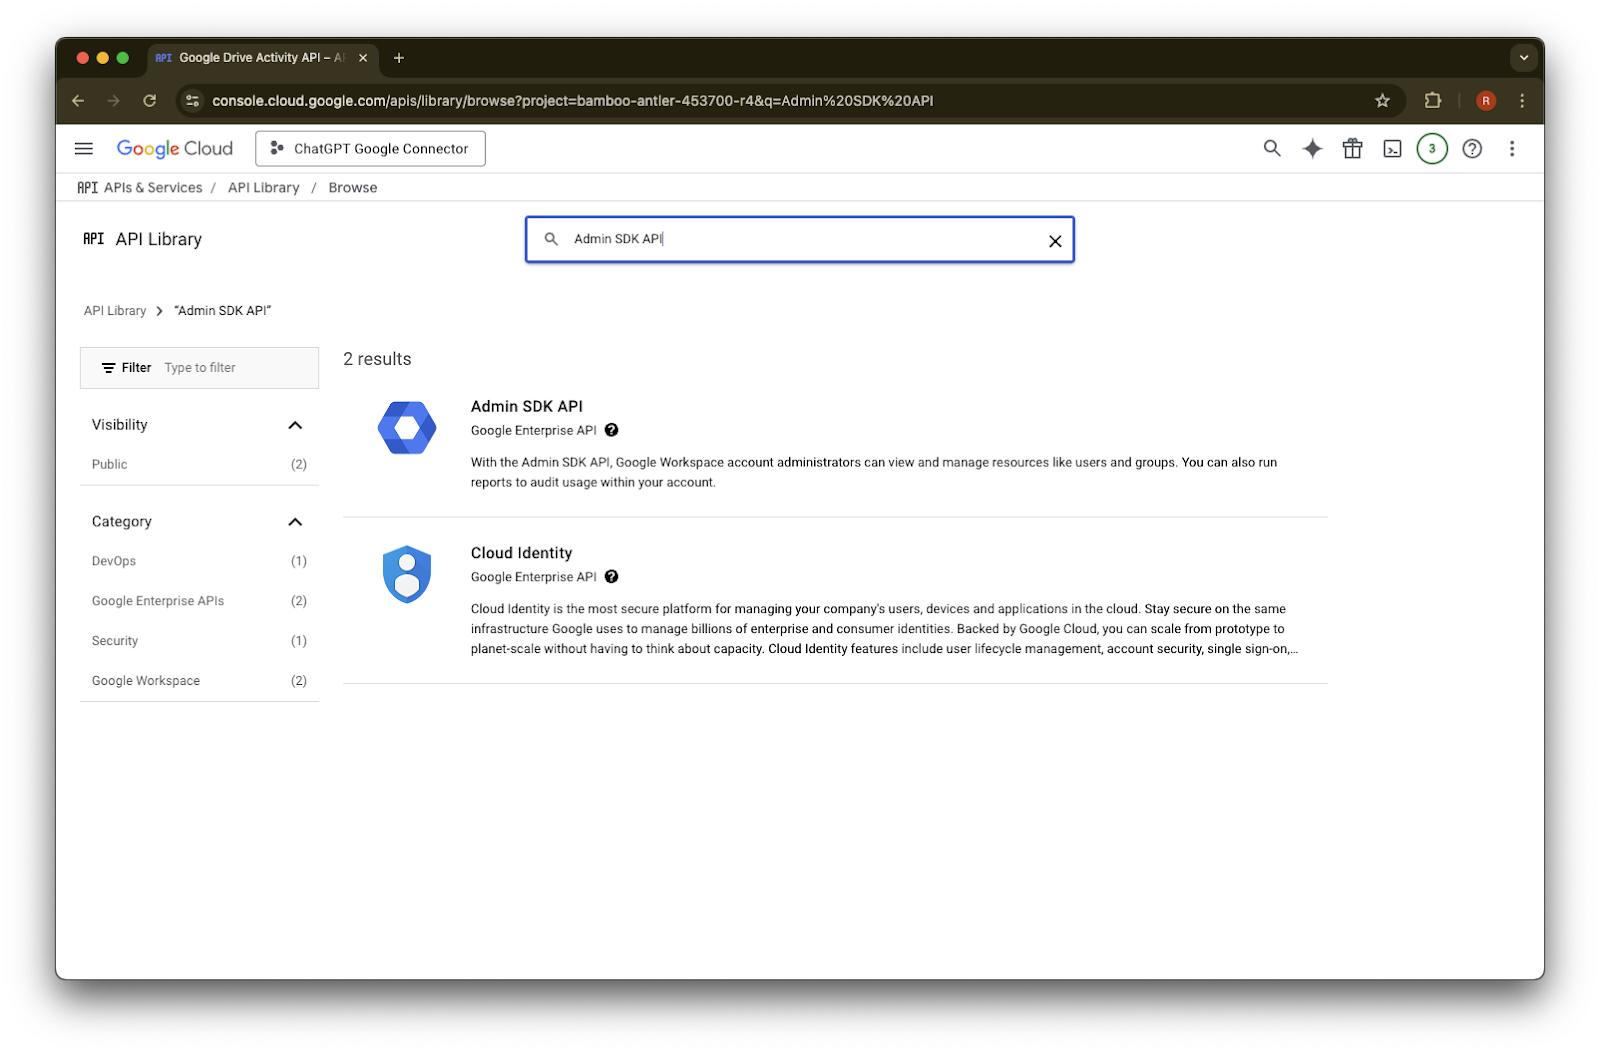
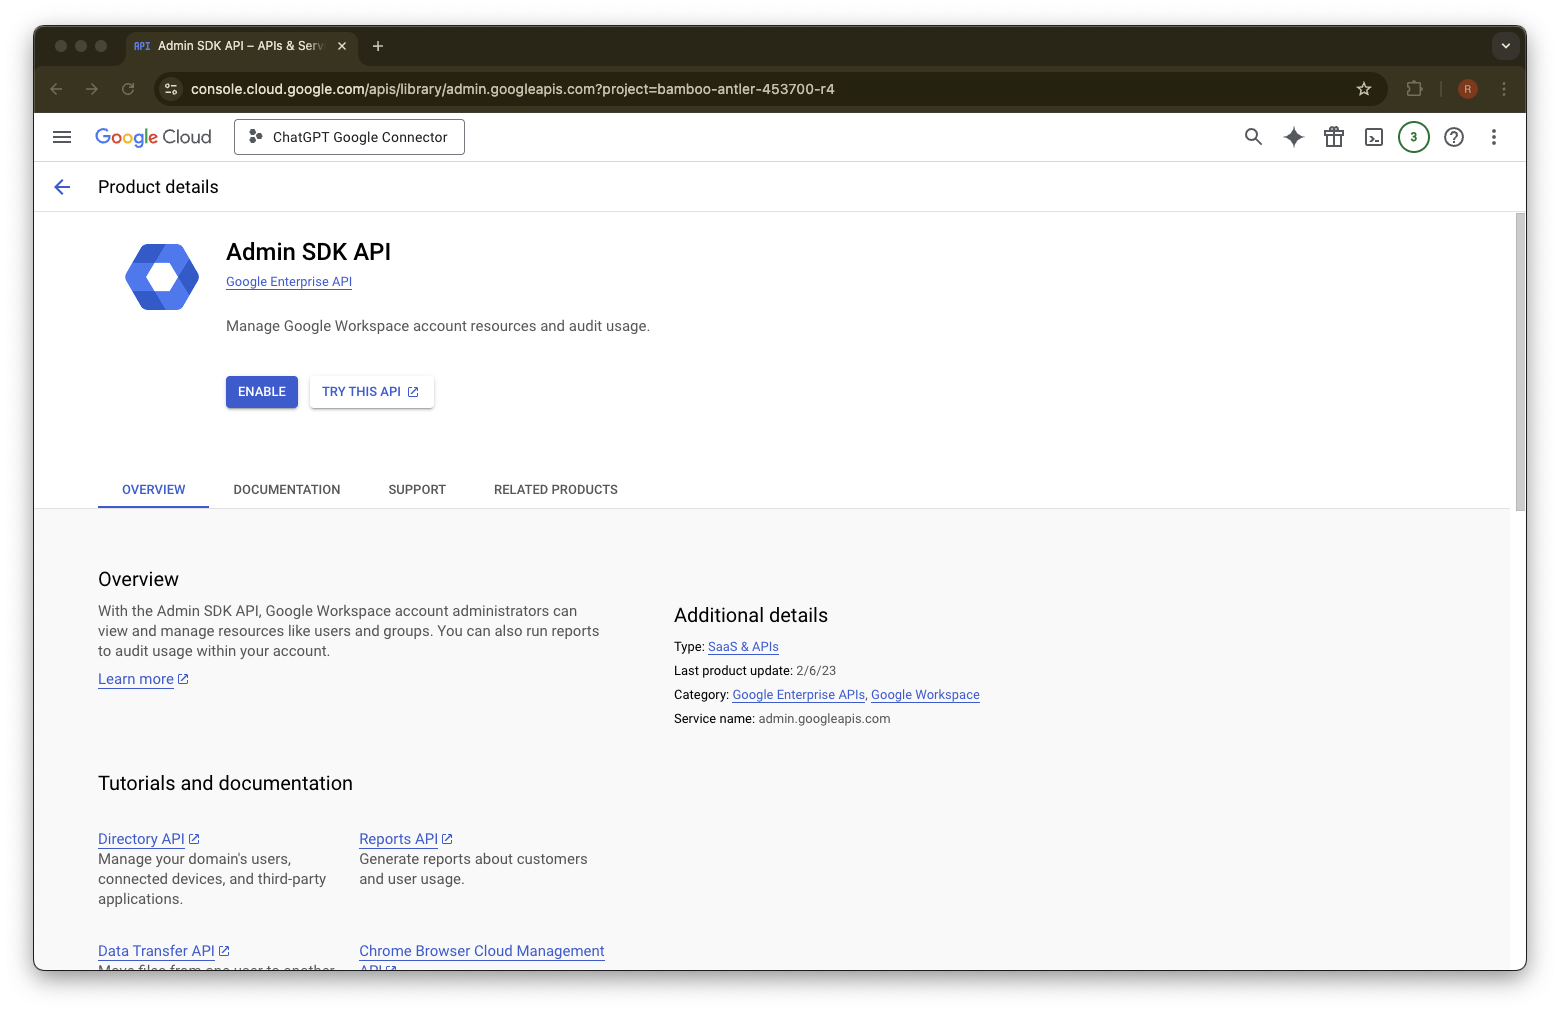
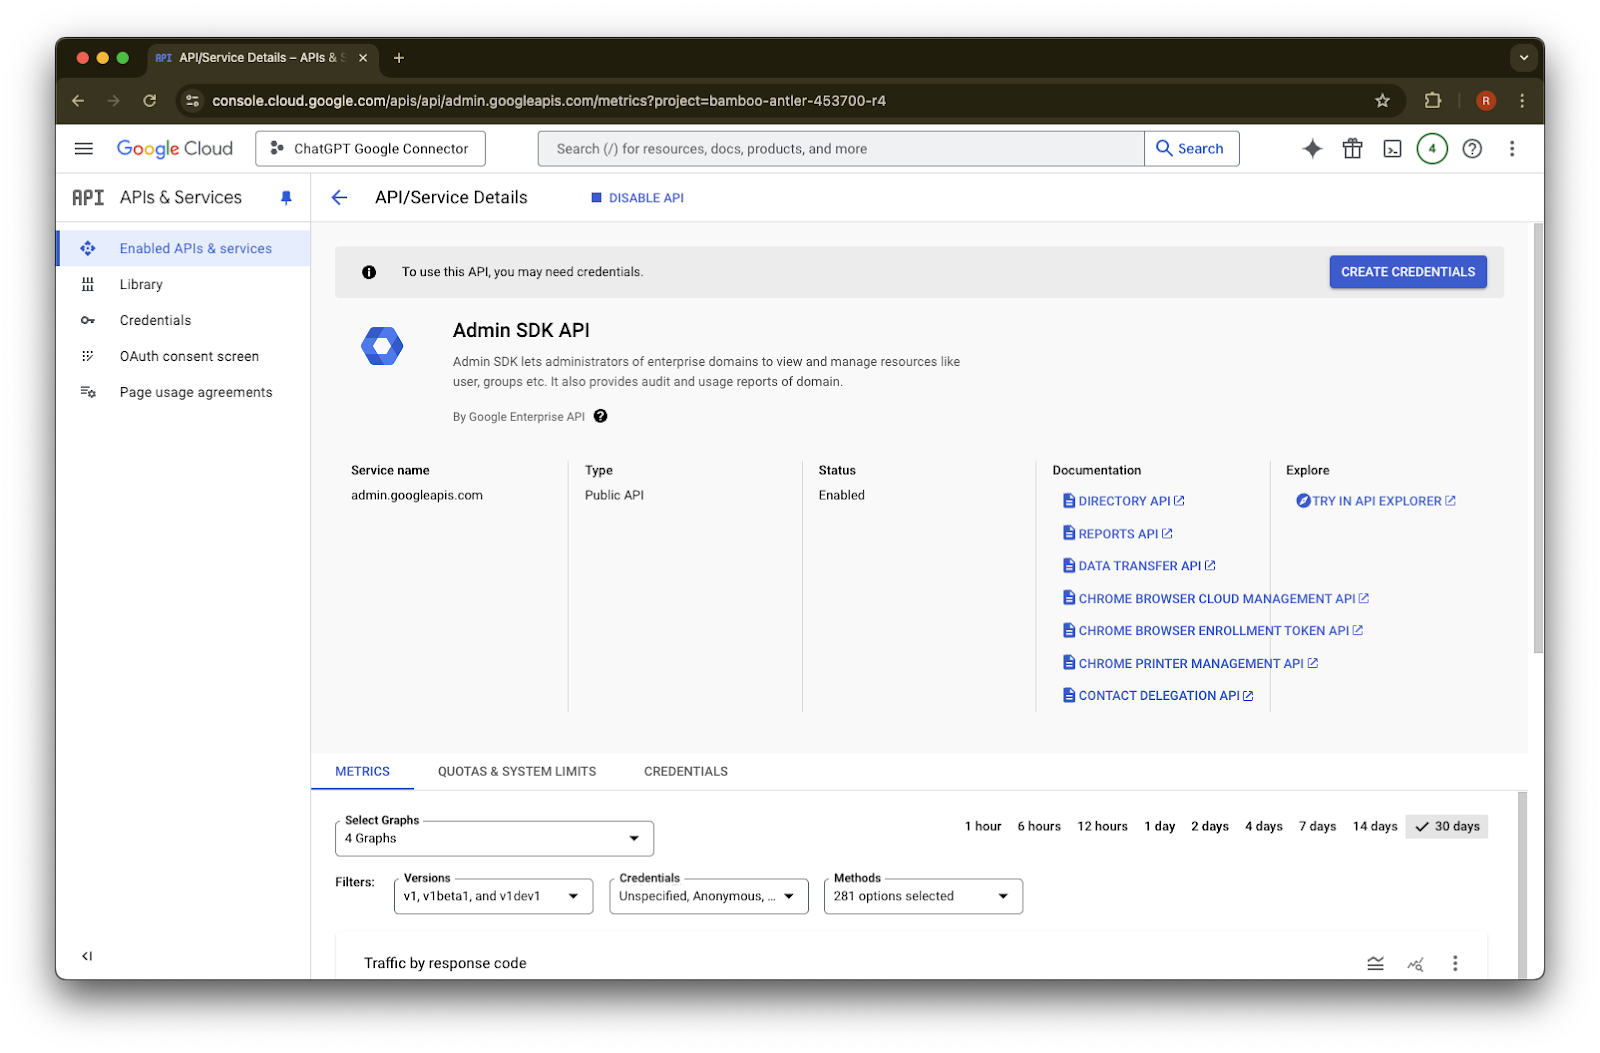
Admin SDK API ကို ရှာပါ
Admin SDK API
ကို ရွေးချယ်ပါEnable ကို နှိပ်ပါ
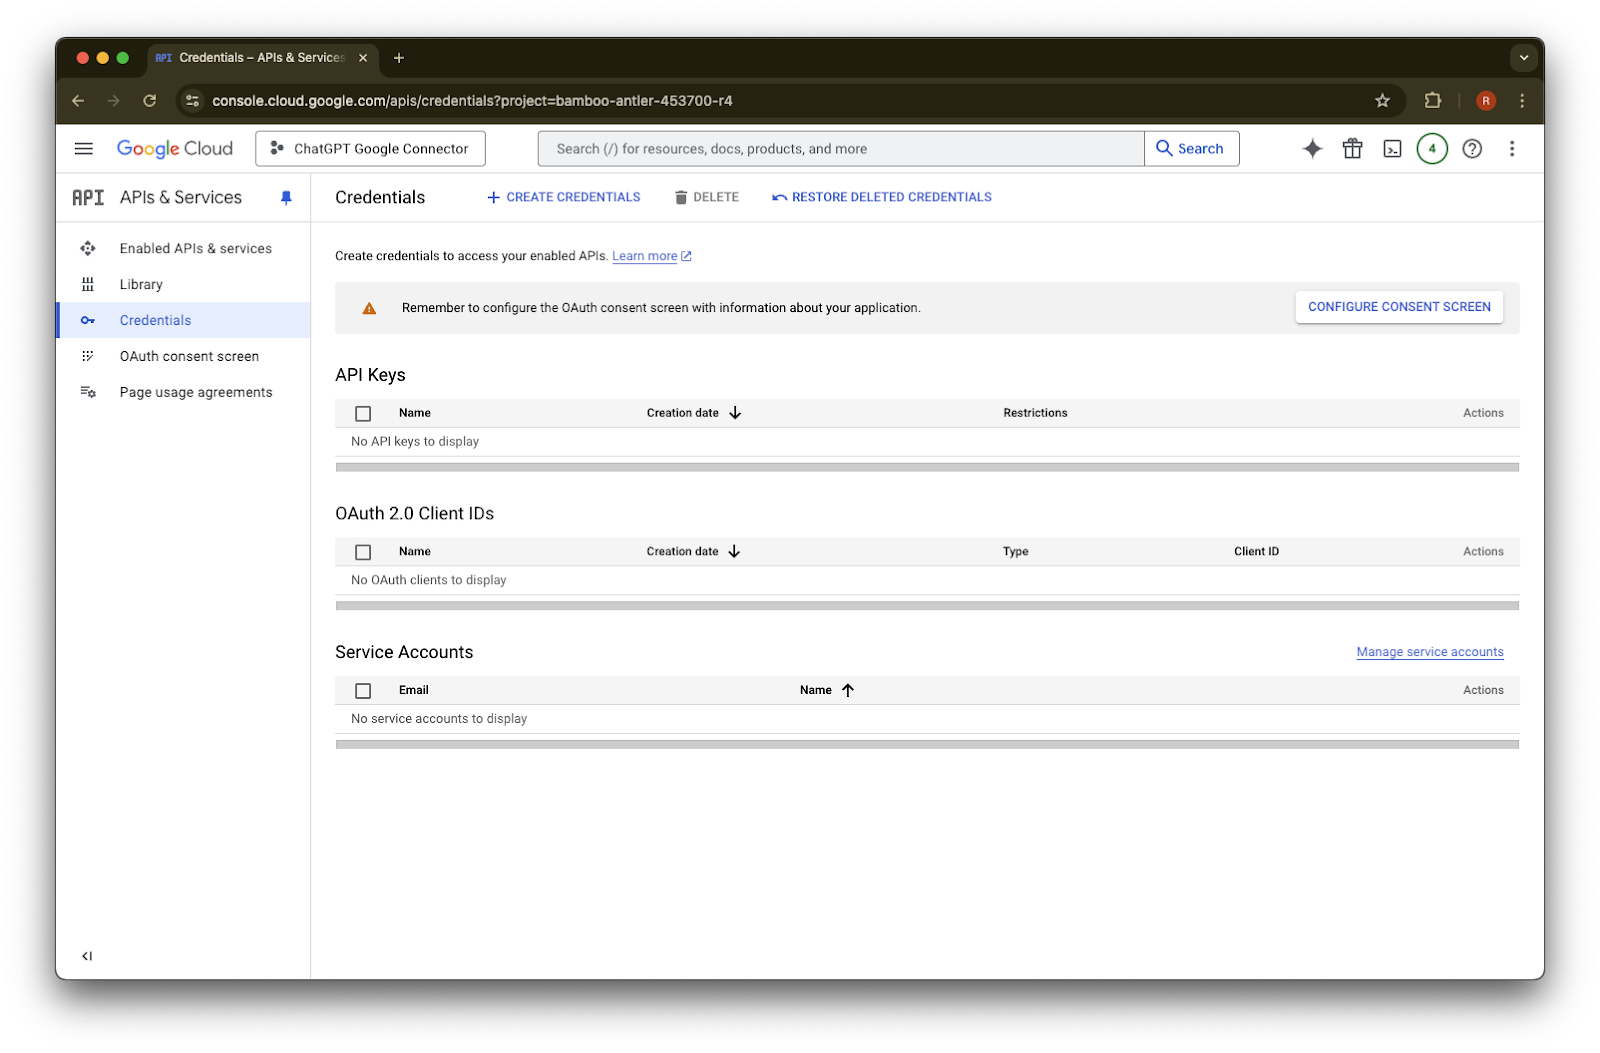
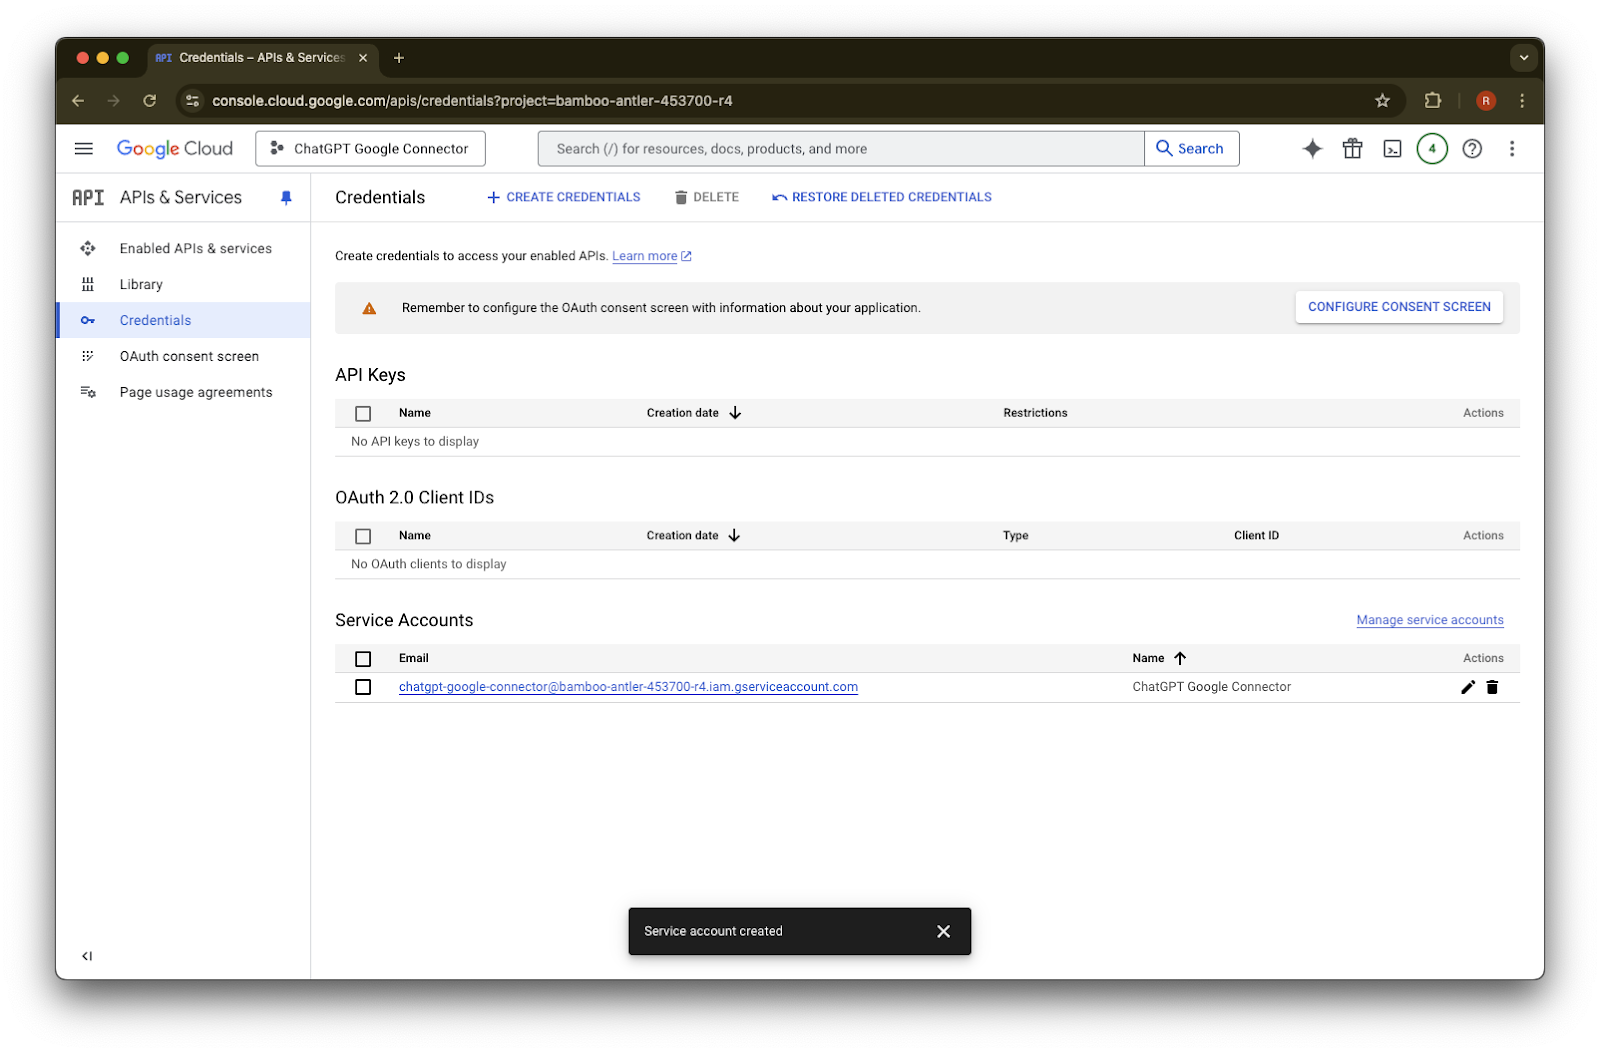
Credentials ကို နှိပ်ပါ
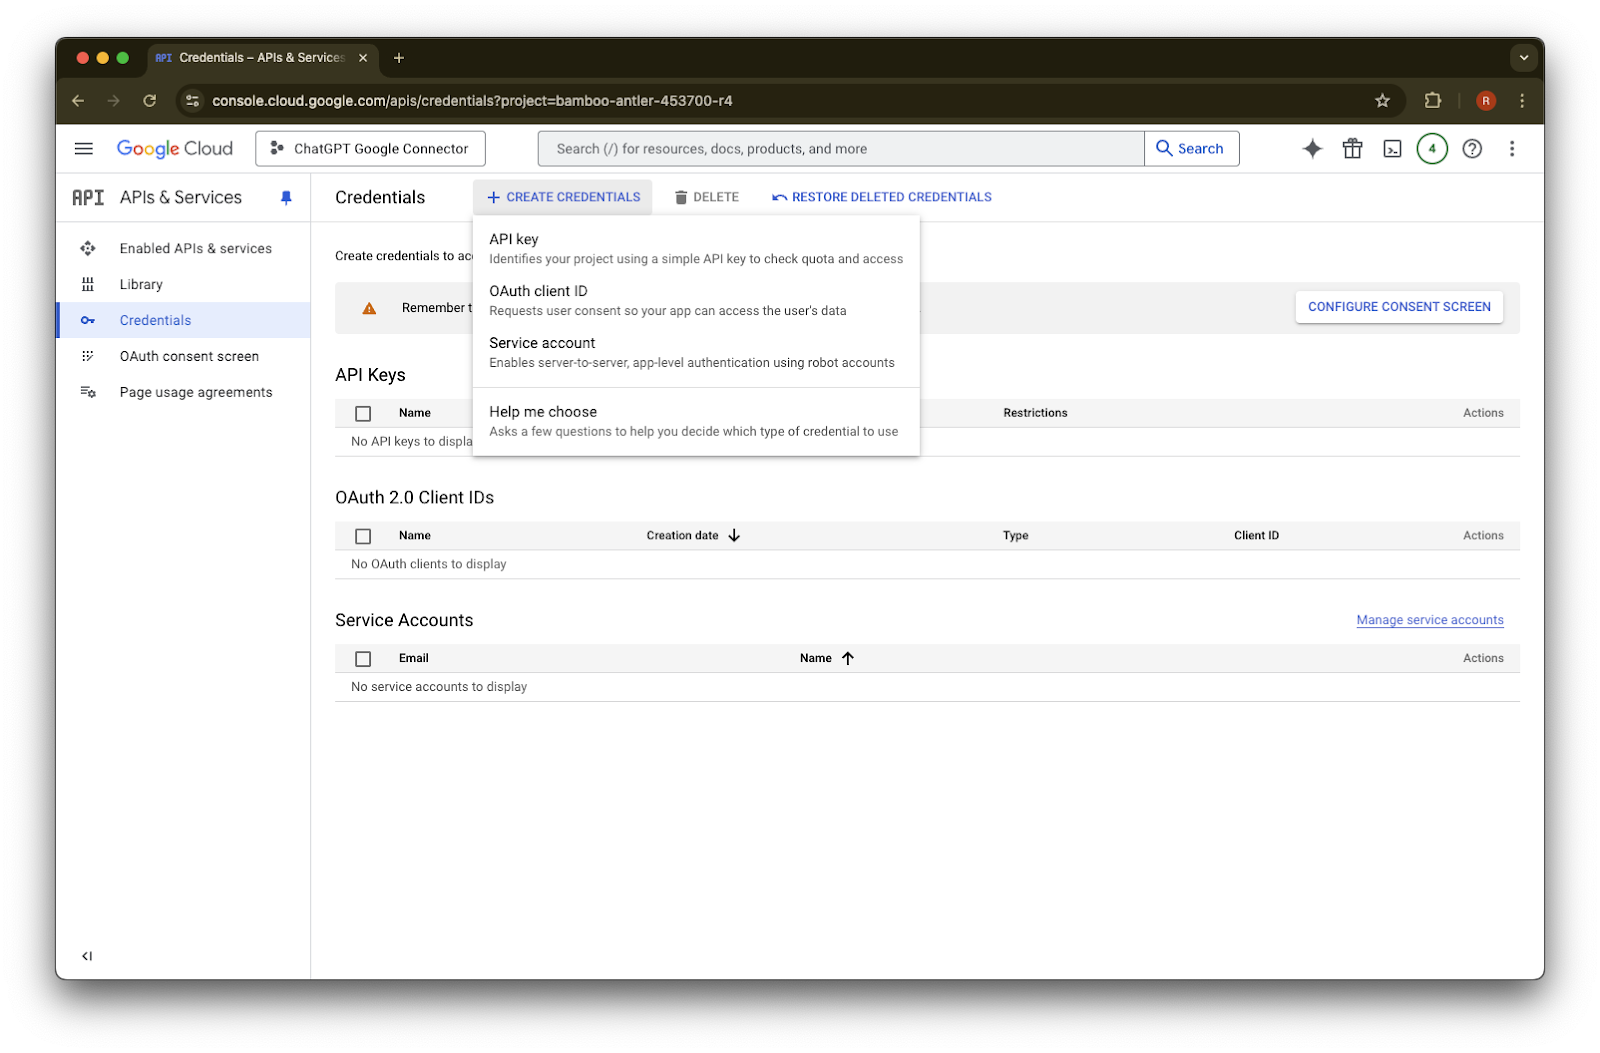
Create Credentials ကို နှိပ်ပါ
Service account ကို နှိပ်ပါ
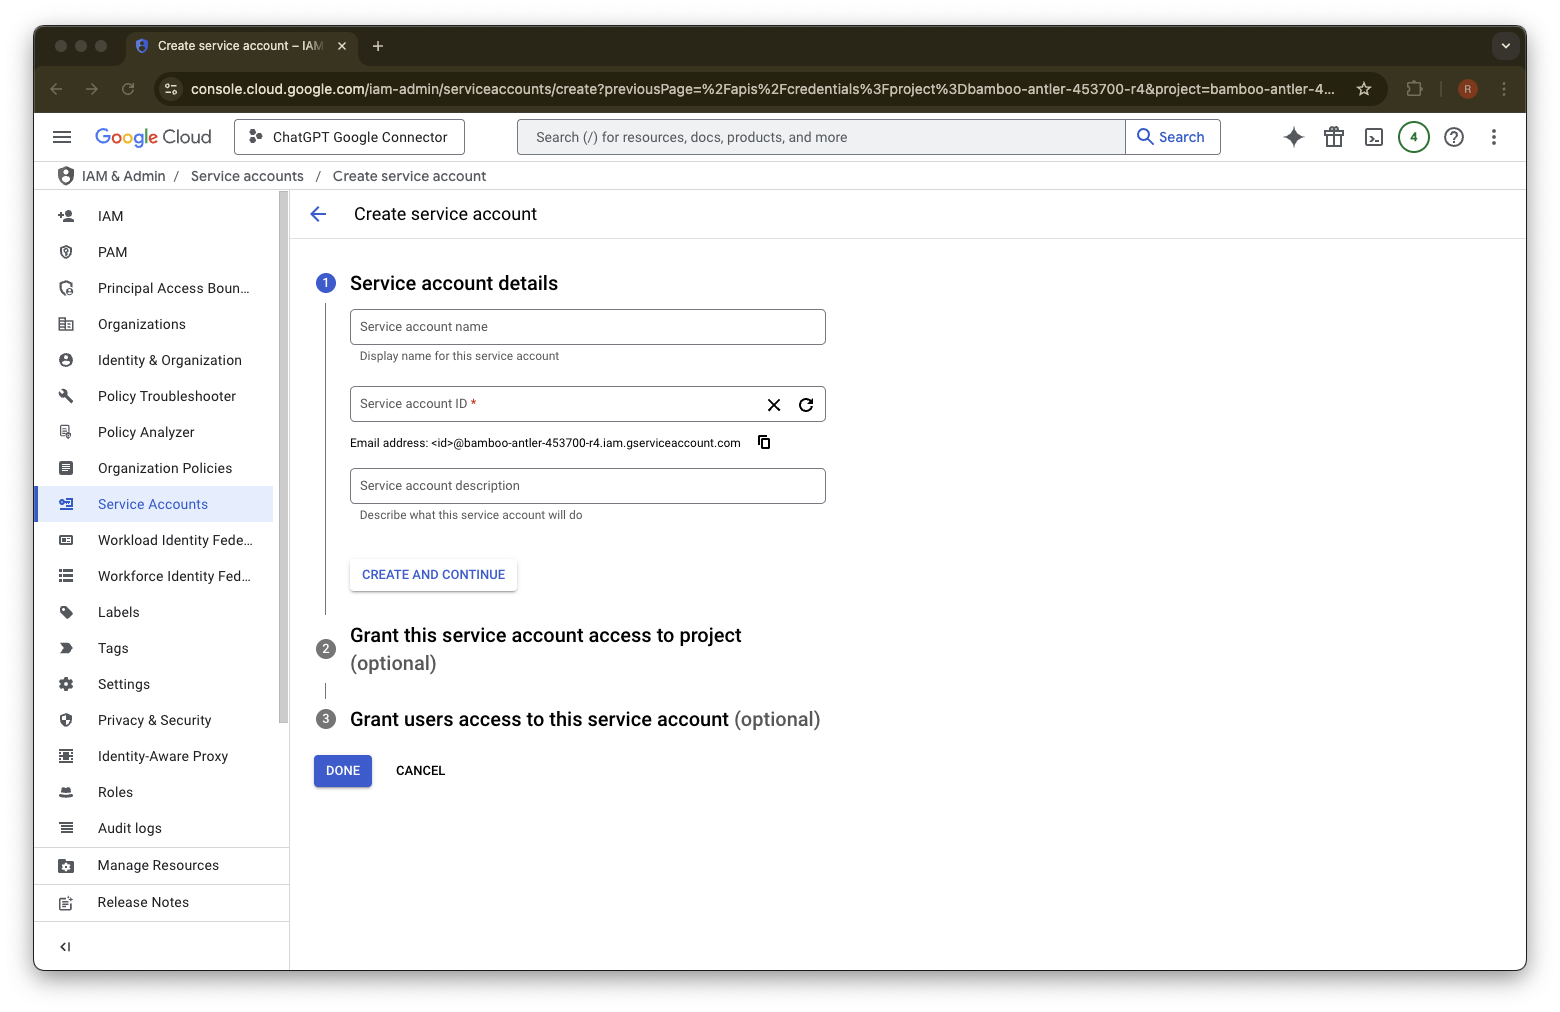
ဤ service account အတွက် သင့်စိတ်ကြိုက် name နှင့် description ကို ထည့်ပါ
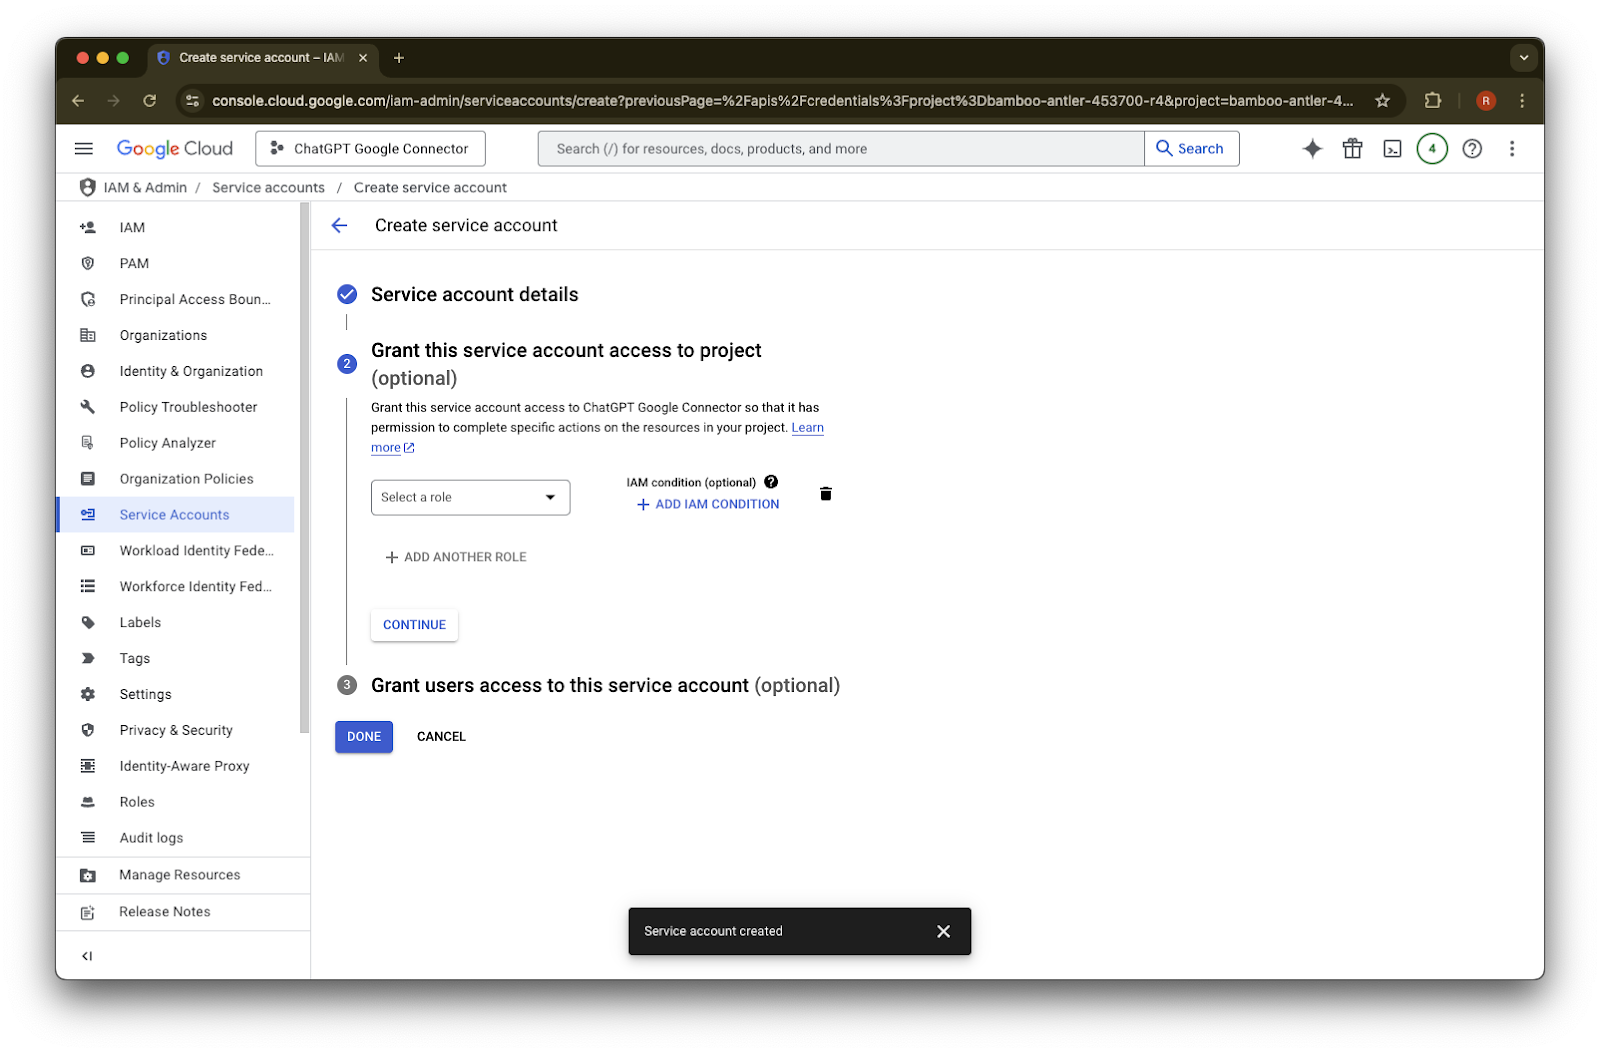
(Optional) role တစ်ခု သတ်မှတ်နိုင်ပါသည် - ၎င်းကို ChatGPT အတွက် မလိုအပ်ပါ။
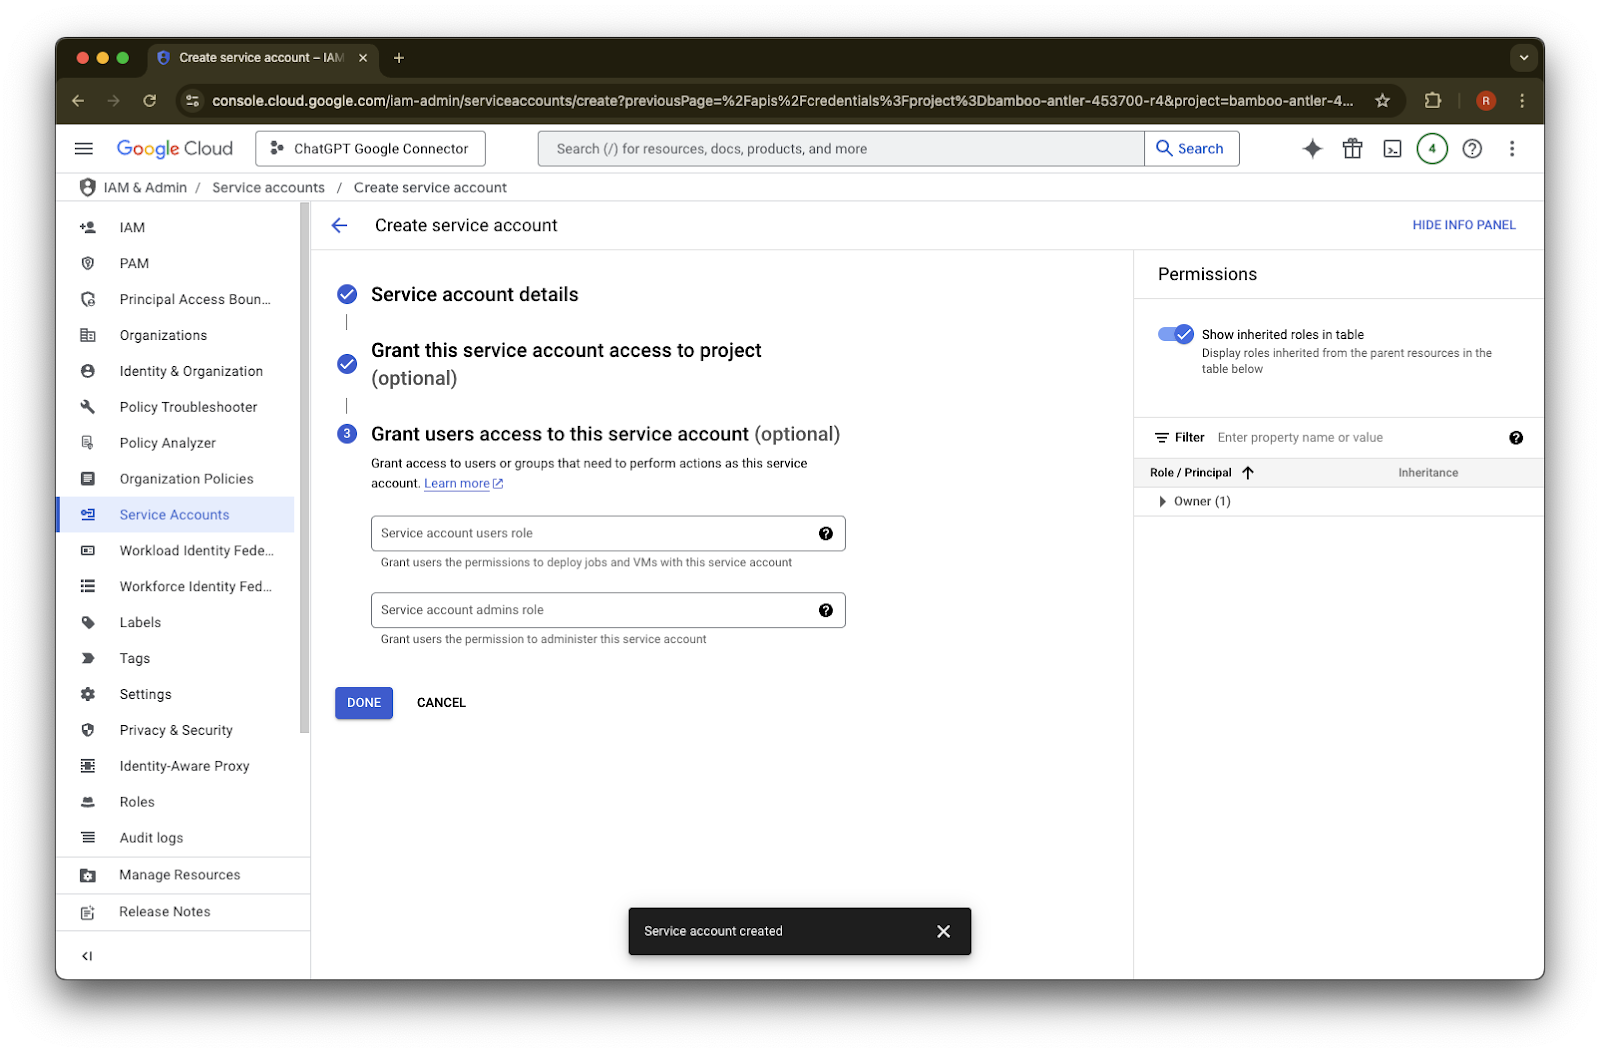
(Optional) service account သို့ access ပေးနိုင်ပါသည် - ၎င်းကို ChatGPT အတွက် မလိုအပ်ပါ။
Done ကို နှိပ်ပါ။
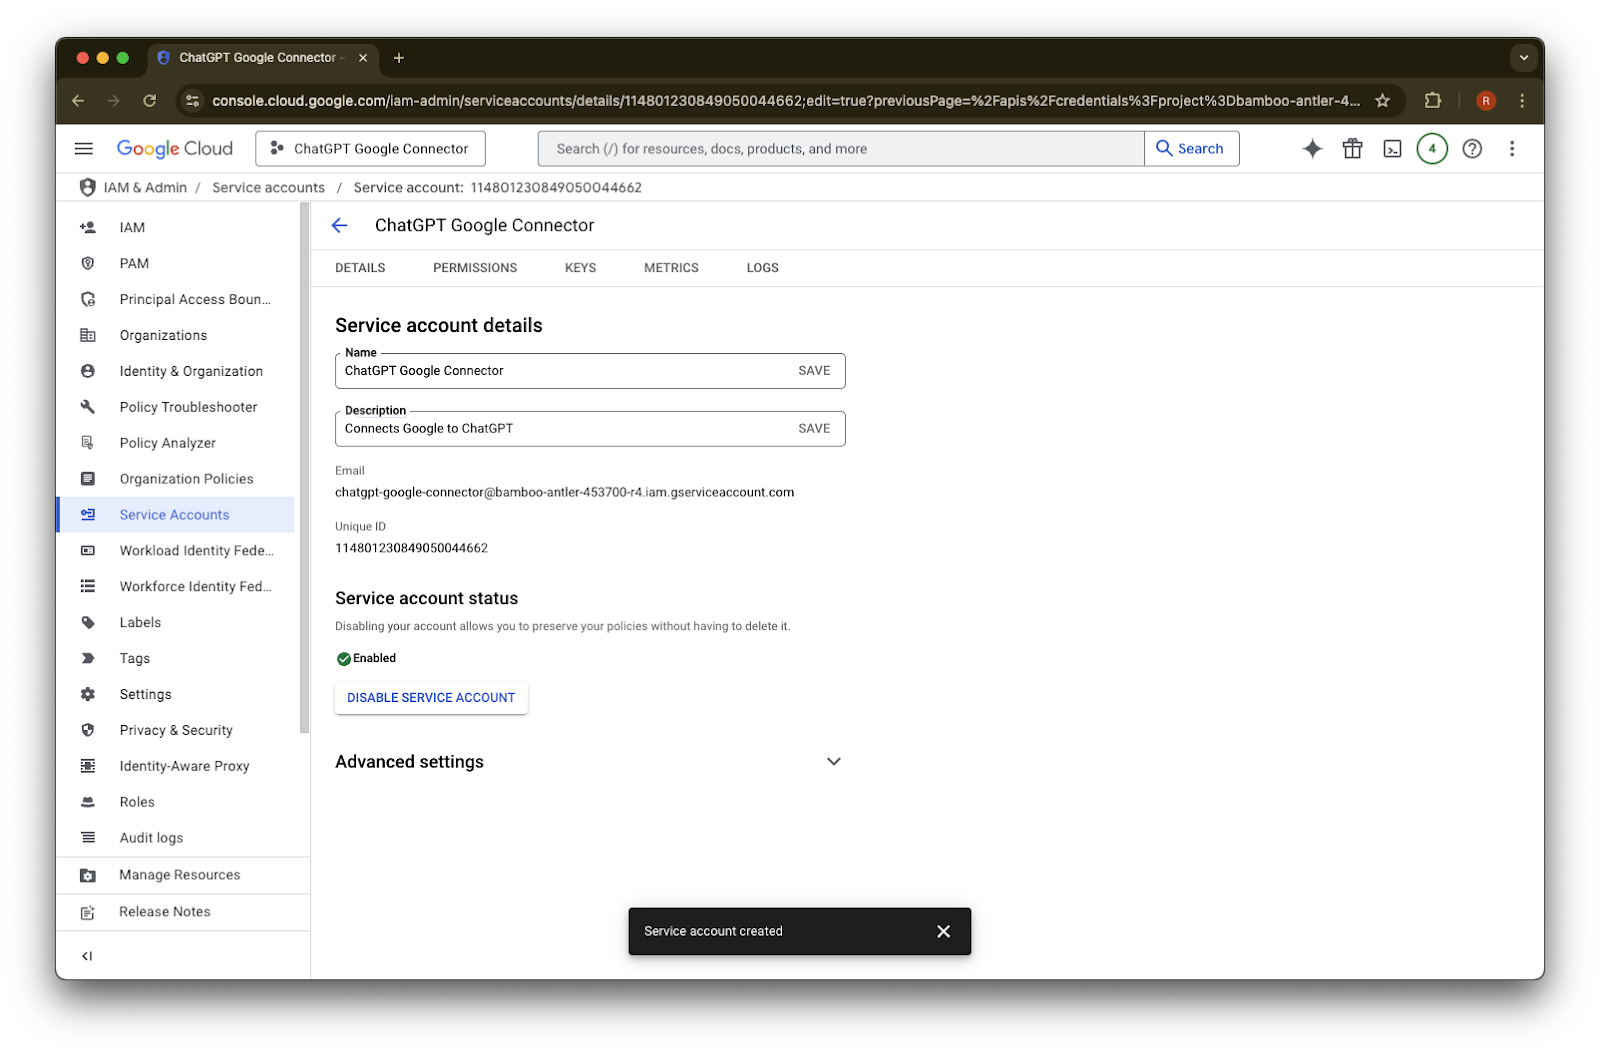
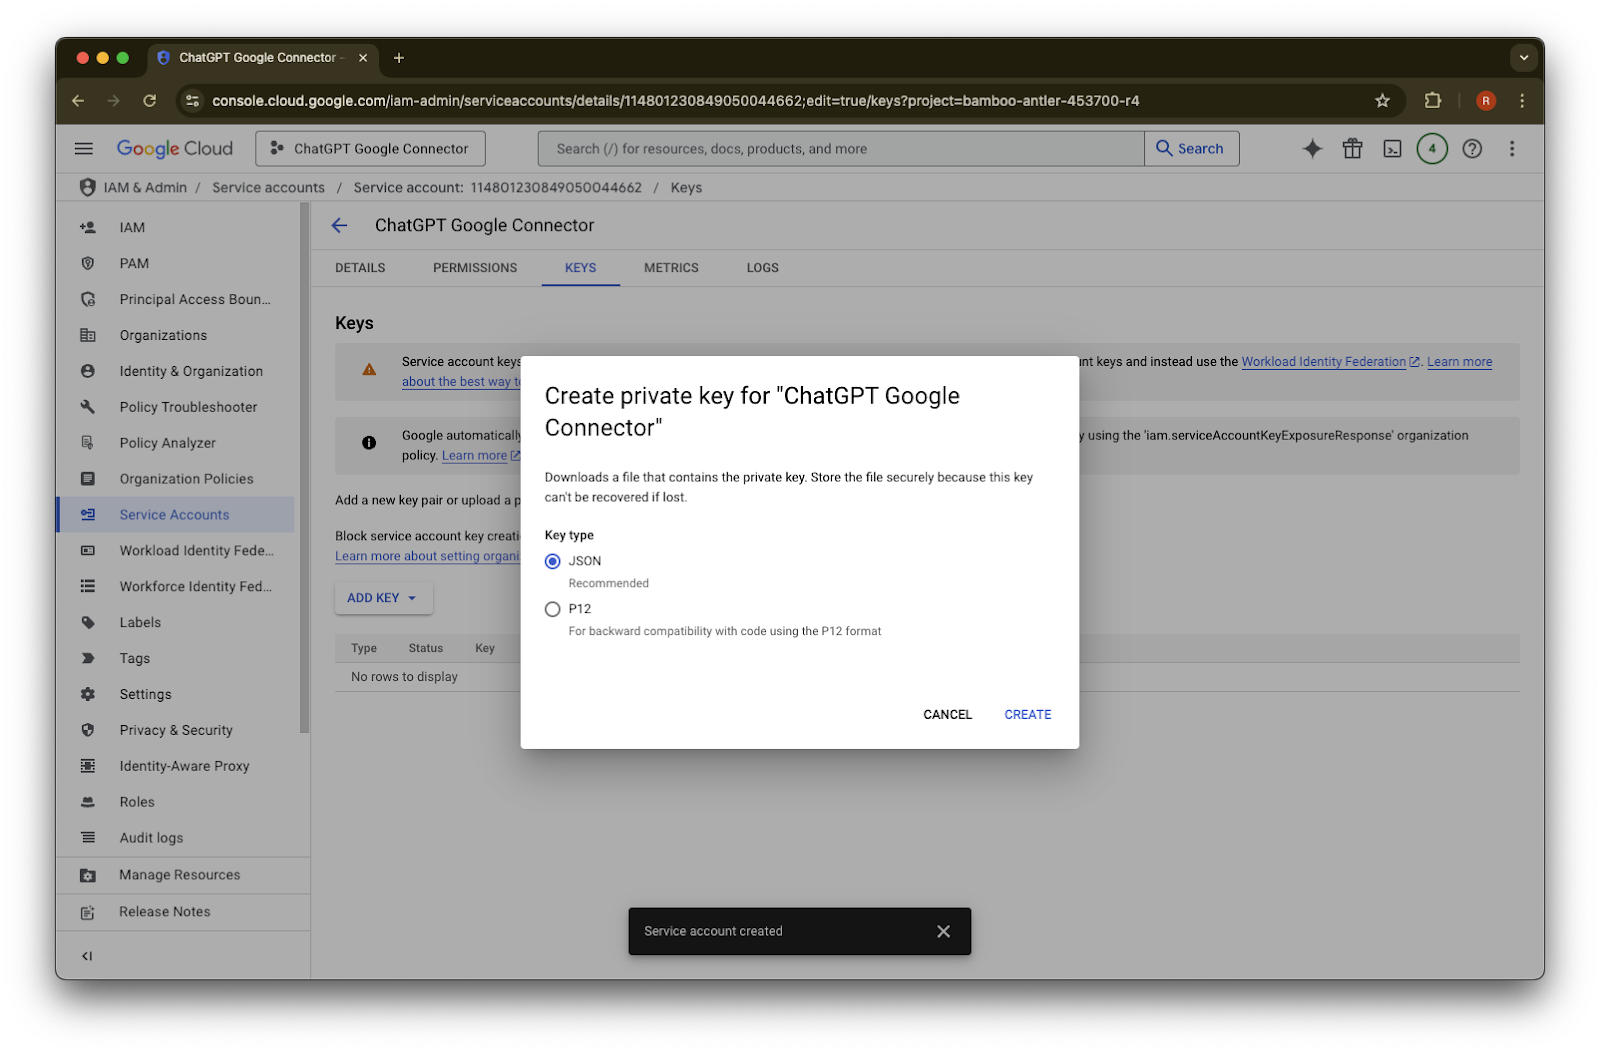
ယခု ဖန်တီးပြီးသော service account ကို နှိပ်ပါ။
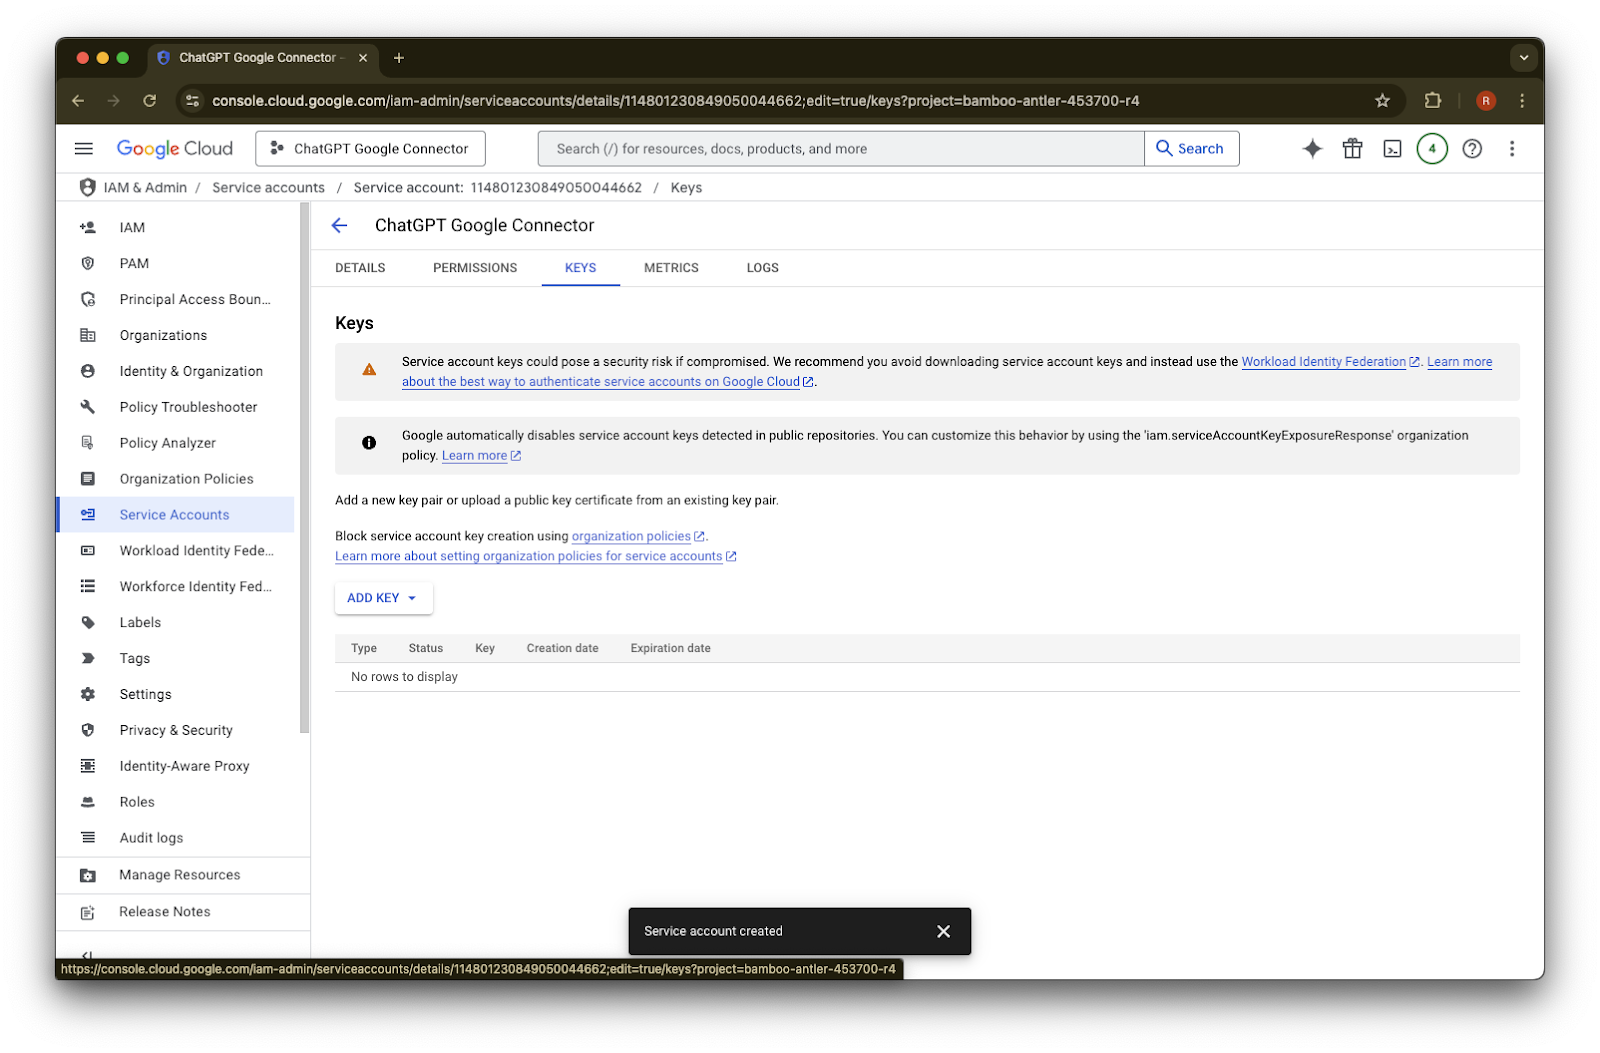
keys. ကို နှိပ်ပါ
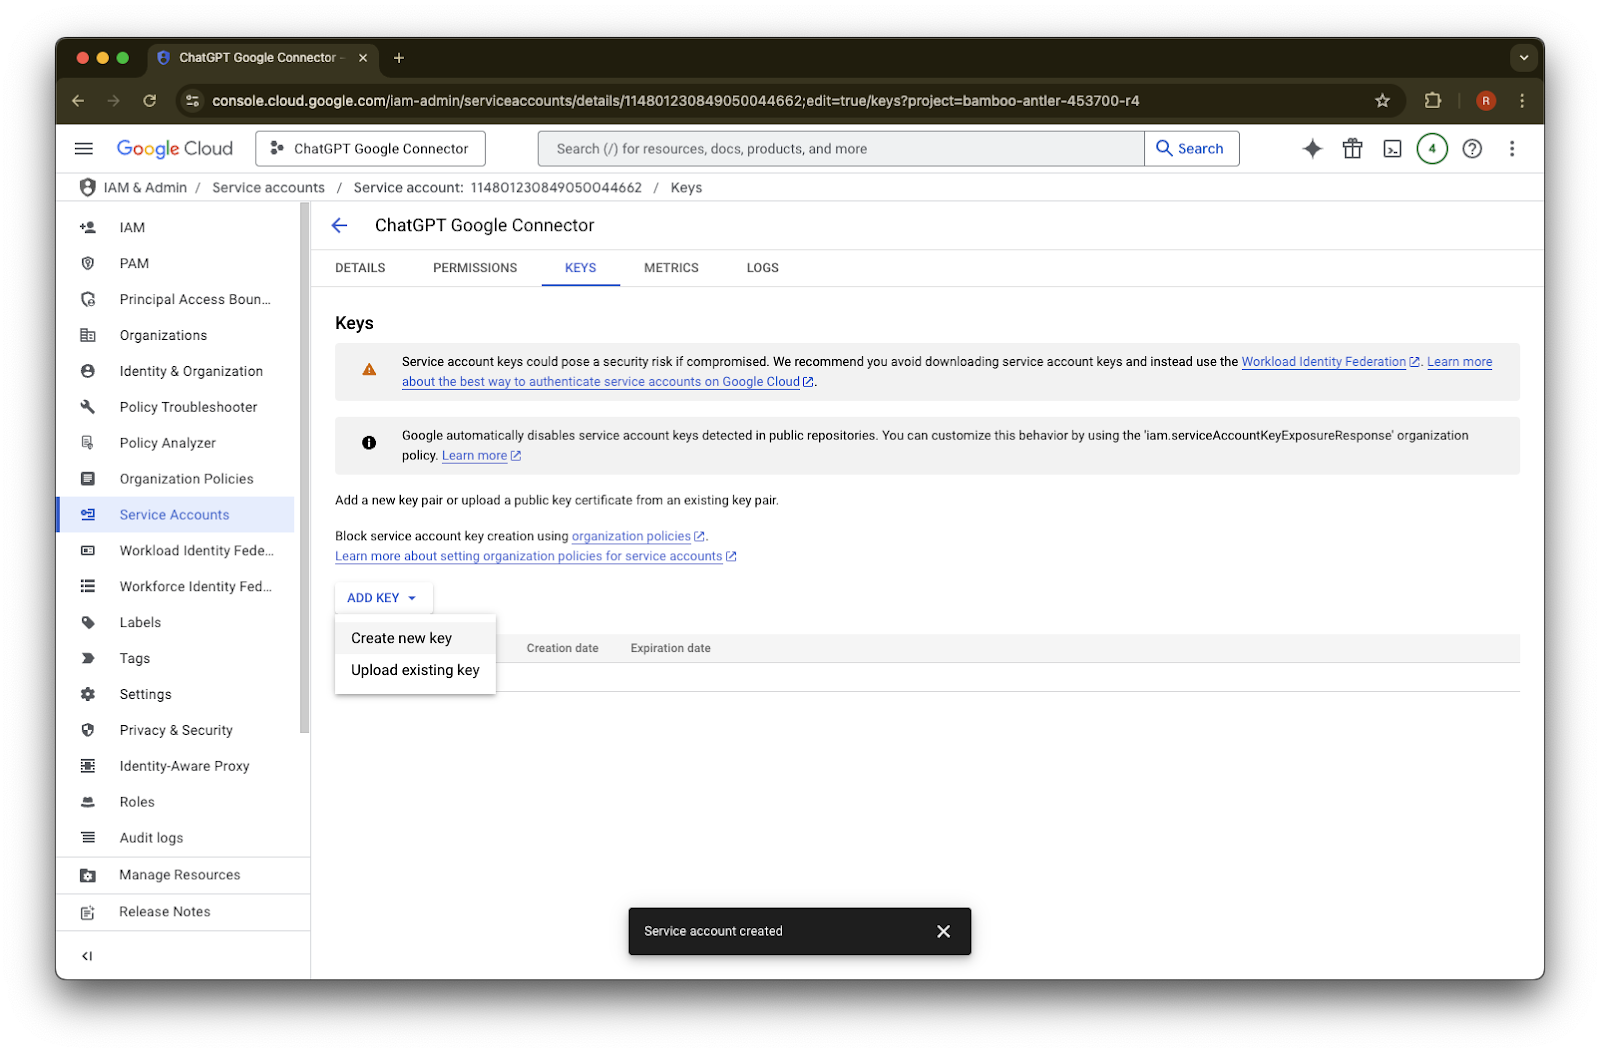
Add Key ကို နှိပ်ပါ
Create new key ကို နှိပ်ပါ
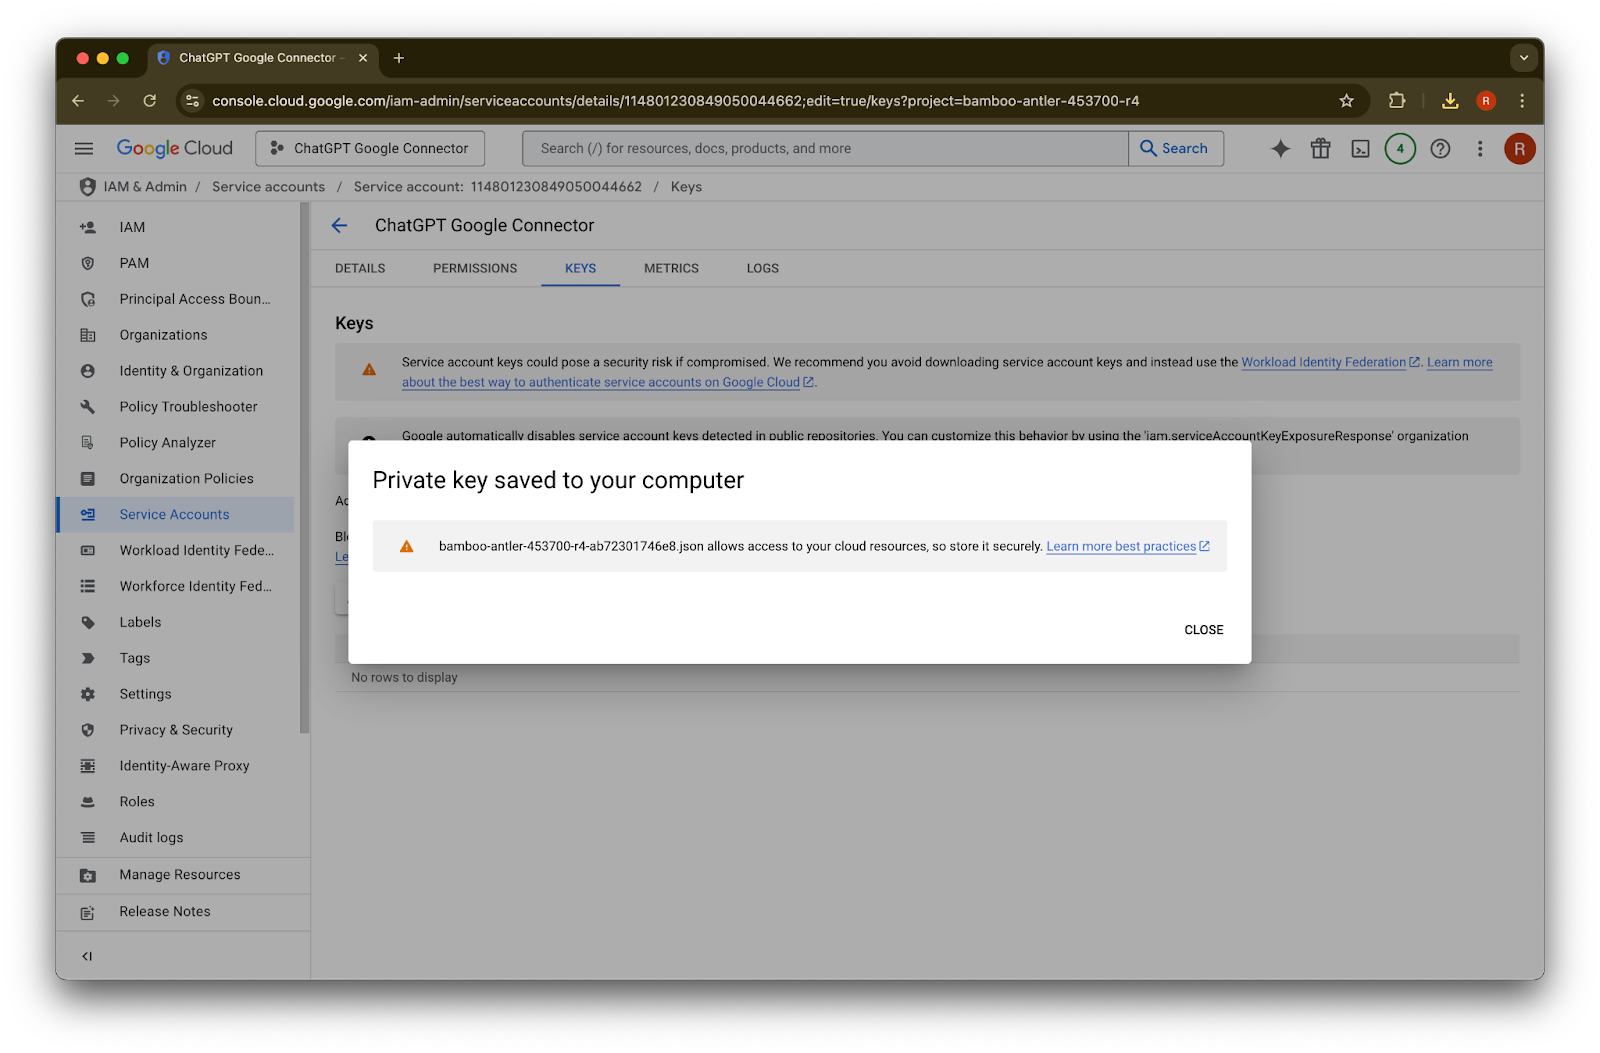
မူလ JSON key type ကို ထားပြီး Create ကို နှိပ်ပါ
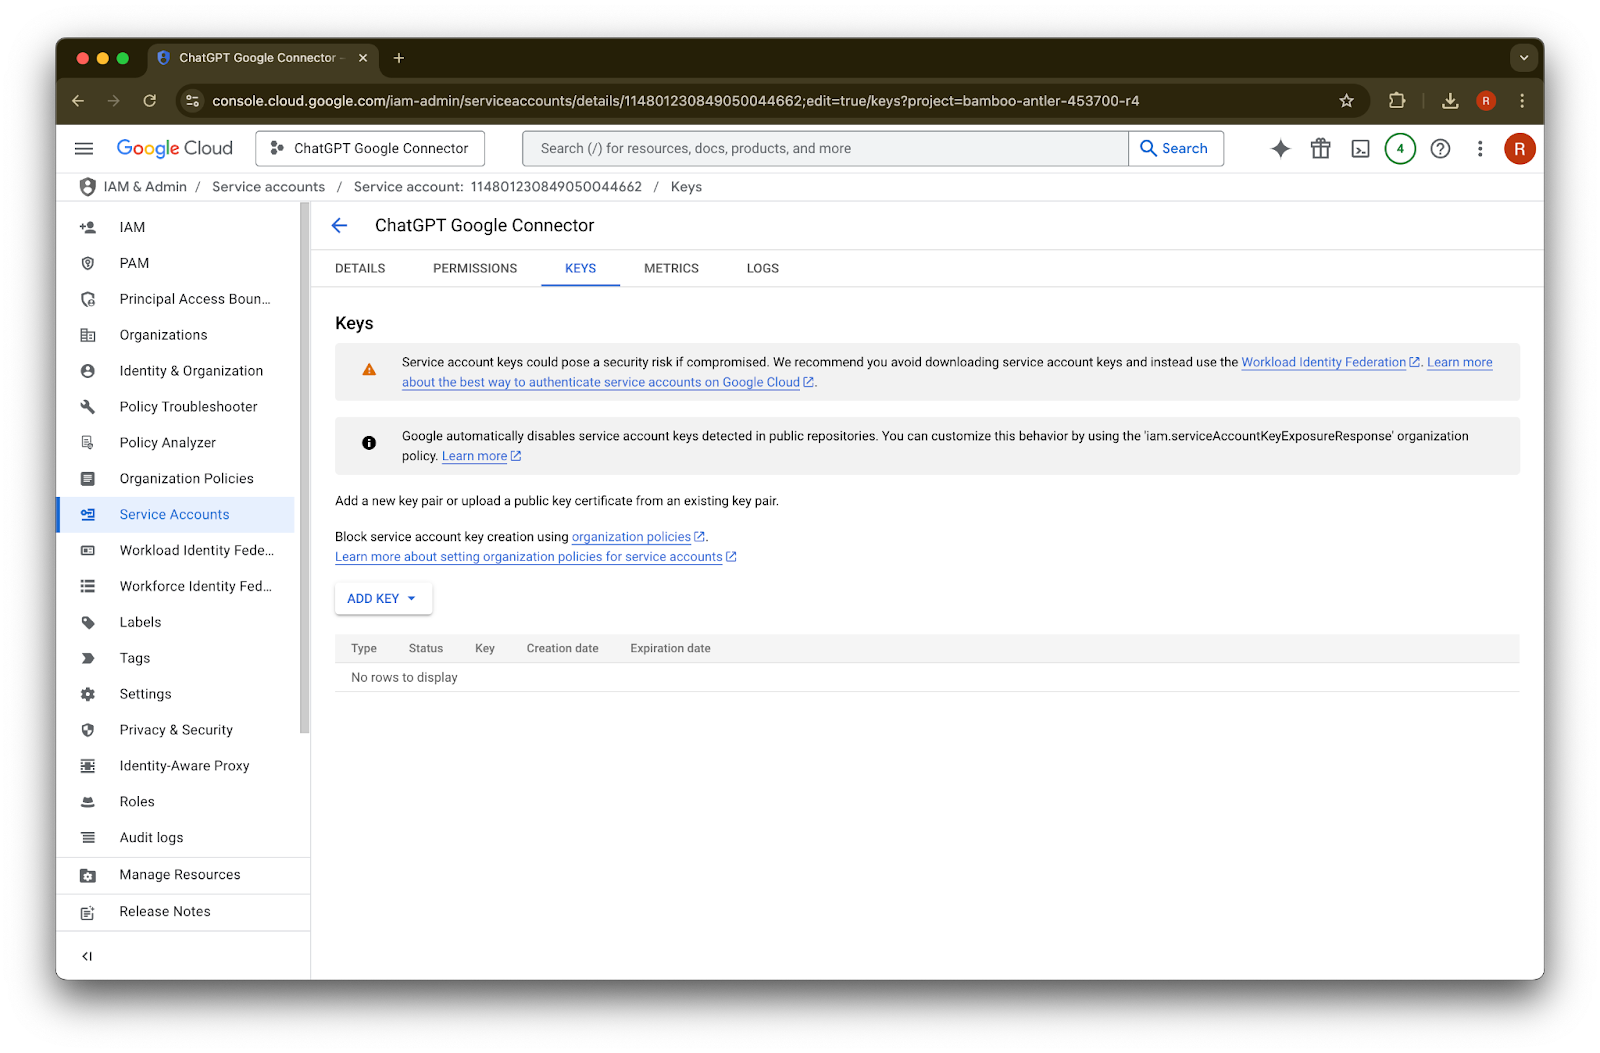
“Service account key creation is disabled” ဟူသော error message တက်လာပါက creation ကို ဖွင့်ရန် ဤအဆင့်များကို လိုက်နာပါ။Close ကို နှိပ်ပါ။ key ကို ယခု သင့်ကွန်ပျူတာသို့ ဒေါင်းလုဒ်လုပ်ပြီးပါပြီ။ နောက်ပိုင်းတွင် ၎င်းကို ChatGPT admin console သို့ အပ်လုဒ်လုပ်ရမည်ဖြစ်သည်။
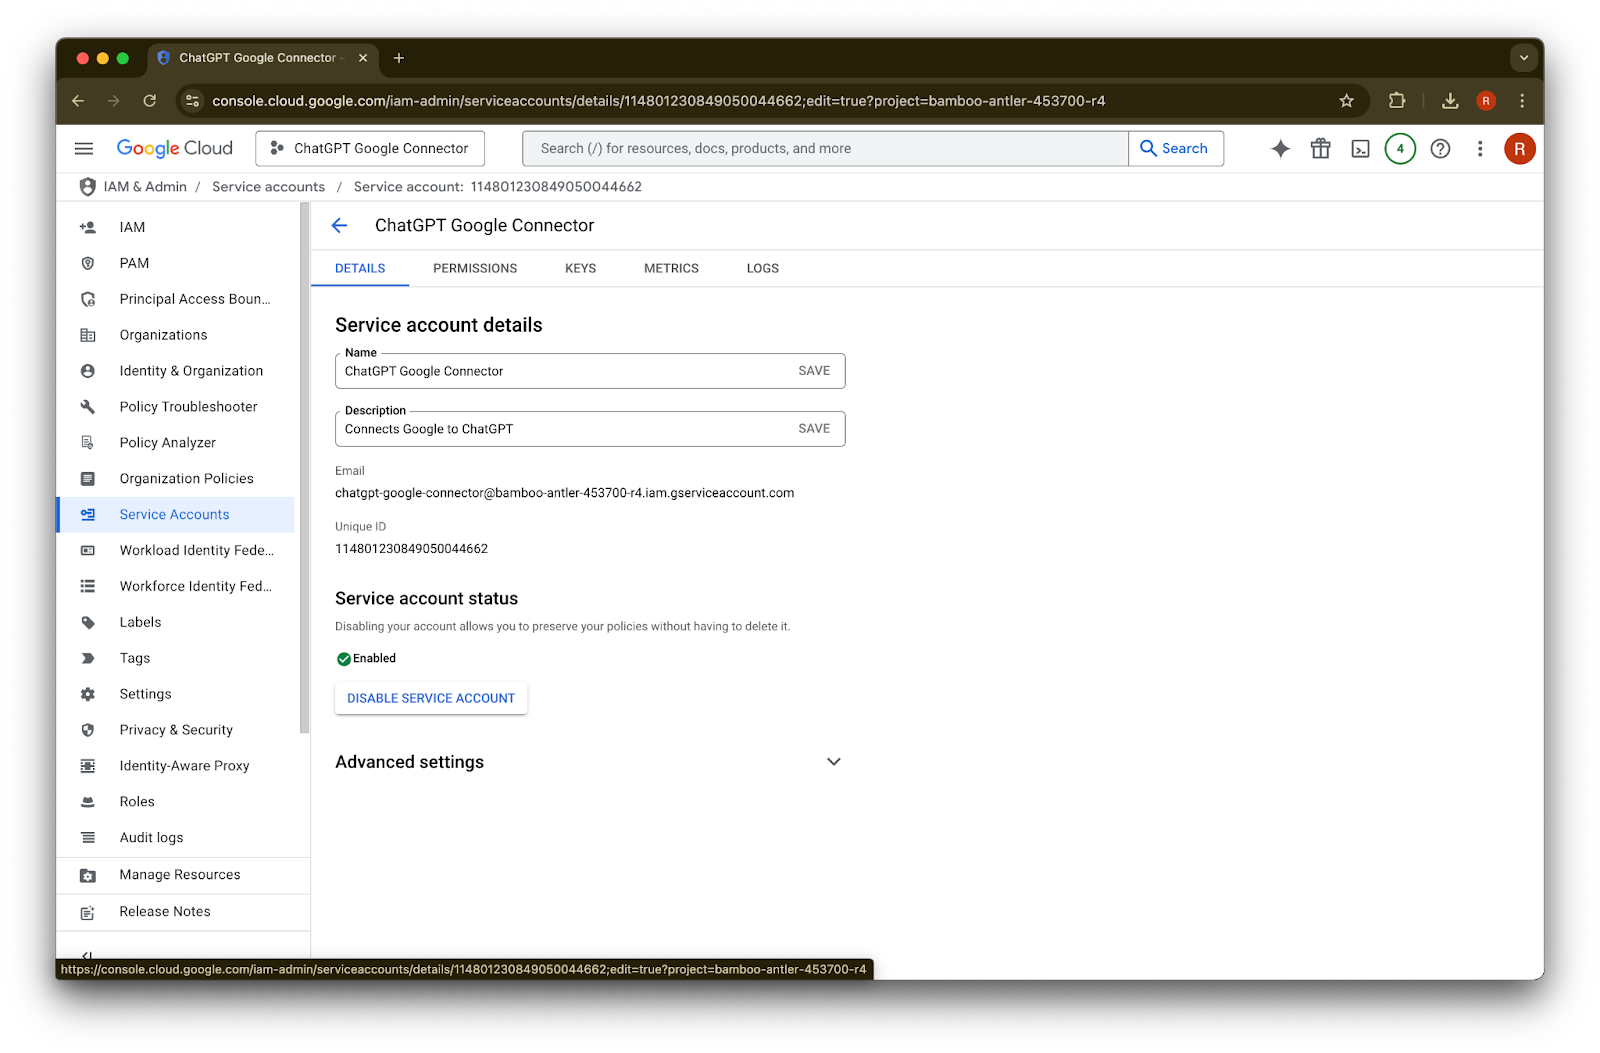
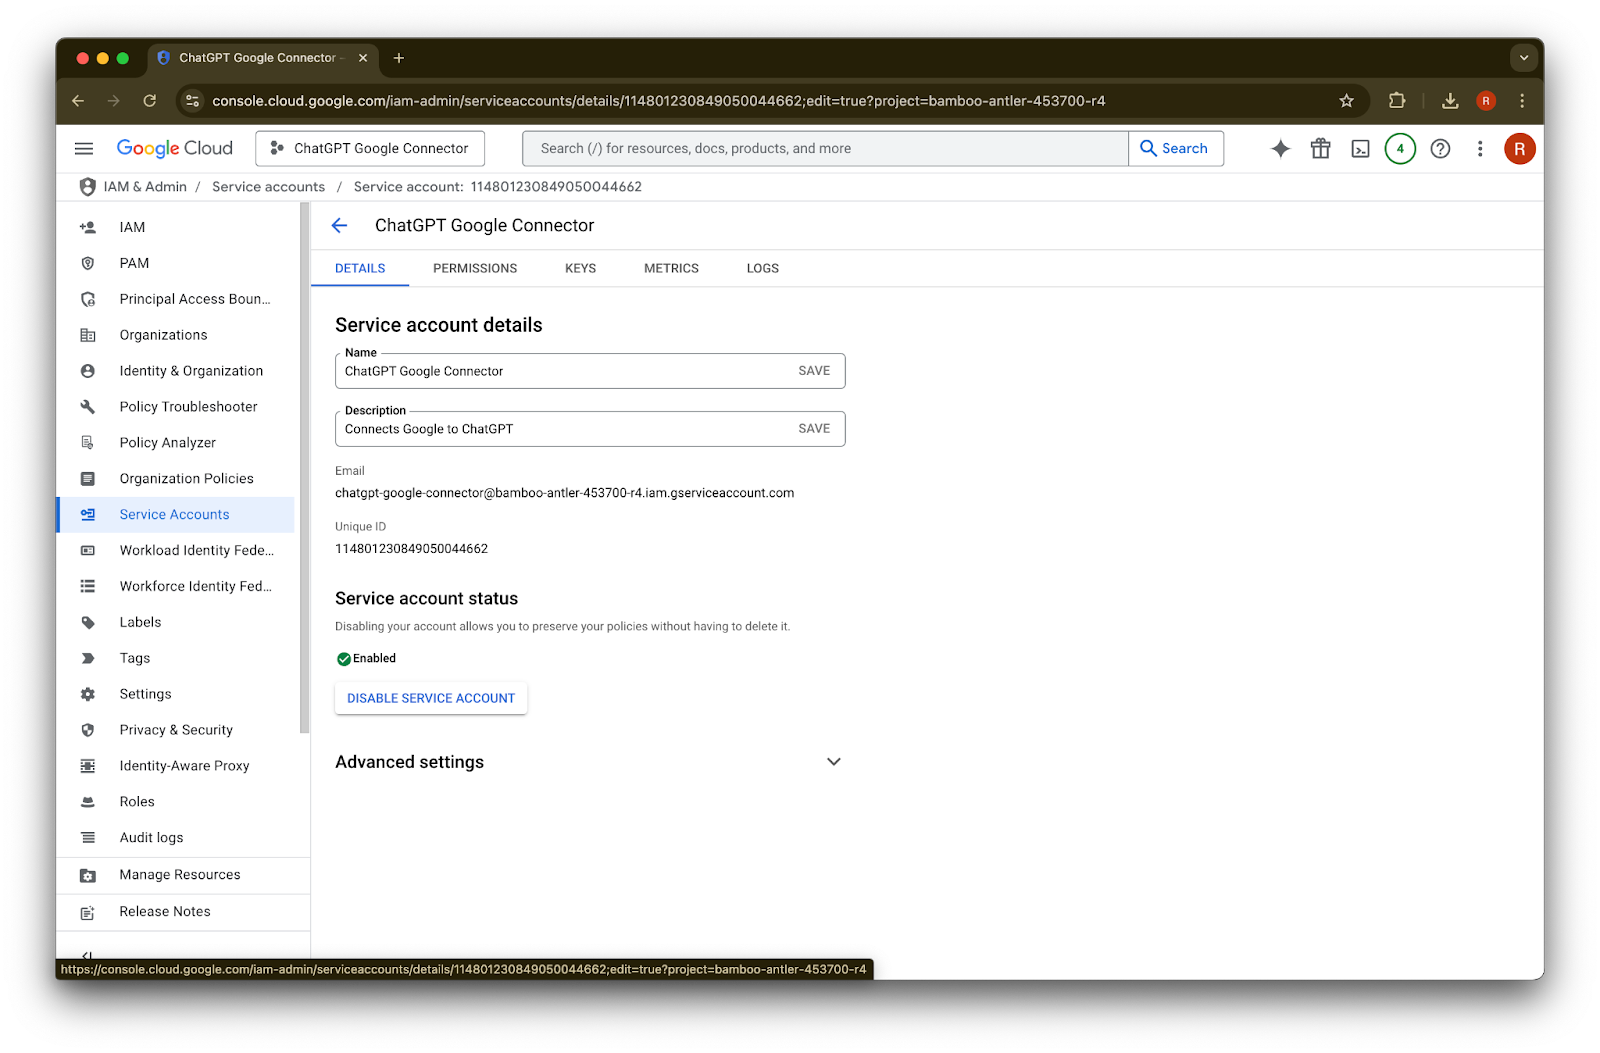
details ကို နှိပ်ပါ
Unique ID ကို မှတ်သားထားပါ။ ၎င်းကို Step 42 တွင် လိုအပ်ပါမည်။
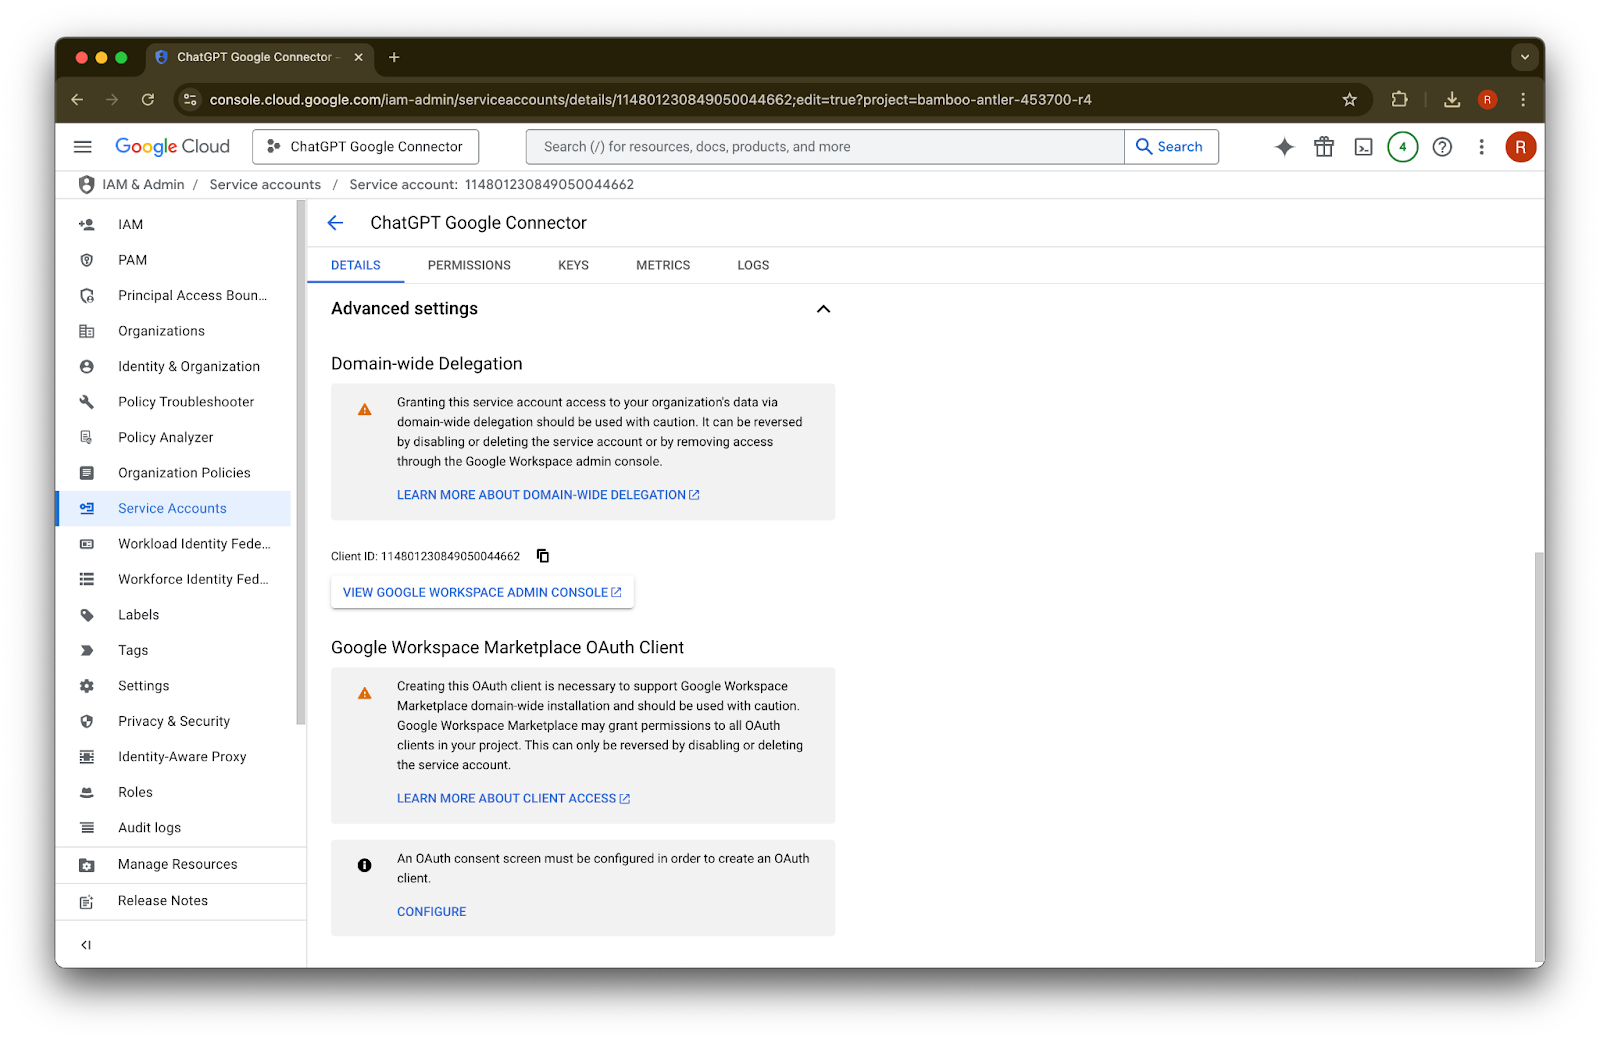
Advanced settings ကို ချဲ့ပါ
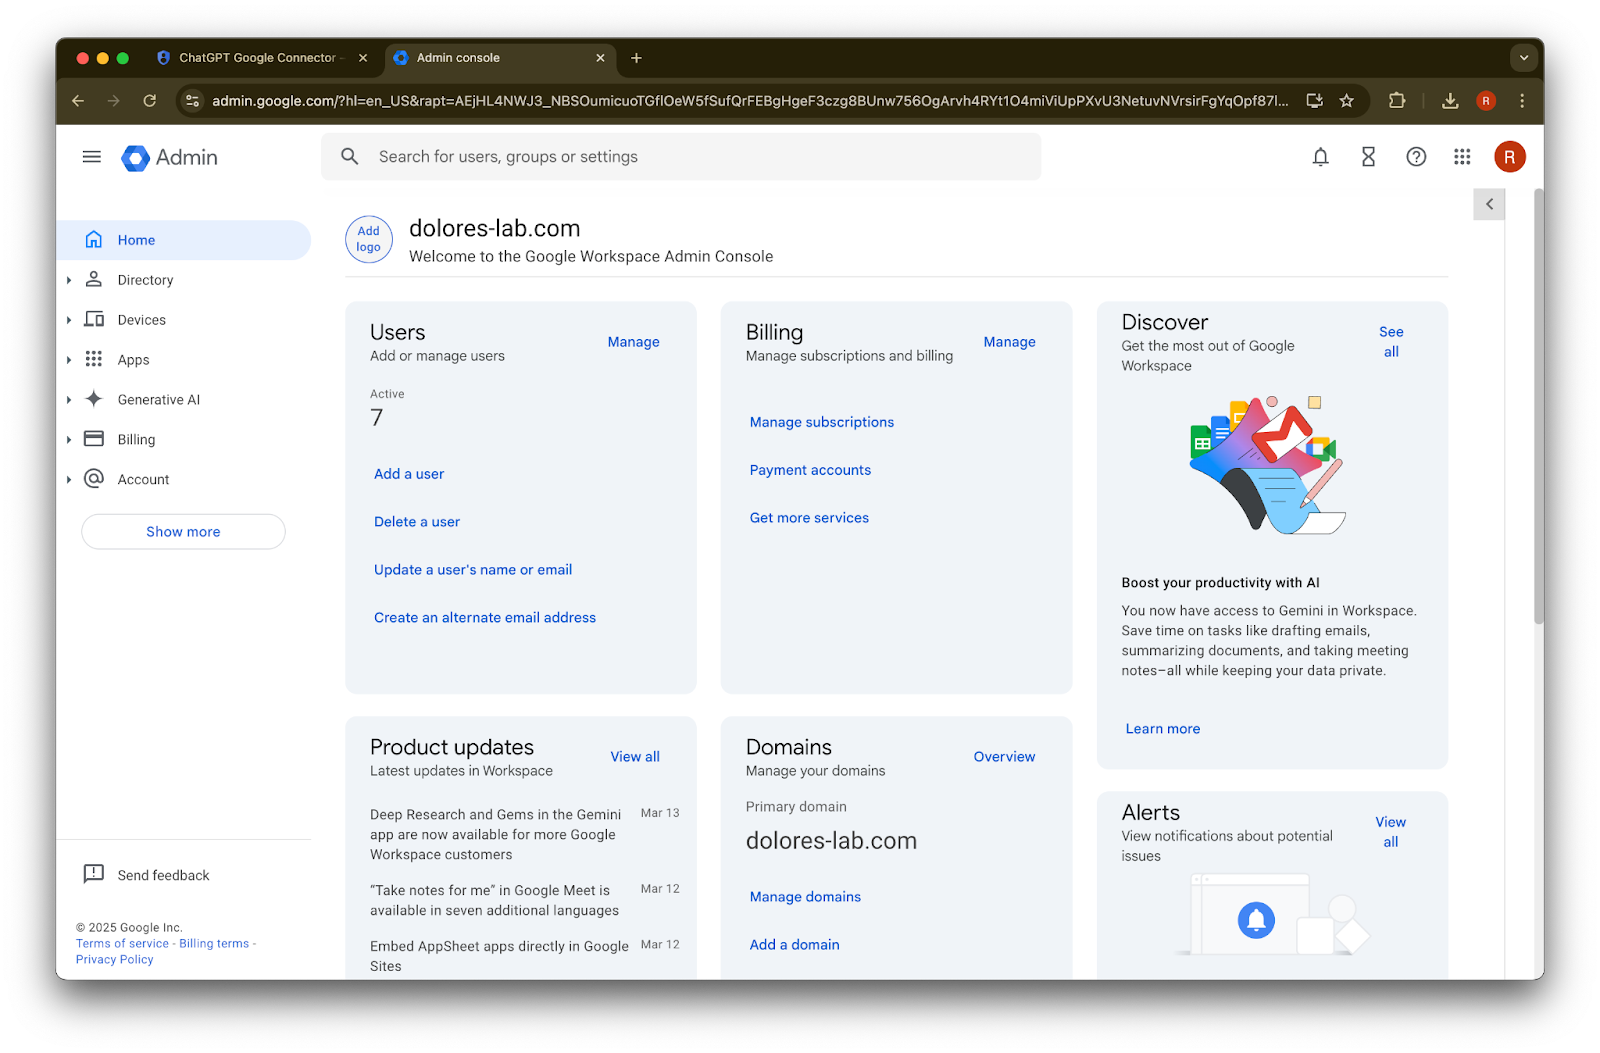
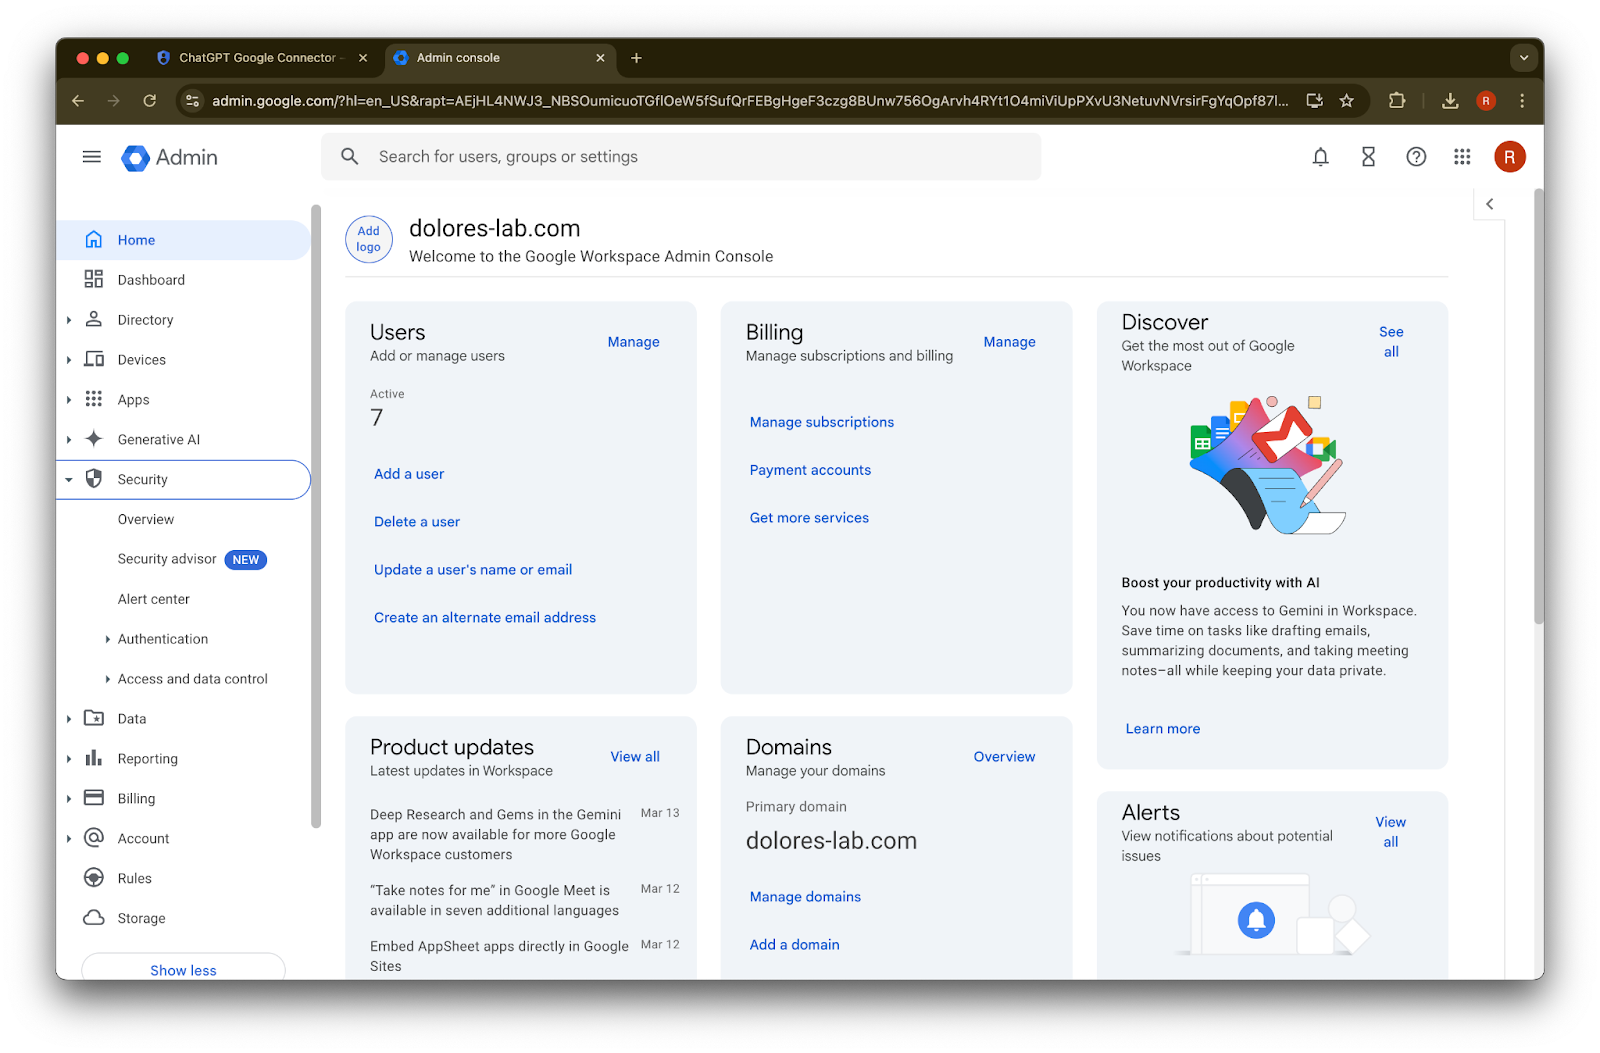
အောက်သို့ scroll ဆင်းပြီး View Google Workspace Admin Console ကို နှိပ်ပါ။ Google Workspace console သည် tab အသစ်တွင် ဖွင့်မည်ဖြစ်သည်။
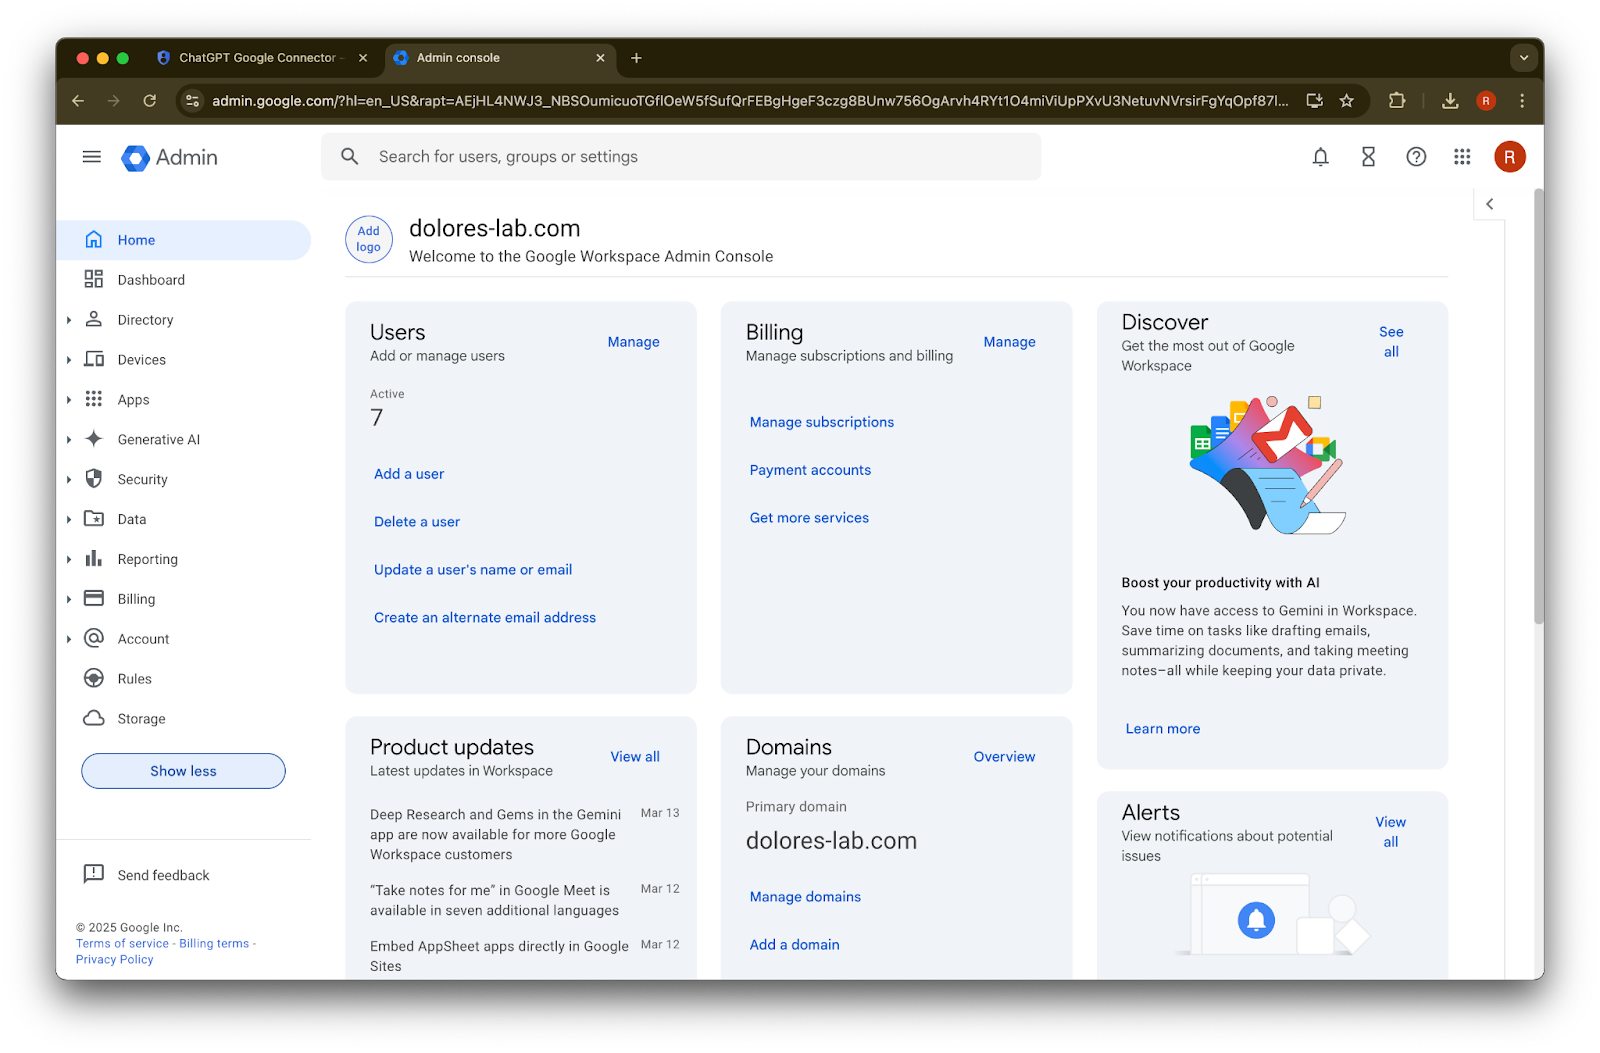
Show more ကို နှိပ်ပါ
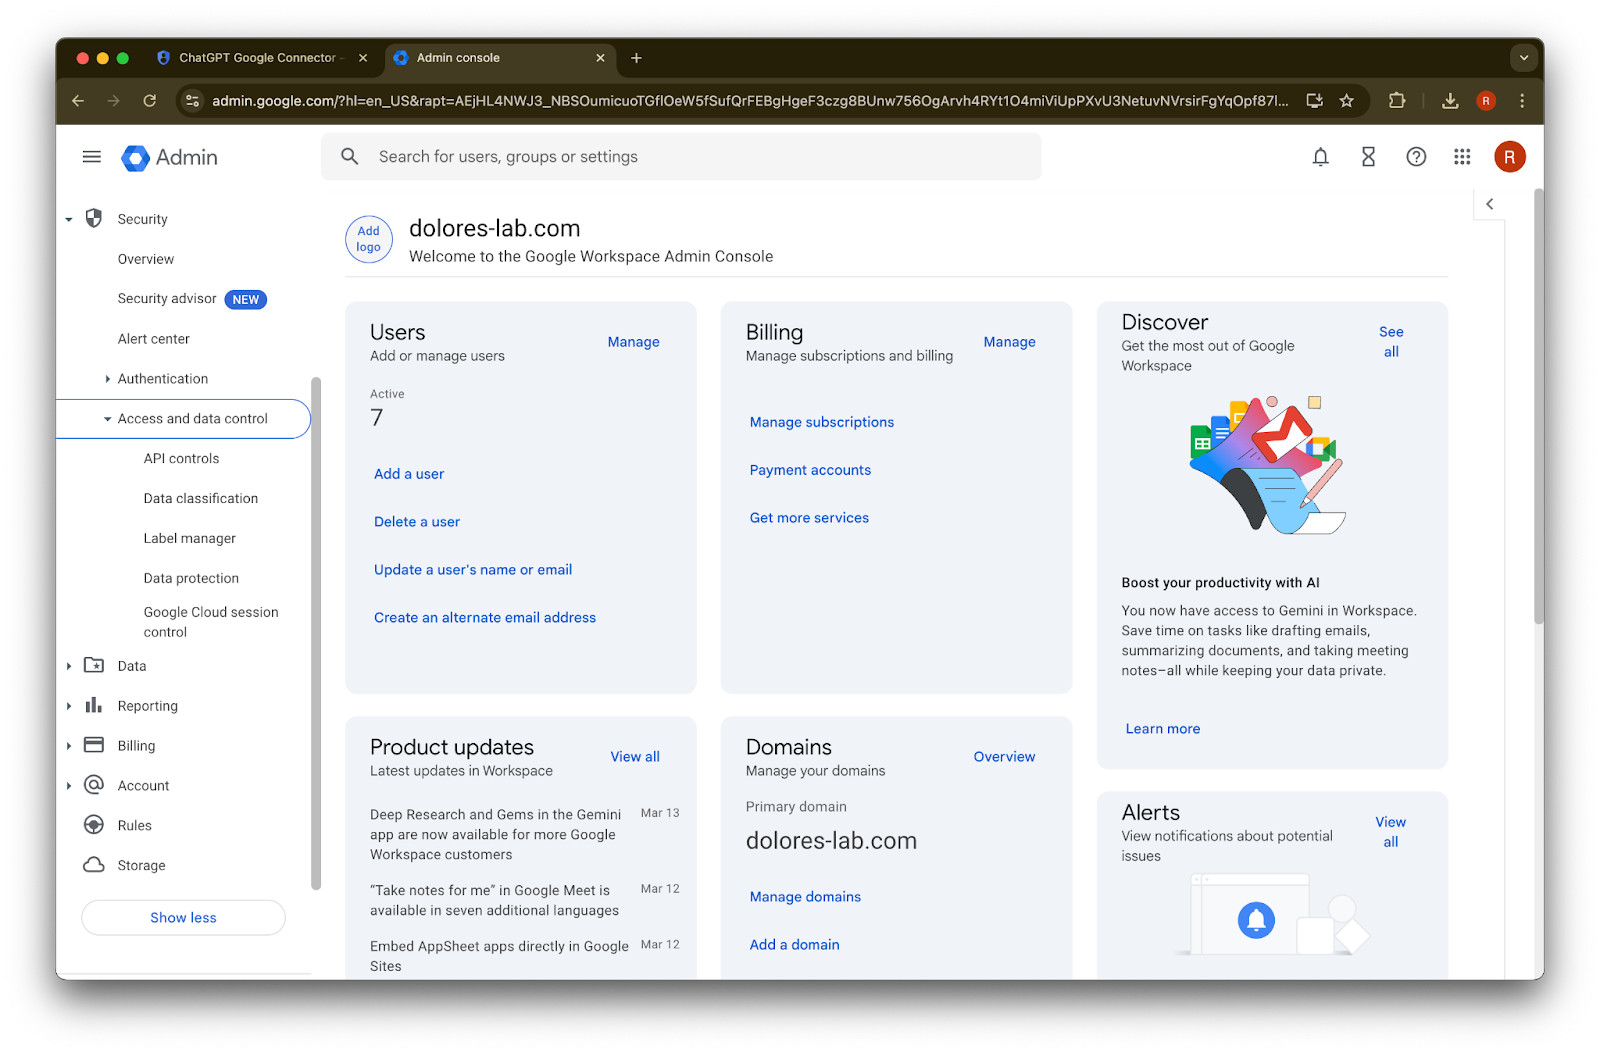
Security အပိုင်းကို ချဲ့ပါ
Access and data controls အပိုင်းကို ချဲ့ပါ
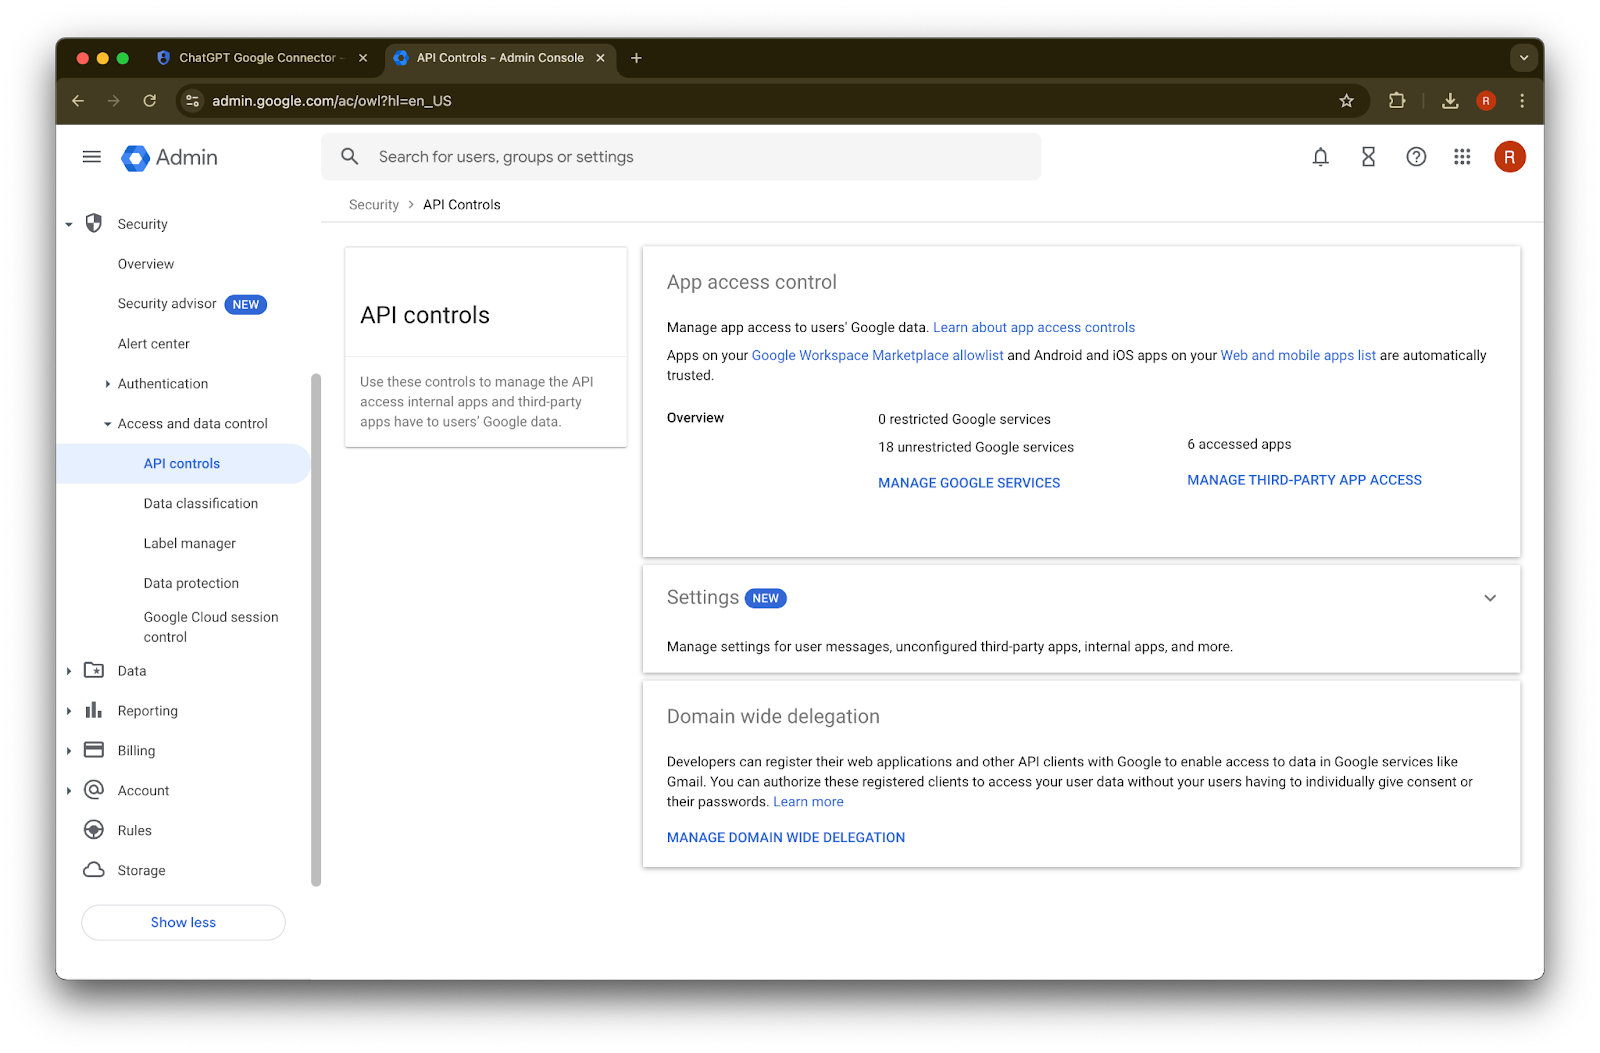
API controls အပိုင်းကို နှိပ်ပါ
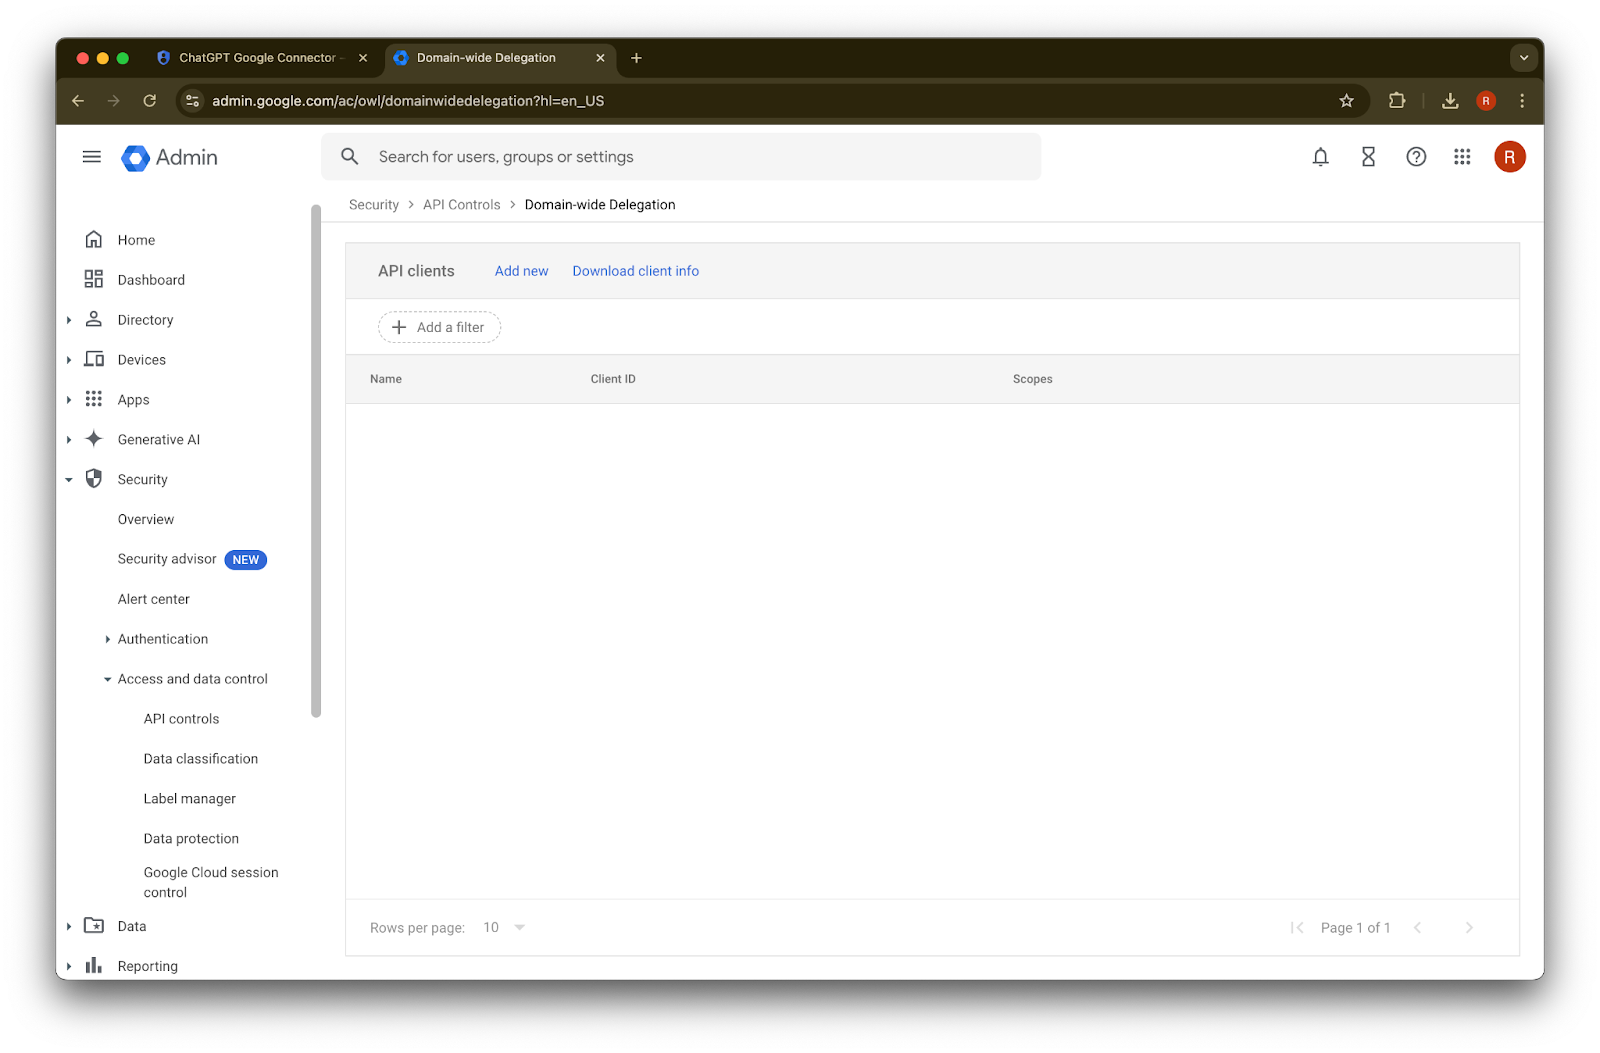
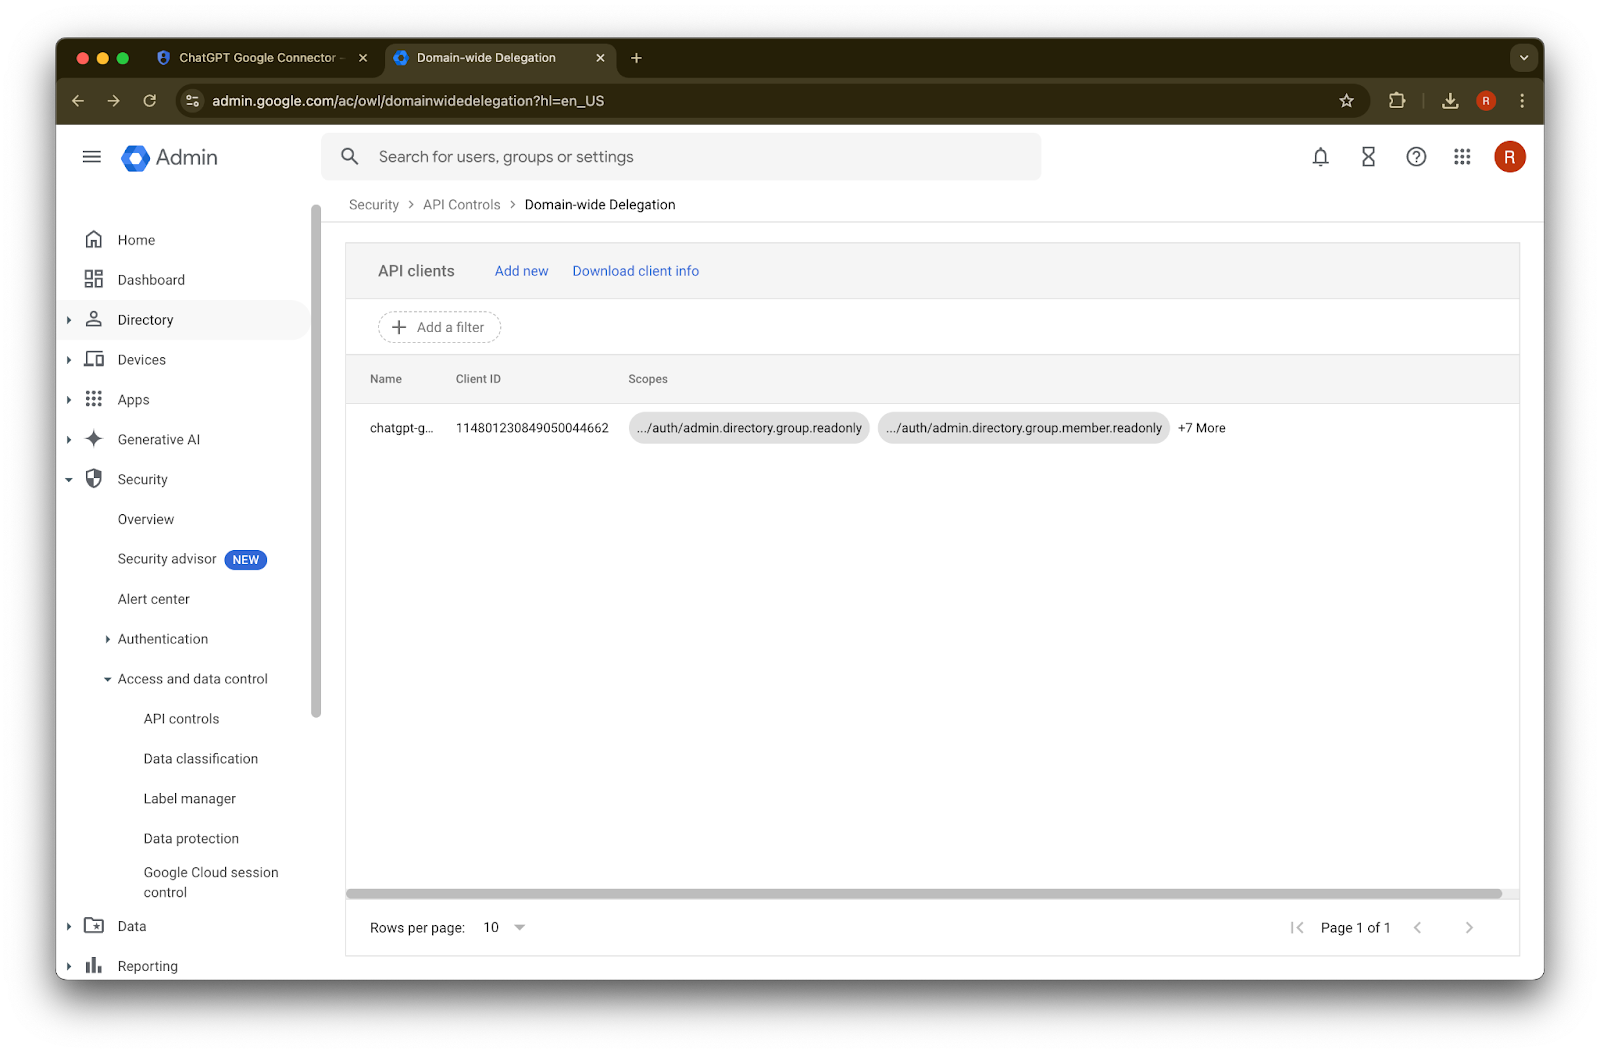
Manage Domain Wide Delegation ကို နှိပ်ပါ
Add new ကို နှိပ်ပါ
ယခင်က မှတ်သားထားသော Unique ID ကို ဤ Client ID အတွက် value အဖြစ် အသုံးပြုပါ
OAuth scopes အတွက် copy and paste လုပ်ရန် လိုအပ်သော comma de-limited auth scopes values များကို အောက်တွင် ကိုးကားပါ-
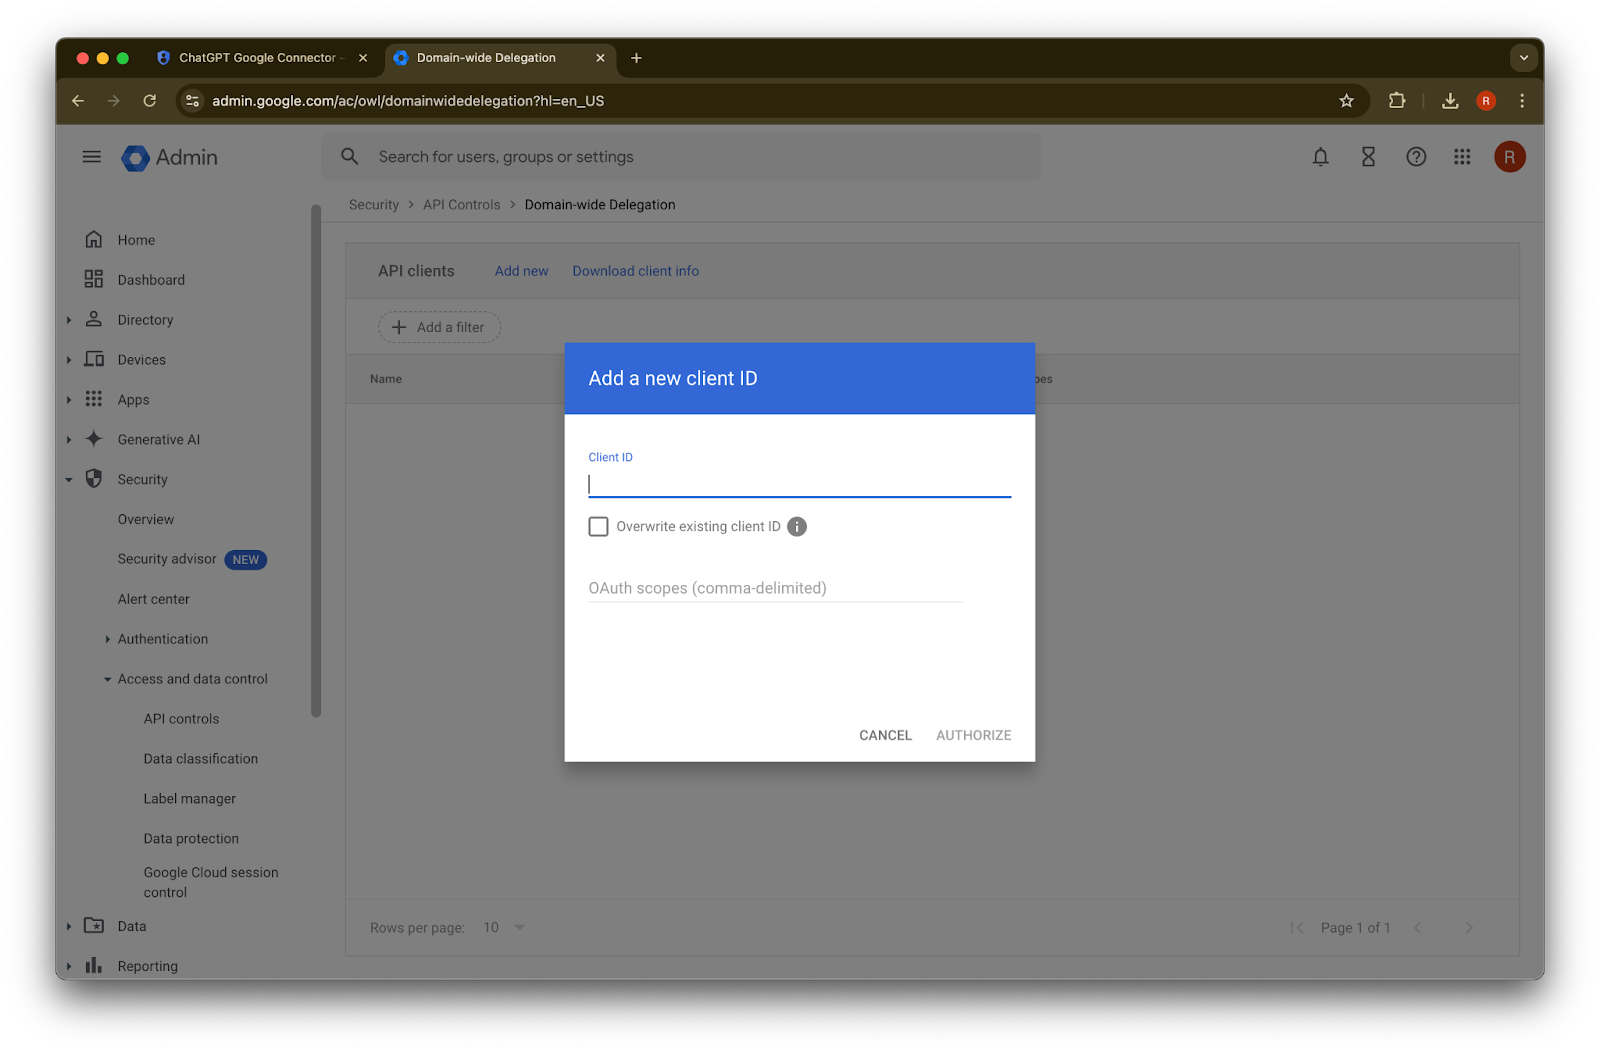
https://www.googleapis.com/auth/admin.directory.group.readonly, https://www.googleapis.com/auth/admin.directory.group.member.readonly, https://www.googleapis.com/auth/admin.directory.user.readonly, https://www.googleapis.com/auth/admin.directory.user.alias.readonly, https://www.googleapis.com/auth/drive.activity.readonly, https://www.googleapis.com/auth/drive.metadata.readonly, https://www.googleapis.com/auth/drive.readonly, https://www.googleapis.com/auth/userinfo.profile, https://www.googleapis.com/auth/userinfo.email| Scope | ကျိုးကြောင်းသင့်လျော်စွာ စဉ််းစားပေးသော |
| admin.directory.group.readonly | group-based permissions များကို enforce လုပ်ရန် |
| admin.directory.group.member.readonly | group-based permissions များကို enforce လုပ်ရန် |
| admin.directory.user.alias.readonly | အသုံးပြုသူအား alias မှတစ်ဆင့် permission ပေးထားသော အခြေအနေများကို ကိုင်တွယ်ရန် |
| drive.activity.readonly | ဖိုင်များတွင် ပြောင်းလဲမှုများ ဖြစ်ပေါ်သောအခါ အသိပေးခံရရန် |
| drive.metadata.readonly | ဖိုင်အကြောင်းအရာနှင့် ဆက်စပ် metadata (ဥပမာ last modified date) ကို sync လုပ်ရန် |
| drive.readonly | ဖိုင်အကြောင်းအရာနှင့် ဆက်စပ် metadata (ဥပမာ last modified date) ကို sync လုပ်ရန် |
| userinfo.profile | ကျွန်ုပ်တို့ ဖိုင်များကို sync လုပ်နေသော အသုံးပြုသူများကို သတ်မှတ်ရန် |
| userinfo.email | ကျွန်ုပ်တို့ ဖိုင်များကို sync လုပ်နေသော အသုံးပြုသူများကို သတ်မှတ်ရန် |
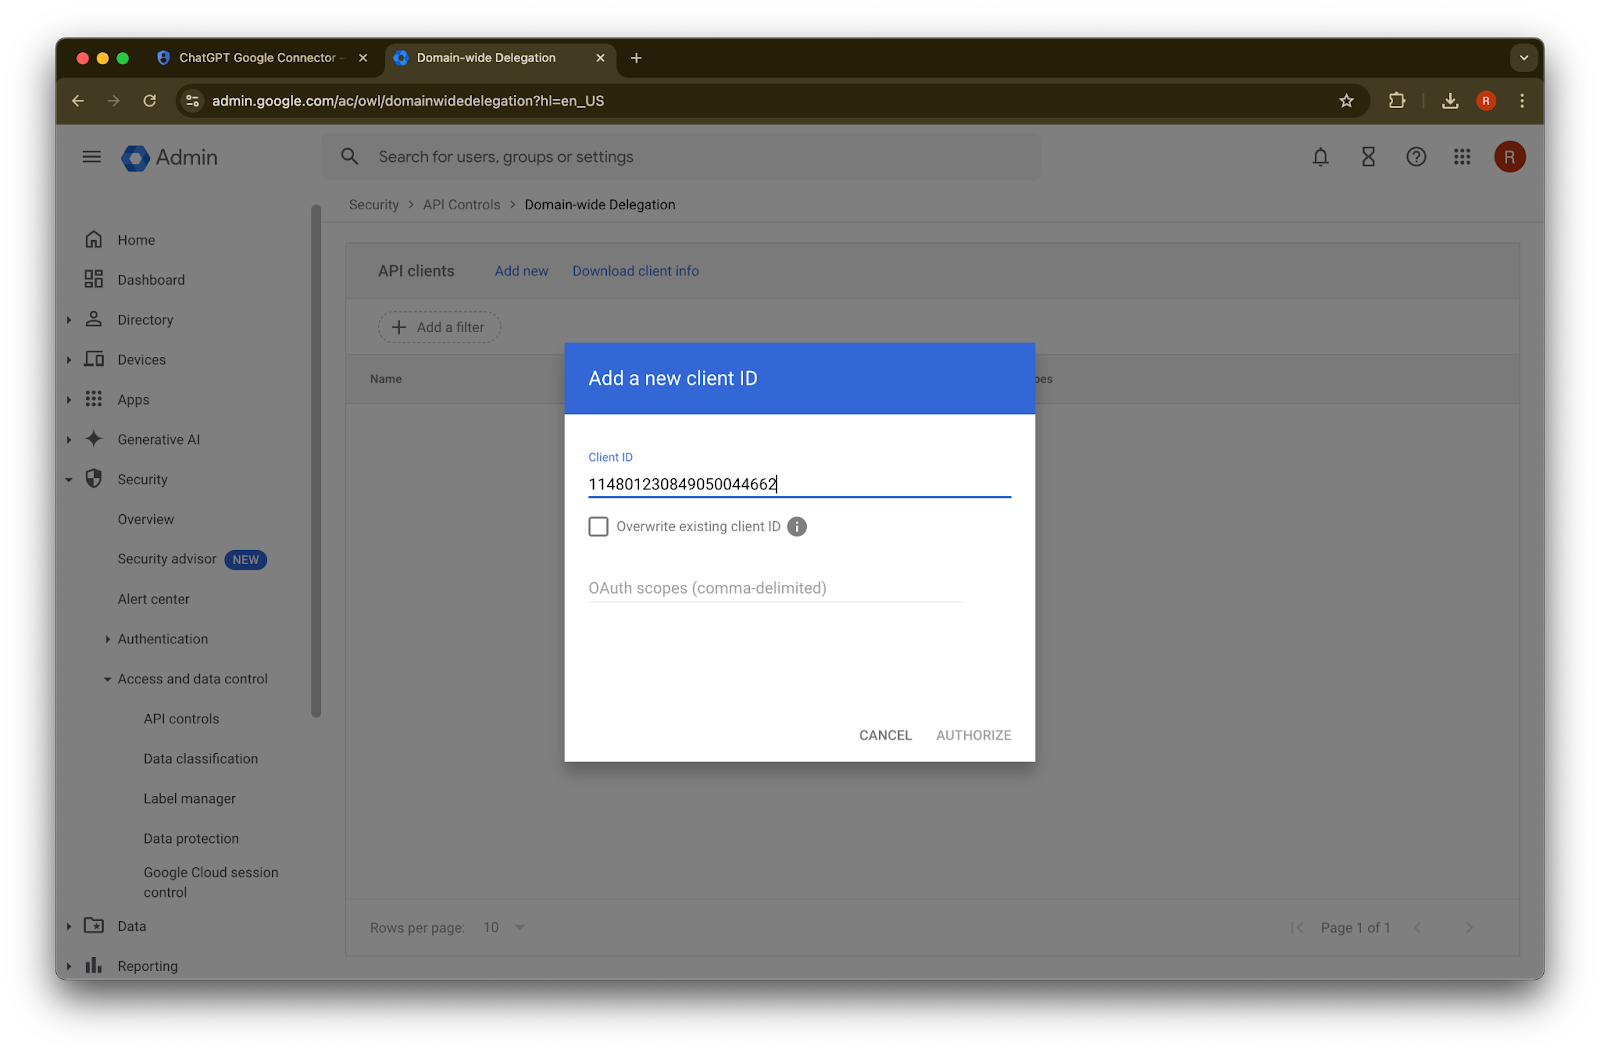
45. Authorize ကို နှိပ်ပါ
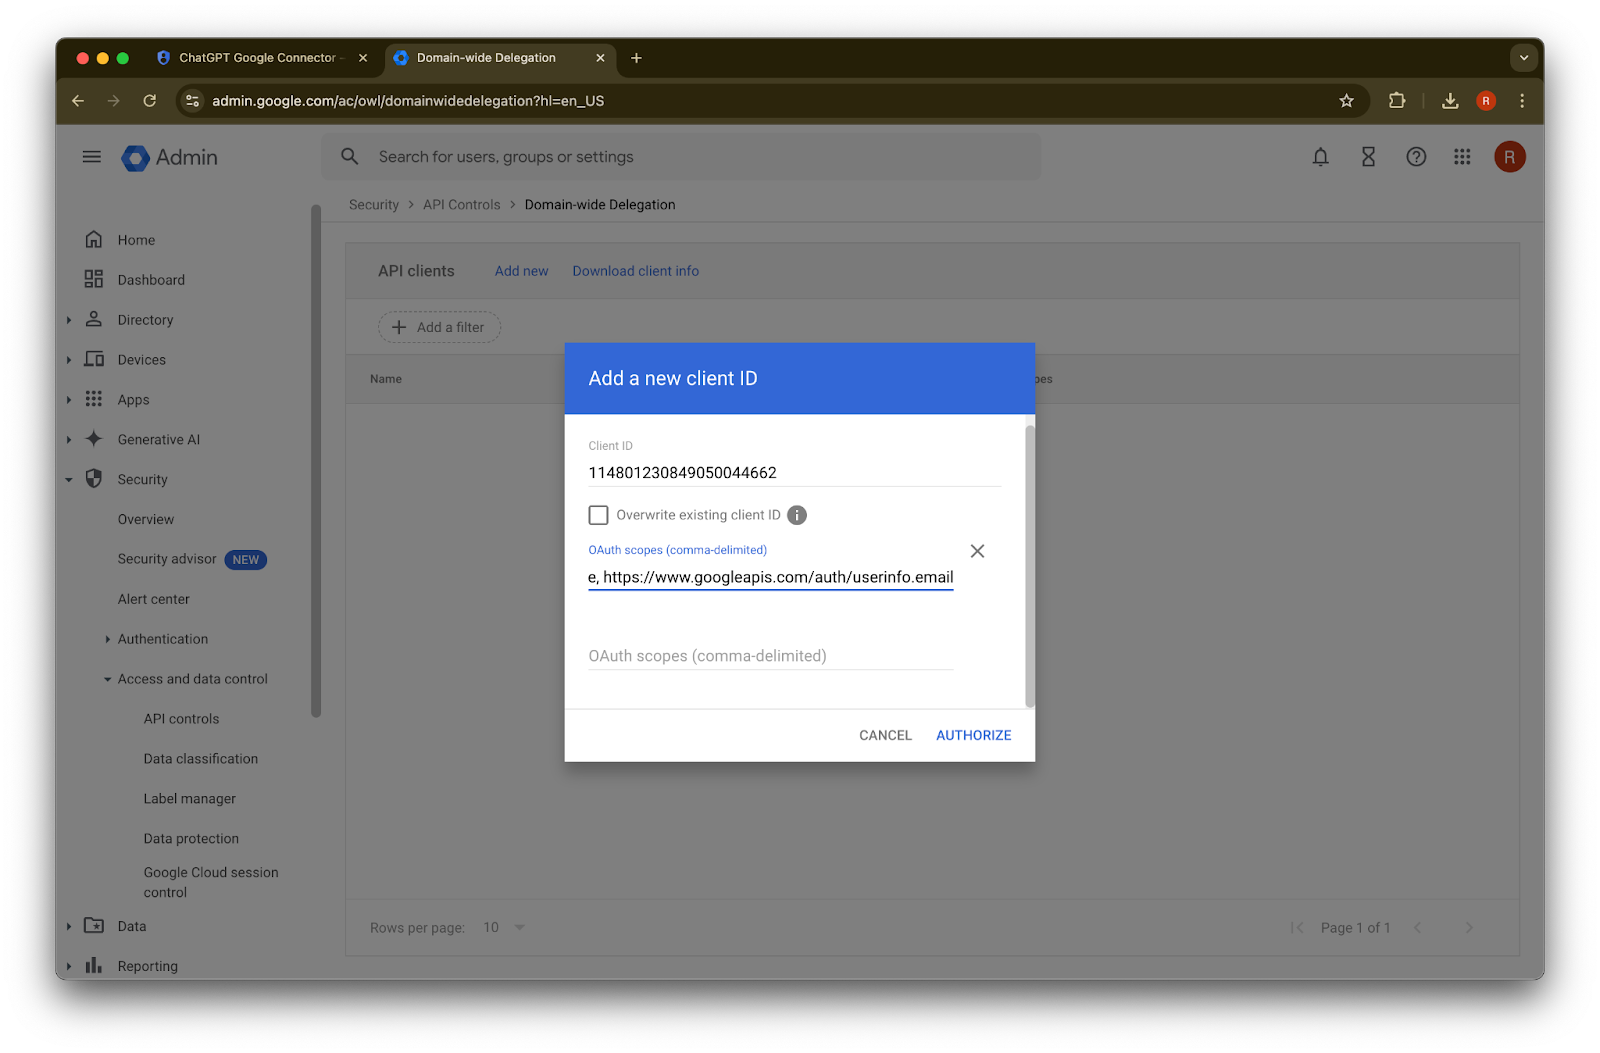
46. အောင်မြင်ပါသည်!
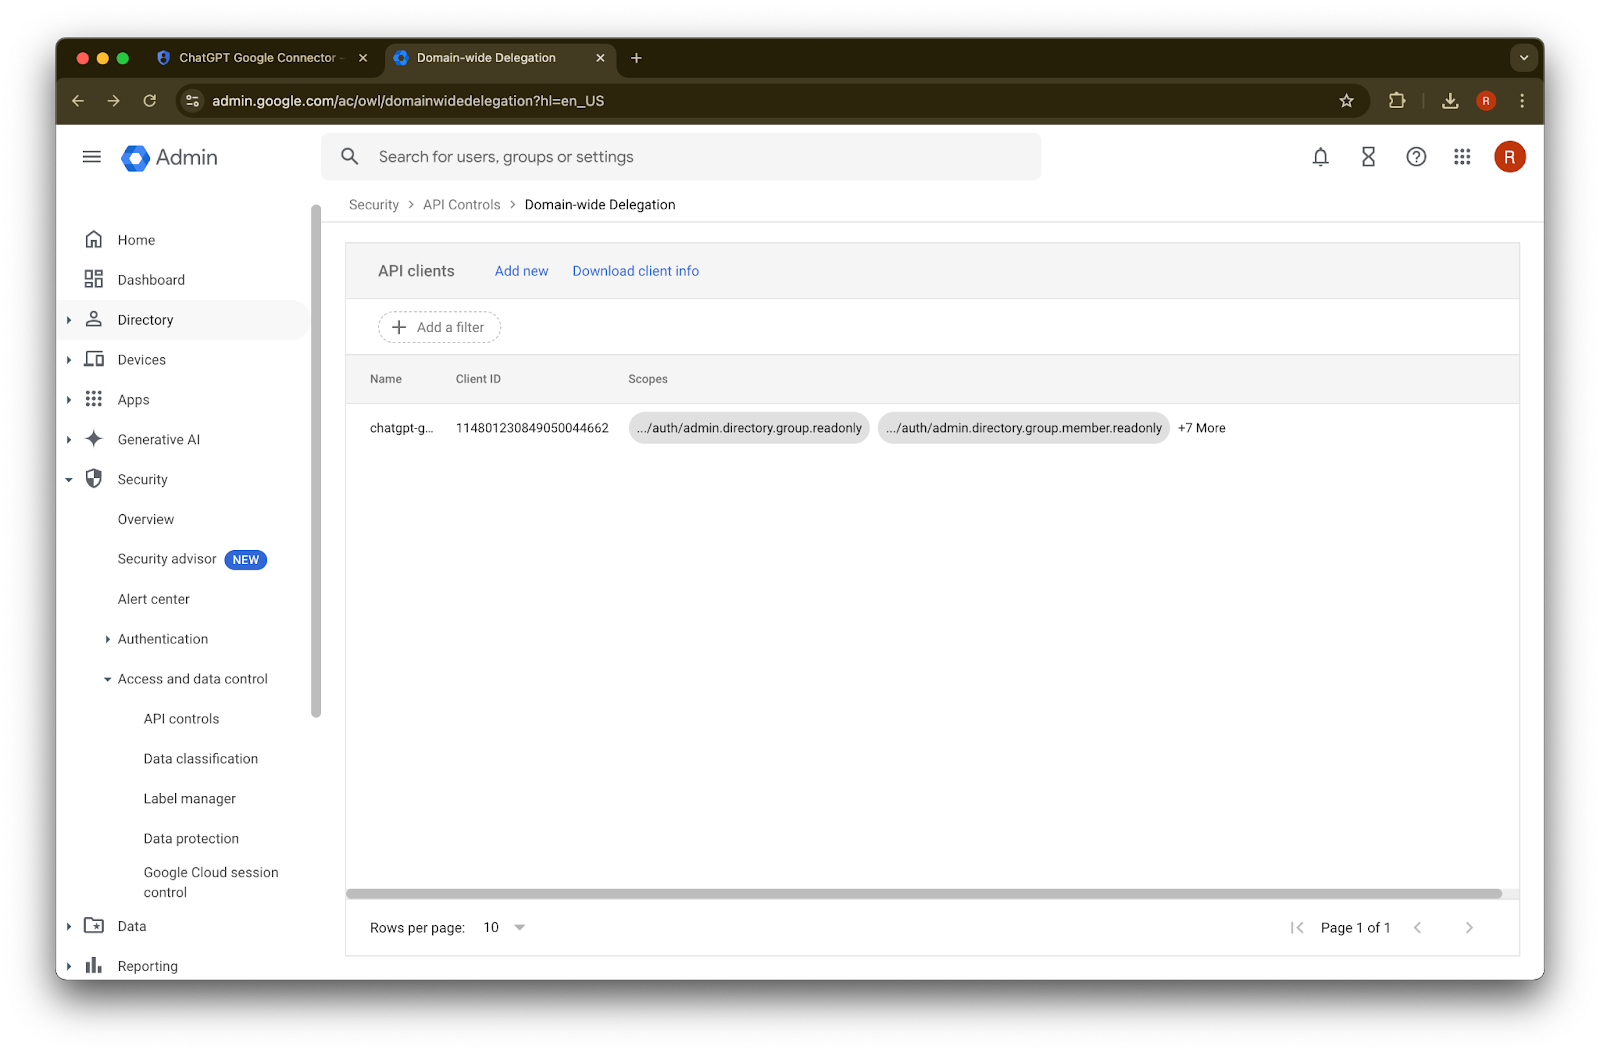
Admin Account ကို စနစ်တပ်ဆင်ခြင်း
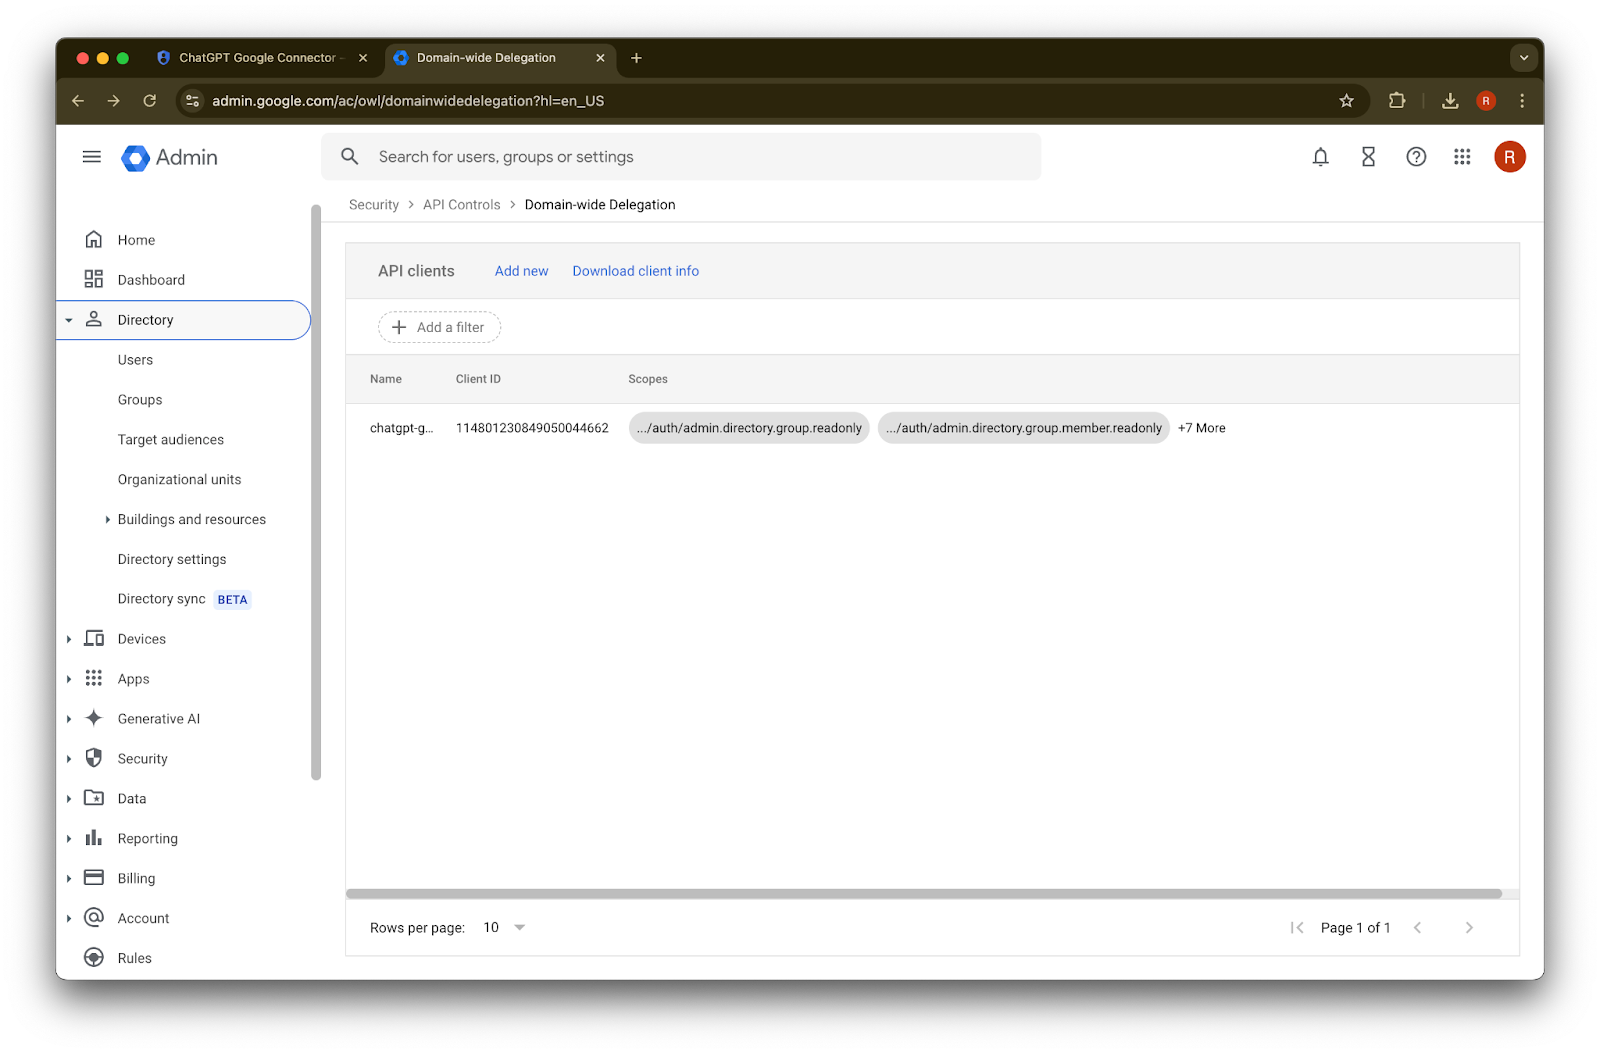
Directory ကို ချဲ့ပါ
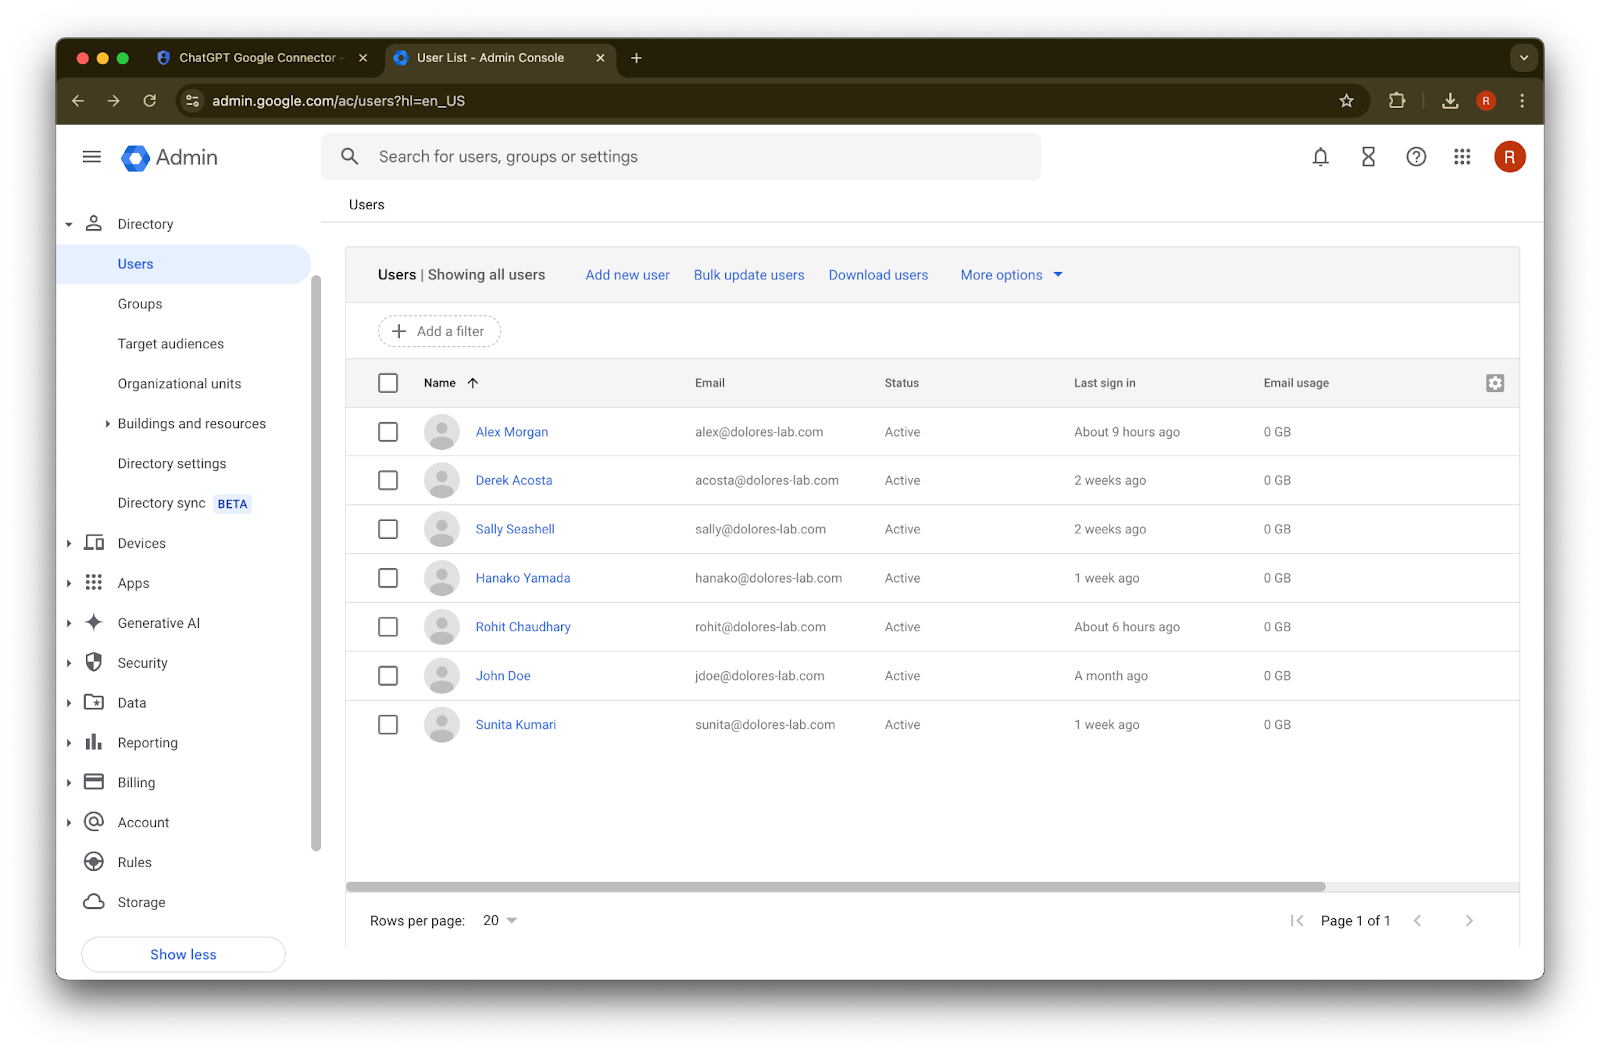
Users ကို နှိပ်ပါ
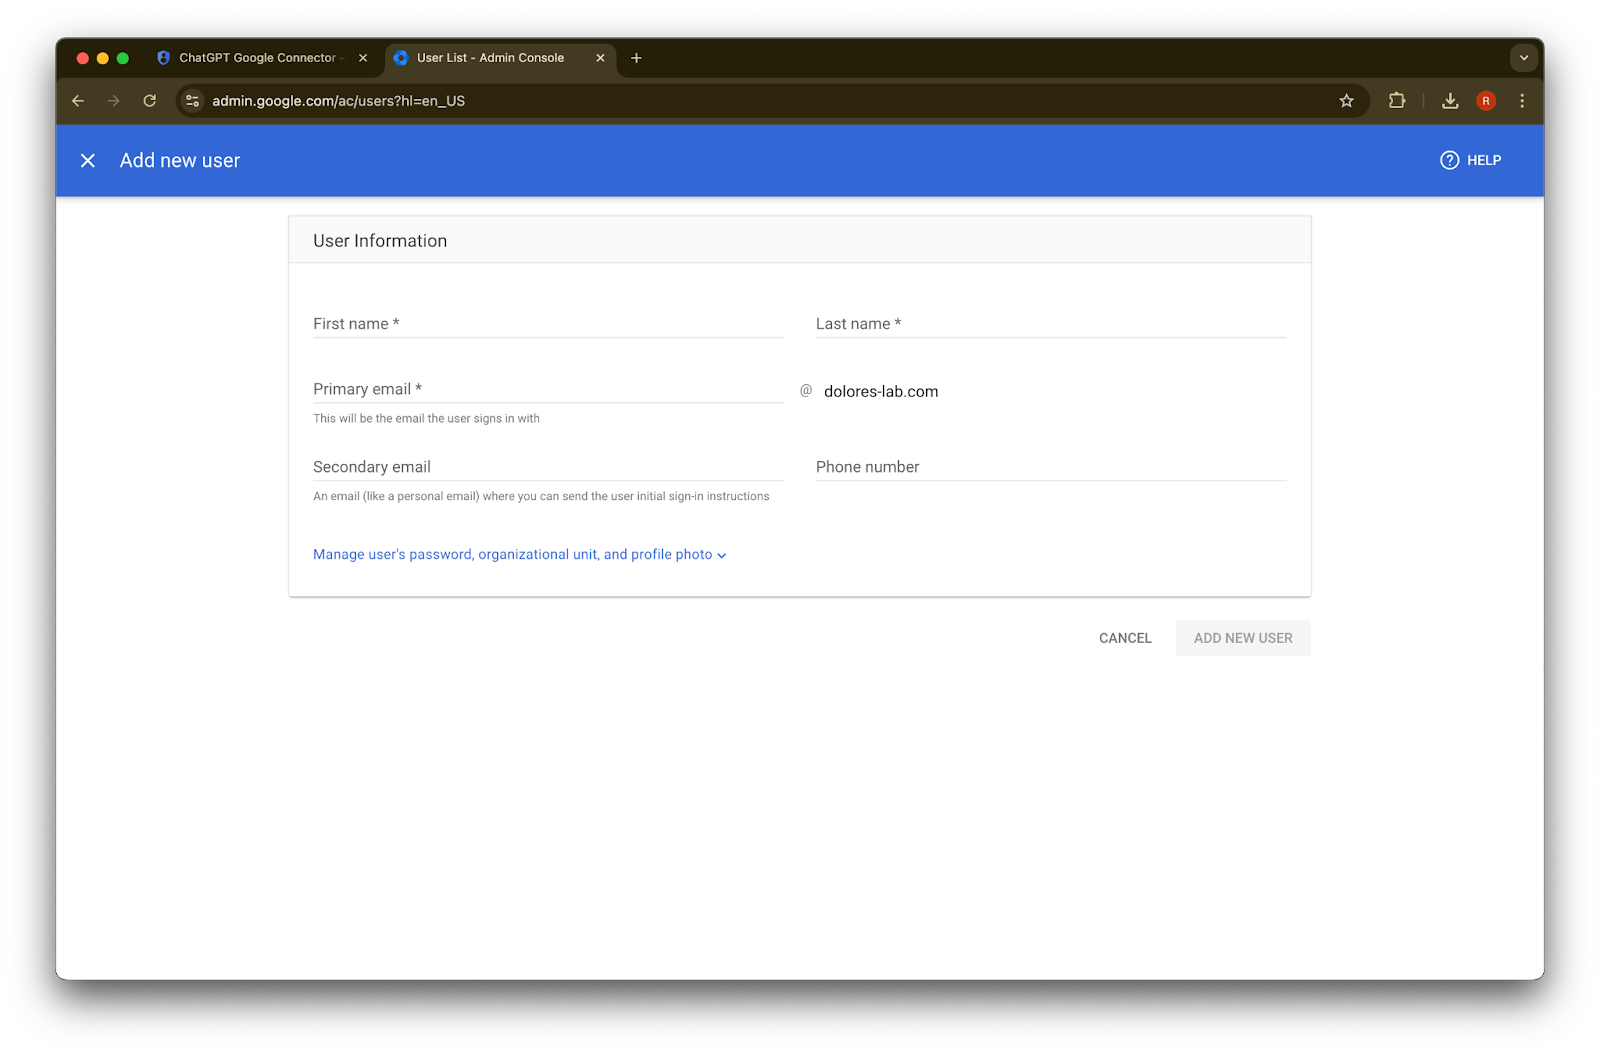
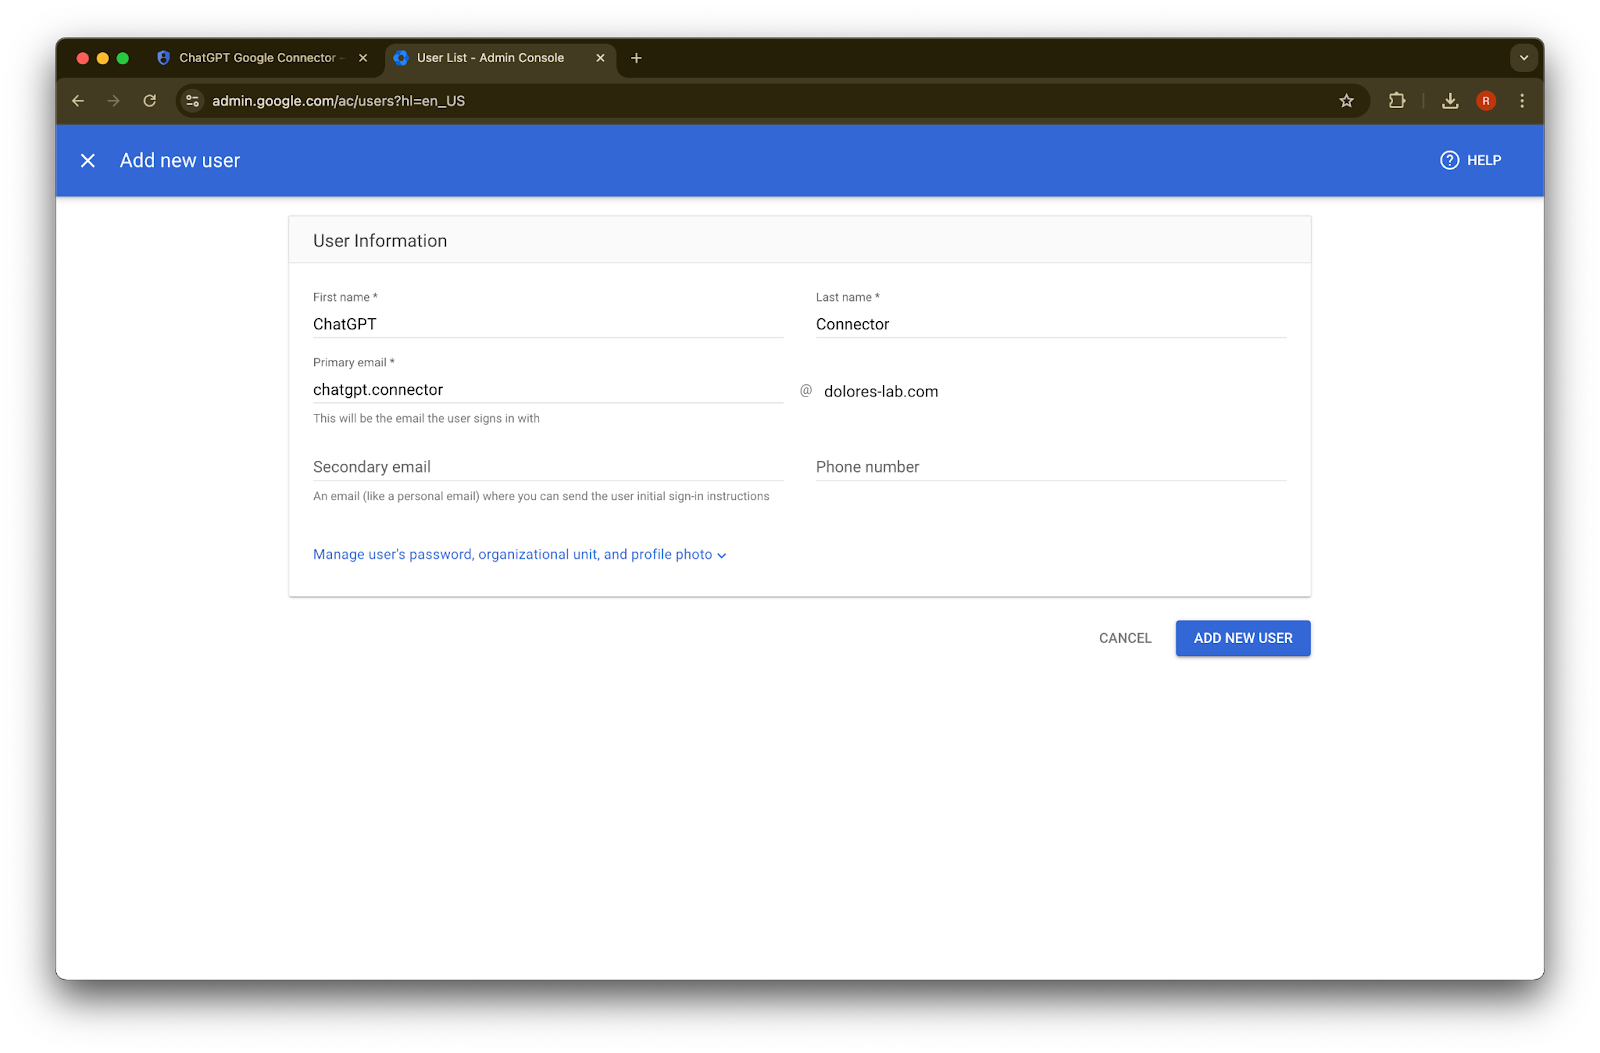
သင့်စိတ်ကြိုက် first name၊ last name နှင့် primary email address ကို ထည့်ပါ
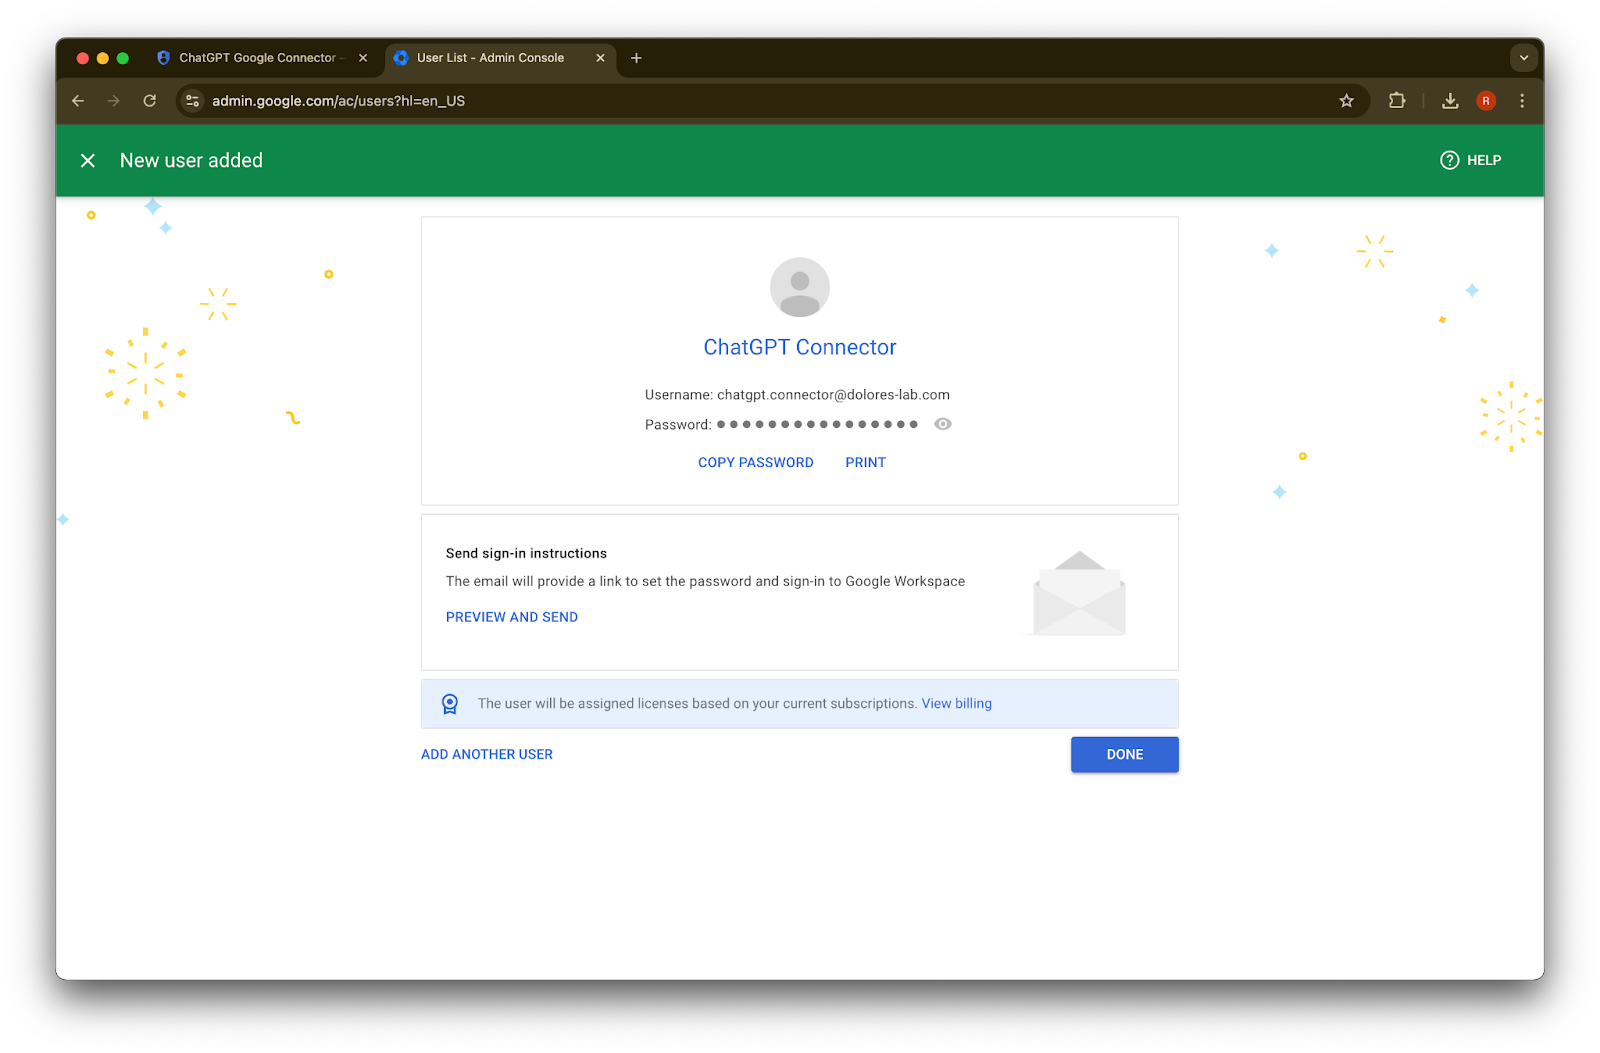
Add new user
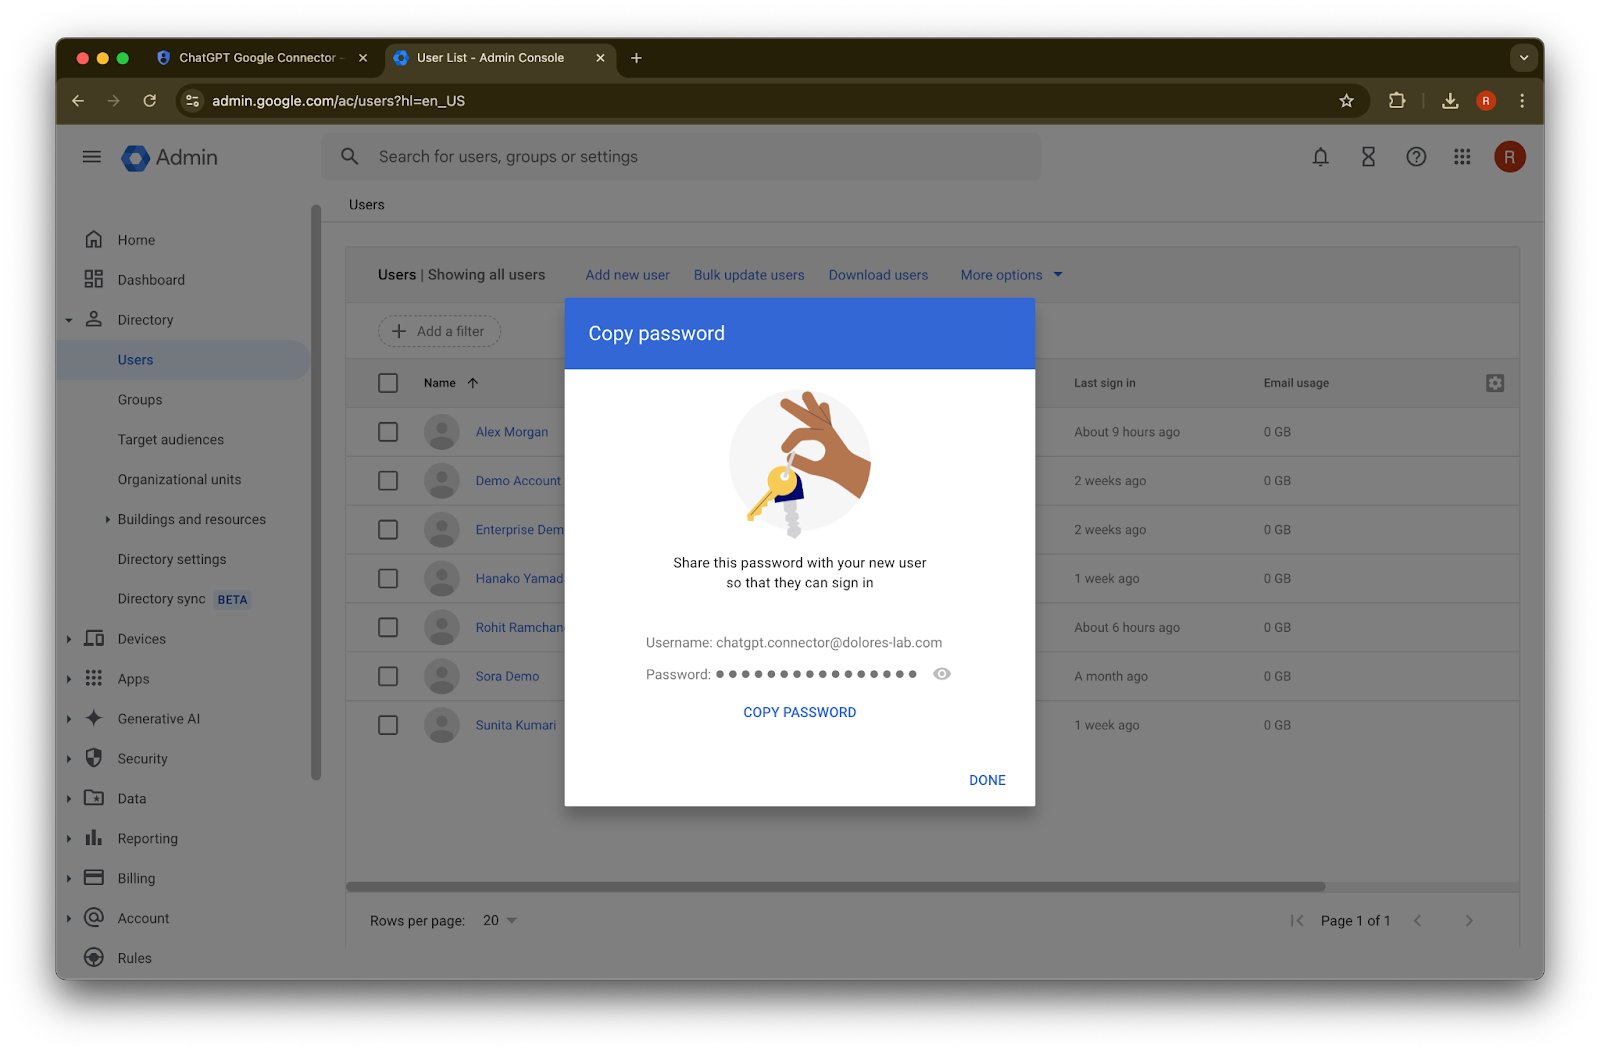
ကို နှိပ်ပါ(Optional) ဤ credentials များကို မှတ်တမ်းတင်ထားနိုင်သည်။ ChatGPT သည် ဤ credentials များကို မလိုအပ်ပါ။
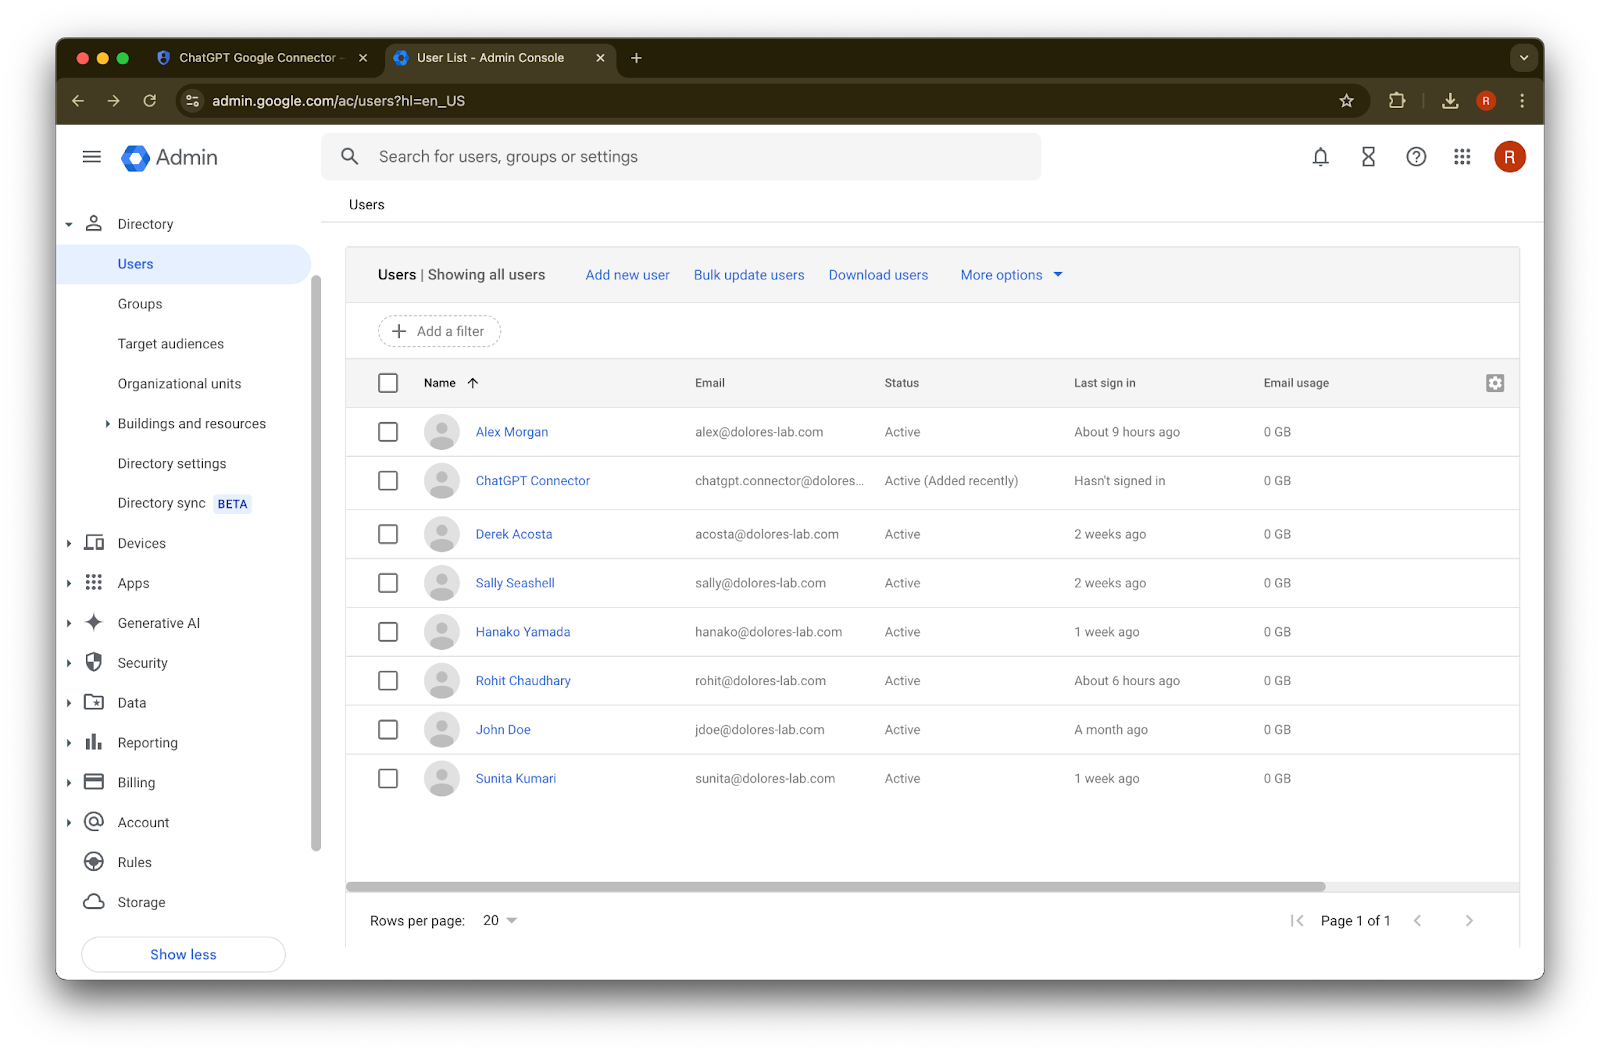
Done ကို နှိပ်ပါ။
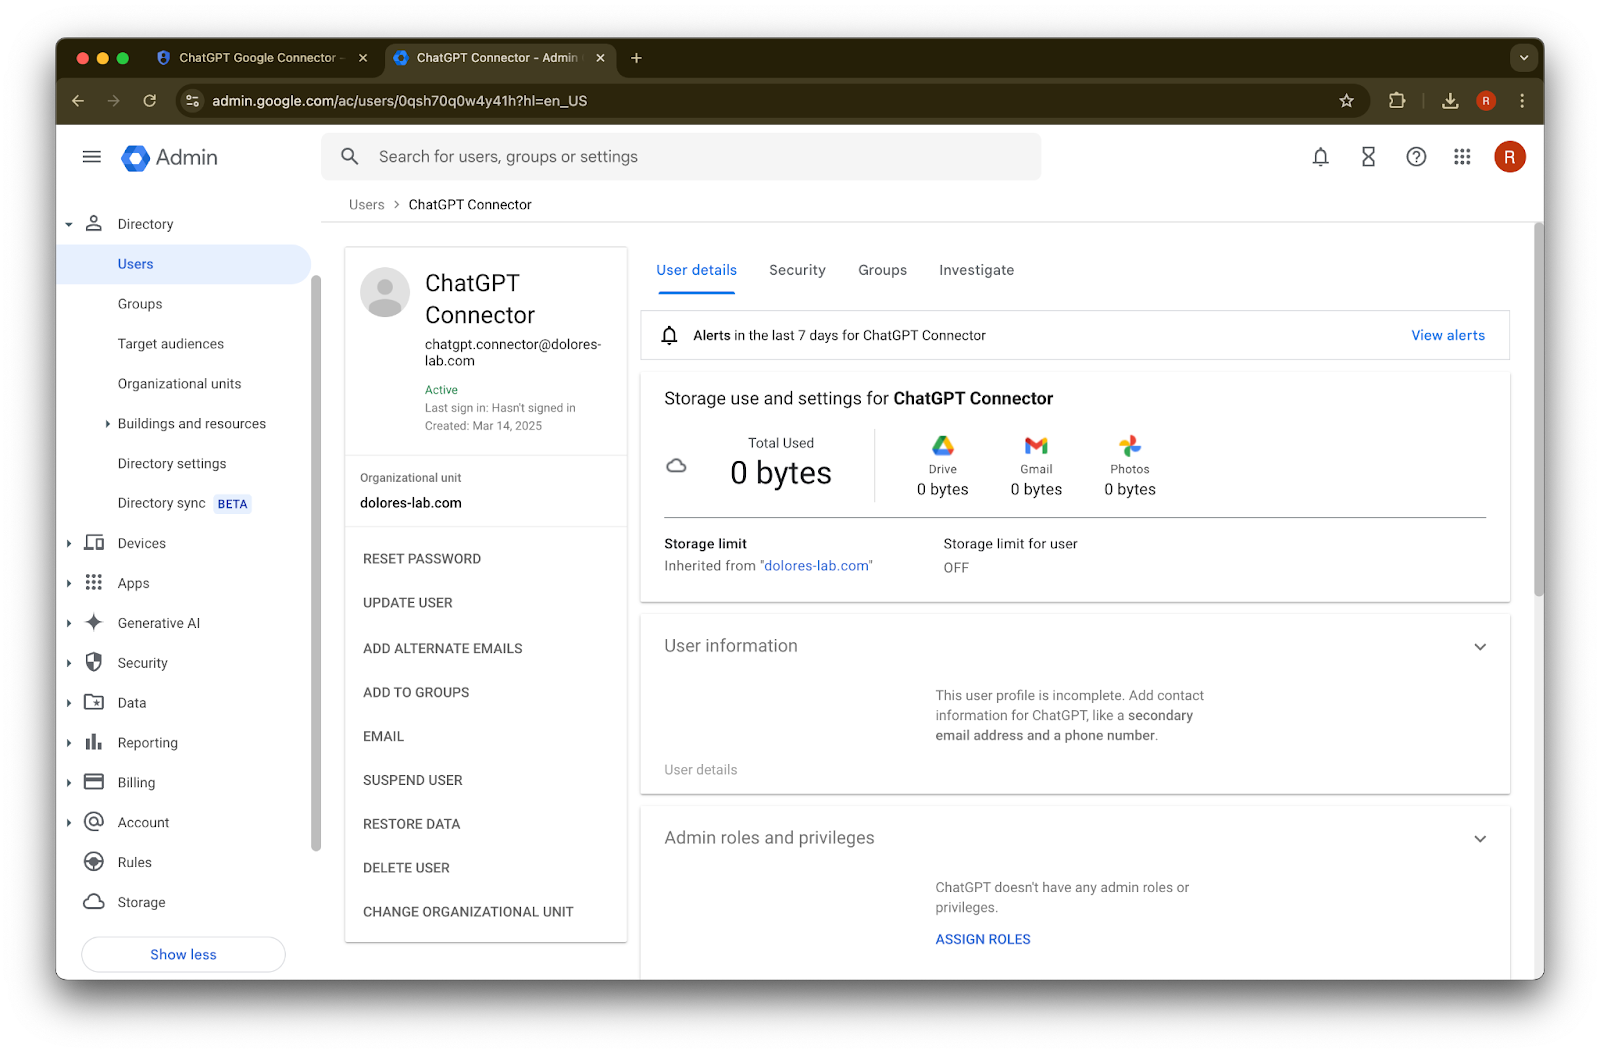
ယခု ဖန်တီးလိုက်သော account ကို နှိပ်ပါ။ စာရင်းတွင် မပေါ်ပါက စာမျက်နှာကို refresh လုပ်ပါ သို့မဟုတ် cache နှင့် cookies များကို ရှင်းလင်းပြီး ထပ်မံကြိုးစားပါ။
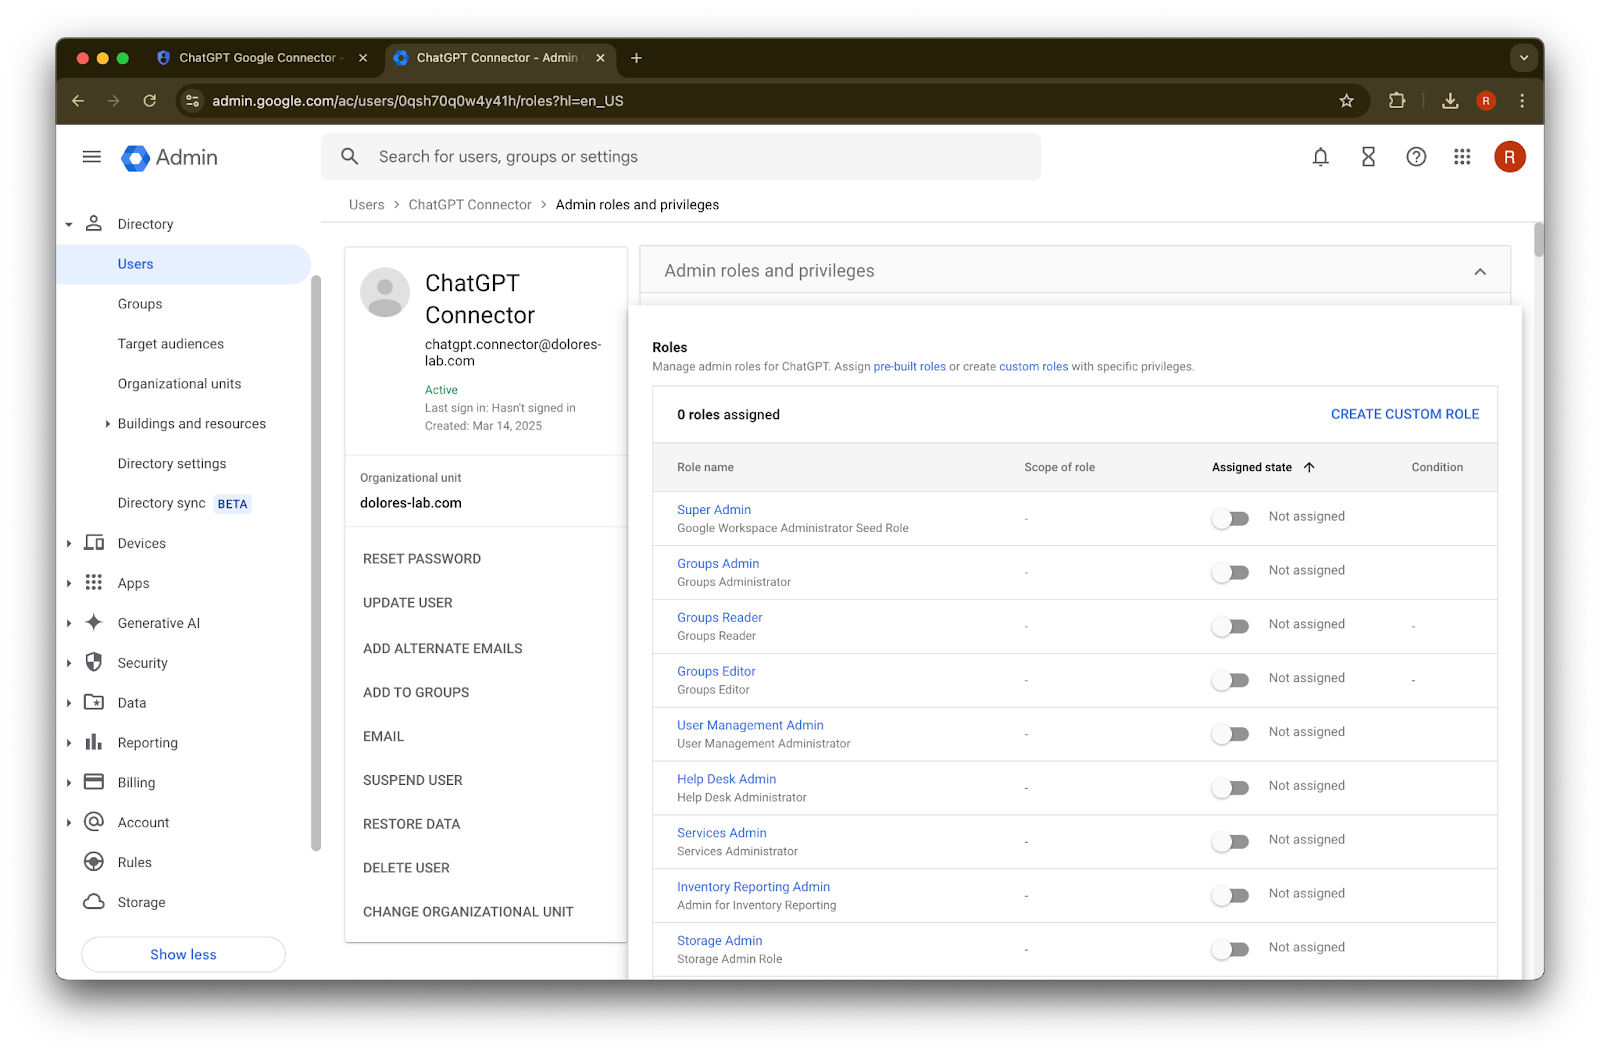
assign roles ကို နှိပ်ပါ။
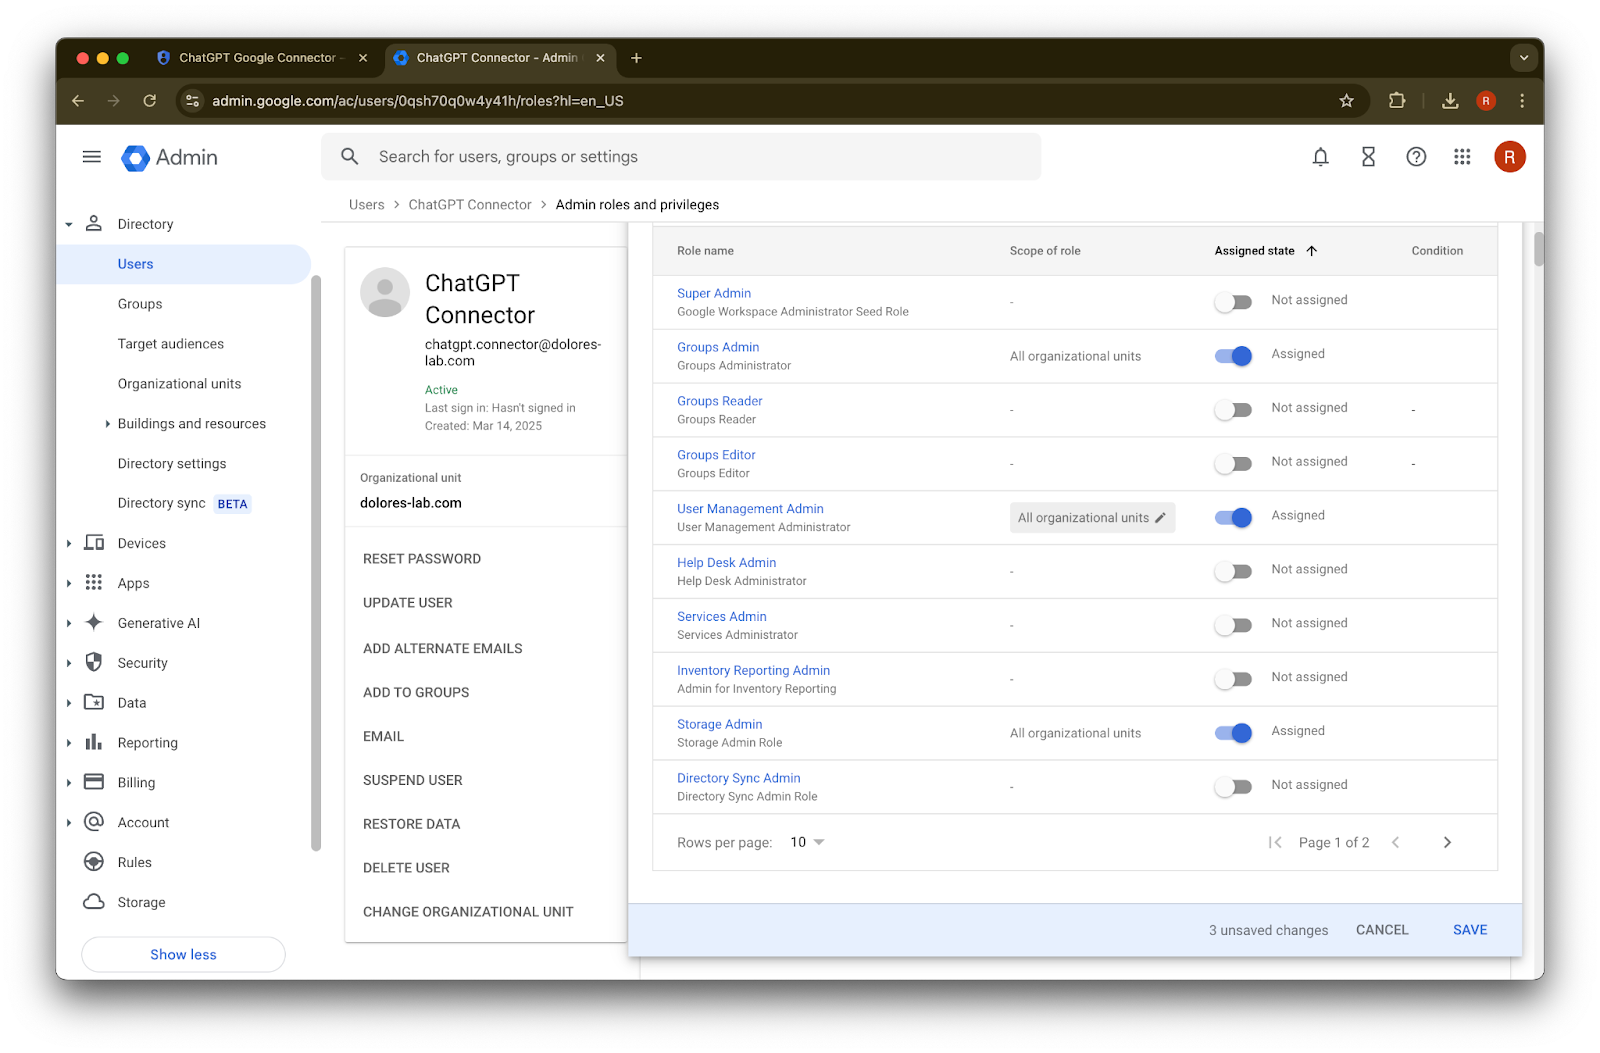
Groups Reader, User Management Admin, နှင့် Storage Admin roles များကို ဖွင့်ပါ။
အောက်သို့ scroll ဆင်းပြီး Save. ကို နှိပ်ပါ။ admin account ကို ယခု အောင်မြင်စွာ ဖန်တီးပြီး စီစဉ်သတ်မှတ်ပြီးပါပြီ။
ChatGPT Admin Console တွင် စနစ်တပ်ဆင်မှုကို အပြီးသတ်ခြင်း
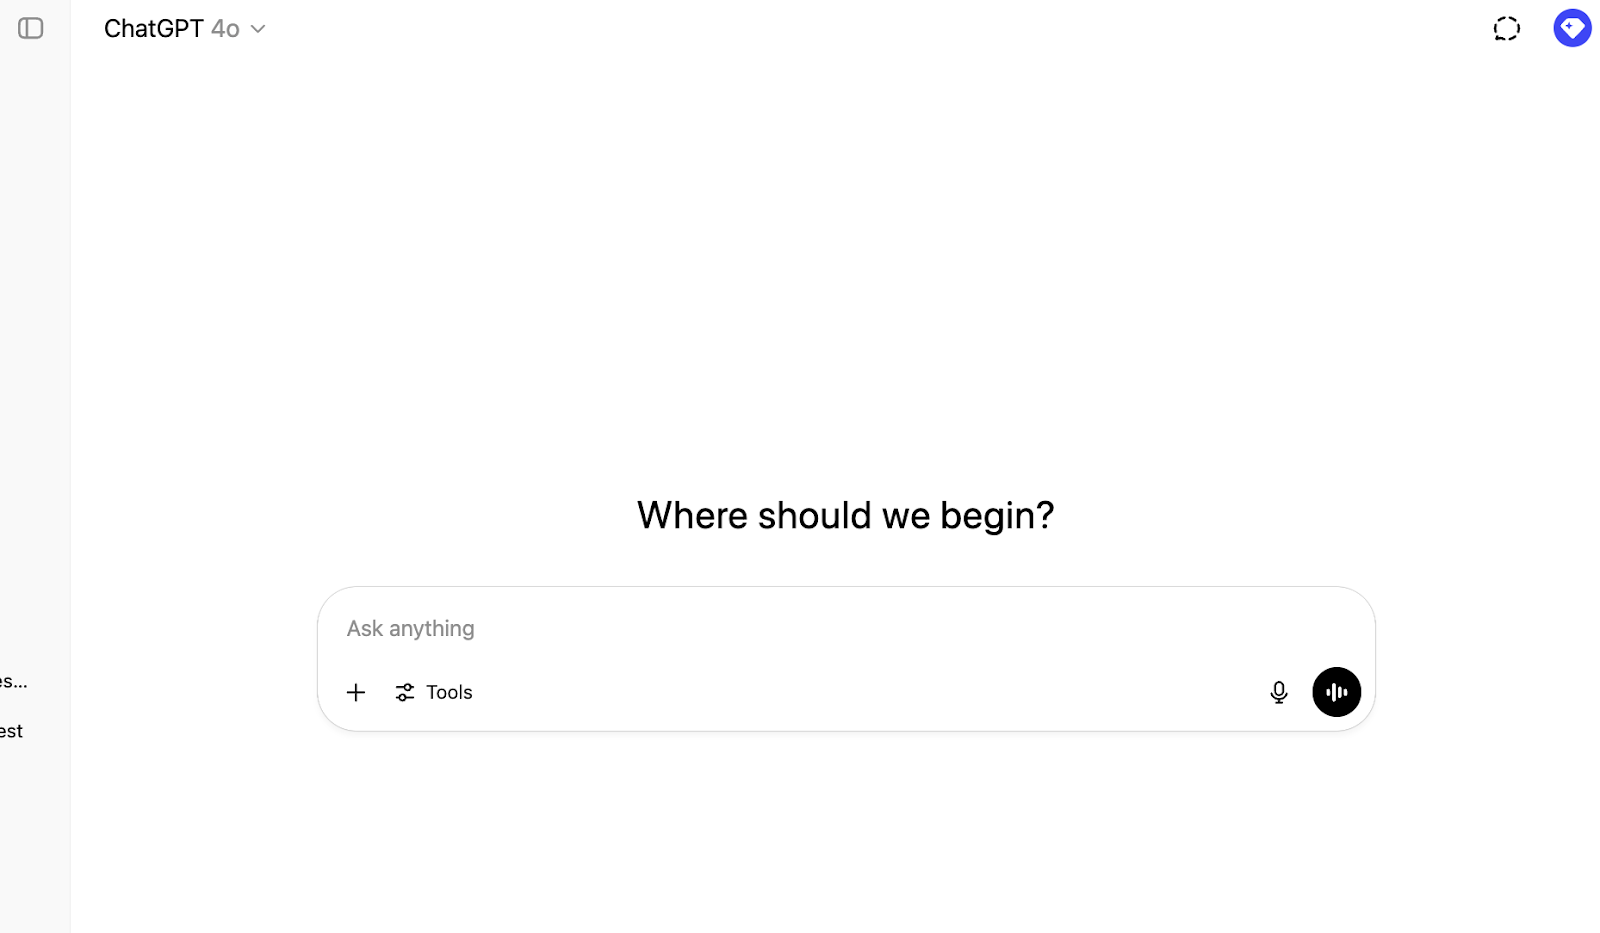
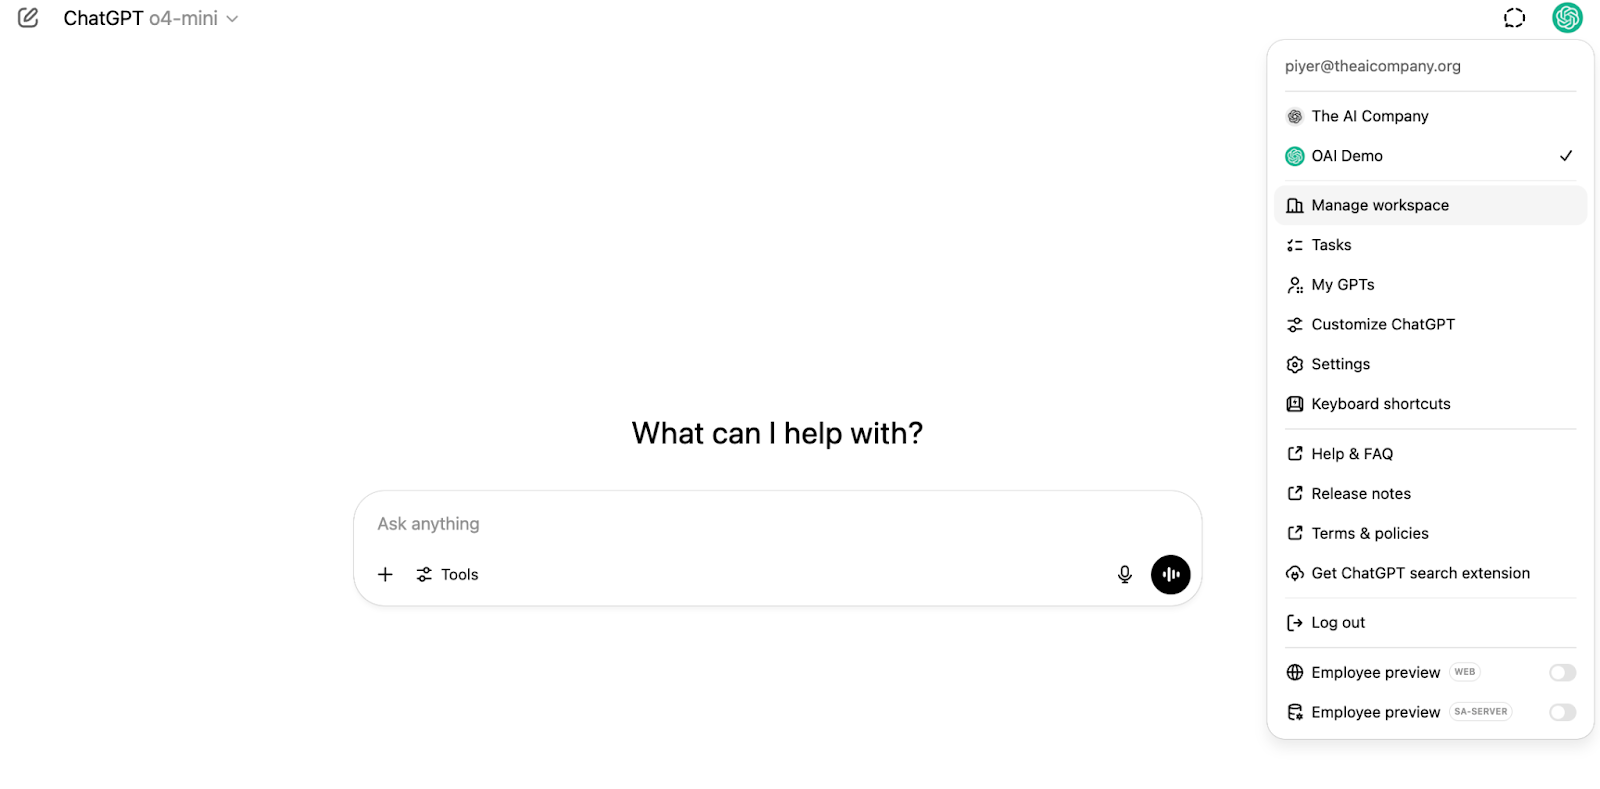
ChatGPT သို့သွားပြီး စာမျက်နှာ၏ ညာဘက်အပေါ်ထောင့်ရှိ ပရိုဖိုင် အိုင်ကွန်ကို နှိပ်ပါ။
Manage workspace
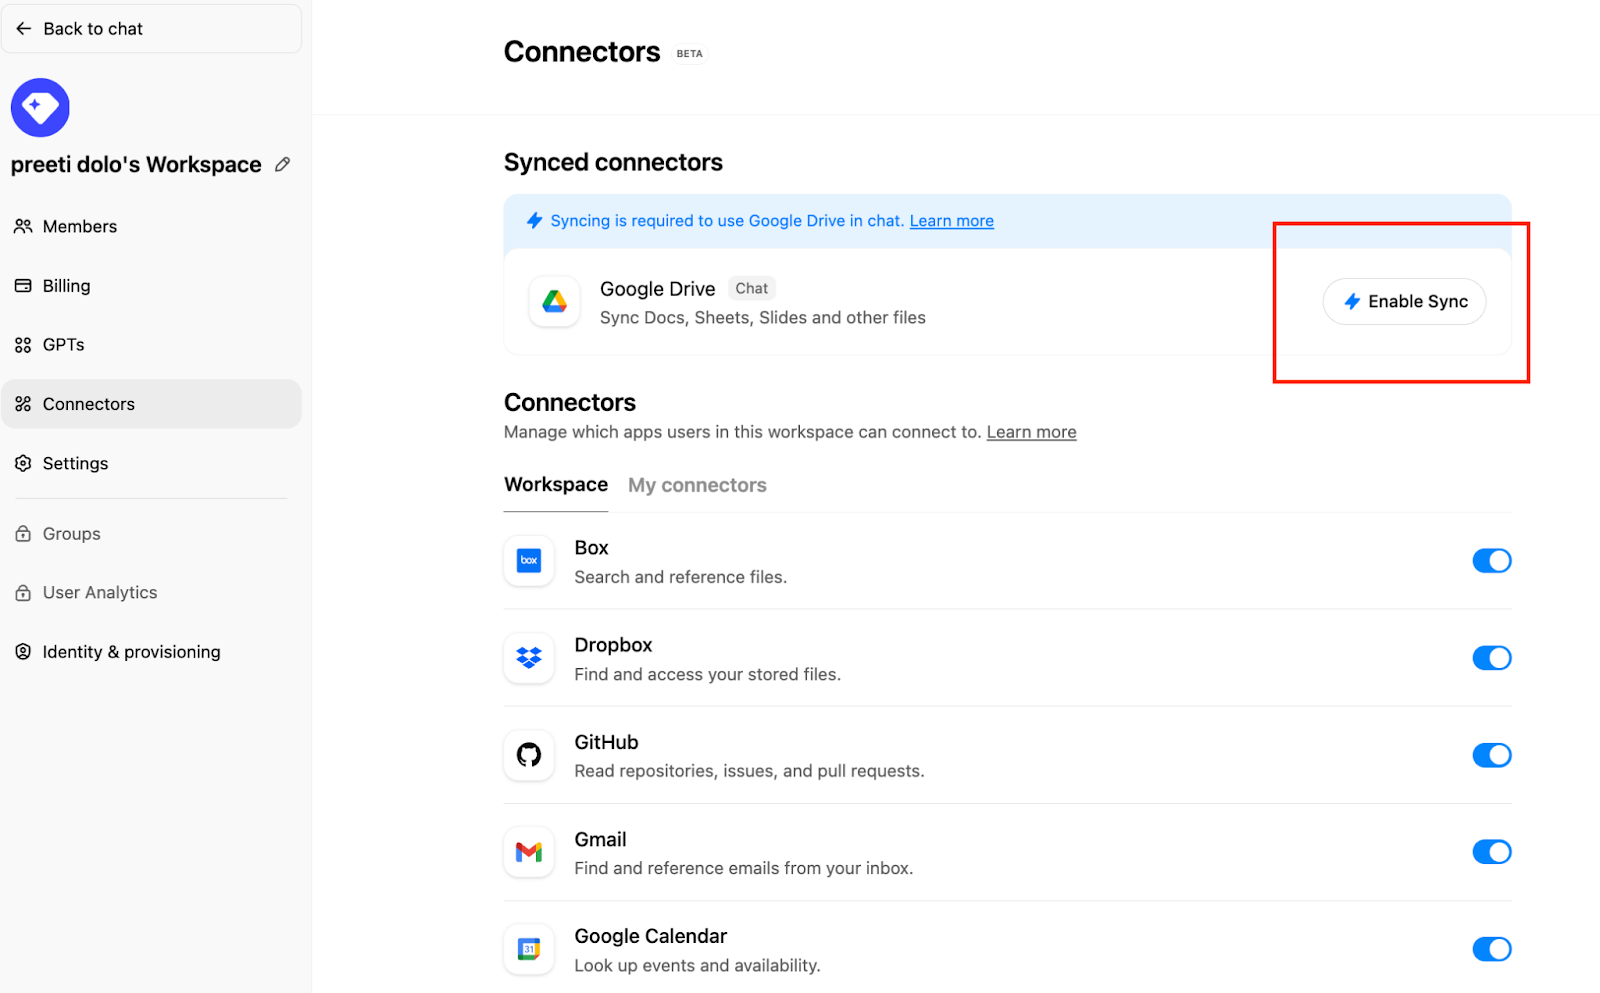
ကို နှိပ်ပါConnections ကိုနှိပ်ပြီးနောက် ‘Synced connectors’ အောက်ရှိ → Enable Sync ကို နှိပ်ပါ
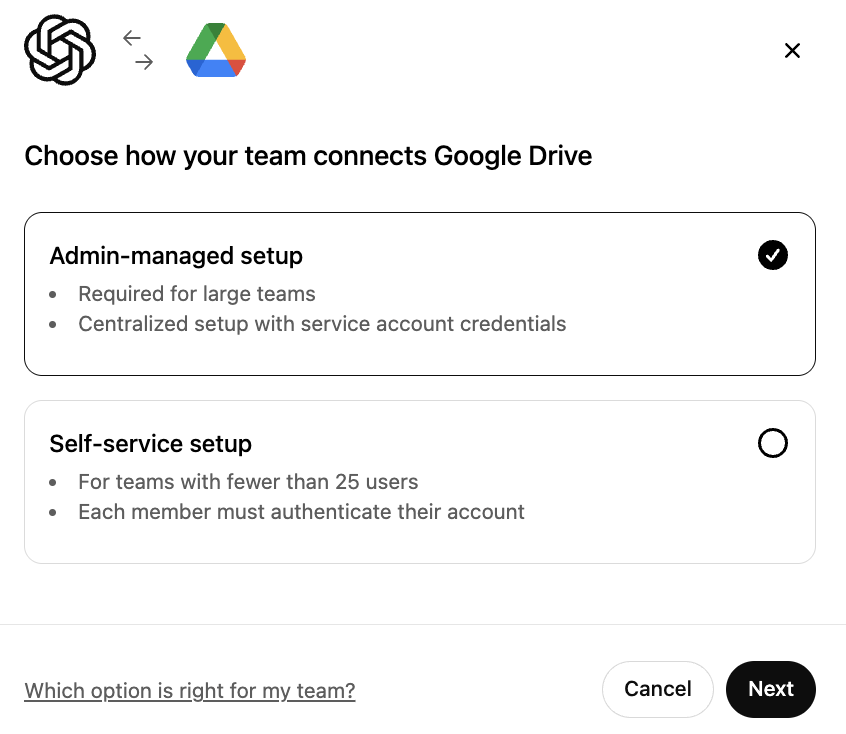
Admin-managed ကိုရွေးထားကြောင်း သေချာစေပြီး Next ကို နှိပ်ပါ
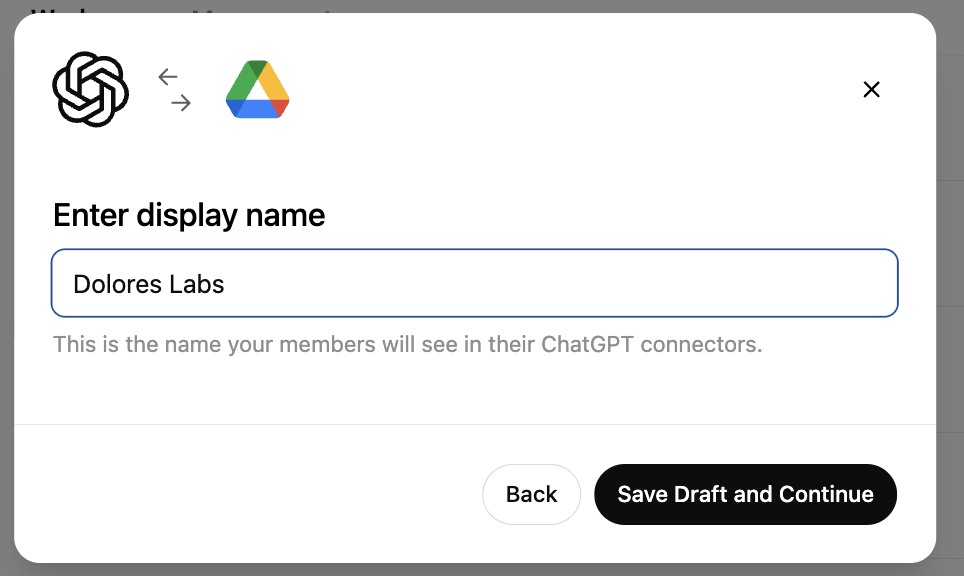
display name တစ်ခု ရိုက်ထည့်ပါ။ သင့် Google Workspace ၏ အမည်ကို အသုံးပြုရန် အကြံပြုပါသည်။
ကျေးဇူးပြု၍ မှတ်သားပါ၊ လက်ရှိတွင် သင့် connection ၏ အမည်ကို ပြောင်းလဲခြင်းကို မပံ့ပိုးသေးပါ။Save Draft and Continue ကို နှိပ်ပါ
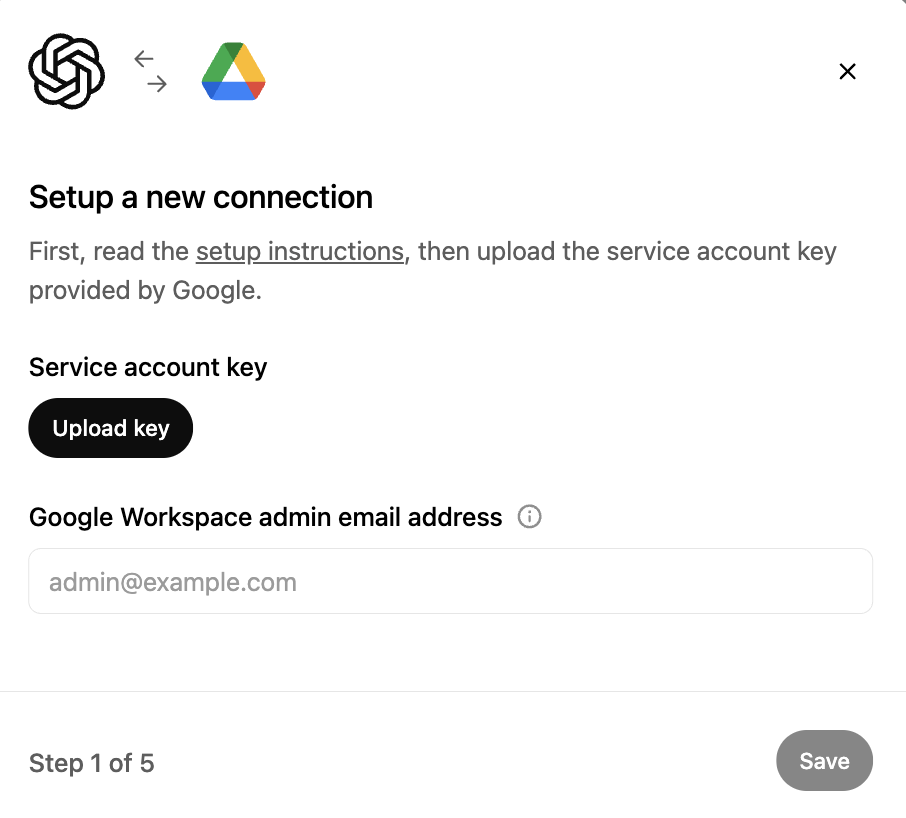
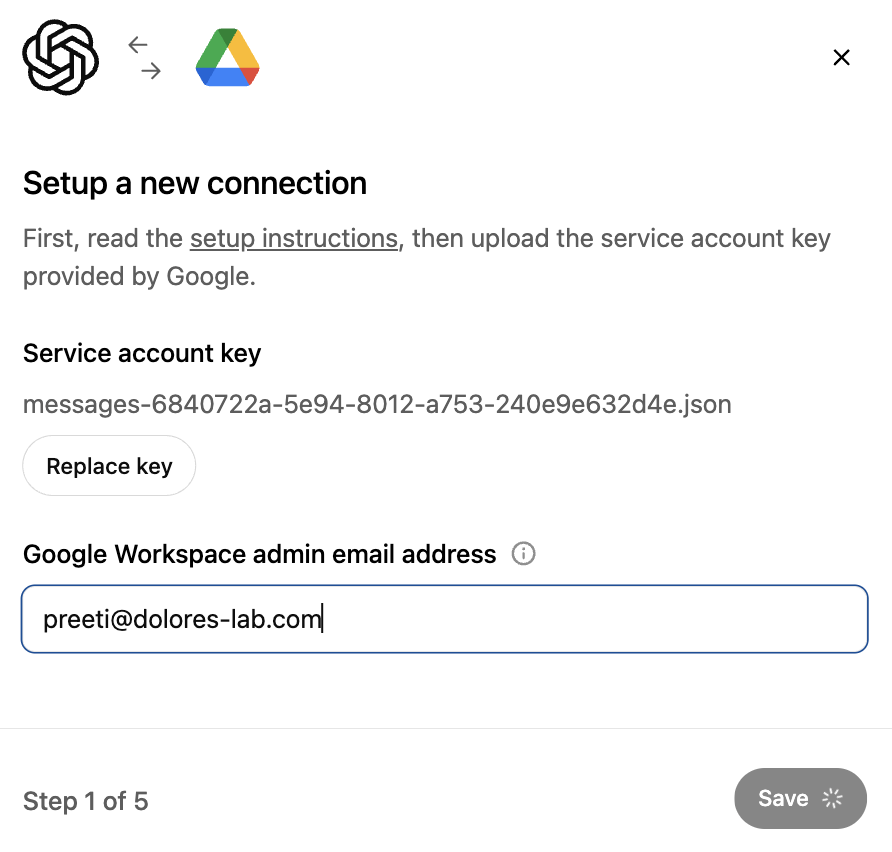
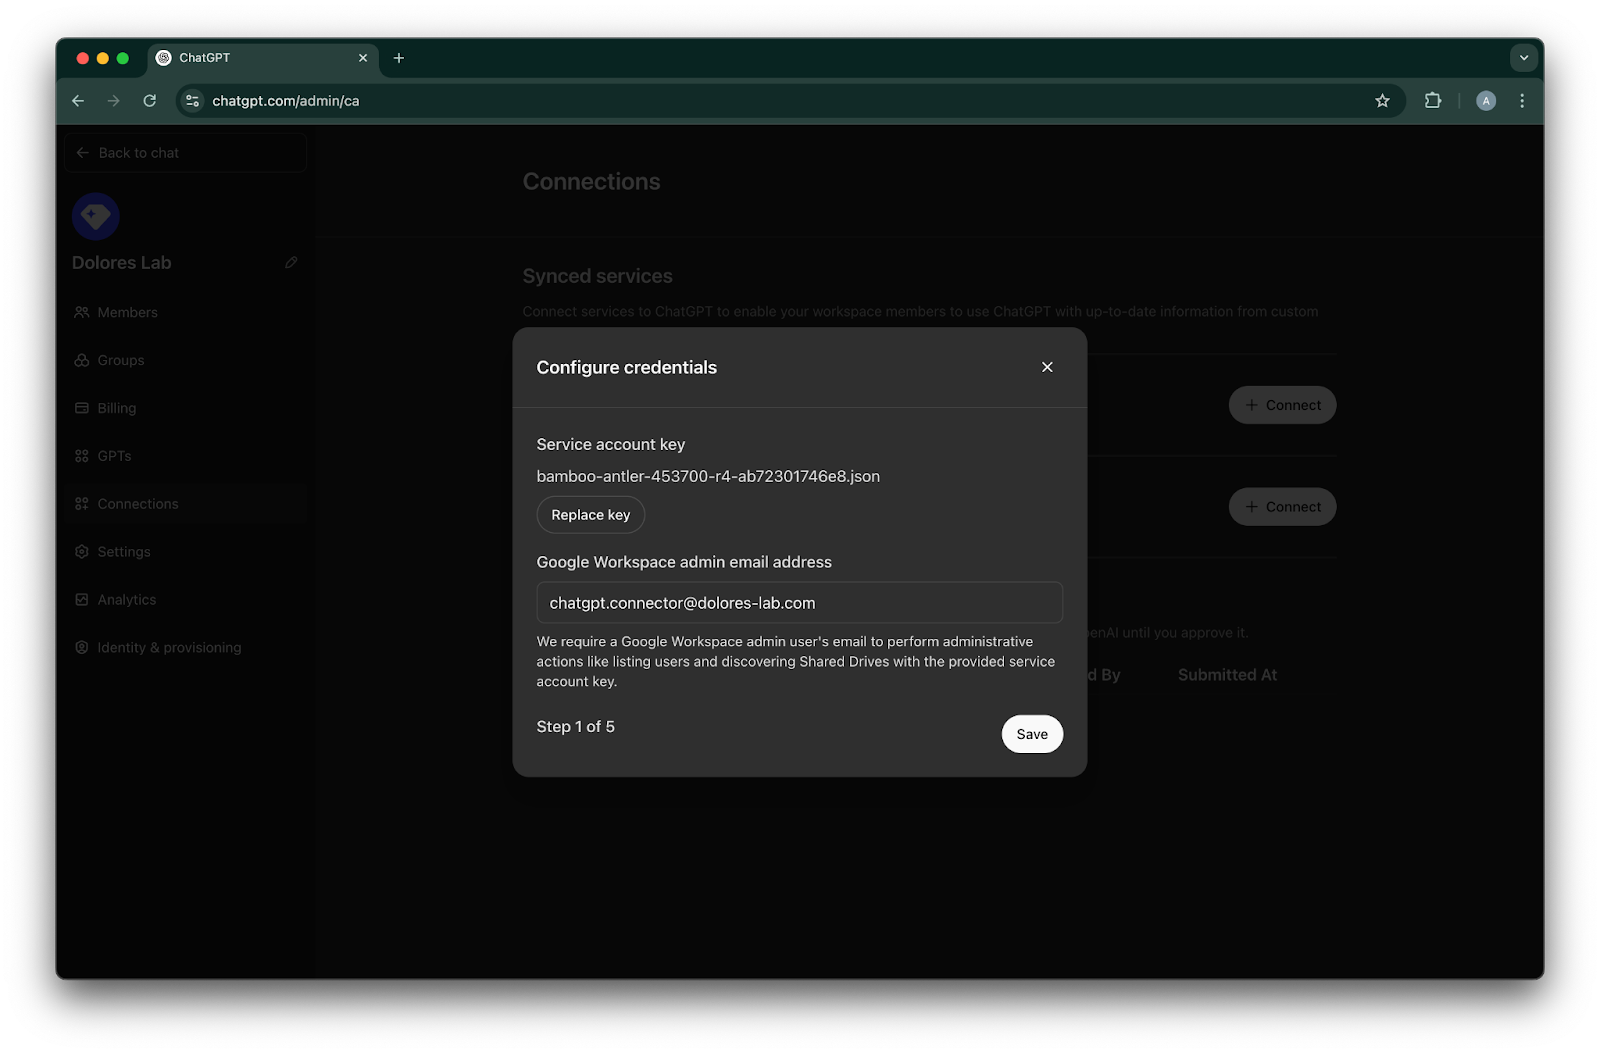
Upload key ကို နှိပ်ပါ။ အထက်တွင် service account ကို စနစ်တပ်ဆင်စဉ် ဒေါင်းလုဒ်လုပ်ခဲ့သော key ဖြစ်သည့် JSON ဖိုင်ကို ရွေးပါ။ ဤ key မှန်ကန်ကြောင်း သေချာစေပါ
admin email address ကို ရိုက်ထည့်ပါ။ ၎င်းသည် ယခင်က သင်ဖန်တီးခဲ့သော admin account ဖြစ်သည်။
Save. ကို နှိပ်ပါ
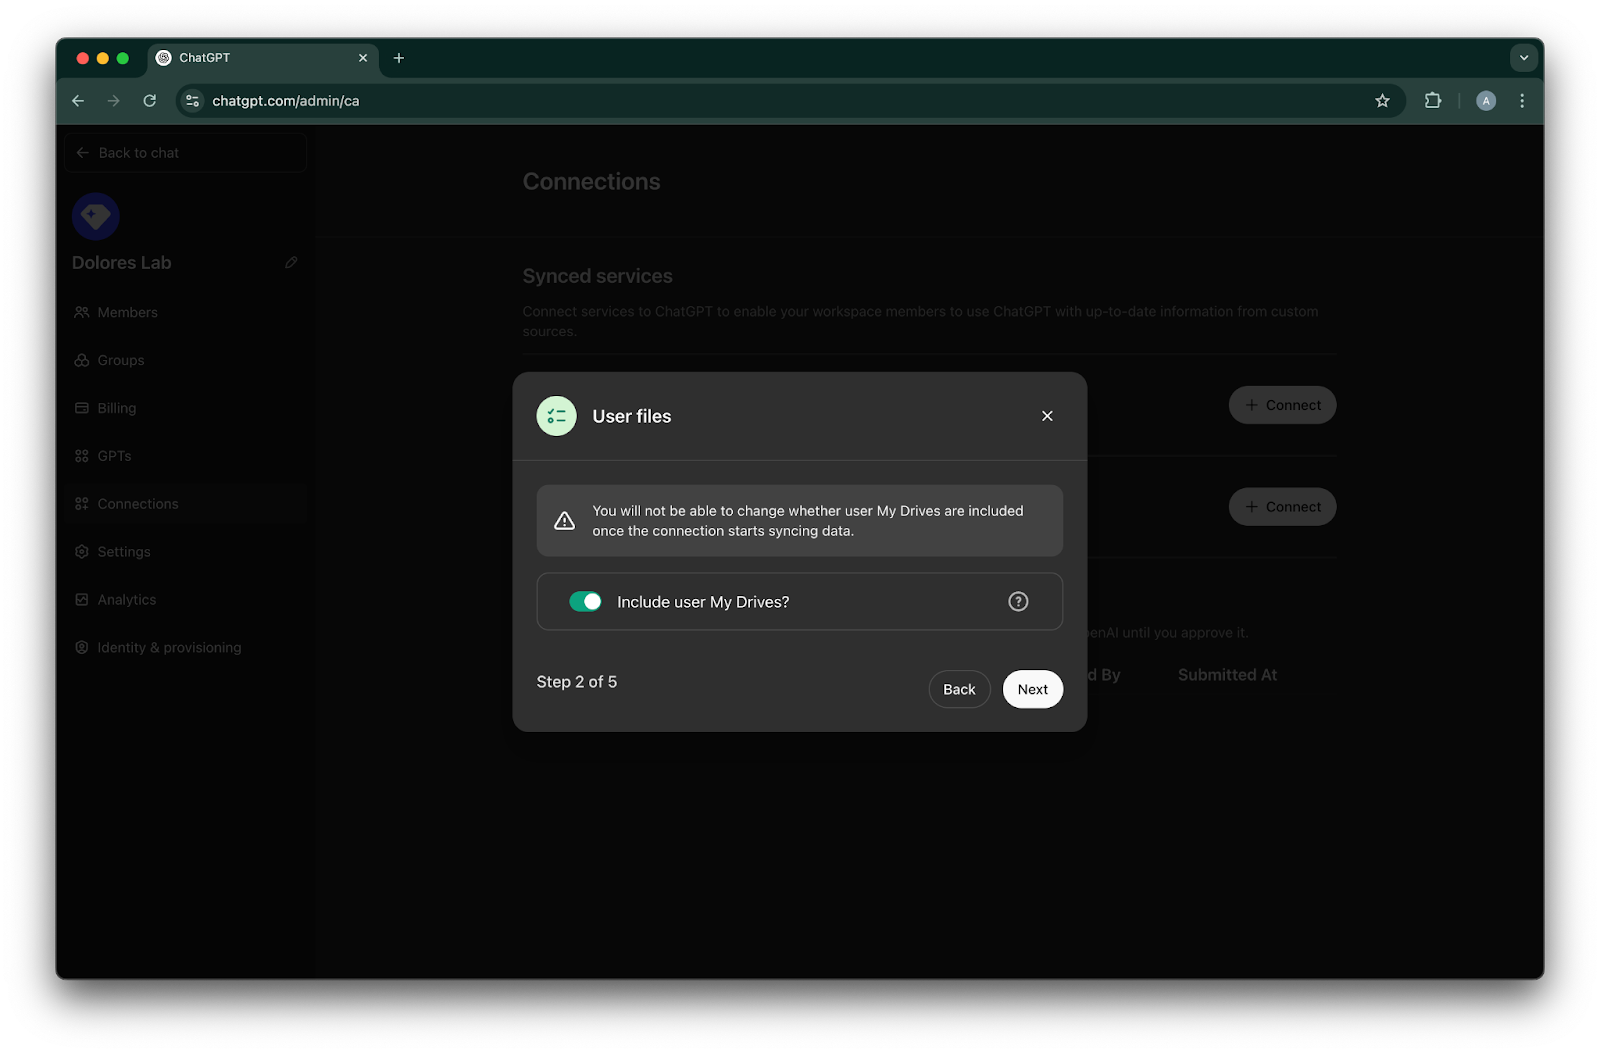
သင့်အသုံးပြုသူအားလုံး၏ My Drives ထဲရှိ ဖိုင်များအားလုံးကို ထည့်သွင်းလို/မလို ရွေးချယ်ပါ။
Next ကို နှိပ်ပါ
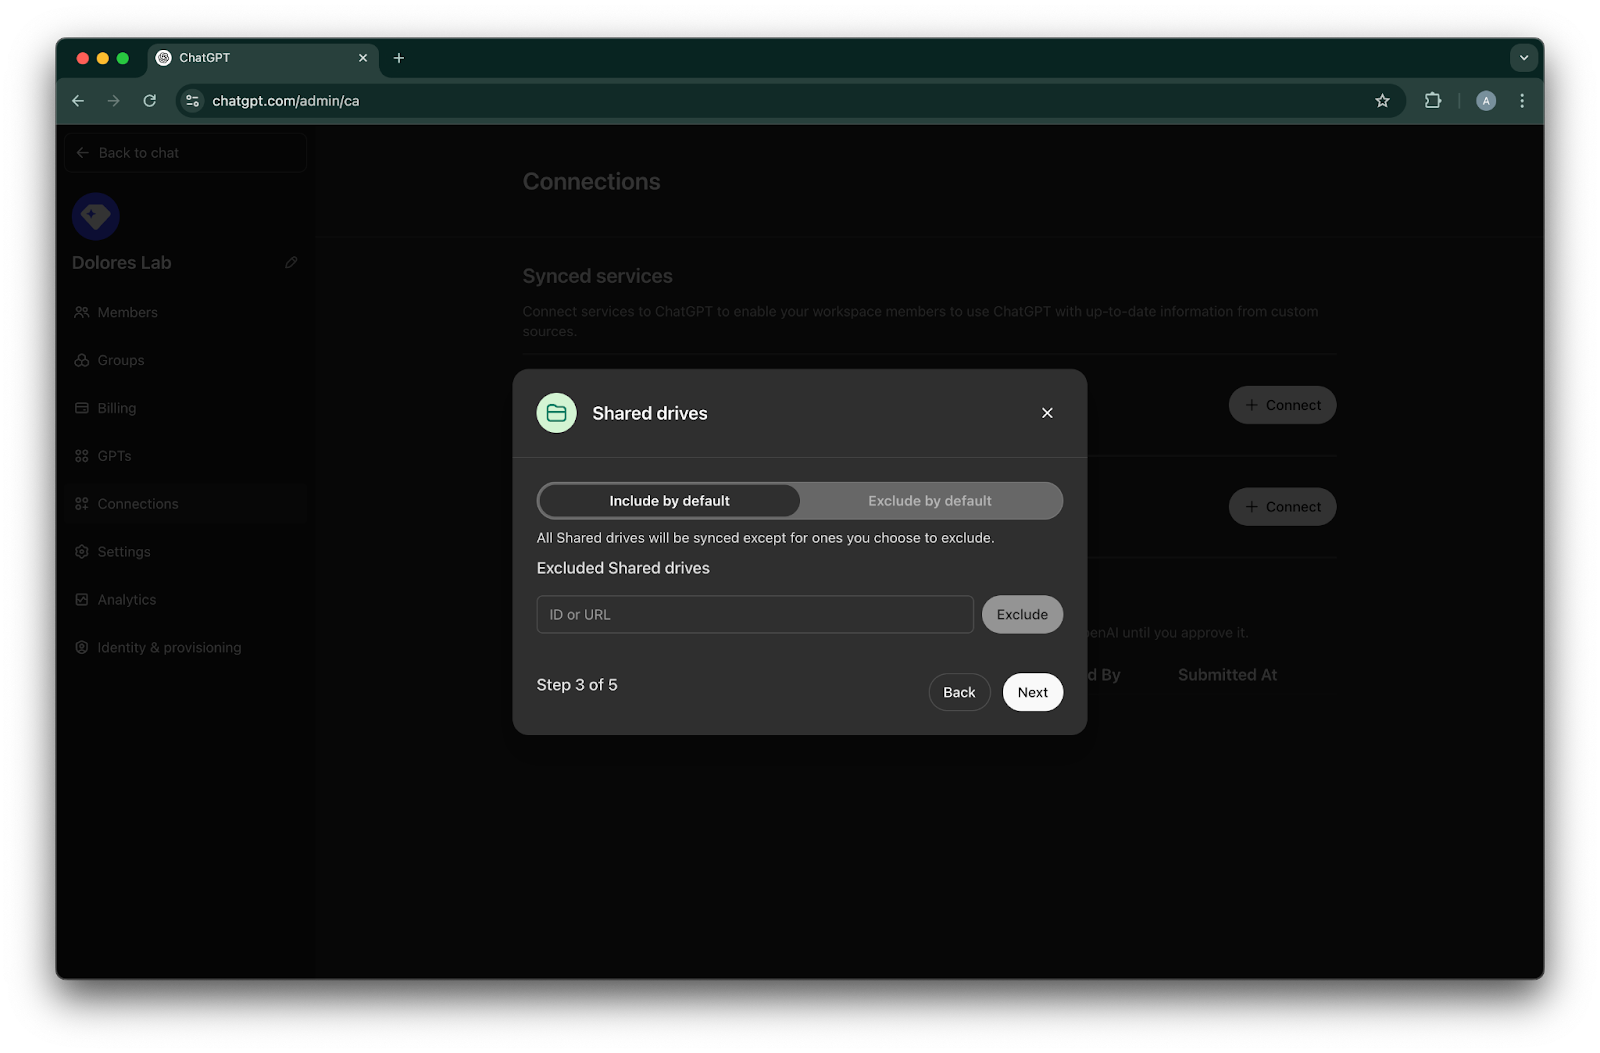
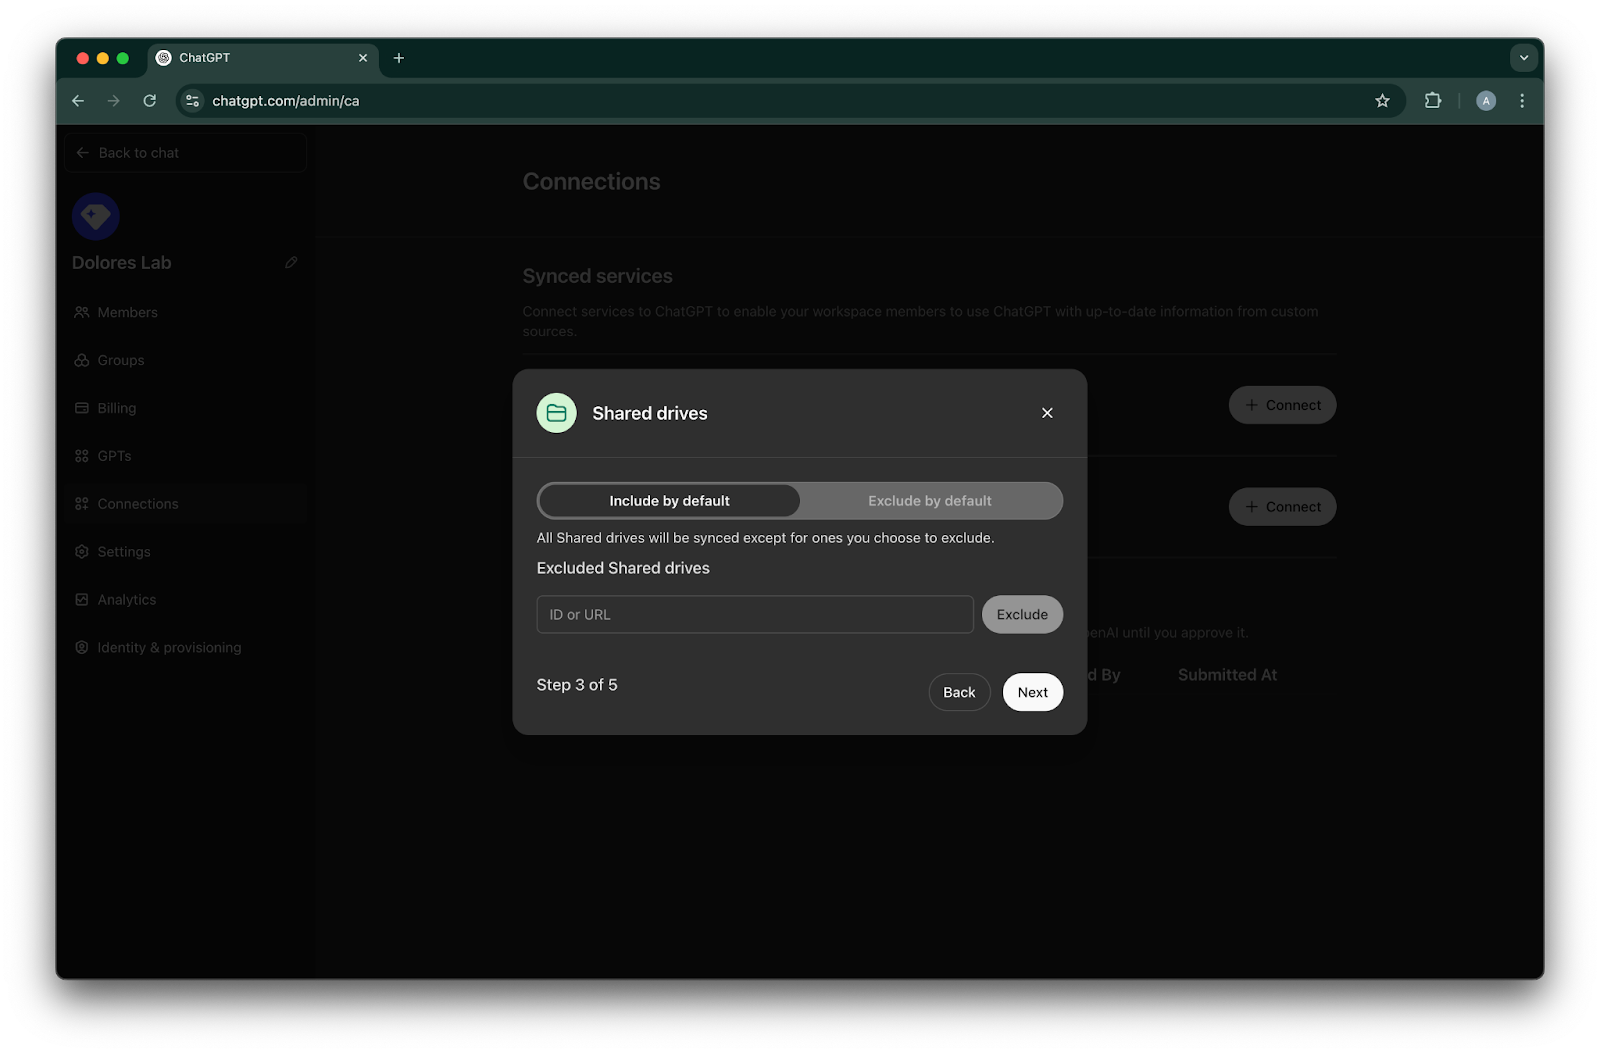
shared drives များကို မည်သို့ စီမံမည်ကို ရွေးချယ်ပါ။ ကျွန်ုပ်တို့သည် အောက်ပါ အခြေအနေ ၃ မျိုးကို ပံ့ပိုးပါသည်-
shared drives အားလုံးကို ထည့်သွင်းလိုပါက Include by default ကို ရွေးပြီး ဖယ်ထုတ်လိုသော shared drive IDs များကို မထည့်ပါနှင့်
shared drives အများစုကို ထည့်သွင်းလိုပါက Include by defaultကို ရွေးပြီး ဖယ်ထုတ်လိုသော shared drives များ၏ IDs များကို ထည့်ပါ
shared drives အများစုကို ဖယ်ထုတ်လိုပါက Exclude by defaultကို ရွေးပြီး ထည့်သွင်းလိုသော shared drives များ၏ IDs များကို ထည့်ပါ
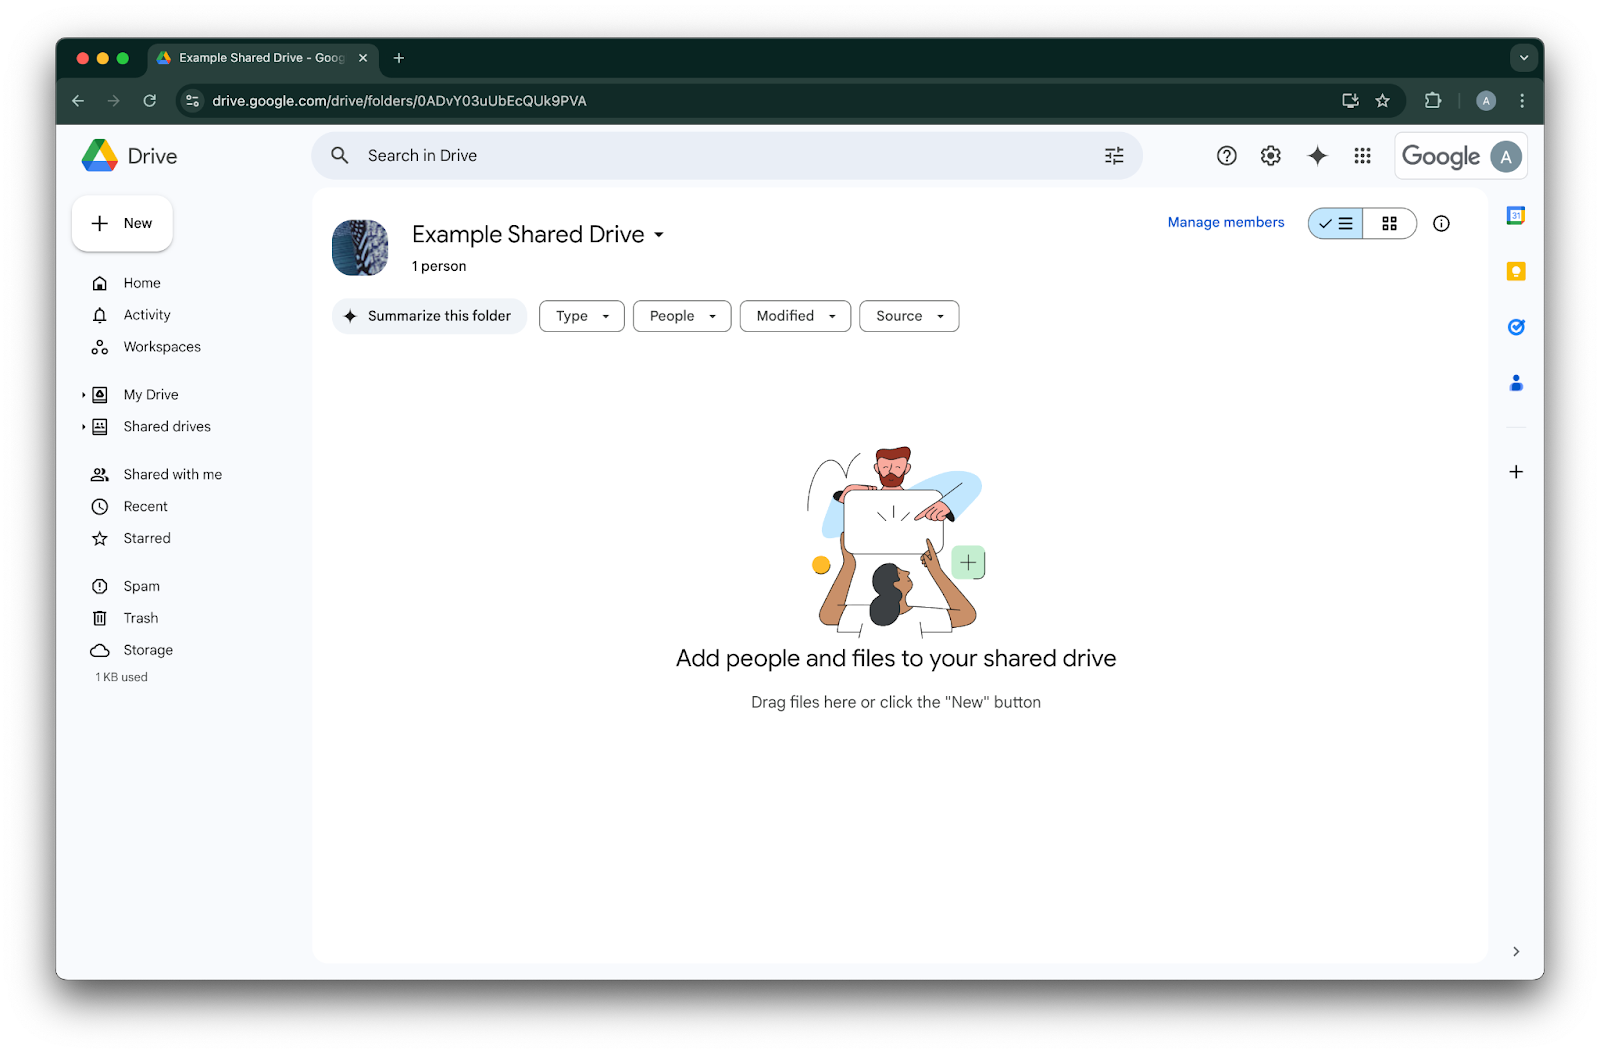
shared drive တစ်ခု၏ ID ကို ကြည့်ရှုရန် ဝဘ်ဘရောက်ဇာတွင် ၎င်းသို့ သွားပါ။ URL ၏ နောက်ဆုံးအပိုင်း သည် shared drive ID ဖြစ်သည်။
အောက်ပါ ဥပမာတွင် ၎င်းမှာ `0ADvY03uUbEcQUk9PVA`' ဖြစ်သည်Next ကို နှိပ်ပါ
Google Drive connection ကို မည်သူများ အသုံးပြုခွင့်ရမည်ကို ရွေးချယ်ပါ။ ChatGPT အလုပ်နေရာ ၏ Admins များသာ ရွေးနိုင်သလို၊ လူတိုင်းအတွက်လည်း ဖွင့်နိုင်သည်။ လူတိုင်းအတွက် ဖွင့်ထားပါက အလုပ်နေရာသို့ အသစ်ထည့်သွင်းသော အသုံးပြုသူများသည် အလိုအလျောက် ပါဝင်မည်ဖြစ်သည်။
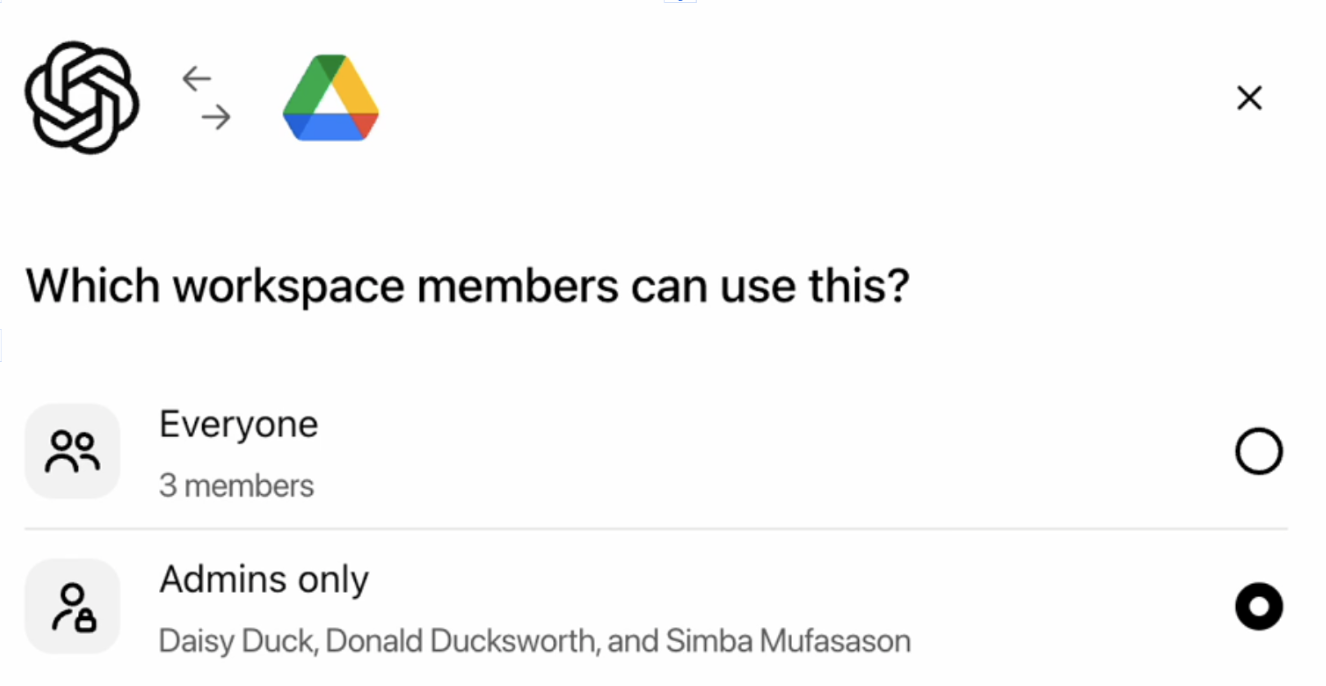
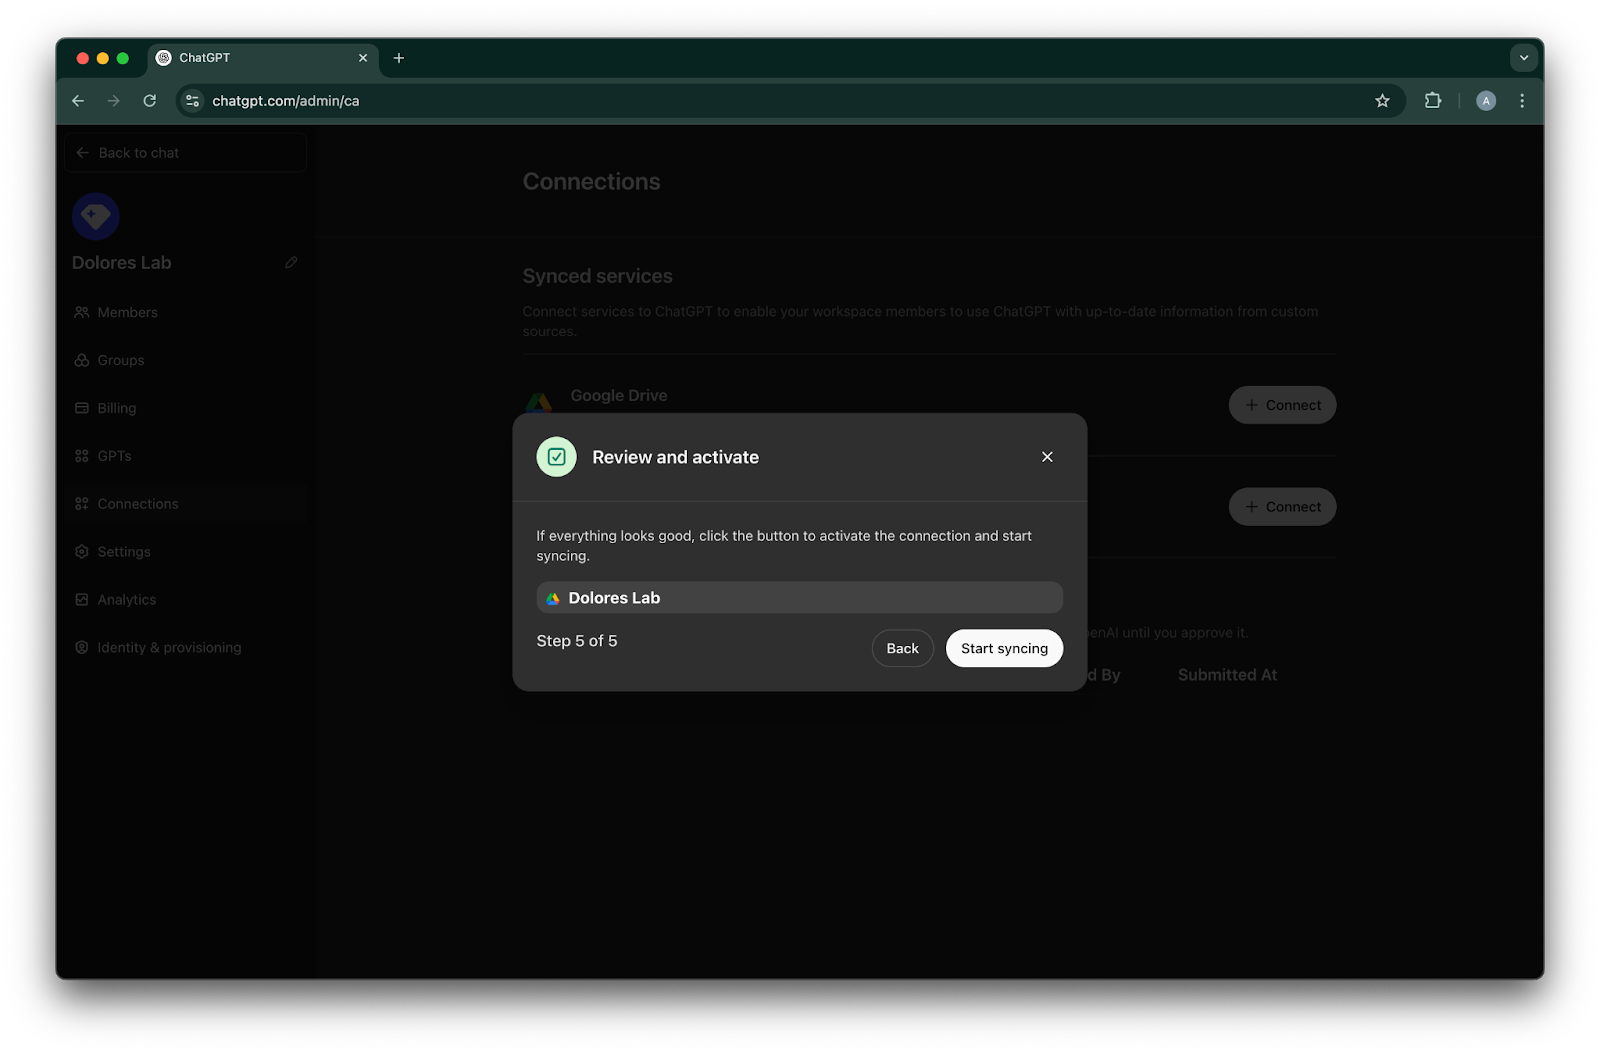
Start syncing ကို နှိပ်ပါ
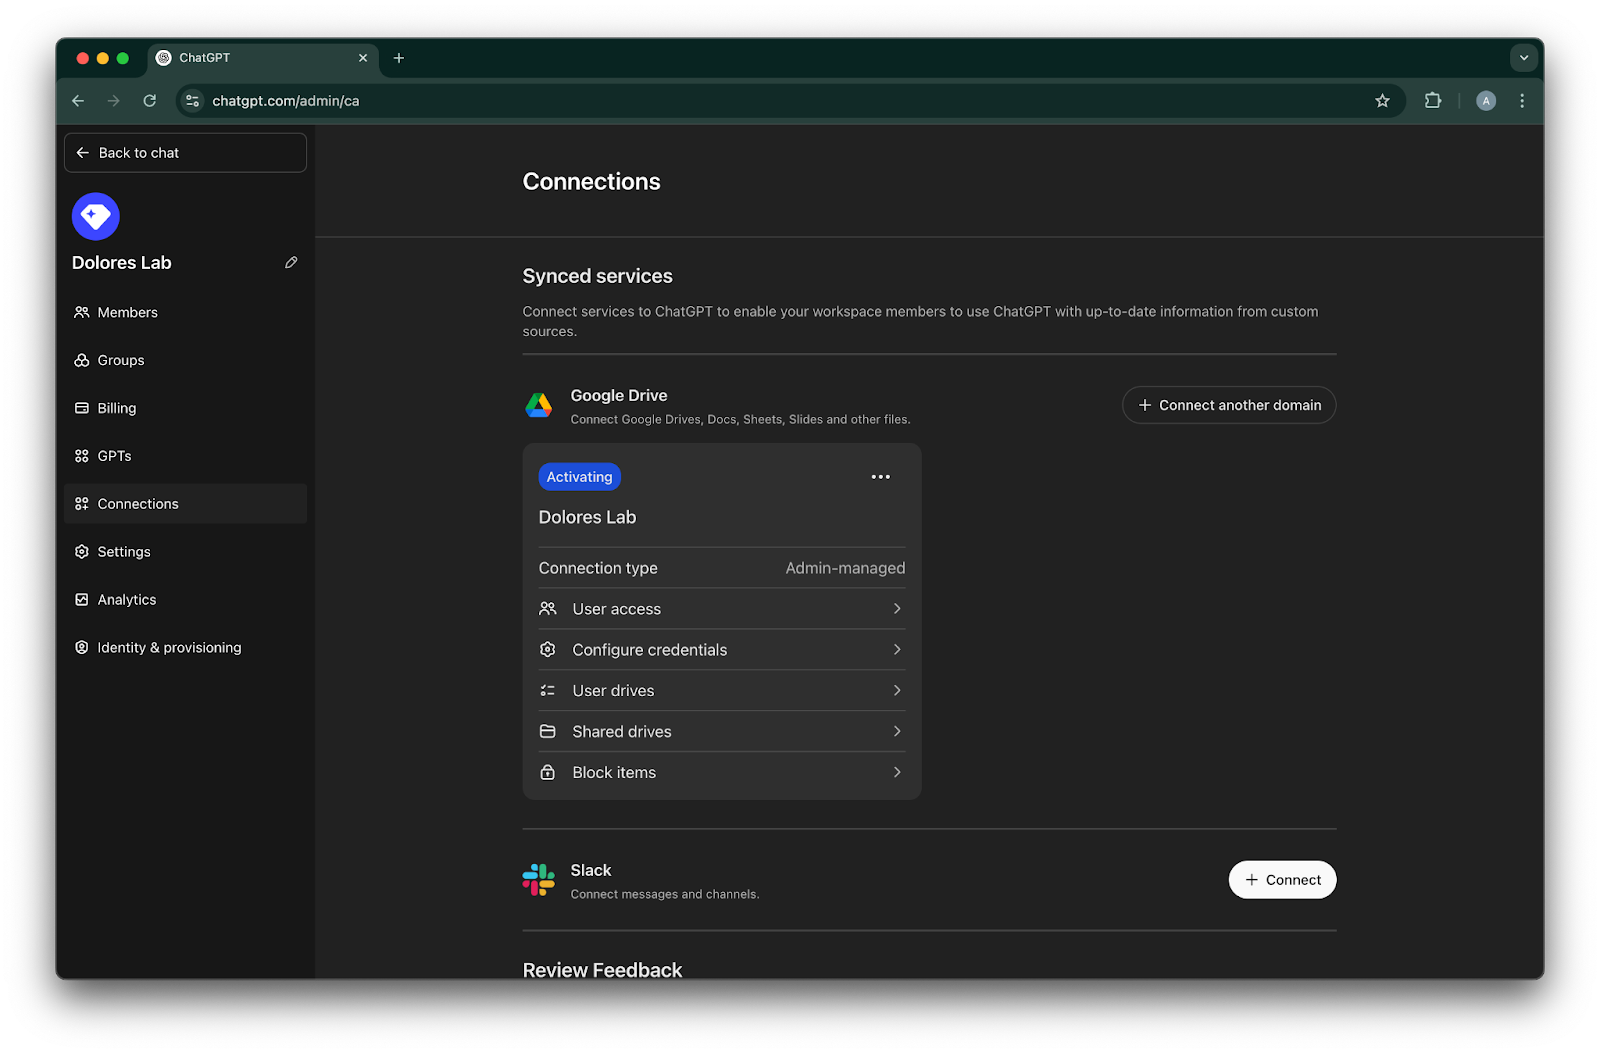
သင့် Google Drive connection ကို ယခု အောင်မြင်စွာ ဖန်တီးပြီးပါပြီ!
ချက်ချင်း sync စတင်မည်ဖြစ်သော်လည်း သင့် setting များအပေါ် မူတည်၍ ထည့်သွင်းထားသော ဖိုင်အရေအတွက်ပေါ်မူတည်ကာ အပြီးသတ်ရန် နာရီပိုင်းမှ ရက်ပိုင်းအထိ ကြာနိုင်ကြောင်း ကျေးဇူးပြု၍ မှတ်သားပါ။
ပြီးခဲ့သော 30 ရက်အတွင်း ထည့်သွင်း/တည်းဖြတ်ထားသော ဖိုင်များ sync ပြီးသွားသည်နှင့် connector ကို သင်ဖွင့်ပေးထားသော အသုံးပြုသူများ အသုံးပြုနိုင်မည်ဖြစ်သည်။
service account key creation ကို ဖွင့်ခြင်း
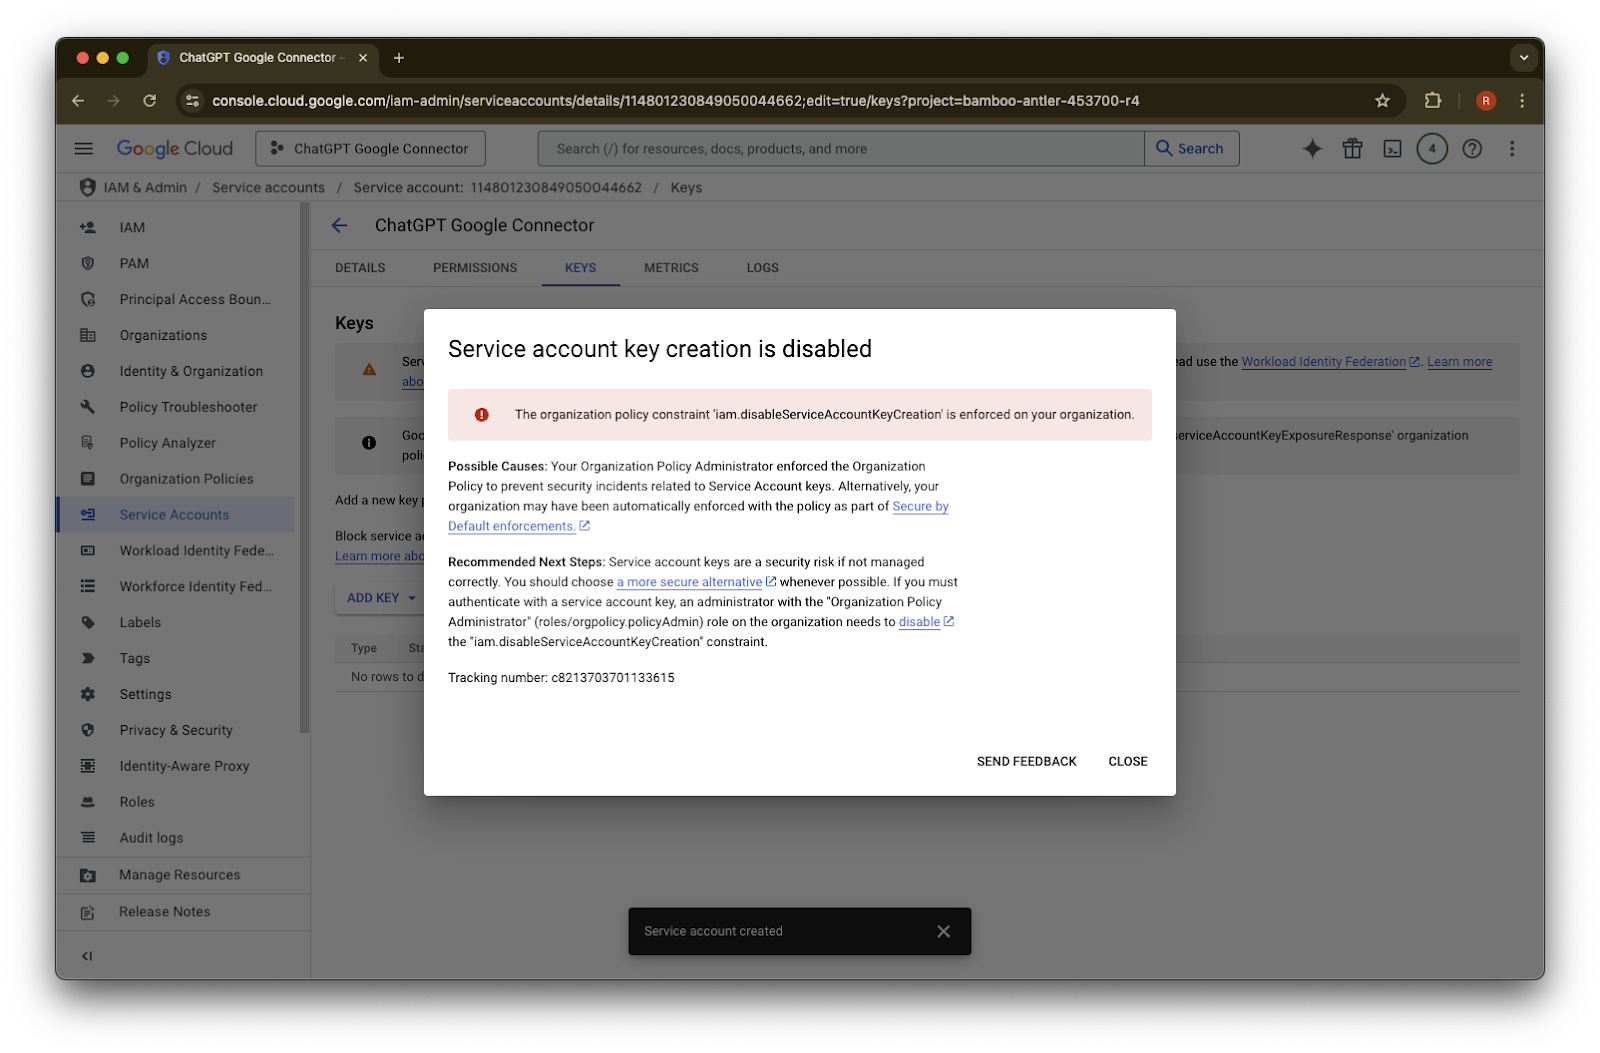
အောက်ပါ error ကို လက်ခံရရှိပါက ဤ project အတွက် service account creation ကို ဖွင့်ရန် လိုအပ်ပါမည်-
> အဖွဲ့အစည်းပေါ်တွင် organization policy constraint ‘iam.disableServiceAccountKeyCreation’ ကို enforce လုပ်ထားပါသည်။
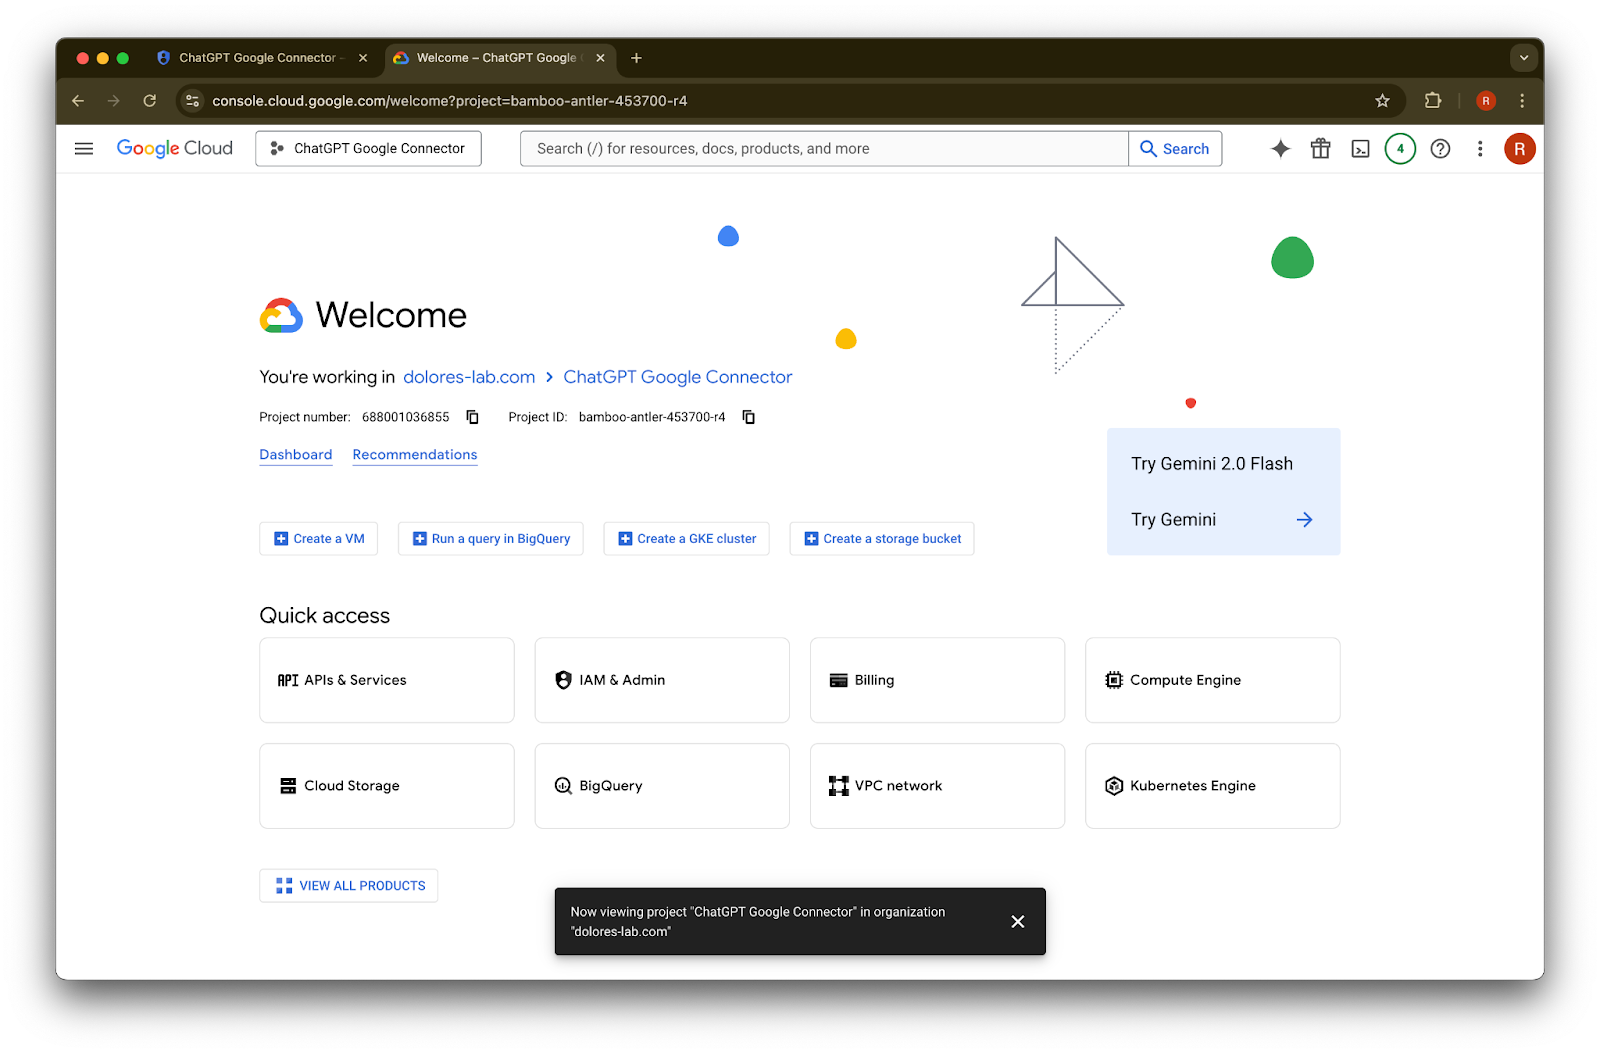
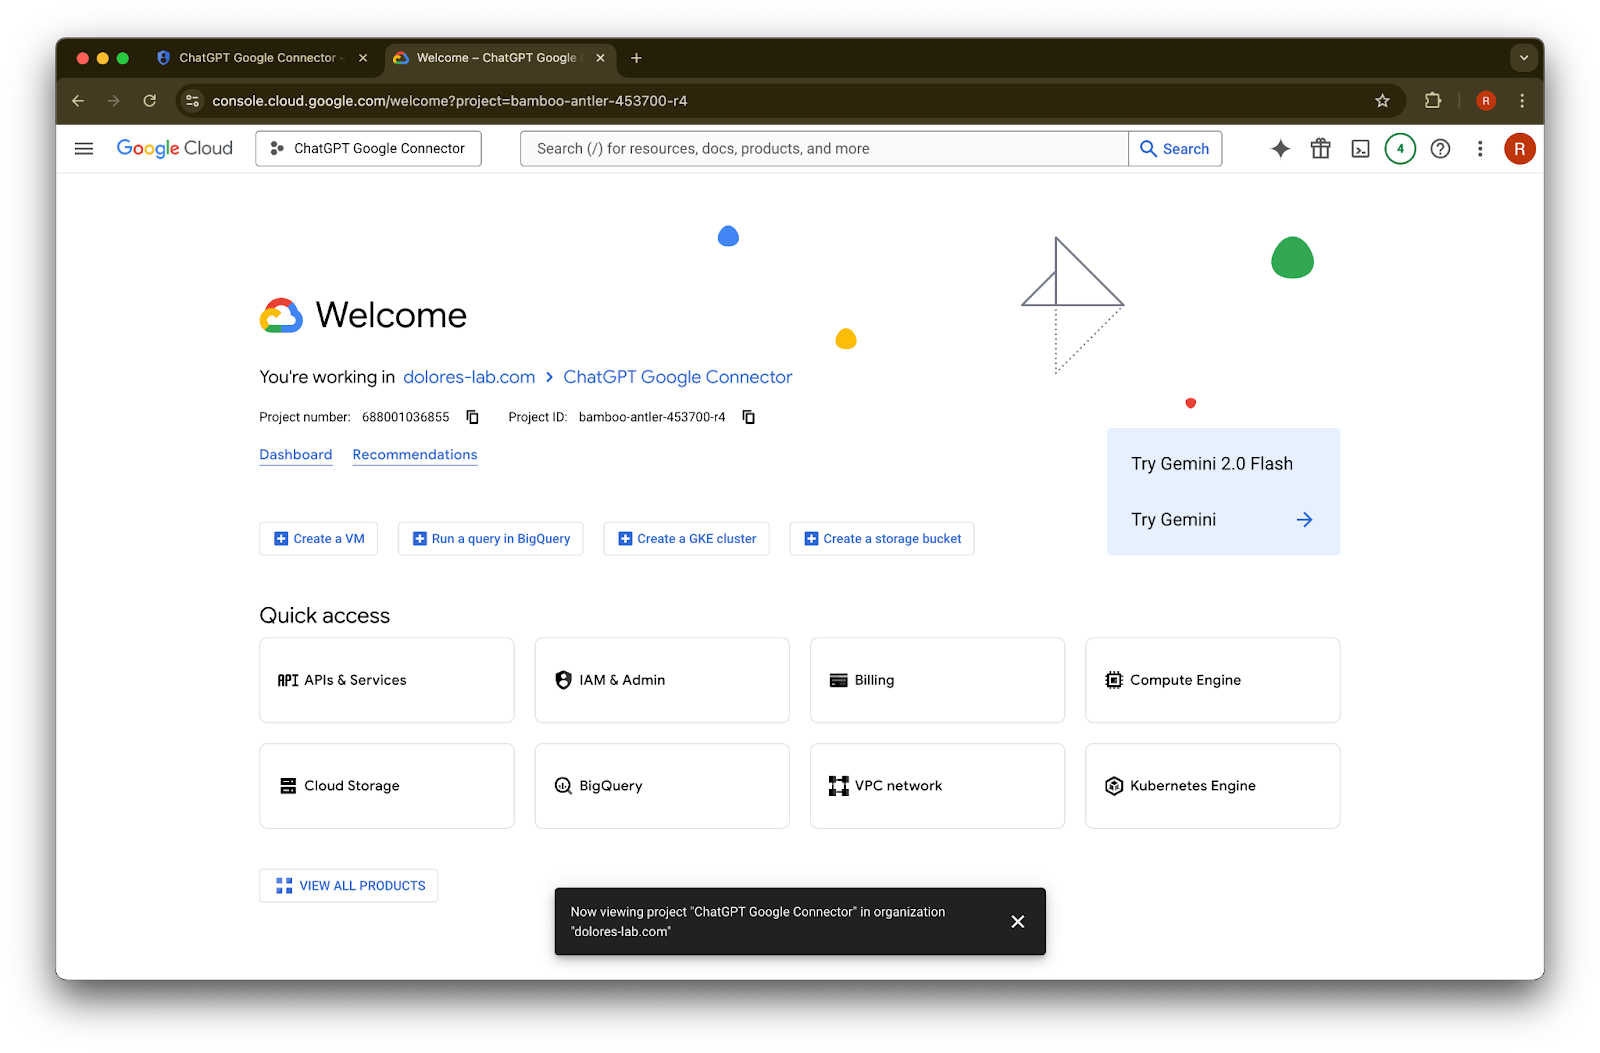
tab အသစ်တစ်ခု ဖွင့်ပြီး console.cloud.google.com သို့ သွားပါ။ ရွေးချယ်ထားသော project သည် သင် ယခင်က ရွေးချယ်ထားပြီးသား project ဖြစ်ကြောင်း သေချာစေပါ။
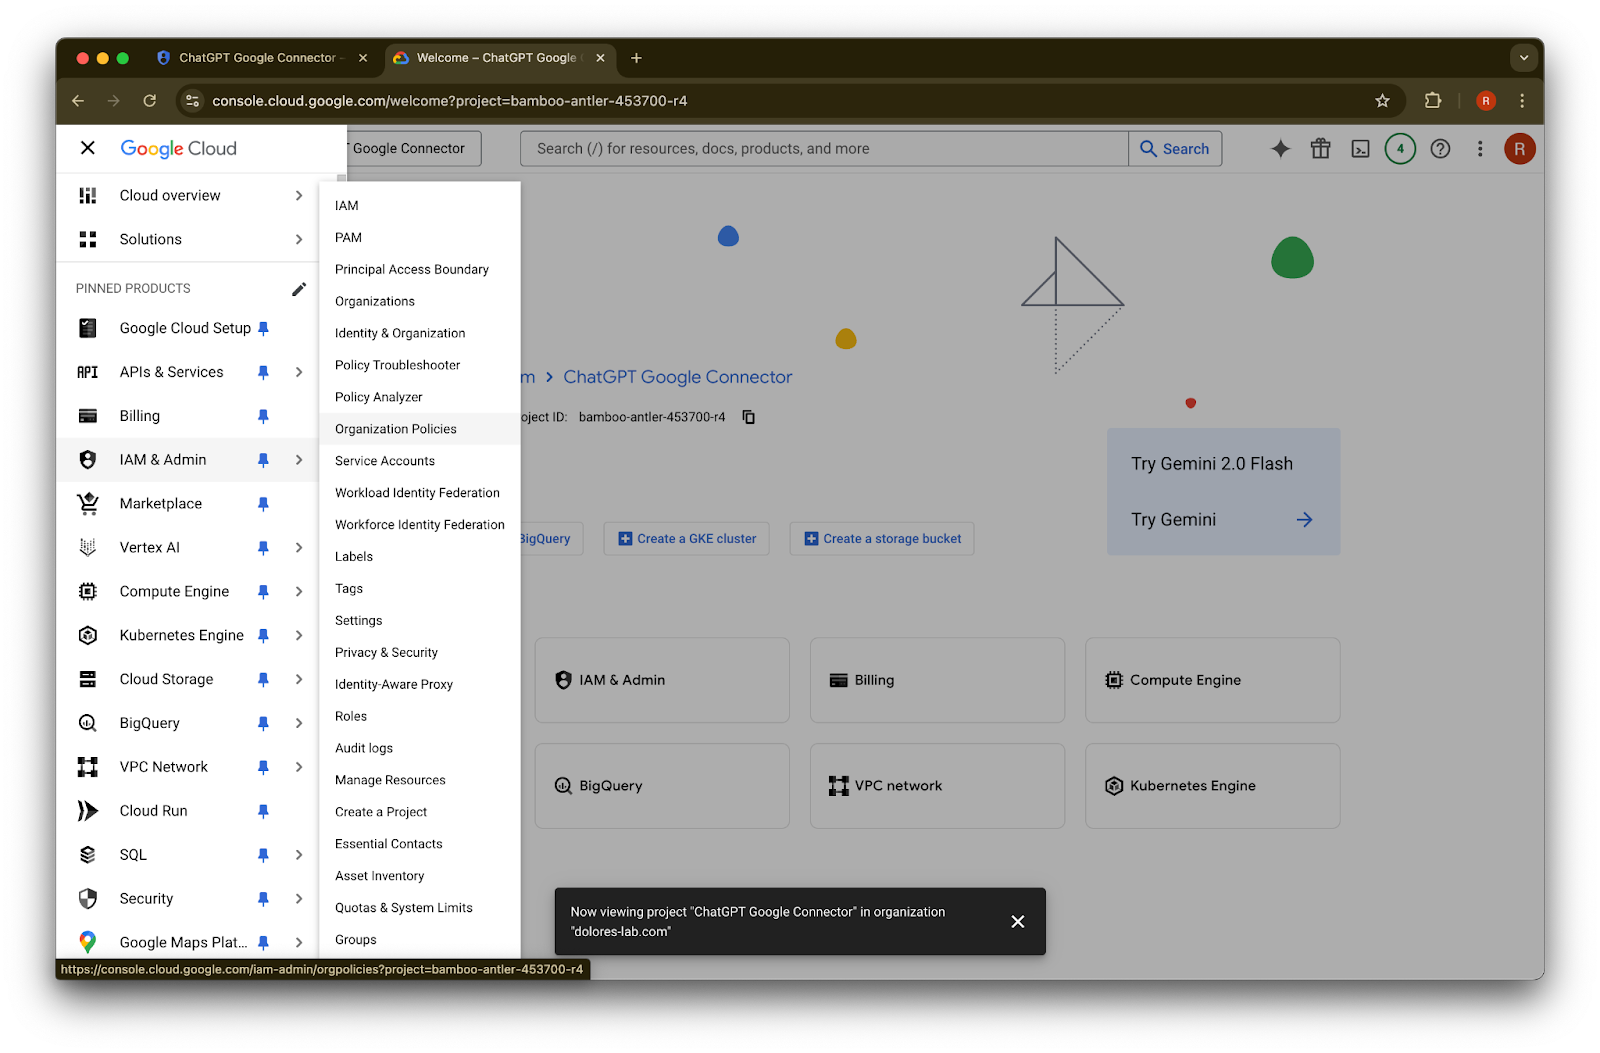
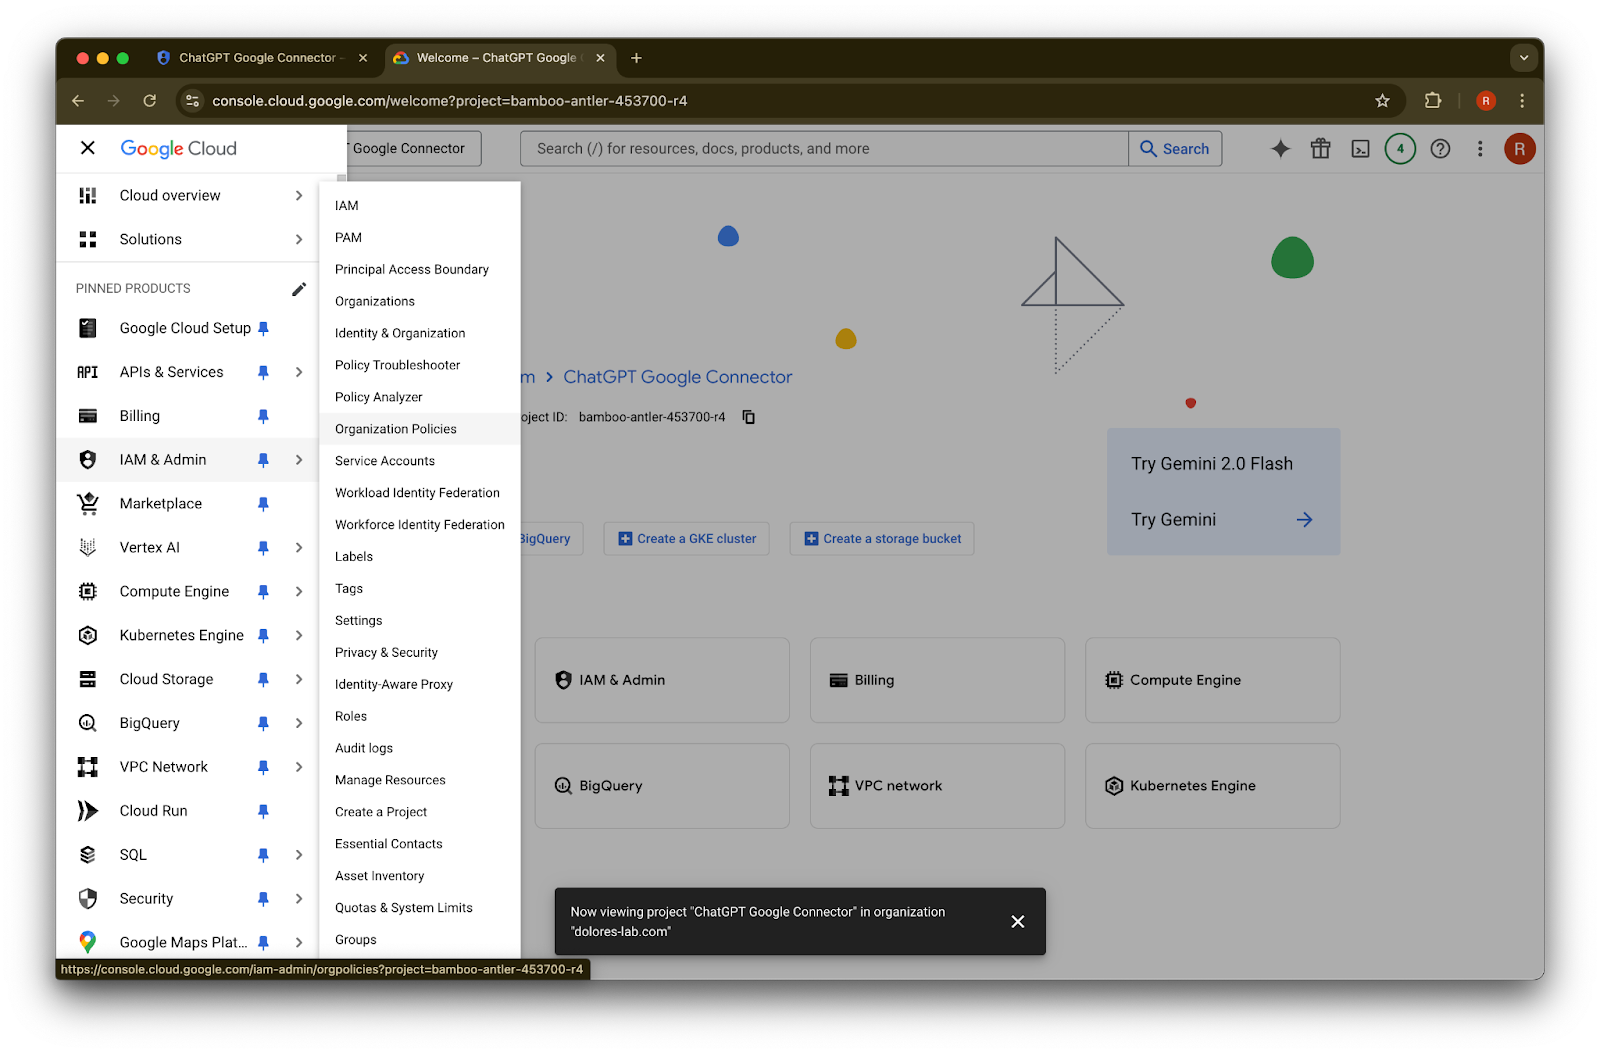
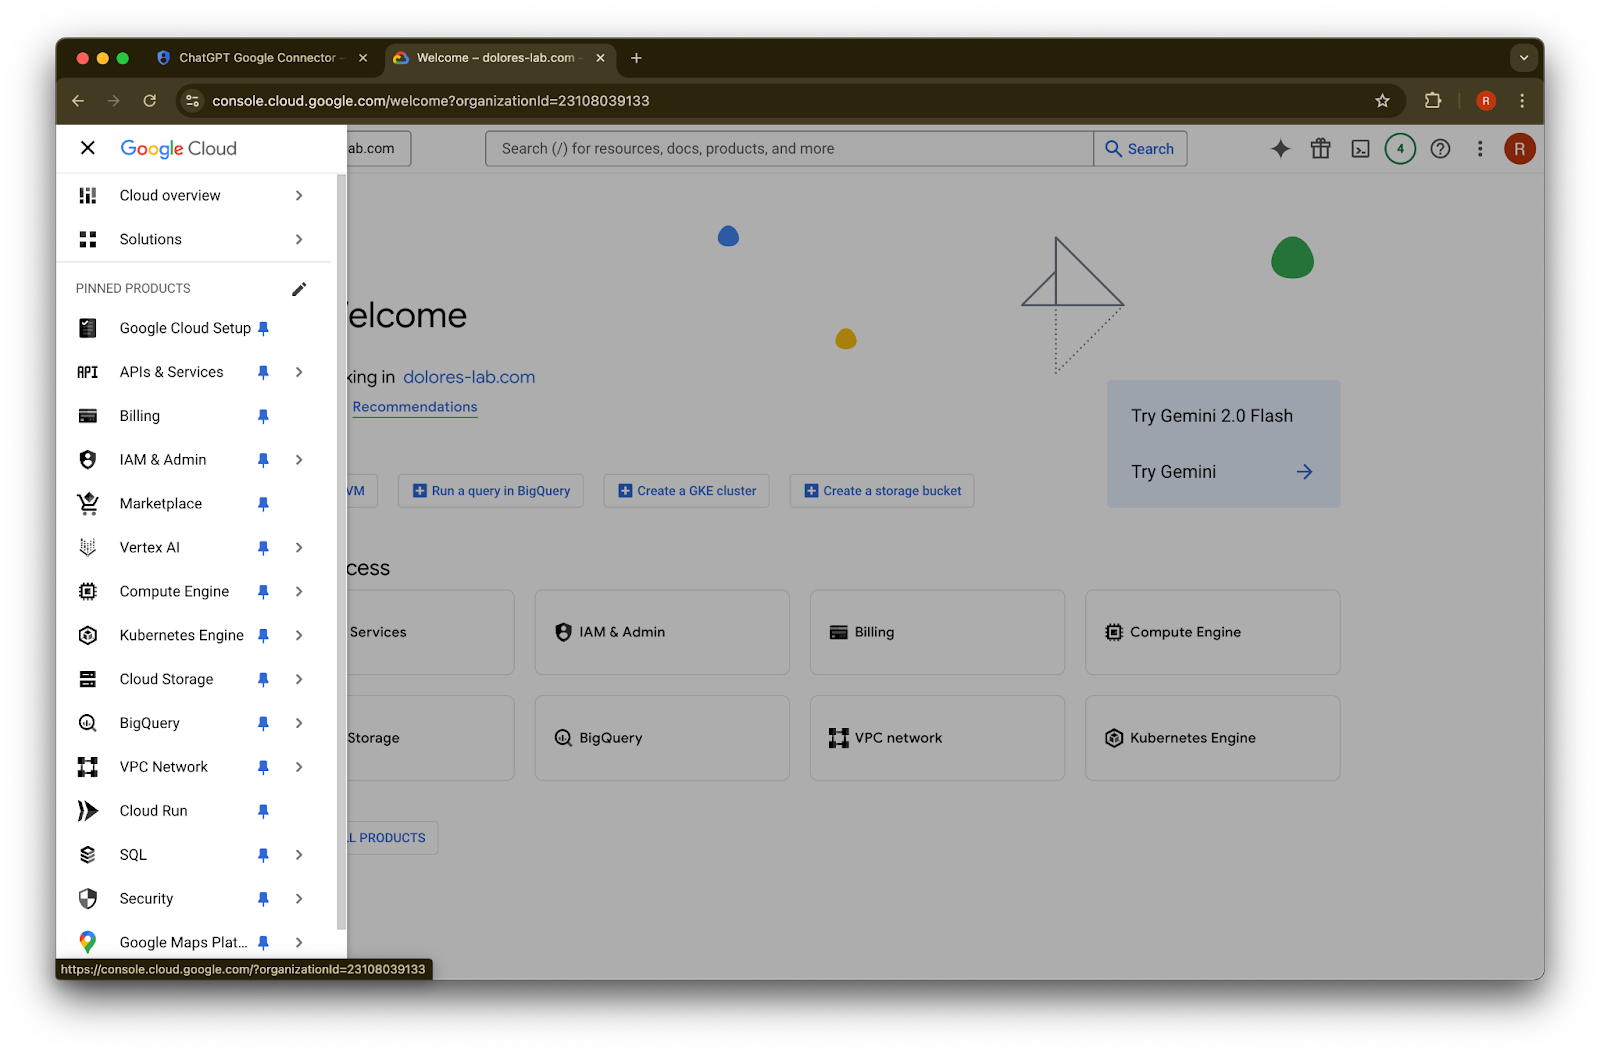
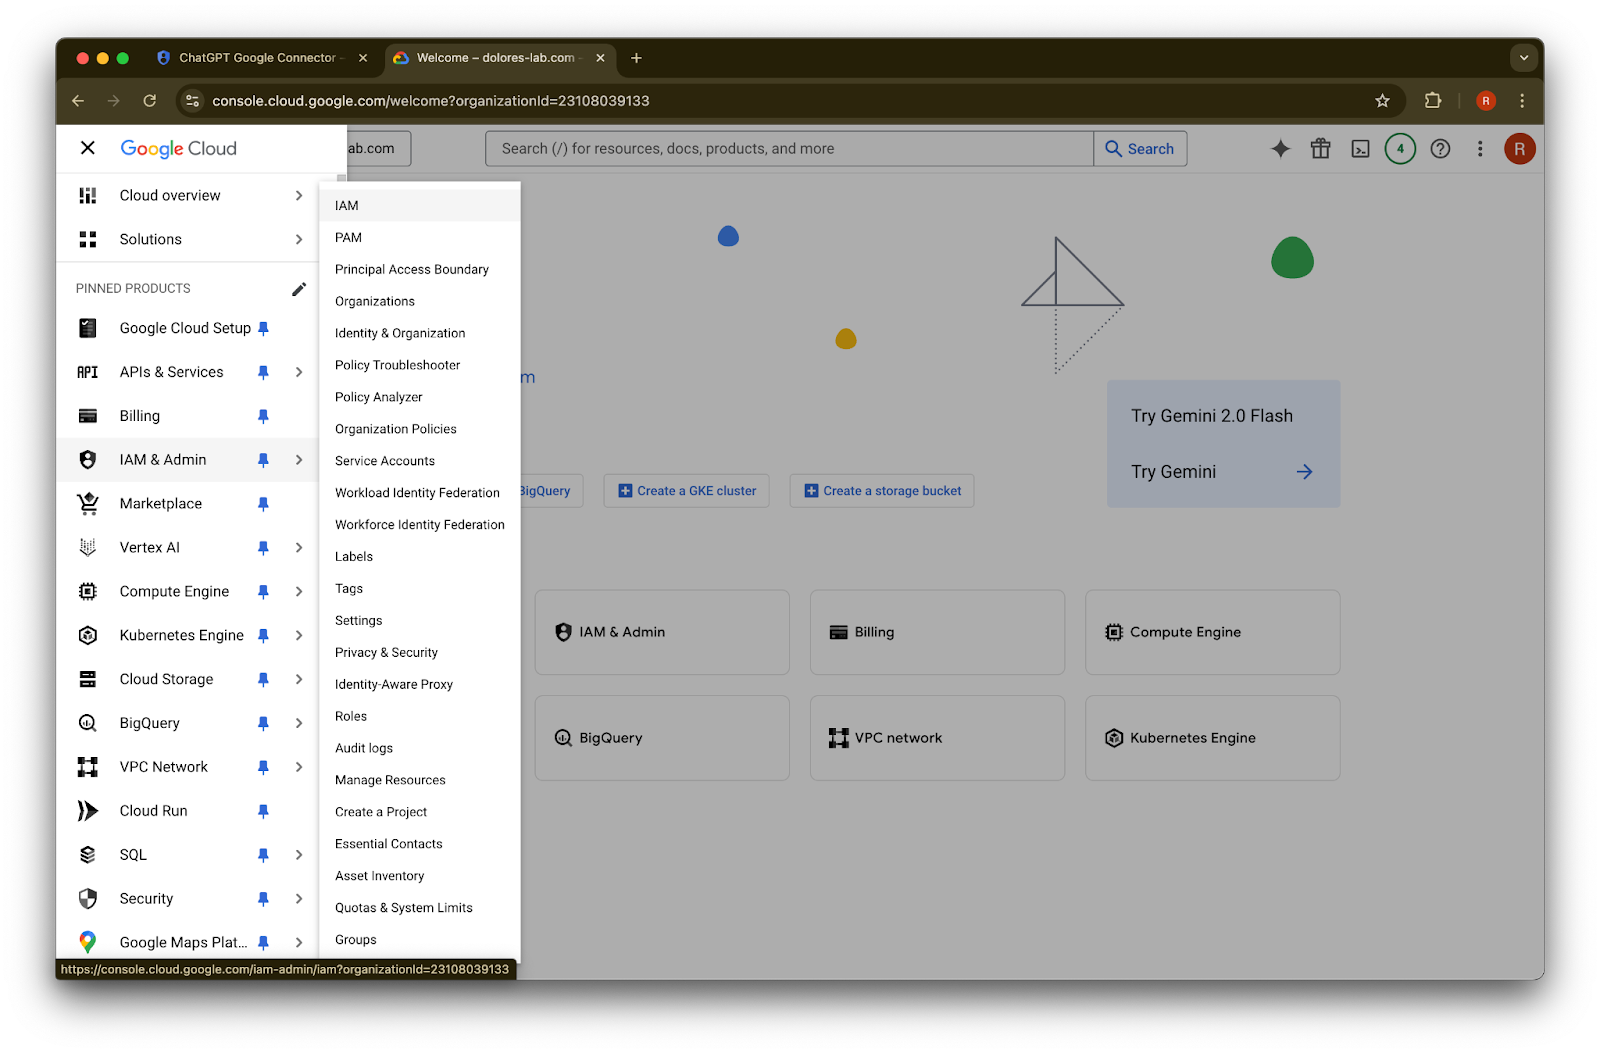
ဘယ်ဘက်အပေါ်ထောင့်ရှိ menu icon ကို နှိပ်ပါ။IAM & Admin ပေါ်တွင် cursor တင်ပါ
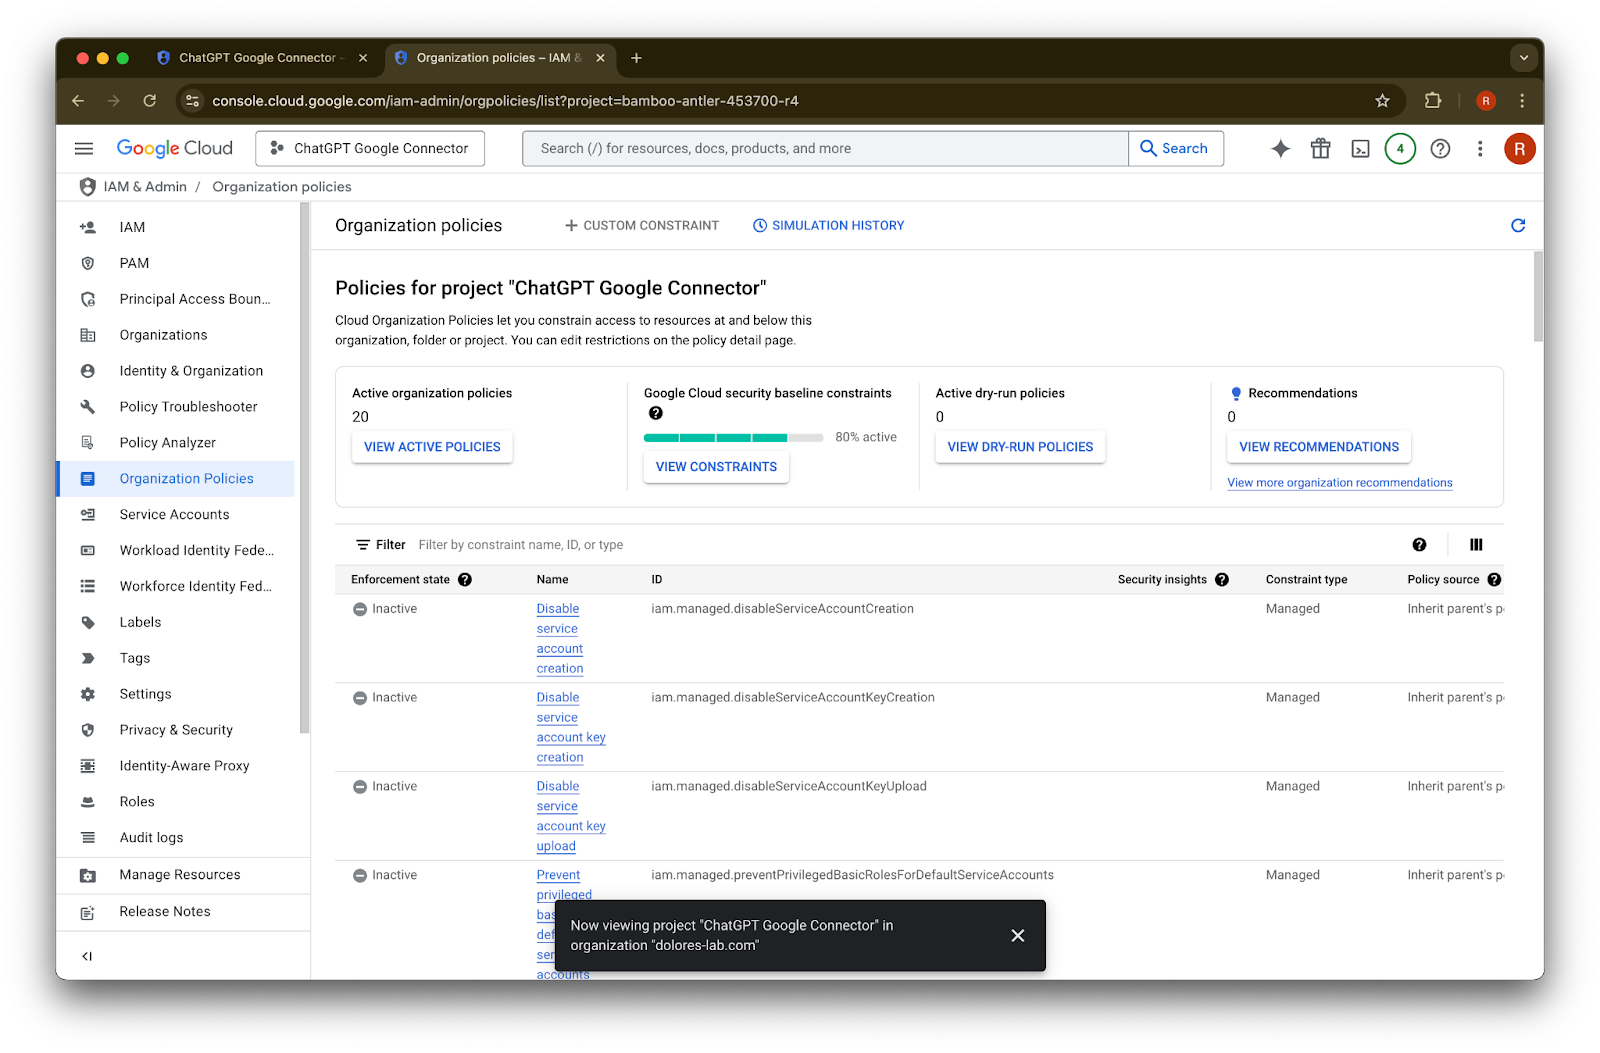
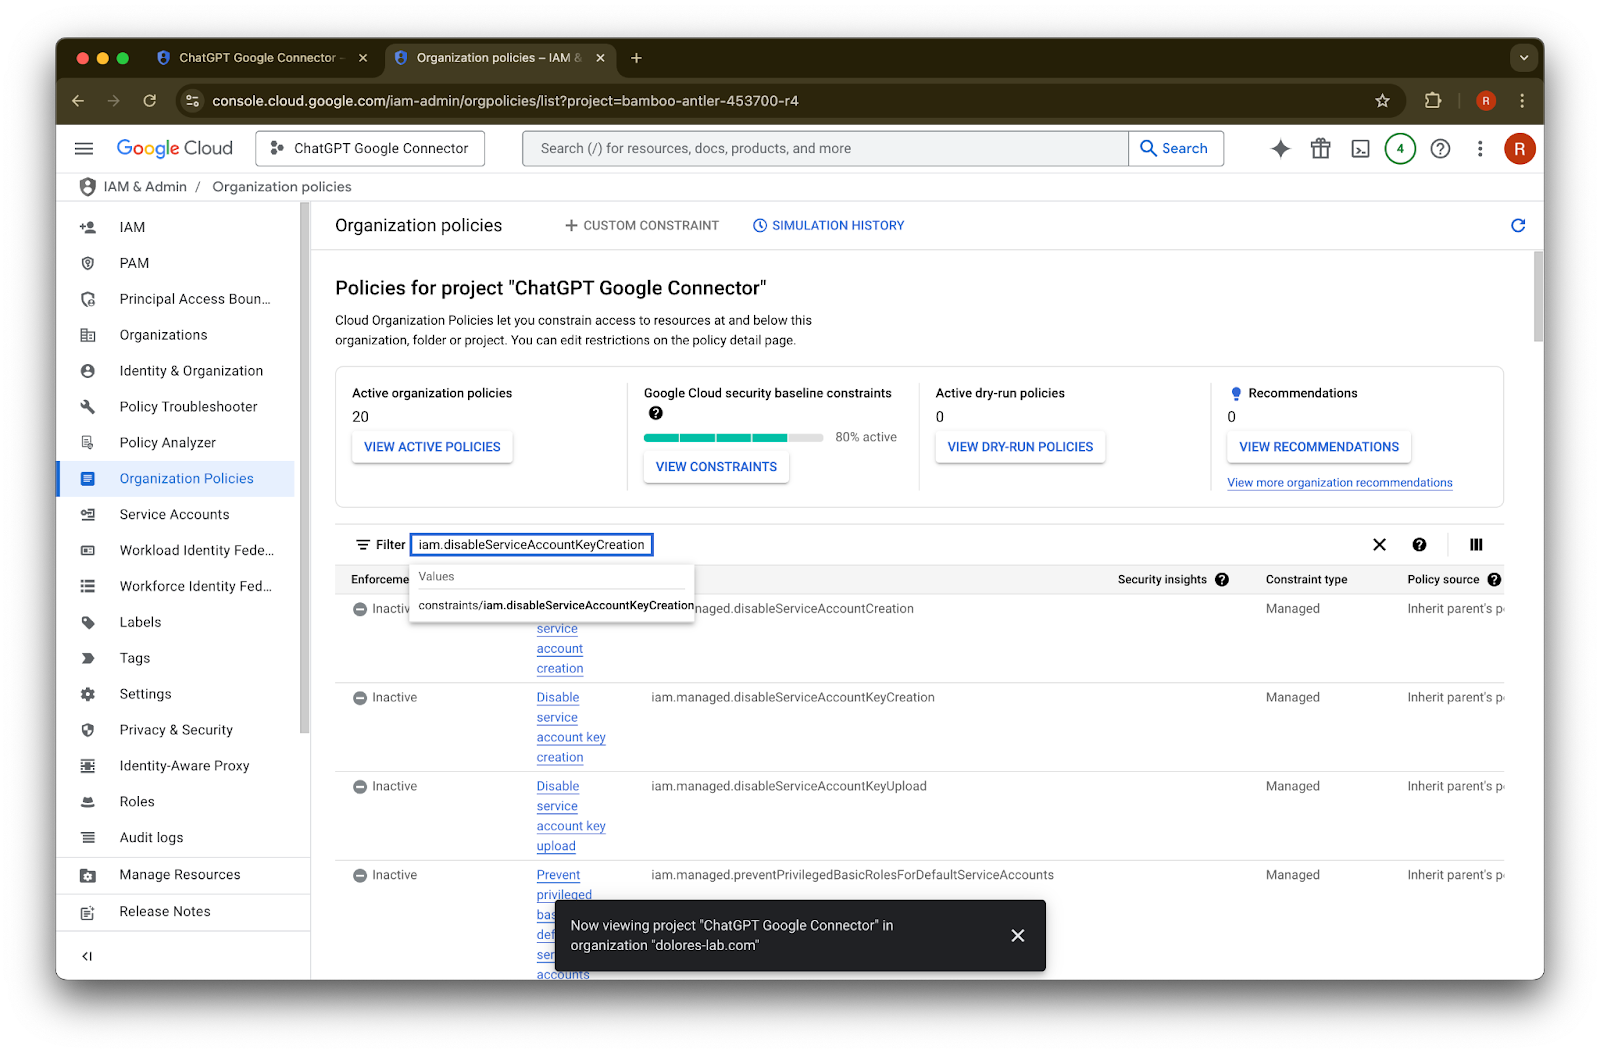
Organizational Policies ကို နှိပ်ပါ
iam.disableServiceAccountKeyCreation
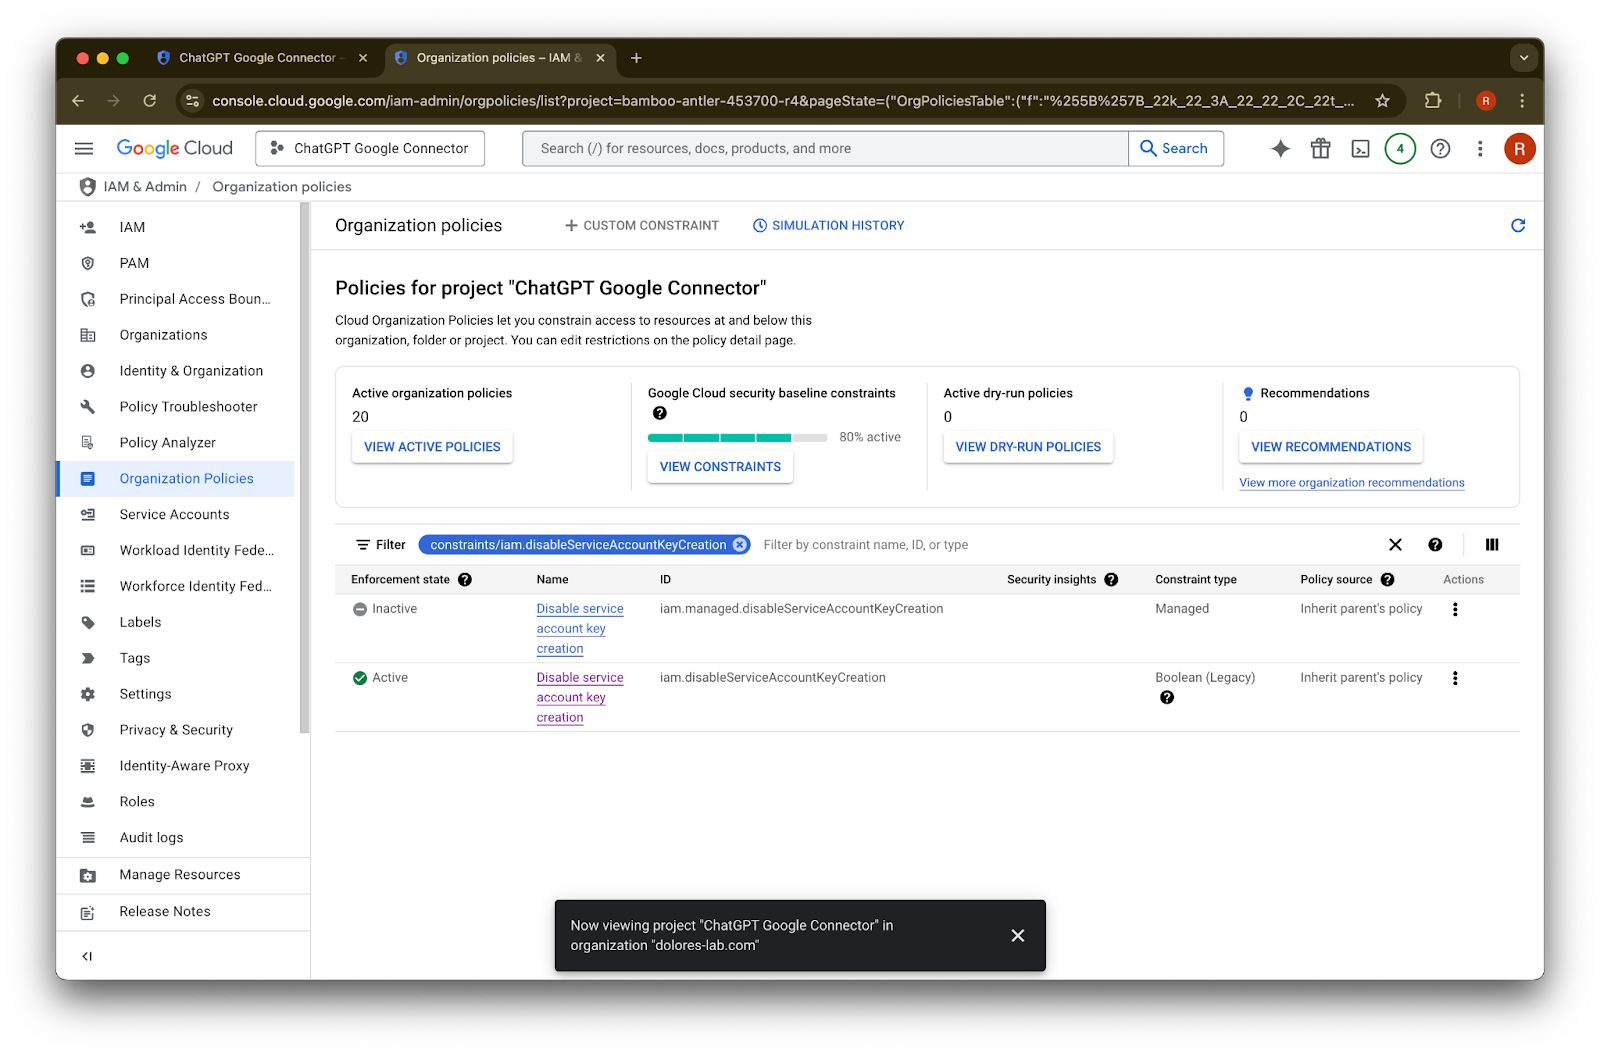
ကို ရှာပါconstraints/iam.disableServiceAccountKeyCreation
အတွက် ရလဒ်ကို နှိပ်ပါiam.disableServiceAccountKeyCreation
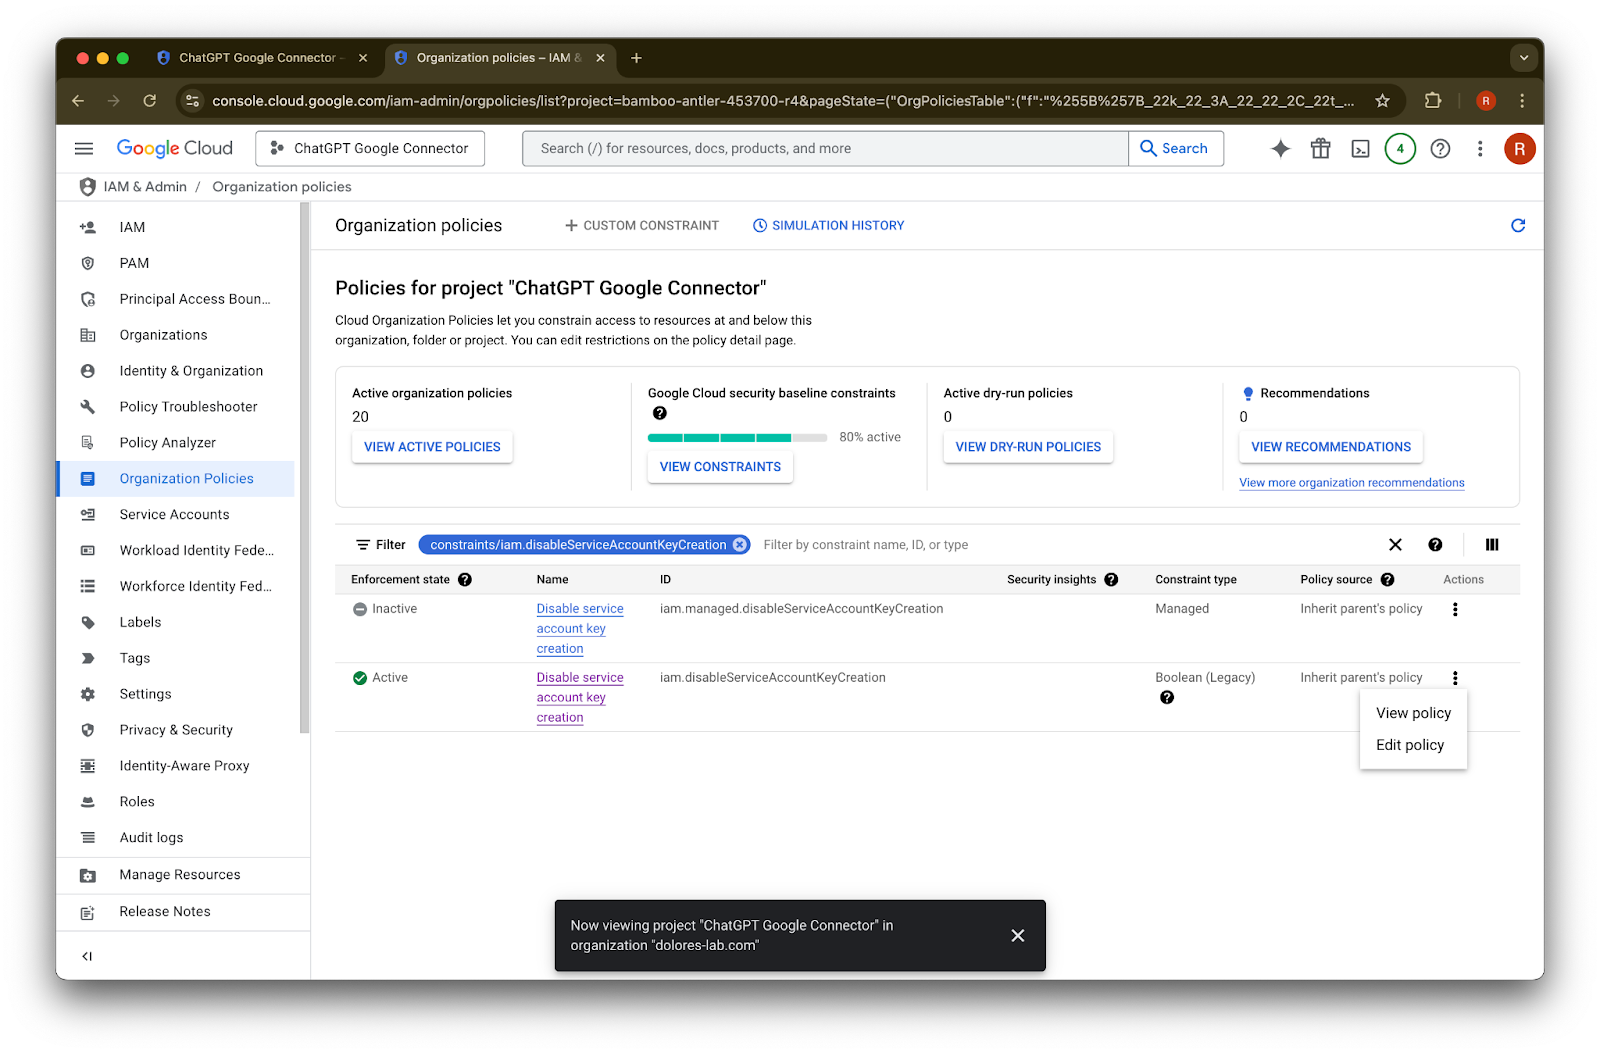
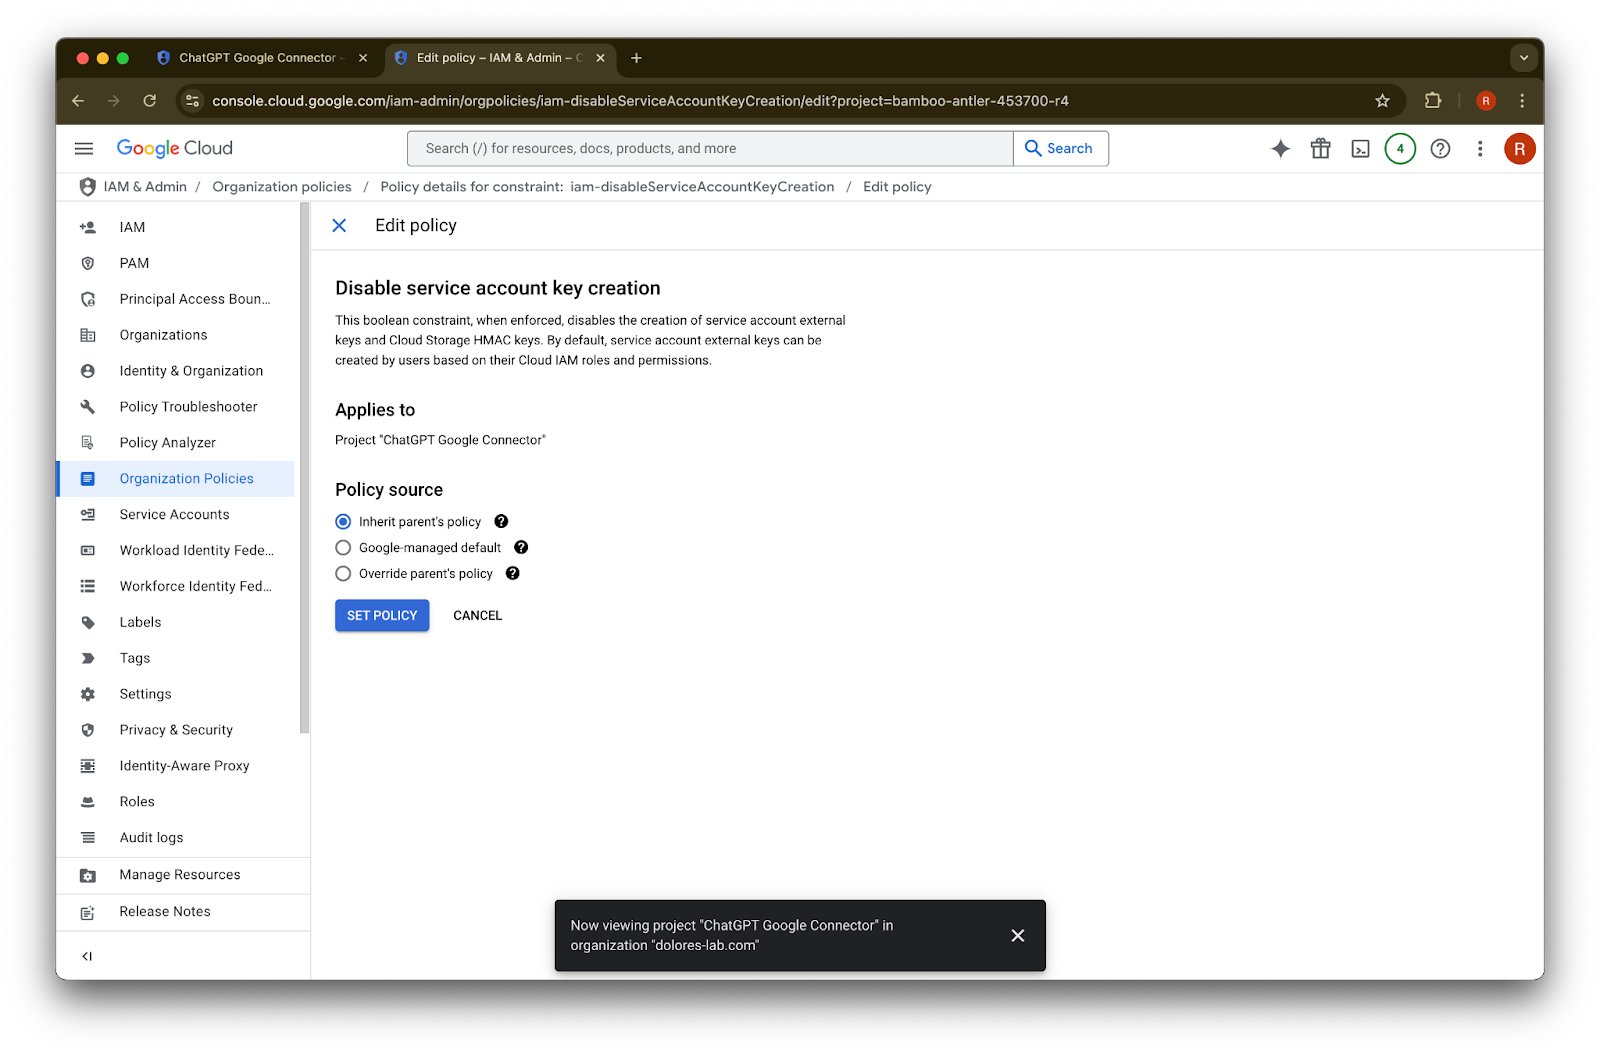
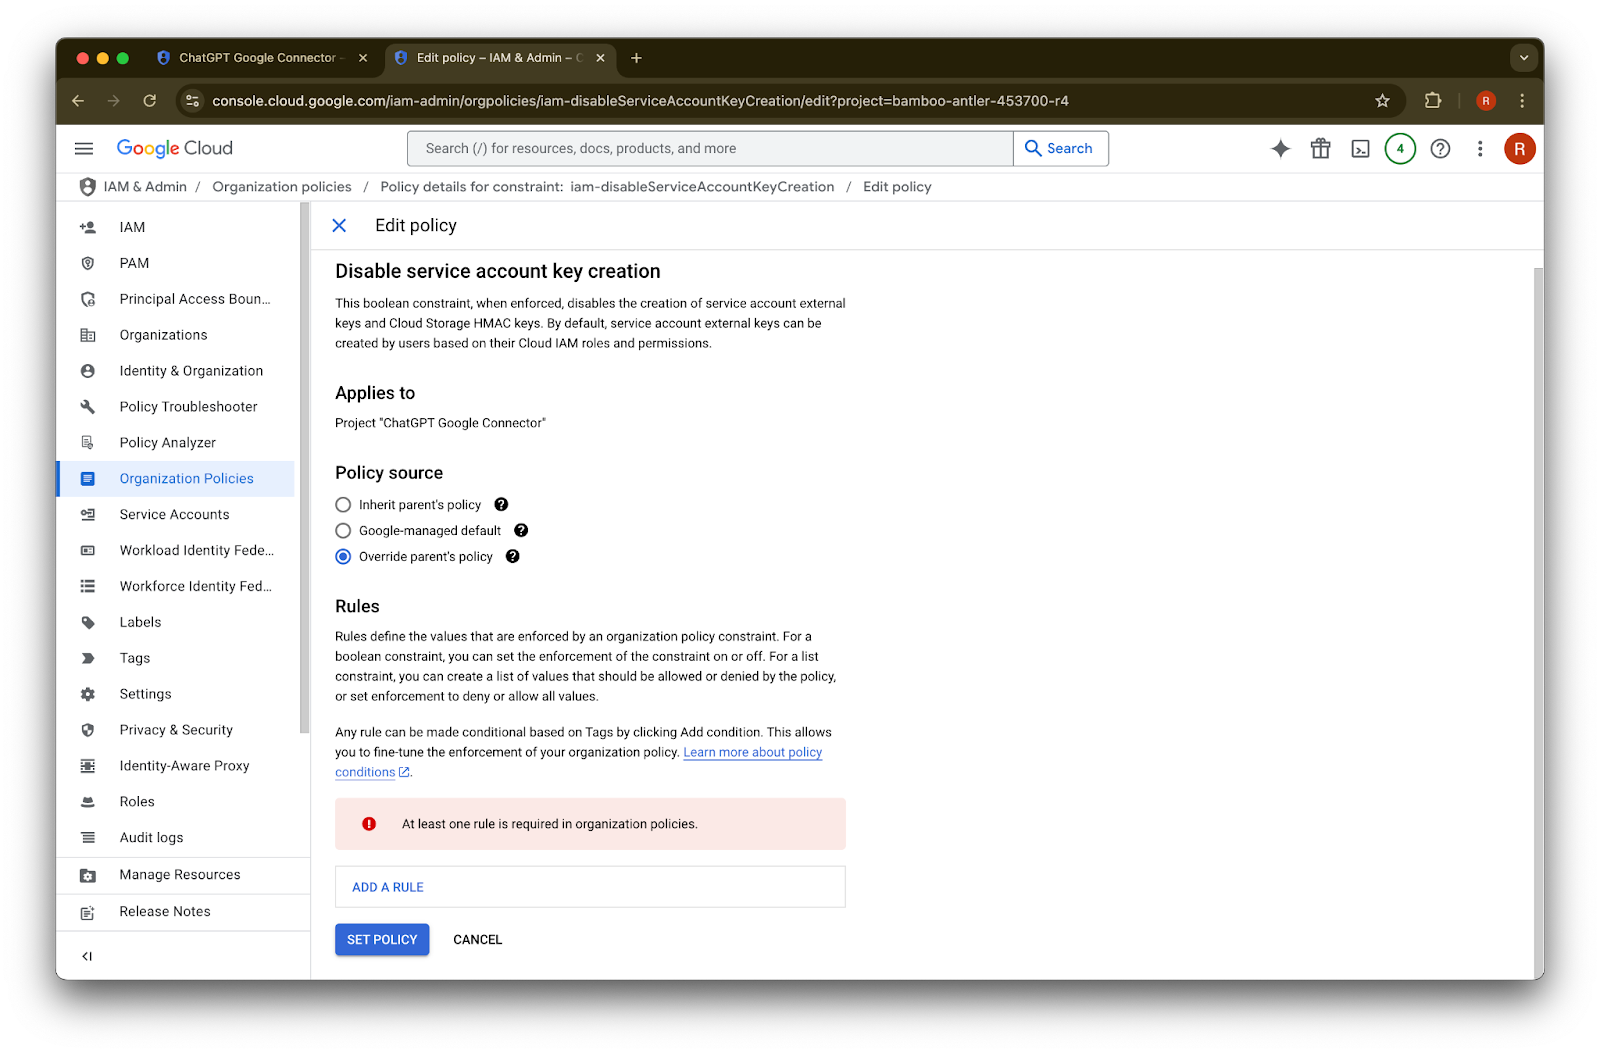
ID ပါသော row အတွက် … ကို နှိပ်ပါEdit policy ကို နှိပ်ပါ။ Edit policy ကို ပိတ်ထားပါက သင်သည် Organization Policy Administrator ဖြစ်ရန် လိုအပ်ပါမည်။
Override parent’s policy
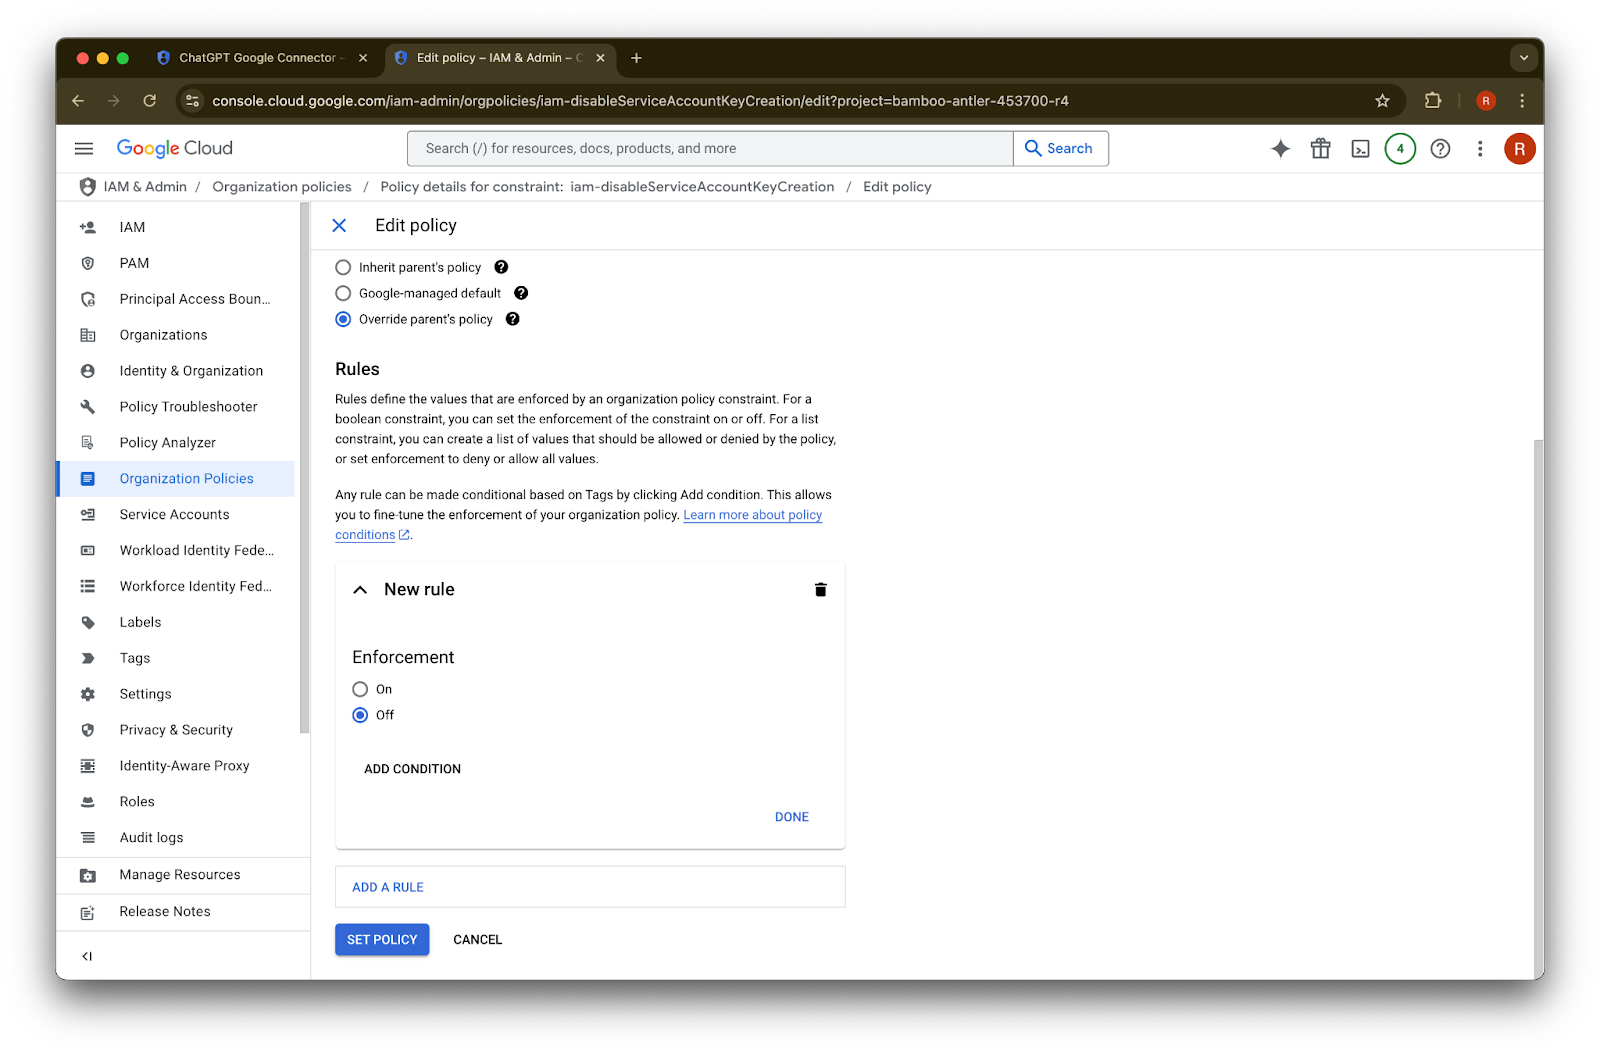
ကို နှိပ်ပါAdd a rule
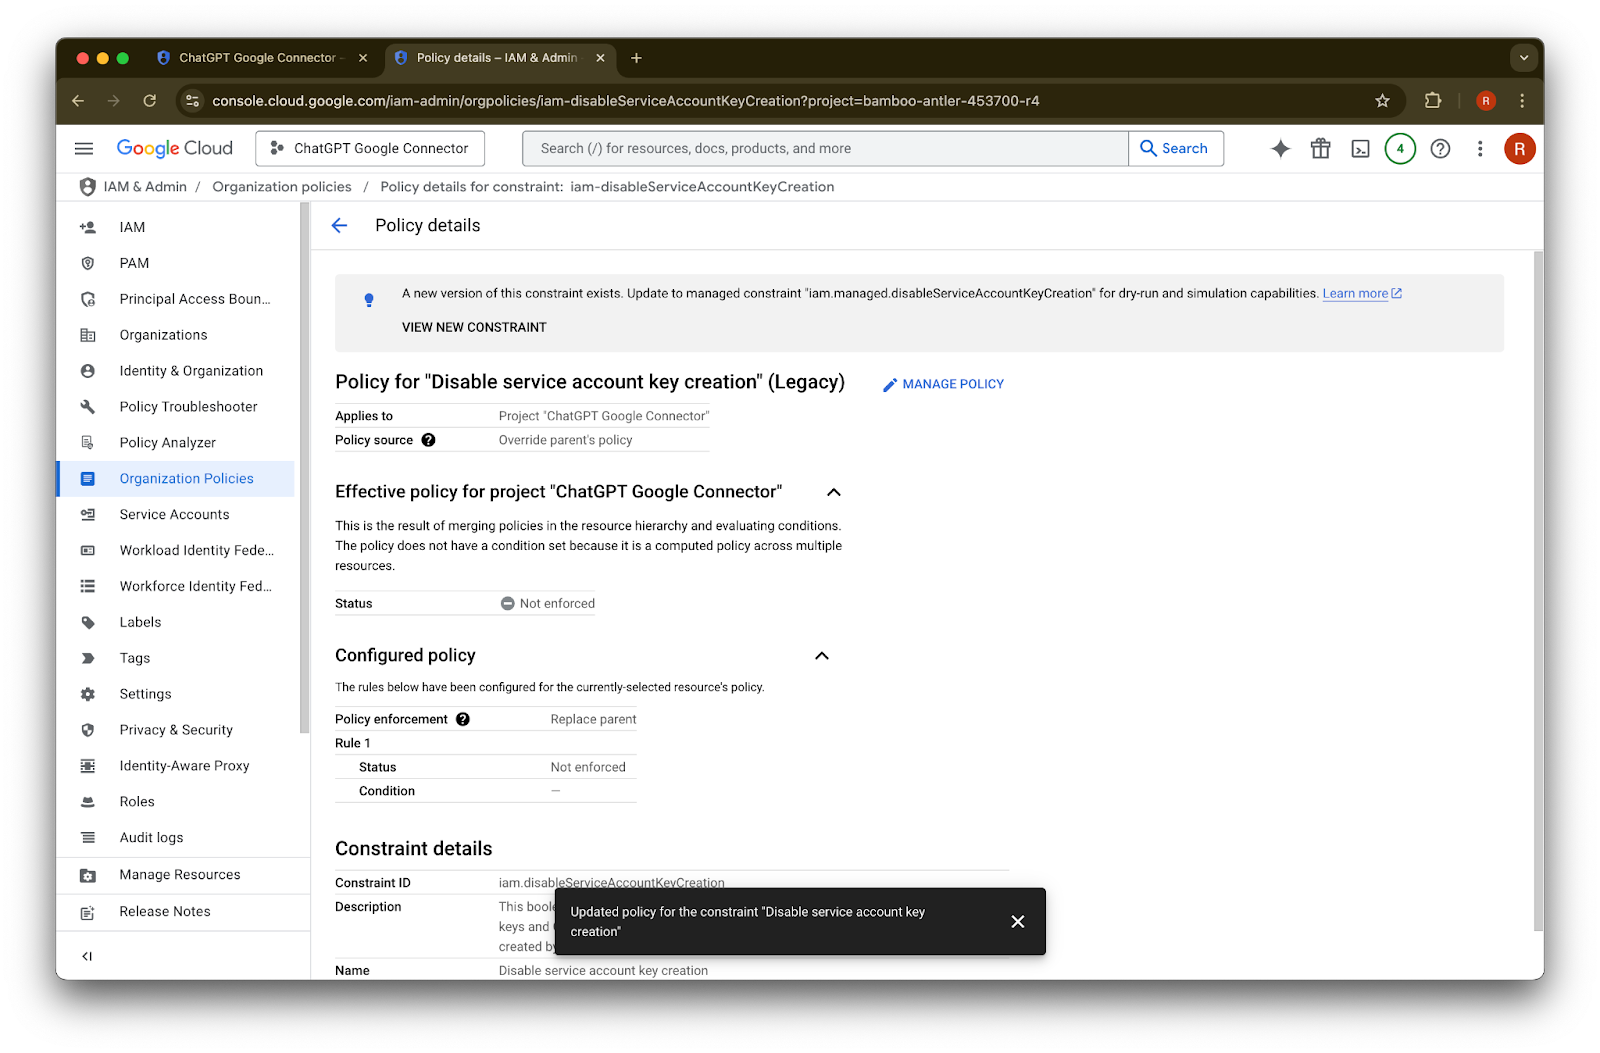
ကို နှိပ်ပါSet Policy
ကို နှိပ်ပါယခု သင်သည် service account key တစ်ခုကို ဖန်တီးနိုင်ပါပြီ။ ဤဖွင့်ခြင်းသည် အကျိုးသက်ရောက်ရန် မိနစ်အနည်းငယ် ကြာနိုင်ပါသည်။
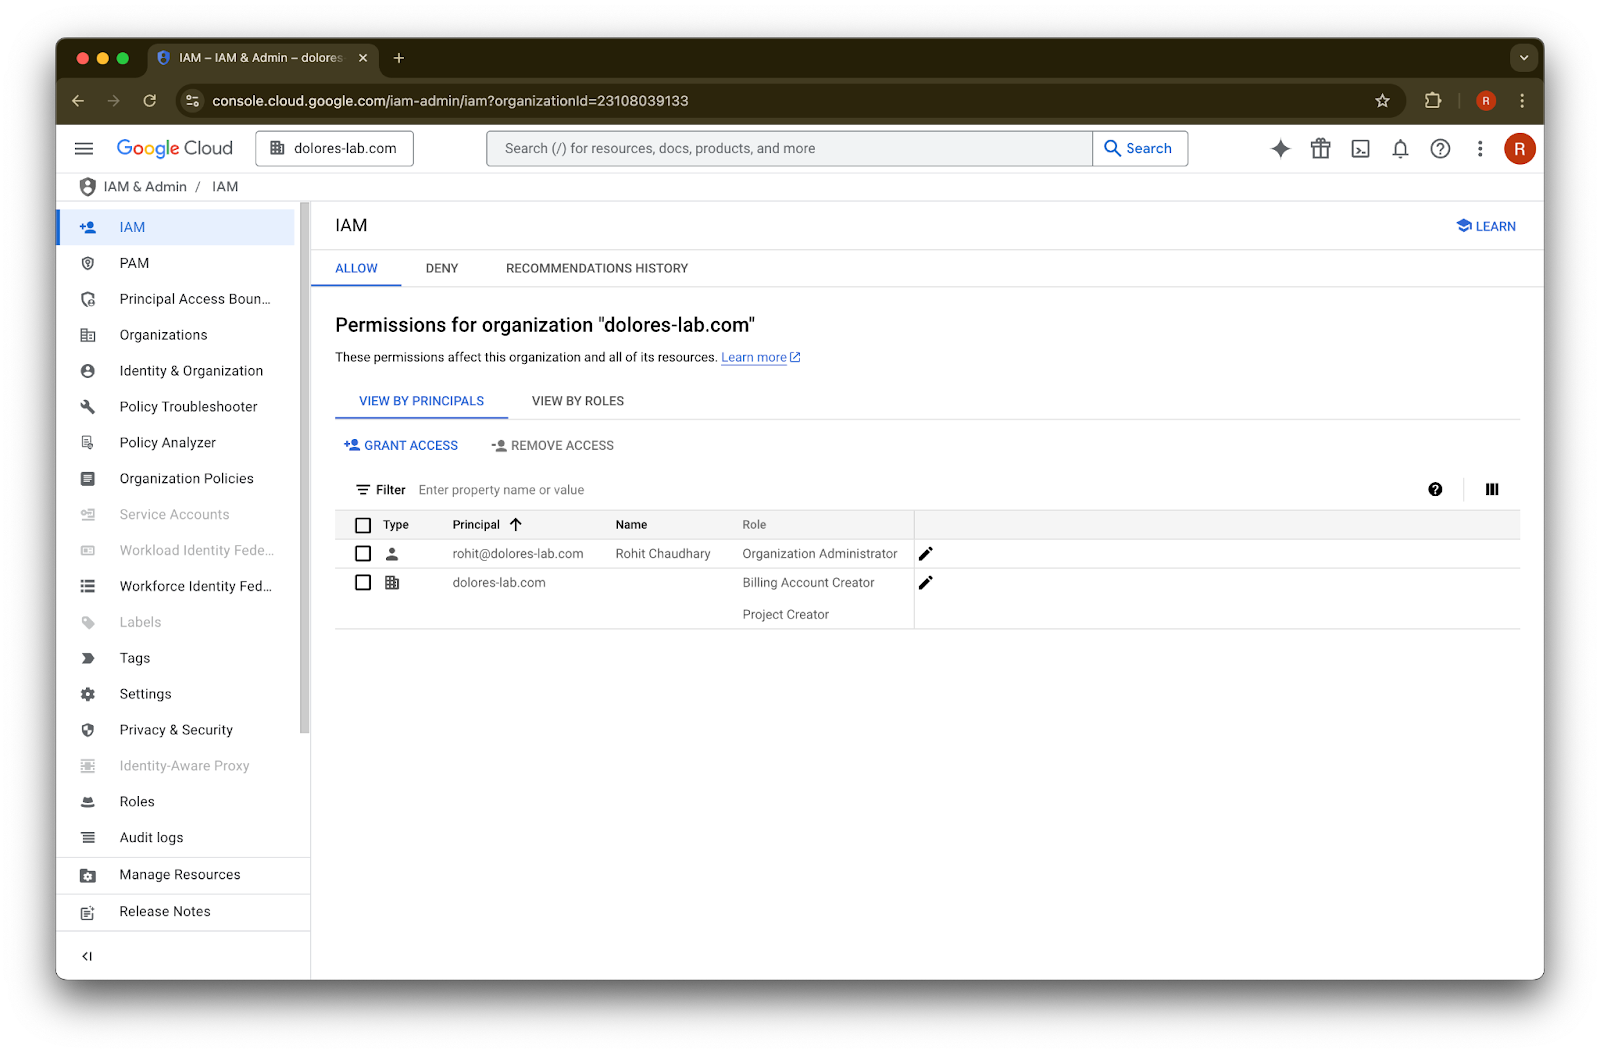
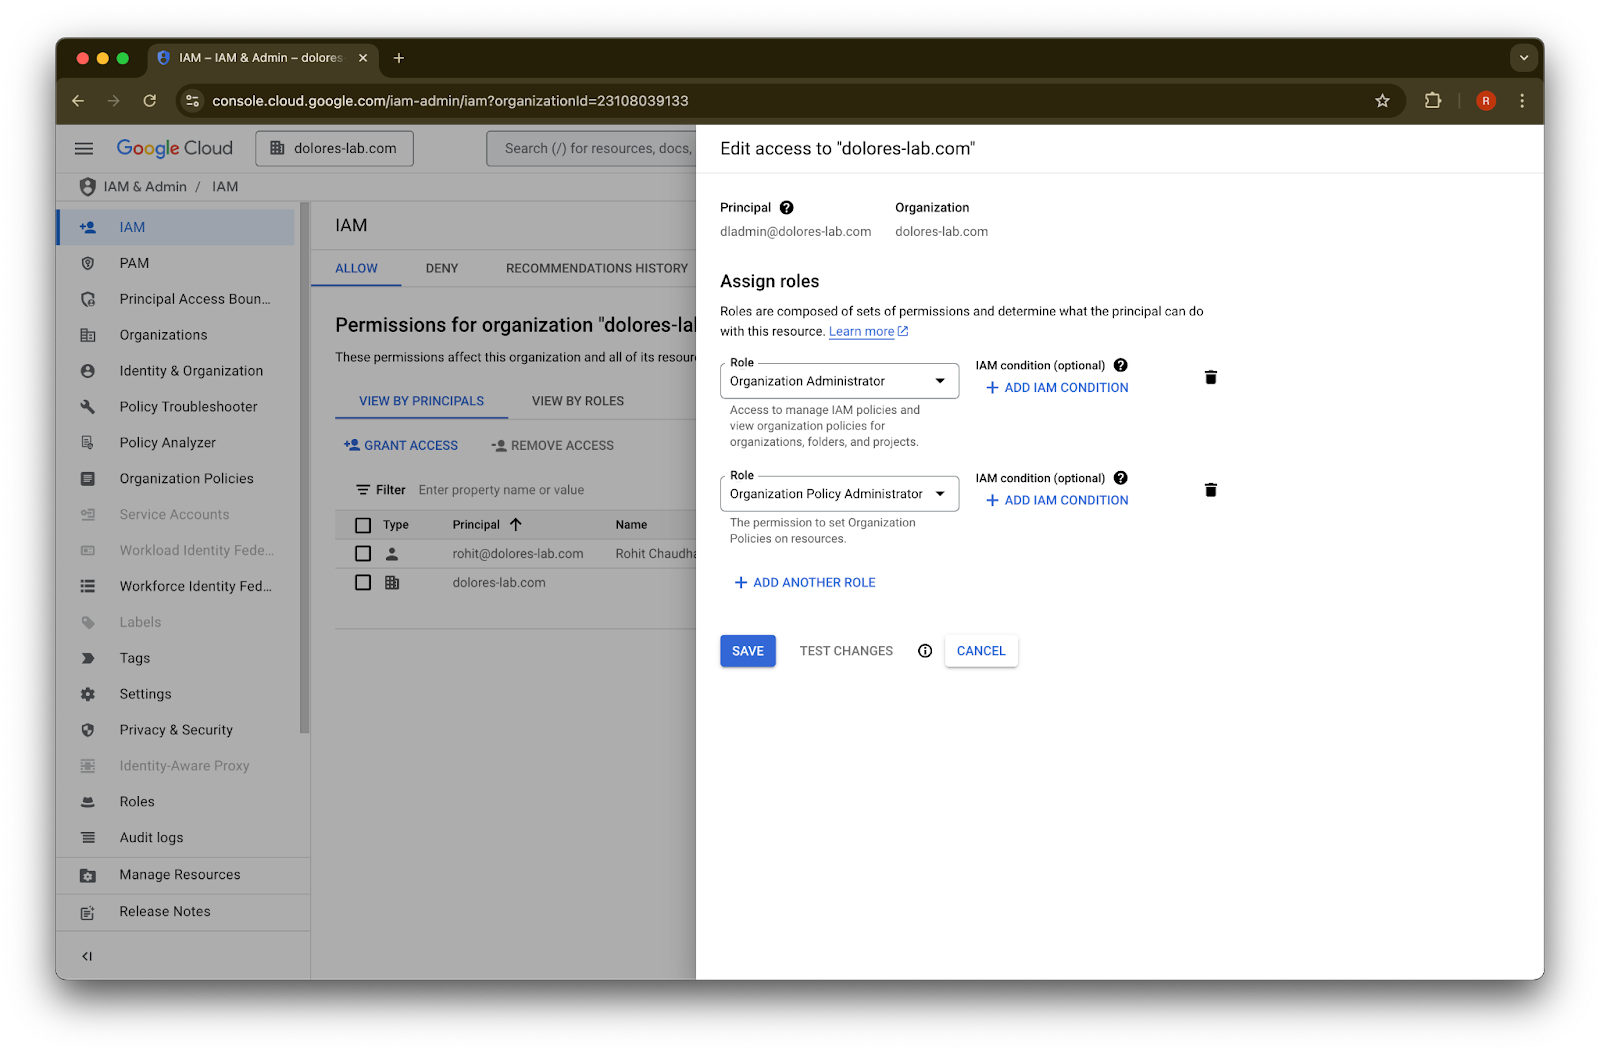
Organization Policy Administrator ဖြစ်လာခြင်း
console.cloud.google.com သို့ သွားပြီး project/organization selector ကို နှိပ်ပါ
your organization
ကို နှိပ်ပါဘယ်ဘက်အပေါ်ထောင့်ရှိ menu icon ကို နှိပ်ပါ
IAM & Admin
ပေါ်တွင် cursor တင်ပါIAM
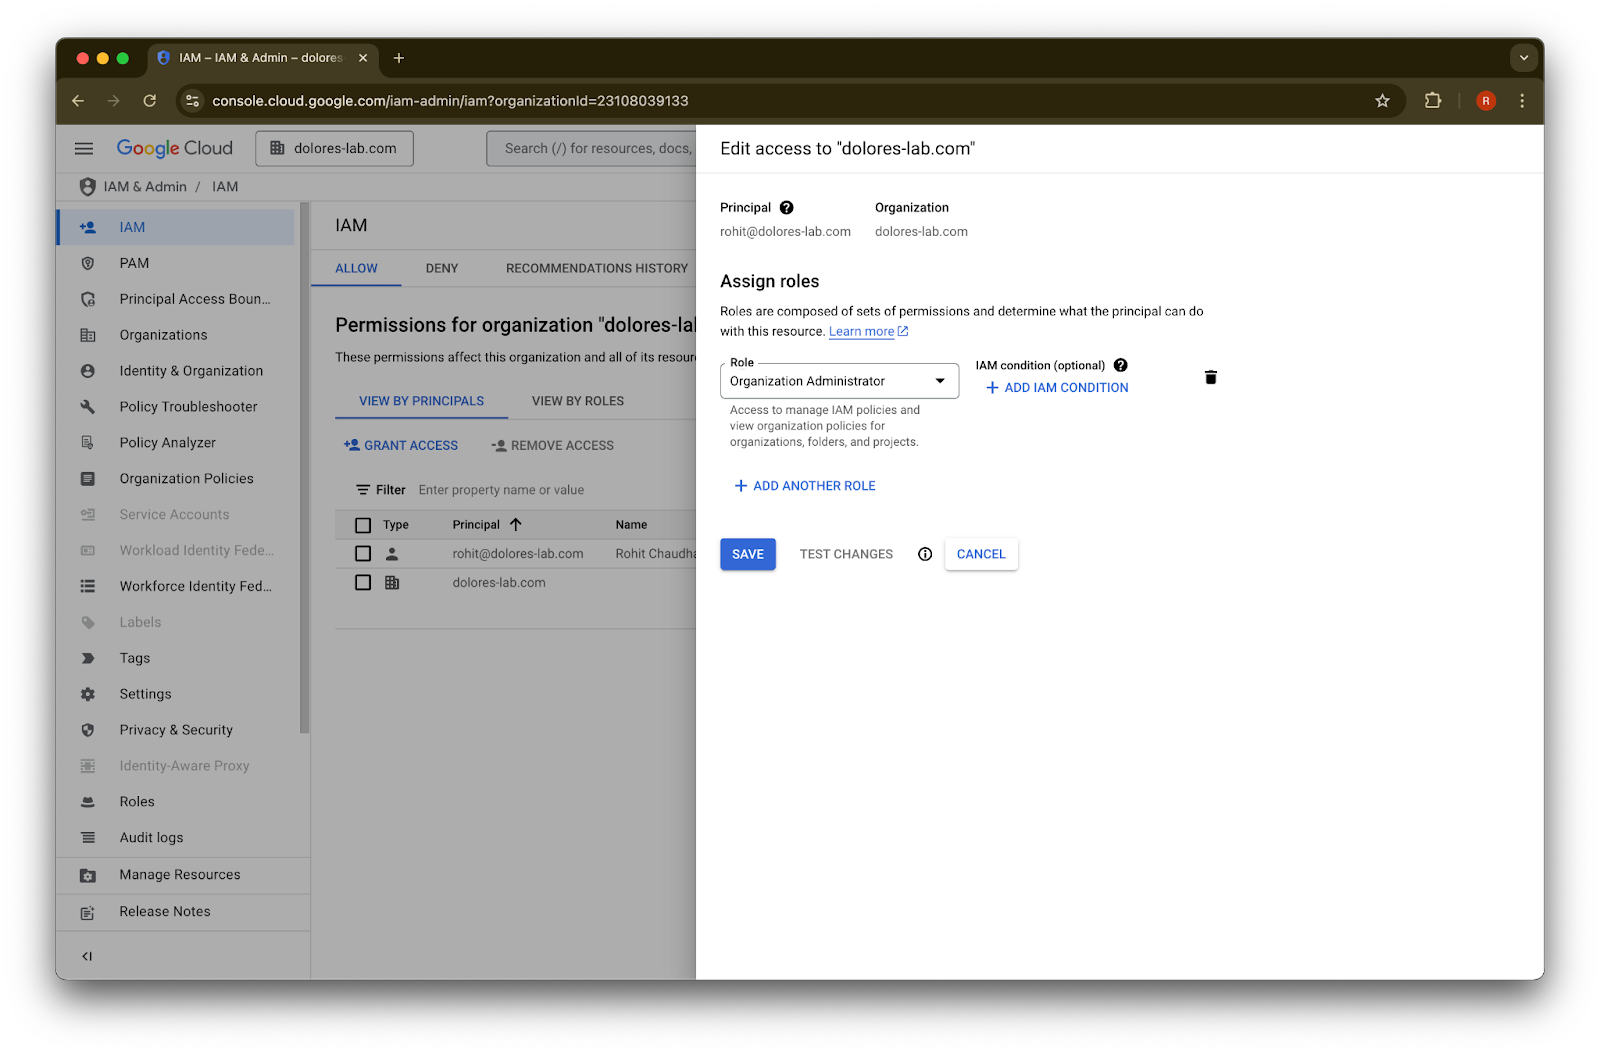
ကို နှိပ်ပါသင့် account အတွက် pencil ကို နှိပ်ပါ
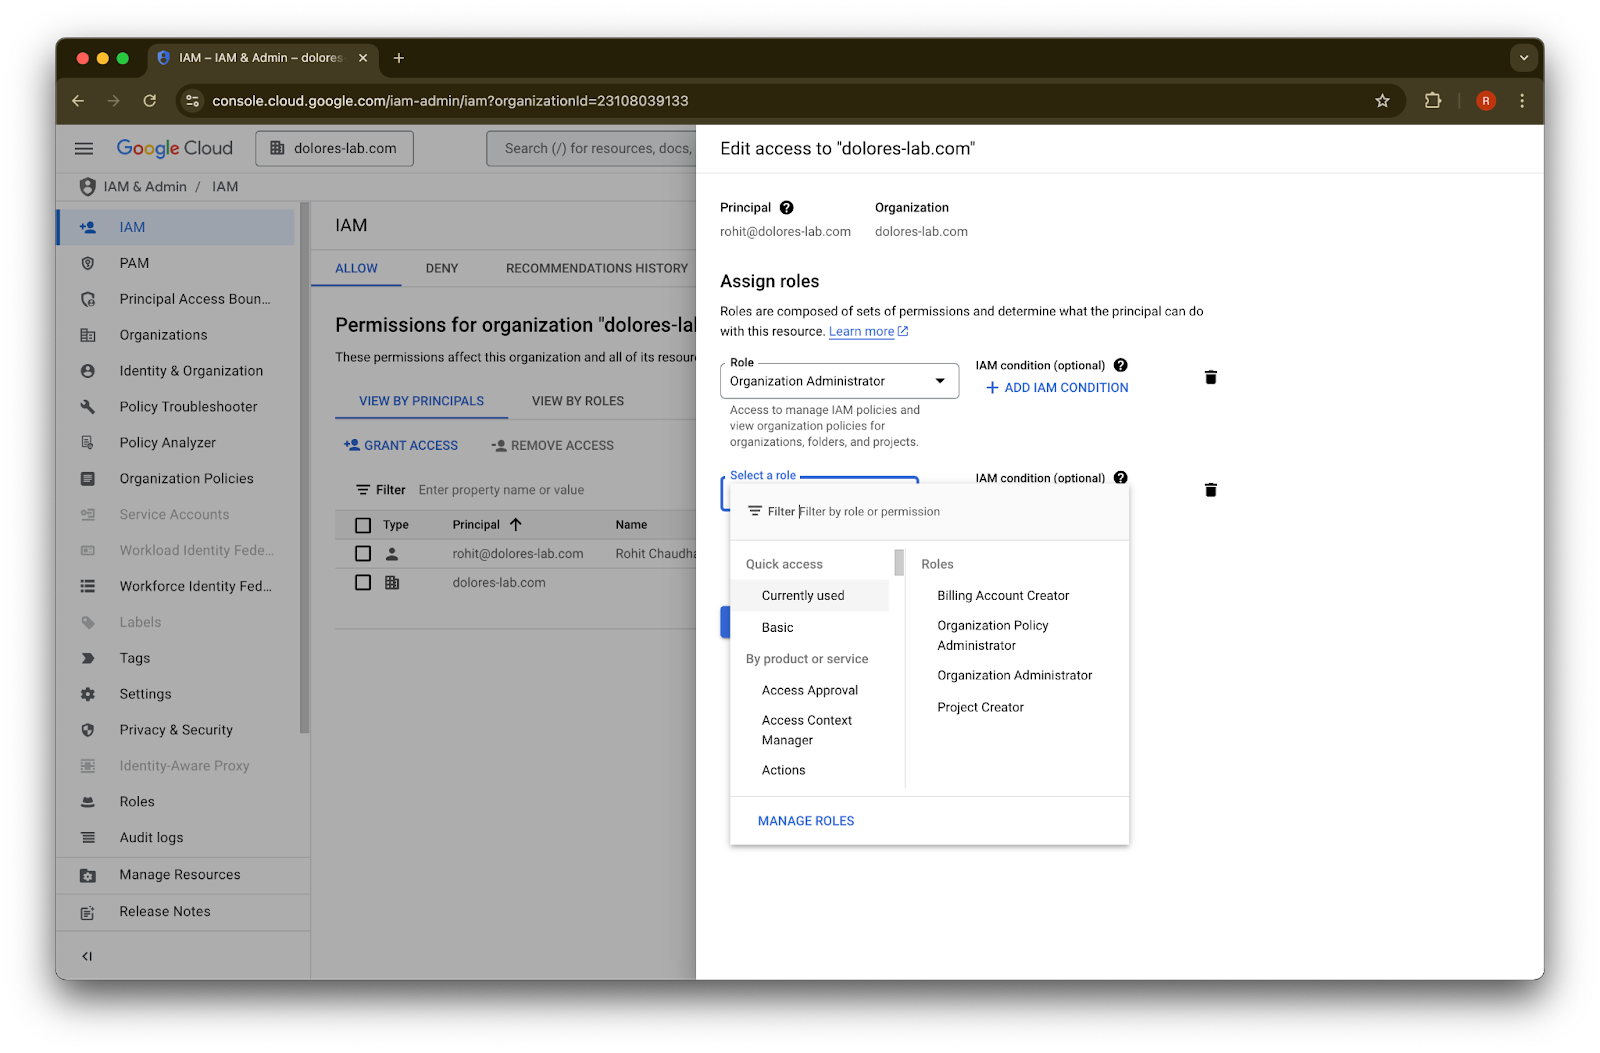
Add Another Role
ကို နှိပ်ပါOrganization Policy Administrator
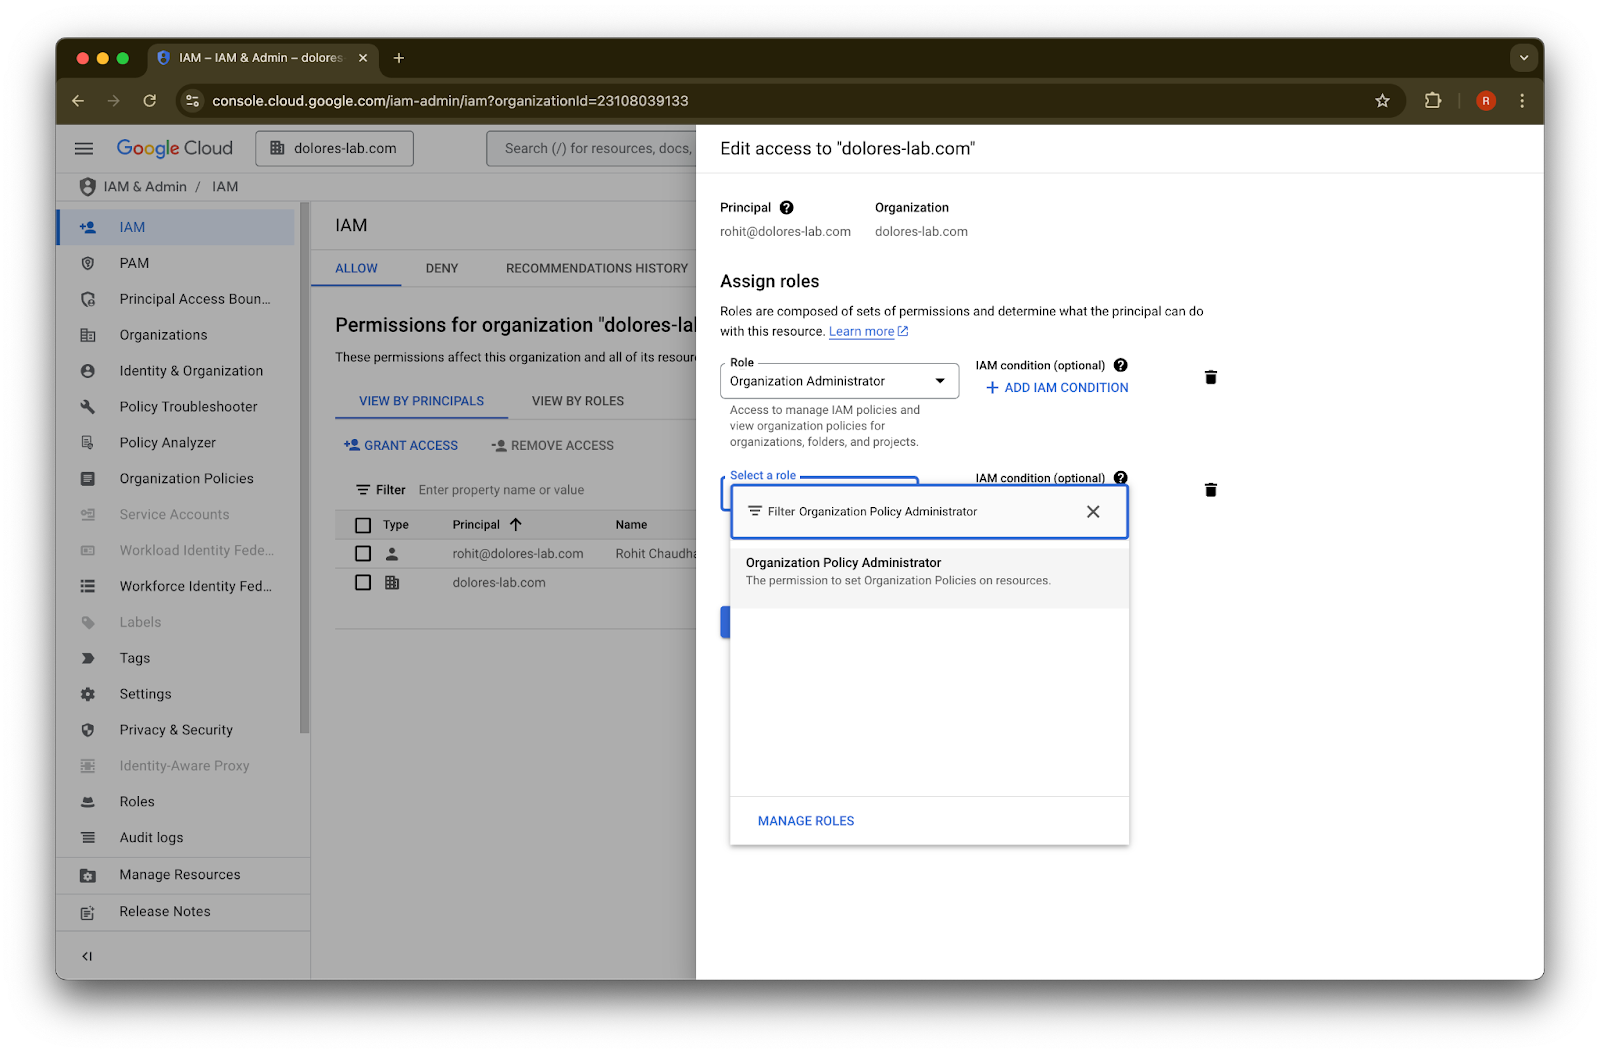
ကို ရှာပါOrganization Policy Administrator
ကို နှိပ်ပါSave ကို နှိပ်ပါ
ယခု သင့် account တွင် service account key creation ကို ဖွင့်ရန် ခွင့်ပြုချက် ရရှိသွားပါပြီ။ ၎င်းသည် အကျိုးသက်ရောက်ရန် မိနစ်အနည်းငယ် ကြာနိုင်ပါသည်။
Google Workspace နှင့် ChatGPT အတွက် မတူညီသော Email Accounts များကို ထိန်းသိမ်းရန် Google Email Alias ကို အသုံးပြုခြင်း
Google Drive synced connectors များအတွက် Google Workspace ကို သင့် ChatGPT အလုပ်နေရာ နှင့် admin-managed setup ကို အသုံးပြု၍ ချိတ်ဆက်နေသော admin တစ်ဦးဖြစ်ပြီး၊ သင့်အဖွဲ့အစည်းသည် ChatGPT နှင့် Google Workspace အတွက် မတူညီသော email domains များကို အသုံးပြုနေပါက၊ အသုံးပြုသူများ Google Drive synced connectors ကို အောင်မြင်စွာ အသုံးပြုနိုင်ရန် နောက်ထပ်အဆင့်များကို လုပ်ဆောင်ရန် လိုအပ်ပါမည်။
အကြံပြုချက် - ဖြစ်နိုင်သမျှ အခါတိုင်း Google Workspace နှင့် ChatGPT account နှစ်ခုစလုံးအတွက် တူညီသော primary email addresses များကို အသုံးပြုပါ။
ဤနည်းလမ်း မဖြစ်နိုင်ပါက ChatGPT sign-in email နှင့် ကိုက်ညီသော Google Workspace email alias ကို စီစဉ်သတ်မှတ်ရန် အောက်ပါညွှန်ကြားချက်များကို လိုက်နာပါ။
Google Workspace Alias ထည့်ရန် အဆင့်များ
အသုံးပြုသူတစ်ဦးချင်း၏ ChatGPT email ကို ၎င်းတို့၏ Google Workspace account နှင့် ချိတ်ဆက်နိုင်ရန် သေချာစေရန် Google Admin Console တွင် အောက်ပါအဆင့်များကို လုပ်ဆောင်ပါ-
Admin Console သို့ သွားပါ။ Directory > Users သို့ သွားပါ
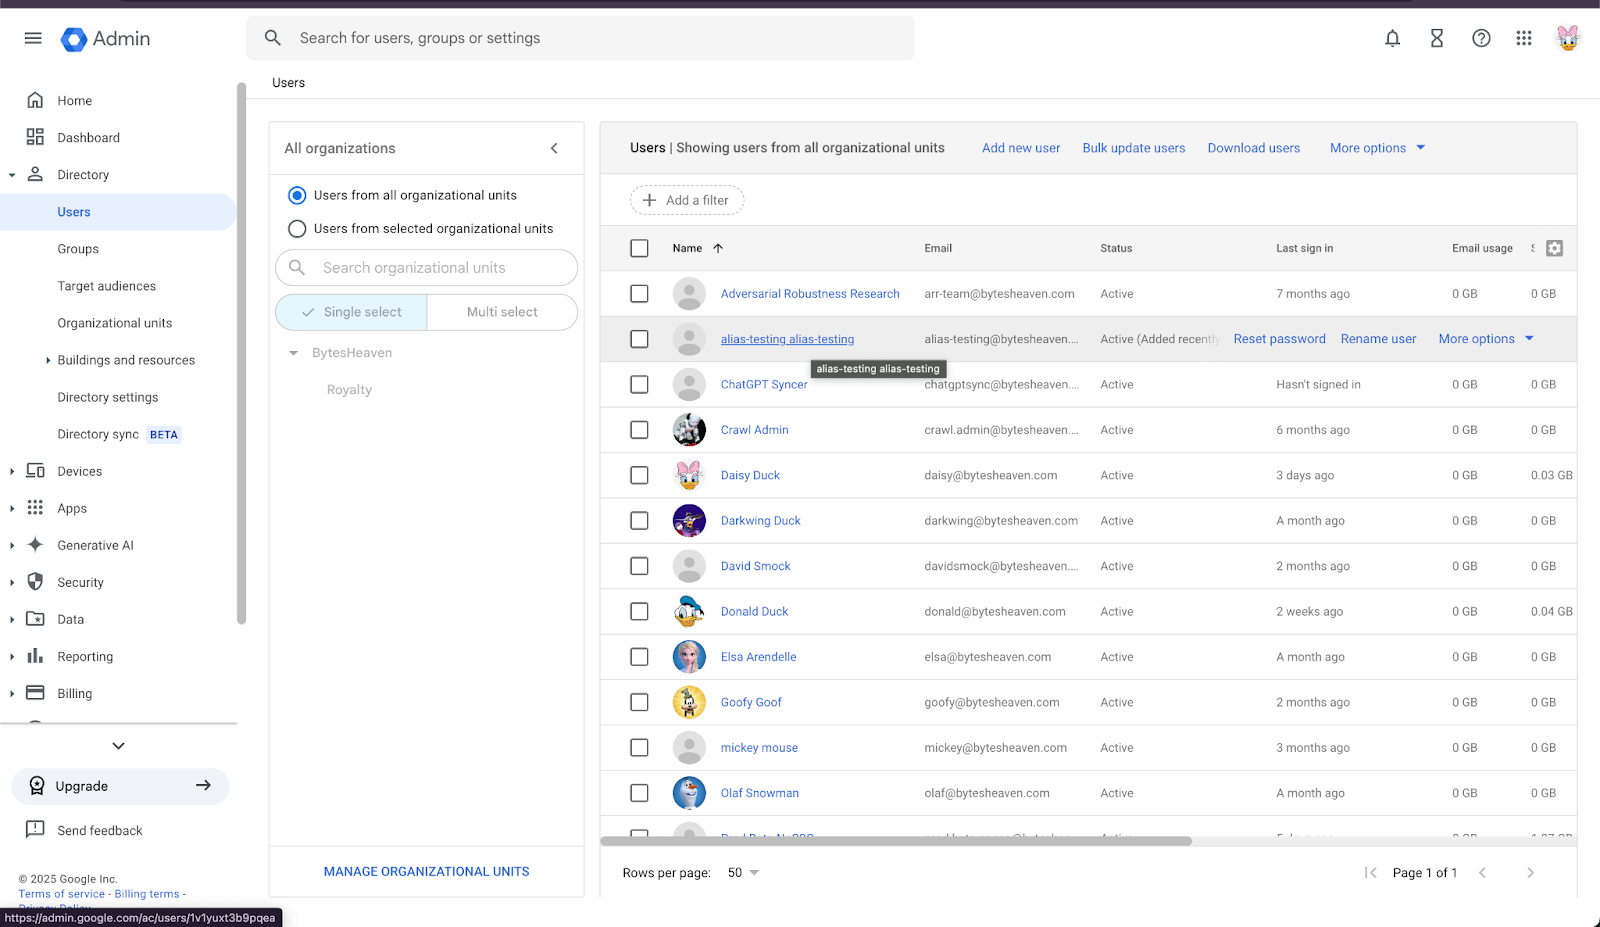
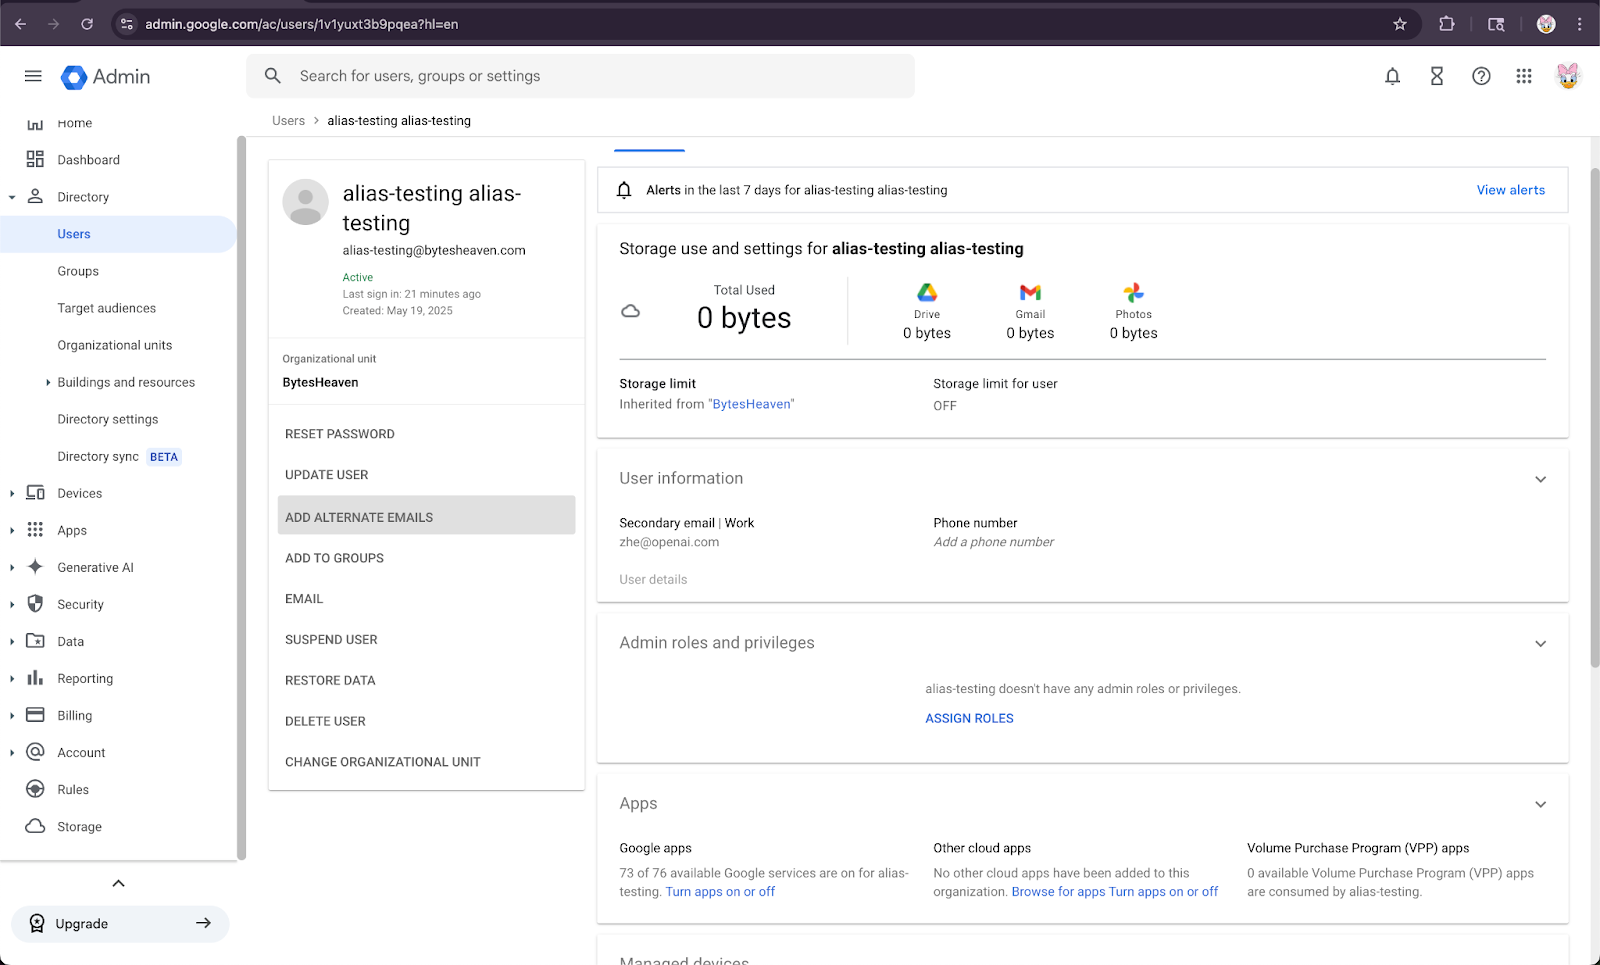
2. အသုံးပြုသူတစ်ဦးကို ရွေးချယ်ပြီး “ADD ALTERNATIVE EMAILS” ကို နှိပ်ပါ။
3. အခြား Email တစ်ခုထည့်ပါ။ ၎င်းသည် အသုံးပြုသူ၏ ChatGPT account နှင့် ကိုက်ညီကြောင်း သေချာစေပါ။
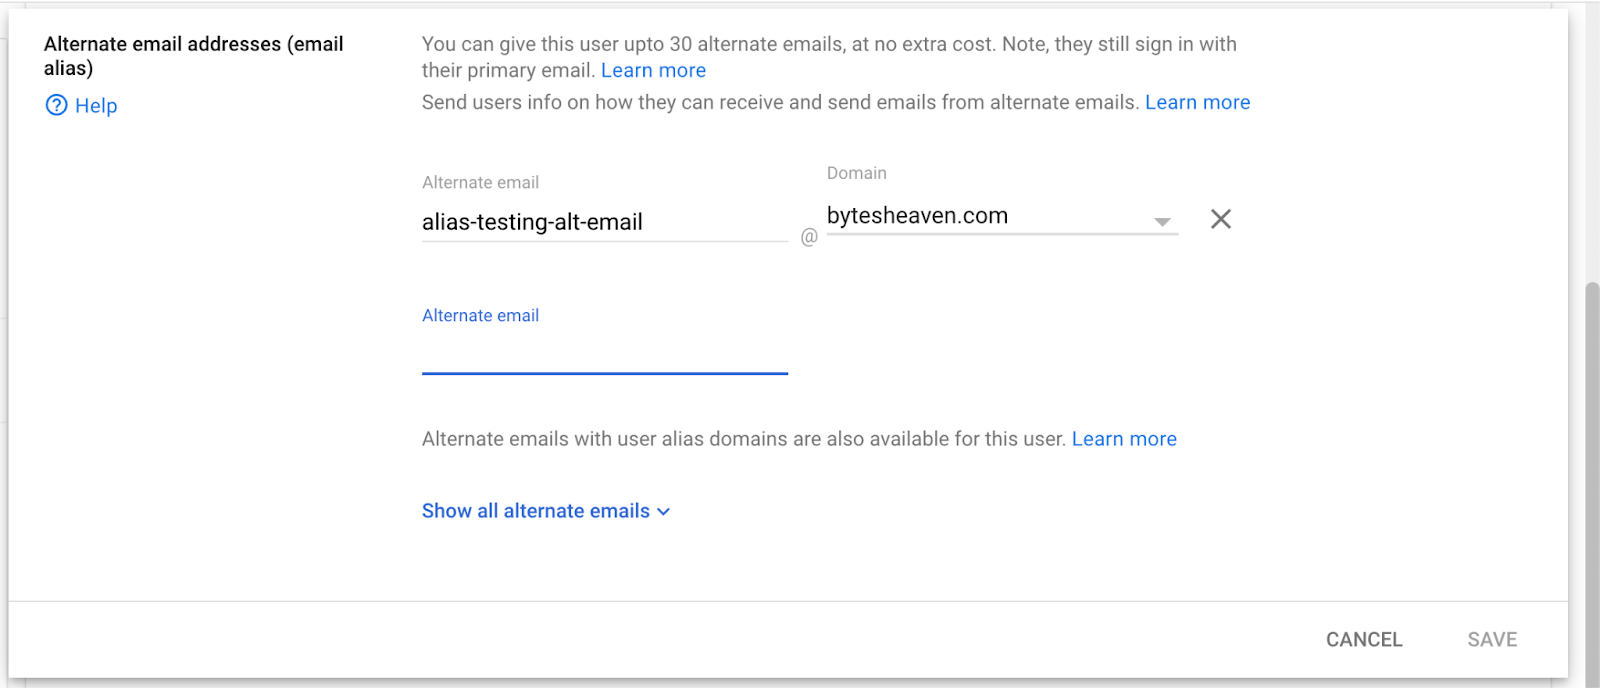
4. Save ကို ရွေးချယ်ပါ
သိရှိထားသင့်သော ကန့်သတ်ချက်များ
ကိုယ်ပိုင် email addresses များကို မပံ့ပိုးပါ
ကိုယ်ပိုင်လိပ်စာများ (ဥပမာ example@gmail.com) ဖြင့် ChatGPT အတွက် မှတ်ပုံတင်ထားသော အသုံးပြုသူများသည် Google Workspace နှင့် မချိတ်ဆက်နိုင်ပါ။ ဤစနစ်တပ်ဆင်ပုံကို မပံ့ပိုးထားသည့်အပြင် အဖွဲ့အစည်းပြင်ပမှ internal data များကို ဝင်ရောက်နိုင်စေနိုင်သဖြင့် လုံခြုံရေး အန္တရာယ်ရှိပါသည်။
Gmail "+" aliases များကို မပံ့ပိုးပါ
Gmail သည် အသုံးပြုသူများအား ၎င်းတို့၏လိပ်စာတွင် "+" ထည့်ခြင်းဖြင့် alias များ ဖန်တီးခွင့်ပြုပါသည် (ဥပမာ user+alias@gmail.com)။ ဤ alias အမျိုးအစားသည် Google Drive synced connectors နှင့် အလုပ်မလုပ်ပါ။ alias ကို Google Workspace တွင် တိတိကျကျ စီစဉ်သတ်မှတ်ထားရပါမည်။
အဖြစ်များသော Error Message
email addresses များကို မှန်ကန်စွာ ချိတ်ဆက်မထားပါက အသုံးပြုသူများသည် ဤ message ကို တွေ့နိုင်ပါသည်- "သင့် account ကို Google Drive နှင့် ချိတ်ဆက်၍ မရပါ။ ပိုမိုလေ့လာရန် နှိပ်ပါ."
အသုံးပြုသူများ ဤ message ကို လက်ခံရရှိပါက ဤစာတမ်းရှိ အဆင့်များကို ပြန်လည်စစ်ဆေးပြီး တိကျစွာ လိုက်နာထားကြောင်း သေချာစေပါ။ နောက်ထပ်အကူအညီ လိုအပ်ပါက ကျေးဇူးပြု၍ ကျွန်ုပ်တို့၏ support team ကို ဆက်သွယ်ပါ။