
admin-managed setup ਦੀ ਵਰਤੋਂ ਕਰਕੇ ਆਪਣੇ Google Workspace ਨੂੰ ChatGPT ਨਾਲ ਕਨੈਕਟ ਕਰਨ ਲਈ, ਤੁਸੀਂ ਪਹਿਲਾਂ Google ਦੇ admin consoles ਵਿੱਚ access ਕਨਫ਼ਿਗਰ ਕਰੋਗੇ:
Google Drive, users, ਅਤੇ groups ਲਈ read-only access ਵਾਲਾ ਇੱਕ service account ਬਣਾਓ.
ਇਹ ਜ਼ੋਰਦਾਰ ਸਿਫਾਰਸ਼ ਕੀਤੀ ਜਾਂਦੀ ਹੈ ਕਿ ਇਹ service account ਉਸੇ Google account ਦੇ ਹੇਠਾਂ ਬਣਾਇਆ ਜਾਵੇ ਜੋ ਤੁਹਾਡੇ ChatGPT Workspace ਨਾਲ ਸੰਬੰਧਿਤ ਹੈ. ਜੇ ChatGPT ਵਰਕਸਪੇਸ ਵਿੱਚ ਅਕਾਊਂਟਾਂ ਦਾ email domain Google Workspace ਵਿੱਚ ਵਰਤੇ ਗਏ domain ਤੋਂ ਵੱਖਰਾ ਹੈ, ਤਾਂ ਆਪਣੇ ਯੂਜ਼ਰਾਂ ਲਈ ਇਸ connector ਨੂੰ ਯੋਗ ਕਰਨ ਲਈ ਤੁਹਾਨੂੰ ਵਾਧੂ ਕਦਮ ਫੋਲੋ ਕਰਨੇ ਪੈਣਗੇ.
ਇੱਕ admin account ਬਣਾਓ ਜਿਸ ਦੀ ਥਾਂ ‘ਤੇ service account ਕੰਮ ਕਰੇਗਾ.
ਫਿਰ, ChatGPT ਐਡਮਿਨ ਕਨਸੋਲ ਵਿੱਚ ਸੈਟਅੱਪ ਪੂਰਾ ਕਰੋ:
service account ਦੀ private key ਅਪਲੋਡ ਕਰੋ (Google ਤੋਂ ਇੱਕ JSON ਫ਼ਾਈਲ).
admin account ਦਰਜ ਕਰੋ (credentials ਦੀ ਲੋੜ ਨਹੀਂ).
ਕਿਹੜੀਆਂ ਫ਼ਾਈਲਾਂ ਸਿੰਕ ਕਰਨੀ ਹਨ ਚੁਣੋ ਅਤੇ ਉਹ ਯੂਜ਼ਰ ਚੁਣੋ ਜਿਨ੍ਹਾਂ ਨੂੰ ਕਨੈਕਸ਼ਨ ਤੱਕ ਪਹੁੰਚ ਹੋਵੇਗੀ.
ਇਹ ਗਾਈਡ ਤੁਹਾਨੂੰ ਇਹਨਾਂ 6 ਕਦਮਾਂ ਵਿਚੋਂ ਹਰ ਇੱਕ ਬਾਰੇ ਦੱਸਦੀ ਹੈ.
ਸਰਵਿਸ ਅਕਾਊਂਟ ਸੈਟਅੱਪ ਕਰਨਾ
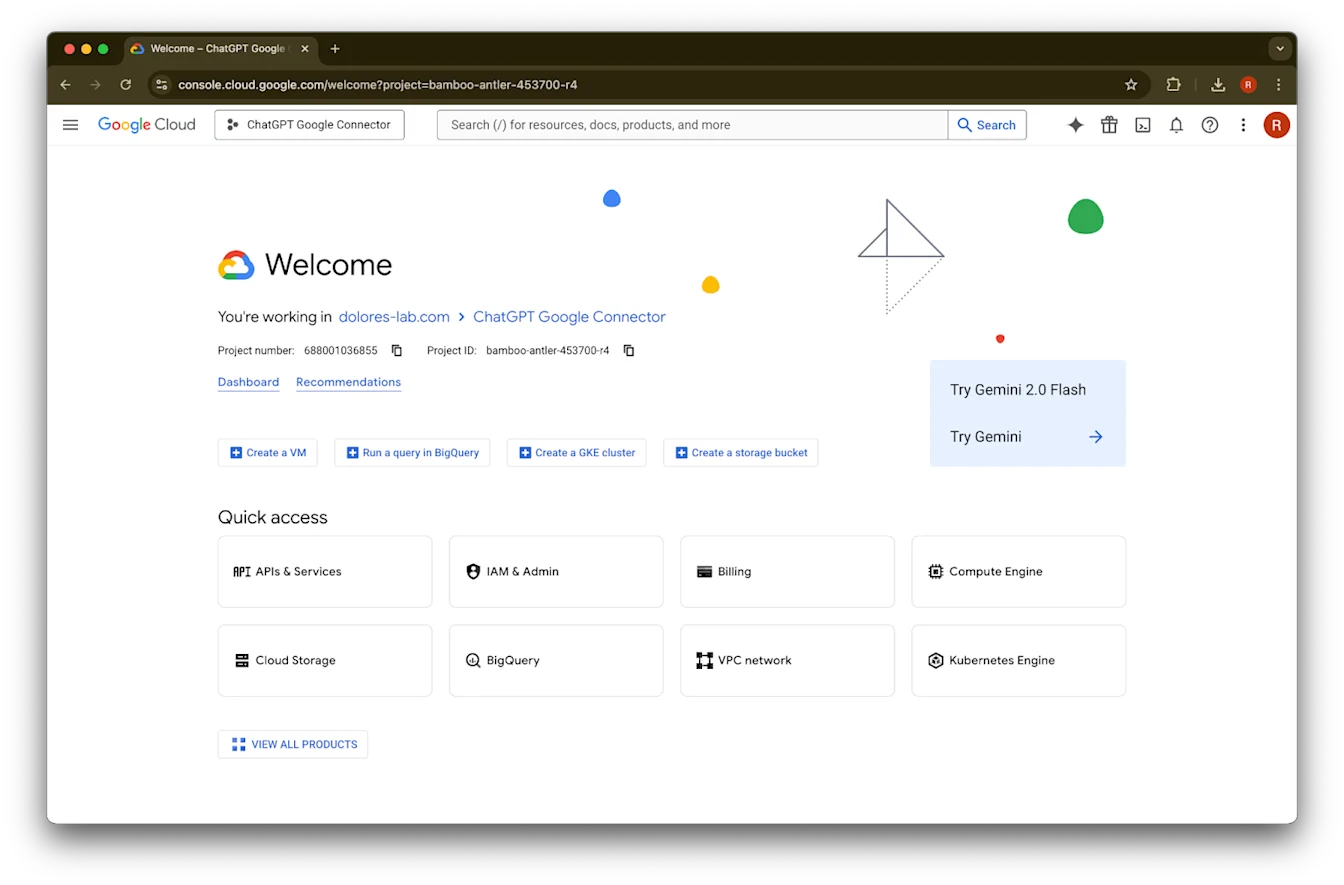
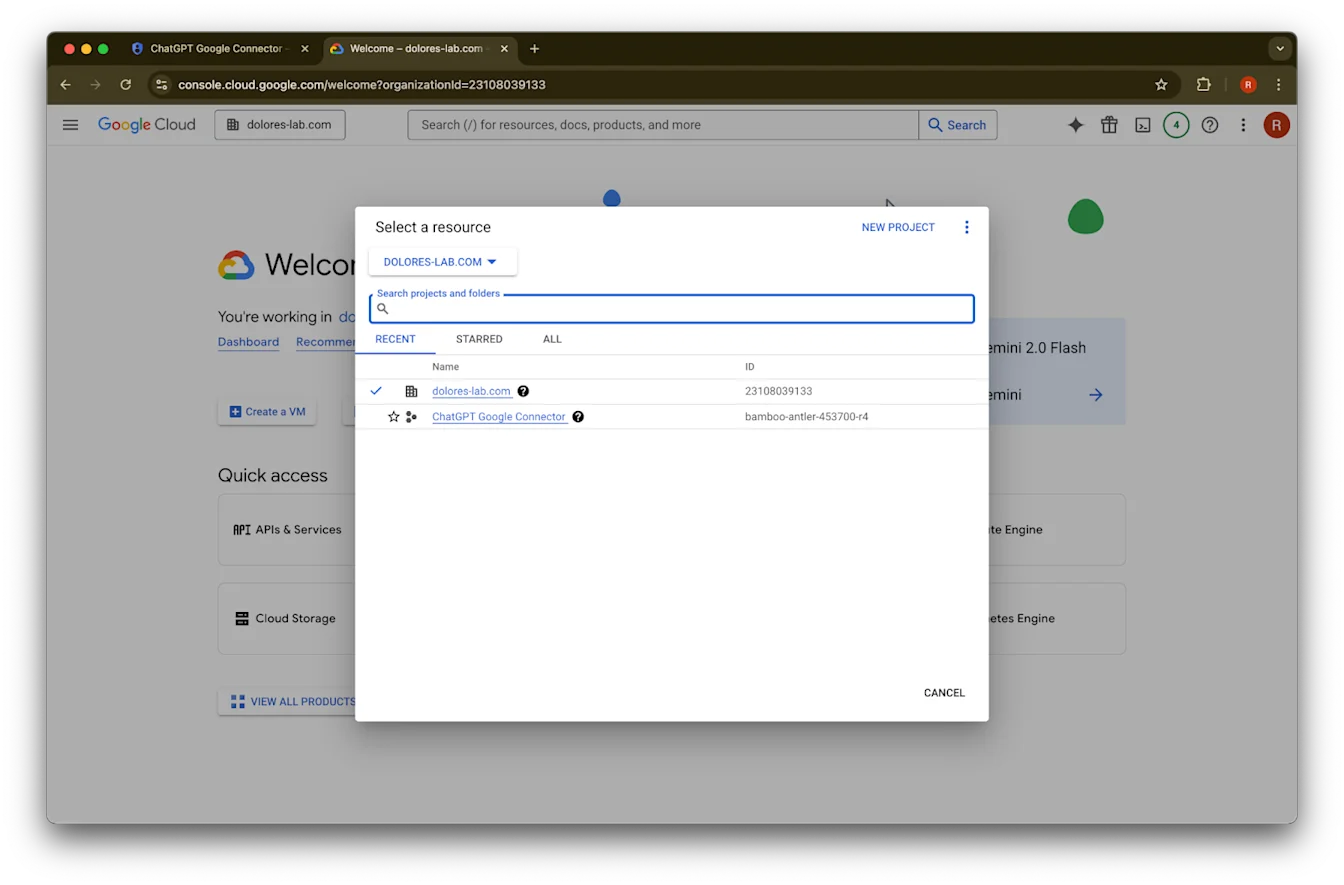
console.cloud.google.com ‘ਤੇ ਜਾਓ.
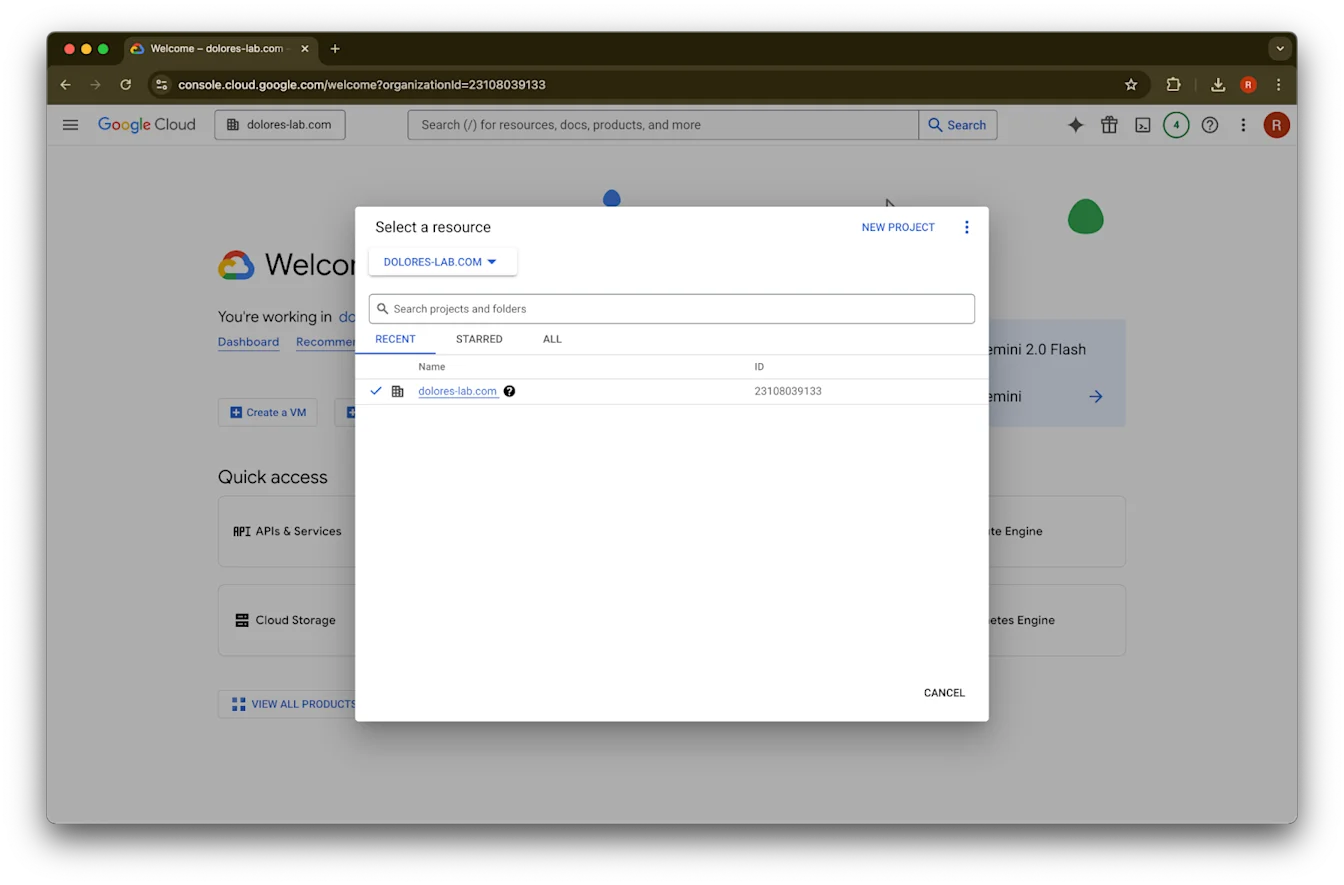
projects dropdown ‘ਤੇ ਕਲਿੱਕ ਕਰੋ.Imageਯਕੀਨੀ ਬਣਾਓ ਕਿ ਤੁਸੀਂ ਉਹੀ Google ਵਰਕਸਪੇਸ ਵਿੱਚ ਲਾਗਇਨ ਹੋ ਜੋ ਤੁਹਾਡੇ ChatGPT ਵਰਕਸਪੇਸ ਨਾਲ ਸੰਬੰਧਿਤ ਹੈ (ਜੇ ਤੁਹਾਡੇ ChatGPT ਵਰਕਸਪੇਸ ਨਾਲ ਕੋਈ Google ਵਰਕਸਪੇਸ ਜੁੜਿਆ ਨਹੀਂ ਹੈ ਅਤੇ ਦੋਵਾਂ ਵਿੱਚ ਵੱਖ-ਵੱਖ email ਹਨ, ਤਾਂ ਤੁਹਾਨੂੰ ਵਾਧੂ ਕਦਮ ਫੋਲੋ ਕਰਨੇ ਪੈਣਗੇ, ਨਹੀਂ ਤਾਂ ਤੁਹਾਡੇ ਯੂਜ਼ਰ Google Drive synced connectors ਵਰਤ ਨਹੀਂ ਸਕਣਗੇ).
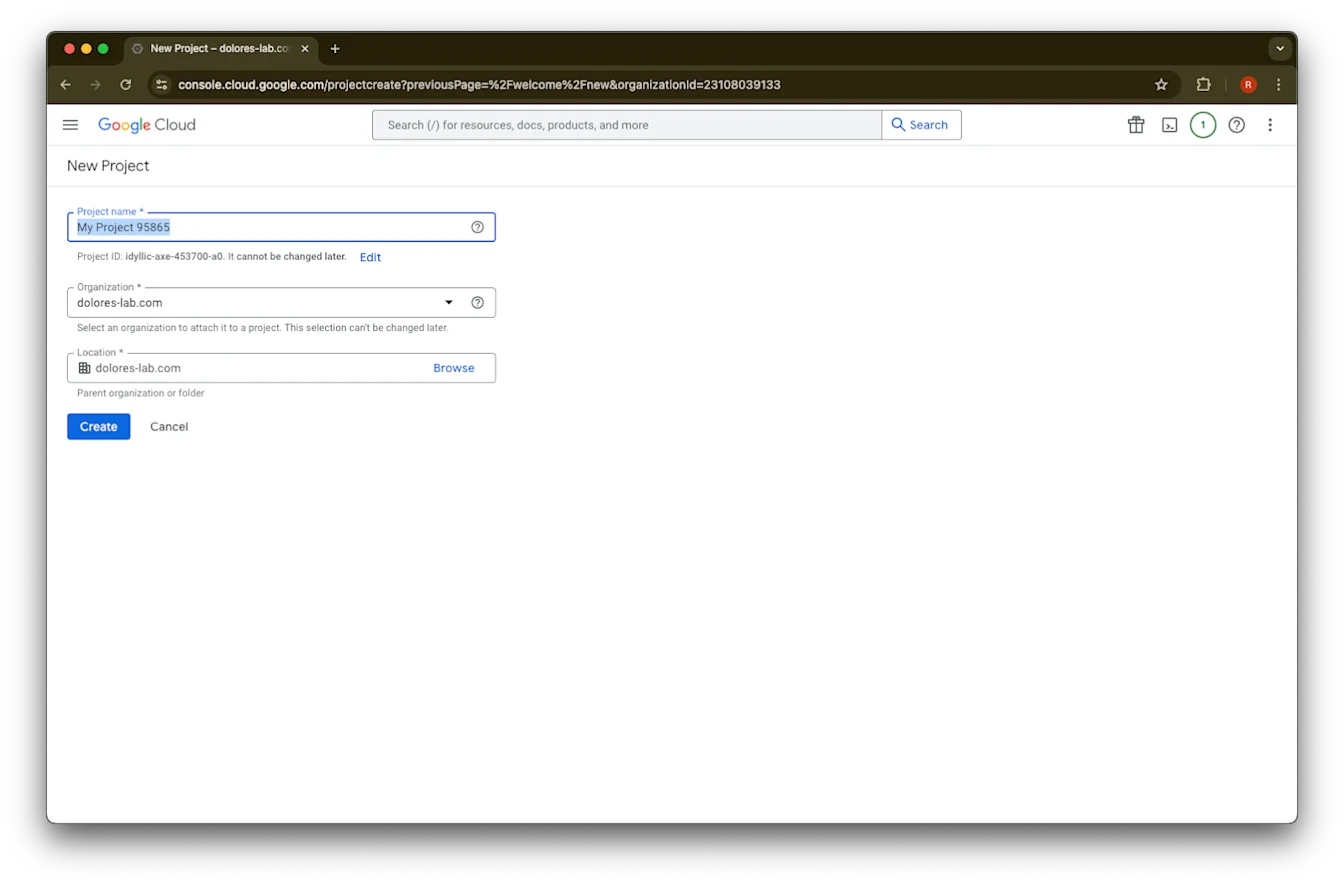
New Project ਚੁਣੋ.
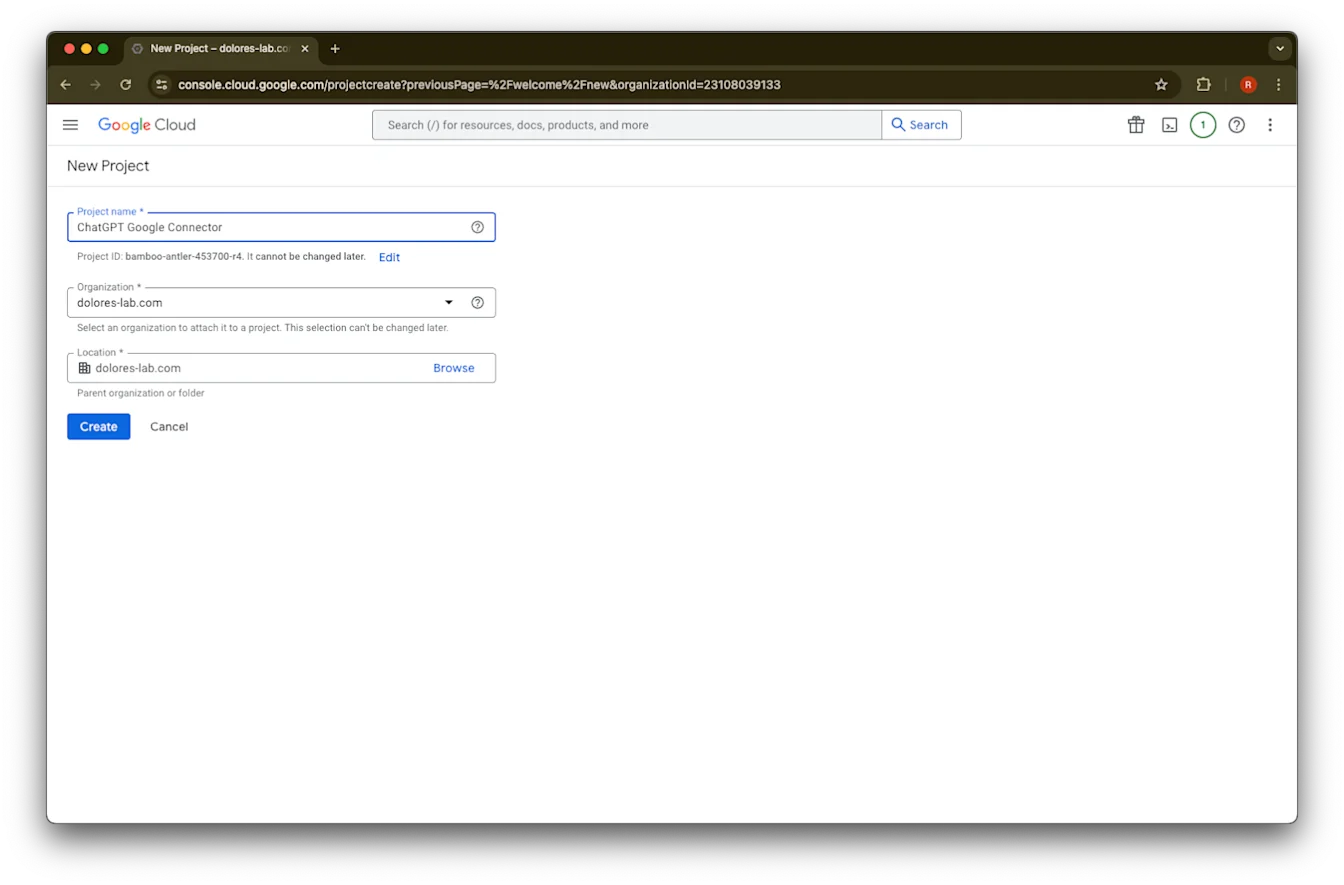
Project Name ਦਰਜ ਕਰੋ.
ਪ੍ਰੋਜੈਕਟ ਬਣਾਓ.
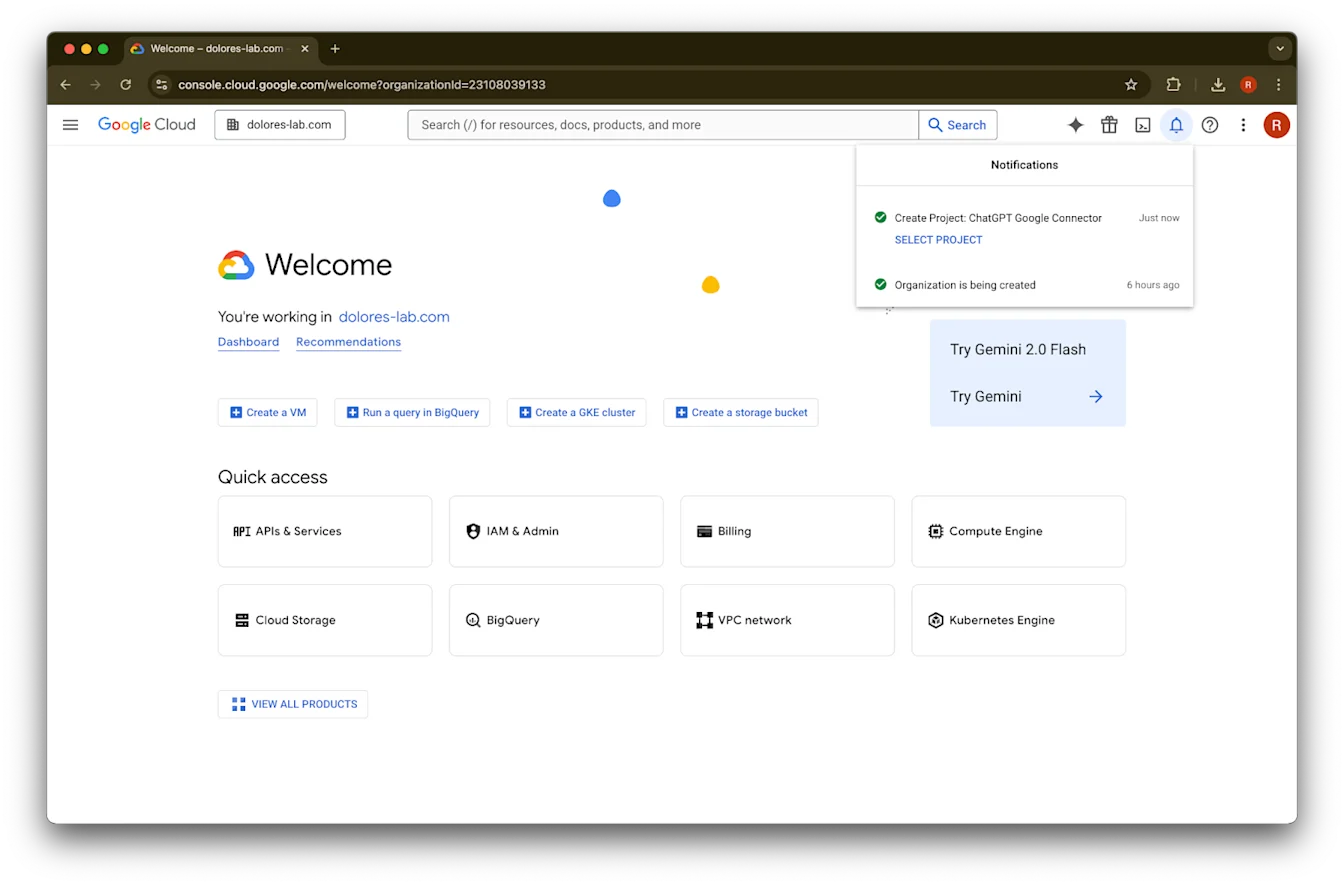
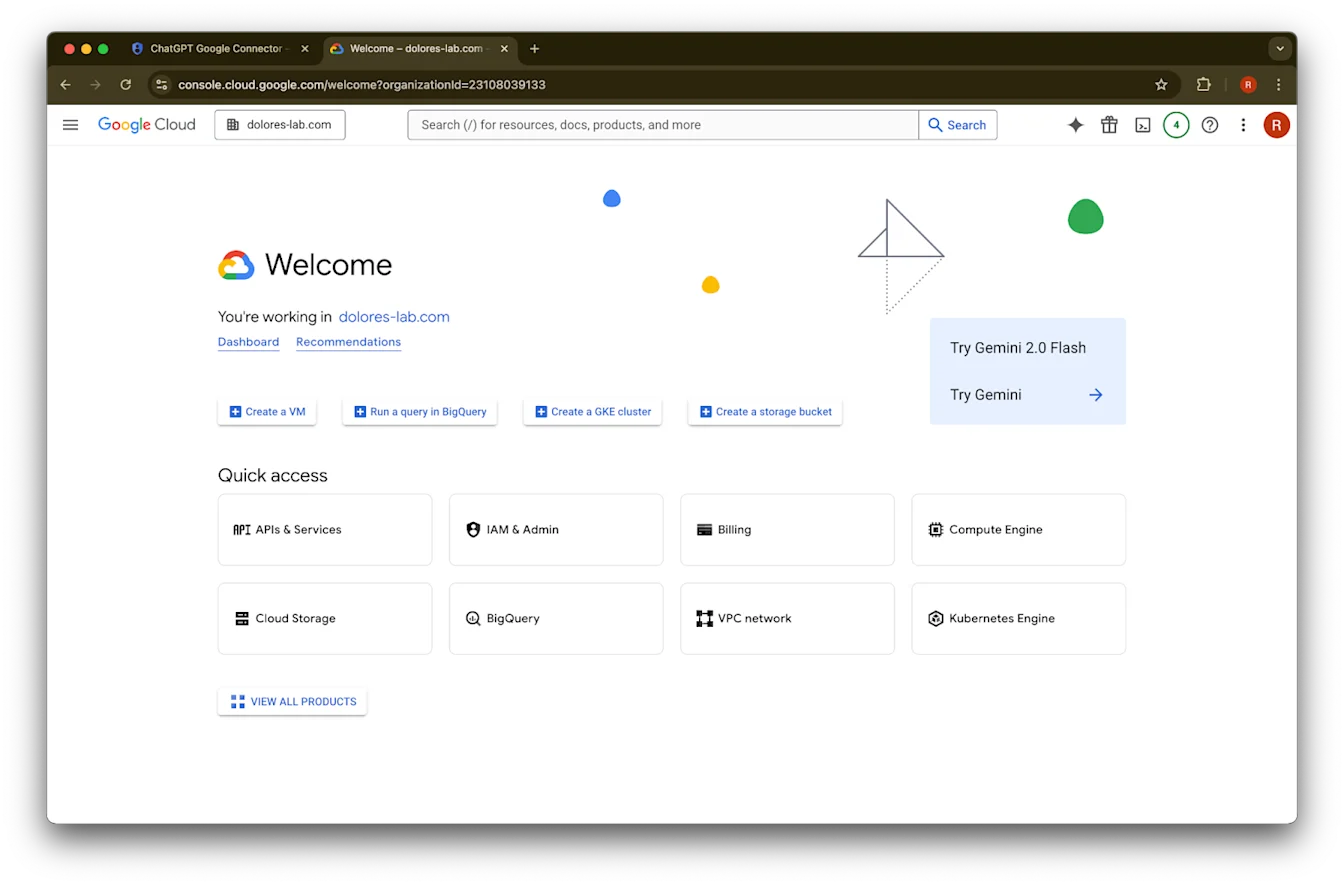
ਪ੍ਰੋਜੈਕਟ ਬਣ ਜਾਣ ਤੱਕ ਉਡੀਕ ਕਰੋ, ਫਿਰ Select Project ‘ਤੇ ਕਲਿੱਕ ਕਰੋ.
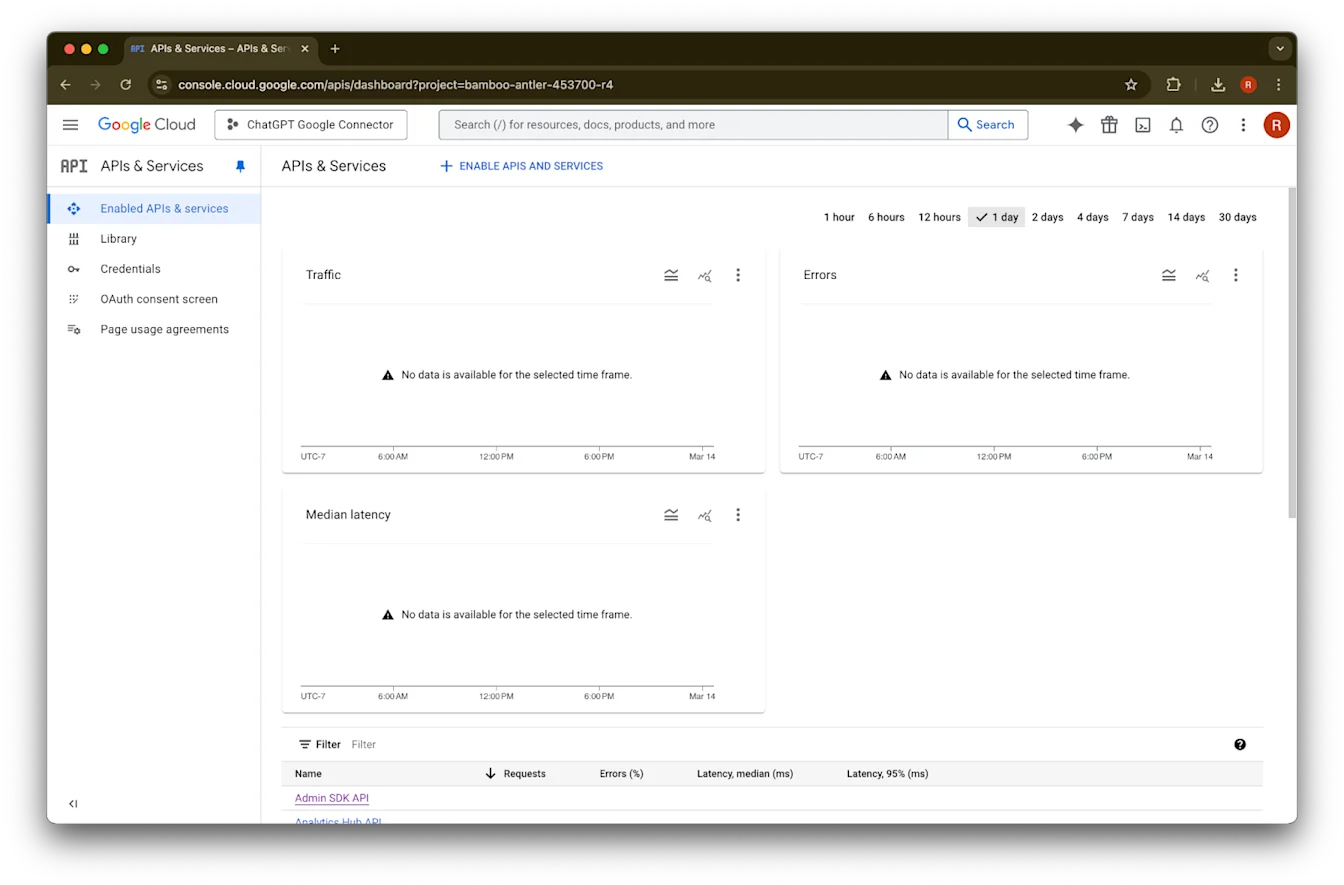
APIs & Services ‘ਤੇ ਕਲਿੱਕ ਕਰੋ.
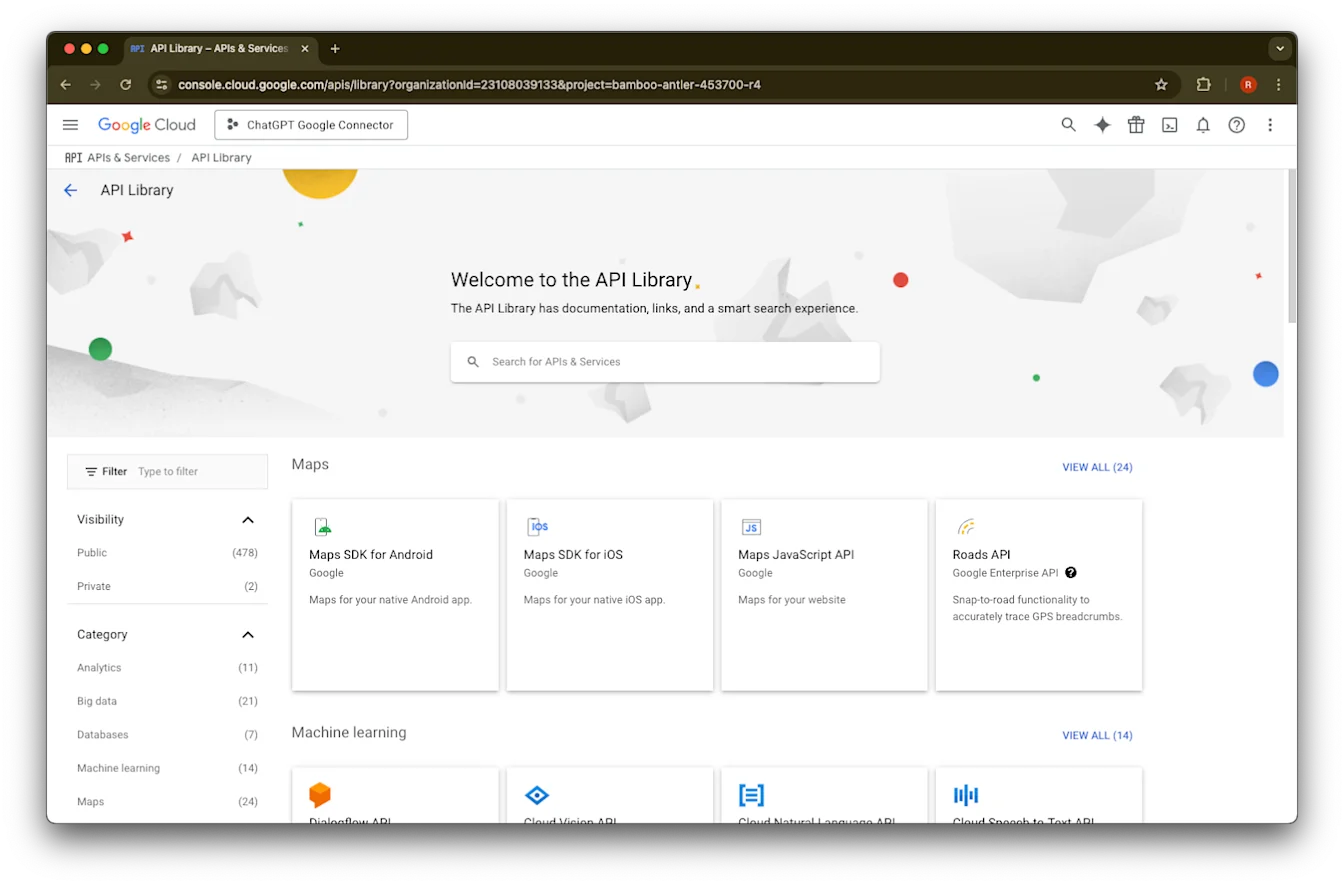
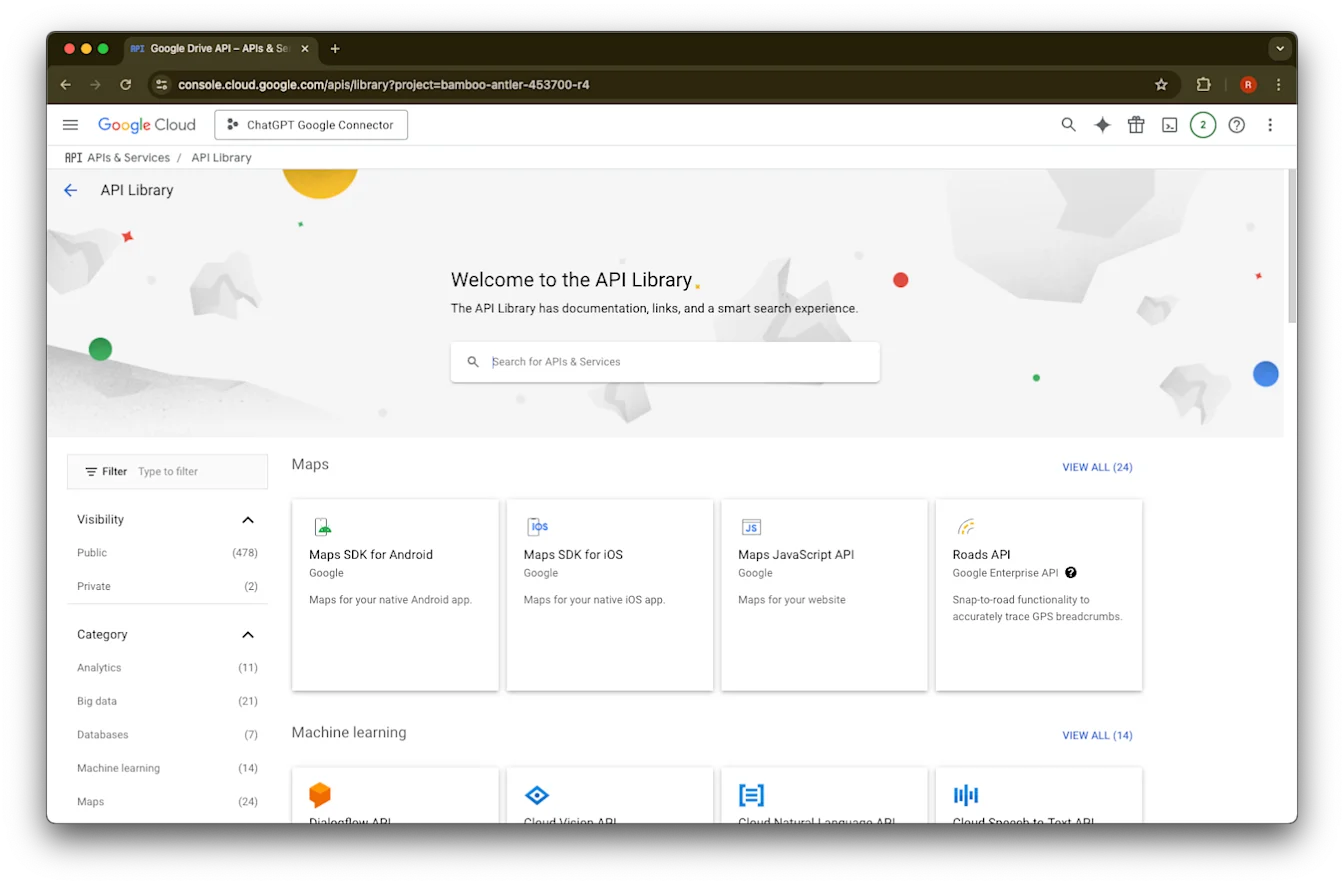
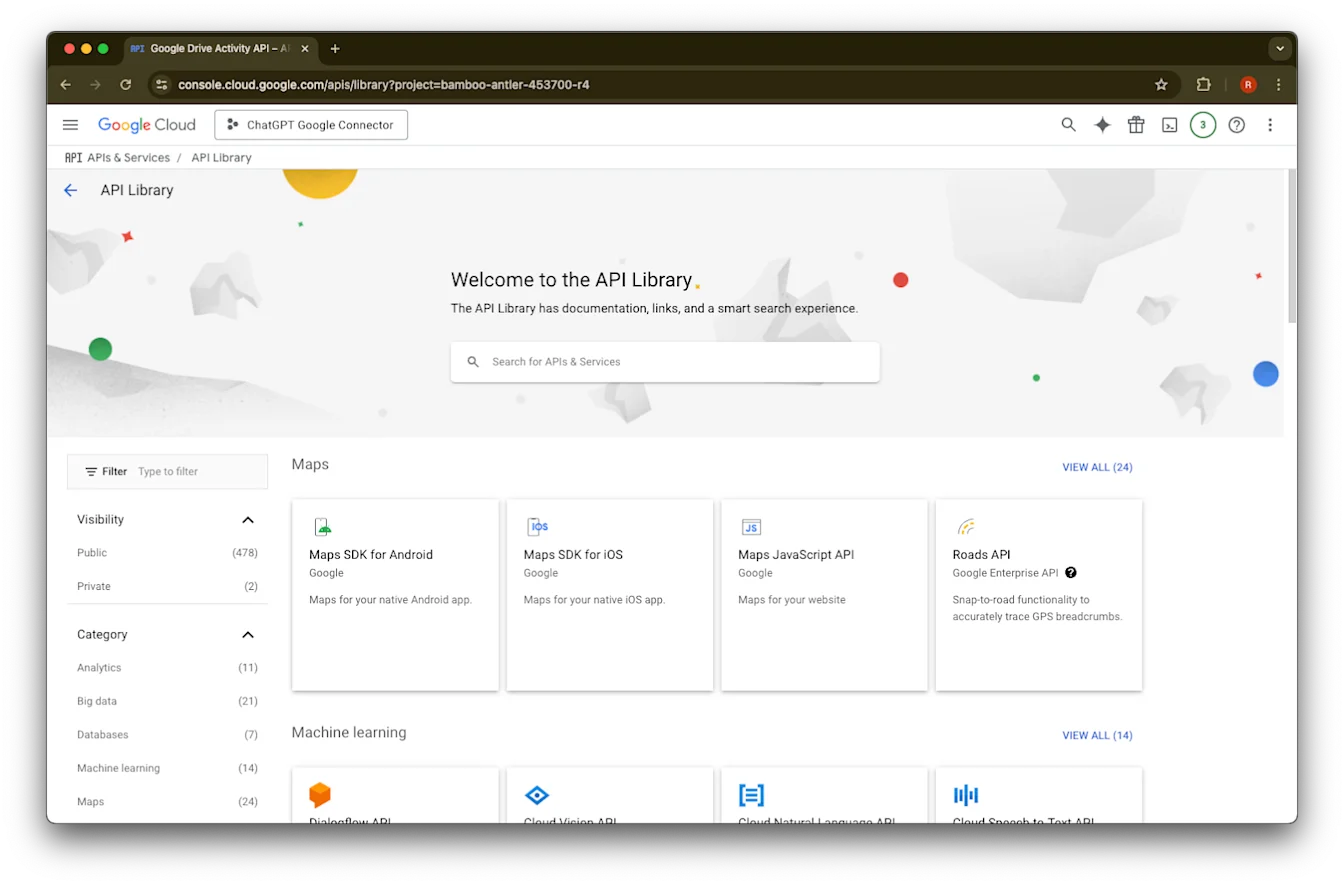
Library ‘ਤੇ ਕਲਿੱਕ ਕਰੋ.
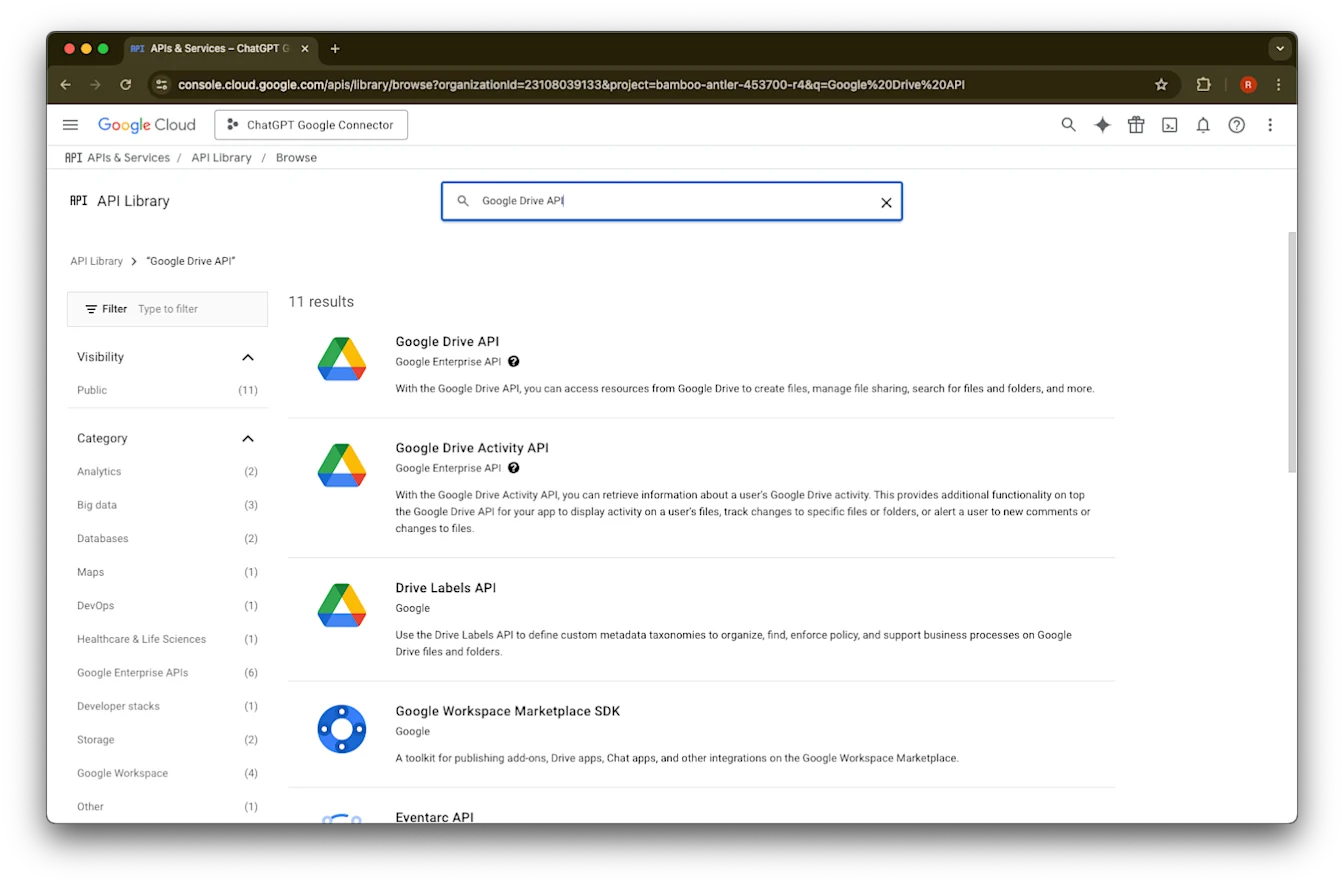
ਹੁਣ ਅਸੀਂ ਤਿੰਨ APIs ਜੋੜਾਂਗੇ, ਉਨ੍ਹਾਂ ਨੂੰ ਲੱਭਣ ਲਈ search box ਵਰਤਦੇ ਹੋਏ.
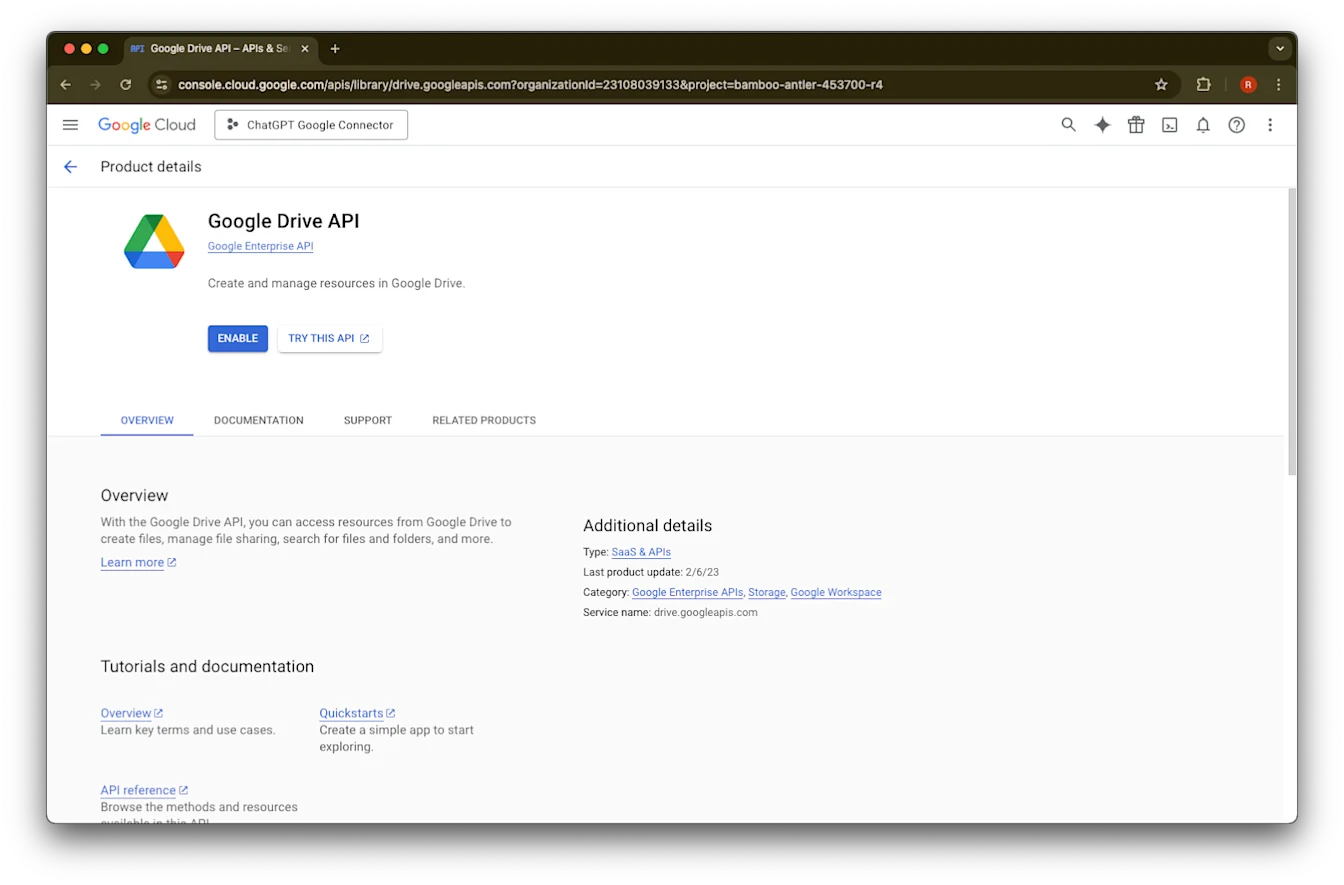
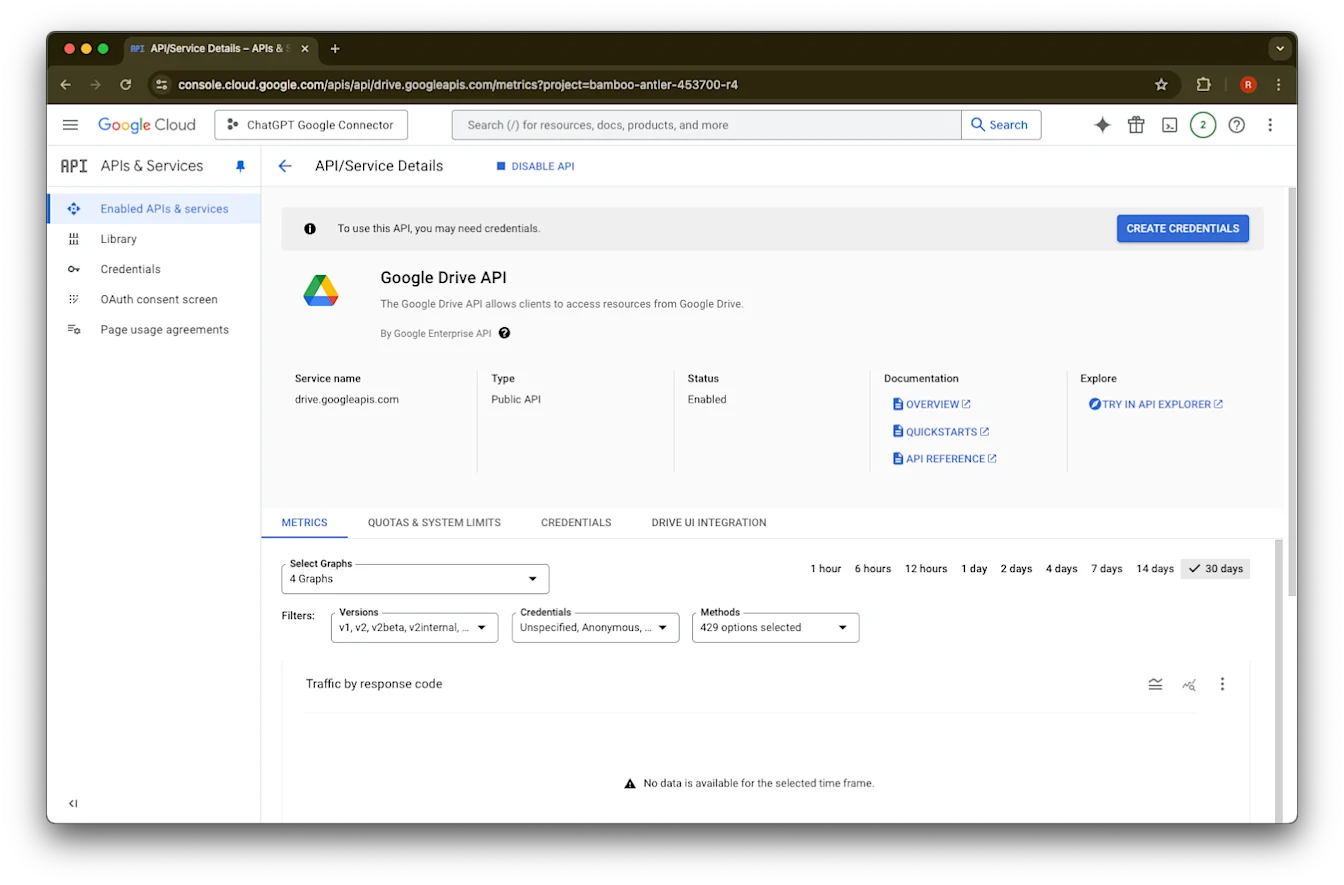
Google Drive API ਖੋਜੋ ਅਤੇ ਚੁਣੋ.
Enable ‘ਤੇ ਕਲਿੱਕ ਕਰੋ.
Library ‘ਤੇ ਕਲਿੱਕ ਕਰੋ.
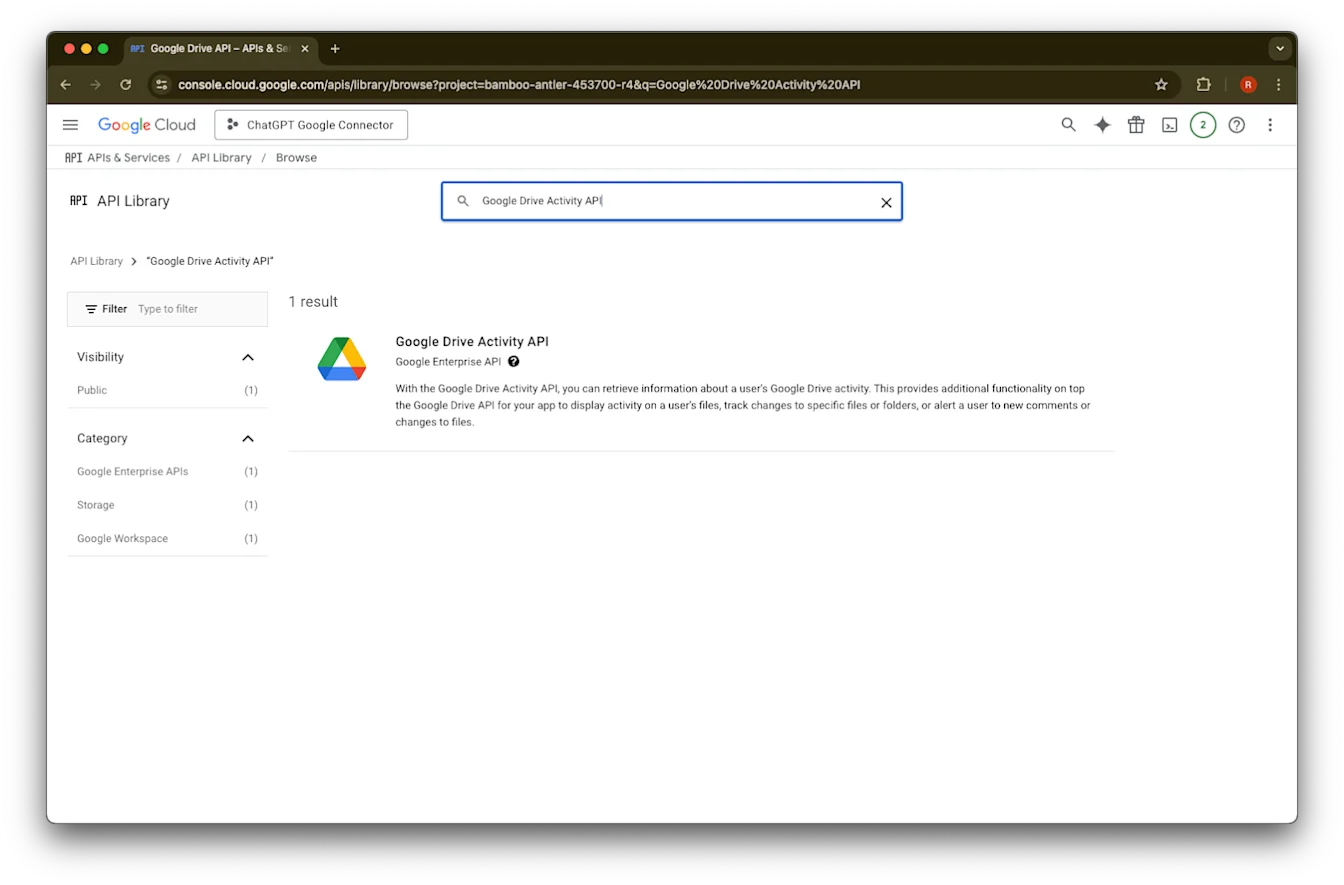
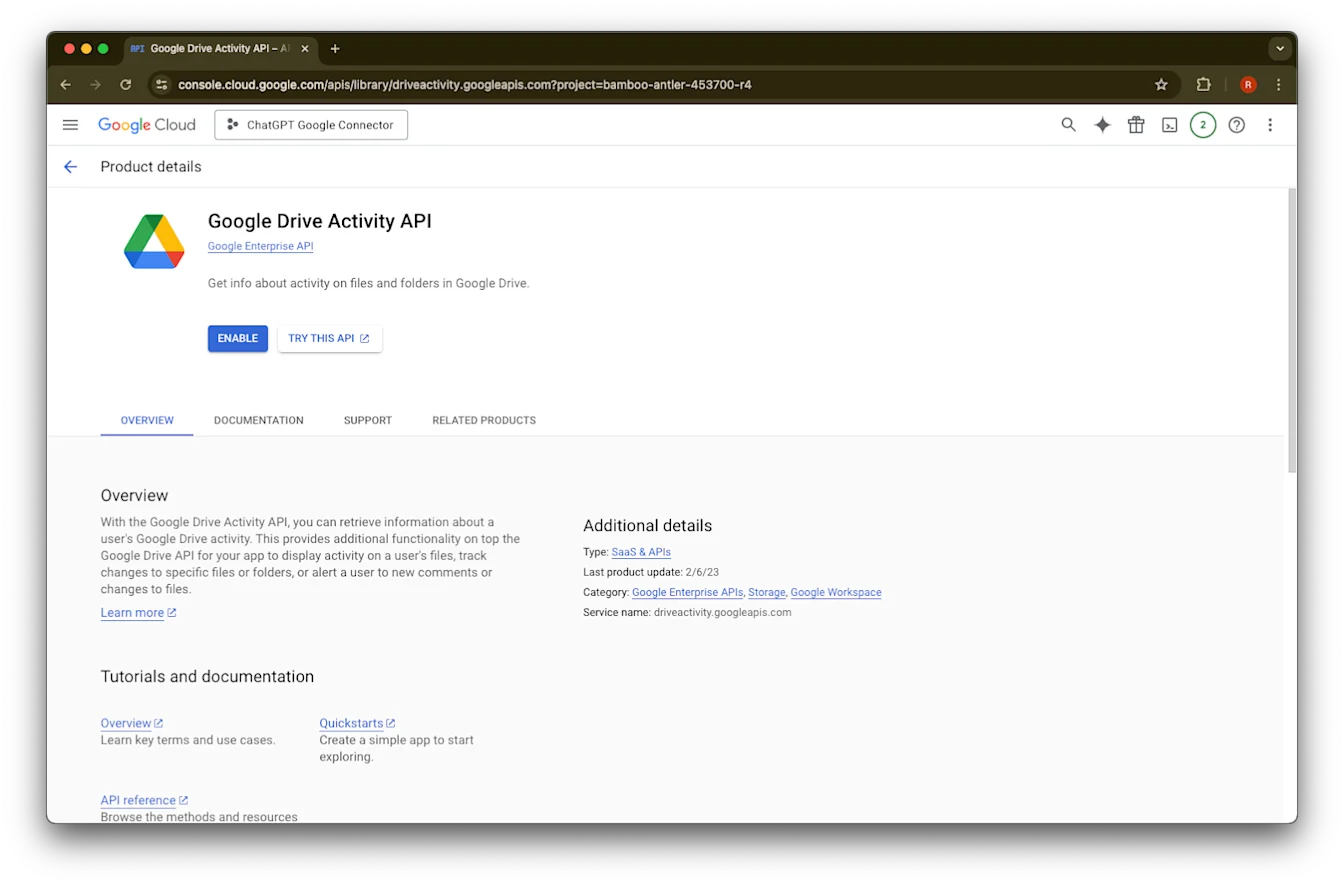
Google Drive Activity ਖੋਜੋ.
Google Drive Activity API ਚੁਣੋ.
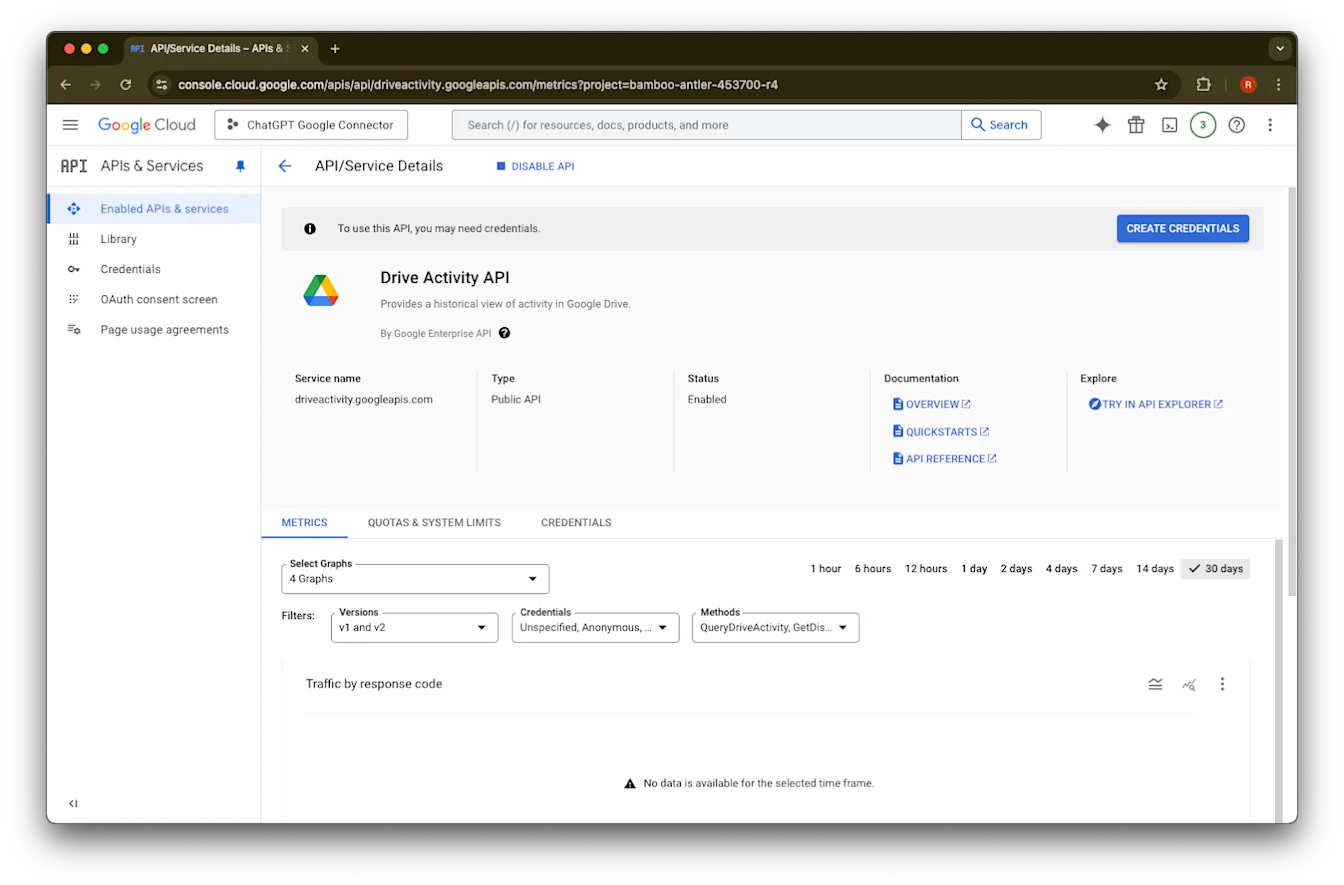
Enable ‘ਤੇ ਕਲਿੱਕ ਕਰੋ.
Library ‘ਤੇ ਕਲਿੱਕ ਕਰੋ.
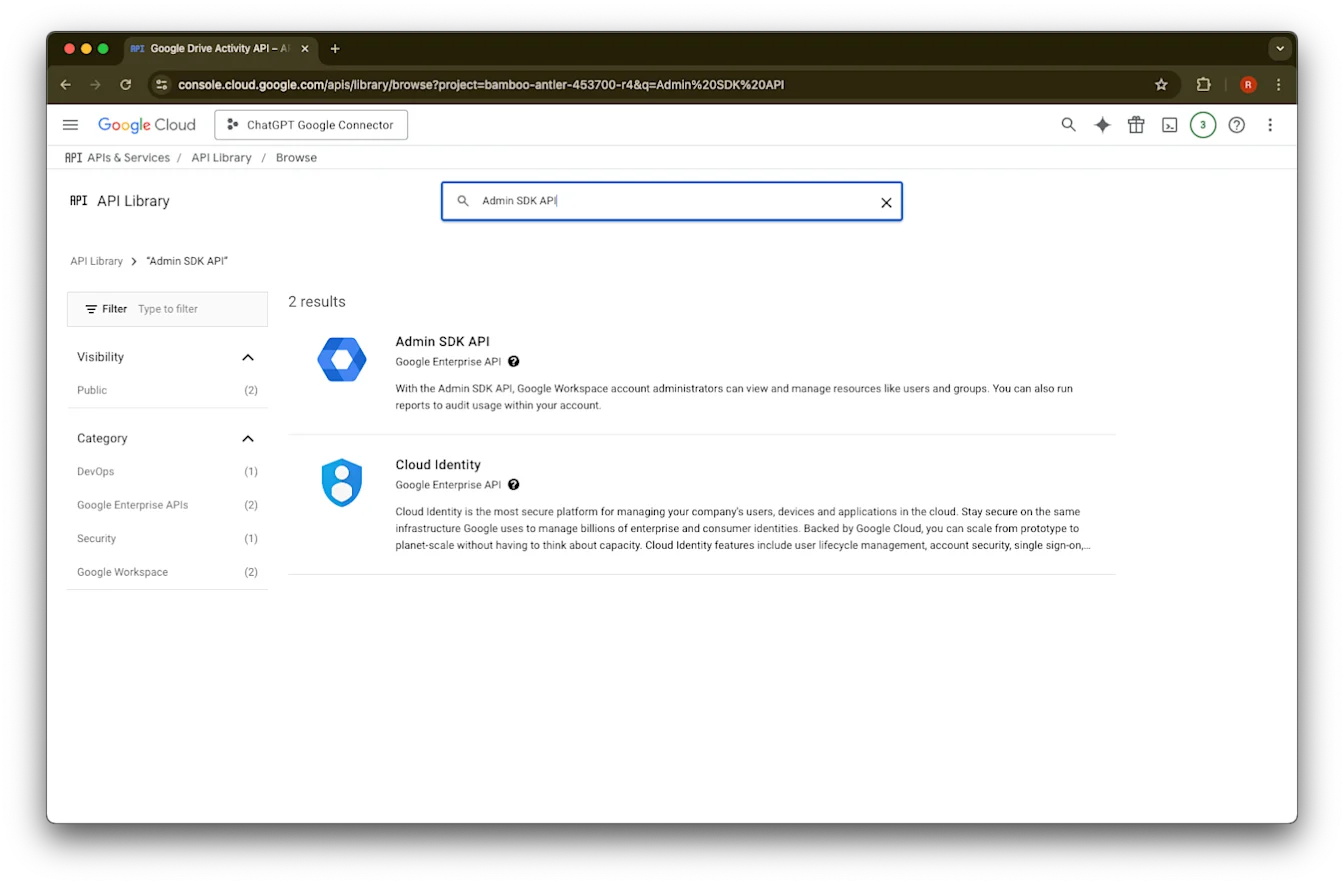
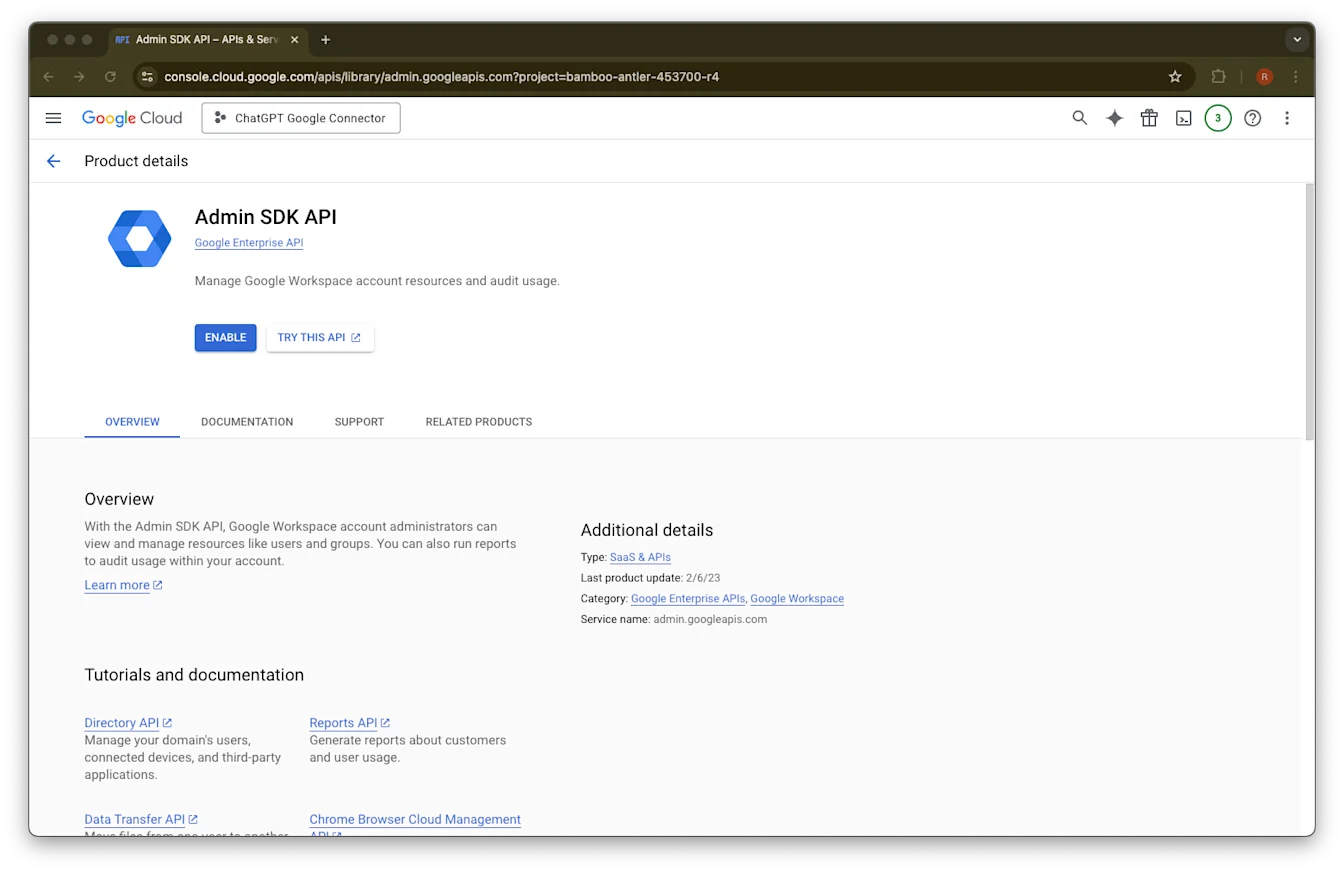
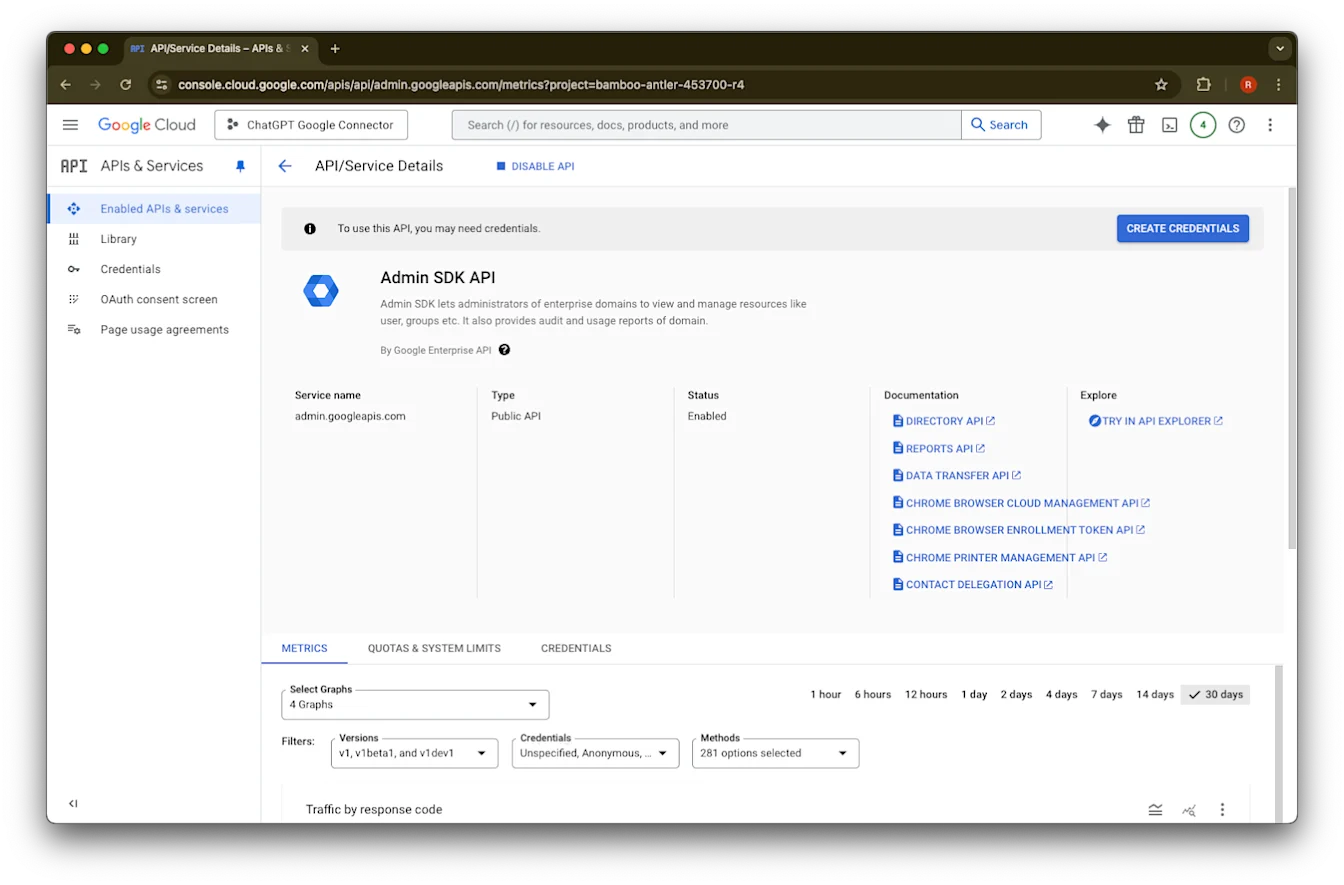
Admin SDK API ਖੋਜੋ.
Admin SDK API
ਚੁਣੋ.Enable ‘ਤੇ ਕਲਿੱਕ ਕਰੋ.
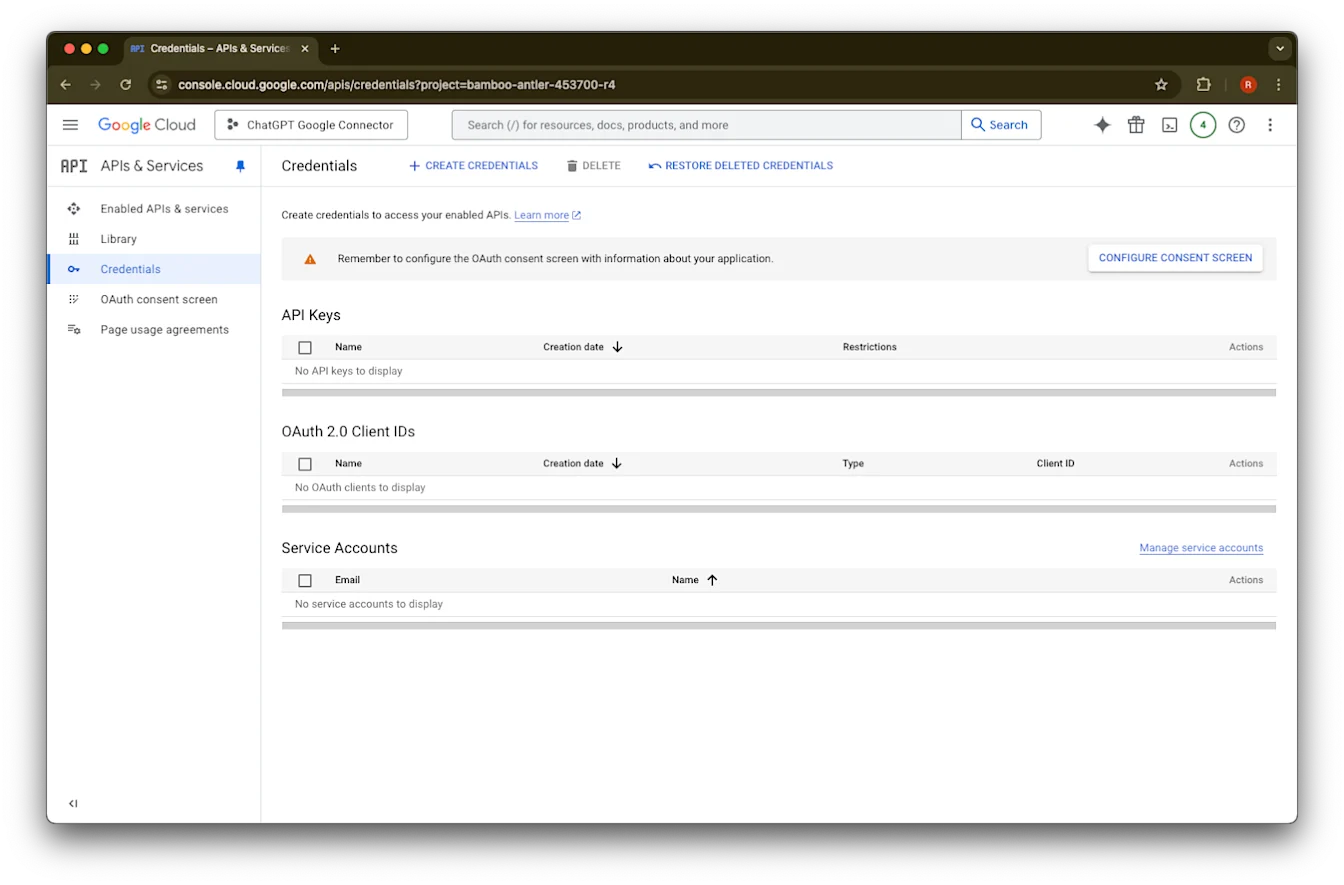
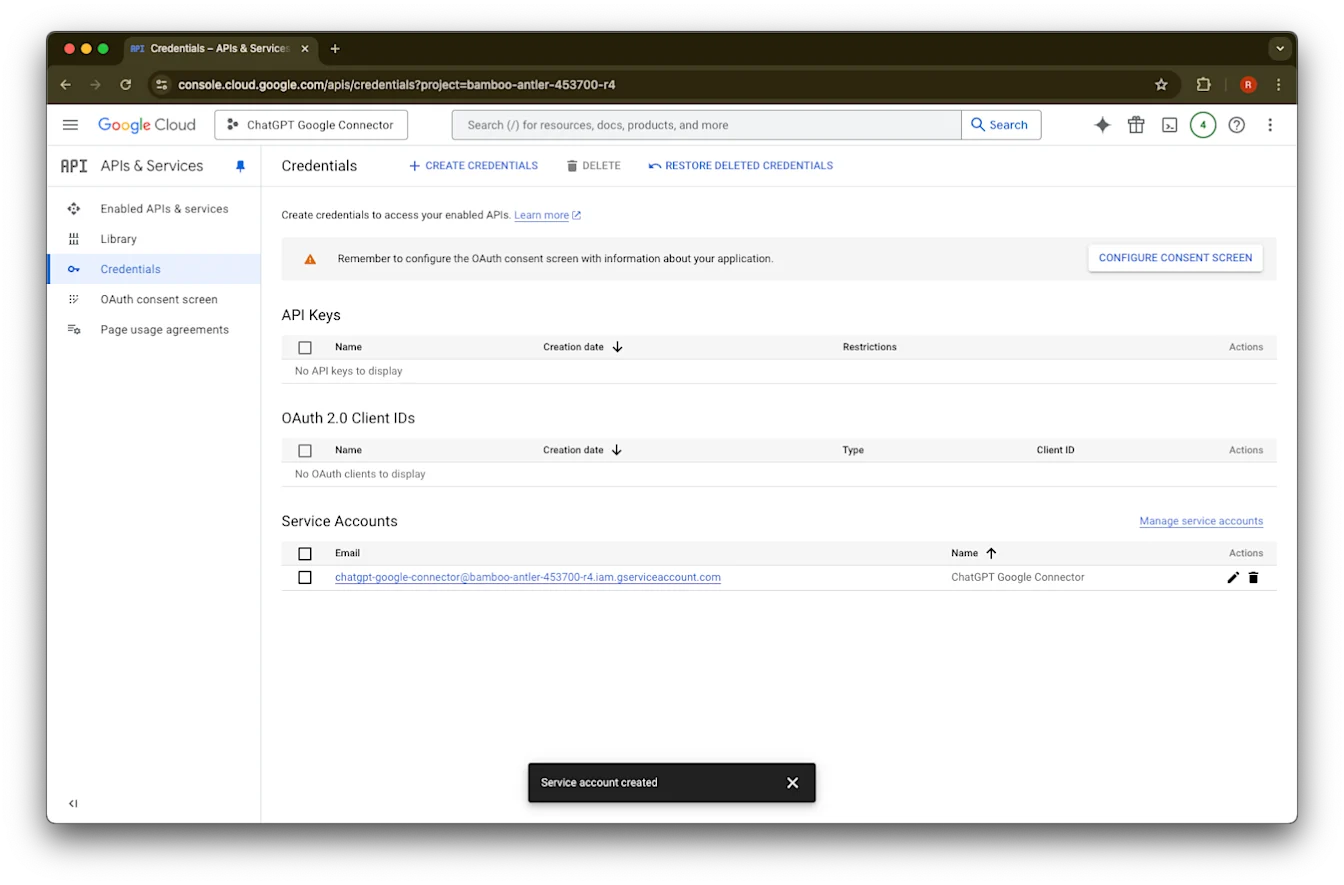
Credentials ‘ਤੇ ਕਲਿੱਕ ਕਰੋ.
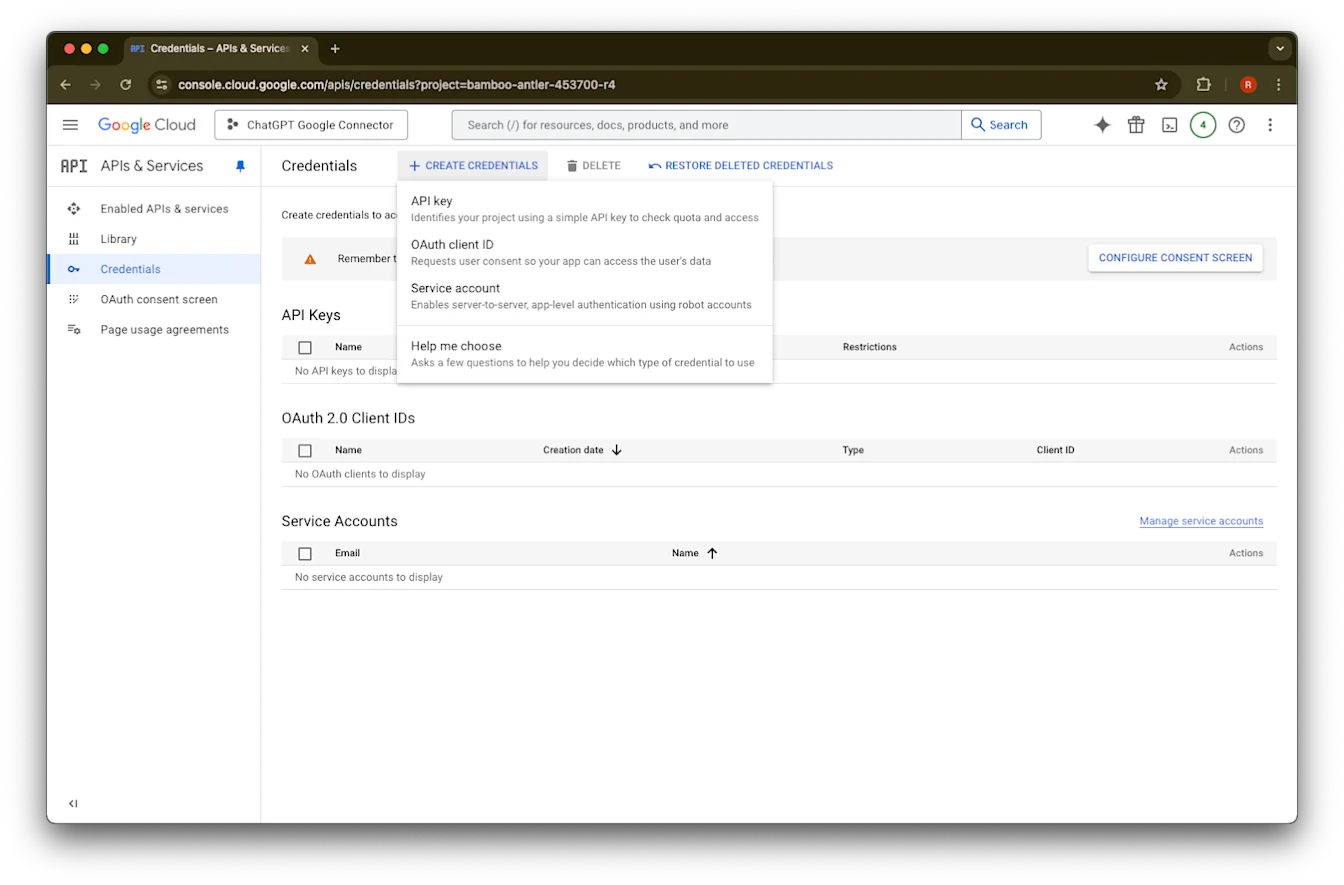
Create Credentials ‘ਤੇ ਕਲਿੱਕ ਕਰੋ.
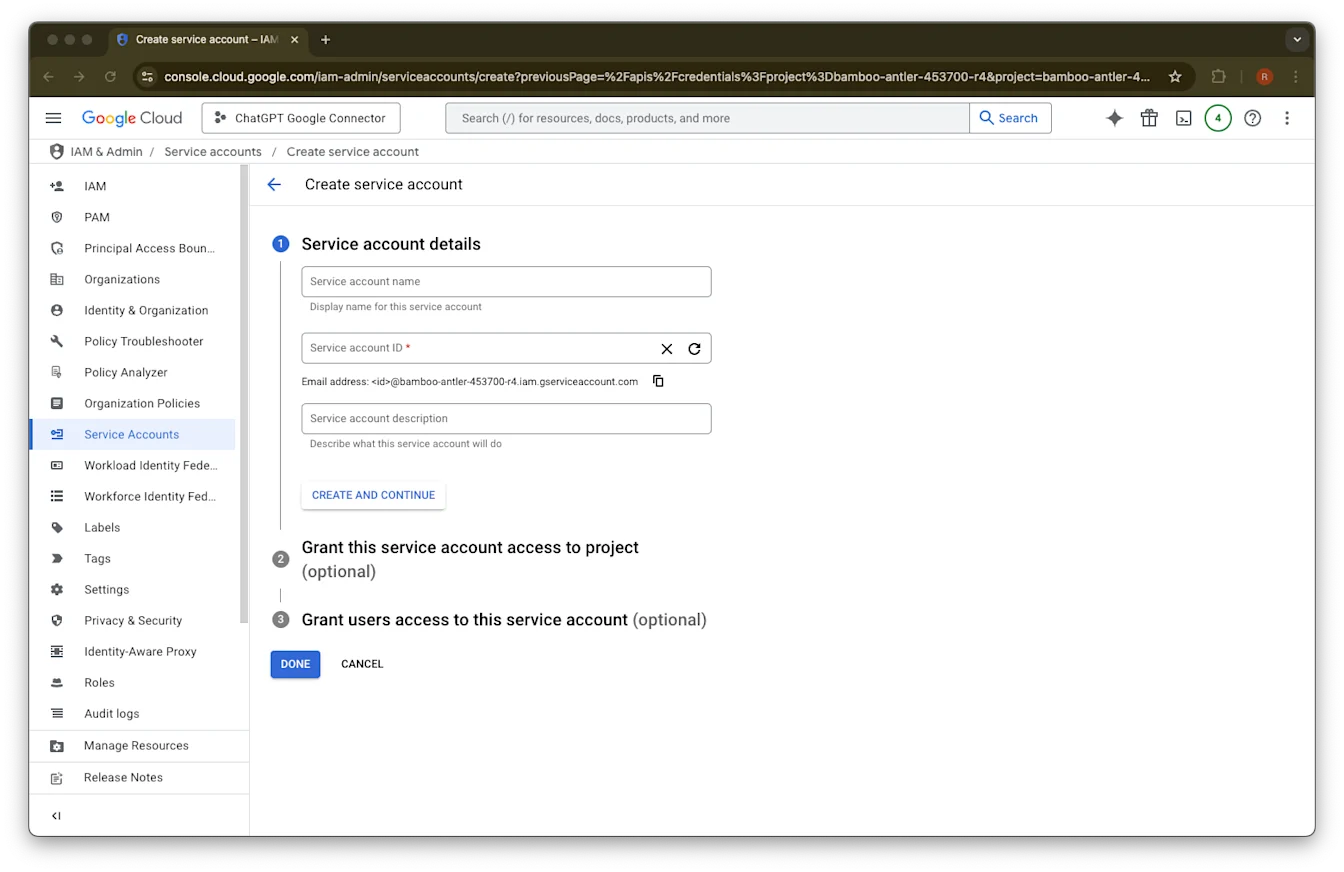
Service account ‘ਤੇ ਕਲਿੱਕ ਕਰੋ.
ਇਸ ਸਰਵਿਸ ਅਕਾਊਂਟ ਲਈ ਆਪਣੀ ਪਸੰਦ ਦਾ name ਅਤੇ description ਦਿਓ.
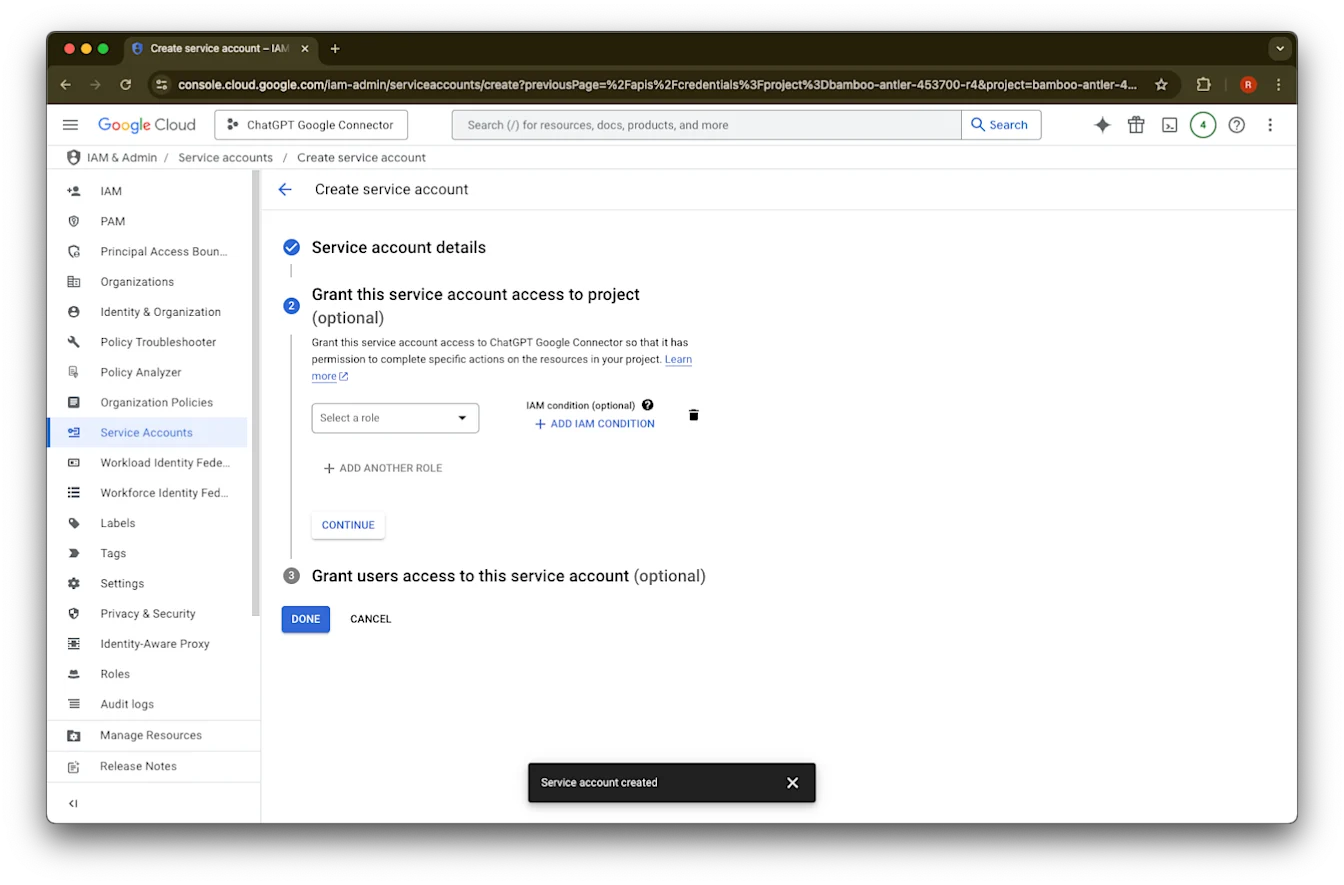
(ਵਿਕਲਪਿਕ) ਤੁਸੀਂ ਇੱਕ role assign ਕਰ ਸਕਦੇ ਹੋ - ChatGPT ਲਈ ਇਹ ਲਾਜ਼ਮੀ ਨਹੀਂ ਹੈ.
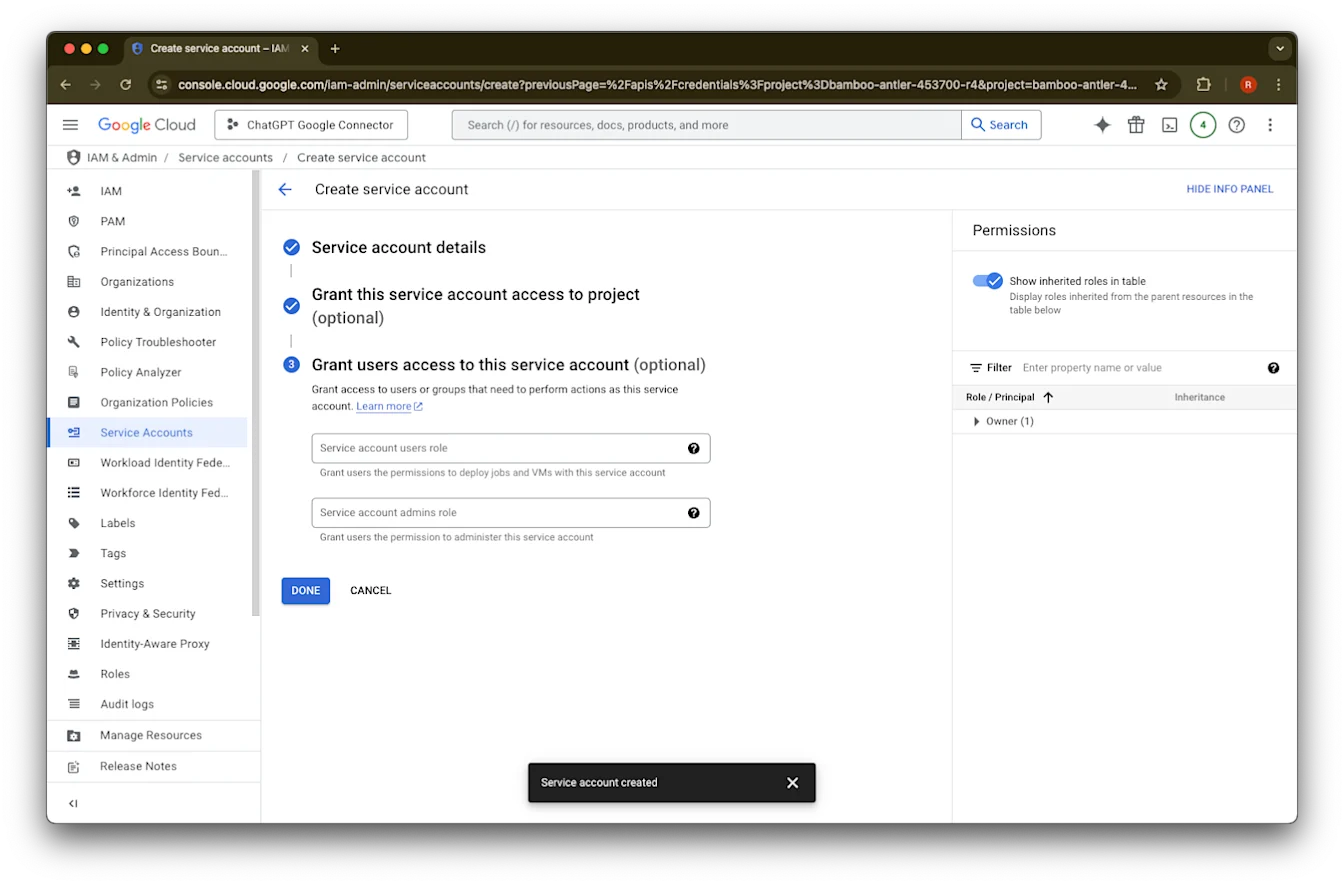
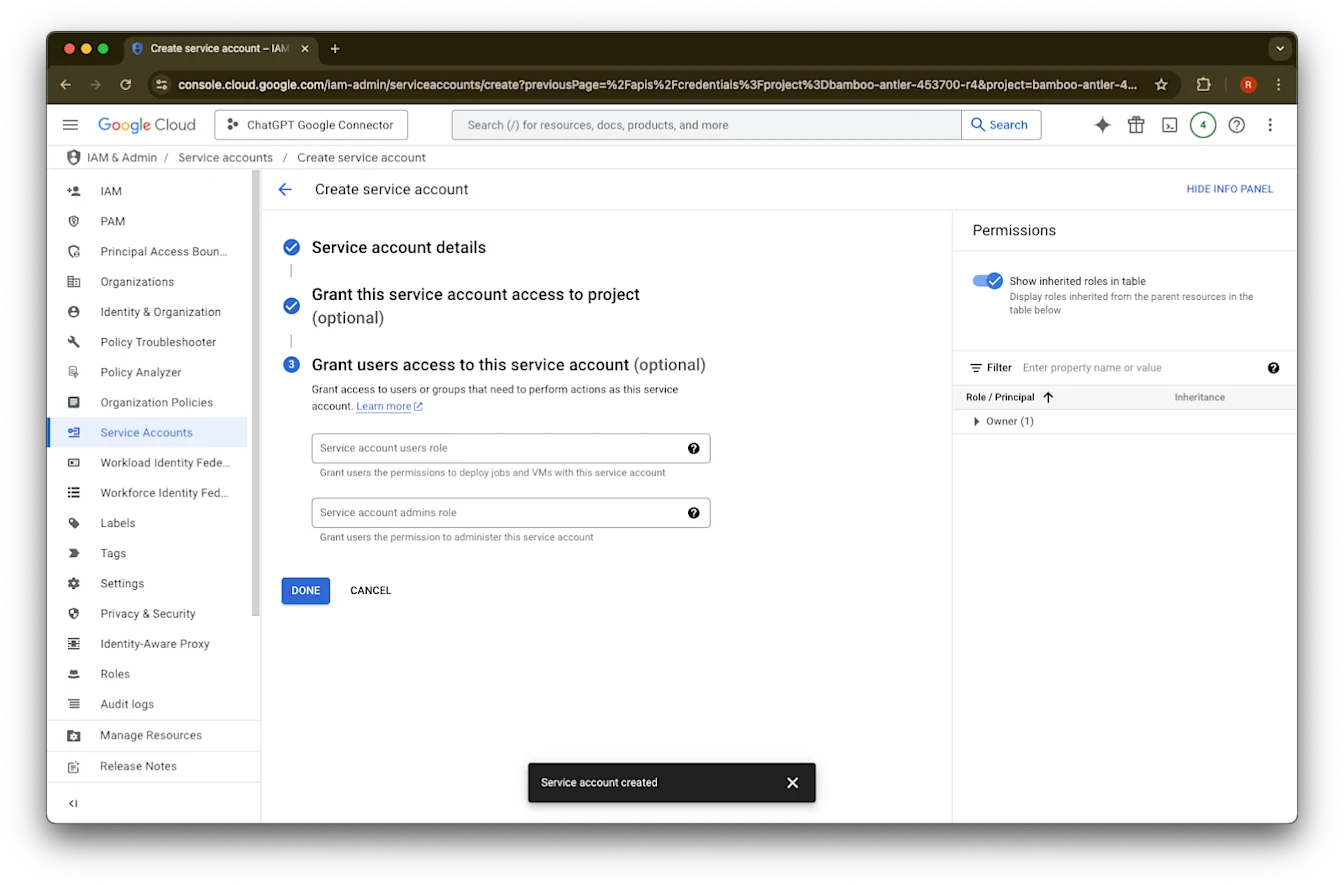
(ਵਿਕਲਪਿਕ) ਤੁਸੀਂ ਸਰਵਿਸ ਅਕਾਊਂਟ ਨੂੰ access ਦੇ ਸਕਦੇ ਹੋ - ChatGPT ਲਈ ਇਹ ਲਾਜ਼ਮੀ ਨਹੀਂ ਹੈ.
Done ‘ਤੇ ਕਲਿੱਕ ਕਰੋ.
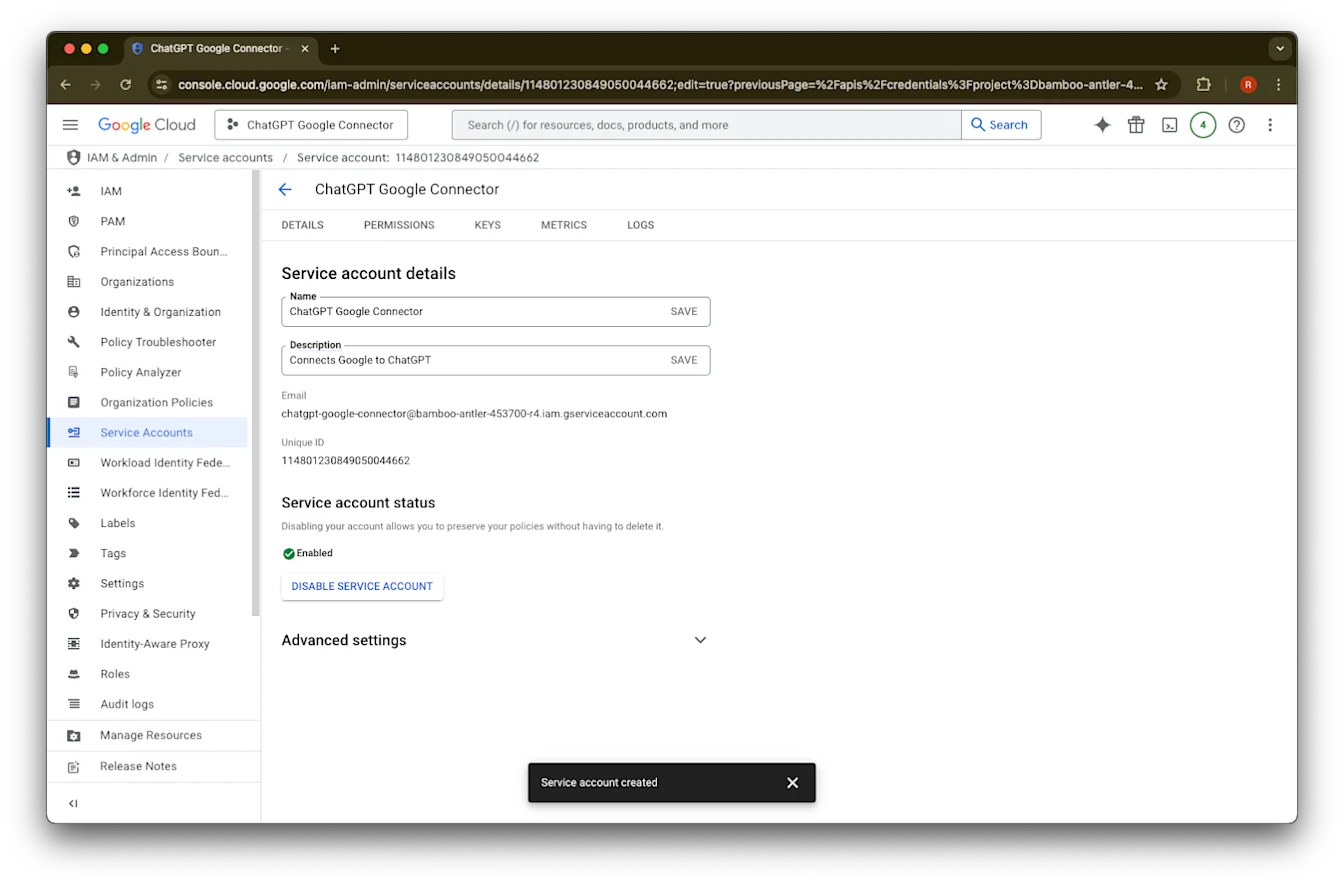
ਉਸ service account ‘ਤੇ ਕਲਿੱਕ ਕਰੋ ਜੋ ਹੁਣ ਬਣ ਚੁੱਕਾ ਹੈ.
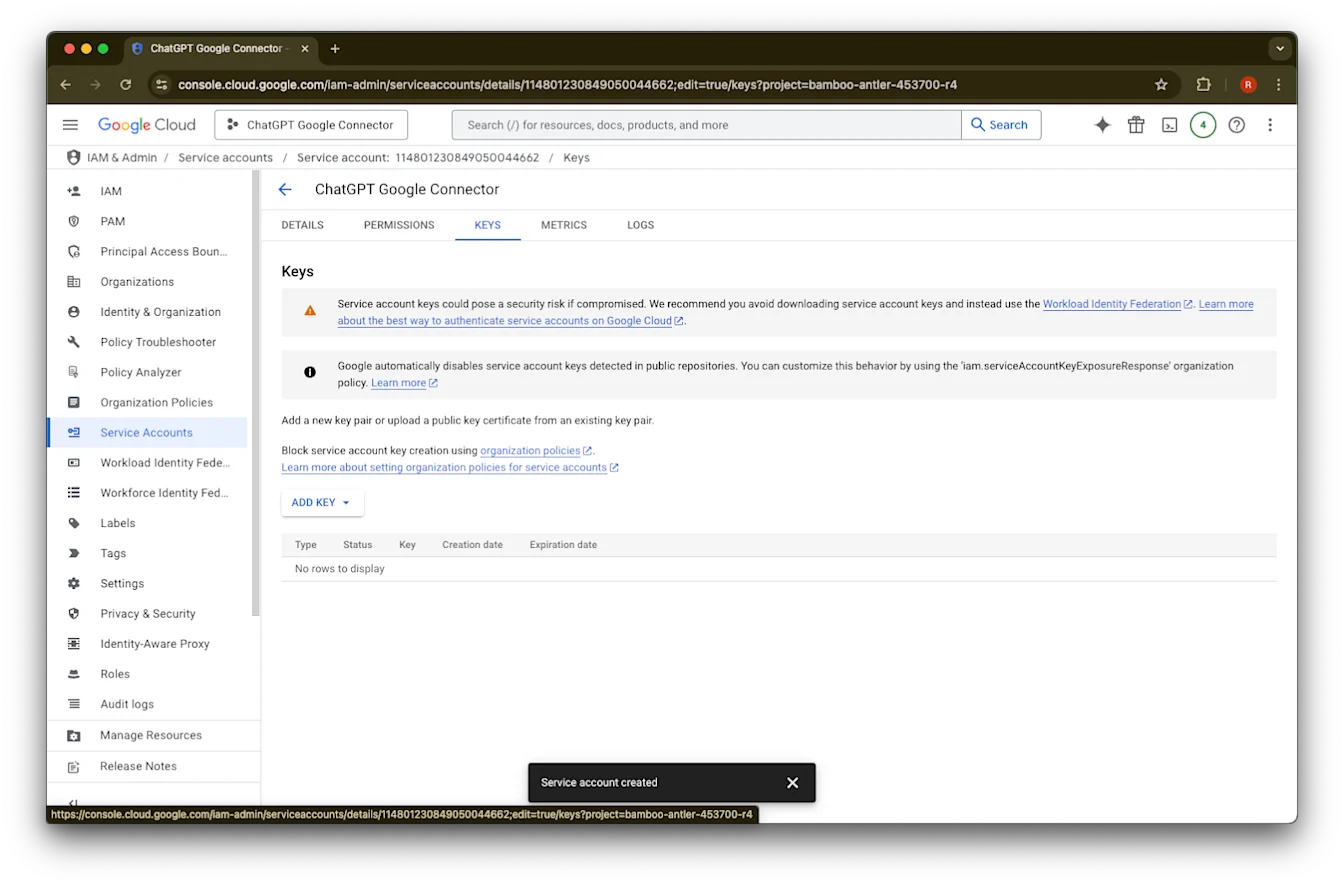
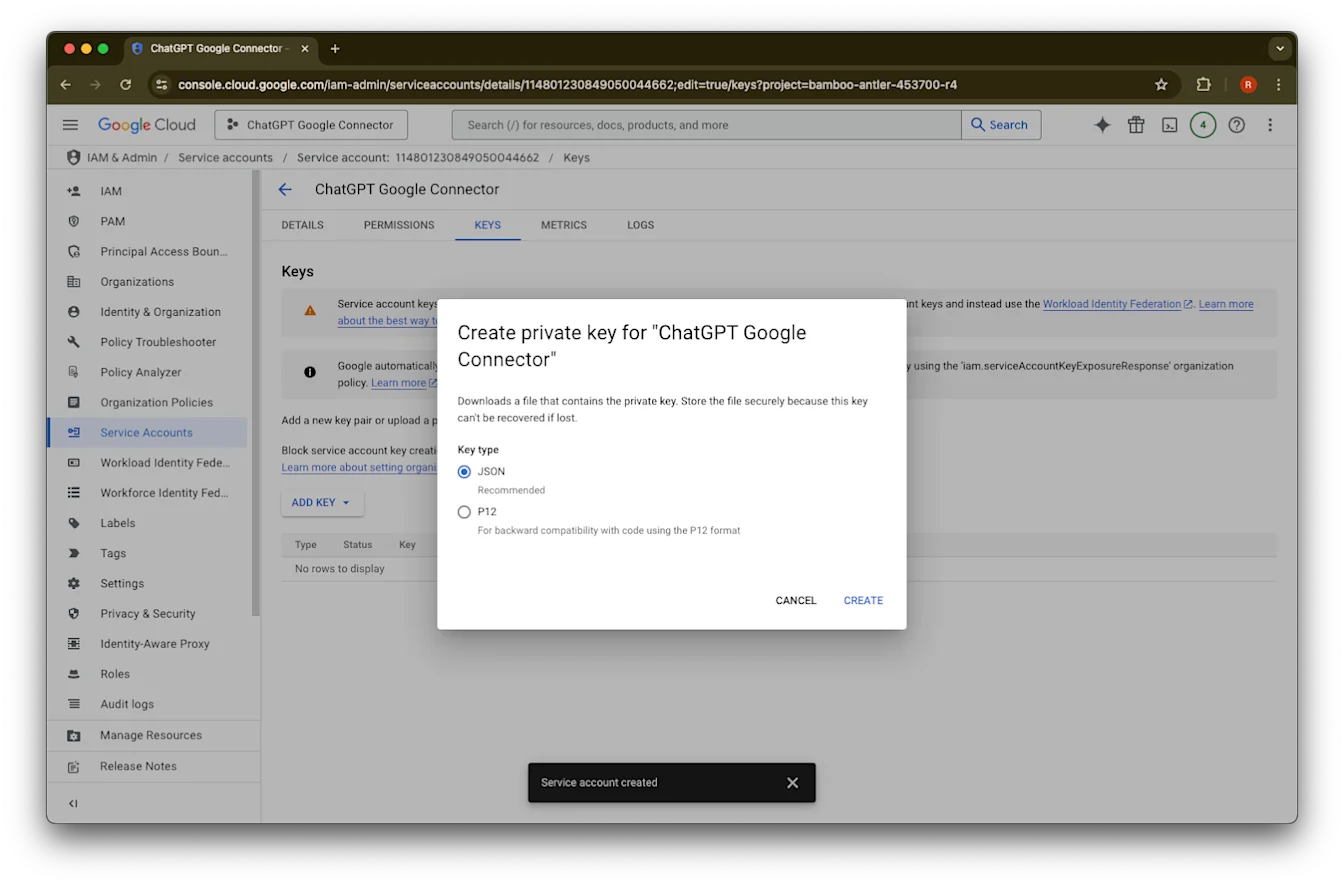
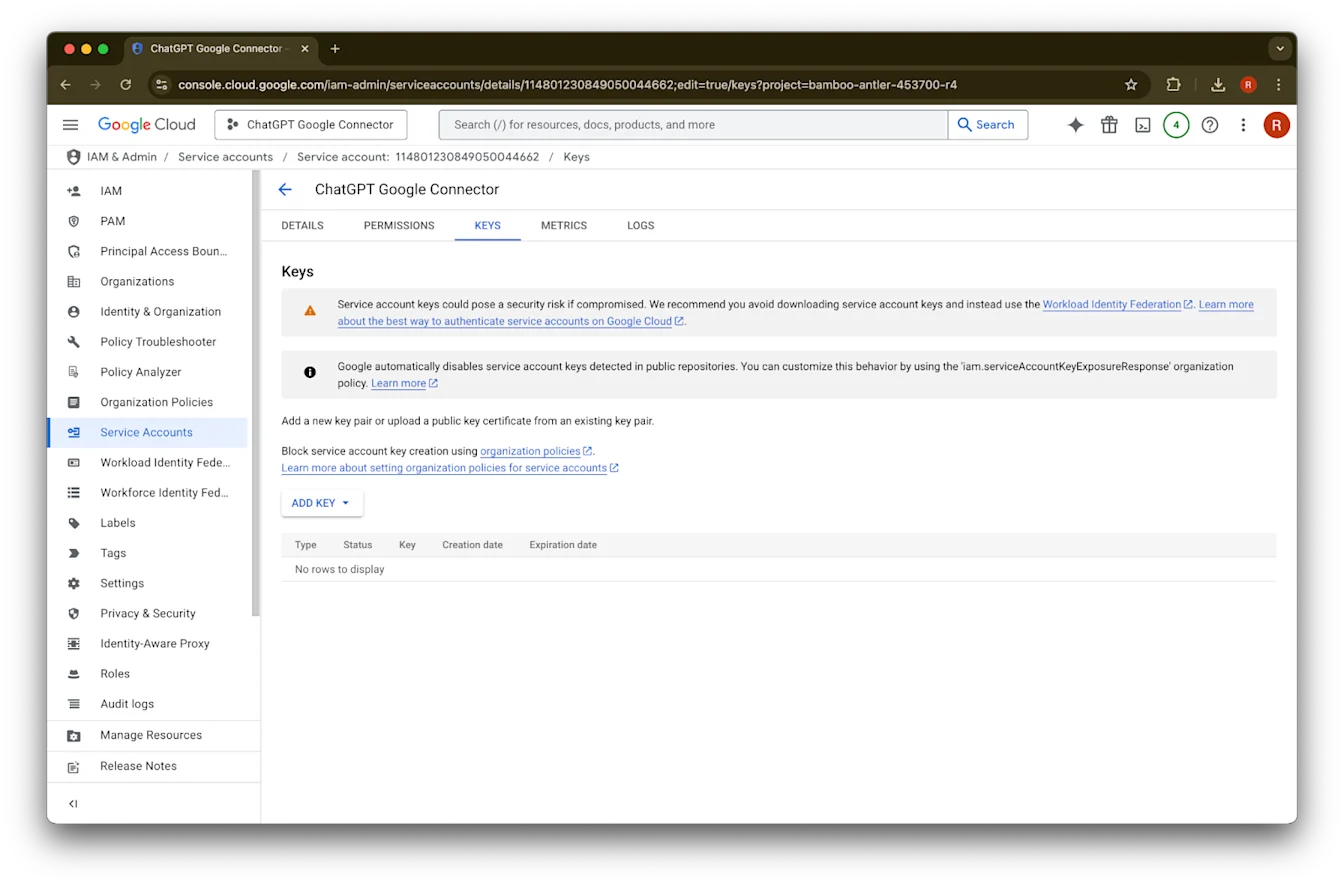
keys. ‘ਤੇ ਕਲਿੱਕ ਕਰੋ.
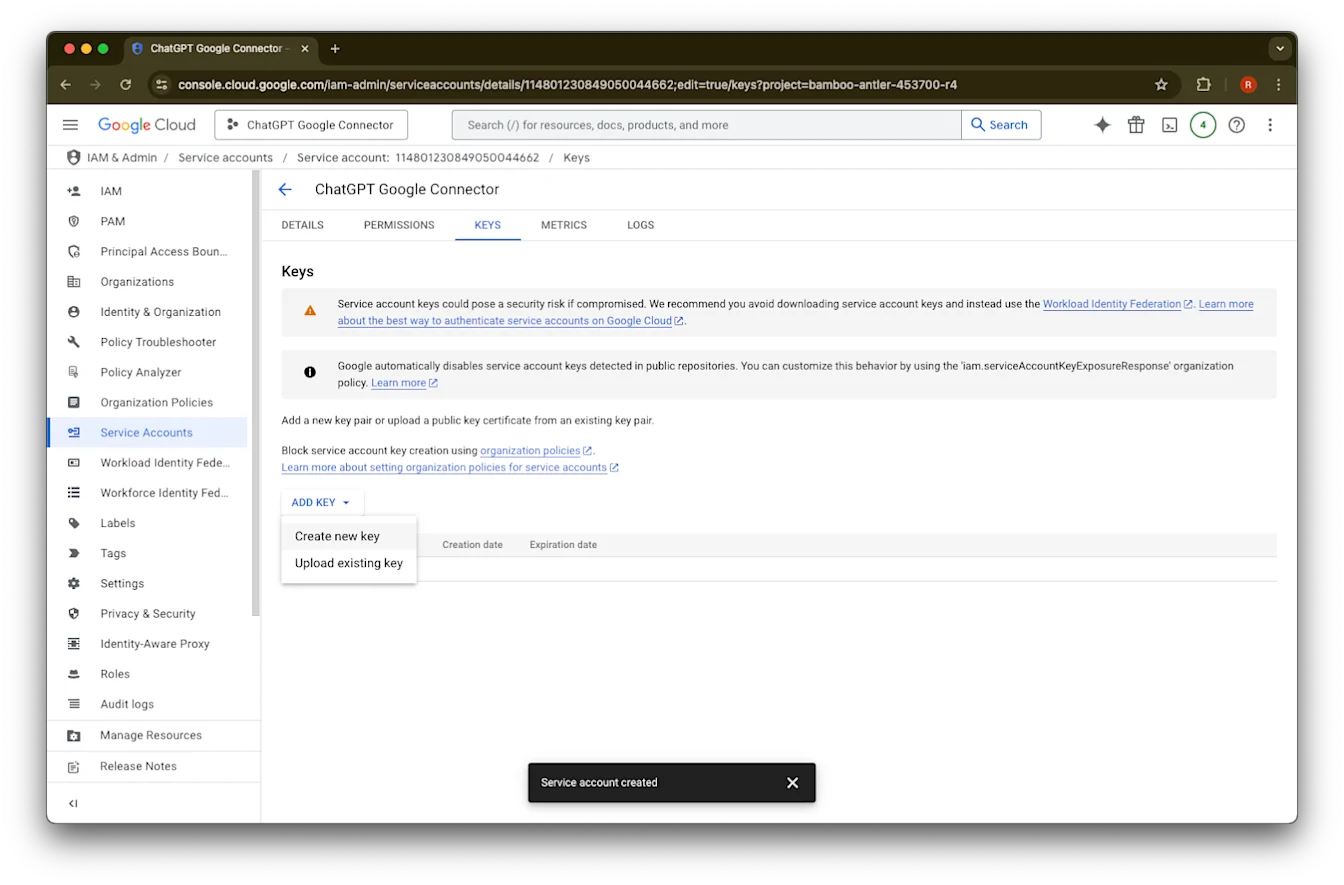
Add Key ‘ਤੇ ਕਲਿੱਕ ਕਰੋ.
Create new key ‘ਤੇ ਕਲਿੱਕ ਕਰੋ.
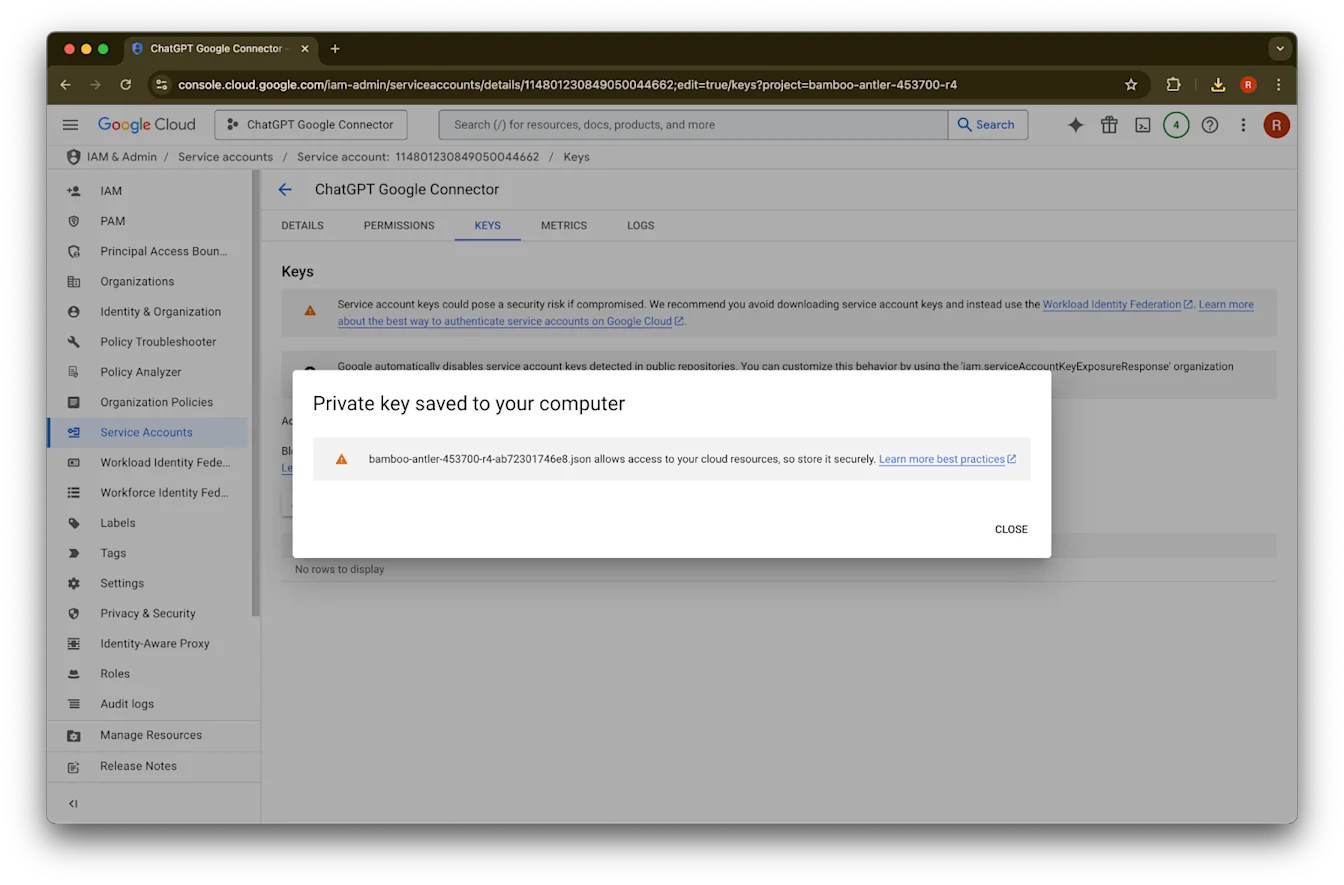
ਡਿਫ਼ੌਲਟ JSON key type ਹੀ ਰਹਿਣ ਦਿਓ ਅਤੇ Create ‘ਤੇ ਕਲਿੱਕ ਕਰੋ.
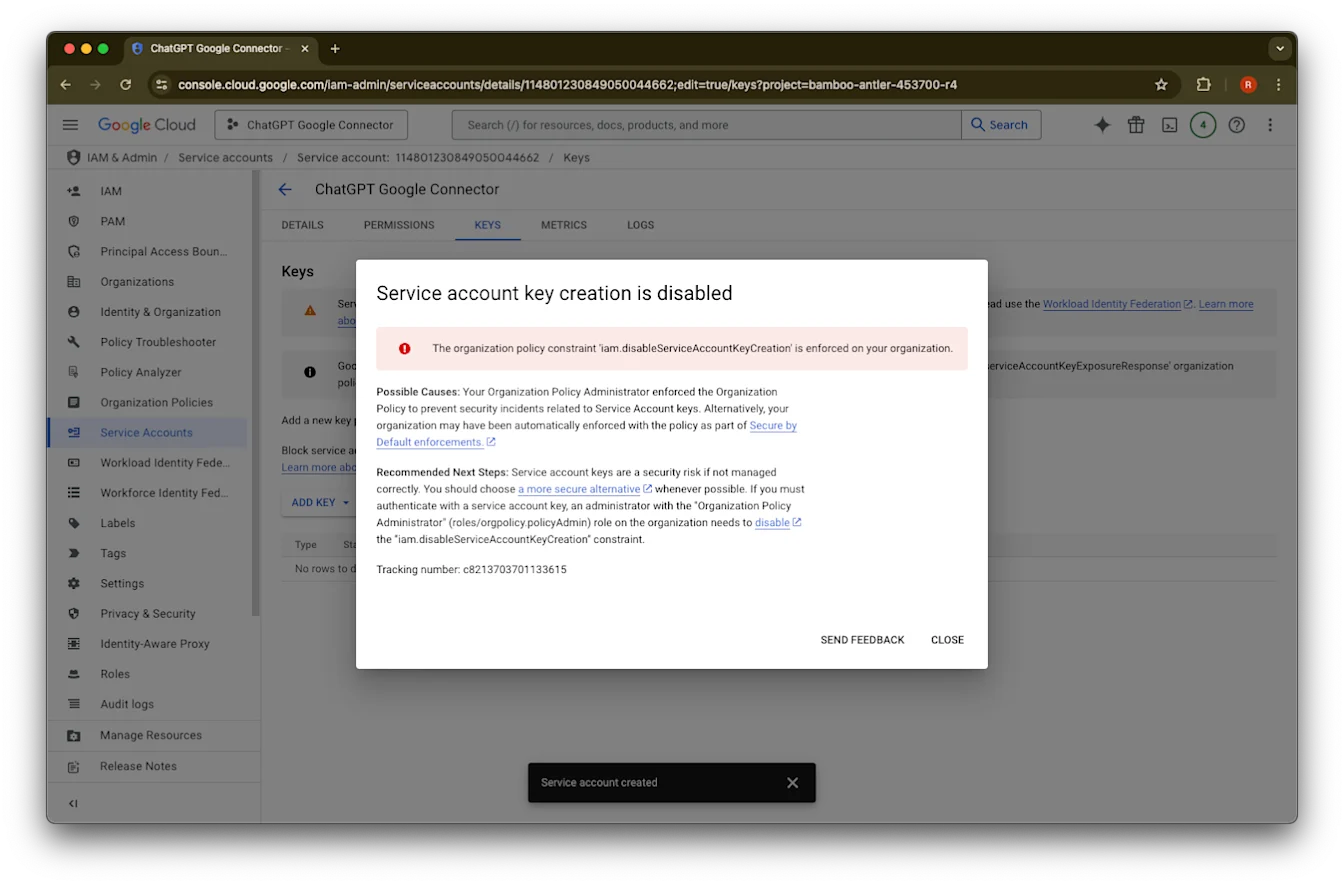
ਜੇ ਤੁਹਾਨੂੰ ਇਹ ਗਲਤੀ ਸੁਨੇਹਾ ਦਿਖਾਈ ਦੇਵੇ “Service account key creation is disabled” ਤਾਂ creation ਯੋਗ ਕਰਨ ਲਈ ਇਹ ਕਦਮ ਫੋਲੋ ਕਰੋ.Close ‘ਤੇ ਕਲਿੱਕ ਕਰੋ. ਕੁੰਜੀ ਹੁਣ ਤੁਹਾਡੇ ਕੰਪਿਊਟਰ ‘ਤੇ ਡਾਊਨਲੋਡ ਹੋ ਚੁੱਕੀ ਹੈ. ਤੁਸੀਂ ਬਾਅਦ ਵਿੱਚ ਇਸਨੂੰ ChatGPT ਐਡਮਿਨ ਕਨਸੋਲ ਵਿੱਚ ਅਪਲੋਡ ਕਰੋਗੇ.
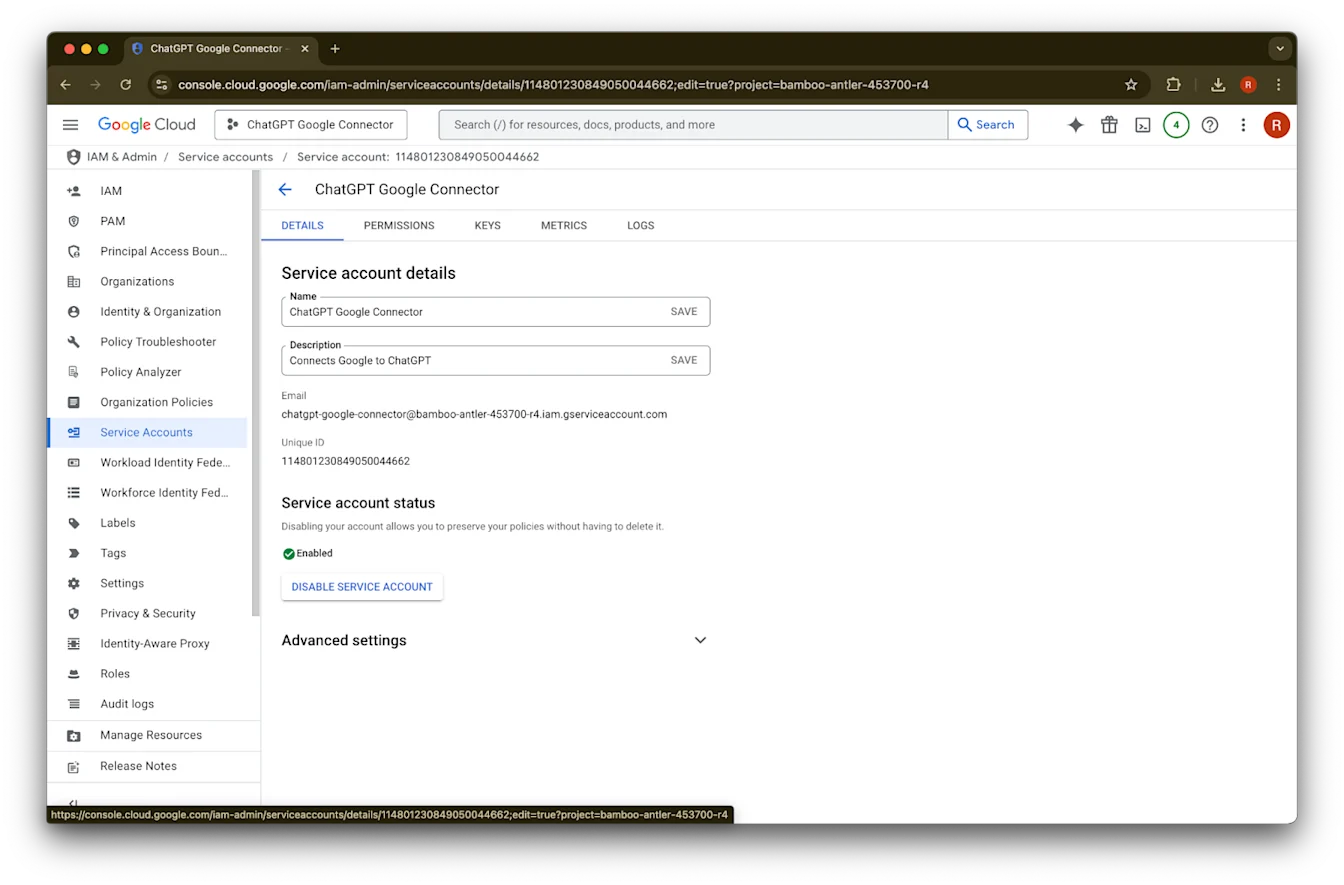
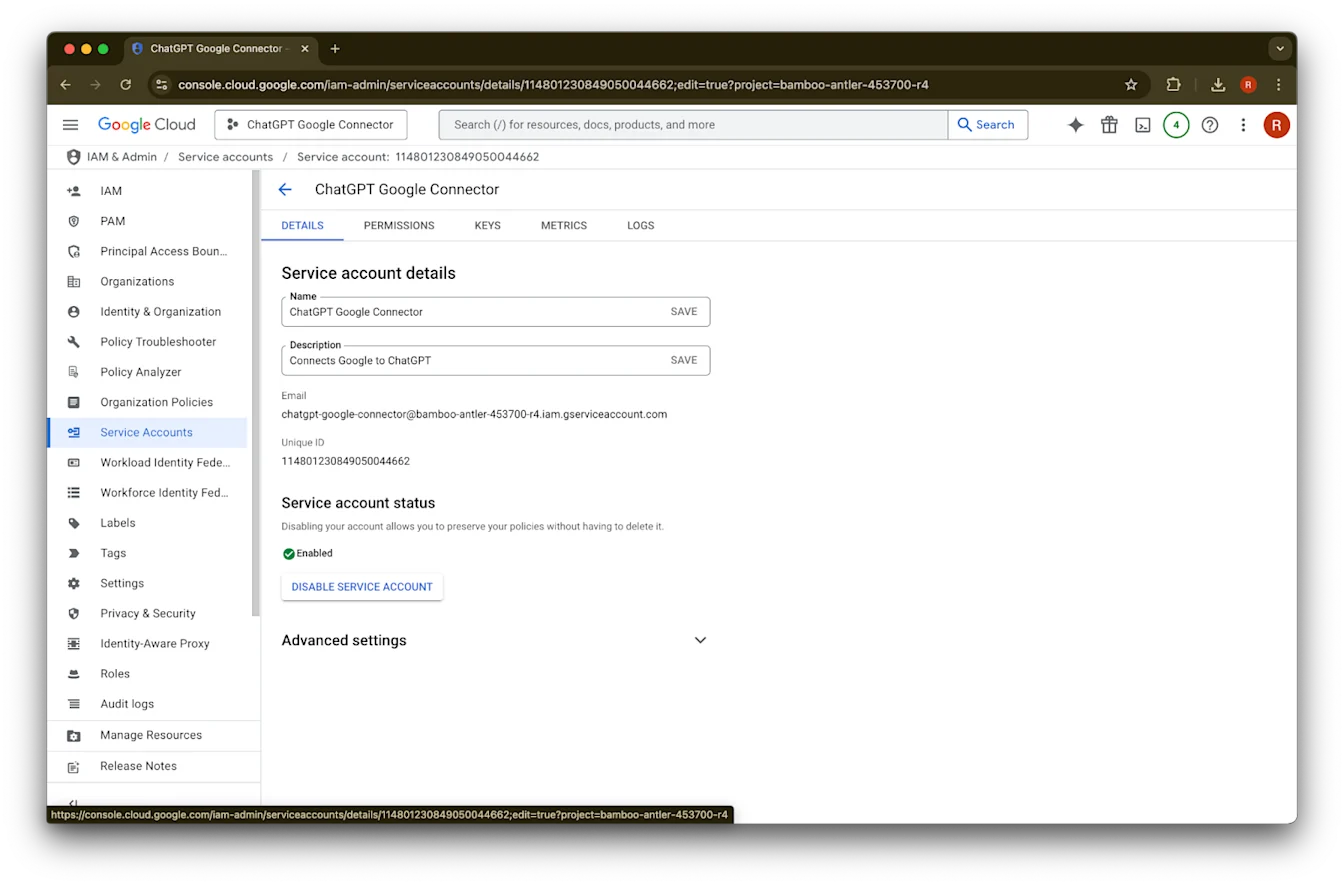
details ‘ਤੇ ਕਲਿੱਕ ਕਰੋ.
Unique ID ਨੋਟ ਕਰੋ. ਇਹ Step 42 ਵਿੱਚ ਲੋੜੀਂਦੀ ਹੋਵੇਗੀ.
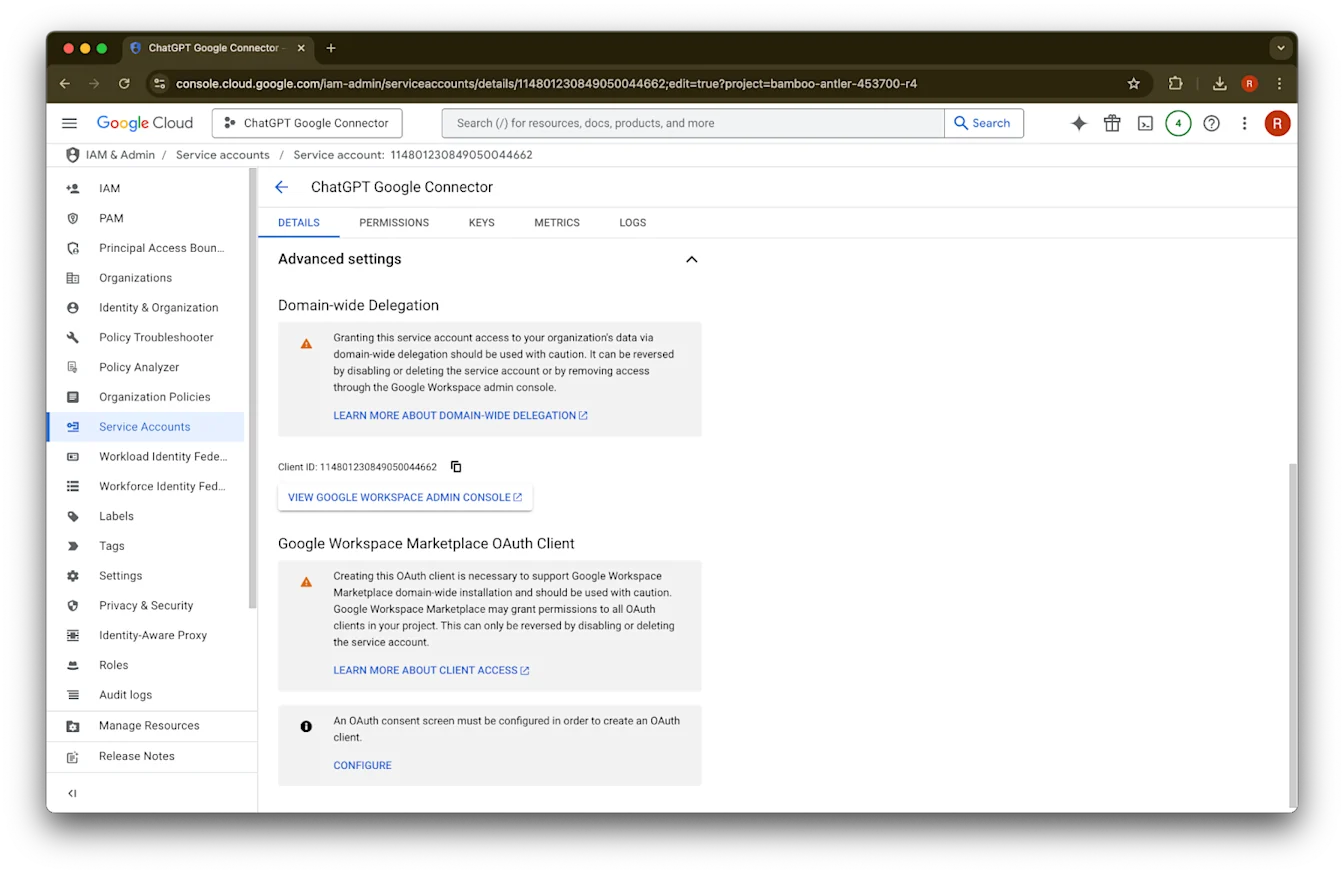
Advanced settings ਫੈਲਾਓ.
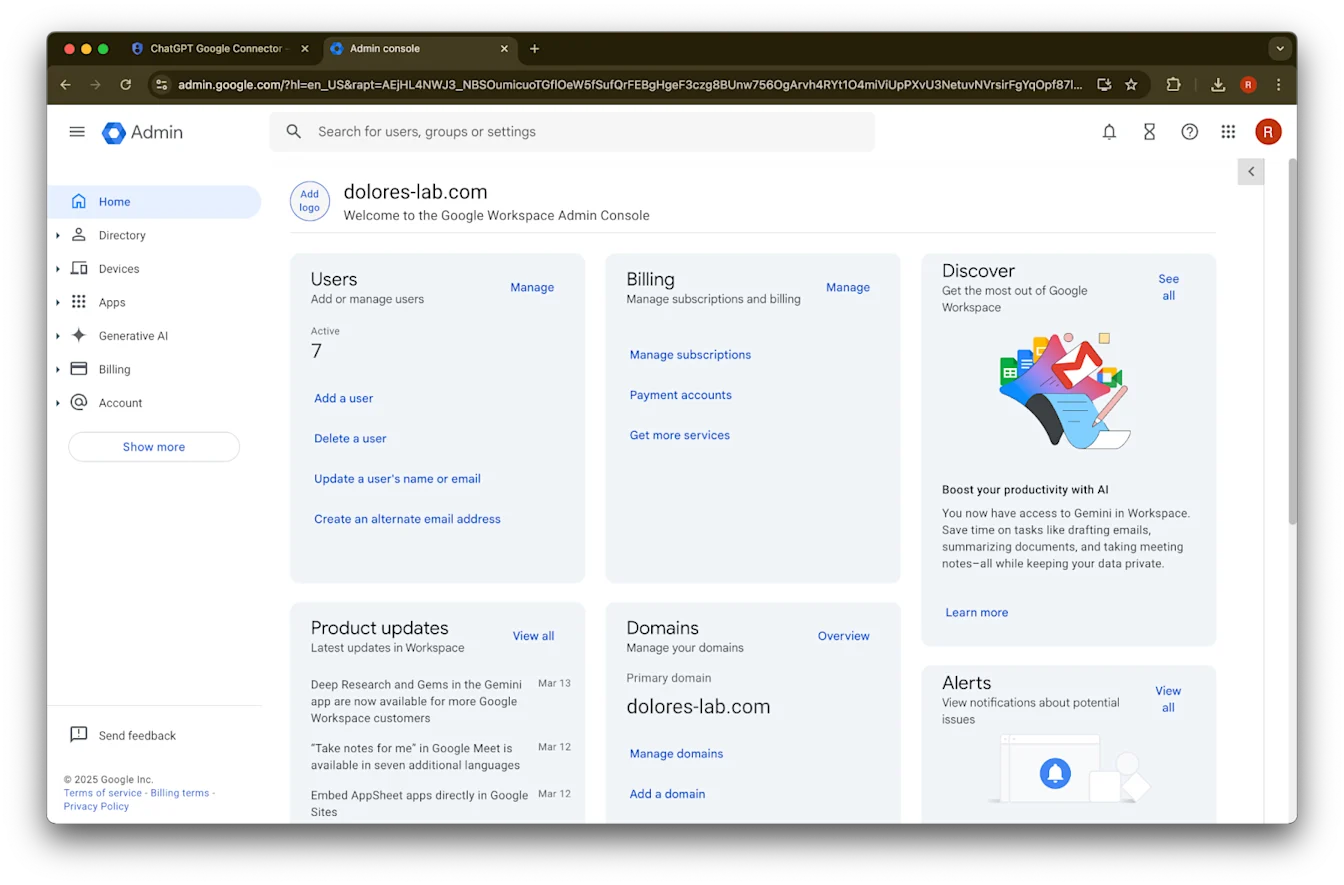
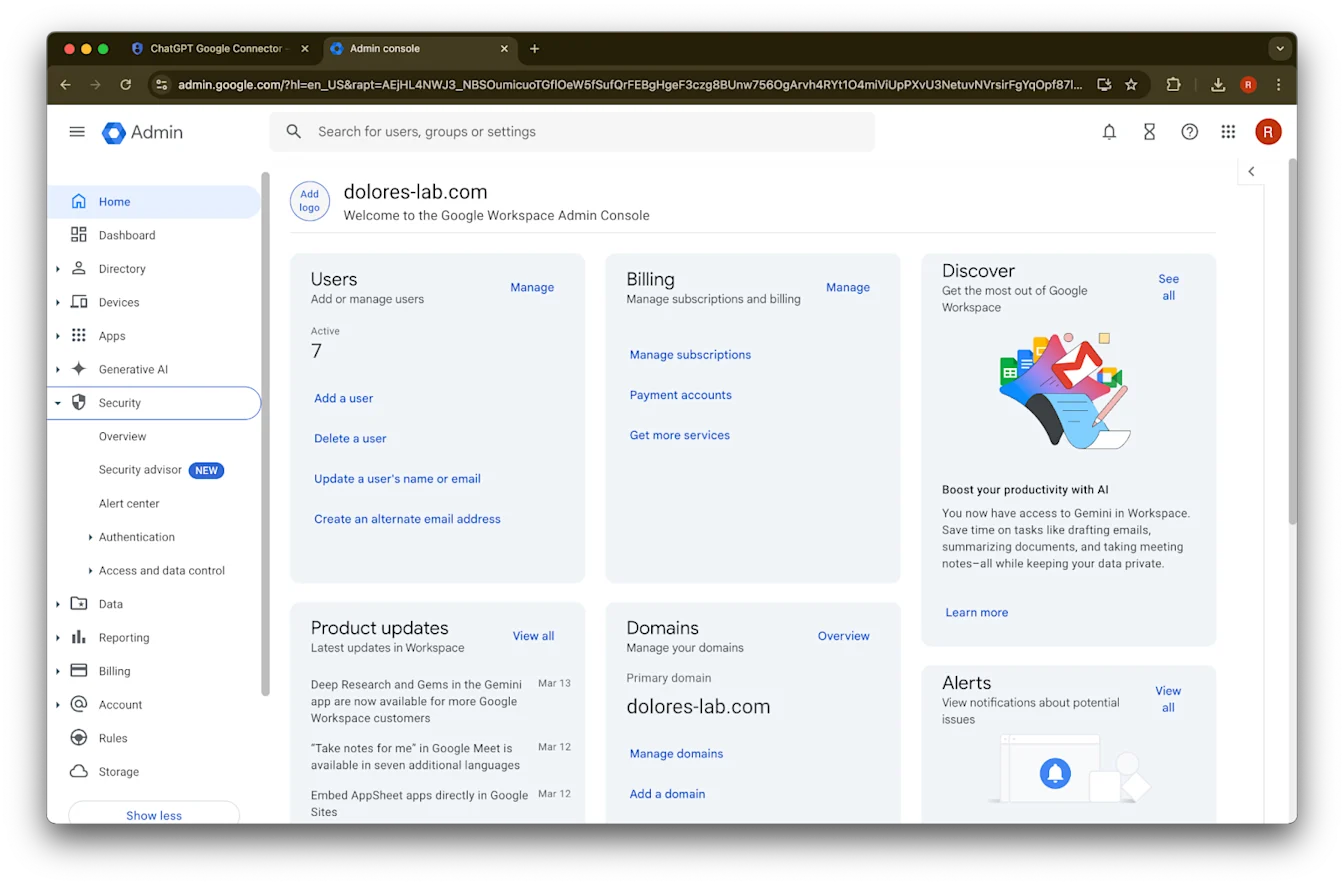
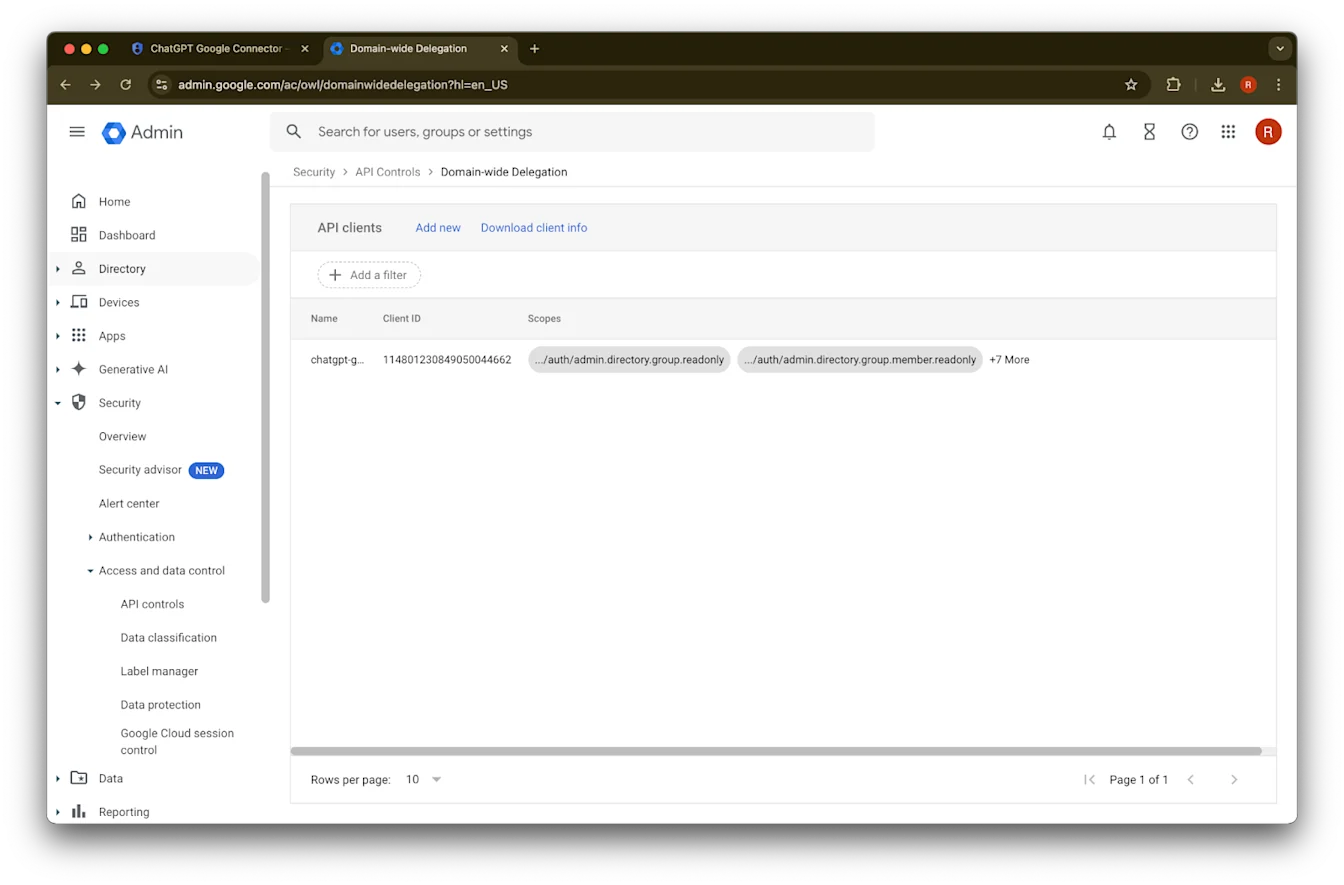
ਹੇਠਾਂ ਸਕ੍ਰੋਲ ਕਰੋ ਅਤੇ View Google Workspace Admin Console ‘ਤੇ ਕਲਿੱਕ ਕਰੋ. Google Workspace ਕਨਸੋਲ ਨਵੀਂ tab ਵਿੱਚ ਖੁੱਲੇਗਾ.
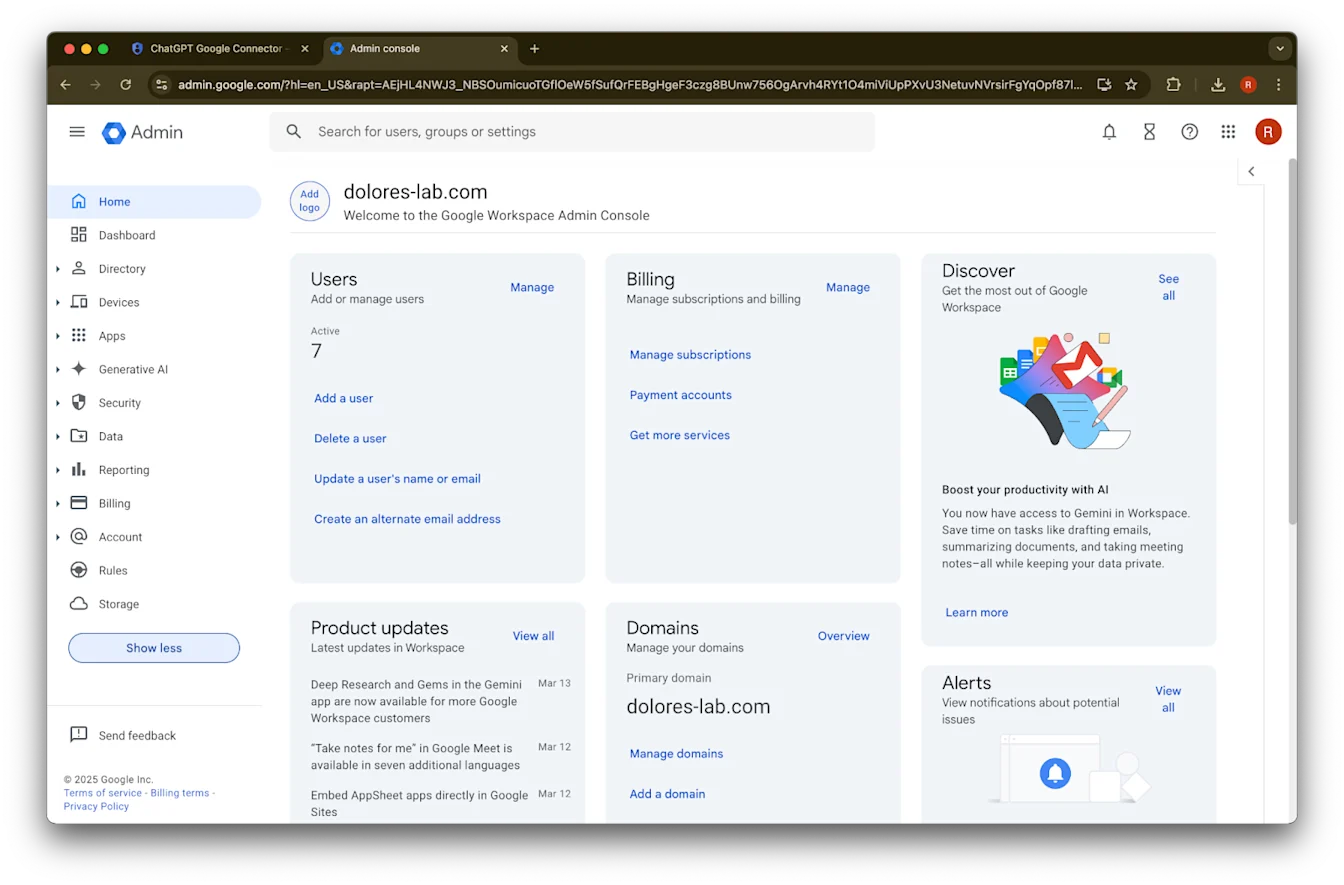
Show more ‘ਤੇ ਕਲਿੱਕ ਕਰੋ.
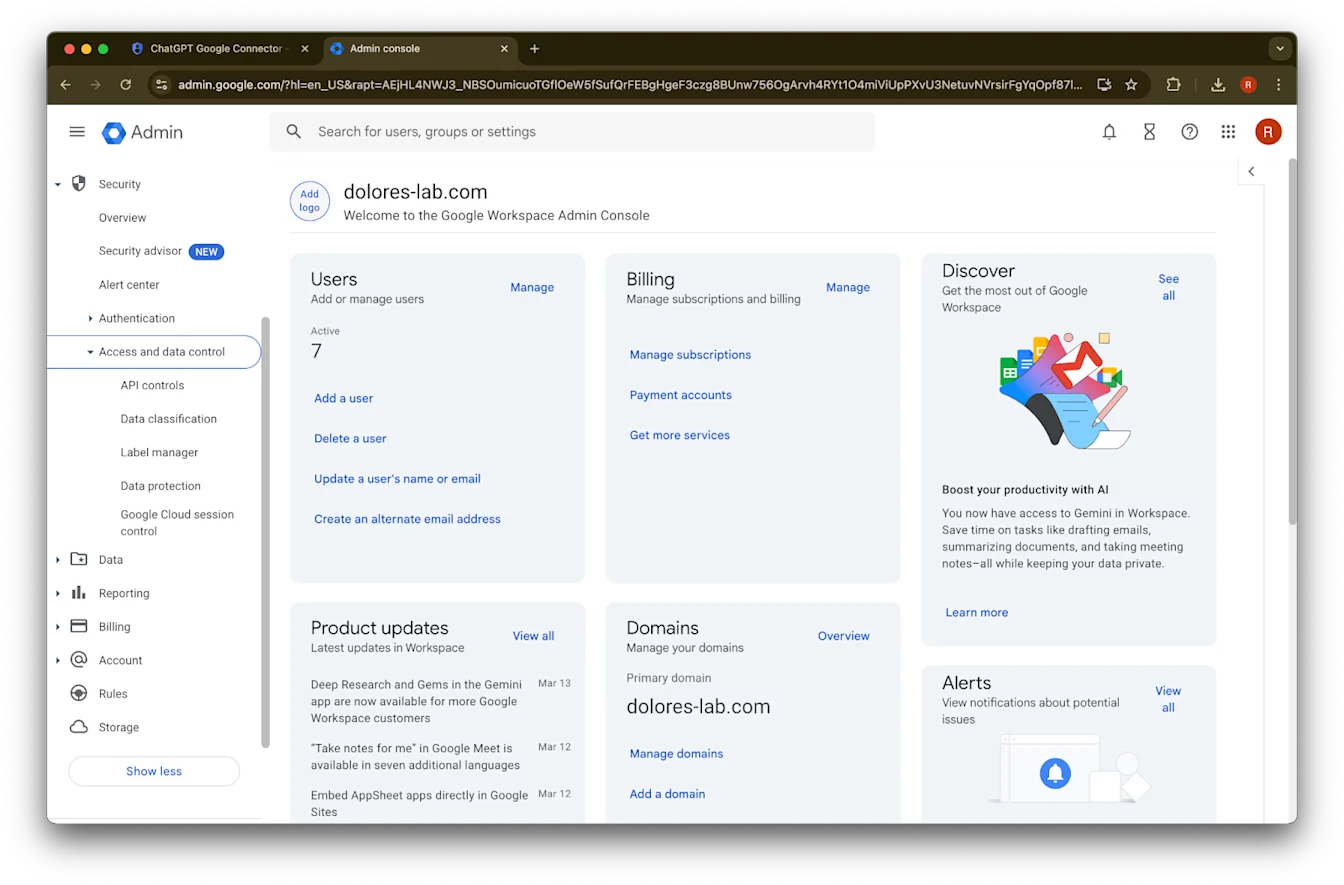
Security ਸੈਕਸ਼ਨ ਫੈਲਾਓ.
Access and data controls ਸੈਕਸ਼ਨ ਫੈਲਾਓ.
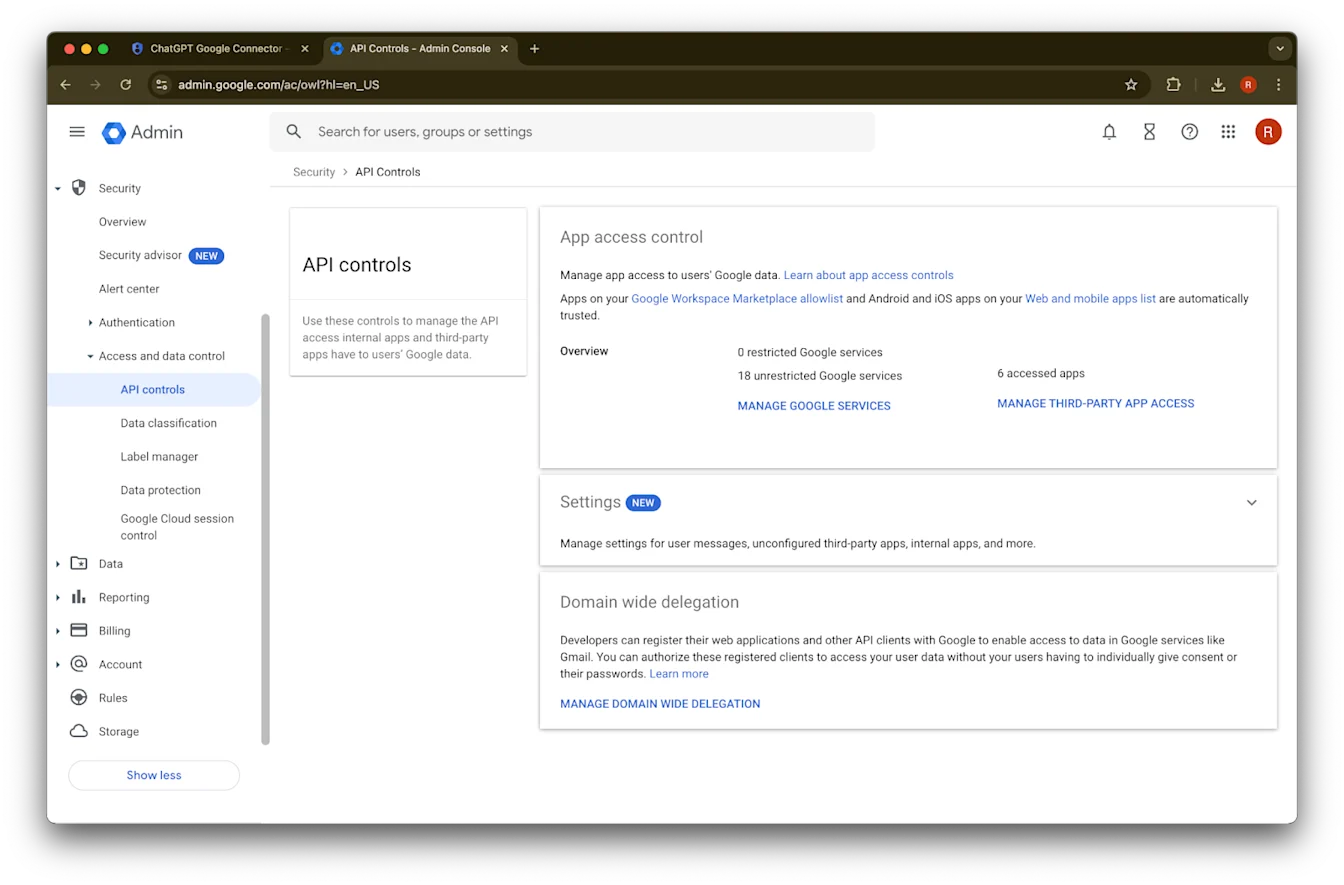
API controls ਸੈਕਸ਼ਨ ‘ਤੇ ਕਲਿੱਕ ਕਰੋ.
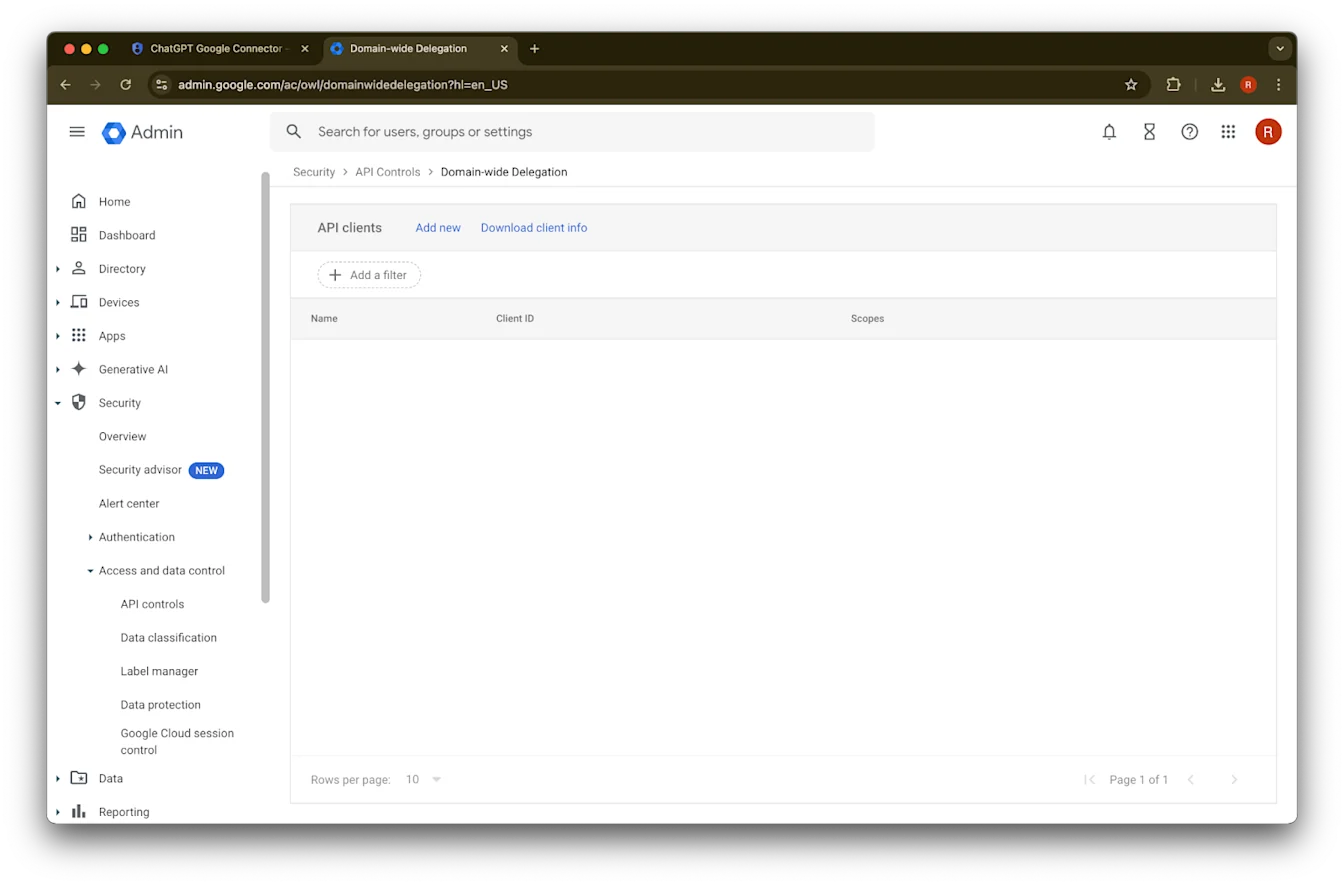
Manage Domain Wide Delegation ‘ਤੇ ਕਲਿੱਕ ਕਰੋ.
Add new ‘ਤੇ ਕਲਿੱਕ ਕਰੋ.
ਪਹਿਲਾਂ ਨੋਟ ਕੀਤੀ Unique ID ਨੂੰ ਇਸ Client ID ਦੀ value ਵਜੋਂ ਵਰਤੋ.
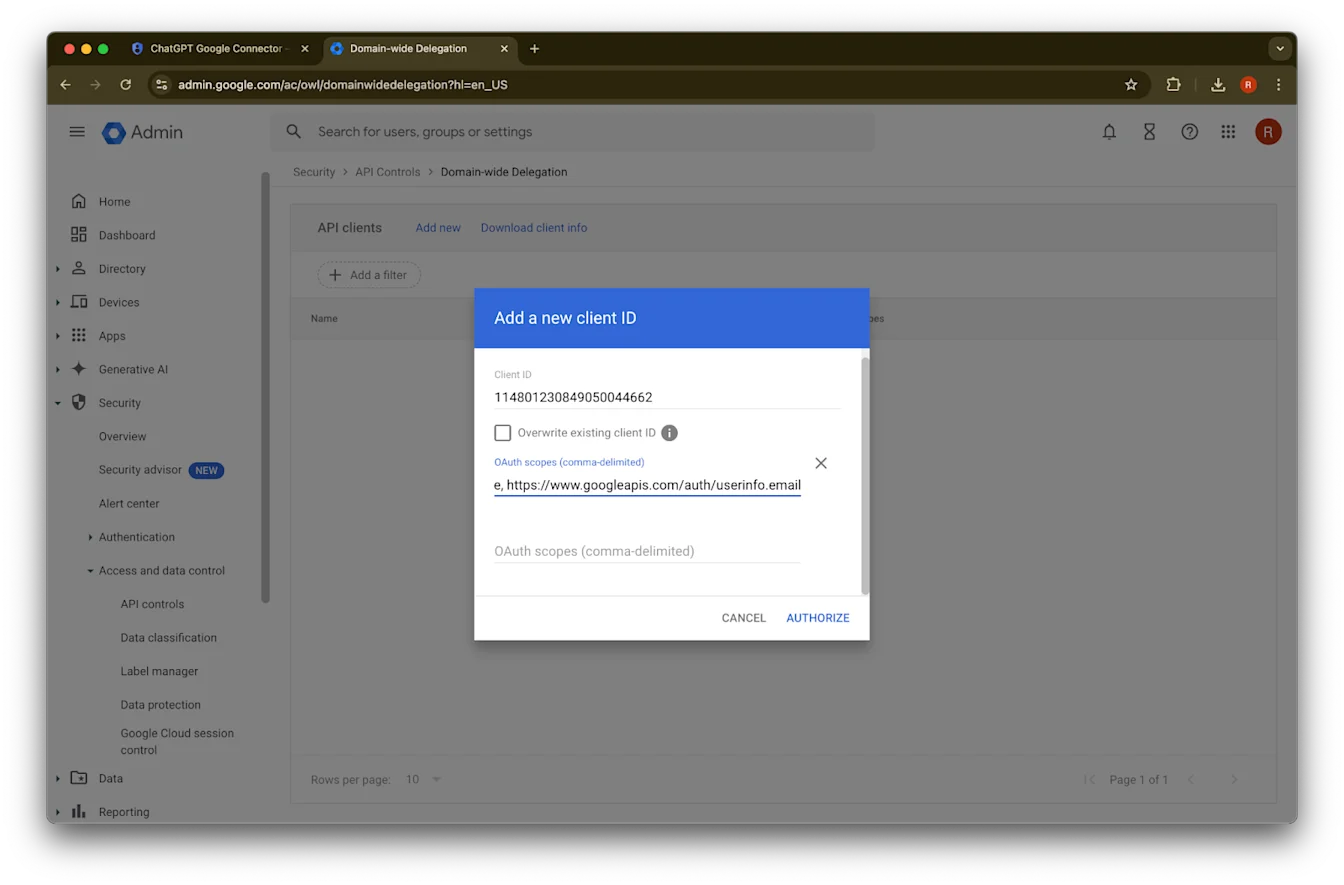
OAuth scopes ਲਈ, ਹੇਠਾਂ ਦਿੱਤੀਆਂ comma de-limited auth scopes values ਵੇਖੋ ਜਿਨ੍ਹਾਂ ਨੂੰ ਤੁਹਾਨੂੰ copy ਅਤੇ paste ਕਰਨਾ ਹੋਵੇਗਾ:
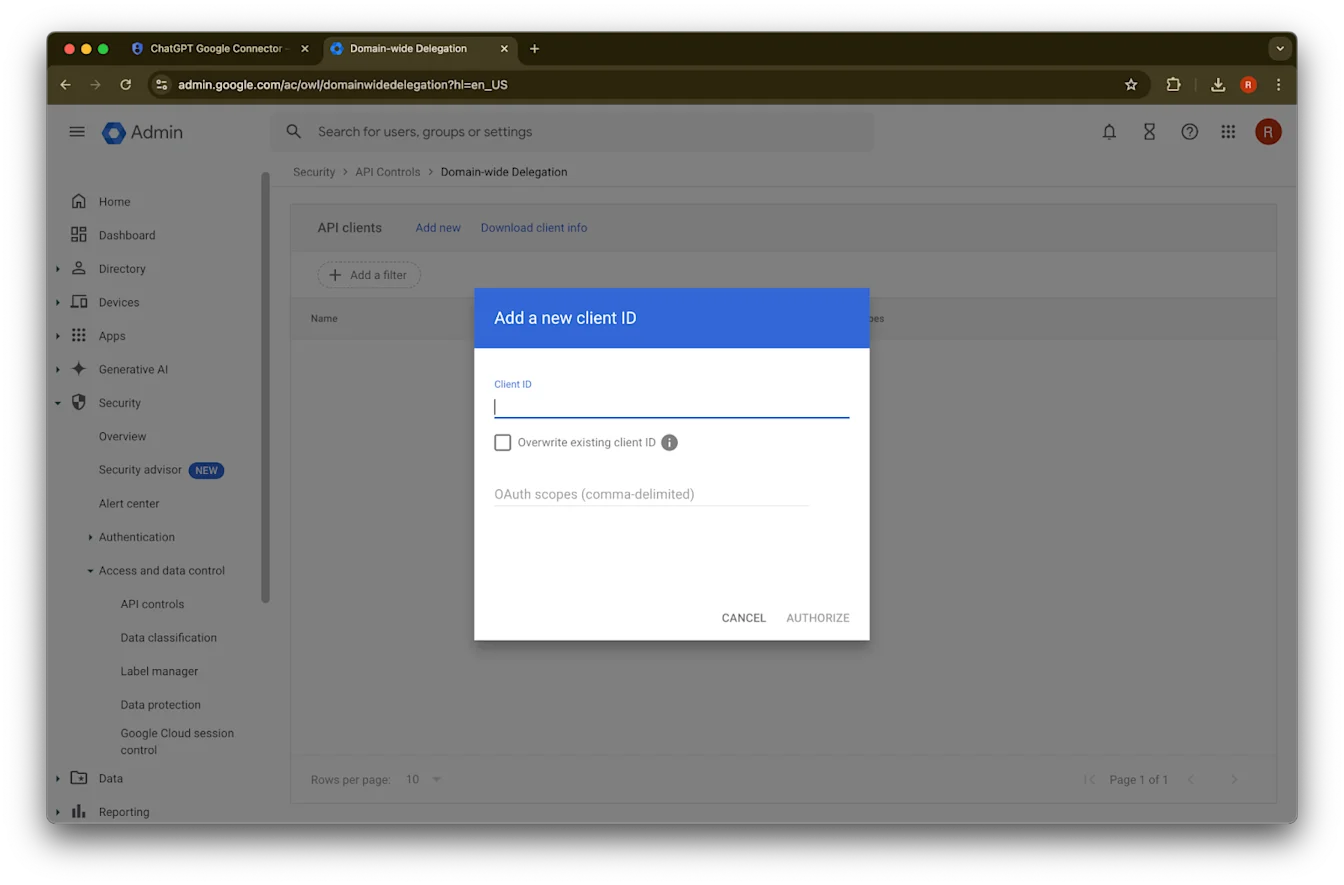
https://www.googleapis.com/auth/admin.directory.group.readonly, https://www.googleapis.com/auth/admin.directory.group.member.readonly, https://www.googleapis.com/auth/admin.directory.user.readonly, https://www.googleapis.com/auth/admin.directory.user.alias.readonly, https://www.googleapis.com/auth/drive.activity.readonly, https://www.googleapis.com/auth/drive.metadata.readonly, https://www.googleapis.com/auth/drive.readonly, https://www.googleapis.com/auth/userinfo.profile, https://www.googleapis.com/auth/userinfo.email| Scope | ਰੀਜ਼ਨਿੰਗ |
| admin.directory.group.readonly | group-based permissions ਲਾਗੂ ਕਰੋ |
| admin.directory.group.member.readonly | group-based permissions ਲਾਗੂ ਕਰੋ |
| admin.directory.user.alias.readonly | ਉਹ ਮਾਮਲੇ ਸੰਭਾਲੋ ਜਿੱਥੇ ਯੂਜ਼ਰ ਨੂੰ alias ਰਾਹੀਂ permission ਦਿੱਤੀ ਗਈ ਹੋਵੇ |
| drive.activity.readonly | ਜਦੋਂ ਫ਼ਾਈਲਾਂ ਵਿੱਚ ਬਦਲਾਅ ਹੋਣ ਤਾਂ ਸੂਚਿਤ ਹੋਣ ਲਈ |
| drive.metadata.readonly | ਫ਼ਾਈਲ ਸਮੱਗਰੀ ਅਤੇ ਸੰਬੰਧਿਤ metadata ਸਿੰਕ ਕਰੋ (ਜਿਵੇਂ ਆਖਰੀ ਸੋਧ ਮਿਤੀ) |
| drive.readonly | ਫ਼ਾਈਲ ਸਮੱਗਰੀ ਅਤੇ ਸੰਬੰਧਿਤ metadata ਸਿੰਕ ਕਰੋ (ਜਿਵੇਂ ਆਖਰੀ ਸੋਧ ਮਿਤੀ) |
| userinfo.profile | ਉਹ ਯੂਜ਼ਰ ਨਿਰਧਾਰਤ ਕਰੋ ਜਿਨ੍ਹਾਂ ਲਈ ਅਸੀਂ ਫ਼ਾਈਲਾਂ ਸਿੰਕ ਕਰ ਰਹੇ ਹਾਂ |
| userinfo.email | ਉਹ ਯੂਜ਼ਰ ਨਿਰਧਾਰਤ ਕਰੋ ਜਿਨ੍ਹਾਂ ਲਈ ਅਸੀਂ ਫ਼ਾਈਲਾਂ ਸਿੰਕ ਕਰ ਰਹੇ ਹਾਂ |
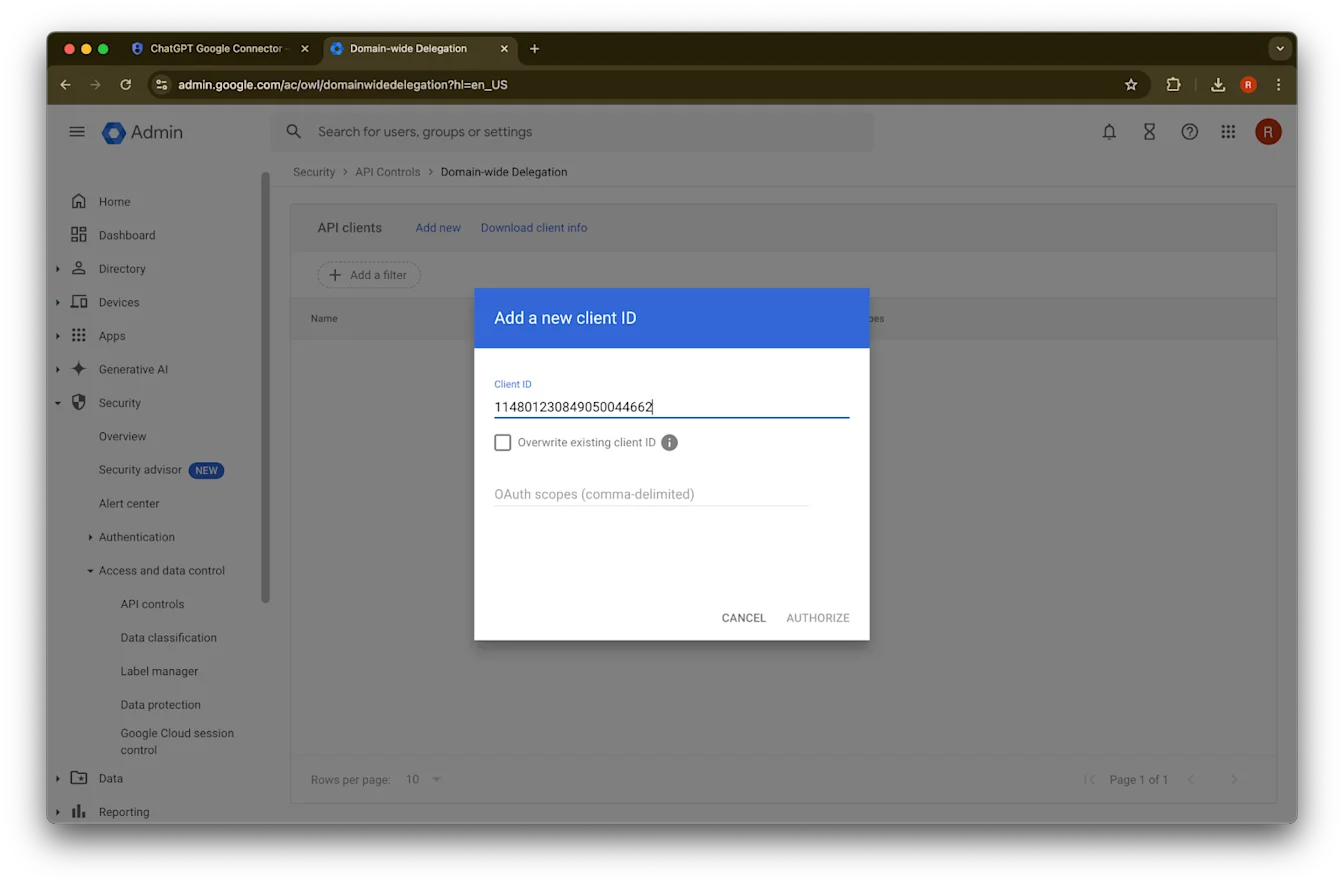
45. Authorize ‘ਤੇ ਕਲਿੱਕ ਕਰੋ.
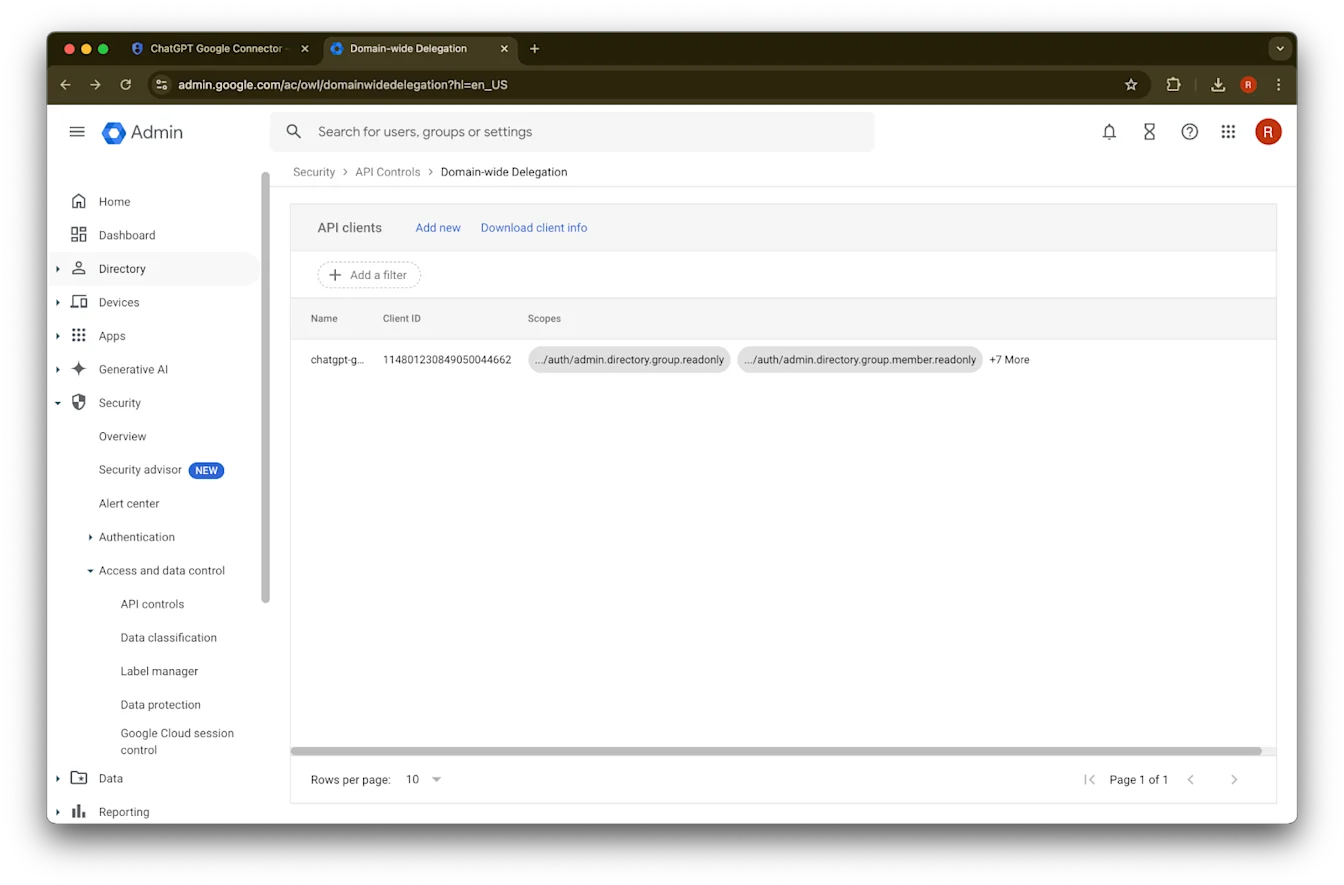
46. ਸਫਲਤਾ.
ਐਡਮਿਨ ਅਕਾਊਂਟ ਸੈਟਅੱਪ ਕਰਨਾ
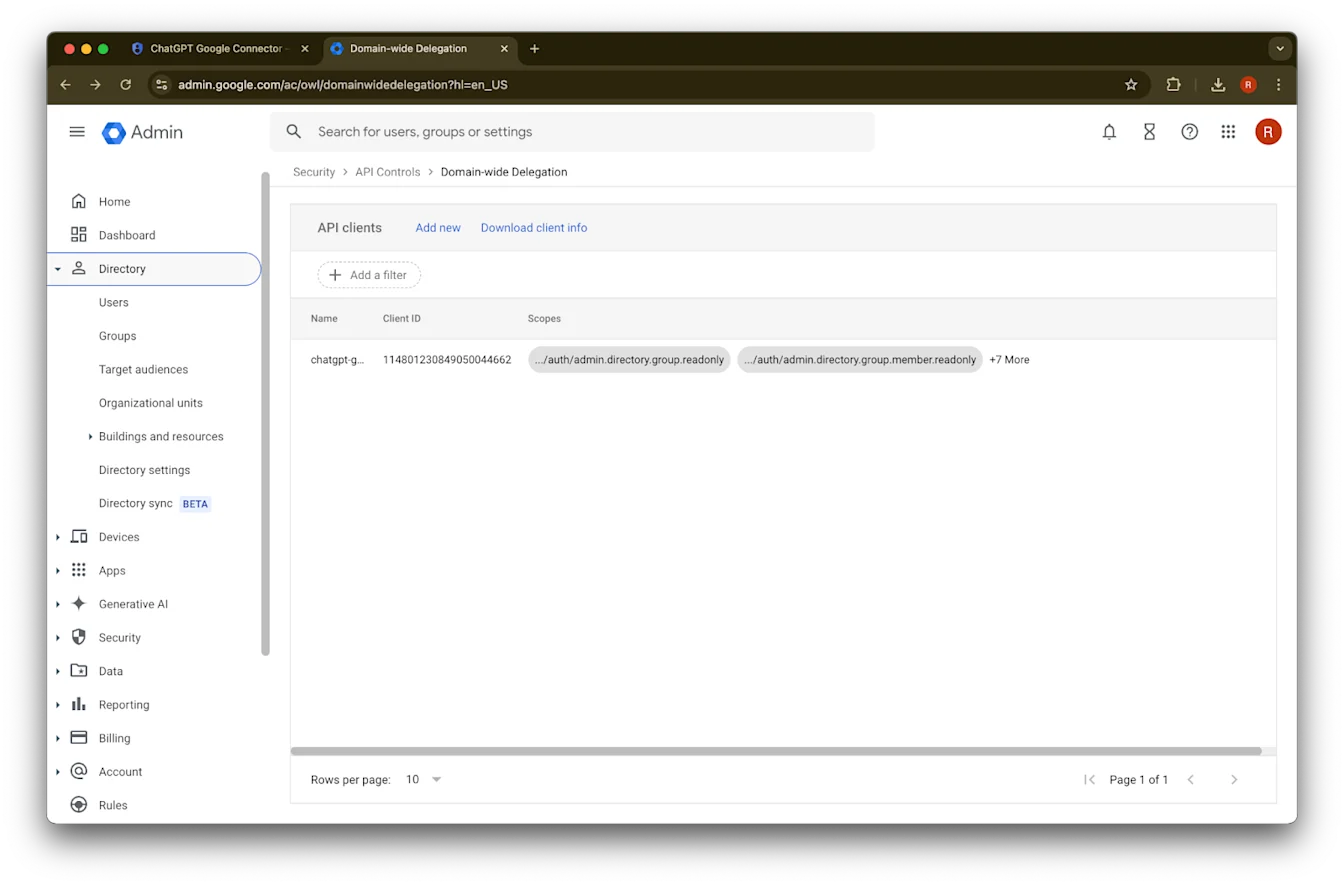
Directory ਫੈਲਾਓ.
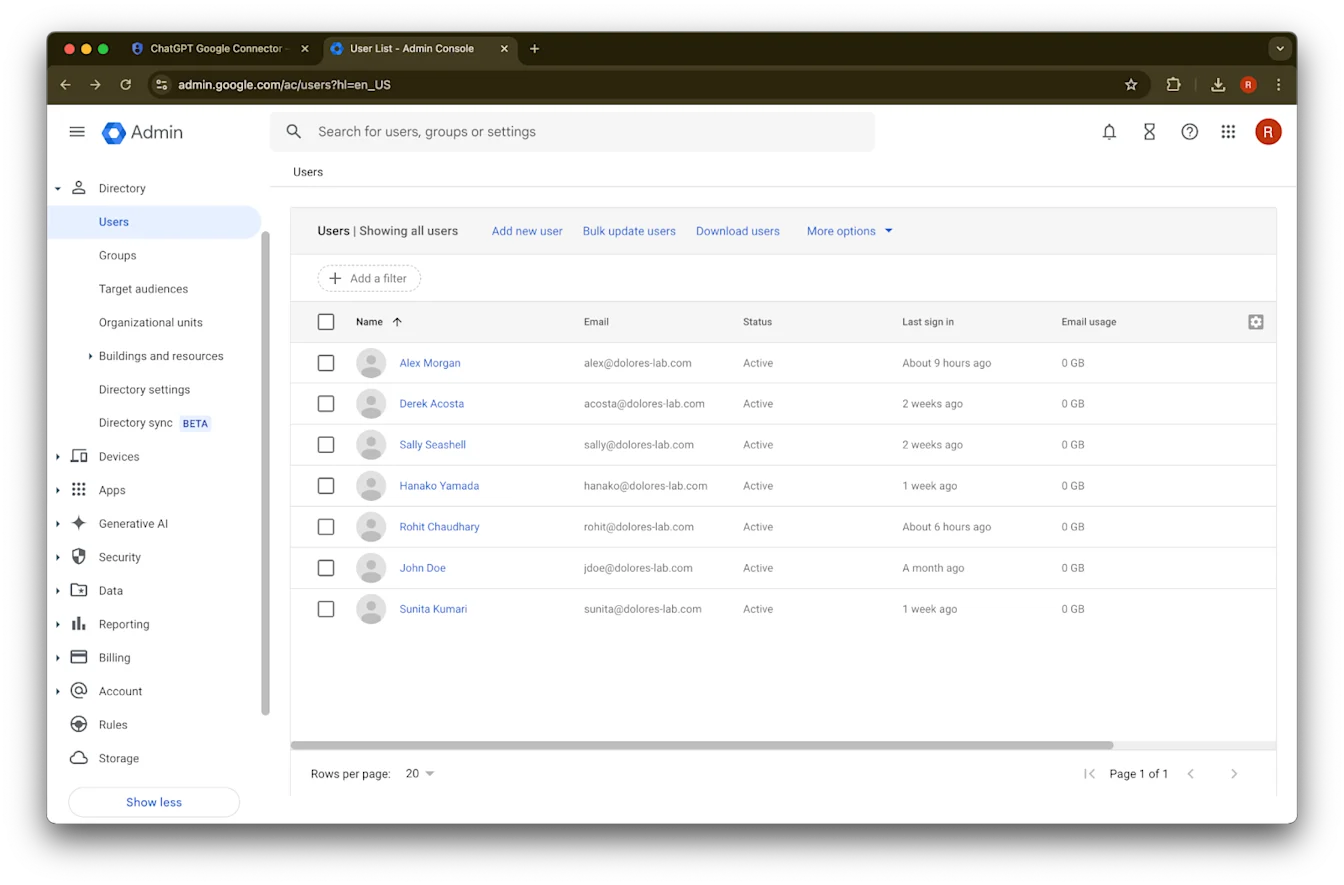
Users ‘ਤੇ ਕਲਿੱਕ ਕਰੋ.
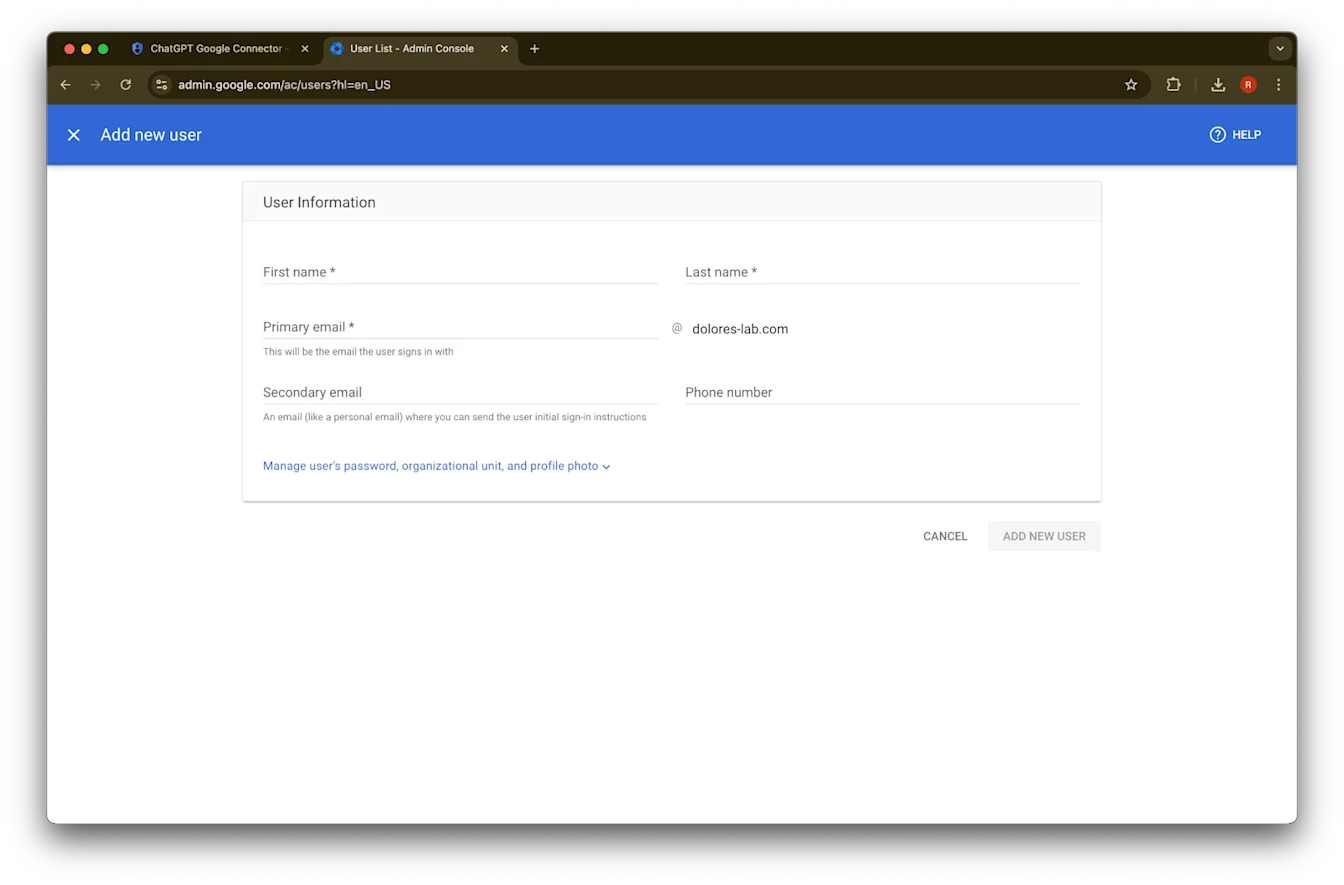
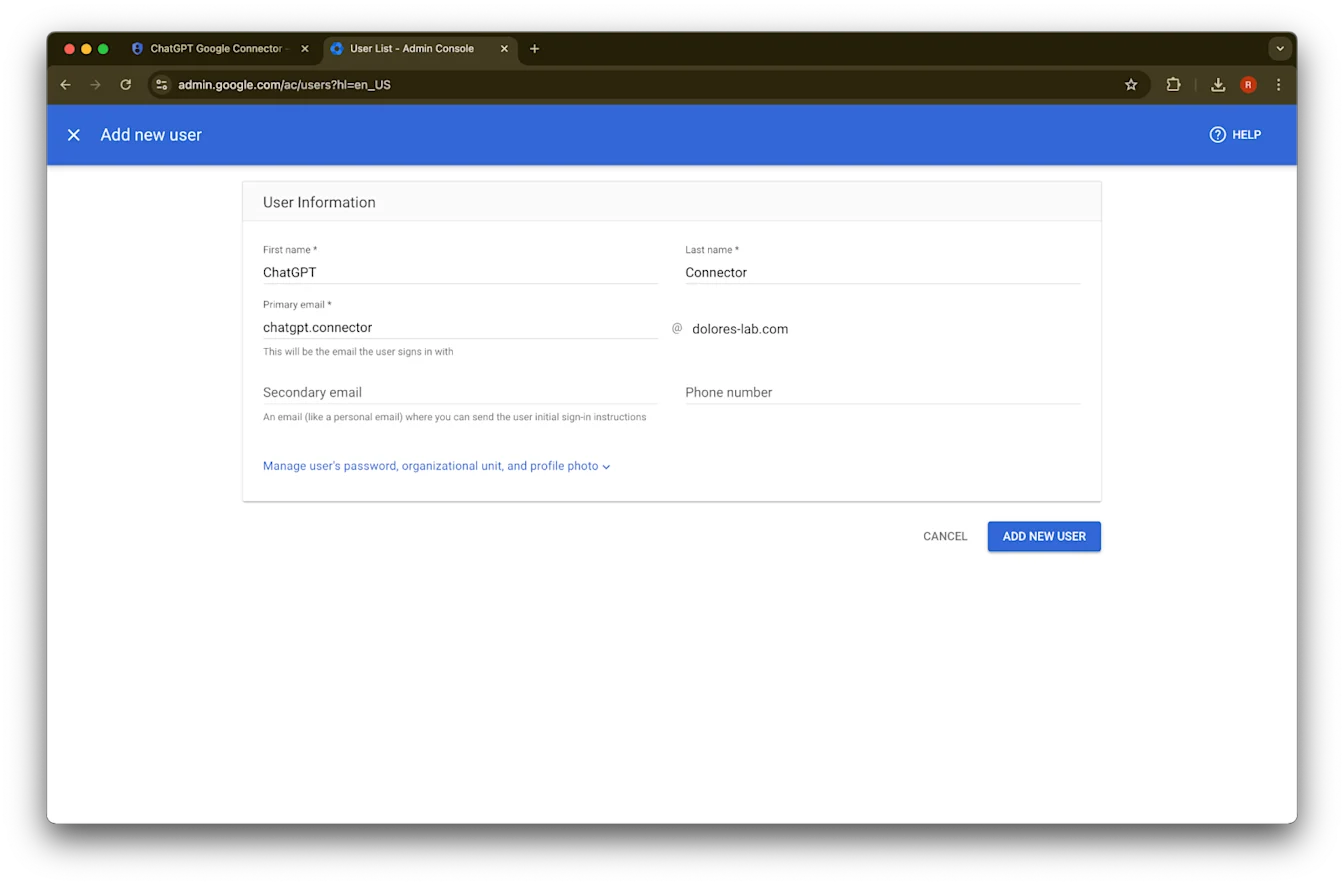
ਆਪਣੀ ਪਸੰਦ ਦਾ first name, last name, ਅਤੇ primary email address ਦਿਓ.
Add new user
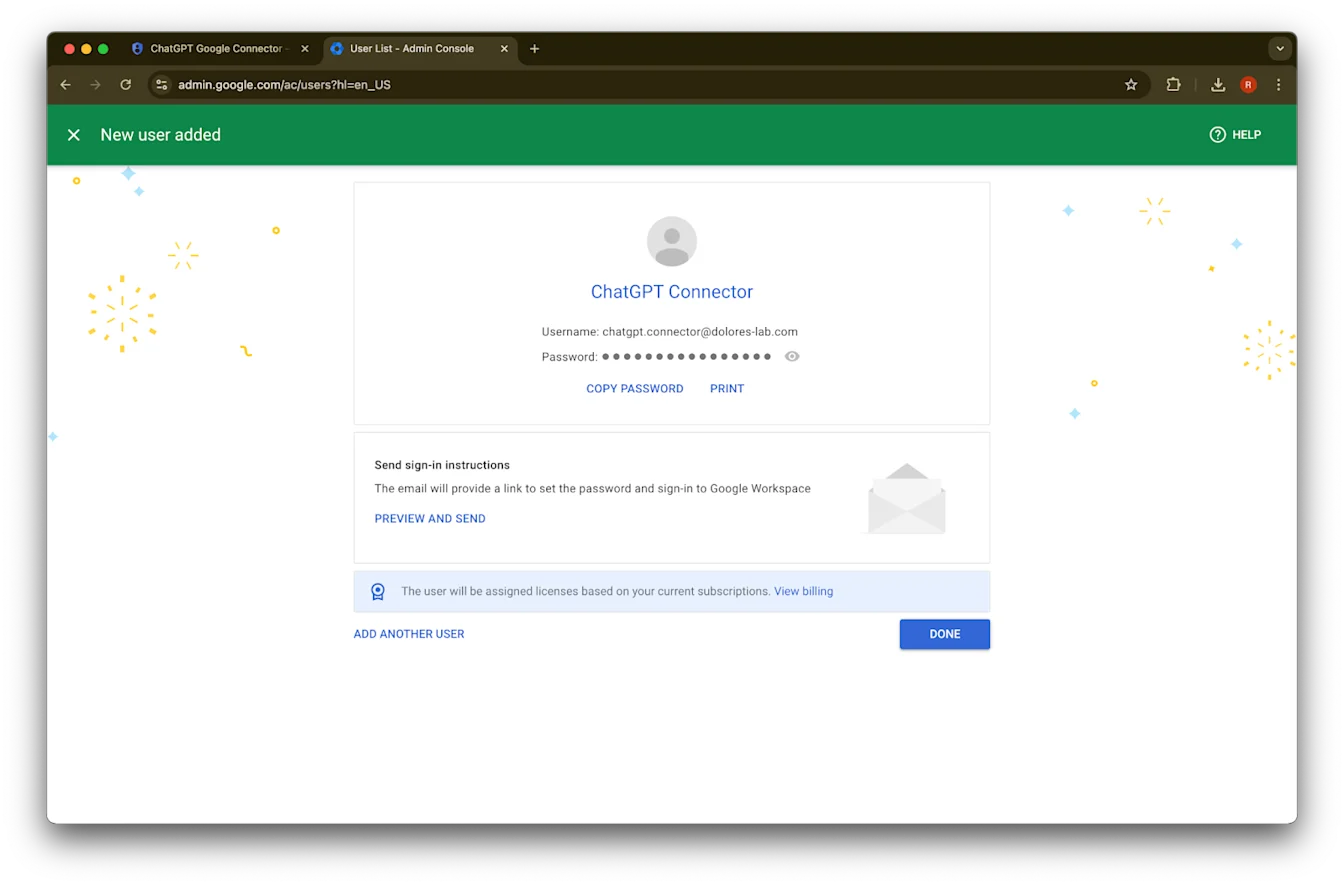
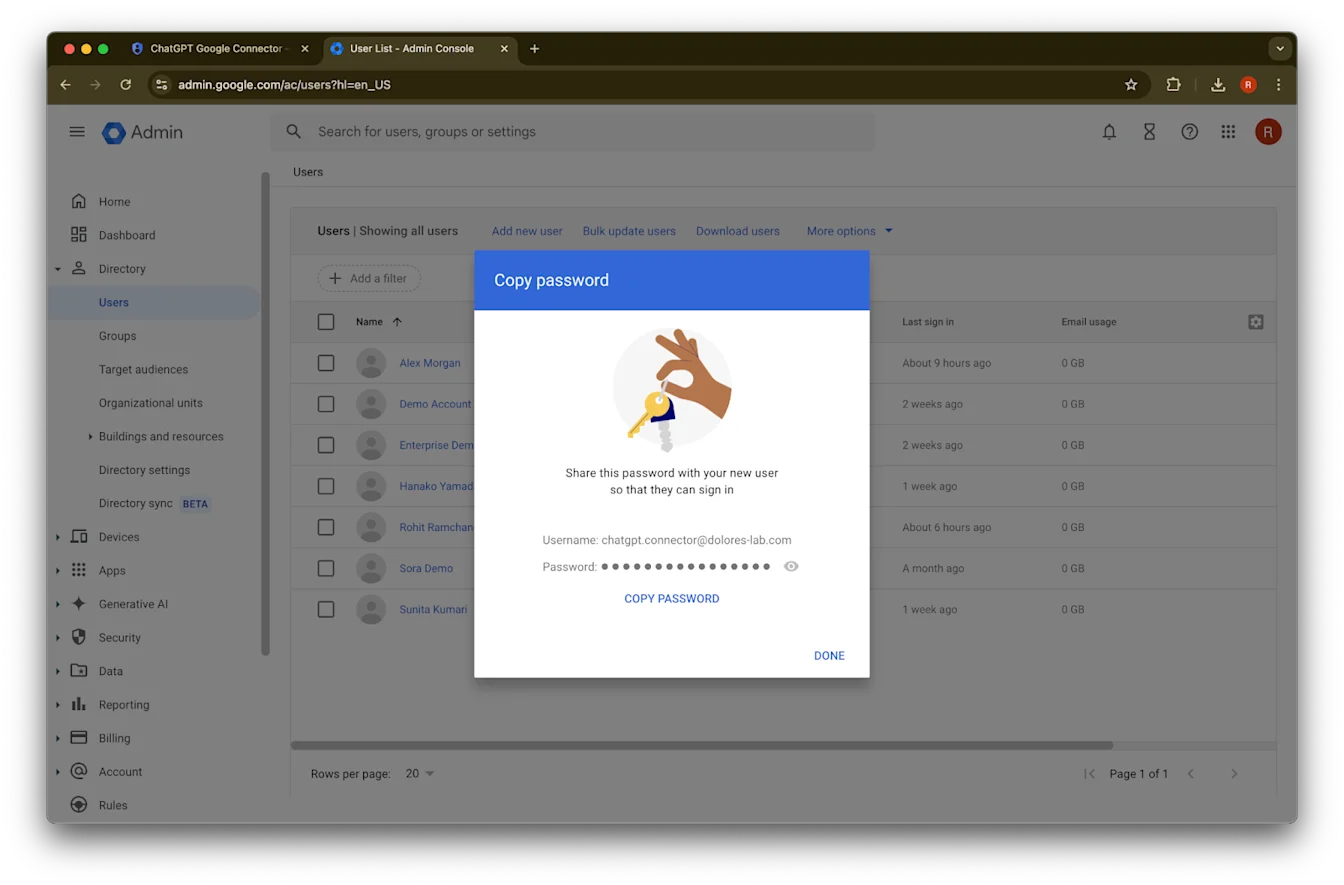
‘ਤੇ ਕਲਿੱਕ ਕਰੋ.(ਵਿਕਲਪਿਕ) ਇਹ credentials ਲਿਖ ਕੇ ਰੱਖੋ. ChatGPT ਨੂੰ ਇਹ credentials ਨਹੀਂ ਚਾਹੀਦੀਆਂ.
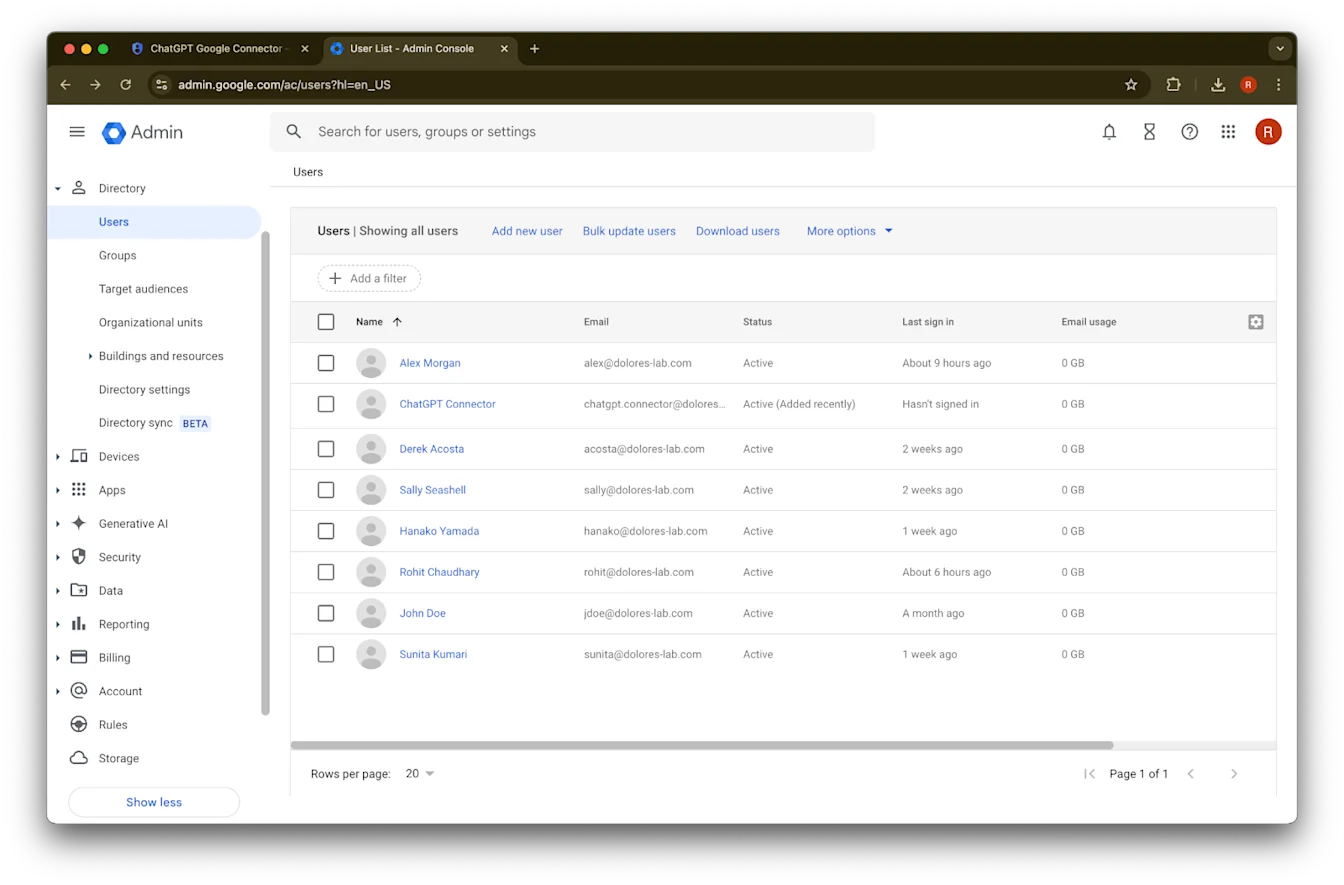
Done ‘ਤੇ ਕਲਿੱਕ ਕਰੋ.
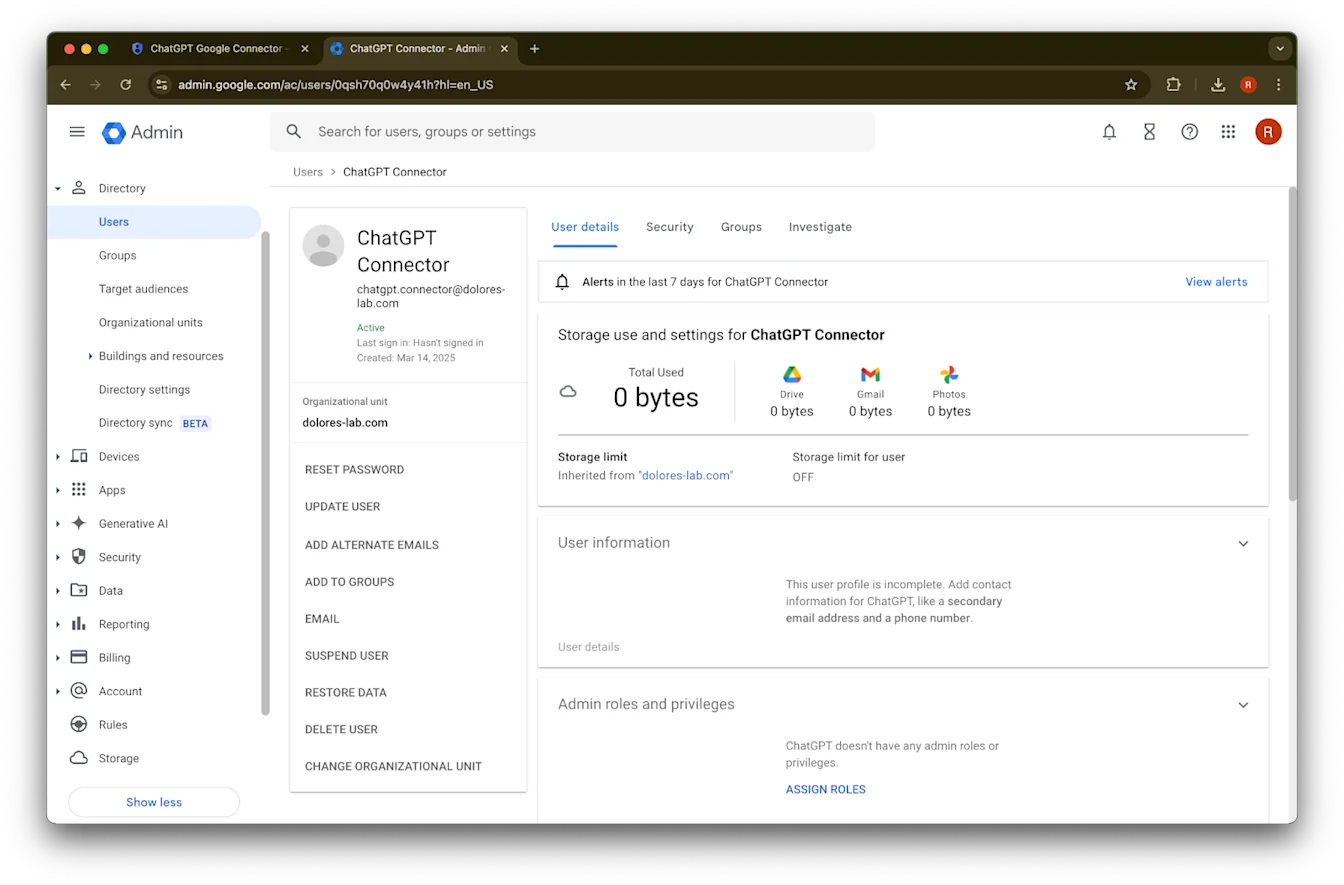
ਉਸ account ‘ਤੇ ਕਲਿੱਕ ਕਰੋ ਜੋ ਤੁਸੀਂ ਹੁਣੇ ਬਣਾਇਆ ਹੈ. ਜੇ ਇਹ ਸੂਚੀ ਵਿੱਚ ਨਹੀਂ ਦਿਖਦਾ, ਤਾਂ ਪੇਜ਼ refresh ਕਰੋ ਜਾਂ ਆਪਣਾ cache ਅਤੇ cookies clear ਕਰੋ ਅਤੇ ਫਿਰ ਕੋਸ਼ਿਸ਼ ਕਰੋ.
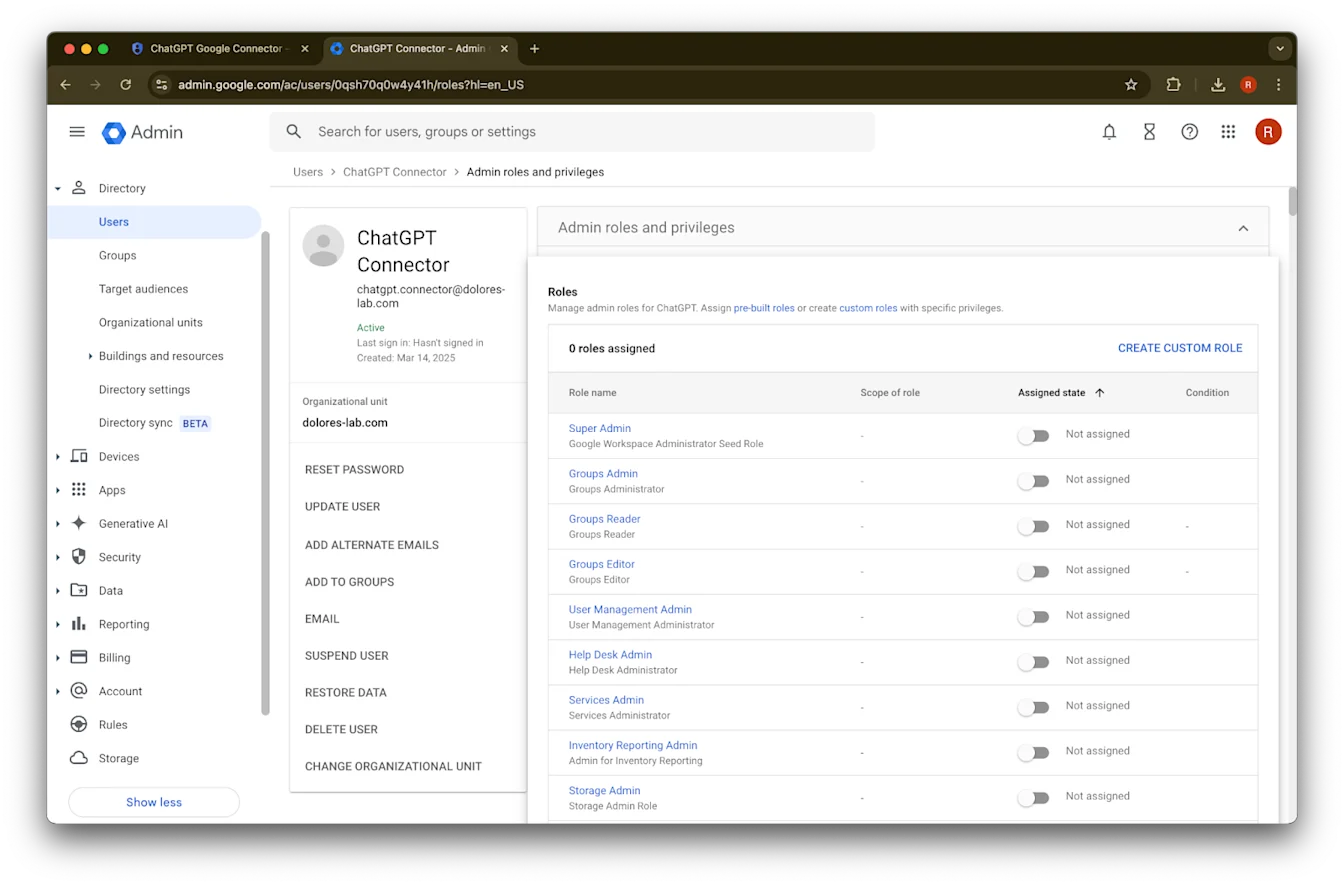
assign roles ‘ਤੇ ਕਲਿੱਕ ਕਰੋ.
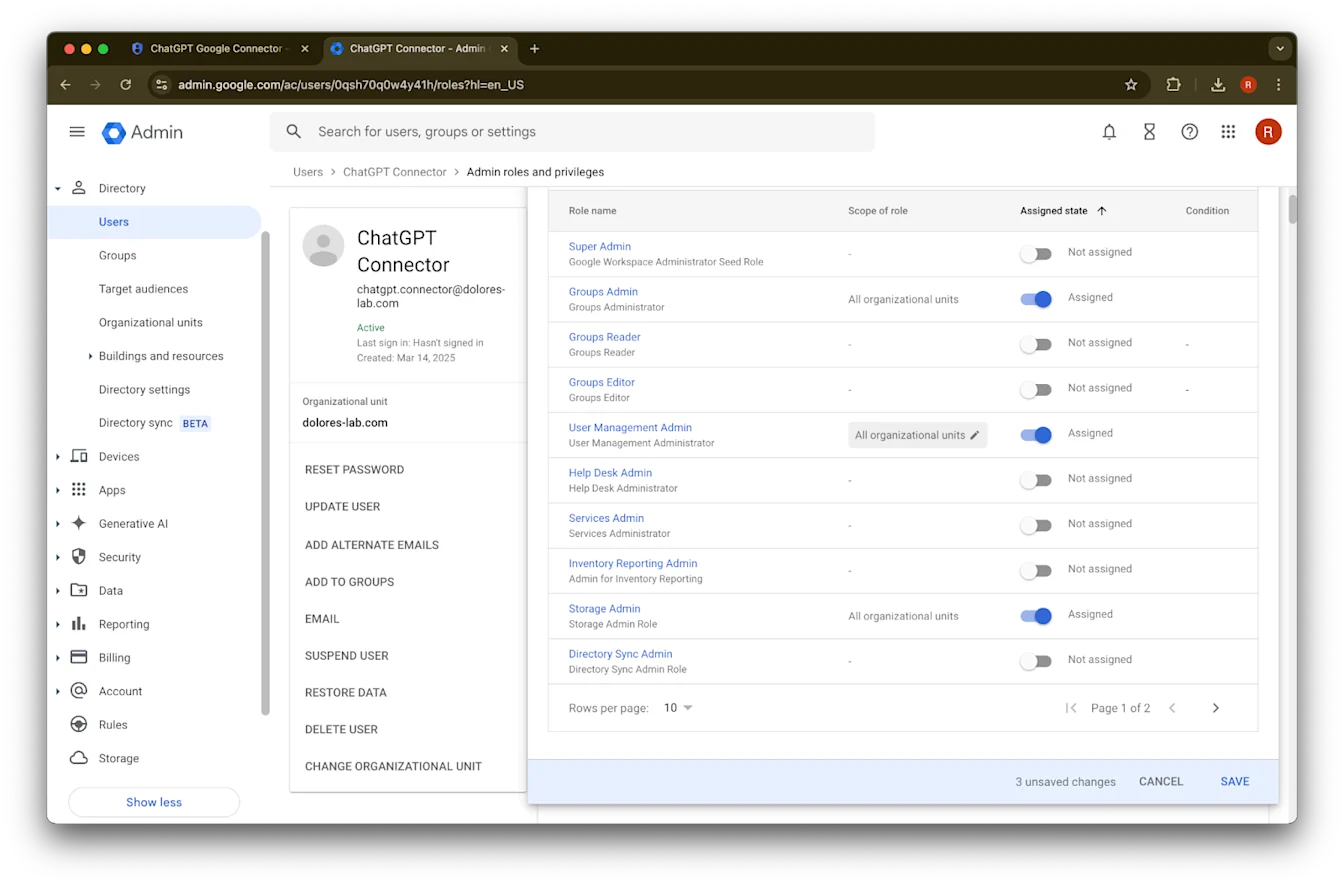
Groups Reader, User Management Admin, ਅਤੇ Storage Admin roles ਨੂੰ on ਕਰੋ.
ਹੇਠਾਂ ਸਕ੍ਰੋਲ ਕਰੋ ਅਤੇ Save. ‘ਤੇ ਕਲਿੱਕ ਕਰੋ. ਐਡਮਿਨ ਅਕਾਊਂਟ ਹੁਣ ਸਫਲਤਾਪੂਰਵਕ ਬਣ ਗਿਆ ਹੈ ਅਤੇ ਕਨਫ਼ਿਗਰ ਹੋ ਗਿਆ ਹੈ.
ChatGPT ਐਡਮਿਨ ਕਨਸੋਲ ‘ਤੇ ਸੈਟਅੱਪ ਪੂਰਾ ਕਰਨਾ
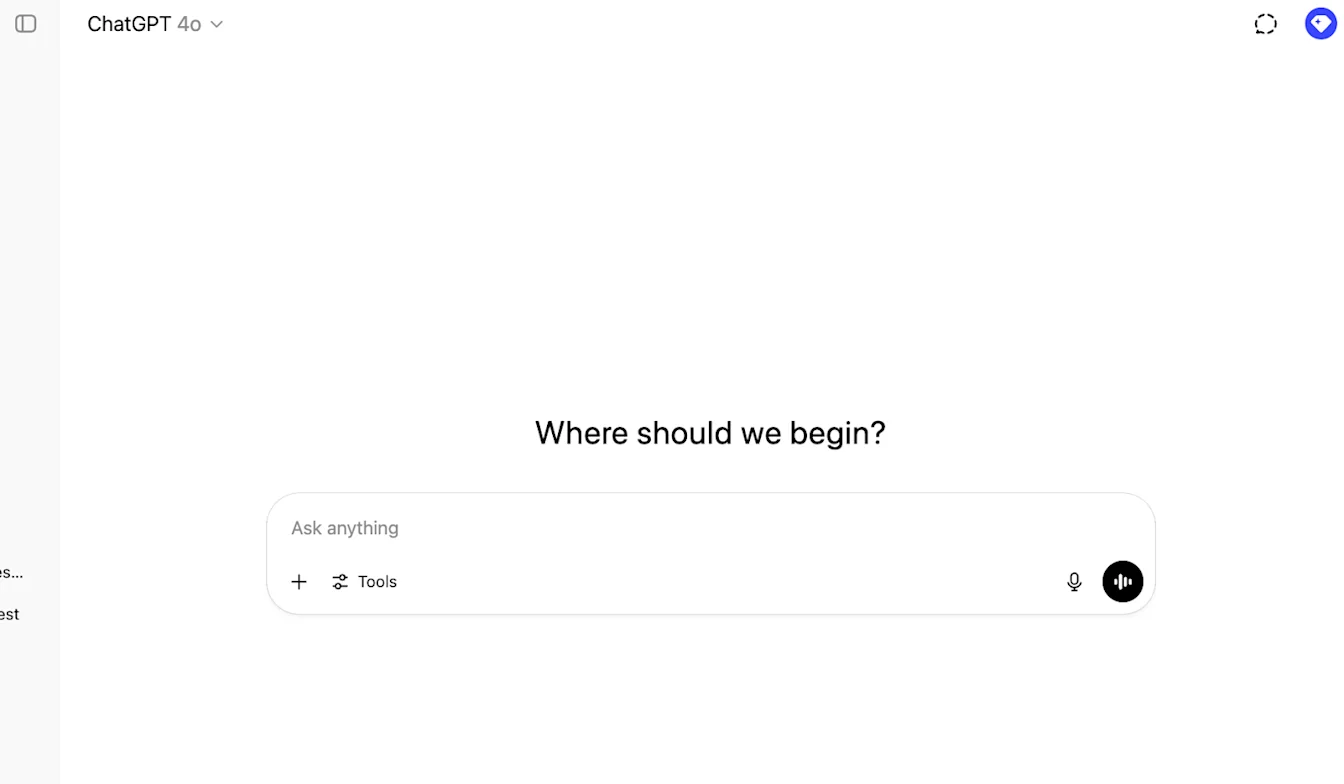
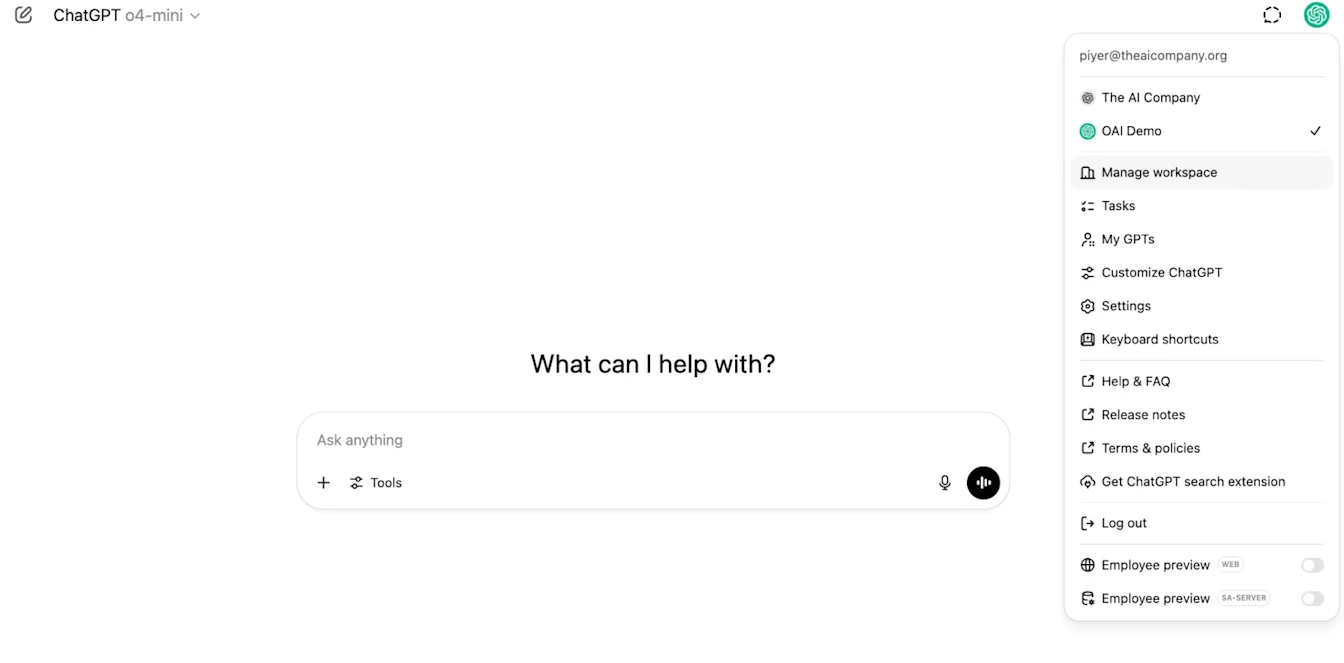
ChatGPT ‘ਤੇ ਜਾਓ ਅਤੇ ਪੰਨੇ ਦੇ ਉੱਪਰ ਸੱਜੇ ਕੋਨੇ ਵਿੱਚ ਪ੍ਰੋਫ਼ਾਈਲ ਆਇਕਨ ‘ਤੇ ਕਲਿੱਕ ਕਰੋ.
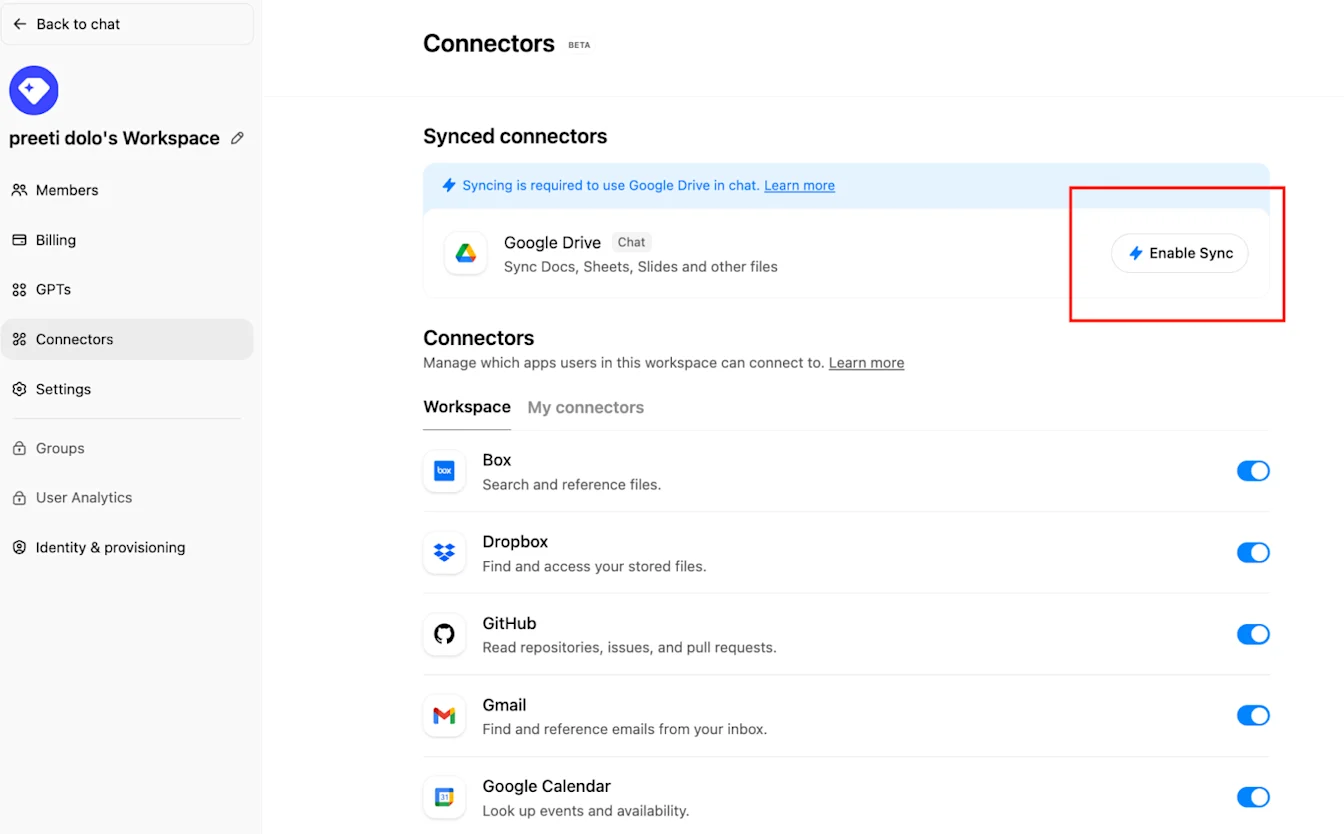
Manage workspace
‘ਤੇ ਕਲਿੱਕ ਕਰੋConnections ‘ਤੇ ਕਲਿੱਕ ਕਰੋ ਅਤੇ ਫਿਰ ‘Synced connectors’ ਦੇ ਹੇਠਾਂ → Enable Sync
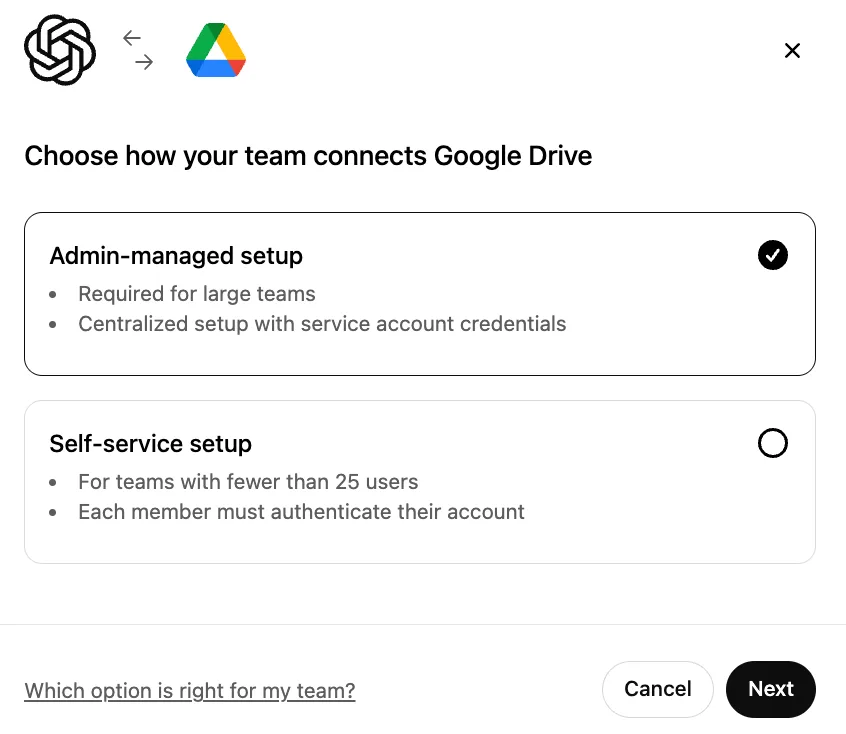
ਯਕੀਨੀ ਬਣਾਓ ਕਿ Admin-managed ਚੁਣਿਆ ਗਿਆ ਹੈ ਅਤੇ Next ‘ਤੇ ਕਲਿੱਕ ਕਰੋ.
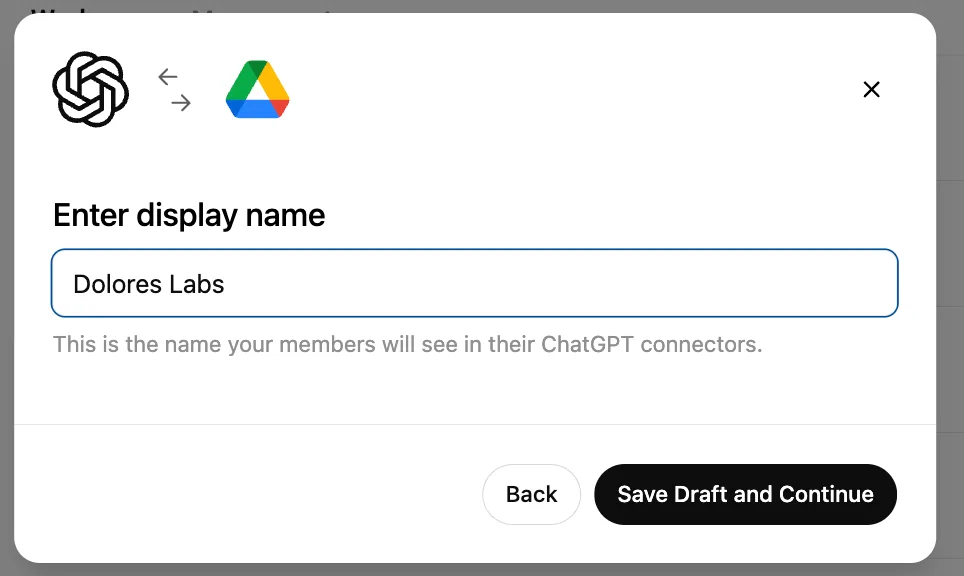
ਇੱਕ display name ਦਰਜ ਕਰੋ. ਅਸੀਂ ਤੁਹਾਡੇ Google Workspace ਦਾ ਨਾਮ ਵਰਤਣ ਦੀ ਸਿਫਾਰਸ਼ ਕਰਦੇ ਹਾਂ.
ਕਿਰਪਾ ਕਰਕੇ ਧਿਆਨ ਦਿਓ ਕਿ ਅਸੀਂ ਇਸ ਵੇਲੇ ਤੁਹਾਡੇ ਕਨੈਕਸ਼ਨ ਦਾ ਨਾਮ ਬਦਲਣ ਦਾ ਸਮਰਥਨ ਨਹੀਂ ਕਰਦੇ.Save Draft and Continue ‘ਤੇ ਕਲਿੱਕ ਕਰੋ.
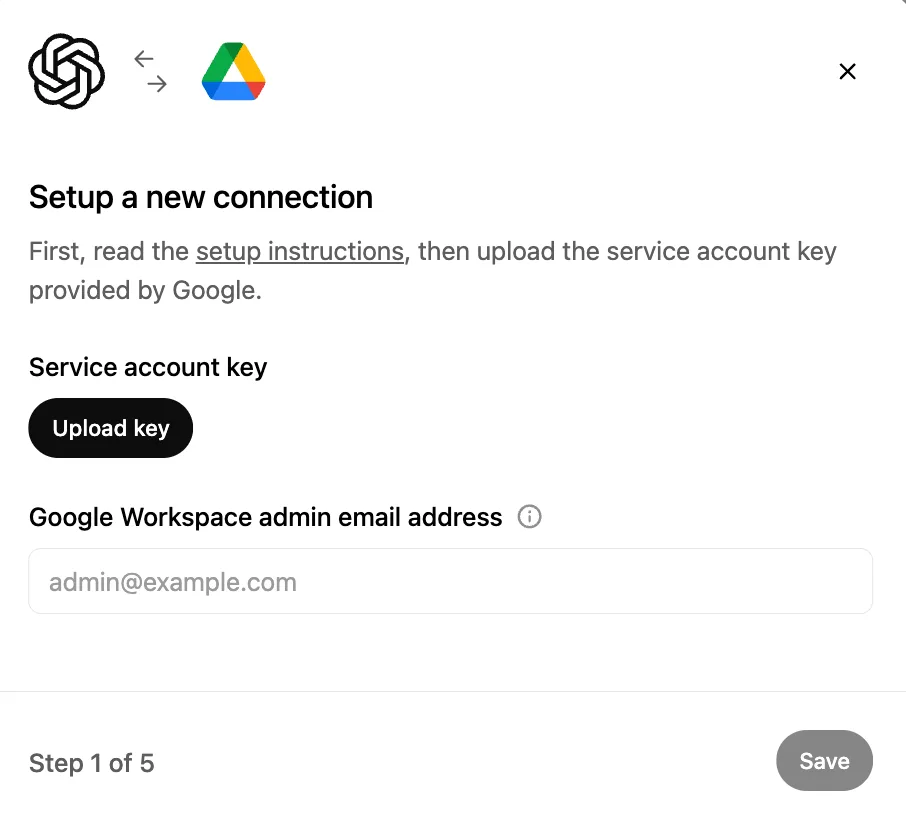
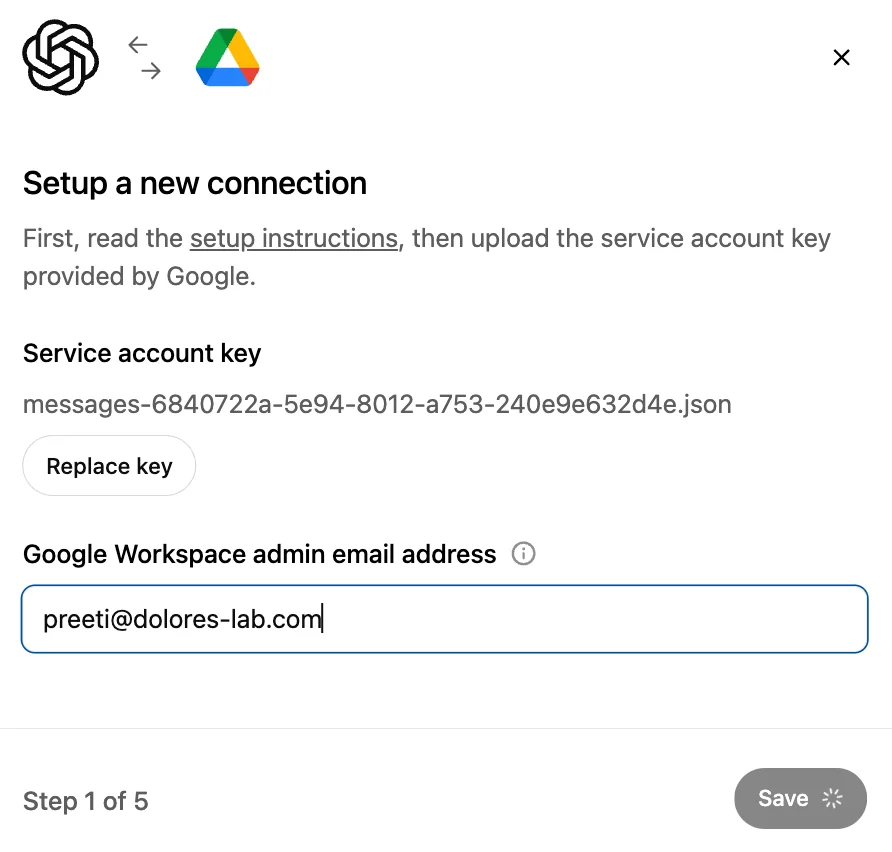
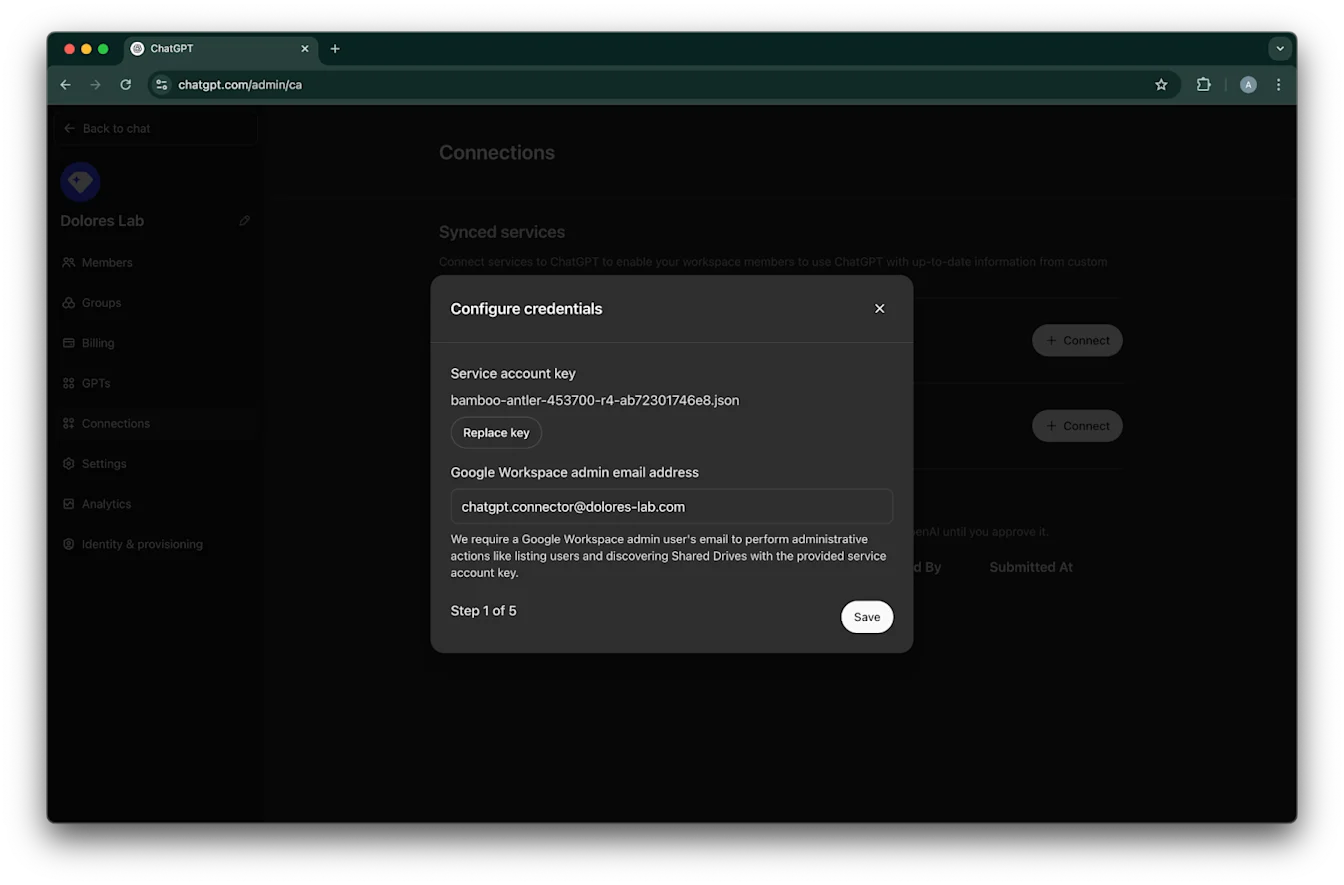
Upload key ‘ਤੇ ਕਲਿੱਕ ਕਰੋ. JSON ਫ਼ਾਈਲ ਚੁਣੋ, ਜੋ ਉਹ ਕੁੰਜੀ ਹੈ ਜੋ ਤੁਸੀਂ ਉੱਪਰ ਸਰਵਿਸ ਅਕਾਊਂਟ ਸੈਟਅੱਪ ਕਰਦੇ ਸਮੇਂ ਡਾਊਨਲੋਡ ਕੀਤੀ ਸੀ. ਯਕੀਨੀ ਬਣਾਓ ਕਿ ਇਹ ਕੁੰਜੀ ਸਹੀ ਹੈ.
admin email address ਦਰਜ ਕਰੋ. ਇਹ ਉਹ ਐਡਮਿਨ ਅਕਾਊਂਟ ਹੈ ਜੋ ਤੁਸੀਂ ਪਹਿਲਾਂ ਬਣਾਇਆ ਸੀ.
Save. ‘ਤੇ ਕਲਿੱਕ ਕਰੋ.
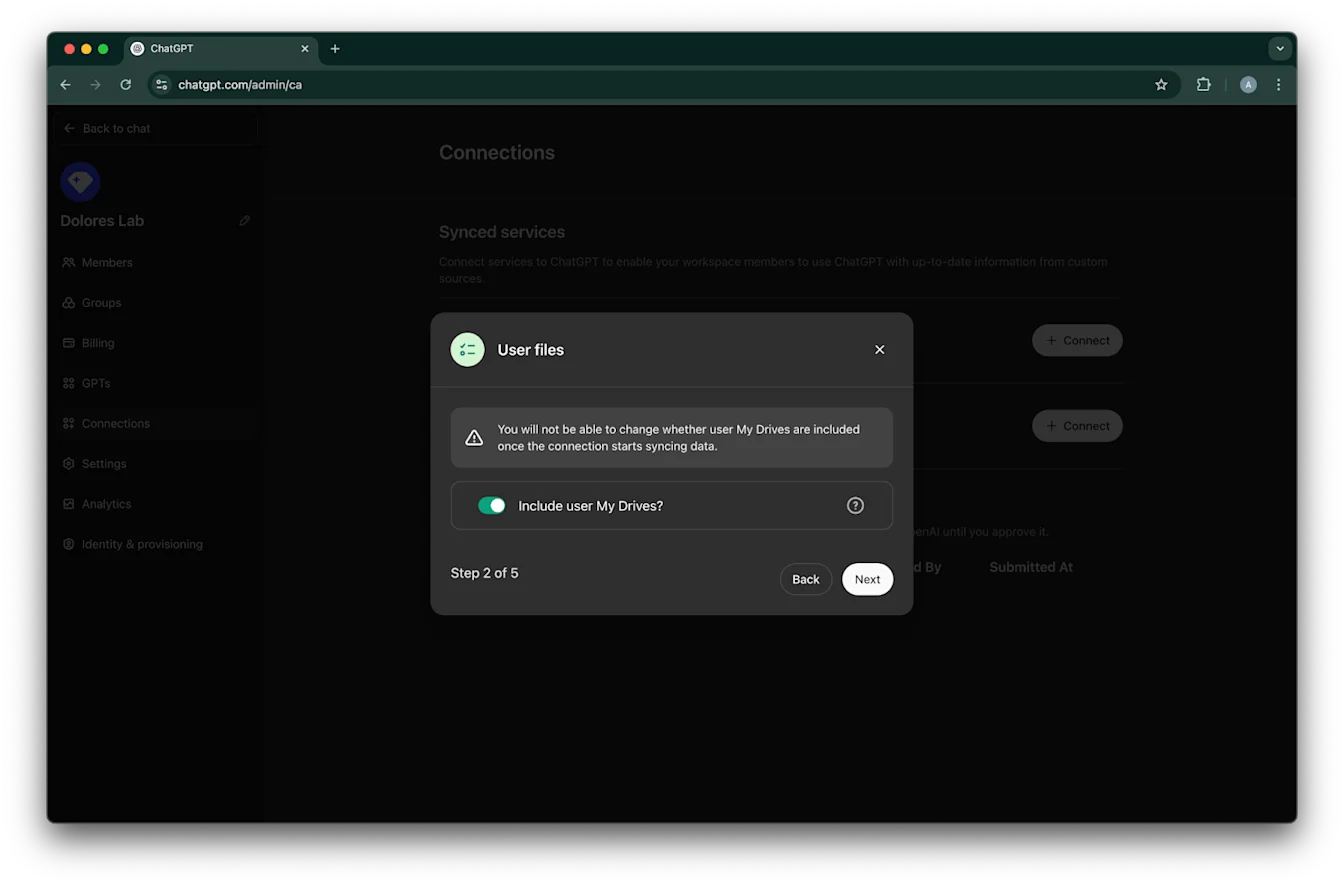
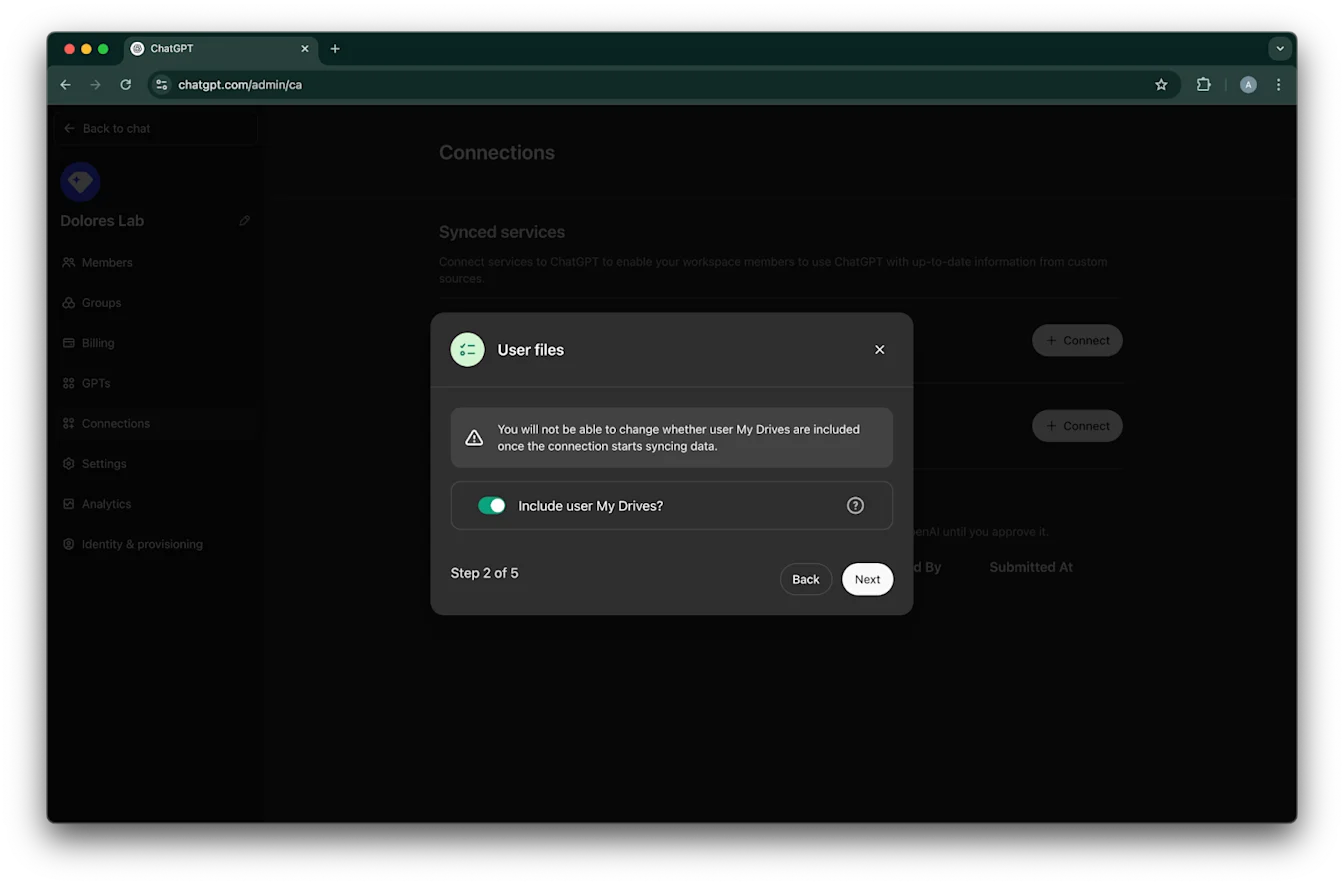
ਚੁਣੋ ਕਿ ਕੀ ਤੁਸੀਂ ਆਪਣੇ ਸਾਰੇ ਯੂਜ਼ਰਾਂ ਦੇ My Drives ਵਿੱਚ ਮੌਜੂਦ ਫ਼ਾਈਲਾਂ ਨੂੰ ਸ਼ਾਮਲ ਕਰਨਾ ਚਾਹੁੰਦੇ ਹੋ.
Next ‘ਤੇ ਕਲਿੱਕ ਕਰੋ.
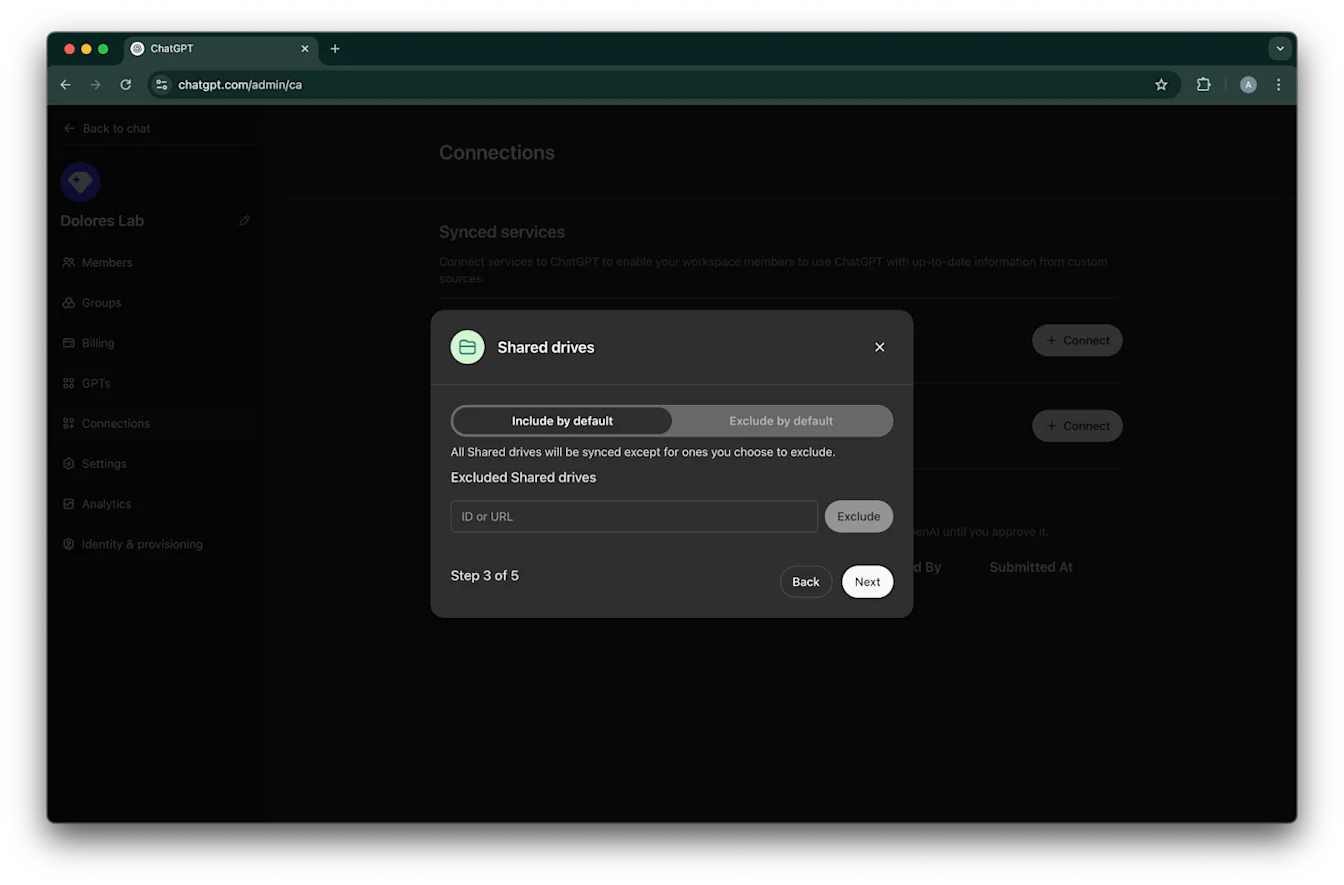
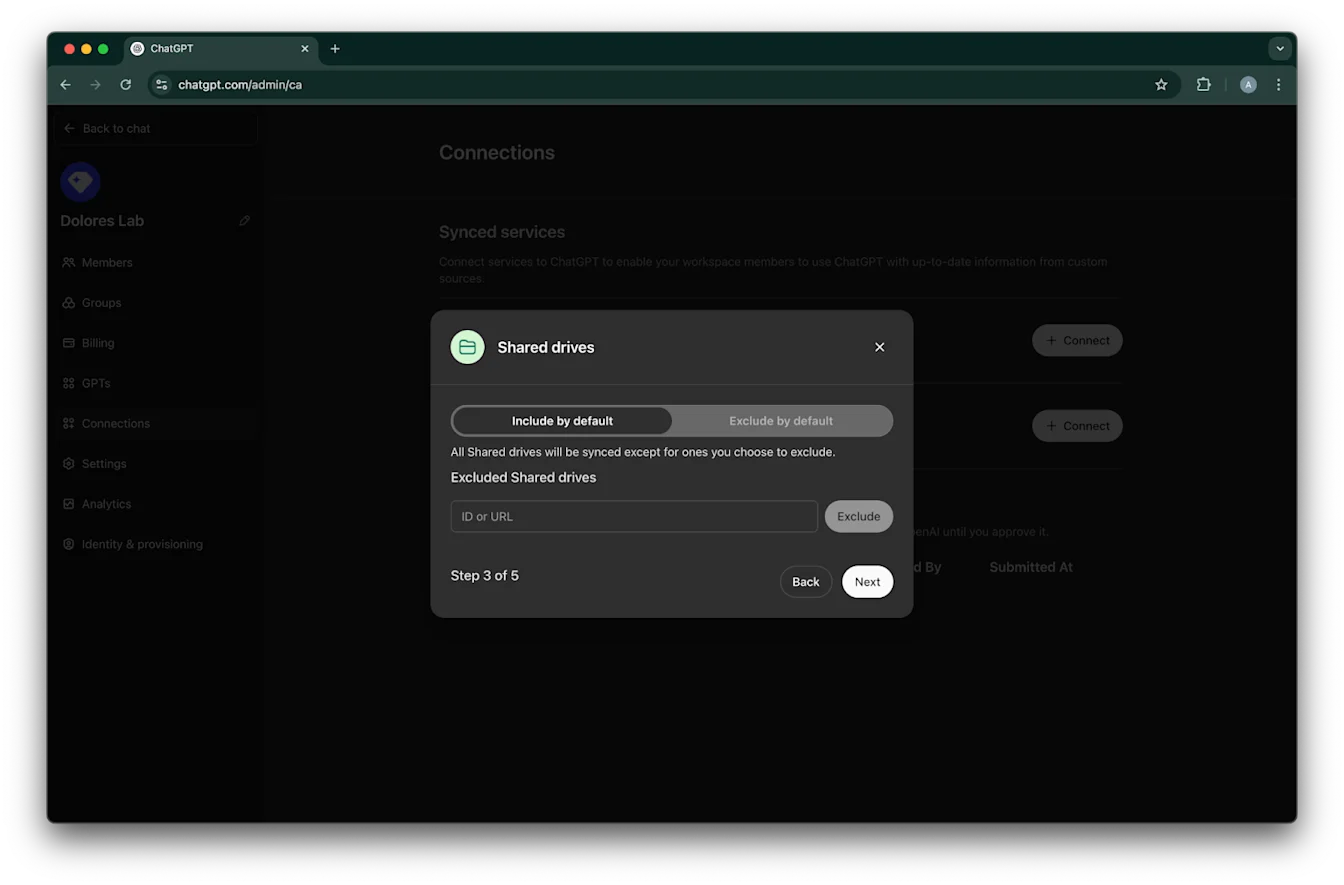
ਸ਼ੇਅਰ ਕੀਤੀਆਂ ਡਰਾਈਵਾਂ ਨੂੰ ਕਿਵੇਂ ਮੈਨੇਜ ਕਰਨਾ ਹੈ, ਇਹ ਚੁਣੋ. ਅਸੀਂ ਹੇਠ ਲਿਖੀਆਂ ਤਿੰਨ ਸਥਿਤੀਆਂ ਦਾ ਸਮਰਥਨ ਕਰਦੇ ਹਾਂ:
ਜੇ ਤੁਸੀਂ ਸਾਰੀਆਂ shared drives ਸ਼ਾਮਲ ਕਰਨੀ ਚਾਹੁੰਦੇ ਹੋ, ਤਾਂ Include by default ਚੁਣੋ ਅਤੇ ਬਾਹਰ ਰੱਖਣ ਲਈ shared drive IDs ਨਾ ਜੋੜੋ.
ਜੇ ਤੁਸੀਂ ਜ਼ਿਆਦਾਤਰ shared drives ਸ਼ਾਮਲ ਕਰਨੀ ਚਾਹੁੰਦੇ ਹੋ, ਤਾਂ Include by default ਚੁਣੋ ਅਤੇ ਉਹ shared drives ਦੀਆਂ IDs ਜੋੜੋ ਜਿਨ੍ਹਾਂ ਨੂੰ ਤੁਸੀਂ ਬਾਹਰ ਰੱਖਣਾ ਚਾਹੁੰਦੇ ਹੋ.
ਜੇ ਤੁਸੀਂ ਜ਼ਿਆਦਾਤਰ shared drives ਬਾਹਰ ਰੱਖਣੀਆਂ ਚਾਹੁੰਦੇ ਹੋ, ਤਾਂ Exclude by default ਚੁਣੋ ਅਤੇ ਉਹ shared drives ਦੀਆਂ IDs ਜੋੜੋ ਜਿਨ੍ਹਾਂ ਨੂੰ ਤੁਸੀਂ ਸ਼ਾਮਲ ਕਰਨਾ ਚਾਹੁੰਦੇ ਹੋ.
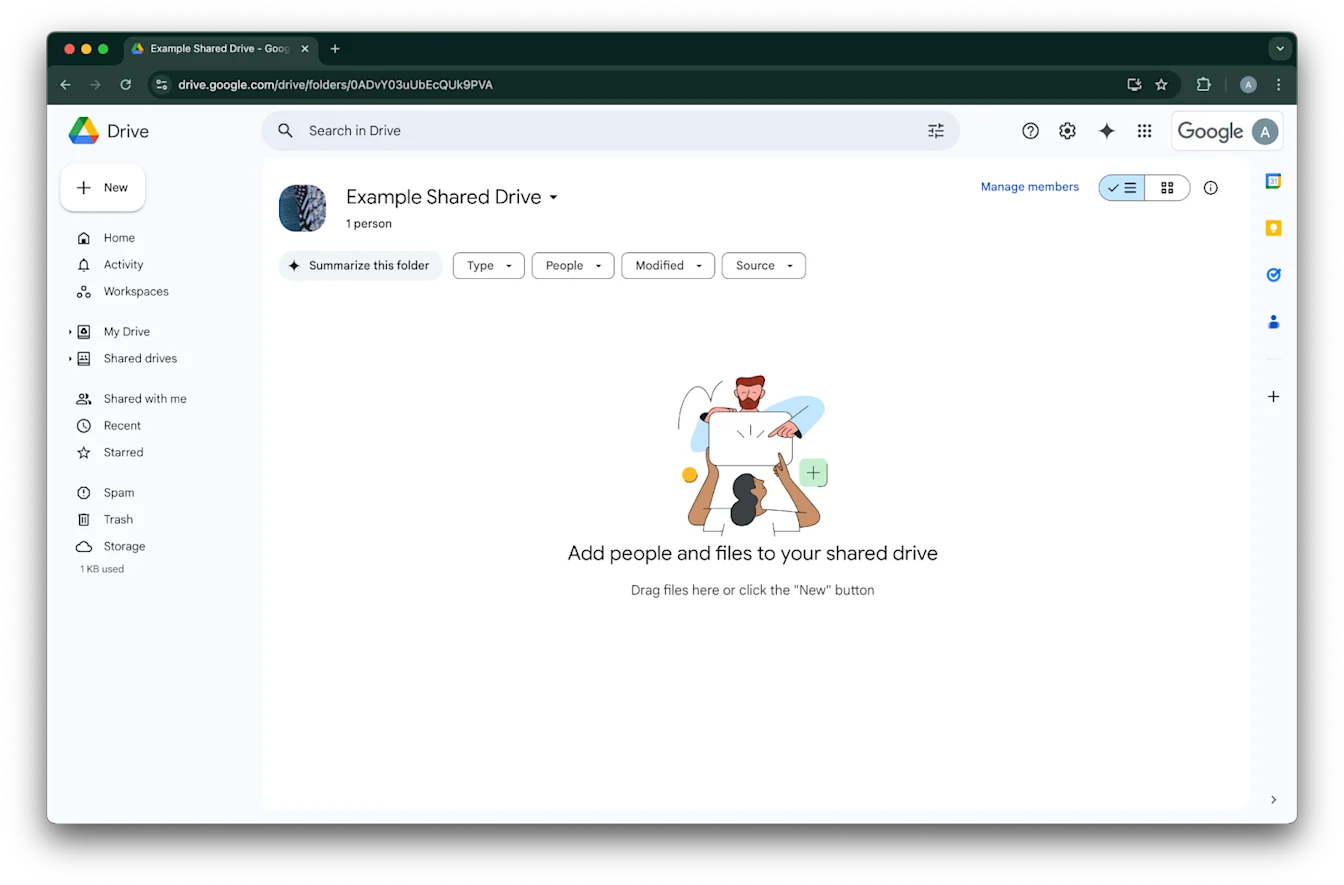
ਕਿਸੇ shared drive ਦੀ ID ਲੱਭਣ ਲਈ, ਵੈੱਬ ਬ੍ਰਾਊਜ਼ਰ ਵਿੱਚ ਉਸ ‘ਤੇ ਜਾਓ. URL ਦਾ ਆਖਰੀ ਹਿੱਸਾ shared drive ID ਹੁੰਦਾ ਹੈ.
ਹੇਠਾਂ ਦਿੱਤੇ ਉਦਾਹਰਨ ਵਿੱਚ, ਇਹ `0ADvY03uUbEcQUk9PVA` ਹੈ.Next ‘ਤੇ ਕਲਿੱਕ ਕਰੋ.
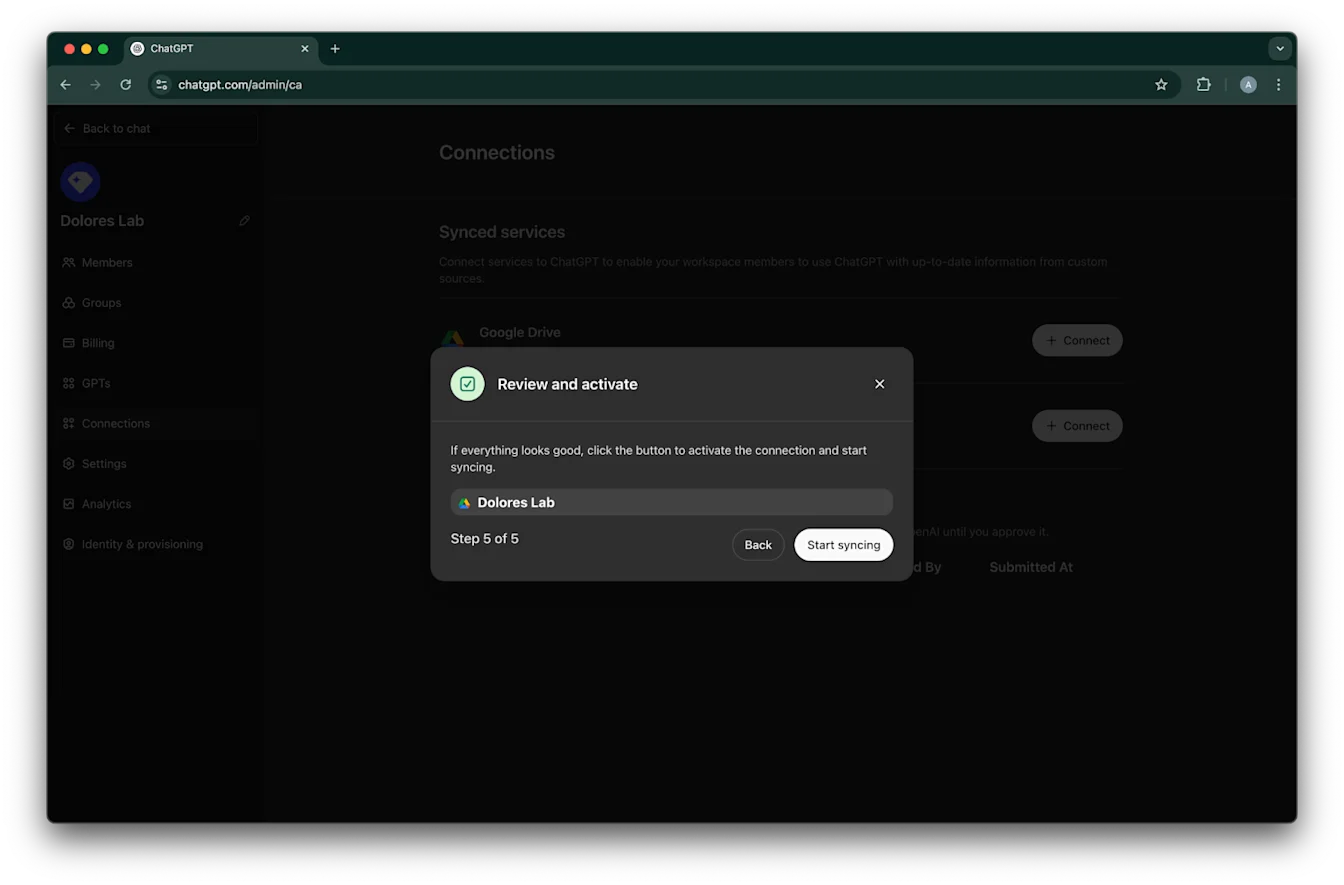
ਚੁਣੋ ਕਿ Google Drive ਕਨੈਕਸ਼ਨ ਤੱਕ ਕਿਸਦੀ ਪਹੁੰਚ ਹੋਣੀ ਚਾਹੀਦੀ ਹੈ. ਤੁਸੀਂ ਜਾਂ ਤਾਂ ਸਿਰਫ਼ ChatGPT ਵਰਕਸਪੇਸ ਦੇ Admins ਚੁਣ ਸਕਦੇ ਹੋ, ਜਾਂ ਇਸਨੂੰ ਸਭ ਲਈ ਯੋਗ ਕਰ ਸਕਦੇ ਹੋ. ਜੇ ਸਭ ਲਈ ਯੋਗ ਕੀਤਾ ਗਿਆ ਹੋਵੇ, ਤਾਂ ਵਰਕਸਪੇਸ ਵਿੱਚ ਜੋੜੇ ਗਏ ਨਵੇਂ ਯੂਜ਼ਰ ਆਪਣੇ ਆਪ ਸ਼ਾਮਲ ਹੋ ਜਾਣਗੇ.
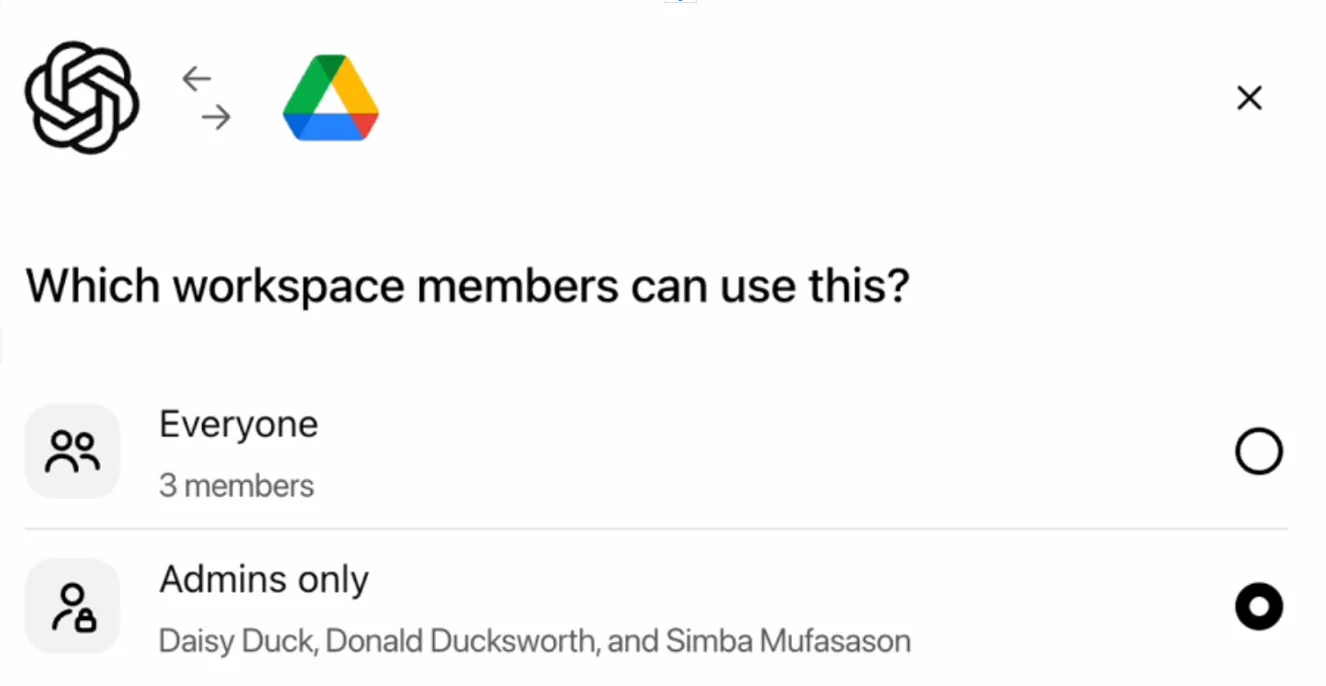
Start syncing ‘ਤੇ ਕਲਿੱਕ ਕਰੋ.
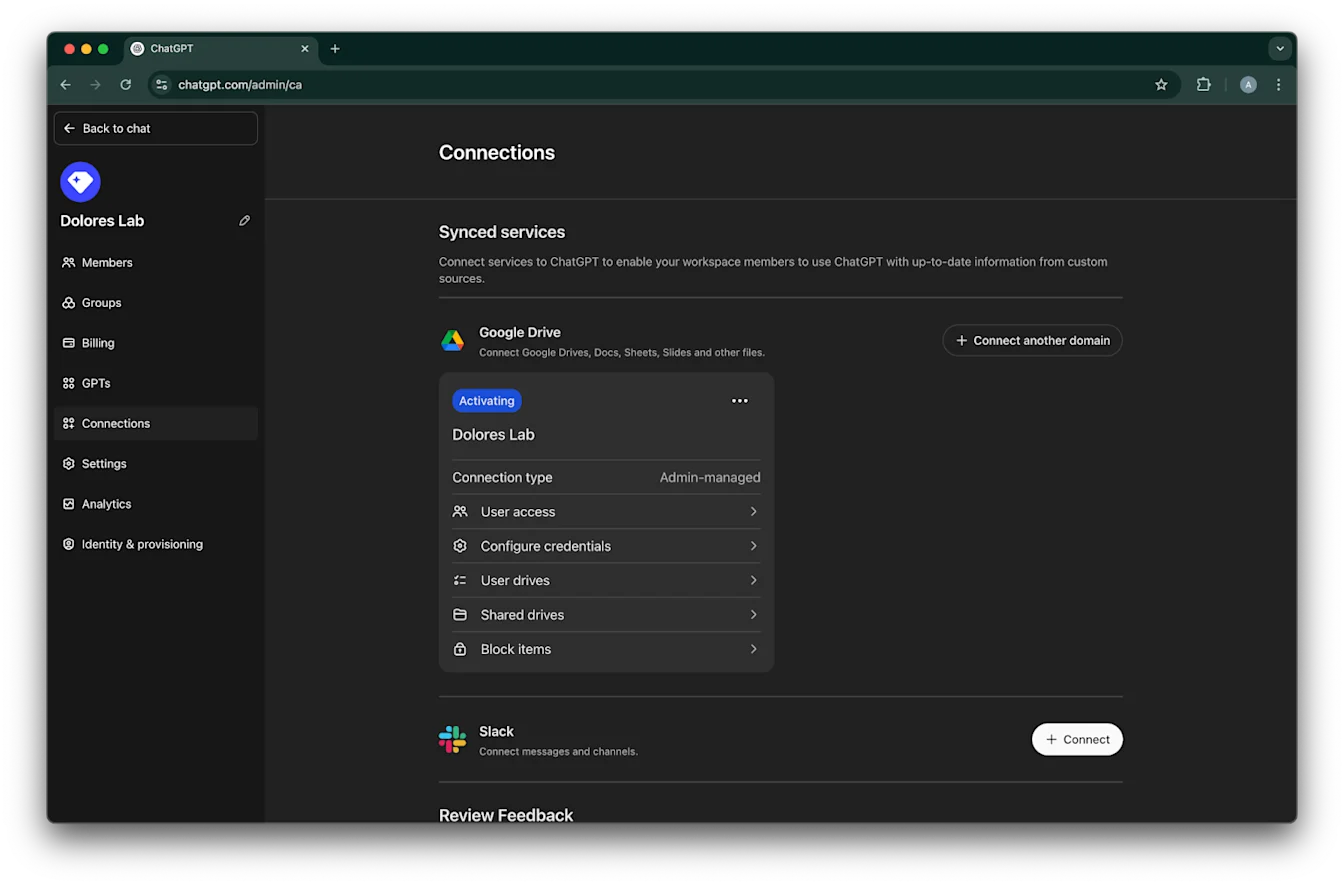
ਤੁਹਾਡਾ Google Drive ਕਨੈਕਸ਼ਨ ਹੁਣ ਸਫਲਤਾਪੂਰਵਕ ਬਣ ਗਿਆ ਹੈ.
ਕਿਰਪਾ ਕਰਕੇ ਧਿਆਨ ਦਿਓ ਕਿ, ਭਾਵੇਂ ਇਹ ਤੁਰੰਤ ਸਿੰਕ ਕਰਨਾ ਸ਼ੁਰੂ ਕਰ ਦੇਵੇਗਾ, ਪਰ ਤੁਹਾਡੀਆਂ ਸੈਟਿੰਗਾਂ ਅਨੁਸਾਰ ਕਿੰਨੀਆਂ ਫ਼ਾਈਲਾਂ ਸ਼ਾਮਲ ਕੀਤੀਆਂ ਗਈਆਂ ਹਨ, ਇਸ ‘ਤੇ ਨਿਰਭਰ ਕਰਦੇ ਹੋਏ ਇਸਨੂੰ ਪੂਰਾ ਹੋਣ ਵਿੱਚ ਘੰਟਿਆਂ ਤੋਂ ਦਿਨ ਲੱਗ ਸਕਦੇ ਹਨ.
ਜਦੋਂ ਪਿਛਲੇ 30 ਦਿਨਾਂ ਵਿੱਚ ਜੋੜੀਆਂ/ਸੰਪਾਦਿਤ ਫ਼ਾਈਲਾਂ ਸਿੰਕ ਹੋ ਜਾਣਗੀਆਂ, ਤਾਂ ਕਨੈਕਟਰ ਉਹਨਾਂ ਯੂਜ਼ਰਾਂ ਲਈ ਉਪਲਬਧ ਹੋ ਜਾਵੇਗਾ ਜਿਨ੍ਹਾਂ ਲਈ ਤੁਸੀਂ ਇਸਨੂੰ ਯੋਗ ਕੀਤਾ ਹੈ.
ਸਰਵਿਸ ਅਕਾਊਂਟ key creation ਯੋਗ ਕਰਨਾ
ਜੇ ਤੁਹਾਨੂੰ ਹੇਠਾਂ ਦਿੱਤੀ ਗਲਤੀ ਮਿਲਦੀ ਹੈ, ਤਾਂ ਤੁਹਾਨੂੰ ਇਸ ਖਾਸ project ਲਈ service account creation ਯੋਗ ਕਰਨੀ ਪਵੇਗੀ:
> The organization policy constraint ‘iam.disableServiceAccountKeyCreation’ is enforced on your organization.
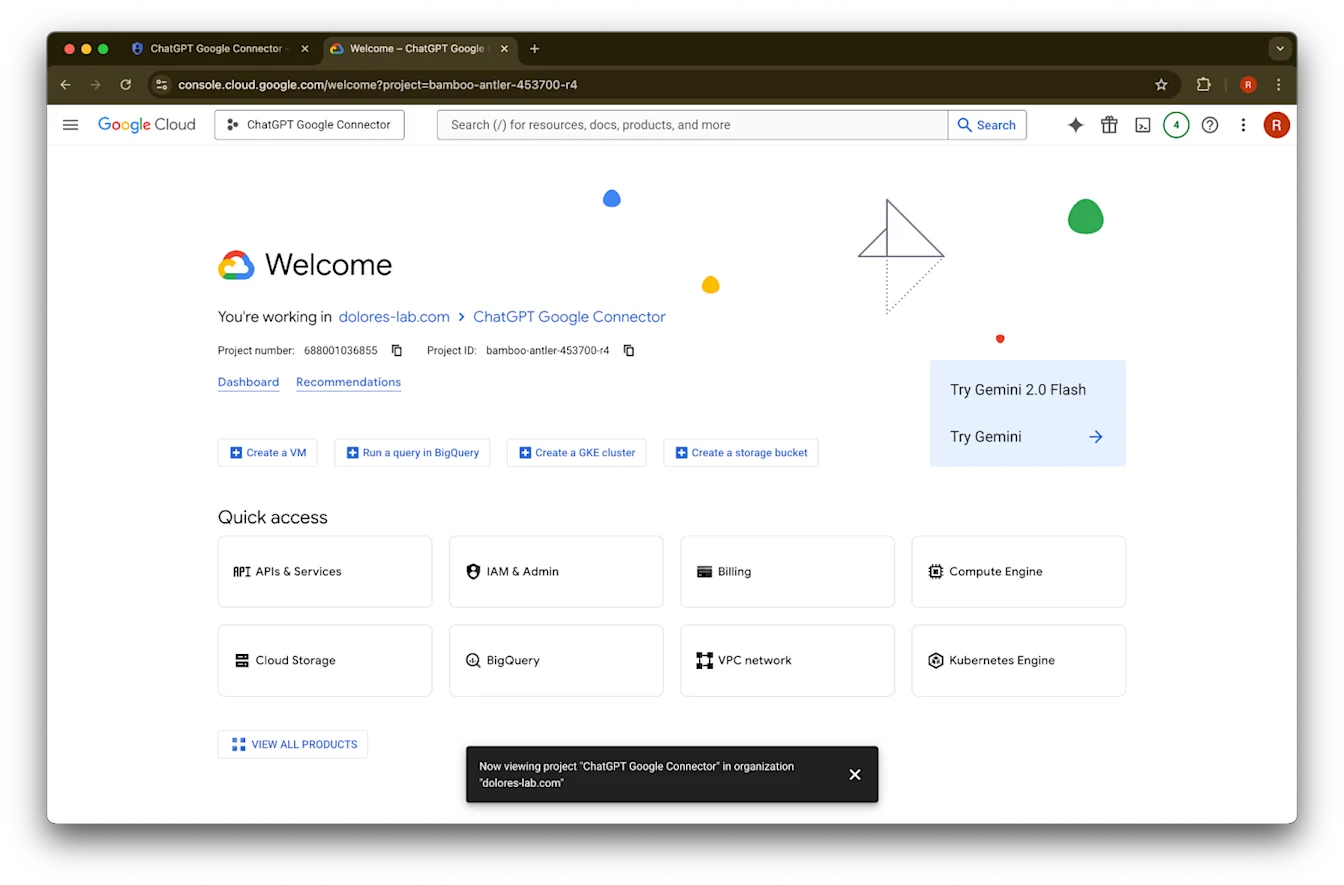
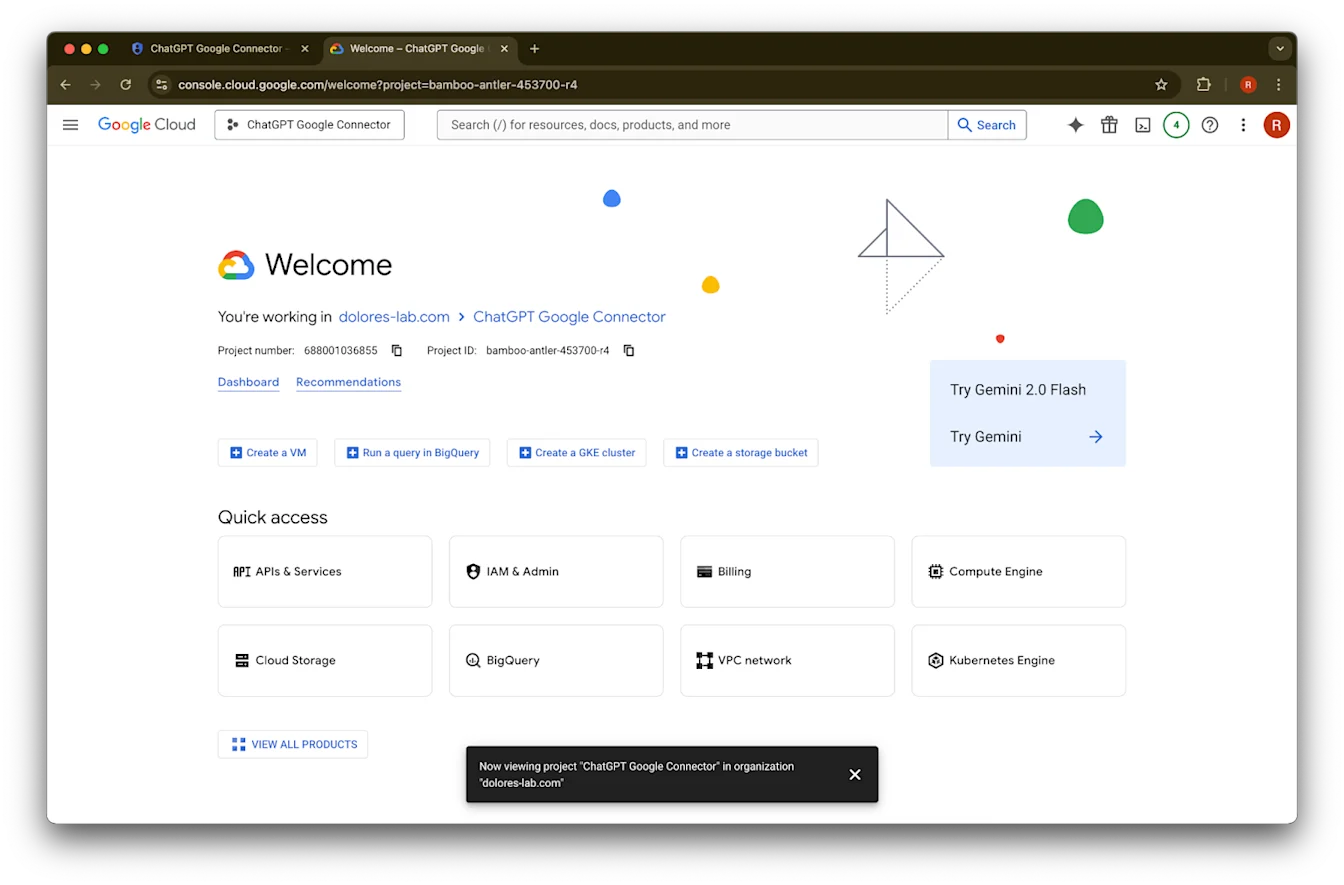
ਨਵੀਂ tab ਖੋਲ੍ਹੋ ਅਤੇ console.cloud.google.com ‘ਤੇ ਜਾਓ. ਯਕੀਨੀ ਬਣਾਓ ਕਿ ਚੁਣਿਆ ਗਿਆ project ਉਹੀ ਹੈ ਜੋ ਤੁਸੀਂ ਪਹਿਲਾਂ ਹੀ ਚੁਣਿਆ ਹੈ.
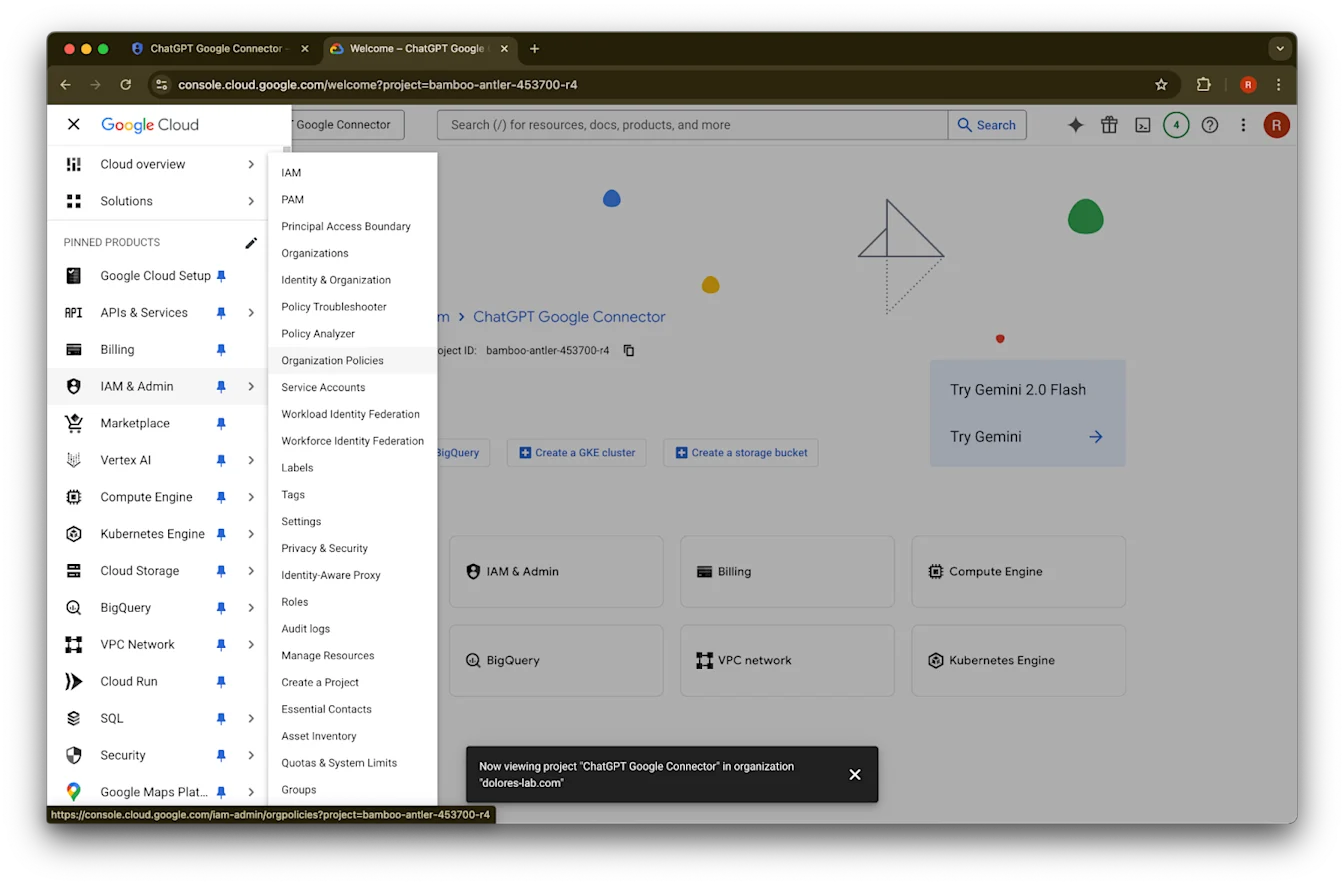
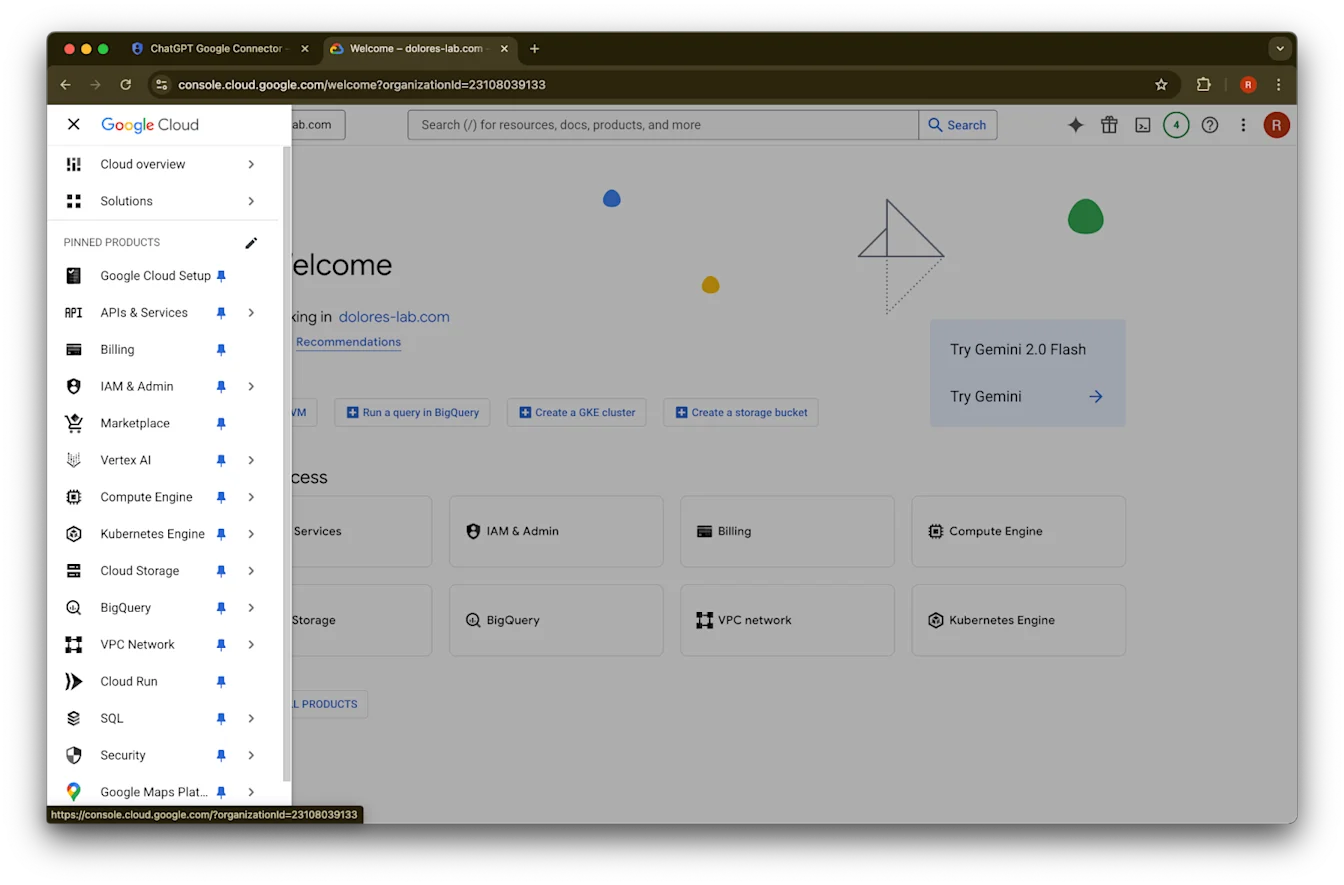
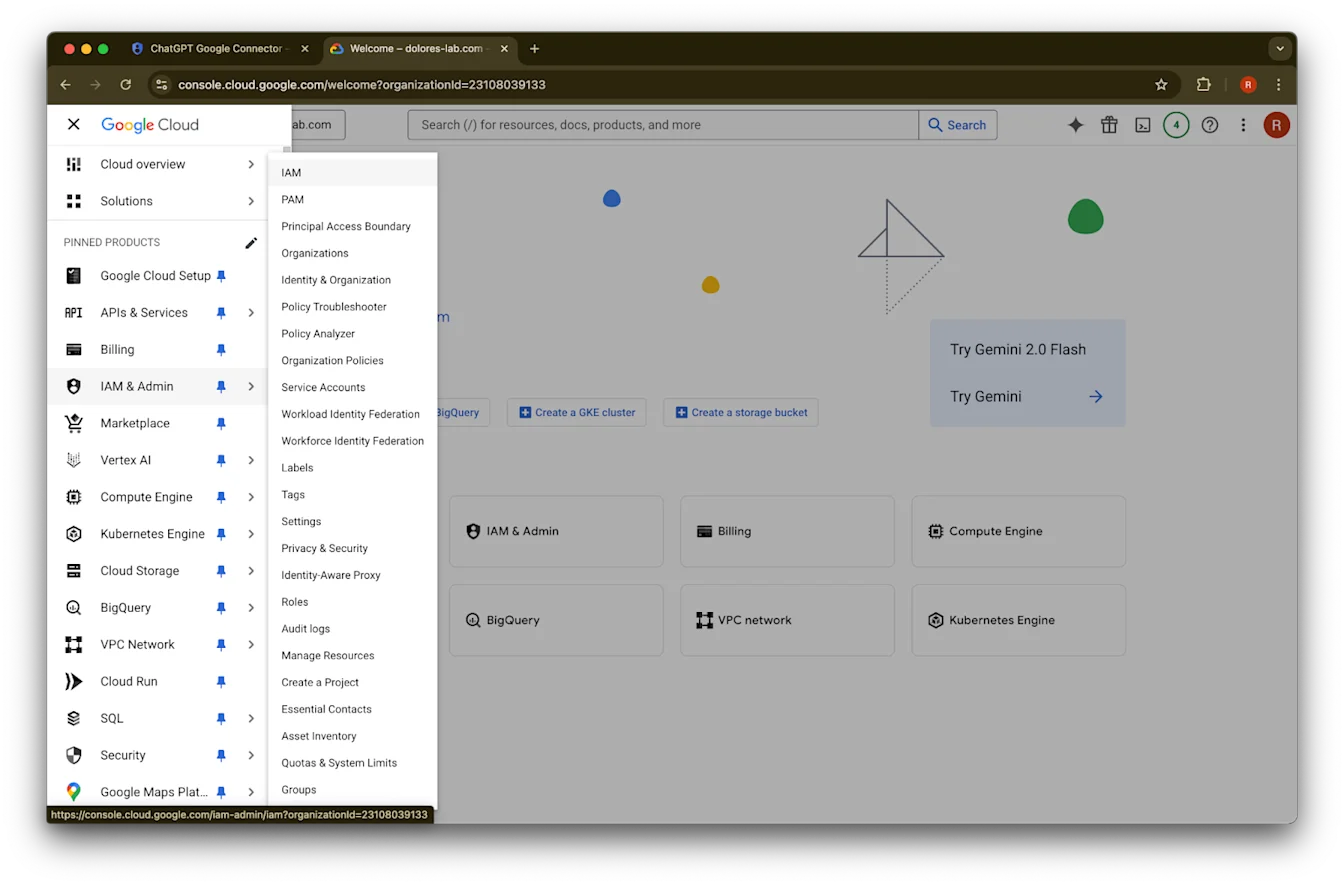
ਉੱਪਰ ਖੱਬੇ ਕੋਨੇ ਵਿੱਚ menu icon ‘ਤੇ ਕਲਿੱਕ ਕਰੋ.IAM & Admin ‘ਤੇ hover ਕਰੋ.
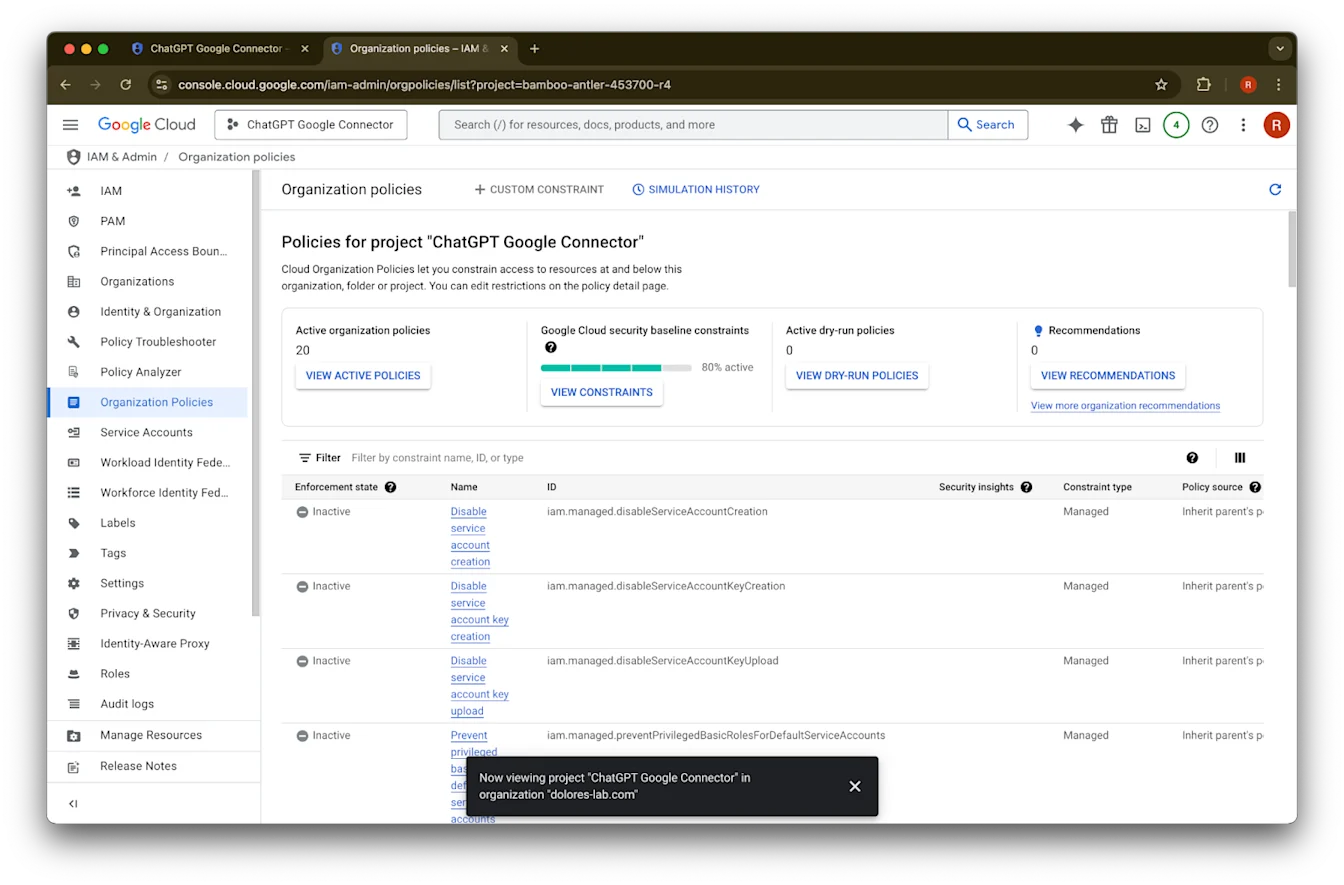
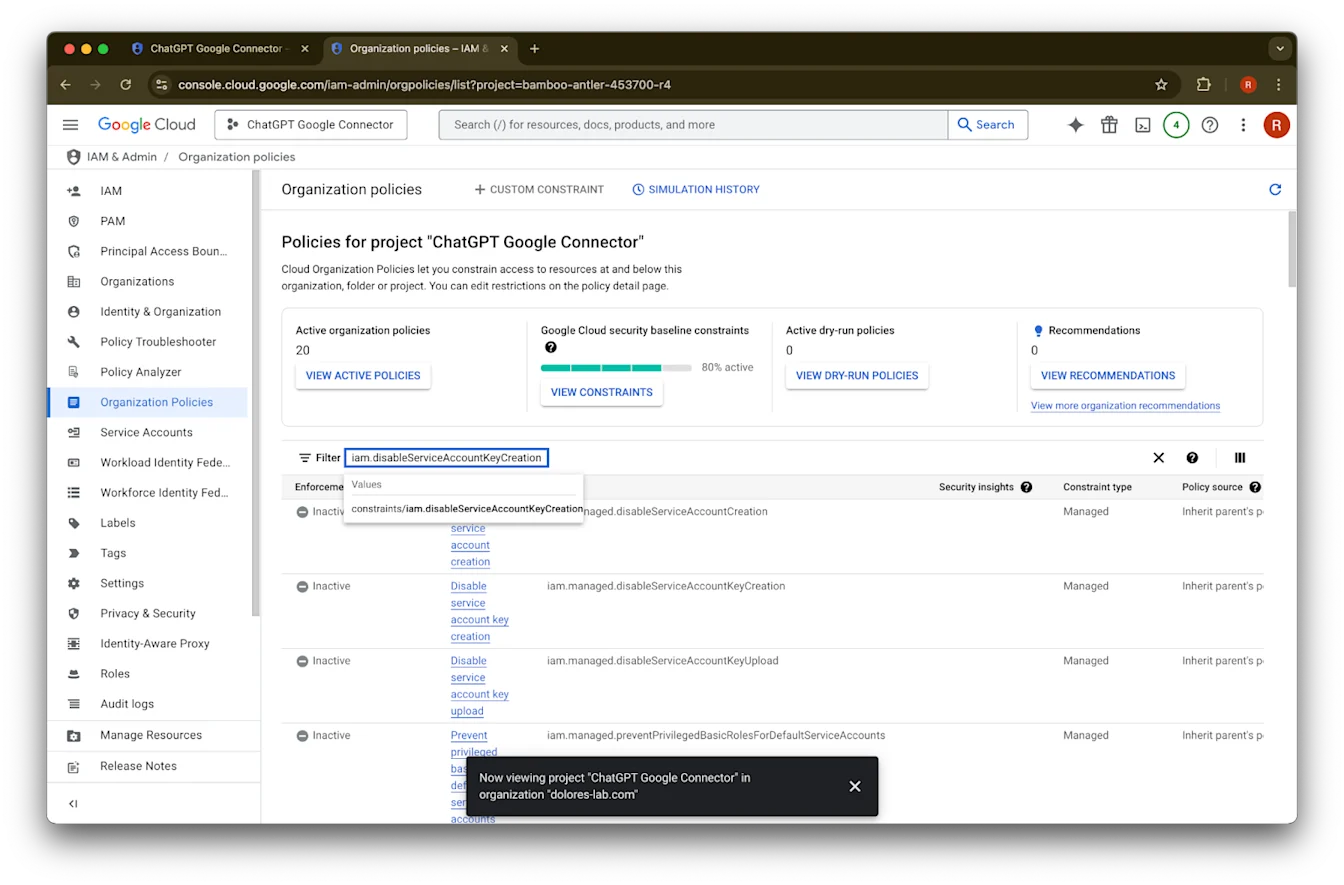
Organizational Policies ‘ਤੇ ਕਲਿੱਕ ਕਰੋ.
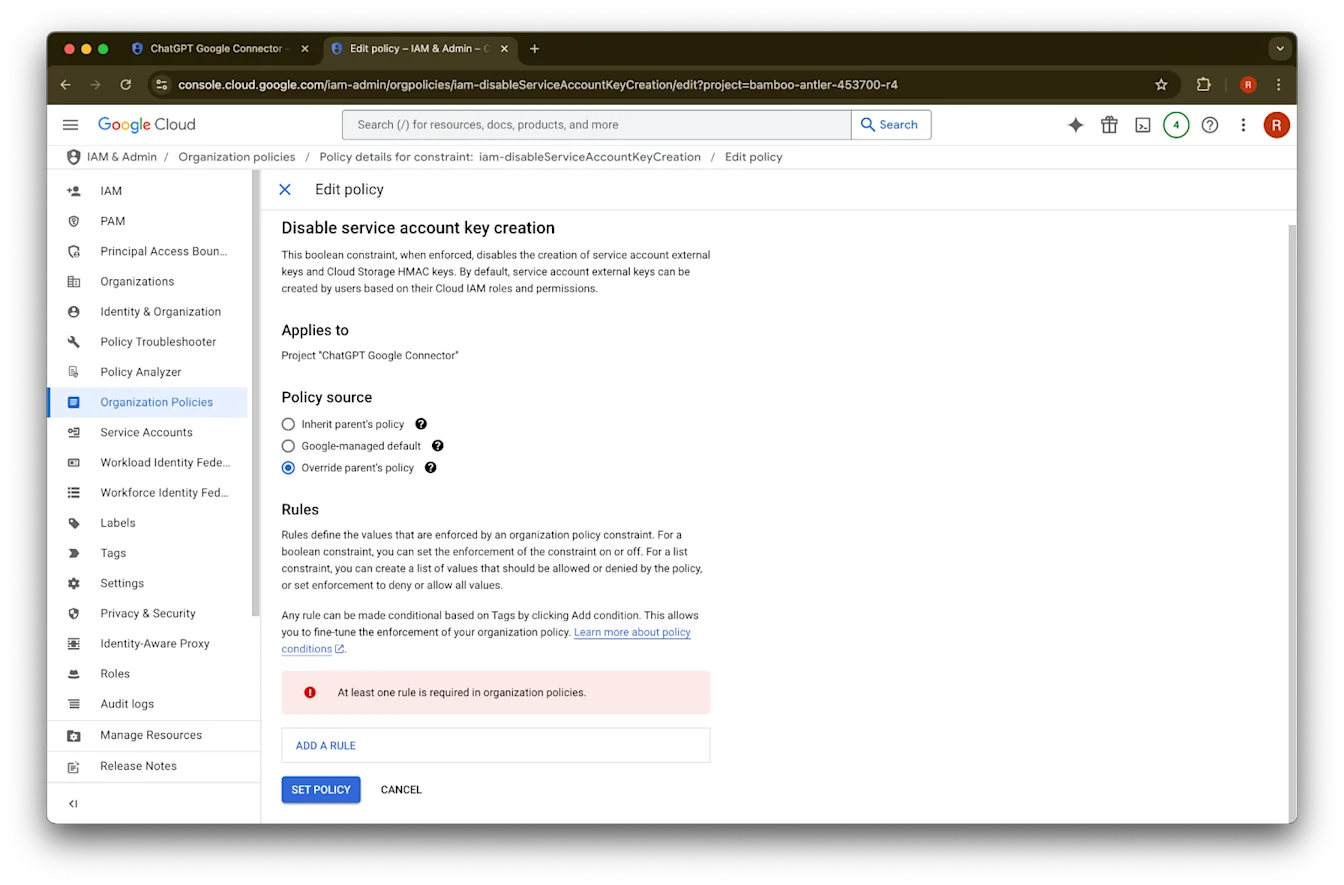
iam.disableServiceAccountKeyCreation
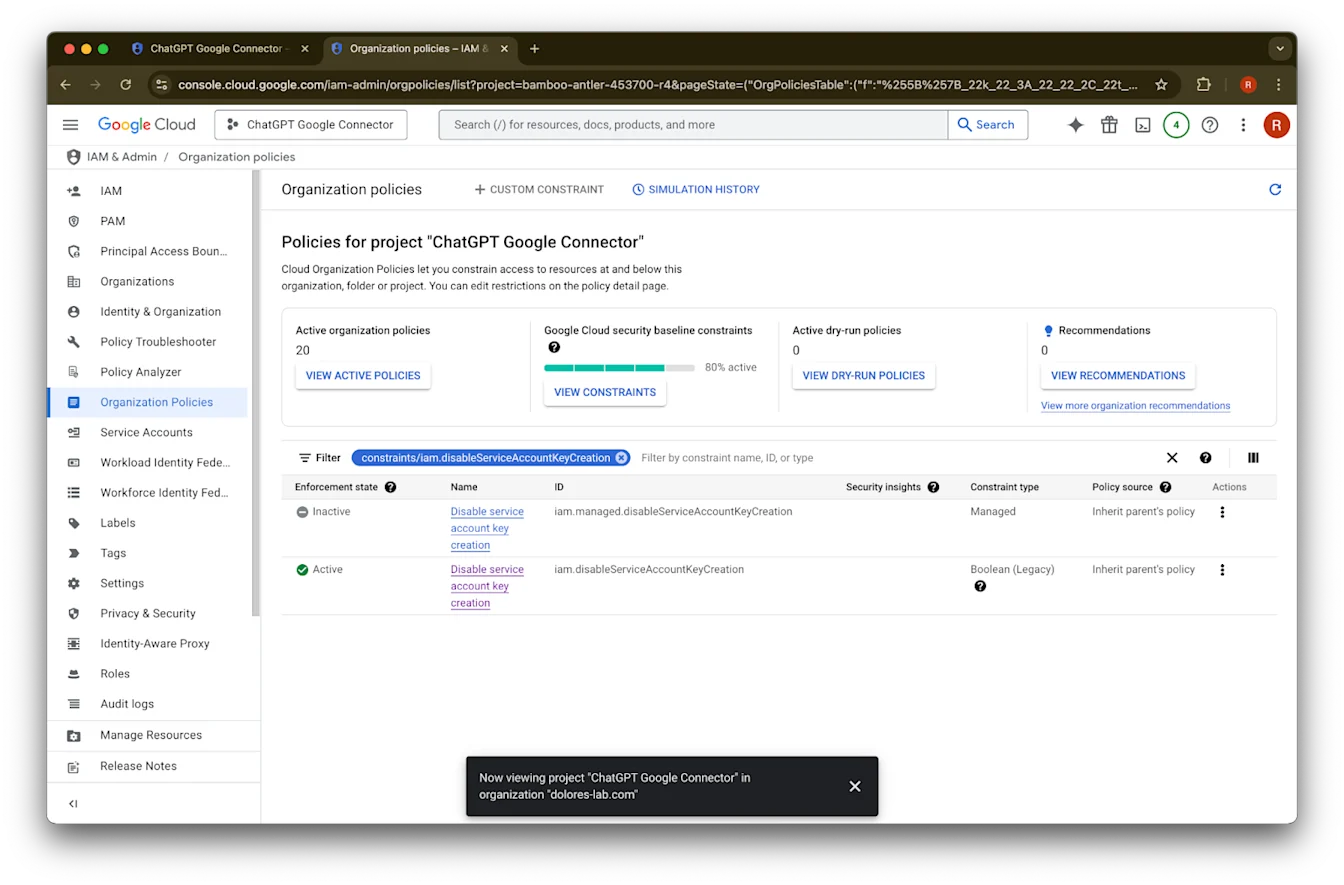
ਖੋਜੋ.constraints/iam.disableServiceAccountKeyCreation
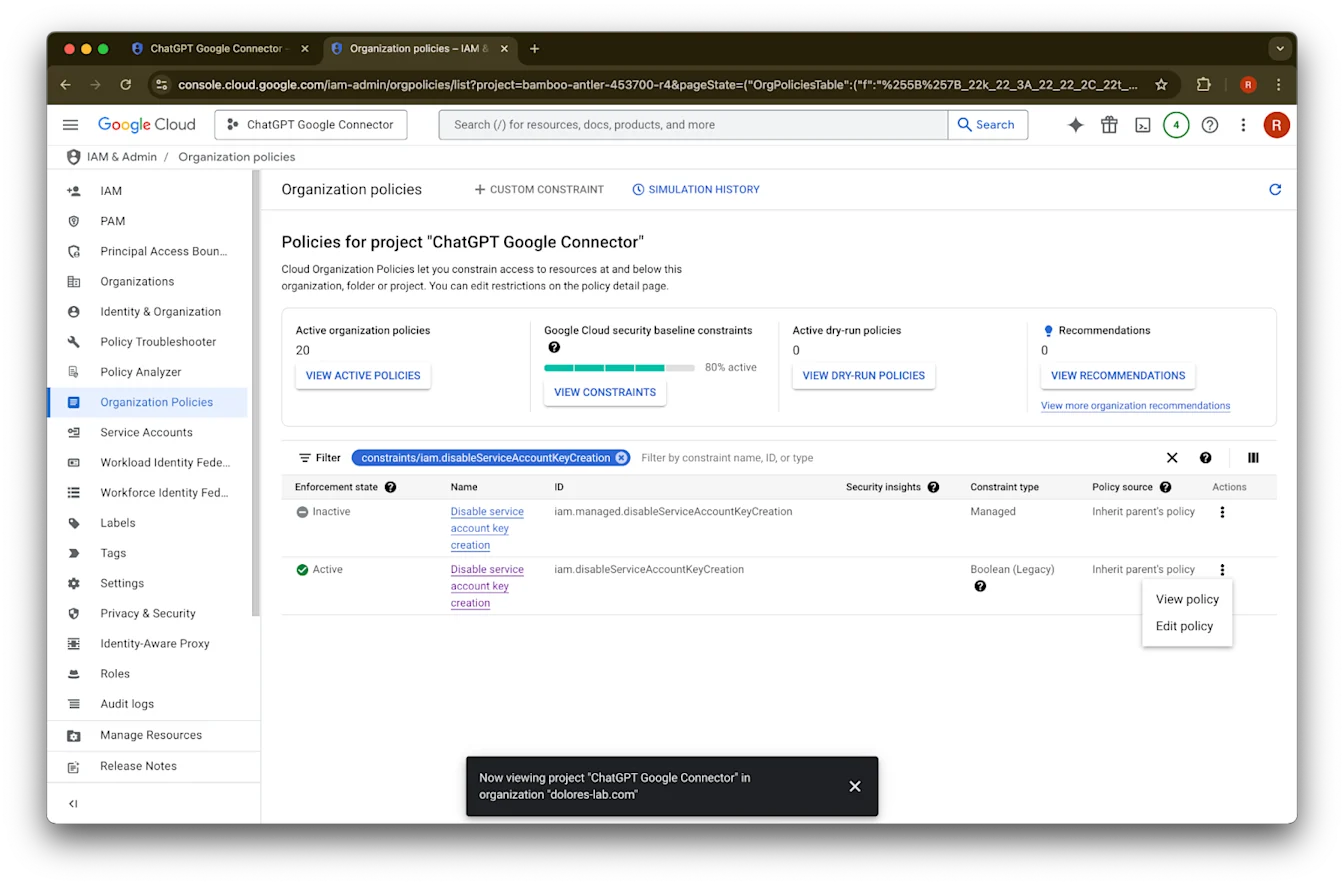
ਵਾਲੇ ਨਤੀਜੇ ‘ਤੇ ਕਲਿੱਕ ਕਰੋ.iam.disableServiceAccountKeyCreation
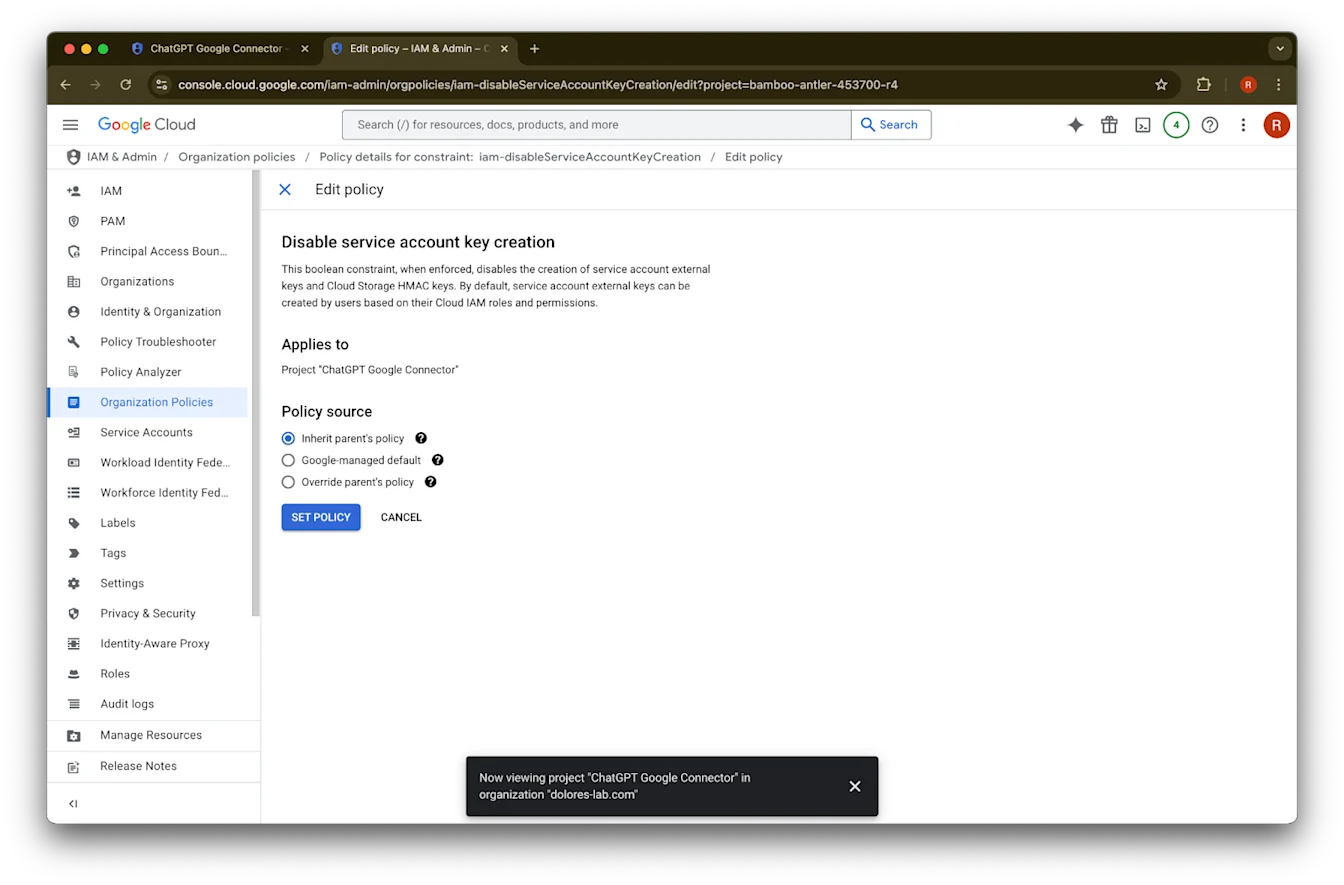
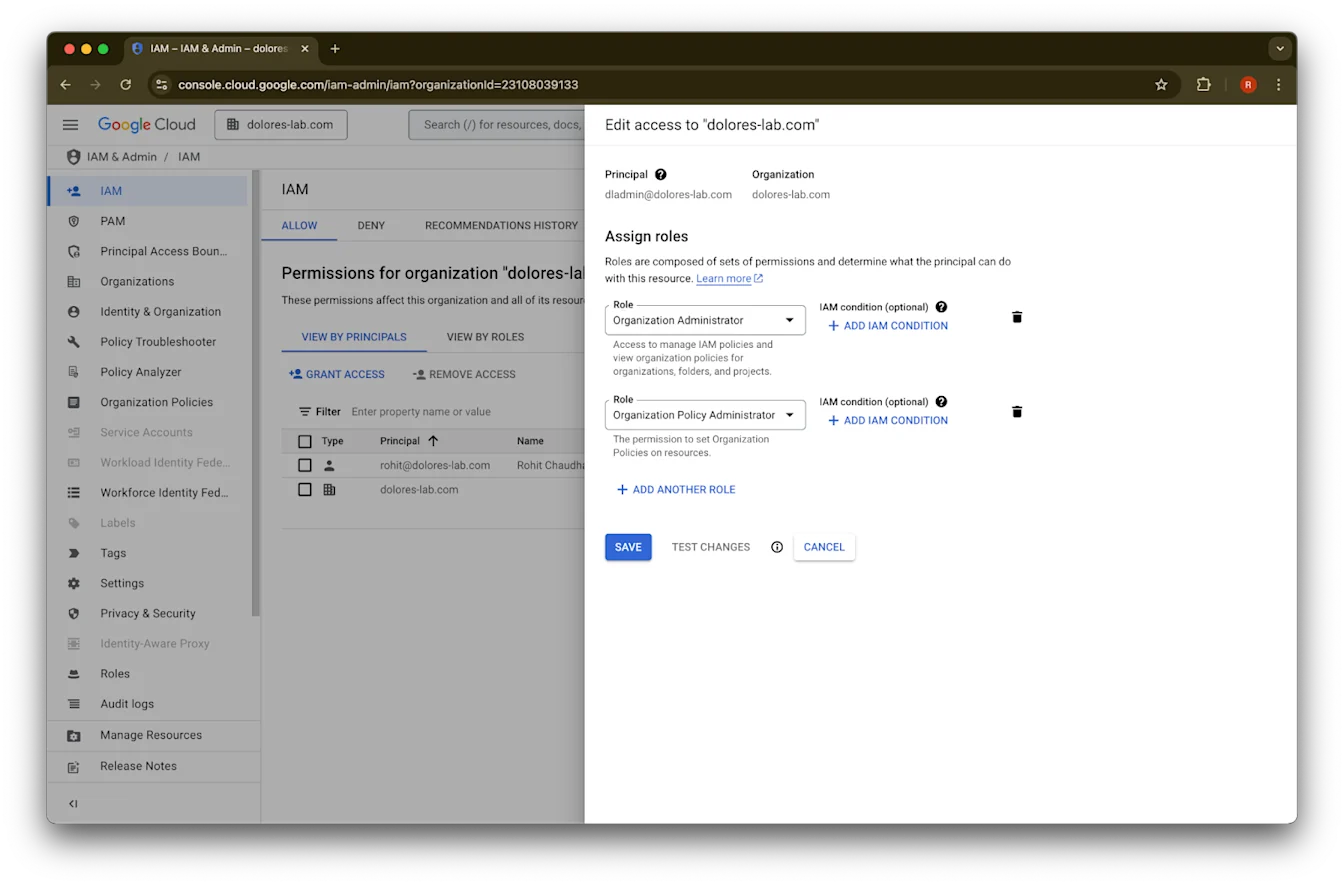
ID ਵਾਲੀ row ਲਈ … ‘ਤੇ ਕਲਿੱਕ ਕਰੋ.Edit policy ‘ਤੇ ਕਲਿੱਕ ਕਰੋ. ਜੇ Edit policy disabled ਹੈ, ਤਾਂ ਤੁਹਾਨੂੰ Organization Policy Administrator ਬਣਨਾ ਪਵੇਗਾ.
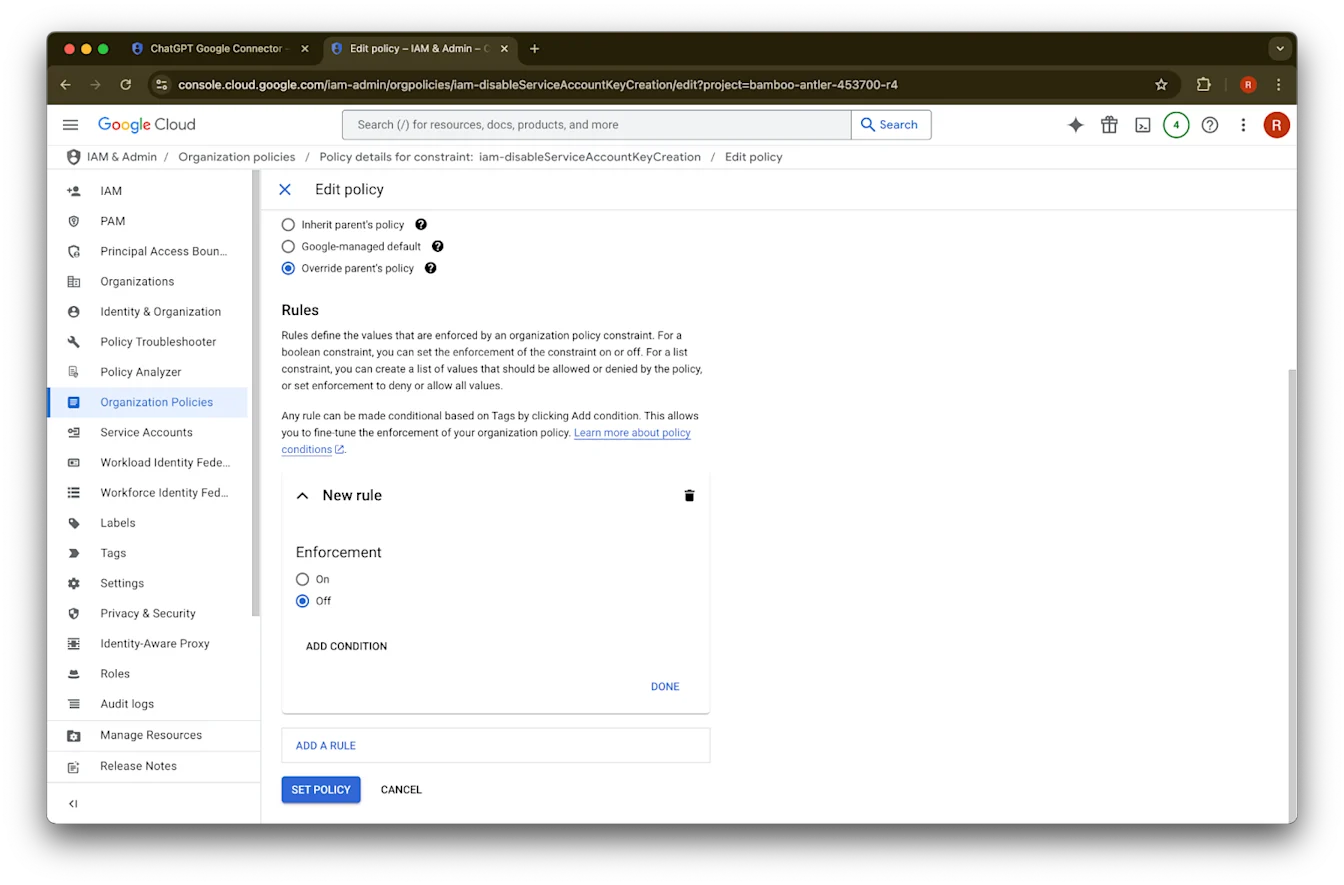
Override parent’s policy
‘ਤੇ ਕਲਿੱਕ ਕਰੋ.Add a rule
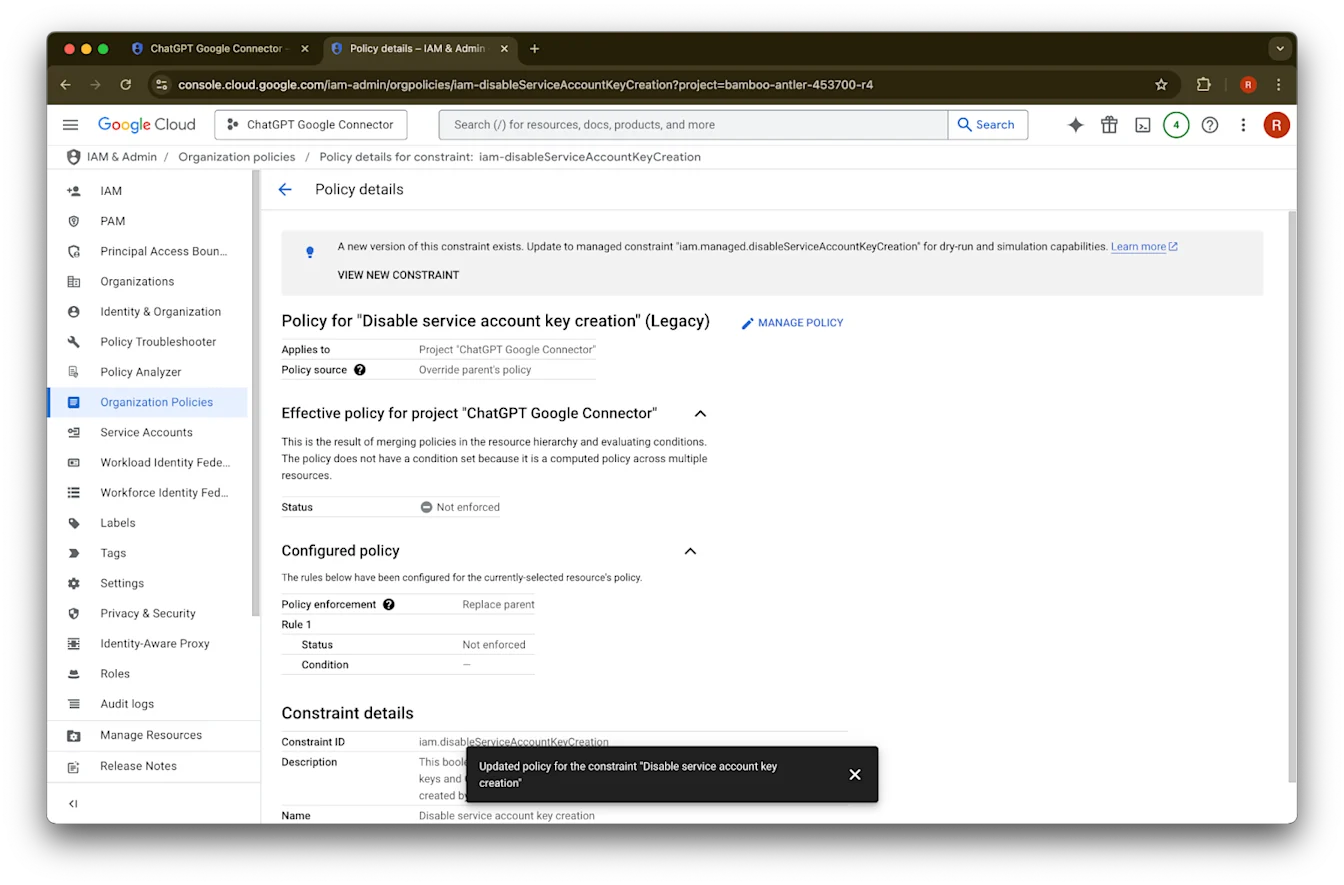
‘ਤੇ ਕਲਿੱਕ ਕਰੋ.Set Policy
‘ਤੇ ਕਲਿੱਕ ਕਰੋ.ਹੁਣ ਤੁਸੀਂ service account key ਬਣਾ ਸਕਦੇ ਹੋ. ਇਹ ਯੋਗਤਾ ਲਾਗੂ ਹੋਣ ਵਿੱਚ ਕੁਝ ਮਿੰਟ ਲੱਗ ਸਕਦੇ ਹਨ.
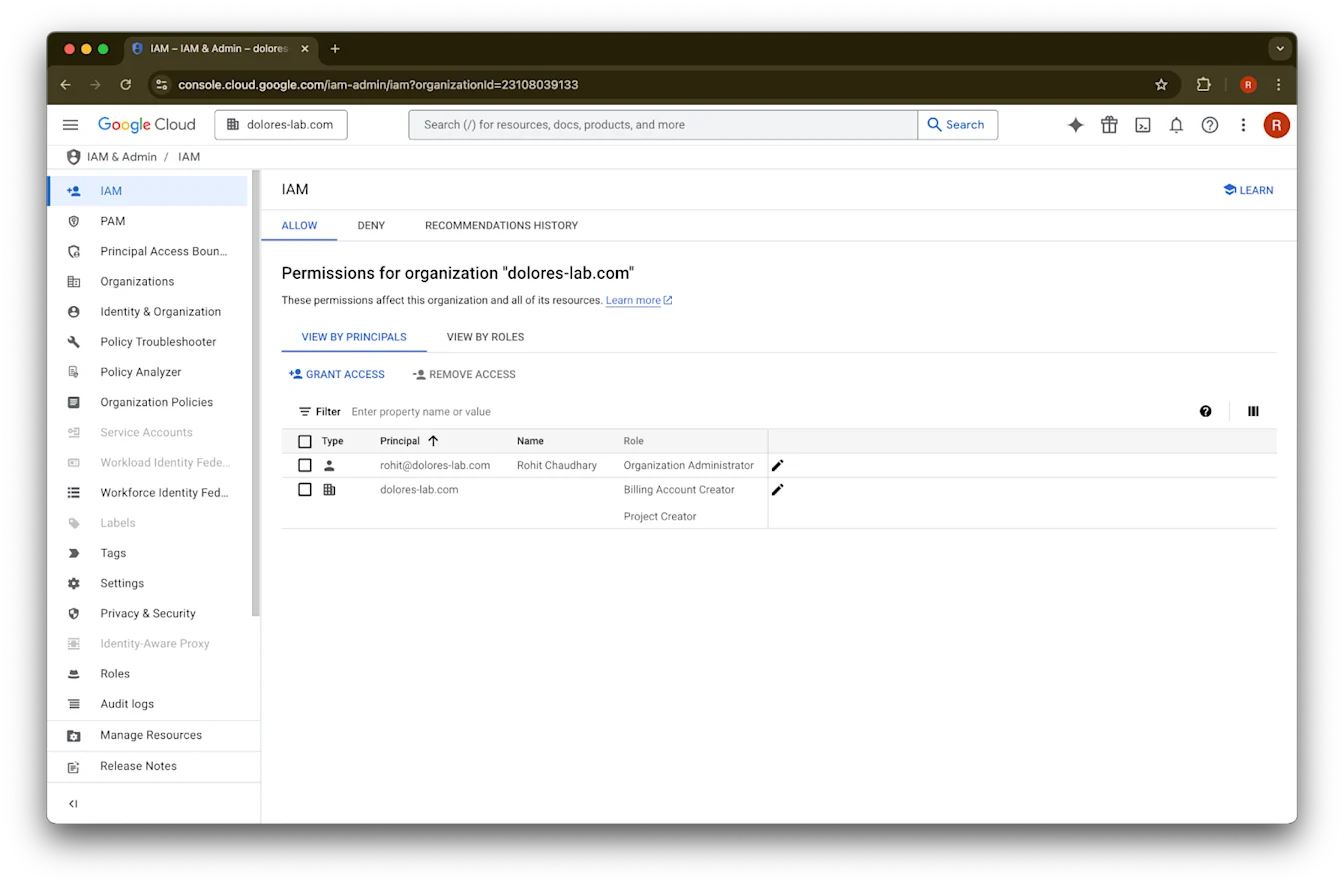
Organization Policy Administrator ਬਣਨਾ
console.cloud.google.com ‘ਤੇ ਜਾਓ ਅਤੇ project/organization selector ‘ਤੇ ਕਲਿੱਕ ਕਰੋ.
your organization
‘ਤੇ ਕਲਿੱਕ ਕਰੋ.ਉੱਪਰ-ਖੱਬੇ ਕੋਨੇ ਵਿੱਚ menu icon ‘ਤੇ ਕਲਿੱਕ ਕਰੋ.
IAM & Admin
‘ਤੇ hover ਕਰੋ.IAM
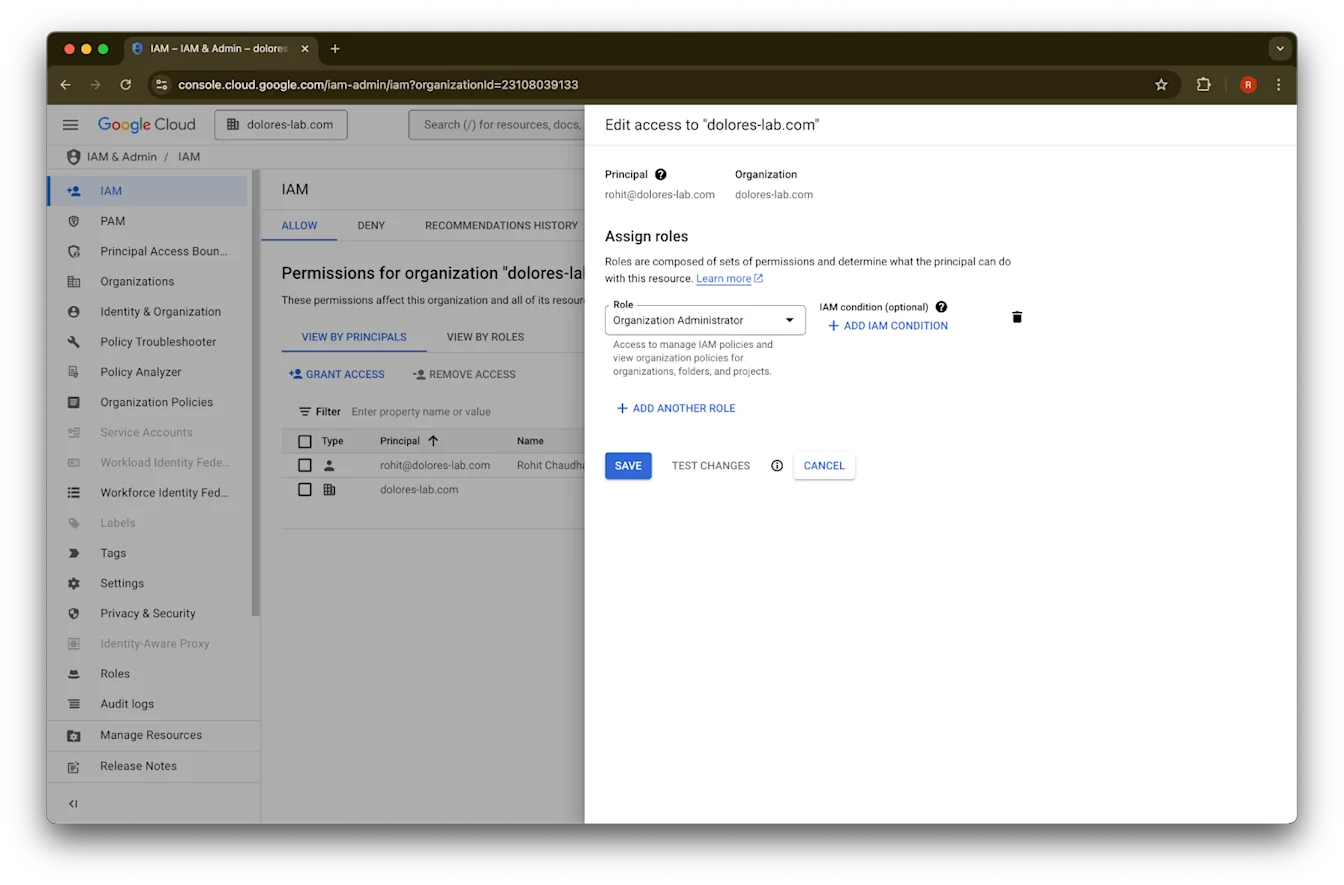
‘ਤੇ ਕਲਿੱਕ ਕਰੋ.ਆਪਣੇ ਅਕਾਊਂਟ ਲਈ pencil ‘ਤੇ ਕਲਿੱਕ ਕਰੋ.
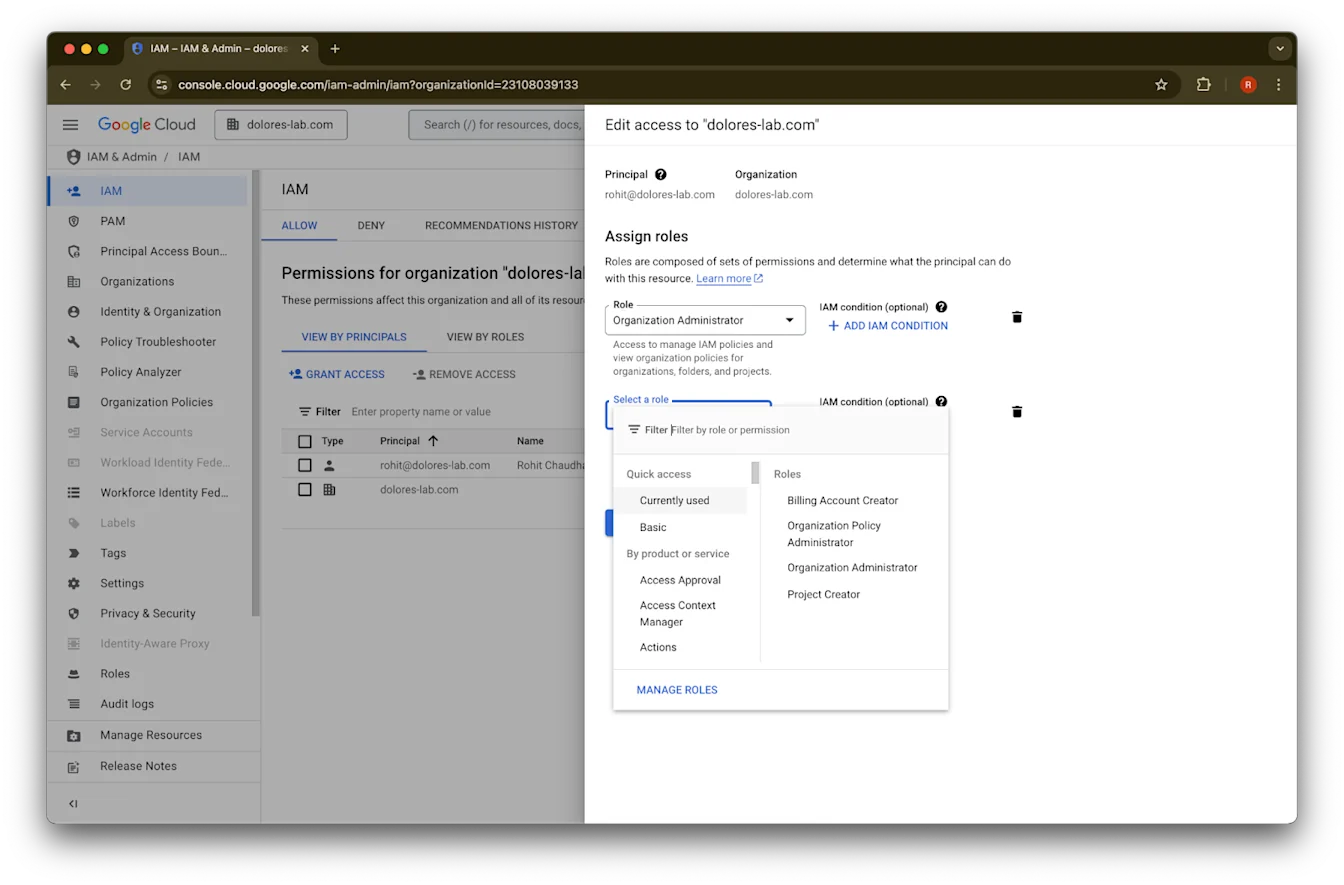
Add Another Role
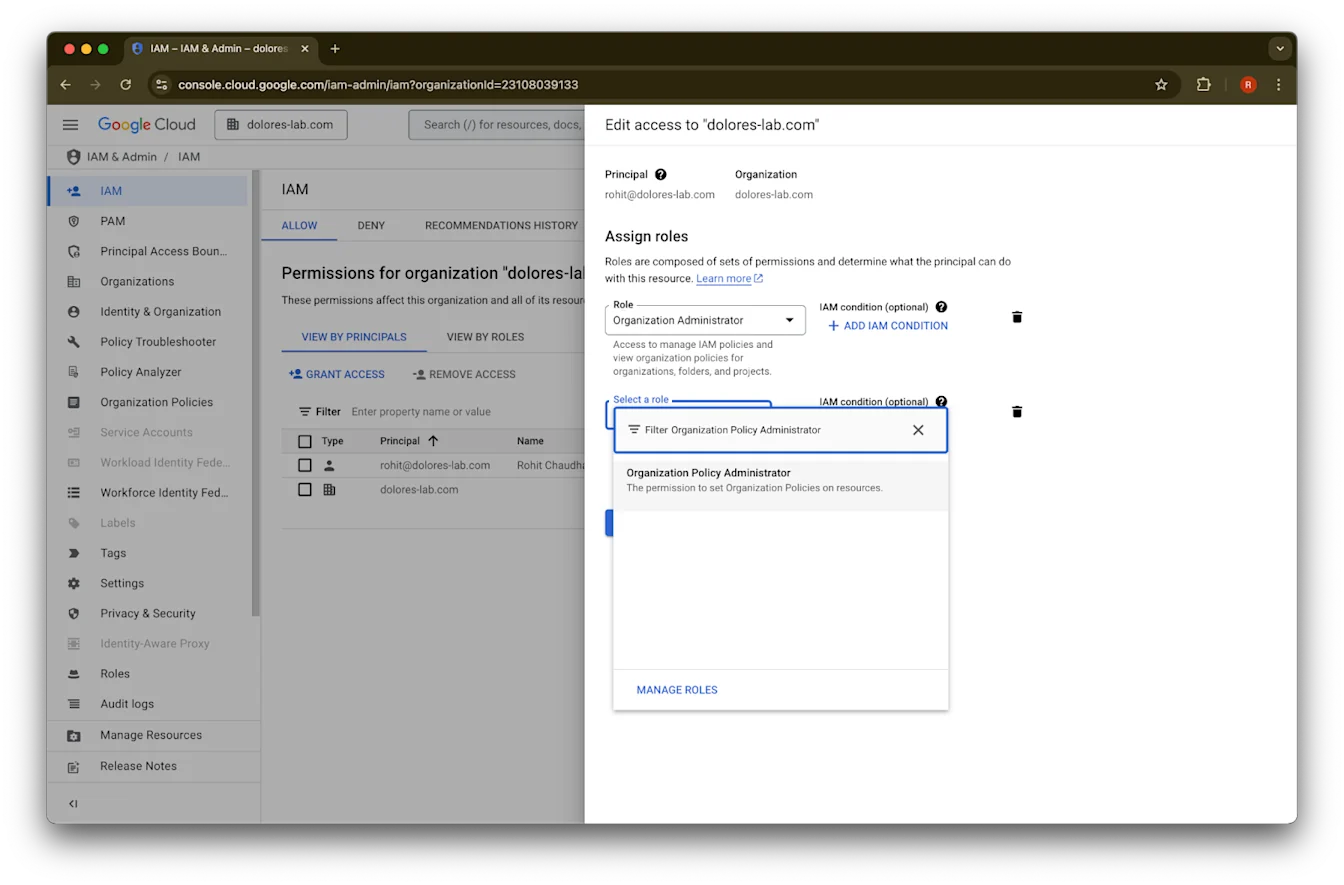
‘ਤੇ ਕਲਿੱਕ ਕਰੋ.Organization Policy Administrator
ਖੋਜੋ.Organization Policy Administrator
‘ਤੇ ਕਲਿੱਕ ਕਰੋ.Save ‘ਤੇ ਕਲਿੱਕ ਕਰੋ.
ਹੁਣ ਤੁਹਾਡੇ ਅਕਾਊਂਟ ਕੋਲ service account key creation ਯੋਗ ਕਰਨ ਦੀ permission ਹੈ. ਇਹ ਲਾਗੂ ਹੋਣ ਵਿੱਚ ਕੁਝ ਮਿੰਟ ਲੱਗ ਸਕਦੇ ਹਨ.
Google Workspace ਅਤੇ ChatGPT ਲਈ ਵੱਖ-ਵੱਖ Email Accounts ਬਣਾਈ ਰੱਖਣ ਲਈ Google Email Alias ਵਰਤਣਾ
ਜੇ ਤੁਸੀਂ Google Drive synced connectors ਲਈ admin-managed setup ਦੀ ਵਰਤੋਂ ਕਰਕੇ ਆਪਣੇ ChatGPT ਵਰਕਸਪੇਸ ਨਾਲ Google Workspace ਕਨੈਕਟ ਕਰਨ ਵਾਲੇ ਐਡਮਿਨ ਹੋ, ਅਤੇ ਤੁਹਾਡੀ ਸੰਸਥਾ ChatGPT ਅਤੇ Google Workspace ਲਈ ਵੱਖ-ਵੱਖ email domains ਵਰਤਦੀ ਹੈ, ਤਾਂ ਯੂਜ਼ਰਾਂ ਨੂੰ Google Drive synced connectors ਤੱਕ ਸਫਲਤਾਪੂਰਵਕ ਪਹੁੰਚ ਦੇਣ ਲਈ ਤੁਹਾਨੂੰ ਵਾਧੂ ਕਦਮ ਲੈਣੇ ਪੈਣਗੇ.
ਸਿਫਾਰਸ਼: ਜਦੋਂ ਵੀ ਸੰਭਵ ਹੋਵੇ, Google Workspace ਅਤੇ ChatGPT ਅਕਾਊਂਟ ਦੋਹਾਂ ਲਈ ਇੱਕੋ primary email address ਵਰਤੋ.
ਜੇ ਇਹ ਸੰਭਵ ਨਹੀਂ ਹੈ, ਤਾਂ ChatGPT sign-in email ਨਾਲ ਮੇਲ ਖਾਂਦਾ Google Workspace email alias ਕਨਫ਼ਿਗਰ ਕਰਨ ਲਈ ਹੇਠਾਂ ਦਿੱਤੀਆਂ ਹਦਾਇਤਾਂ ਫੋਲੋ ਕਰੋ.
Google Workspace Alias ਜੋੜਣ ਦੇ ਕਦਮ
ਇਹ ਕਦਮ Google Admin Console ਵਿੱਚ ਫੋਲੋ ਕਰੋ ਤਾਂ ਜੋ ਹਰ ਯੂਜ਼ਰ ਦਾ ChatGPT email ਉਸਦੇ Google Workspace ਅਕਾਊਂਟ ਨਾਲ ਲਿੰਕ ਕੀਤਾ ਜਾ ਸਕੇ:
Admin Console ‘ਤੇ ਜਾਓ. ਇੱਥੇ ਜਾਓ: Directory > Users
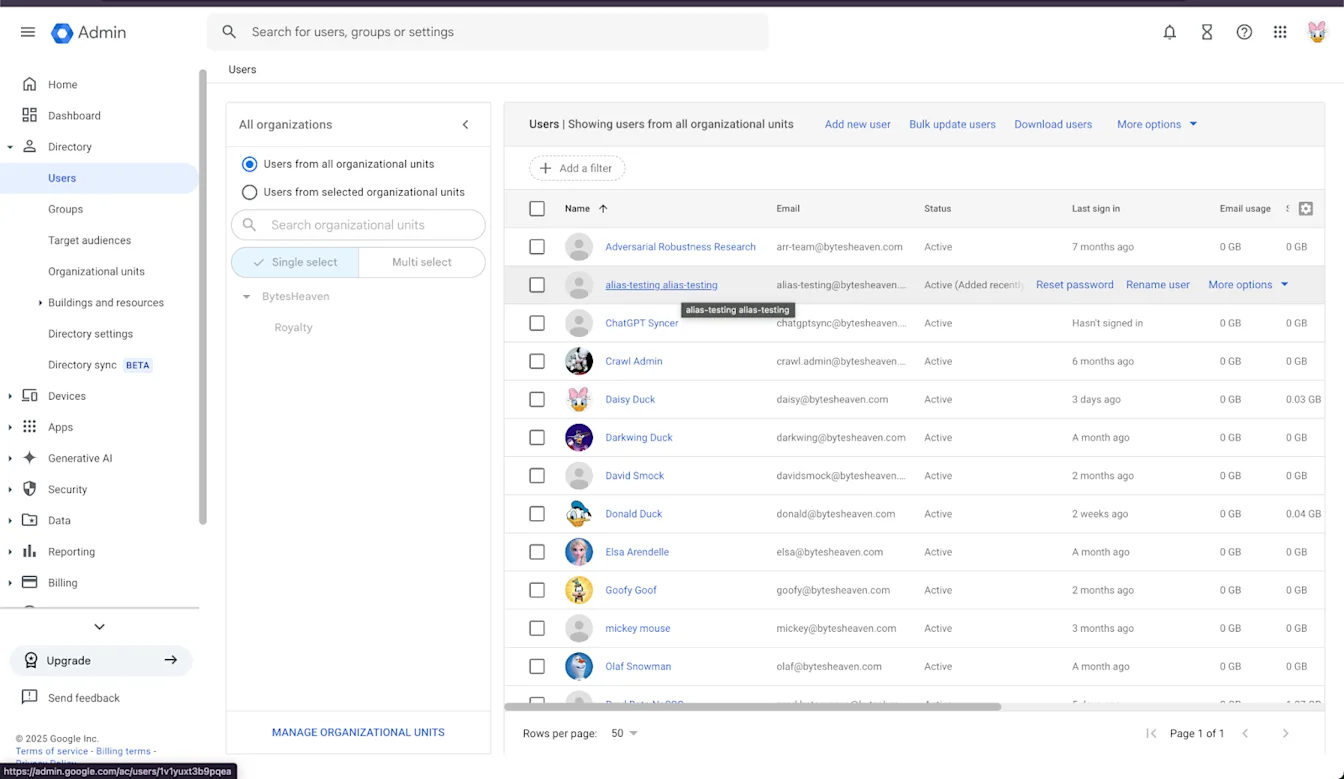
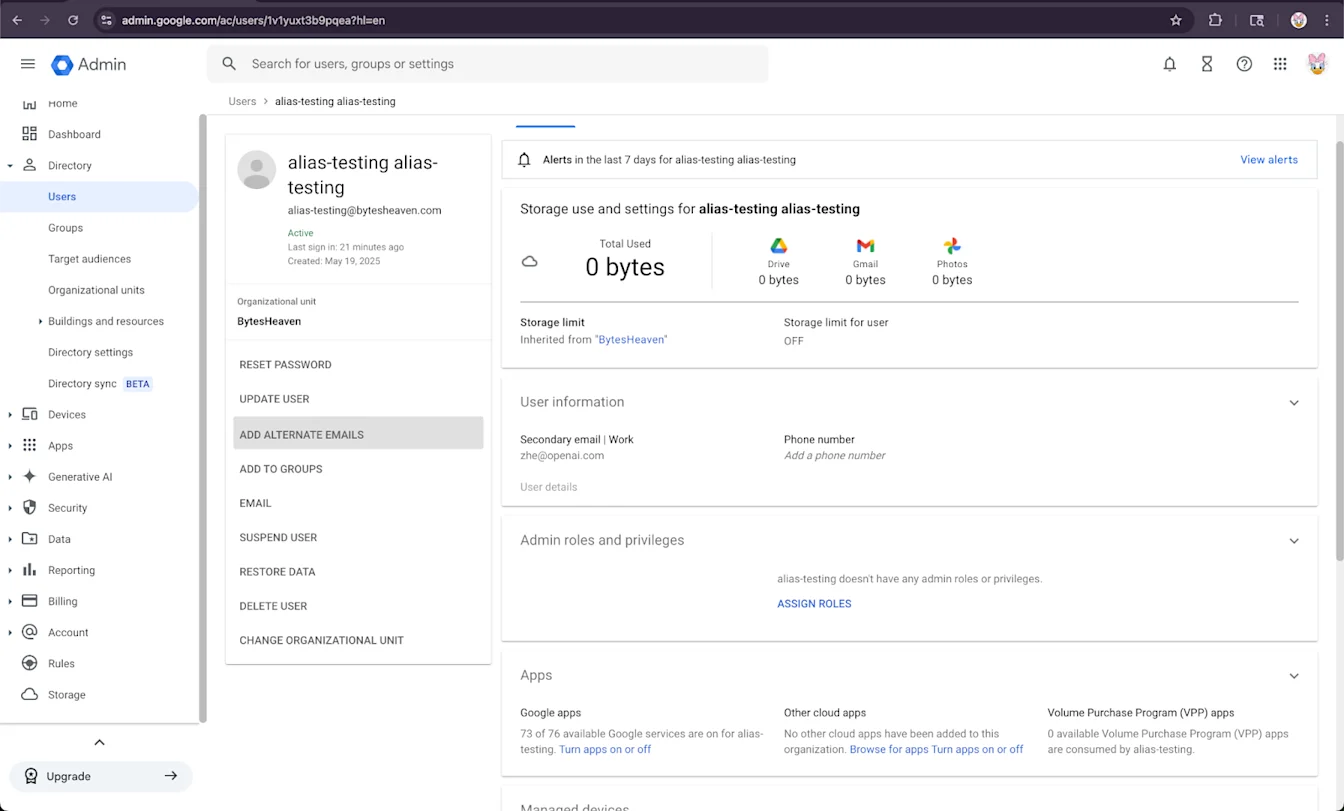
2. ਕਿਸੇ ਯੂਜ਼ਰ ਨੂੰ ਚੁਣੋ, ਫਿਰ “ADD ALTERNATIVE EMAILS”.
3. ਇੱਕ Alternative Email ਜੋੜੋ. ਯਕੀਨੀ ਬਣਾਓ ਕਿ ਇਹ ਯੂਜ਼ਰ ਦੇ ChatGPT ਅਕਾਊਂਟ ਨਾਲ ਮੇਲ ਖਾਂਦੀ ਹੋਵੇ.
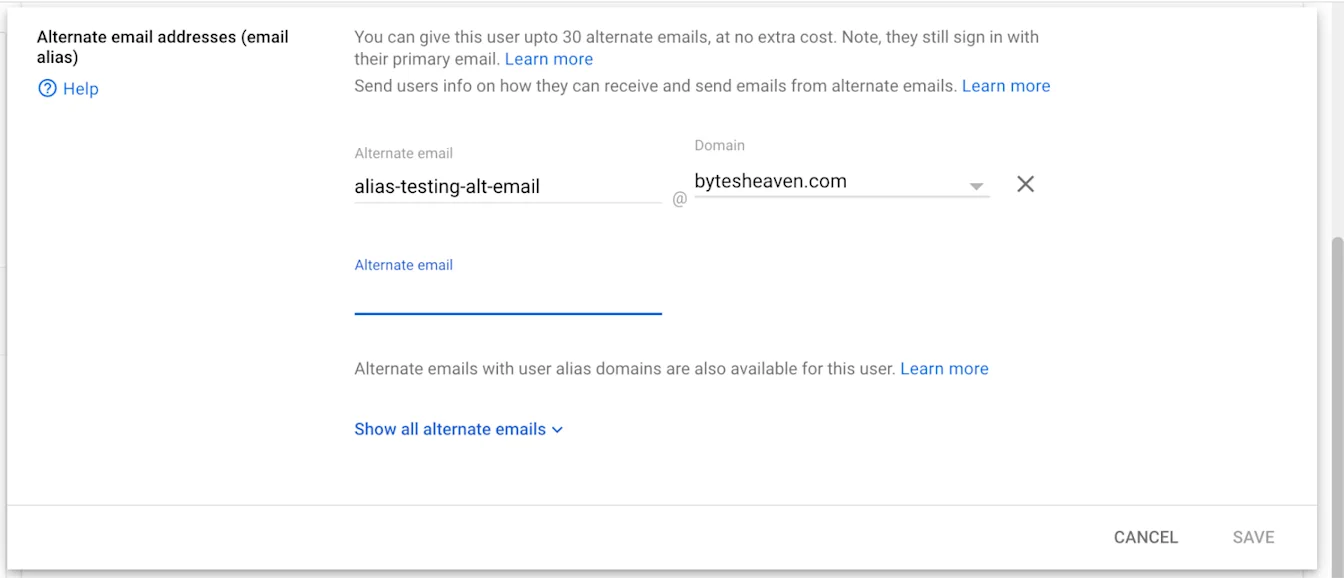
4. Save ਚੁਣੋ.
ਜਾਣੀਆਂ ਸੀਮਾਵਾਂ
ਨਿੱਜੀ email addresses ਦਾ ਸਮਰਥਨ ਨਹੀਂ ਹੈ
ਜੋ ਯੂਜ਼ਰ ਨਿੱਜੀ addresses (ਉਦਾਹਰਨ ਲਈ, example@gmail.com) ਨਾਲ ChatGPT ਲਈ ਰਜਿਸਟਰ ਕਰਦੇ ਹਨ, ਉਹ Google Workspace ਨਾਲ ਕਨੈਕਟ ਨਹੀਂ ਕਰ ਸਕਦੇ. ਇਹ ਸੈਟਅੱਪ ਸਮਰਥਿਤ ਨਹੀਂ ਹੈ ਅਤੇ ਸੁਰੱਖਿਆ ਜੋਖਮ ਪੈਦਾ ਕਰਦਾ ਹੈ, ਕਿਉਂਕਿ ਇਹ ਸੰਸਥਾ ਤੋਂ ਬਾਹਰੋਂ ਅੰਦਰੂਨੀ ਡਾਟਾ ਤੱਕ ਪਹੁੰਚ ਯੋਗ ਕਰਦਾ ਹੈ.
Gmail "+" aliases ਦਾ ਸਮਰਥਨ ਨਹੀਂ ਹੈ
Gmail ਯੂਜ਼ਰਾਂ ਨੂੰ ਆਪਣੇ address ਨਾਲ "+" ਜੋੜ ਕੇ aliases ਬਣਾਉਣ ਦੀ ਆਗਿਆ ਦਿੰਦਾ ਹੈ (ਉਦਾਹਰਨ ਲਈ, user+alias@gmail.com). ਇਸ ਤਰ੍ਹਾਂ ਦੀ aliasing Google Drive synced connectors ਨਾਲ ਕੰਮ ਨਹੀਂ ਕਰਦੀ. Alias ਨੂੰ Google Workspace ਵਿੱਚ ਸਪਸ਼ਟ ਤੌਰ ‘ਤੇ ਕਨਫ਼ਿਗਰ ਕੀਤਾ ਜਾਣਾ ਚਾਹੀਦਾ ਹੈ.
ਆਮ ਗਲਤੀ ਸੁਨੇਹਾ
ਜੇ email addresses ਠੀਕ ਤਰ੍ਹਾਂ ਲਿੰਕ ਨਾ ਹੋਣ, ਤਾਂ ਯੂਜ਼ਰਾਂ ਨੂੰ ਇਹ ਸੁਨੇਹਾ ਮਿਲ ਸਕਦਾ ਹੈ: "ਅਸੀਂ ਤੁਹਾਡਾ ਅਕਾਊਂਟ Google Drive ਨਾਲ ਕਨੈਕਟ ਨਹੀਂ ਕਰ ਸਕੇ. ਹੋਰ ਜਾਣਨ ਲਈ ਕਲਿੱਕ ਕਰੋ."
ਜੇ ਯੂਜ਼ਰਾਂ ਨੂੰ ਇਹ ਸੁਨੇਹਾ ਮਿਲੇ, ਤਾਂ ਇਸ ਦਸਤਾਵੇਜ਼ ਵਿੱਚ ਦਿੱਤੇ ਕਦਮਾਂ ਦੀ ਸਮੀਖਿਆ ਕਰੋ ਅਤੇ ਯਕੀਨੀ ਬਣਾਓ ਕਿ ਉਹ ਠੀਕ ਤਰ੍ਹਾਂ ਫੋਲੋ ਕੀਤੇ ਗਏ ਹਨ. ਜੇ ਹੋਰ ਮਦਦ ਦੀ ਲੋੜ ਹੋਵੇ, ਤਾਂ ਕਿਰਪਾ ਕਰਕੇ ਸਾਡੀ support team ਨਾਲ ਸੰਪਰਕ ਕਰੋ.