
admin-managed setup ಬಳಸಿ ನಿಮ್ಮ Google Workspace ಅನ್ನು ChatGPT ಗೆ ಸಂಪರ್ಕಿಸಲು, ನೀವು ಮೊದಲು Google ನ ನಿರ್ವಾಹಕ ಕನ್ಸೋಲ್ಗಳಲ್ಲಿ ಪ್ರವೇಶವನ್ನು ಸಂರಚಿಸಬೇಕು.
Google Drive, ಬಳಕೆದಾರರು ಮತ್ತು ಗುಂಪುಗಳಿಗೆ ಓದಲು ಮಾತ್ರ ಇರುವ ಪ್ರವೇಶದೊಂದಿಗೆ ಸೇವಾ ಖಾತೆಯನ್ನು ರಚಿಸಿ.
ಈ ಸೇವಾ ಖಾತೆಯನ್ನು ನಿಮ್ಮ ChatGPT ವರ್ಕ್ಸ್ಪೇಸ್ಗೆ ಸಂಬಂಧಿಸಿದ ಅದೇ Google ಖಾತೆಯ ಅಡಿಯಲ್ಲಿ ರಚಿಸುವಂತೆ ನಾವು ಬಲವಾಗಿ ಶಿಫಾರಸು ಮಾಡುತ್ತೇವೆ. ChatGPT ವರ್ಕ್ಸ್ಪೇಸ್ನ ಖಾತೆಗಳು Google Workspace ನಲ್ಲಿ ಬಳಸಿದ ಇಮೇಲ್ ಡೊಮೇನ್ನಿಂದ ಬೇರೆ ಇಮೇಲ್ ಡೊಮೇನ್ ಹೊಂದಿದ್ದರೆ, ನಿಮ್ಮ ಬಳಕೆದಾರರಿಗೆ ಈ ಕನೆಕ್ಟರ್ ಅನ್ನು ಸಕ್ರಿಯಗೊಳಿಸಲು ನೀವು ಹೆಚ್ಚುವರಿ ಹಂತಗಳನ್ನು ಅನುಸರಿಸಬೇಕು.
ಸೇವಾ ಖಾತೆ ಕಾರ್ಯನಿರ್ವಹಿಸುವ ಪರವಾಗಿ ನಿರ್ವಾಹಕ ಖಾತೆಯನ್ನು ರಚಿಸಿ.
ನಂತರ, ChatGPT ನಿರ್ವಾಹಕ ಕನ್ಸೋಲ್ನಲ್ಲಿ ಸೆಟಪ್ ಪೂರ್ಣಗೊಳಿಸಿ.
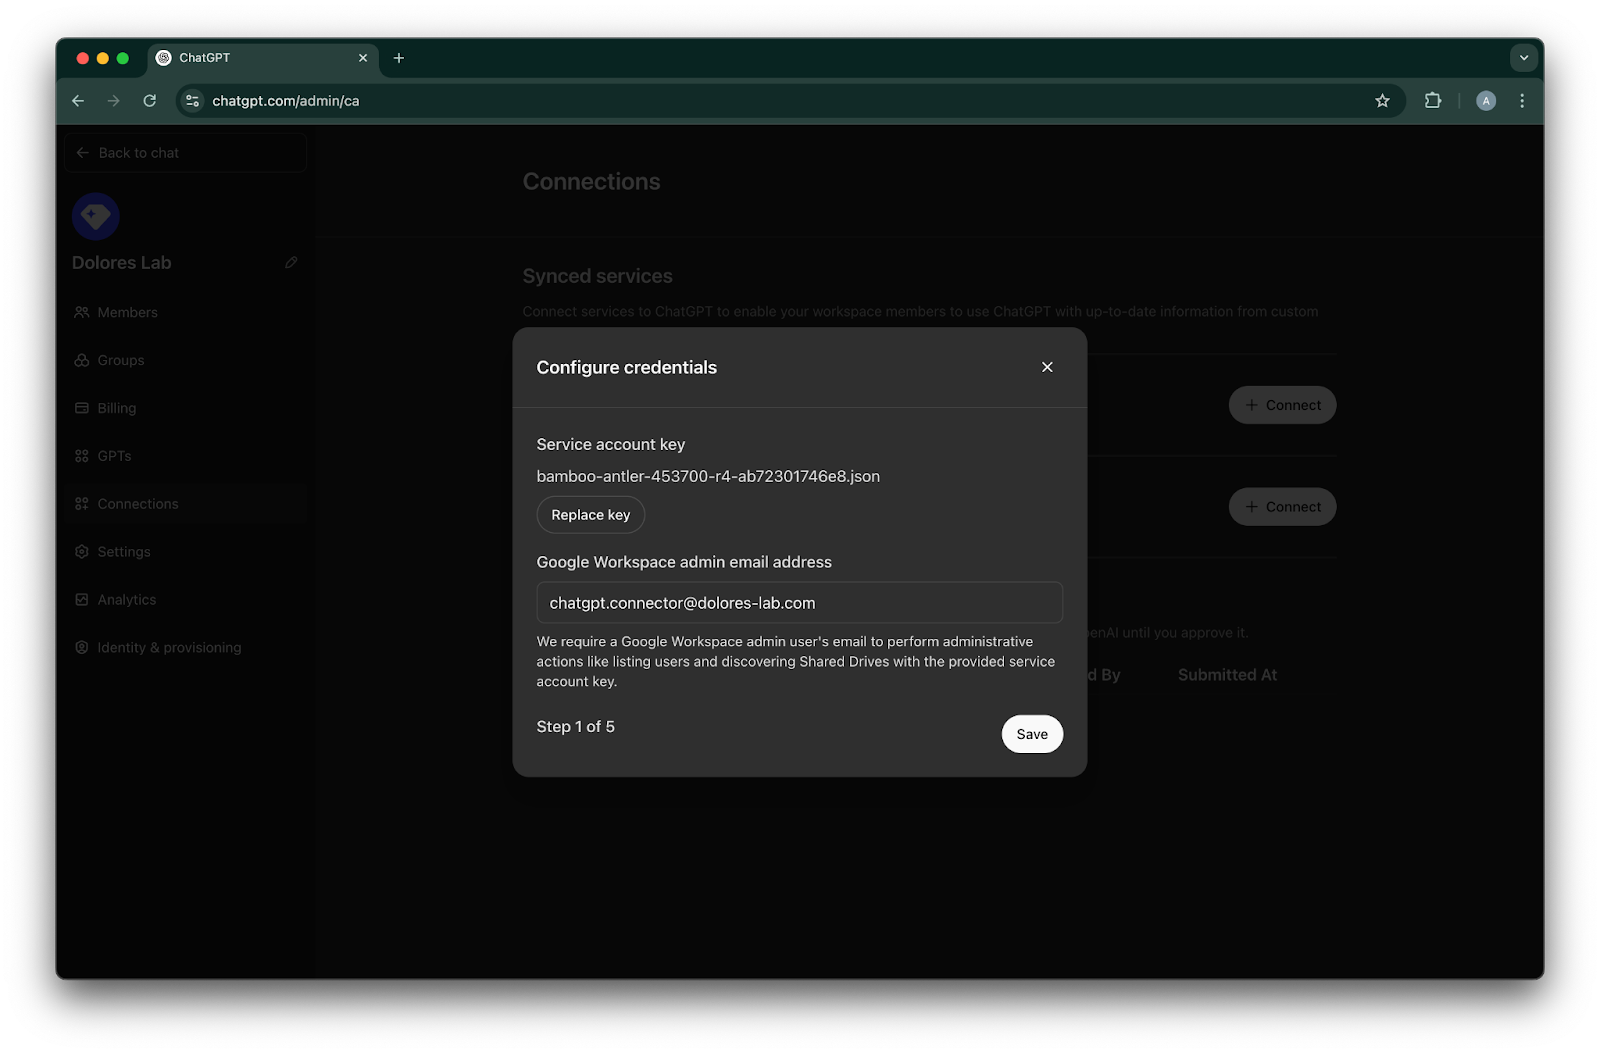
ಸೇವಾ ಖಾತೆಯ ಖಾಸಗಿ ಕೀಯನ್ನು ಅಪ್ಲೋಡ್ ಮಾಡಿ (Google ನಿಂದ ಬಂದ JSON ಫೈಲ್)
ನಿರ್ವಾಹಕ ಖಾತೆಯನ್ನು ನಿರ್ದಿಷ್ಟಪಡಿಸಿ (ರುಜುವಾತುಗಳು ಅಗತ್ಯವಿಲ್ಲ).
ಯಾವ ಫೈಲ್ಗಳನ್ನು ಸಿಂಕ್ ಮಾಡಬೇಕು ಎಂಬುದನ್ನು ಆಯ್ಕೆಮಾಡಿ ಮತ್ತು ಕನೆಕ್ಷನ್ಗೆ ಪ್ರವೇಶ ಹೊಂದುವ ಬಳಕೆದಾರರನ್ನು ಆರಿಸಿ.
ಈ ಮಾರ್ಗದರ್ಶಿ ಈ 6 ಹಂತಗಳ ಪ್ರತಿಯೊಂದರ ಮೂಲಕ ನಿಮ್ಮನ್ನು ನಡೆಸುತ್ತದೆ.
ಸೇವಾ ಖಾತೆ ಸೆಟಪ್ ಮಾಡುವುದು
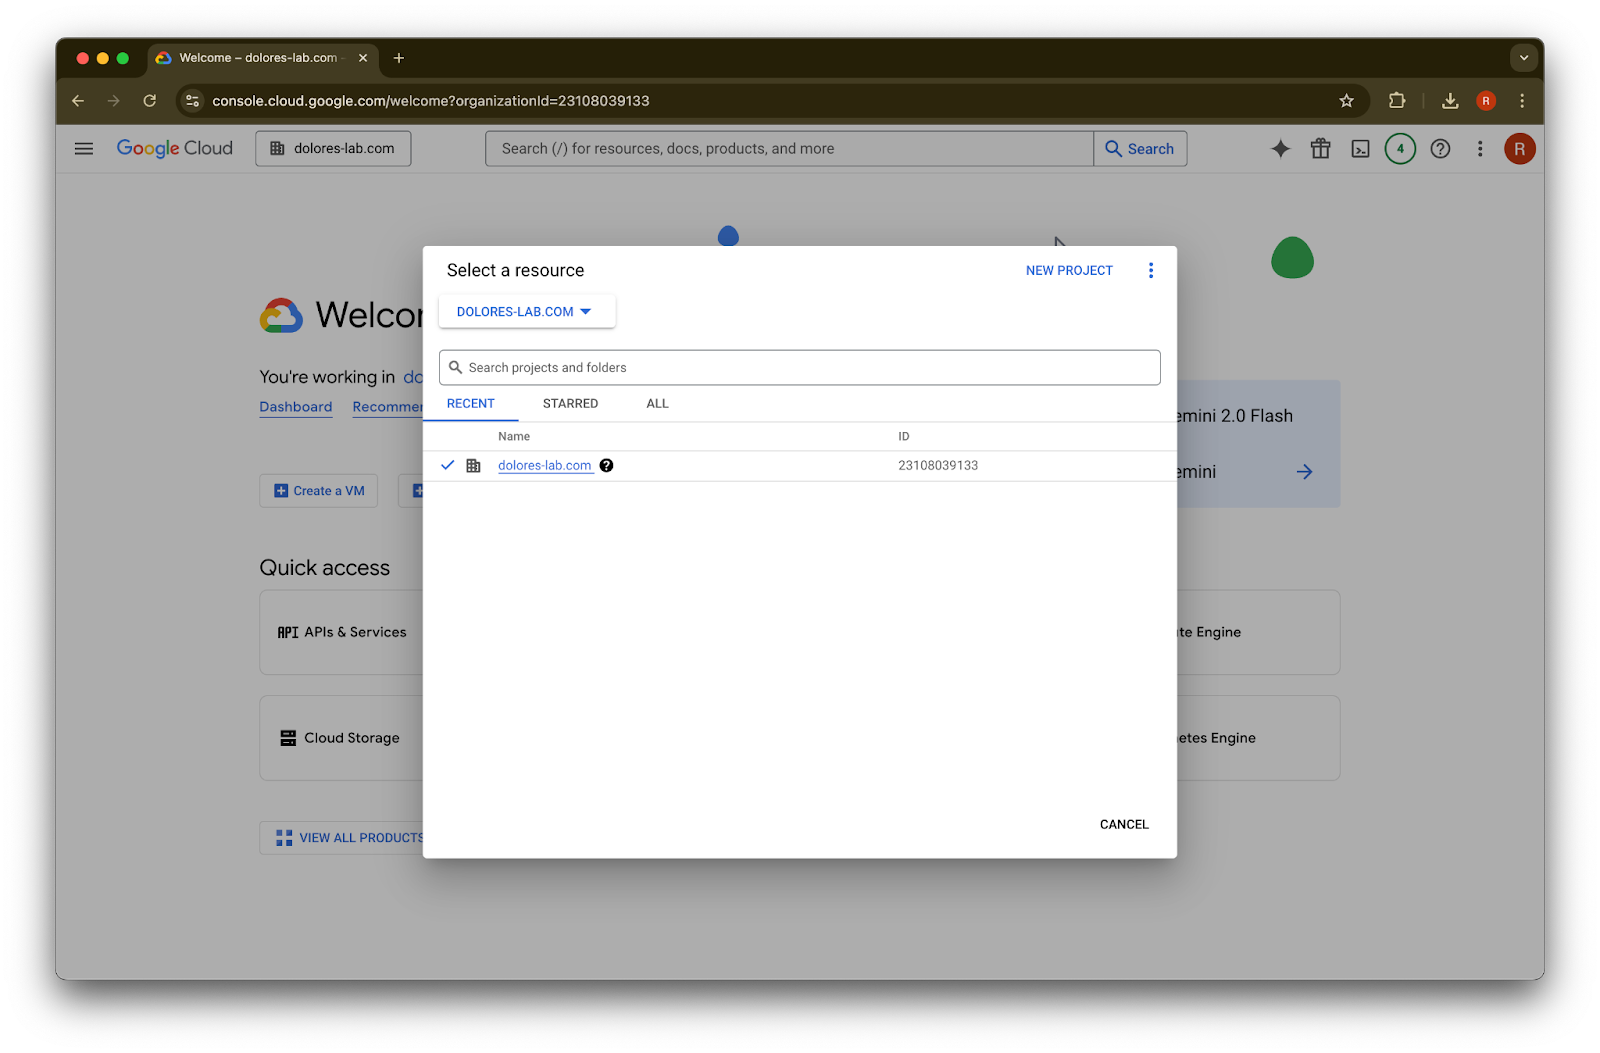
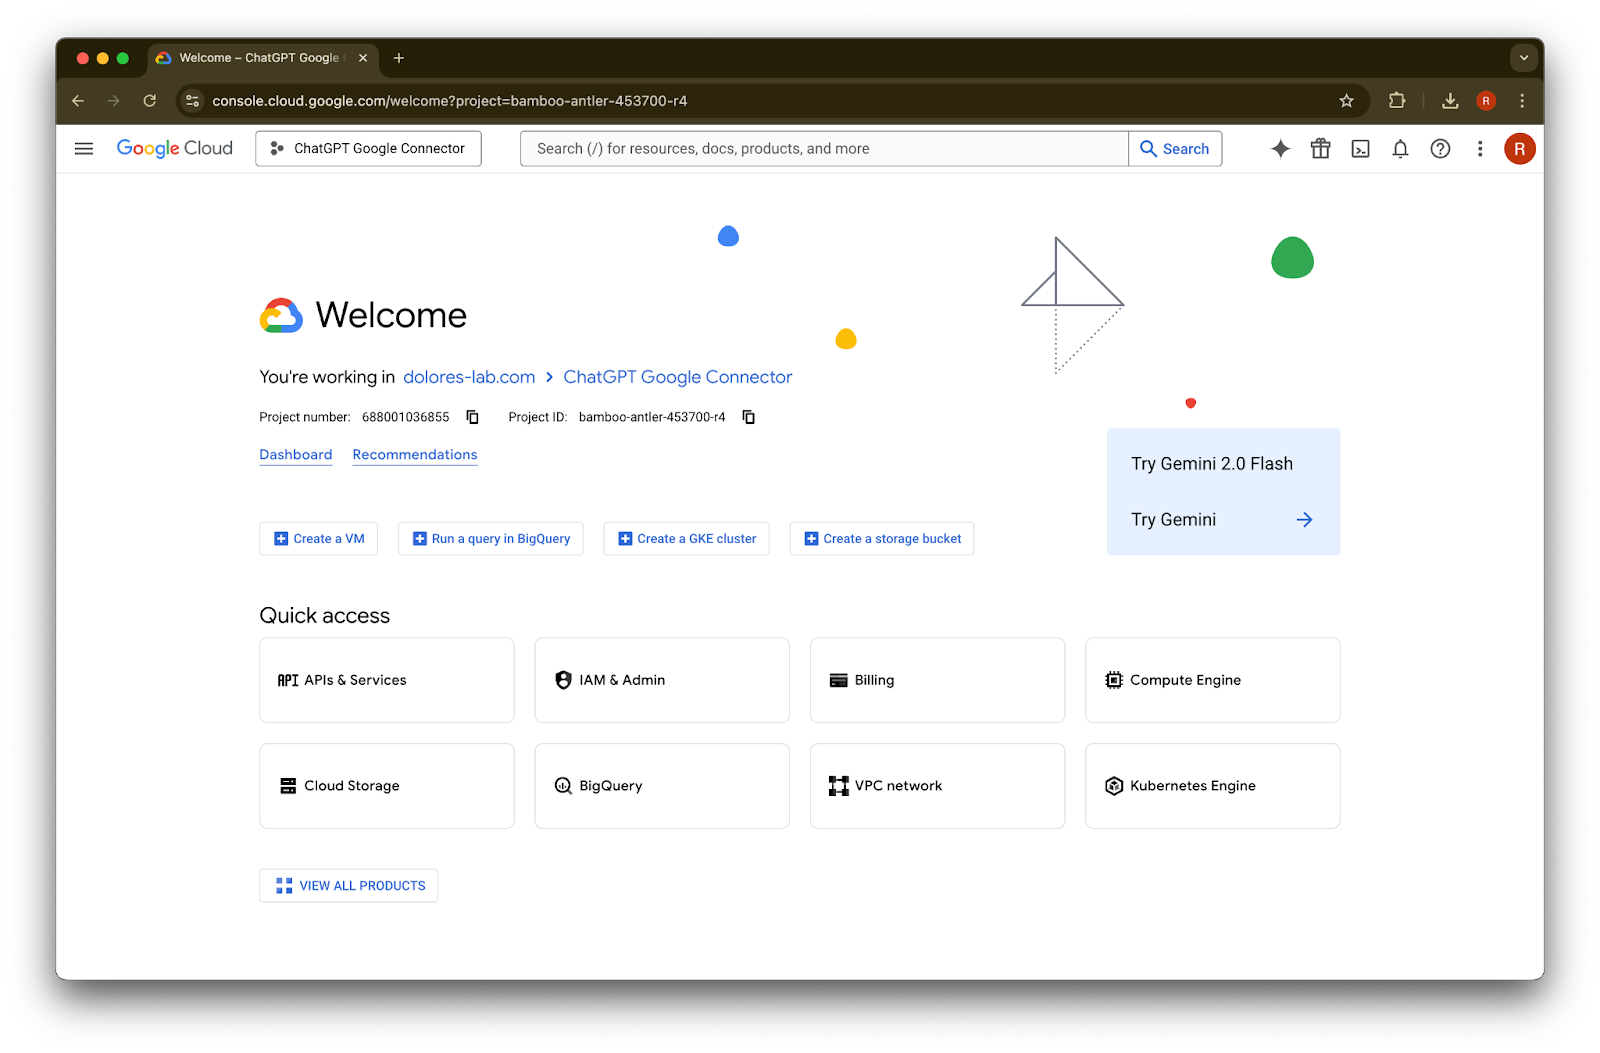
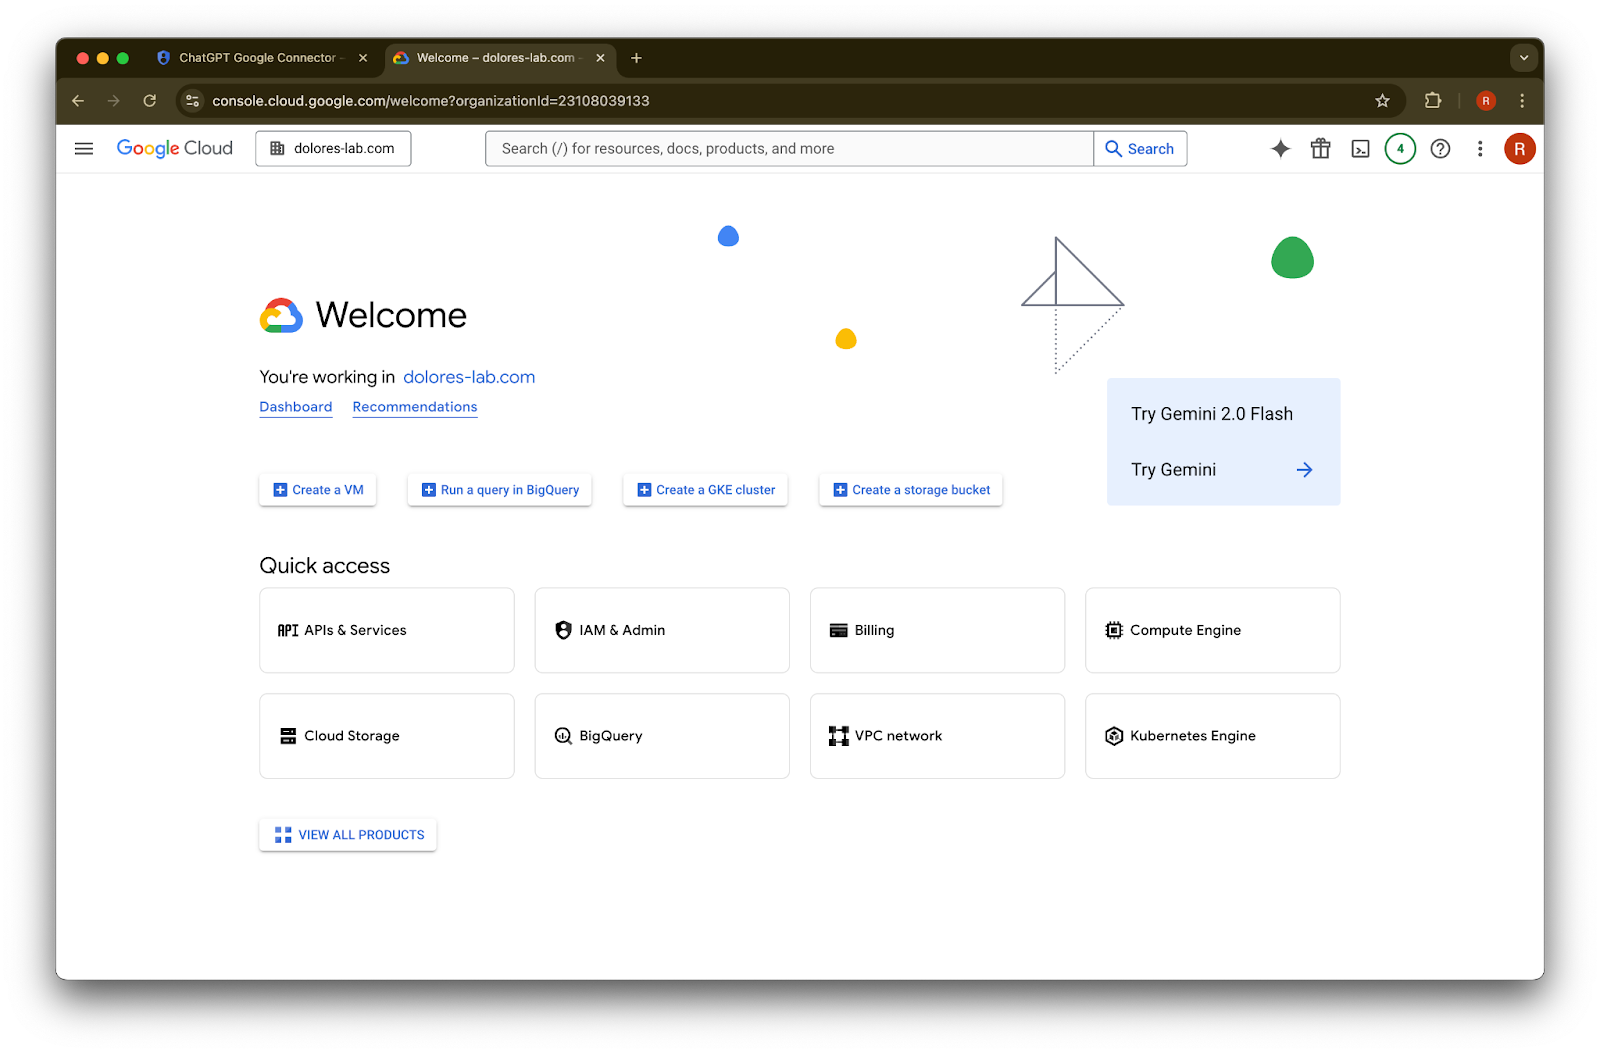
console.cloud.google.com ಗೆ ಹೋಗಿ.
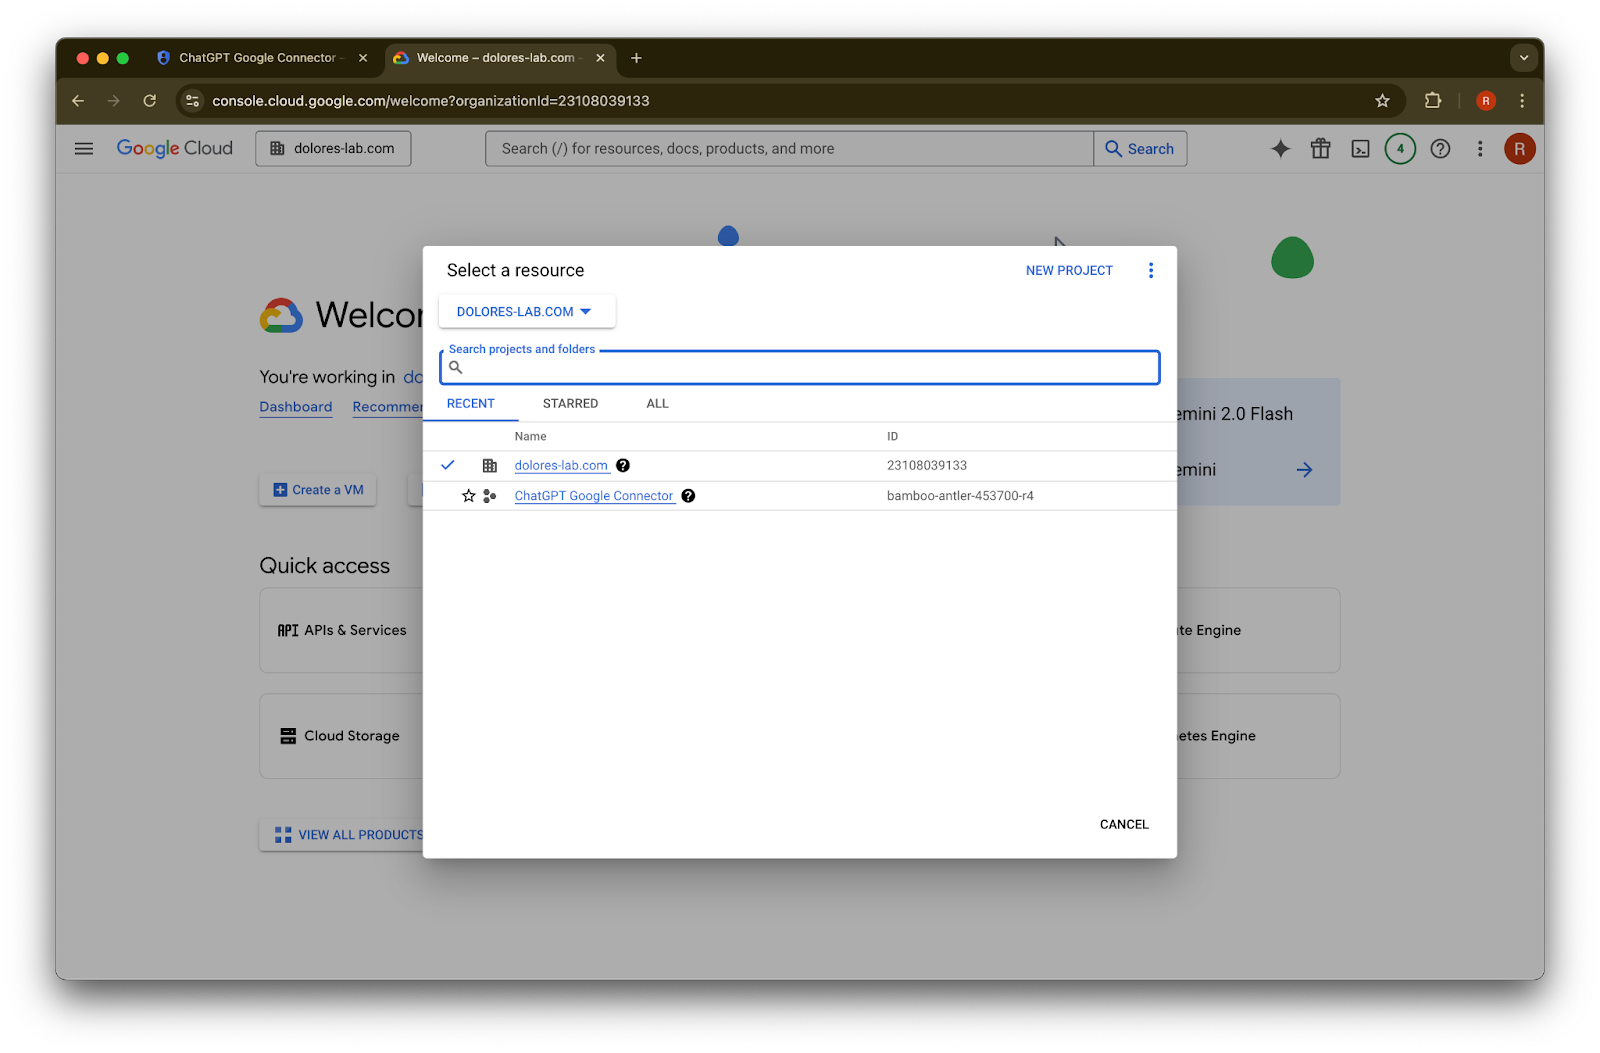
ಪ್ರಾಜೆಕ್ಟ್ಗಳ ಡ್ರಾಪ್ಡೌನ್ ಮೇಲೆ ಕ್ಲಿಕ್ ಮಾಡಿ.Imageನಿಮ್ಮ ChatGPT ವರ್ಕ್ಸ್ಪೇಸ್ಗೆ ಸಂಬಂಧಿಸಿದ ಅದೇ Google workspace ಗೆ ನೀವು ಲಾಗಿನ್ ಆಗಿರುವುದನ್ನು ಖಚಿತಪಡಿಸಿ (ನಿಮ್ಮ ChatGPT ವರ್ಕ್ಸ್ಪೇಸ್ಗೆ ಸಂಬಂಧಿಸಿದ Google workspace ಇಲ್ಲದಿದ್ದರೆ ಮತ್ತು ಎರಡರ ನಡುವೆ ಇಮೇಲ್ಗಳು ಬೇರೆಬೇರೆ ಇದ್ದರೆ, ನೀವು ಹೆಚ್ಚುವರಿ ಹಂತಗಳನ್ನು ಅನುಸರಿಸಬೇಕು, ಇಲ್ಲವಾದರೆ ನಿಮ್ಮ ಬಳಕೆದಾರರು Google Drive synced connectors ಅನ್ನು ಬಳಸಲು ಸಾಧ್ಯವಾಗದೇ ಇರಬಹುದು).
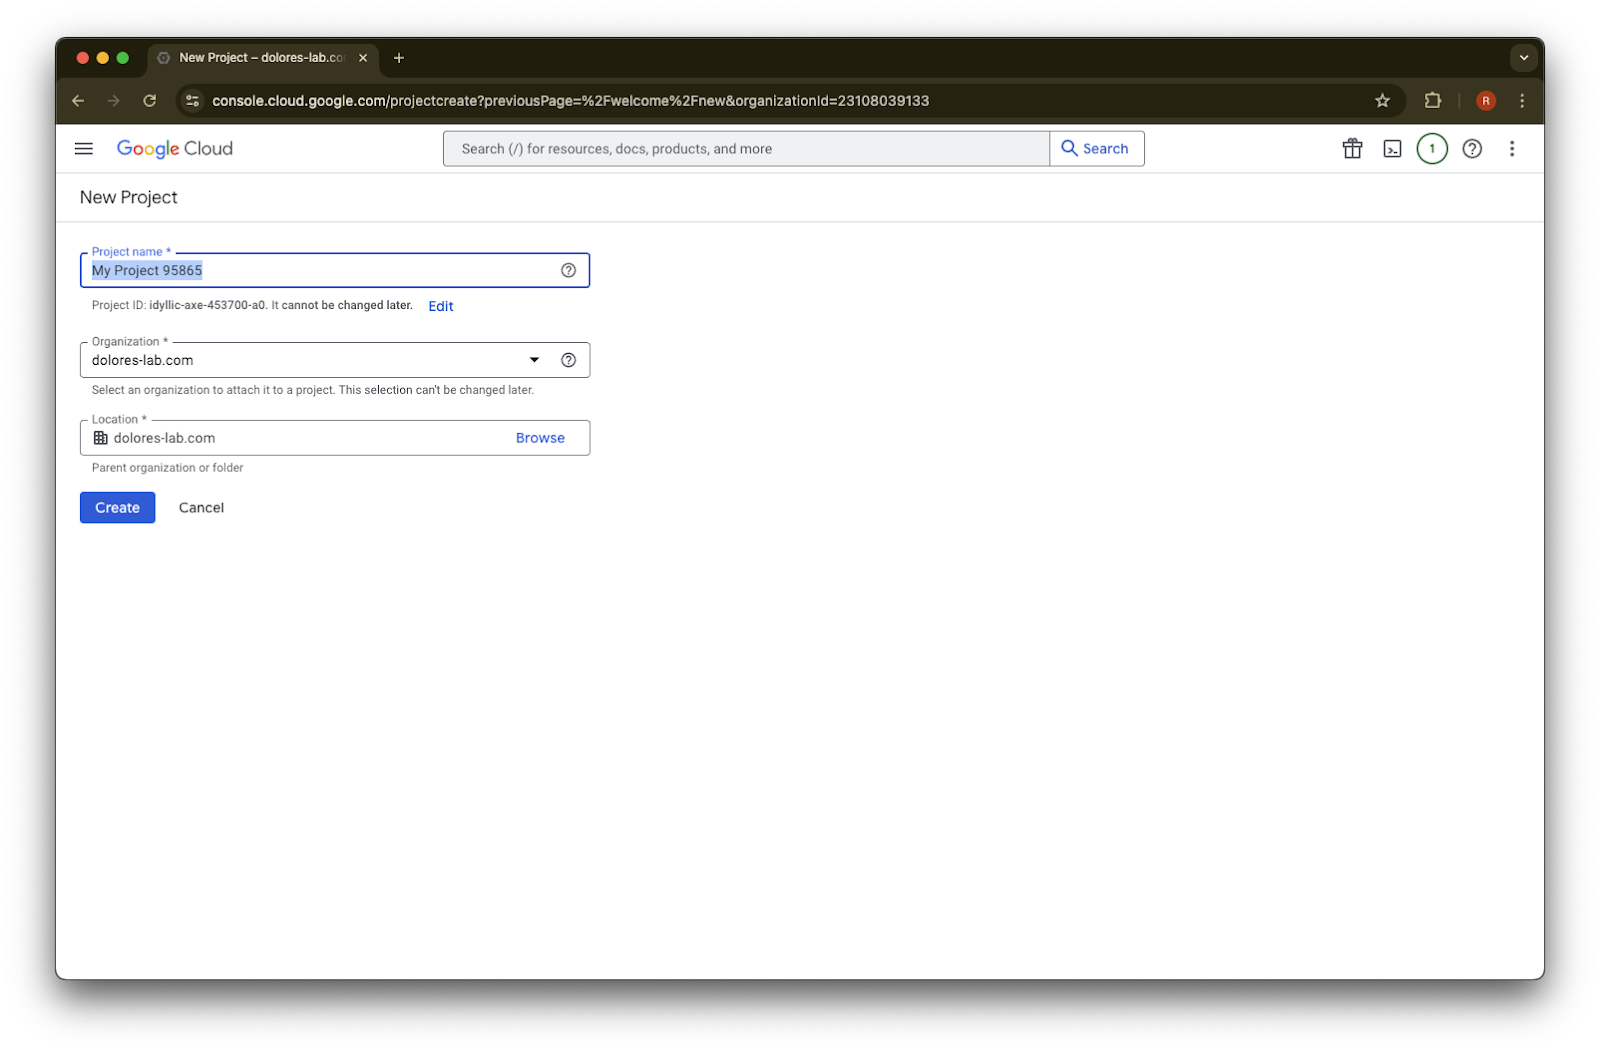
New Project ಆಯ್ಕೆಮಾಡಿ
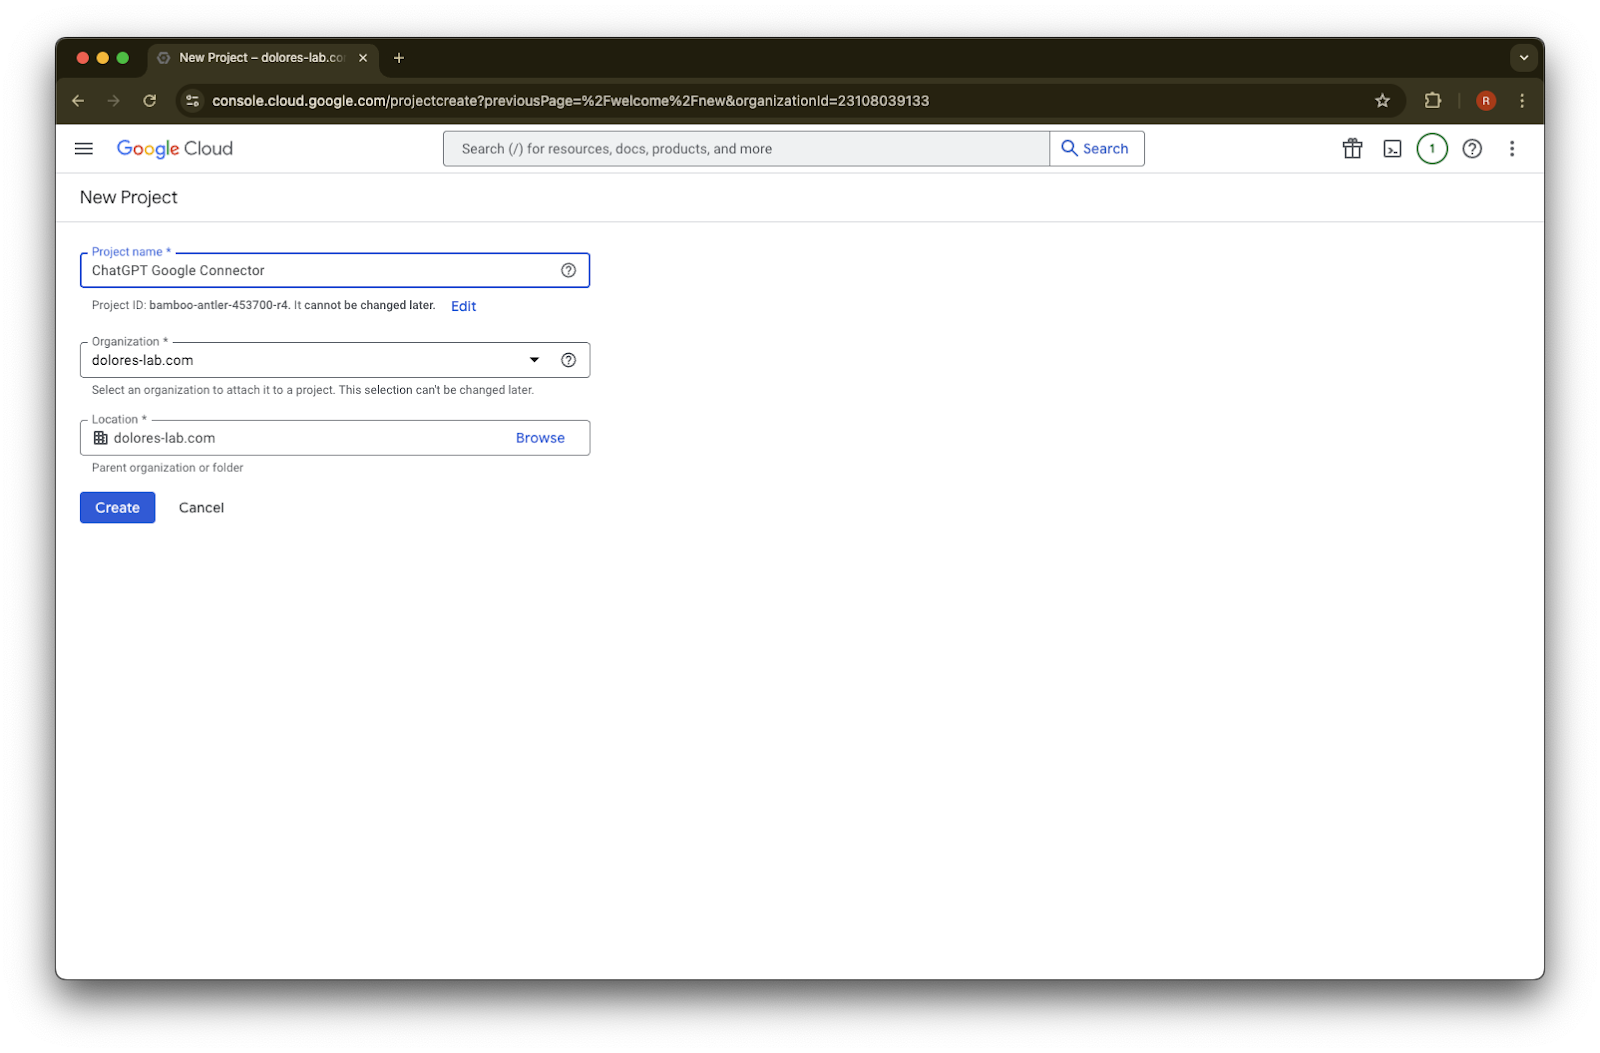
Project Name ನಮೂದಿಸಿ
ಪ್ರಾಜೆಕ್ಟ್ ರಚಿಸಿ
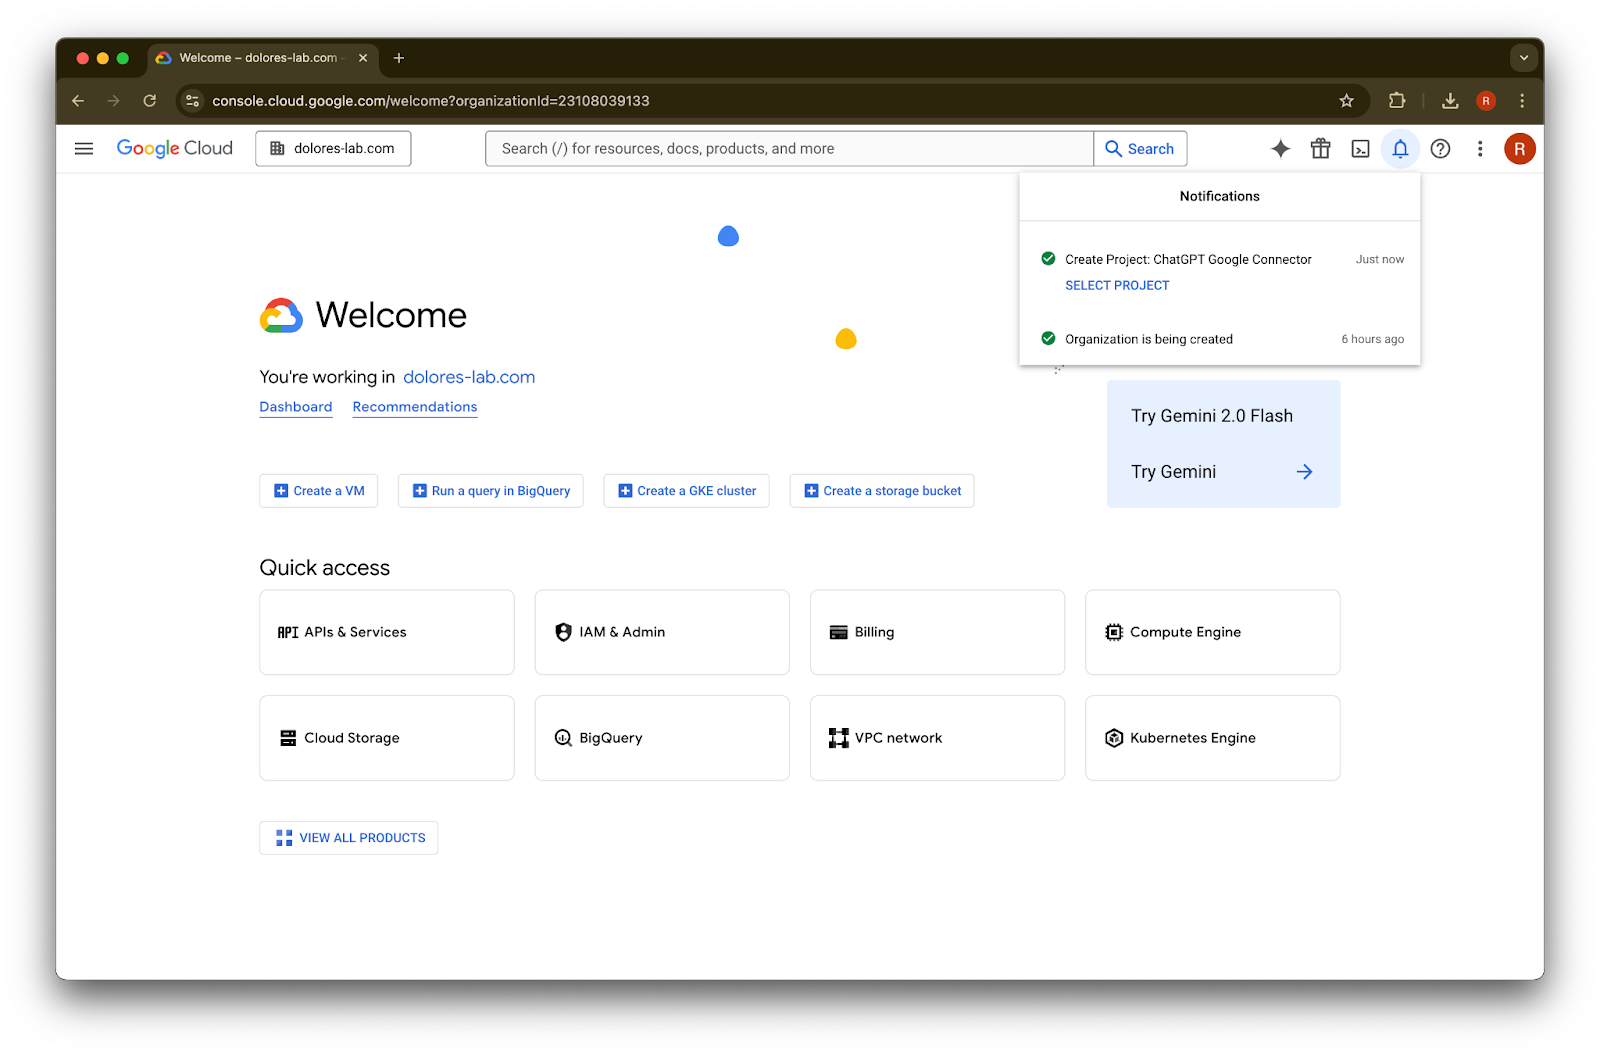
ಪ್ರಾಜೆಕ್ಟ್ ರಚನೆಯಾಗುವವರೆಗೆ ಕಾಯಿರಿ, ನಂತರ Select Project ಮೇಲೆ ಕ್ಲಿಕ್ ಮಾಡಿ
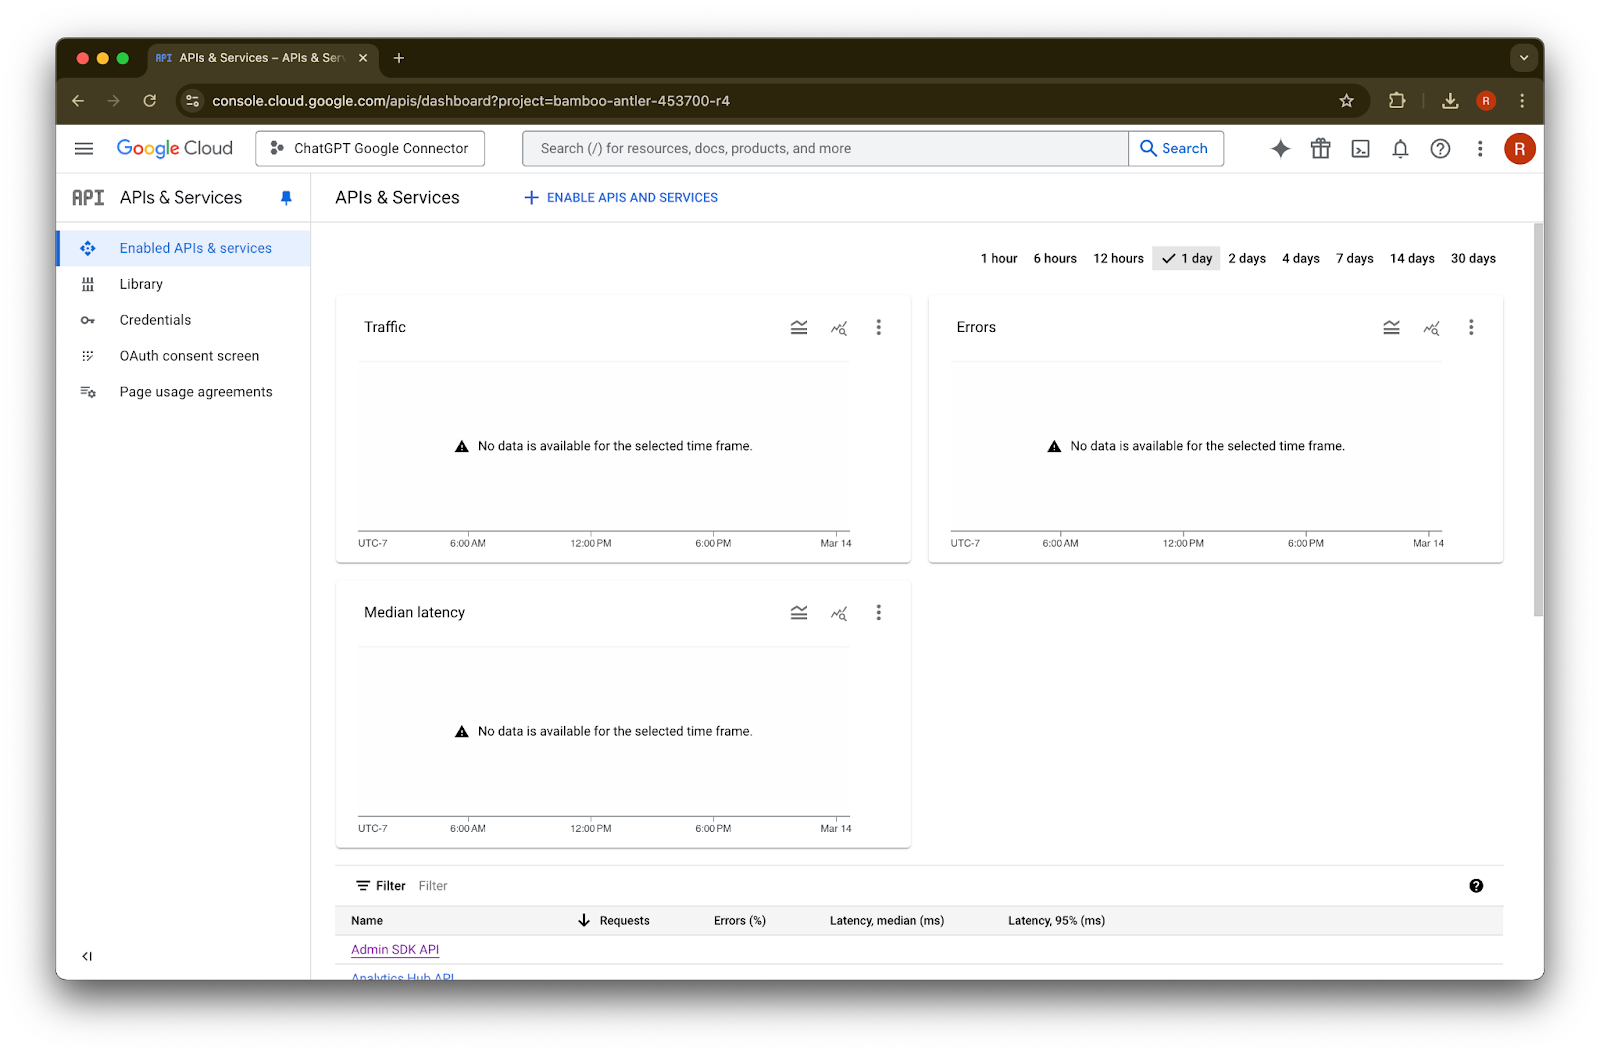
APIs & Services ಮೇಲೆ ಕ್ಲಿಕ್ ಮಾಡಿ
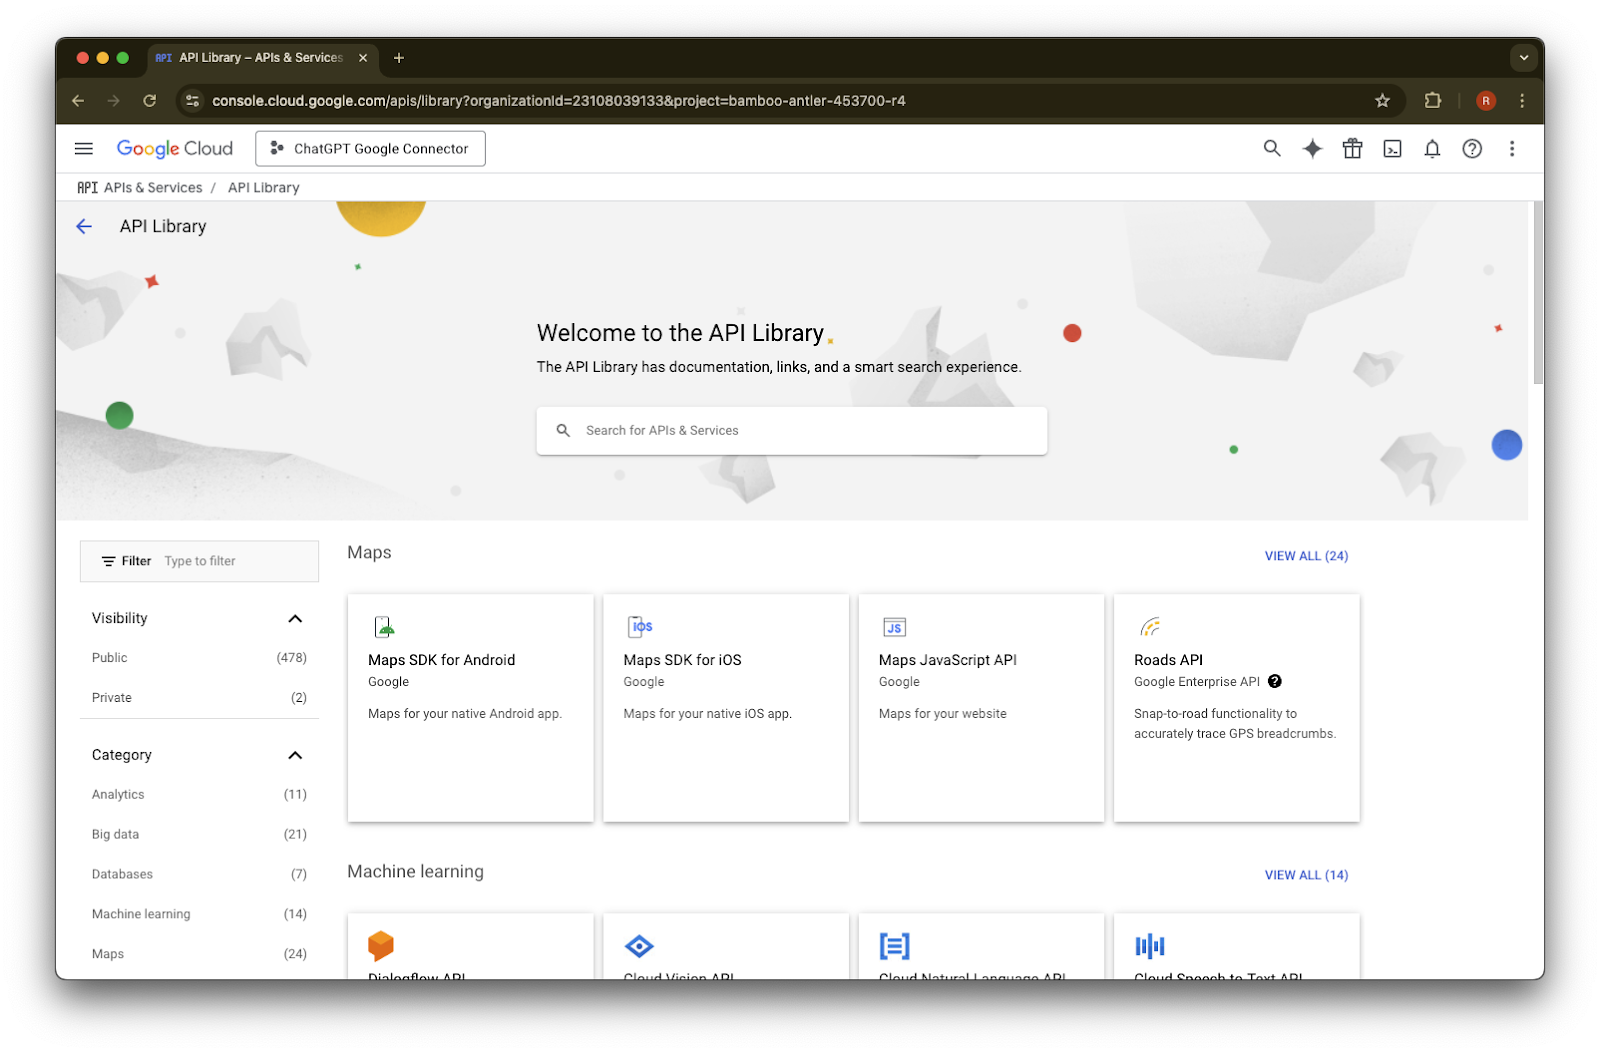
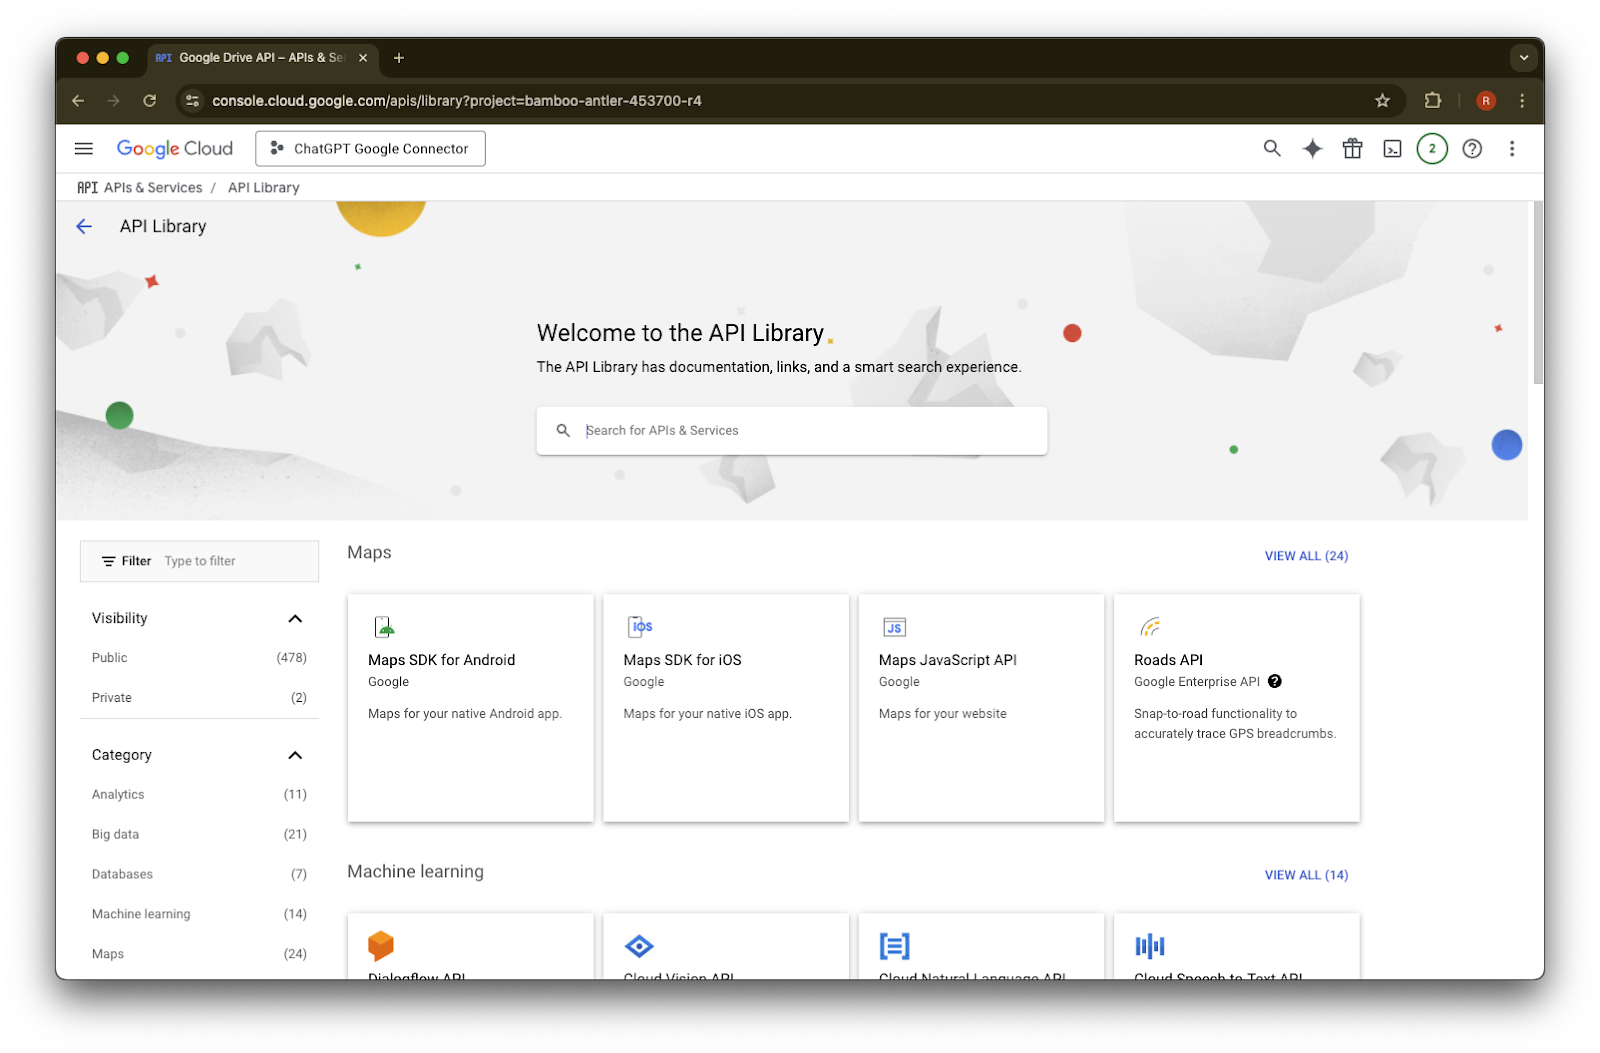
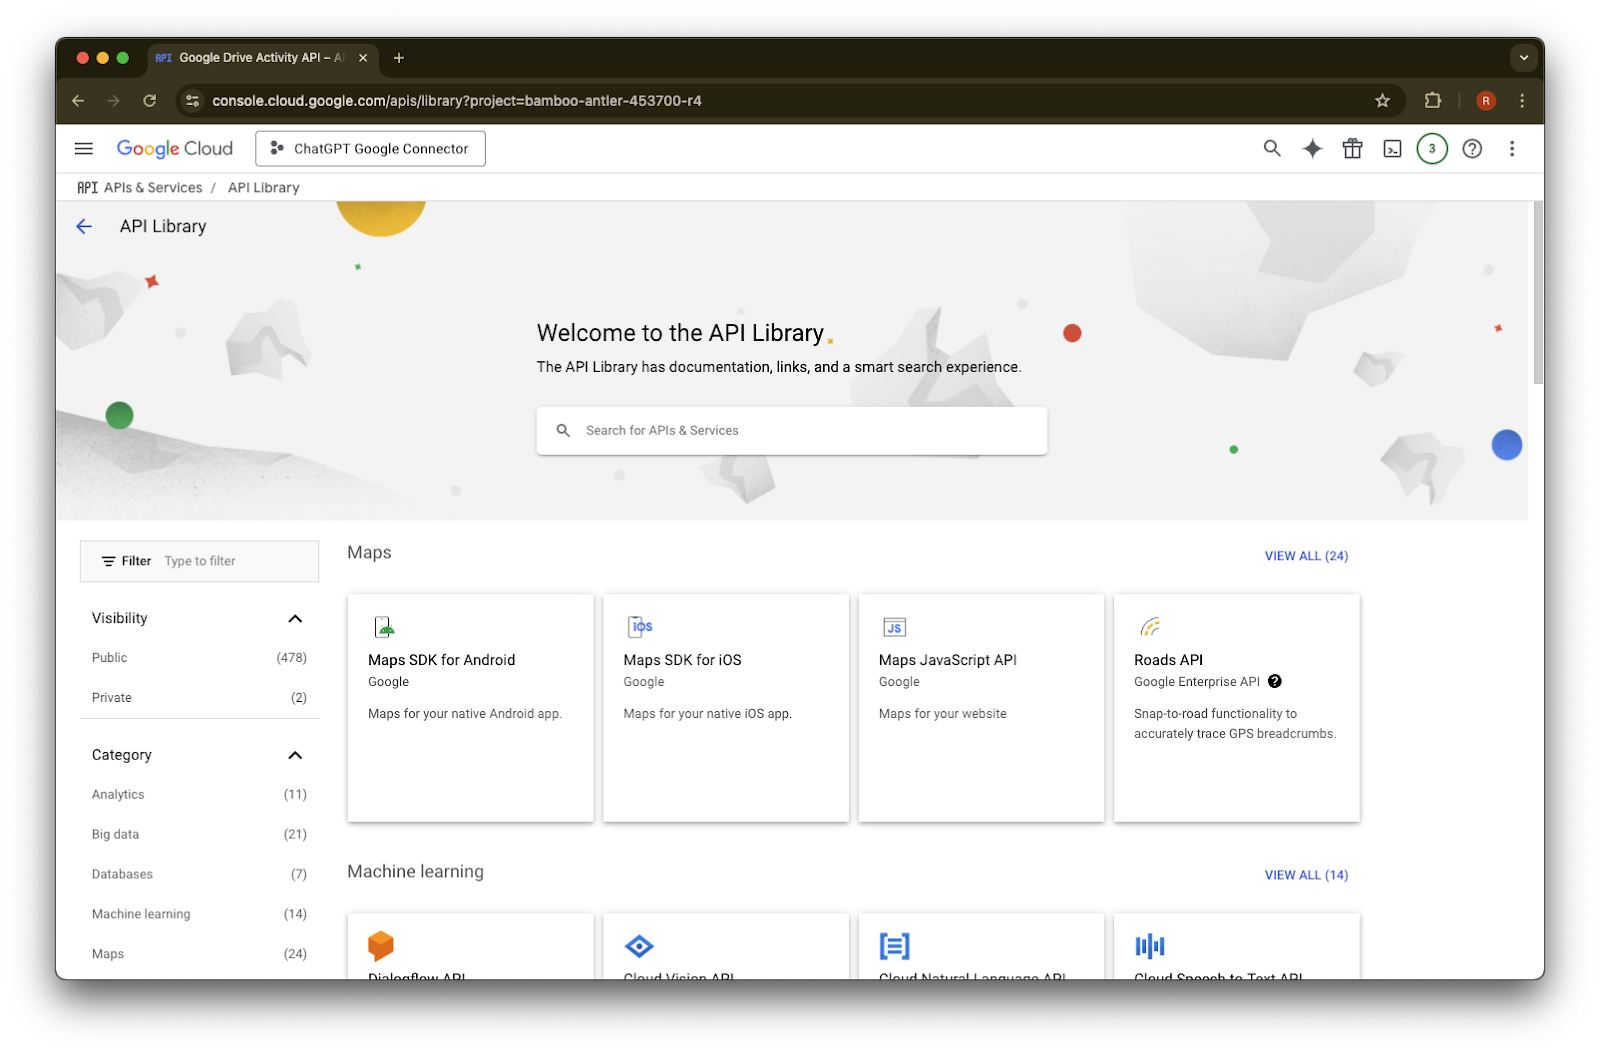
Library ಮೇಲೆ ಕ್ಲಿಕ್ ಮಾಡಿ
ಈಗ ನಾವು ಮೂರು APIಗಳನ್ನು ಸೇರಿಸಲಿದ್ದೇವೆ, ಅವನ್ನು ಕಂಡುಹಿಡಿಯಲು search box ಅನ್ನು ಬಳಸುತ್ತೇವೆ
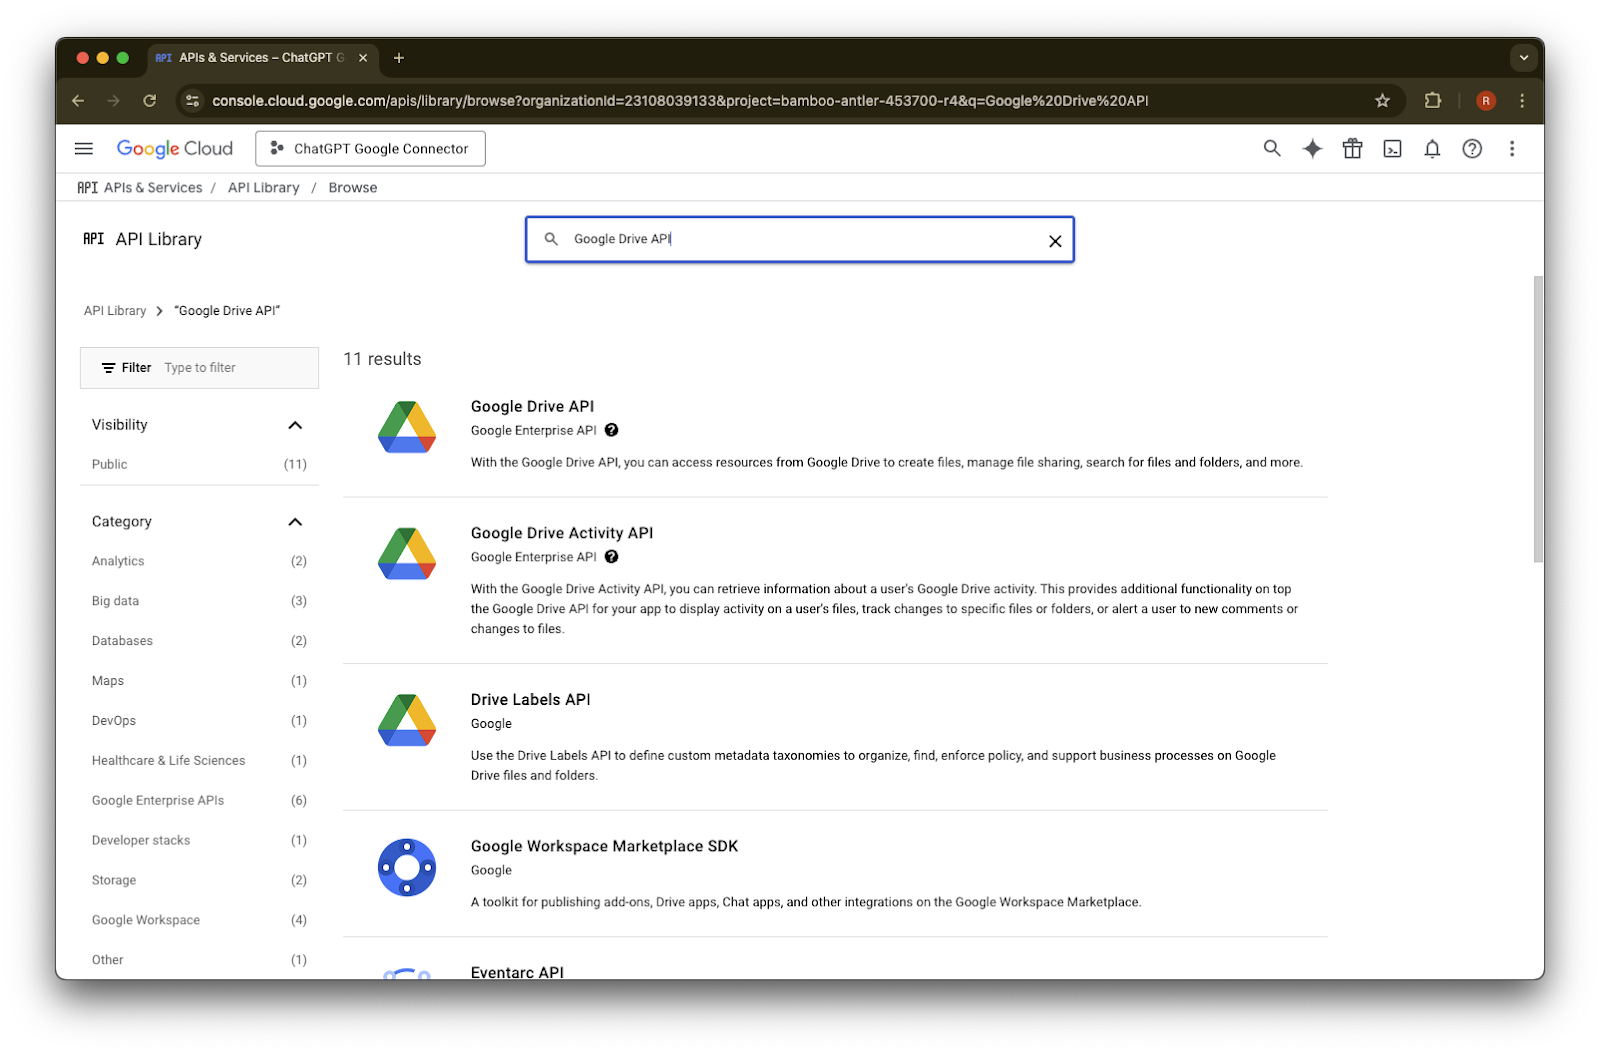
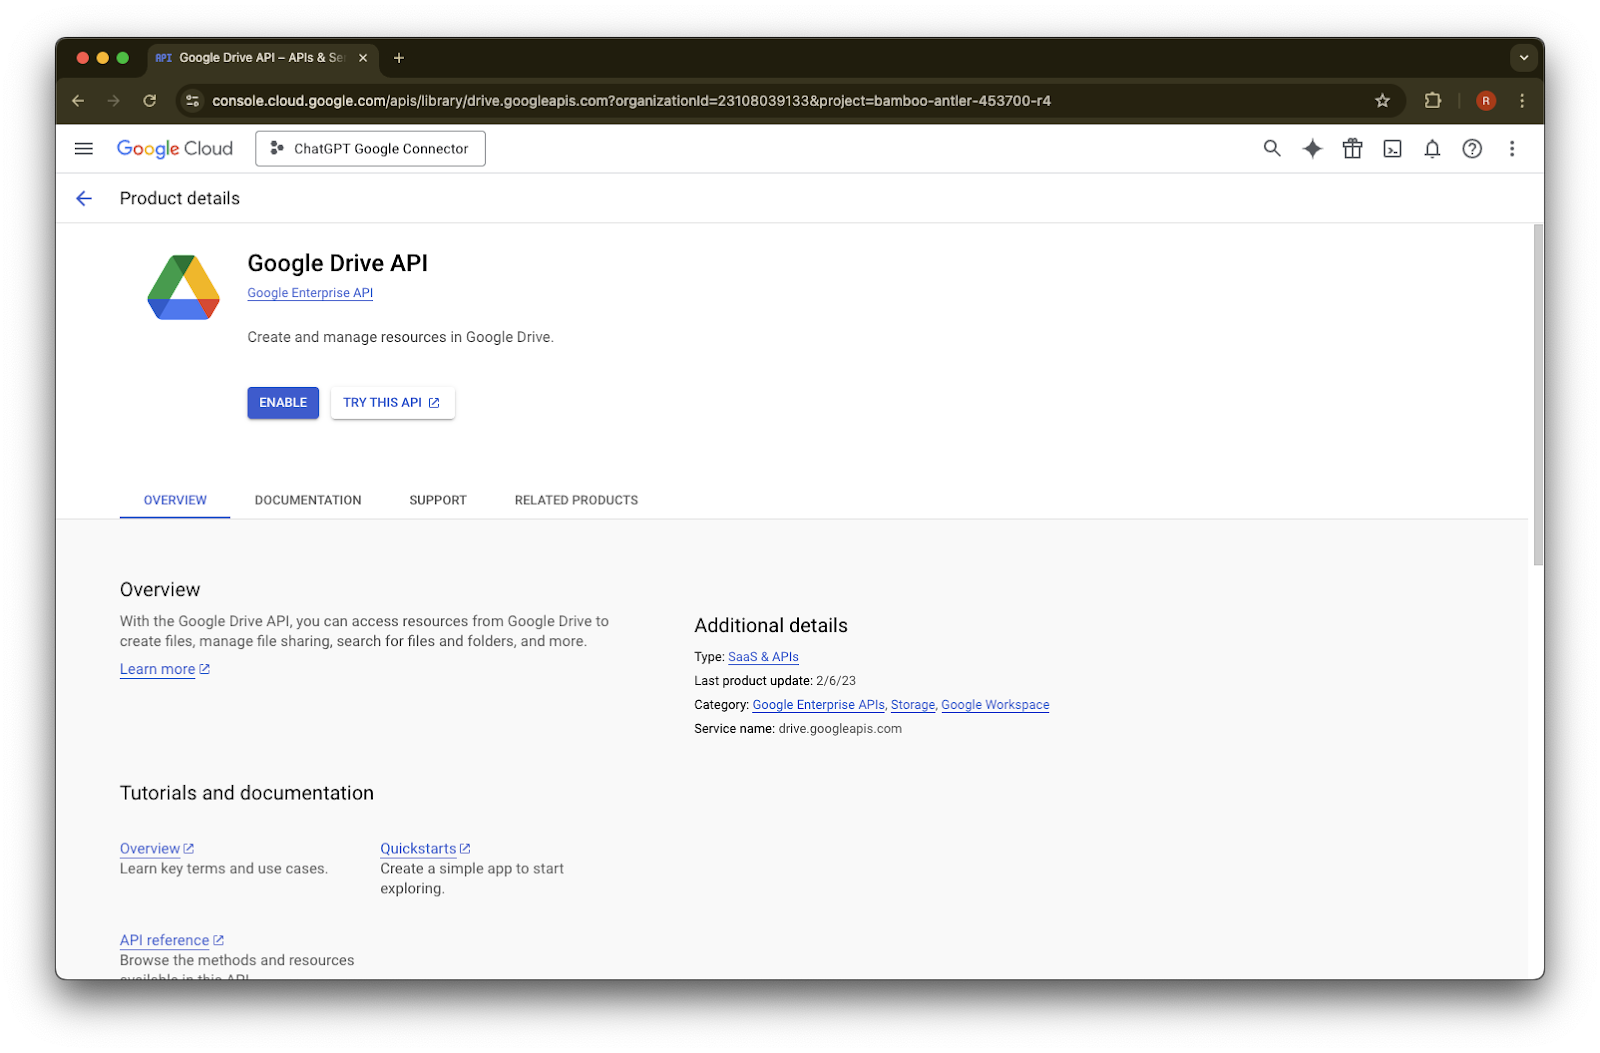
ಹುಡುಕಿ Google Drive API ಆಯ್ಕೆಮಾಡಿ
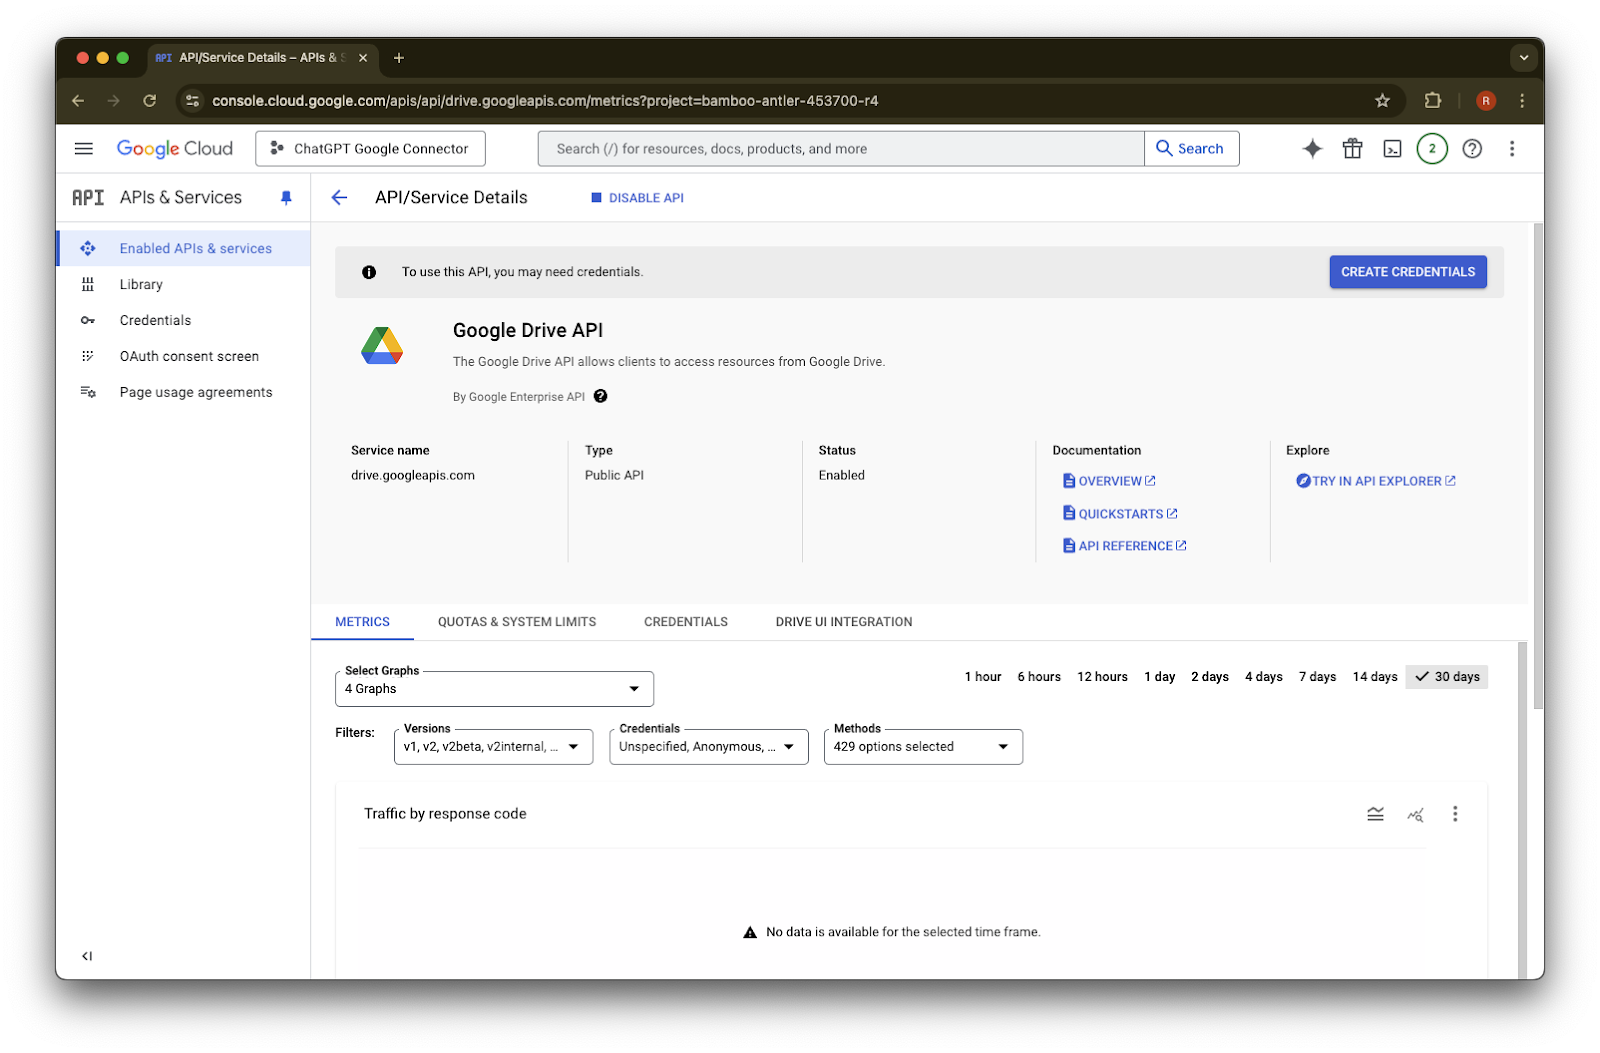
Enable ಮೇಲೆ ಕ್ಲಿಕ್ ಮಾಡಿ
Library ಮೇಲೆ ಕ್ಲಿಕ್ ಮಾಡಿ
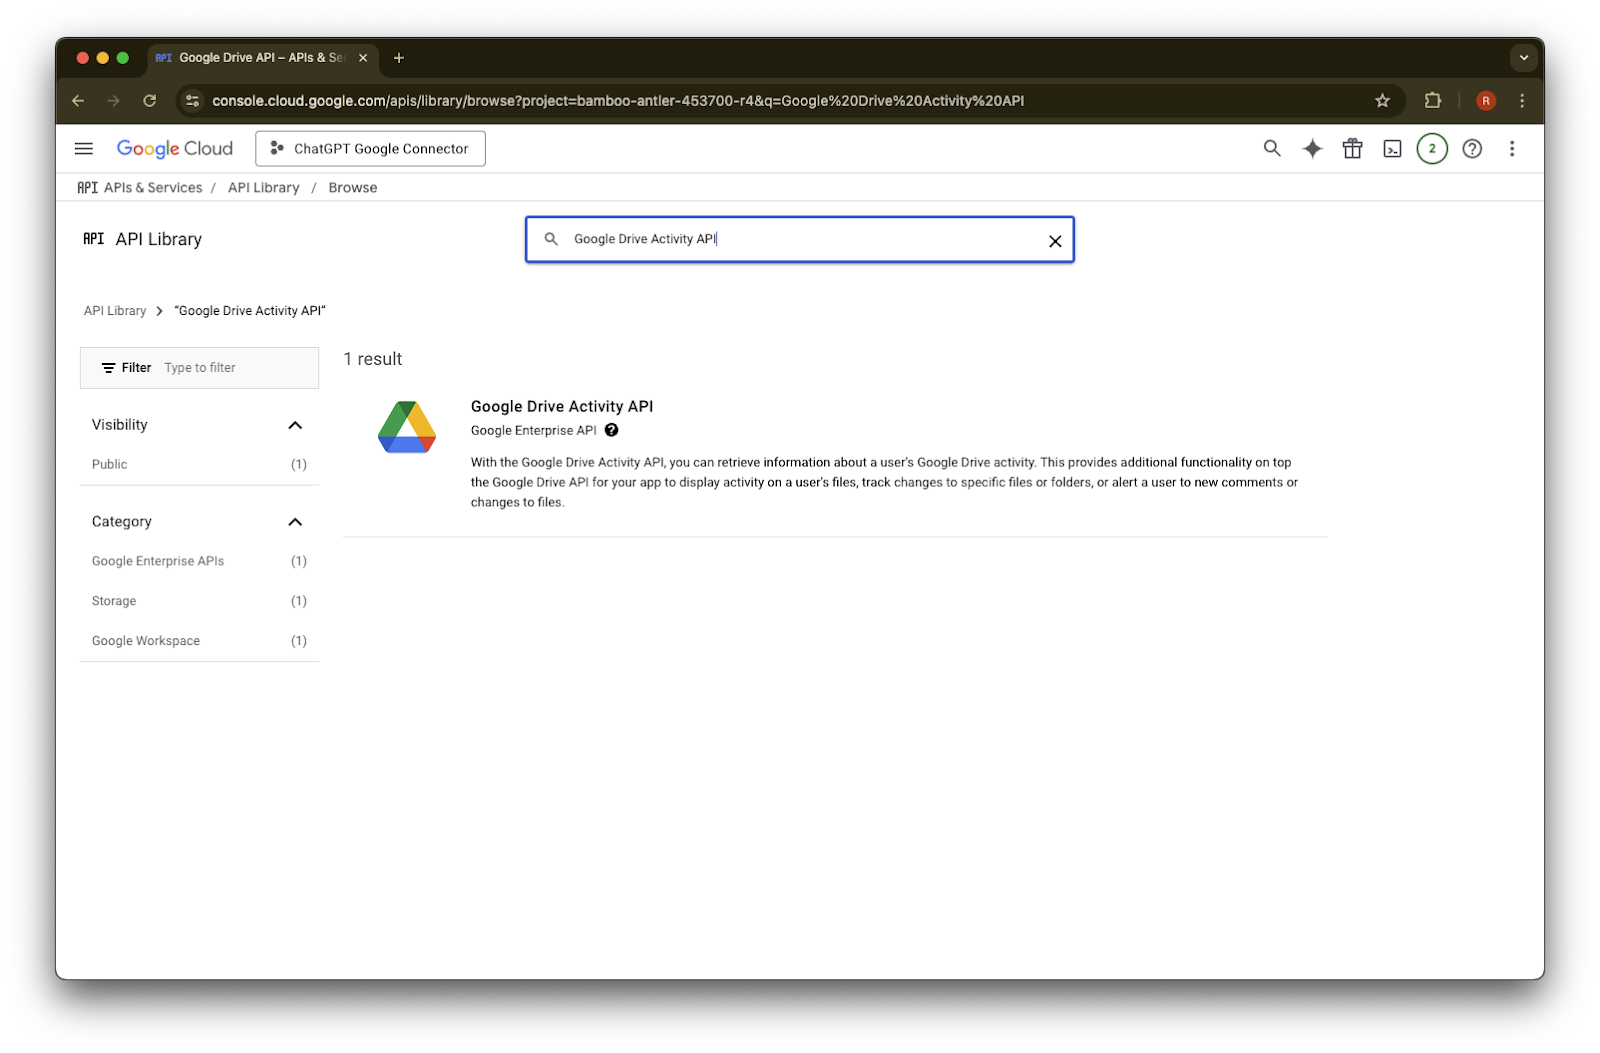
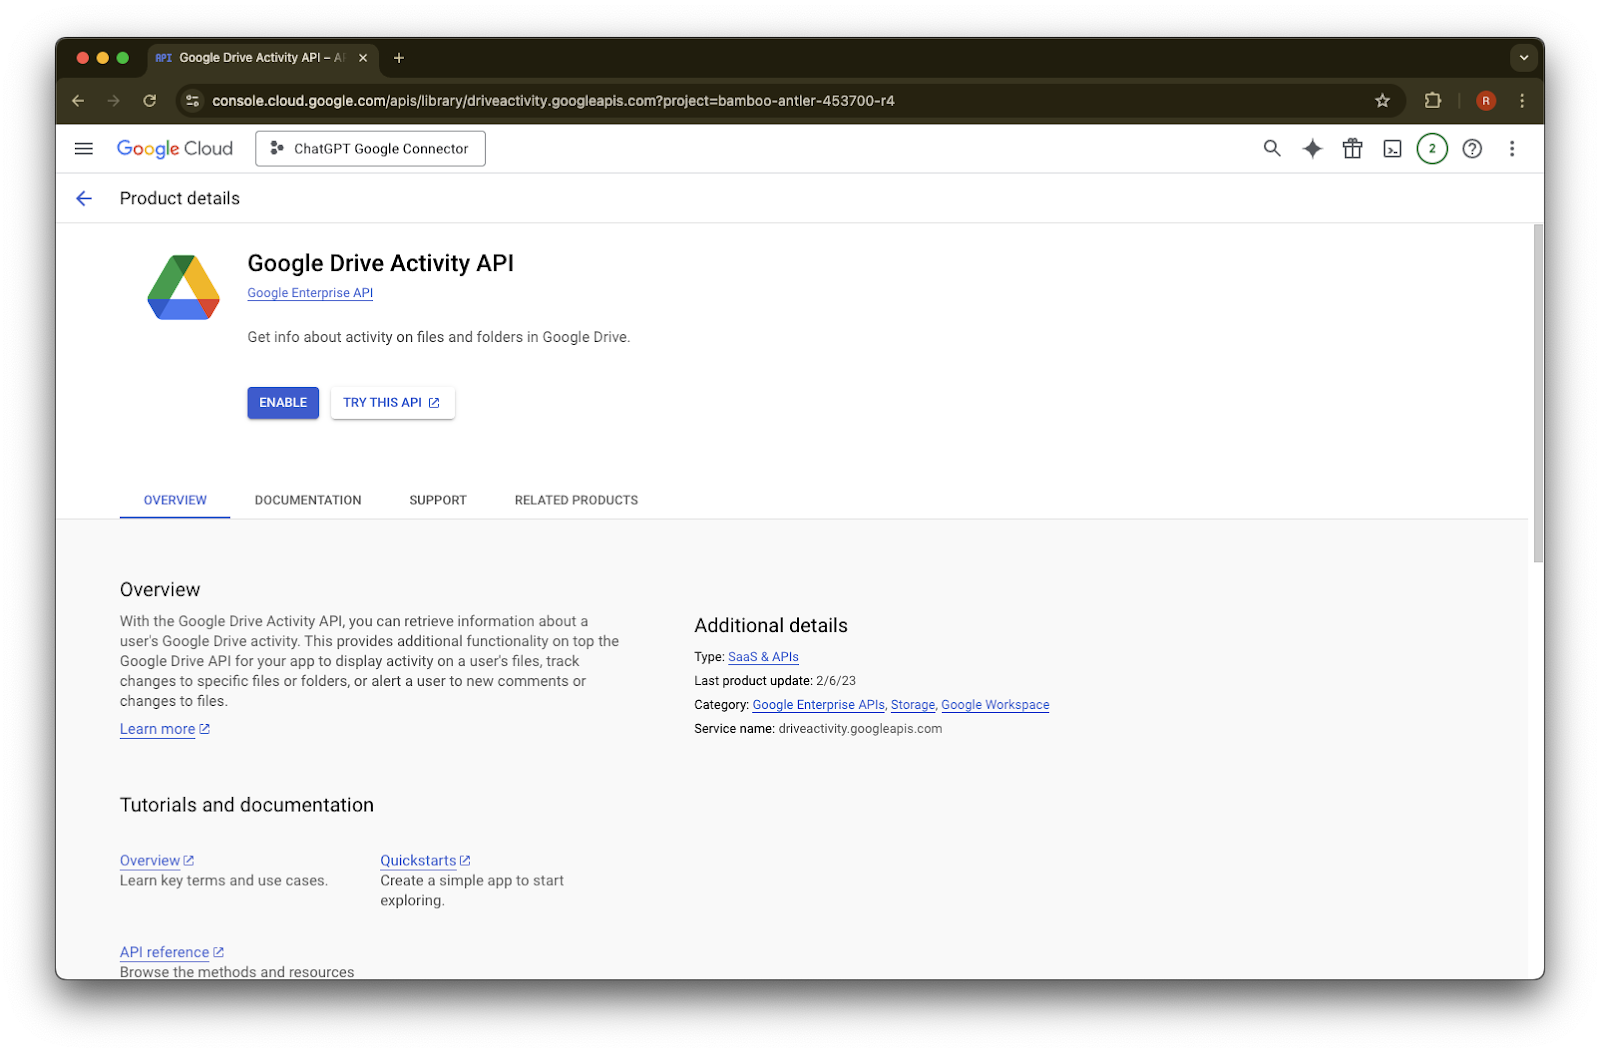
Google Drive Activity ಅನ್ನು ಹುಡುಕಿ
Google Drive Activity API ಆಯ್ಕೆಮಾಡಿ
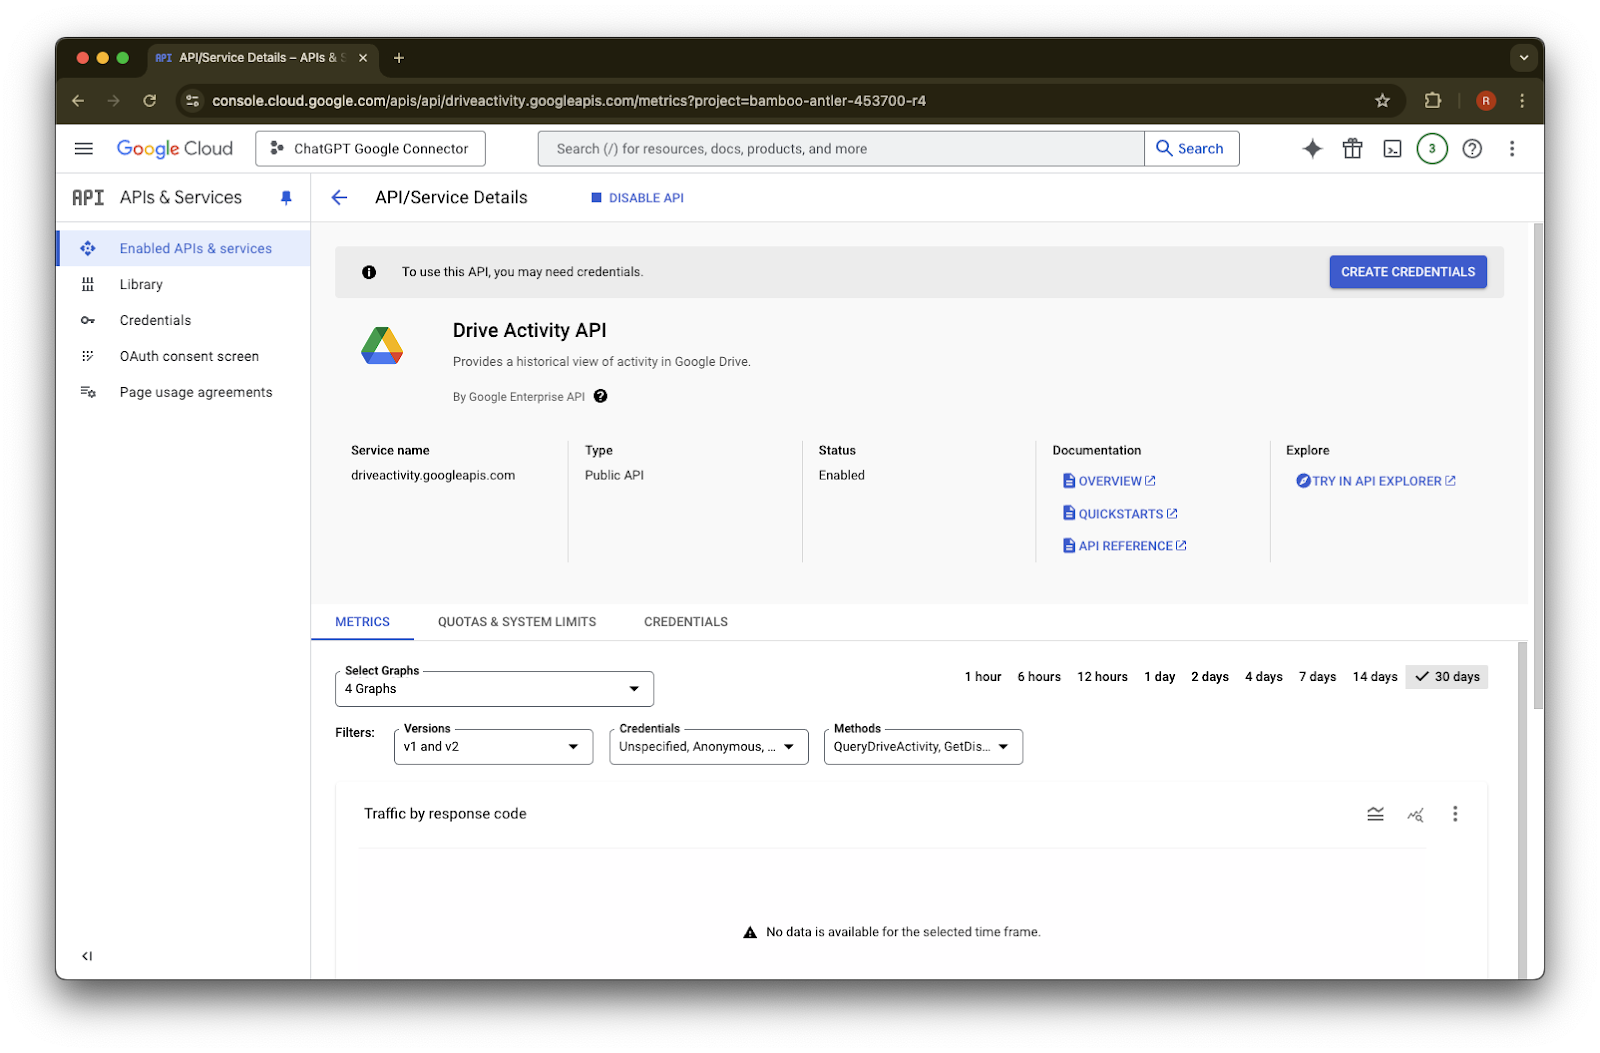
Enable ಮೇಲೆ ಕ್ಲಿಕ್ ಮಾಡಿ
Library ಮೇಲೆ ಕ್ಲಿಕ್ ಮಾಡಿ
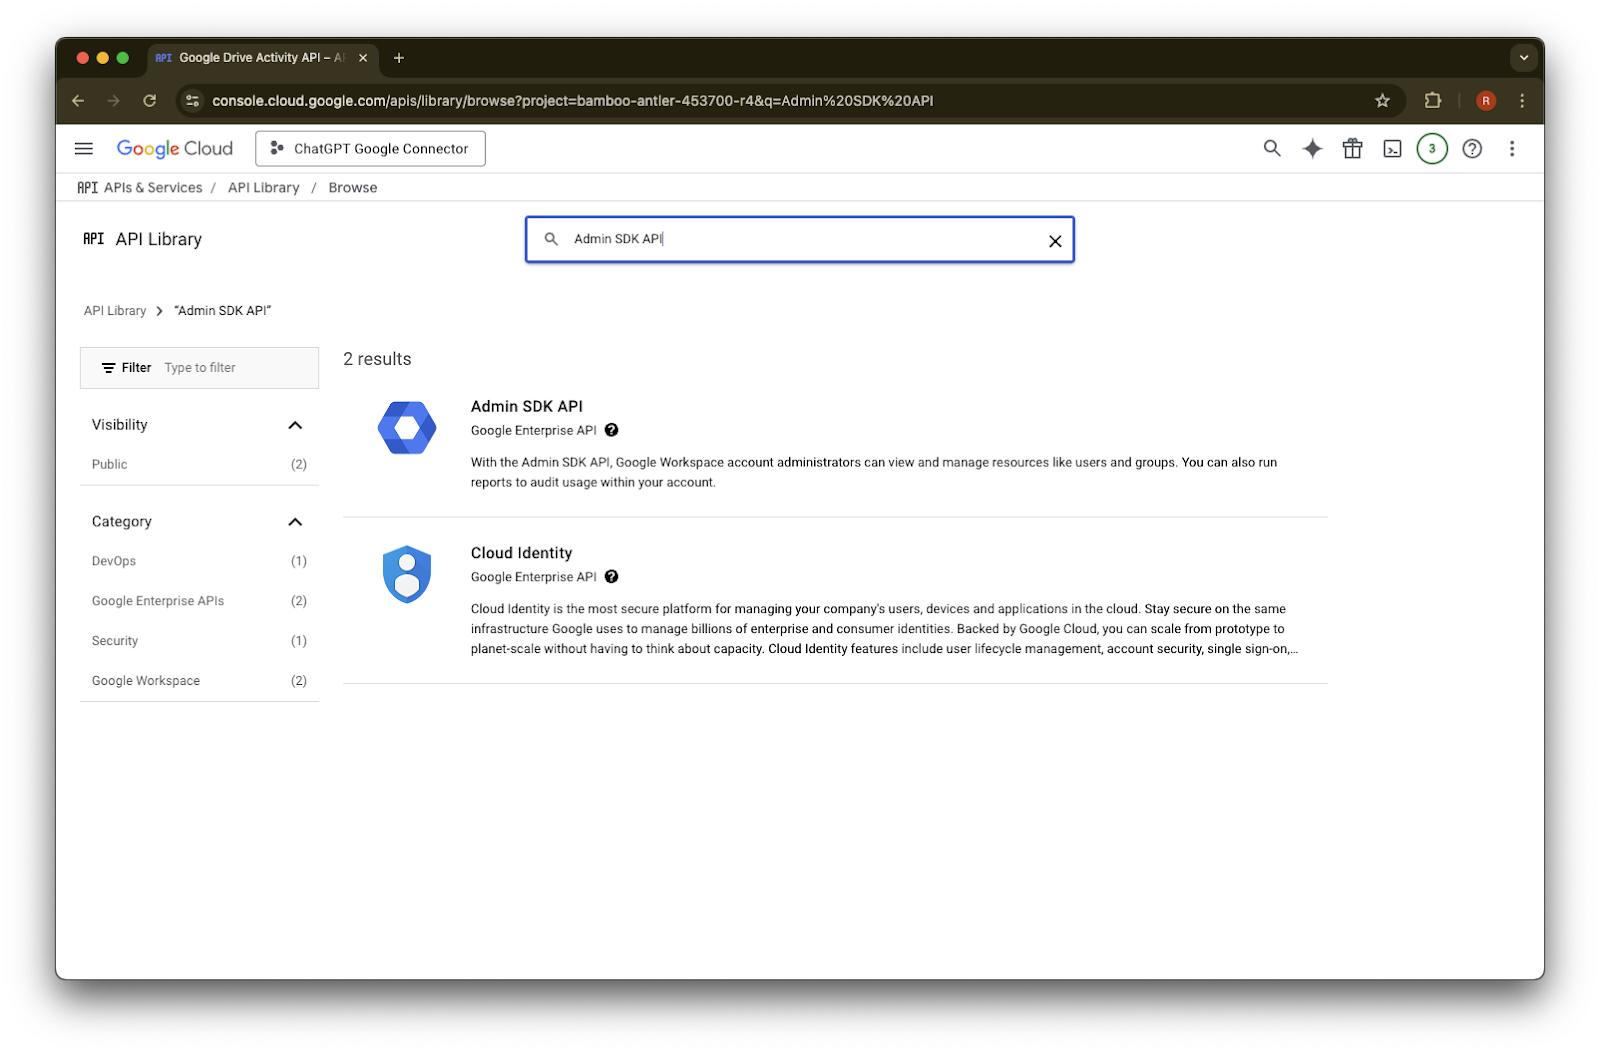
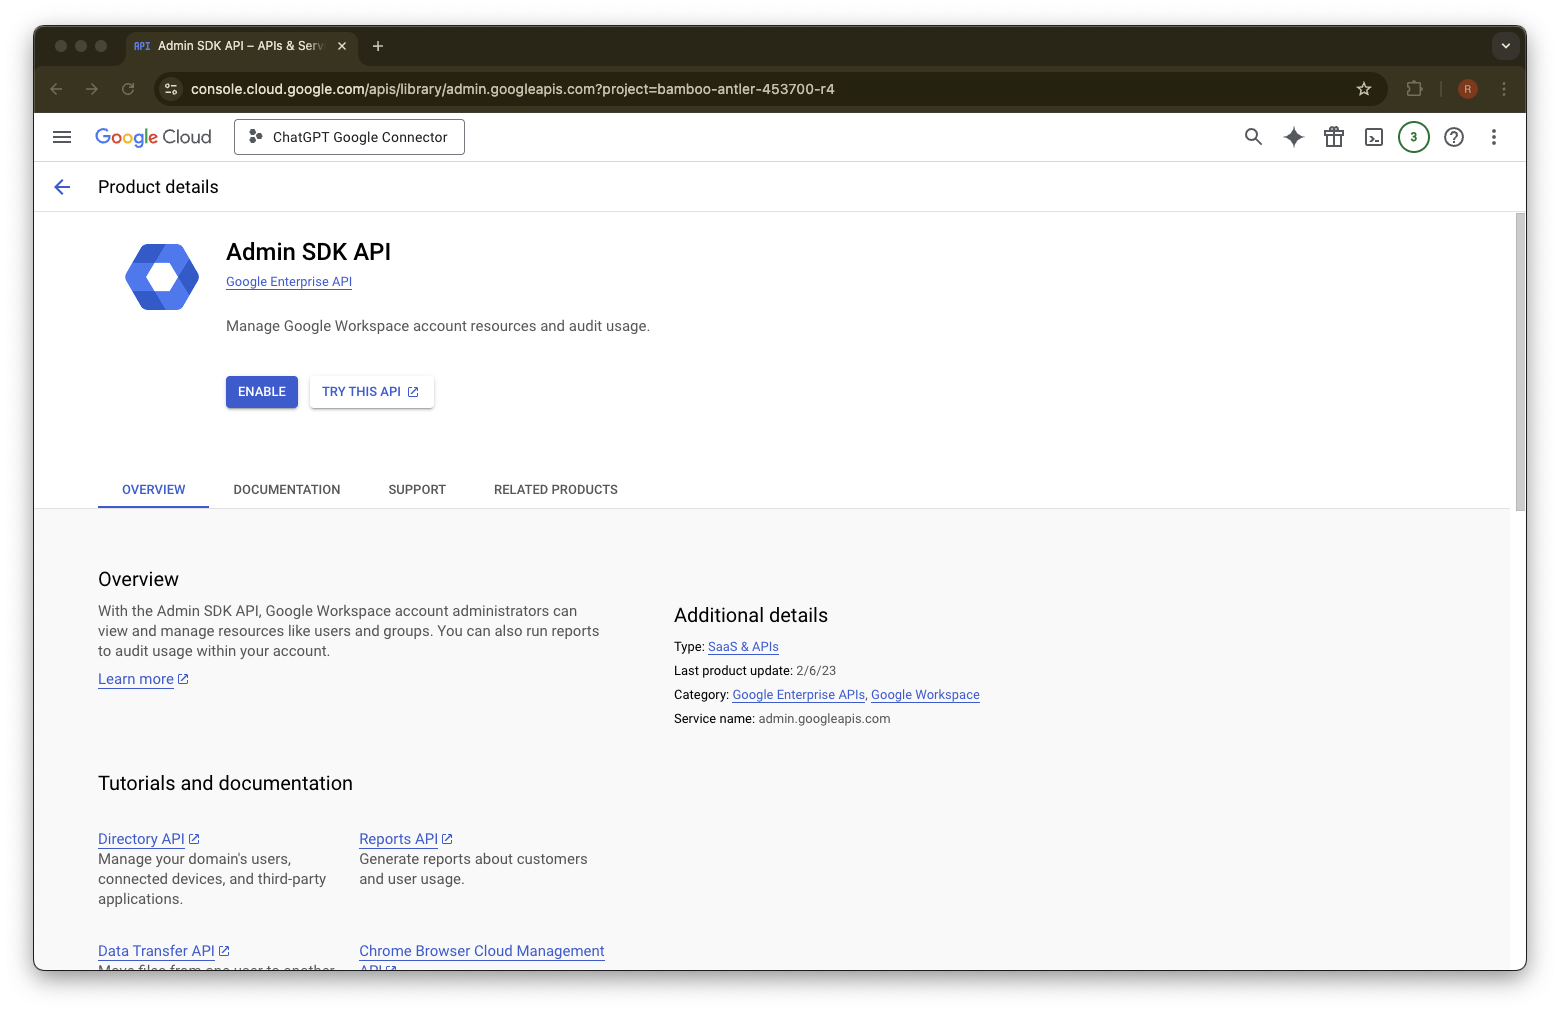
Admin SDK API ಅನ್ನು ಹುಡುಕಿ
Admin SDK API
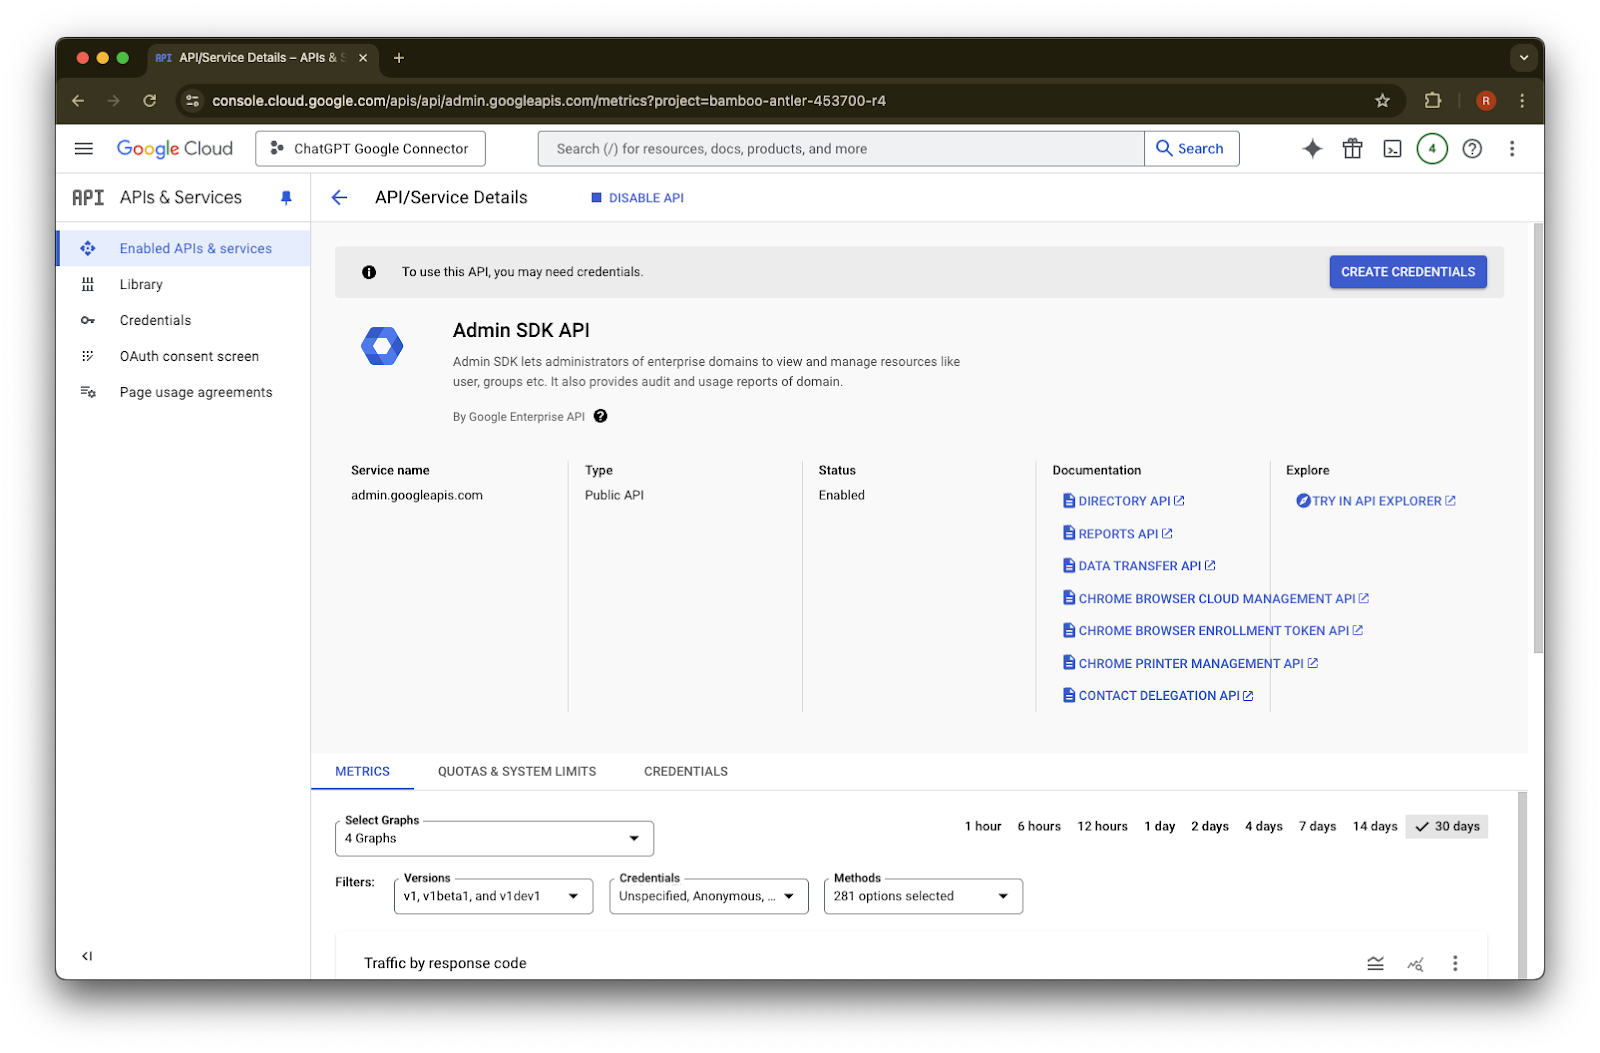
ಆಯ್ಕೆಮಾಡಿEnable ಮೇಲೆ ಕ್ಲಿಕ್ ಮಾಡಿ
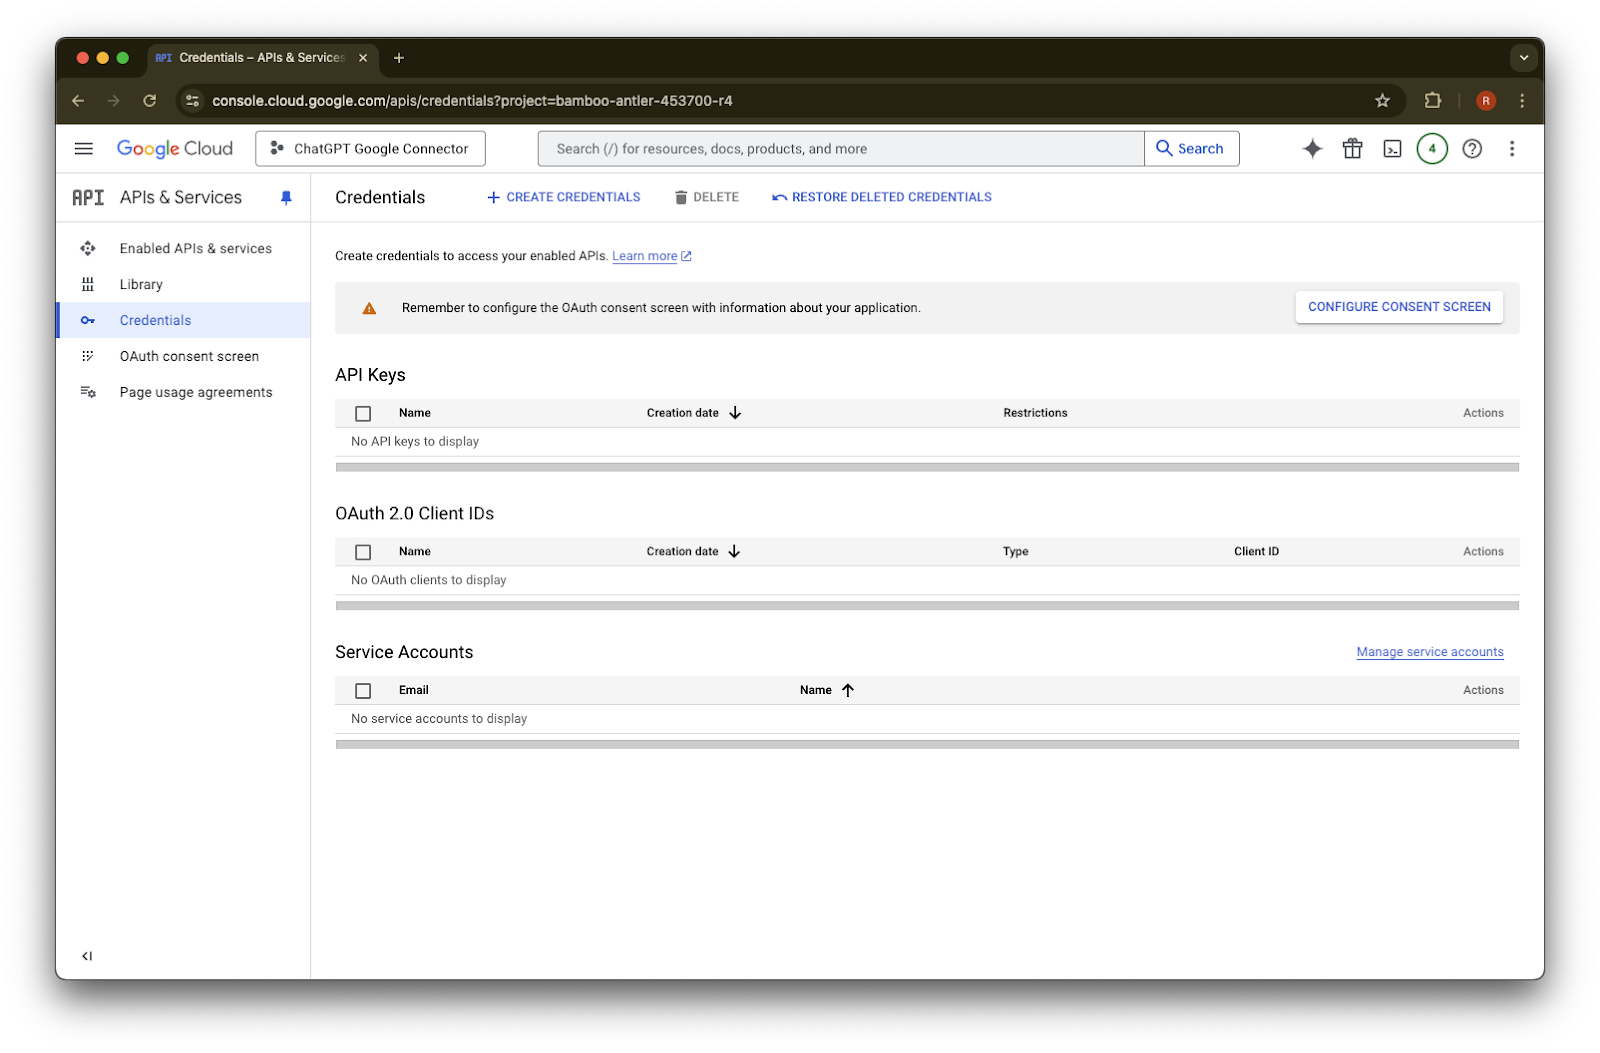
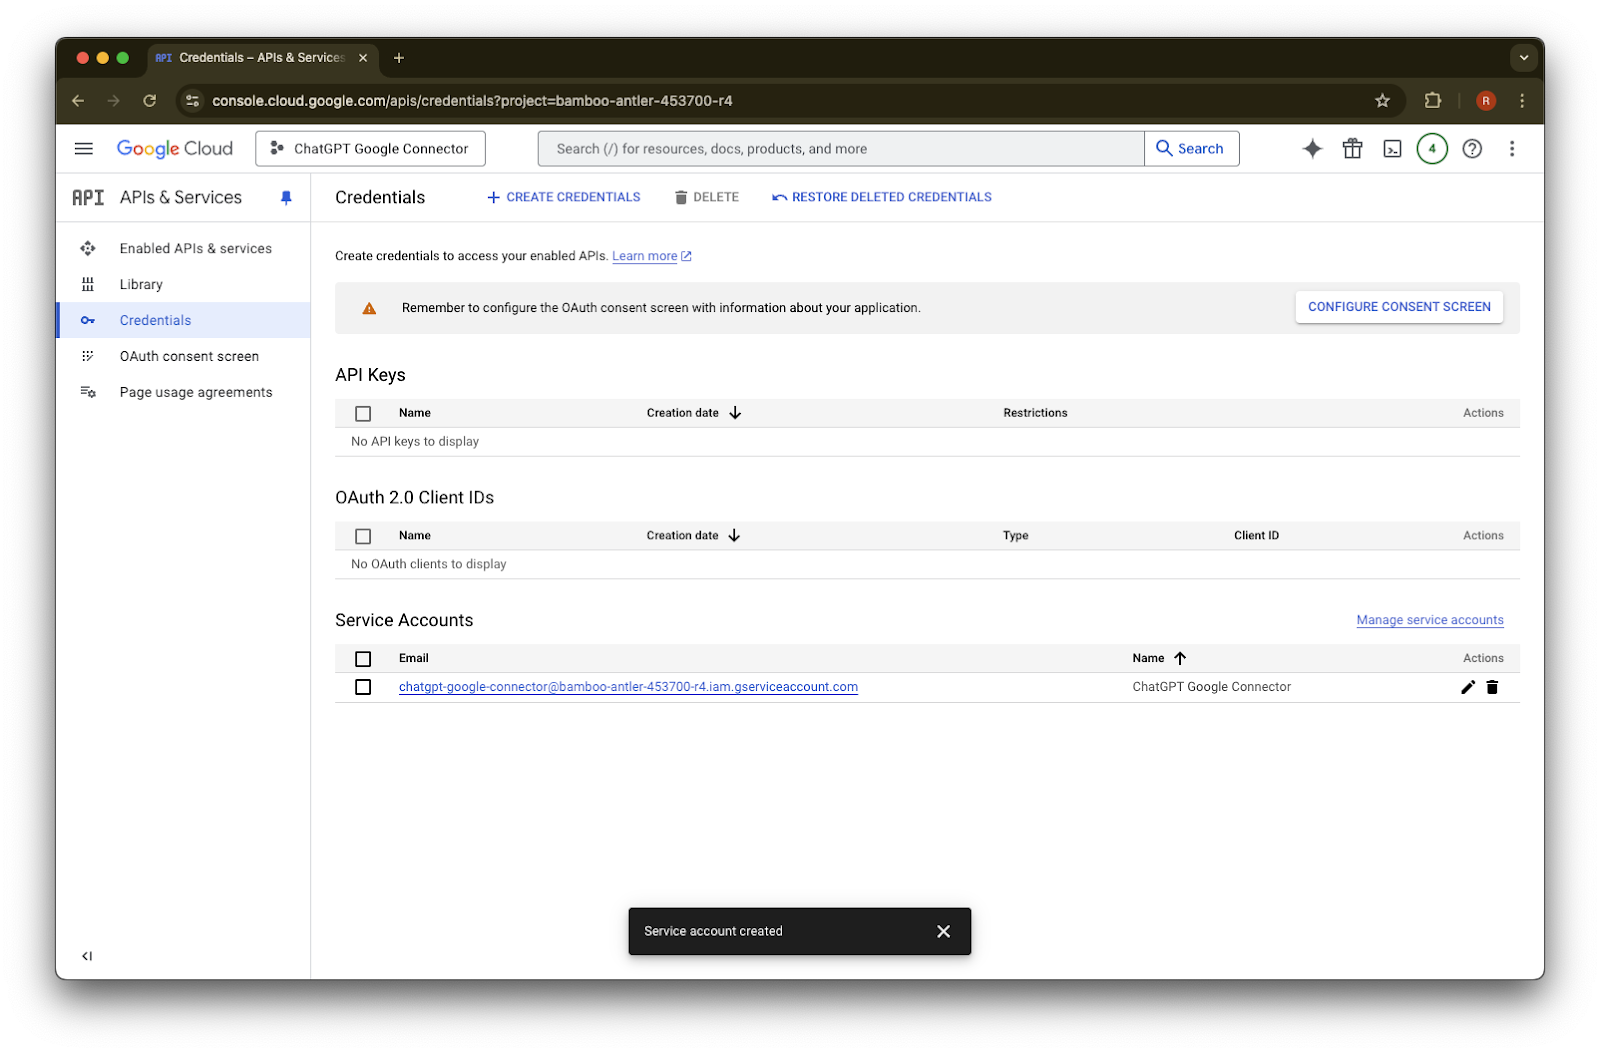
Credentials ಮೇಲೆ ಕ್ಲಿಕ್ ಮಾಡಿ
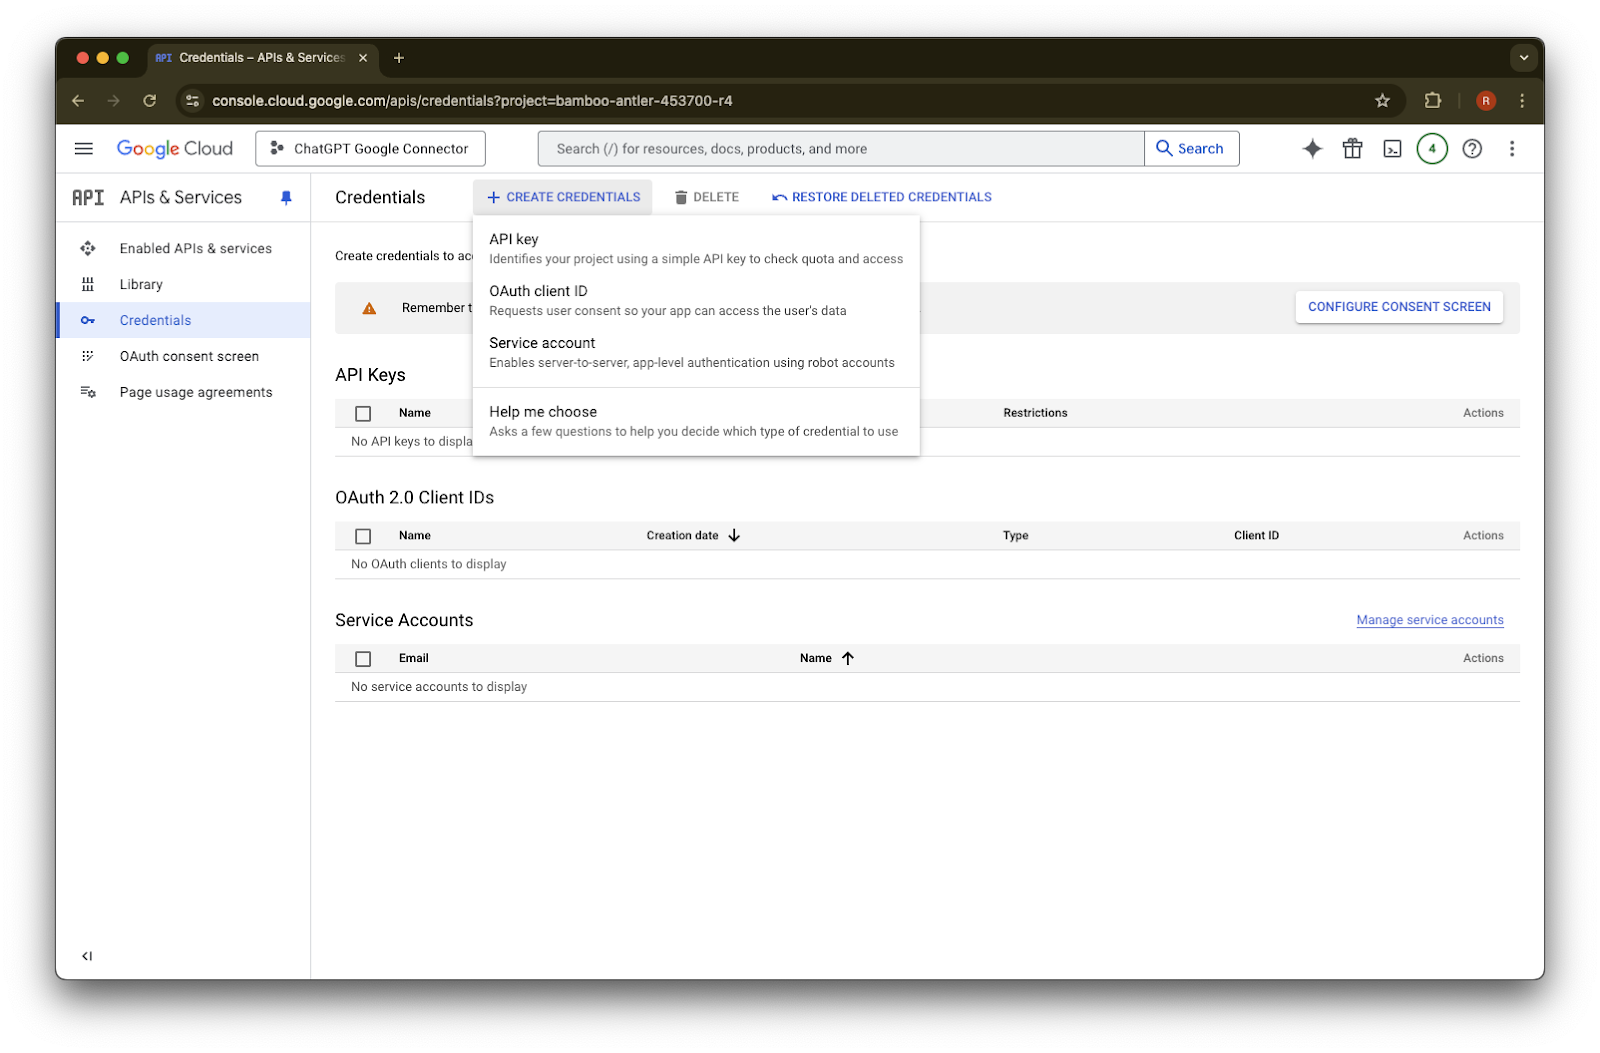
Create Credentials ಮೇಲೆ ಕ್ಲಿಕ್ ಮಾಡಿ
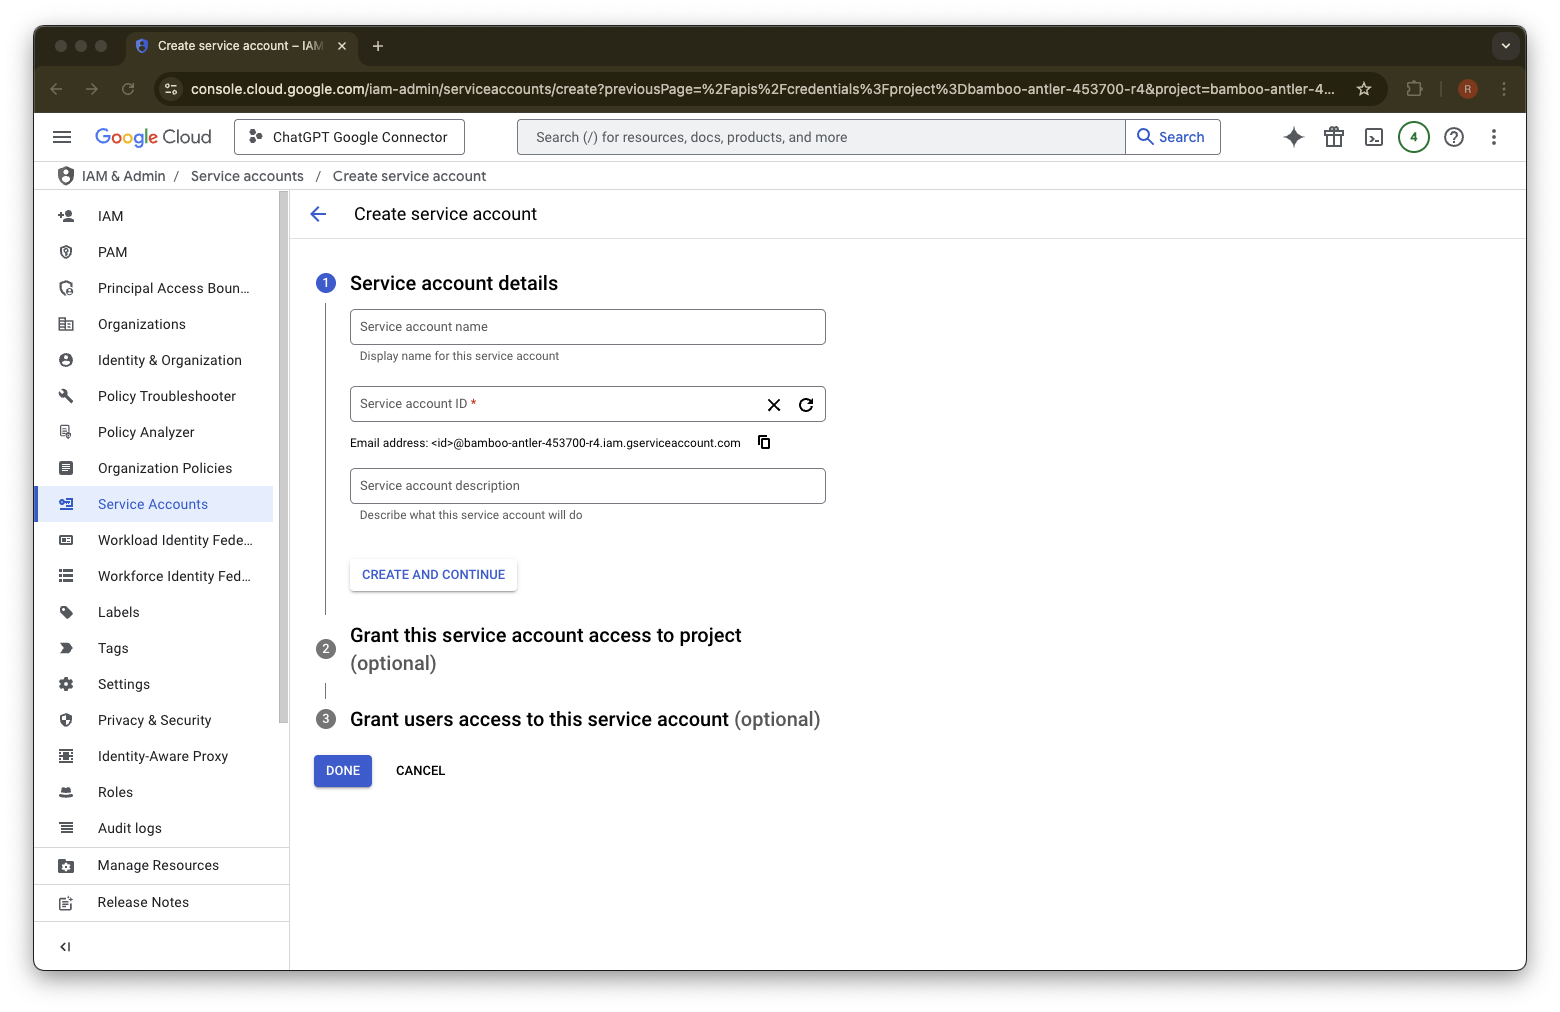
Service account ಮೇಲೆ ಕ್ಲಿಕ್ ಮಾಡಿ
ಈ ಸೇವಾ ಖಾತೆಗೆ ನಿಮ್ಮ ಆಯ್ಕೆಯ name ಮತ್ತು description ಒದಗಿಸಿ
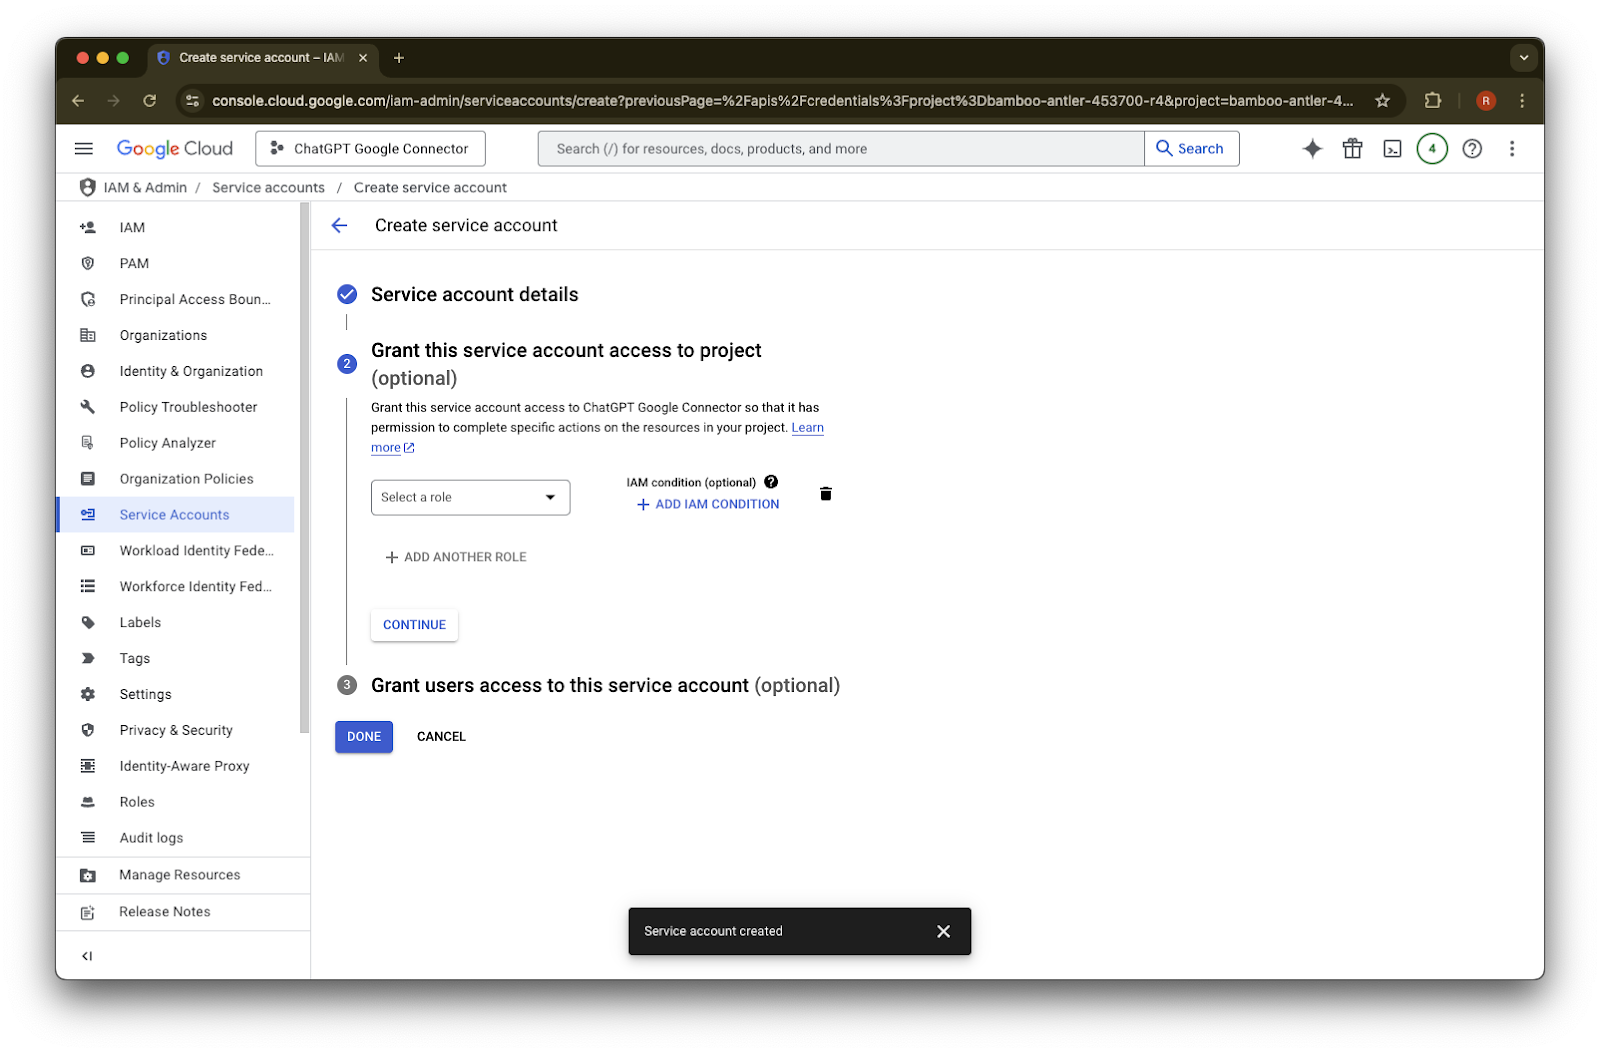
(ಐಚ್ಛಿಕ) ನೀವು ಒಂದು ಪಾತ್ರವನ್ನು ನೀಡಬಹುದು - ಇದು ChatGPT ಗೆ ಅಗತ್ಯವಿಲ್ಲ.
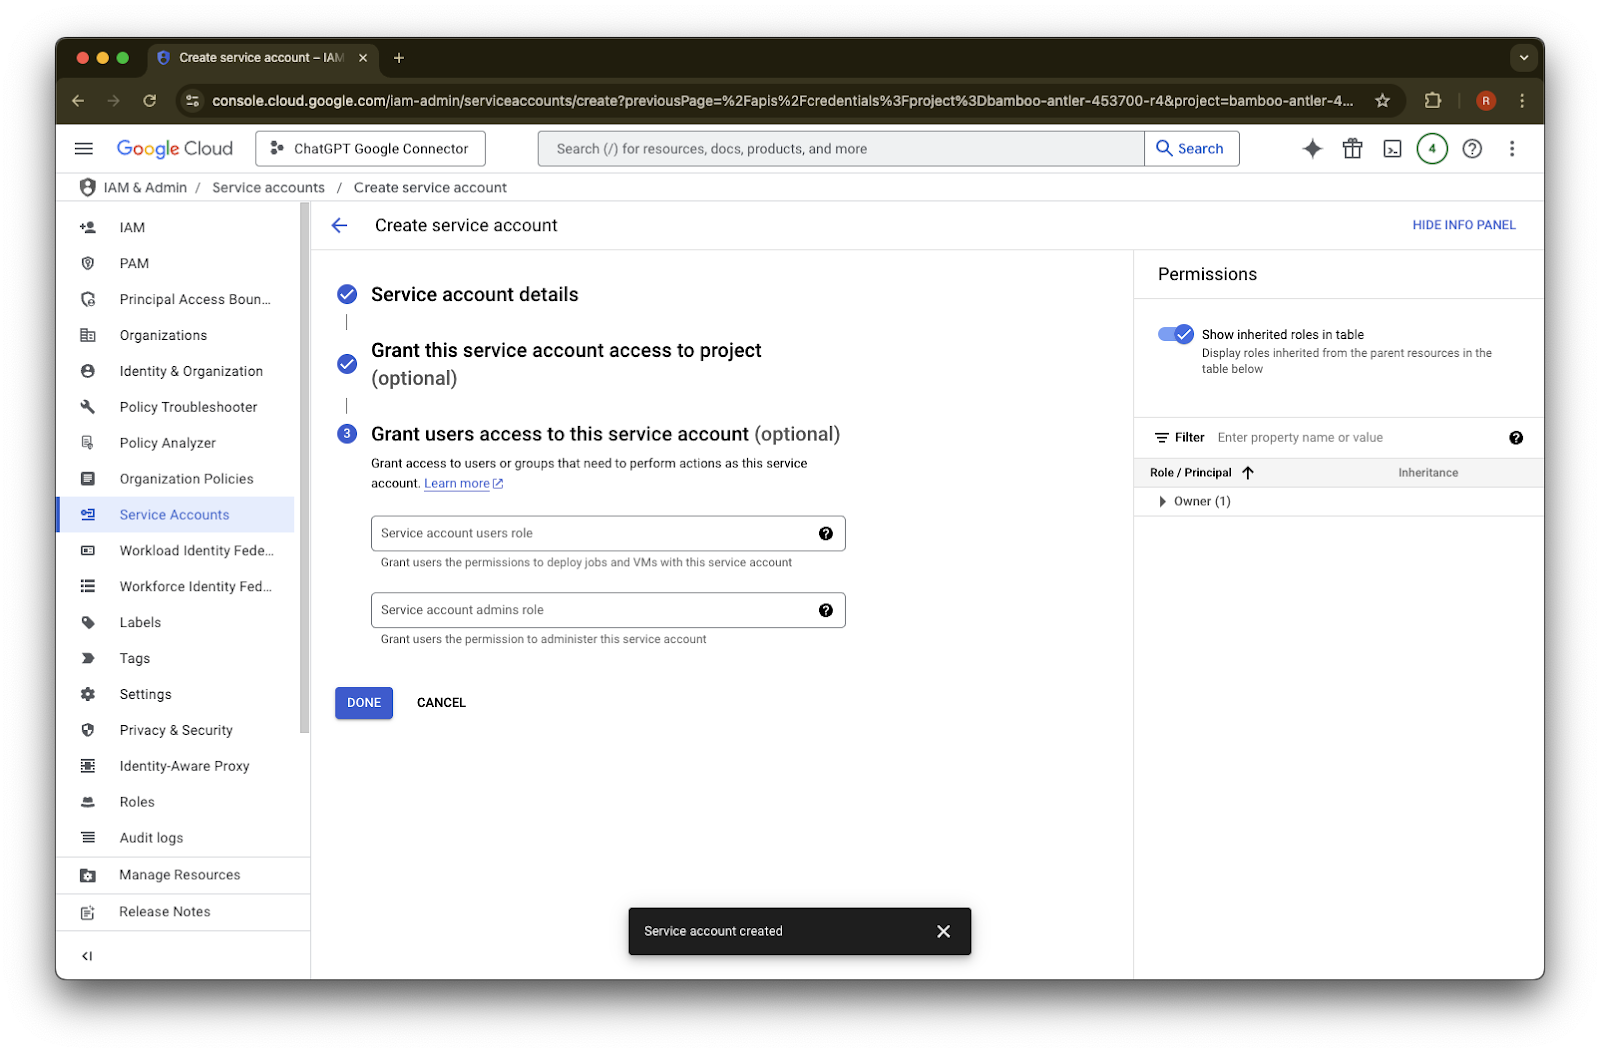
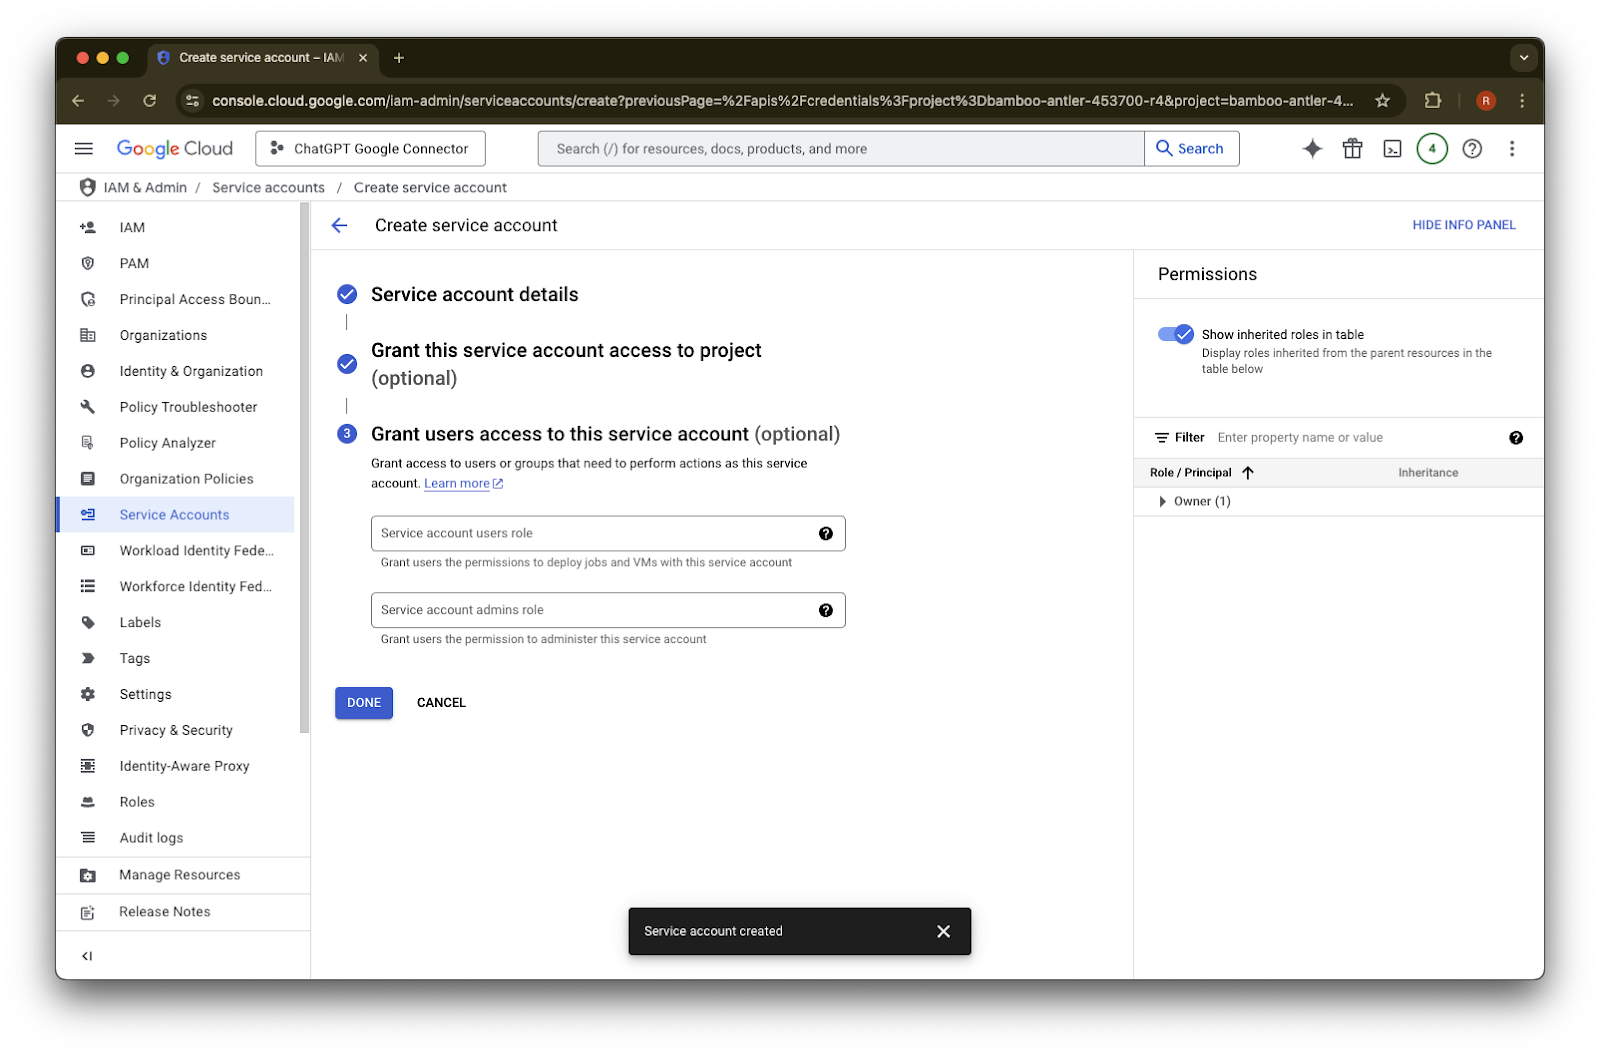
(ಐಚ್ಛಿಕ) ನೀವು ಸೇವಾ ಖಾತೆಗೆ ಪ್ರವೇಶ ನೀಡಬಹುದು - ಇದು ChatGPT ಗೆ ಅಗತ್ಯವಿಲ್ಲ.
Done ಮೇಲೆ ಕ್ಲಿಕ್ ಮಾಡಿ.
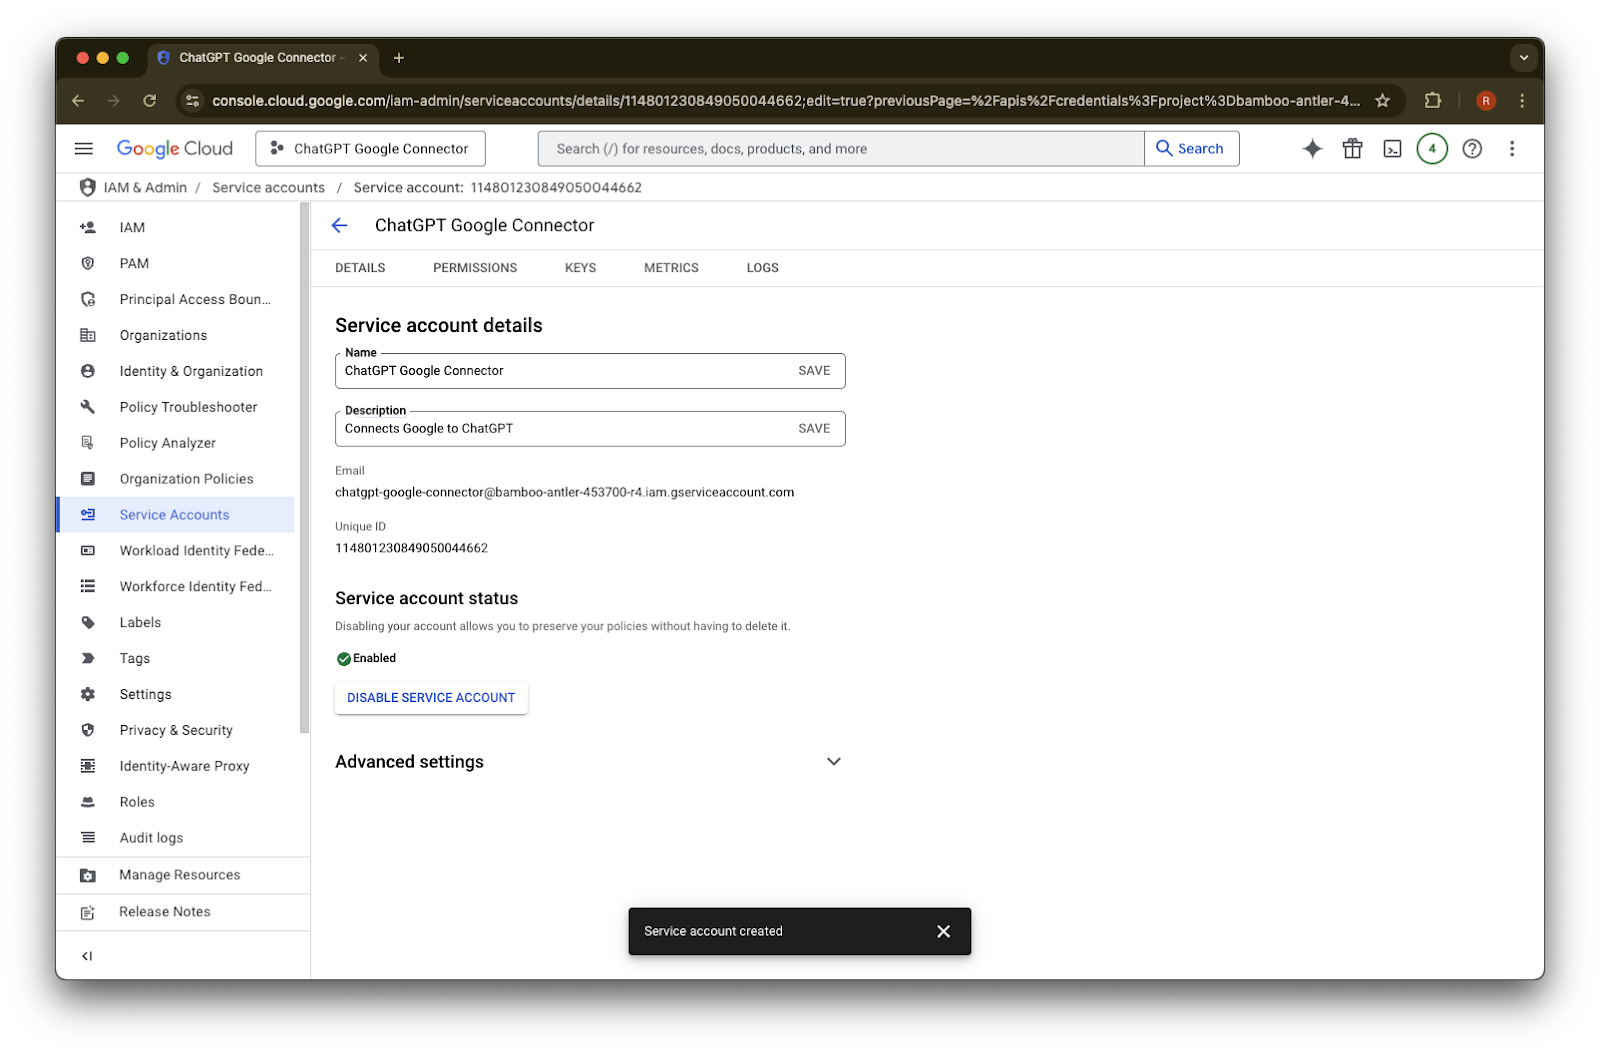
ಈಗ ರಚಿಸಲಾದ service account ಮೇಲೆ ಕ್ಲಿಕ್ ಮಾಡಿ.
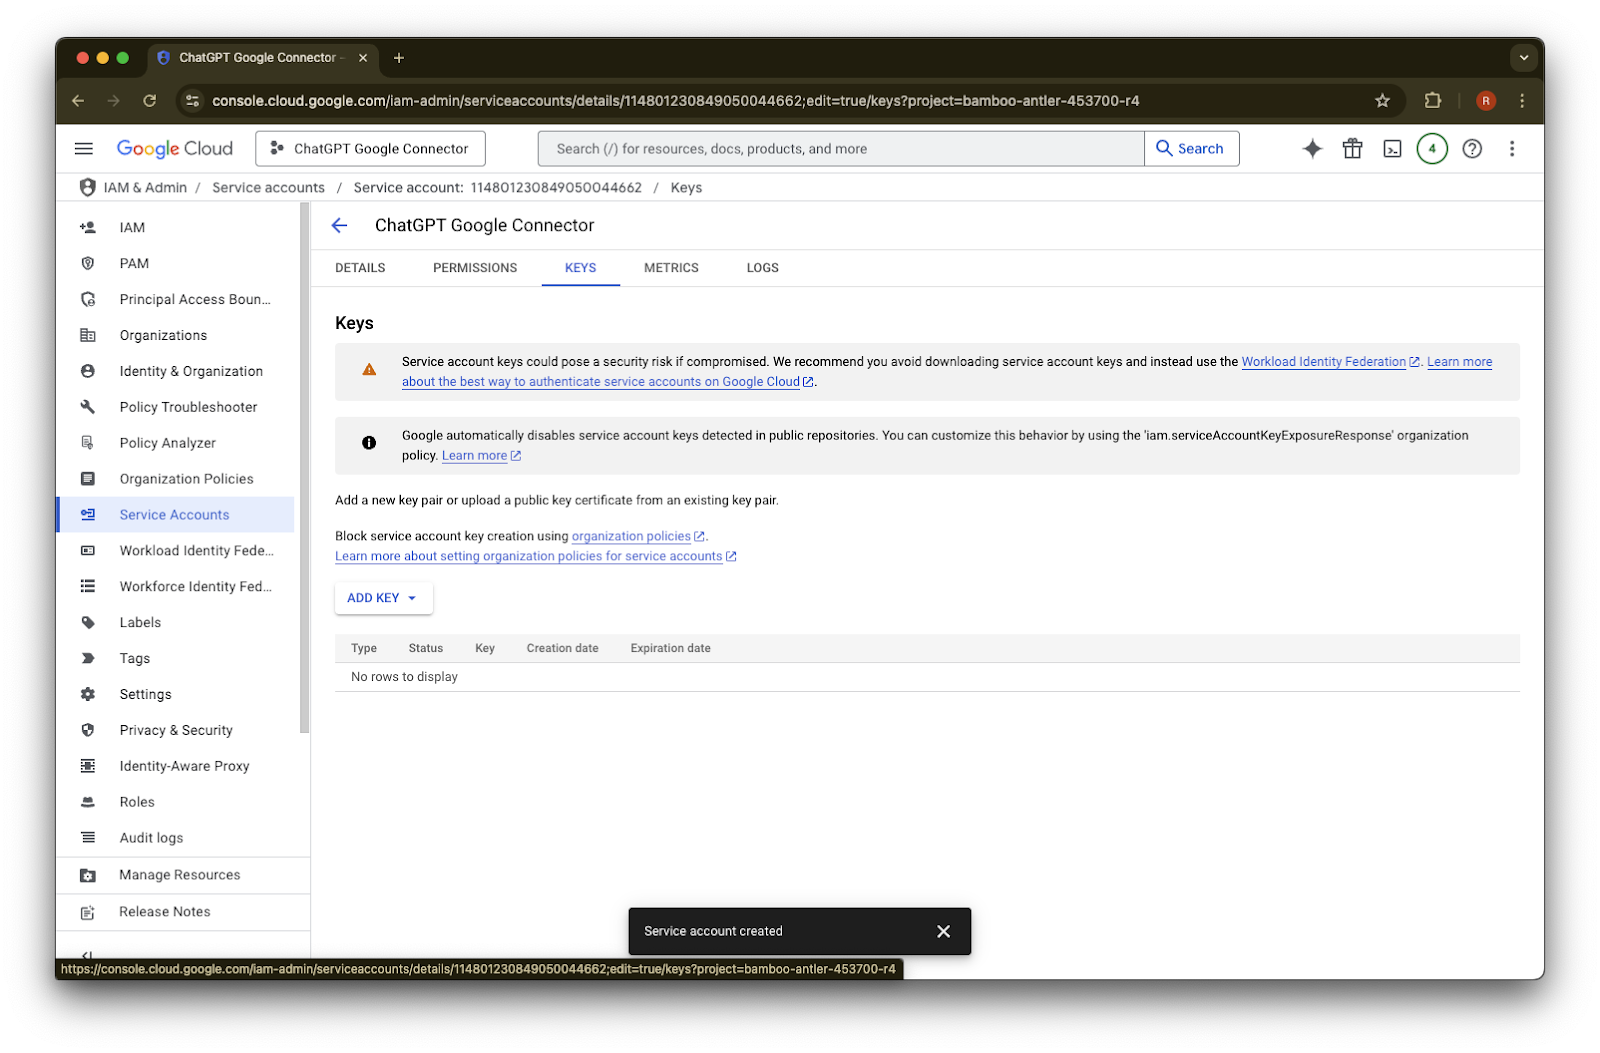
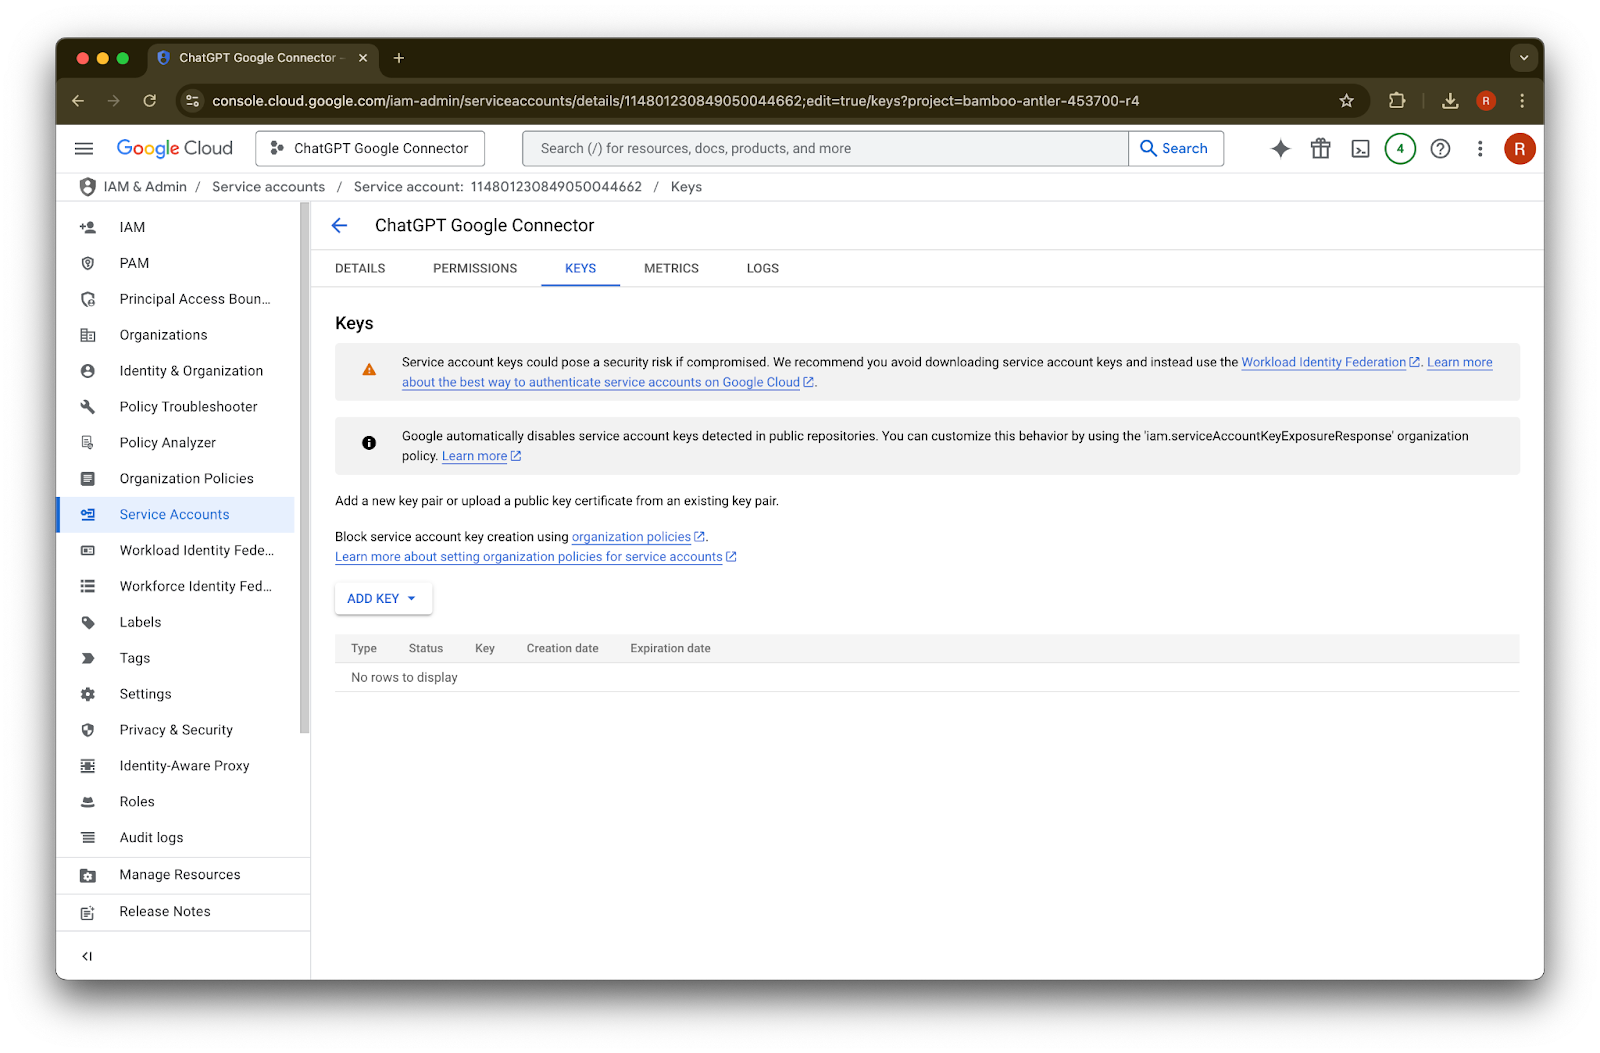
keys. ಮೇಲೆ ಕ್ಲಿಕ್ ಮಾಡಿ
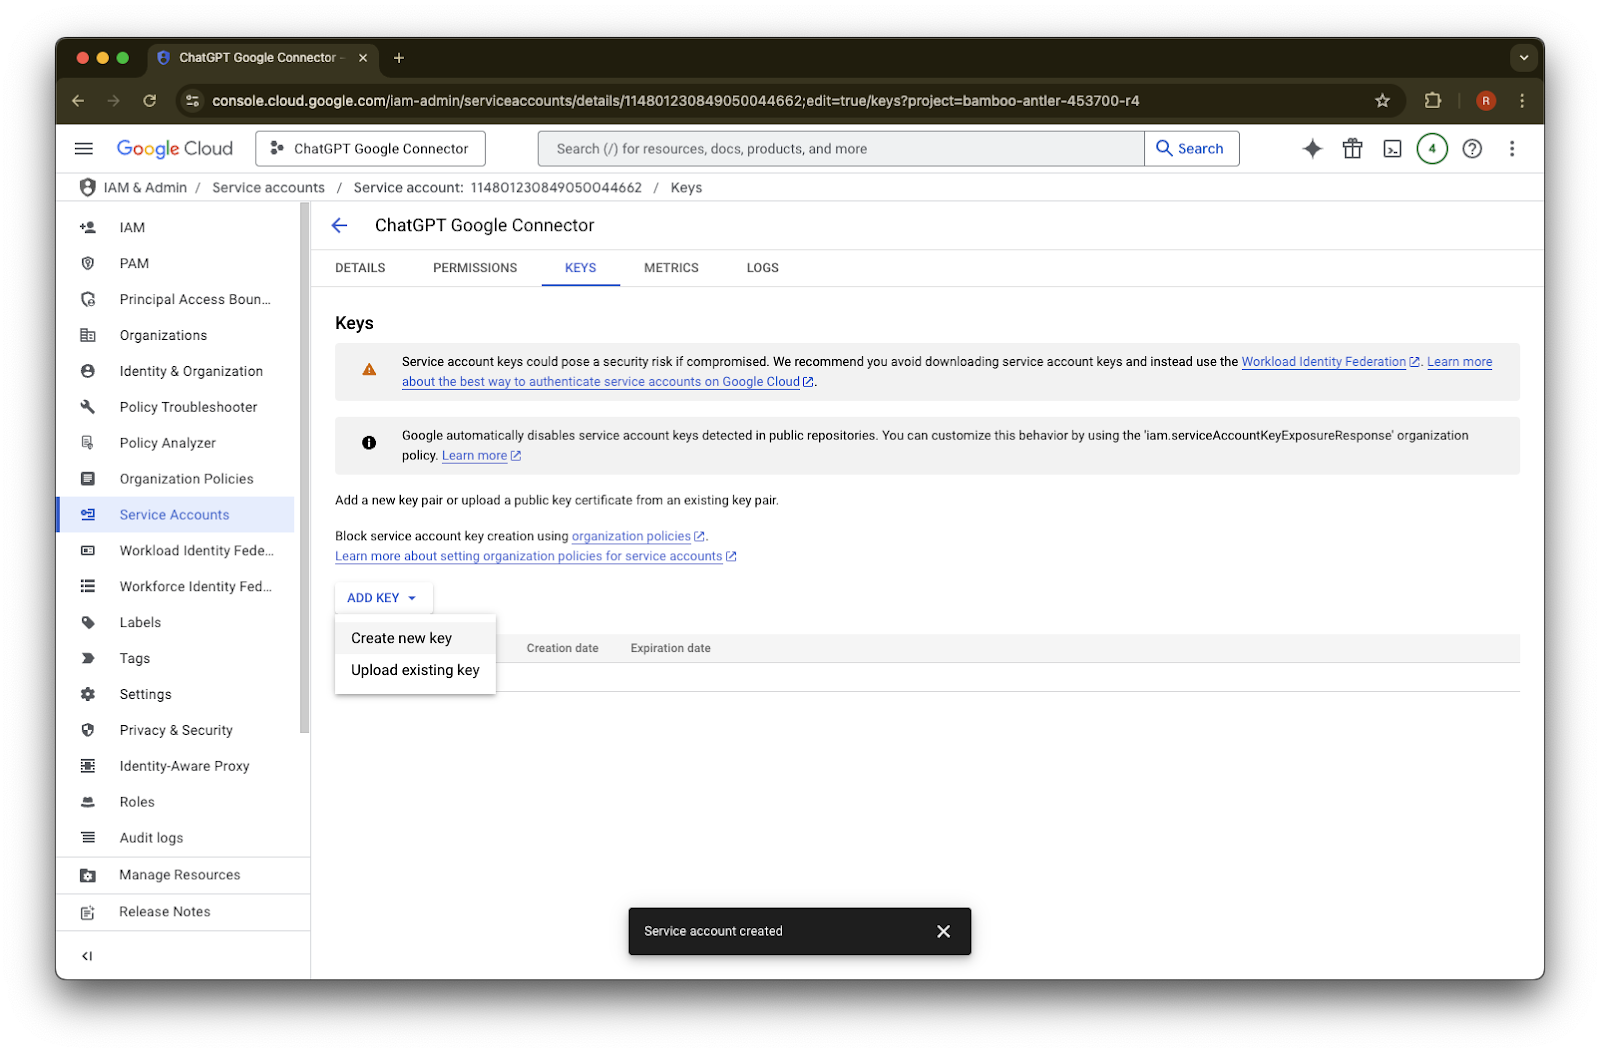
Add Key ಮೇಲೆ ಕ್ಲಿಕ್ ಮಾಡಿ
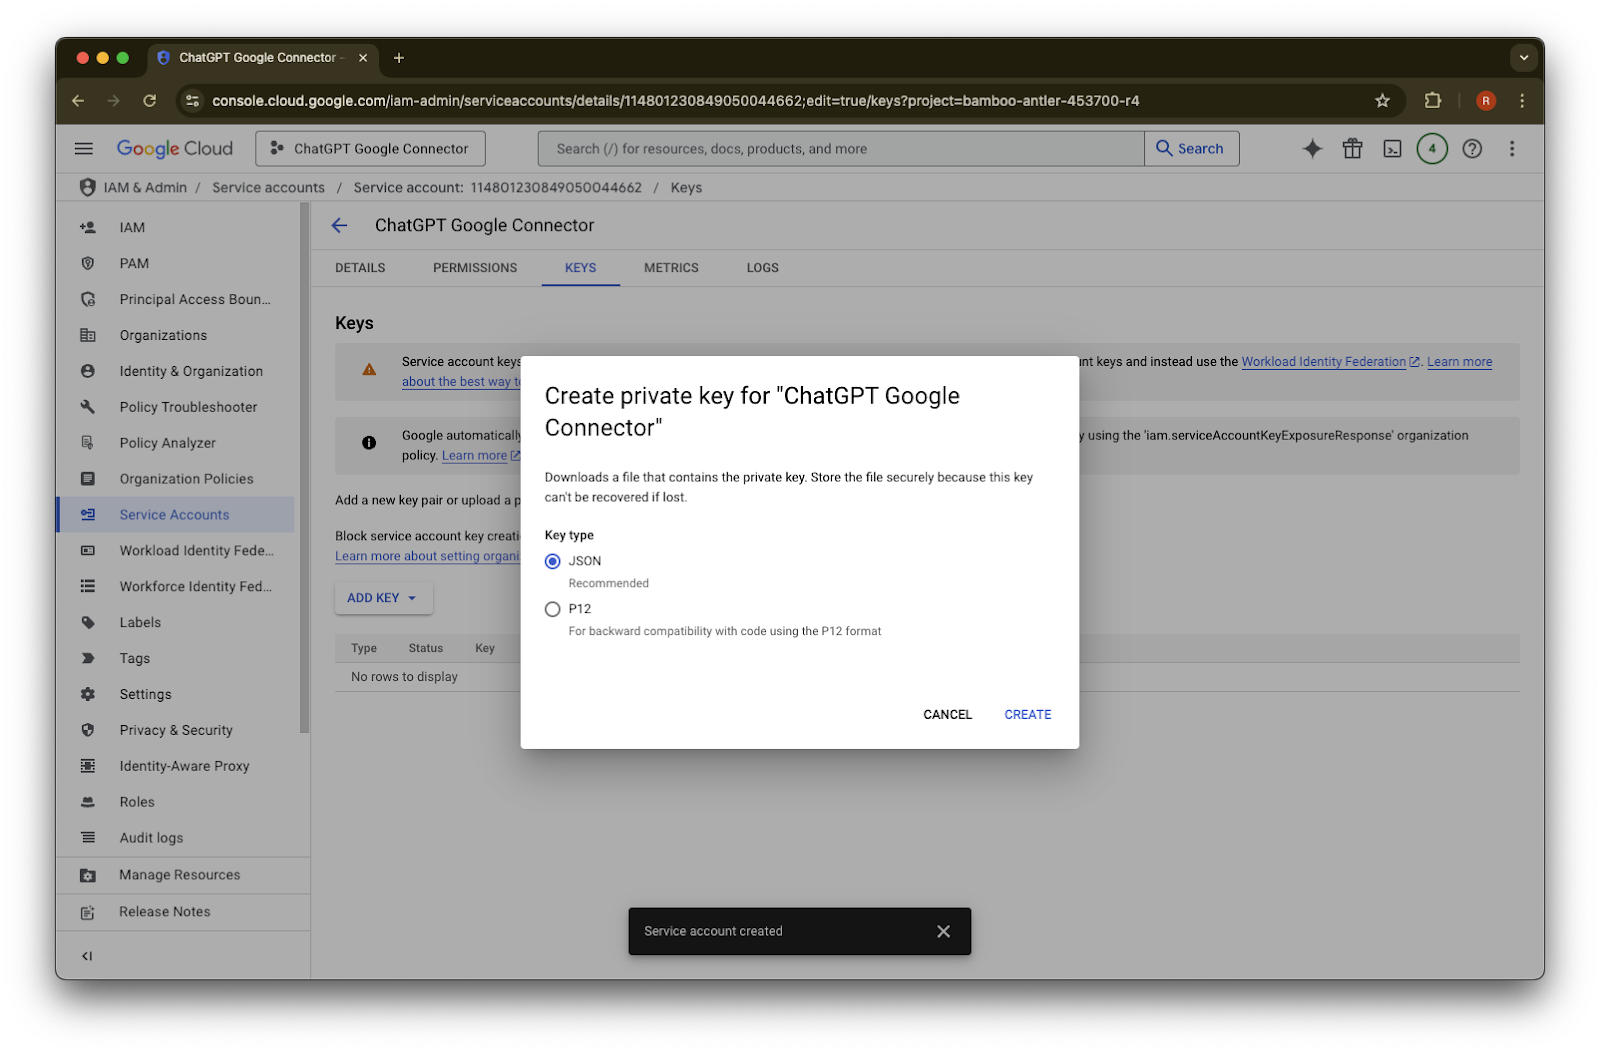
Create new key ಮೇಲೆ ಕ್ಲಿಕ್ ಮಾಡಿ
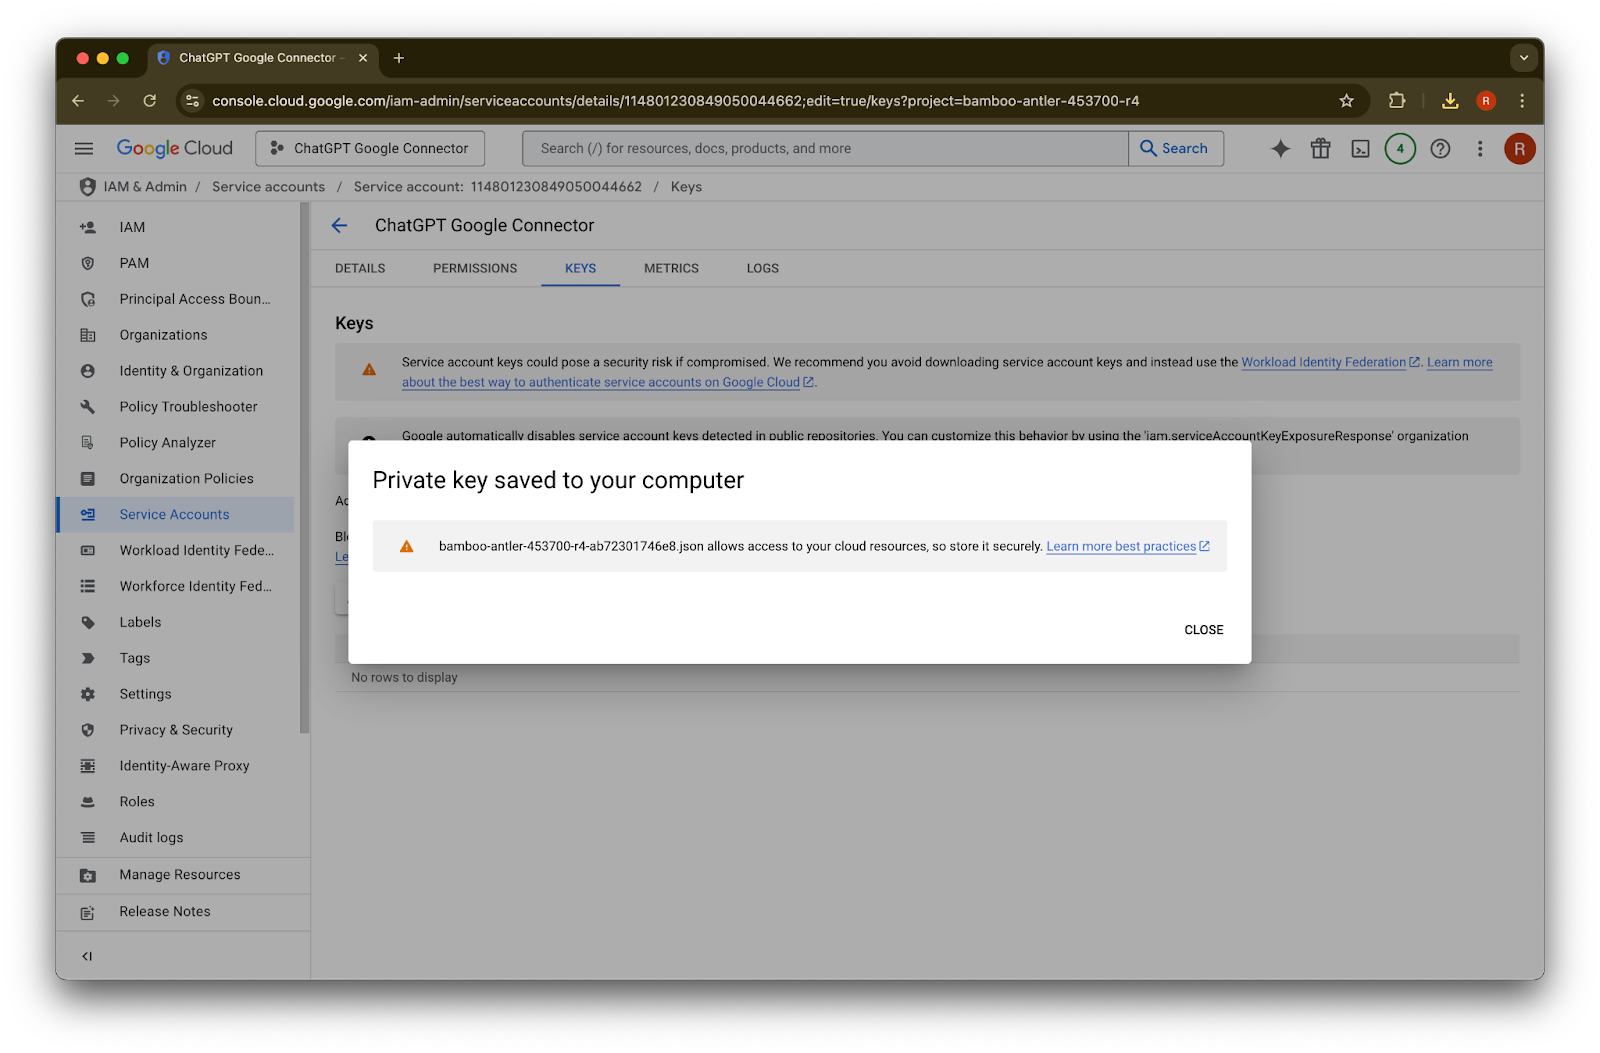
ಡೀಫಾಲ್ಟ್ JSON key type ಅನ್ನು ಉಳಿಸಿ ಮತ್ತು Create ಮೇಲೆ ಕ್ಲಿಕ್ ಮಾಡಿ.
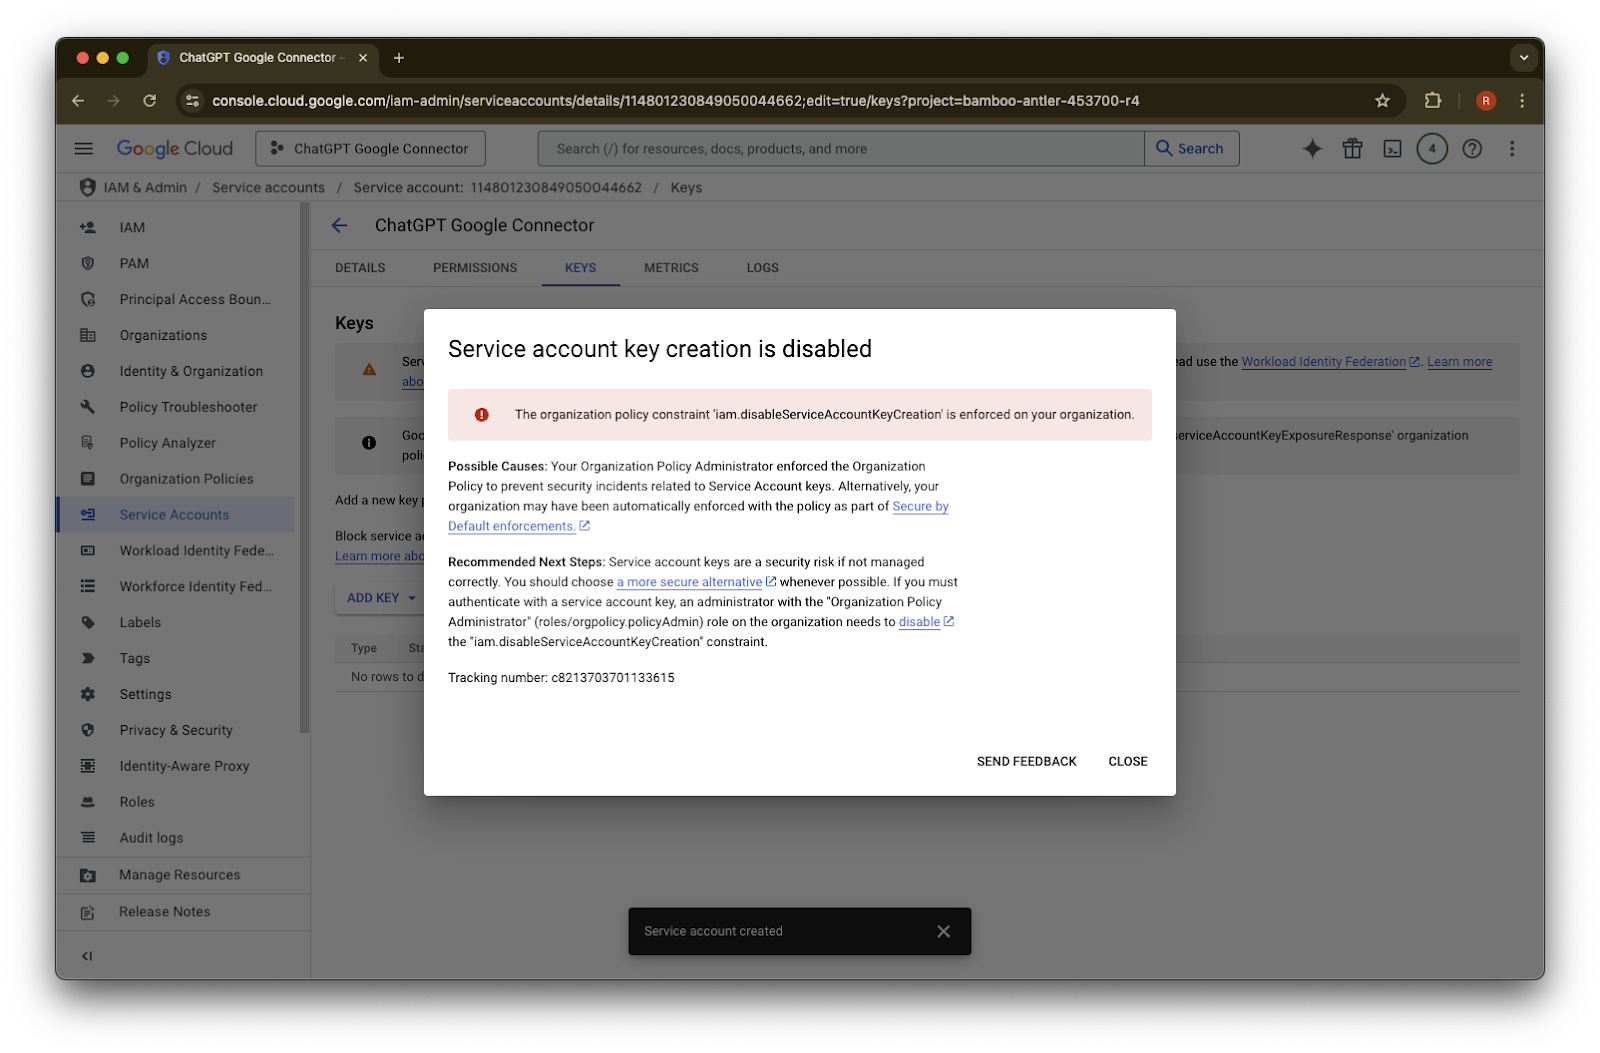
“Service account key creation is disabled” ಎಂದು ಹೇಳುವ ದೋಷ ಸಂದೇಶ ಕಂಡುಬಂದರೆ, ರಚನೆಯನ್ನು ಸಕ್ರಿಯಗೊಳಿಸಲು ಈ ಹಂತಗಳನ್ನು ಅನುಸರಿಸಿ.Close ಮೇಲೆ ಕ್ಲಿಕ್ ಮಾಡಿ. ಕೀ ಈಗ ನಿಮ್ಮ ಕಂಪ್ಯೂಟರ್ಗೆ ಡೌನ್ಲೋಡ್ ಆಗಿದೆ. ನಂತರ ನೀವು ಇದನ್ನು ChatGPT ನಿರ್ವಾಹಕ ಕನ್ಸೋಲ್ಗೆ ಅಪ್ಲೋಡ್ ಮಾಡುತ್ತೀರಿ.
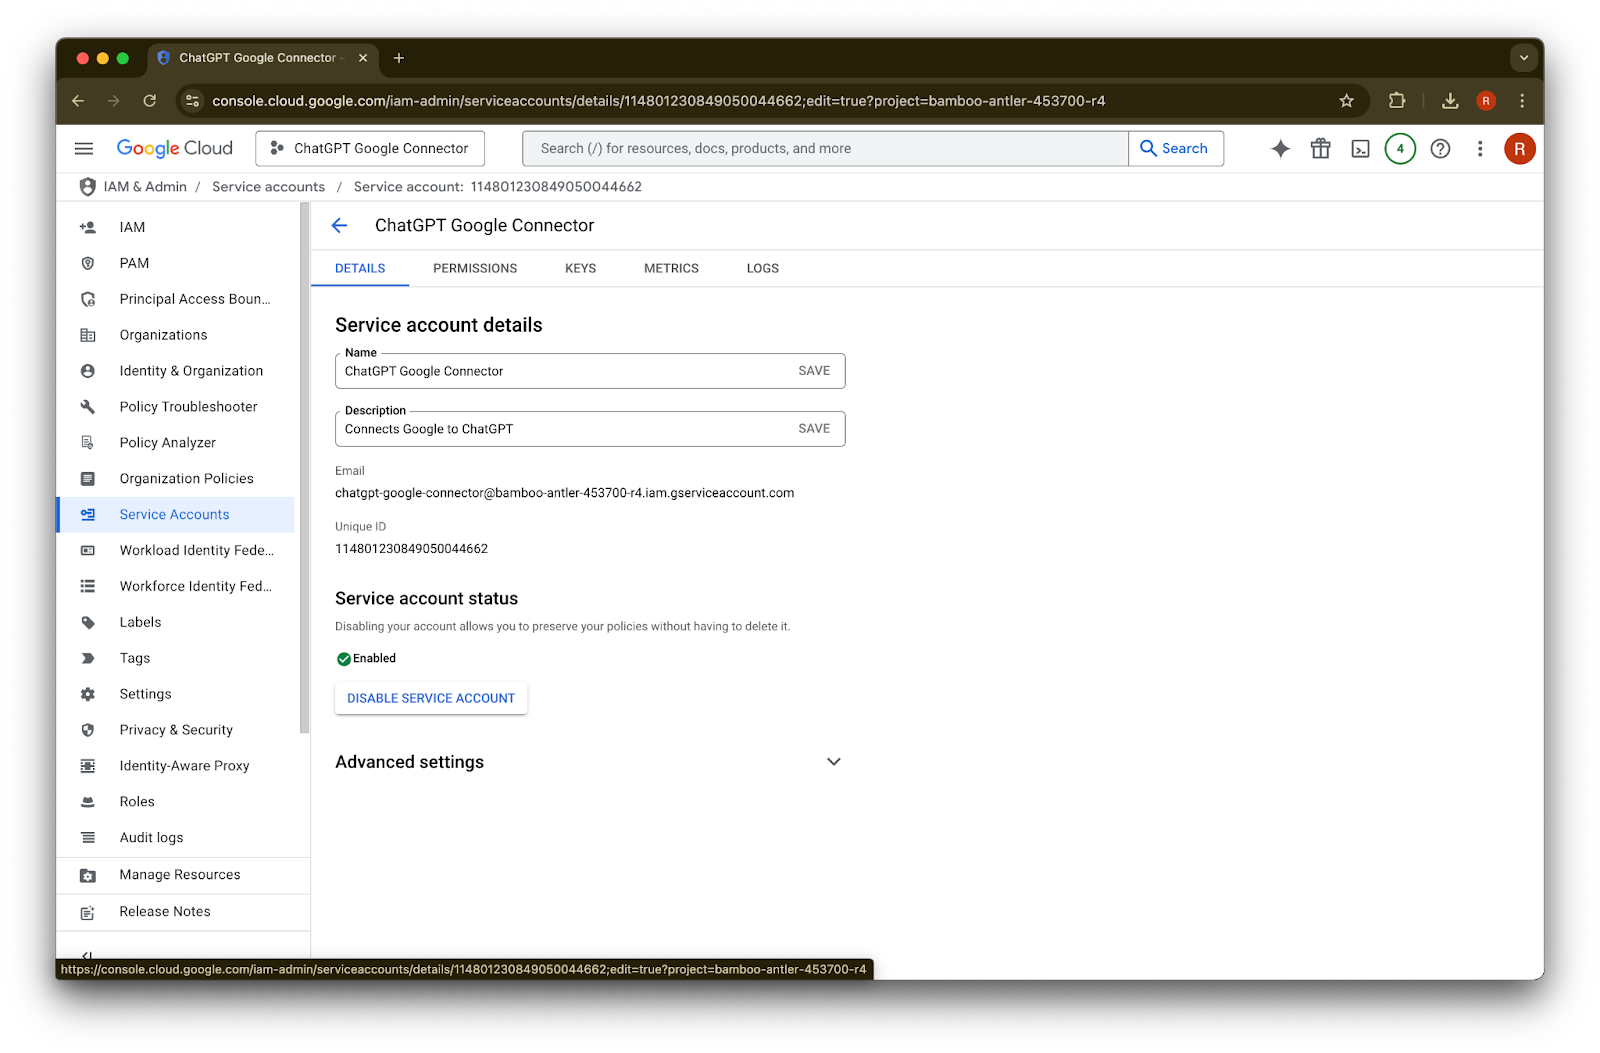
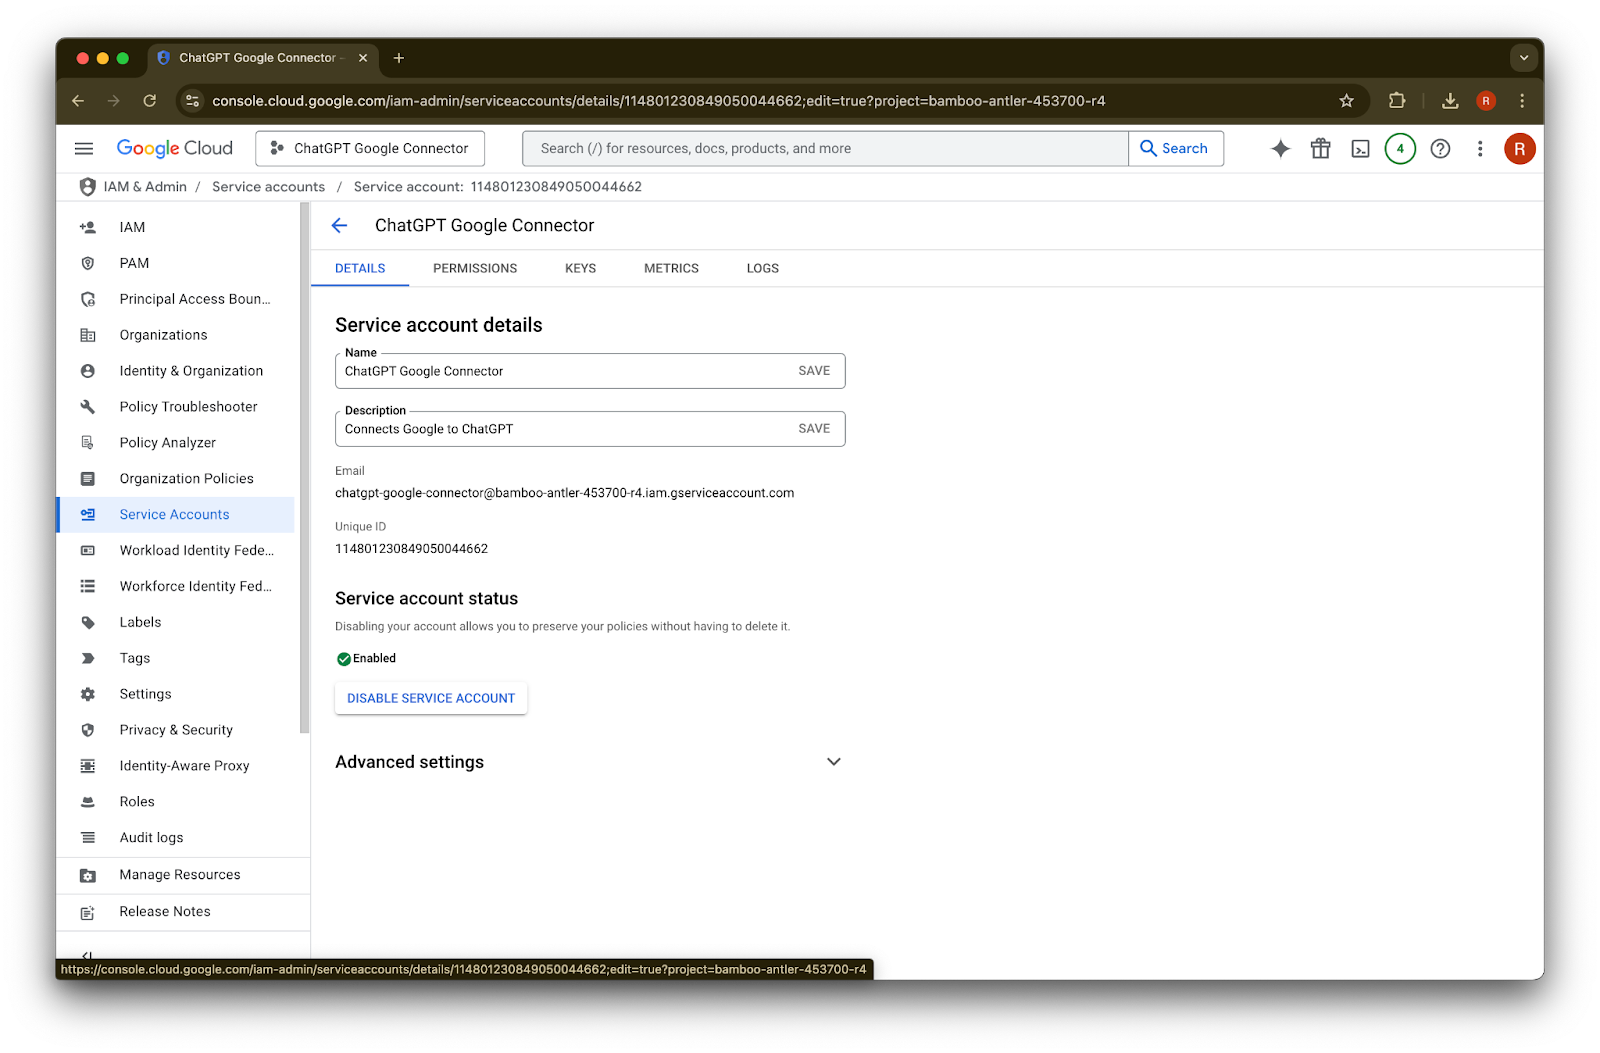
details ಮೇಲೆ ಕ್ಲಿಕ್ ಮಾಡಿ
Unique ID ಅನ್ನು ಗಮನಿಸಿ. ಇದು ಹಂತ 42ರಲ್ಲಿ ಬೇಕಾಗುತ್ತದೆ.
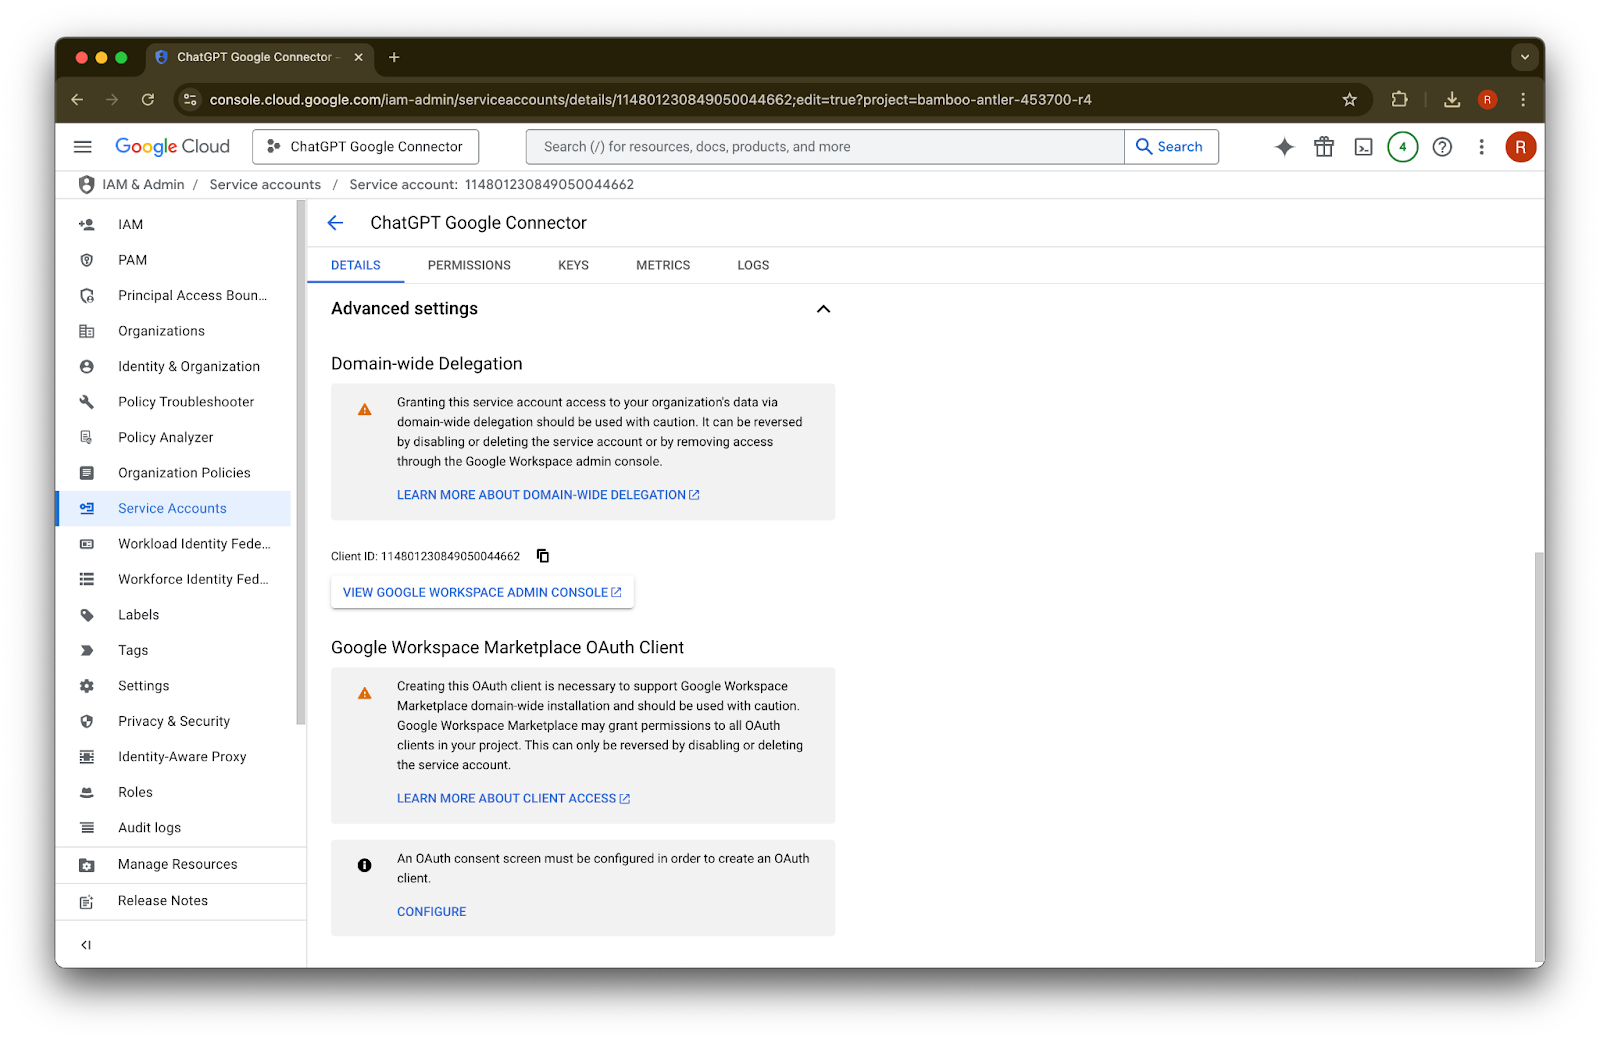
Advanced settings ಅನ್ನು ವಿಸ್ತರಿಸಿ
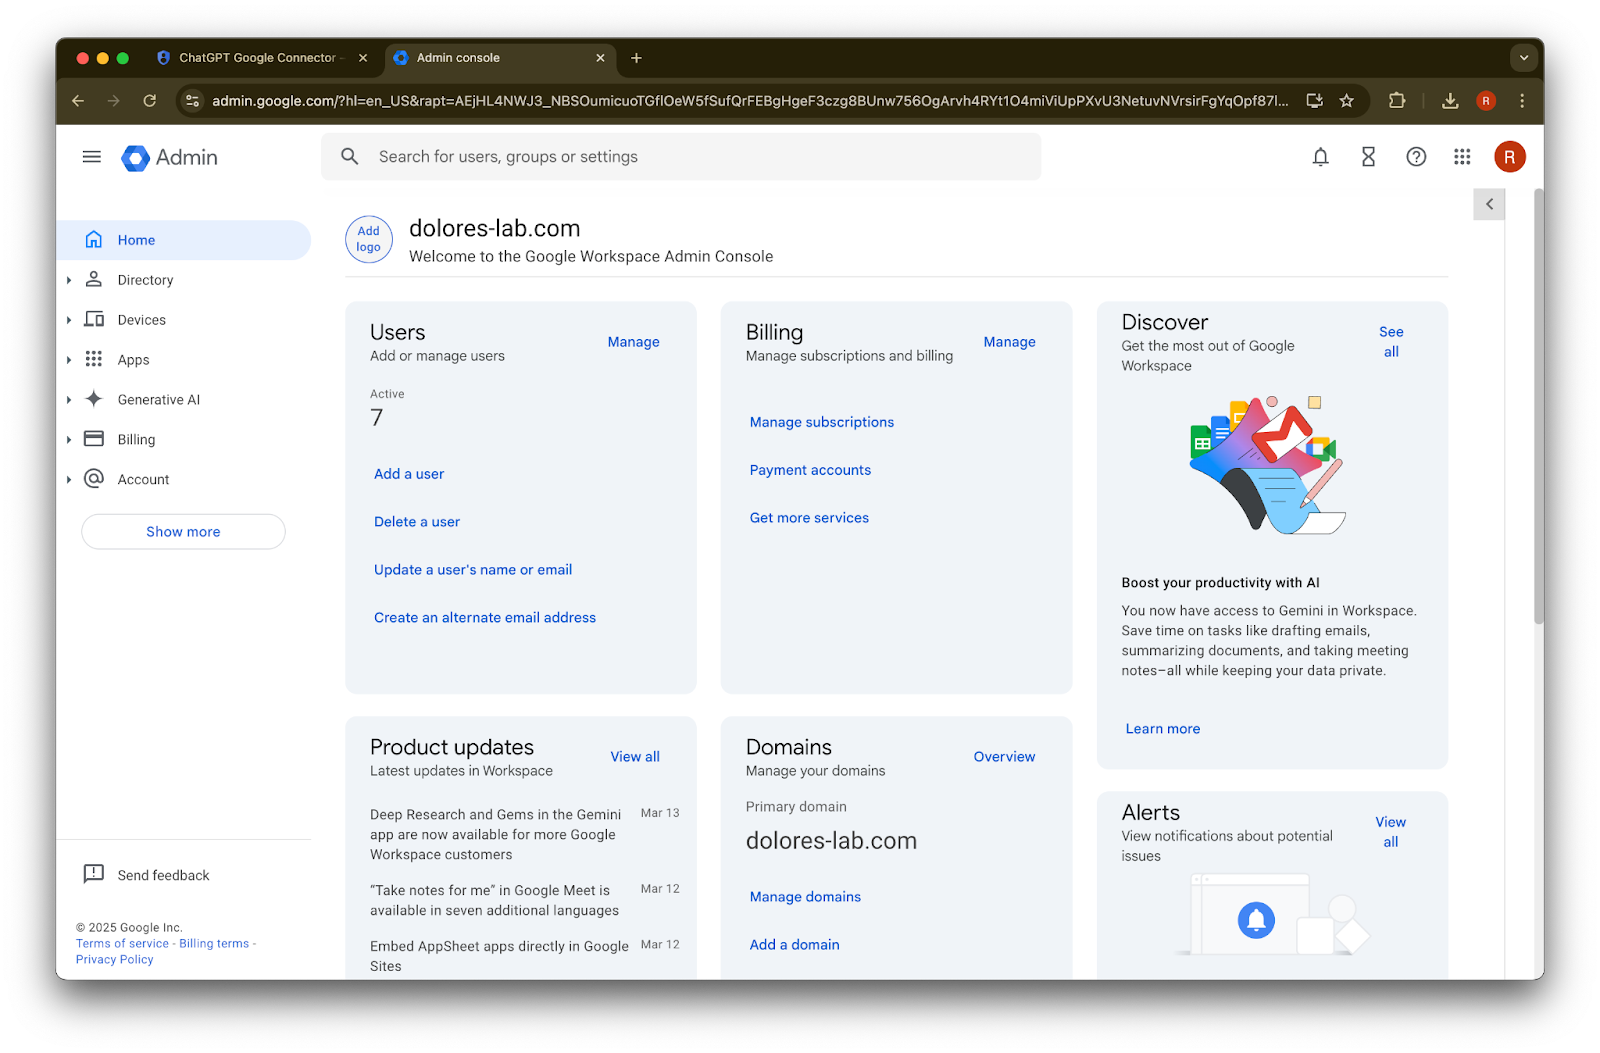
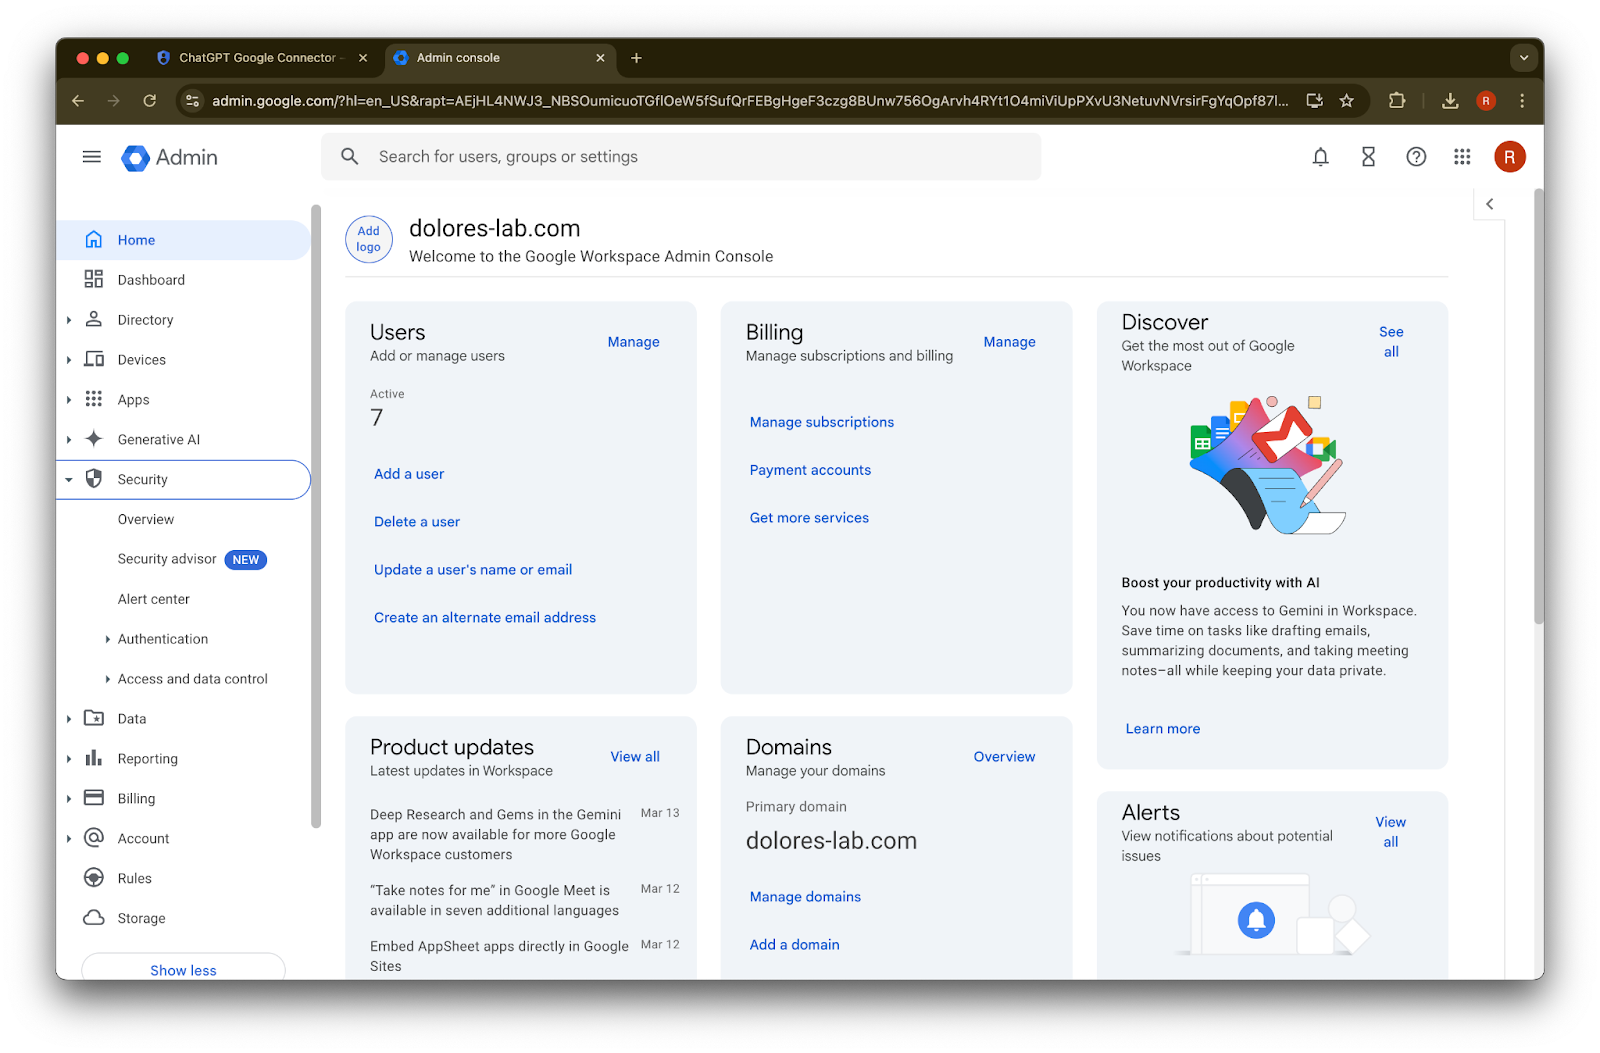
ಕೆಳಕ್ಕೆ ಸ್ಕ್ರೋಲ್ ಮಾಡಿ ಮತ್ತು View Google Workspace Admin Console ಮೇಲೆ ಕ್ಲಿಕ್ ಮಾಡಿ. Google Workspace ಕನ್ಸೋಲ್ ಹೊಸ ಟ್ಯಾಬ್ನಲ್ಲಿ ತೆರೆಯುತ್ತದೆ.
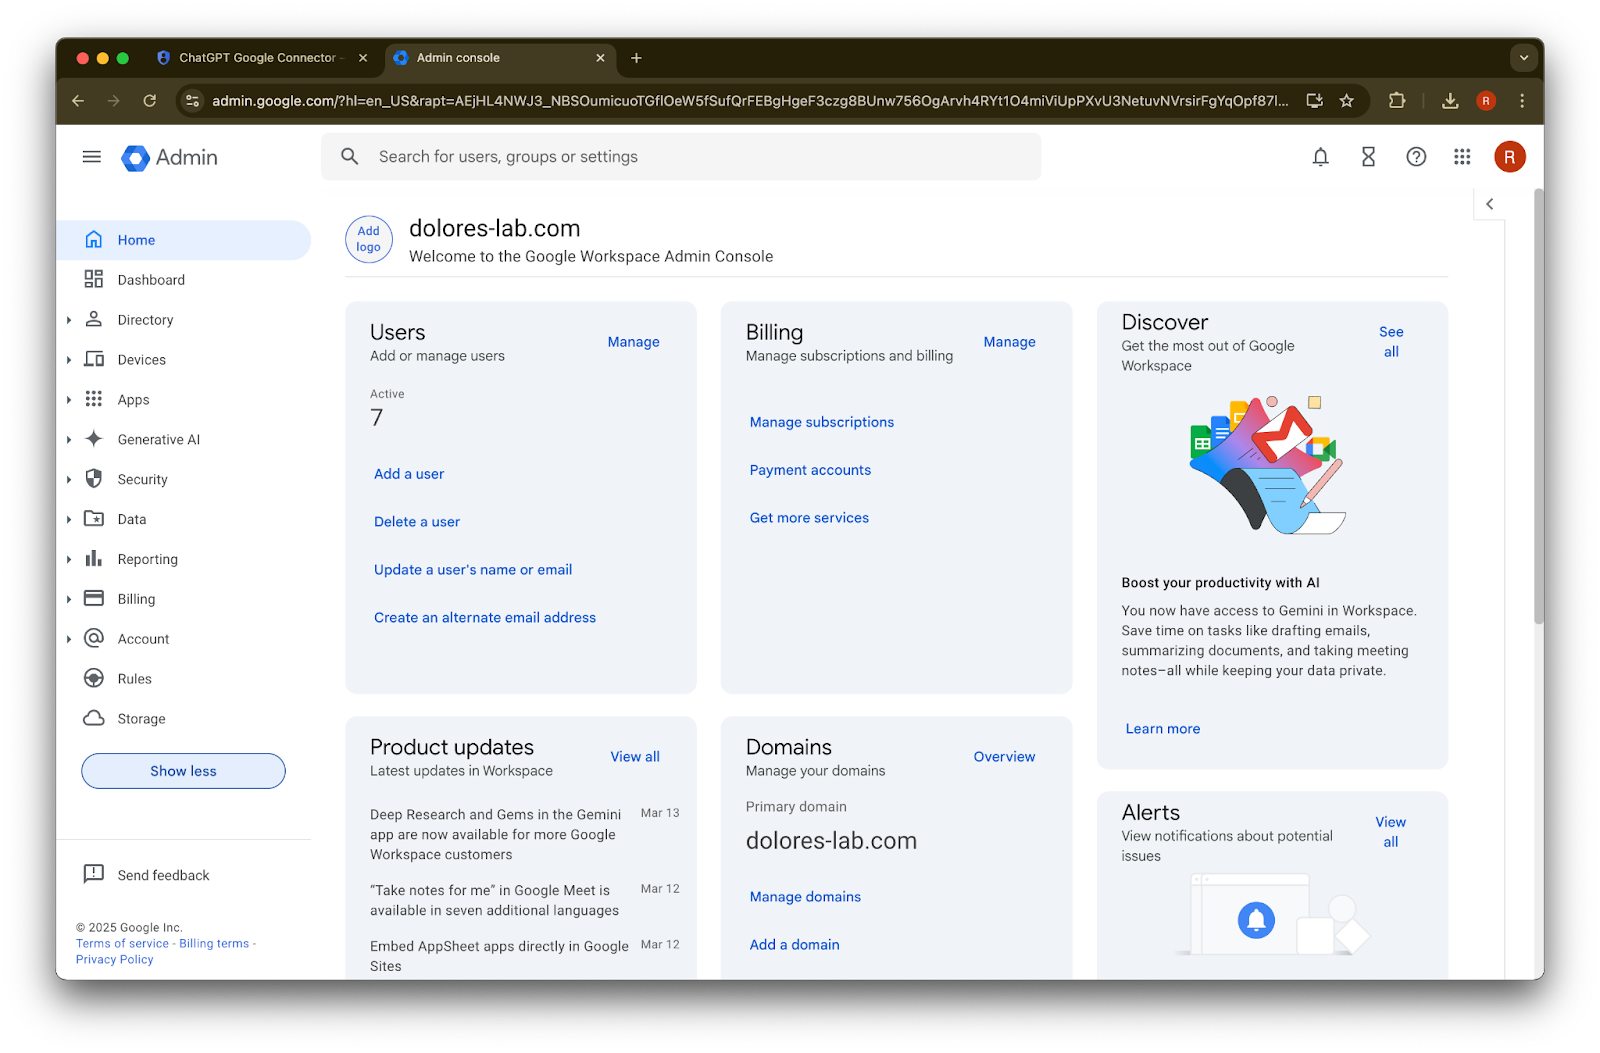
Show more ಮೇಲೆ ಕ್ಲಿಕ್ ಮಾಡಿ
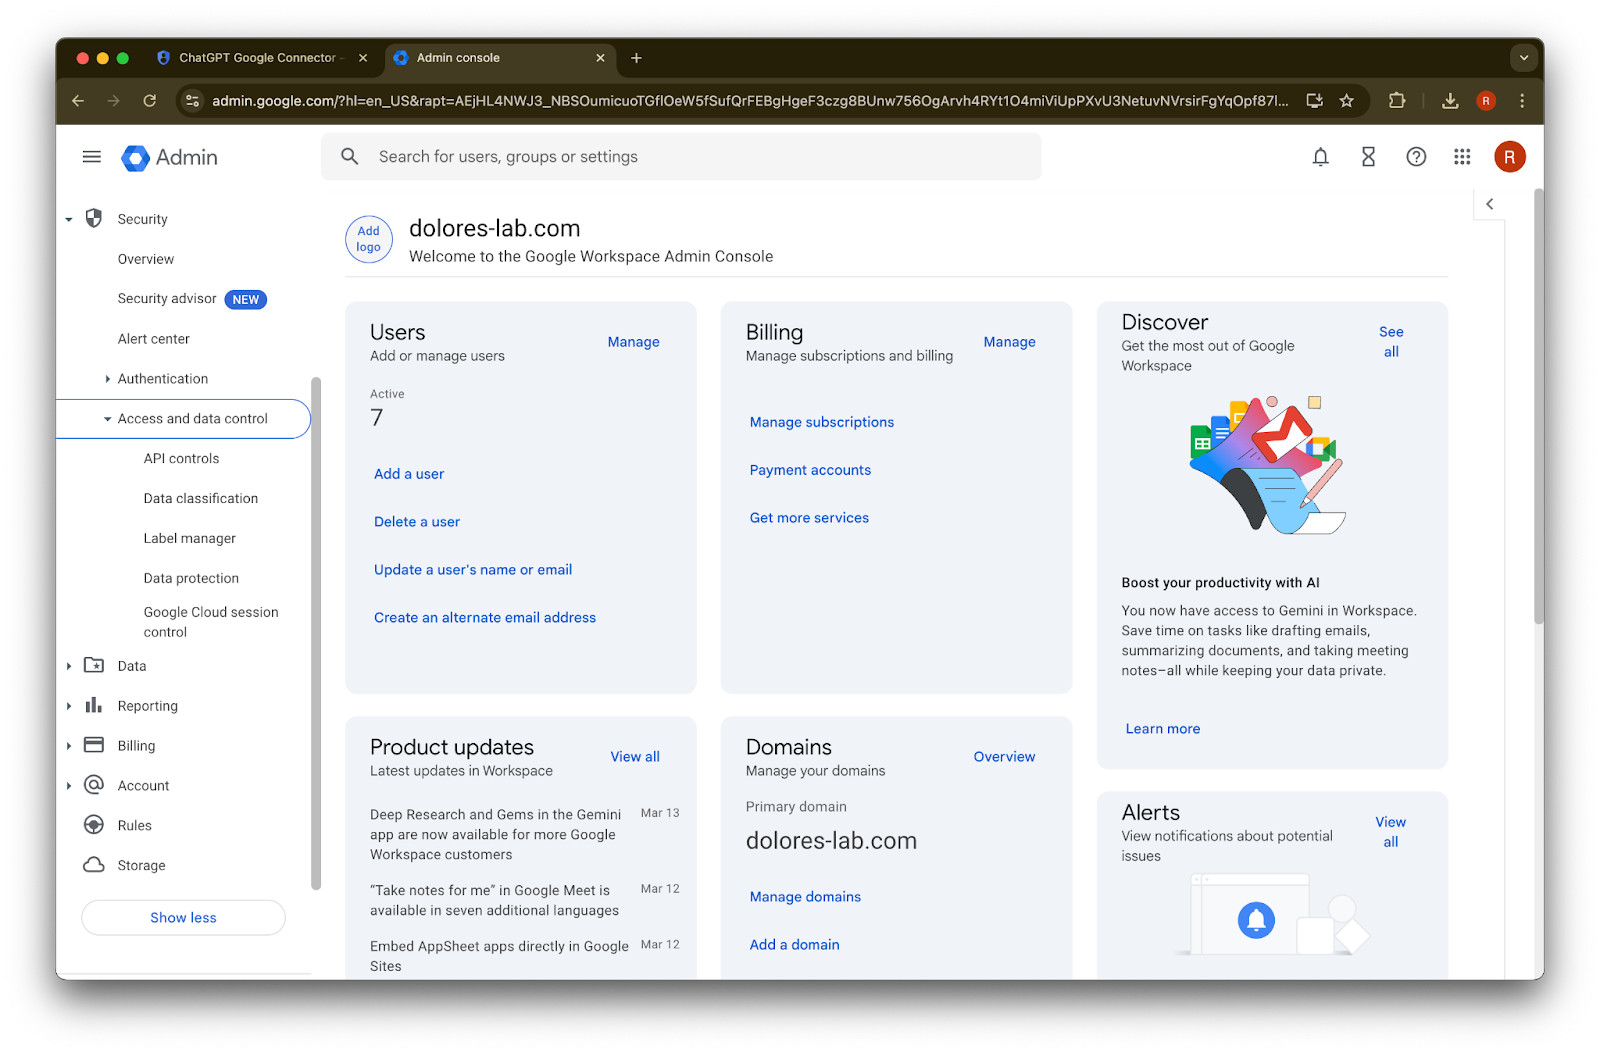
Security ವಿಭಾಗವನ್ನು ವಿಸ್ತರಿಸಿ
Access and data controls ವಿಭಾಗವನ್ನು ವಿಸ್ತರಿಸಿ
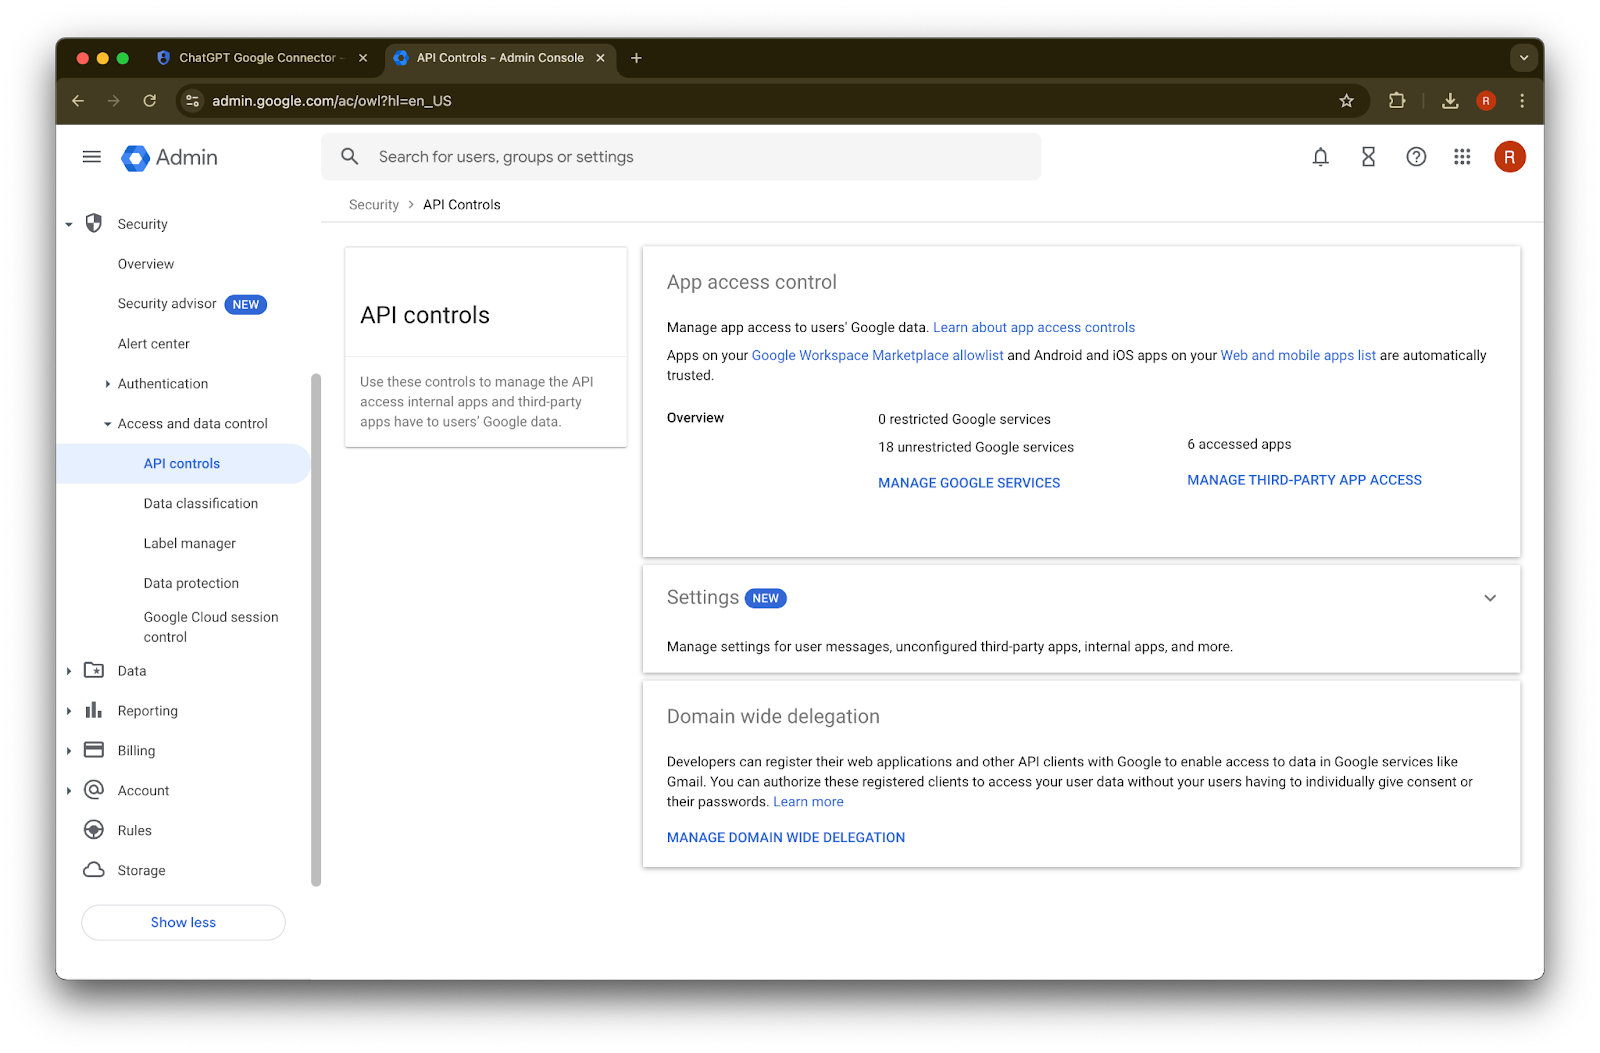
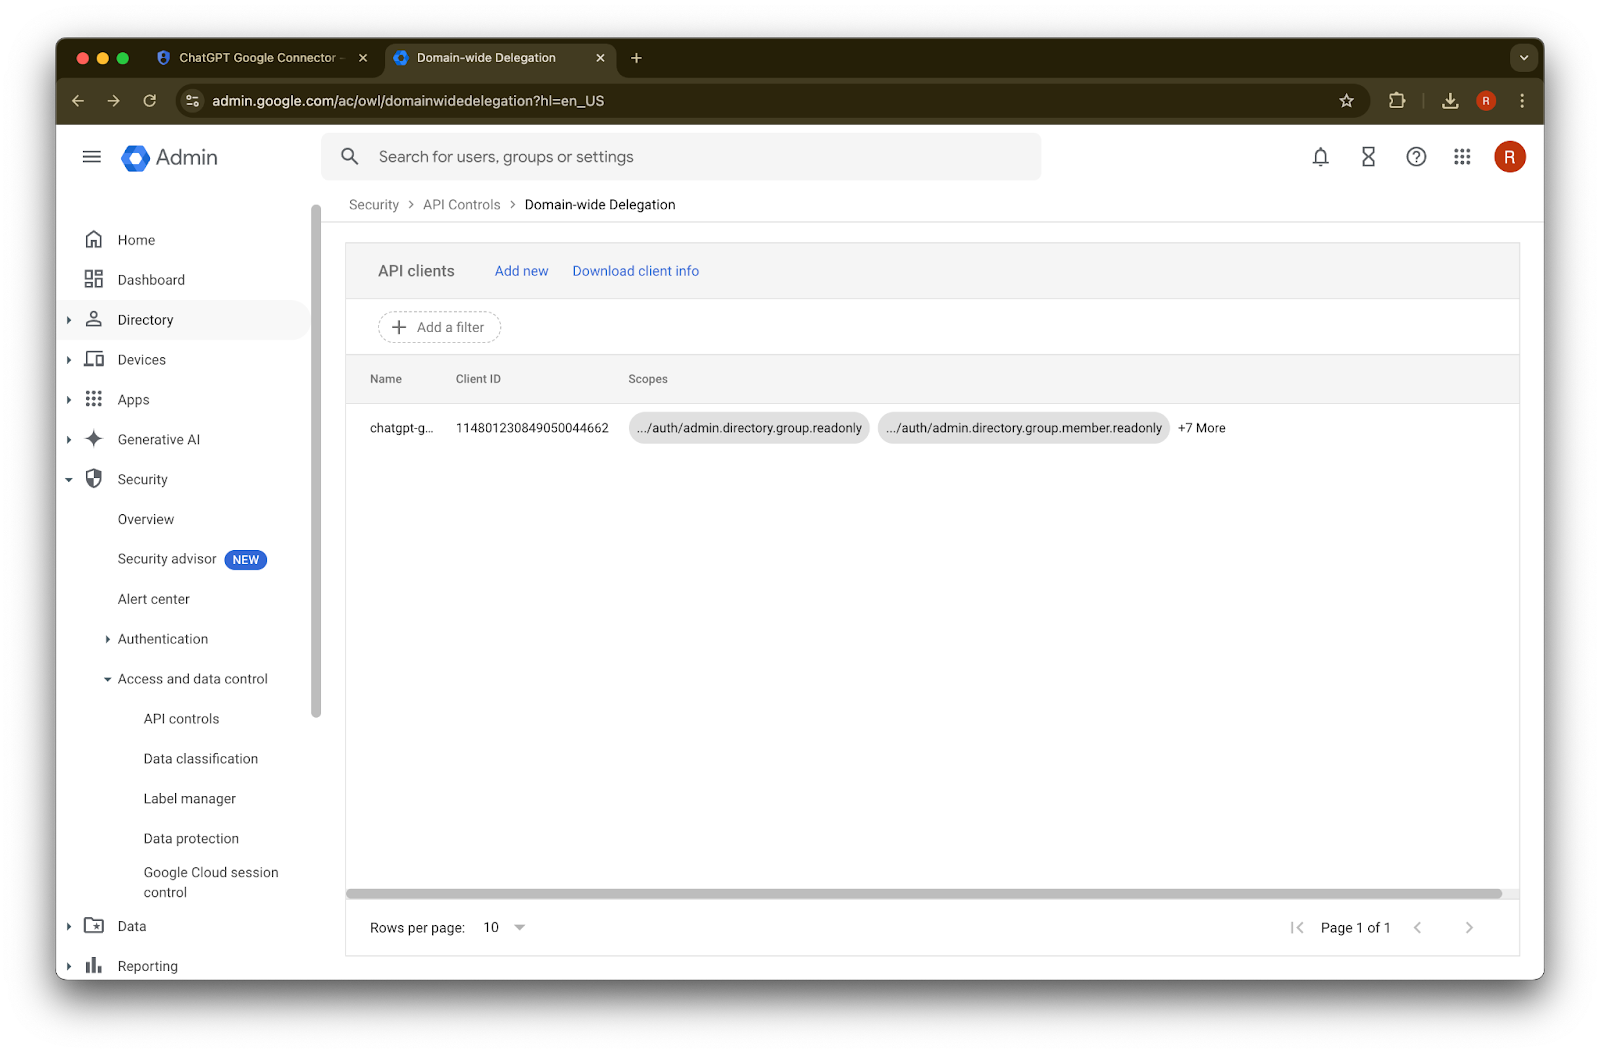
API controls ವಿಭಾಗದ ಮೇಲೆ ಕ್ಲಿಕ್ ಮಾಡಿ
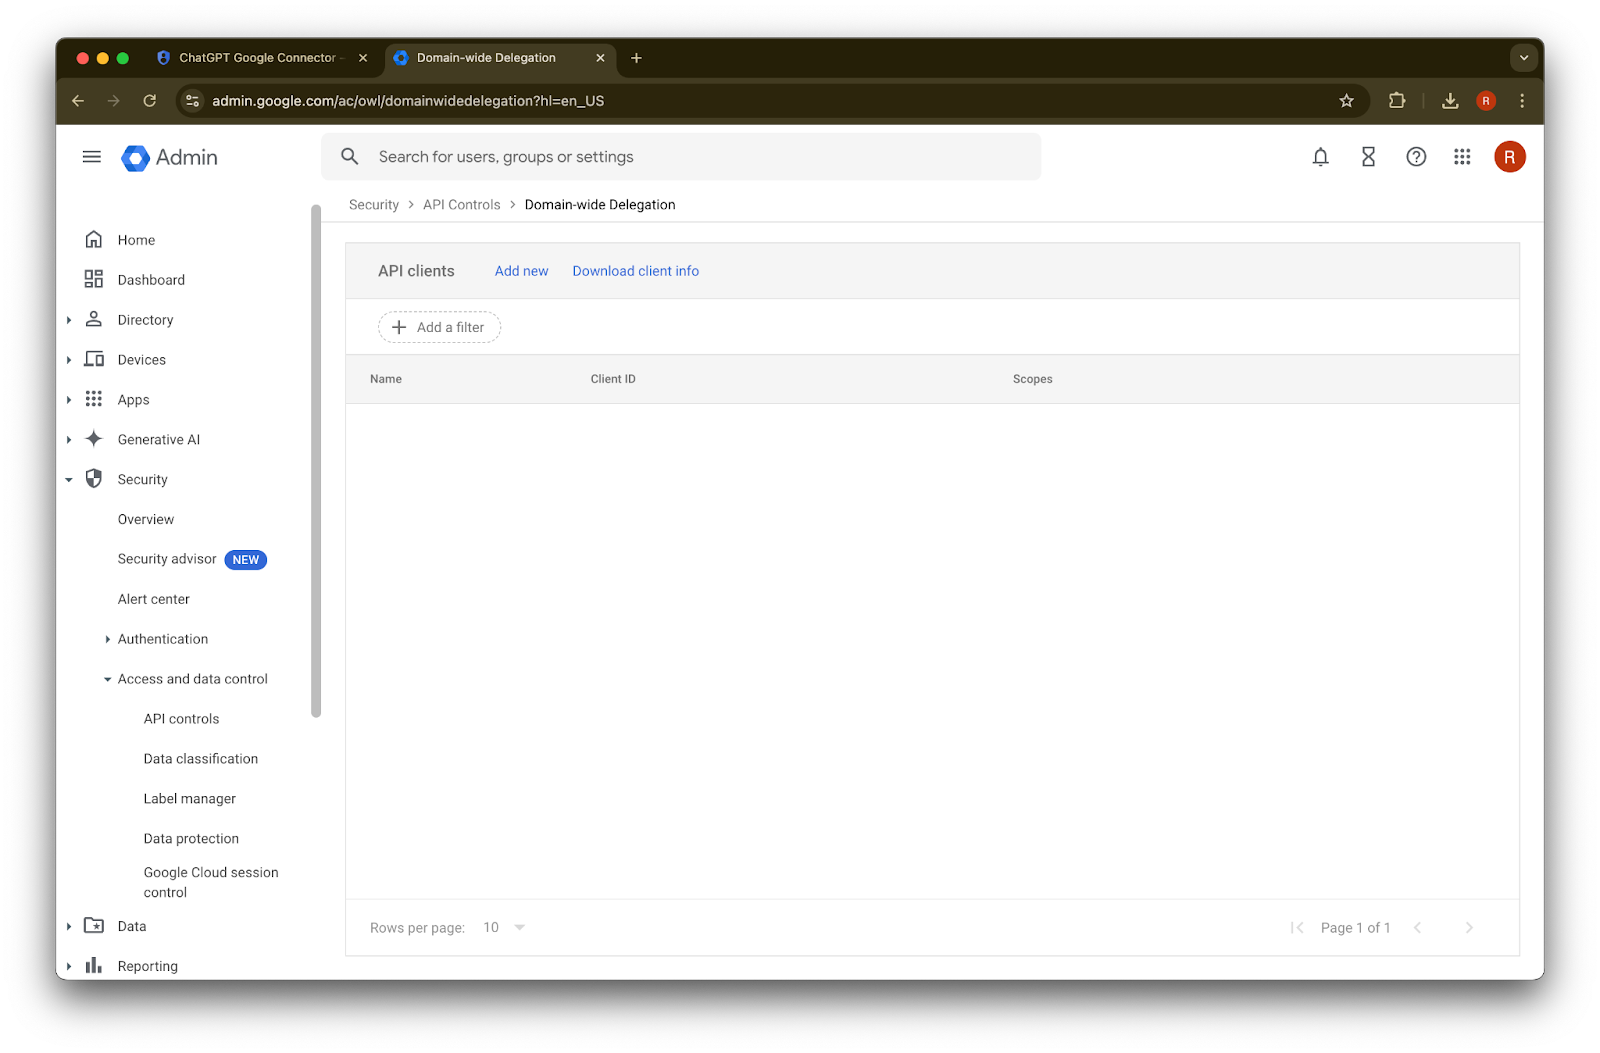
Manage Domain Wide Delegation ಮೇಲೆ ಕ್ಲಿಕ್ ಮಾಡಿ
Add new ಮೇಲೆ ಕ್ಲಿಕ್ ಮಾಡಿ
ಈ Client ID ಯ ಮೌಲ್ಯವಾಗಿ ಮೊದಲು ಗಮನಿಸಿದ Unique ID ಅನ್ನು ಬಳಸಿ
OAuth scopes ಗಾಗಿ, ನೀವು ಕಾಪಿ ಮತ್ತು ಪೇಸ್ಟ್ ಮಾಡಬೇಕಾದ ಕೆಳಗಿನ ಕಾಮಾ-ವಿಭಜಿತ auth scopes ಮೌಲ್ಯಗಳನ್ನು ನೋಡಿ.
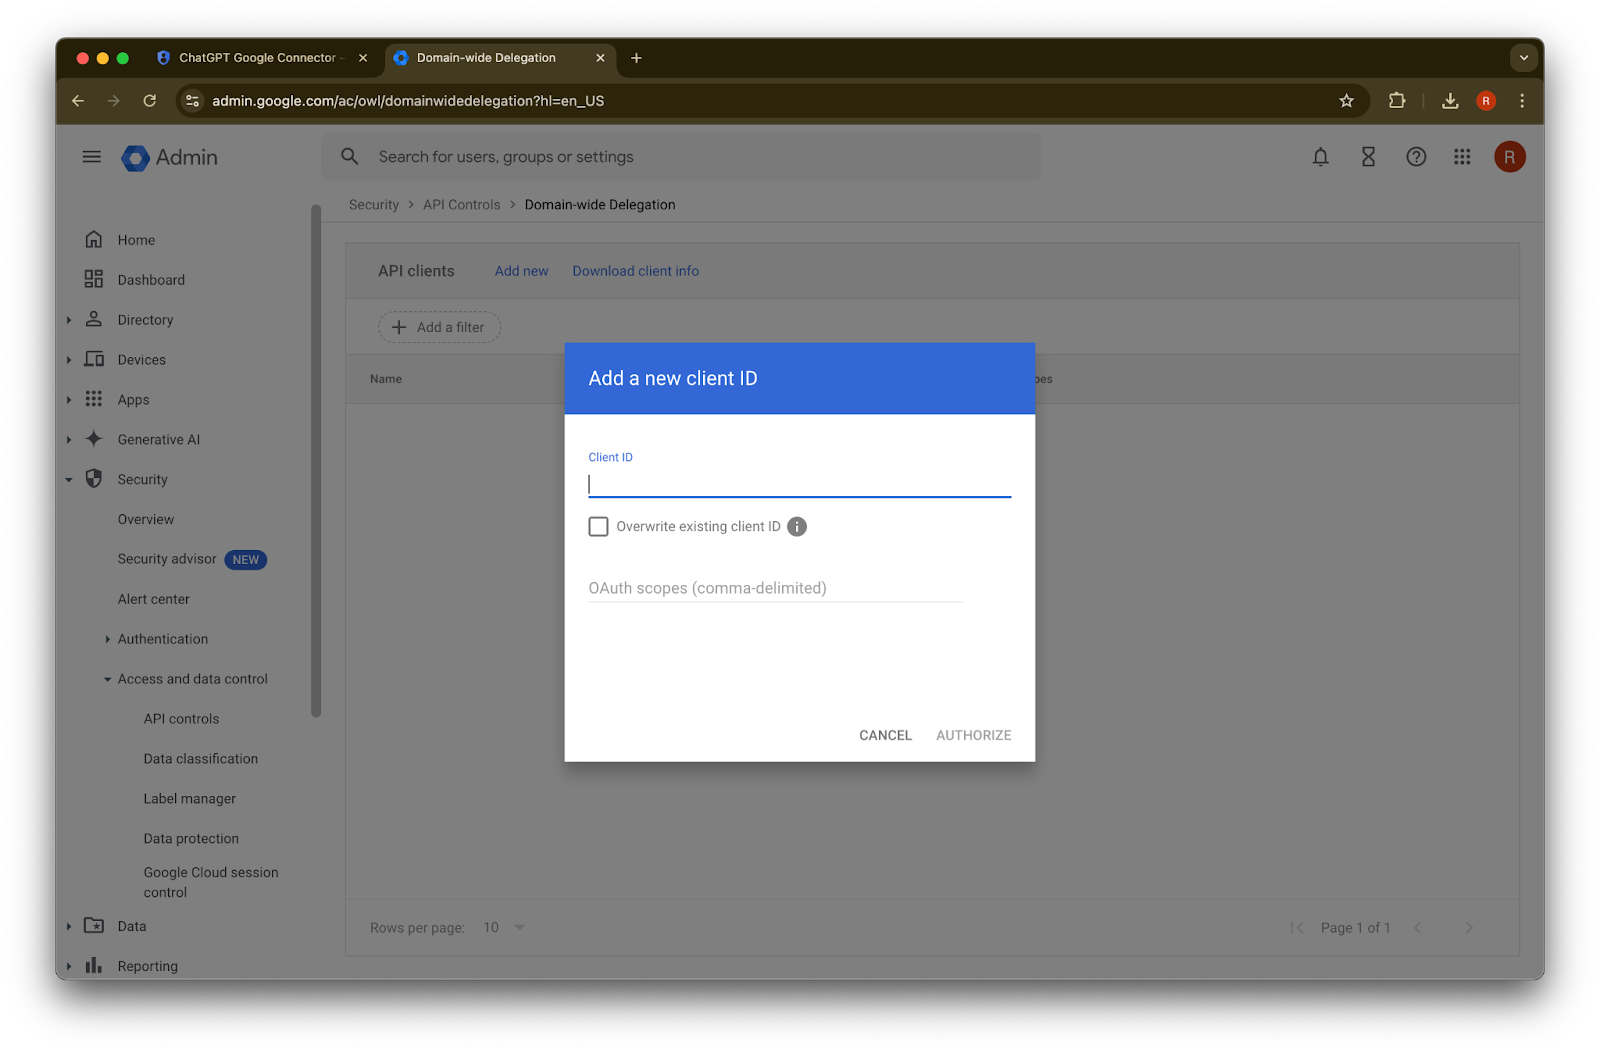
https://www.googleapis.com/auth/admin.directory.group.readonly, https://www.googleapis.com/auth/admin.directory.group.member.readonly, https://www.googleapis.com/auth/admin.directory.user.readonly, https://www.googleapis.com/auth/admin.directory.user.alias.readonly, https://www.googleapis.com/auth/drive.activity.readonly, https://www.googleapis.com/auth/drive.metadata.readonly, https://www.googleapis.com/auth/drive.readonly, https://www.googleapis.com/auth/userinfo.profile, https://www.googleapis.com/auth/userinfo.email| ವ್ಯಾಪ್ತಿ | ರೀಜನಿಂಗ್ |
| admin.directory.group.readonly | ಗುಂಪು-ಆಧಾರಿತ ಅನುಮತಿಗಳನ್ನು ಜಾರಿಗೆ ತರಲು |
| admin.directory.group.member.readonly | ಗುಂಪು-ಆಧಾರಿತ ಅನುಮತಿಗಳನ್ನು ಜಾರಿಗೆ ತರಲು |
| admin.directory.user.alias.readonly | ಬಳಕೆದಾರರಿಗೆ ಅಲಿಯಾಸ್ ಮೂಲಕ ಅನುಮತಿ ನೀಡಲಾದ ಸಂದರ್ಭಗಳನ್ನು ನಿರ್ವಹಿಸಲು |
| drive.activity.readonly | ಫೈಲ್ಗಳಲ್ಲಿ ಬದಲಾವಣೆಗಳು ಸಂಭವಿಸಿದಾಗ ಸೂಚನೆ ಪಡೆಯಲು |
| drive.metadata.readonly | ಫೈಲ್ ವಿಷಯ ಮತ್ತು ಸಂಬಂಧಿತ ಮೆಟಾಡೇಟಾವನ್ನು ಸಿಂಕ್ ಮಾಡಲು (ಉದಾ. ಕೊನೆಯ ತಿದ್ದುಪಡಿ ದಿನಾಂಕ) |
| drive.readonly | ಫೈಲ್ ವಿಷಯ ಮತ್ತು ಸಂಬಂಧಿತ ಮೆಟಾಡೇಟಾವನ್ನು ಸಿಂಕ್ ಮಾಡಲು (ಉದಾ. ಕೊನೆಯ ತಿದ್ದುಪಡಿ ದಿನಾಂಕ) |
| userinfo.profile | ನಾವು ಯಾರಿಗಾಗಿ ಫೈಲ್ಗಳನ್ನು ಸಿಂಕ್ ಮಾಡುತ್ತಿದ್ದೇವೆ ಎಂಬ ಬಳಕೆದಾರರನ್ನು ನಿರ್ಧರಿಸಲು |
| userinfo.email | ನಾವು ಯಾರಿಗಾಗಿ ಫೈಲ್ಗಳನ್ನು ಸಿಂಕ್ ಮಾಡುತ್ತಿದ್ದೇವೆ ಎಂಬ ಬಳಕೆದಾರರನ್ನು ನಿರ್ಧರಿಸಲು |
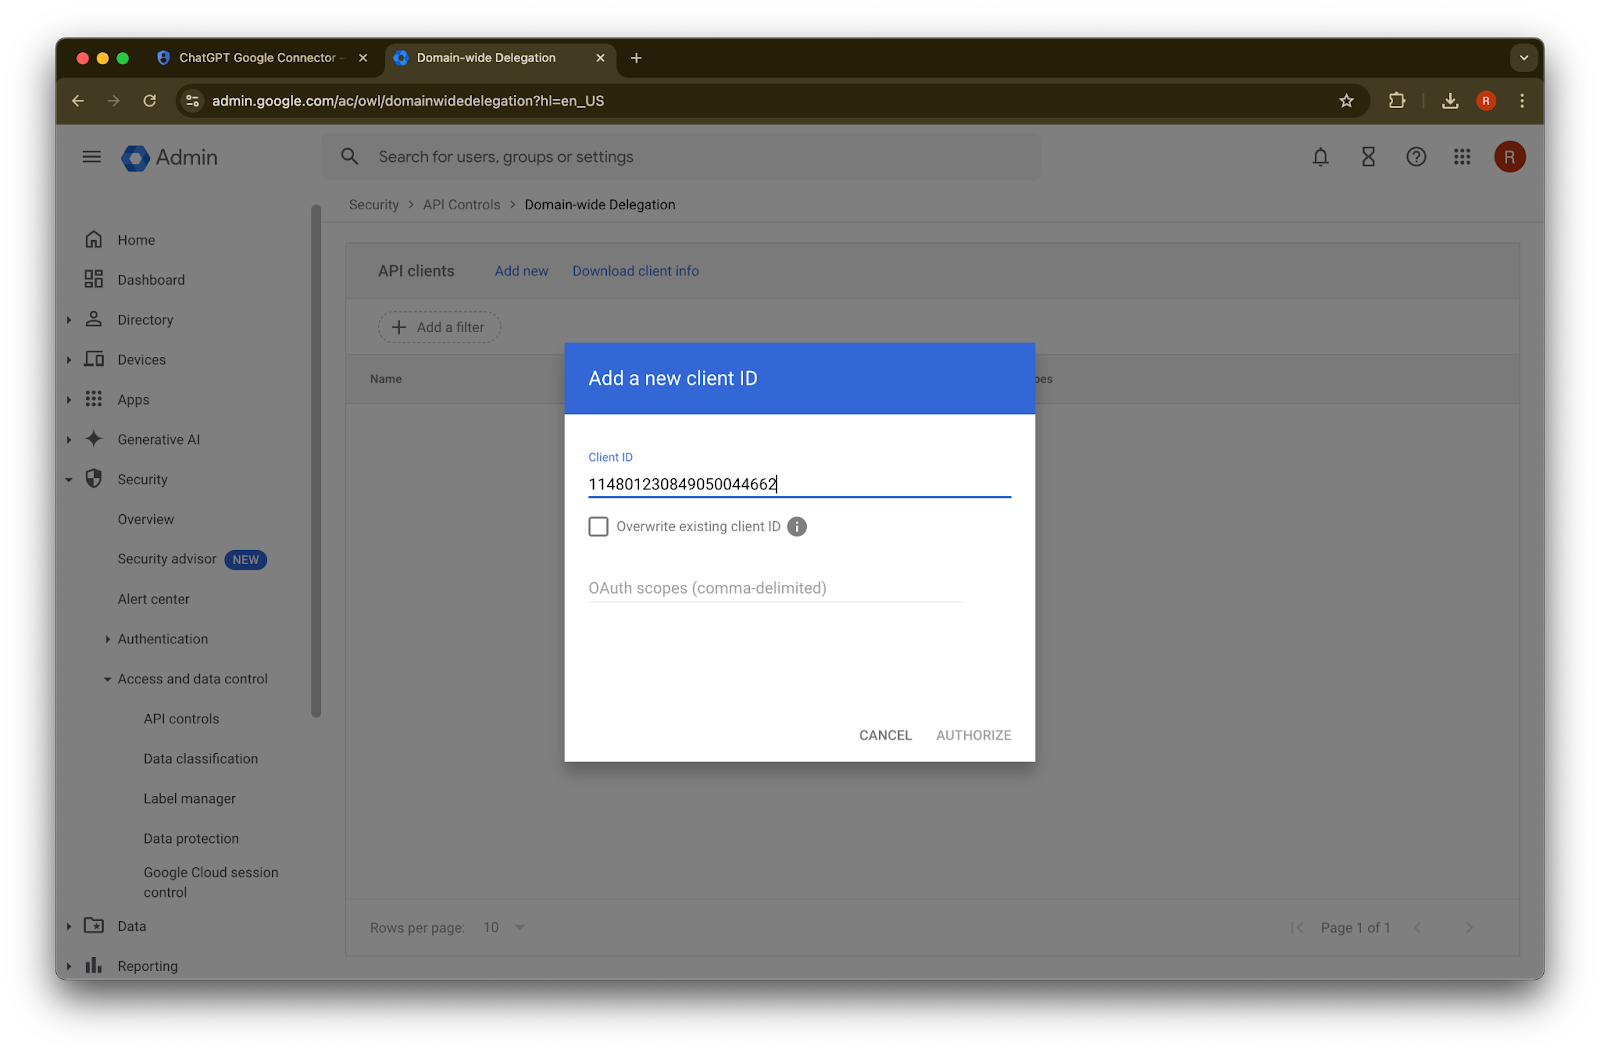
45. Authorize ಮೇಲೆ ಕ್ಲಿಕ್ ಮಾಡಿ
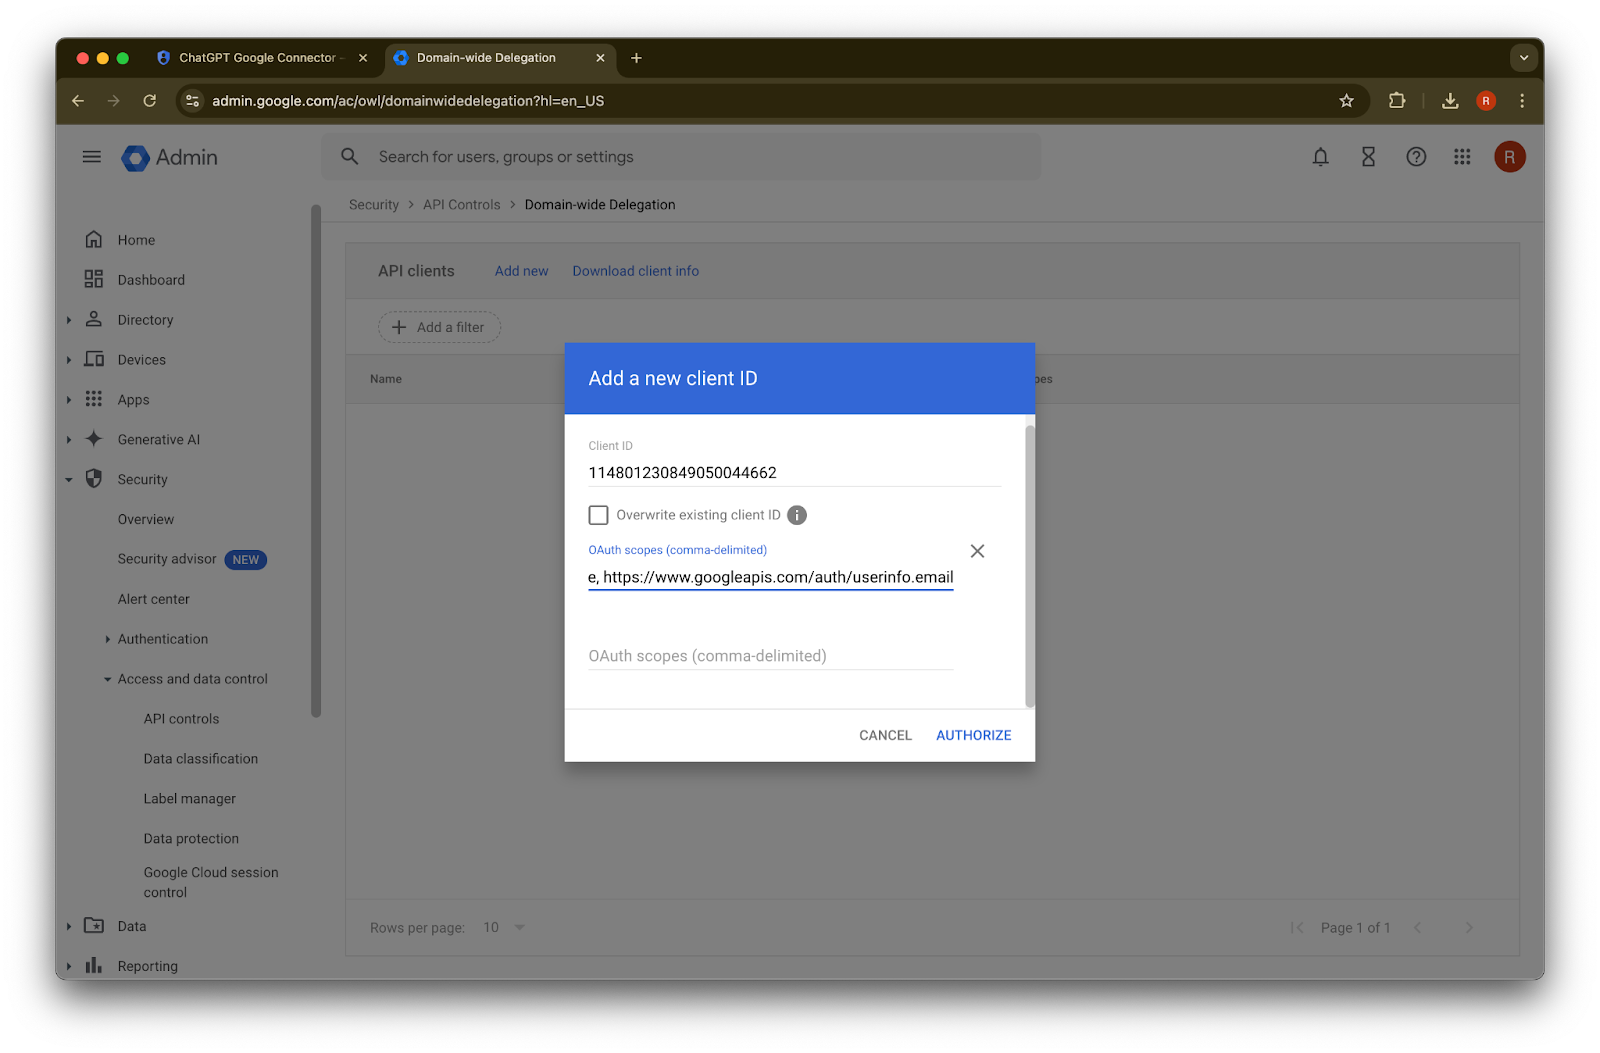
46. ಯಶಸ್ಸು!
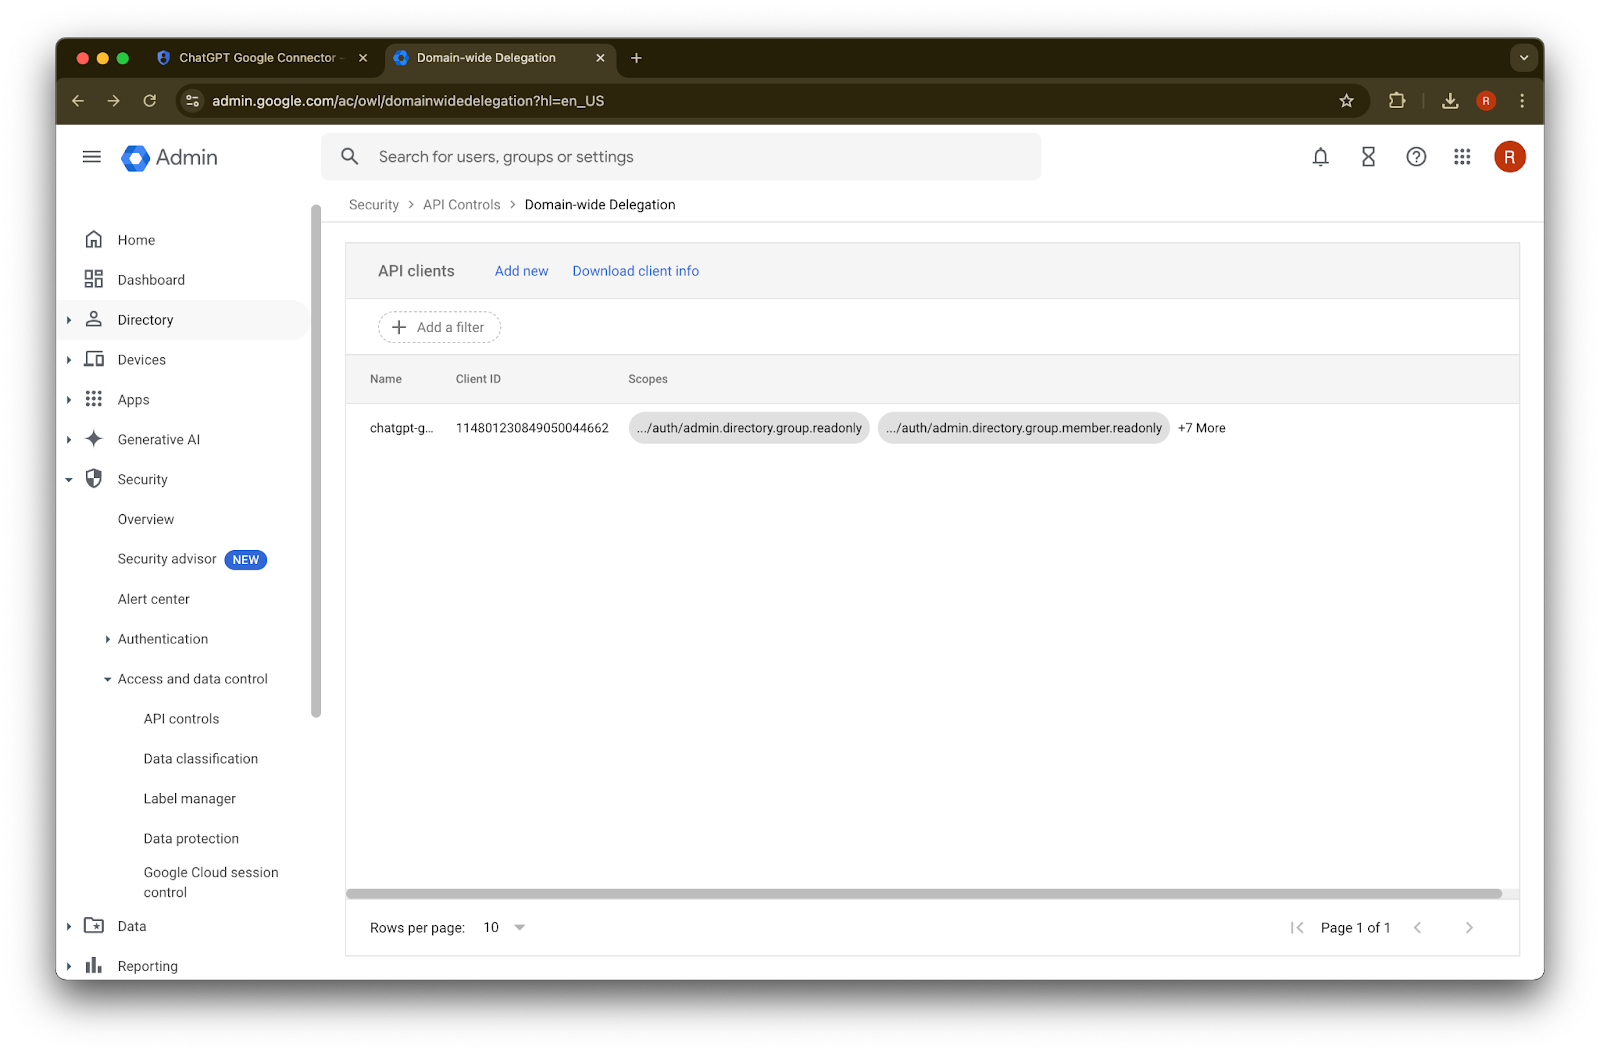
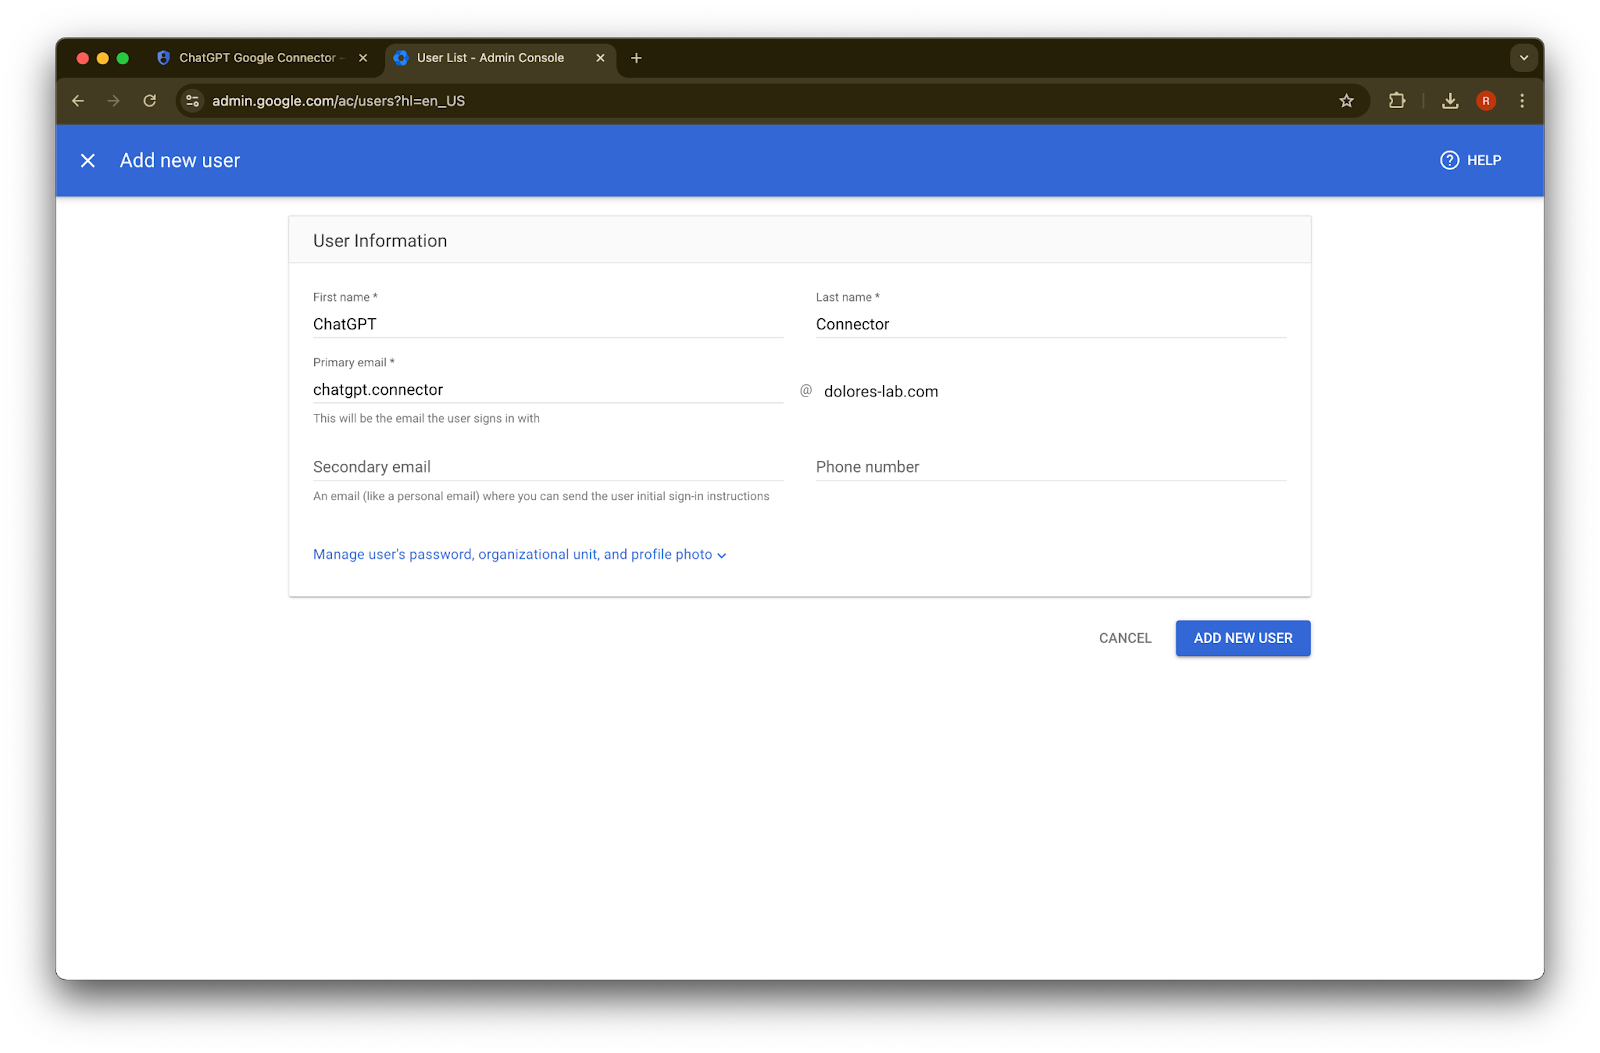
ನಿರ್ವಾಹಕ ಖಾತೆ ಸೆಟಪ್ ಮಾಡುವುದು
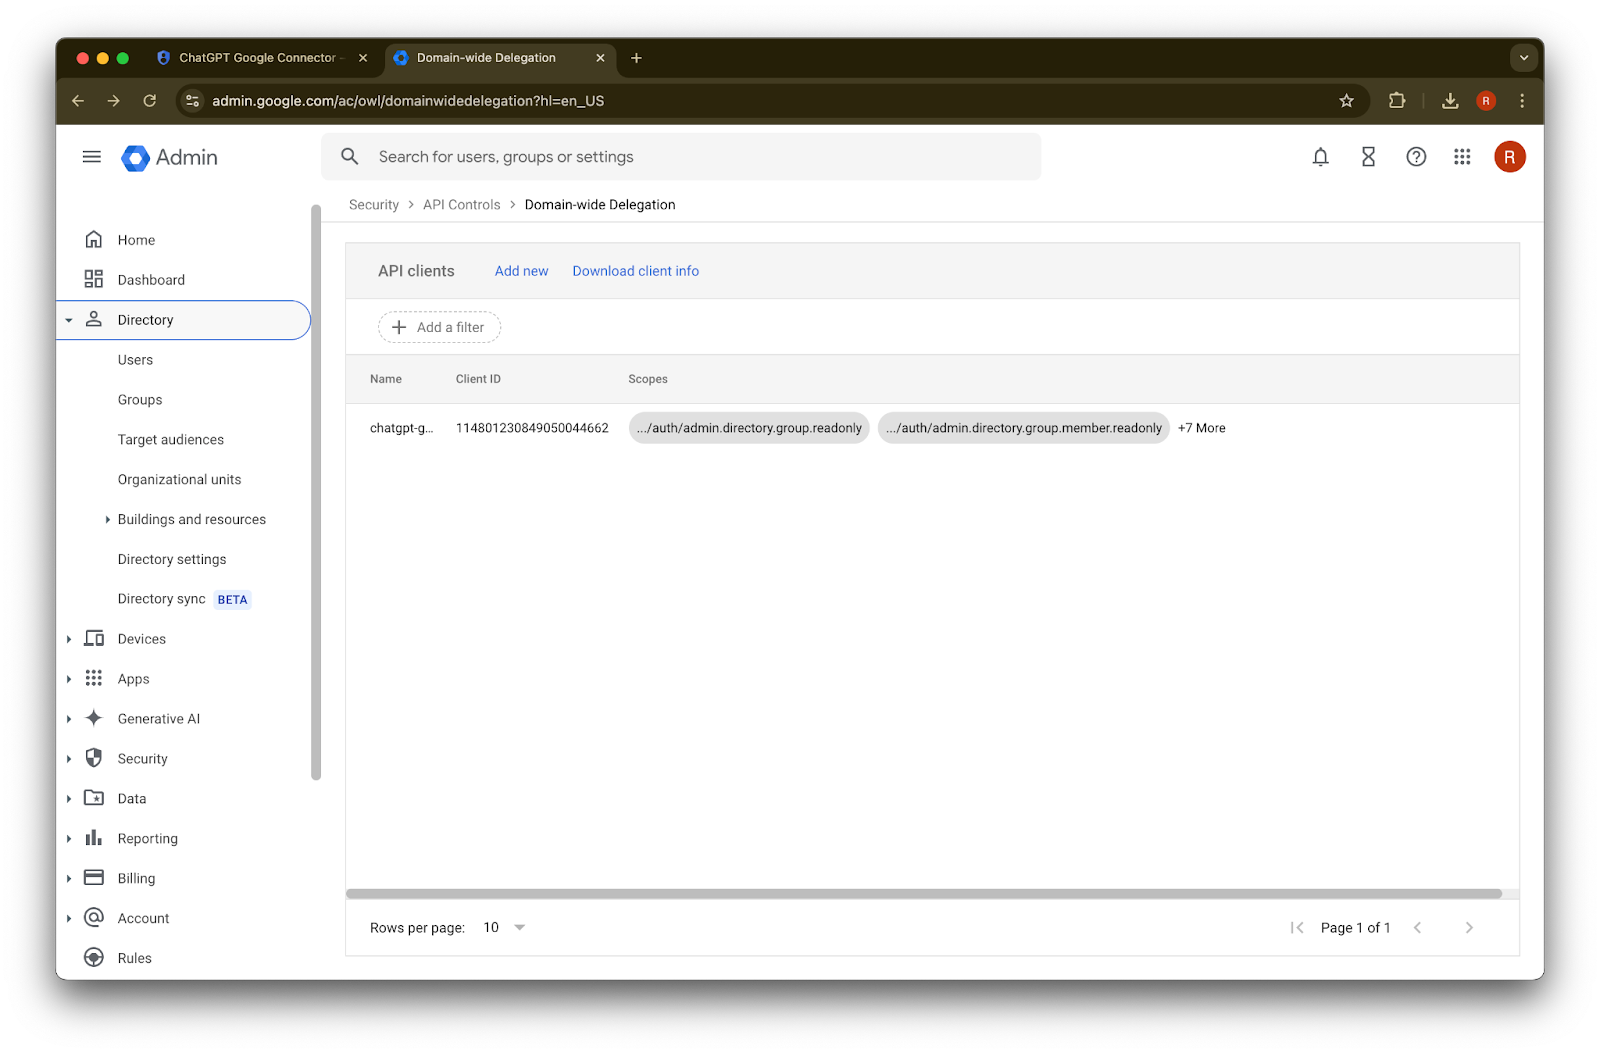
Directory ಅನ್ನು ವಿಸ್ತರಿಸಿ
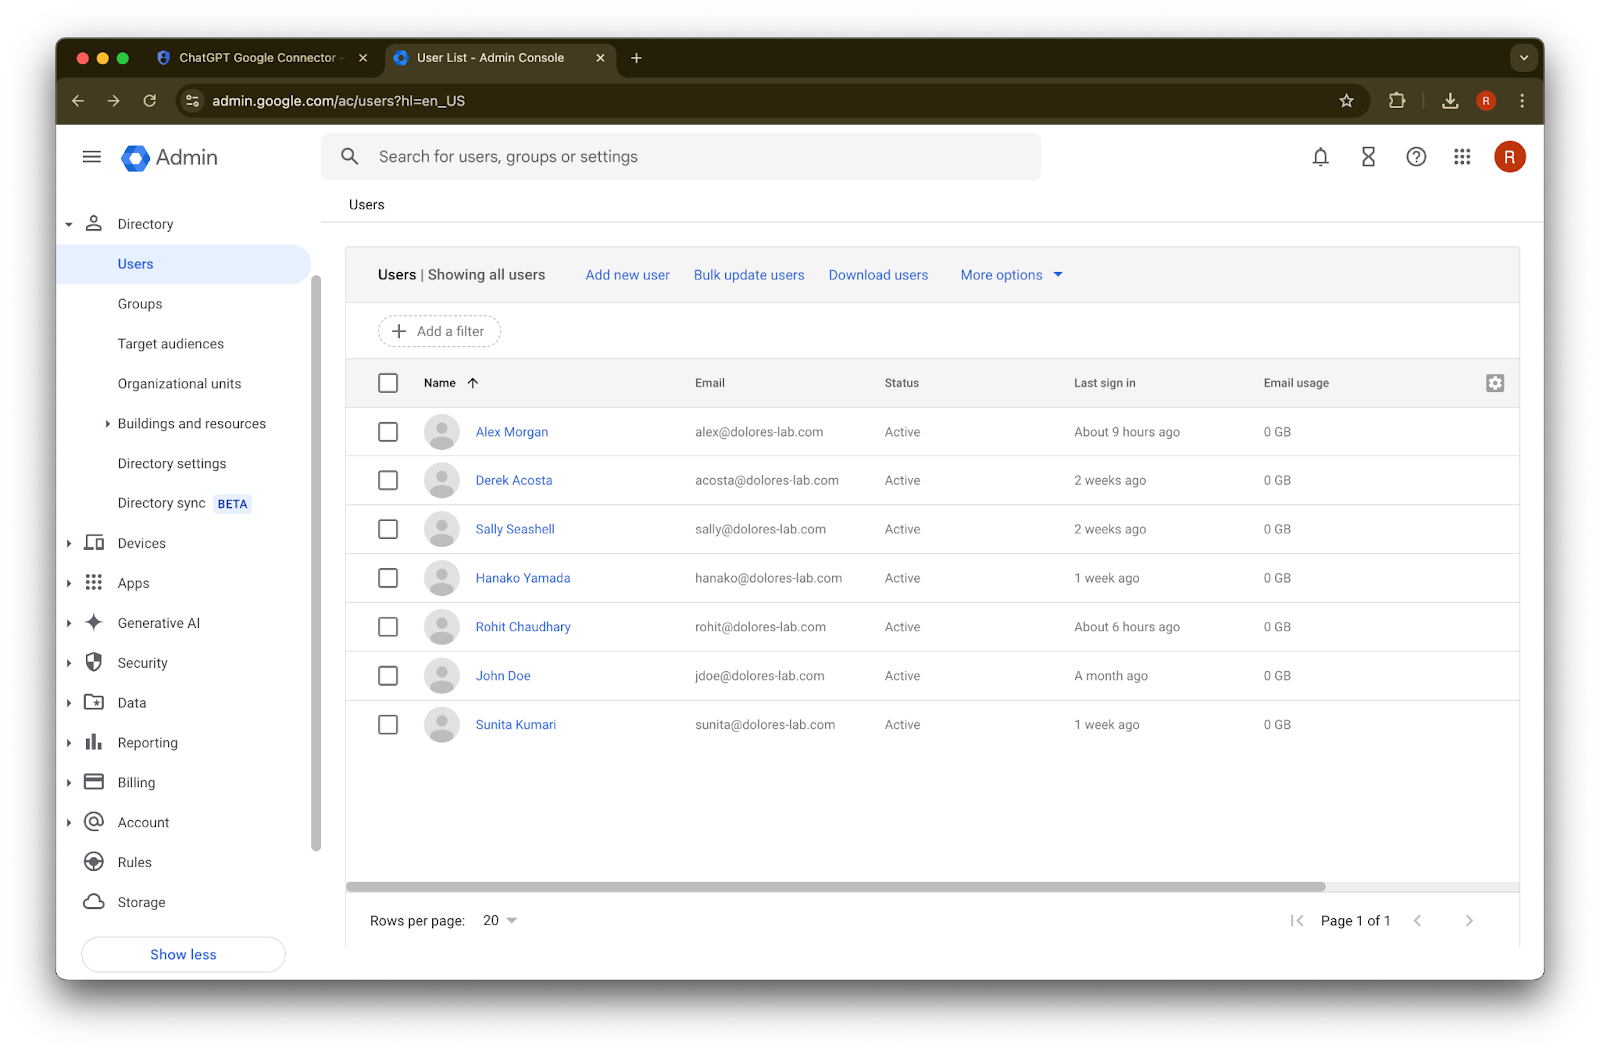
Users ಮೇಲೆ ಕ್ಲಿಕ್ ಮಾಡಿ
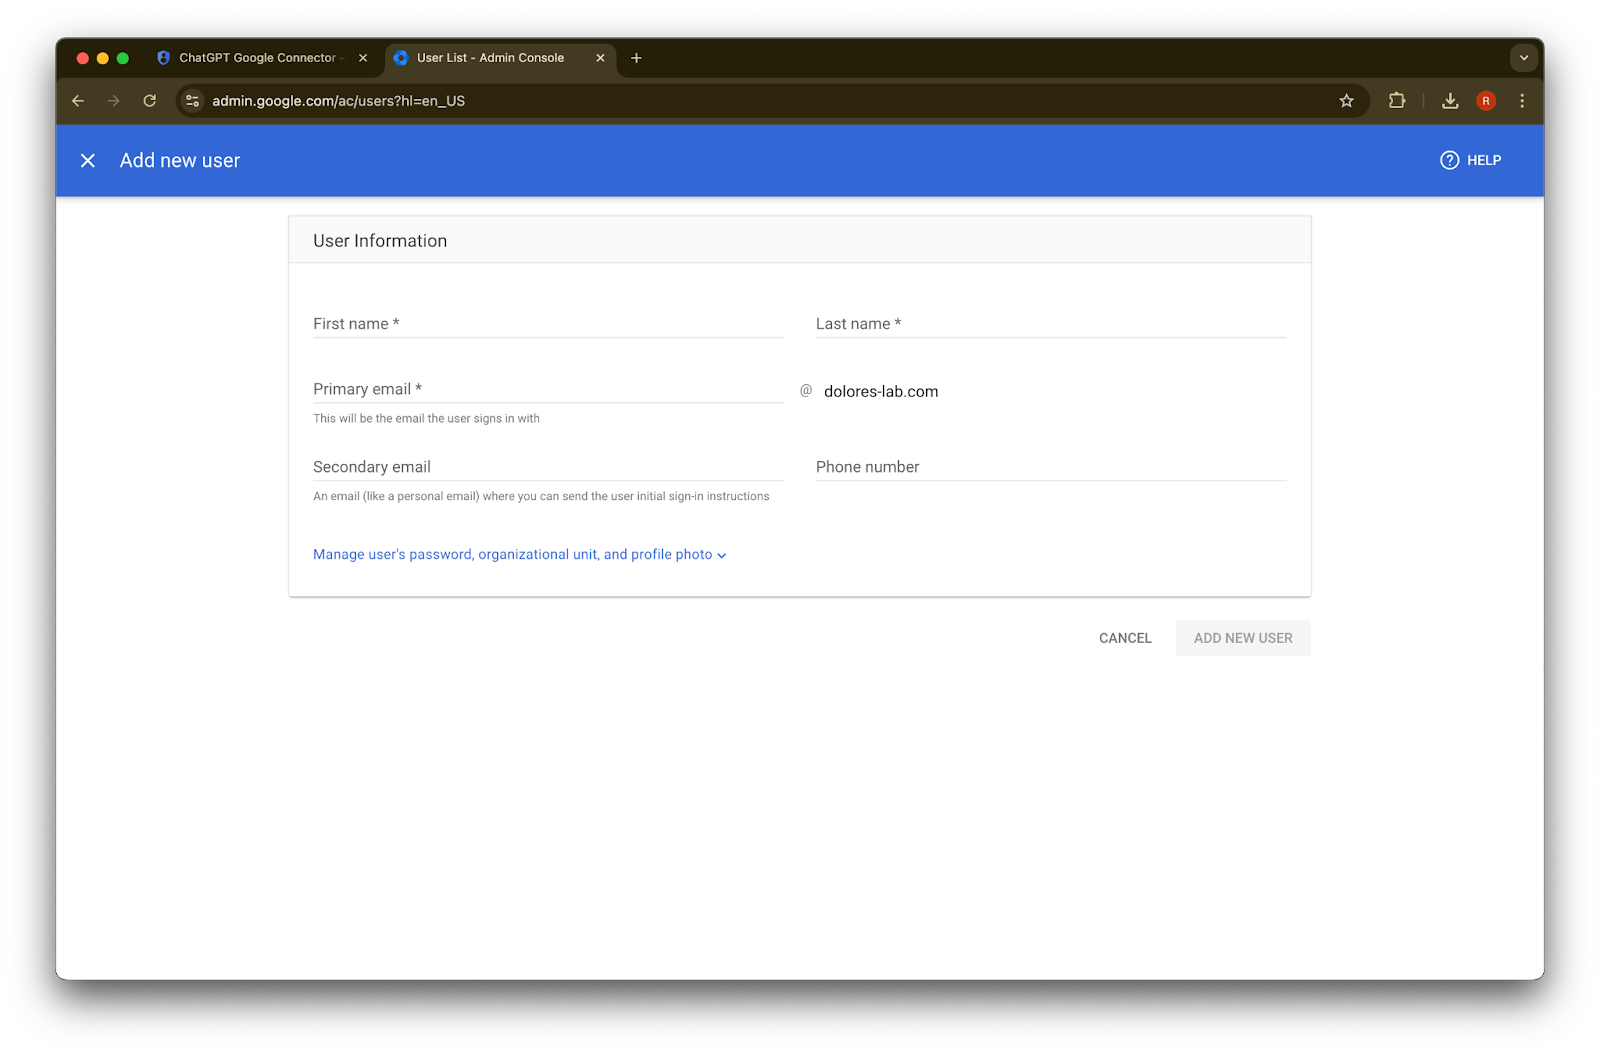
ನಿಮ್ಮ ಆಯ್ಕೆಯ first name, last name, ಮತ್ತು primary email ವಿಳಾಸವನ್ನು ಒದಗಿಸಿ
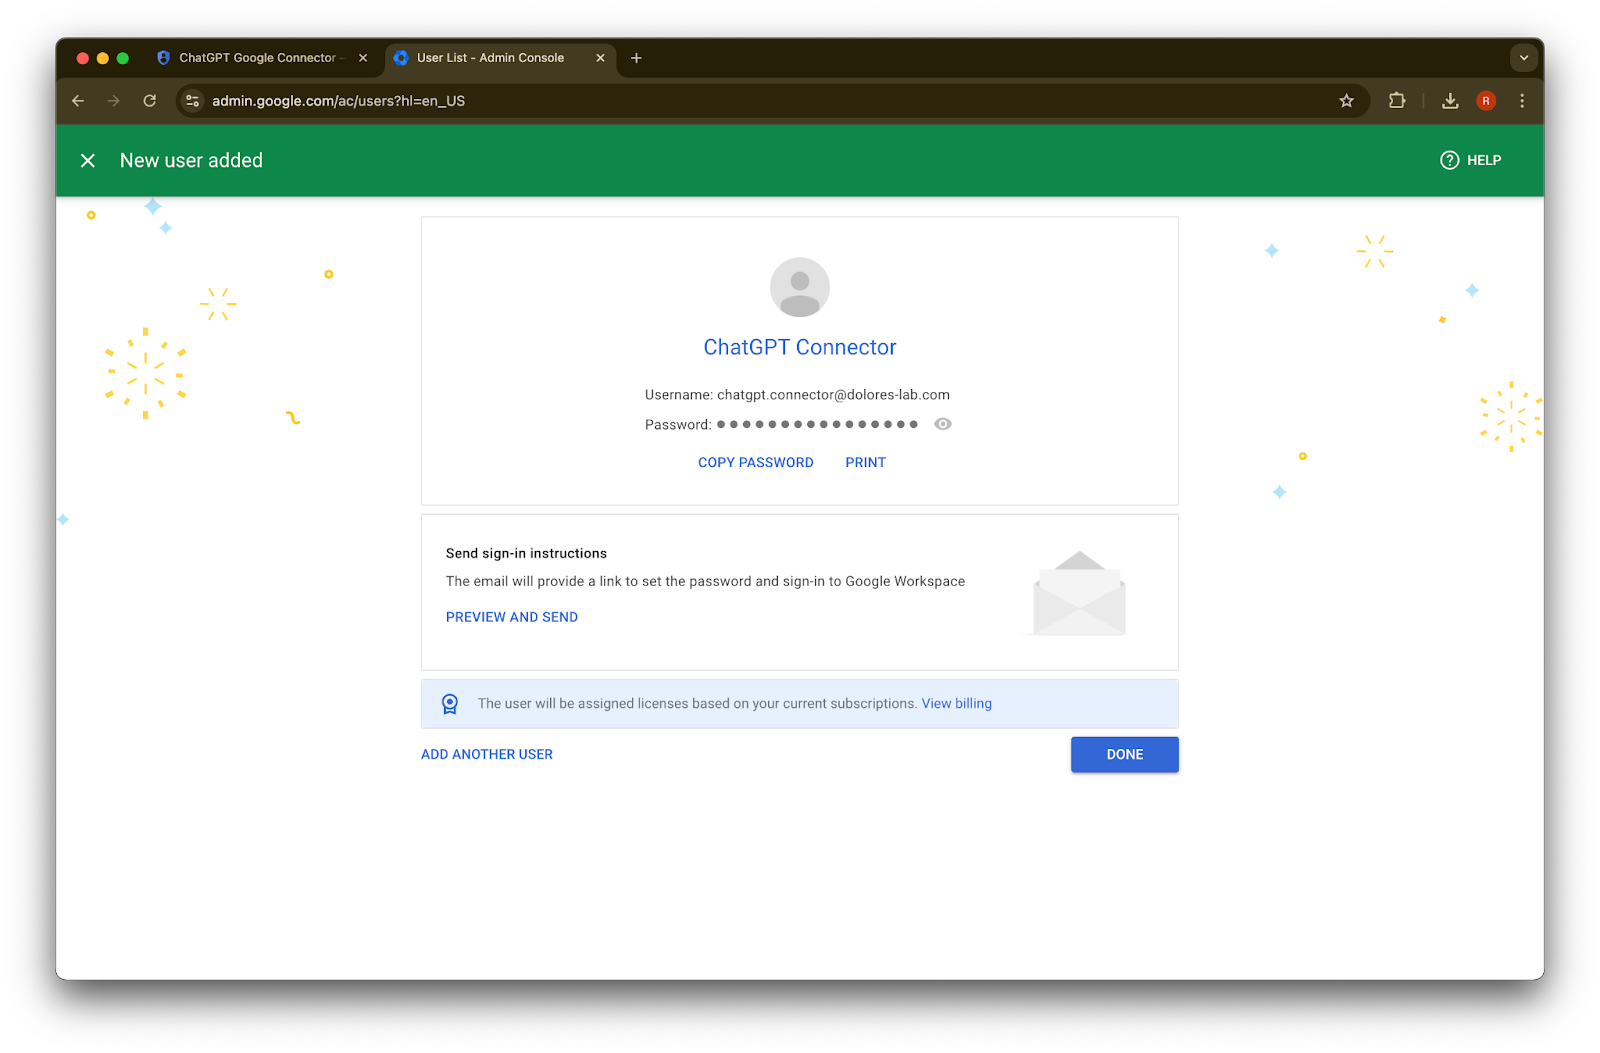
Add new user
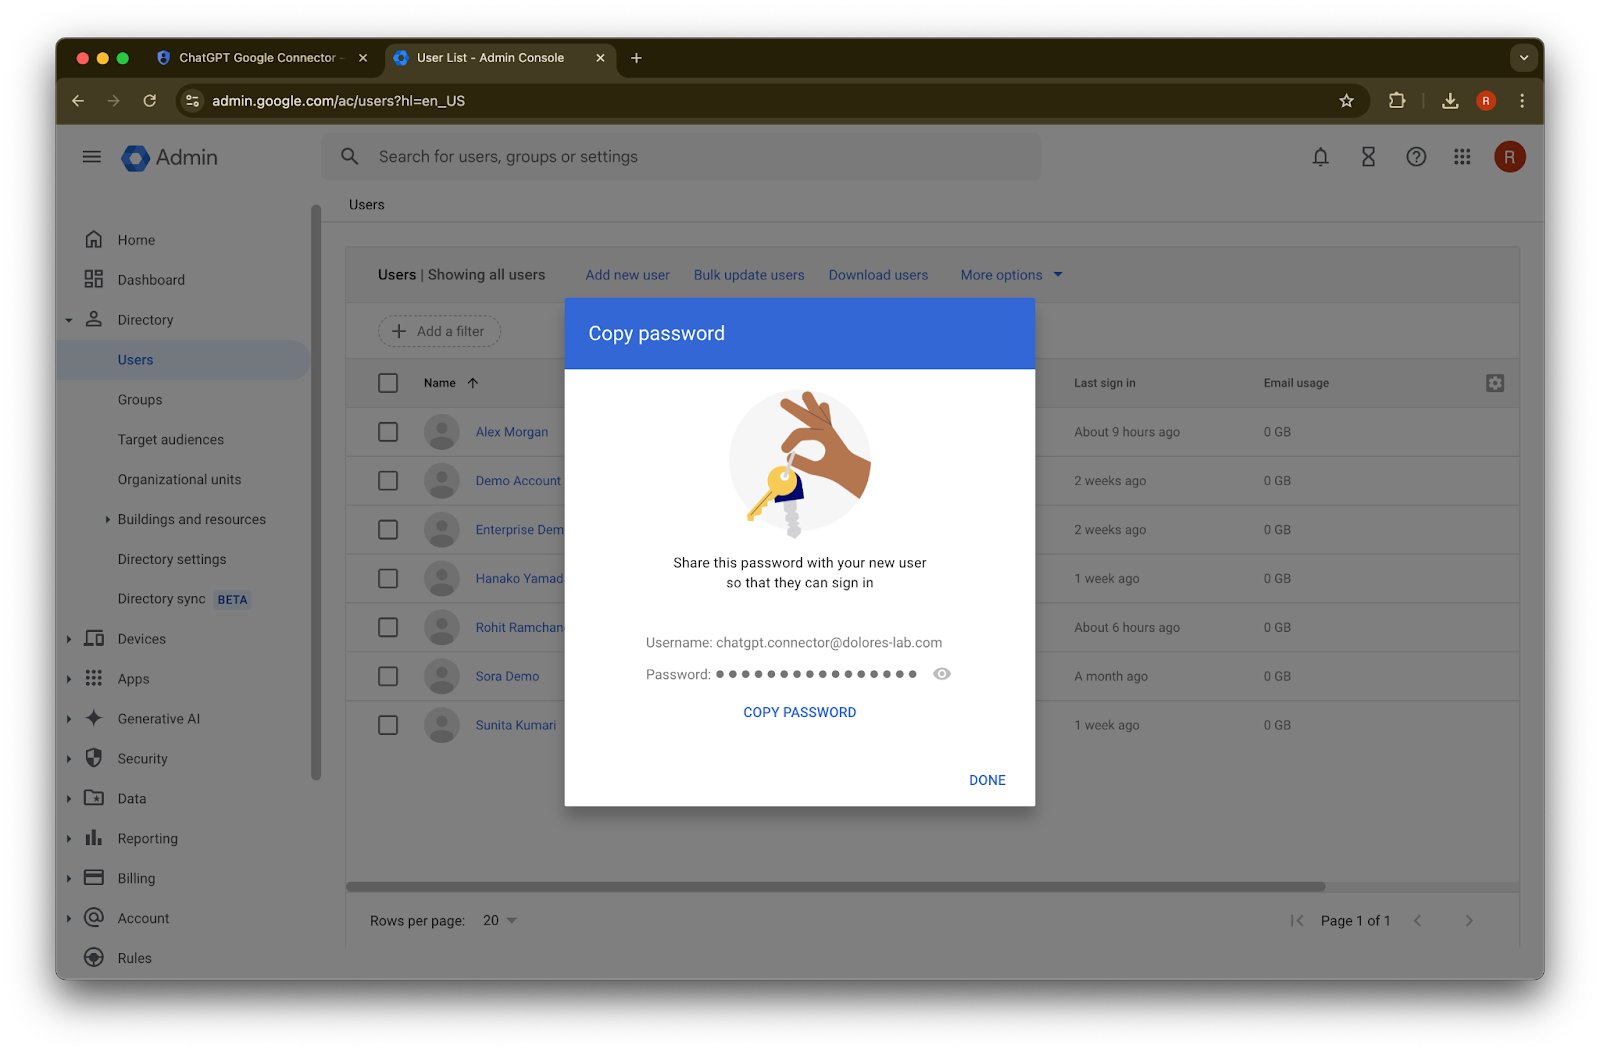
ಮೇಲೆ ಕ್ಲಿಕ್ ಮಾಡಿ(ಐಚ್ಛಿಕ) ಈ ರುಜುವಾತುಗಳನ್ನು ದಾಖಲಿಸಿ. ChatGPT ಗೆ ಈ ರುಜುವಾತುಗಳು ಅಗತ್ಯವಿಲ್ಲ.
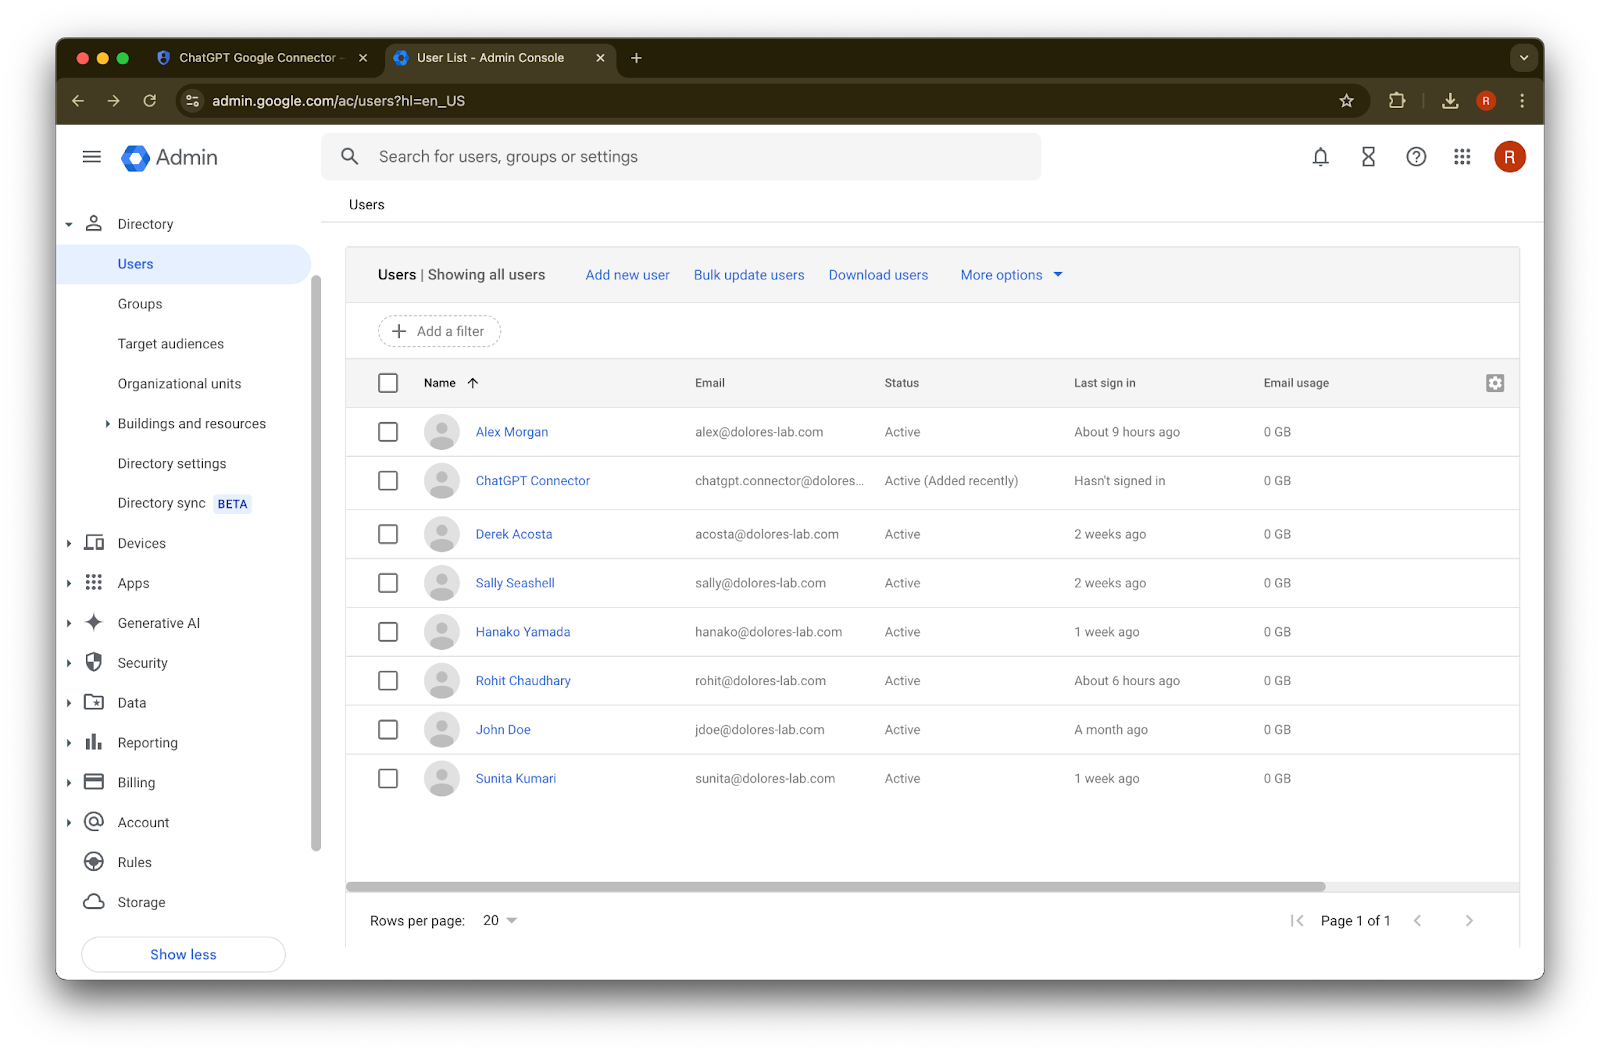
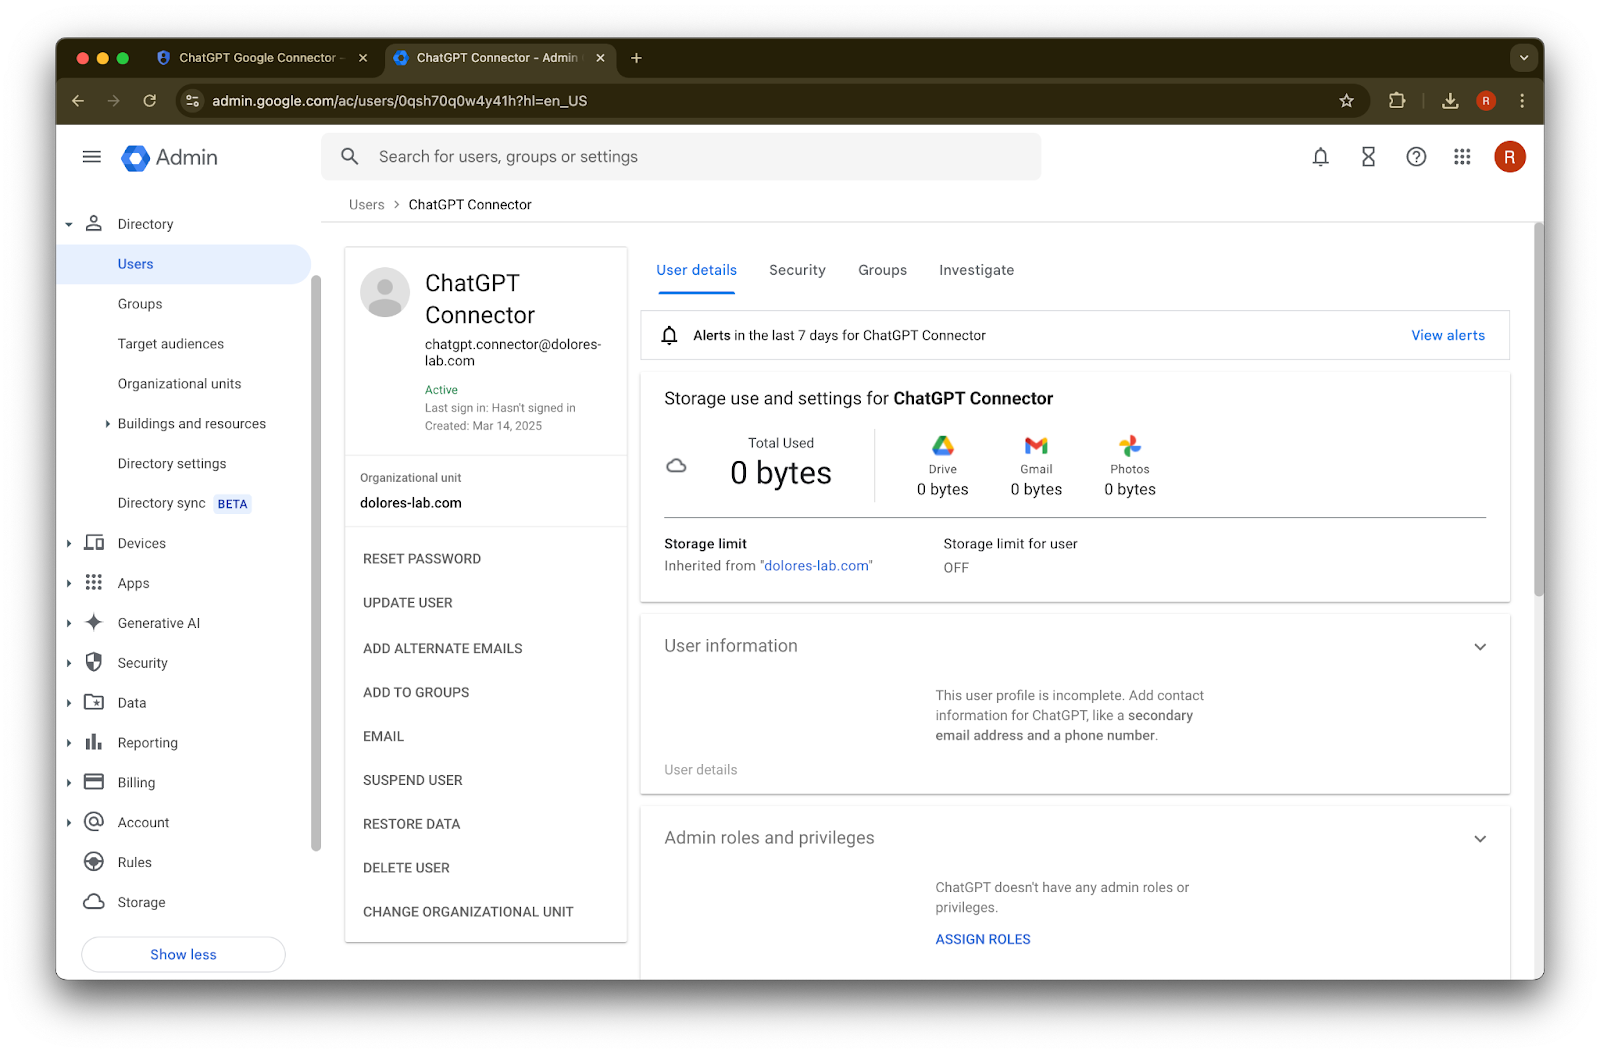
Done ಮೇಲೆ ಕ್ಲಿಕ್ ಮಾಡಿ.
ನೀವು ಈಗಷ್ಟೇ ರಚಿಸಿದ account ಮೇಲೆ ಕ್ಲಿಕ್ ಮಾಡಿ. ಅದು ಪಟ್ಟಿಯಲ್ಲಿ ಕಾಣಿಸದಿದ್ದರೆ, ಪುಟವನ್ನು ರಿಫ್ರೆಶ್ ಮಾಡಿ ಅಥವಾ ನಿಮ್ಮ ಕ್ಯಾಶೆ ಮತ್ತು ಕುಕೀಸ್ ಅನ್ನು ತೆರವುಗೊಳಿಸಿ ಮತ್ತೆ ಪ್ರಯತ್ನಿಸಿ.
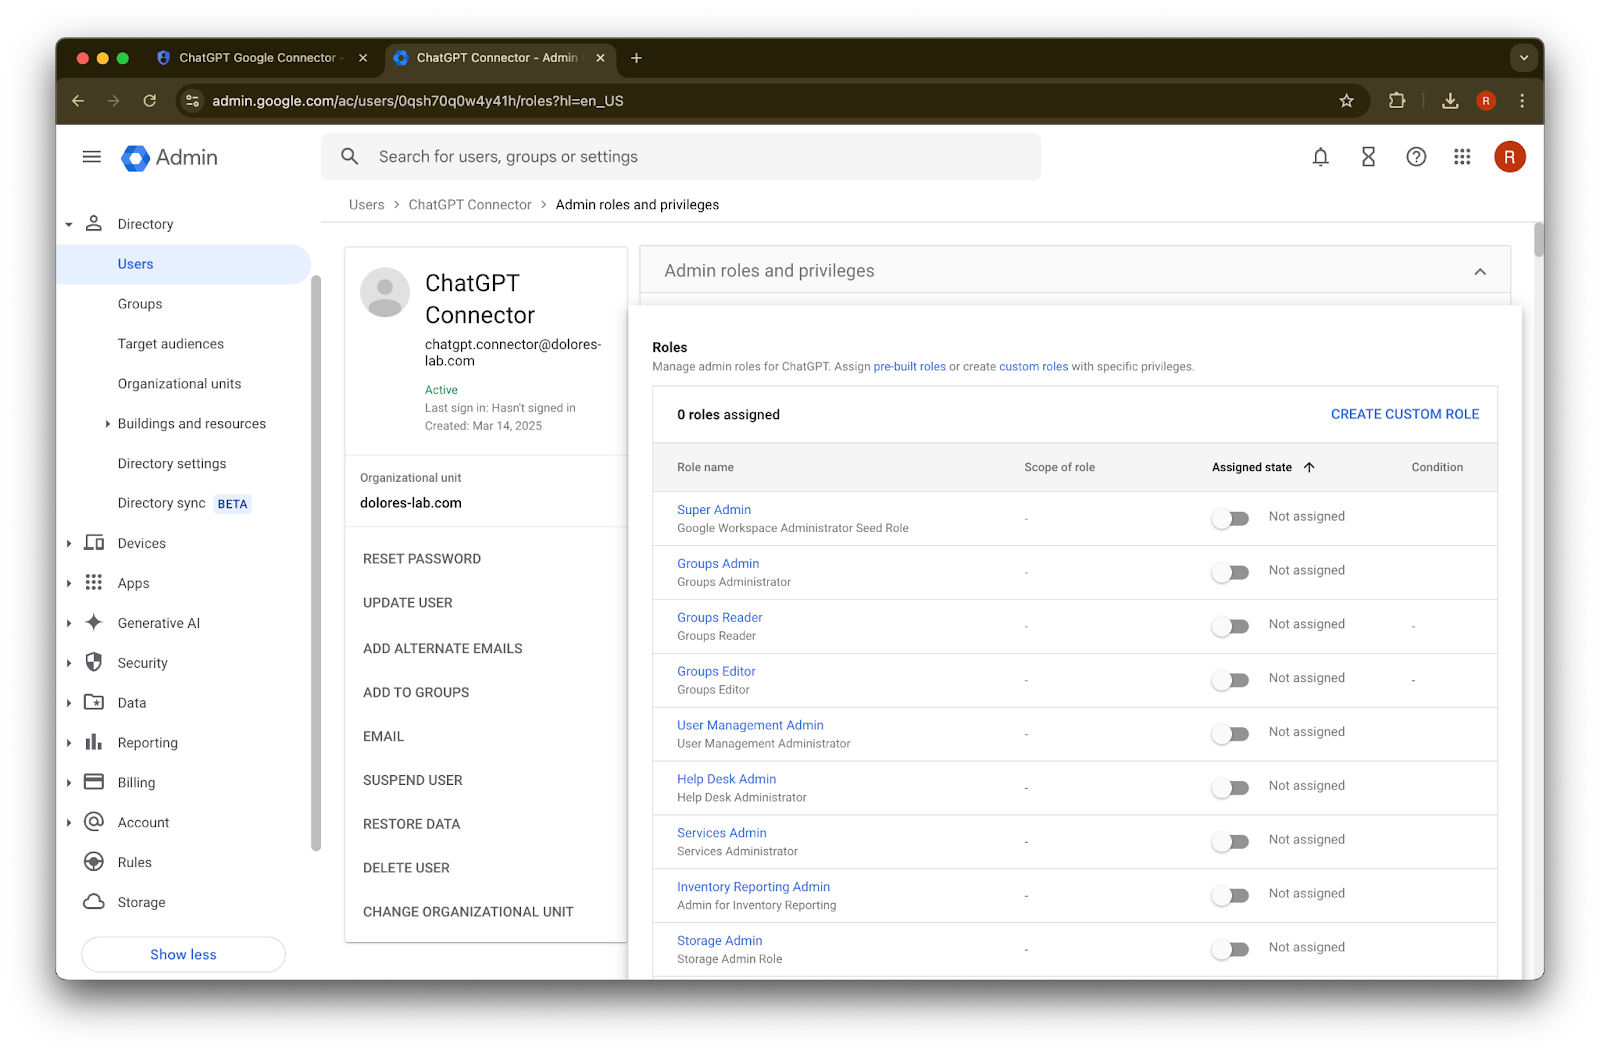
assign roles ಮೇಲೆ ಕ್ಲಿಕ್ ಮಾಡಿ.
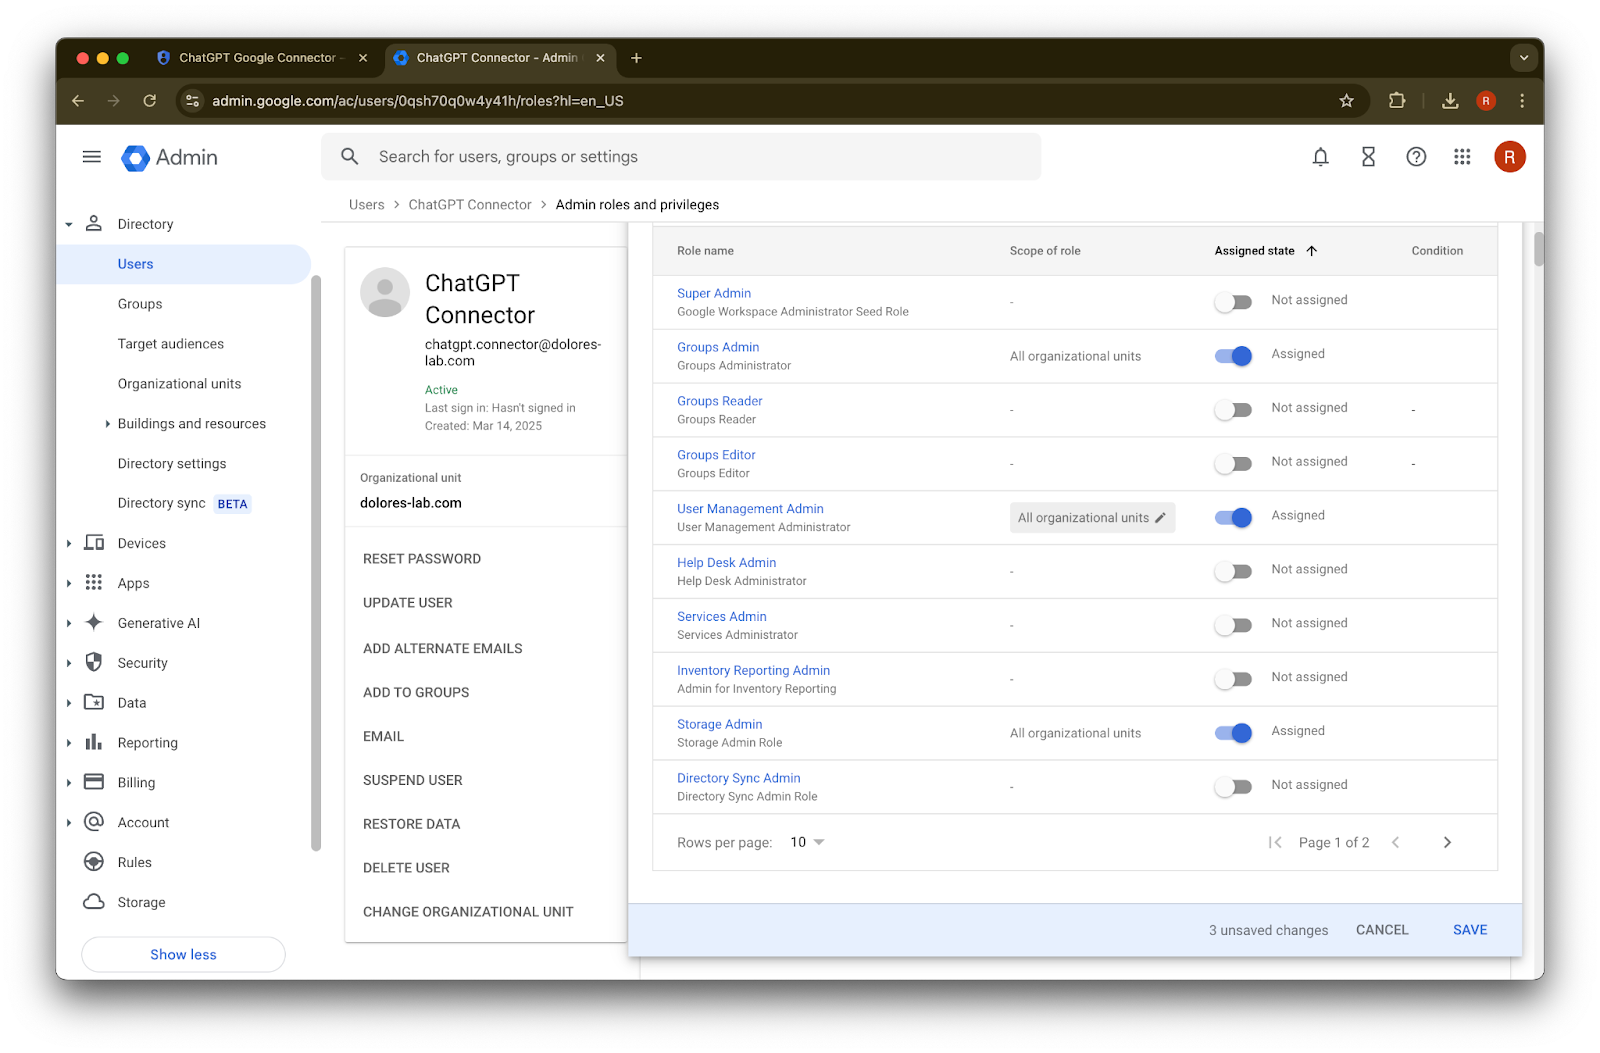
Groups Reader, User Management Admin, ಮತ್ತು Storage Admin ಪಾತ್ರಗಳನ್ನು ಆನ್ ಮಾಡಿ.
ಕೆಳಕ್ಕೆ ಸ್ಕ್ರೋಲ್ ಮಾಡಿ ಮತ್ತು Save. ಮೇಲೆ ಕ್ಲಿಕ್ ಮಾಡಿ. ನಿರ್ವಾಹಕ ಖಾತೆ ಈಗ ಯಶಸ್ವಿಯಾಗಿ ರಚಿಸಲ್ಪಟ್ಟು ಸಂರಚಿಸಲಾಗಿದೆ.
ChatGPT ನಿರ್ವಾಹಕ ಕನ್ಸೋಲ್ನಲ್ಲಿ ಸೆಟಪ್ ಪೂರ್ಣಗೊಳಿಸುವುದು
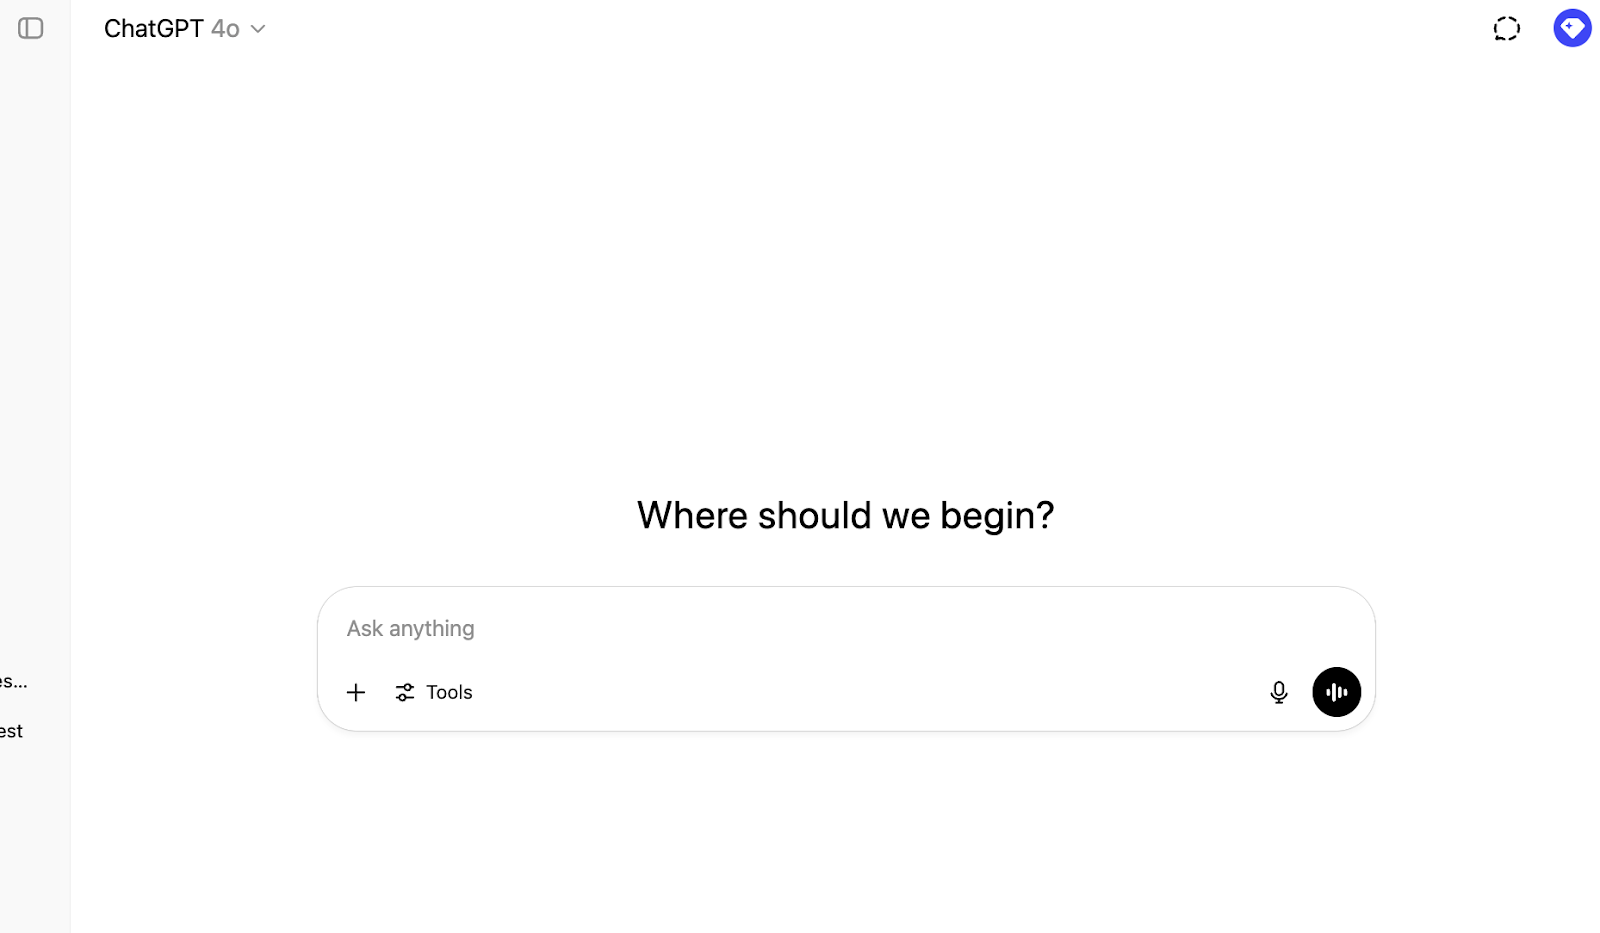
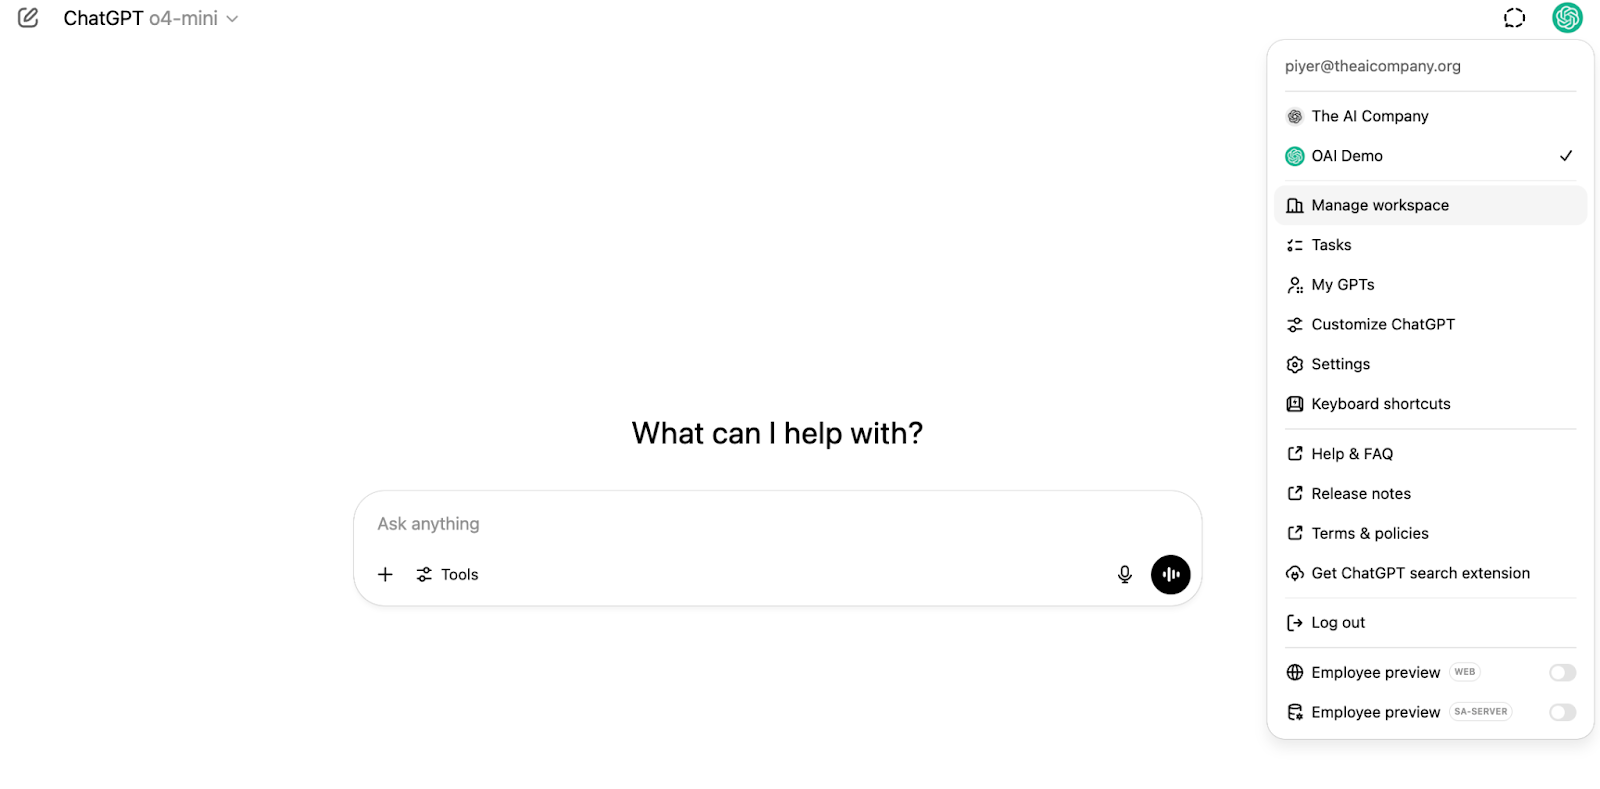
ChatGPT ಗೆ ಹೋಗಿ ಮತ್ತು ಪುಟದ ಮೇಲಿನ ಬಲ ಮೂಲೆಯಲ್ಲಿರುವ ಪ್ರೊಫೈಲ್ ಐಕಾನ್ ಮೇಲೆ ಕ್ಲಿಕ್ ಮಾಡಿ.
Manage workspace
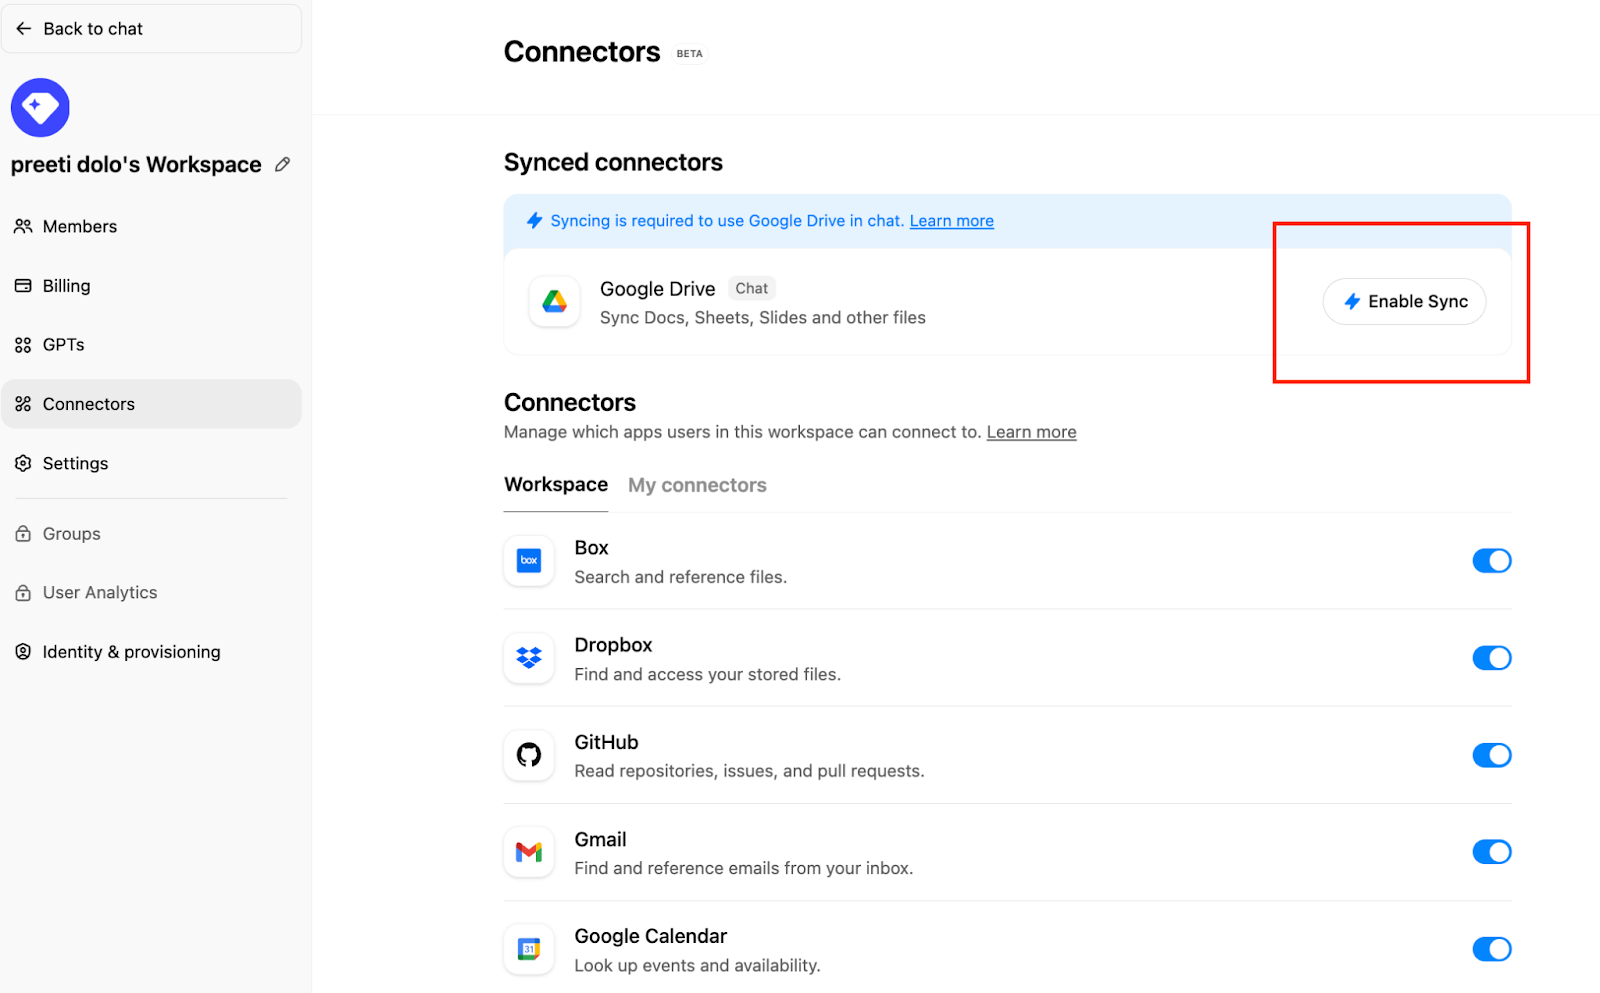
ಮೇಲೆ ಕ್ಲಿಕ್ ಮಾಡಿConnections ಮೇಲೆ ಕ್ಲಿಕ್ ಮಾಡಿ ಮತ್ತು ನಂತರ ‘Synced connectors’ ಅಡಿಯಲ್ಲಿ → Enable Sync ಮೇಲೆ ಕ್ಲಿಕ್ ಮಾಡಿ
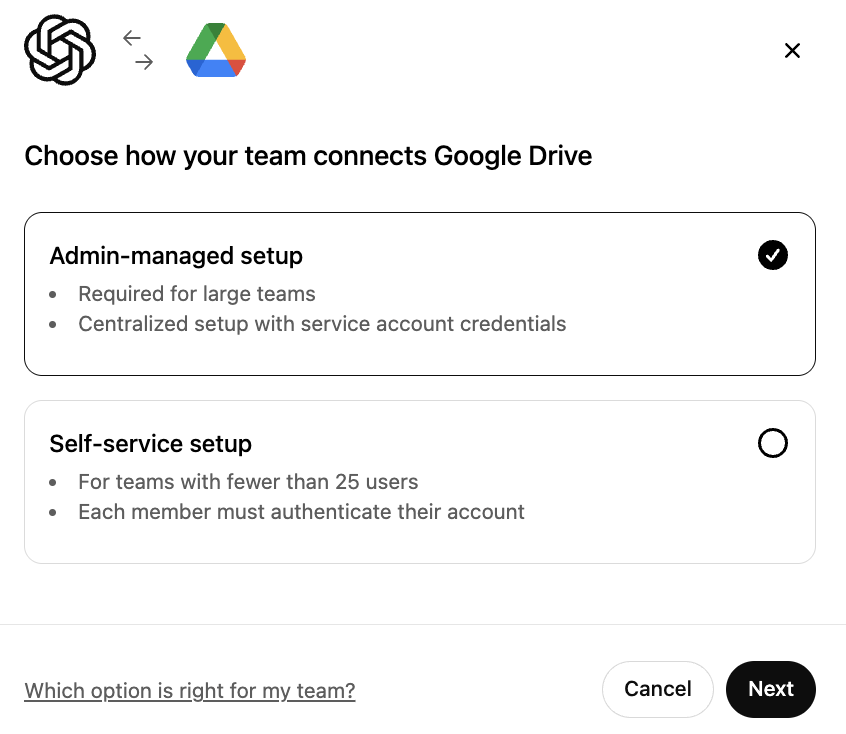
Admin-managed ಆಯ್ಕೆಮಾಡಲಾಗಿದೆ ಎಂದು ಖಚಿತಪಡಿಸಿ ಮತ್ತು Next ಮೇಲೆ ಕ್ಲಿಕ್ ಮಾಡಿ
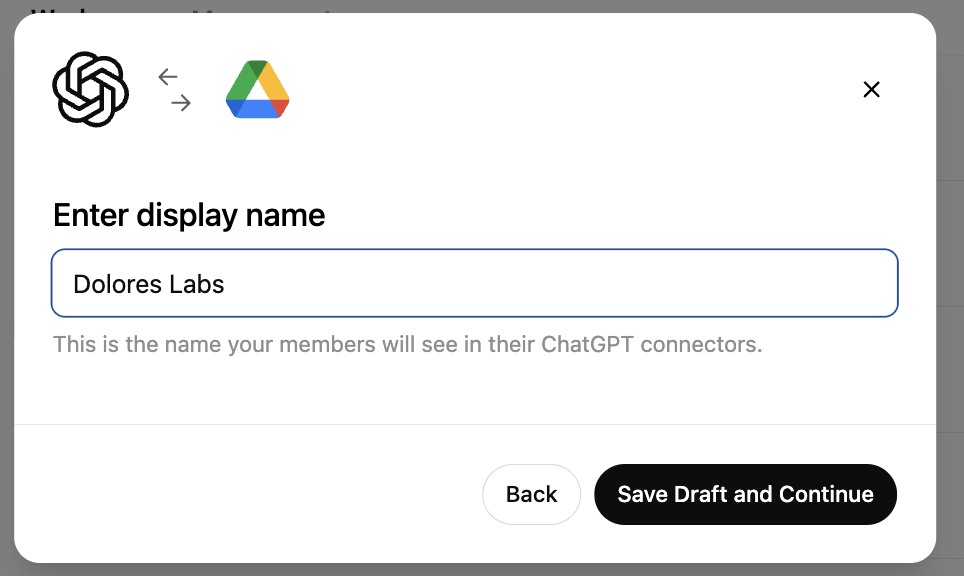
display name ಅನ್ನು ನಮೂದಿಸಿ. ನಿಮ್ಮ Google Workspace ನ ಹೆಸರನ್ನು ಬಳಸಲು ನಾವು ಶಿಫಾರಸು ಮಾಡುತ್ತೇವೆ.
ದಯವಿಟ್ಟು ಗಮನಿಸಿ, ಪ್ರಸ್ತುತ ನಿಮ್ಮ ಕನೆಕ್ಷನ್ನ ಹೆಸರನ್ನು ಬದಲಾಯಿಸುವುದನ್ನು ನಾವು ಬೆಂಬಲಿಸುವುದಿಲ್ಲ.Save Draft and Continue ಮೇಲೆ ಕ್ಲಿಕ್ ಮಾಡಿ
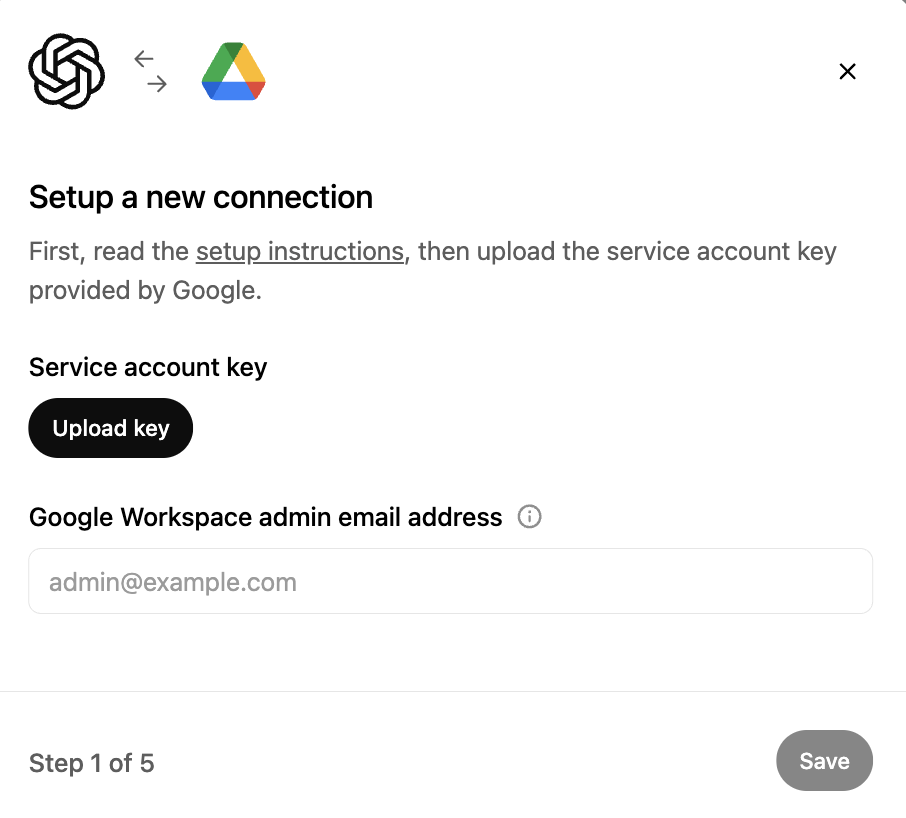
Upload key ಮೇಲೆ ಕ್ಲಿಕ್ ಮಾಡಿ. JSON ಫೈಲ್ ಅನ್ನು ಆಯ್ಕೆಮಾಡಿ, ಇದು ಮೇಲಿನ ಸೇವಾ ಖಾತೆ ಸೆಟಪ್ನ ಭಾಗವಾಗಿ ನೀವು ಡೌನ್ಲೋಡ್ ಮಾಡಿದ ಕೀ ಆಗಿದೆ. ಈ ಕೀ ಸರಿಯಾಗಿದೆಯೇ ಎಂದು ಖಚಿತಪಡಿಸಿ.
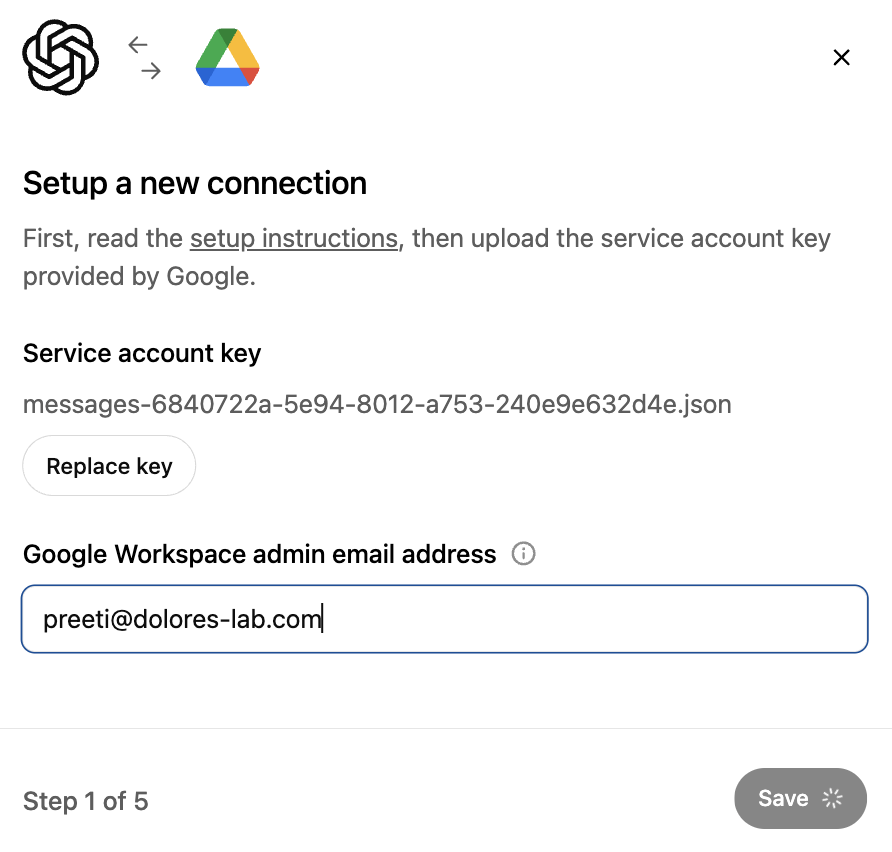
admin email address ಅನ್ನು ನಮೂದಿಸಿ. ಇದು ನೀವು ಮೊದಲು ರಚಿಸಿದ ನಿರ್ವಾಹಕ ಖಾತೆಯಾಗಿದೆ.
Save. ಮೇಲೆ ಕ್ಲಿಕ್ ಮಾಡಿ
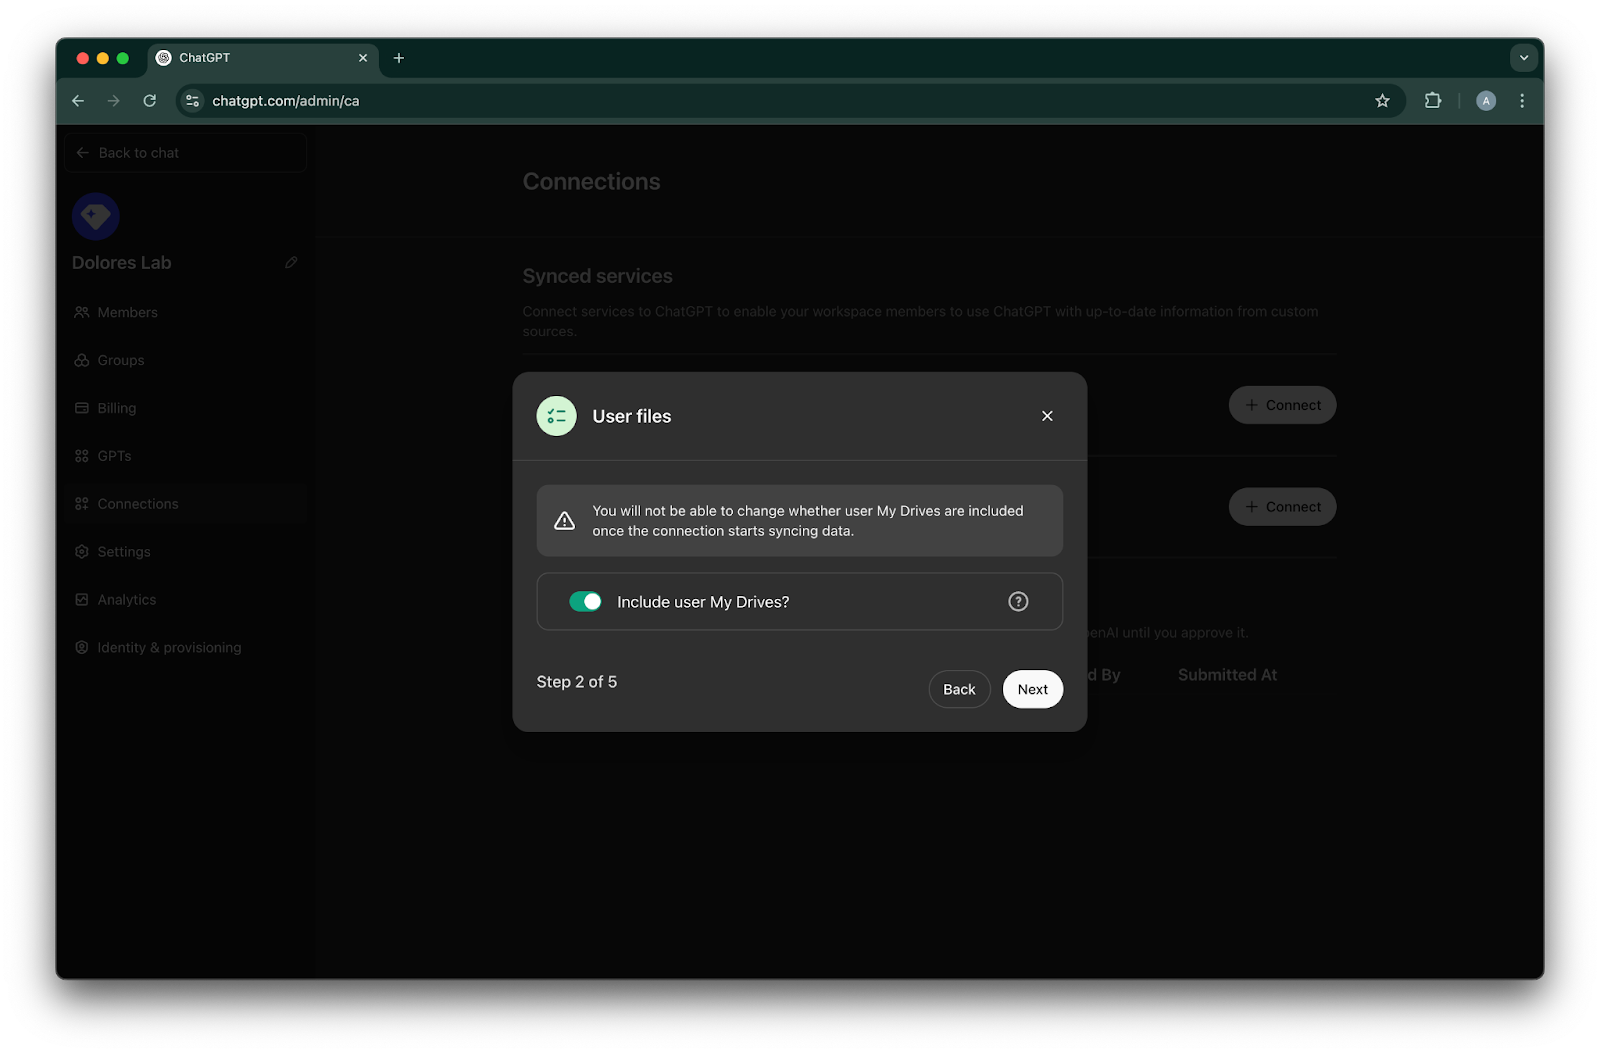
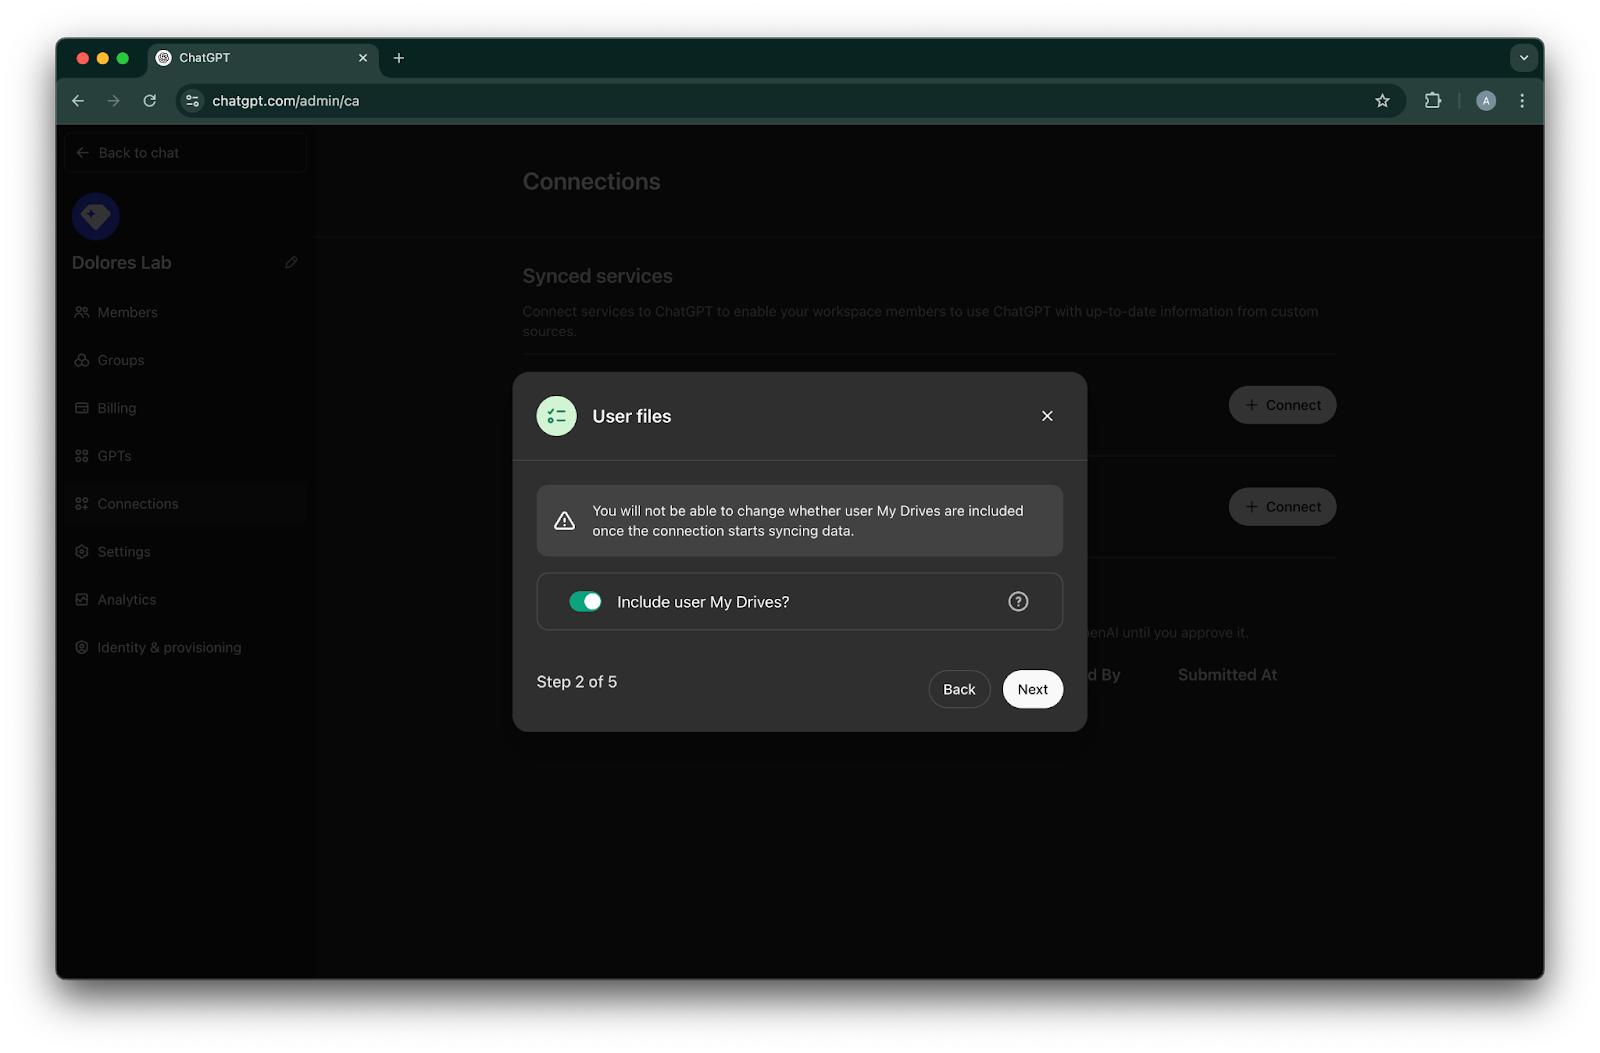
ನಿಮ್ಮ ಎಲ್ಲಾ ಬಳಕೆದಾರರ My Drives ನಲ್ಲಿರುವ ಫೈಲ್ಗಳನ್ನು ಸೇರಿಸಬೇಕೇ ಎಂದು ಆಯ್ಕೆಮಾಡಿ.
Next ಮೇಲೆ ಕ್ಲಿಕ್ ಮಾಡಿ
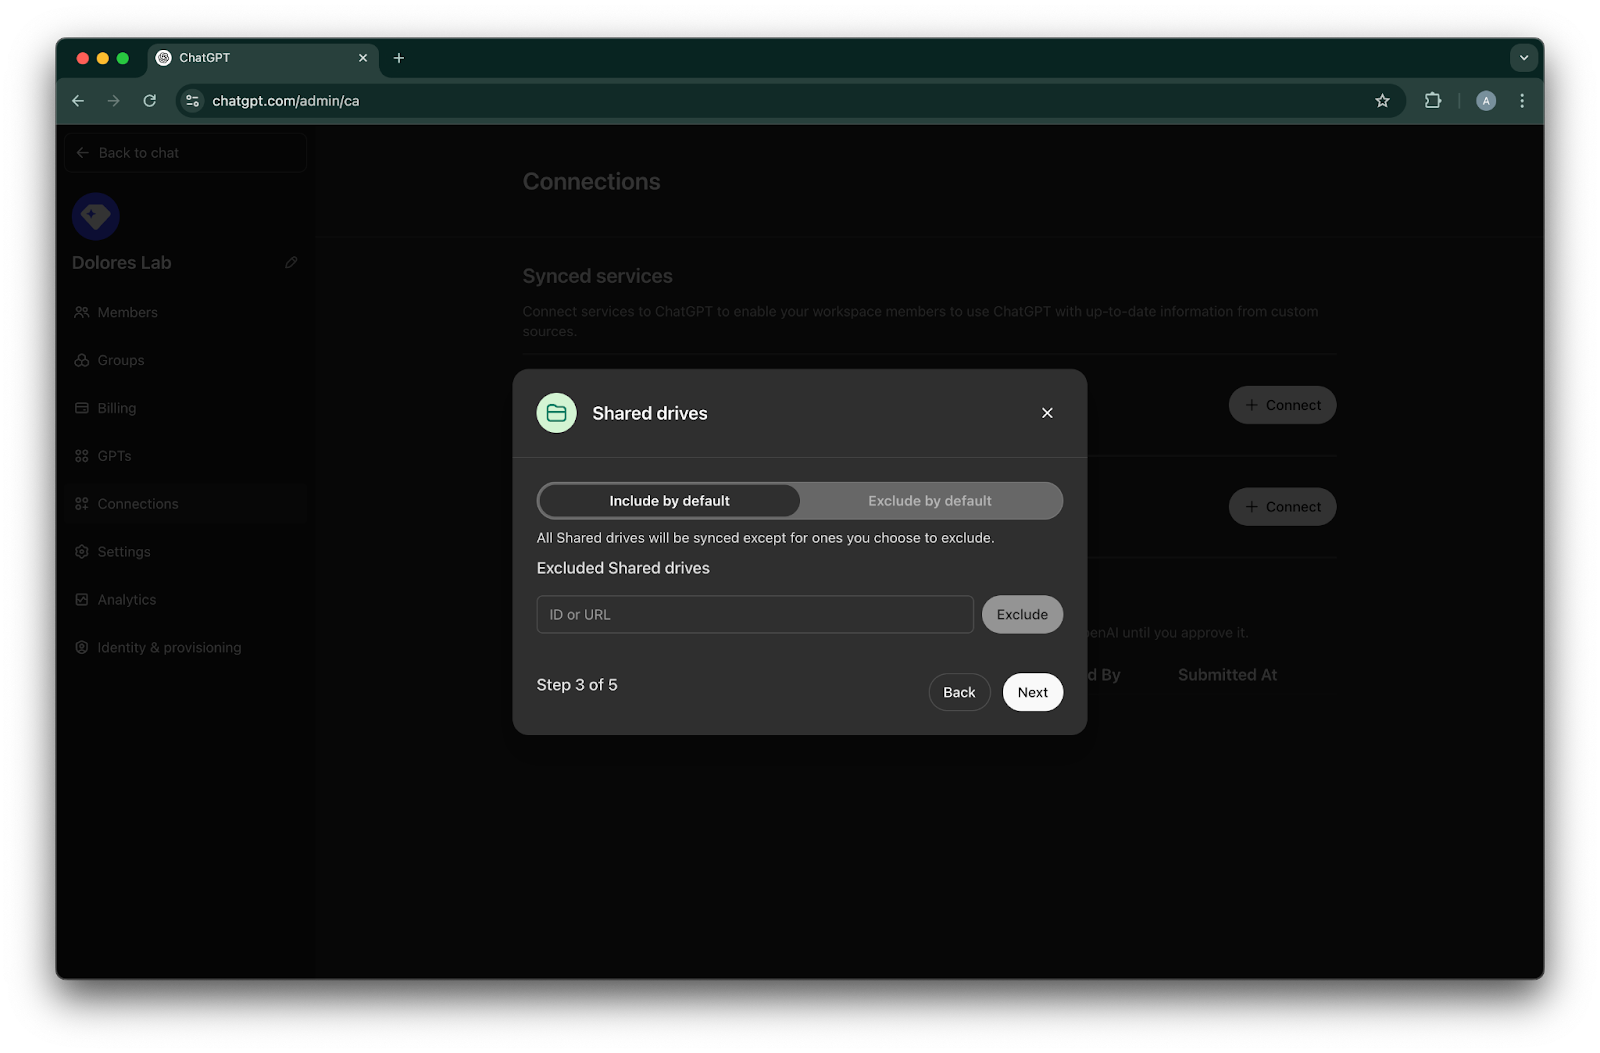
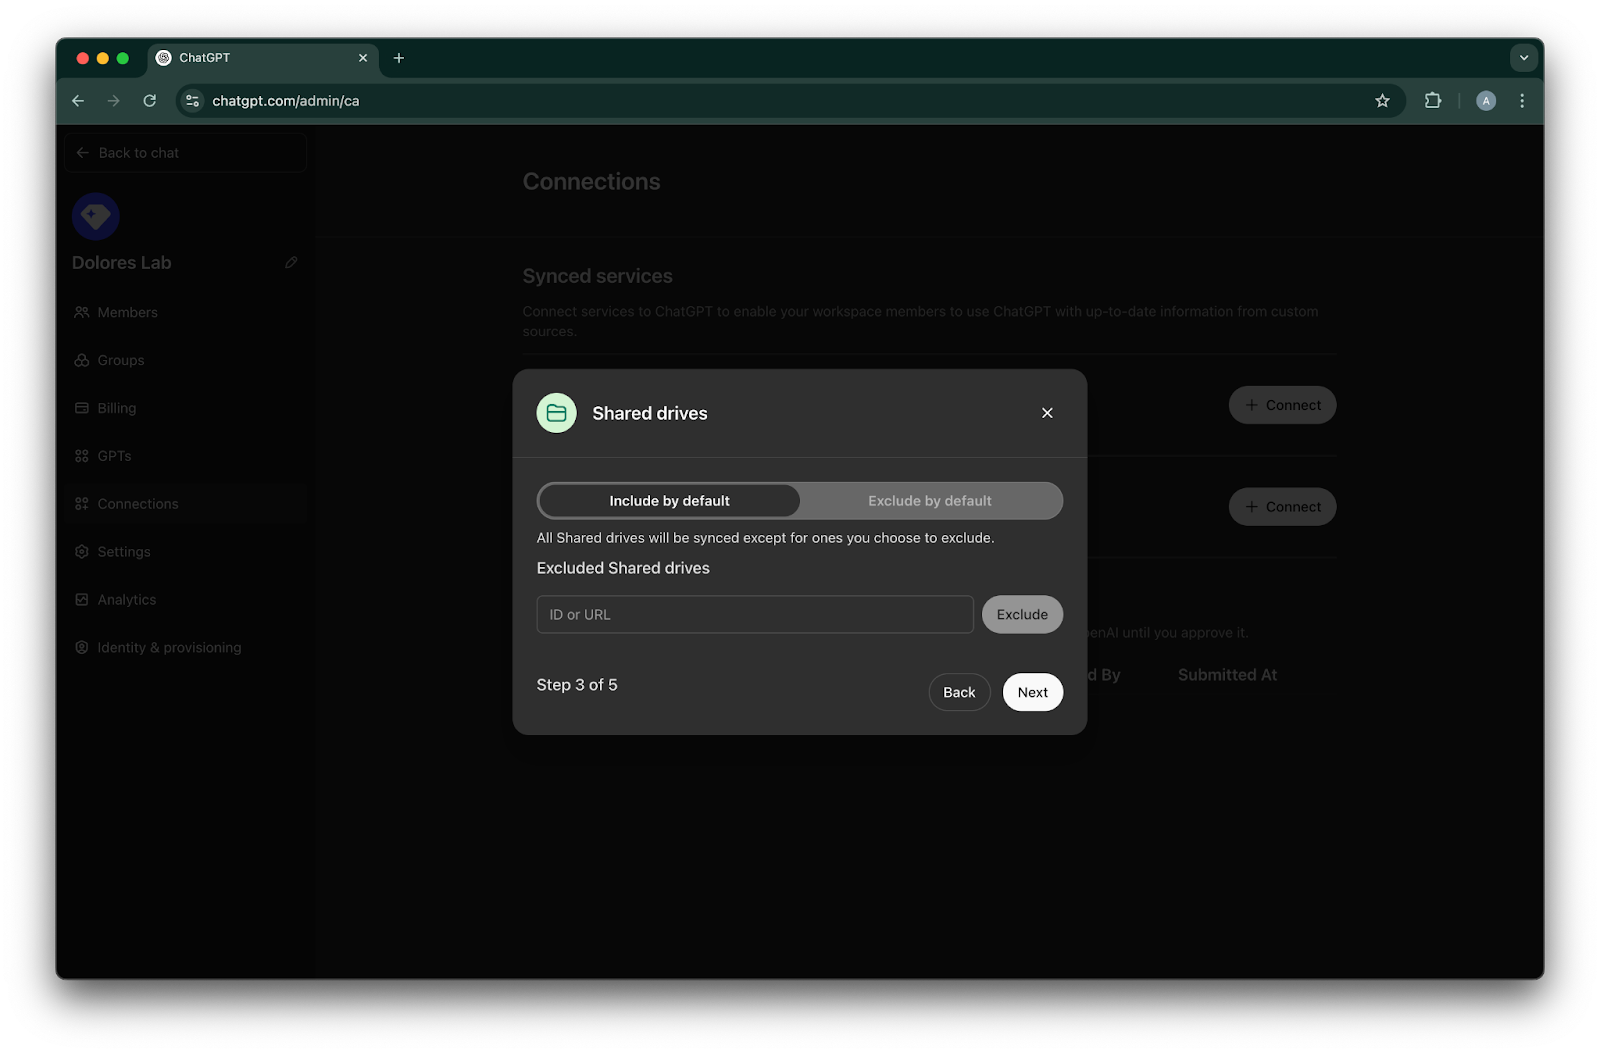
ಹಂಚಿದ ಡ್ರೈವ್ಗಳನ್ನು ಹೇಗೆ ನಿರ್ವಹಿಸಬೇಕೆಂದು ಆಯ್ಕೆಮಾಡಿ. ನಾವು ಕೆಳಗಿನ ಮೂರು ಸಂದರ್ಭಗಳನ್ನು ಬೆಂಬಲಿಸುತ್ತೇವೆ.
ನೀವು ಎಲ್ಲಾ ಹಂಚಿದ ಡ್ರೈವ್ಗಳನ್ನು ಸೇರಿಸಲು ಬಯಸಿದರೆ, Include by default ಆಯ್ಕೆಮಾಡಿ ಮತ್ತು ಹೊರತುಪಡಿಸಬೇಕಾದ ಹಂಚಿದ ಡ್ರೈವ್ IDಗಳನ್ನು ಸೇರಿಸಬೇಡಿ.
ನೀವು ಬಹುತೇಕ ಹಂಚಿದ ಡ್ರೈವ್ಗಳನ್ನು ಸೇರಿಸಲು ಬಯಸಿದರೆ, Include by default ಆಯ್ಕೆಮಾಡಿ ಮತ್ತು ಹೊರತುಪಡಿಸಬೇಕಾದ ಹಂಚಿದ ಡ್ರೈವ್ಗಳ IDಗಳನ್ನು ಸೇರಿಸಿ.
ನೀವು ಬಹುತೇಕ ಹಂಚಿದ ಡ್ರೈವ್ಗಳನ್ನು ಹೊರತುಪಡಿಸಲು ಬಯಸಿದರೆ, Exclude by default ಆಯ್ಕೆಮಾಡಿ ಮತ್ತು ಸೇರಿಸಬೇಕಾದ ಹಂಚಿದ ಡ್ರೈವ್ಗಳ IDಗಳನ್ನು ಸೇರಿಸಿ.
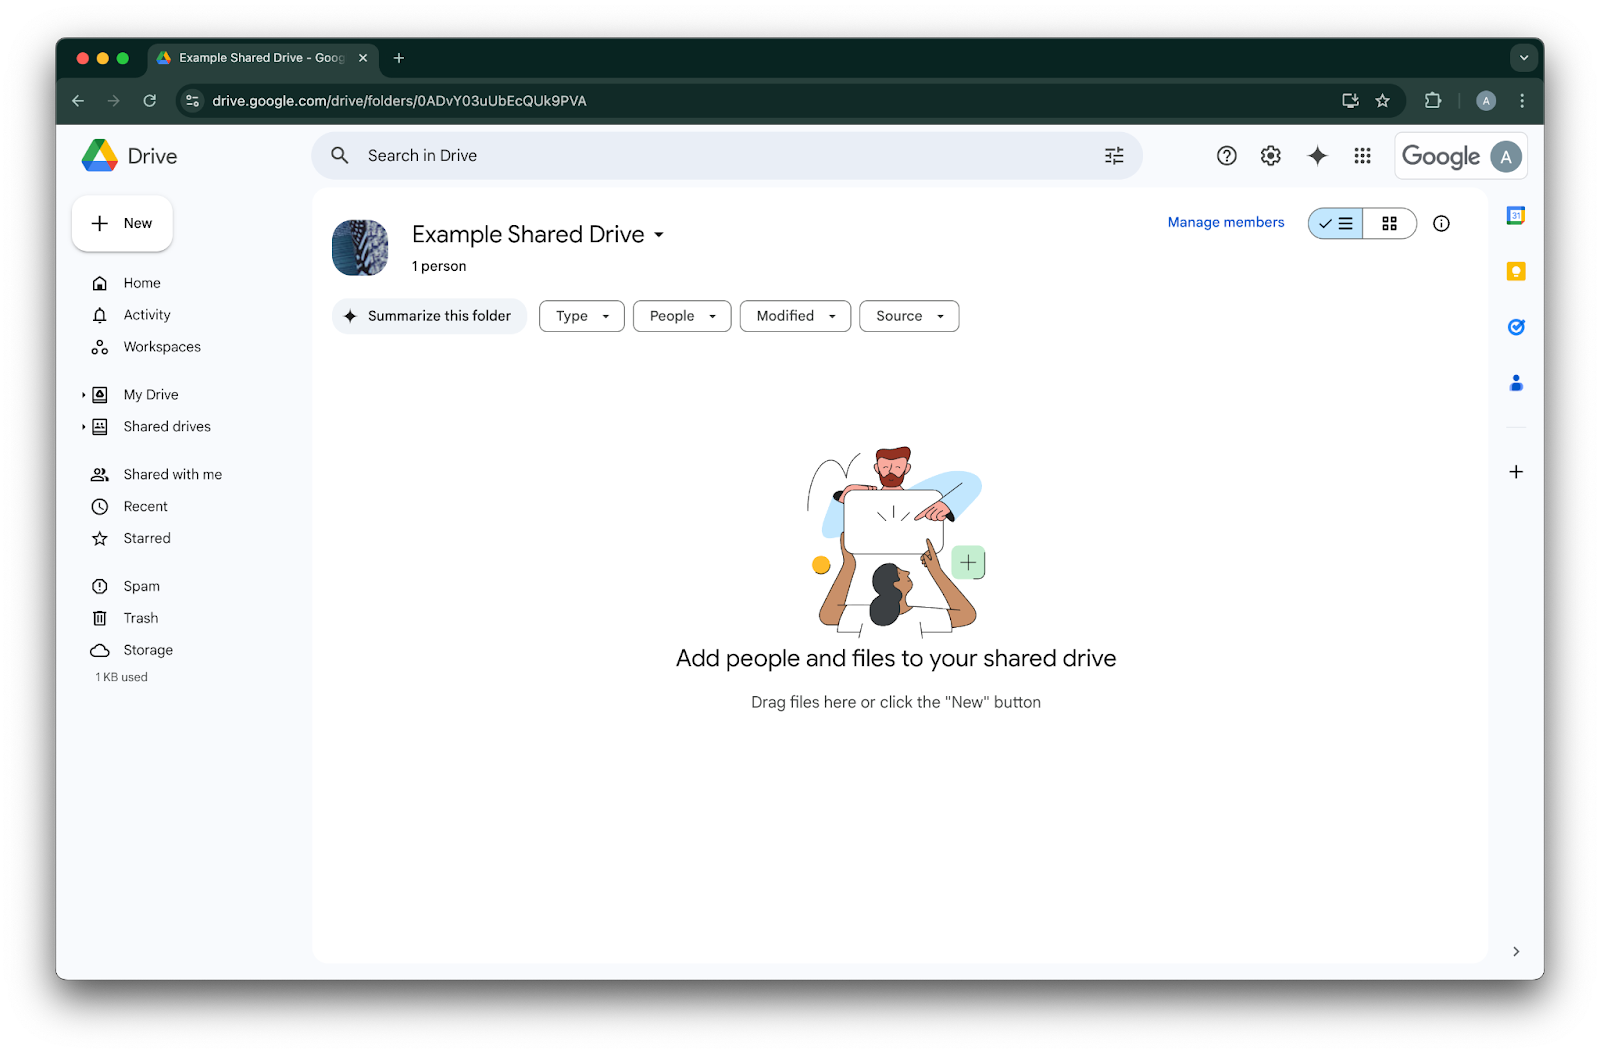
ಹಂಚಿದ ಡ್ರೈವ್ನ ID ನೋಡಲು, ವೆಬ್ ಬ್ರೌಸರ್ನಲ್ಲಿ ಅದಕ್ಕೆ ಹೋಗಿ. URL ನ ಕೊನೆಯ ಭಾಗವೇ ಹಂಚಿದ ಡ್ರೈವ್ ID ಆಗಿರುತ್ತದೆ.
ಕೆಳಗಿನ ಉದಾಹರಣೆಯಲ್ಲಿ, ಅದು `0ADvY03uUbEcQUk9PVA`' ಆಗಿದೆ.Next ಮೇಲೆ ಕ್ಲಿಕ್ ಮಾಡಿ
Google Drive ಕನೆಕ್ಷನ್ಗೆ ಯಾರಿಗೆ ಪ್ರವೇಶ ಇರಬೇಕು ಎಂದು ಆಯ್ಕೆಮಾಡಿ. ನೀವು ChatGPT ವರ್ಕ್ಸ್ಪೇಸ್ನ ನಿರ್ವಾಹಕರನ್ನು ಮಾತ್ರ ಆಯ್ಕೆಮಾಡಬಹುದು, ಅಥವಾ ಎಲ್ಲರಿಗೂ ಸಕ್ರಿಯಗೊಳಿಸಬಹುದು. ಎಲ್ಲರಿಗೂ ಸಕ್ರಿಯಗೊಳಿಸಿದರೆ, ವರ್ಕ್ಸ್ಪೇಸ್ಗೆ ಹೊಸದಾಗಿ ಸೇರಿಸಲಾದ ಬಳಕೆದಾರರು ಸ್ವಯಂಚಾಲಿತವಾಗಿ ಸೇರಿಸಲ್ಪಡುತ್ತಾರೆ.
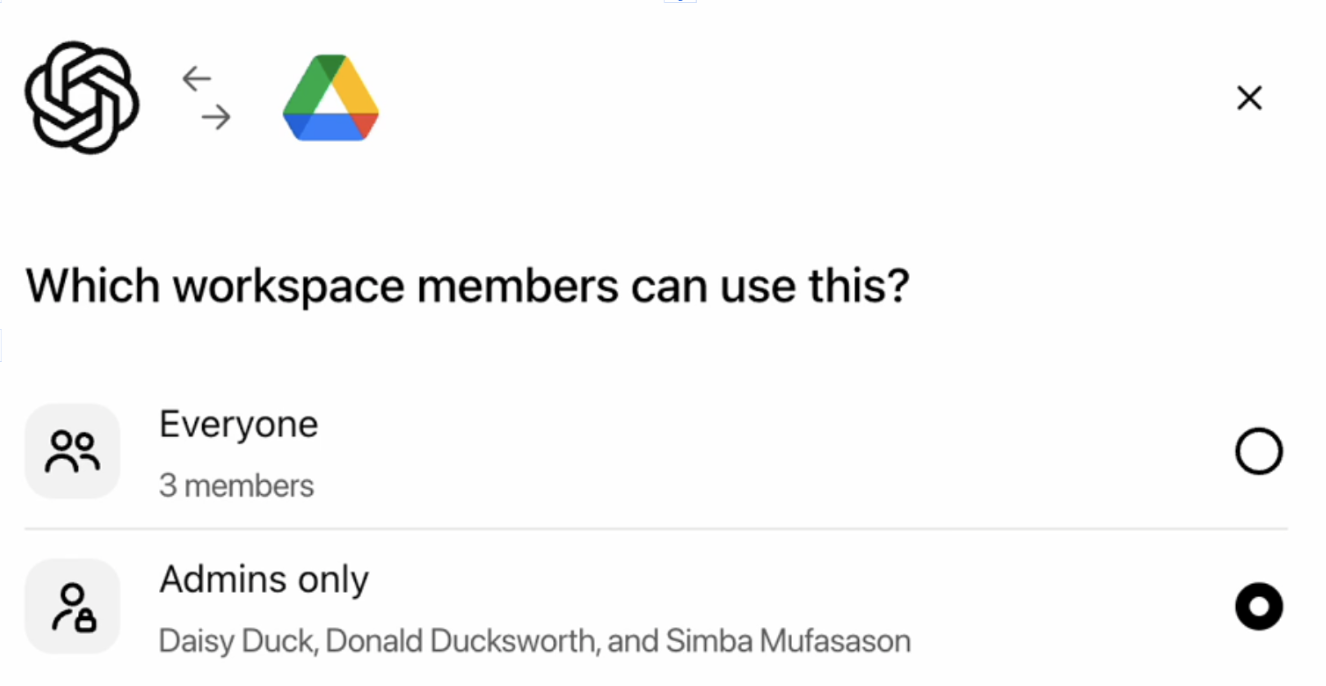
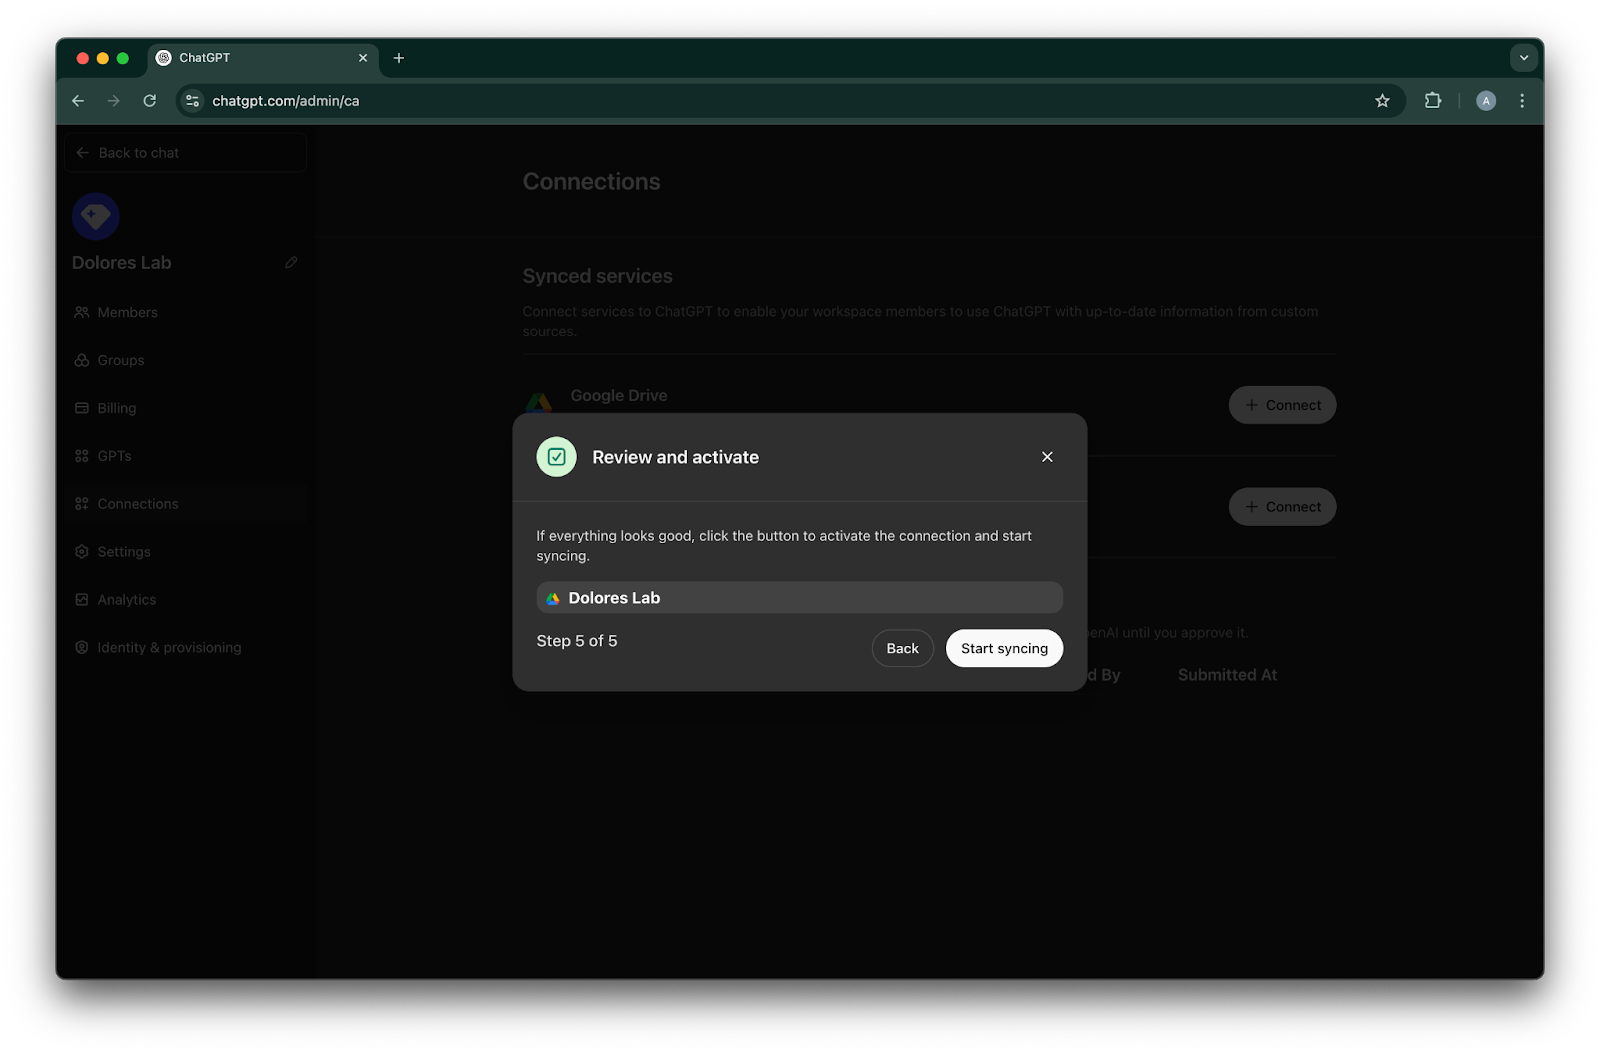
Start syncing ಮೇಲೆ ಕ್ಲಿಕ್ ಮಾಡಿ
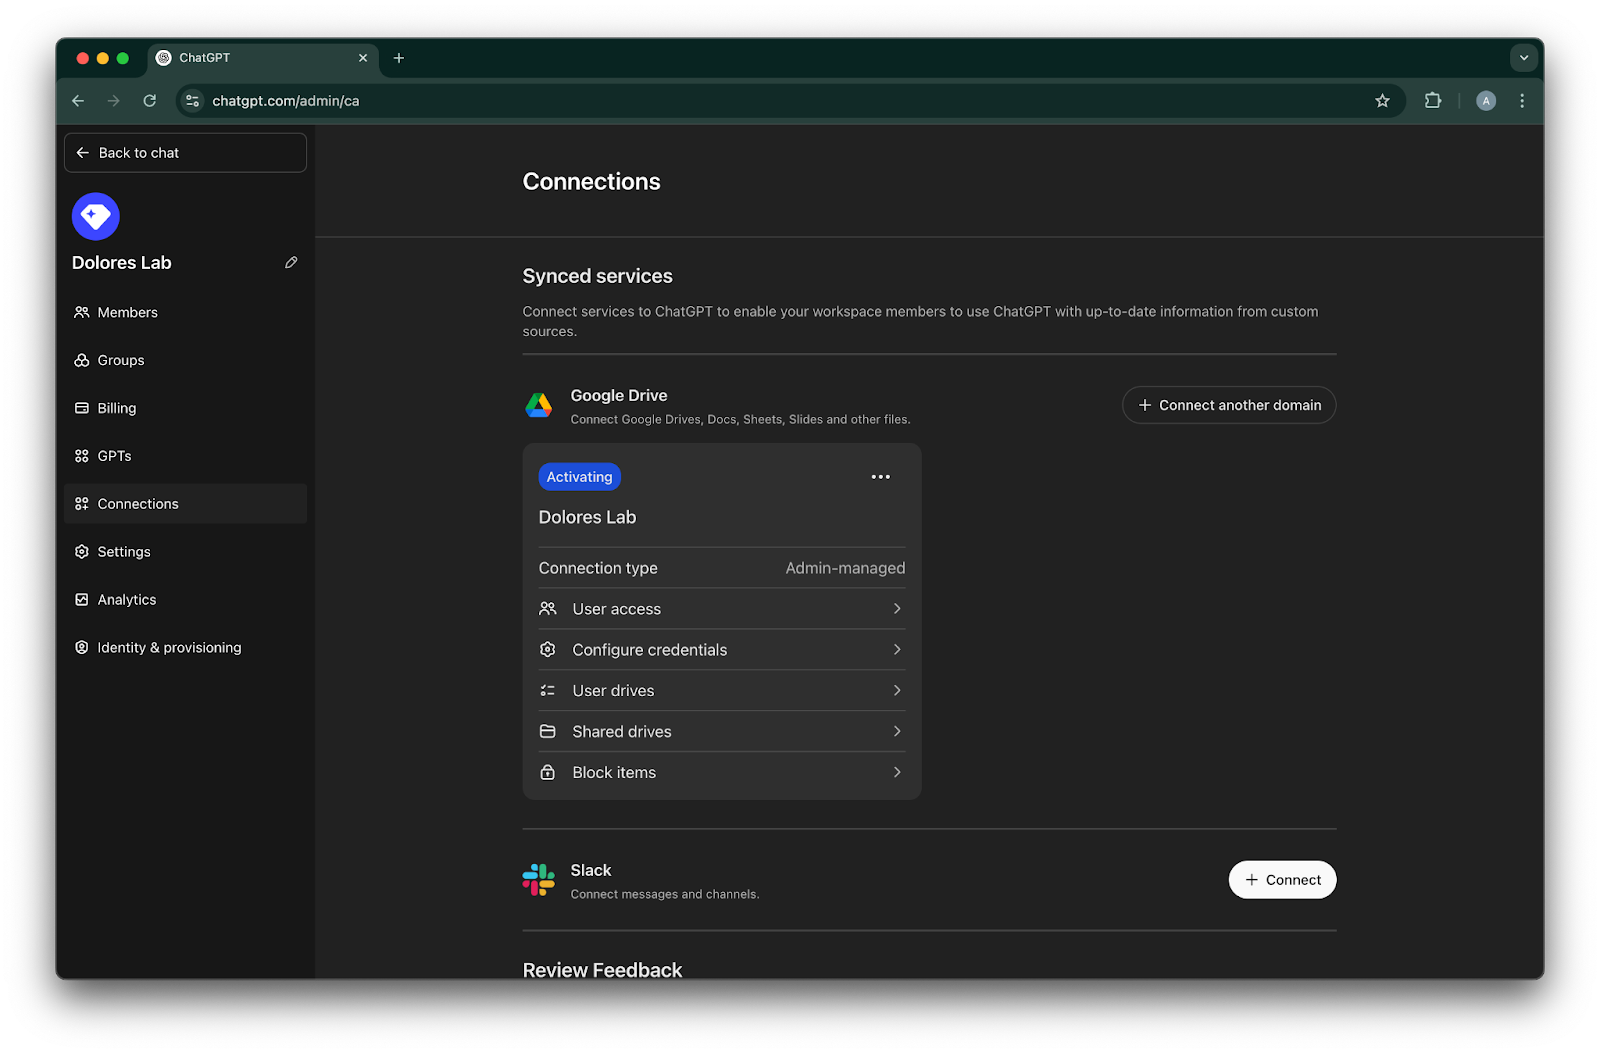
ನಿಮ್ಮ Google Drive ಕನೆಕ್ಷನ್ ಈಗ ಯಶಸ್ವಿಯಾಗಿ ರಚಿಸಲಾಗಿದೆ.
ದಯವಿಟ್ಟು ಗಮನಿಸಿ, ಇದು ತಕ್ಷಣ ಸಿಂಕ್ ಮಾಡಲು ಪ್ರಾರಂಭಿಸಿದರೂ, ನಿಮ್ಮ ಸೆಟ್ಟಿಂಗ್ಗಳ ಆಧಾರದ ಮೇಲೆ ಎಷ್ಟು ಫೈಲ್ಗಳನ್ನು ಸೇರಿಸಲಾಗಿದೆ ಎಂಬುದರ ಮೇಲೆ ಅವಲಂಬಿಸಿ ಇದನ್ನು ಪೂರ್ಣಗೊಳಿಸಲು ಗಂಟೆಗಳಿಂದ ದಿನಗಳವರೆಗೆ ಹಿಡಿಯಬಹುದು.
ಕಳೆದ 30 ದಿನಗಳಲ್ಲಿ ಸೇರಿಸಲಾದ ಅಥವಾ ಸಂಪಾದಿಸಲಾದ ಫೈಲ್ಗಳ ಸಿಂಕ್ ಪೂರ್ಣಗೊಂಡ ನಂತರ, ನೀವು ಸಕ್ರಿಯಗೊಳಿಸಿದ ಬಳಕೆದಾರರಿಗೆ ಕನೆಕ್ಟರ್ ಲಭ್ಯವಾಗುತ್ತದೆ.
ಸೇವಾ ಖಾತೆ ಕೀ ರಚನೆಯನ್ನು ಸಕ್ರಿಯಗೊಳಿಸುವುದು
ನೀವು ಕೆಳಗಿನ ದೋಷವನ್ನು ಸ್ವೀಕರಿಸಿದರೆ, ಈ ನಿರ್ದಿಷ್ಟ ಪ್ರಾಜೆಕ್ಟ್ಗೆ ಸೇವಾ ಖಾತೆ ರಚನೆಯನ್ನು ಸಕ್ರಿಯಗೊಳಿಸಬೇಕಾಗುತ್ತದೆ.
> ಸಂಸ್ಥೆಯ ನೀತಿ ನಿರ್ಬಂಧ ‘iam.disableServiceAccountKeyCreation’ ಅನ್ನು ನಿಮ್ಮ ಸಂಸ್ಥೆಯಲ್ಲಿ ಜಾರಿಗೊಳಿಸಲಾಗಿದೆ.
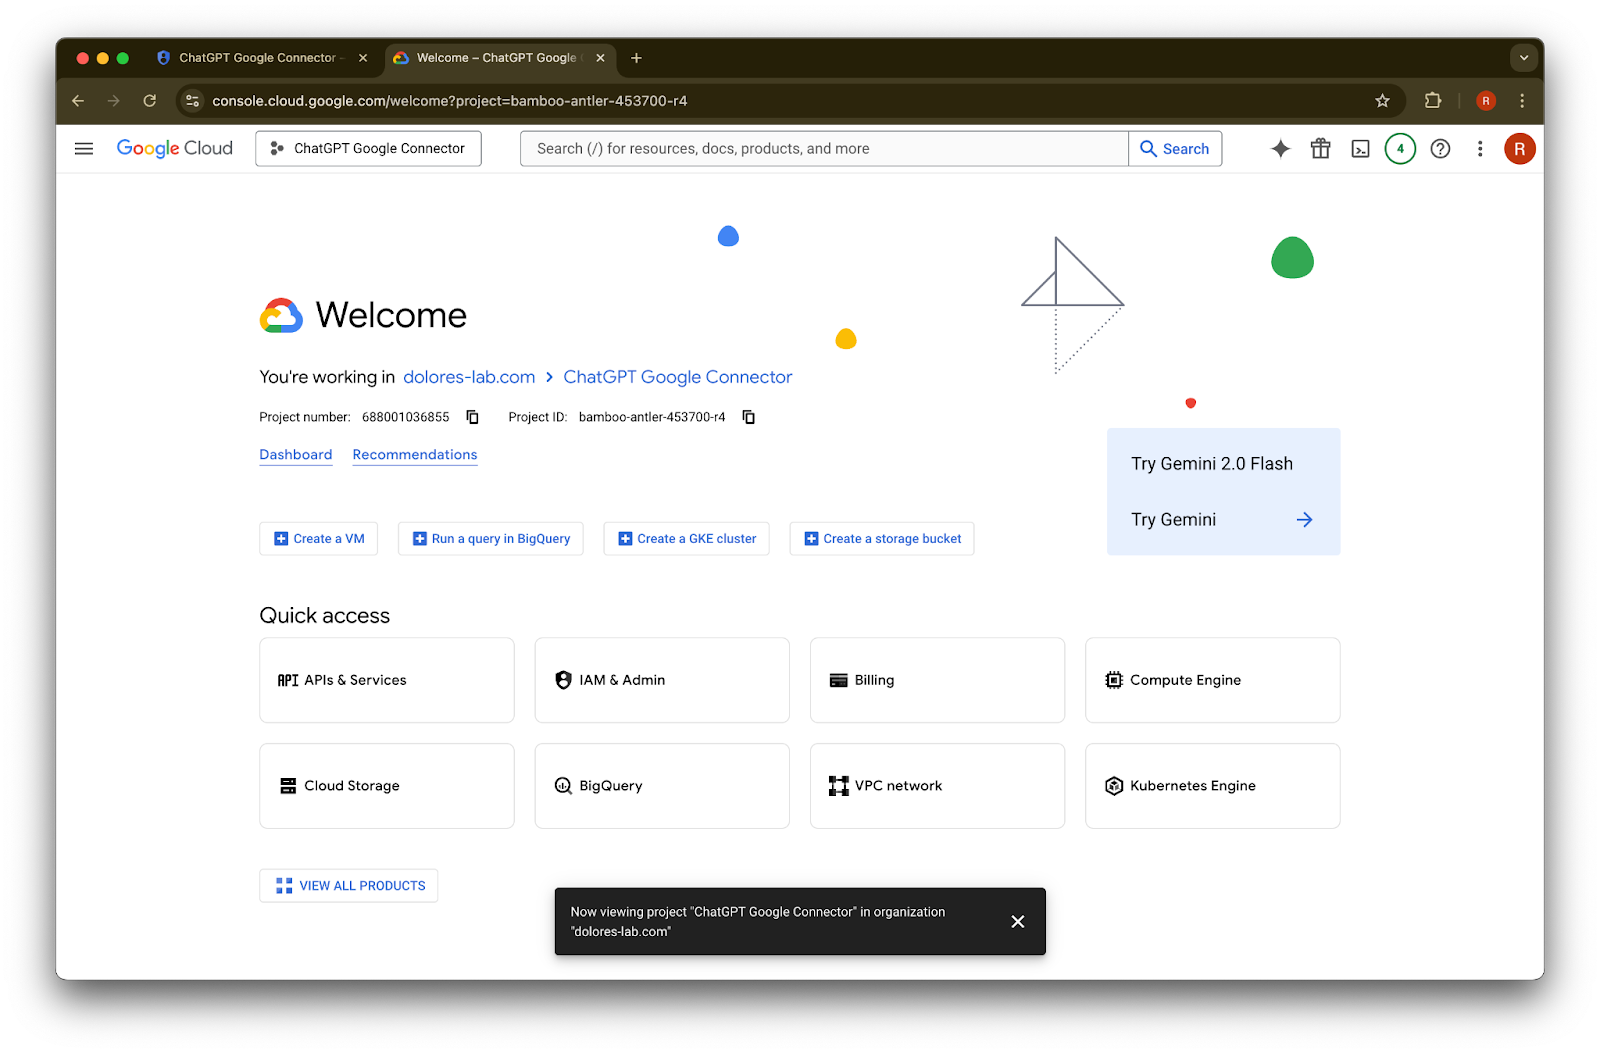
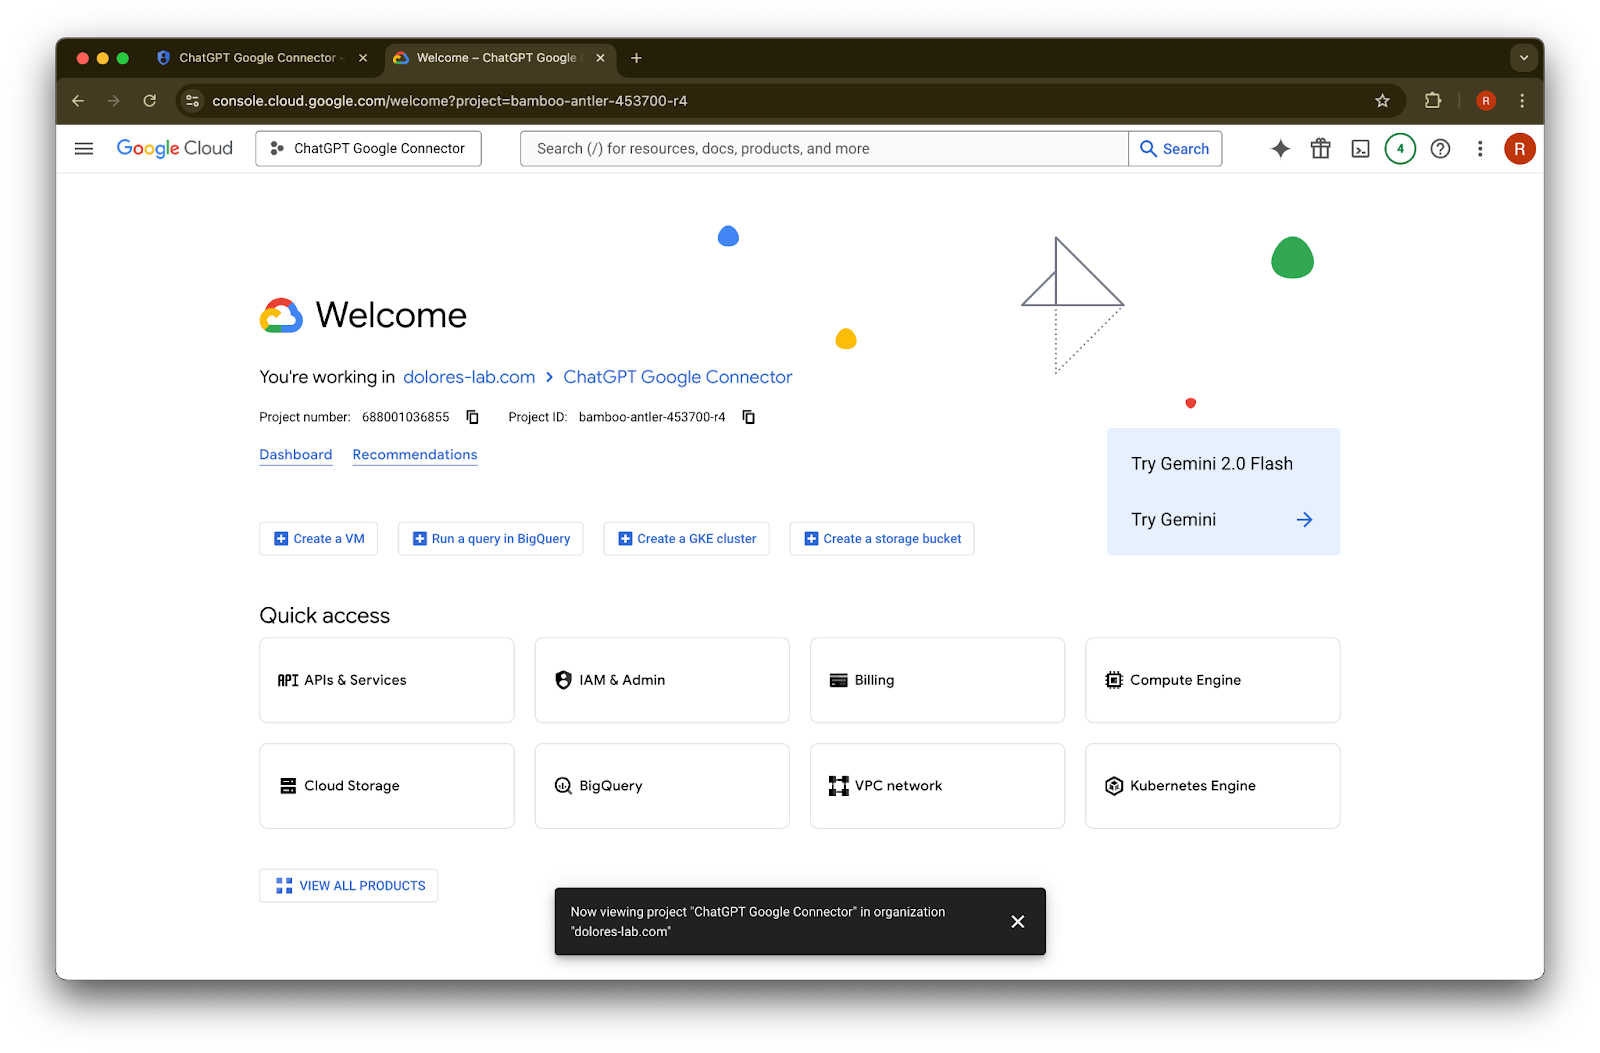
ಹೊಸ ಟ್ಯಾಬ್ ತೆರೆಯಿರಿ ಮತ್ತು console.cloud.google.com ಗೆ ಹೋಗಿ. ಆಯ್ಕೆಮಾಡಿದ ಪ್ರಾಜೆಕ್ಟ್ ನೀವು ಈಗಾಗಲೇ ಆಯ್ಕೆಮಾಡಿದದ್ದೇ ಎಂದು ಖಚಿತಪಡಿಸಿ.
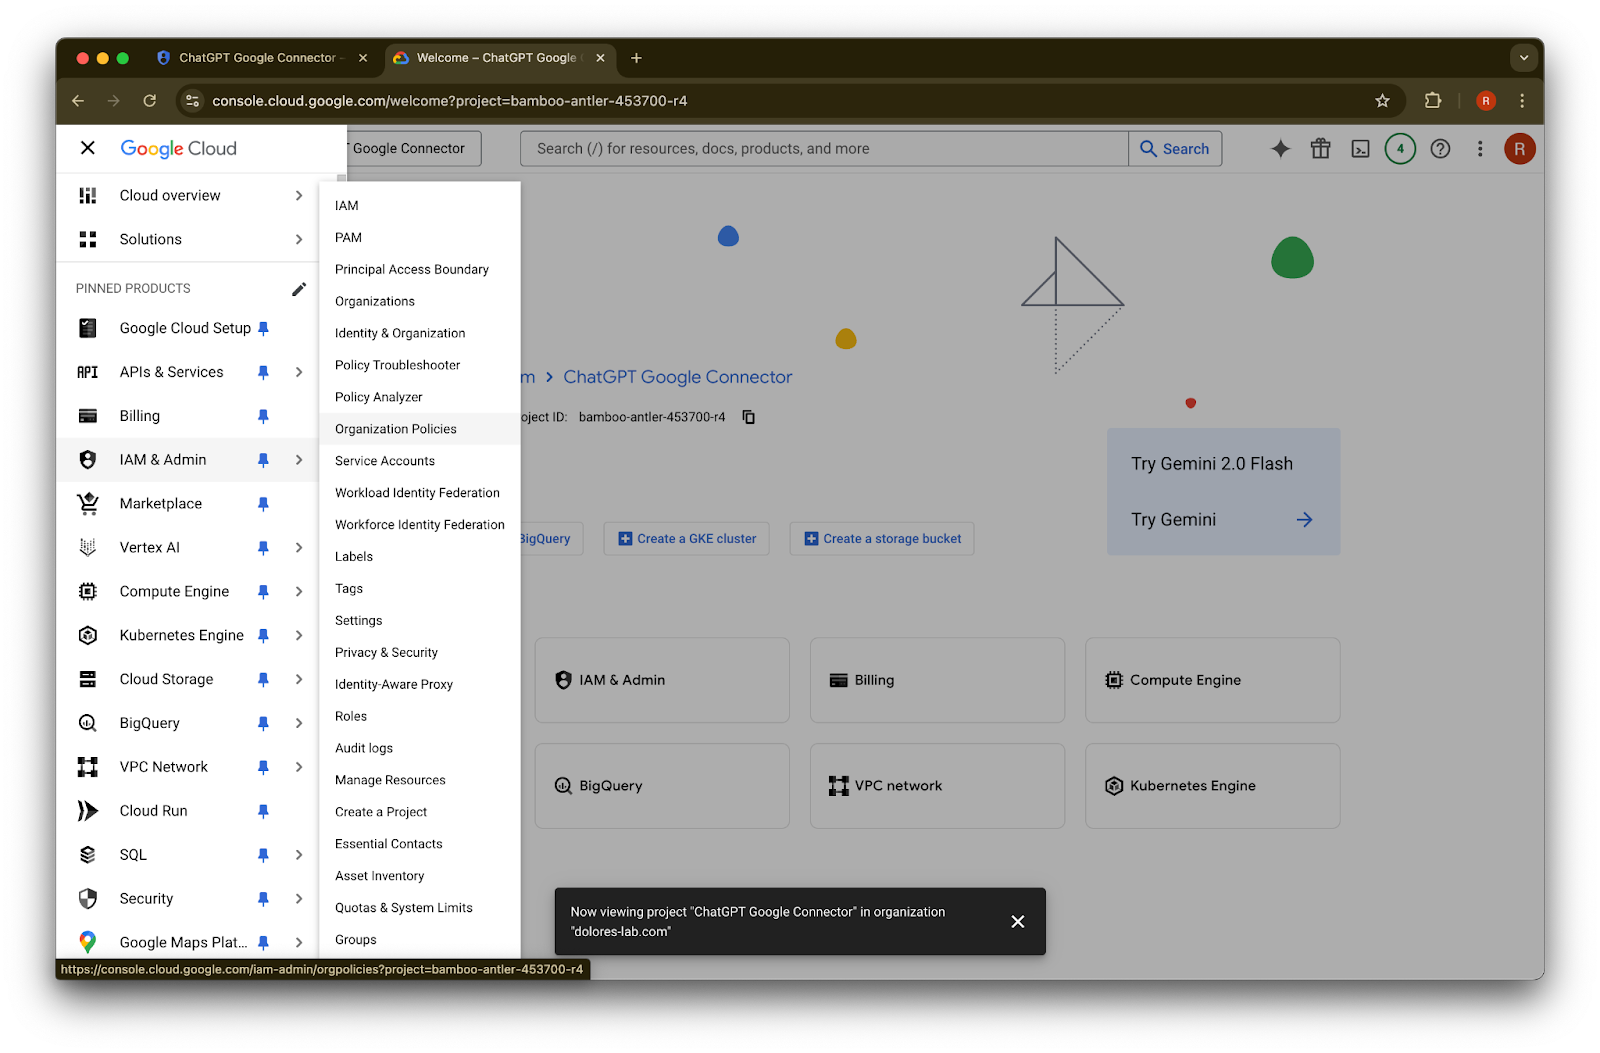
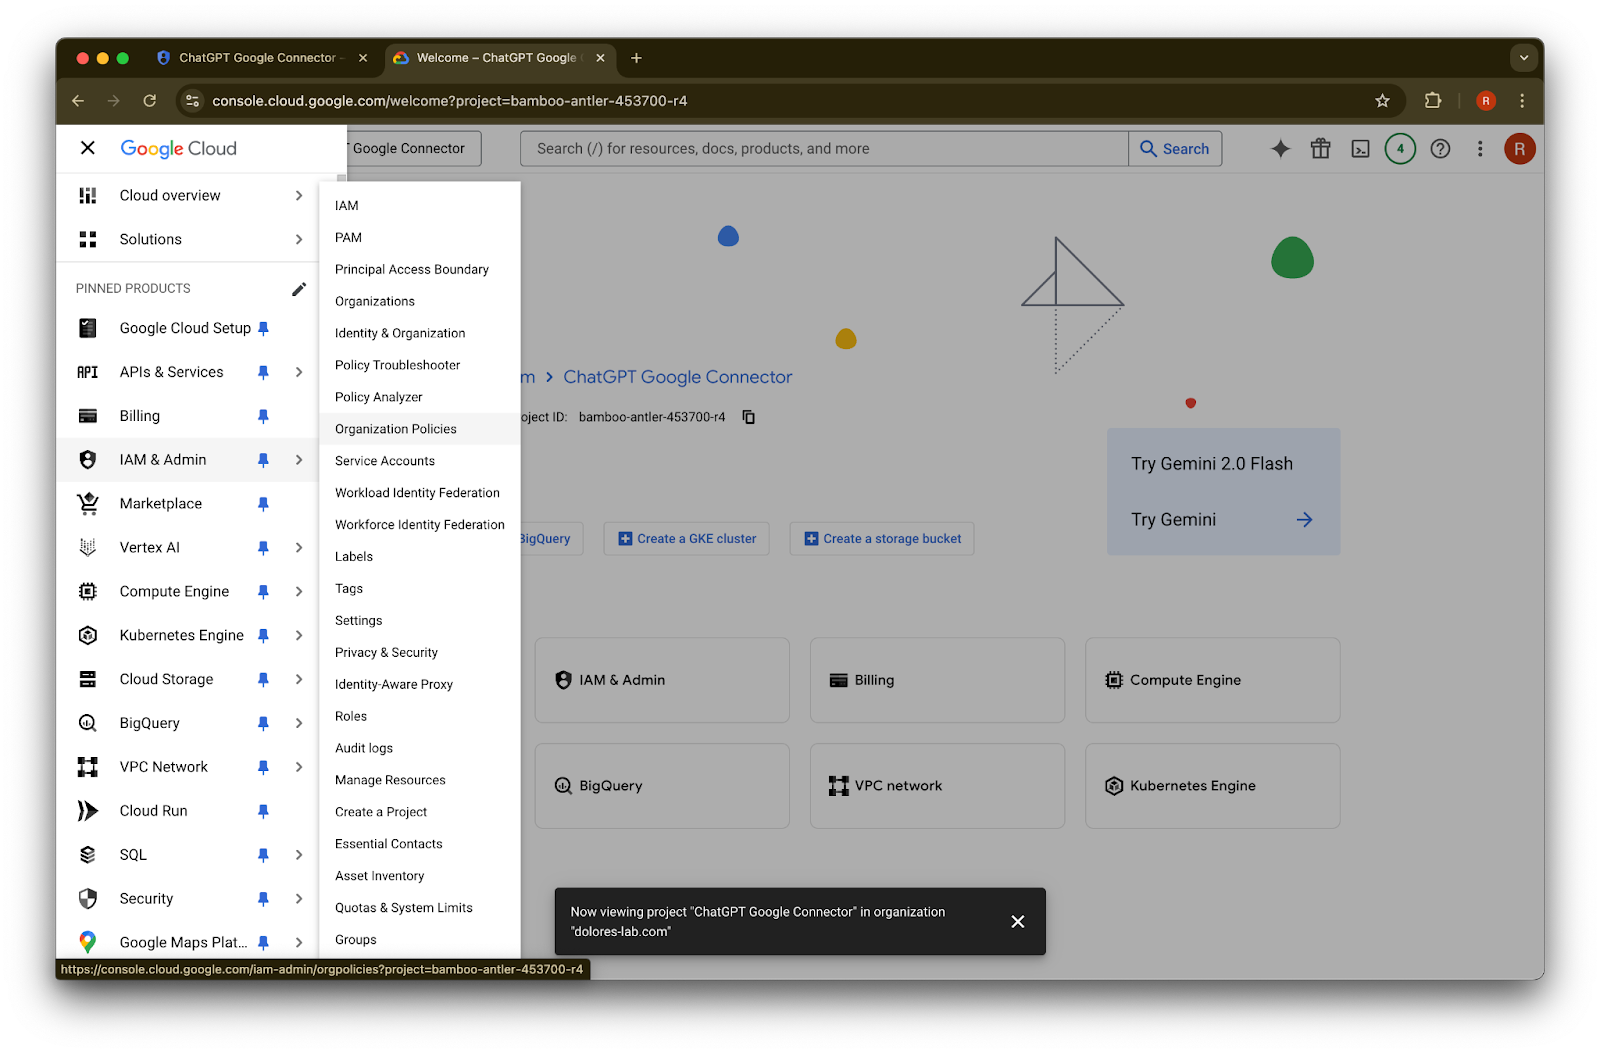
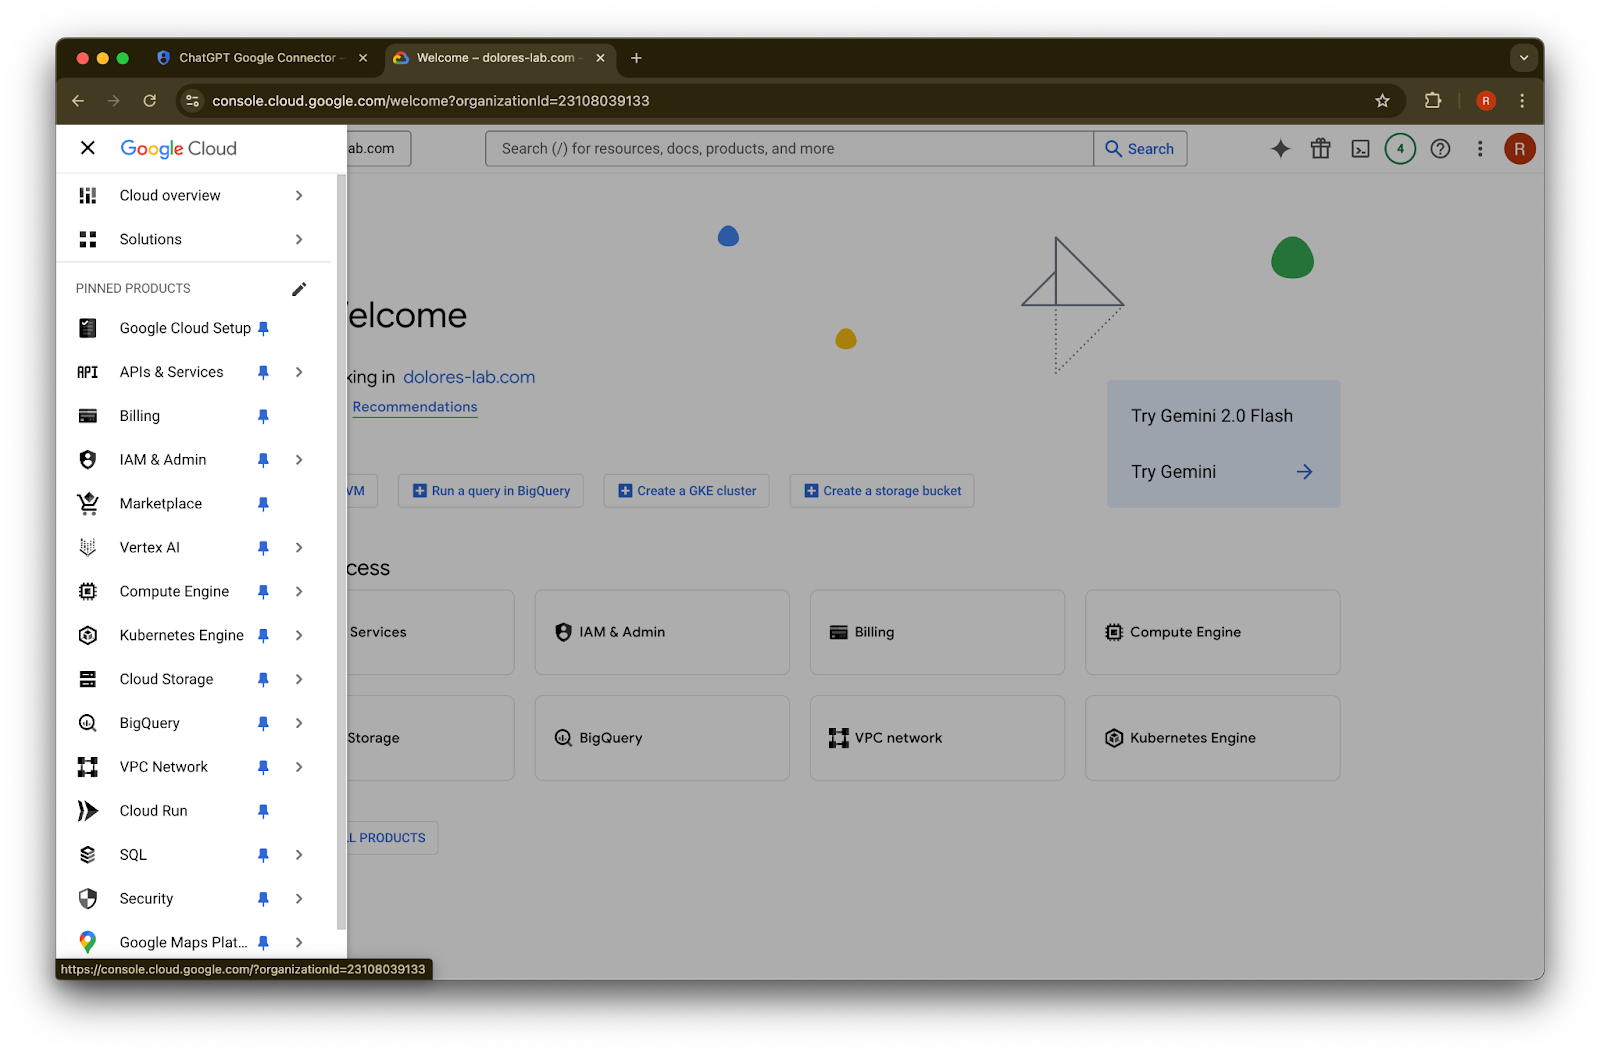
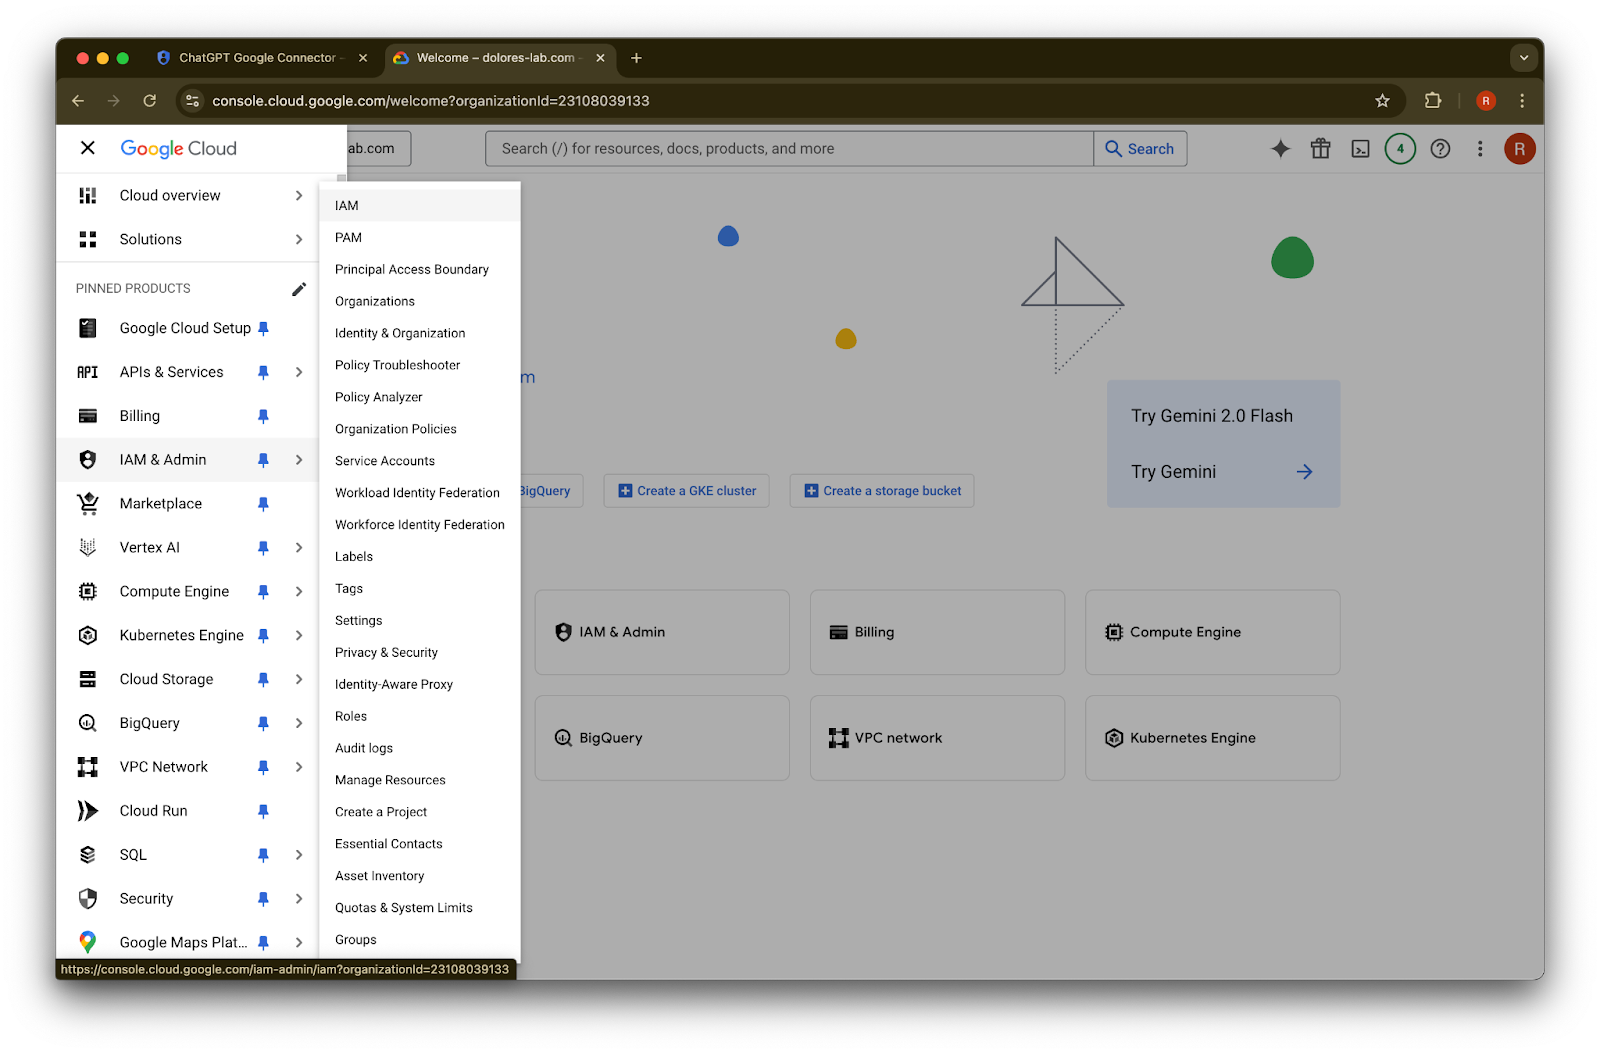
ಮೇಲಿನ ಎಡ ಮೂಲೆಯಲ್ಲಿರುವ menu icon ಮೇಲೆ ಕ್ಲಿಕ್ ಮಾಡಿ.IAM & Admin ಮೇಲೆ ಹೋವರ್ ಮಾಡಿ
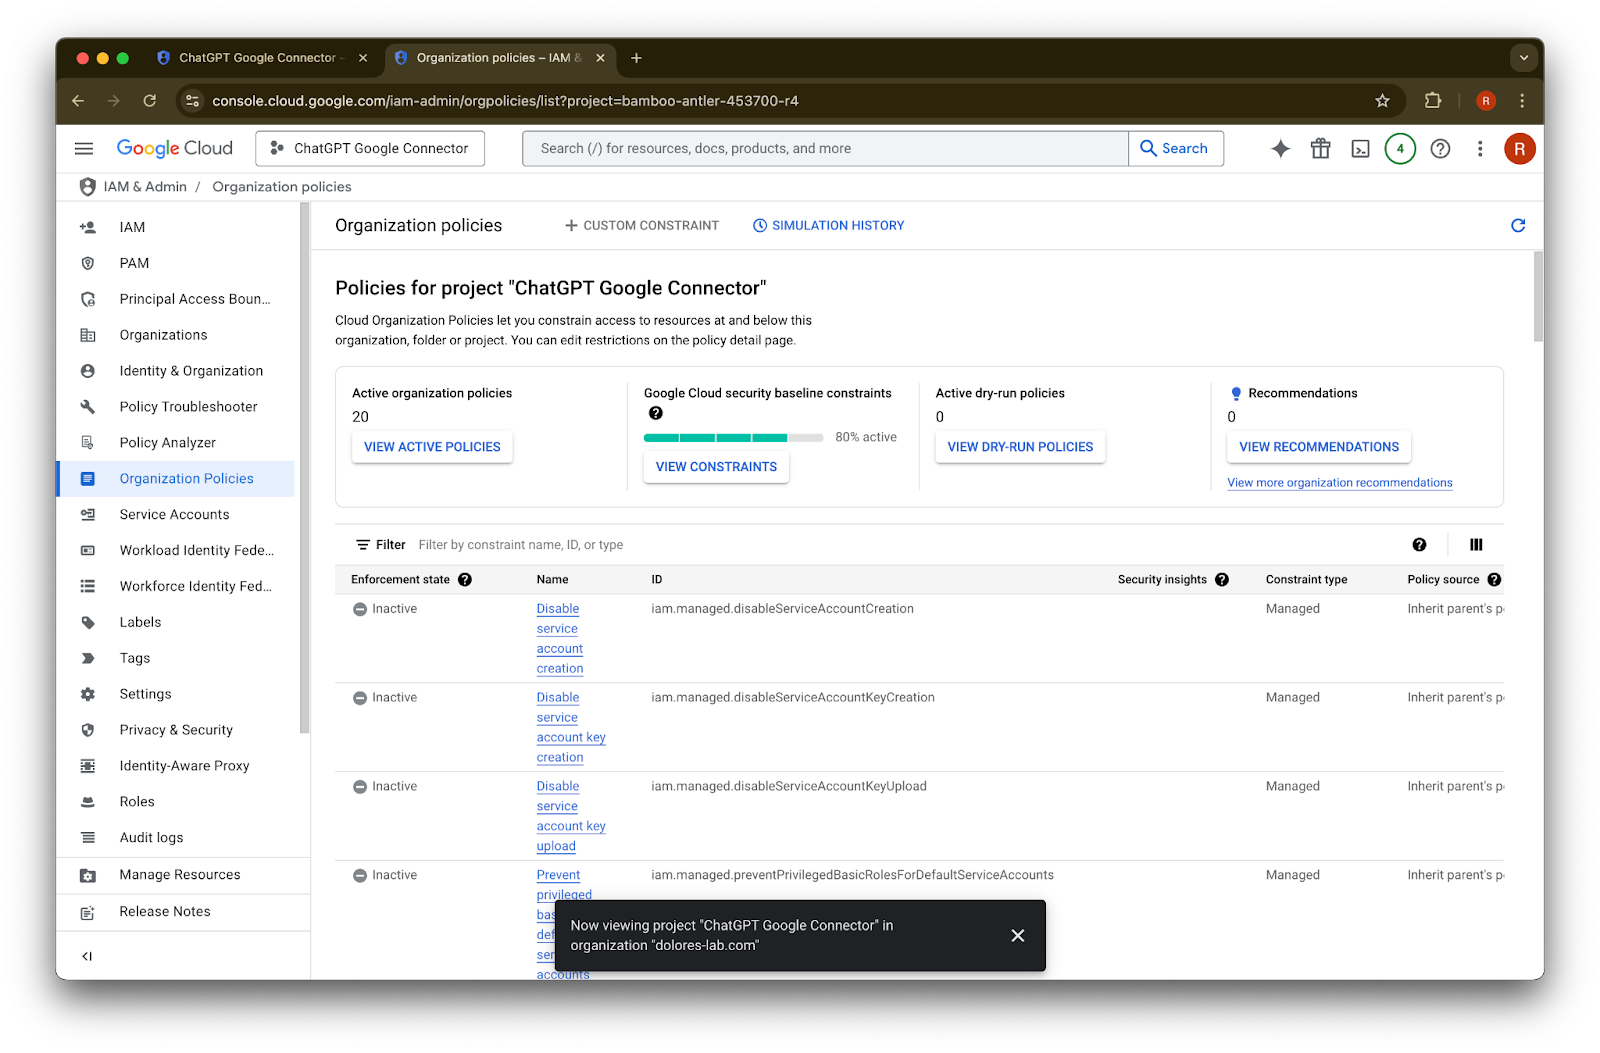
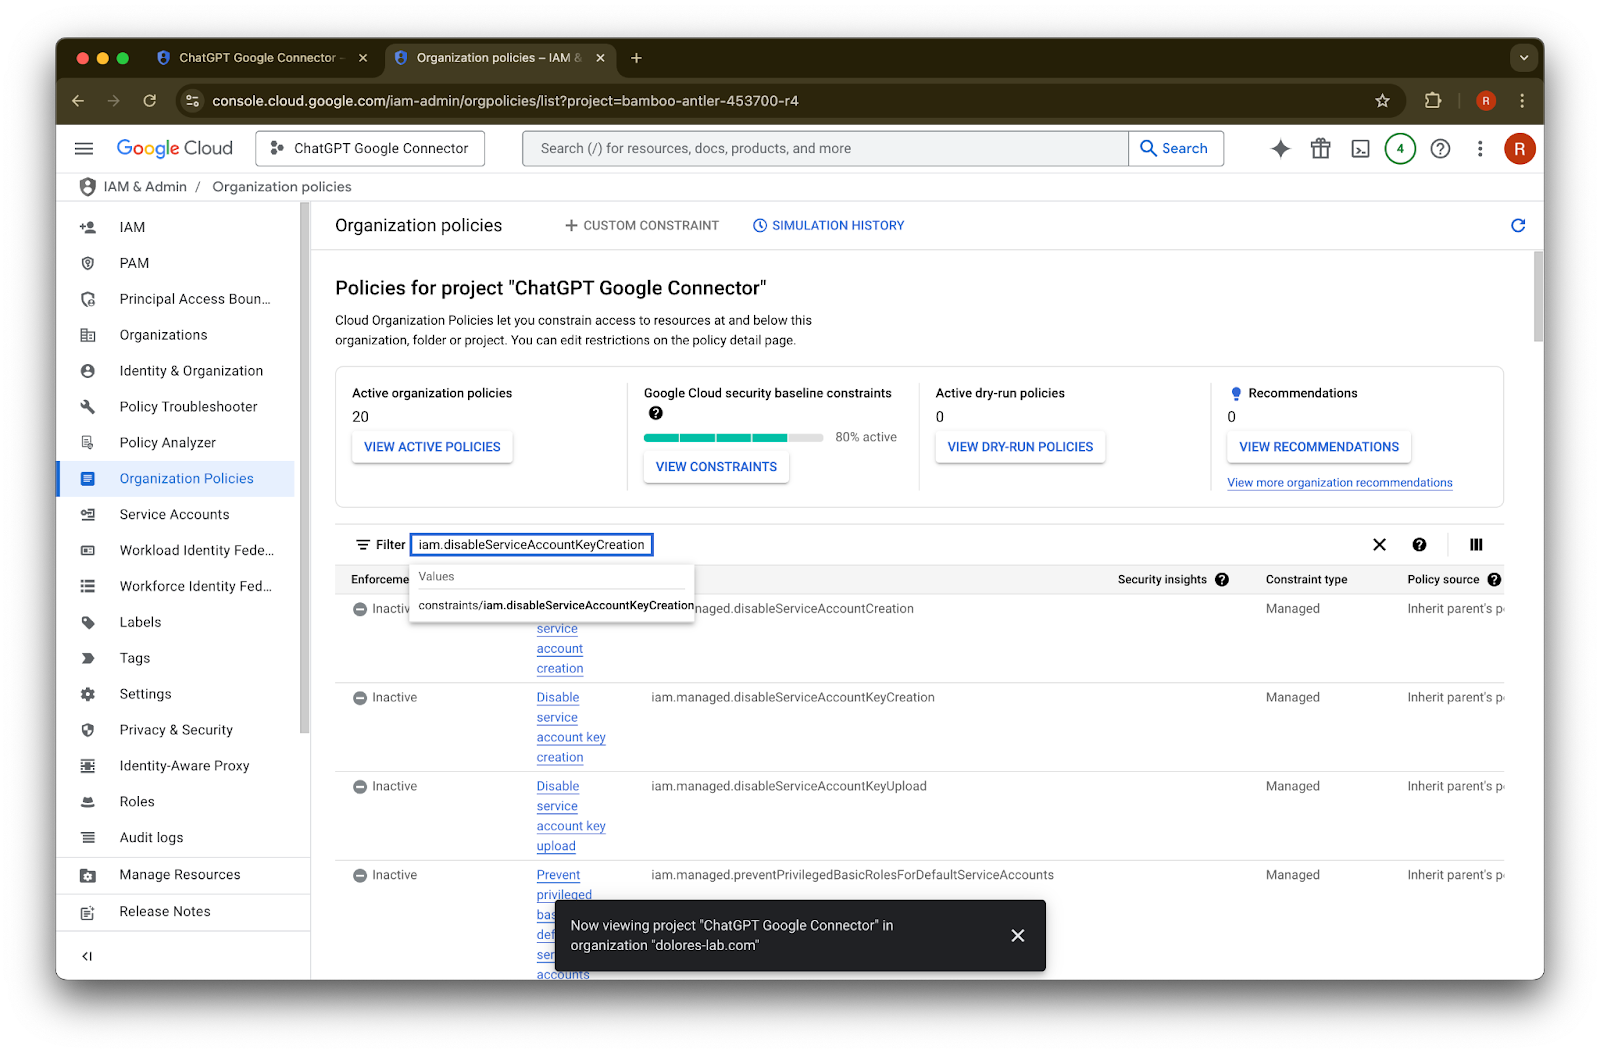
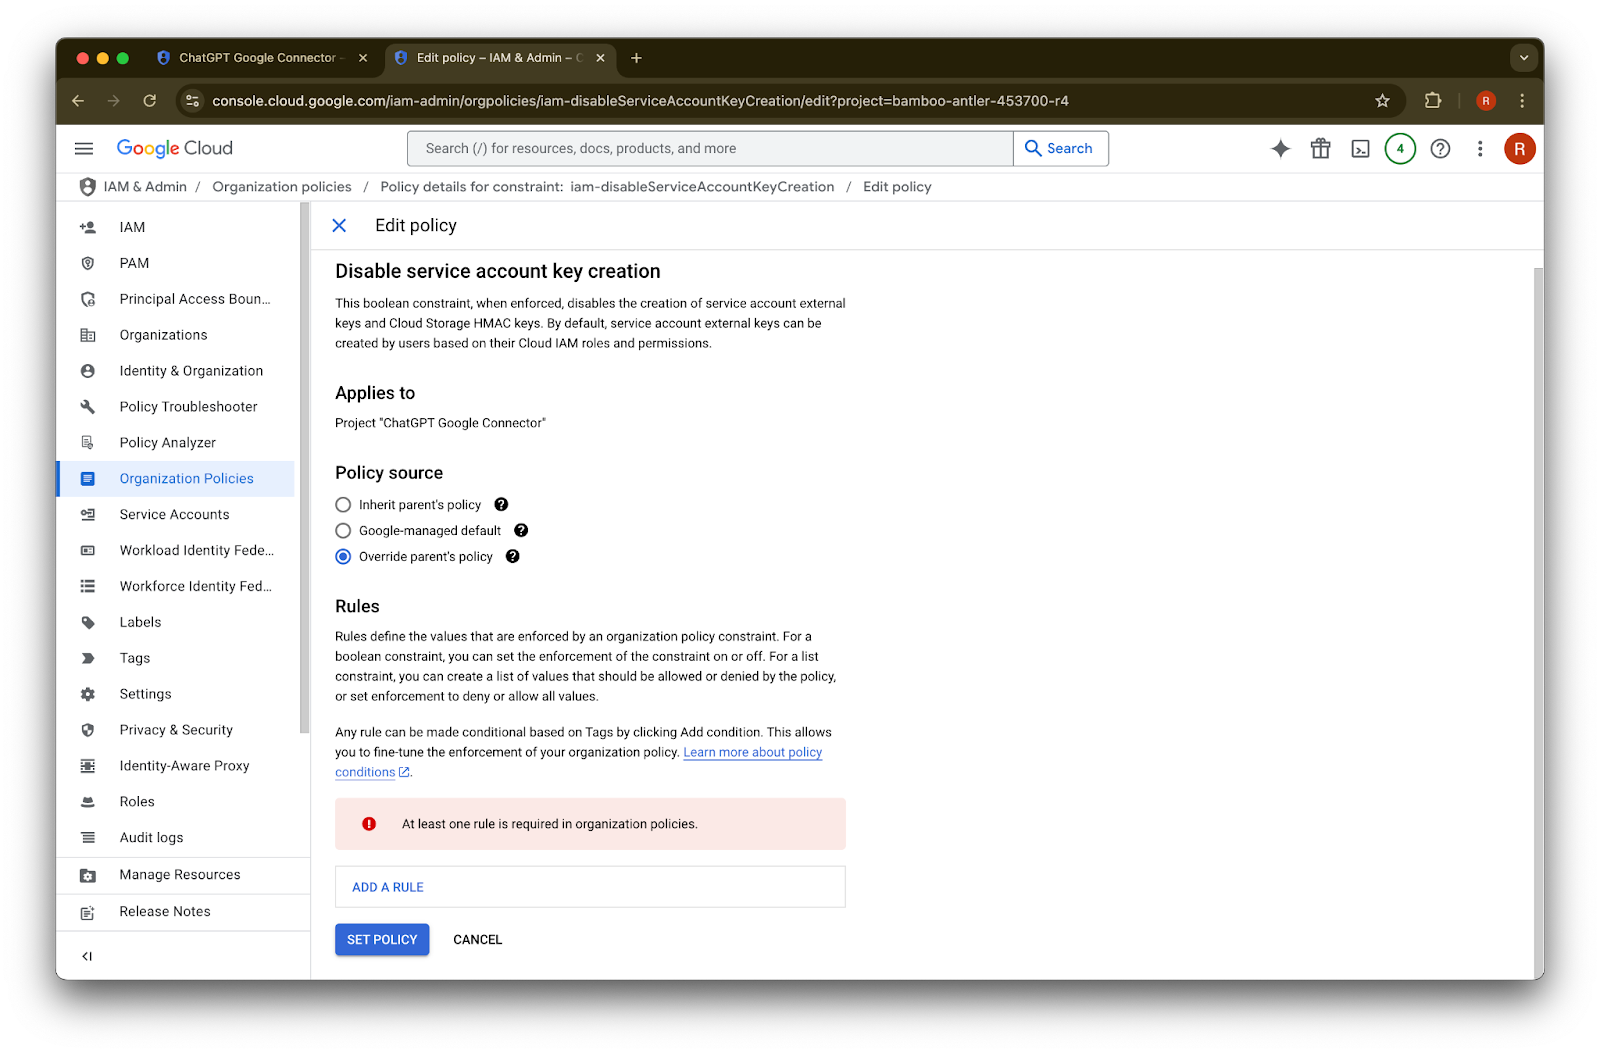
Organizational Policies ಮೇಲೆ ಕ್ಲಿಕ್ ಮಾಡಿ
iam.disableServiceAccountKeyCreation
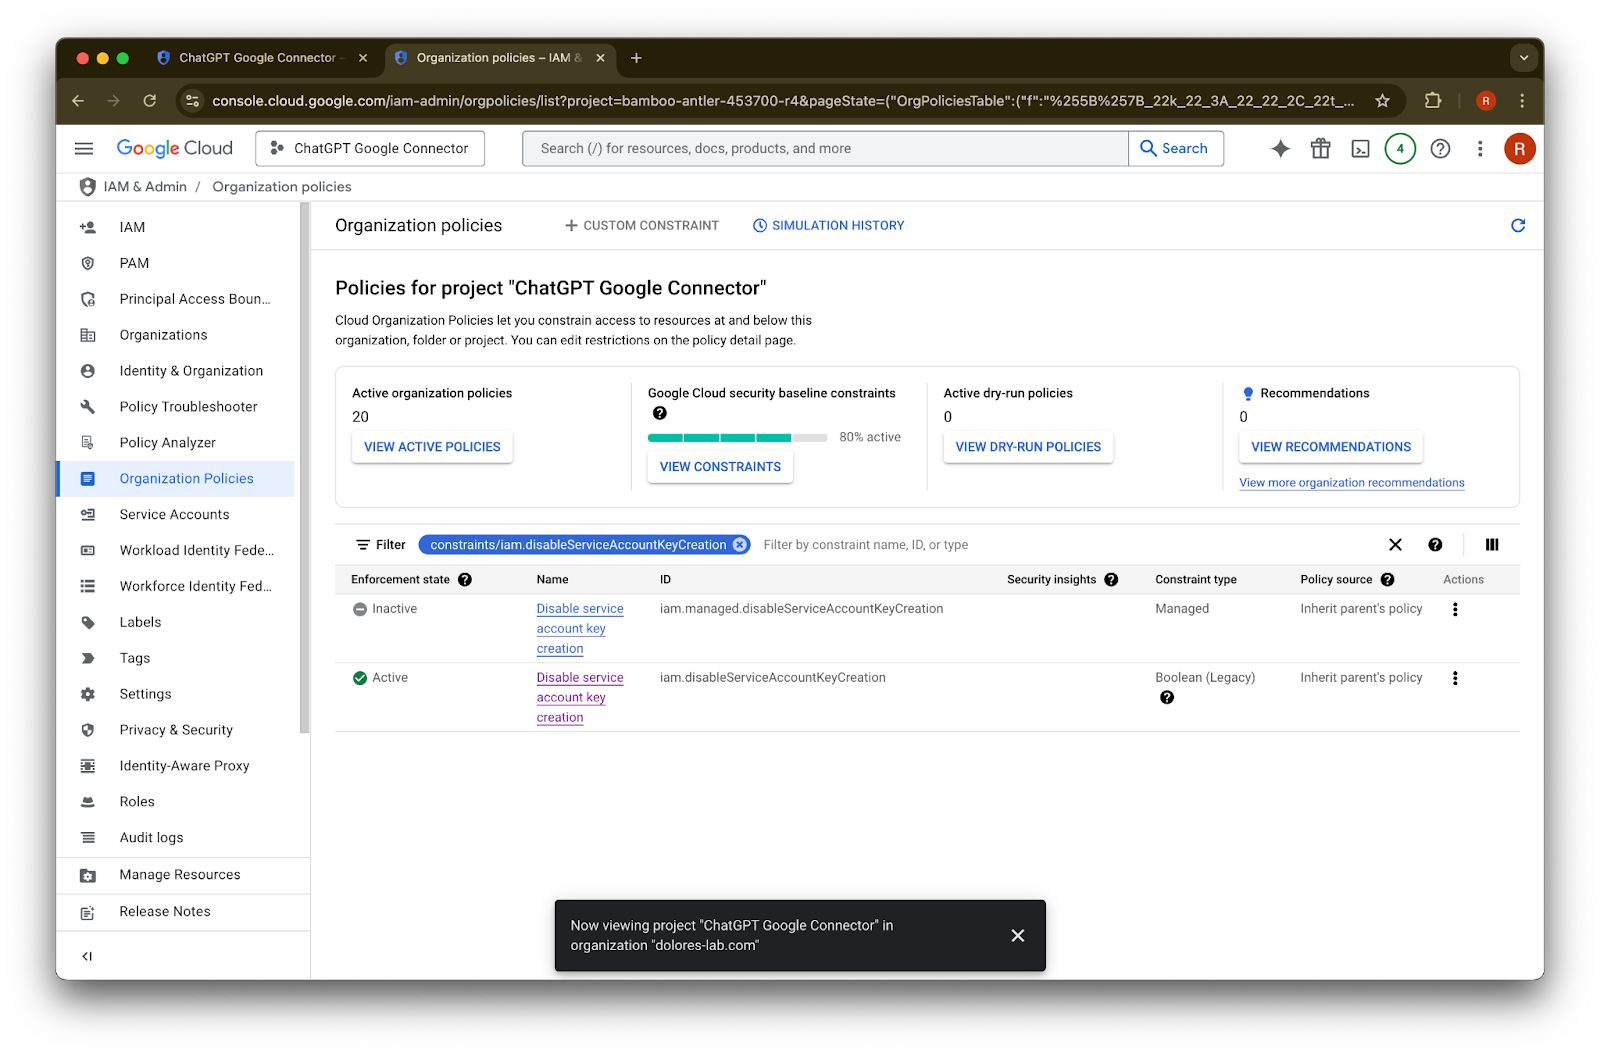
ಅನ್ನು ಹುಡುಕಿconstraints/iam.disableServiceAccountKeyCreation
ಫಲಿತಾಂಶದ ಮೇಲೆ ಕ್ಲಿಕ್ ಮಾಡಿiam.disableServiceAccountKeyCreation
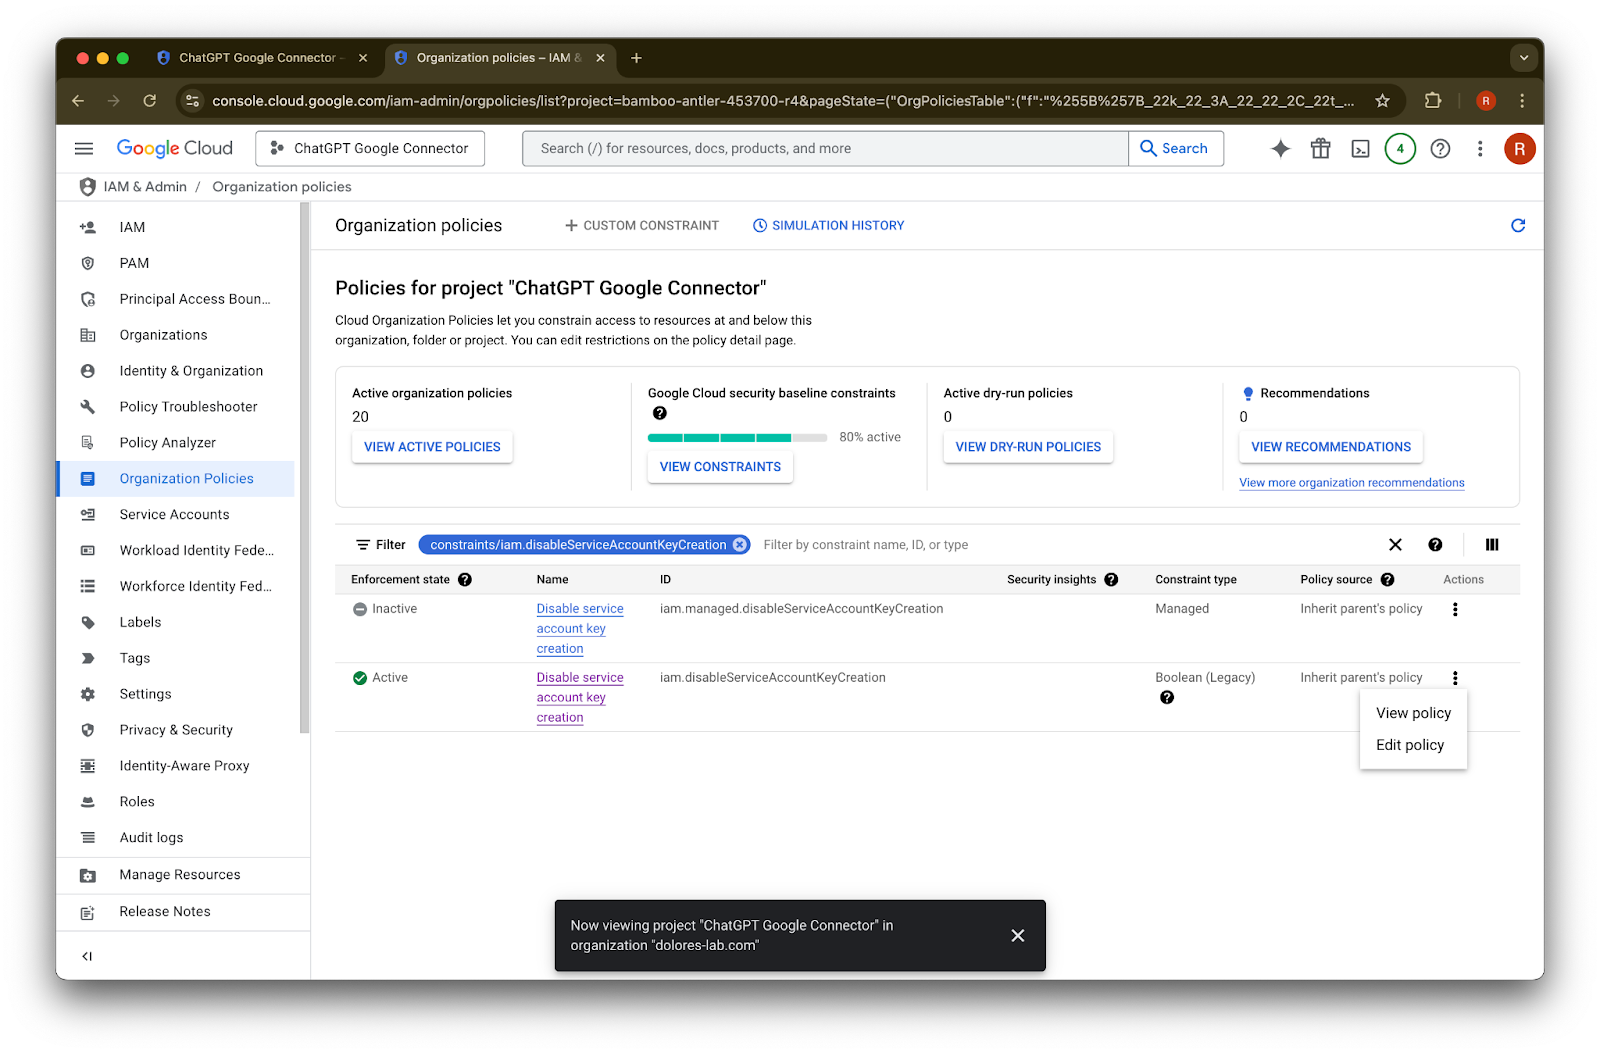
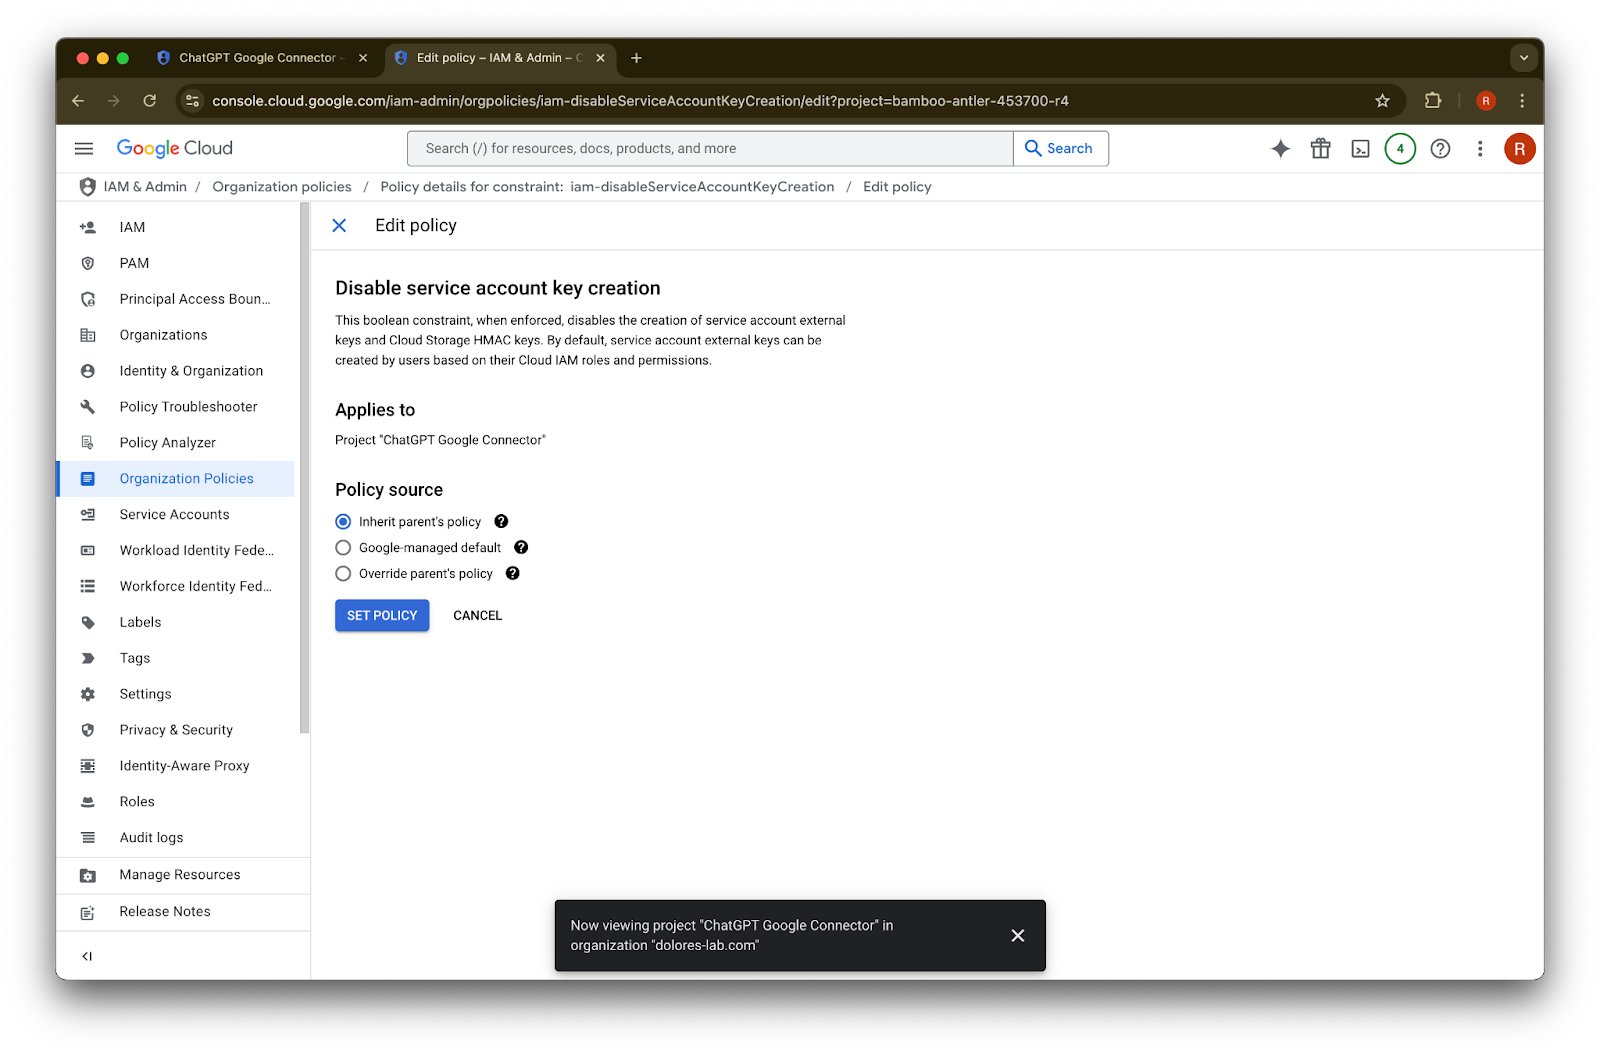
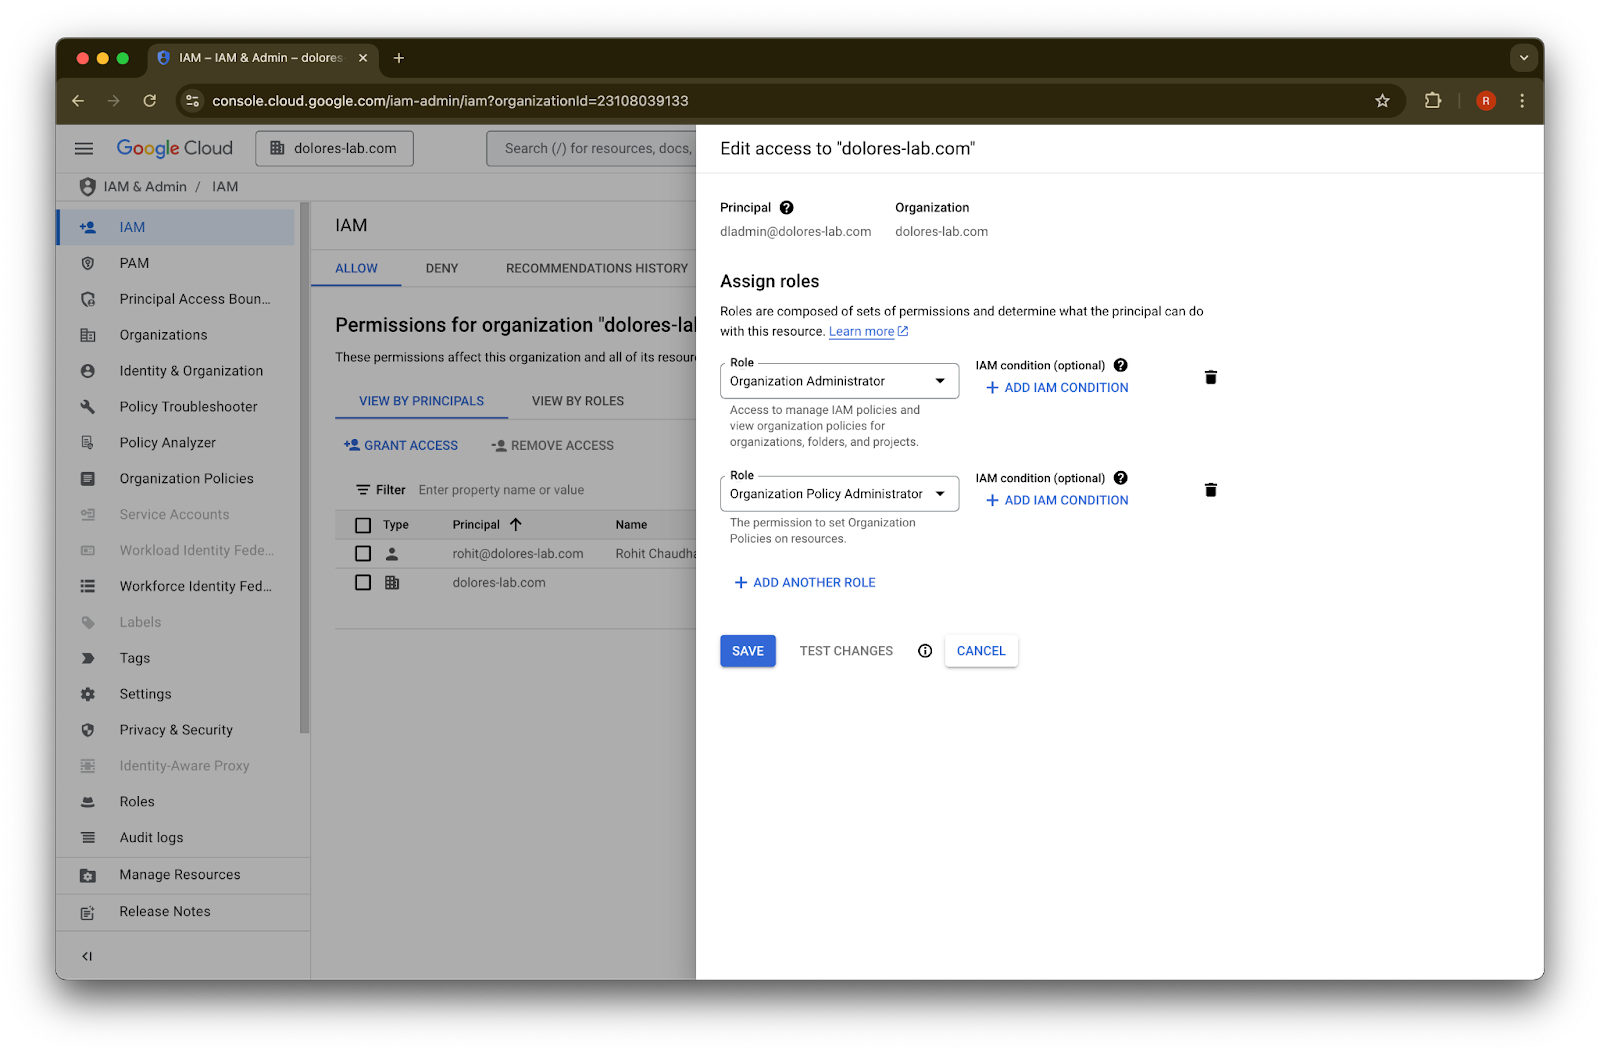
ID ಇರುವ ಸಾಲಿನ … ಮೇಲೆ ಕ್ಲಿಕ್ ಮಾಡಿEdit policy ಮೇಲೆ ಕ್ಲಿಕ್ ಮಾಡಿ. Edit policy ನಿಷ್ಕ್ರಿಯಗೊಂಡಿದ್ದರೆ, ನೀವು Organization Policy Administrator ಆಗಬೇಕಾಗುತ್ತದೆ.
Override parent’s policy
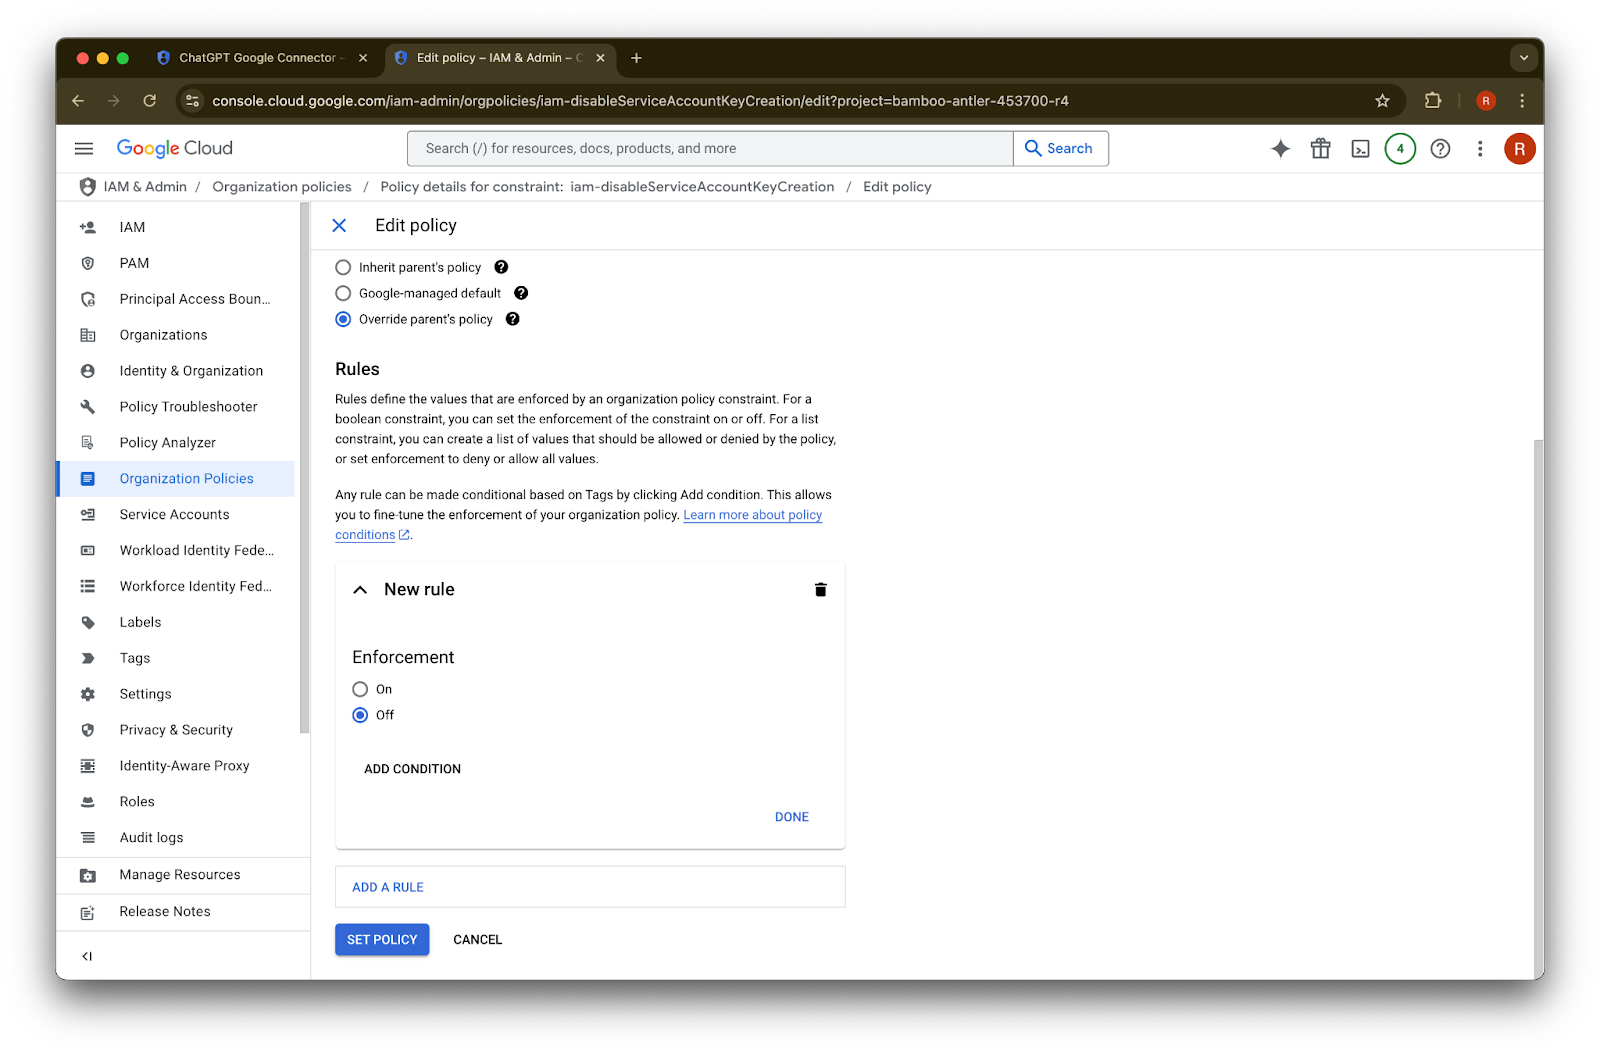
ಮೇಲೆ ಕ್ಲಿಕ್ ಮಾಡಿAdd a rule
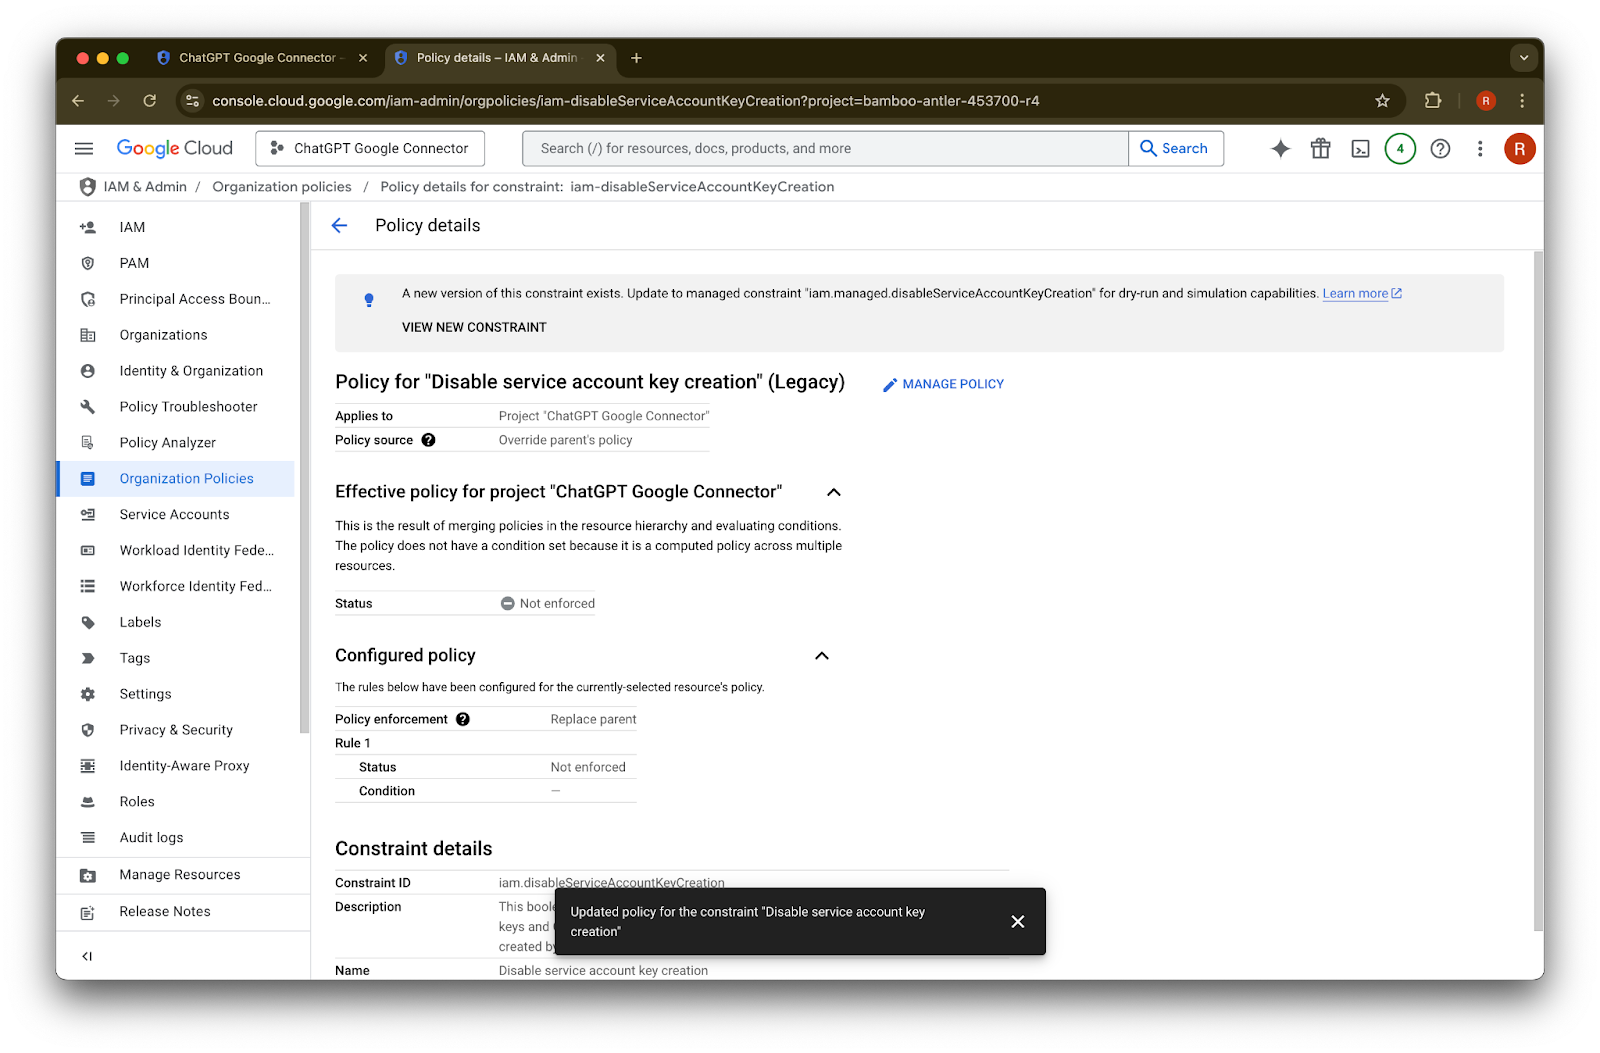
ಮೇಲೆ ಕ್ಲಿಕ್ ಮಾಡಿSet Policy
ಮೇಲೆ ಕ್ಲಿಕ್ ಮಾಡಿನೀವು ಈಗ ಸೇವಾ ಖಾತೆ ಕಿಯನ್ನು ರಚಿಸಬಹುದು. ಈ ಸಕ್ರಿಯಗೊಳಿಕೆ ಪರಿಣಾಮಕಾರಿಯಾಗಲು ಹಲವಾರು ನಿಮಿಷಗಳು ಹಿಡಿಯಬಹುದು.
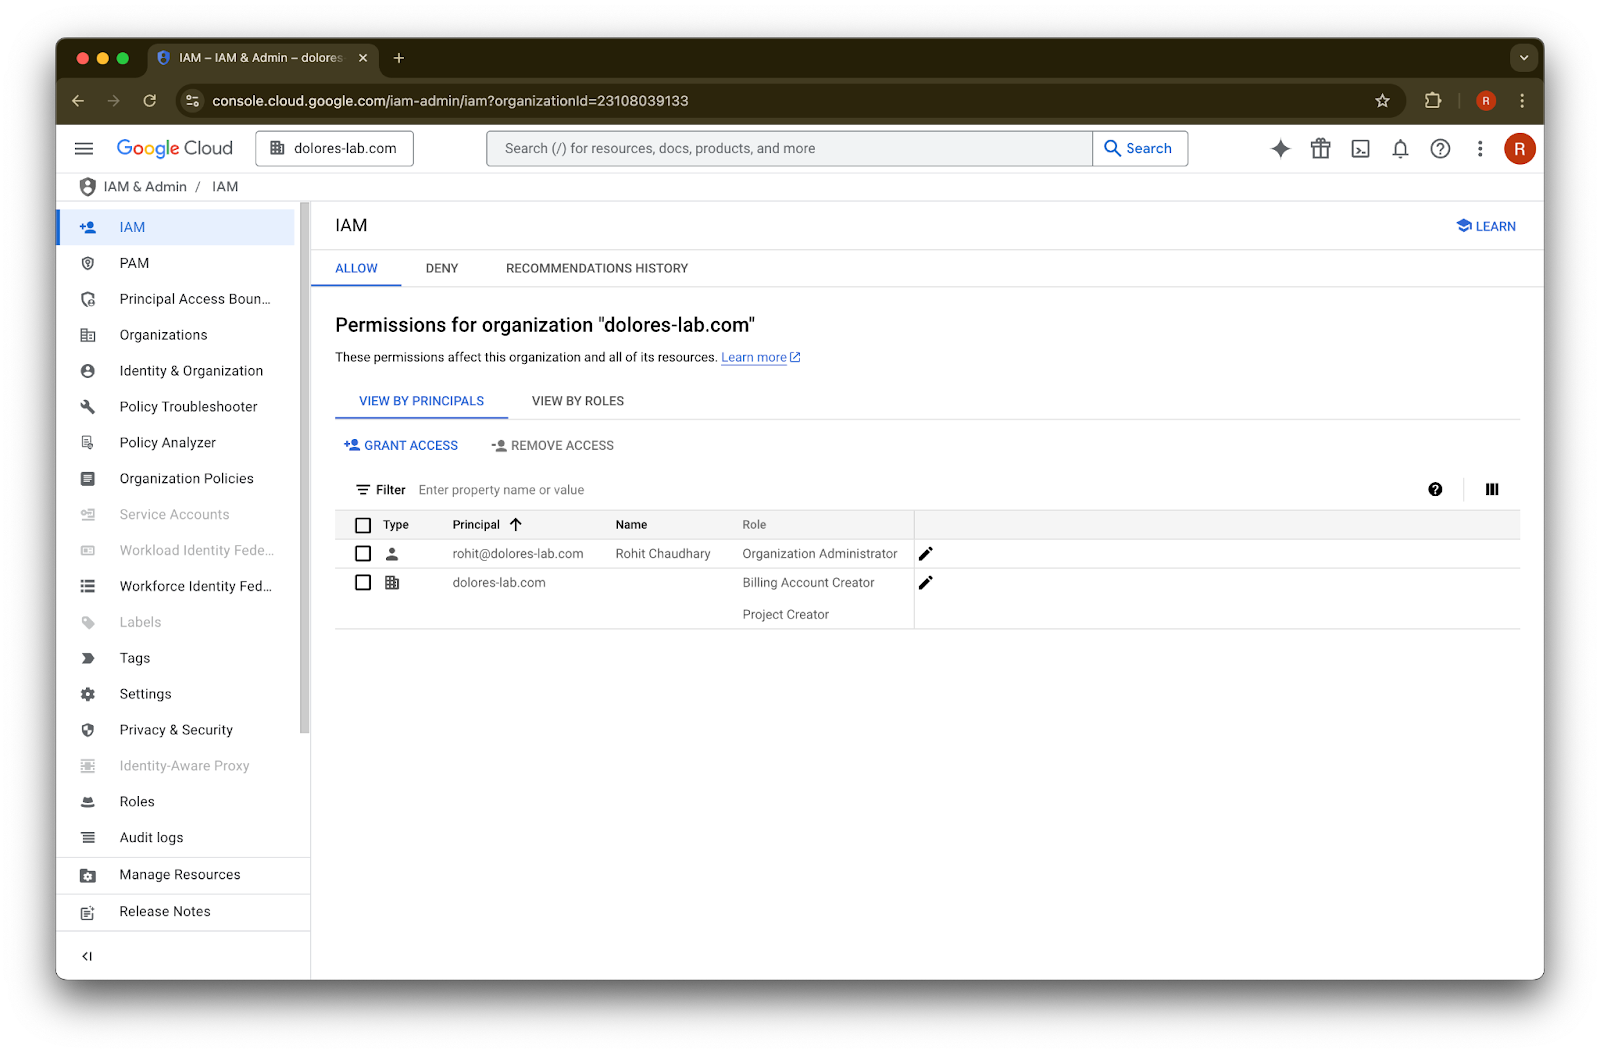
Organization Policy Administrator ಆಗುವುದು
console.cloud.google.com ಗೆ ಹೋಗಿ ಮತ್ತು project/organization selector ಮೇಲೆ ಕ್ಲಿಕ್ ಮಾಡಿ
your organization
ಮೇಲೆ ಕ್ಲಿಕ್ ಮಾಡಿಮೇಲಿನ ಎಡ ಮೂಲೆಯಲ್ಲಿರುವ menu icon ಮೇಲೆ ಕ್ಲಿಕ್ ಮಾಡಿ
IAM & Admin
ಮೇಲೆ ಹೋವರ್ ಮಾಡಿIAM
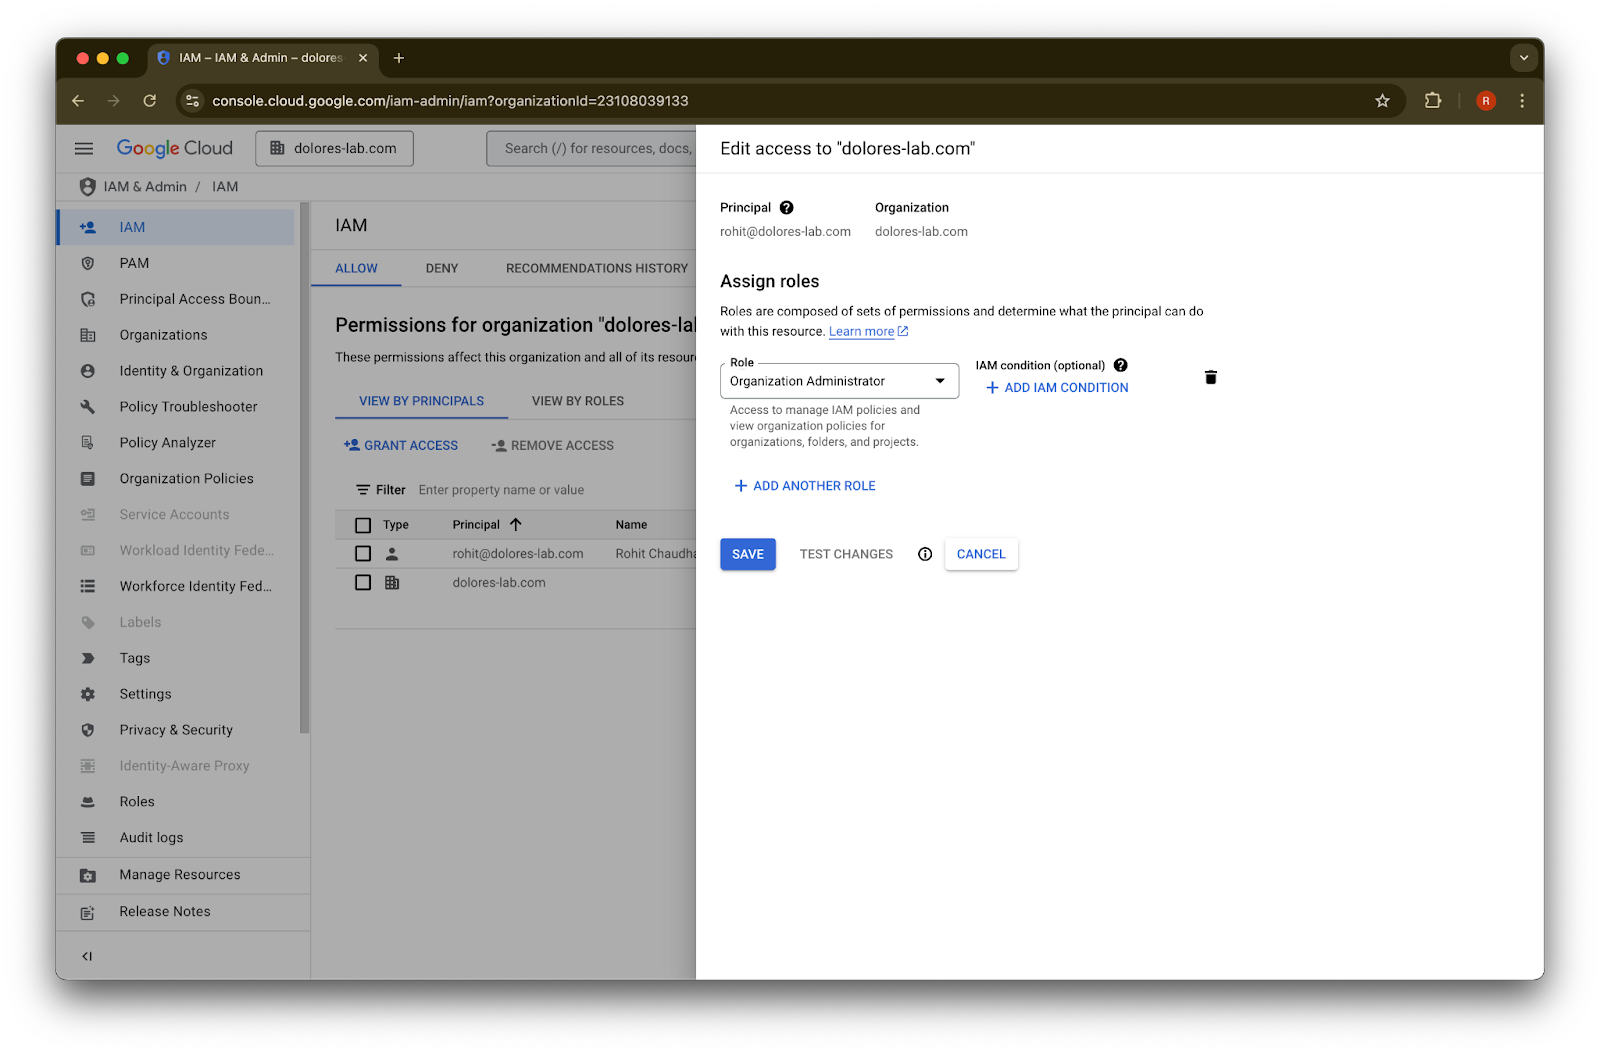
ಮೇಲೆ ಕ್ಲಿಕ್ ಮಾಡಿನಿಮ್ಮ ಖಾತೆಗೆ ಇರುವ pencil ಮೇಲೆ ಕ್ಲಿಕ್ ಮಾಡಿ
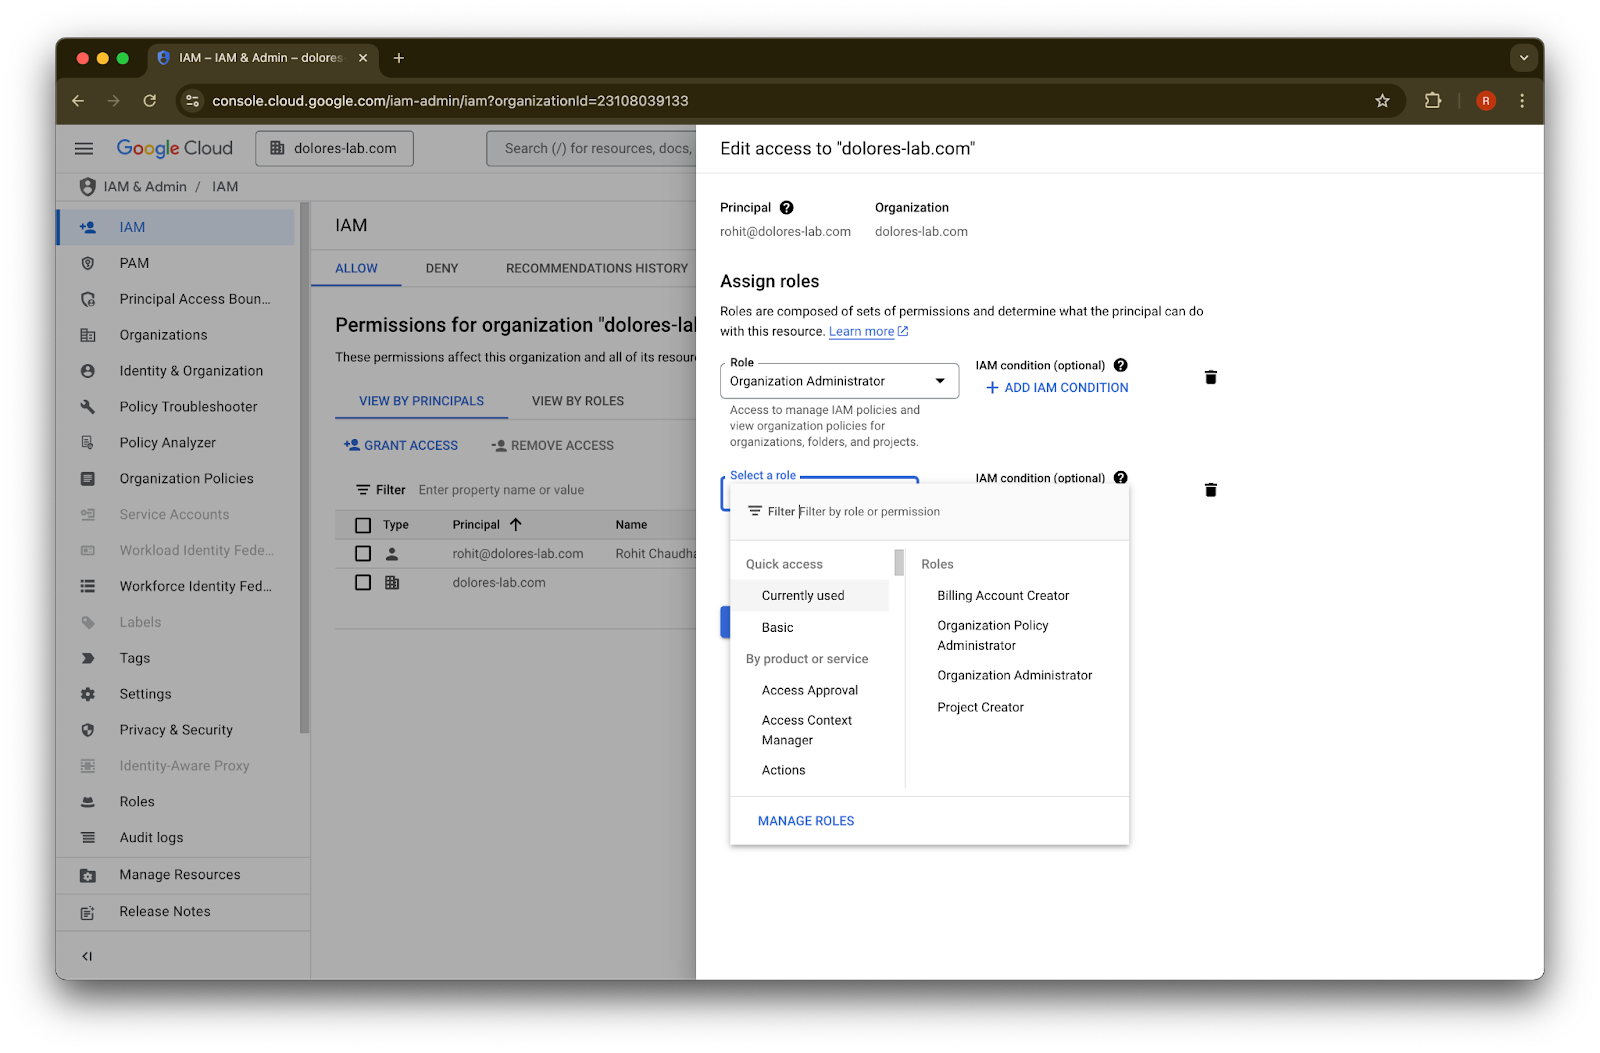
Add Another Role
ಮೇಲೆ ಕ್ಲಿಕ್ ಮಾಡಿOrganization Policy Administrator
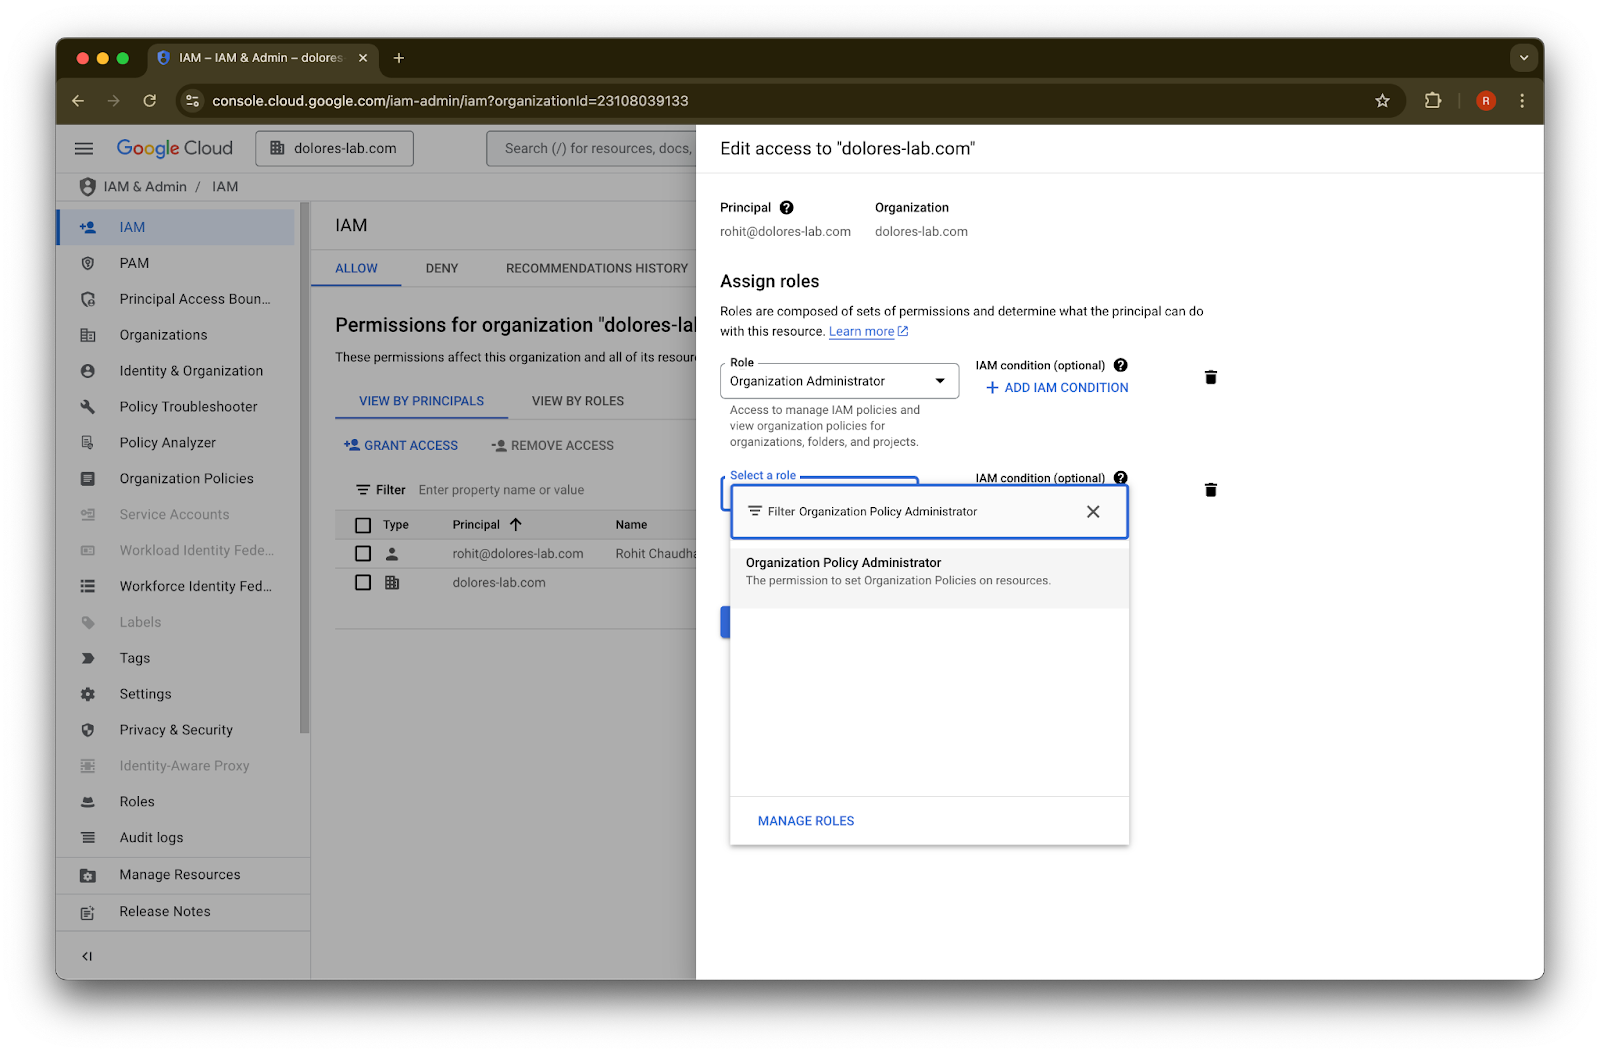
ಅನ್ನು ಹುಡುಕಿOrganization Policy Administrator
ಮೇಲೆ ಕ್ಲಿಕ್ ಮಾಡಿSave ಮೇಲೆ ಕ್ಲಿಕ್ ಮಾಡಿ
ನಿಮ್ಮ ಖಾತೆಗೆ ಈಗ ಸೇವಾ ಖಾತೆ ಕೀ ರಚನೆಯನ್ನು ಸಕ್ರಿಯಗೊಳಿಸುವ ಅನುಮತಿ ಇದೆ. ಇದು ಪರಿಣಾಮಕಾರಿಯಾಗಲು ಹಲವಾರು ನಿಮಿಷಗಳು ಹಿಡಿಯಬಹುದು.
Google Workspace ಮತ್ತು ChatGPT ಗೆ ವಿಭಿನ್ನ ಇಮೇಲ್ ಖಾತೆಗಳನ್ನು ಉಳಿಸಿಕೊಳ್ಳಲು Google ಇಮೇಲ್ ಅಲಿಯಾಸ್ ಬಳಸುವುದು
ನೀವು Google Drive synced connectors ಗಾಗಿ admin-managed setup ಬಳಸಿ ನಿಮ್ಮ ChatGPT ವರ್ಕ್ಸ್ಪೇಸ್ಗೆ Google Workspace ಅನ್ನು ಸಂಪರ್ಕಿಸುತ್ತಿರುವ ನಿರ್ವಾಹಕರಾಗಿದ್ದು, ನಿಮ್ಮ ಸಂಸ್ಥೆ ChatGPT ಮತ್ತು Google Workspace ಗಾಗಿ ಬೇರೆ ಇಮೇಲ್ ಡೊಮೇನ್ಗಳನ್ನು ಬಳಸುತ್ತಿದ್ದರೆ, ಬಳಕೆದಾರರು Google Drive synced connectors ಅನ್ನು ಯಶಸ್ವಿಯಾಗಿ ಪ್ರವೇಶಿಸಬಹುದೆಂದು ಖಚಿತಪಡಿಸಲು ನೀವು ಹೆಚ್ಚುವರಿ ಹಂತಗಳನ್ನು ಕೈಗೊಳ್ಳಬೇಕು.
ಶಿಫಾರಸು: ಸಾಧ್ಯವಾದಾಗಲೆಲ್ಲ, Google Workspace ಮತ್ತು ChatGPT ಖಾತೆಗಳೆರಡಕ್ಕೂ ಒಂದೇ ಪ್ರಾಥಮಿಕ ಇಮೇಲ್ ವಿಳಾಸಗಳನ್ನು ಬಳಸಿ.
ಇದು ಸಾಧ್ಯವಿಲ್ಲದಿದ್ದರೆ, ChatGPT ಸೈನ್-ಇನ್ ಇಮೇಲ್ಗೆ ಹೊಂದುವ Google Workspace ಇಮೇಲ್ ಅಲಿಯಾಸ್ ಅನ್ನು ಸಂರಚಿಸಲು ಕೆಳಗಿನ ಸೂಚನೆಗಳನ್ನು ಅನುಸರಿಸಿ.
Google Workspace ಅಲಿಯಾಸ್ ಸೇರಿಸುವ ಹಂತಗಳು
ಪ್ರತಿ ಬಳಕೆದಾರರ ChatGPT ಇಮೇಲ್ ಅನ್ನು ಅವರ Google Workspace ಖಾತೆಗೆ ಲಿಂಕ್ ಮಾಡಬಹುದೆಂದು ಖಚಿತಪಡಿಸಲು Google Admin Console ನಲ್ಲಿ ಈ ಹಂತಗಳನ್ನು ಅನುಸರಿಸಿ.
Admin Console ಗೆ ಹೋಗಿ. ಇಲ್ಲಿಗೆ ಹೋಗಿ: Directory > Users
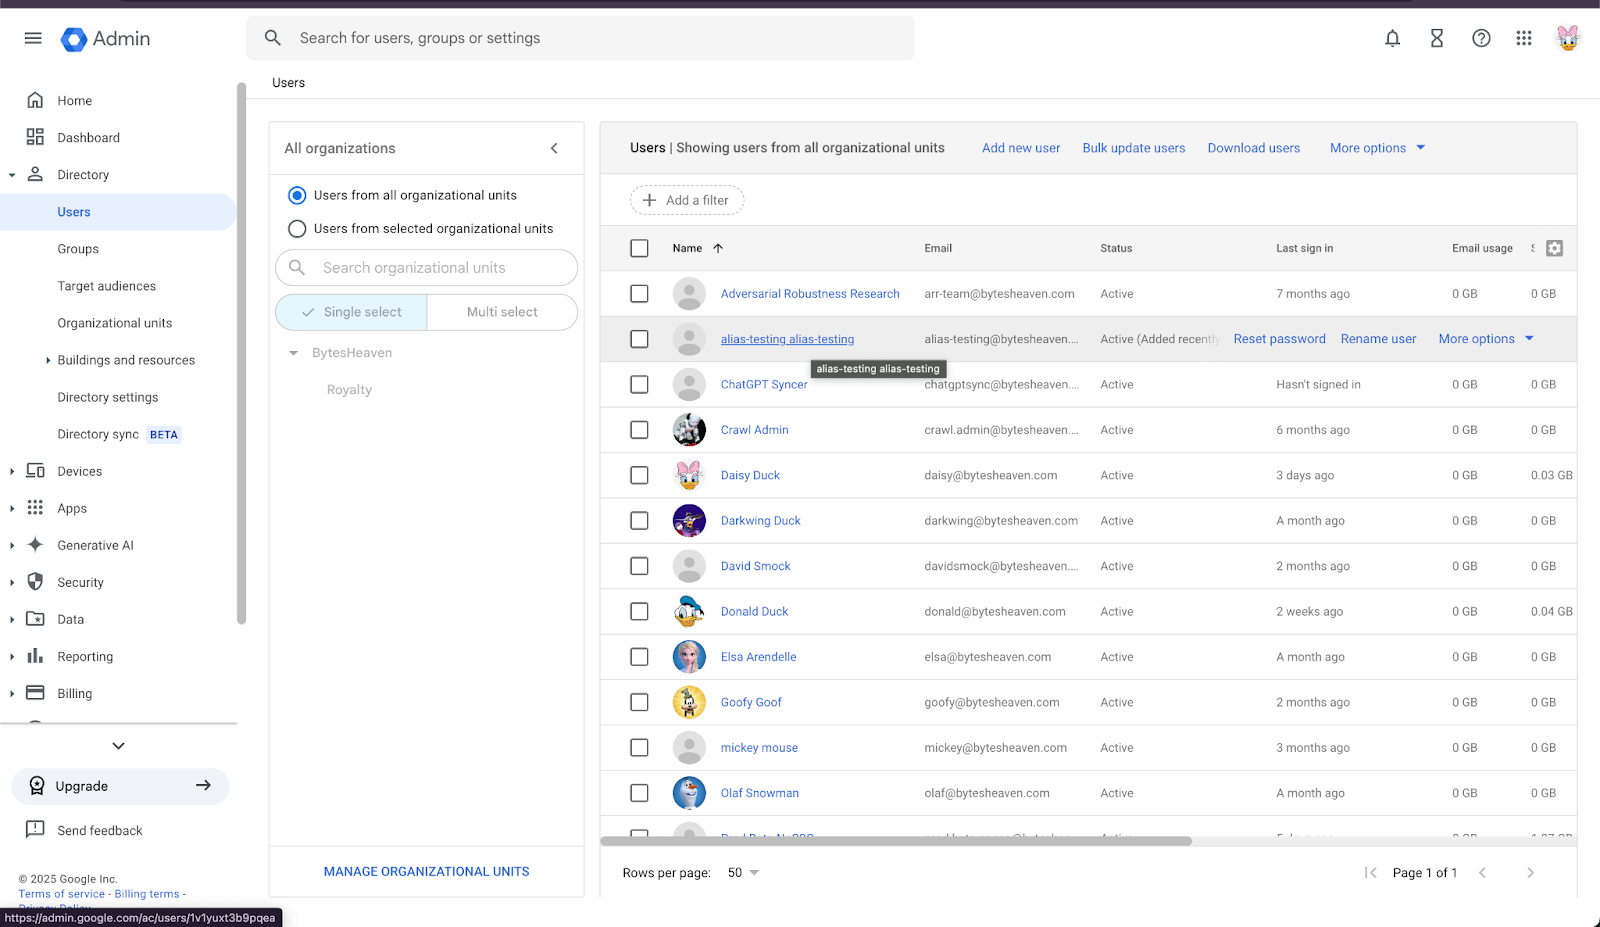
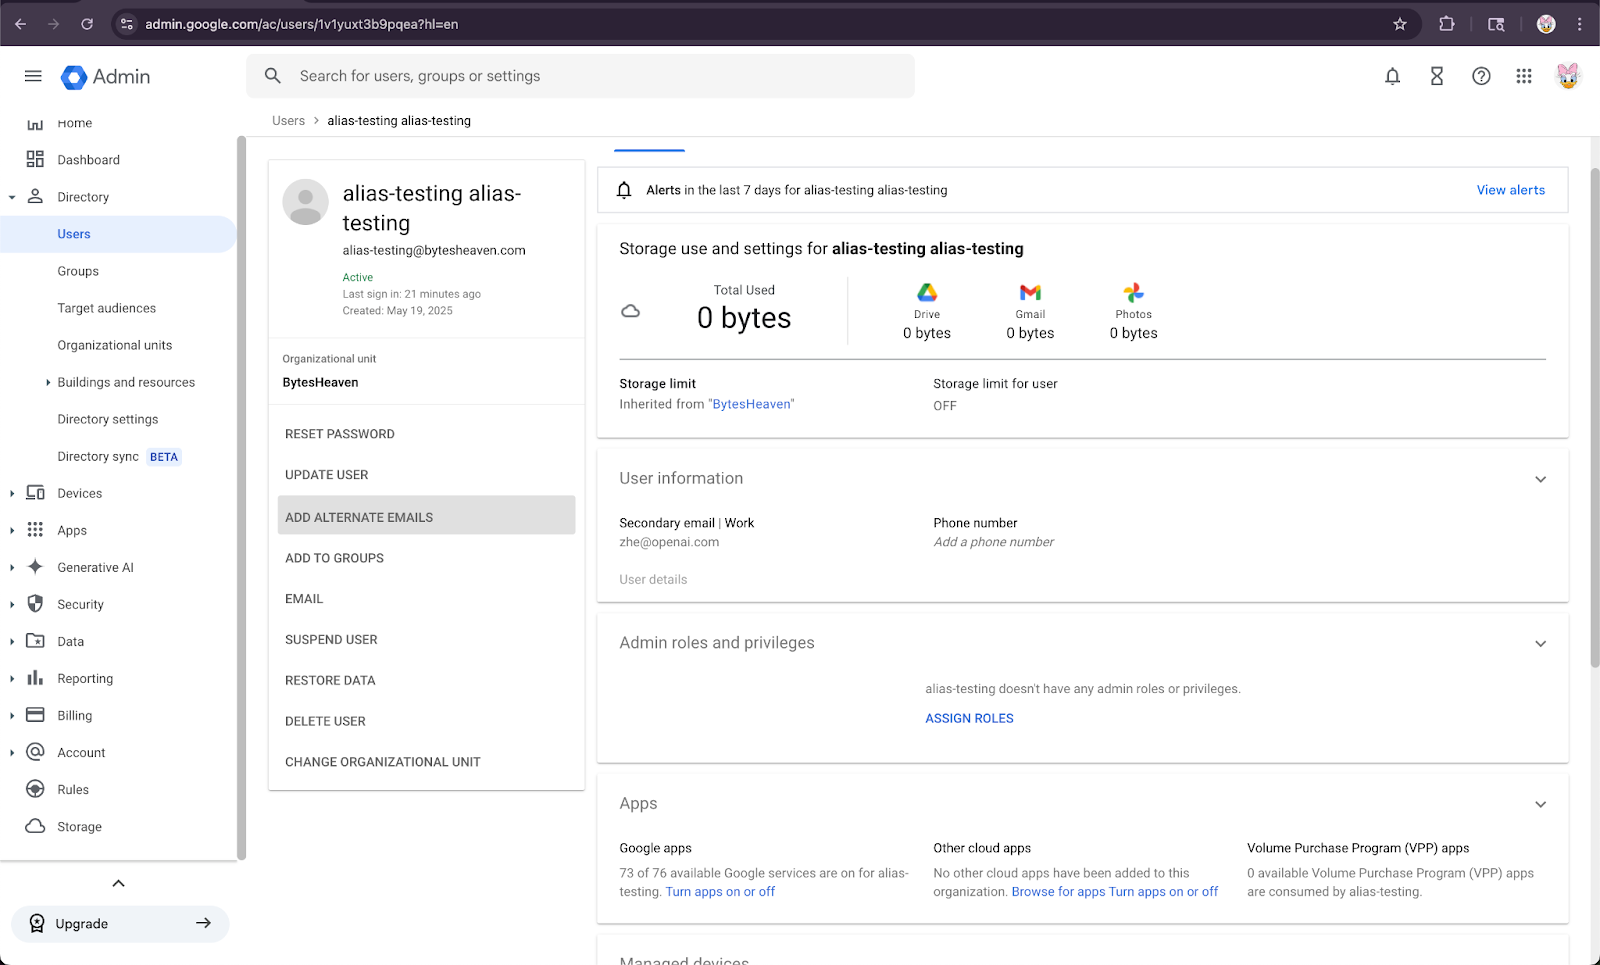
2. ಬಳಕೆದಾರನನ್ನು ಆಯ್ಕೆಮಾಡಿ, ನಂತರ “ADD ALTERNATIVE EMAILS” ಆಯ್ಕೆಮಾಡಿ.
3. ಪರ್ಯಾಯ ಇಮೇಲ್ ಸೇರಿಸಿ. ಅದು ಬಳಕೆದಾರರ ChatGPT ಖಾತೆಗೆ ಹೊಂದಿಕೆಯಾಗಿರುವುದನ್ನು ಖಚಿತಪಡಿಸಿ.
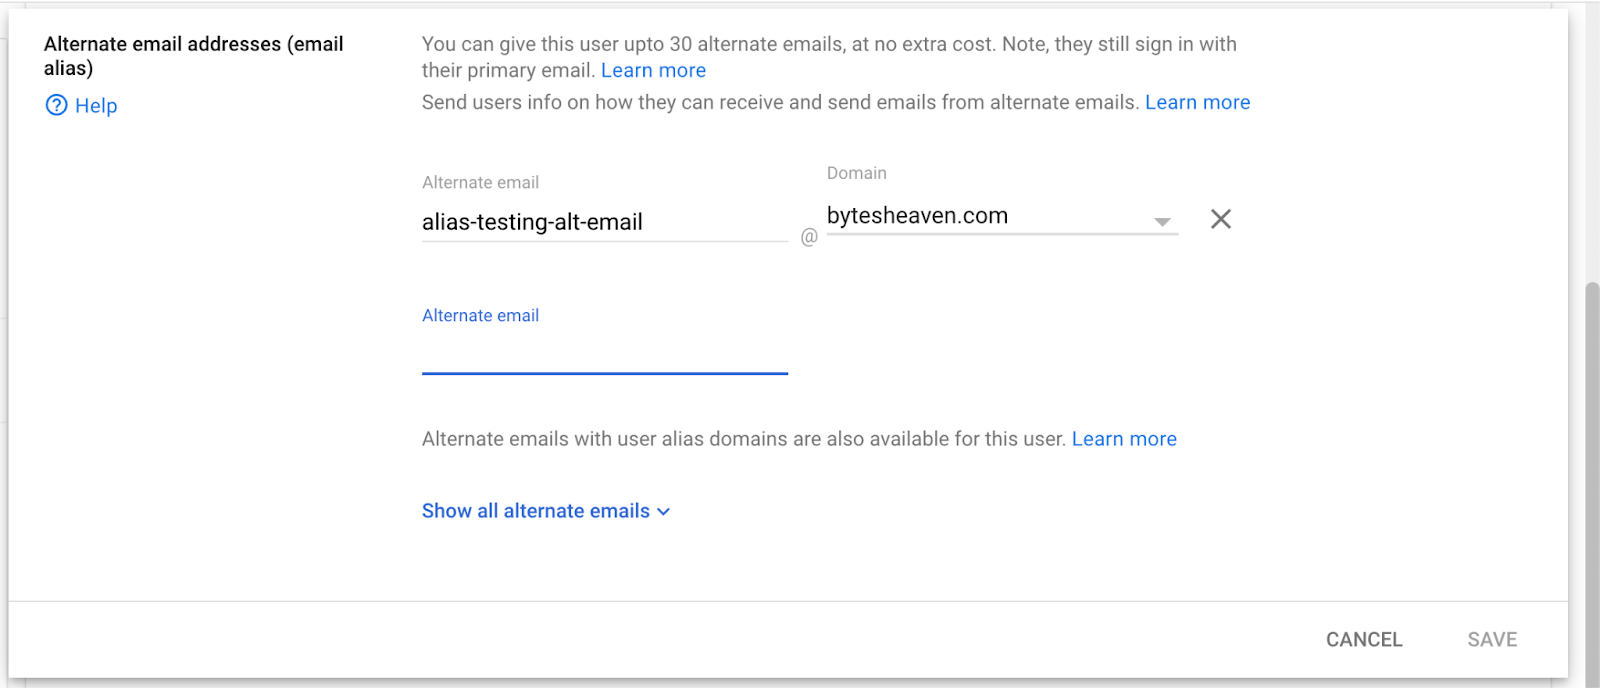
4. Save ಆಯ್ಕೆಮಾಡಿ
ತಿಳಿದಿರುವ ಮಿತಿಗಳು
ವೈಯಕ್ತಿಕ ಇಮೇಲ್ ವಿಳಾಸಗಳಿಗೆ ಬೆಂಬಲ ಇಲ್ಲ
ವೈಯಕ್ತಿಕ ವಿಳಾಸಗಳನ್ನು ಬಳಸಿ ChatGPT ಗೆ ನೋಂದಾಯಿಸುವ ಬಳಕೆದಾರರು (ಉದಾ., example@gmail.com) Google Workspace ಗೆ ಸಂಪರ್ಕಿಸಲು ಸಾಧ್ಯವಿಲ್ಲ. ಈ ಸೆಟಪ್ ಬೆಂಬಲಿತವಾಗಿಲ್ಲ ಮತ್ತು ಇದು ಭದ್ರತಾ ಅಪಾಯವನ್ನು ಉಂಟುಮಾಡುತ್ತದೆ, ಏಕೆಂದರೆ ಇದು ಸಂಸ್ಥೆಯ ಹೊರಗಿನಿಂದ ಆಂತರಿಕ ಡೇಟಾಗೆ ಪ್ರವೇಶವನ್ನು ಸಕ್ರಿಯಗೊಳಿಸುತ್ತದೆ.
Gmail "+" ಅಲಿಯಾಸ್ಗಳಿಗೆ ಬೆಂಬಲ ಇಲ್ಲ
Gmail ನಲ್ಲಿ ಬಳಕೆದಾರರು ತಮ್ಮ ವಿಳಾಸಕ್ಕೆ "+" ಸೇರಿಸಿ ಅಲಿಯಾಸ್ಗಳನ್ನು ರಚಿಸಬಹುದು (ಉದಾ., user+alias@gmail.com). ಈ ರೀತಿಯ ಅಲಿಯಾಸಿಂಗ್ Google Drive synced connectors ಜೊತೆ ಕೆಲಸ ಮಾಡುವುದಿಲ್ಲ. ಅಲಿಯಾಸ್ ಅನ್ನು Google Workspace ನಲ್ಲಿ ಸ್ಪಷ್ಟವಾಗಿ ಸಂರಚಿಸಬೇಕು.
ಸಾಮಾನ್ಯ ದೋಷ ಸಂದೇಶ
ಇಮೇಲ್ ವಿಳಾಸಗಳು ಸರಿಯಾಗಿ ಲಿಂಕ್ ಆಗಿರದಿದ್ದರೆ, ಬಳಕೆದಾರರು ಈ ಸಂದೇಶವನ್ನು ಕಾಣಬಹುದು: "ನಿಮ್ಮ ಖಾತೆಯನ್ನು Google Drive ಗೆ ಸಂಪರ್ಕಿಸಲು ನಮಗೆ ಸಾಧ್ಯವಾಗಲಿಲ್ಲ. ಇನ್ನಷ್ಟು ತಿಳಿಯಲು ಕ್ಲಿಕ್ ಮಾಡಿ."
ಬಳಕೆದಾರರಿಗೆ ಈ ಸಂದೇಶ ಬಂದರೆ, ಈ ದಸ್ತಾವೇಜಿನಲ್ಲಿನ ಹಂತಗಳನ್ನು ಪರಿಶೀಲಿಸಿ ಮತ್ತು ಅವುಗಳನ್ನು ಸರಿಯಾಗಿ ಅನುಸರಿಸಿರುವುದನ್ನು ಖಚಿತಪಡಿಸಿ. ಹೆಚ್ಚುವರಿ ಸಹಾಯ ಬೇಕಿದ್ದರೆ, ದಯವಿಟ್ಟು ನಮ್ಮ ಬೆಂಬಲ ತಂಡವನ್ನು ಸಂಪರ್ಕಿಸಿ.