
admin-managed setup ഉപയോഗിച്ച് നിങ്ങളുടെ Google Workspace ChatGPT-നോട് ബന്ധിപ്പിക്കാൻ, ആദ്യം Google-ന്റെ admin consoles-ൽ access കോൺഫിഗർ ചെയ്യുക.
Google Drive, users, groups എന്നിവയ്ക്ക് read-only access ഉള്ള ഒരു service account സൃഷ്ടിക്കുക.
ഈ service account, നിങ്ങളുടെ ChatGPT Workspace-നോട് ബന്ധപ്പെട്ടിരിക്കുന്ന അതേ Google account-ന്റെ കീഴിൽ സൃഷ്ടിക്കുന്നത് ശക്തമായി ശുപാർശ ചെയ്യുന്നു. ChatGPT വർക്ക്സ്പേസിലെ അക്കൗണ്ടുകൾക്ക് Google Workspace-ൽ ഉപയോഗിക്കുന്നതിൽ നിന്ന് വ്യത്യസ്ത email domain ആണെങ്കിൽ, നിങ്ങളുടെ ഉപയോക്താക്കൾക്കായി ഈ connector സജ്ജമാക്കാൻ നിങ്ങൾ പിന്തുടരേണ്ട അധിക ഘട്ടങ്ങൾ ഉണ്ട്.
service account പ്രവർത്തിക്കേണ്ട ഒരു admin account സൃഷ്ടിക്കുക.
പിന്നീട്, ChatGPT admin console-ൽ setup പൂർത്തിയാക്കുക.
service account-ന്റെ private key അപ്ലോഡ് ചെയ്യുക (Google-ൽ നിന്നുള്ള ഒരു JSON file)
admin account വ്യക്തമാക്കുക (credentials ആവശ്യമില്ല).
ഏത് ഫയലുകൾ sync ചെയ്യണമെന്ന് തിരഞ്ഞെടുക്കുക, കൂടാതെ connection-ലേക്ക് ആക്സസ് ലഭിക്കേണ്ട ഉപയോക്താക്കളെ തിരഞ്ഞെടുക്കുക.
ഈ guide ഈ 6 ഘട്ടങ്ങളിലൂടെയും നിങ്ങളെ നയിക്കുന്നു.
ഒരു Service Account സജ്ജീകരിക്കൽ
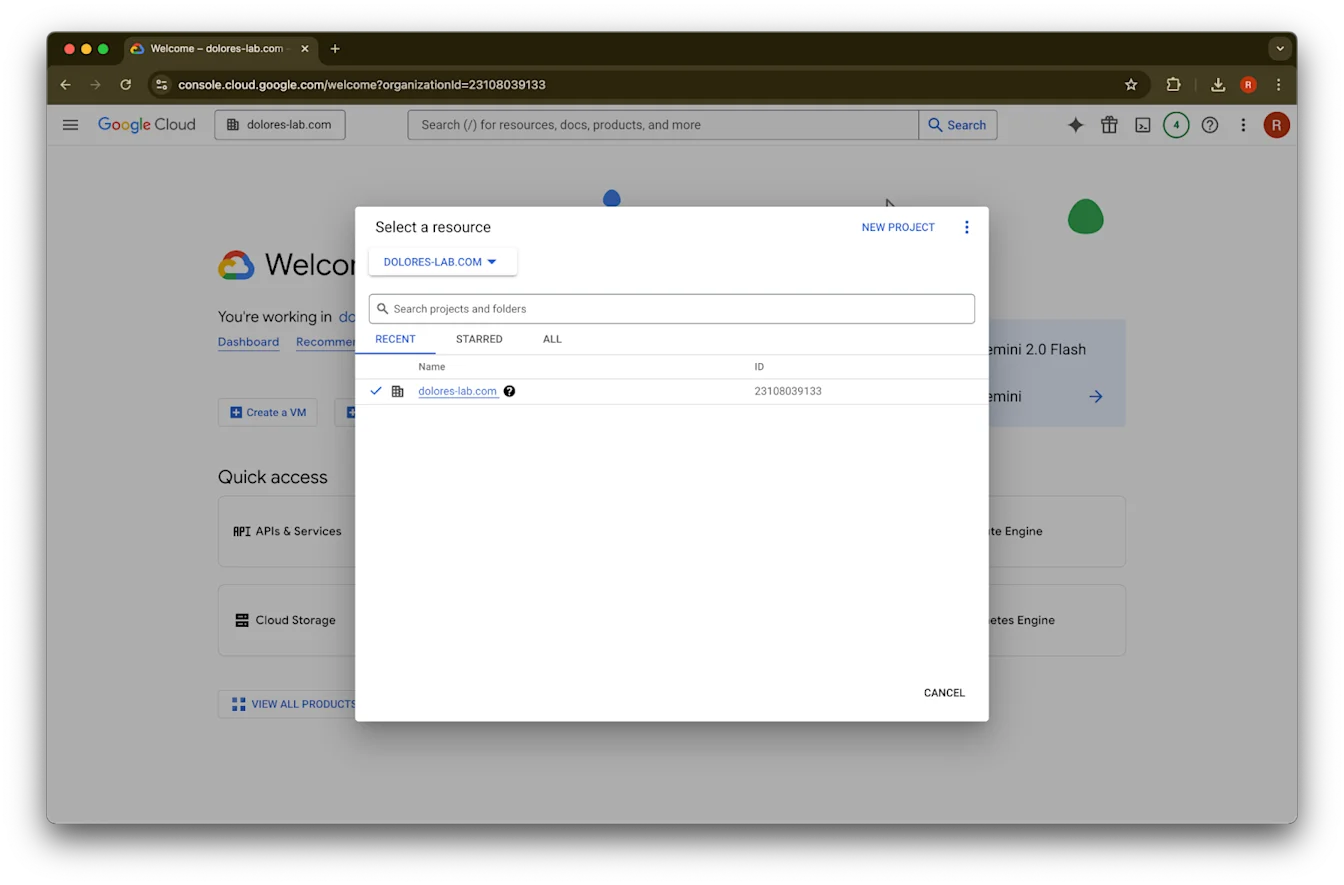
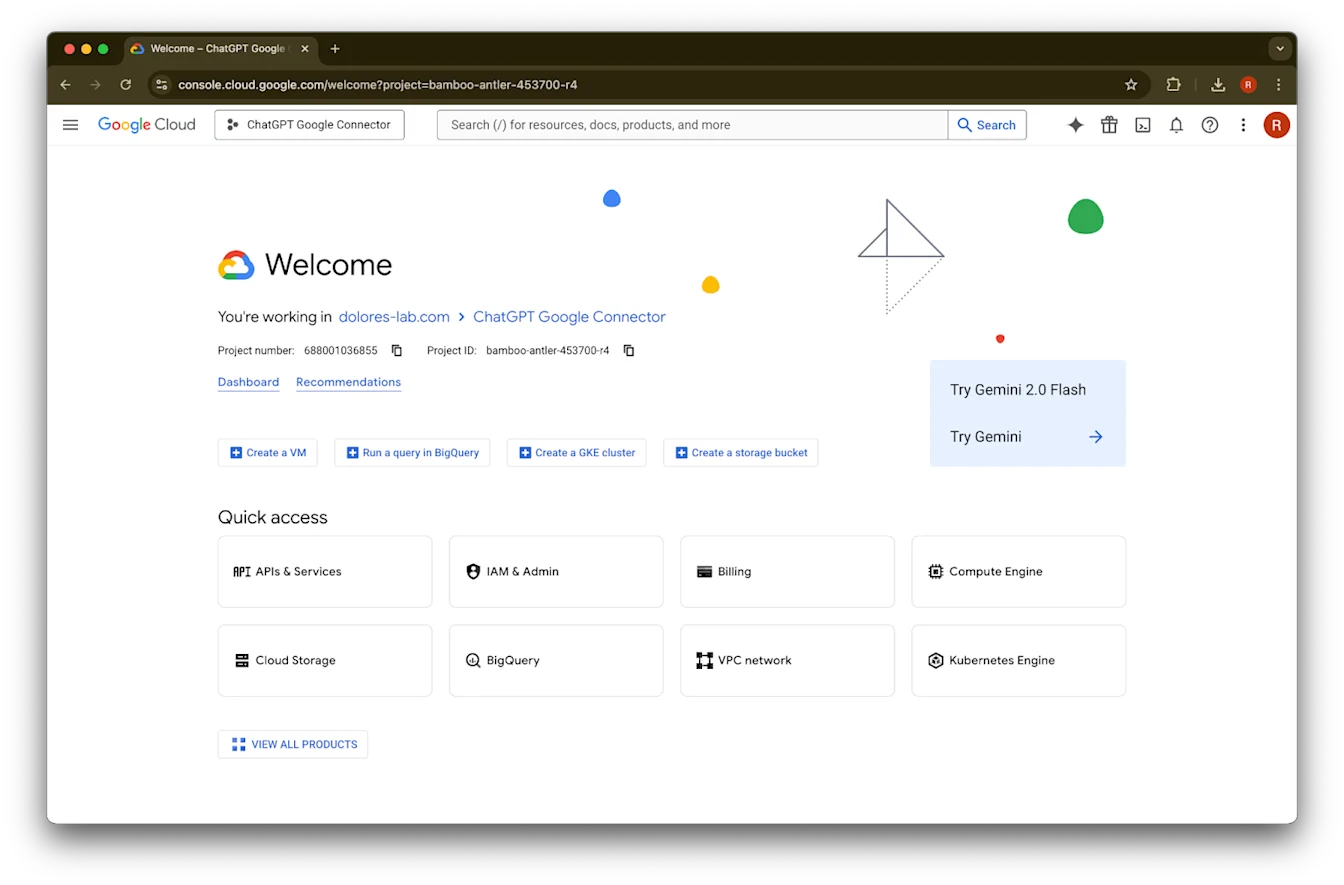
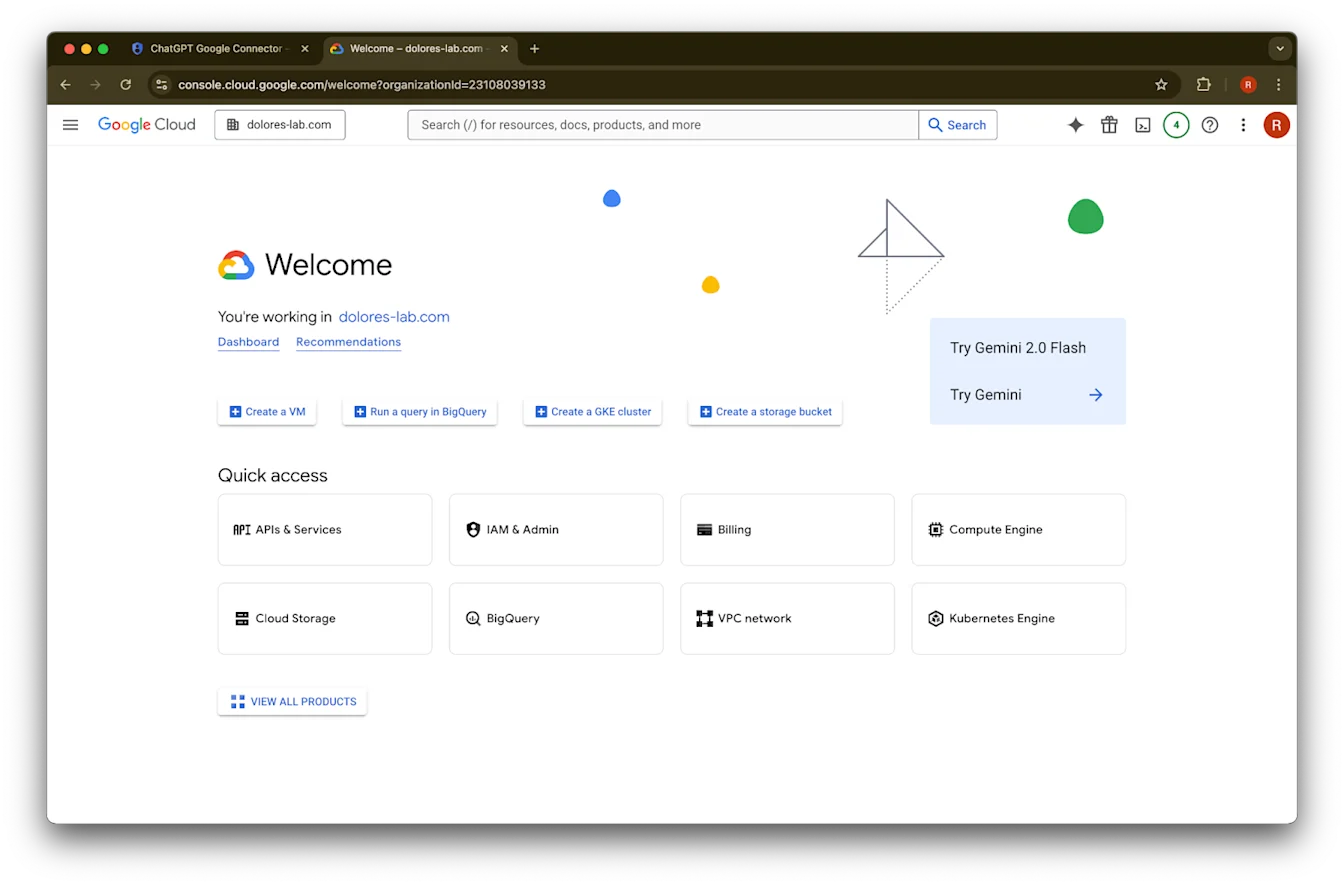
console.cloud.google.com ലേക്ക് പോകുക.
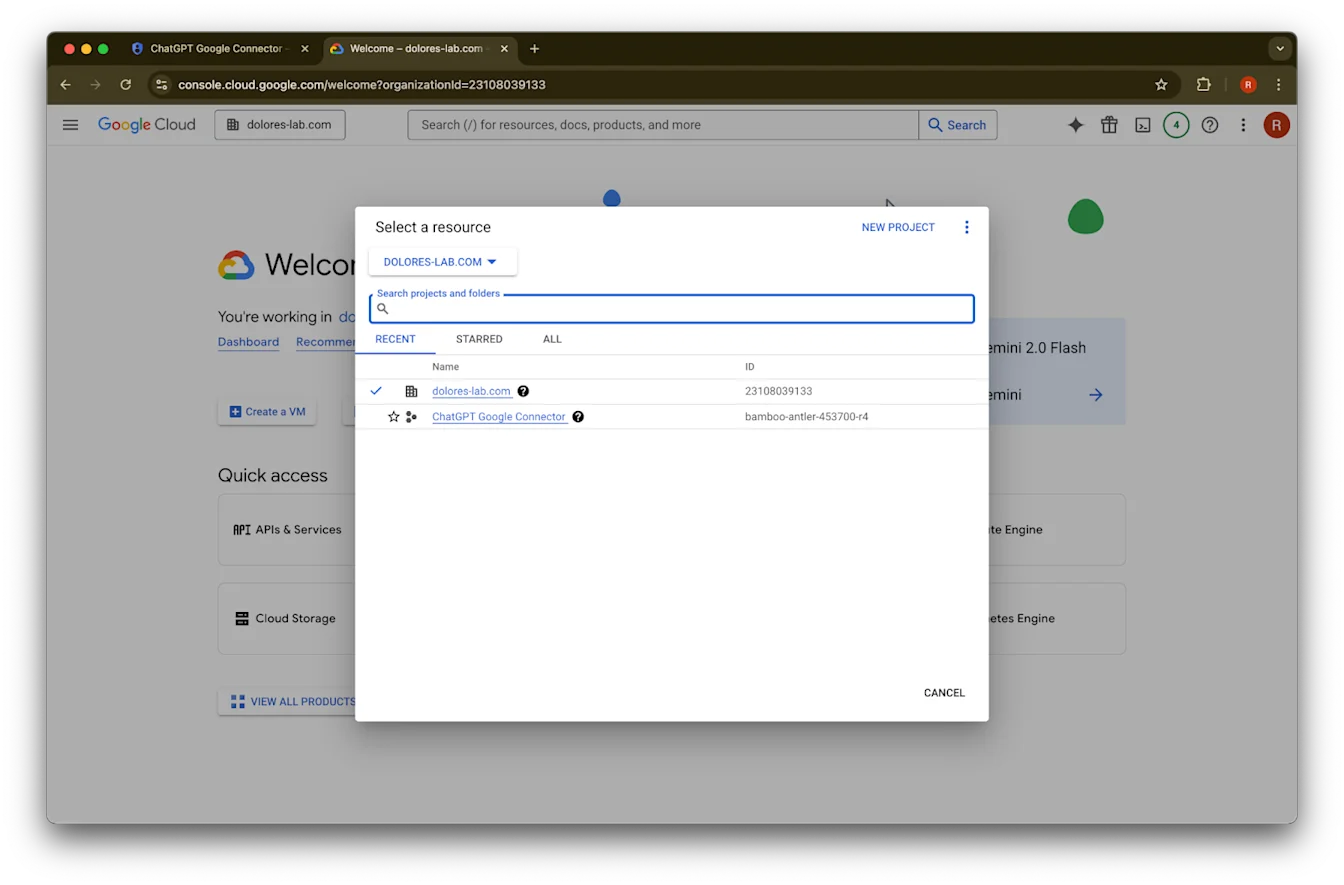
projects dropdown-ൽ ക്ലിക്ക് ചെയ്യുക.Imageനിങ്ങളുടെ ChatGPT വർക്ക്സ്പേസുമായി ബന്ധപ്പെട്ടിരിക്കുന്ന അതേ Google workspace-ലാണ് നിങ്ങൾ ലോഗിൻ ചെയ്തിരിക്കുന്നതെന്ന് ഉറപ്പാക്കുക (നിങ്ങളുടെ ChatGPT വർക്ക്സ്പേസിനോട് ബന്ധപ്പെട്ട Google workspace ഇല്ലെങ്കിൽ, കൂടാതെ ഇരു സംവിധാനങ്ങളിലും ഇമെയിലുകൾ വ്യത്യസ്തമാണെങ്കിൽ, നിങ്ങൾക്ക് കൂടുതൽ ഘട്ടങ്ങൾ പിന്തുടരേണ്ടിവരും; അല്ലാത്തപക്ഷം നിങ്ങളുടെ ഉപയോക്താക്കൾക്ക് Google Drive synced connectors ഉപയോഗിക്കാൻ കഴിയാതിരിക്കാം).
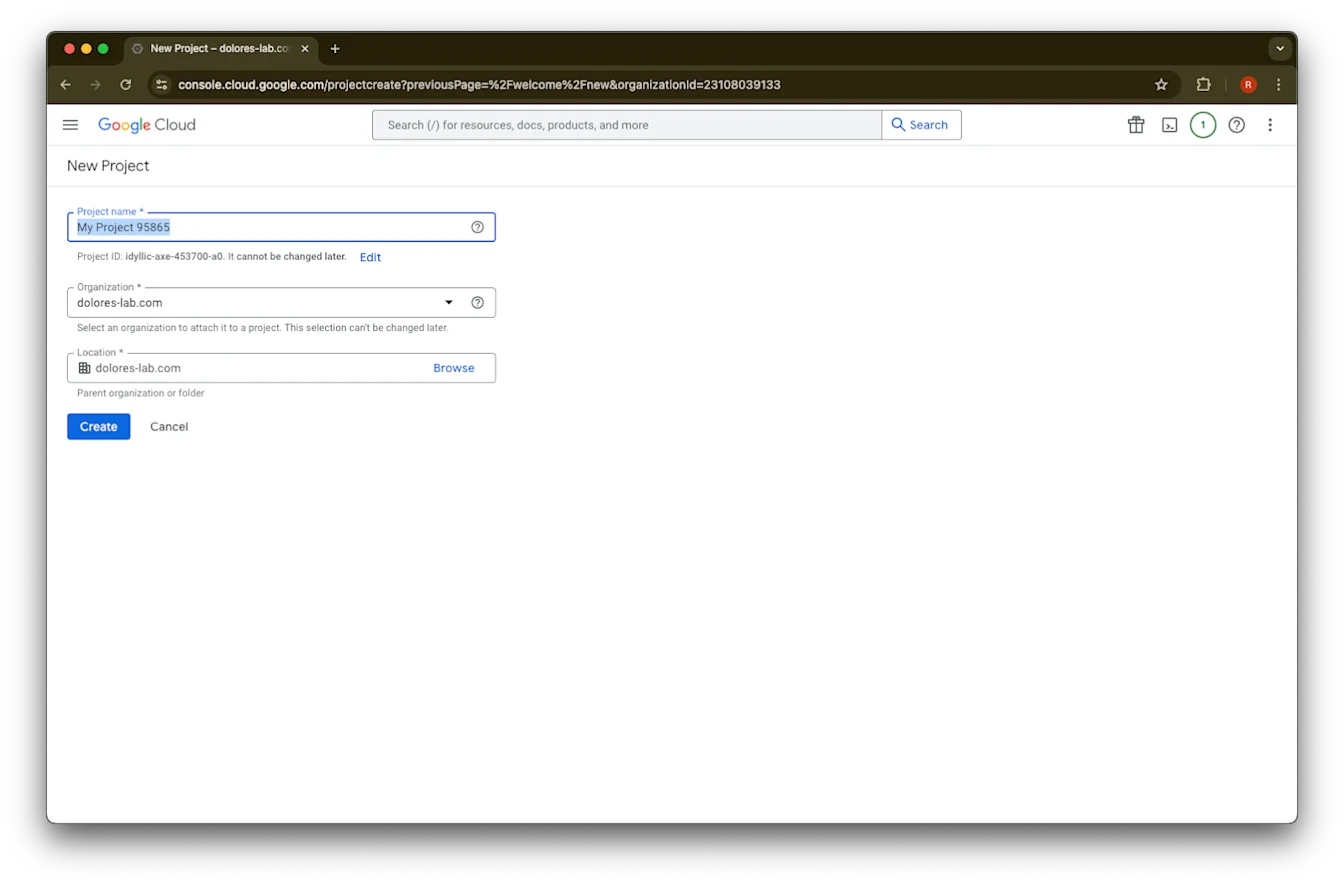
New Project തിരഞ്ഞെടുക്കുക.
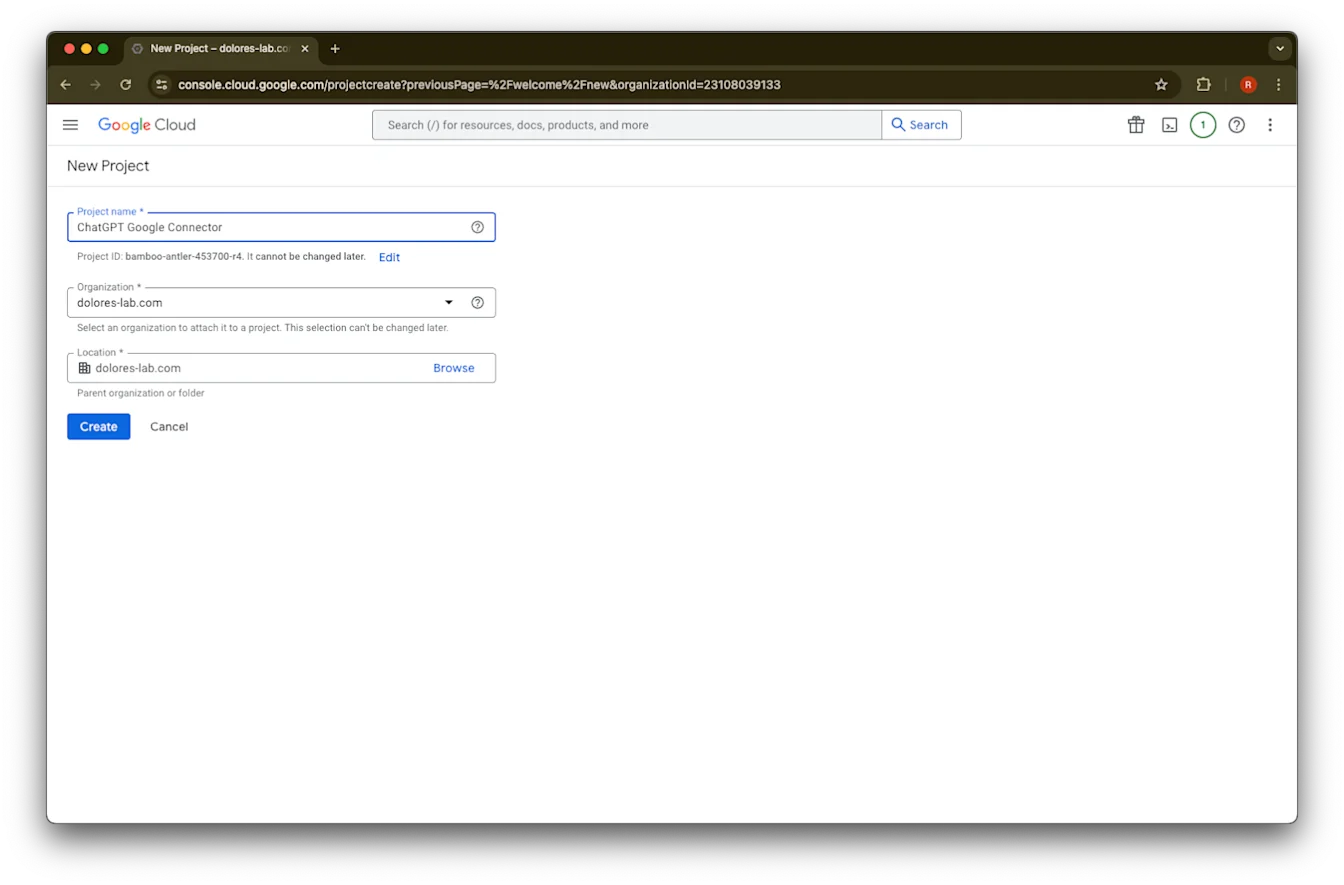
Project Name നൽകുക.
project സൃഷ്ടിക്കുക.
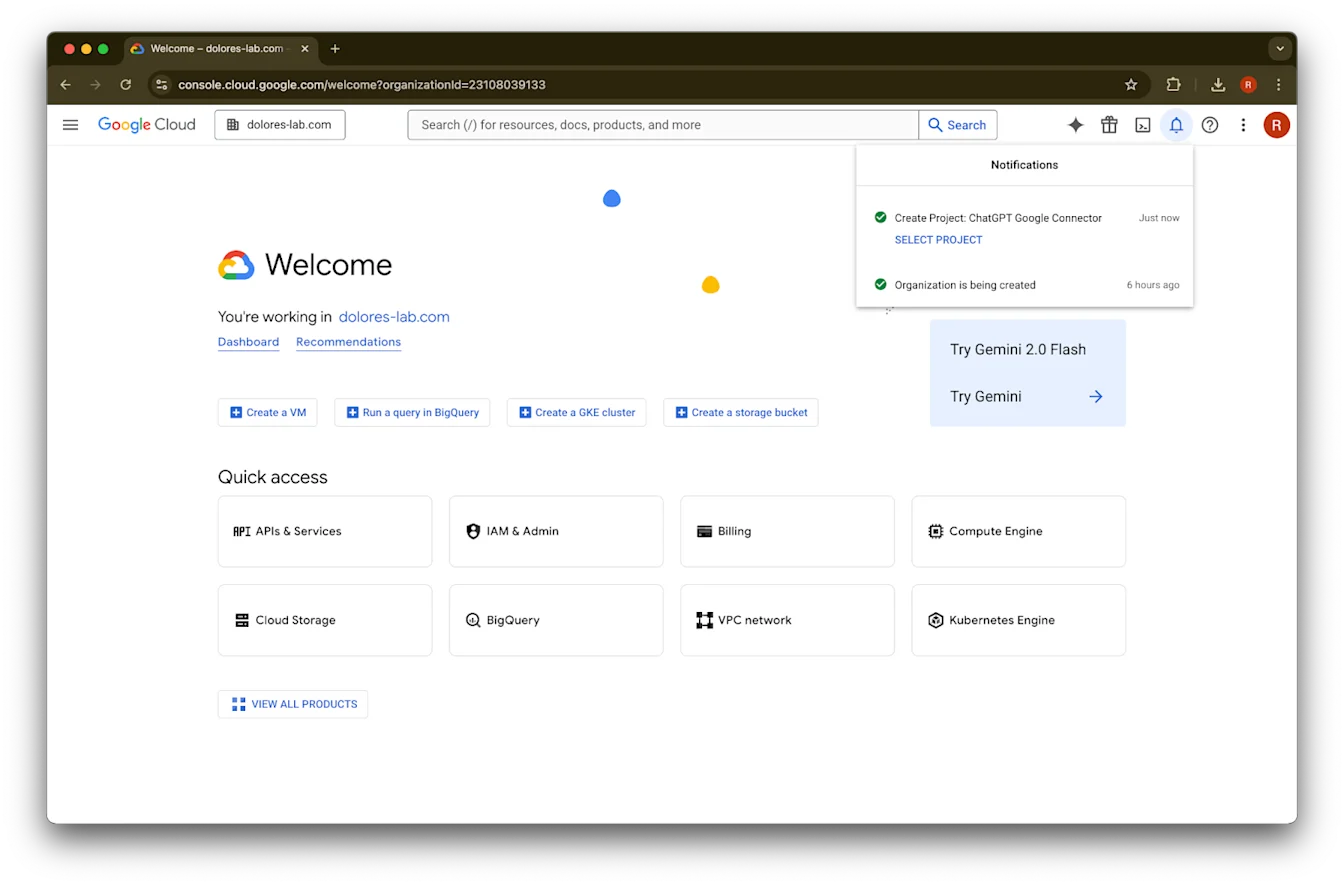
project സൃഷ്ടിക്കപ്പെടുന്നത് വരെ കാത്തிருந்து, തുടർന്ന് Select Project ൽ ക്ലിക്ക് ചെയ്യുക.
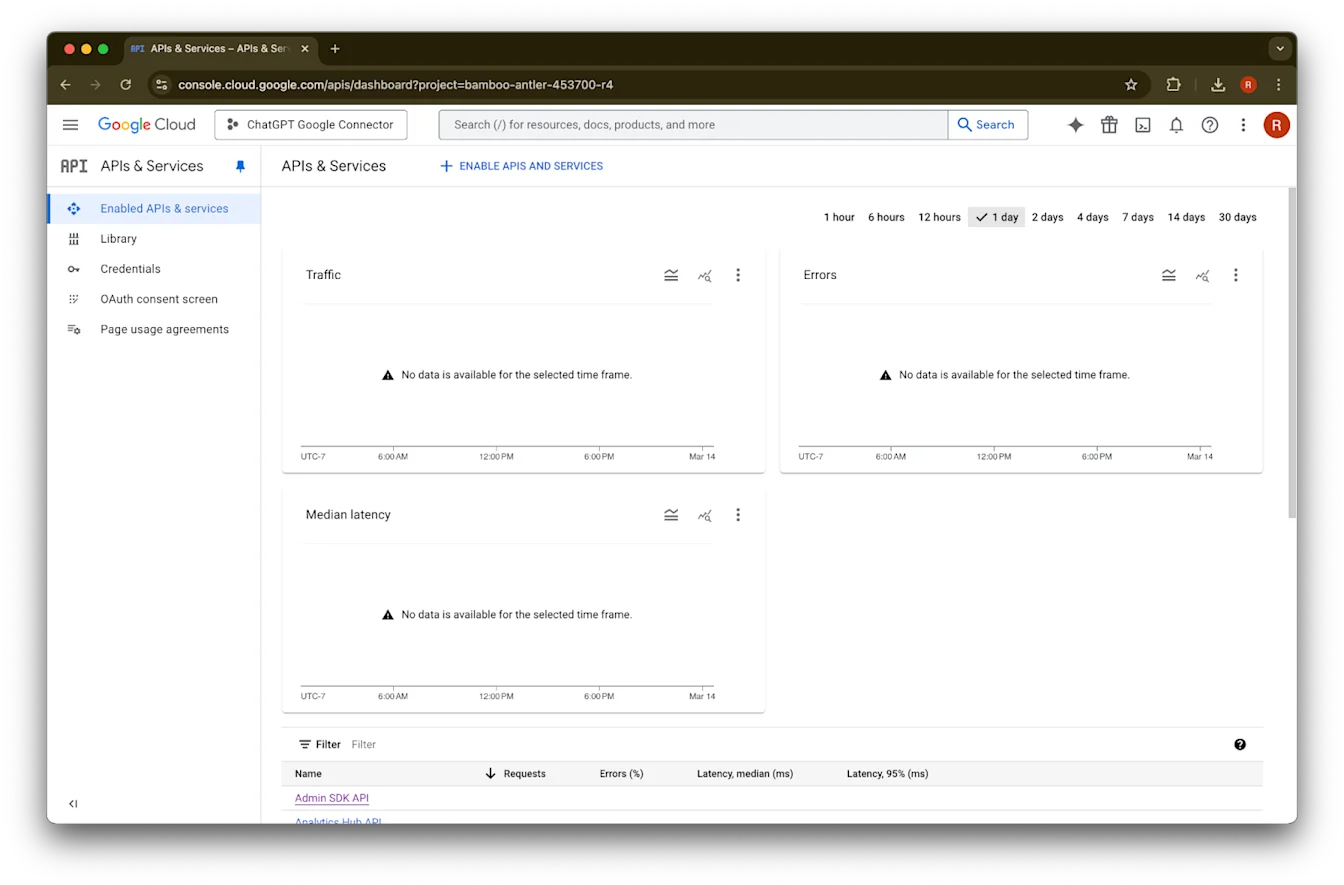
APIs & Services ൽ ക്ലിക്ക് ചെയ്യുക.
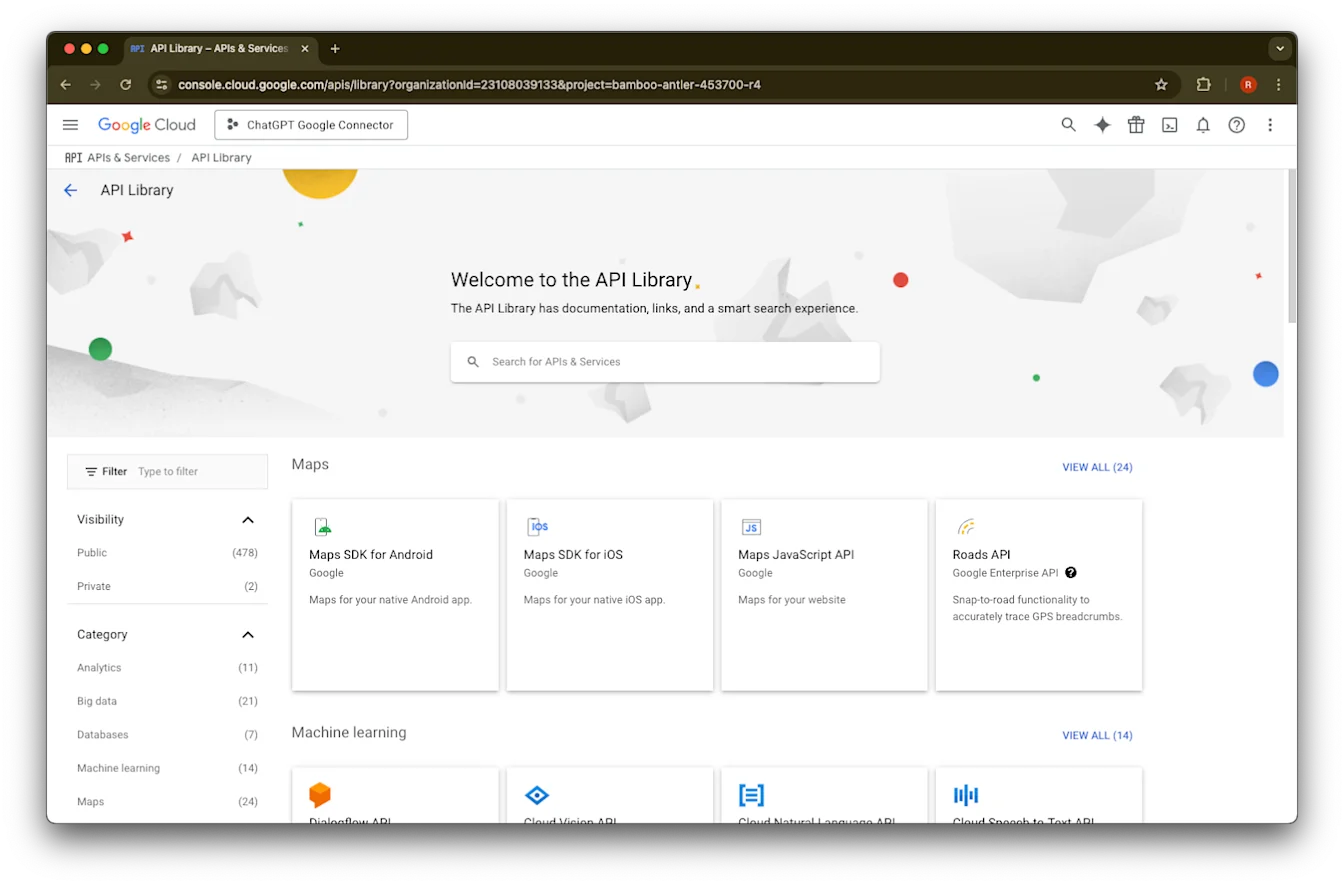
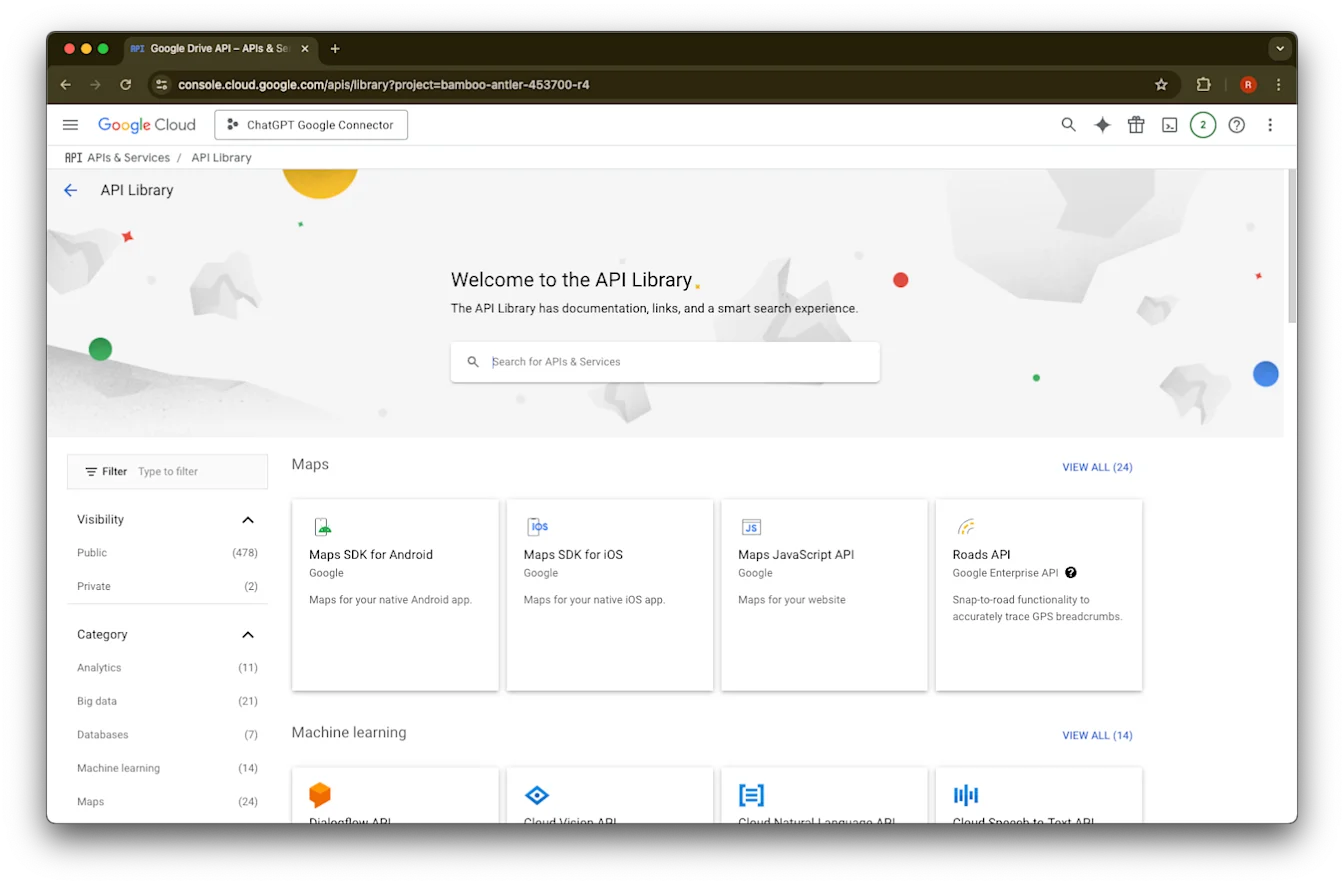
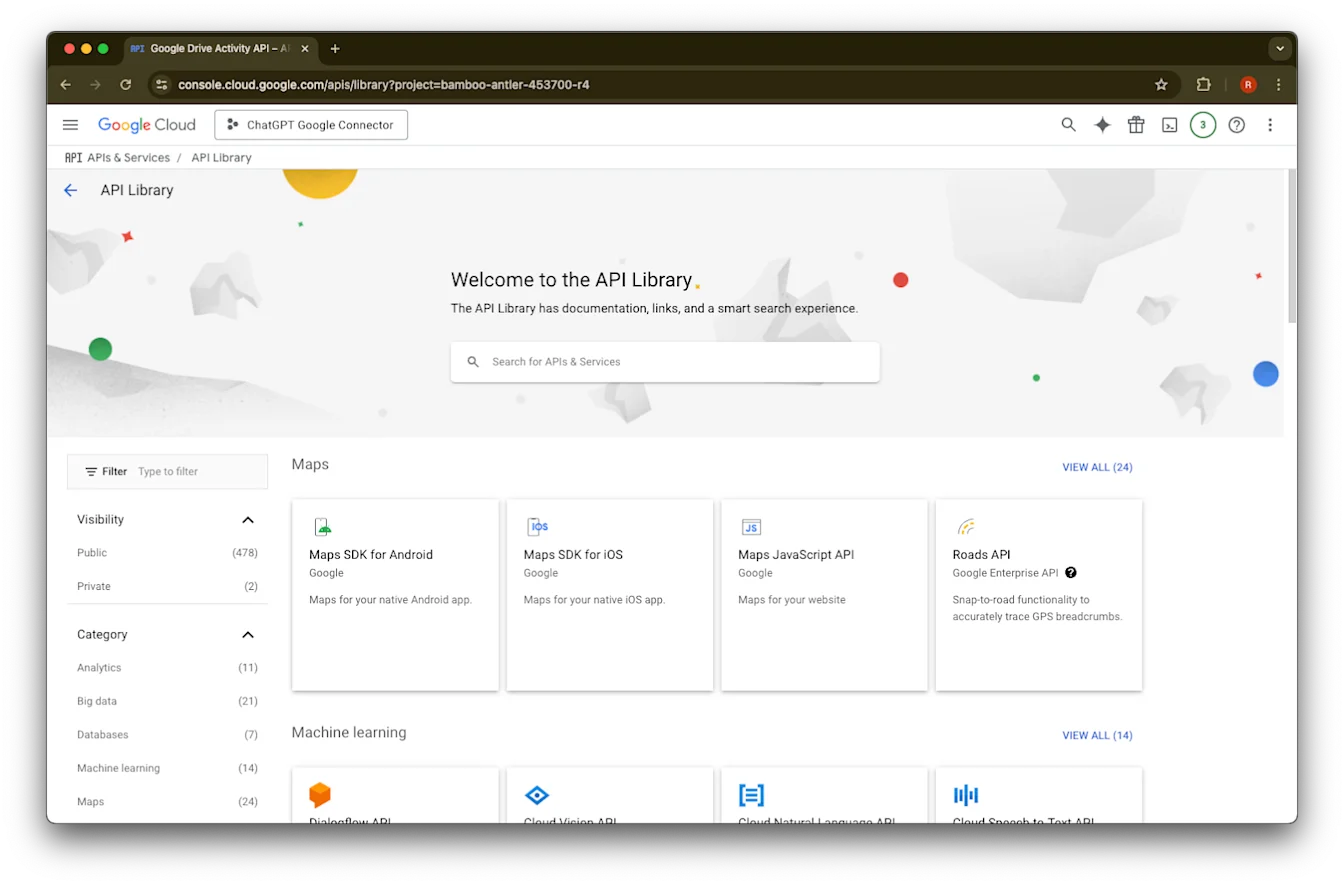
Library ൽ ക്ലിക്ക് ചെയ്യുക.
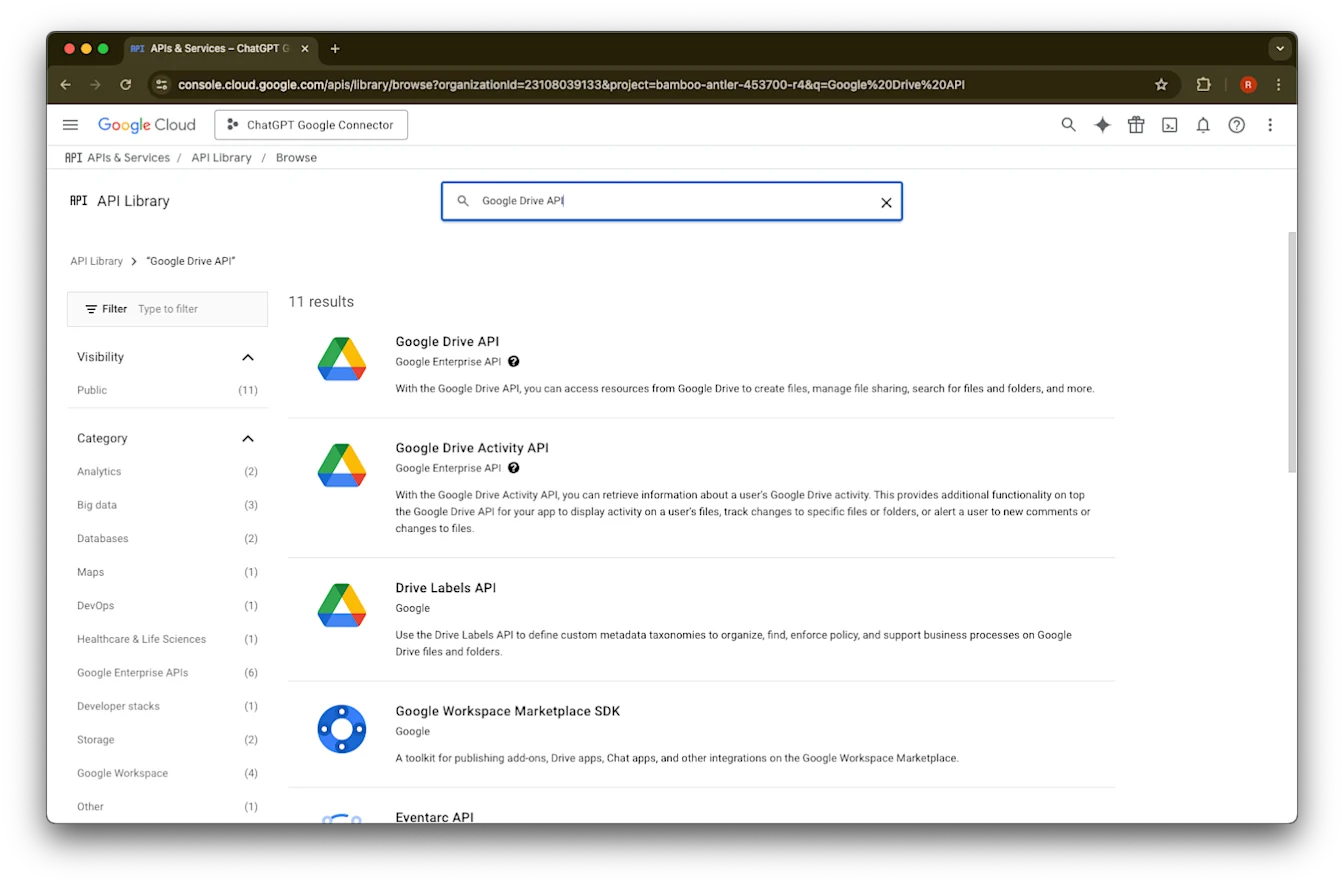
ഇപ്പോൾ ഞങ്ങൾ മൂന്ന് API-കൾ ചേർക്കും; അവ കണ്ടെത്താൻ search box ഉപയോഗിക്കുക.
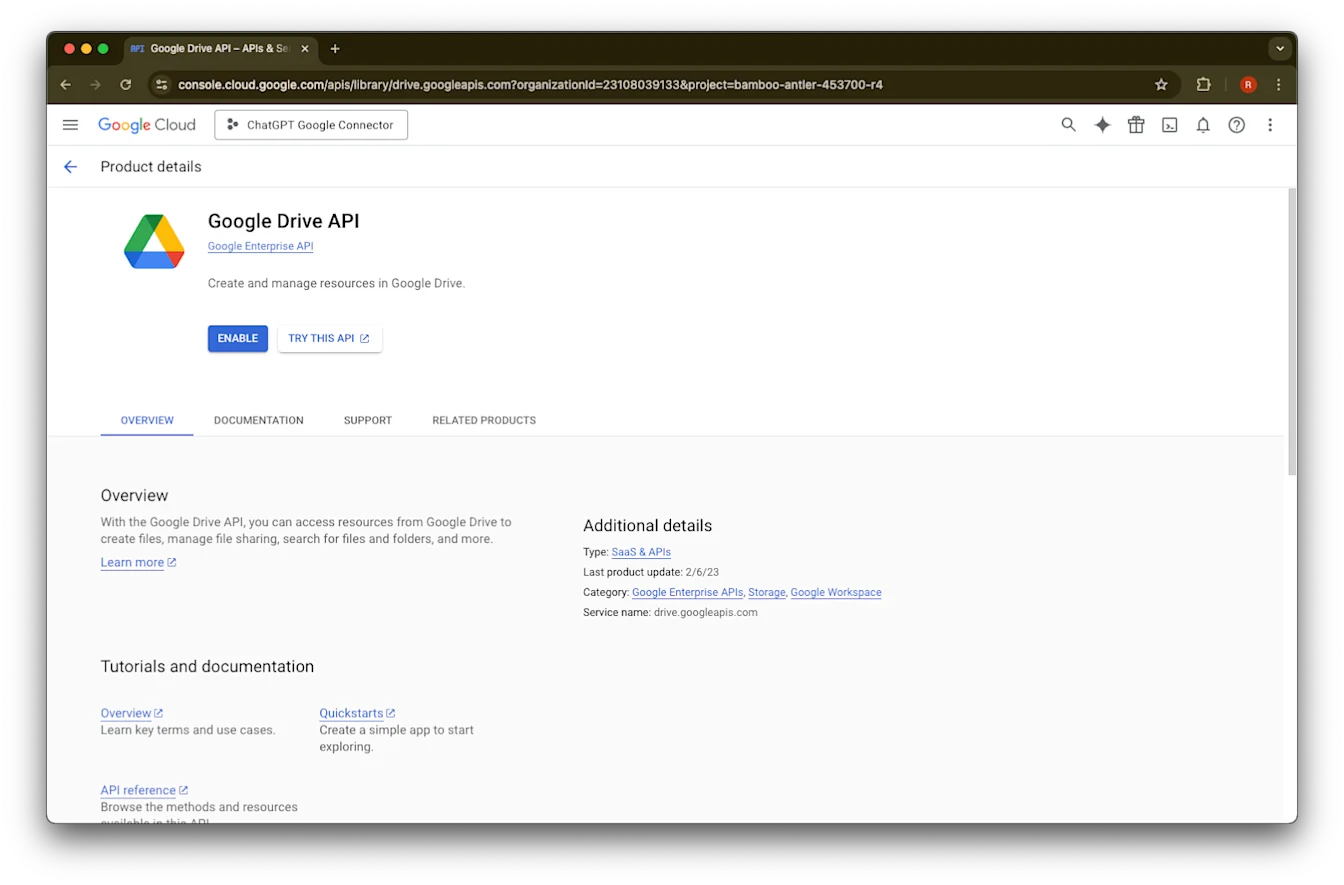
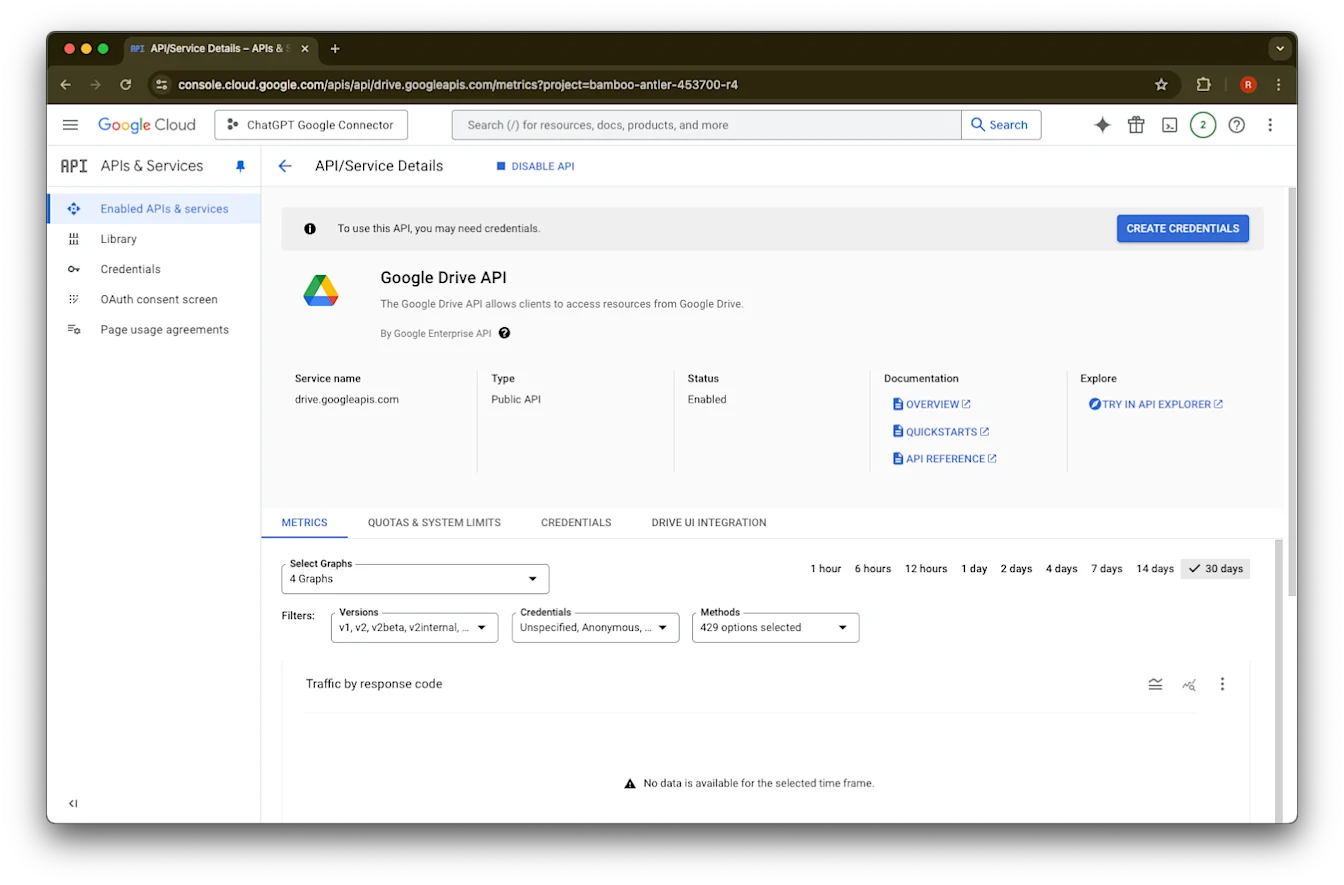
Google Drive API തിരഞ്ഞ് തിരഞ്ഞെടുക്കുക.
Enable ക്ലിക്ക് ചെയ്യുക.
Library ൽ ക്ലിക്ക് ചെയ്യുക.
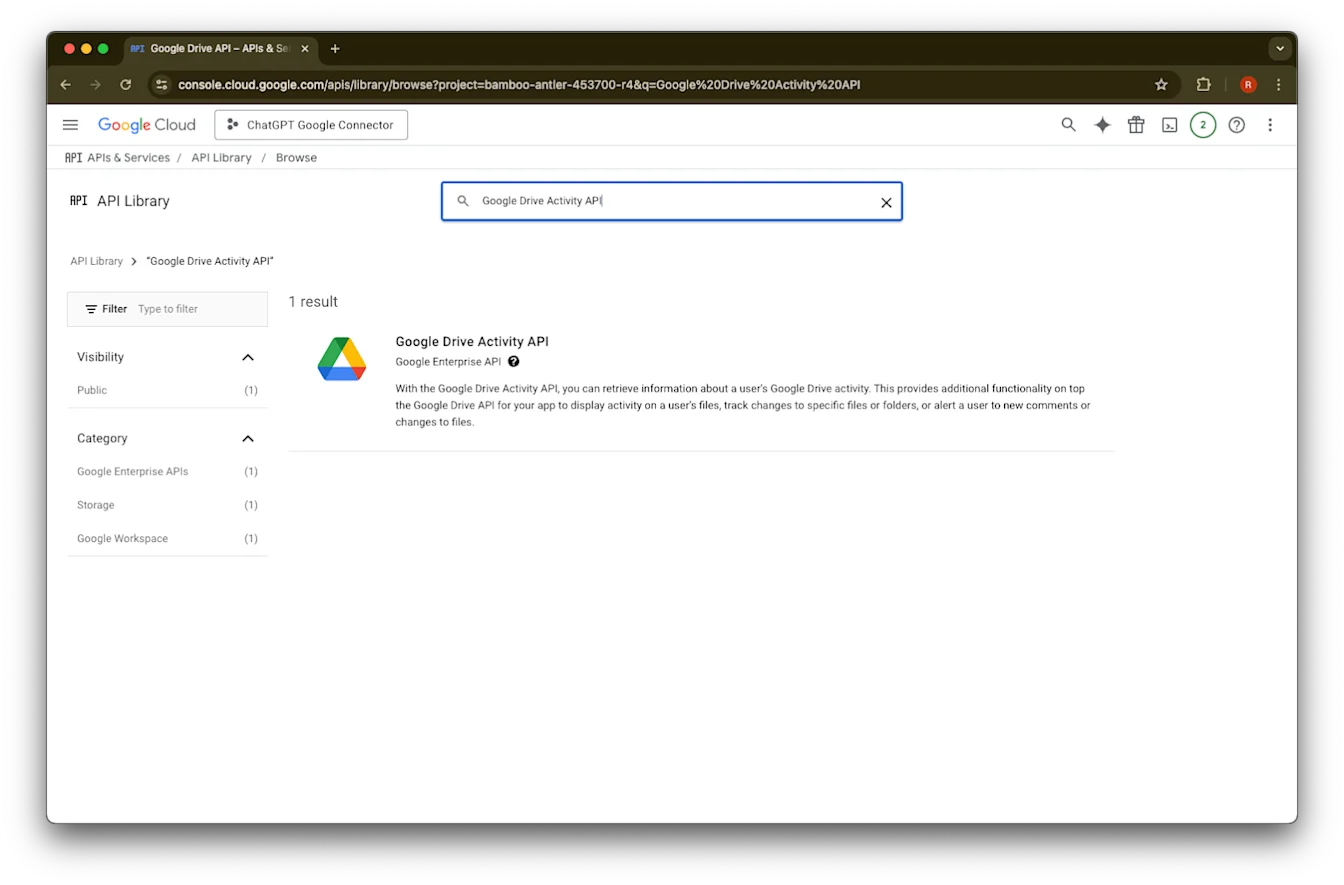
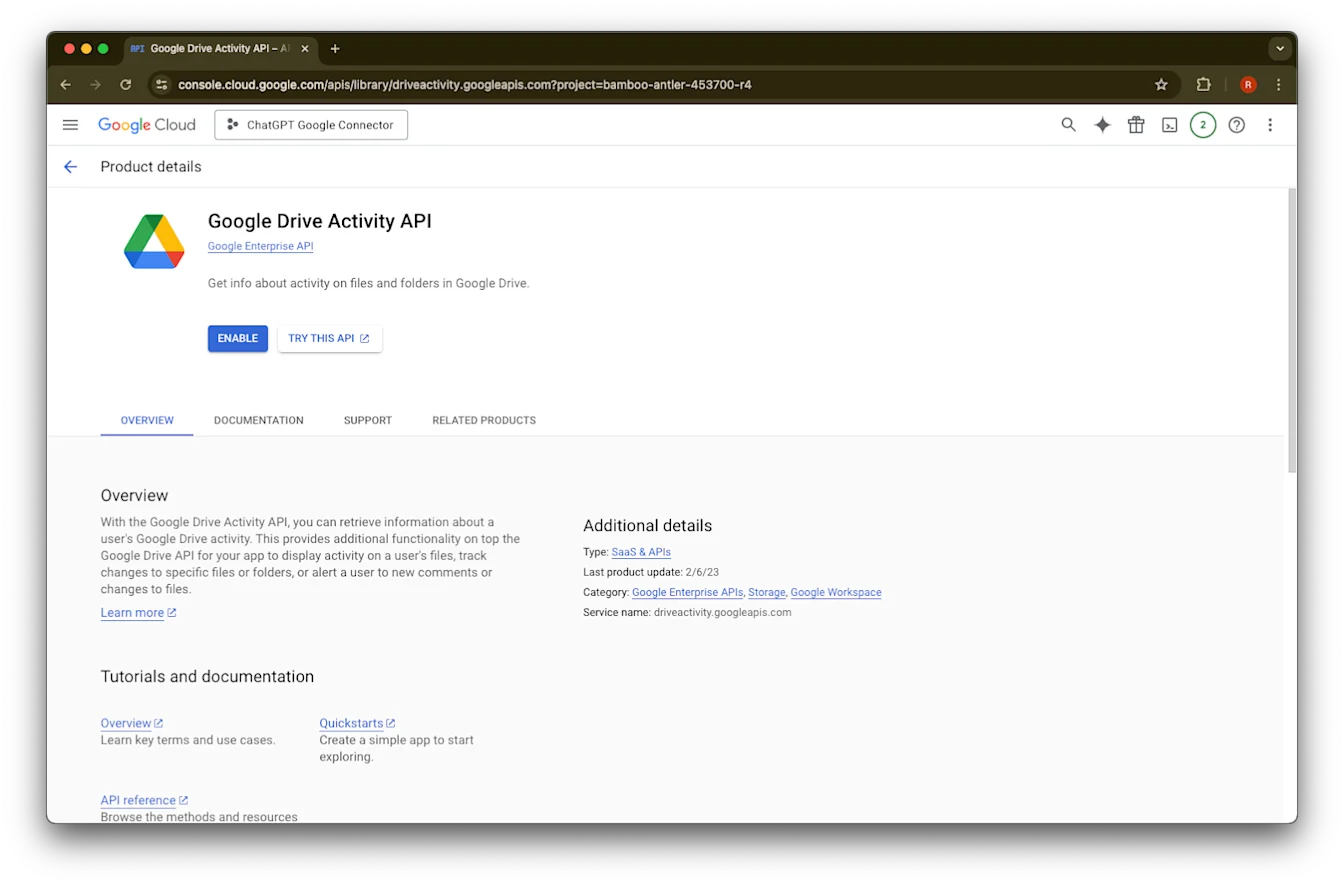
Google Drive Activity തിരയുക.
Google Drive Activity API തിരഞ്ഞെടുക്കുക.
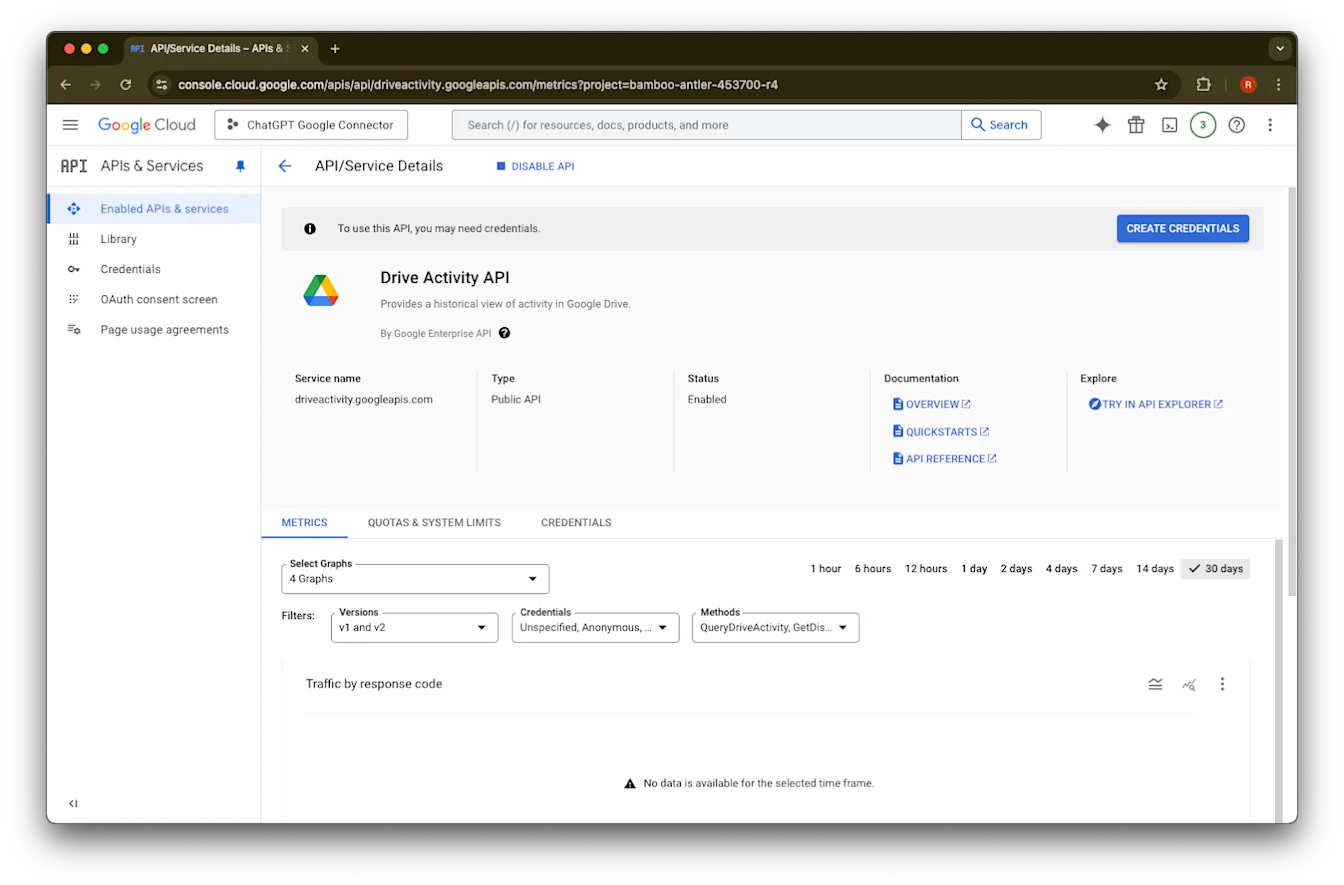
Enable ക്ലിക്ക് ചെയ്യുക.
Library ൽ ക്ലിക്ക് ചെയ്യുക.
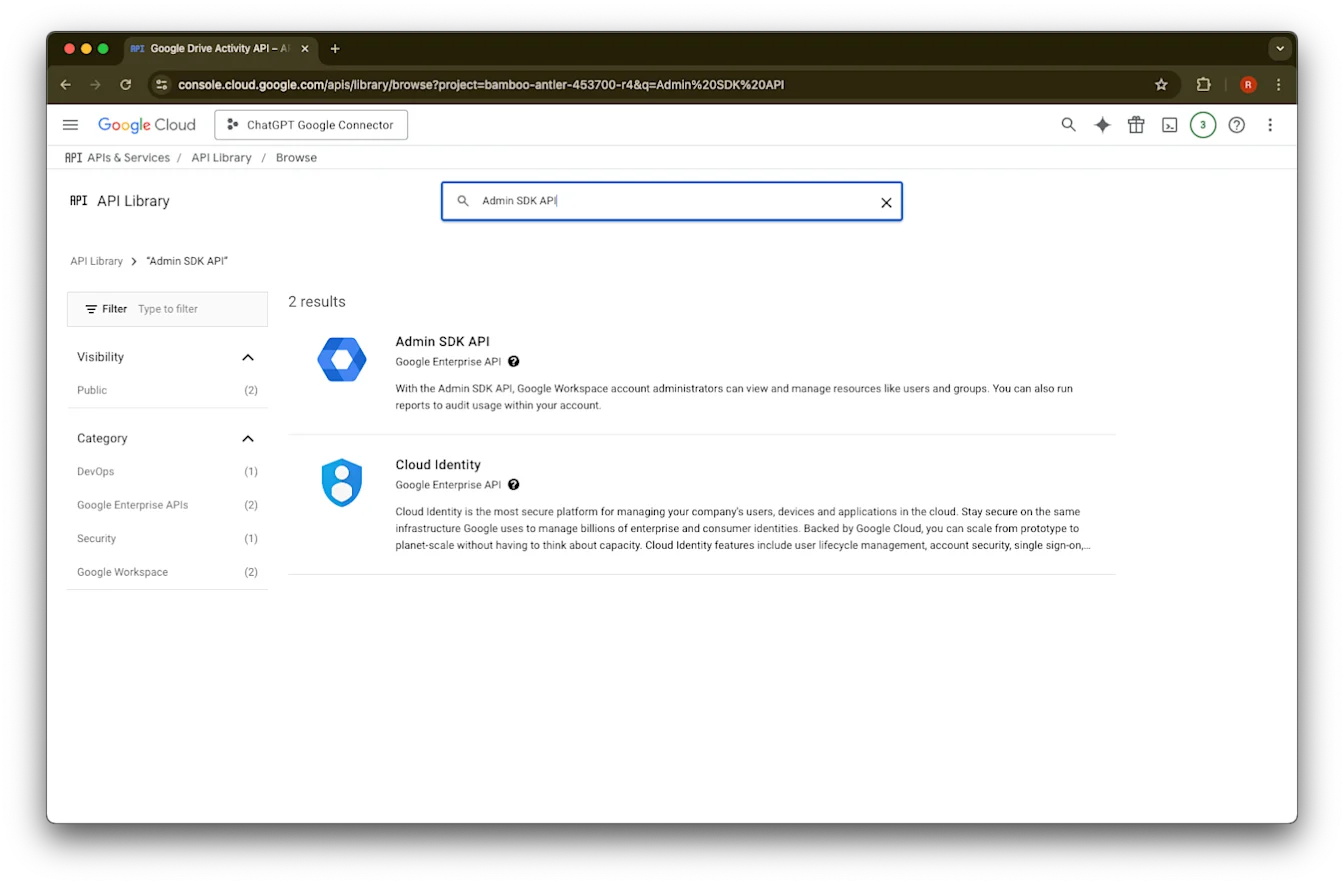
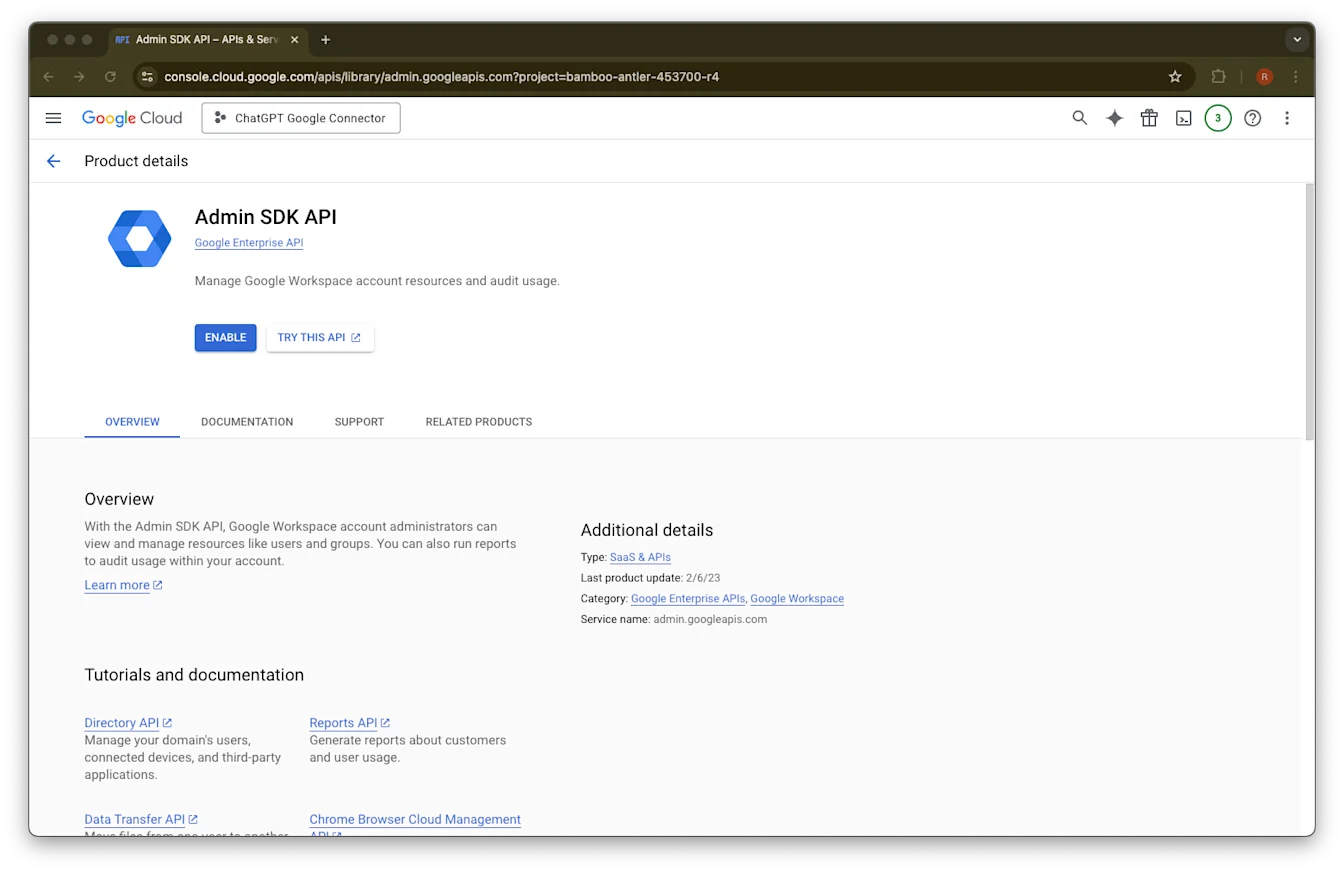
Admin SDK API തിരയുക.
Admin SDK API
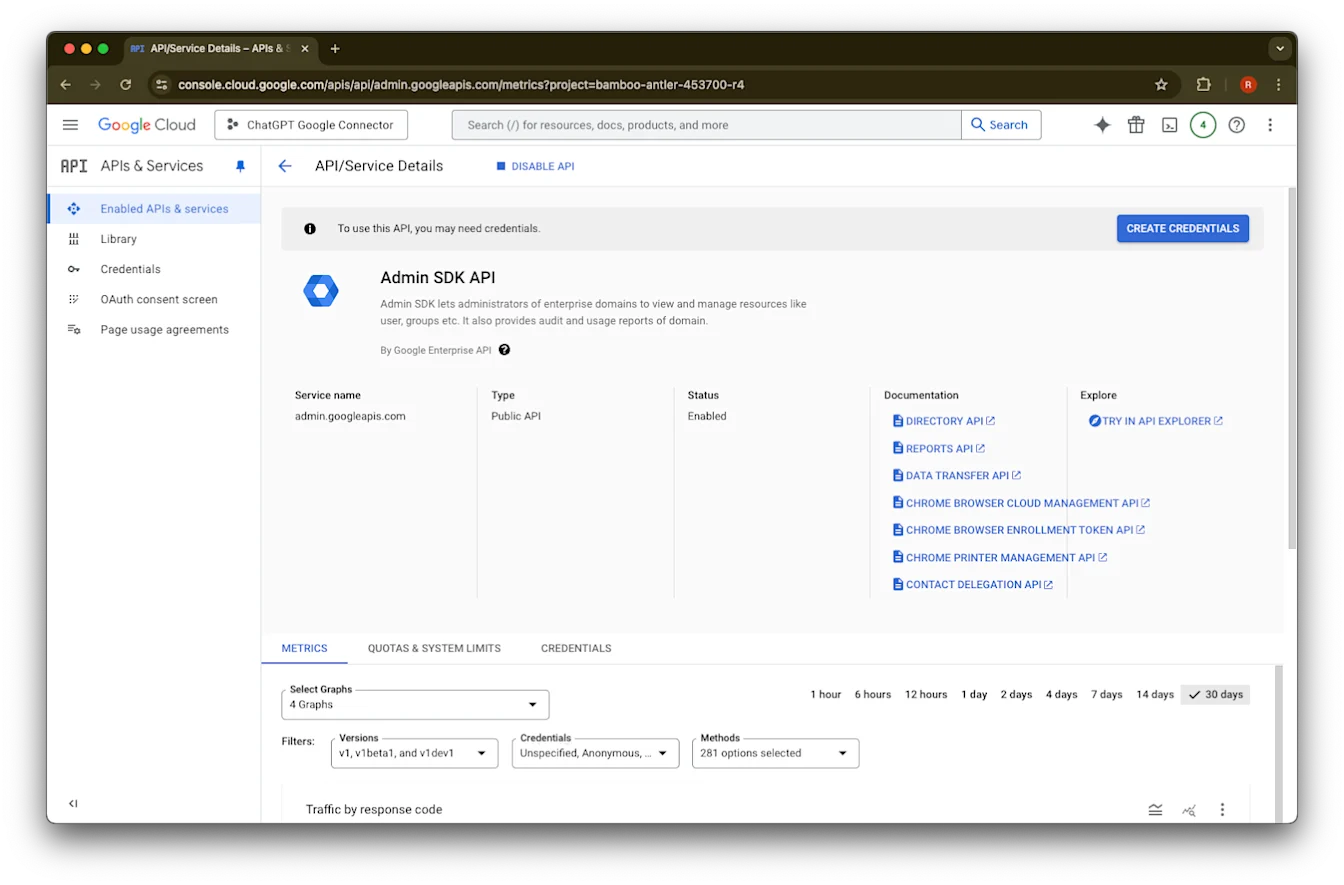
തിരഞ്ഞെടുക്കുക.Enable ക്ലിക്ക് ചെയ്യുക.
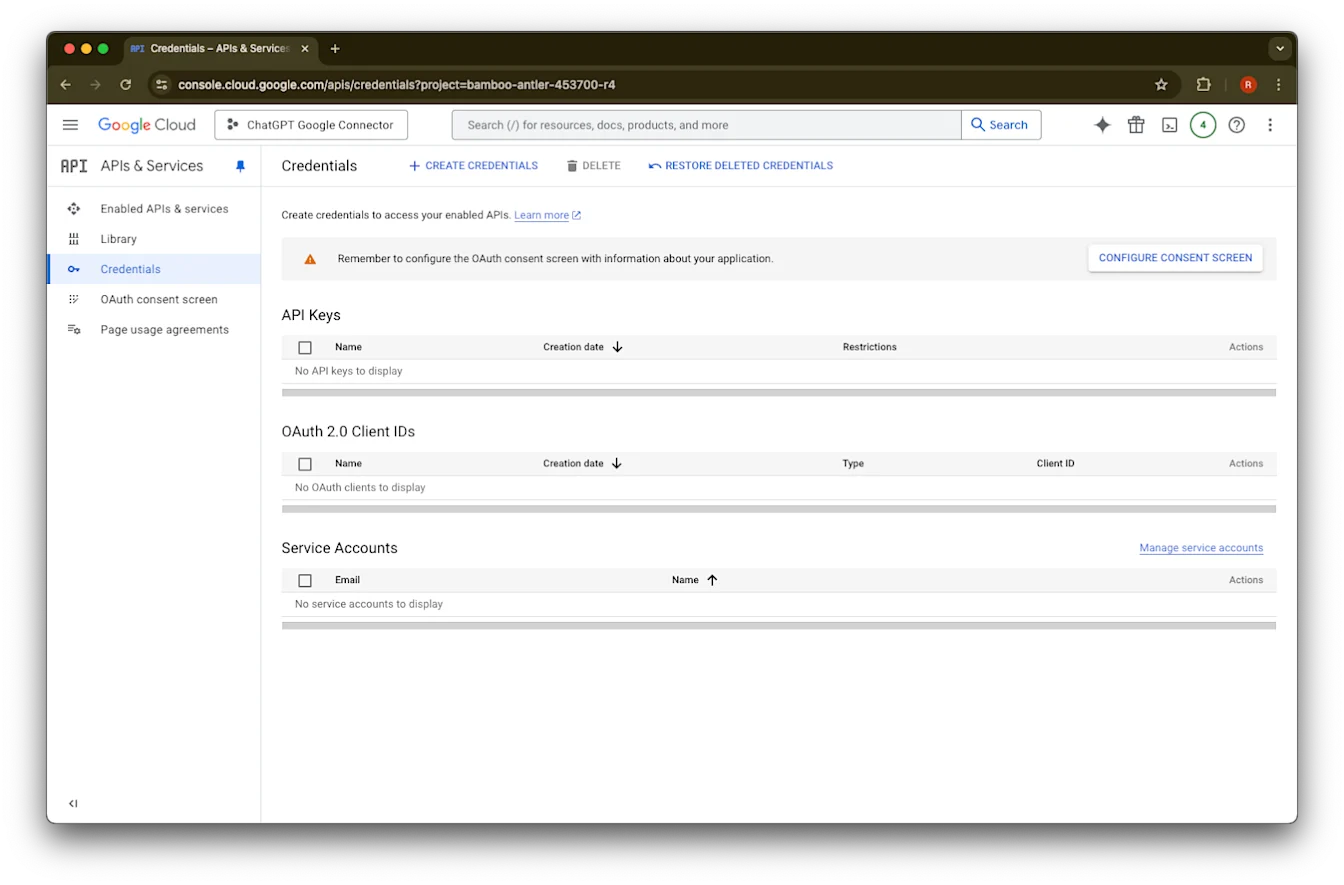
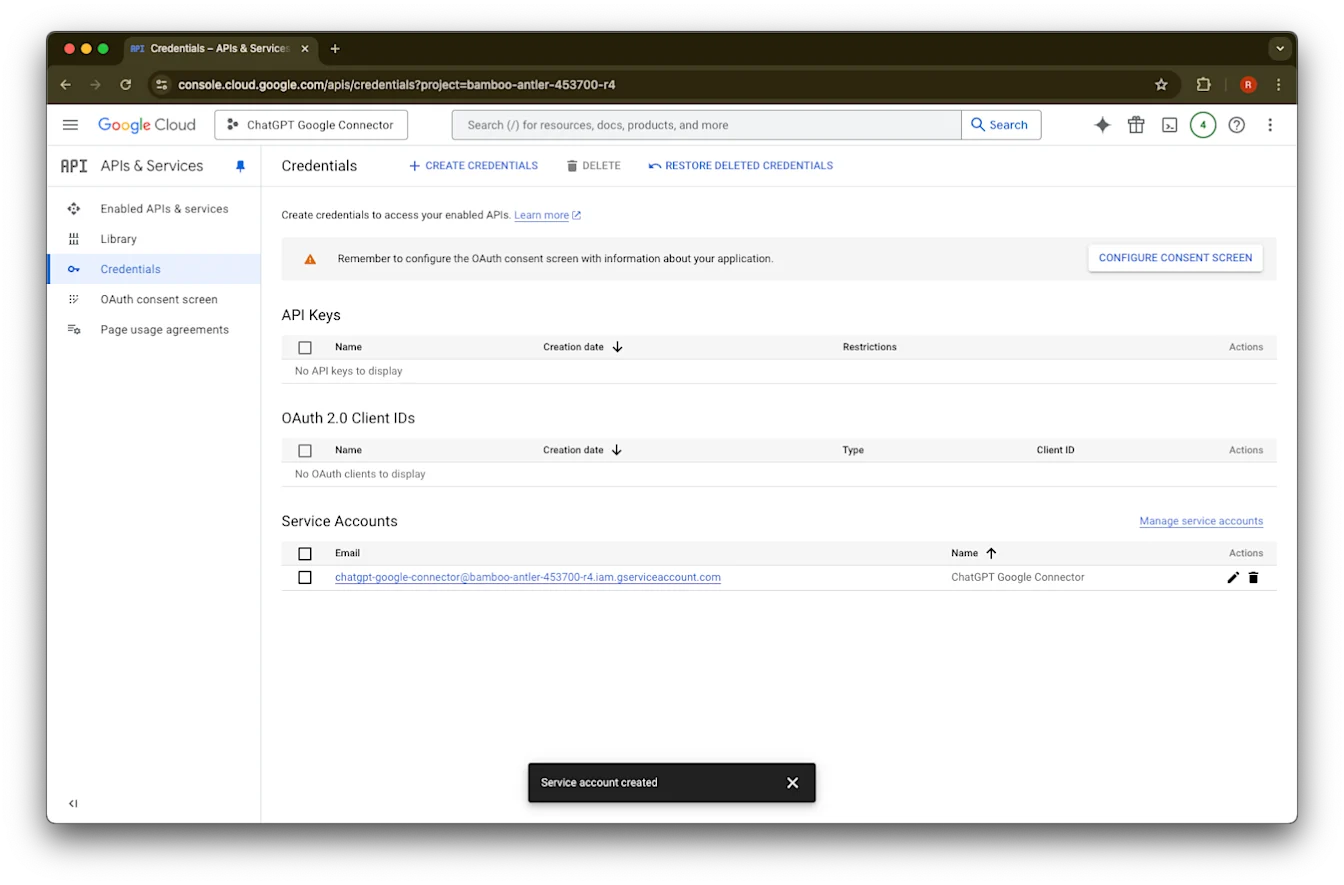
Credentials ൽ ക്ലിക്ക് ചെയ്യുക.
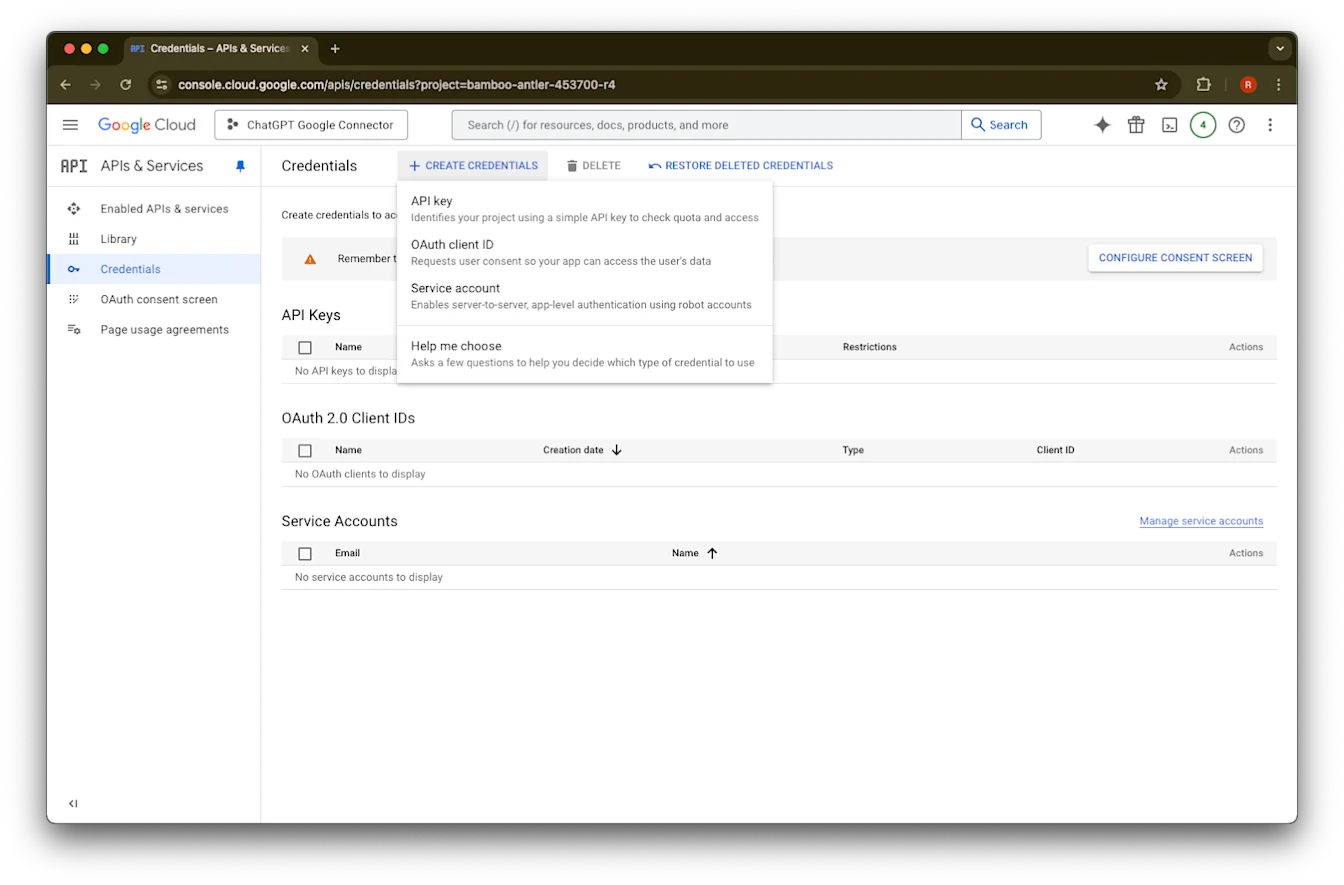
Create Credentials ൽ ക്ലിക്ക് ചെയ്യുക.
Service account ൽ ക്ലിക്ക് ചെയ്യുക.
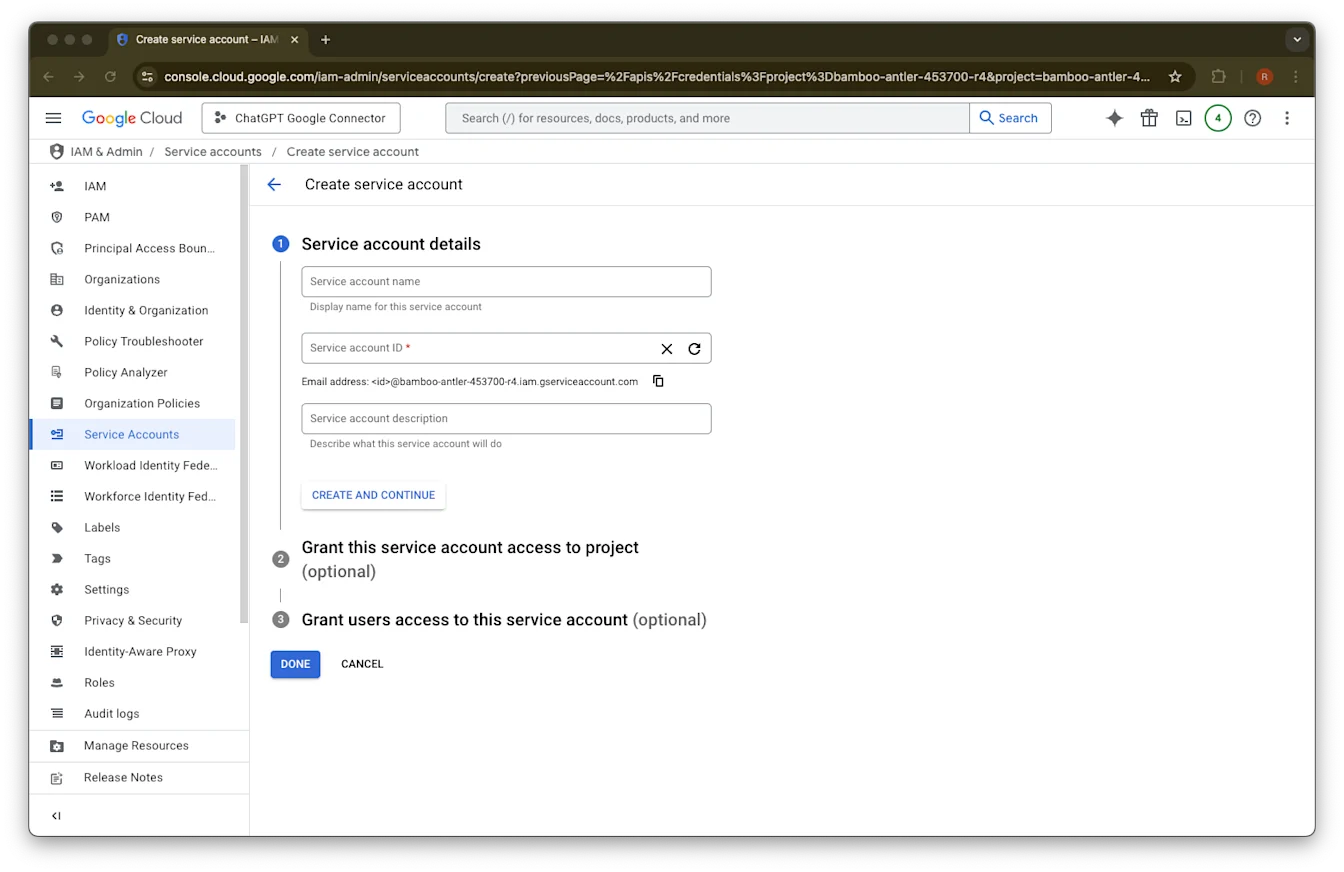
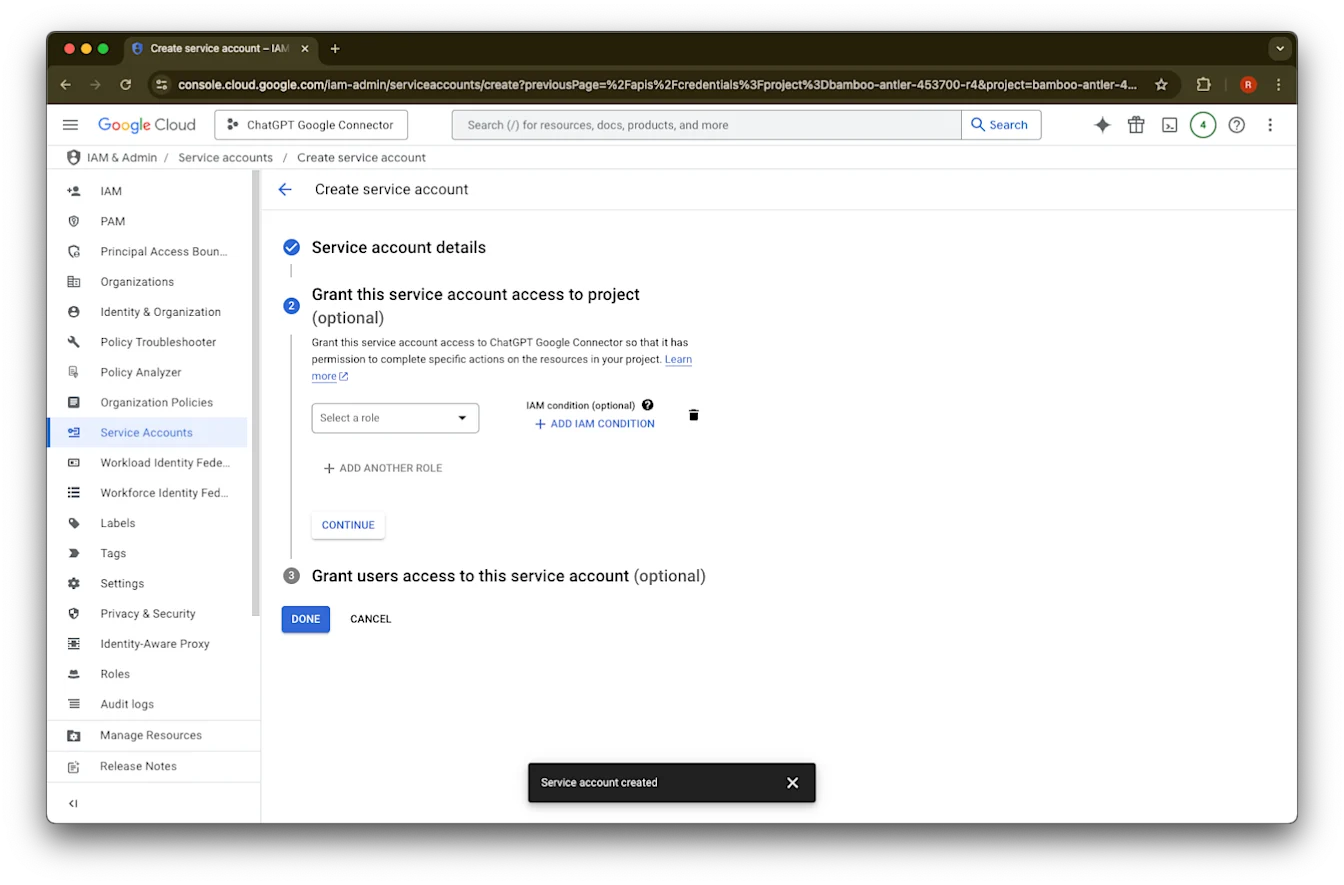
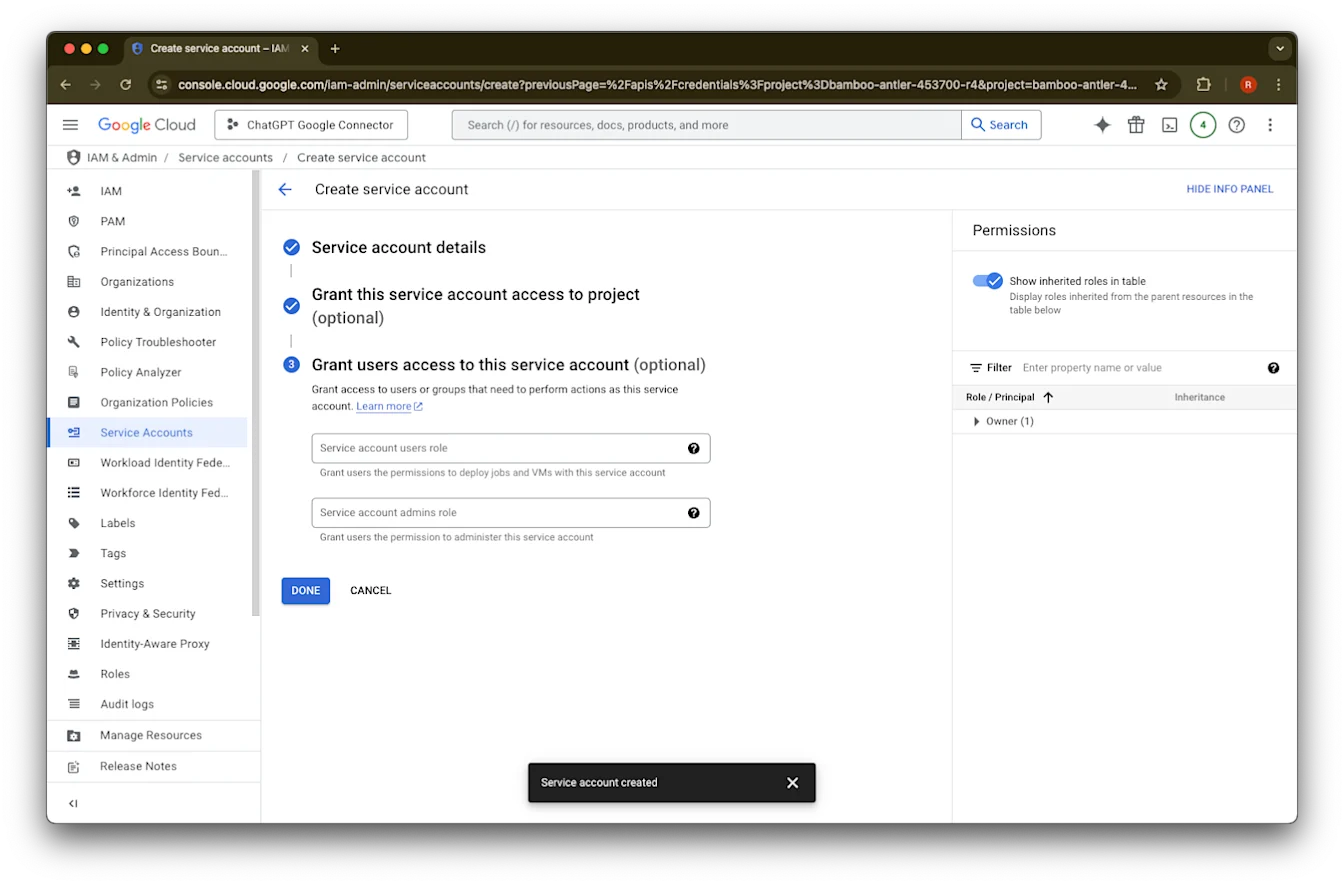
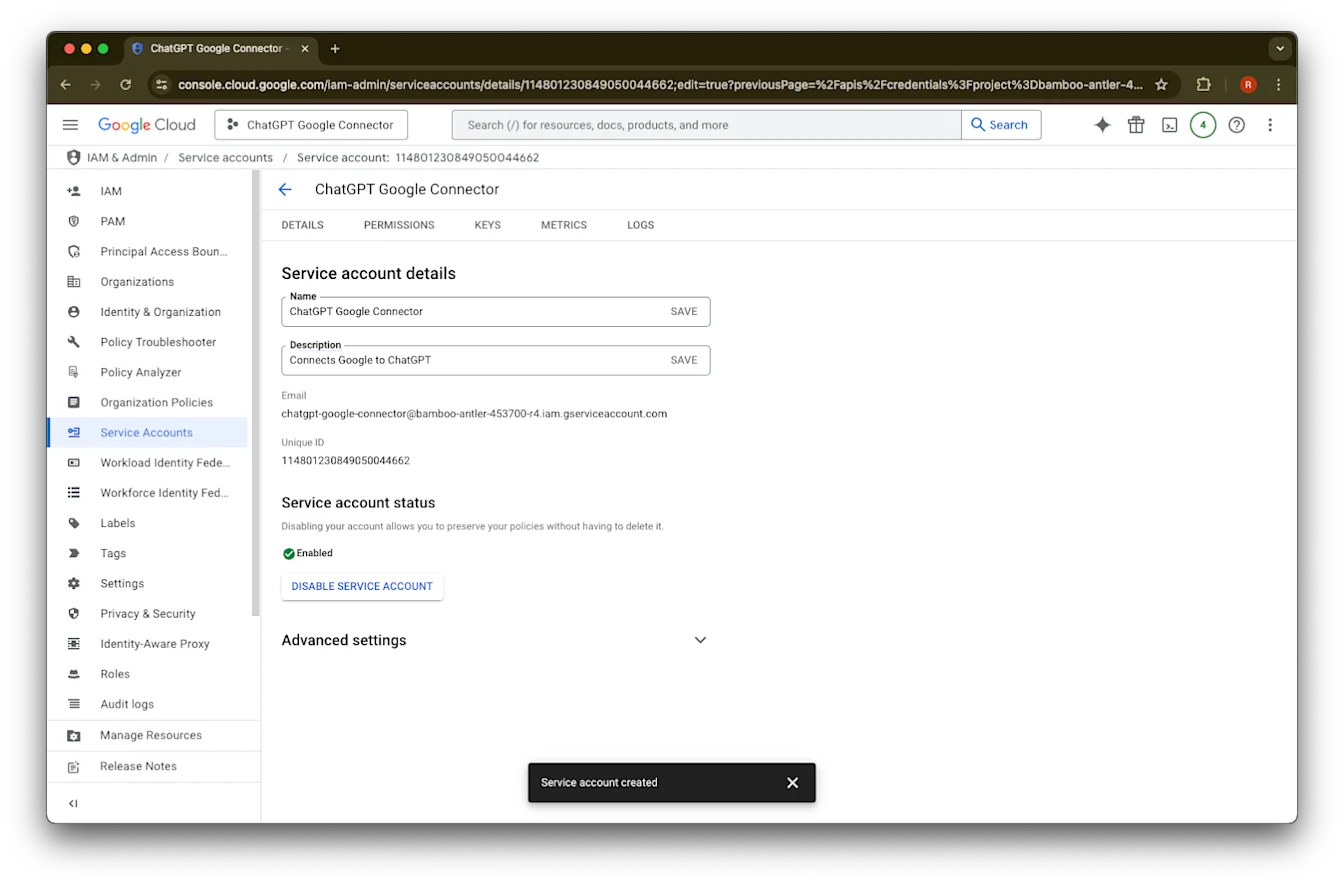
ഈ service account-ന് നിങ്ങൾക്ക് ഇഷ്ടമുള്ള ഒരു name ഉം description ഉം നൽകുക.
(Optional) നിങ്ങൾക്ക് ഒരു role നൽകാം - ഇത് ChatGPT-ന് ആവശ്യമായതല്ല.
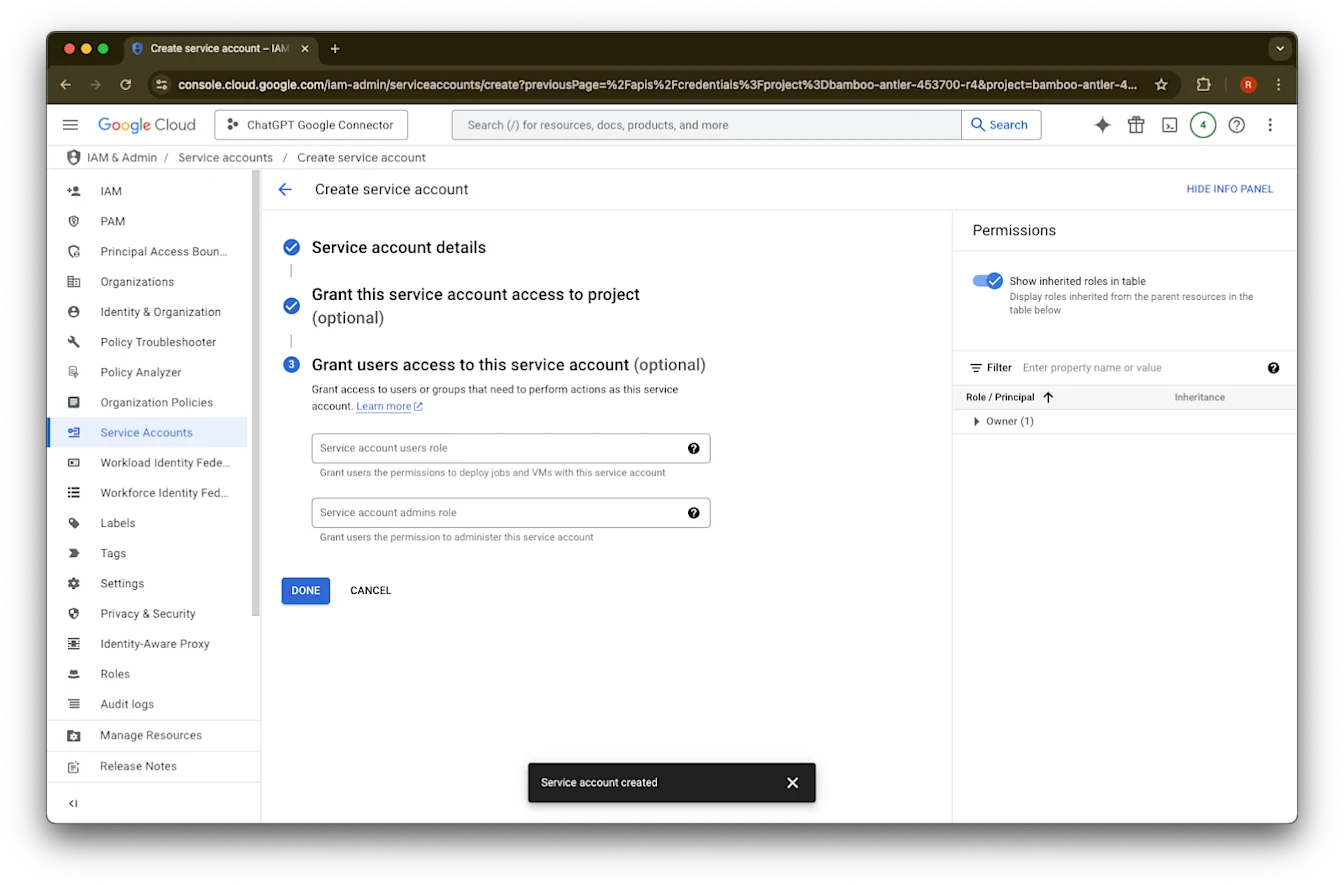
(Optional) നിങ്ങൾക്ക് service account-ലേക്ക് access നൽകാം - ഇത് ChatGPT-ന് ആവശ്യമായതല്ല.
Done ക്ലിക്ക് ചെയ്യുക.
ഇപ്പോൾ സൃഷ്ടിച്ച service account ൽ ക്ലിക്ക് ചെയ്യുക.
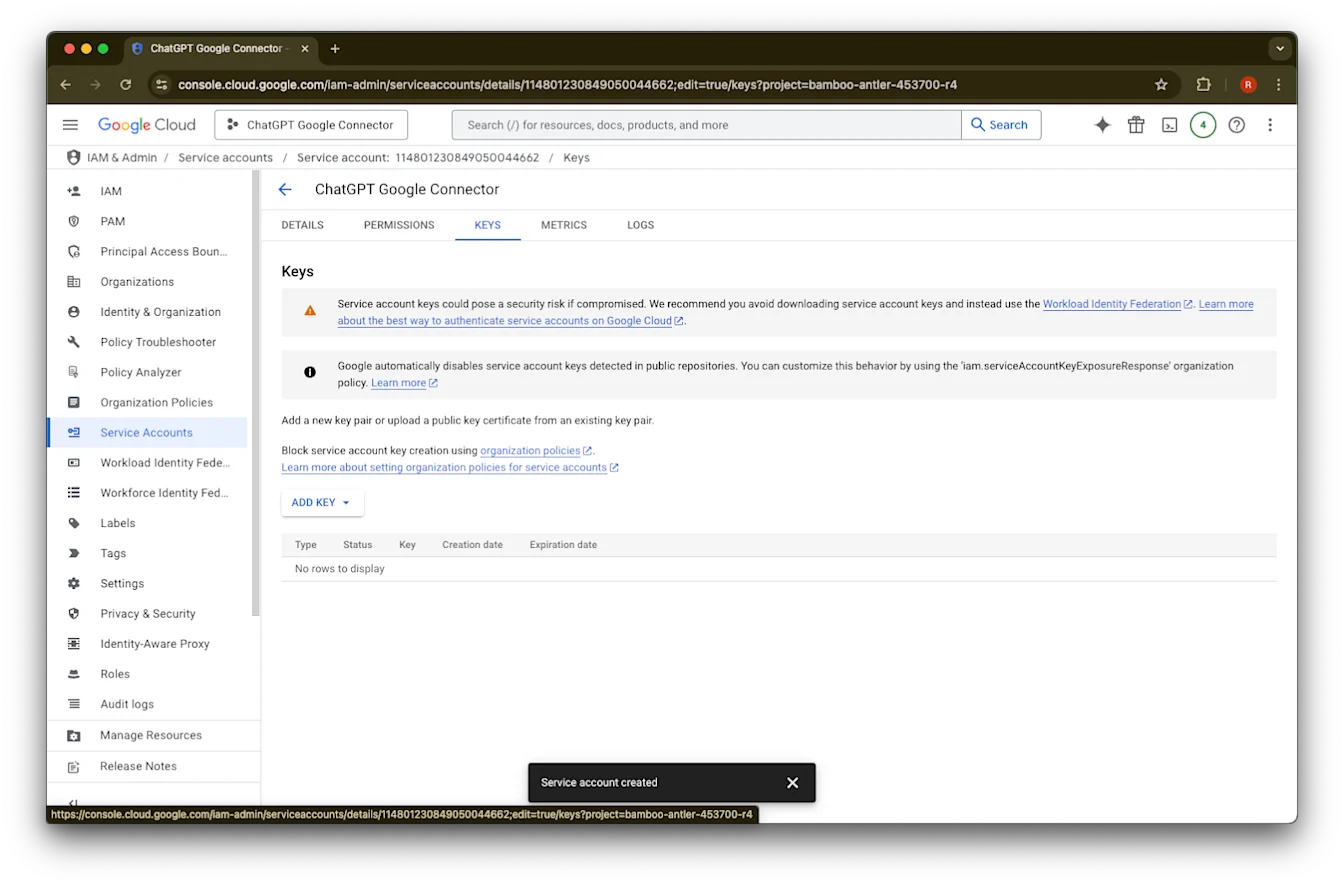
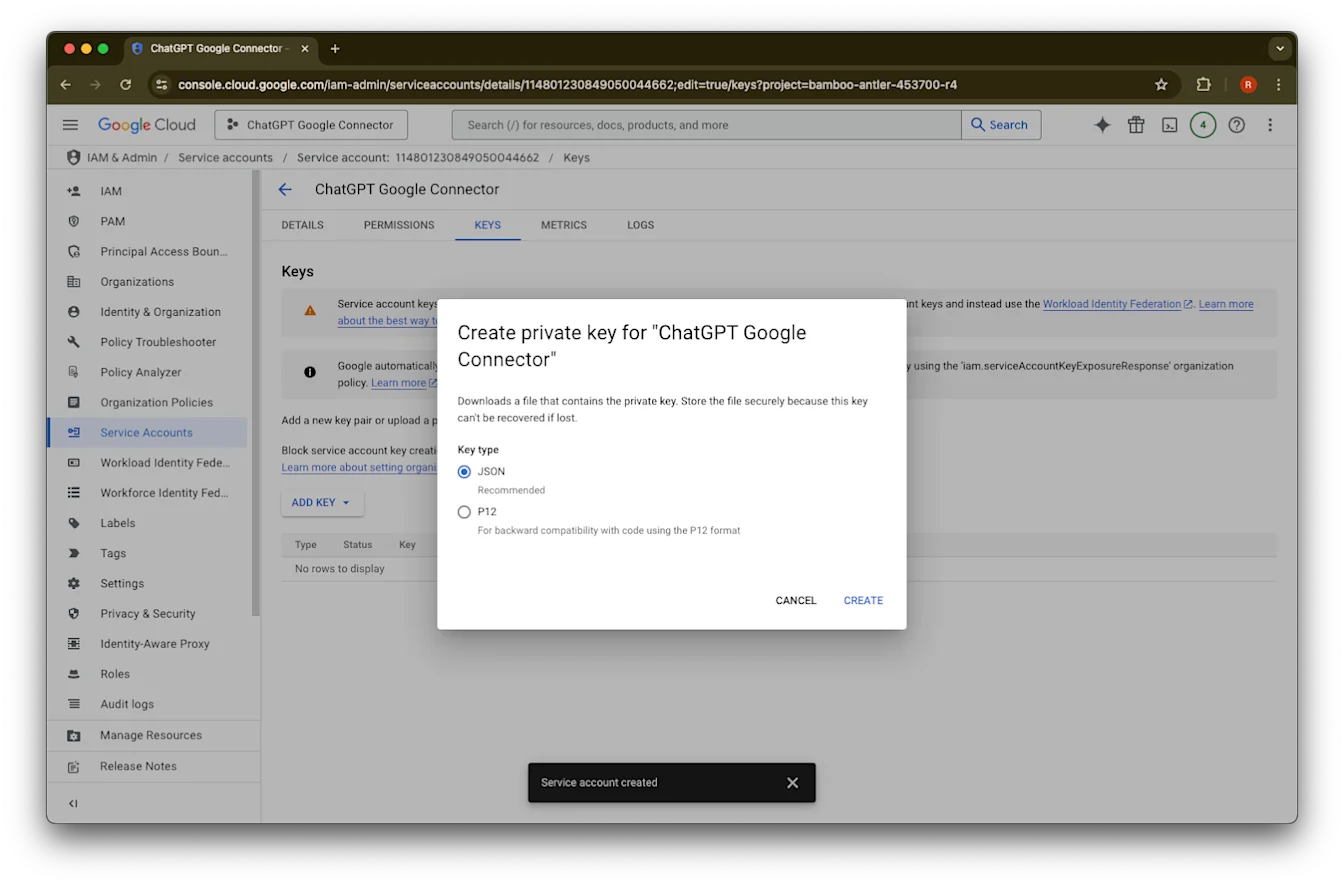
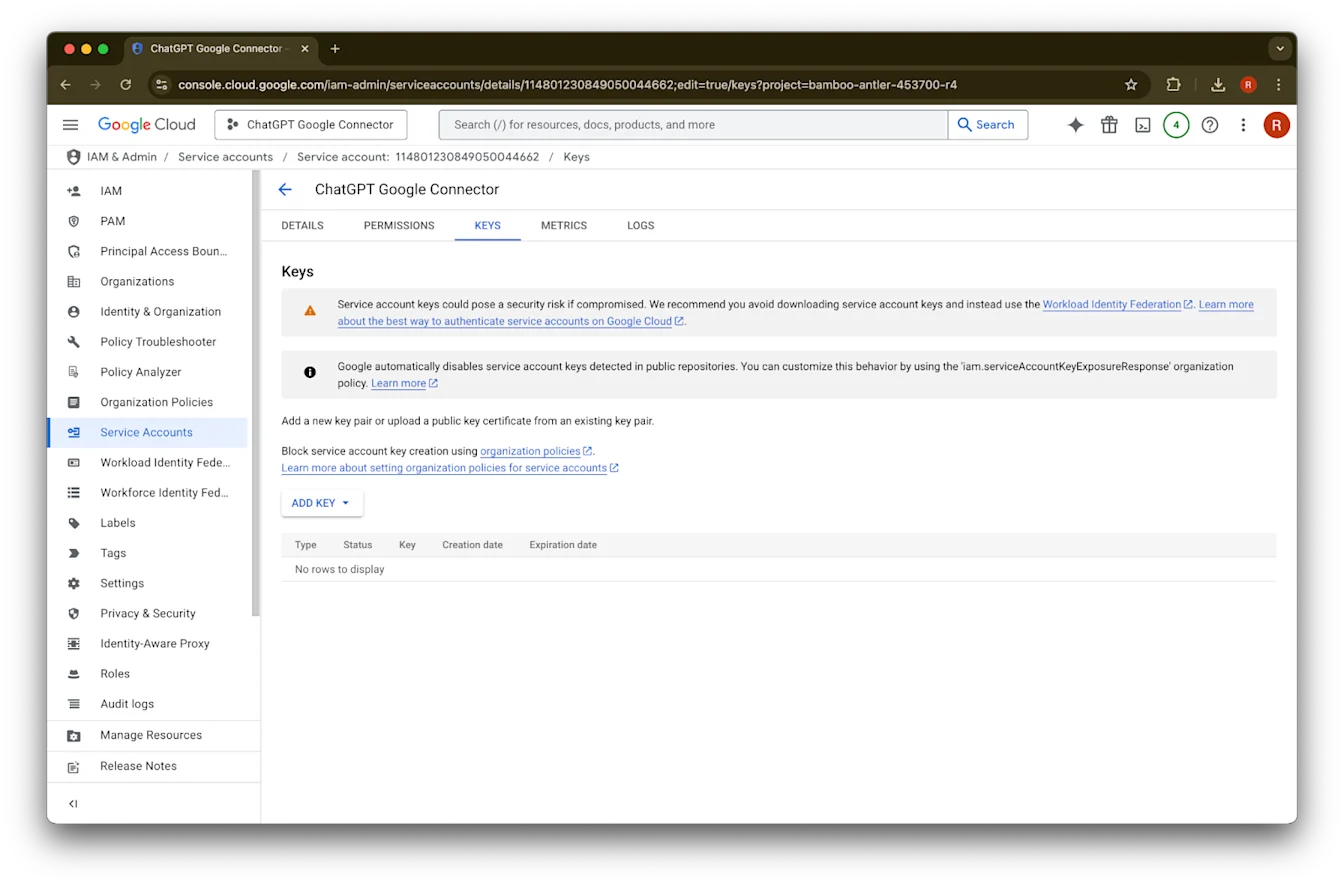
keys. ൽ ക്ലിക്ക് ചെയ്യുക.
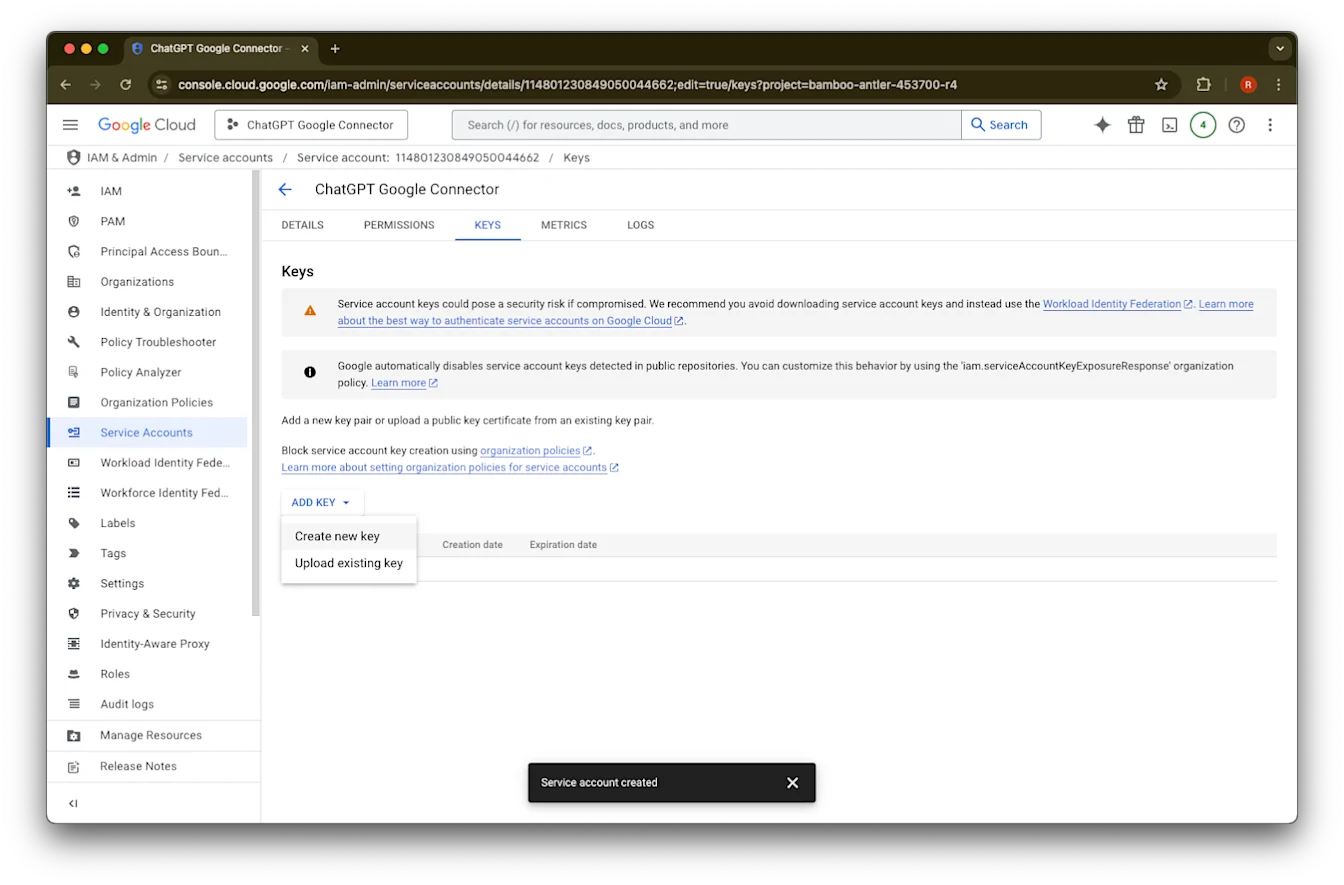
Add Key ൽ ക്ലിക്ക് ചെയ്യുക.
Create new key ൽ ക്ലിക്ക് ചെയ്യുക.
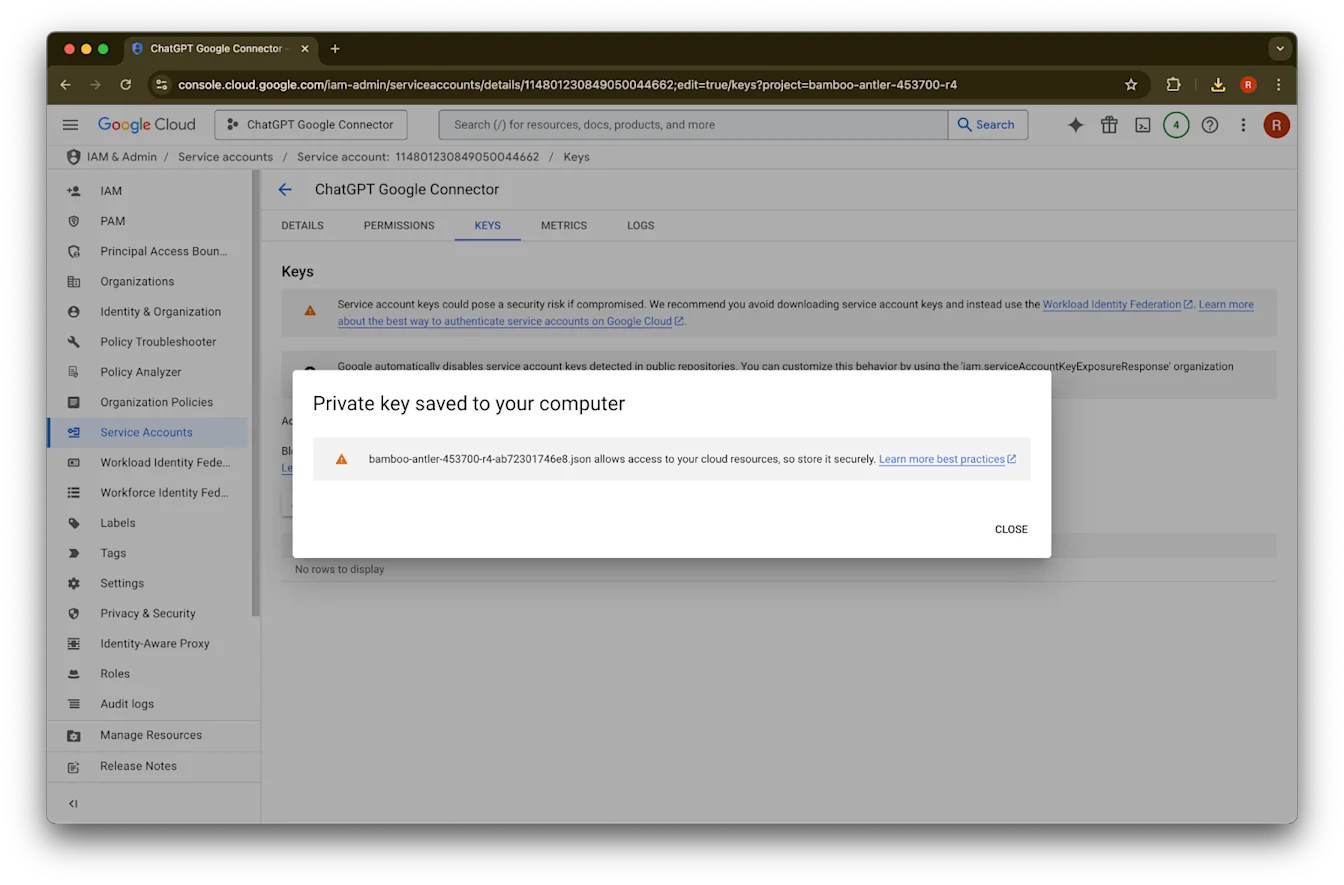
default JSON key type നിലനിർത്തി Create ൽ ക്ലിക്ക് ചെയ്യുക.
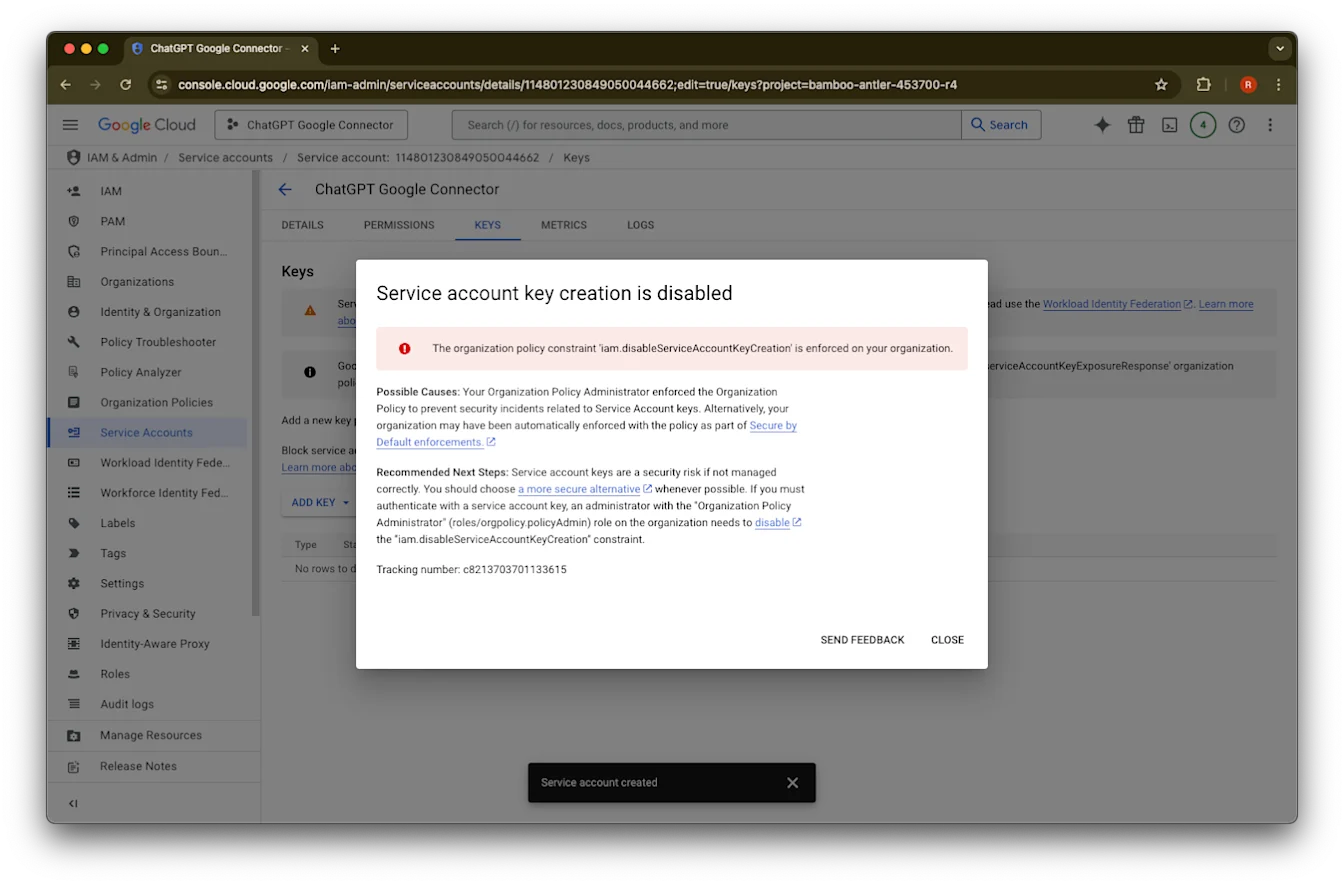
“Service account key creation is disabled” എന്ന് പറയുന്ന ഒരു പിശക് സന്ദേശം കാണുകയാണെങ്കിൽ, creation സജ്ജമാക്കാൻ ഈ ഘട്ടങ്ങൾ പിന്തുടരുക.Close ക്ലിക്ക് ചെയ്യുക. key ഇപ്പോൾ നിങ്ങളുടെ കമ്പ്യൂട്ടറിലേക്ക് ഡൗൺലോഡ് ചെയ്തു. പിന്നീട് ഇത് ChatGPT admin console-ലേക്ക് അപ്ലോഡ് ചെയ്യും.
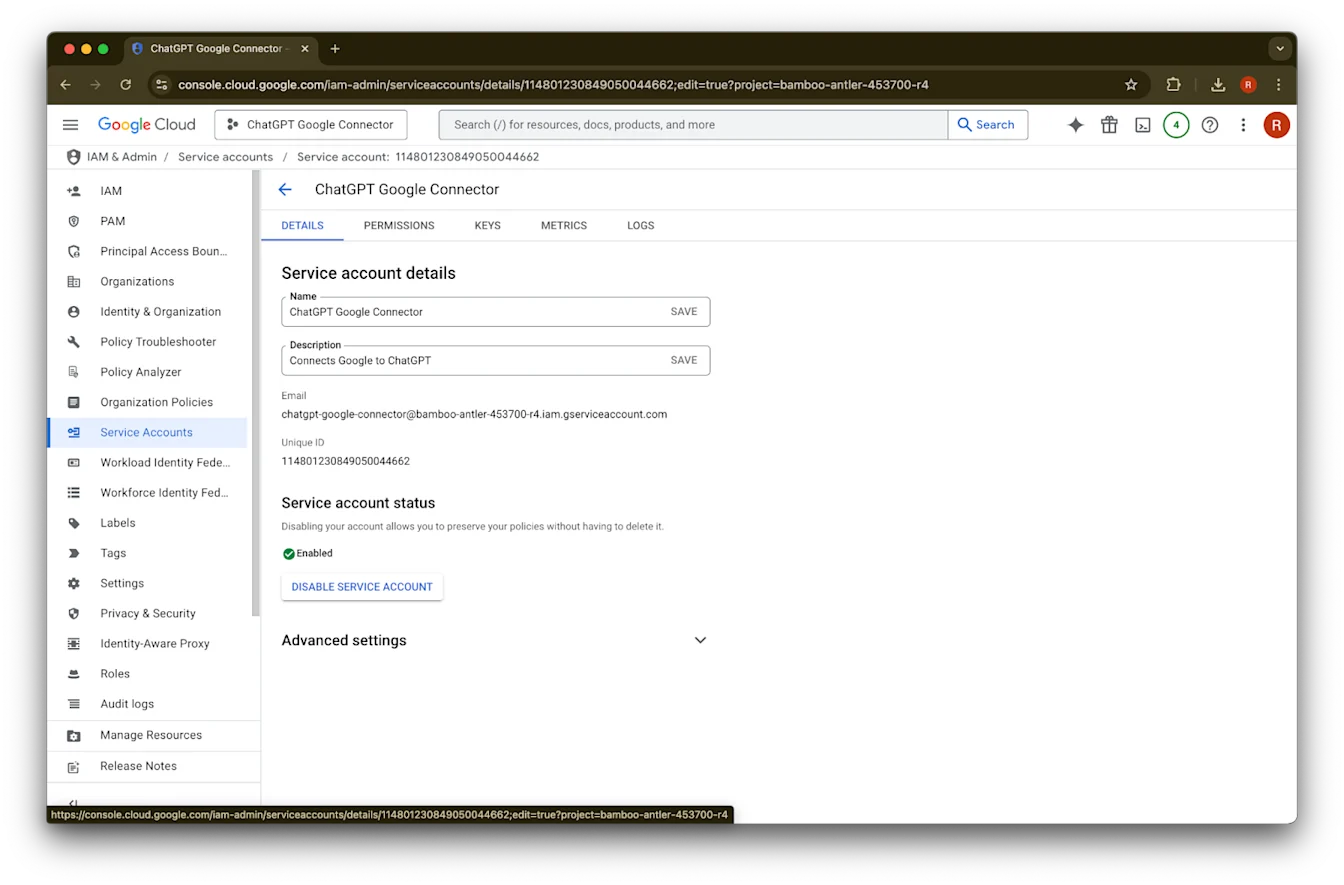
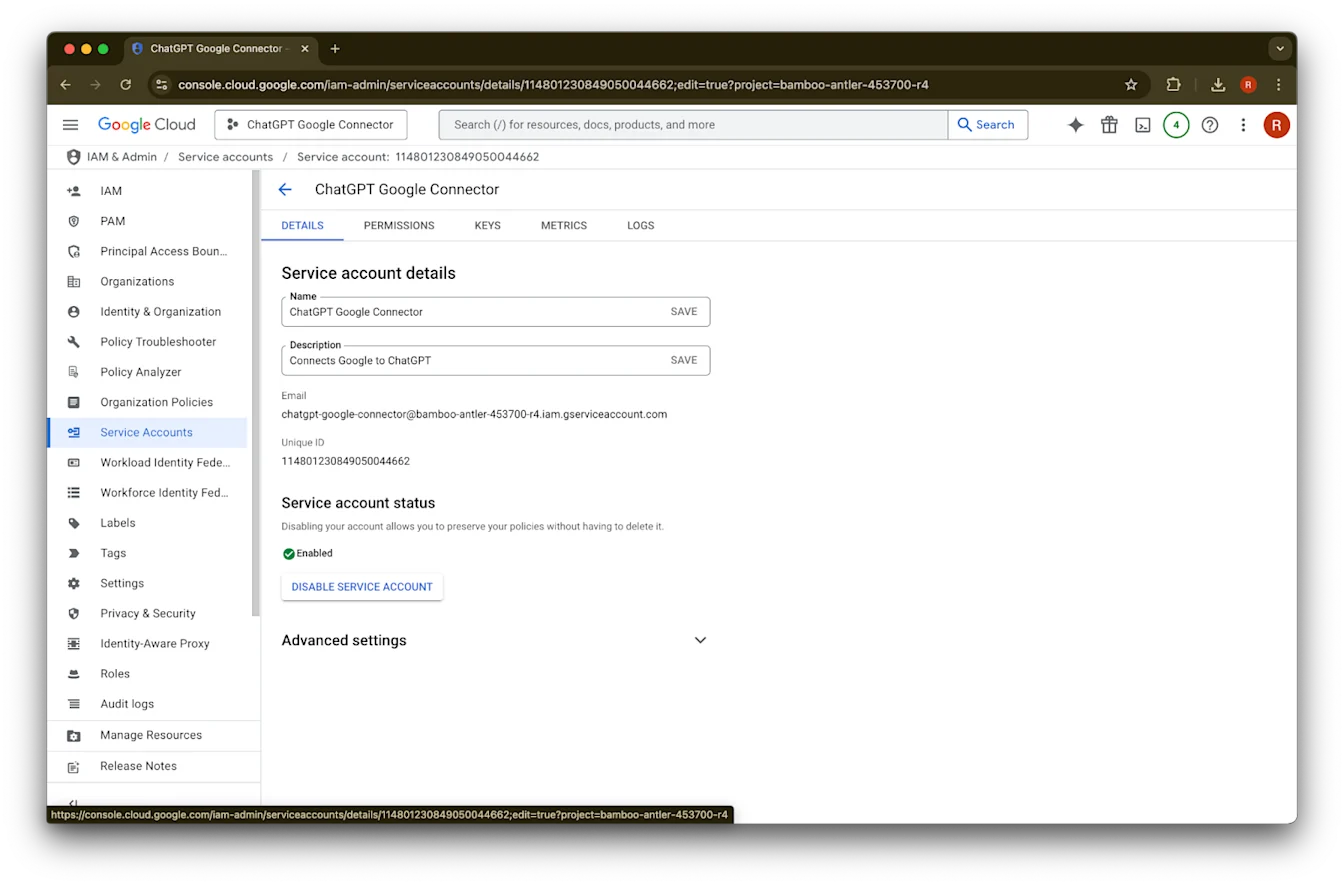
details ൽ ക്ലിക്ക് ചെയ്യുക.
Unique ID ശ്രദ്ധിക്കുക. Step 42-ൽ ഇത് ആവശ്യമായിരിക്കും.
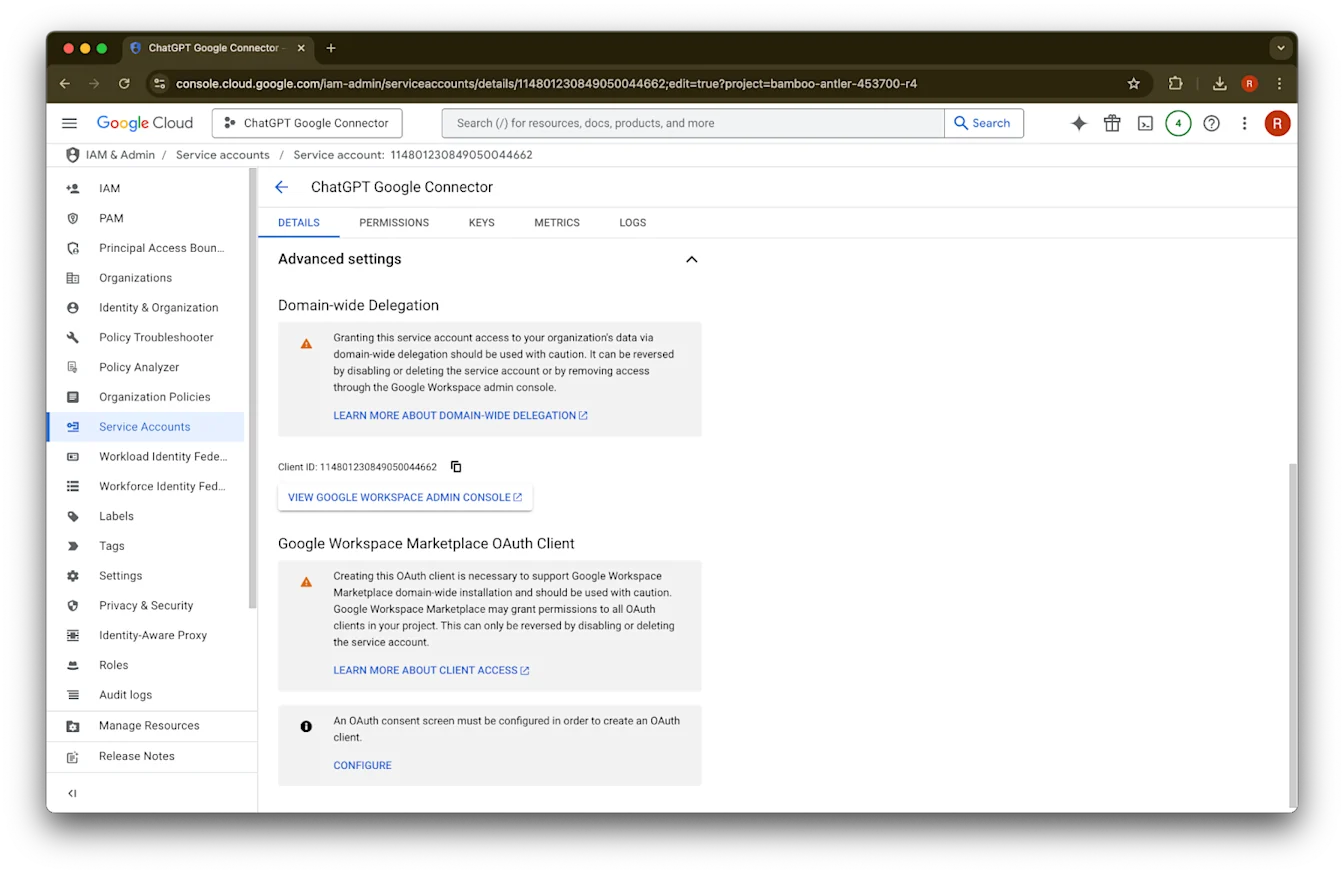
Advanced settings വികസിപ്പിക്കുക.
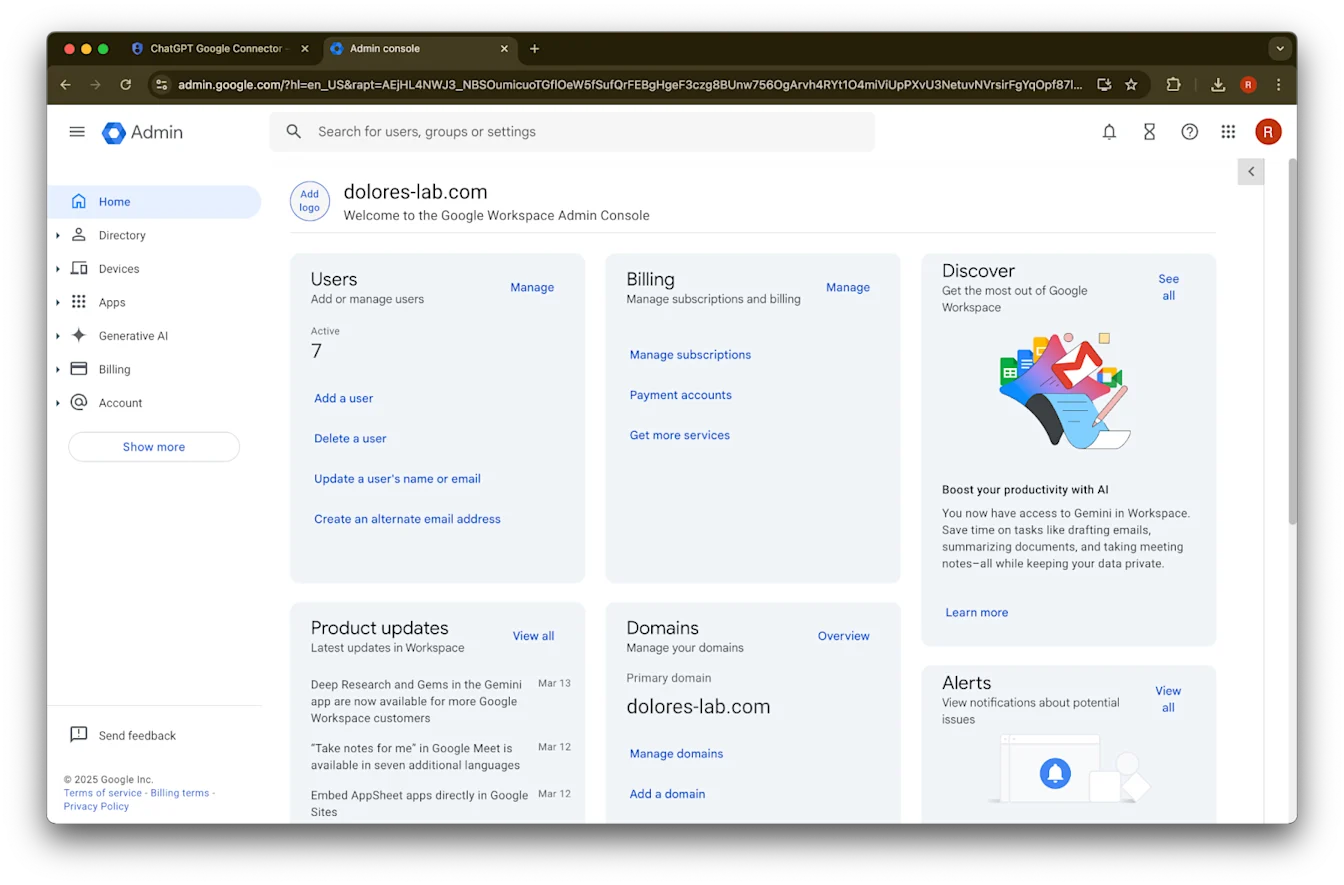
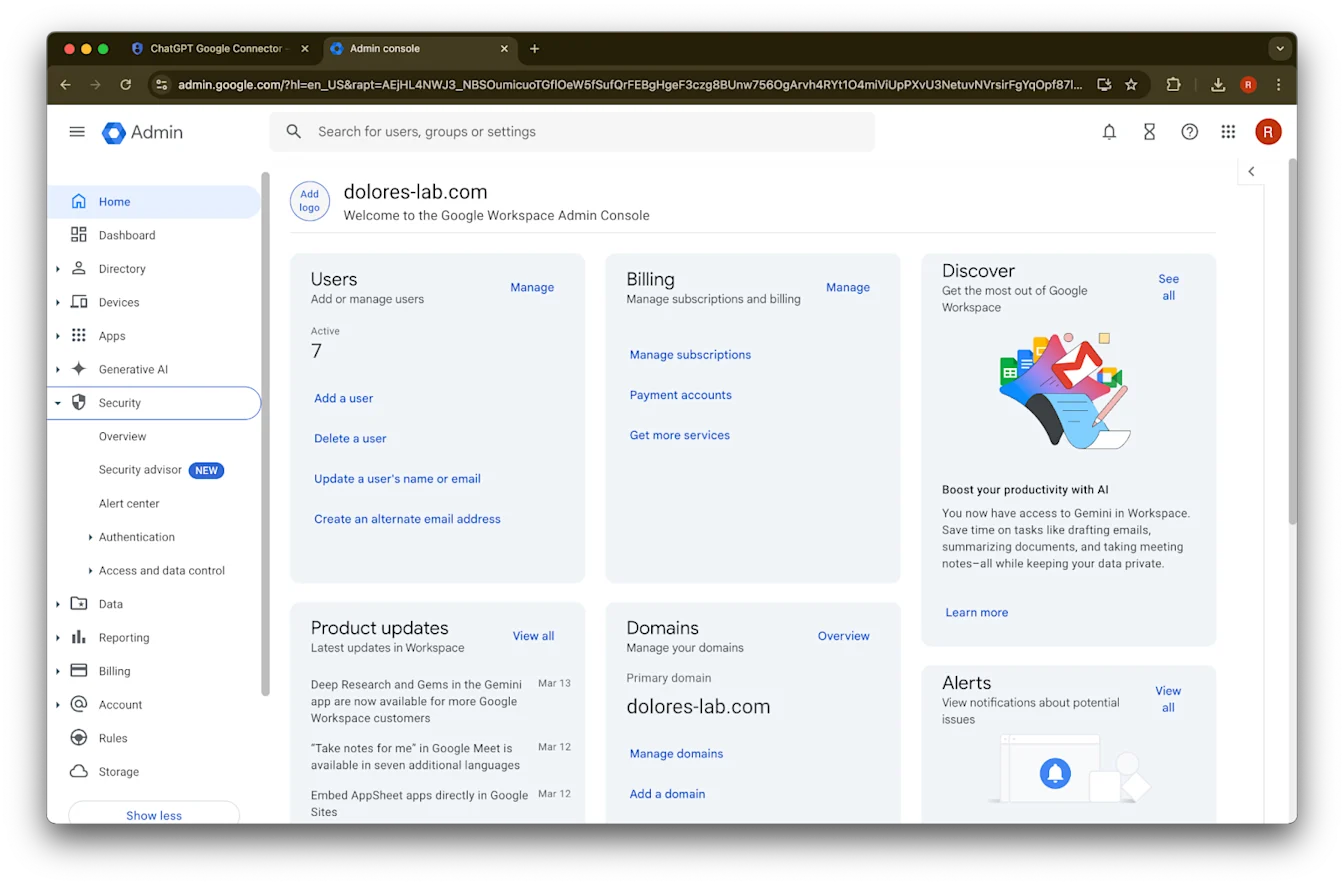
താഴേക്ക് സ്ക്രോൾ ചെയ്ത് View Google Workspace Admin Console ൽ ക്ലിക്ക് ചെയ്യുക. Google Workspace console ഒരു പുതിയ tab-ൽ തുറക്കും.
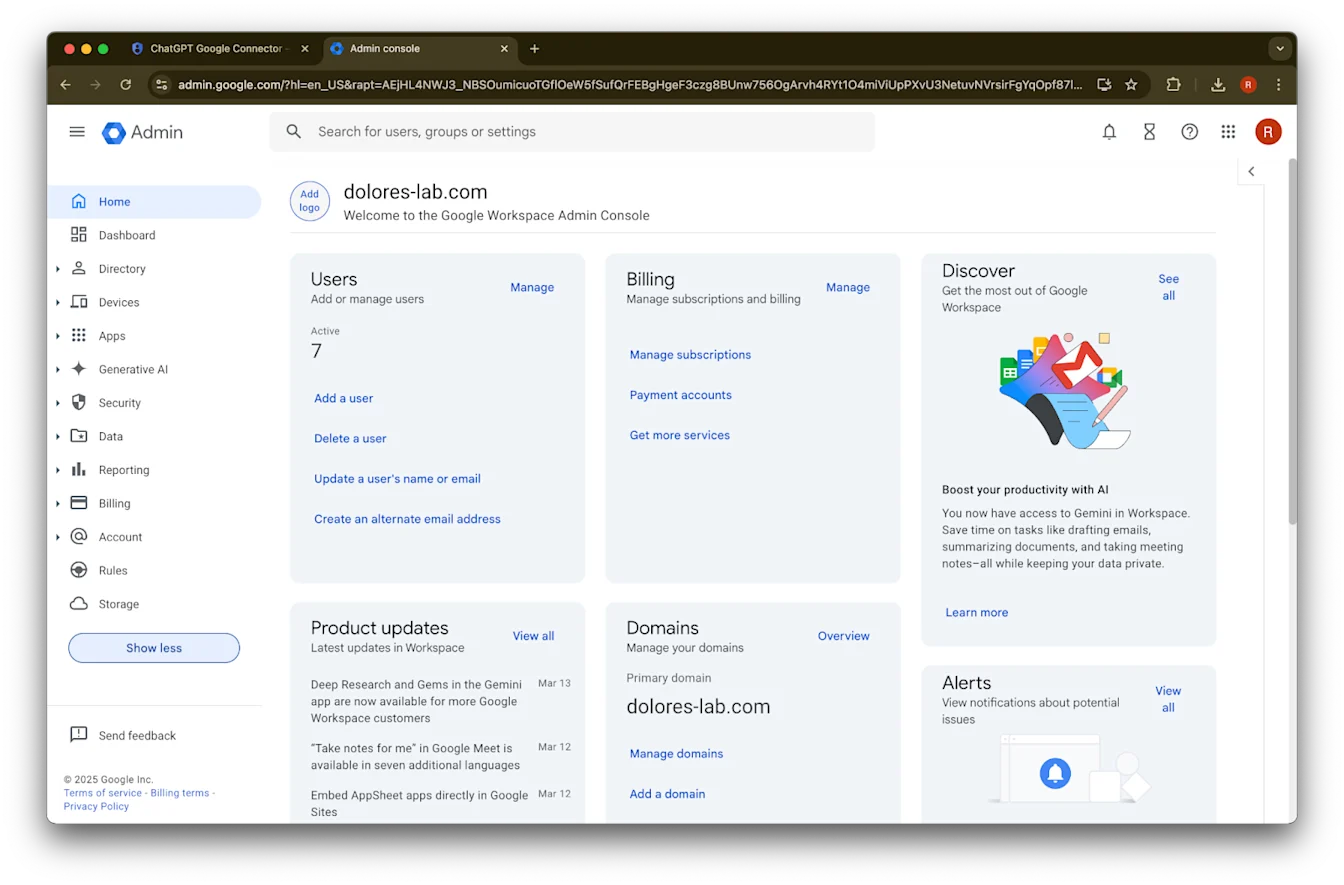
Show more ക്ലിക്ക് ചെയ്യുക.
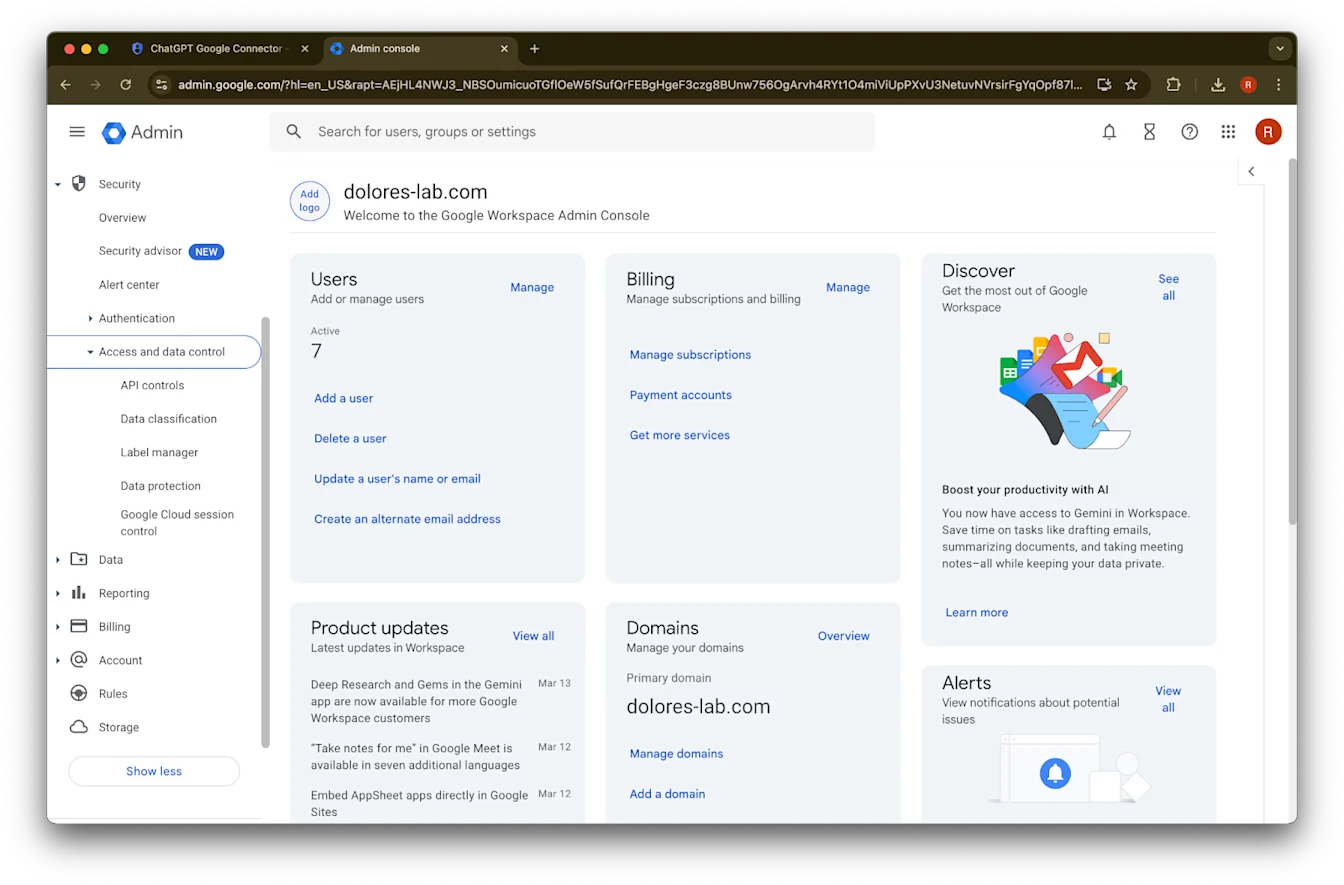
Security വിഭാഗം വികസിപ്പിക്കുക.
Access and data controls വിഭാഗം വികസിപ്പിക്കുക.
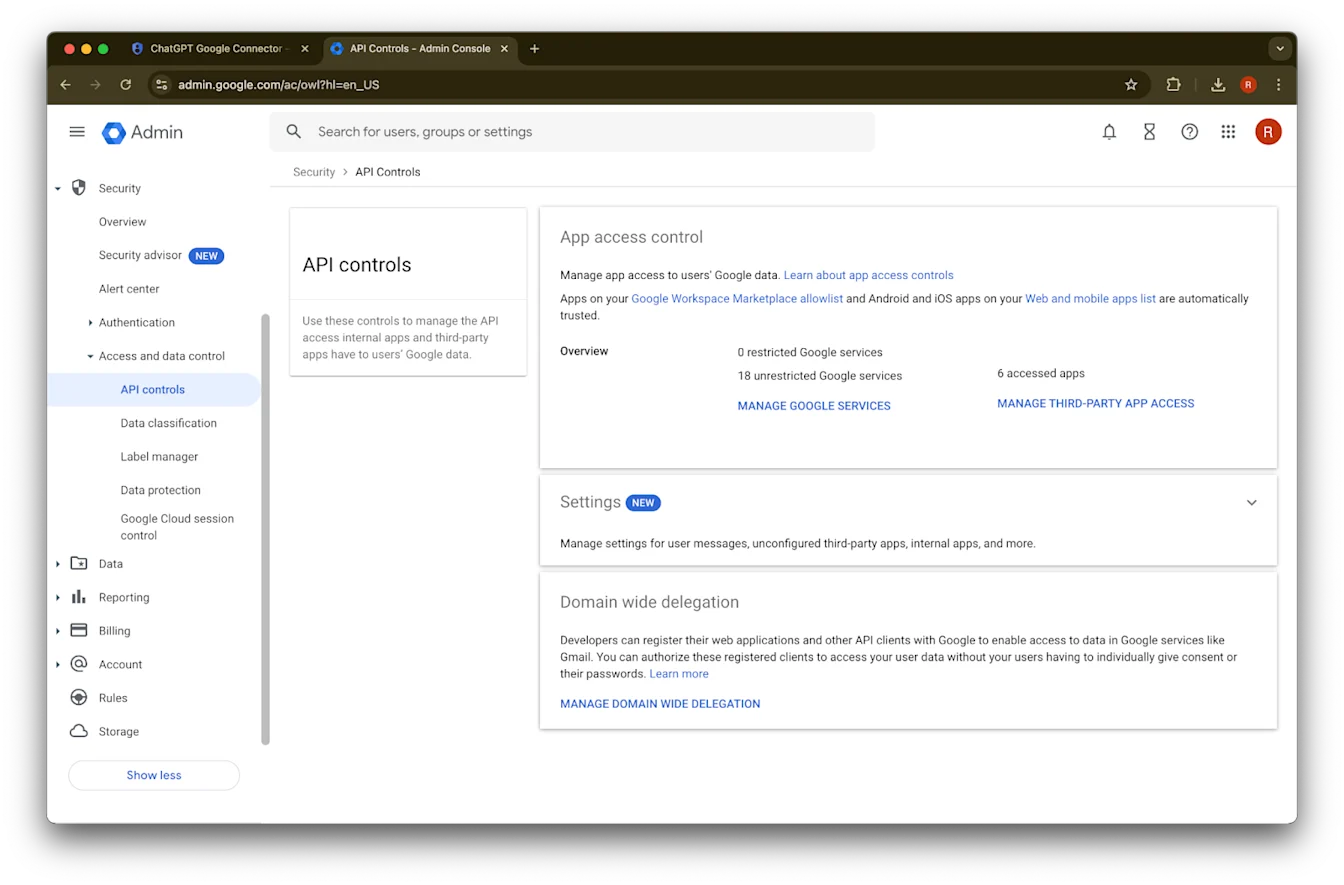
API controls വിഭാഗത്തിൽ ക്ലിക്ക് ചെയ്യുക.
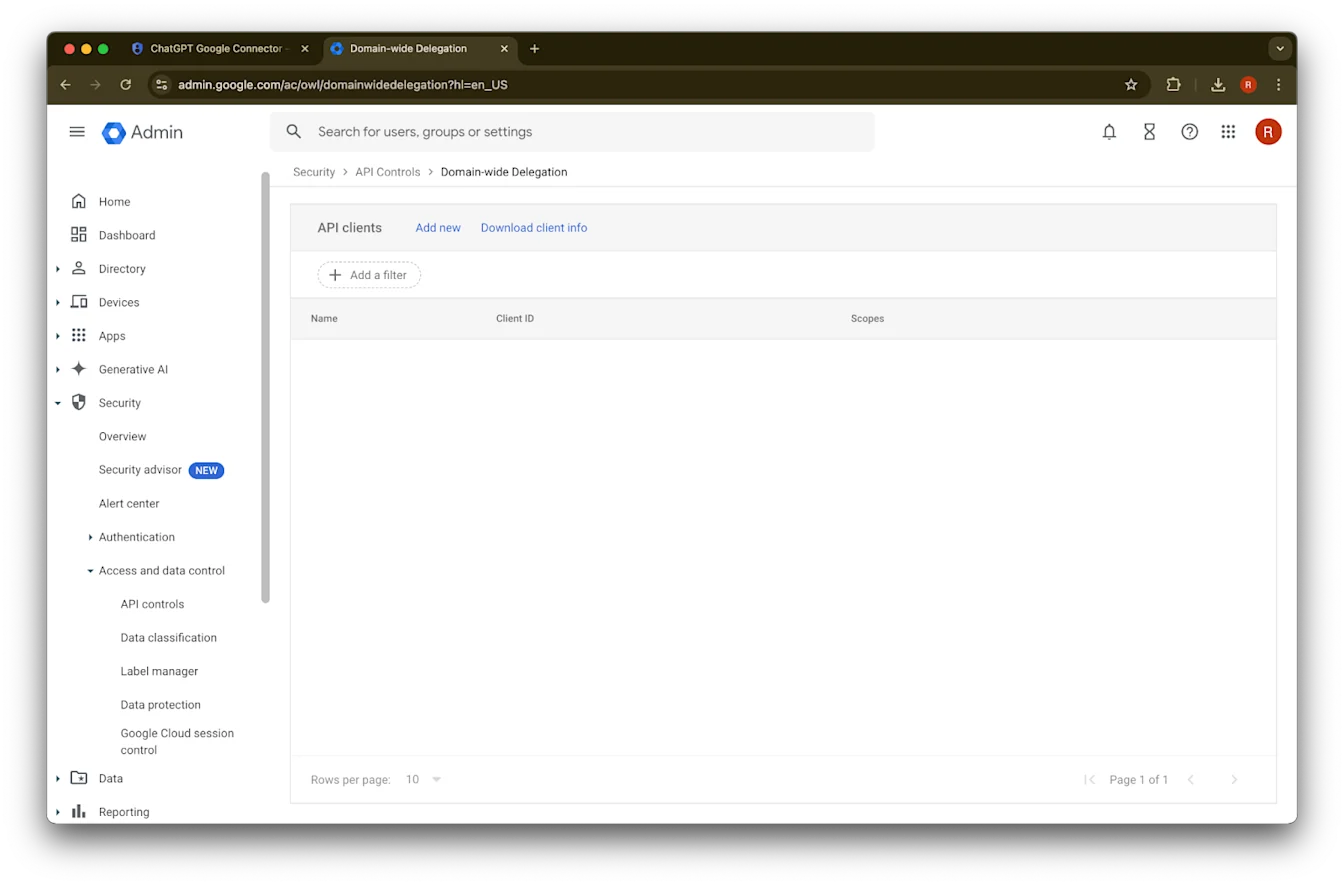
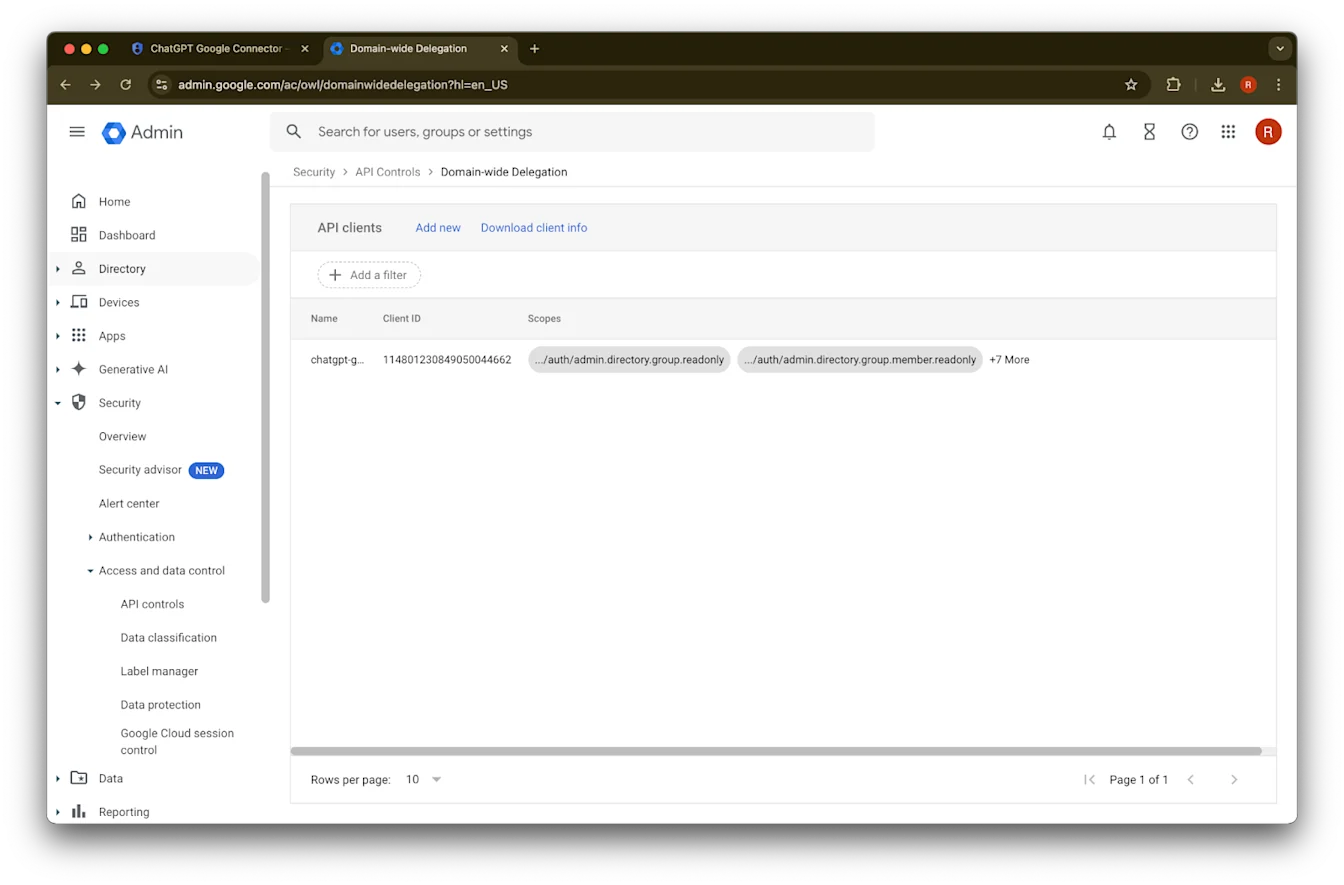
Manage Domain Wide Delegation ൽ ക്ലിക്ക് ചെയ്യുക.
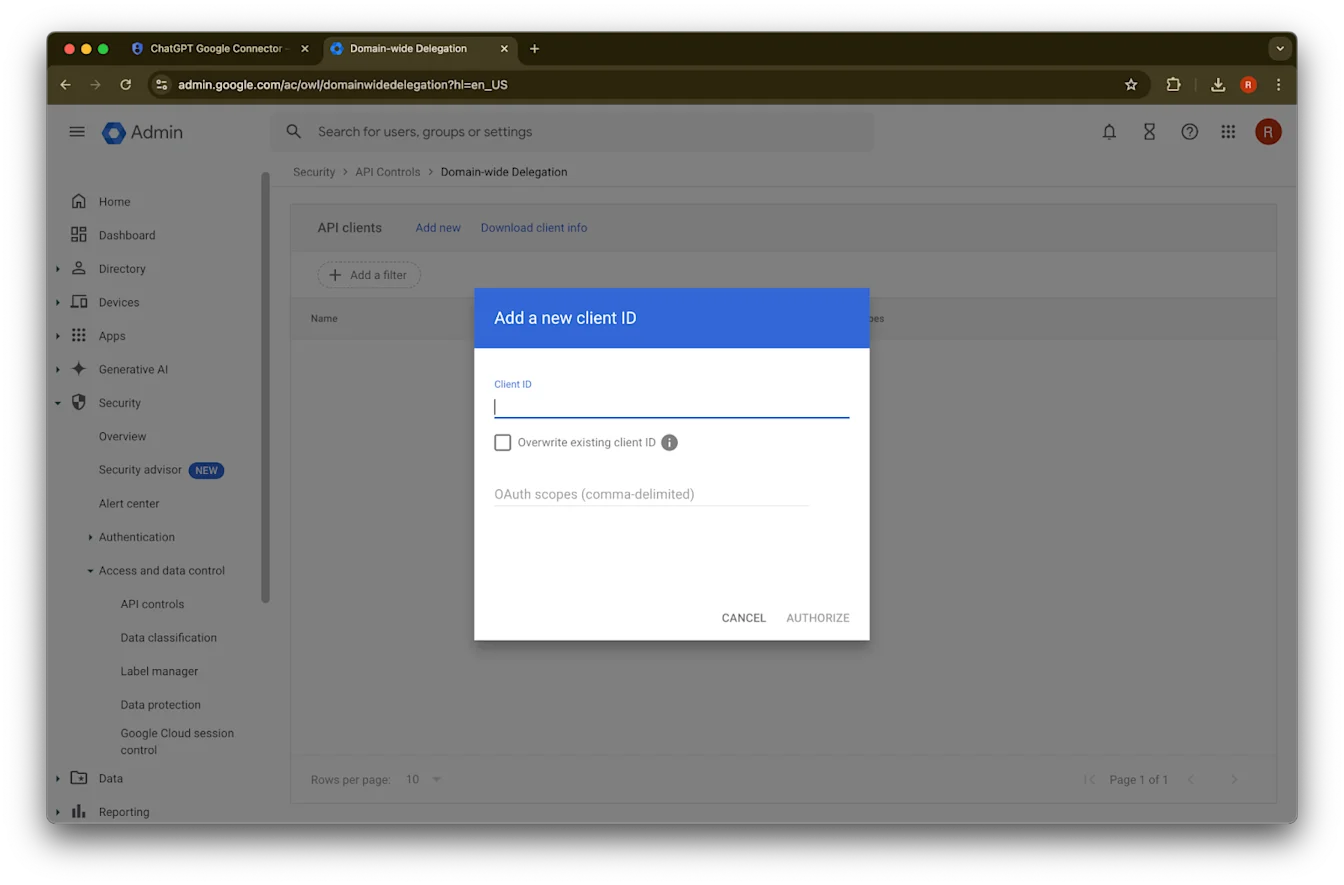
Add new ൽ ക്ലിക്ക് ചെയ്യുക.
മുമ്പ് കുറിച്ചുവെച്ച Unique ID ഈ Client ID യുടെ value ആയി ഉപയോഗിക്കുക.
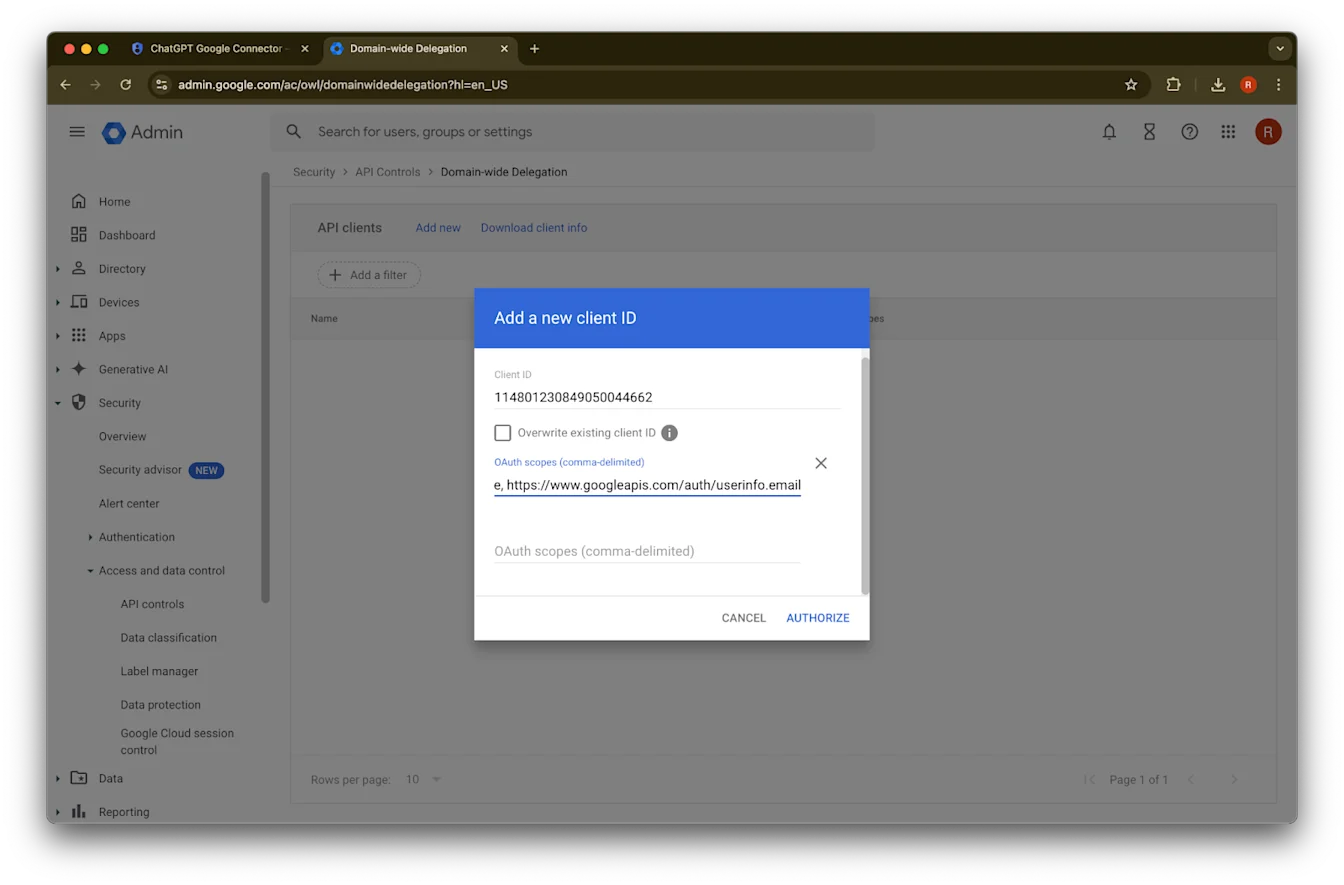
OAuth scopes നായി, നിങ്ങൾ copy-paste ചെയ്യേണ്ട താഴെക്കൊടുത്തിരിക്കുന്ന comma de-limited auth scopes values കാണുക.
https://www.googleapis.com/auth/admin.directory.group.readonly, https://www.googleapis.com/auth/admin.directory.group.member.readonly, https://www.googleapis.com/auth/admin.directory.user.readonly, https://www.googleapis.com/auth/admin.directory.user.alias.readonly, https://www.googleapis.com/auth/drive.activity.readonly, https://www.googleapis.com/auth/drive.metadata.readonly, https://www.googleapis.com/auth/drive.readonly, https://www.googleapis.com/auth/userinfo.profile, https://www.googleapis.com/auth/userinfo.email| Scope | റീസണിംഗ് |
| admin.directory.group.readonly | group-based permissions നടപ്പിലാക്കാൻ |
| admin.directory.group.member.readonly | group-based permissions നടപ്പിലാക്കാൻ |
| admin.directory.user.alias.readonly | alias വഴിയാണ് ഉപയോക്താവിന് permission നൽകിയിരിക്കുന്ന കേസുകൾ കൈകാര്യം ചെയ്യാൻ |
| drive.activity.readonly | ഫയലുകളിൽ മാറ്റങ്ങൾ സംഭവിക്കുമ്പോൾ അറിയിപ്പുകൾ ലഭിക്കാൻ |
| drive.metadata.readonly | ഫയൽ ഉള്ളടക്കവും ബന്ധപ്പെട്ട metadata-യും sync ചെയ്യാൻ (ഉദാ. last modified date) |
| drive.readonly | ഫയൽ ഉള്ളടക്കവും ബന്ധപ്പെട്ട metadata-യും sync ചെയ്യാൻ (ഉദാ. last modified date) |
| userinfo.profile | ആർക്കെല്ലാം ഫയലുകൾ sync ചെയ്യുകയാണെന്ന് നിർണയിക്കാൻ |
| userinfo.email | ആർക്കെല്ലാം ഫയലുകൾ sync ചെയ്യുകയാണെന്ന് നിർണയിക്കാൻ |
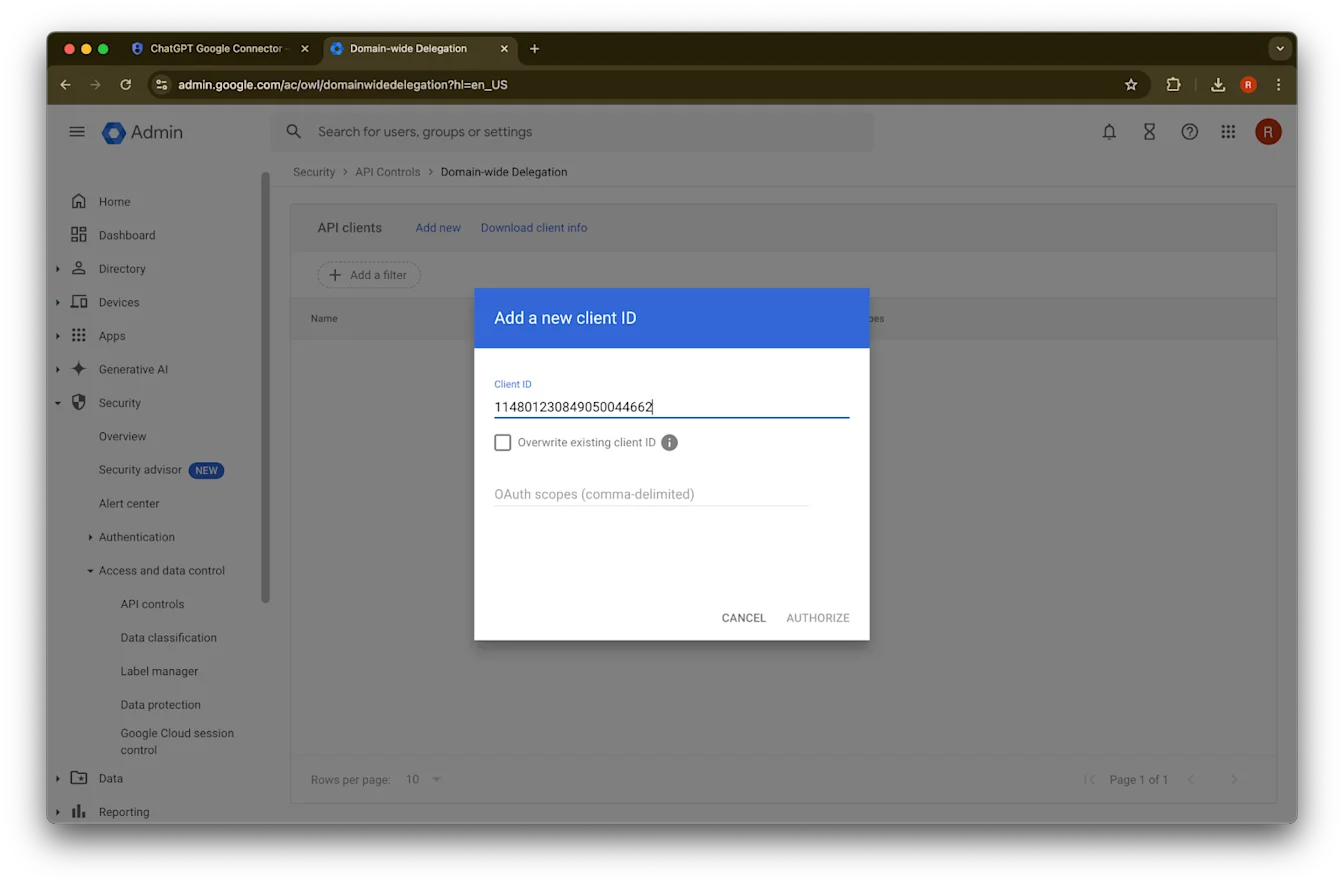
45. Authorize ൽ ക്ലിക്ക് ചെയ്യുക.
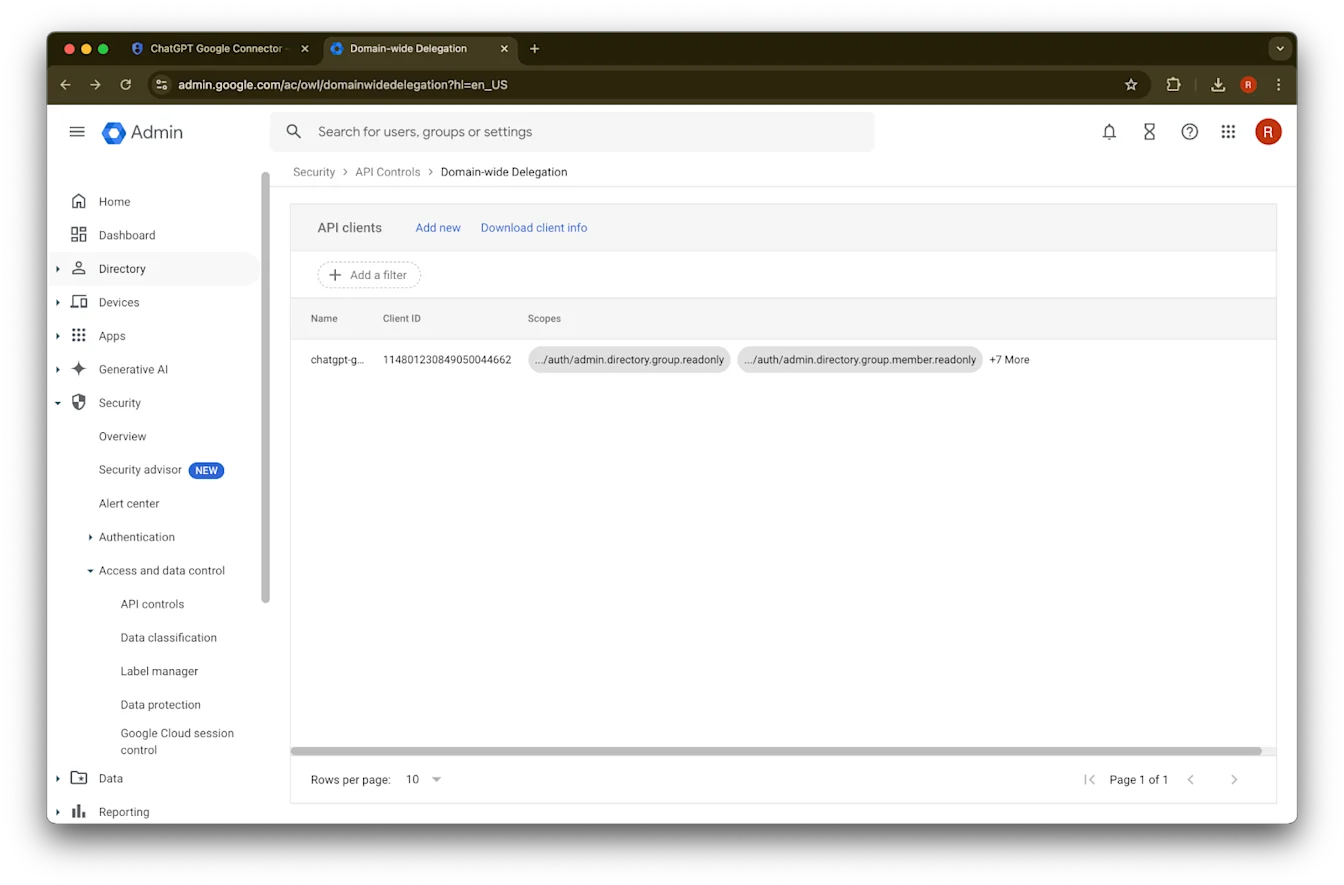
46. വിജയം.
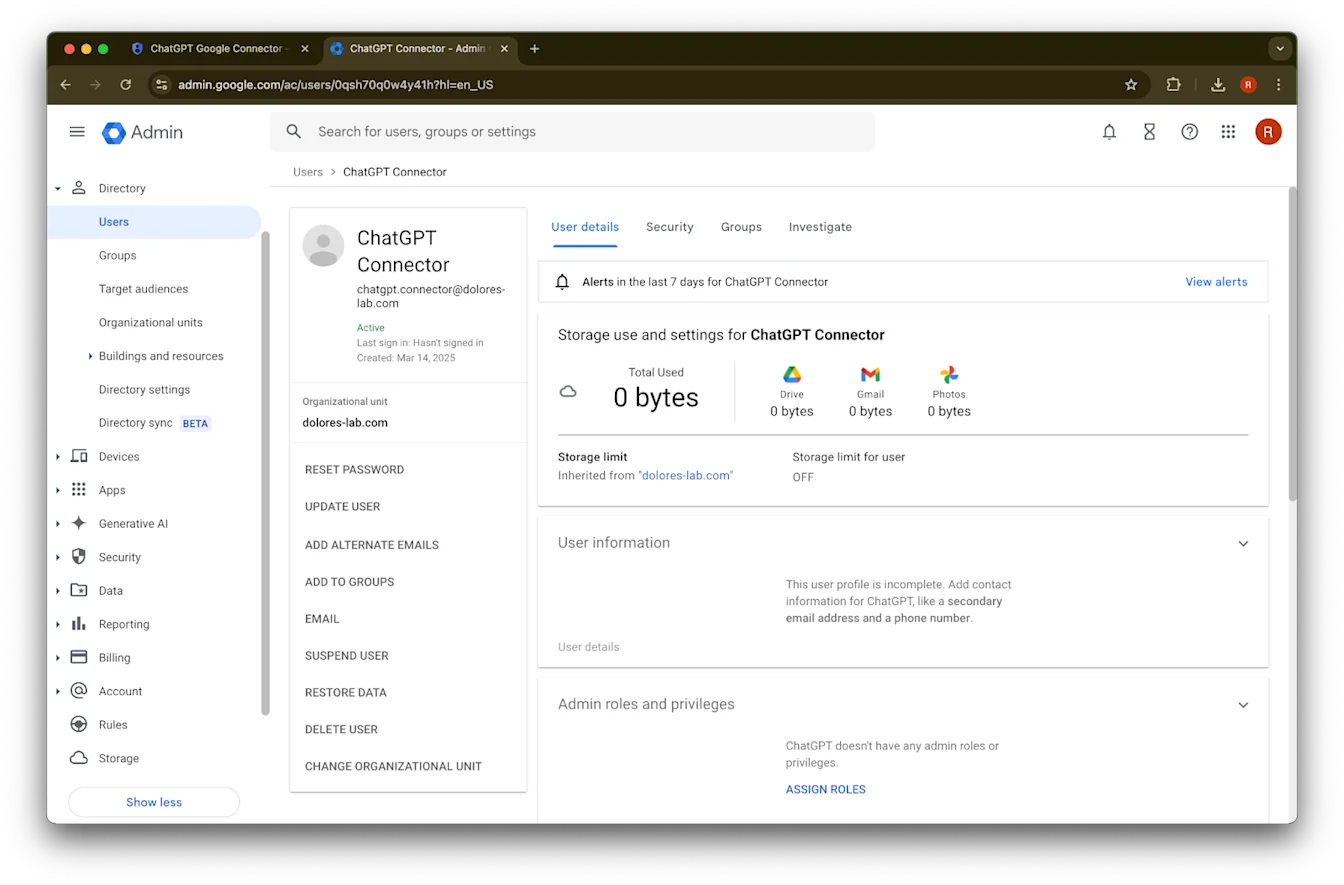
Admin Account സജ്ജീകരിക്കൽ
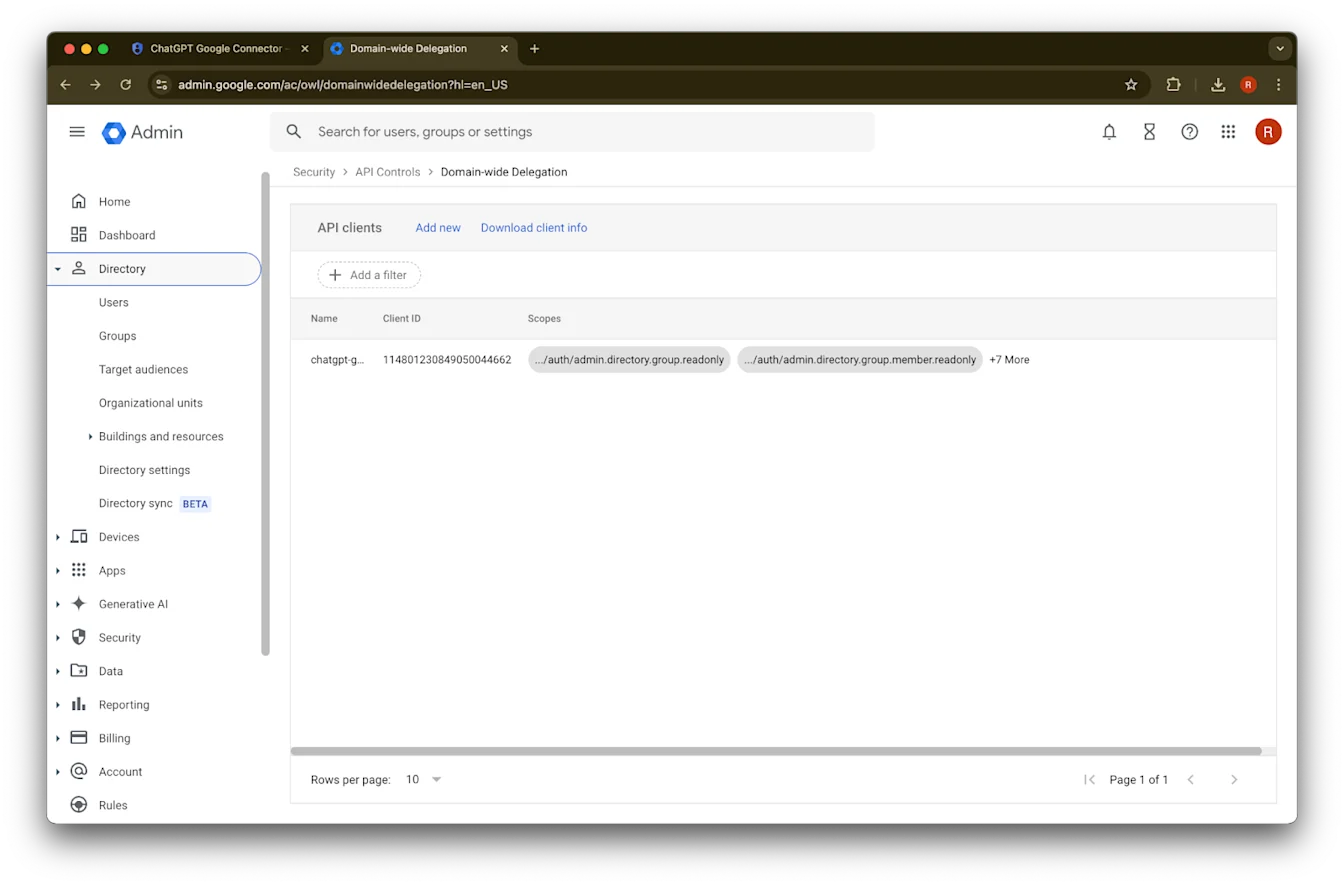
Directory വികസിപ്പിക്കുക.
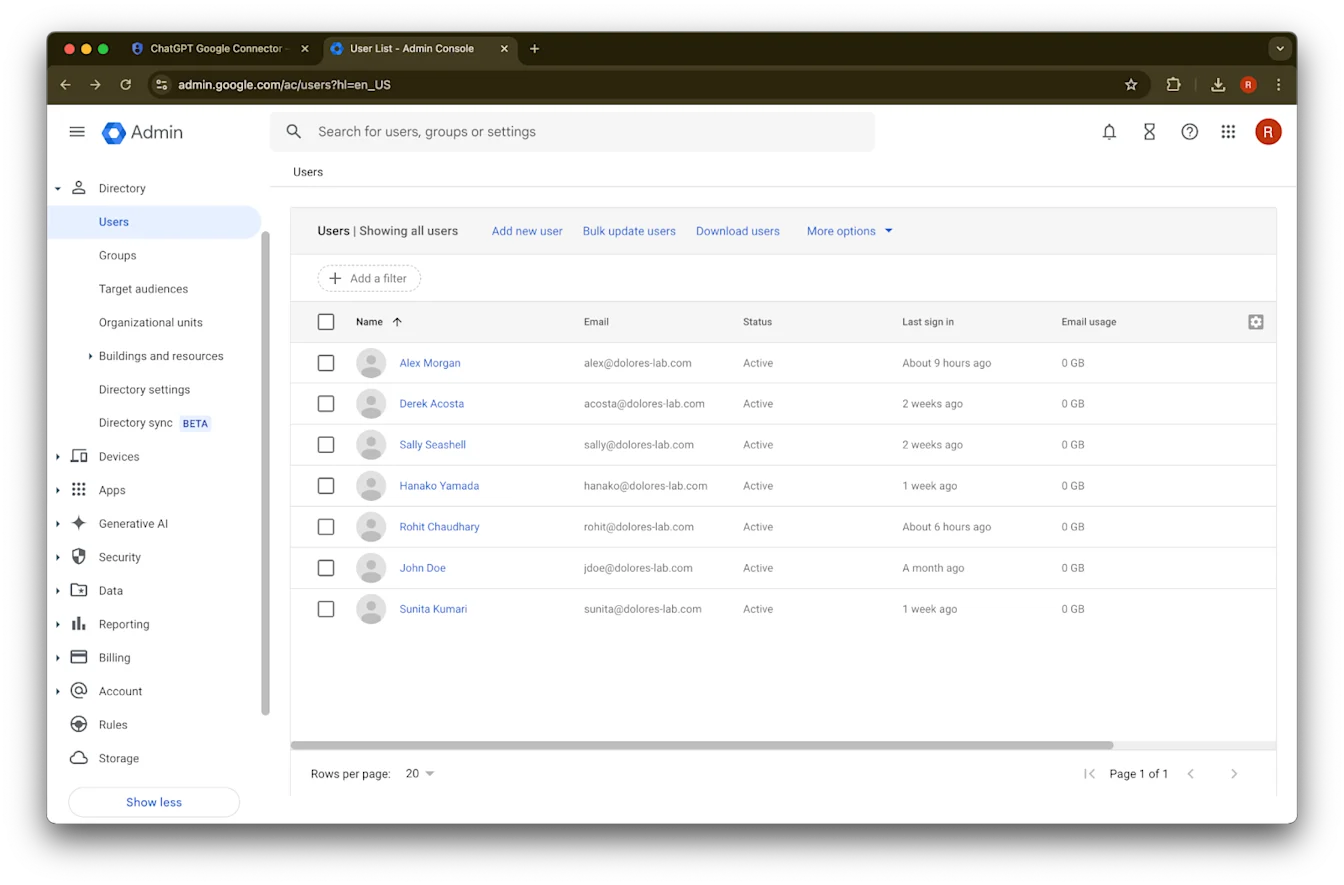
Users ൽ ക്ലിക്ക് ചെയ്യുക.
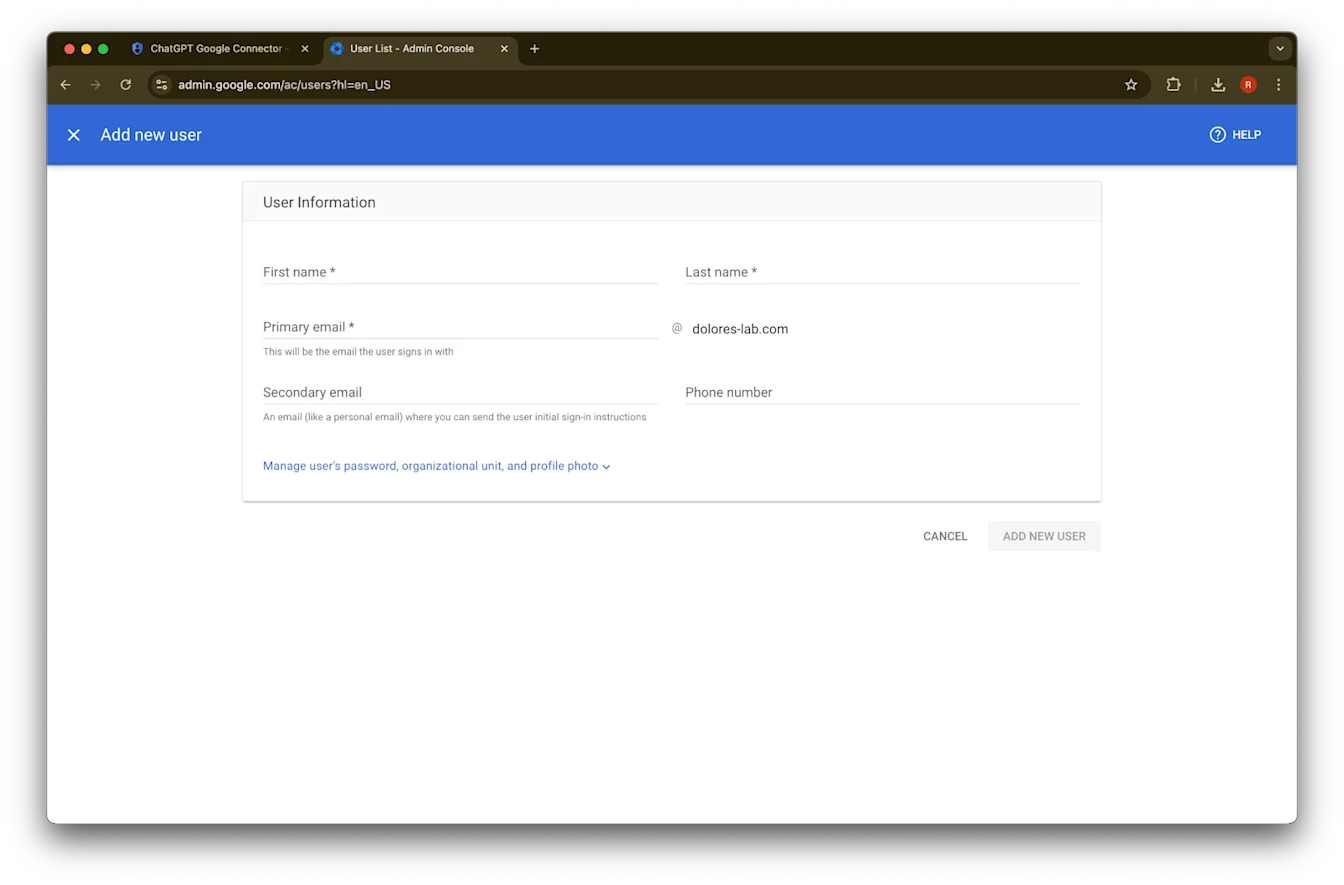
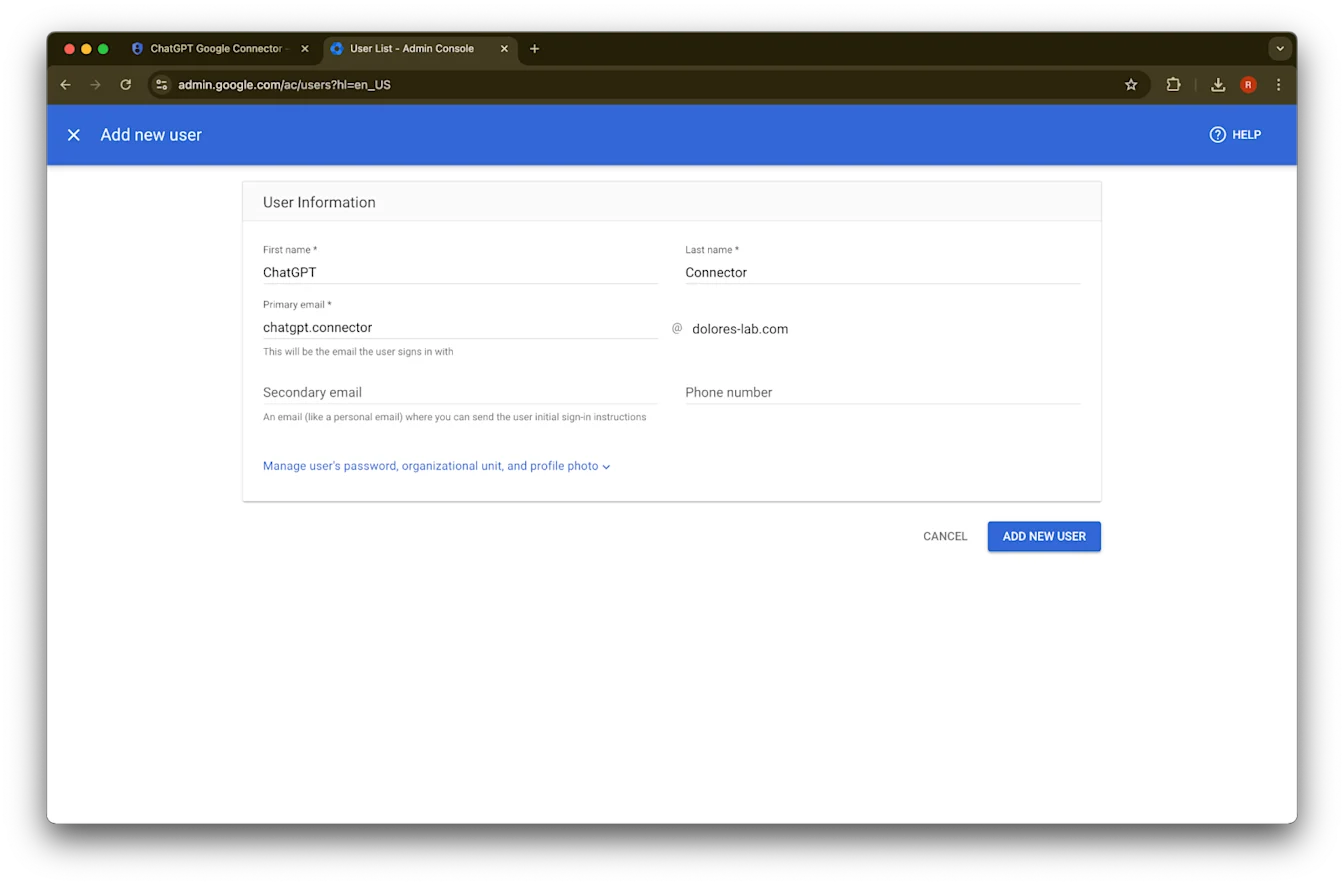
നിങ്ങൾക്ക് ഇഷ്ടമുള്ള first name, last name, primary email വിലാസം എന്നിവ നൽകുക.
Add new user
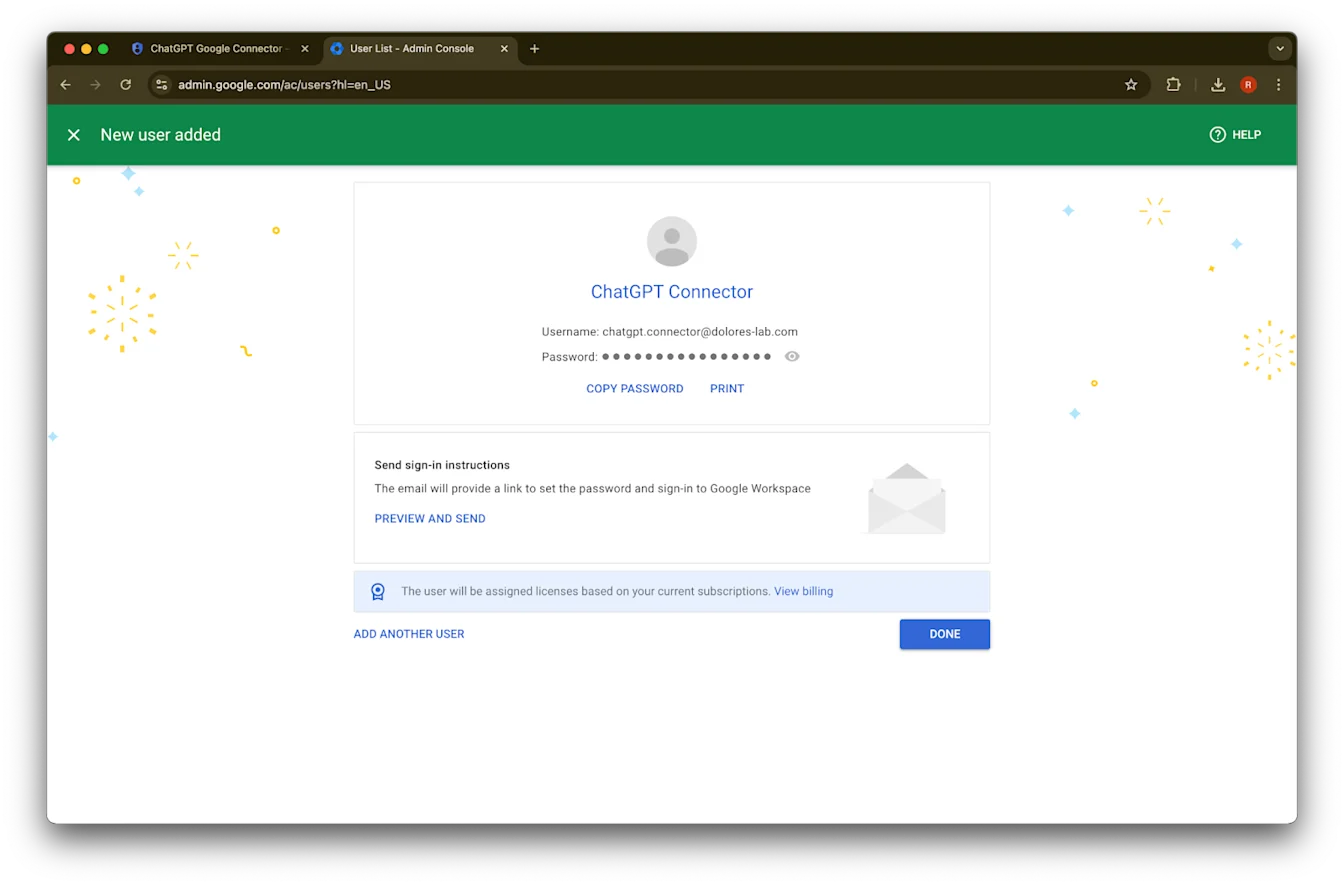
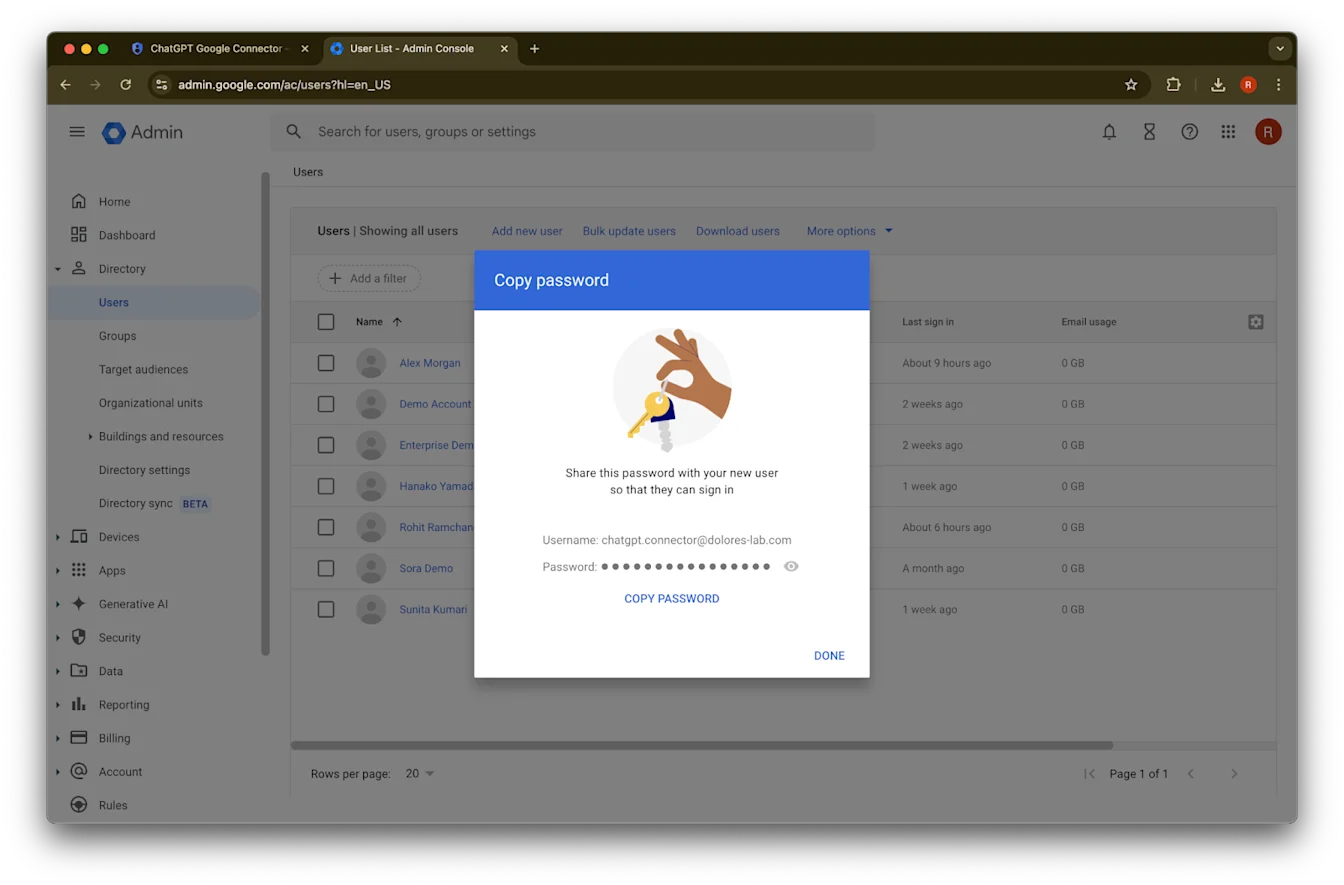
ക്ലിക്ക് ചെയ്യുക.(Optional) ഈ credentials രേഖപ്പെടുത്തി വയ്ക്കുക. ChatGPT-ന് ഈ credentials ആവശ്യമില്ല.
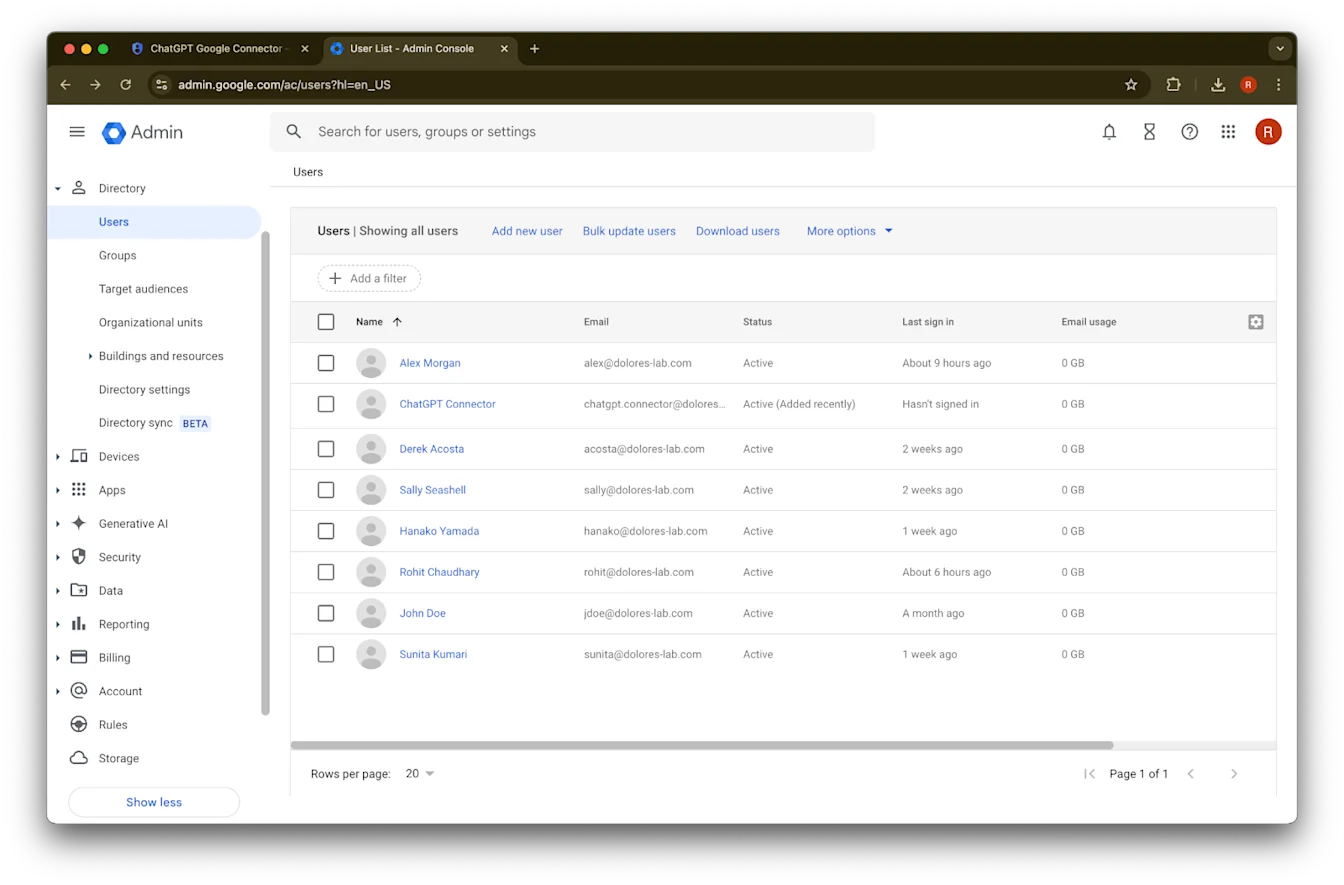
Done ക്ലിക്ക് ചെയ്യുക.
നിങ്ങൾ ഇപ്പോൾ സൃഷ്ടിച്ച account ൽ ക്ലിക്ക് ചെയ്യുക. ലിസ്റ്റിൽ കാണുന്നില്ലെങ്കിൽ പേജ് refresh ചെയ്യുക, അല്ലെങ്കിൽ cache, cookies എന്നിവ നീക്കി വീണ്ടും ശ്രമിക്കുക.
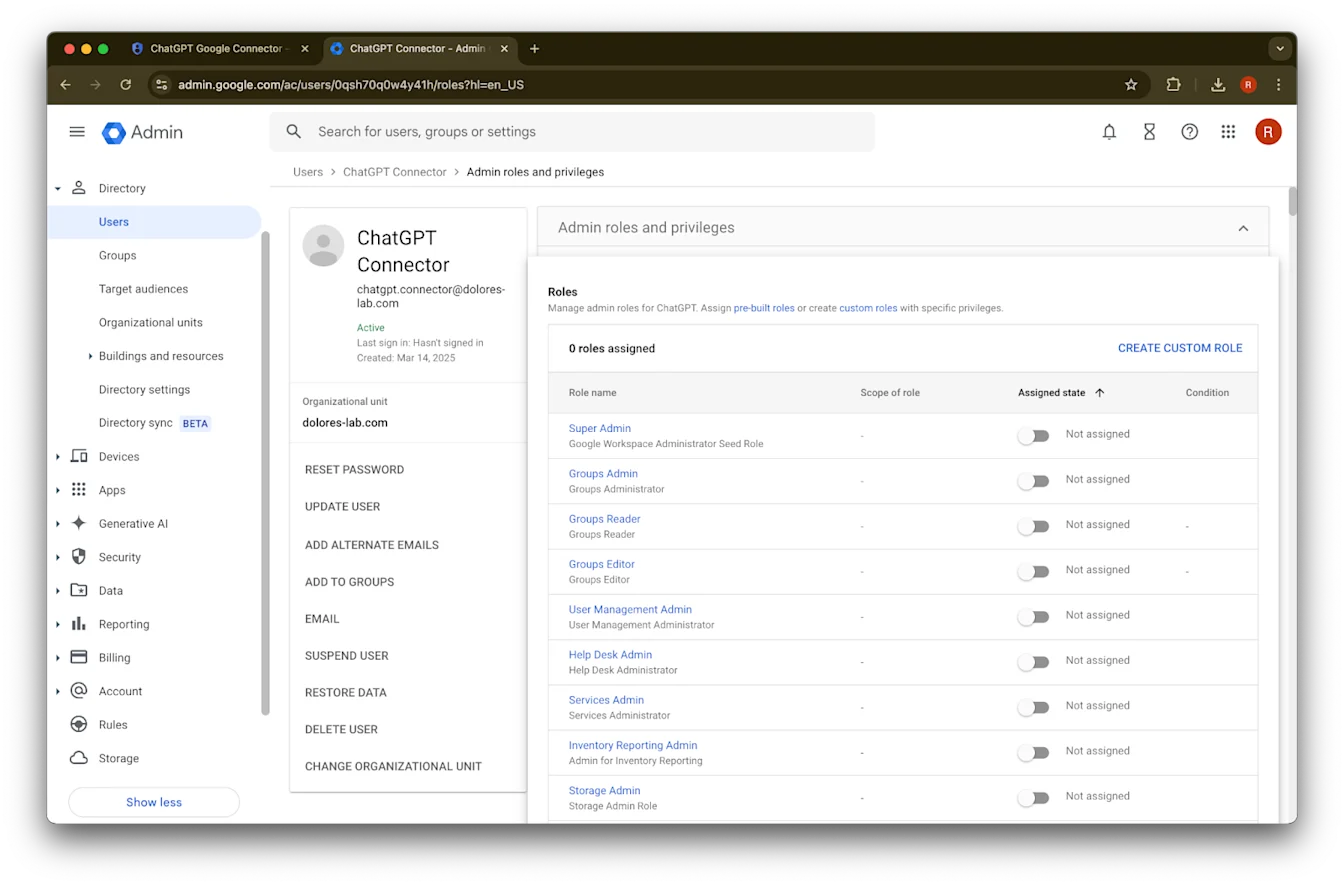
assign roles ൽ ക്ലിക്ക് ചെയ്യുക.
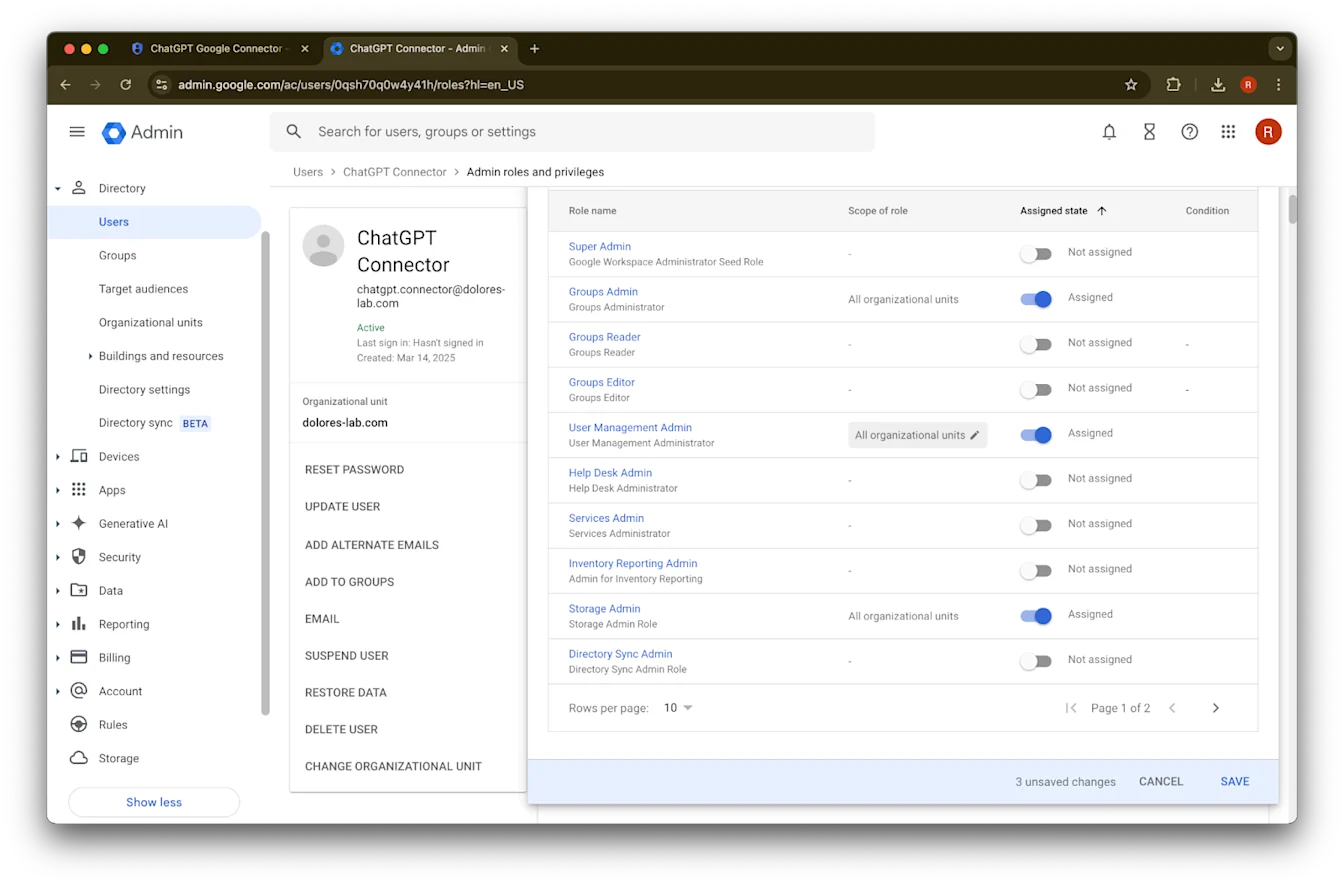
Groups Reader, User Management Admin, എന്നിവയും Storage Admin roles-ഉം ഓൺ ചെയ്യുക.
താഴേക്ക് സ്ക്രോൾ ചെയ്ത് Save. ക്ലിക്ക് ചെയ്യുക. Admin account ഇപ്പോൾ വിജയകരമായി സൃഷ്ടിക്കുകയും കോൺഫിഗർ ചെയ്യുകയും ചെയ്തു.
ChatGPT അഡ്മിൻ കോൺസോളിൽ സജ്ജീകരണം പൂർത്തിയാക്കൽ
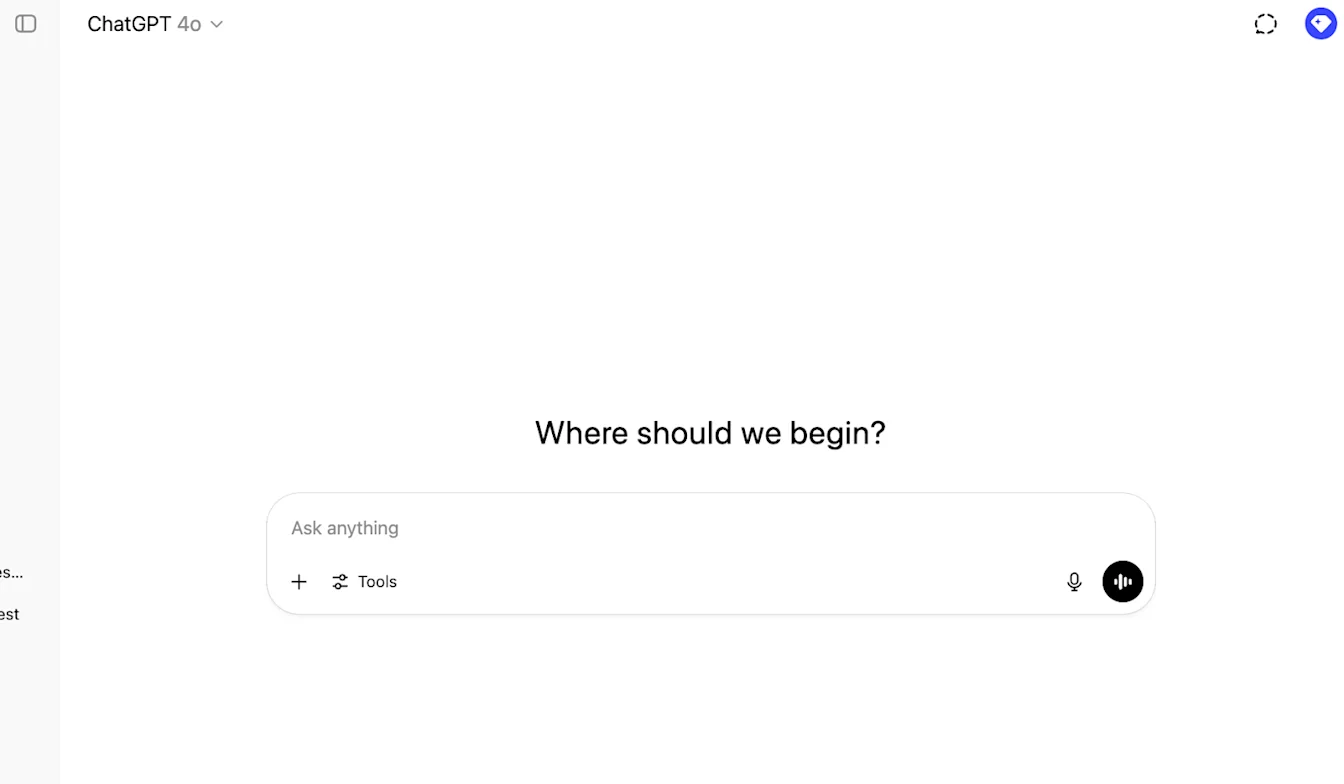
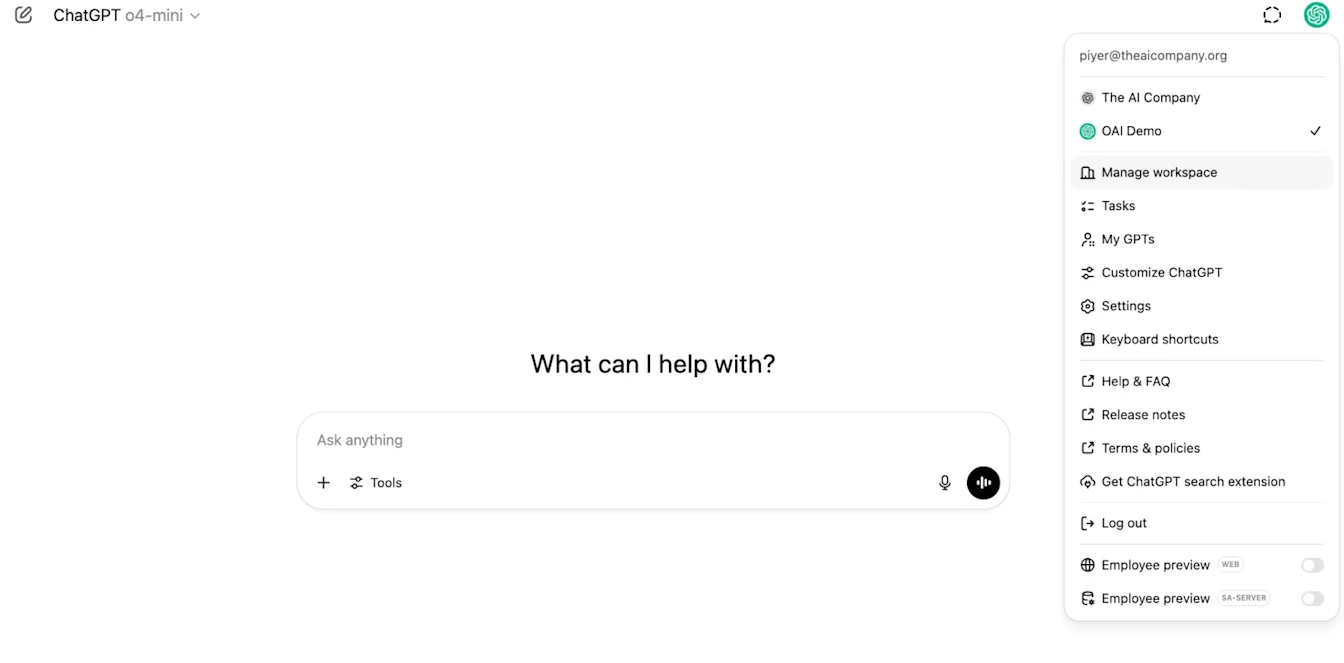
ChatGPT-ലേക്ക് പോയി പേജിന്റെ മുകളിൽ വലത് കോണിലുള്ള പ്രൊഫൈൽ ഐക്കണിൽ ക്ലിക്ക് ചെയ്യുക.
Manage workspace
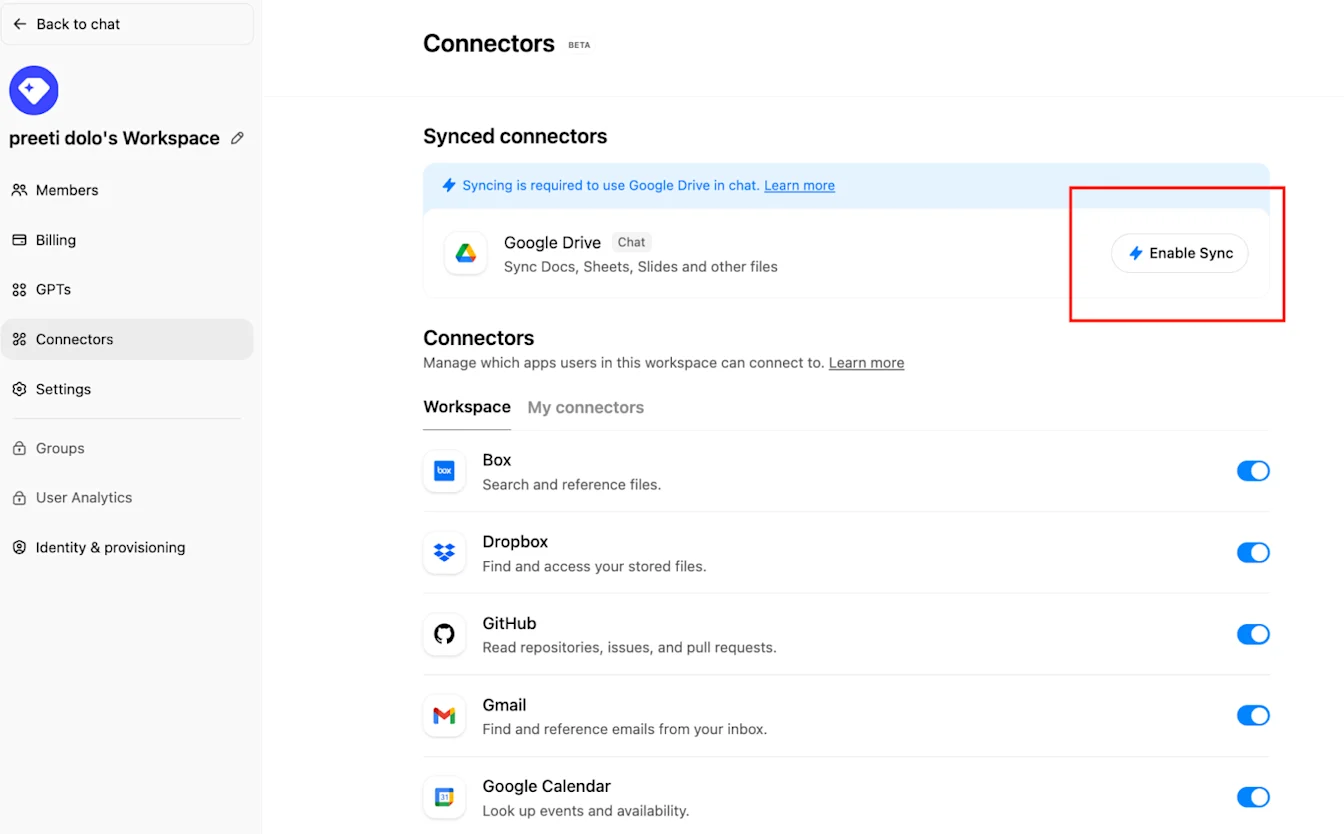
ൽ ക്ലിക്ക് ചെയ്യുക.Connections ൽ ക്ലിക്ക് ചെയ്യുക, തുടർന്ന് ‘Synced connectors’ ന്റെ കീഴിൽ → Enable Sync
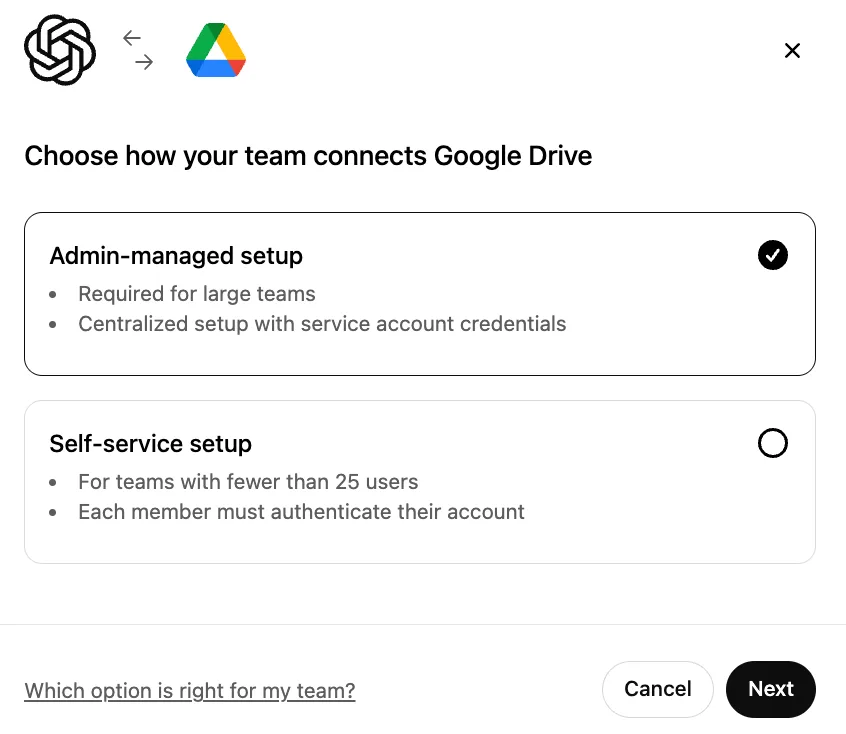
Admin-managed തിരഞ്ഞെടുക്കപ്പെട്ടിട്ടുണ്ടെന്ന് ഉറപ്പാക്കി Next ൽ ക്ലിക്ക് ചെയ്യുക.
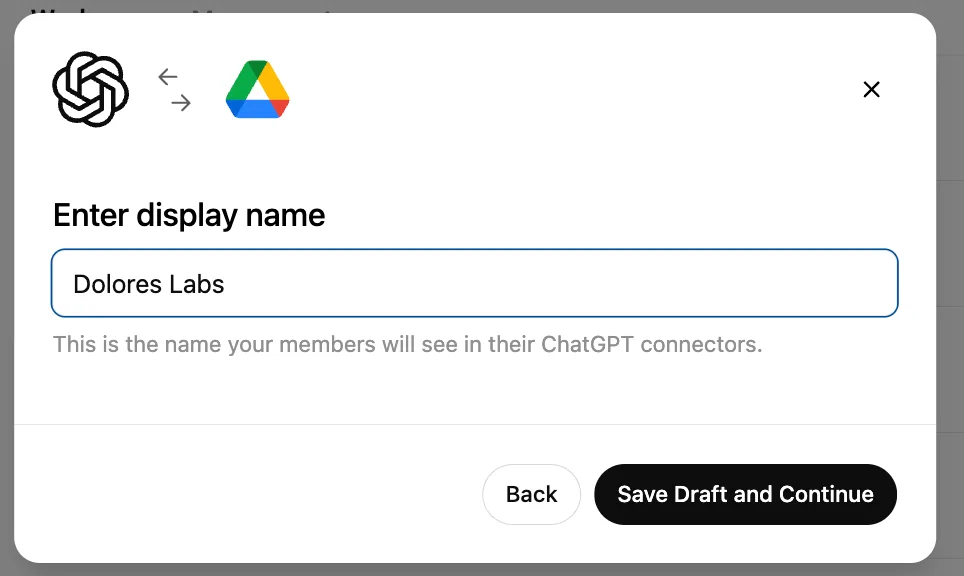
ഒരു display name നൽകുക. നിങ്ങളുടെ Google Workspace-ന്റെ പേര് ഉപയോഗിക്കാൻ ഞങ്ങൾ ശുപാർശ ചെയ്യുന്നു.
നിലവിൽ നിങ്ങളുടെ connection-ന്റെ പേര് മാറ്റുന്നത് ഞങ്ങൾ പിന്തുണയ്ക്കുന്നില്ലെന്നു ദയവായി ശ്രദ്ധിക്കുക.Save Draft and Continue ൽ ക്ലിക്ക് ചെയ്യുക.
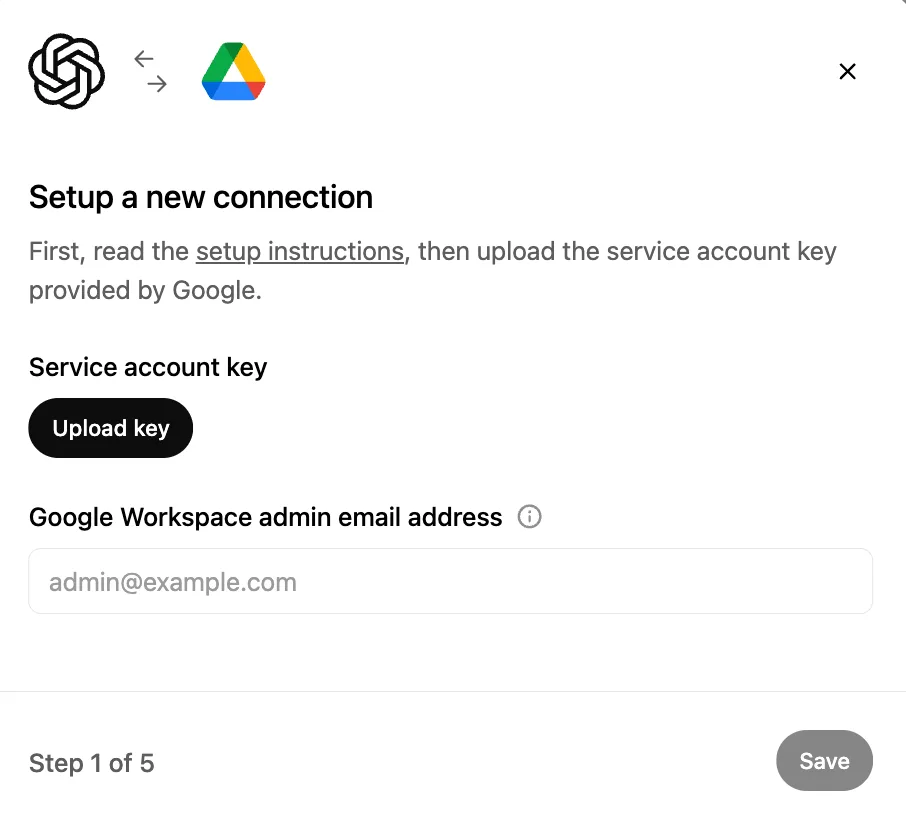
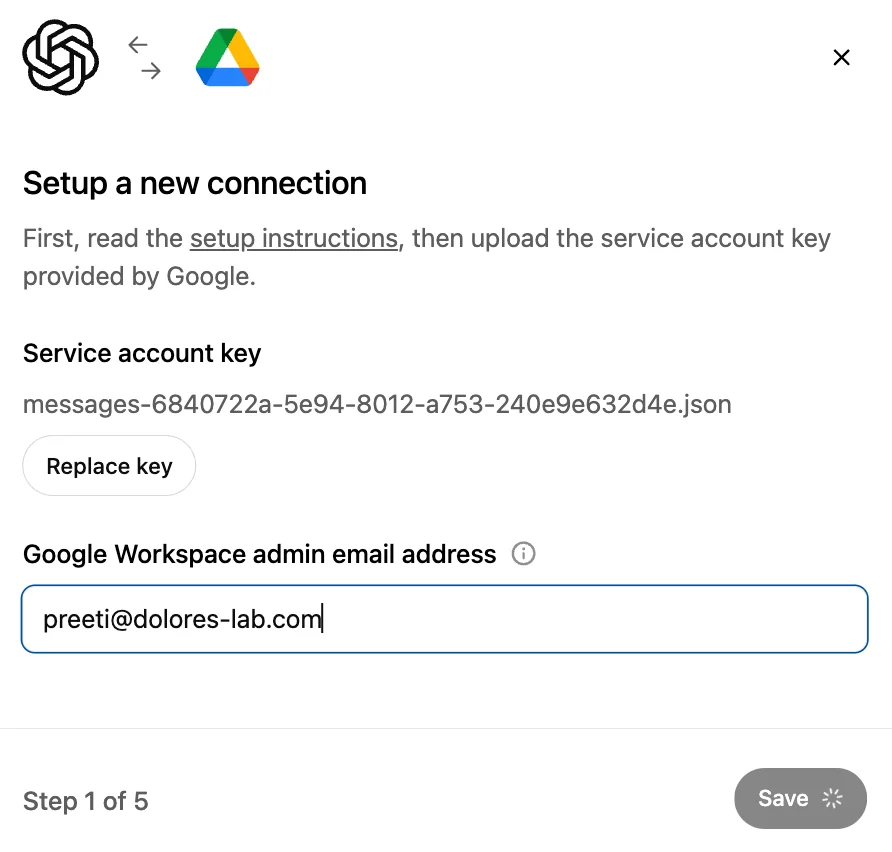
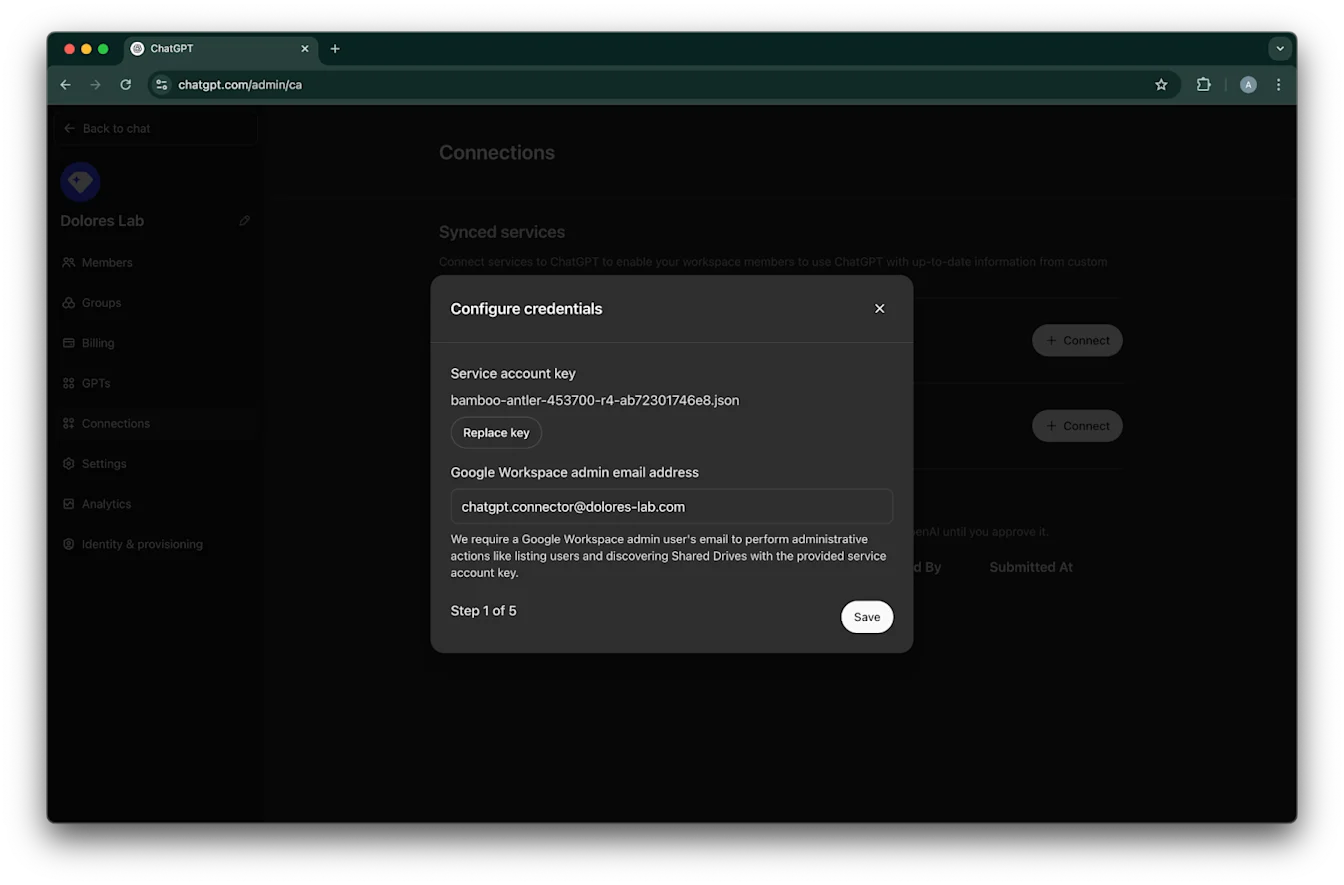
Upload key ൽ ക്ലിക്ക് ചെയ്യുക. JSON ഫയൽ തിരഞ്ഞെടുക്കുക; മുകളിൽ service account സജ്ജീകരണത്തിന്റെ ഭാഗമായി നിങ്ങൾ ഡൗൺലോഡ് ചെയ്ത കീ അതാണ്. ഈ കീ ശരിയാണെന്ന് ഉറപ്പാക്കുക.
admin email address നൽകുക. ഇത് നിങ്ങൾ മുമ്പ് സൃഷ്ടിച്ച അഡ്മിൻ അക്കൗണ്ടാണ്.
Save. ൽ ക്ലിക്ക് ചെയ്യുക.
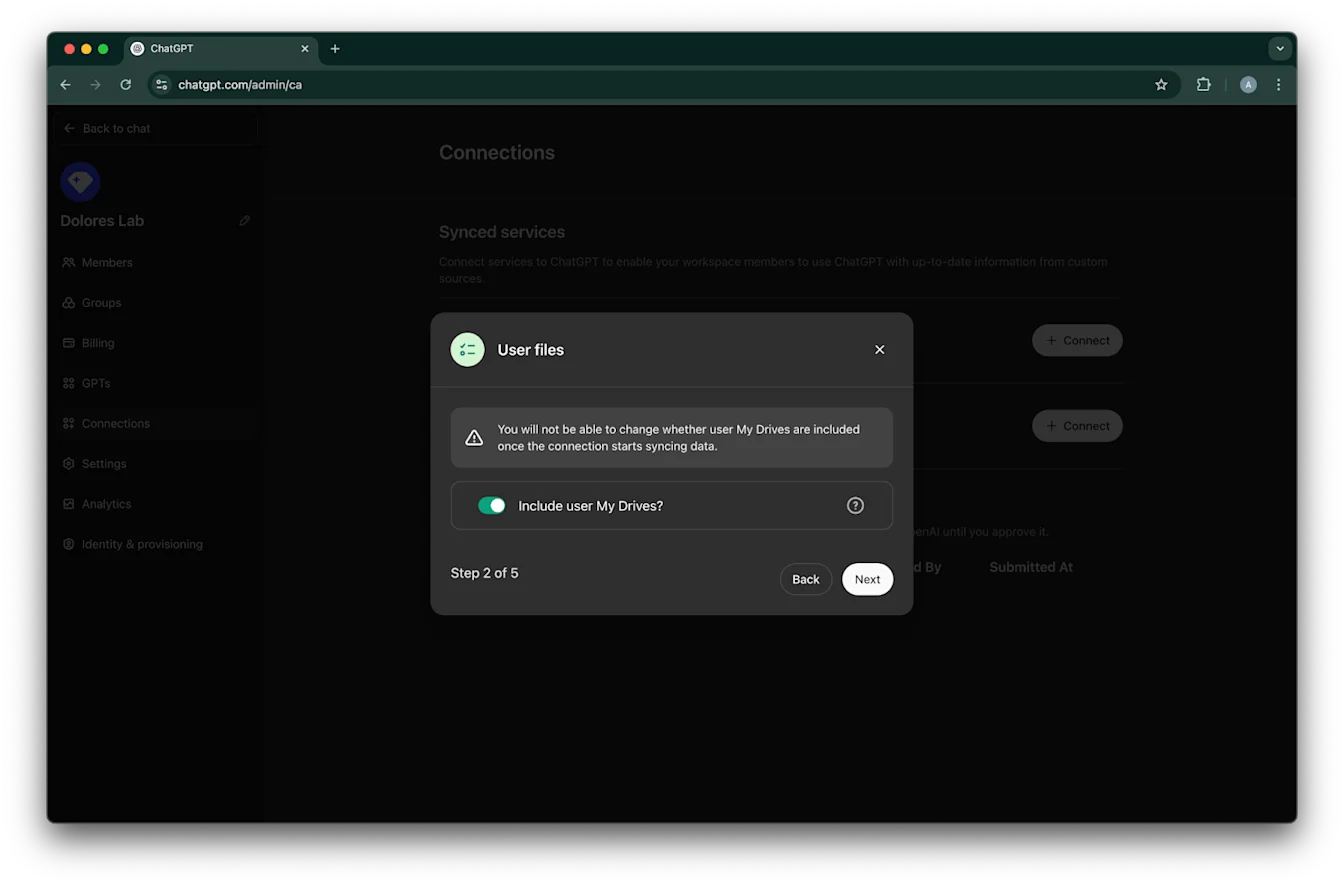
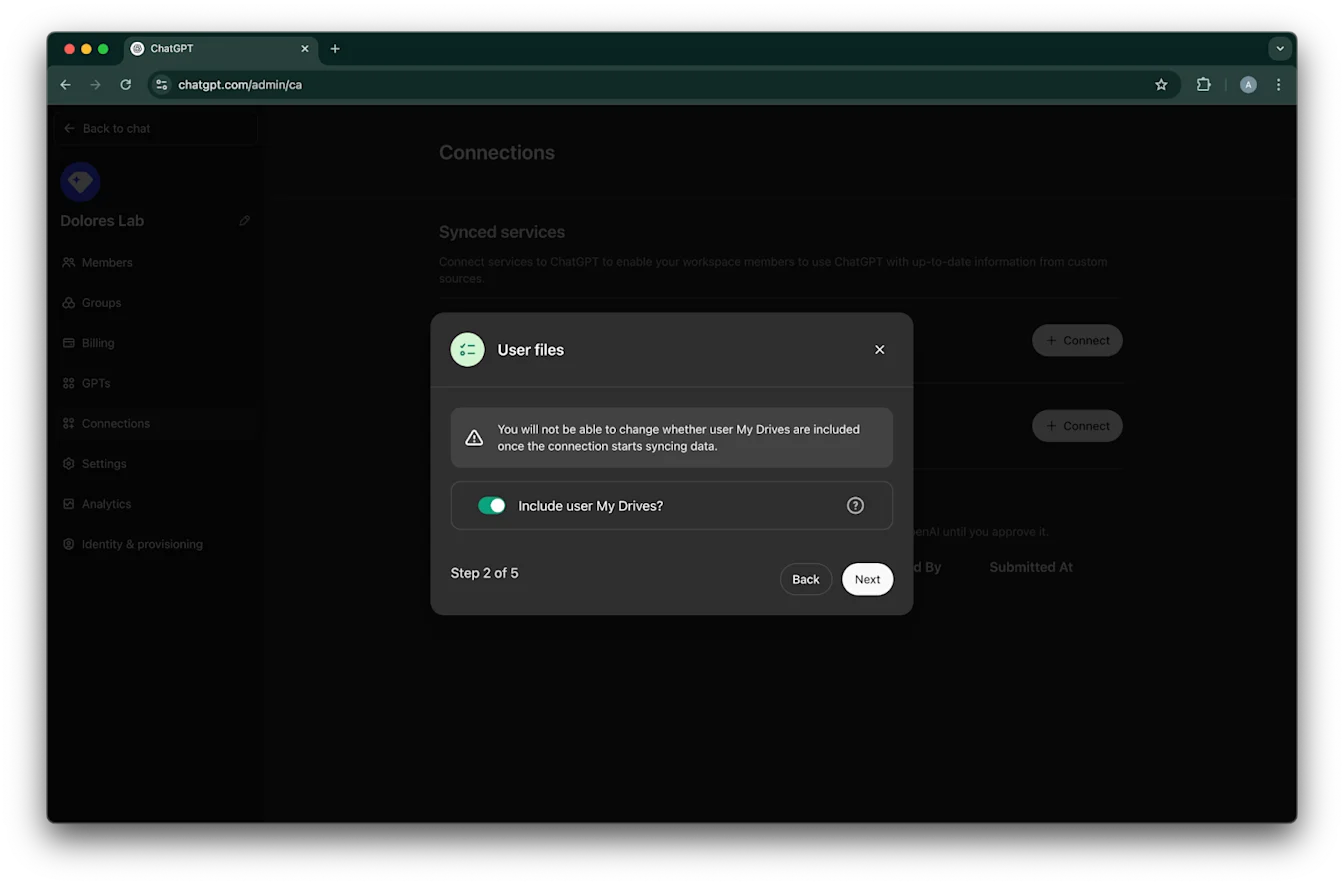
നിങ്ങളുടെ എല്ലാ ഉപയോക്താക്കളുടെയും My Drives-ിലുള്ള ഫയലുകൾ ഉൾപ്പെടുത്തണോ എന്ന് തിരഞ്ഞെടുക്കുക.
Next ൽ ക്ലിക്ക് ചെയ്യുക.
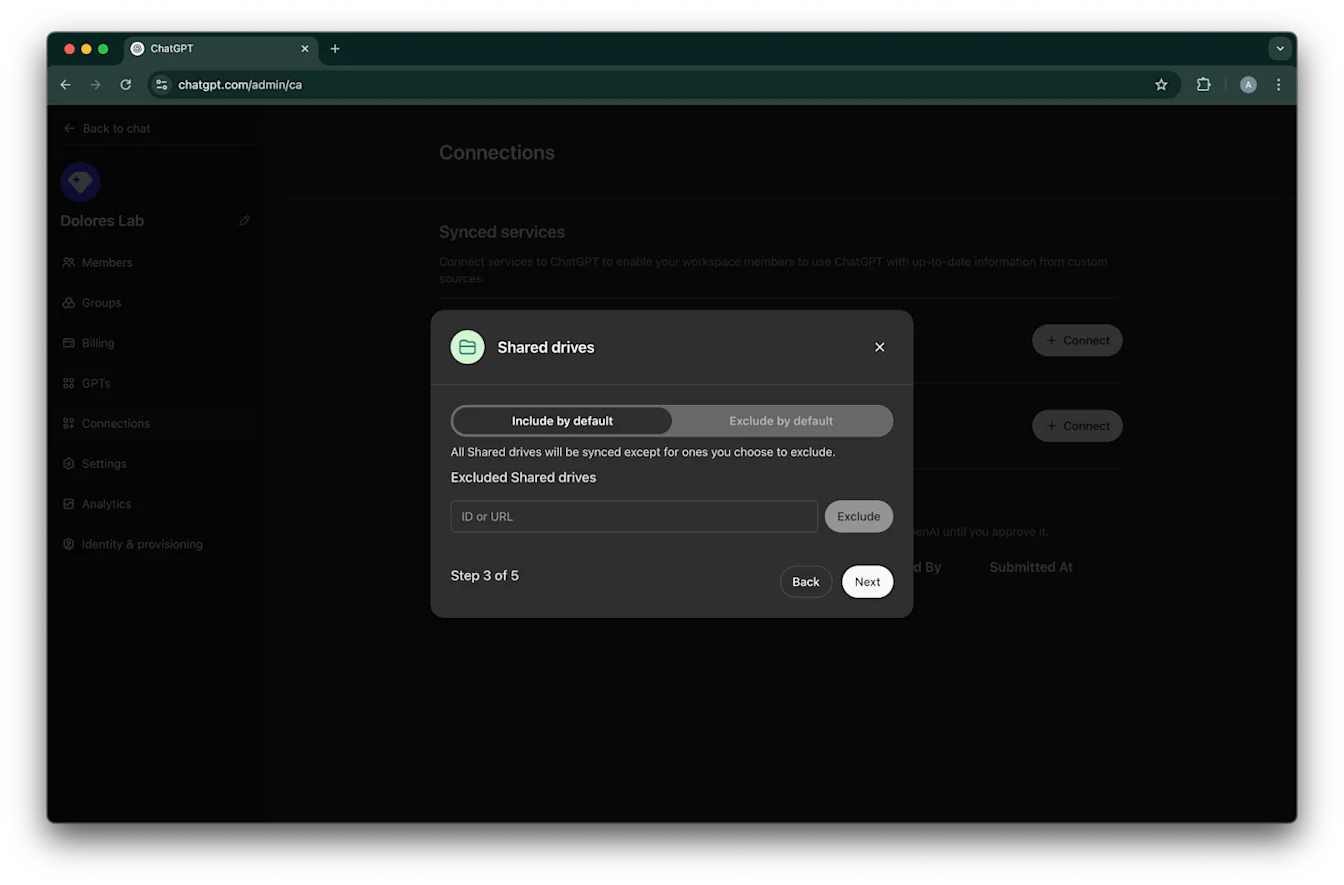
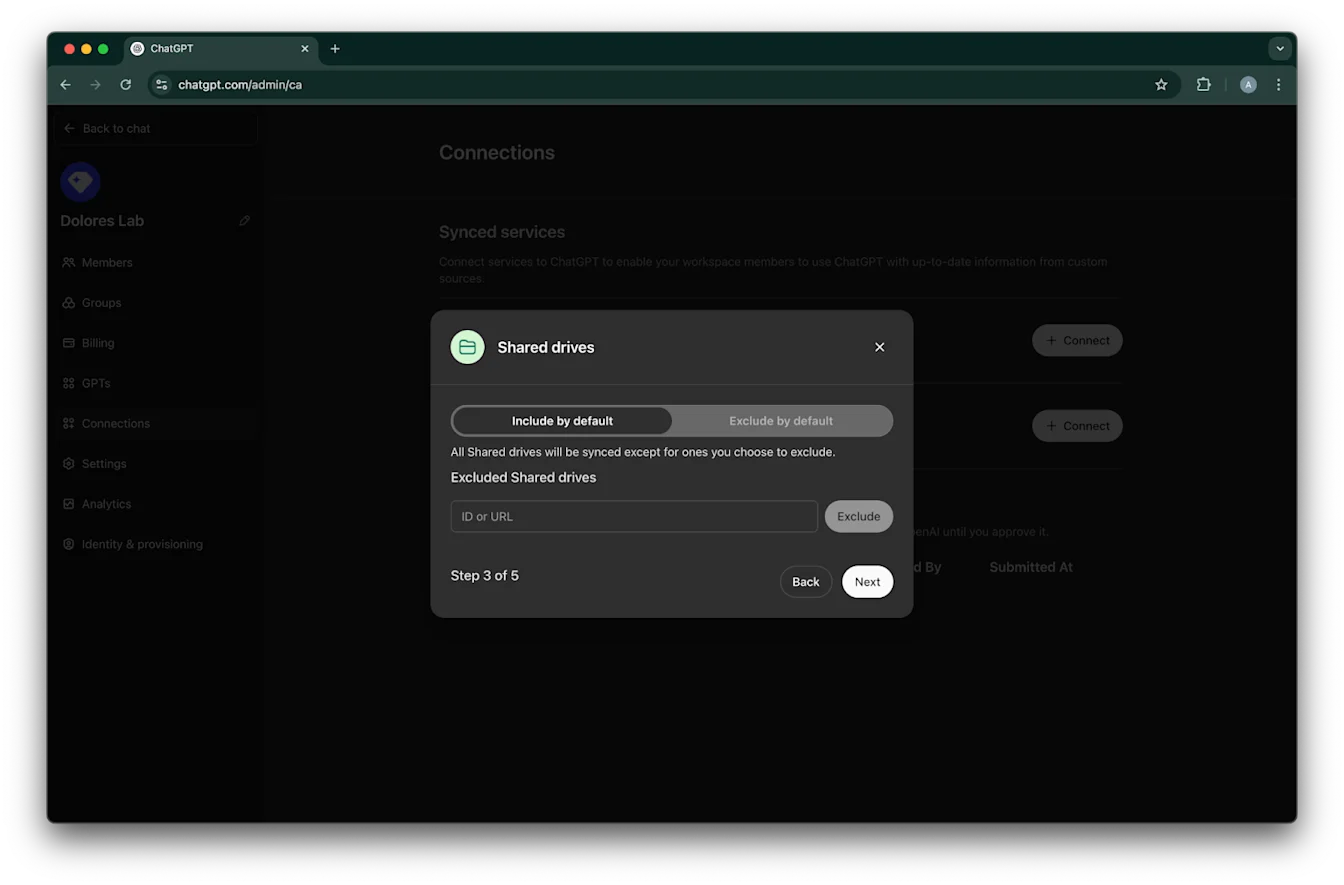
shared drives എങ്ങനെ കൈകാര്യം ചെയ്യണമെന്ന് തിരഞ്ഞെടുക്കുക. താഴെപ്പറയുന്ന മൂന്ന് സാഹചര്യങ്ങൾ ഞങ്ങൾ പിന്തുണയ്ക്കുന്നു.
എല്ലാ shared drives-ഉം ഉൾപ്പെടുത്തണമെങ്കിൽ Include by default തിരഞ്ഞെടുക്കുക, കൂടാതെ ഒഴിവാക്കേണ്ട shared drive ID-കൾ ചേർക്കേണ്ടതില്ല.
മിക്ക shared drives-ഉം ഉൾപ്പെടുത്തണമെങ്കിൽ Include by default തിരഞ്ഞെടുക്കുക, കൂടാതെ ഒഴിവാക്കേണ്ട shared drives-ന്റെ ID-കൾ ചേർക്കുക.
മിക്ക shared drives-ഉം ഒഴിവാക്കണമെങ്കിൽ Exclude by default തിരഞ്ഞെടുക്കുക, കൂടാതെ ഉൾപ്പെടുത്തേണ്ട shared drives-ന്റെ ID-കൾ ചേർക്കുക.
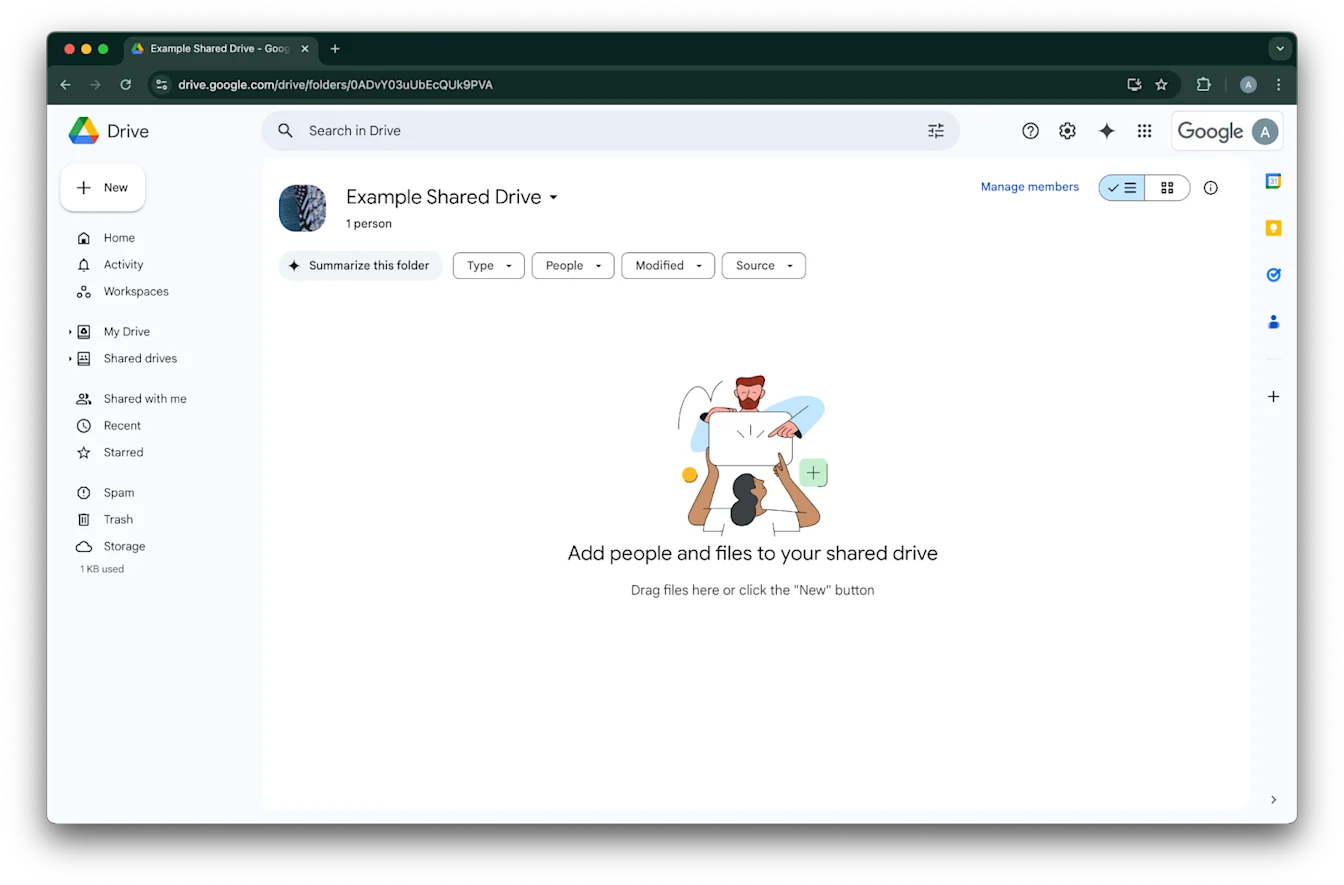
ഒരു shared drive-ന്റെ ID കണ്ടെത്താൻ, അത് വെബ് ബ്രൗസറിൽ തുറക്കുക. URL-ന്റെ അവസാന ഭാഗം shared drive ID ആണ്.
താഴെക്കൊടുത്തിരിക്കുന്ന ഉദാഹരണത്തിൽ അത് `0ADvY03uUbEcQUk9PVA`' ആണ്.Next ൽ ക്ലിക്ക് ചെയ്യുക.
Google Drive connection-ലേക്ക് ആർക്കെല്ലാം ആക്സസ് ലഭിക്കണമെന്ന് തിരഞ്ഞെടുക്കുക. ChatGPT വർക്ക്സ്പേസിലെ Admins only തിരഞ്ഞെടുക്കാനോ, അല്ലെങ്കിൽ എല്ലാവർക്കുമായി ഇത് സജ്ജമാക്കാനോ കഴിയും. എല്ലാവർക്കുമായി സജ്ജമാക്കിയാൽ, വർക്ക്സ്പേസിലേക്ക് ചേർക്കുന്ന പുതിയ ഉപയോക്താക്കളും സ്വമേധയാ ഉൾപ്പെടും.
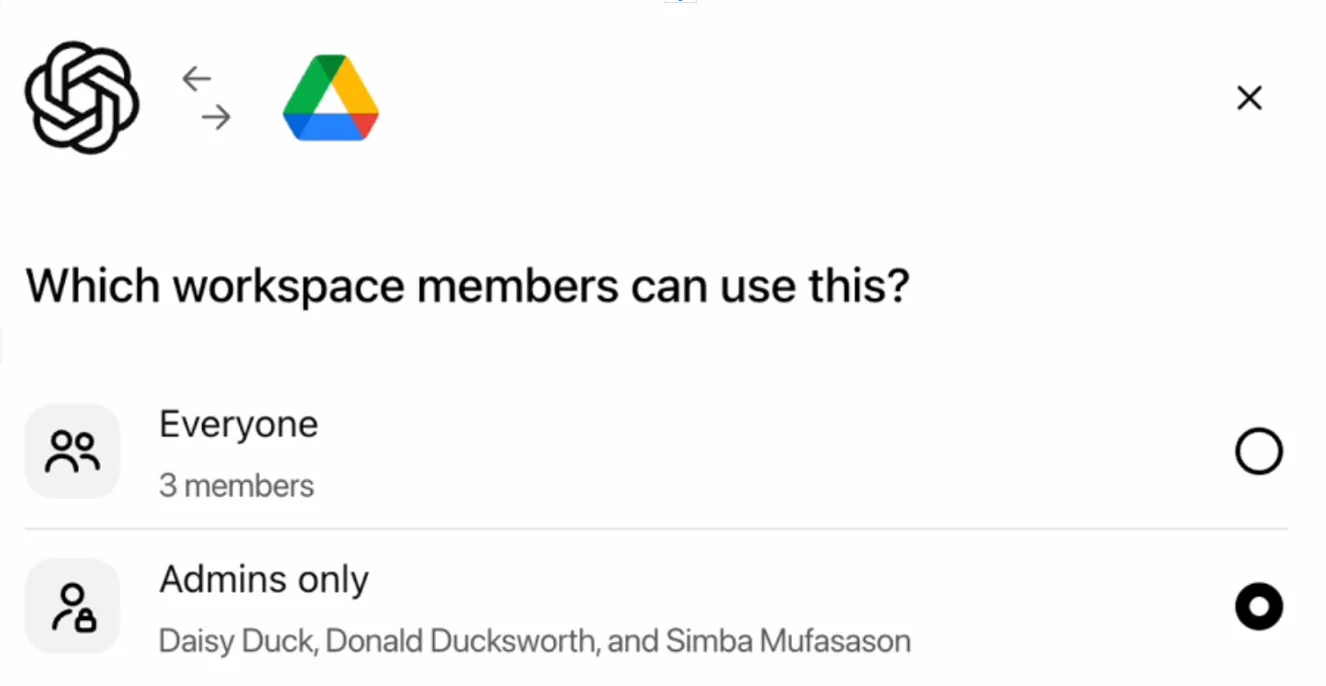
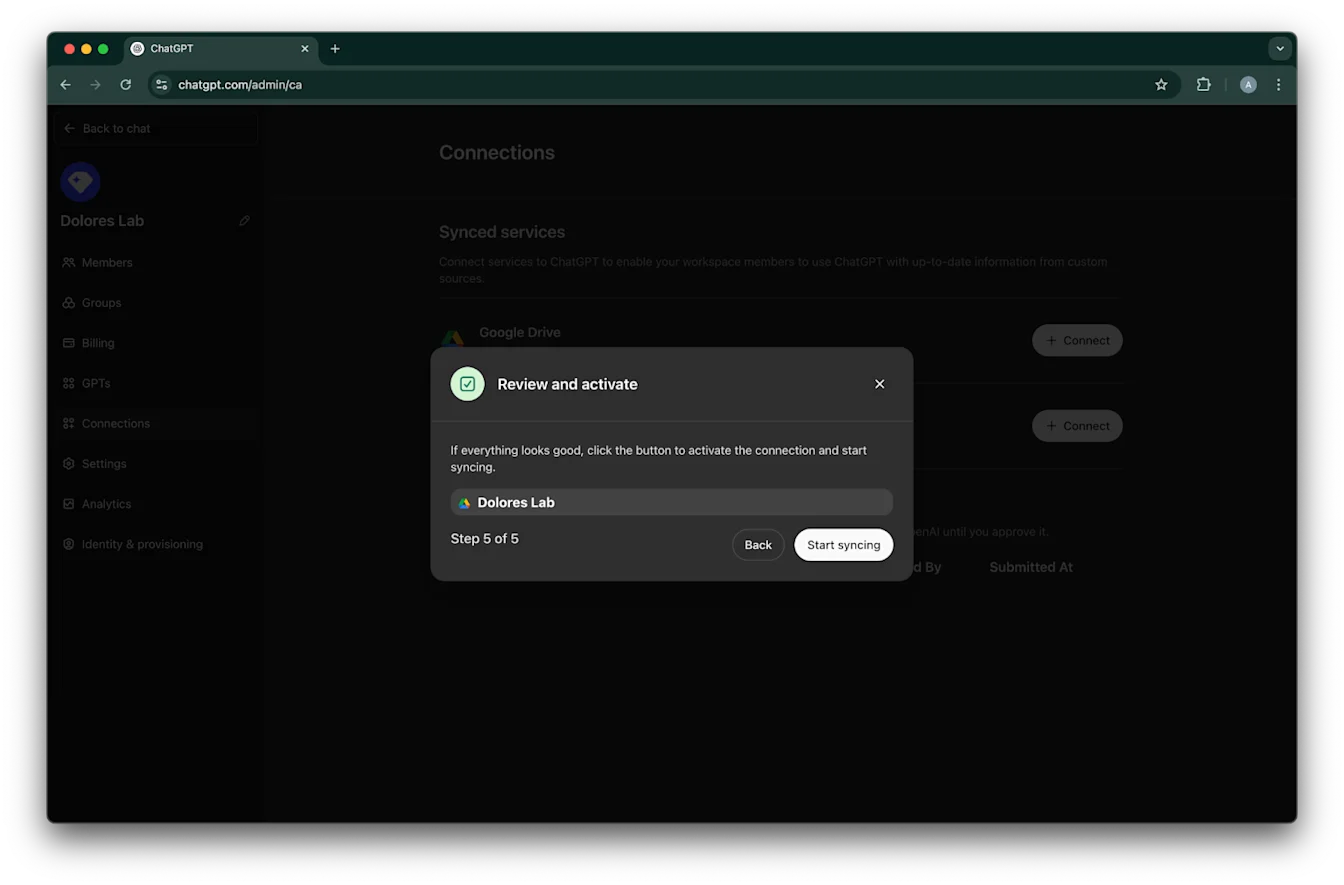
Start syncing ൽ ക്ലിക്ക് ചെയ്യുക.
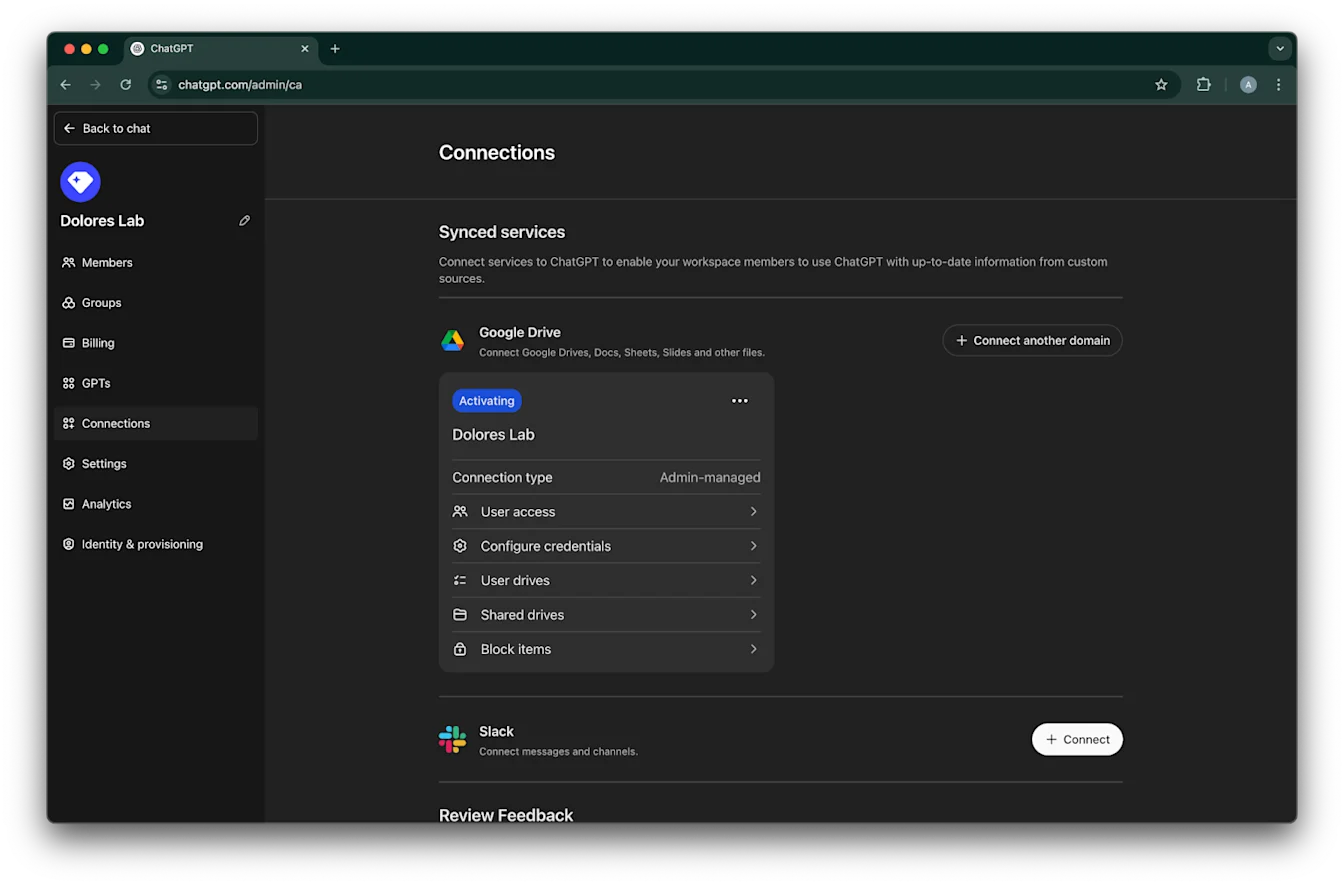
നിങ്ങളുടെ Google Drive connection ഇപ്പോൾ വിജയകരമായി സൃഷ്ടിക്കപ്പെട്ടു.
ഇത് ഉടൻ sync ചെയ്യാൻ തുടങ്ങുമെങ്കിലും, നിങ്ങളുടെ ക്രമീകരണങ്ങളെ അടിസ്ഥാനപ്പെടുത്തി എത്ര ഫയലുകൾ ഉൾപ്പെടുത്തിയിട്ടുണ്ടെന്നതിനെ ആശ്രയിച്ച് ഇത് പൂർത്തിയാകാൻ മണിക്കൂറുകളിൽ നിന്ന് ദിവസങ്ങൾ വരെ എടുക്കാം എന്ന് ദയവായി ശ്രദ്ധിക്കുക.
കഴിഞ്ഞ 30 ദിവസത്തിനുള്ളിൽ ചേർത്തതോ തിരുത്തിയതോ ആയ ഫയലുകൾ sync ചെയ്തു തീർന്നാൽ, നിങ്ങൾ ഇത് സജ്ജമാക്കിയ ഉപയോക്താക്കൾക്ക് connector ലഭ്യമാകും.
Service account key creation സജ്ജമാക്കൽ
താഴെ പറയുന്ന പിശക് ലഭിക്കുകയാണെങ്കിൽ, ഈ പ്രത്യേക project-ന് service account creation സജ്ജമാക്കേണ്ടതുണ്ടാകും.
> നിങ്ങളുടെ organization-ൽ ‘iam.disableServiceAccountKeyCreation’ എന്ന organization policy constraint enforced ചെയ്തിരിക്കുന്നു.
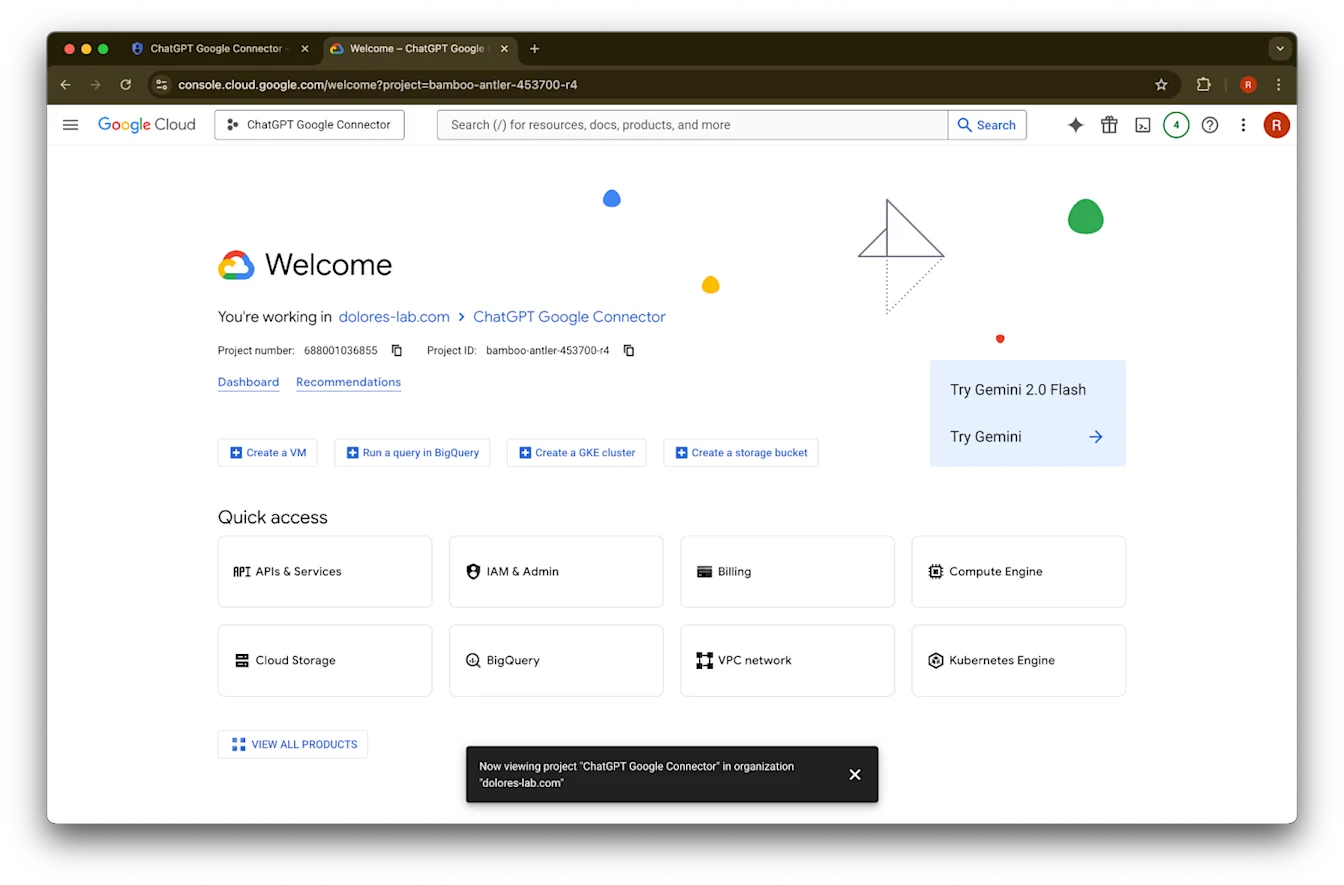
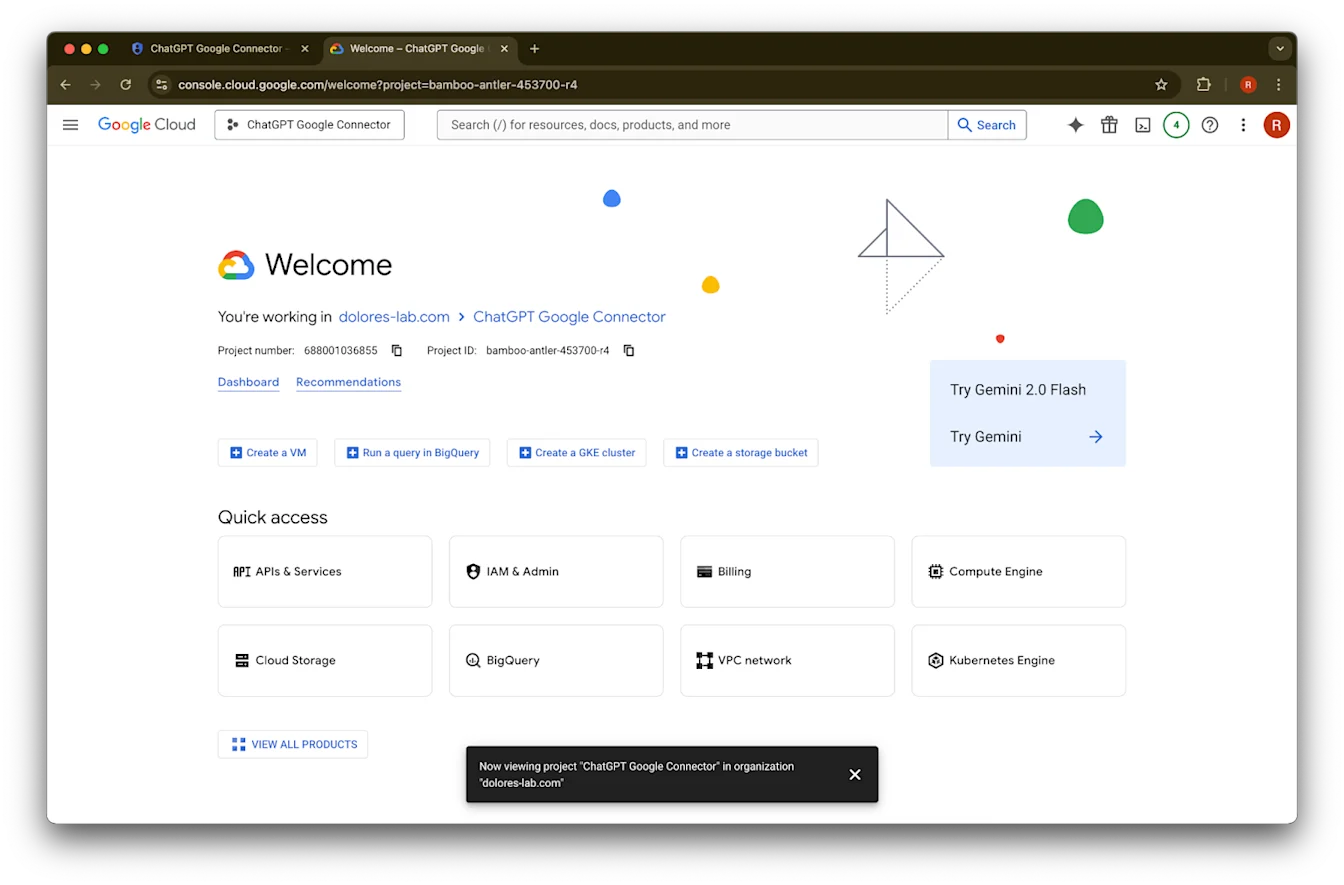
ഒരു പുതിയ tab തുറന്ന് console.cloud.google.com ലേക്ക് പോകുക. തിരഞ്ഞെടുക്കപ്പെട്ട project നിങ്ങൾ ഇതിനകം തിരഞ്ഞെടുത്തതുതന്നെയാണെന്ന് ഉറപ്പാക്കുക.
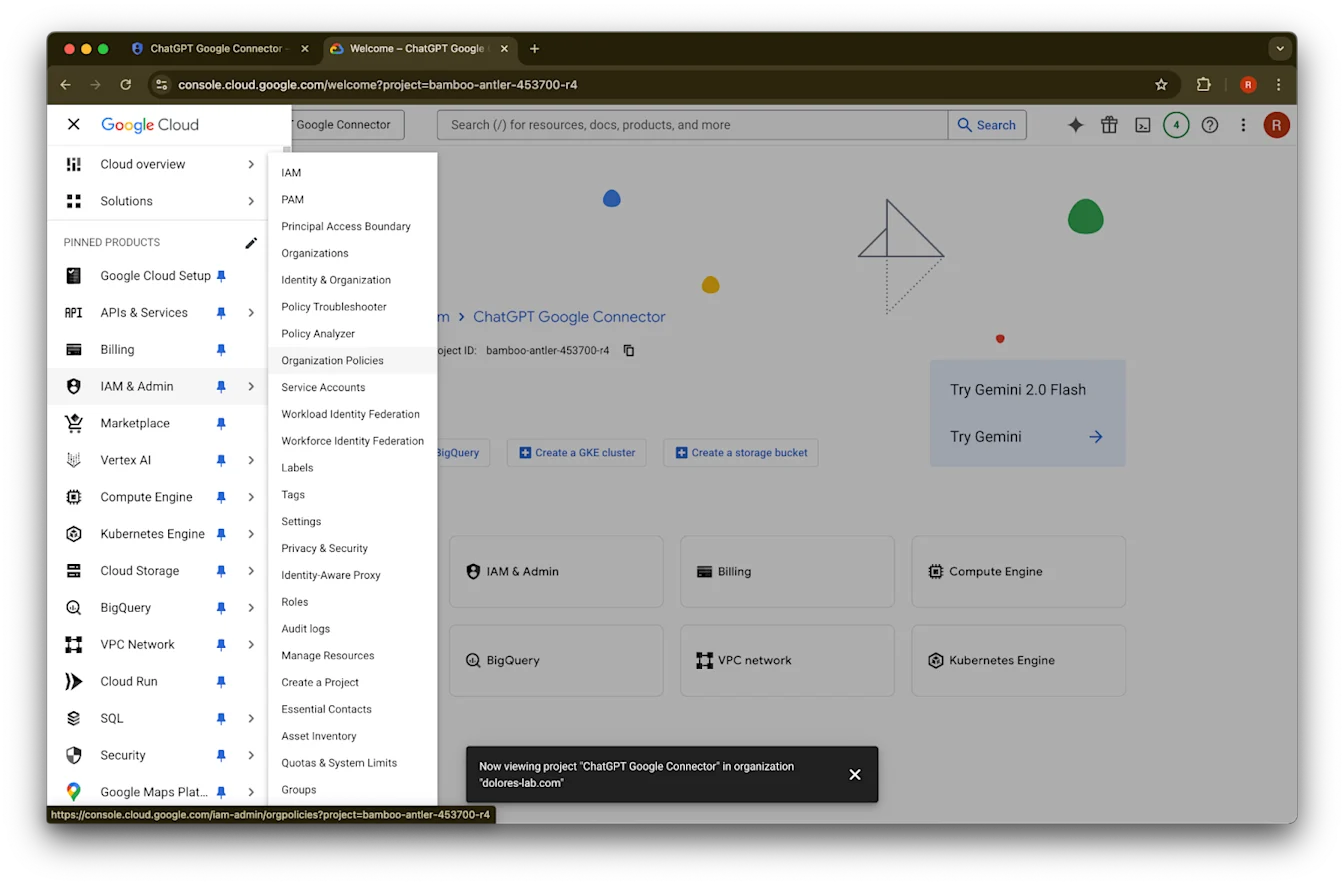
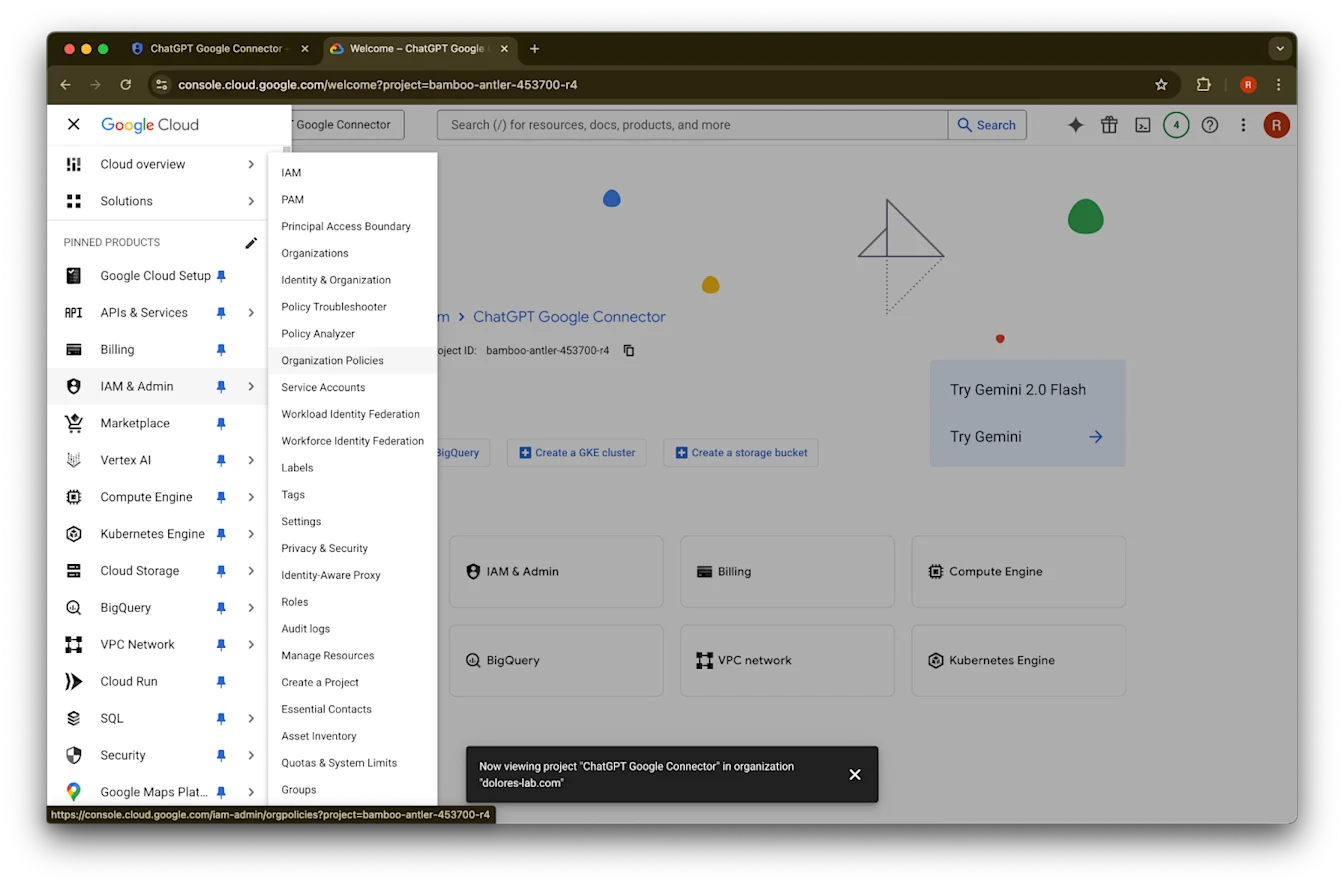
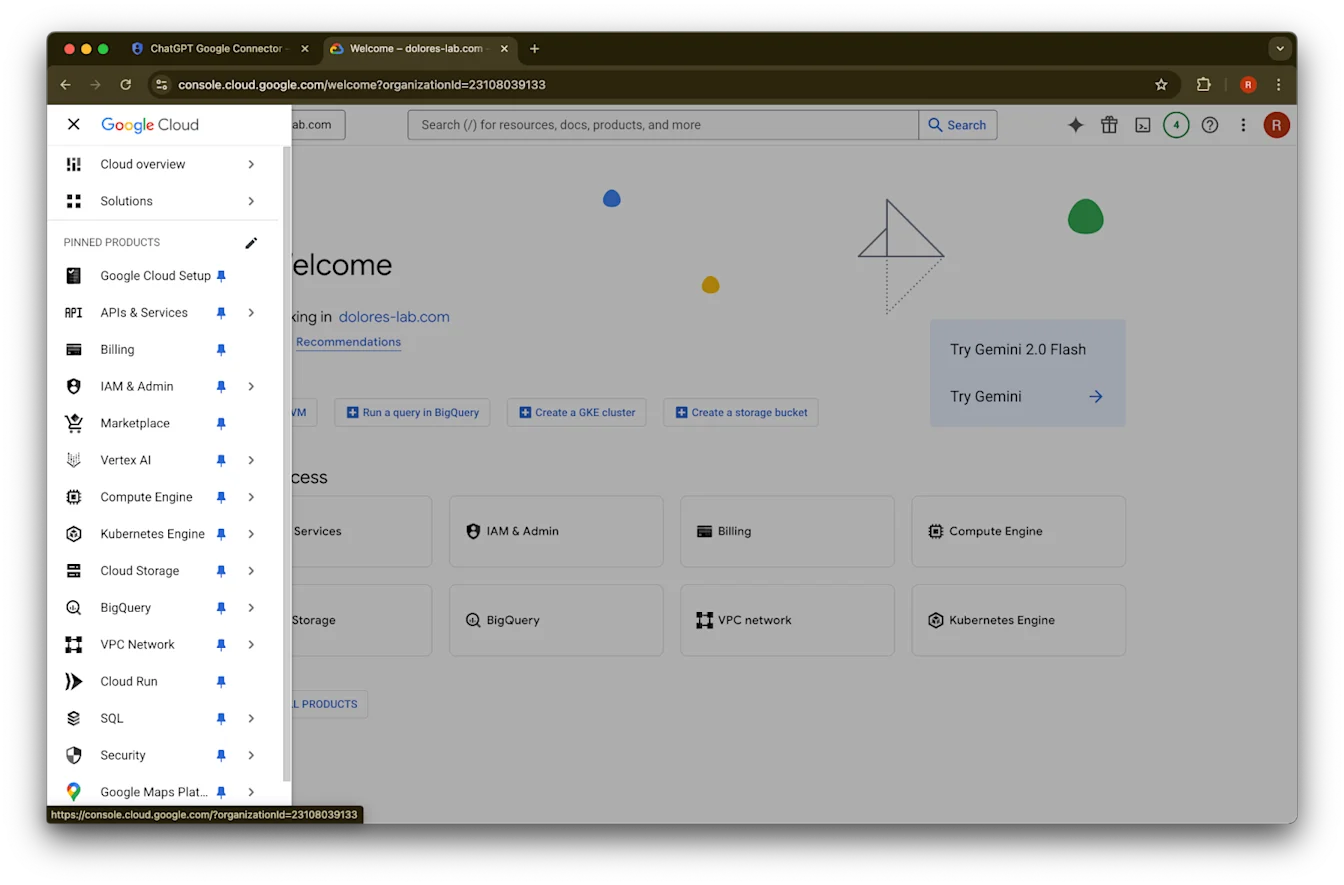
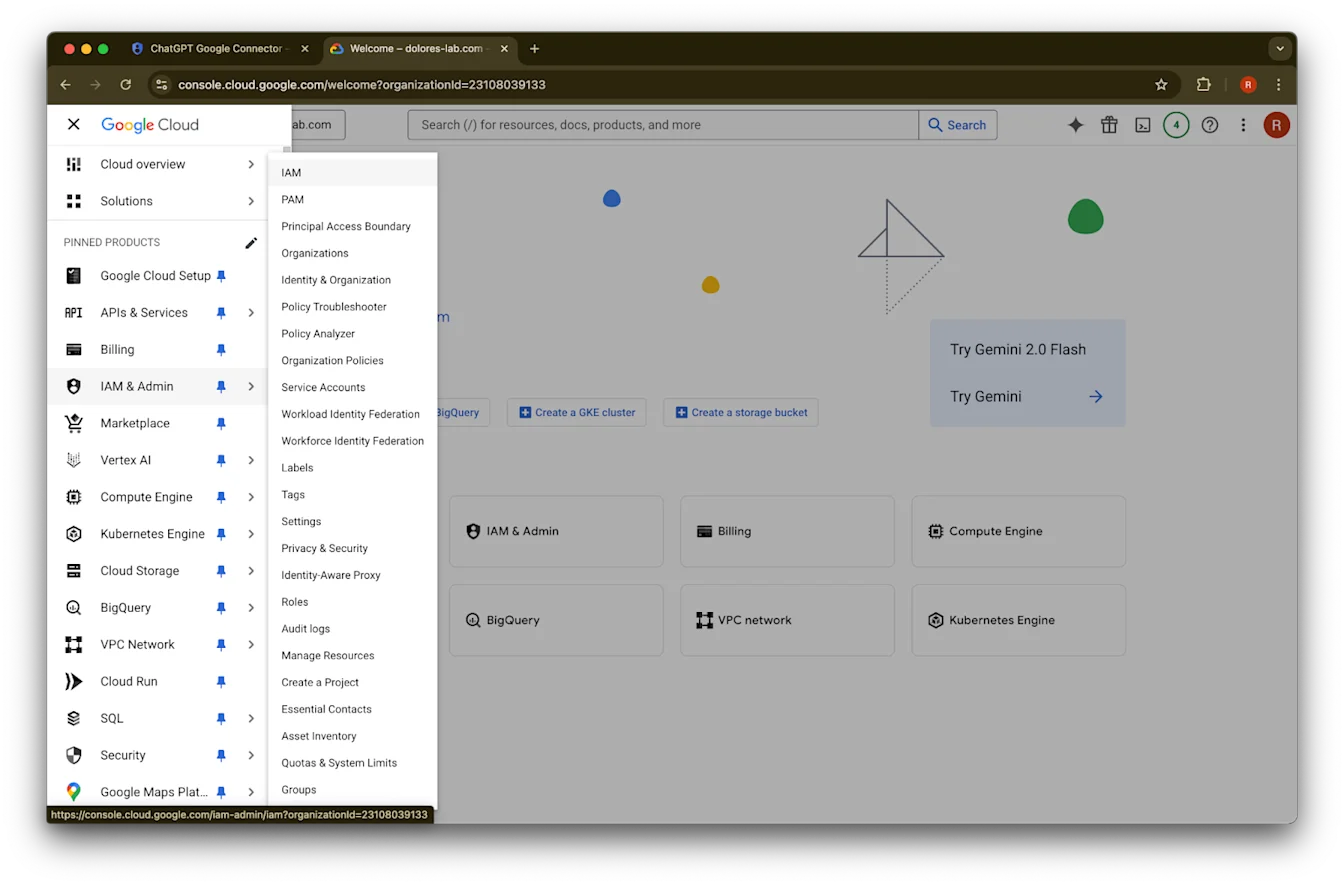
മുകളിൽ ഇടത് കോണിലുള്ള menu icon ൽ ക്ലിക്ക് ചെയ്യുക.IAM & Admin മുകളിൽ hover ചെയ്യുക.
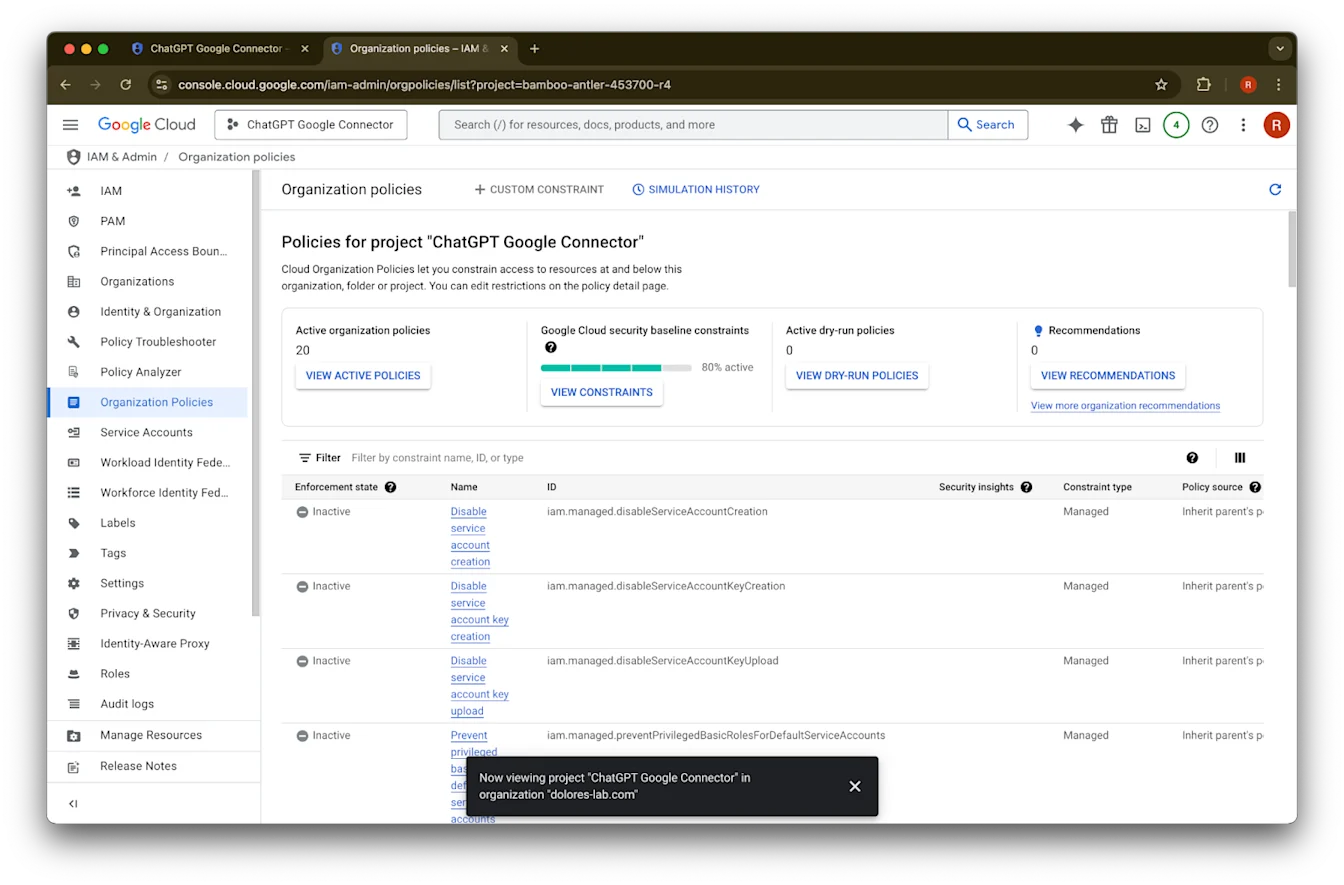
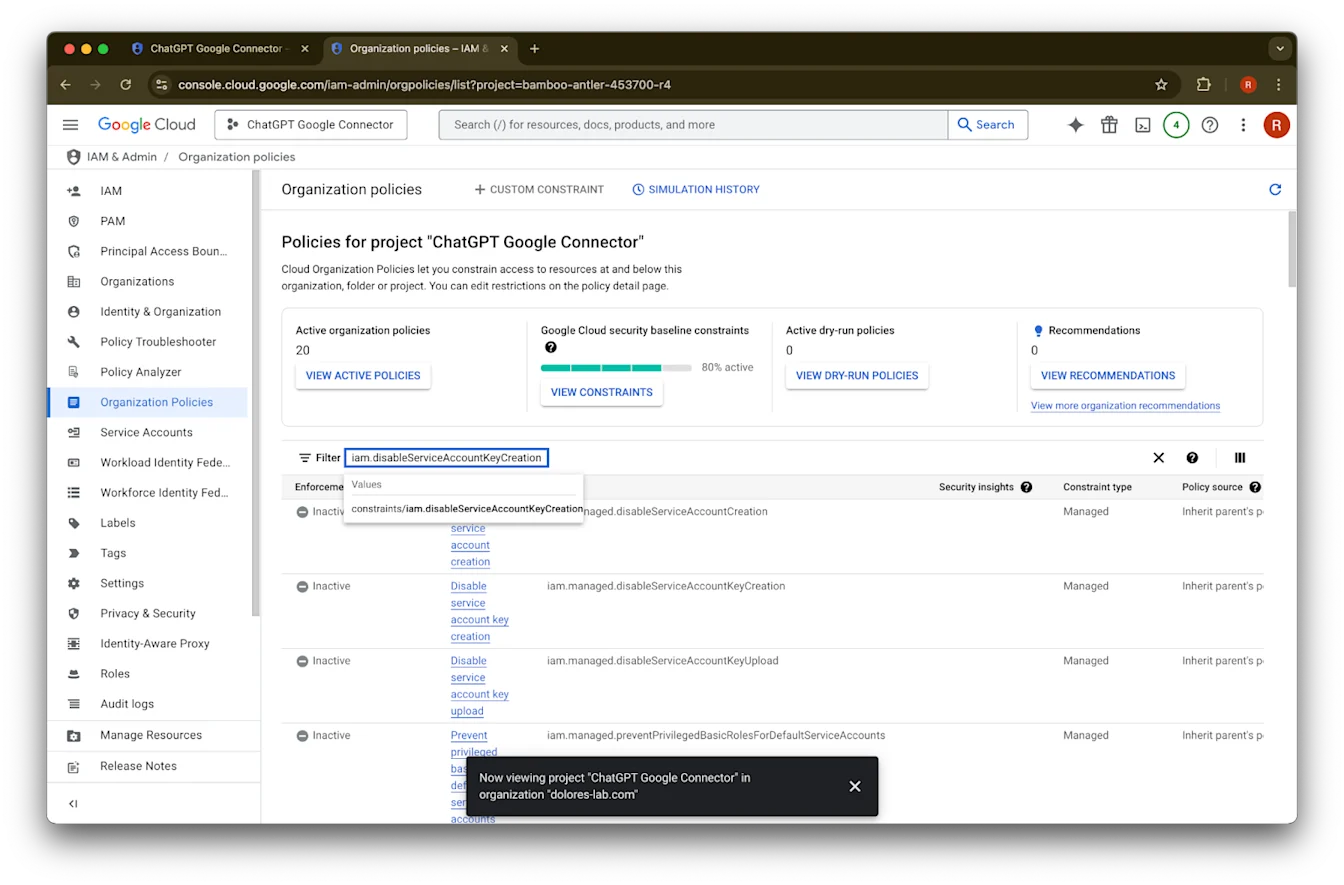
Organizational Policies ൽ ക്ലിക്ക് ചെയ്യുക.
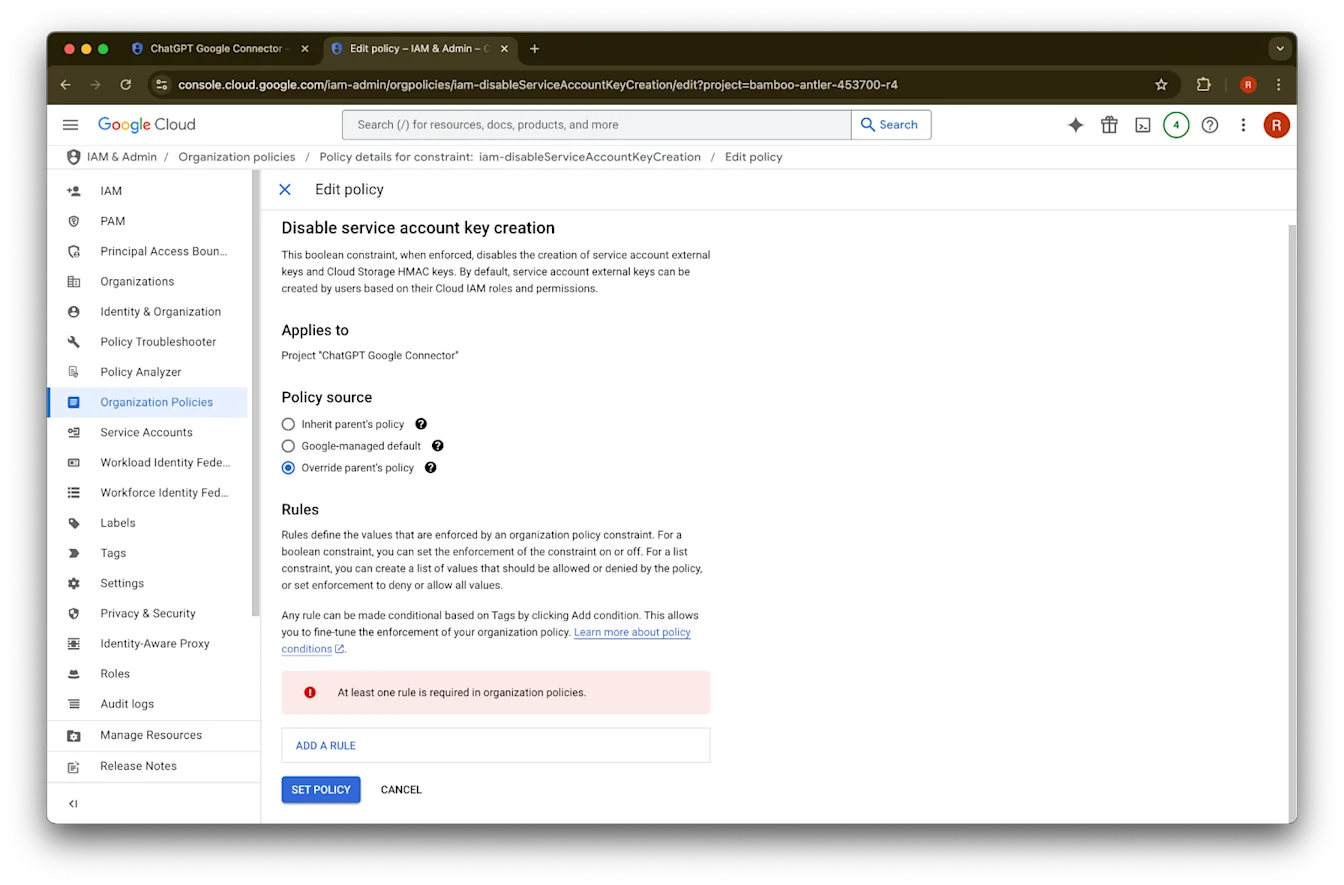
iam.disableServiceAccountKeyCreation
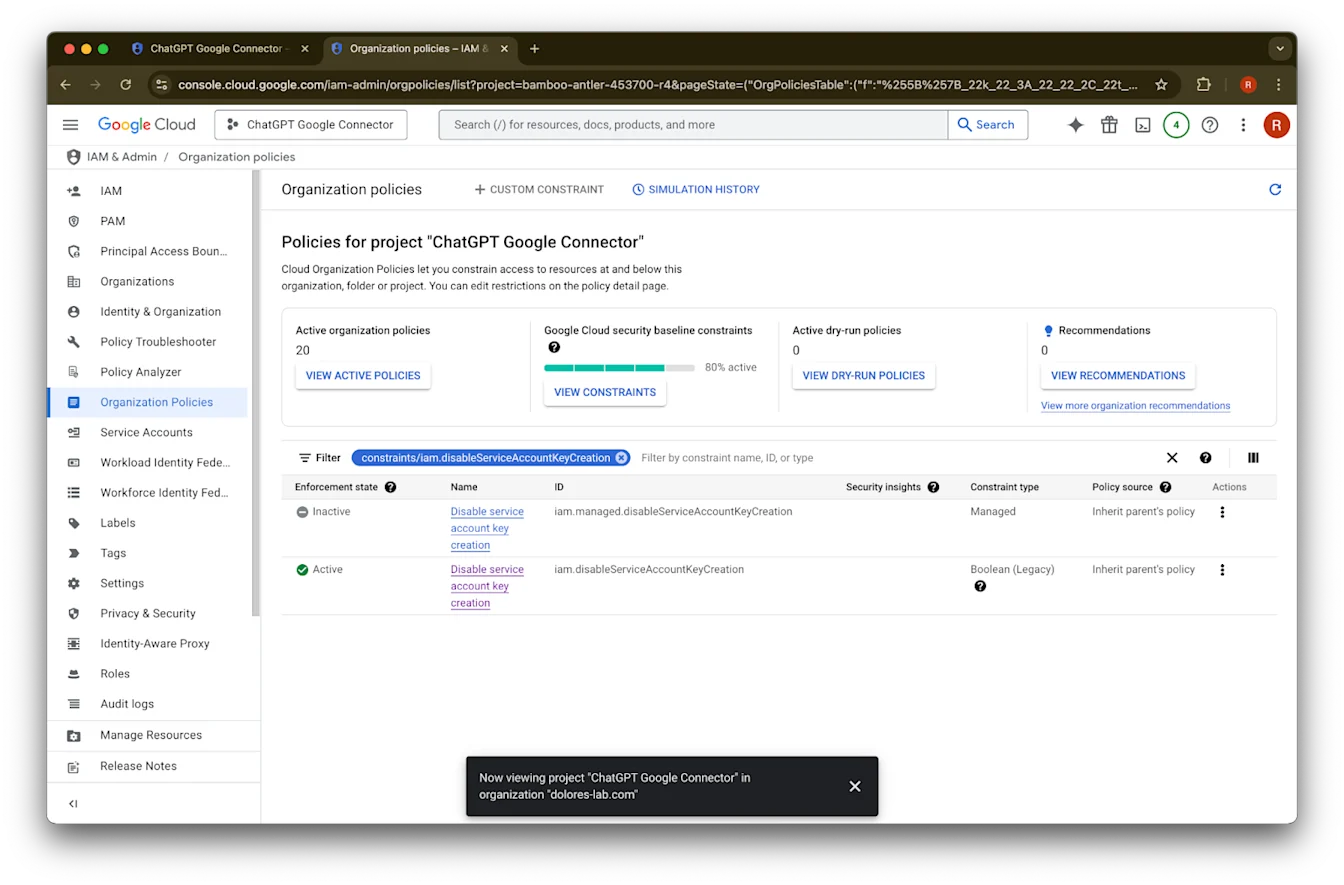
തിരയുക.constraints/iam.disableServiceAccountKeyCreation
എന്ന ഫലത്തിൽ ക്ലിക്ക് ചെയ്യുക.iam.disableServiceAccountKeyCreation
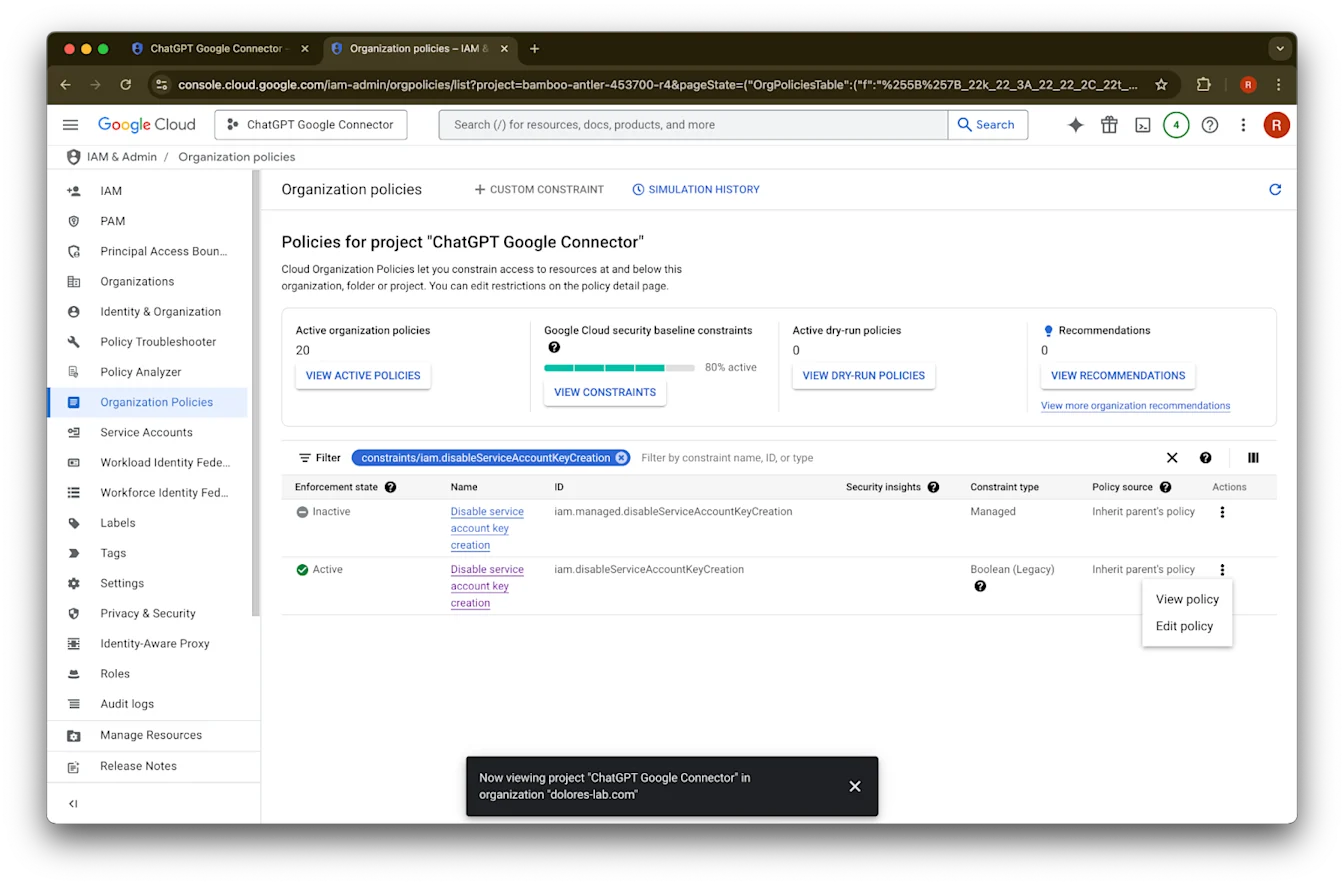
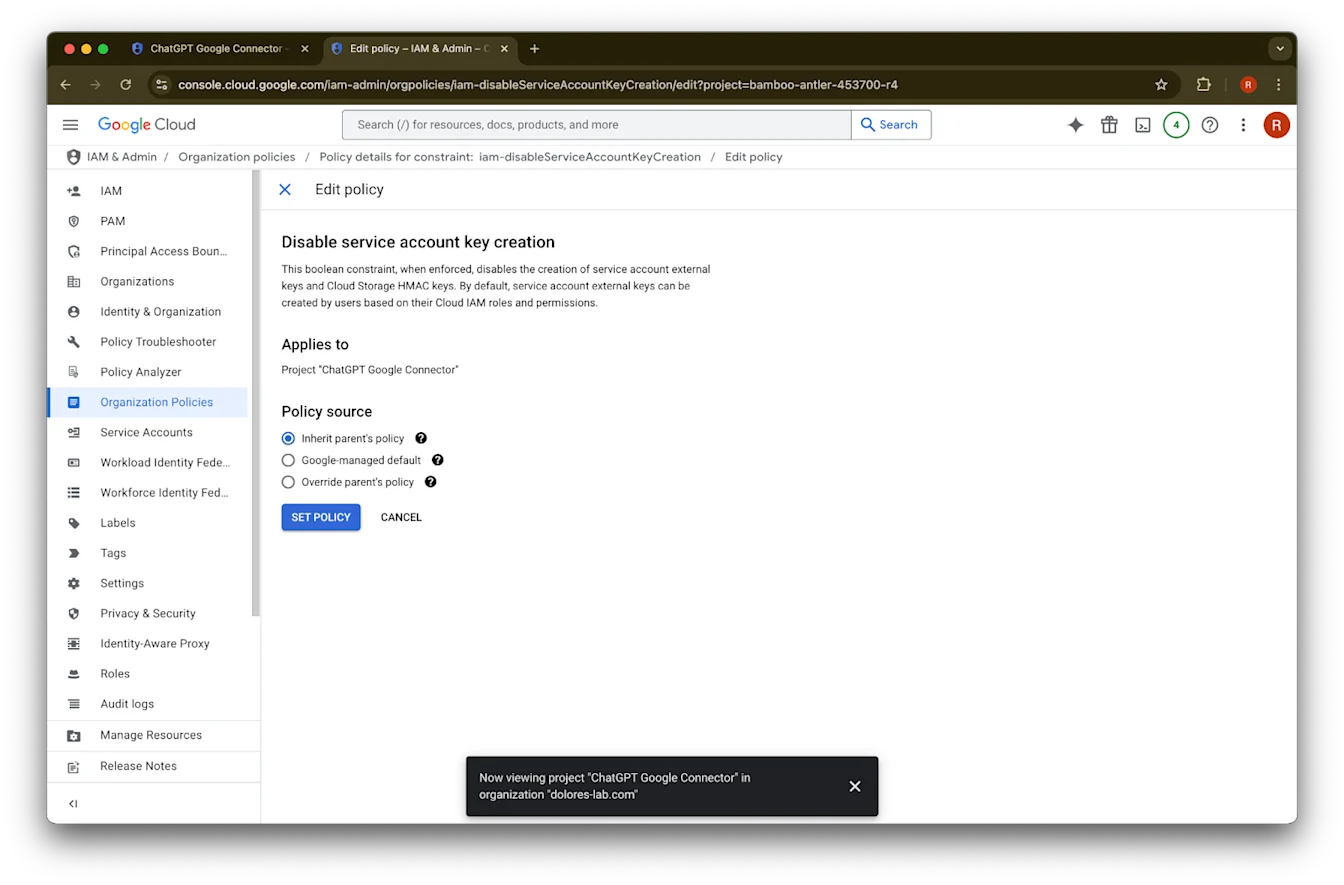
എന്ന ID ഉള്ള വരിയിലെ … ൽ ക്ലിക്ക് ചെയ്യുക.Edit policy ൽ ക്ലിക്ക് ചെയ്യുക. Edit policy disabled ആണെങ്കിൽ, നിങ്ങൾ Organization Policy Administrator ആകേണ്ടിവരും.
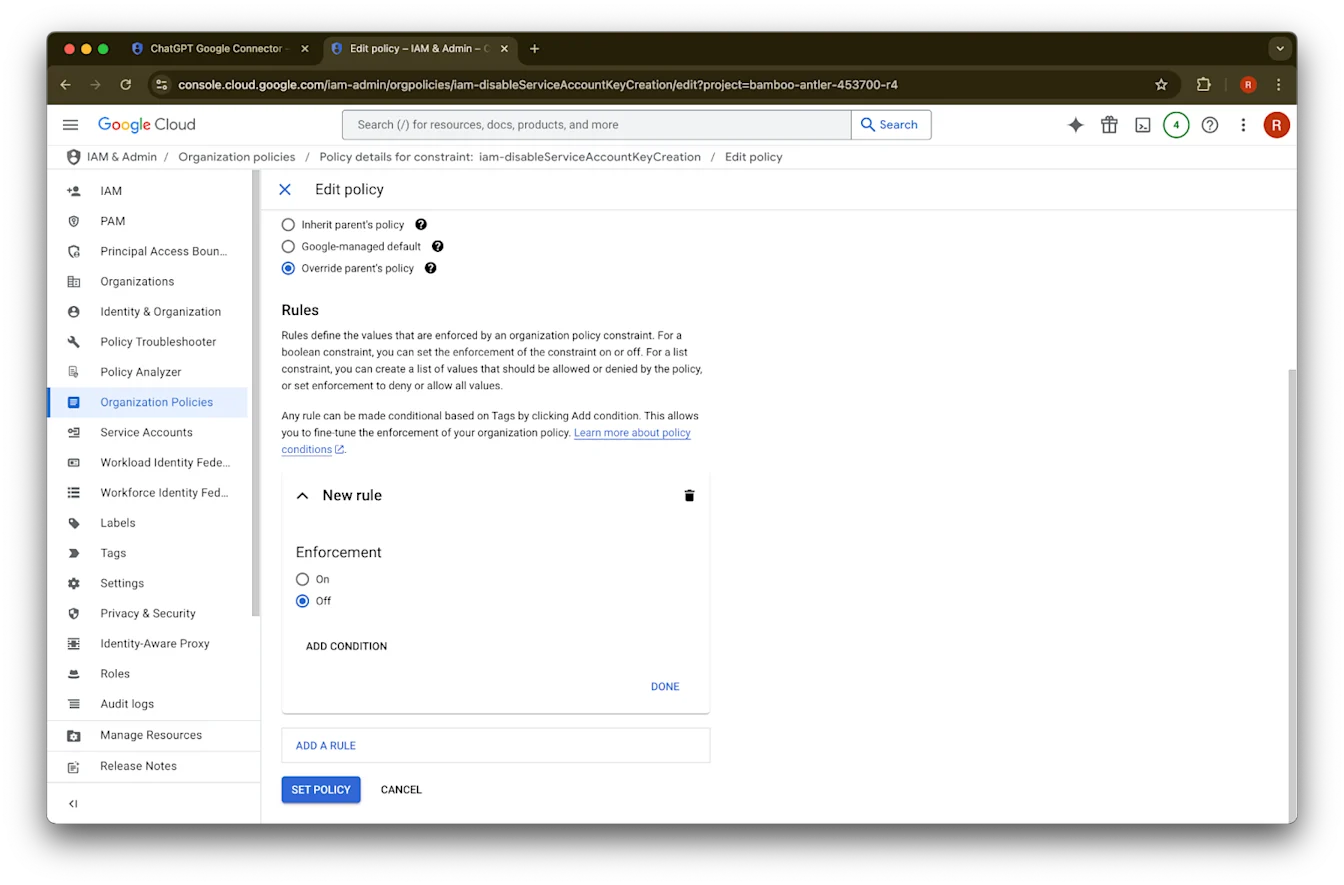
Override parent’s policy
ൽ ക്ലിക്ക് ചെയ്യുക.Add a rule
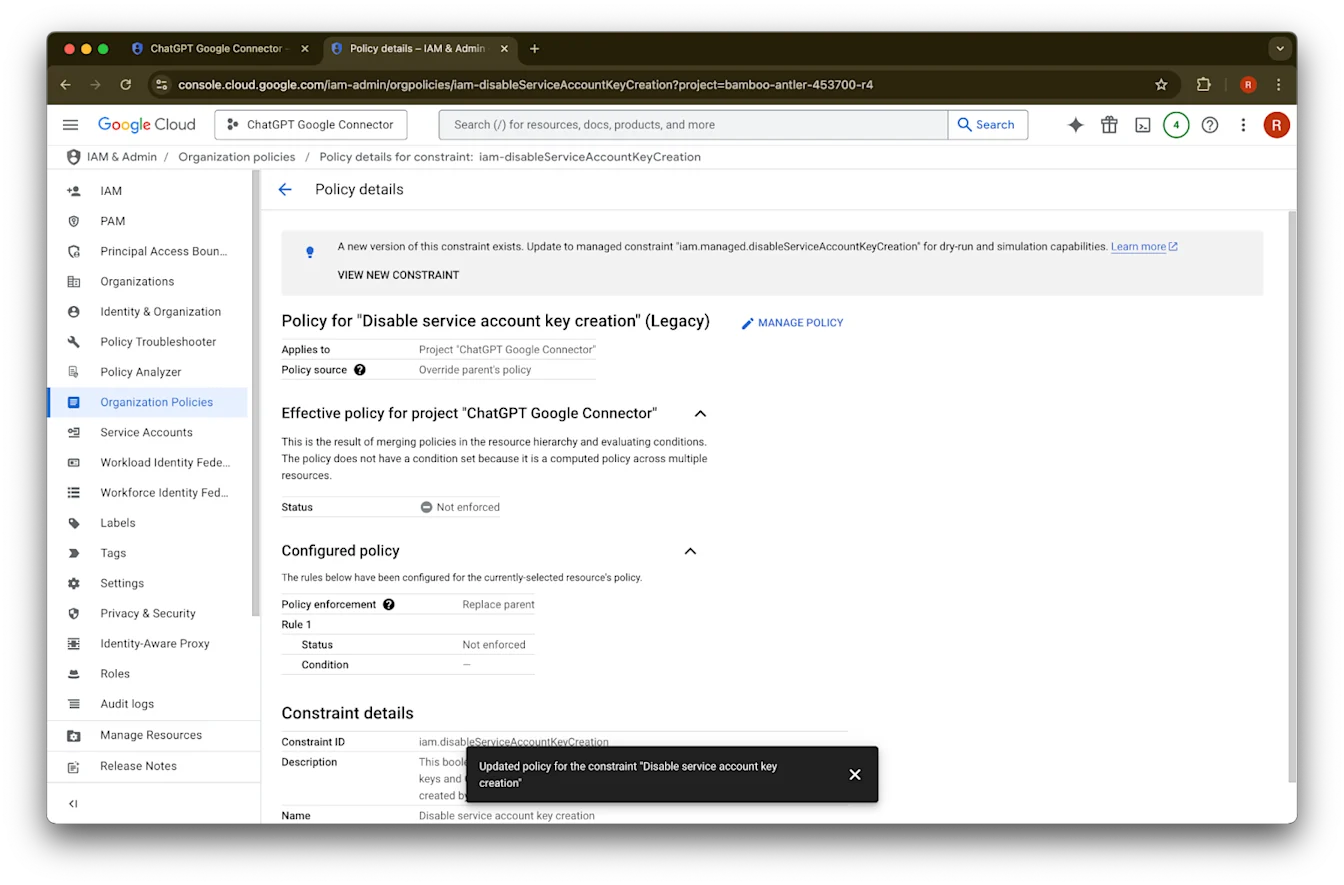
ൽ ക്ലിക്ക് ചെയ്യുക.Set Policy
ൽ ക്ലിക്ക് ചെയ്യുക.ഇപ്പോൾ നിങ്ങൾക്ക് ഒരു service account key സൃഷ്ടിക്കാം. ഇത് പ്രാബല്യത്തിൽ വരാൻ ചില മിനിറ്റുകൾ എടുക്കാം.
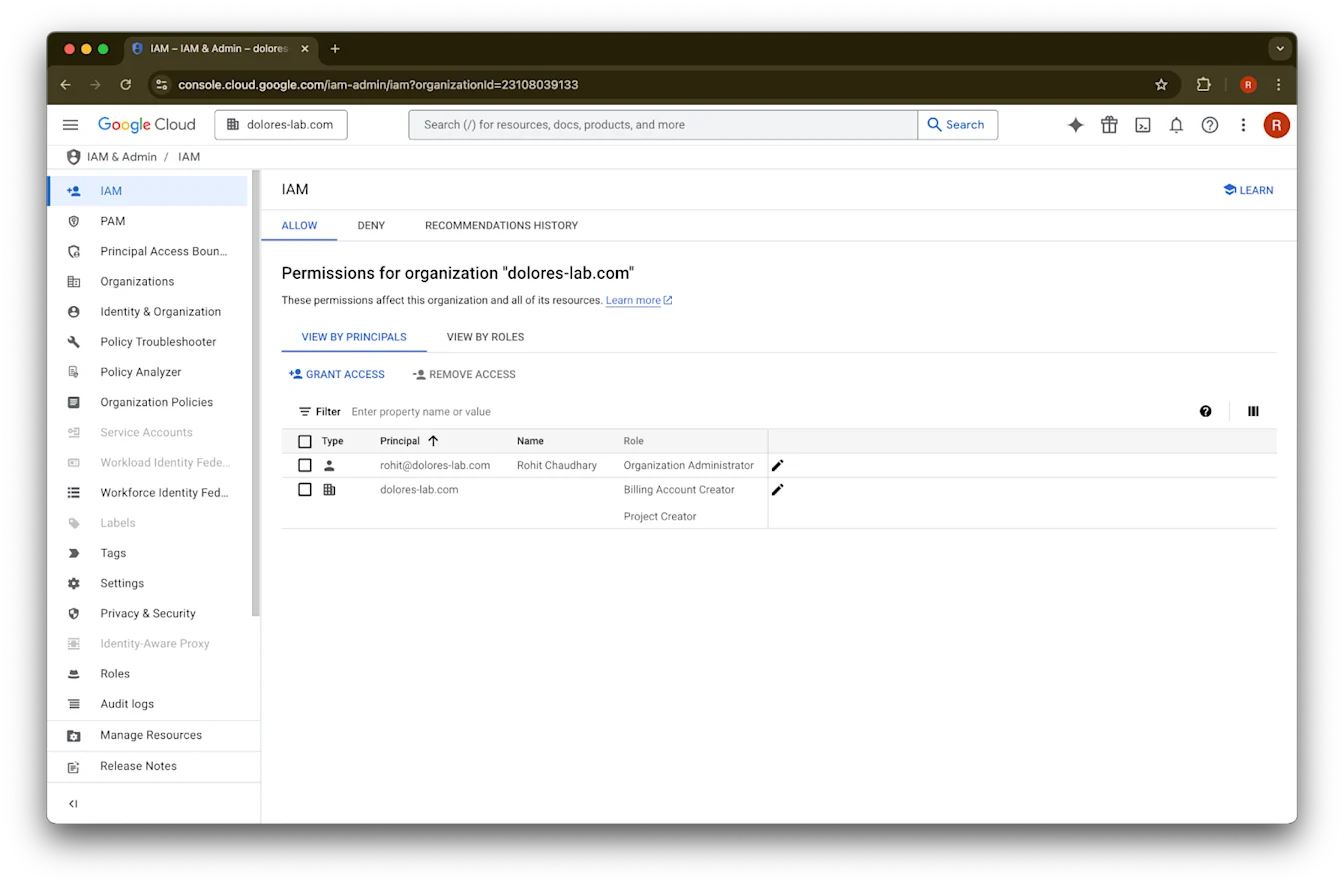
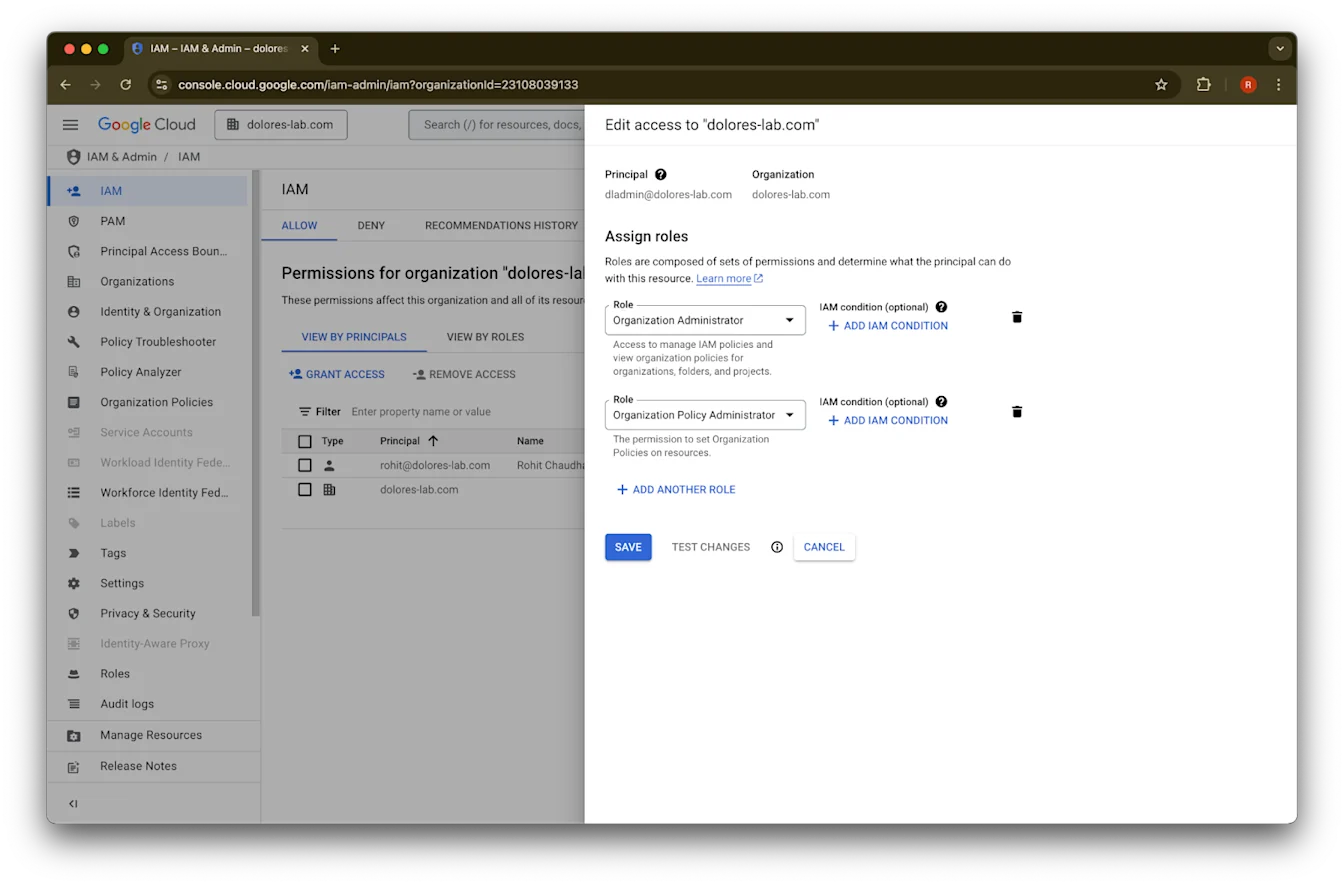
Organization Policy Administrator ആകുന്നത്
console.cloud.google.com ലേക്ക് പോയി project/organization selector ൽ ക്ലിക്ക് ചെയ്യുക.
your organization
ൽ ക്ലിക്ക് ചെയ്യുക.മുകളിൽ ഇടത് കോണിലുള്ള menu icon ൽ ക്ലിക്ക് ചെയ്യുക.
IAM & Admin
മുകളിൽ hover ചെയ്യുക.IAM
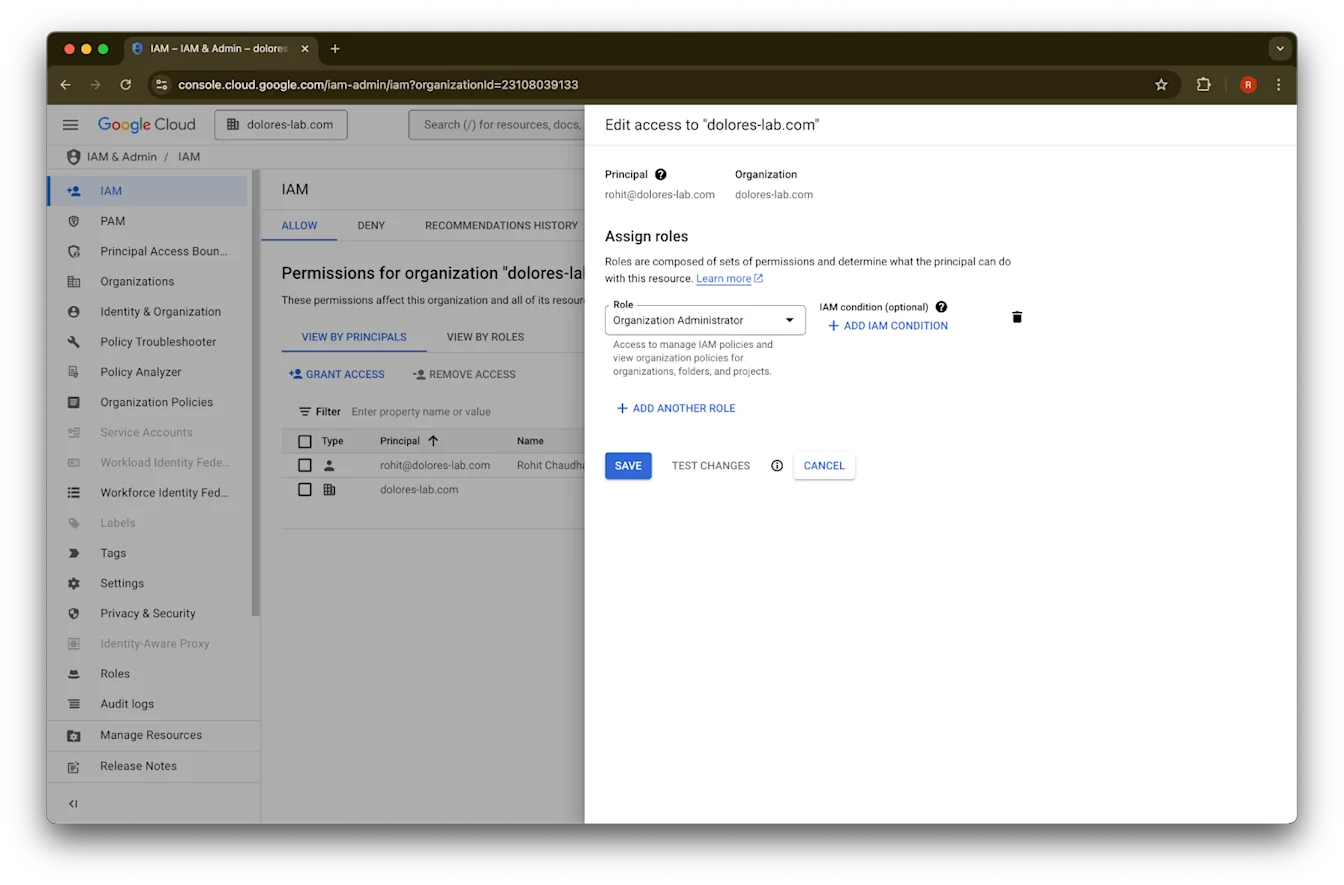
ൽ ക്ലിക്ക് ചെയ്യുക.നിങ്ങളുടെ account-നുള്ള pencil ൽ ക്ലിക്ക് ചെയ്യുക.
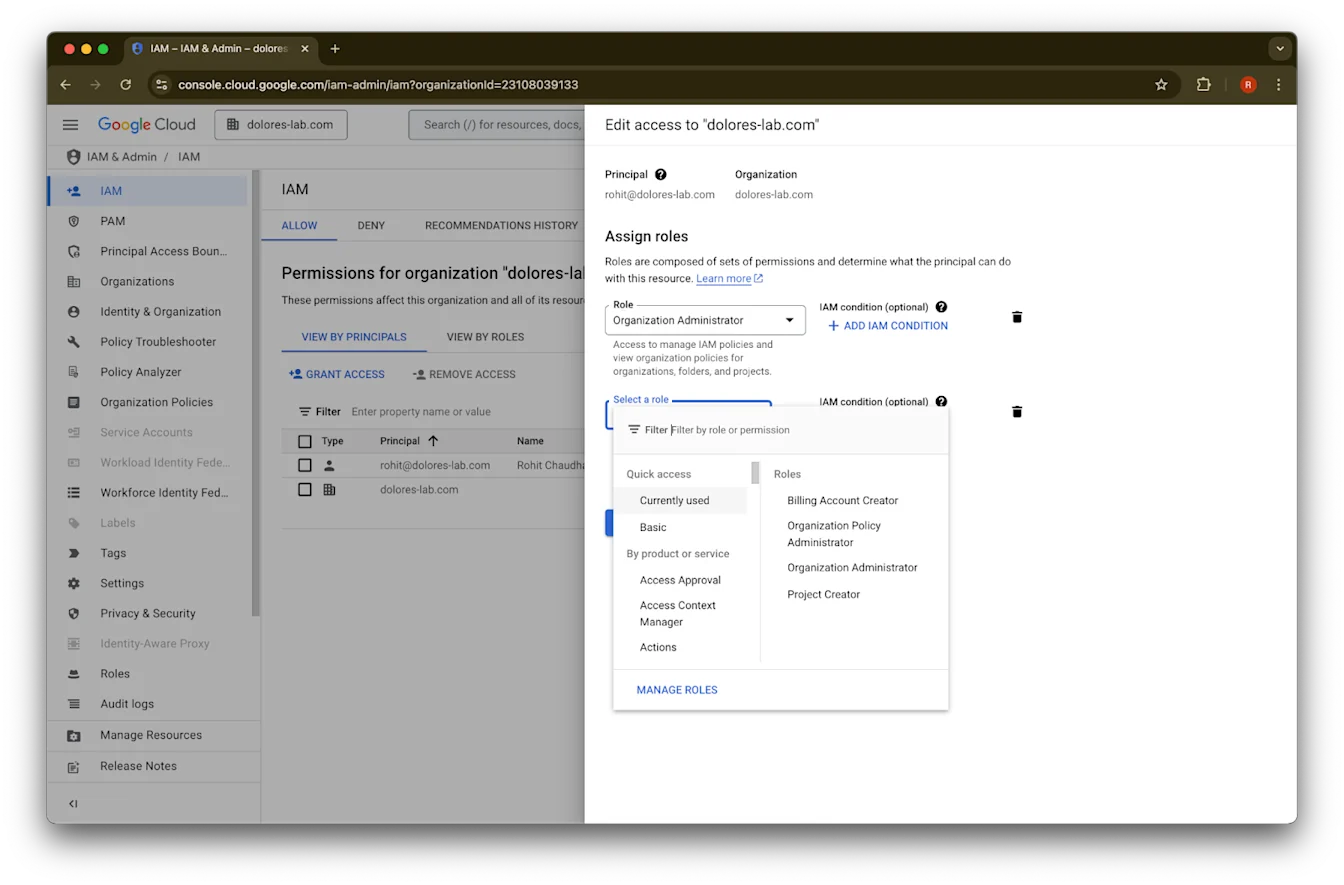
Add Another Role
ൽ ക്ലിക്ക് ചെയ്യുക.Organization Policy Administrator
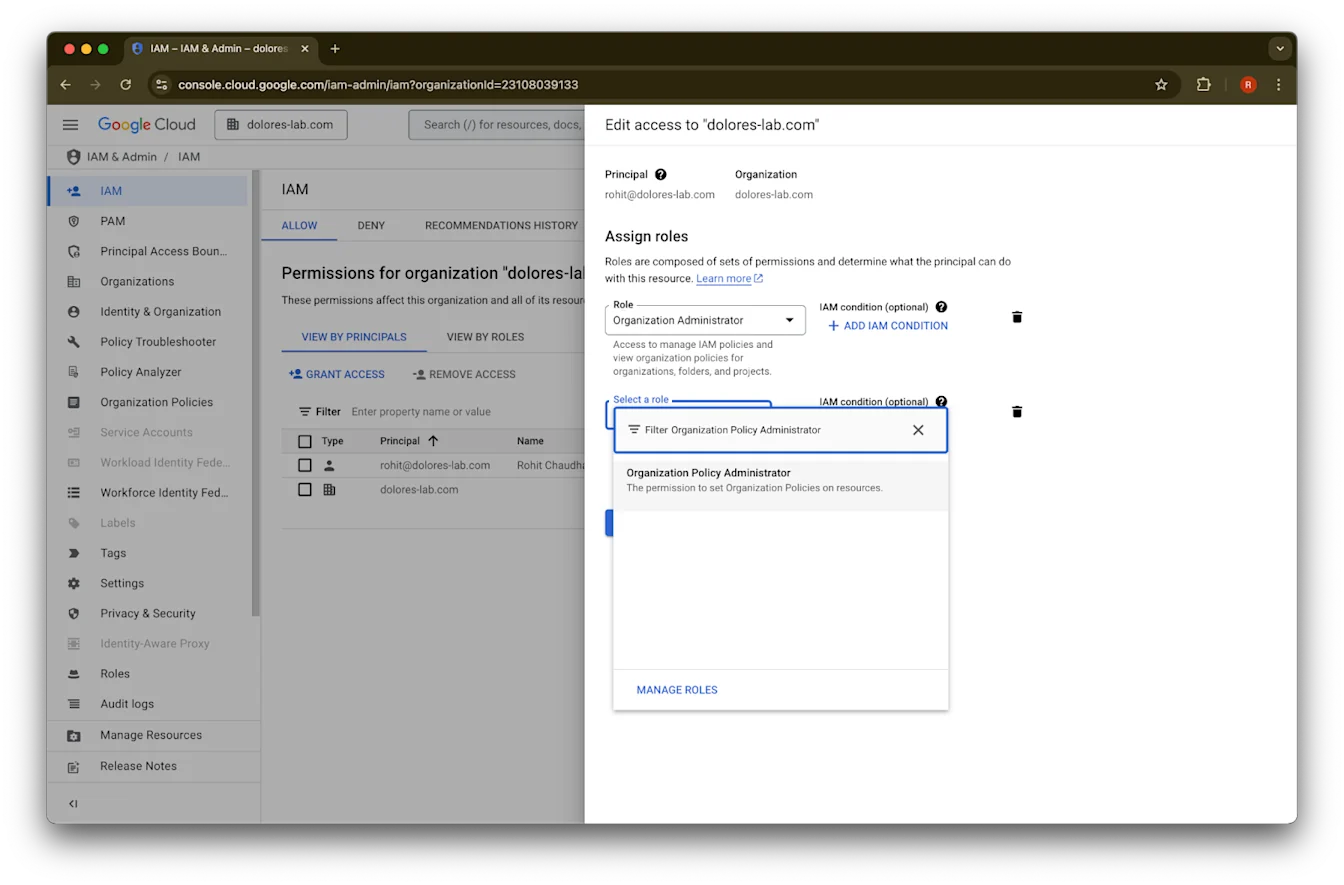
തിരയുക.Organization Policy Administrator
ൽ ക്ലിക്ക് ചെയ്യുക.Save ക്ലിക്ക് ചെയ്യുക.
service account key creation സജ്ജമാക്കാനുള്ള അനുമതി ഇപ്പോൾ നിങ്ങളുടെ account-ക്ക് ലഭിച്ചിട്ടുണ്ട്. ഇത് പ്രാബല്യത്തിൽ വരാൻ ചില മിനിറ്റുകൾ എടുക്കാം.
Google Workspace-നും ChatGPT-നും വ്യത്യസ്ത ഇമെയിൽ അക്കൗണ്ടുകൾ നിലനിർത്താൻ Google Email Alias ഉപയോഗിക്കൽ
Google Drive synced connectors-നായി admin-managed setup ഉപയോഗിച്ച് Google Workspace-നെ നിങ്ങളുടെ ChatGPT വർക്ക്സ്പേസുമായി ബന്ധിപ്പിക്കുന്ന ഒരു അഡ്മിനായിരിക്കുമ്പോൾ, നിങ്ങളുടെ സ്ഥാപനം ChatGPT-നും Google Workspace-നും വ്യത്യസ്ത email domains ഉപയോഗിക്കുന്നുവെങ്കിൽ, ഉപയോക്താക്കൾക്ക് Google Drive synced connectors വിജയകരമായി ആക്സസ് ചെയ്യാൻ കഴിയുന്നുവെന്ന് ഉറപ്പാക്കാൻ നിങ്ങൾക്ക് അധിക ഘട്ടങ്ങൾ സ്വീകരിക്കേണ്ടിവരും.
ശുപാർശ: സാധ്യമായിടത്തോളം, Google Workspace അക്കൗണ്ടിനും ChatGPT അക്കൗണ്ടിനും ഒരേ primary email വിലാസങ്ങൾ ഉപയോഗിക്കുക.
ഇത് പ്രായോഗികമല്ലെങ്കിൽ, ChatGPT sign-in email-നോട് പൊരുത്തപ്പെടുന്ന ഒരു Google Workspace email alias കോൺഫിഗർ ചെയ്യാൻ താഴെക്കൊടുത്തിരിക്കുന്ന നിർദേശങ്ങൾ പിന്തുടരുക.
Google Workspace Alias ചേർക്കാനുള്ള ഘട്ടങ്ങൾ
ഓരോ ഉപയോക്താവിന്റെയും ChatGPT ഇമെയിൽ അവരുടെ Google Workspace അക്കൗണ്ടുമായി ലിങ്ക് ചെയ്യാനാകുന്നുവെന്ന് ഉറപ്പാക്കാൻ Google Admin Console ൽ ഈ ഘട്ടങ്ങൾ പിന്തുടരുക.
Admin Console-ലേക്ക് പോകുക. ഇവിടേക്ക് നാവിഗേറ്റ് ചെയ്യുക: Directory > Users
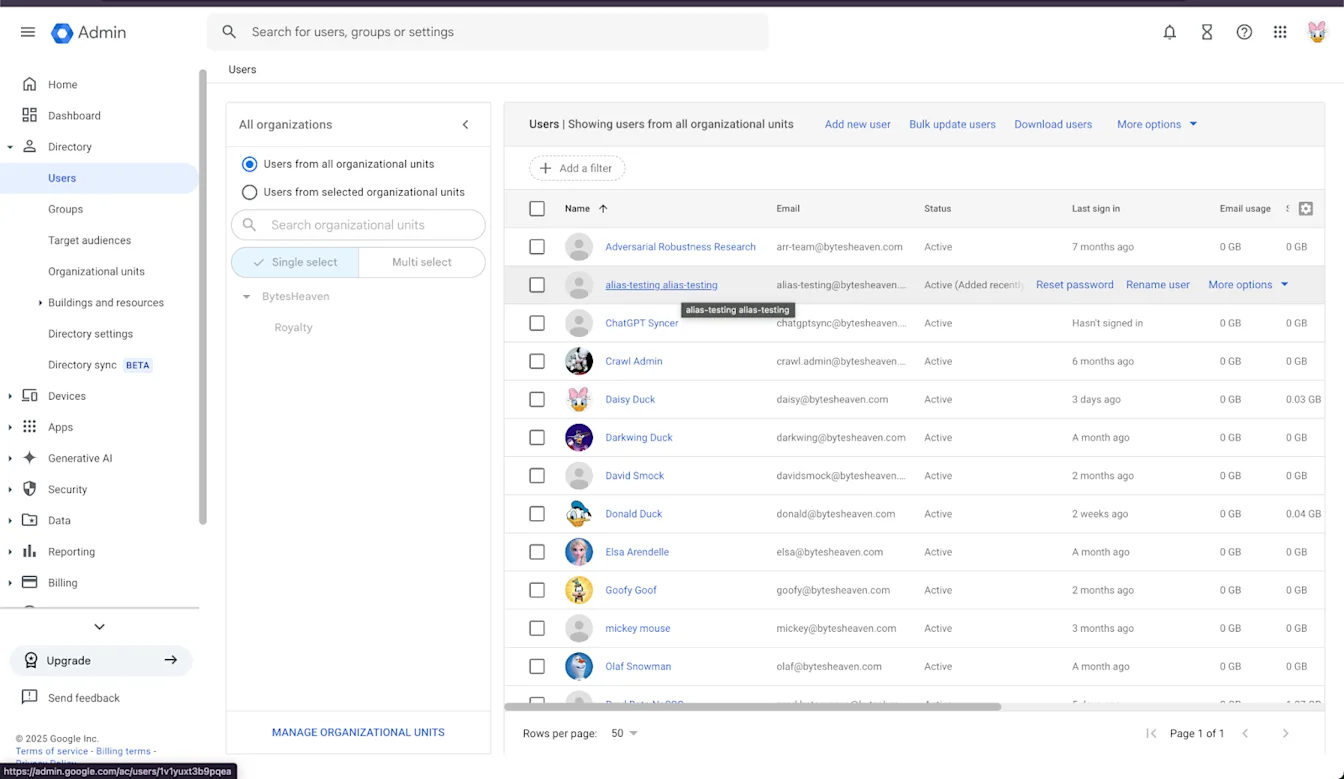
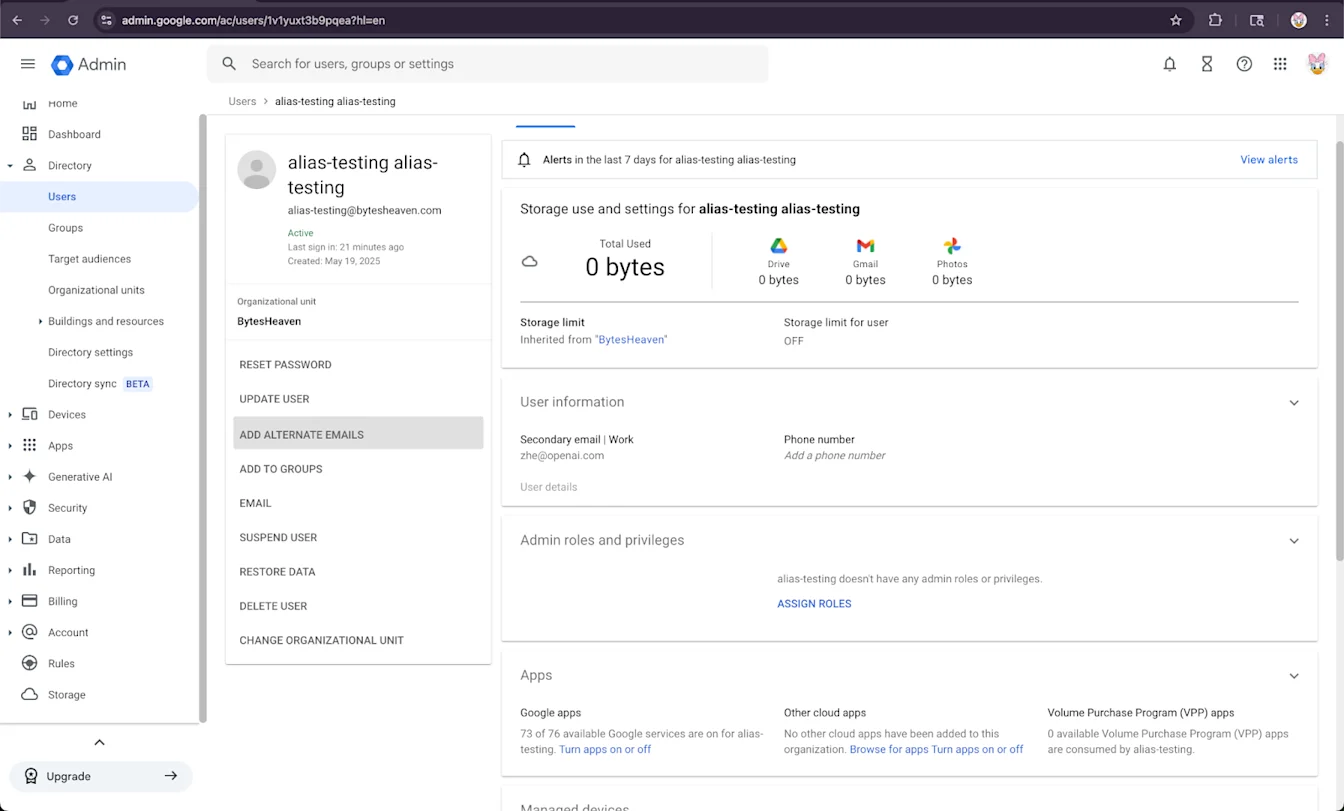
2. ഒരു ഉപയോക്താവിനെ തിരഞ്ഞെടുക്കുക, പിന്നീട് “ADD ALTERNATIVE EMAILS” തിരഞ്ഞെടുക്കുക.
3. ഒരു Alternative Email ചേർക്കുക. അത് ഉപയോക്താവിന്റെ ChatGPT അക്കൗണ്ടിനോടു പൊരുത്തപ്പെടുന്നുവെന്ന് ഉറപ്പാക്കുക.
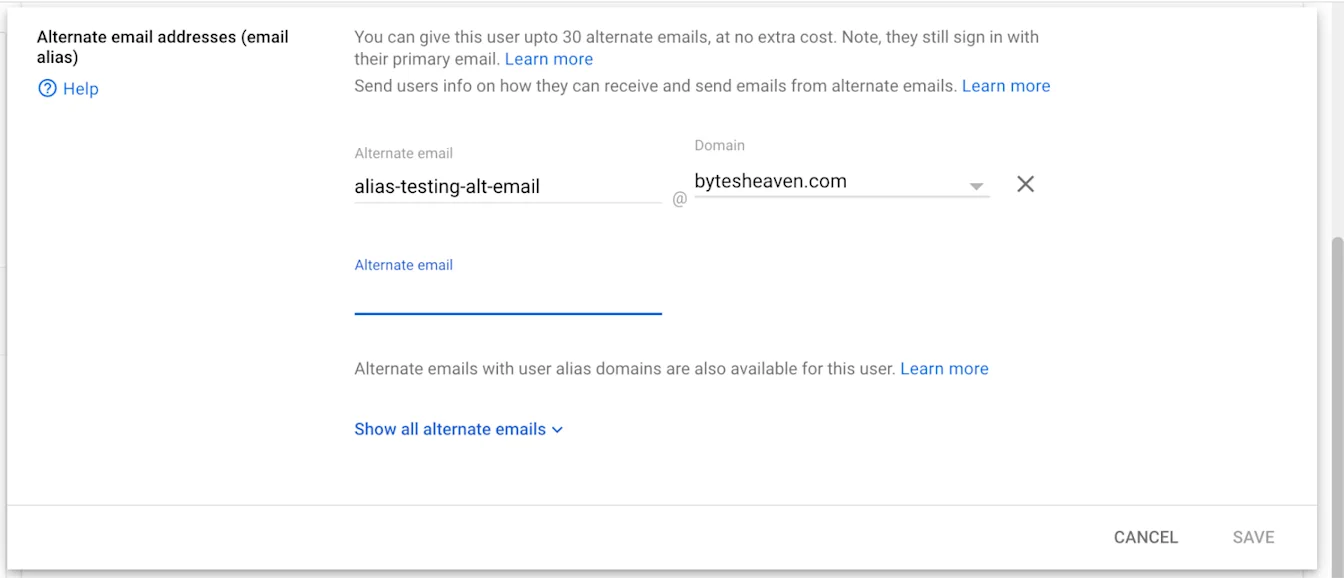
4. Save തിരഞ്ഞെടുക്കുക.
അറിയപ്പെട്ട പരിമിതികൾ
വ്യക്തിഗത email വിലാസങ്ങൾ പിന്തുണയ്ക്കുന്നില്ല
example@gmail.com പോലുള്ള വ്യക്തിഗത വിലാസങ്ങൾ ഉപയോഗിച്ച് ChatGPT-ൽ രജിസ്റ്റർ ചെയ്യുന്ന ഉപയോക്താക്കൾക്ക് Google Workspace-ലേക്ക് കണക്റ്റ് ചെയ്യാൻ കഴിയില്ല. ഈ setup പിന്തുണയ്ക്കുന്നതല്ല, കൂടാതെ സംഘടനയ്ക്ക് പുറത്തുനിന്ന് ആഭ്യന്തര ഡാറ്റയിലേക്കുള്ള ആക്സസ് ഇത് സാധ്യമാക്കുന്നതിനാൽ സുരക്ഷാ അപകടസാധ്യതയും സൃഷ്ടിക്കുന്നു.
Gmail "+" aliases പിന്തുണയ്ക്കുന്നില്ല
വിലാസത്തിന് "+" ചേർത്ത് aliases സൃഷ്ടിക്കാൻ Gmail ഉപയോക്താക്കളെ അനുവദിക്കുന്നു, ഉദാ. user+alias@gmail.com. ഈ തരത്തിലുള്ള aliasing Google Drive synced connectors-നൊപ്പം പ്രവർത്തിക്കില്ല. alias Google Workspace-ൽ വ്യക്തമായി കോൺഫിഗർ ചെയ്തിരിക്കണം.
സാധാരണ പിശക് സന്ദേശം
email വിലാസങ്ങൾ ശരിയായി ലിങ്ക് ചെയ്തിട്ടില്ലെങ്കിൽ, ഉപയോക്താക്കൾക്ക് ഈ സന്ദേശം കാണാം: "നിങ്ങളുടെ account Google Drive-നോട് ബന്ധിപ്പിക്കാൻ ഞങ്ങൾക്ക് കഴിഞ്ഞില്ല. കൂടുതൽ അറിയാൻ ക്ലിക്ക് ചെയ്യുക."
ഉപയോക്താക്കൾക്ക് ഈ സന്ദേശം ലഭിക്കുന്നുവെങ്കിൽ, ഈ പ്രമാണത്തിലെ ഘട്ടങ്ങൾ പരിശോധിച്ച് അവ കൃത്യമായി പാലിക്കുന്നുണ്ടെന്ന് ഉറപ്പാക്കുക. അധിക സഹായം ആവശ്യമുണ്ടെങ്കിൽ, ദയവായി ഞങ്ങളുടെ support team-നെ ബന്ധപ്പെടുക.