
admin-managed setup वापरून तुमचे Google Workspace ChatGPT शी जोडण्यासाठी, तुम्ही प्रथम Google च्या admin consoles मध्ये access configure कराल.
Google Drive, users, आणि groups साठी read-only access असलेले service account तयार करा.
हे service account तुमच्या ChatGPT Workspace शी संबंधित त्याच Google account अंतर्गत तयार करण्याची जोरदार शिफारस केली जाते. जर ChatGPT वर्कस्पेसमधील खात्यांचा ईमेल डोमेन Google Workspace मध्ये वापरलेल्या डोमेनपेक्षा वेगळा असेल, तर तुमच्या युजर्ससाठी हा connector सक्षम करण्यासाठी तुम्हाला अतिरिक्त पायऱ्या फॉलो कराव्या लागतील.
अॅडमिन खाते तयार करा ज्याच्या वतीने service account कार्य करेल.
त्यानंतर, ChatGPT अॅडमिन कन्सोलमध्ये सेटअप पूर्ण करा.
service account ची private key अपलोड करा (Google कडून मिळालेली JSON फाइल)
अॅडमिन खाते निर्दिष्ट करा (credentials आवश्यक नाहीत).
कोणत्या files sync करायच्या ते निवडा आणि connection चा access कोणत्या युजर्सना द्यायचा ते ठरवा.
हे मार्गदर्शक तुम्हाला या 6 पायऱ्यांमधून मार्गदर्शन करते.
Service Account सेट करणे
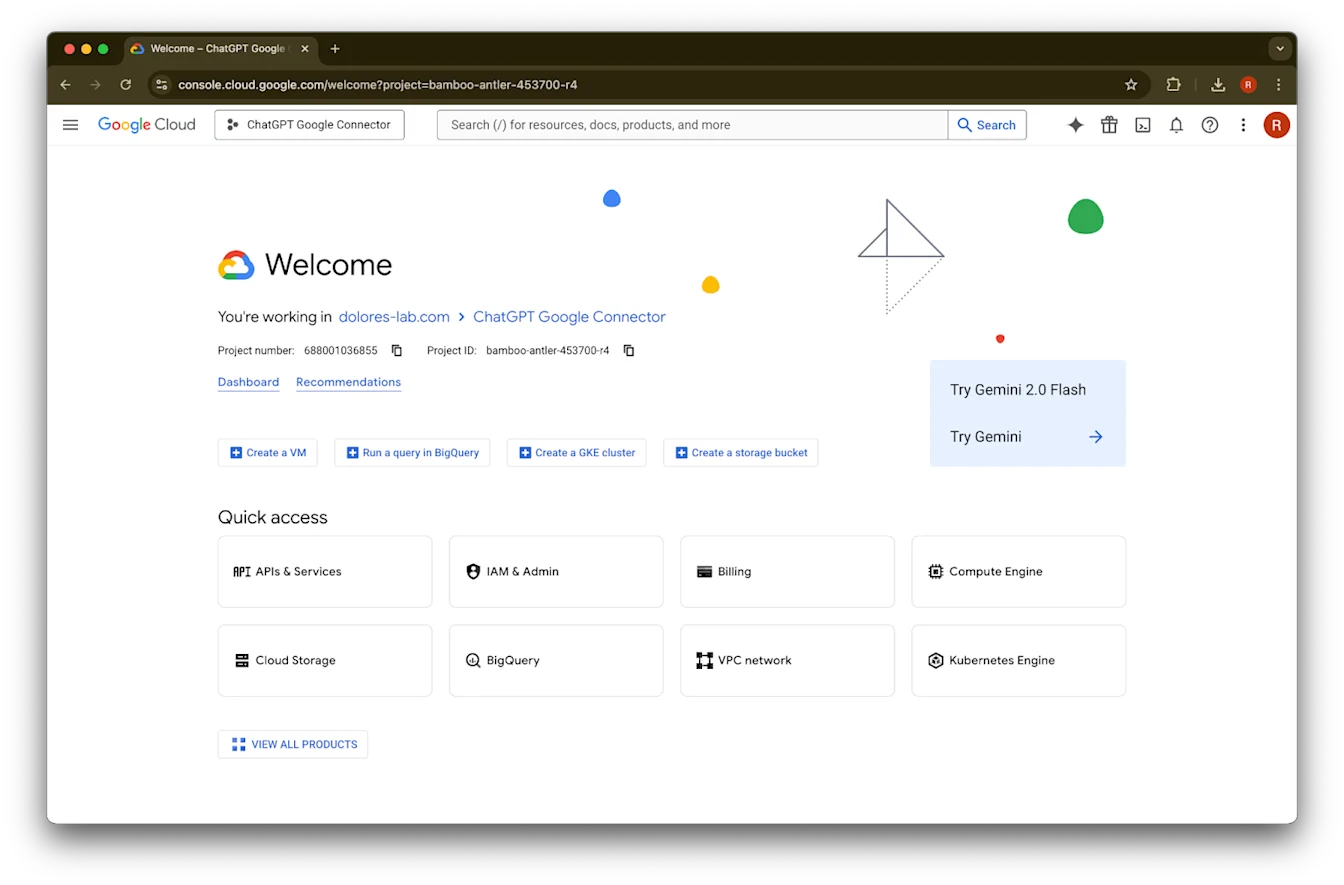
console.cloud.google.com वर जा.
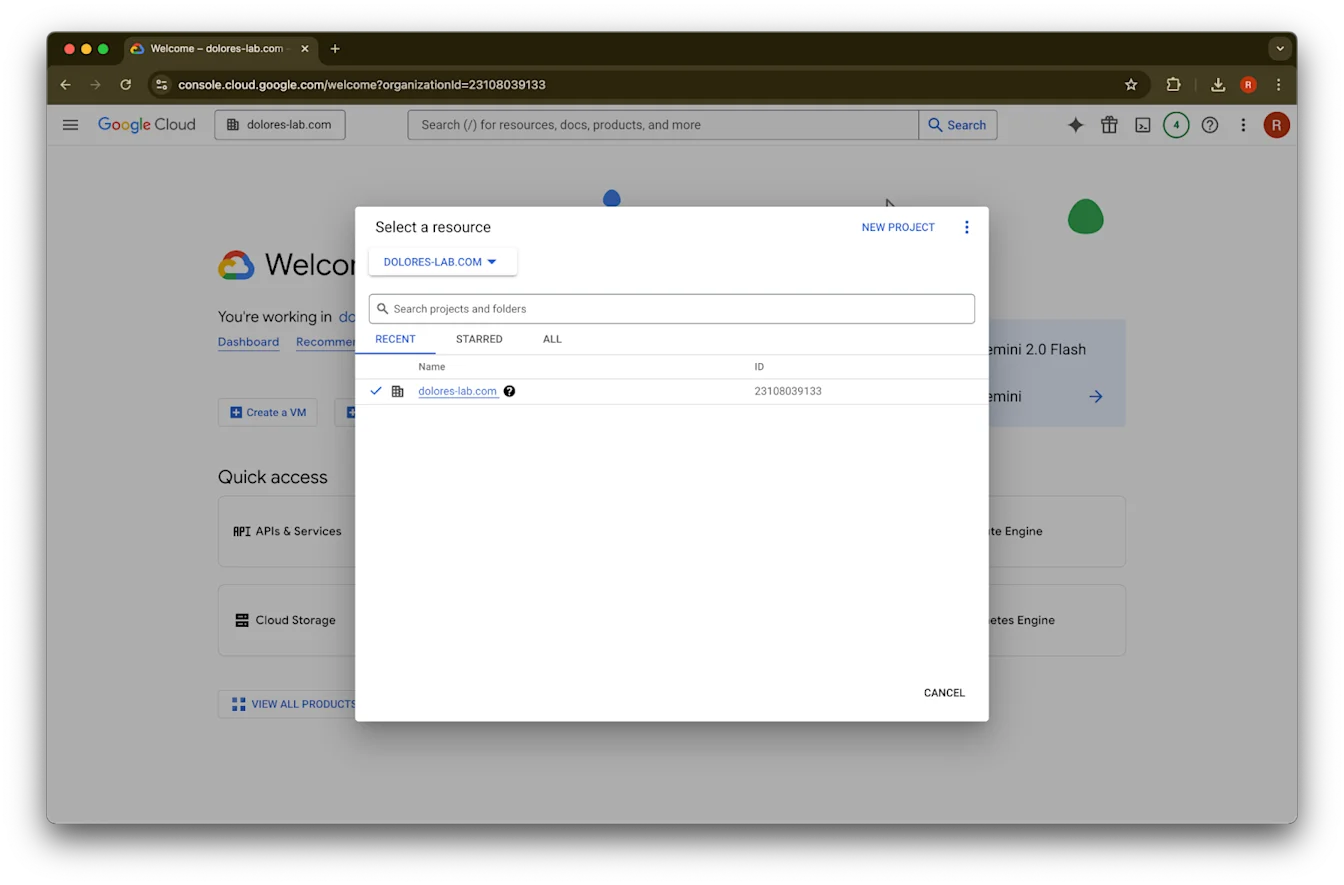
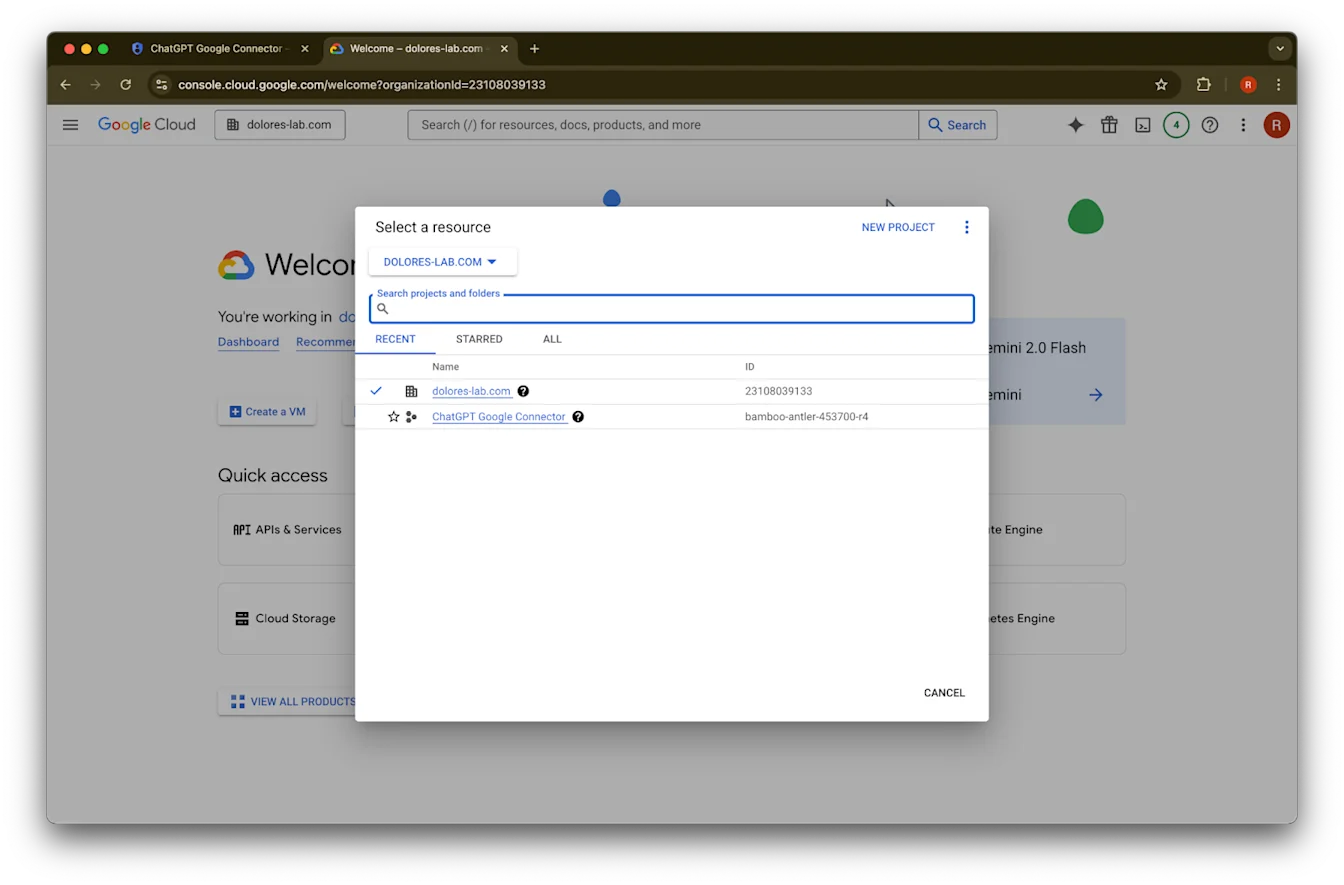
Projects dropdown वर क्लिक करा.Imageतुम्ही त्याच Google workspace मध्ये लॉग इन आहात याची खात्री करा जो तुमच्या ChatGPT वर्कस्पेसशी संबंधित आहे. जर तुमच्या ChatGPT वर्कस्पेसशी संबंधित Google workspace नसेल आणि दोन्ही ठिकाणी ईमेल वेगवेगळे असतील, तर तुम्हाला अतिरिक्त पायऱ्या फॉलो कराव्या लागतील, अन्यथा तुमचे युजर्स Google Drive synced connectors वापरू शकणार नाहीत.
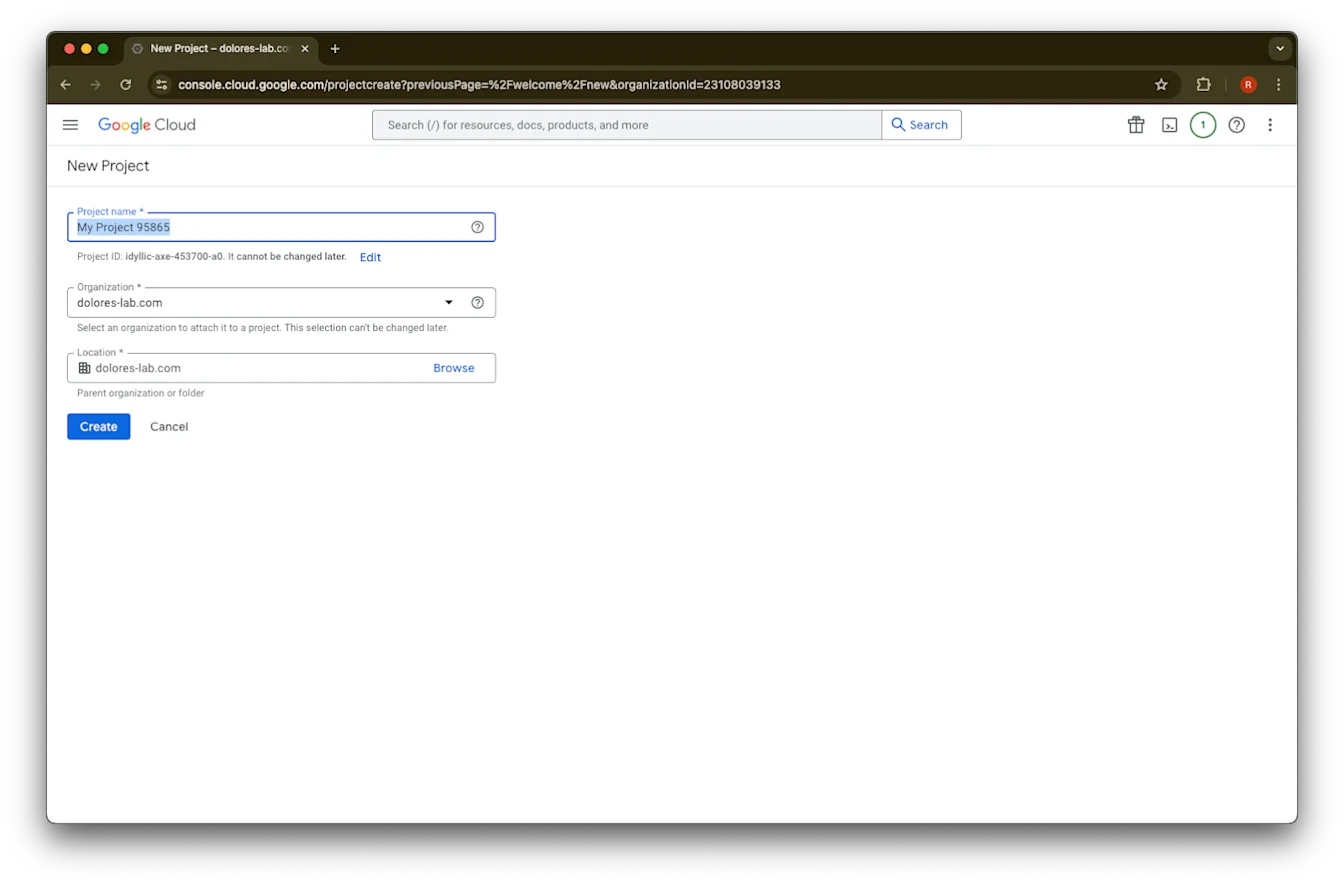
New Project निवडा.
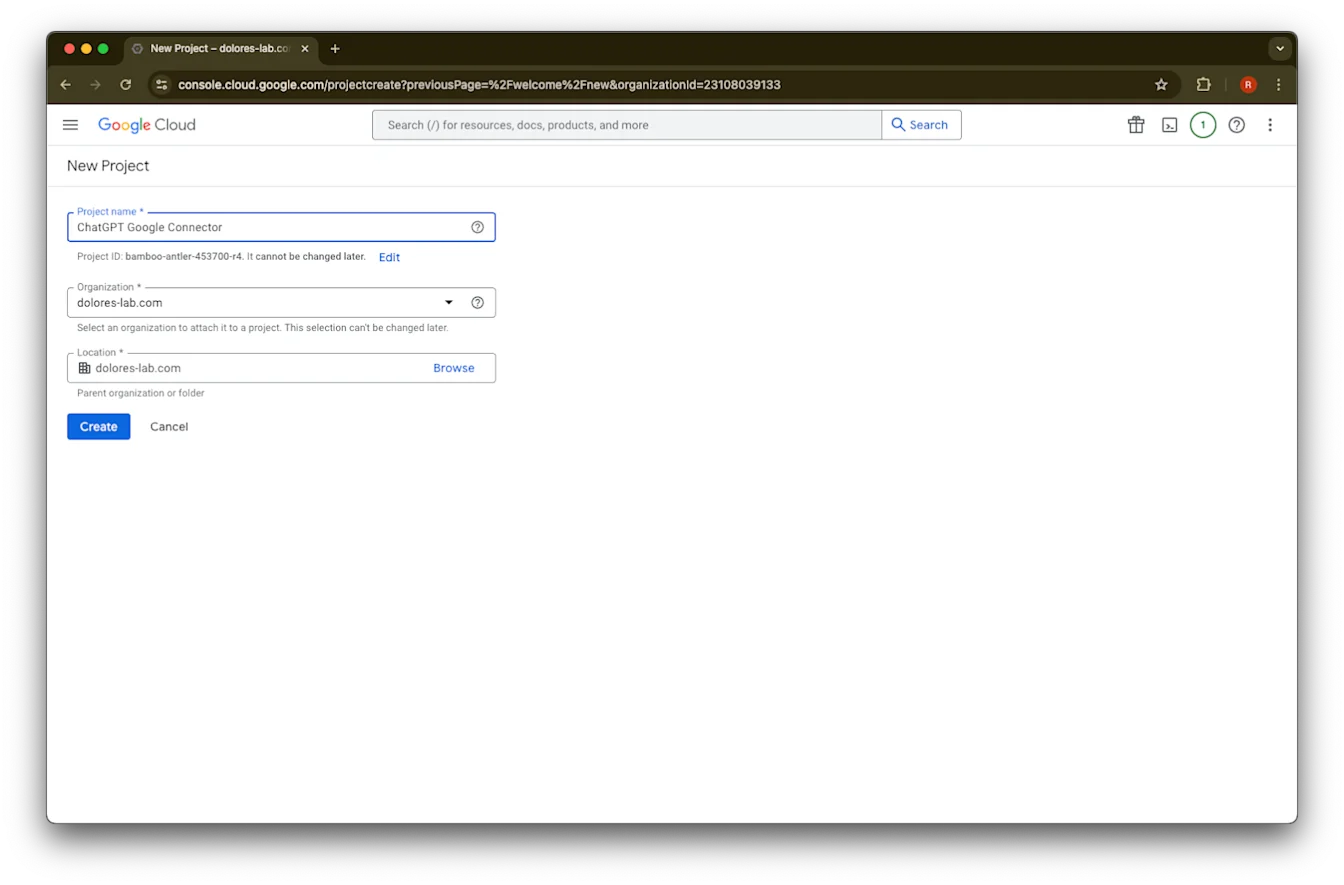
Project Name टाका.
Project तयार करा.
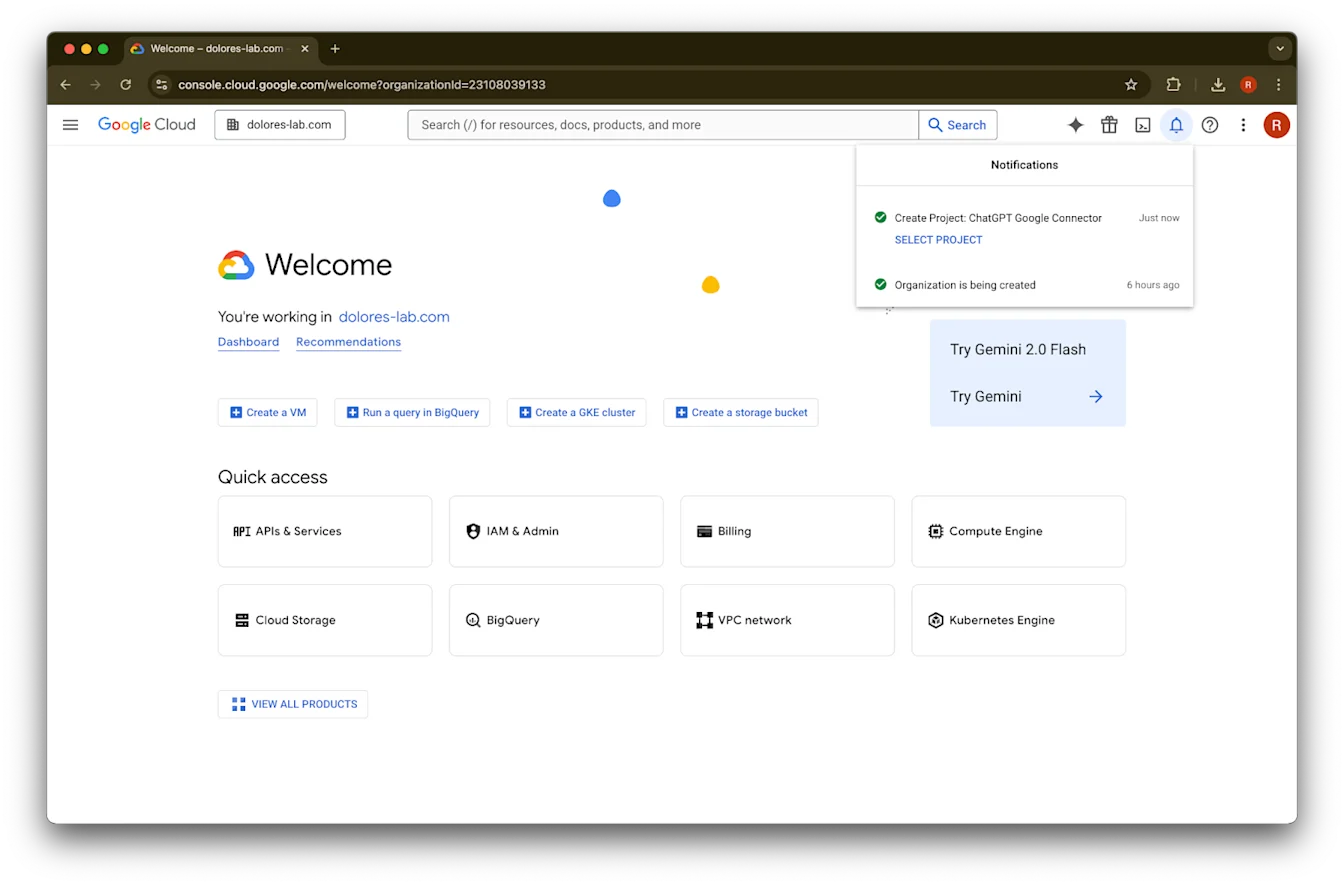
Project तयार होईपर्यंत थांबा, नंतर Select Project वर क्लिक करा.
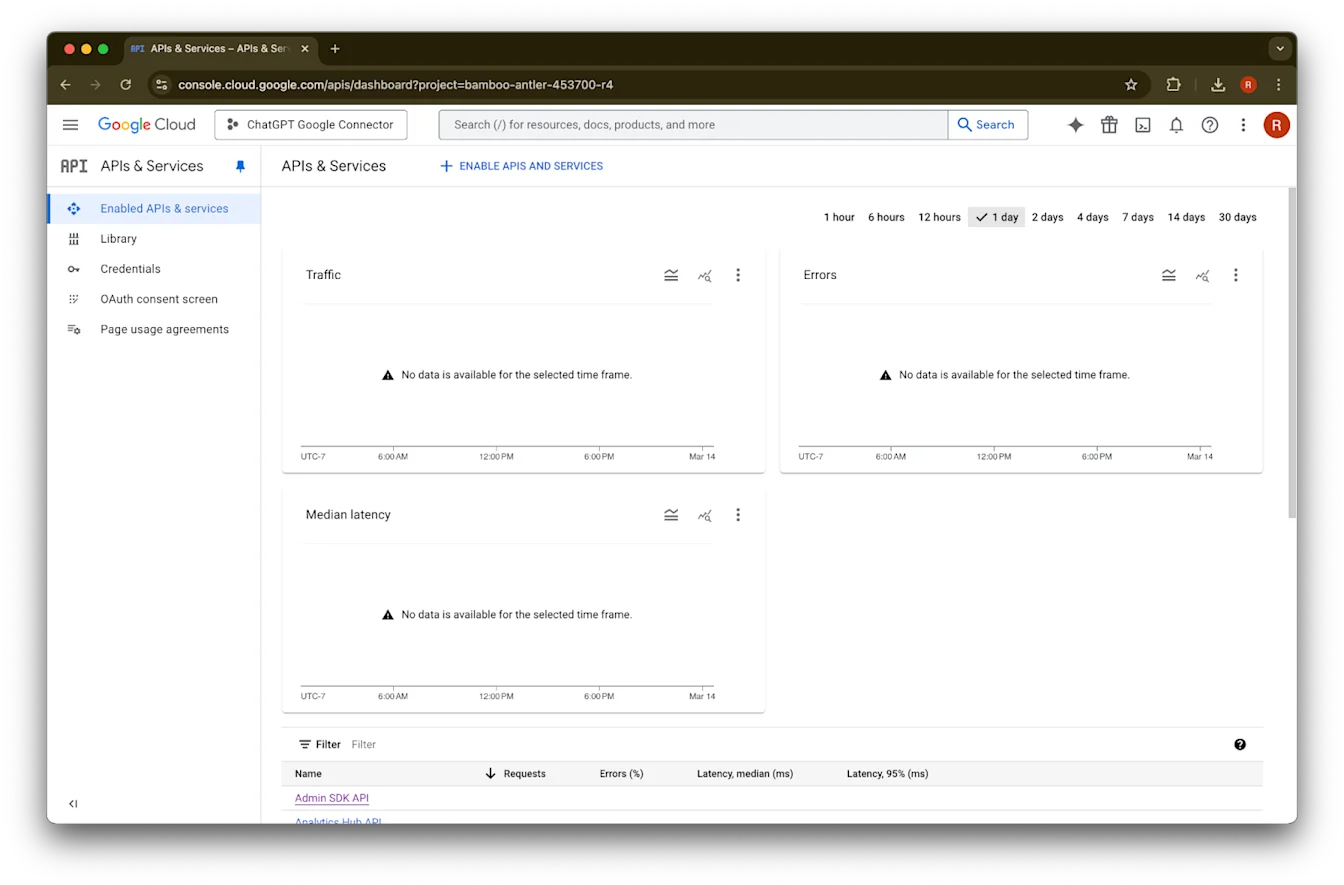
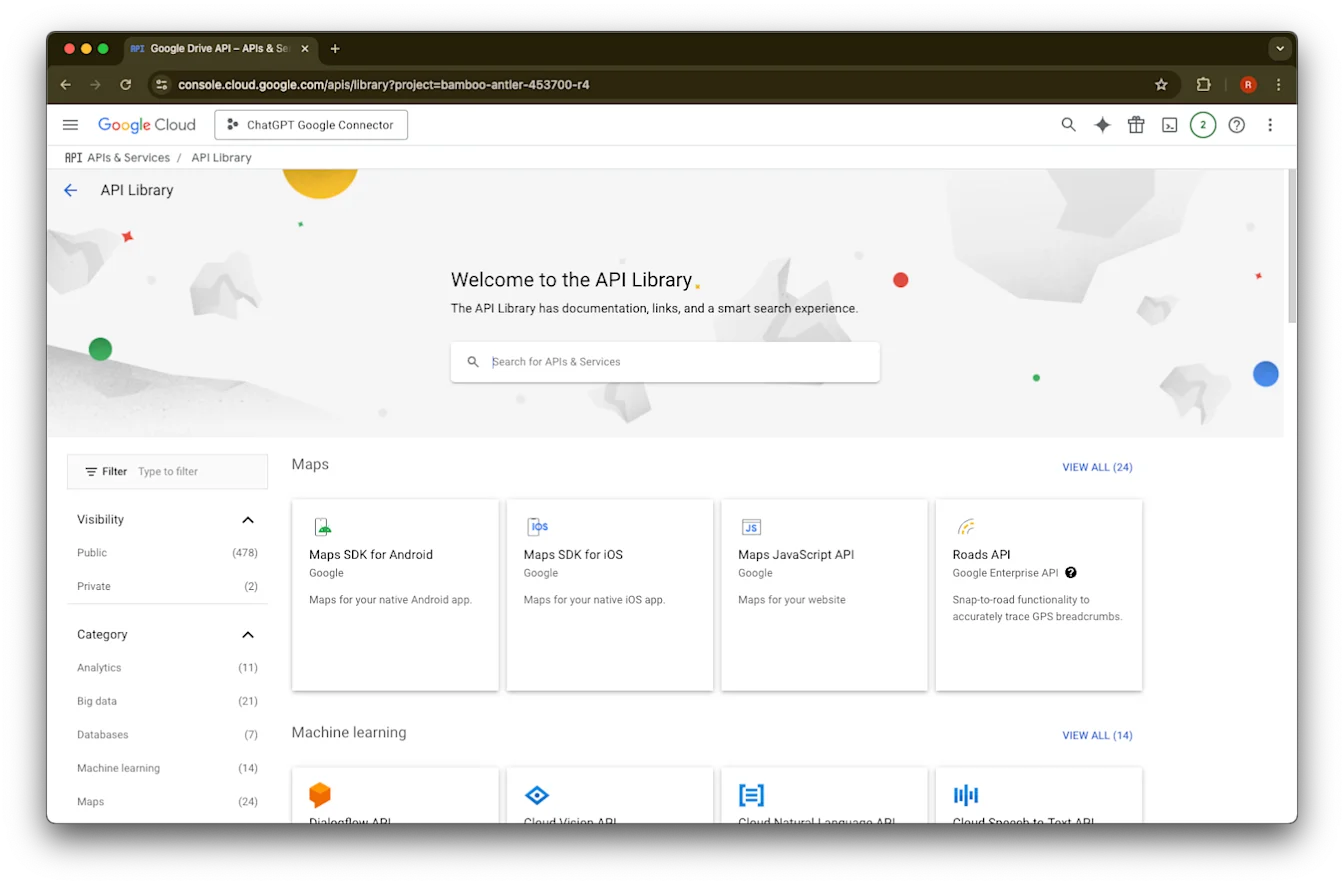
APIs & Services वर क्लिक करा.
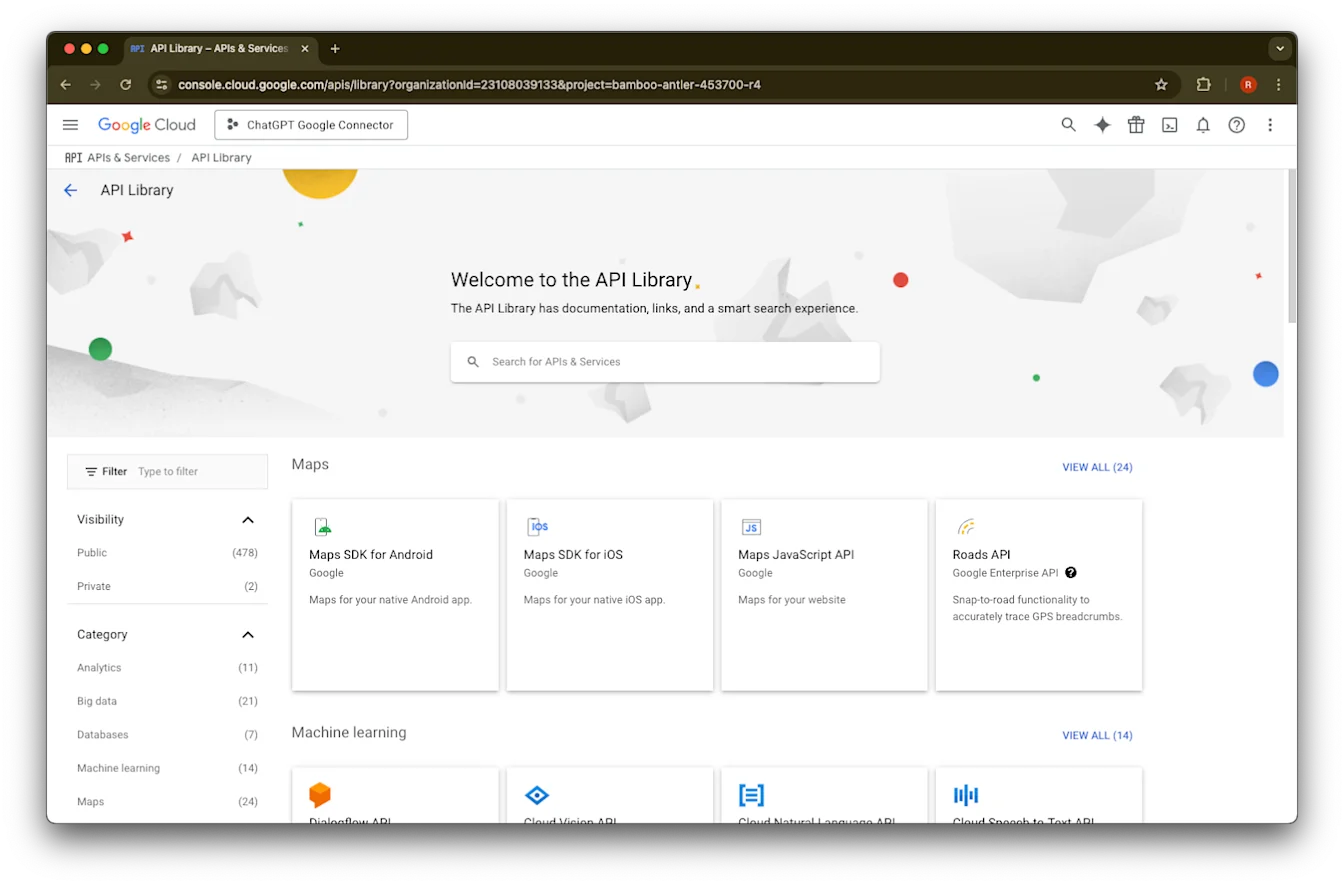
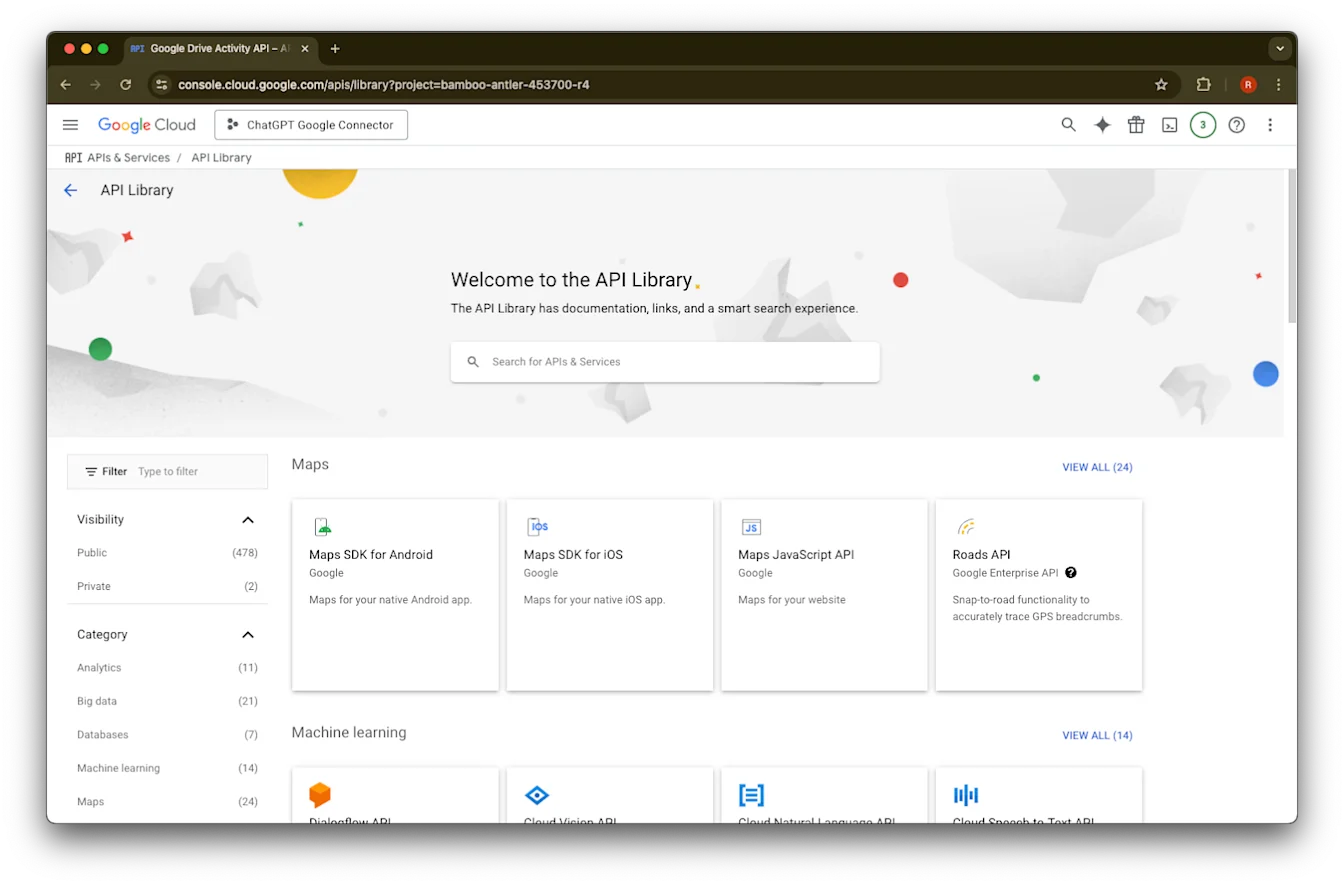
Library वर क्लिक करा.
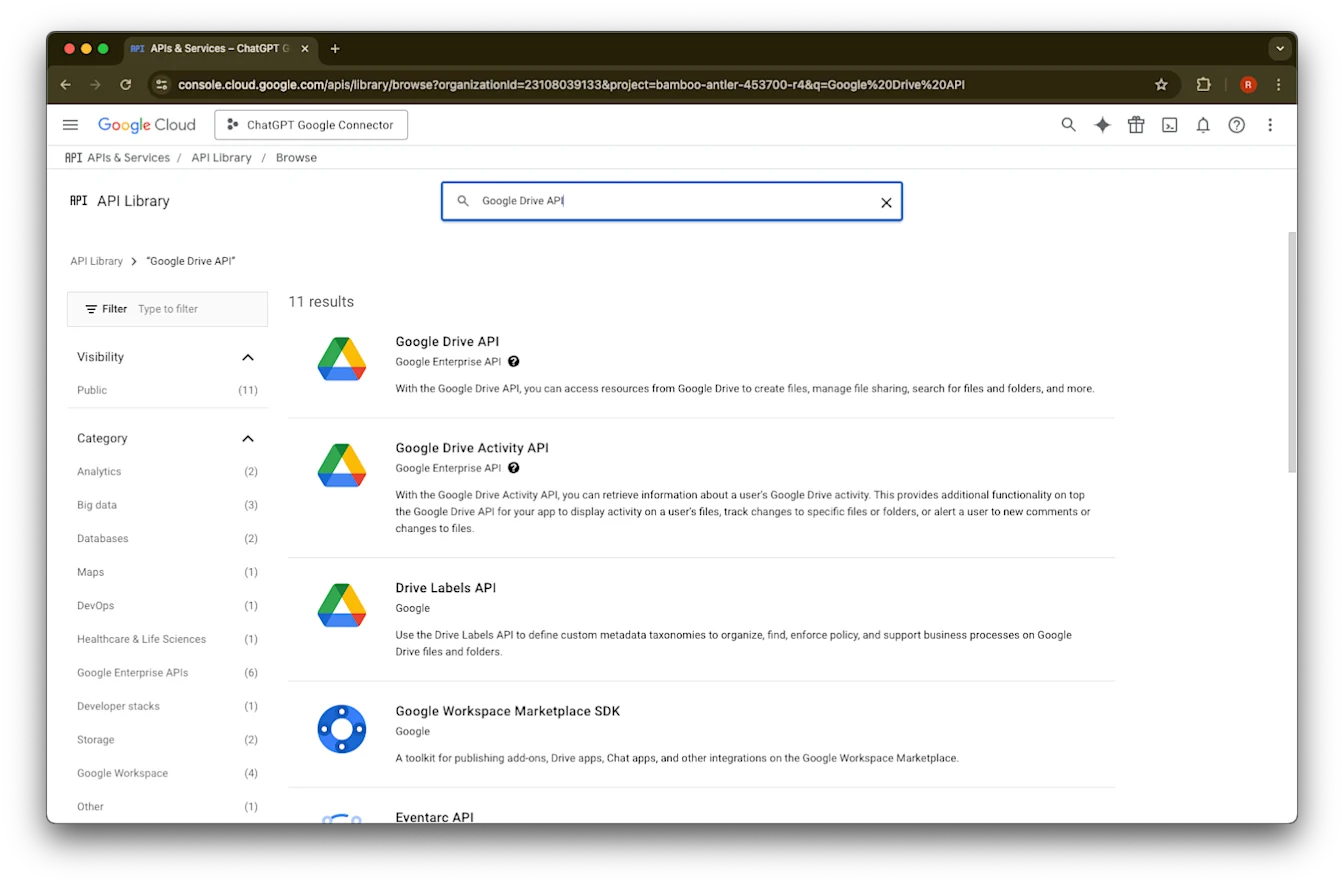
आता आपण तीन APIs जोडणार आहोत, त्यांना शोधण्यासाठी search box वापरून.
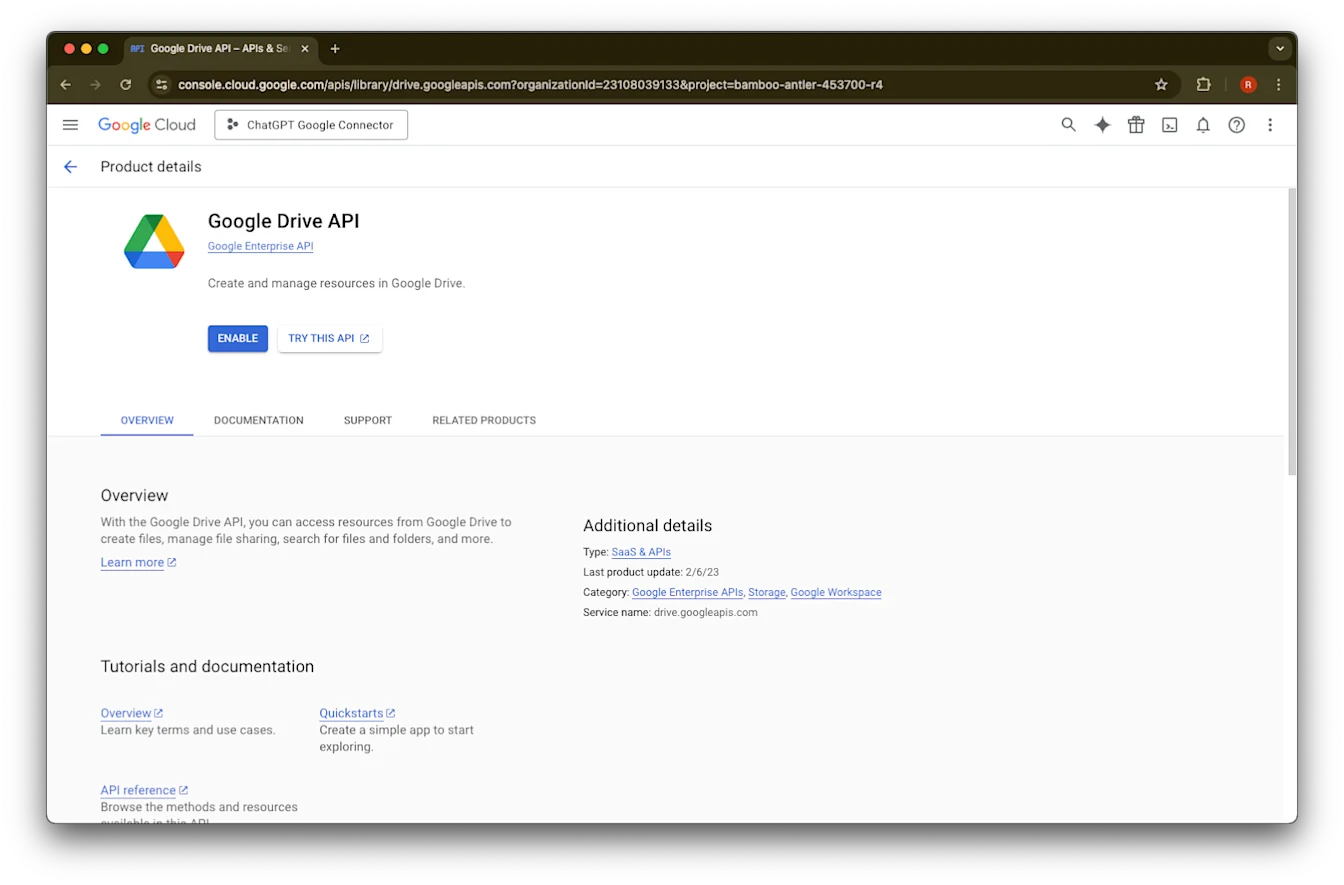
Google Drive API शोधा आणि निवडा.
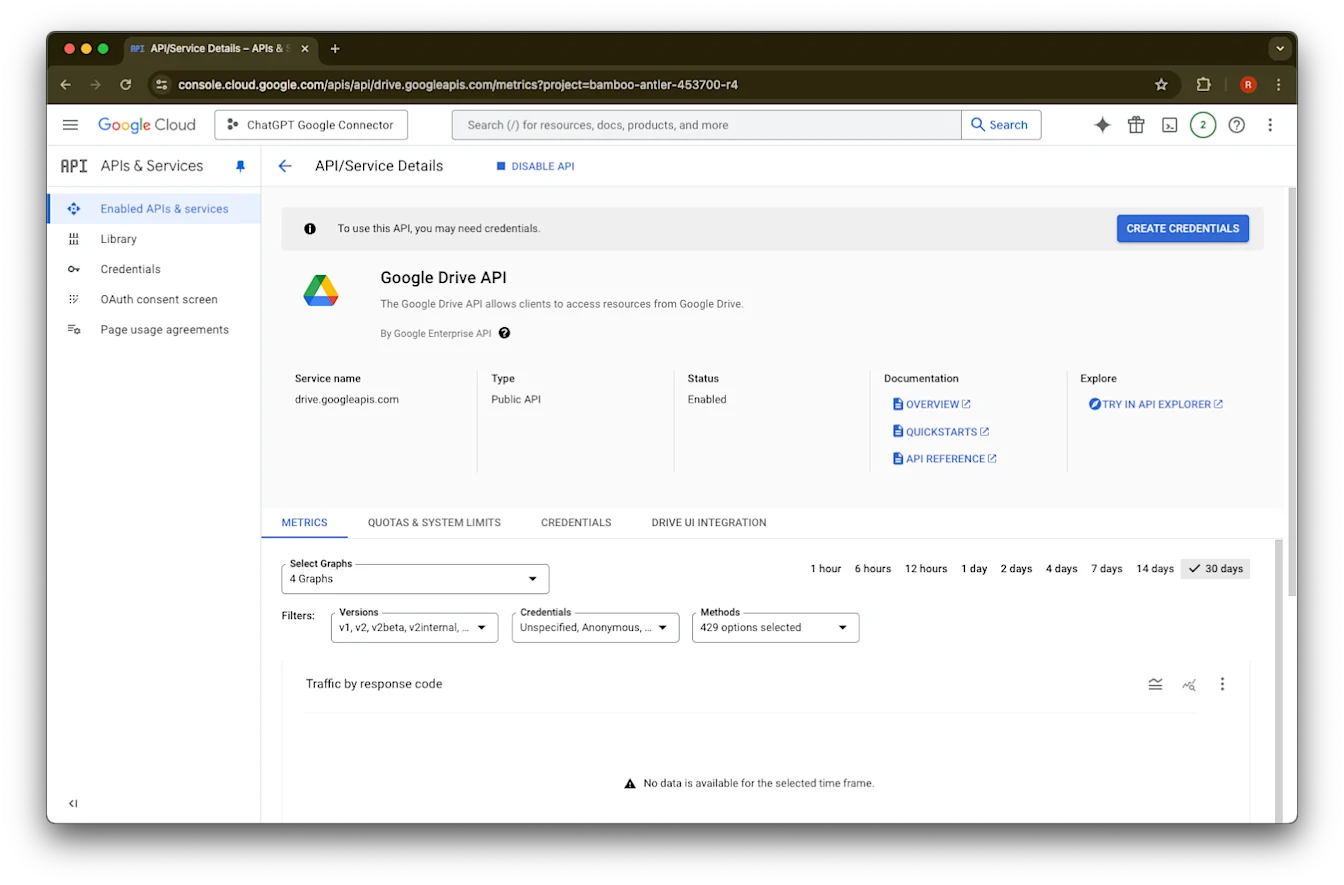
Enable वर क्लिक करा.
Library वर क्लिक करा.
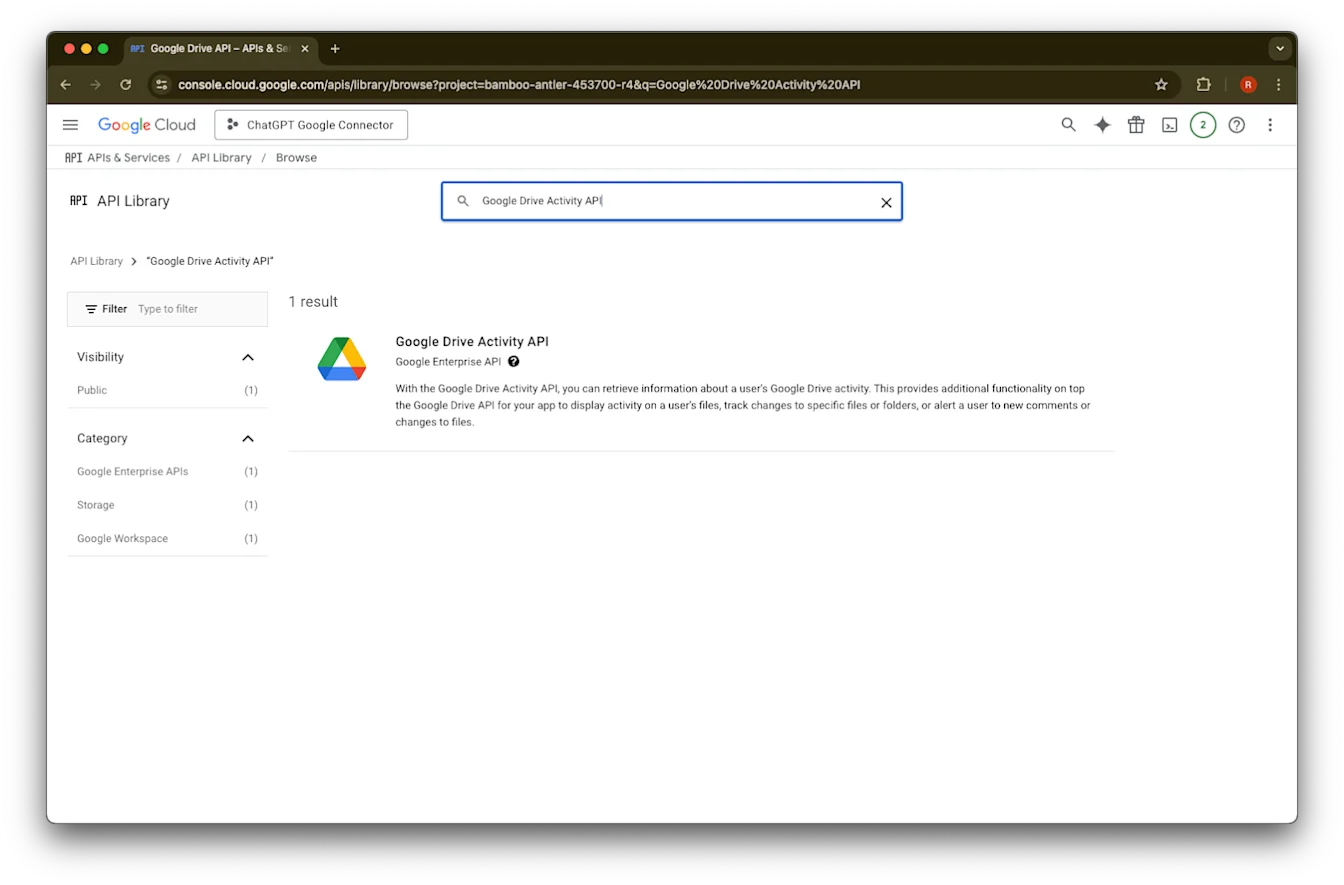
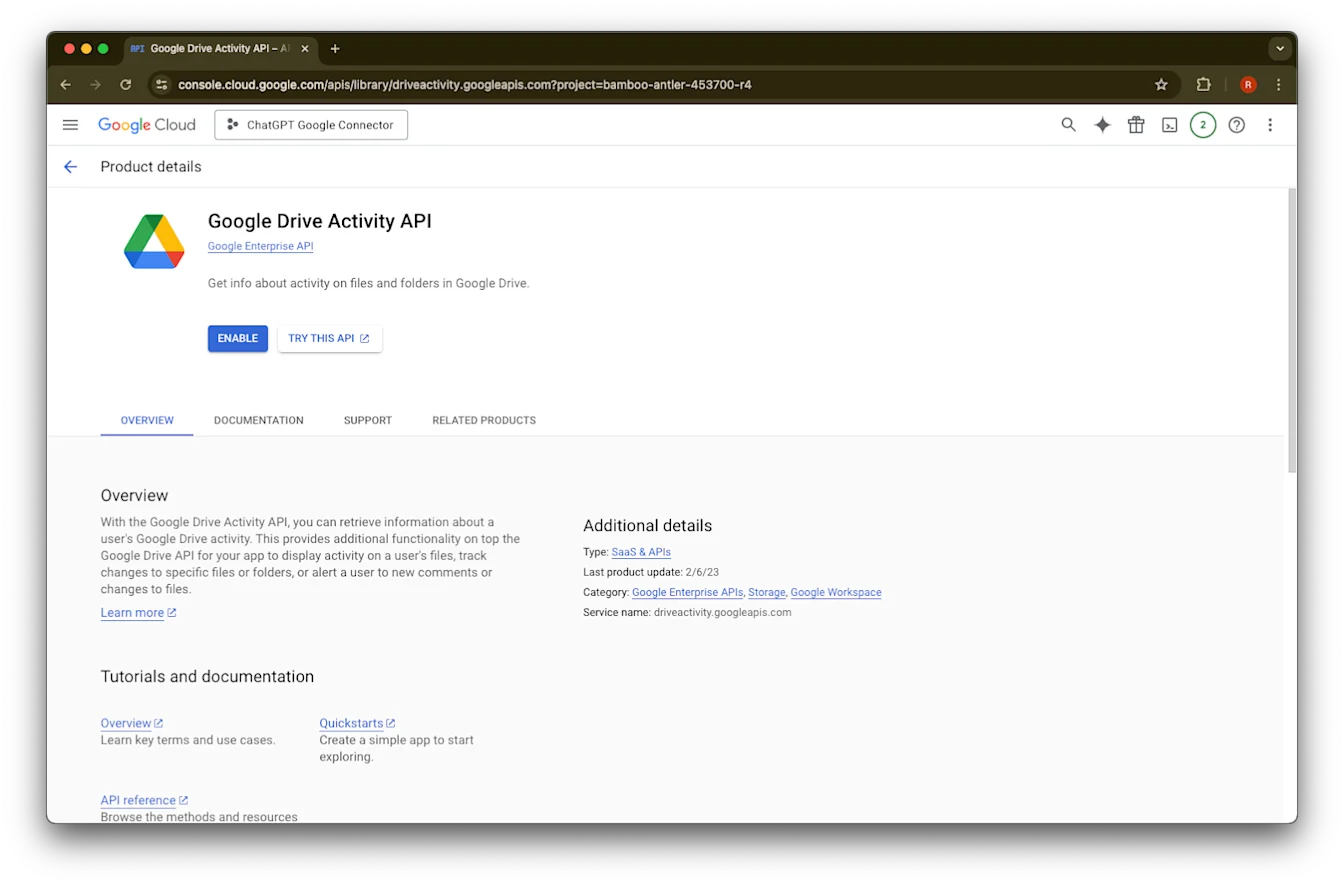
Google Drive Activity शोधा.
Google Drive Activity API निवडा.
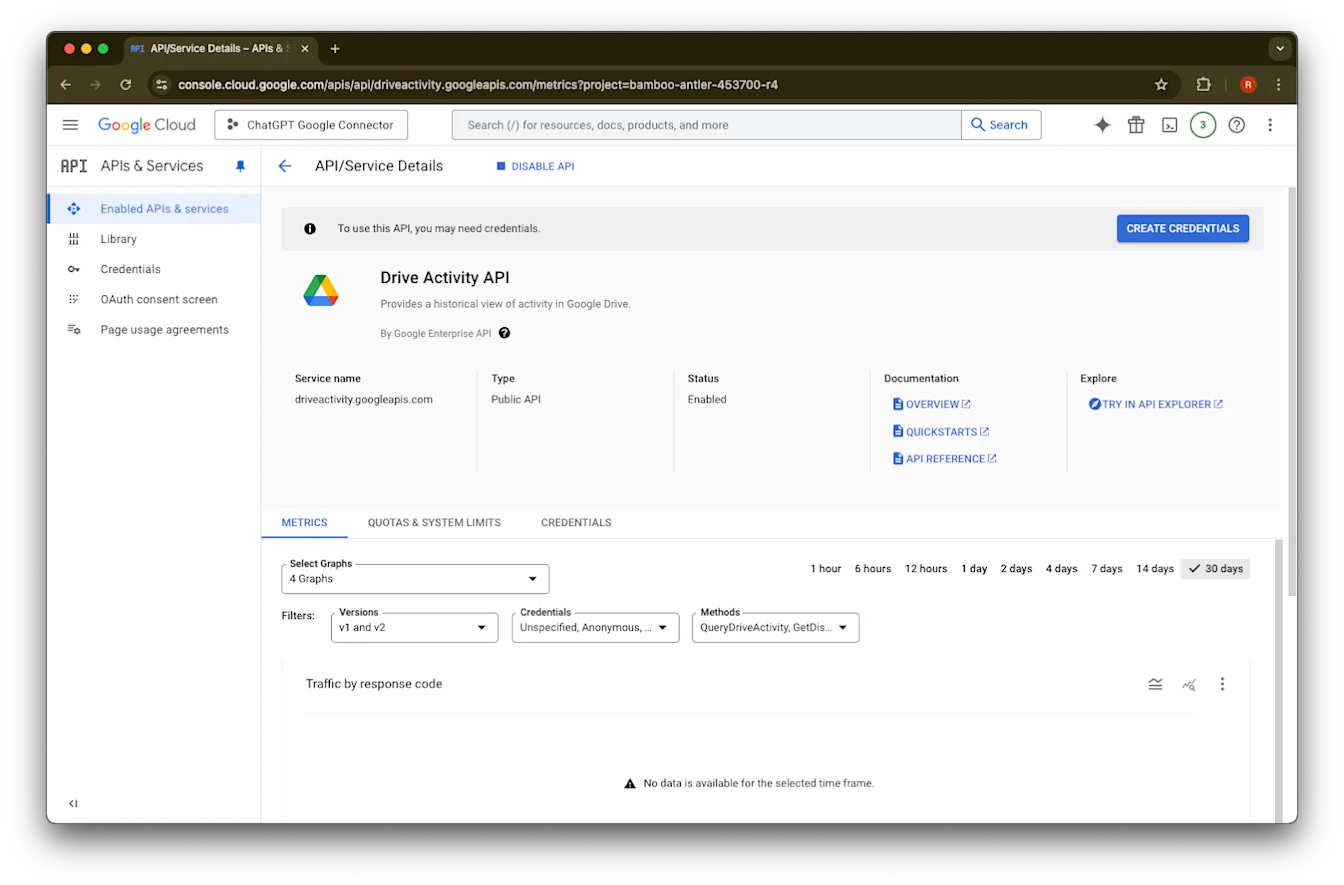
Enable वर क्लिक करा.
Library वर क्लिक करा.
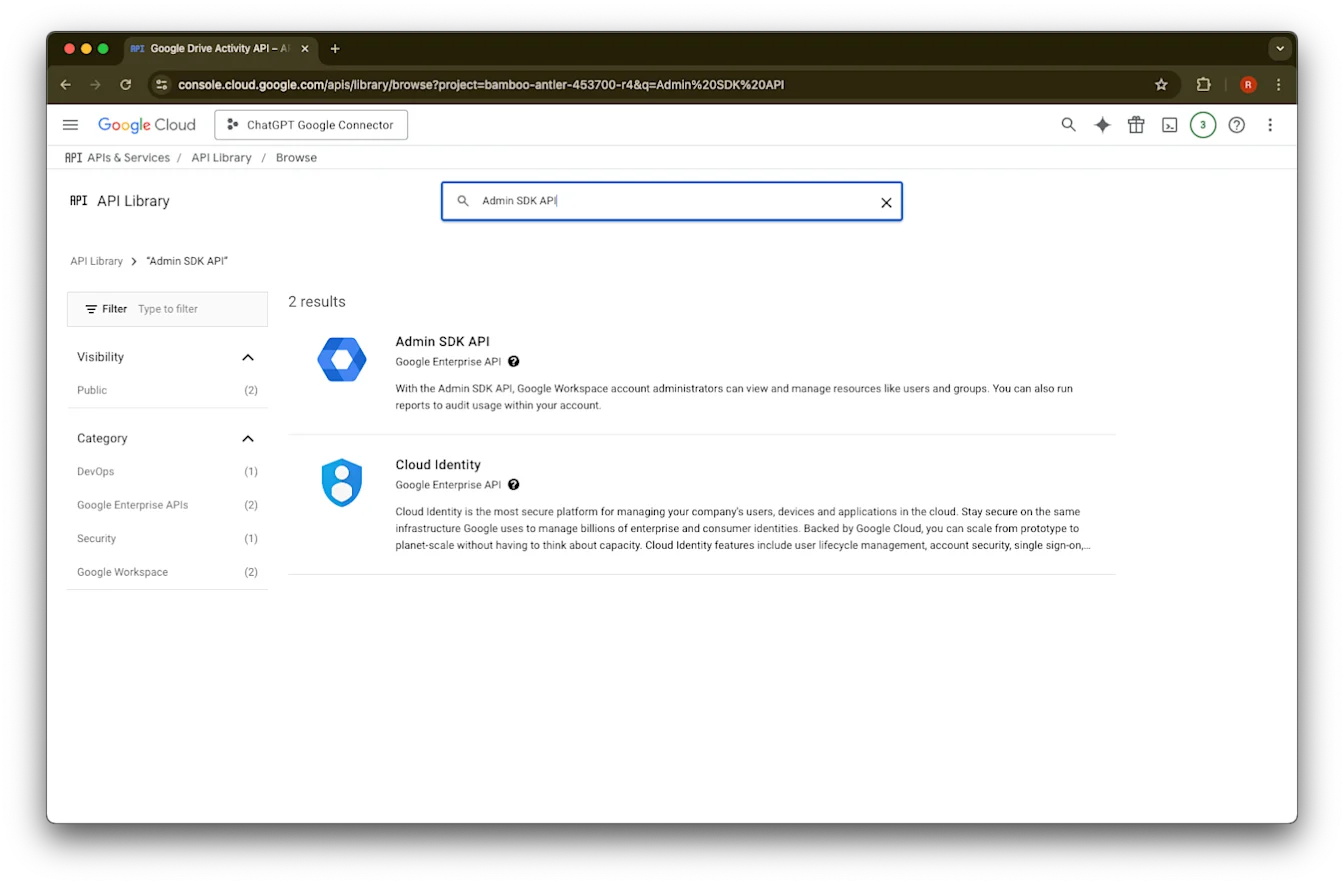
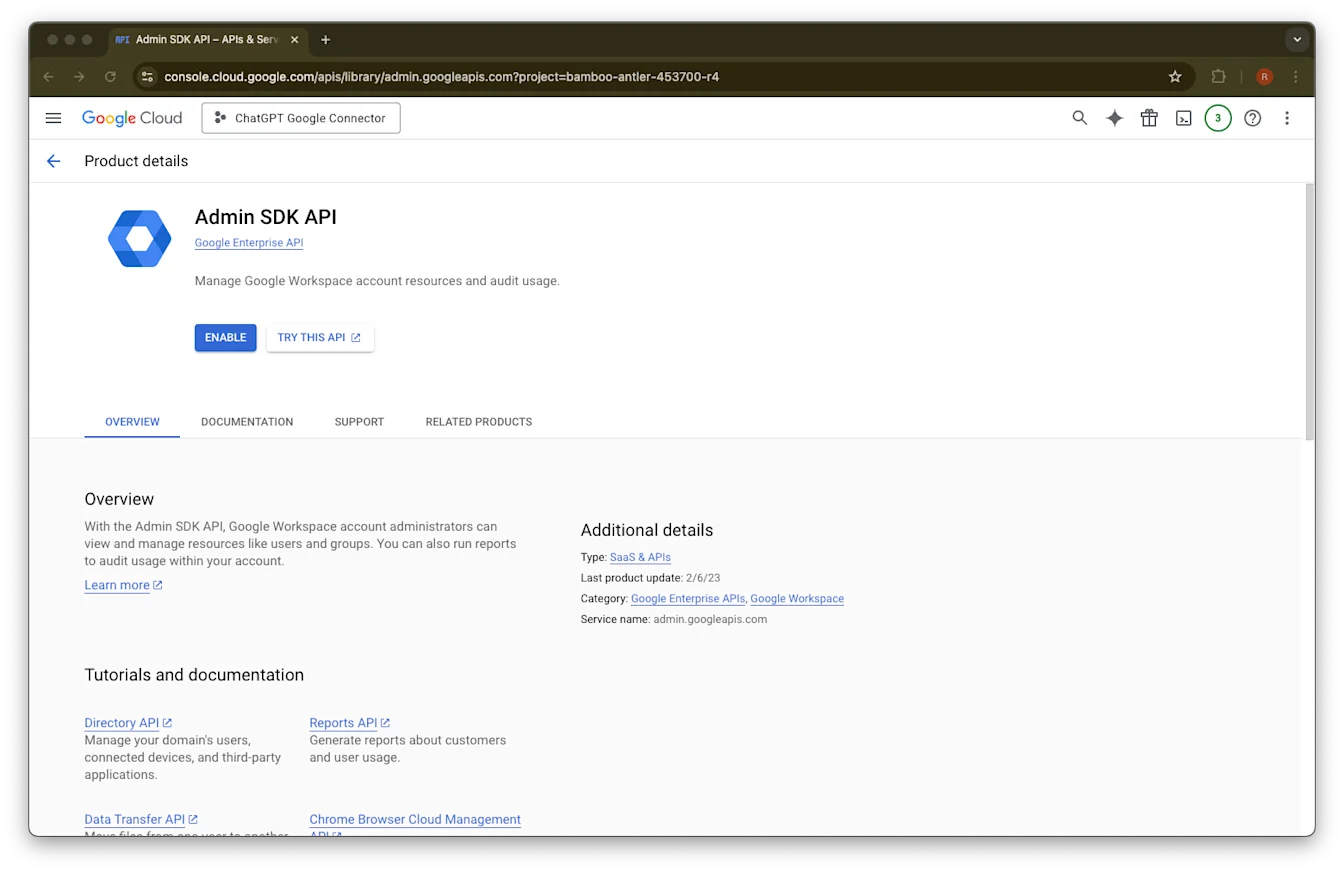
Admin SDK API शोधा.
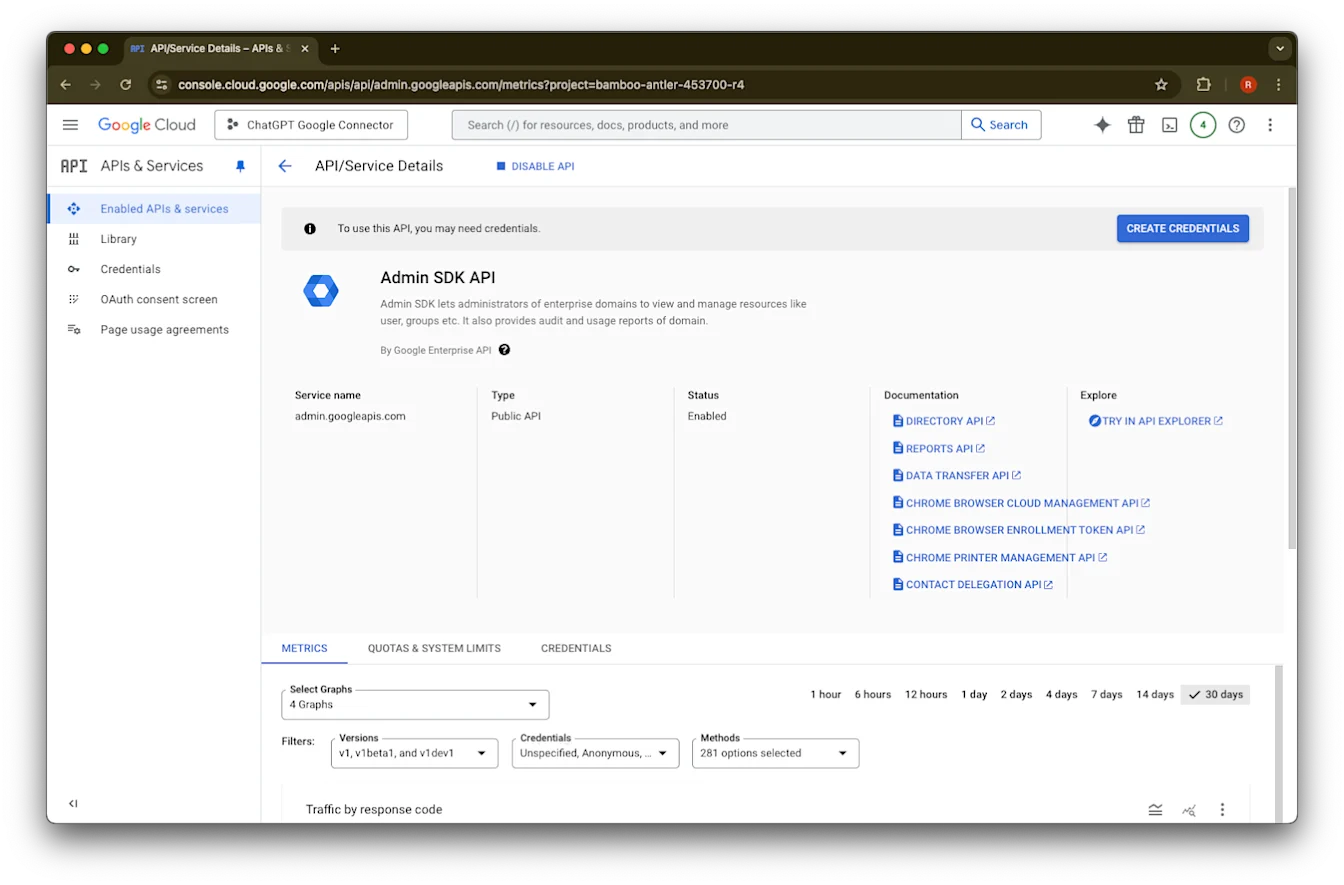
Admin SDK API
निवडा.Enable वर क्लिक करा.
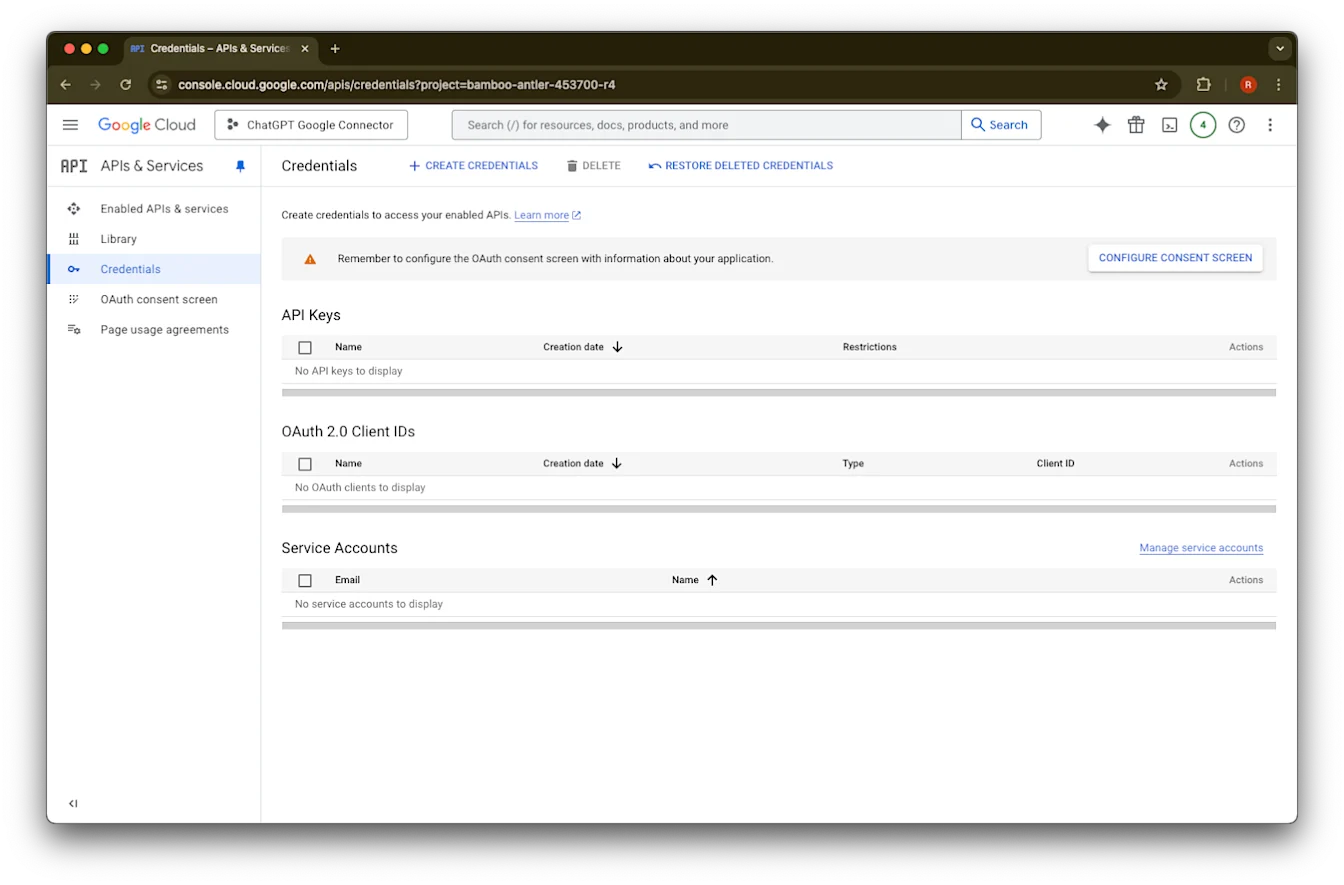
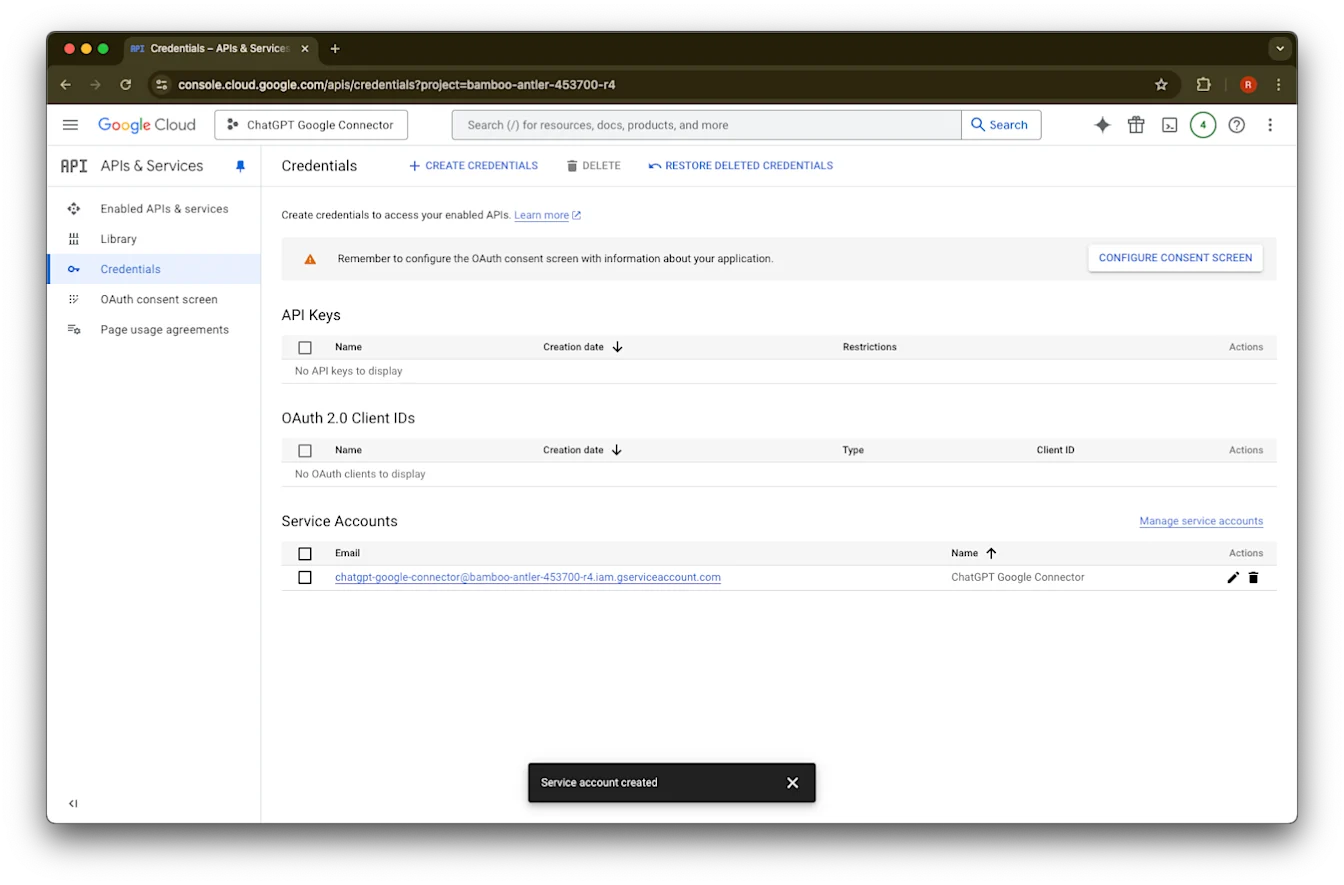
Credentials वर क्लिक करा.
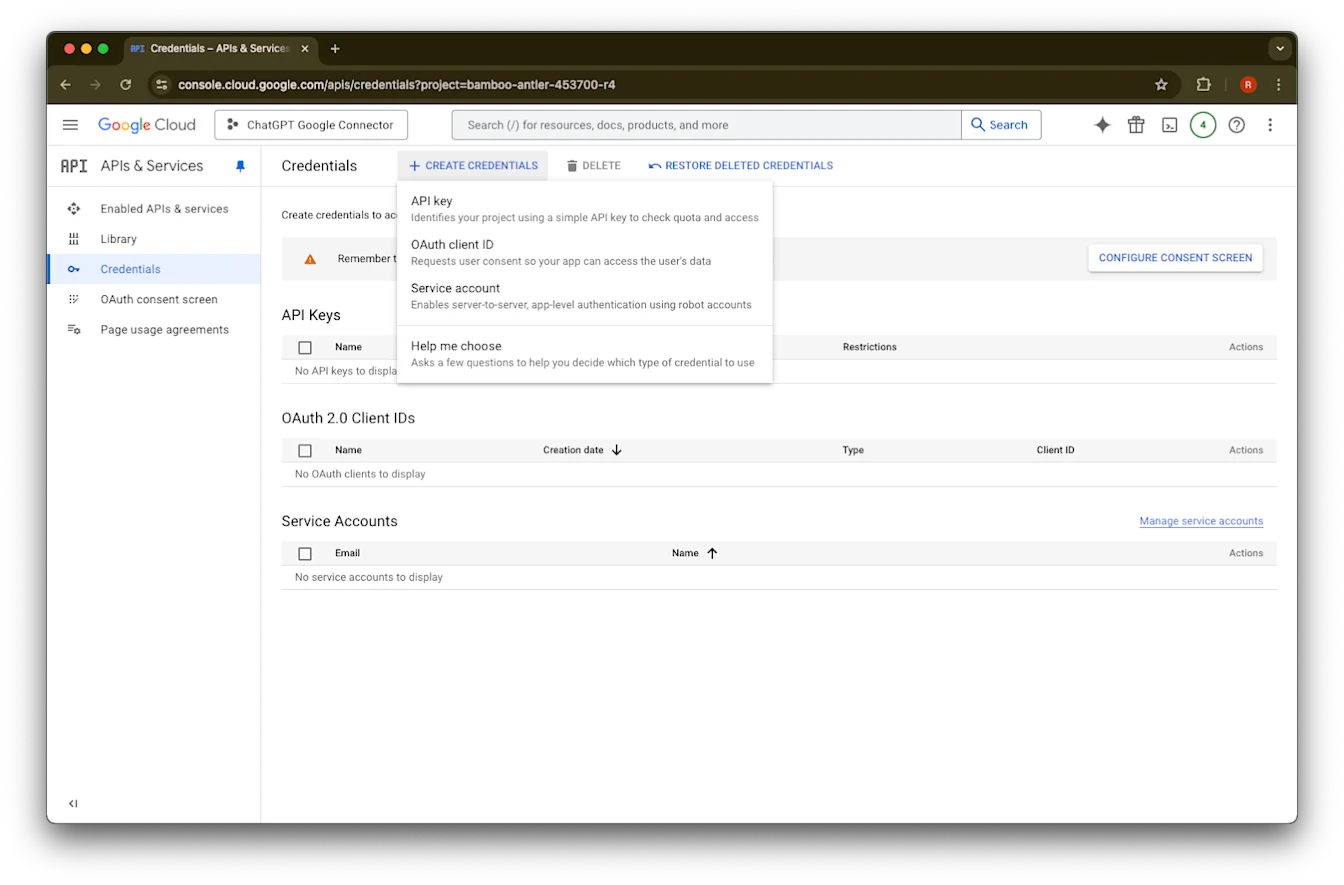
Create Credentials वर क्लिक करा.
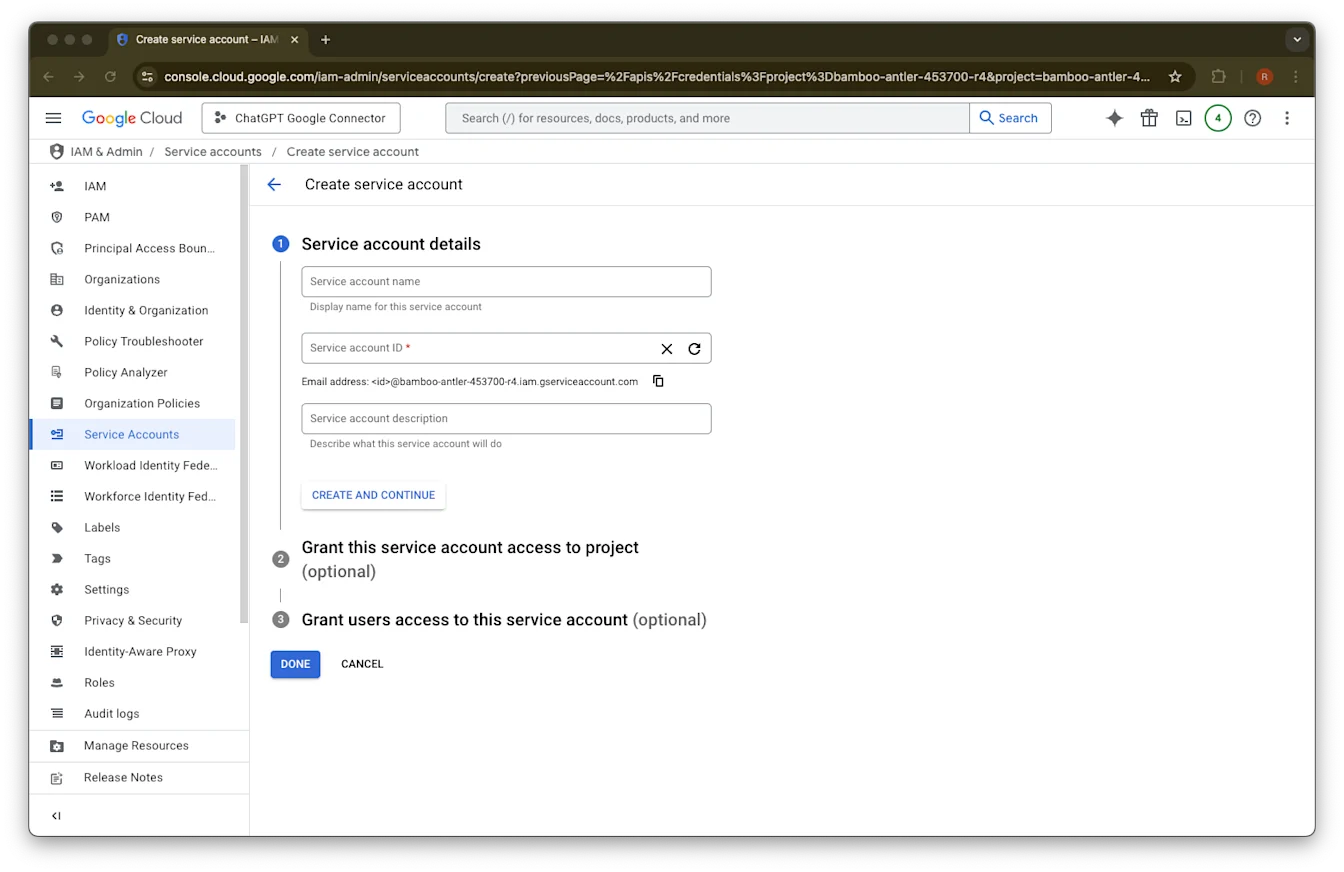
Service account वर क्लिक करा.
या service account साठी तुमच्या पसंतीचे name आणि description द्या.
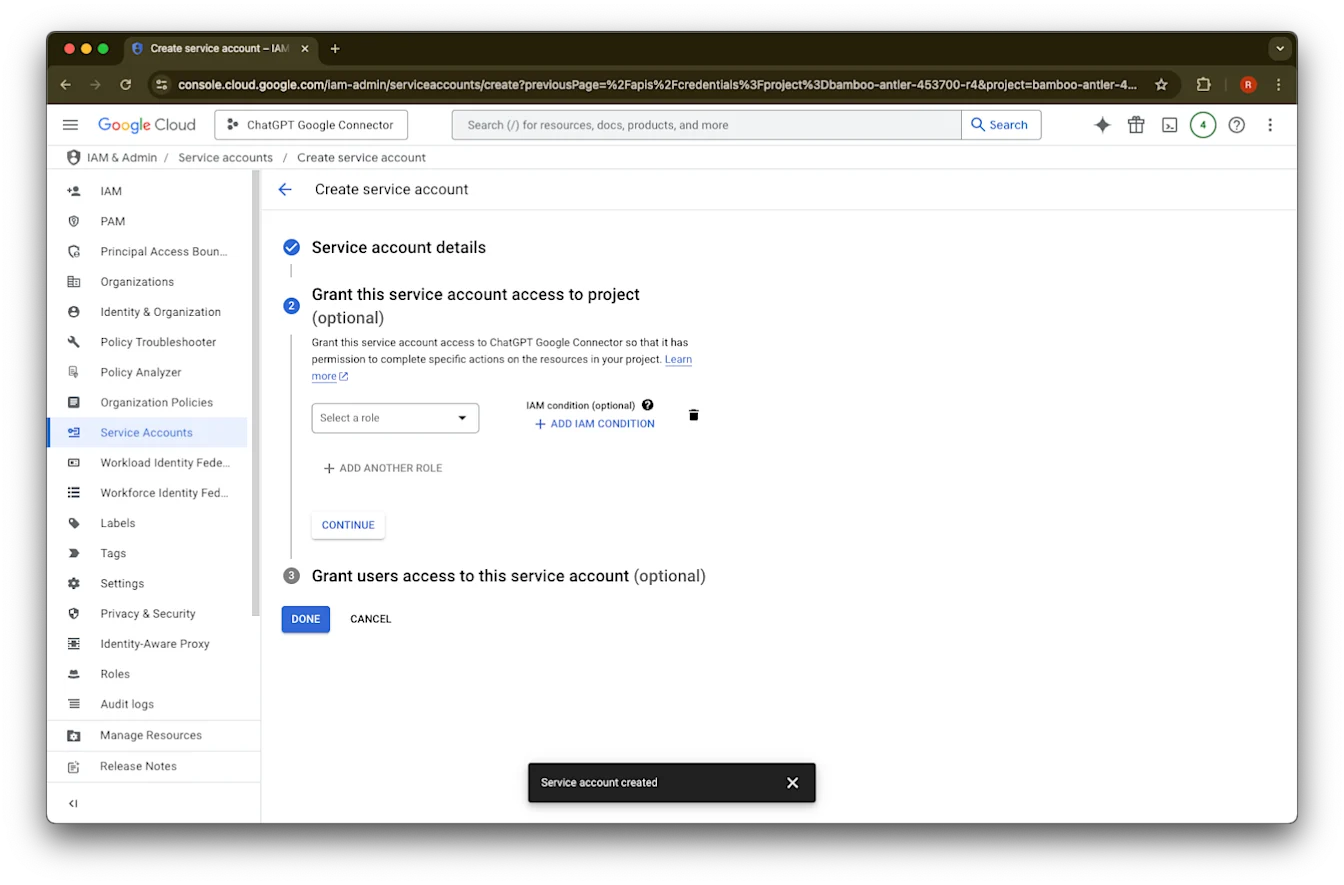
(Optional) तुम्ही एखादी भूमिका देऊ शकता - ChatGPT साठी ही आवश्यक नाही.
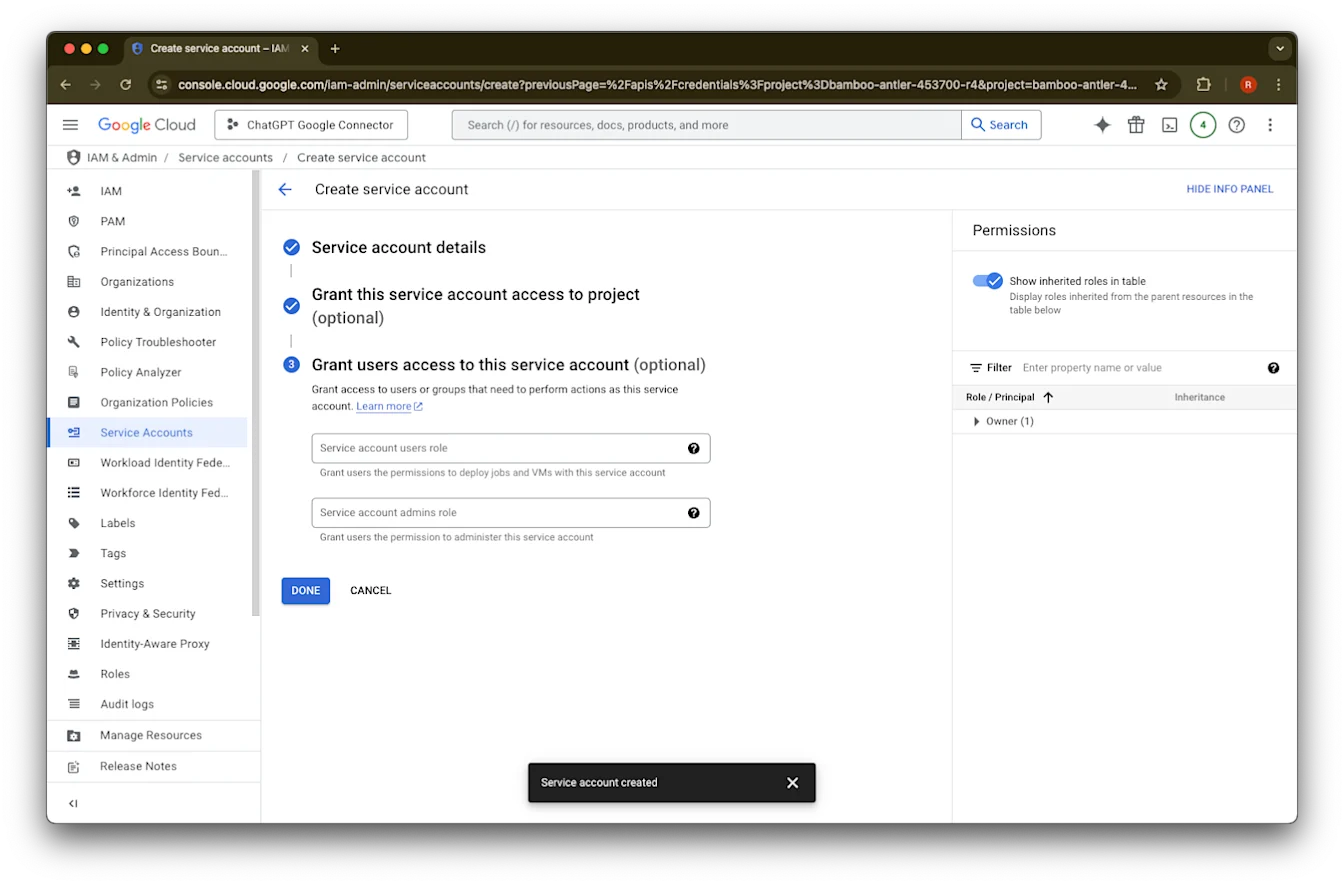
(Optional) तुम्ही service account ला access देऊ शकता - ChatGPT साठी हे आवश्यक नाही.
Done वर क्लिक करा.
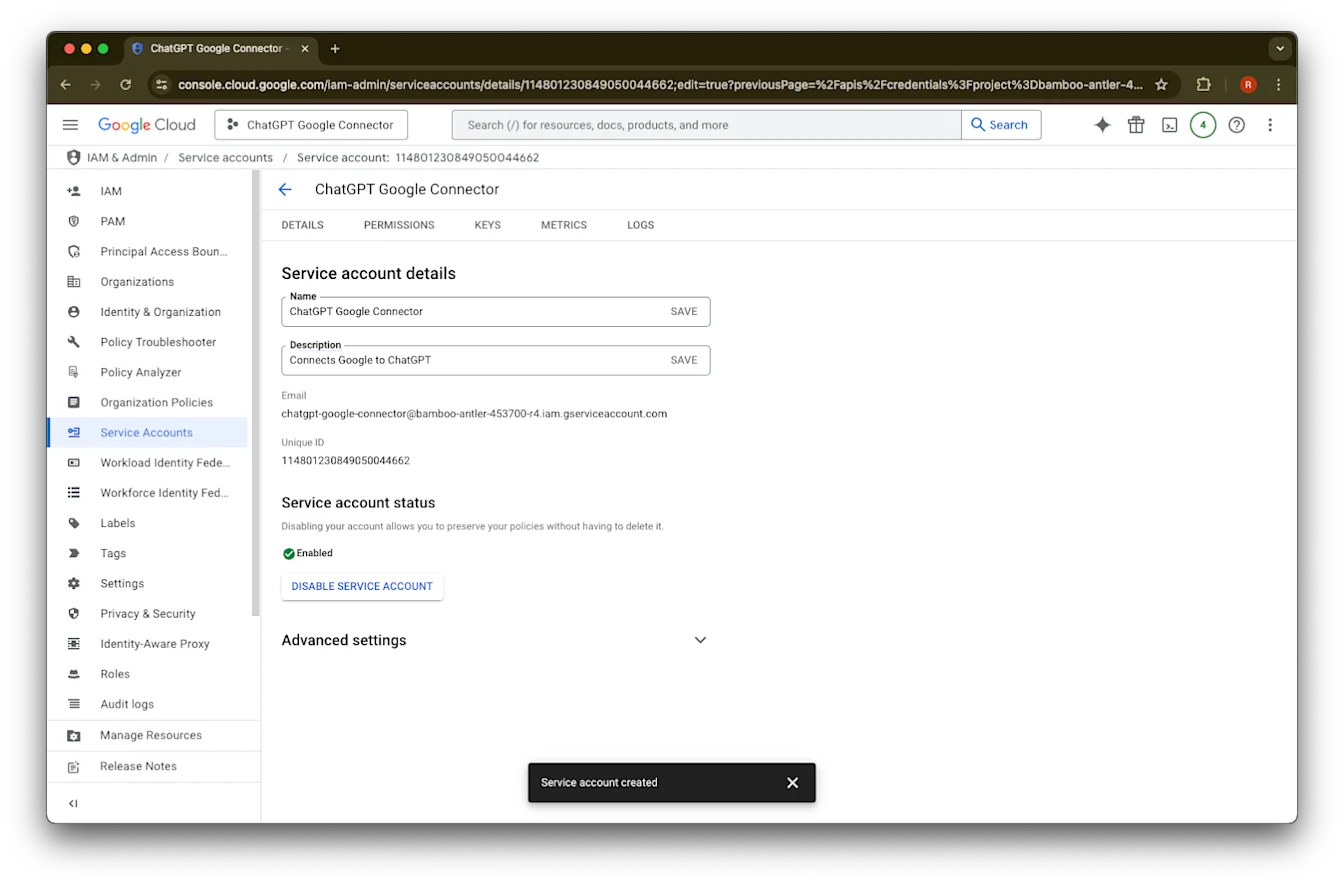
आता तयार झालेले service account वर क्लिक करा.
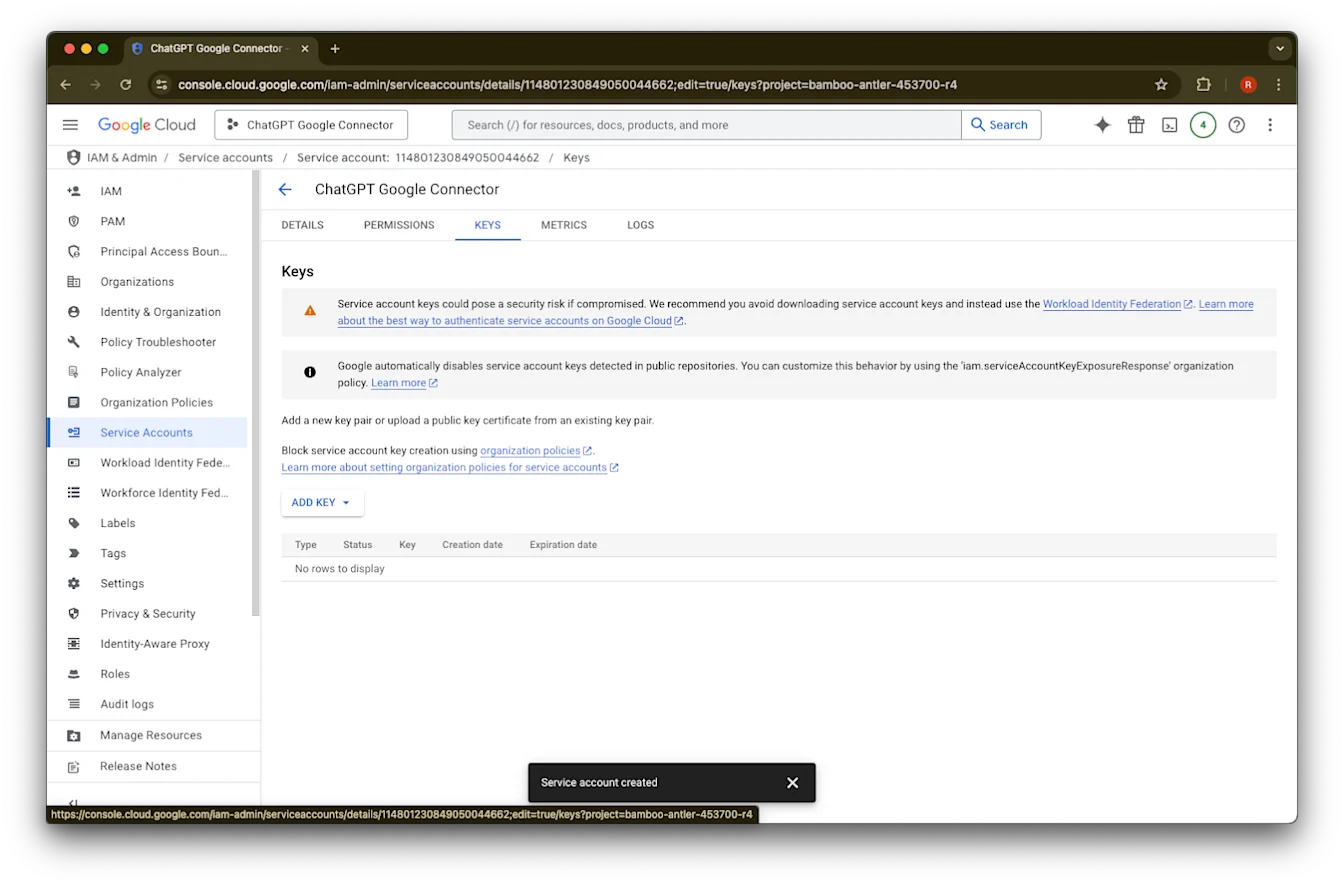
keys. वर क्लिक करा.
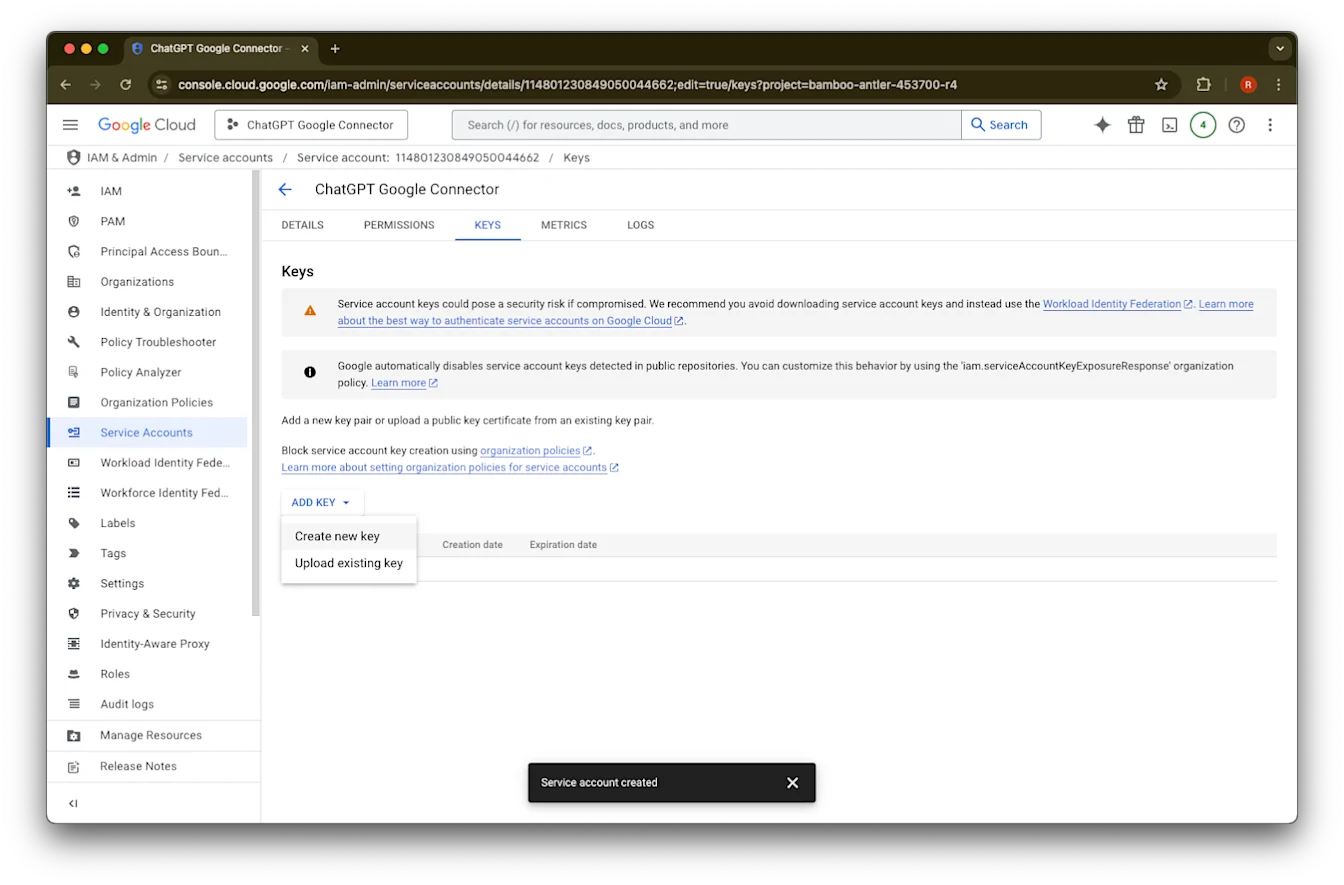
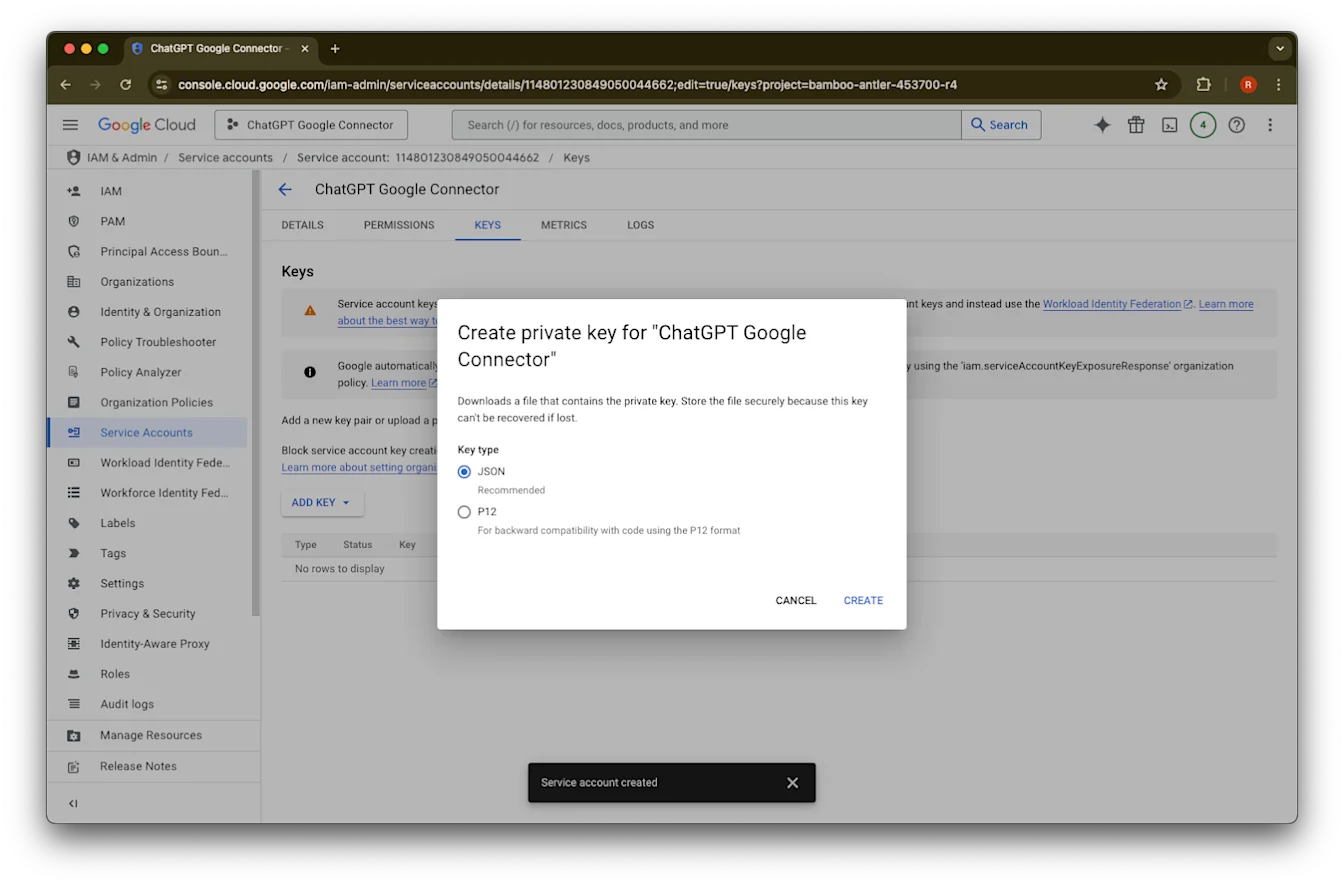
Add Key वर क्लिक करा.
Create new key वर क्लिक करा.
डीफॉल्ट JSON key type तसेच ठेवा आणि Create वर क्लिक करा.
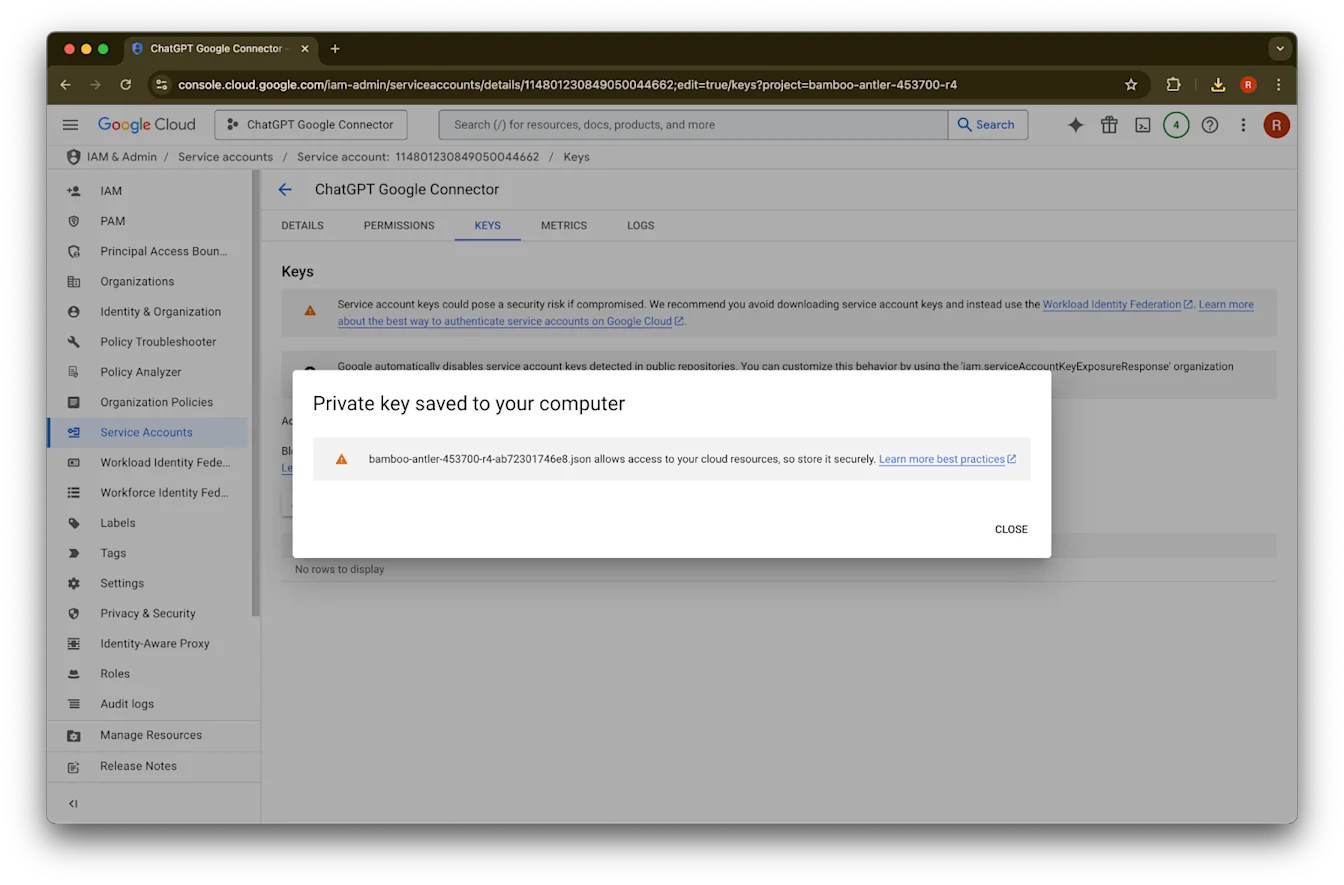
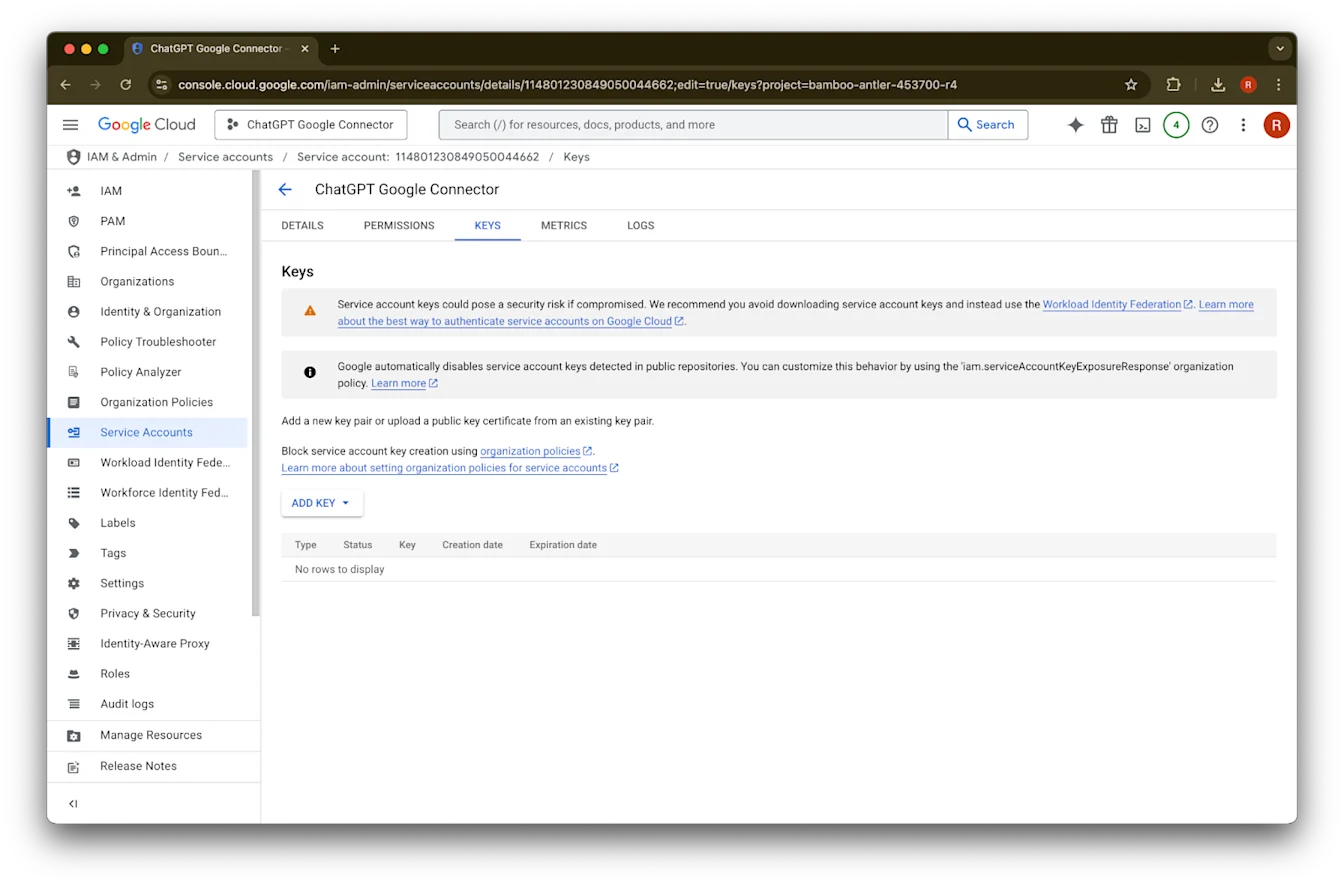
जर तुम्हाला “Service account key creation is disabled” असा error message दिसला, तर creation सक्षम करण्यासाठी या पायऱ्या फॉलो करा.Close वर क्लिक करा. Key आता तुमच्या कॉम्प्युटरवर डाउनलोड झाली आहे. नंतर तुम्ही ती ChatGPT अॅडमिन कन्सोलवर अपलोड कराल.
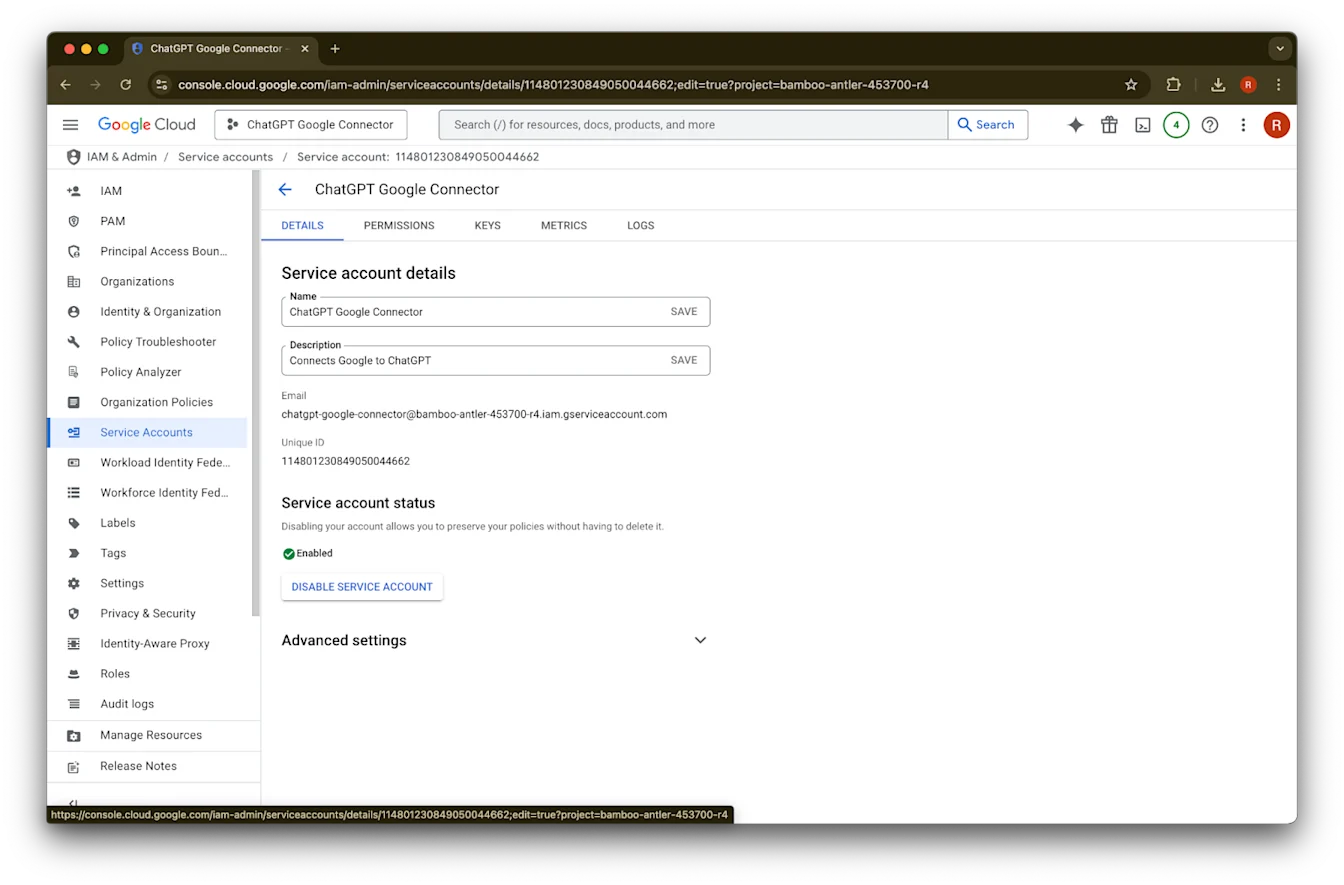
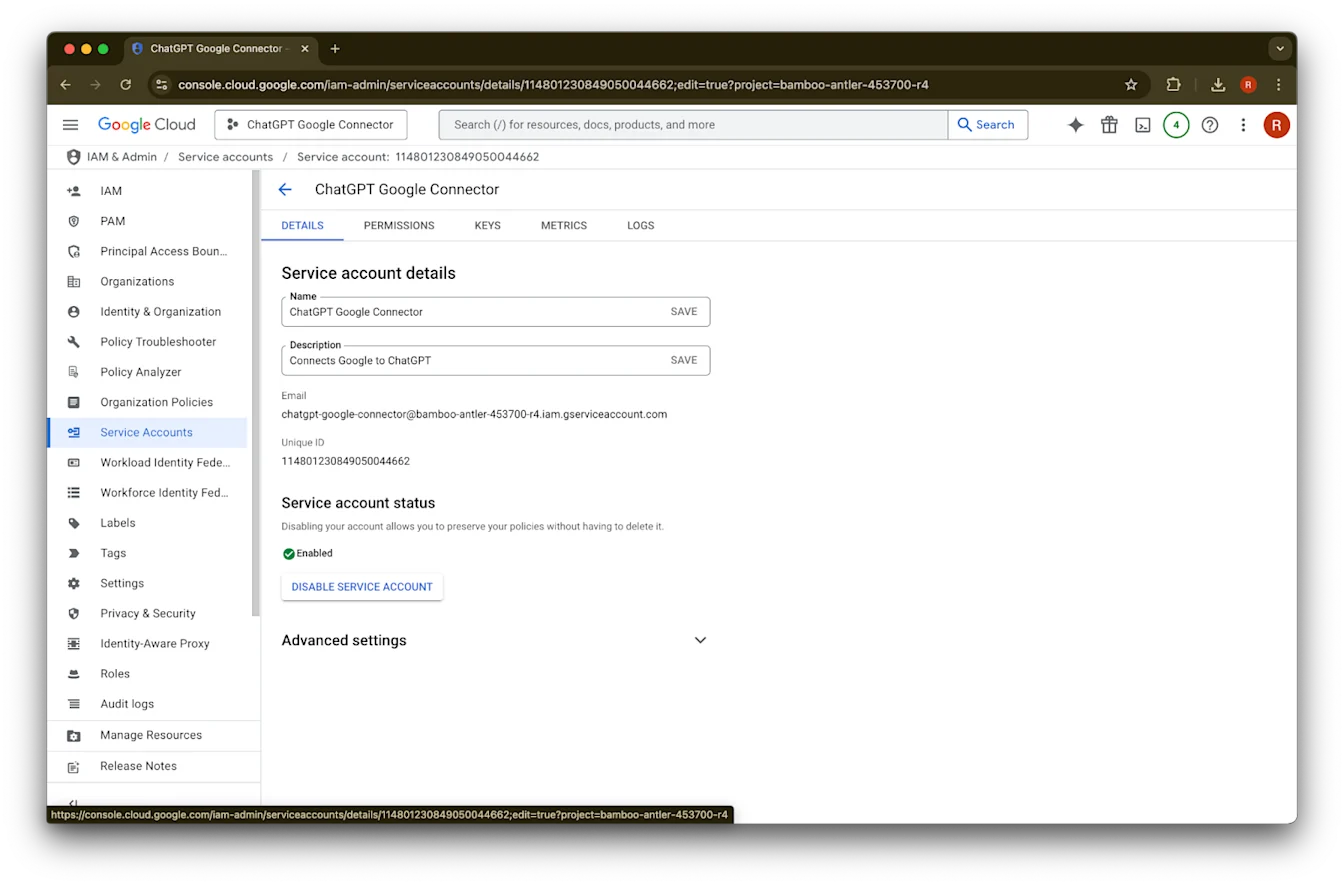
details वर क्लिक करा.
Unique ID लक्षात ठेवा. हे Step 42 मध्ये लागेल.
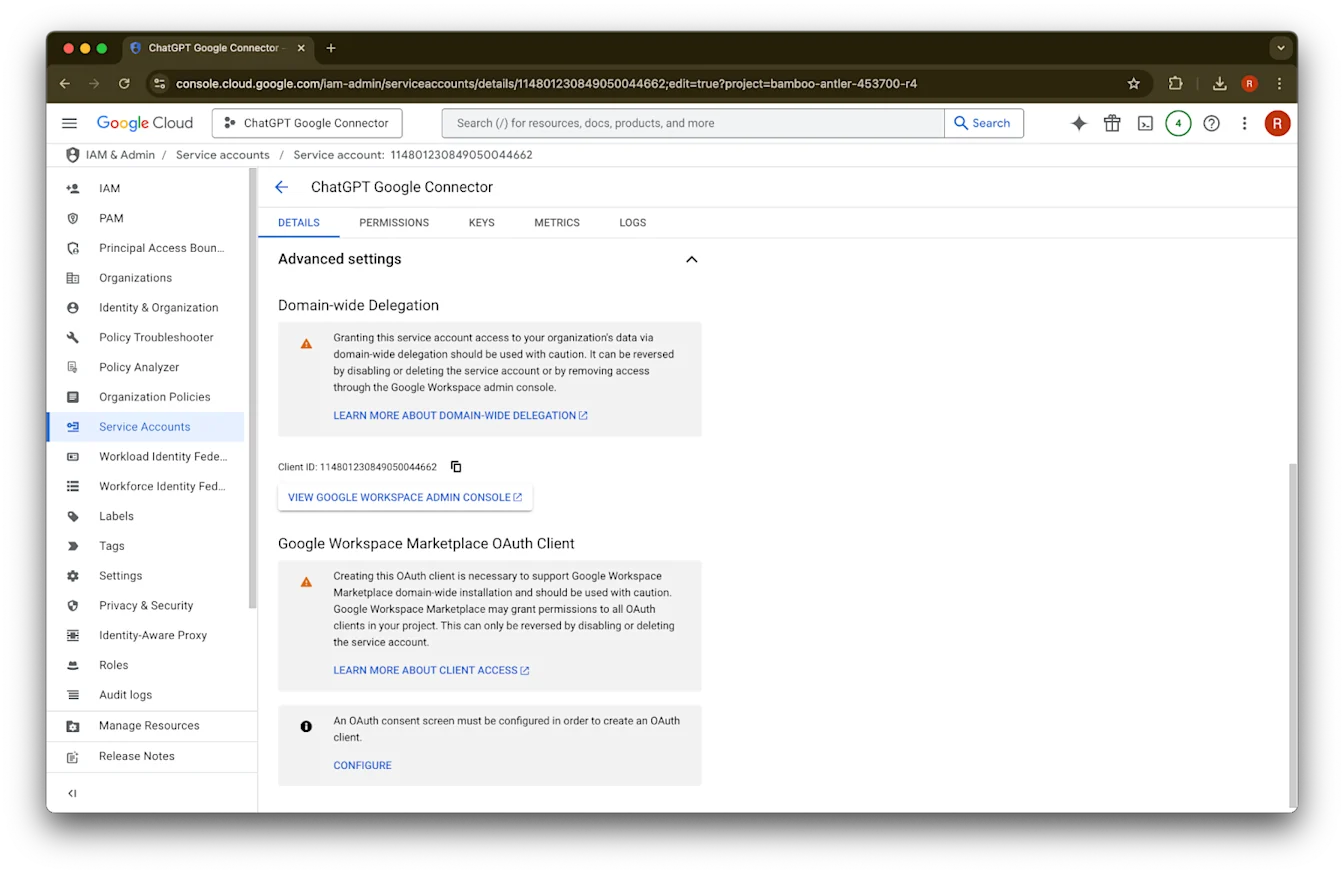
Advanced settings विस्तृत करा.
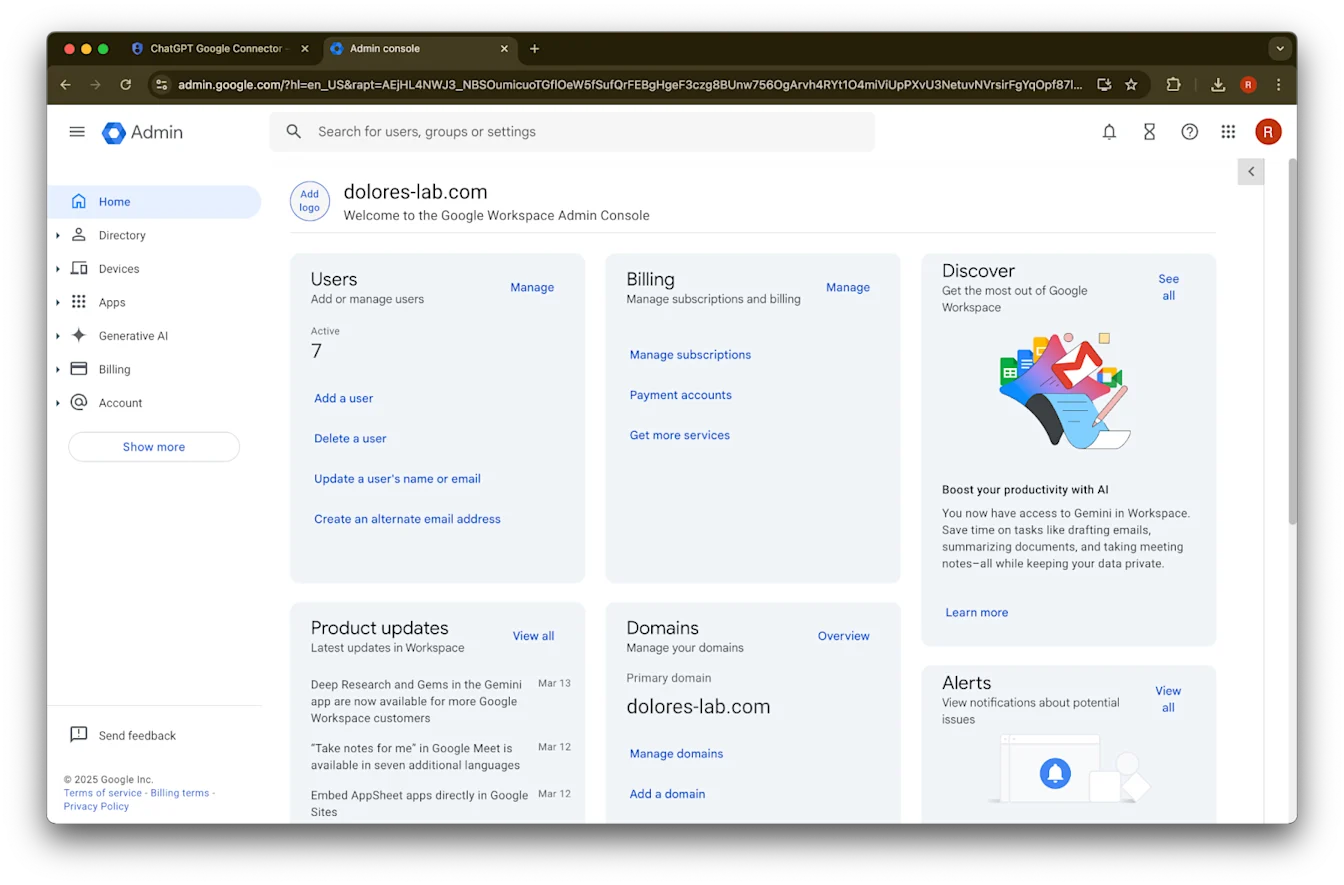
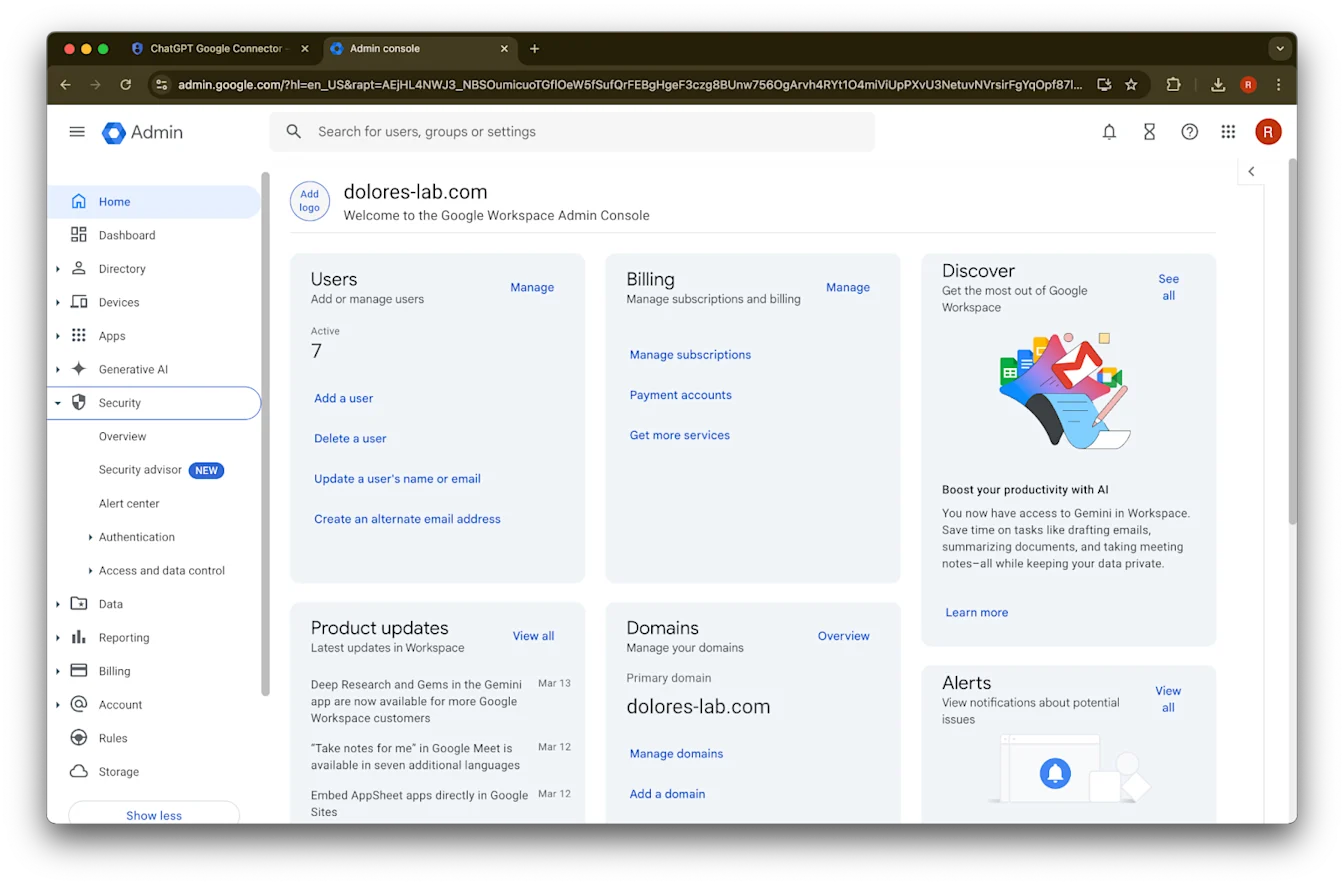
खाली स्क्रोल करा आणि View Google Workspace Admin Console वर क्लिक करा. Google Workspace console नवीन tab मध्ये उघडेल.
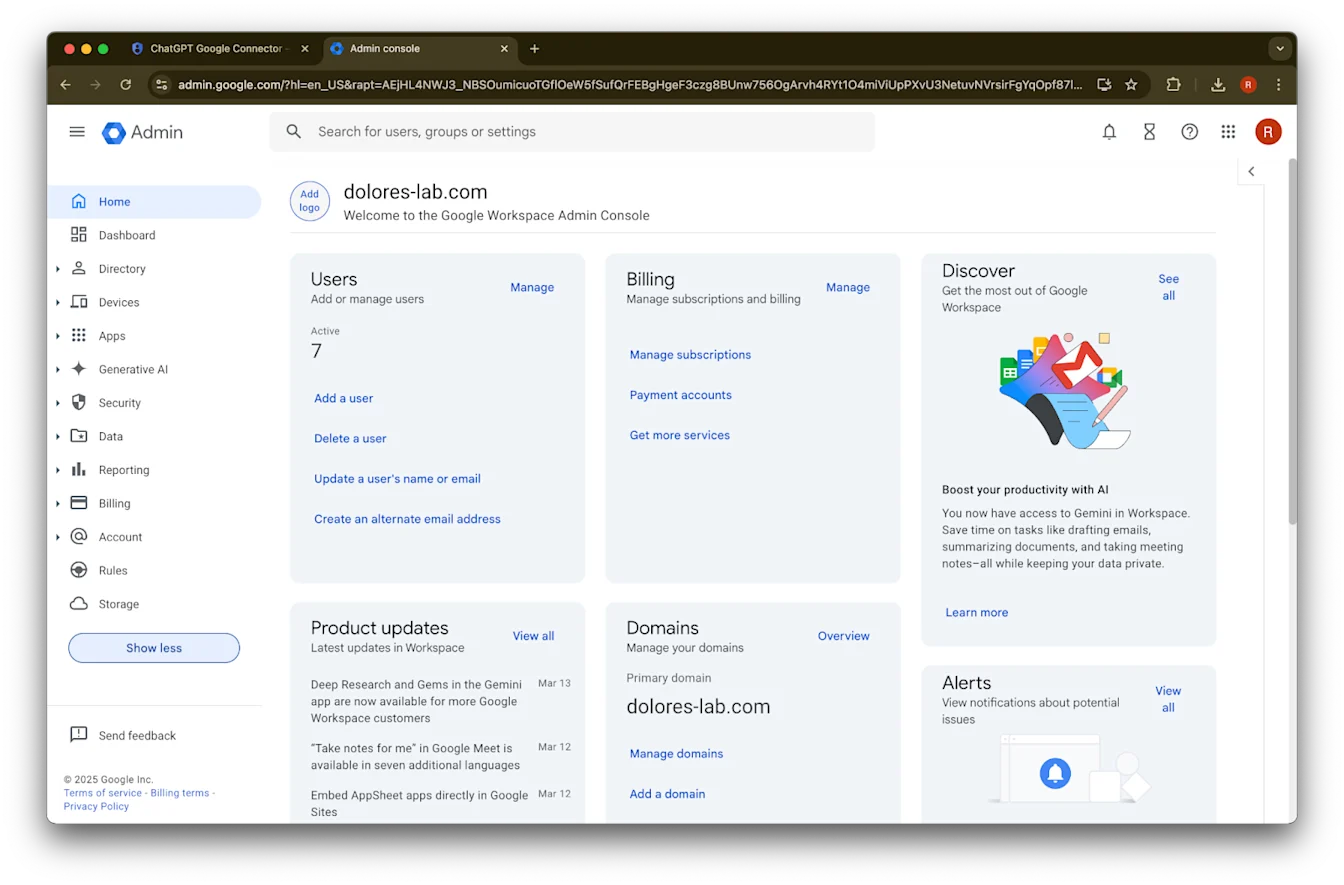
Show more वर क्लिक करा.
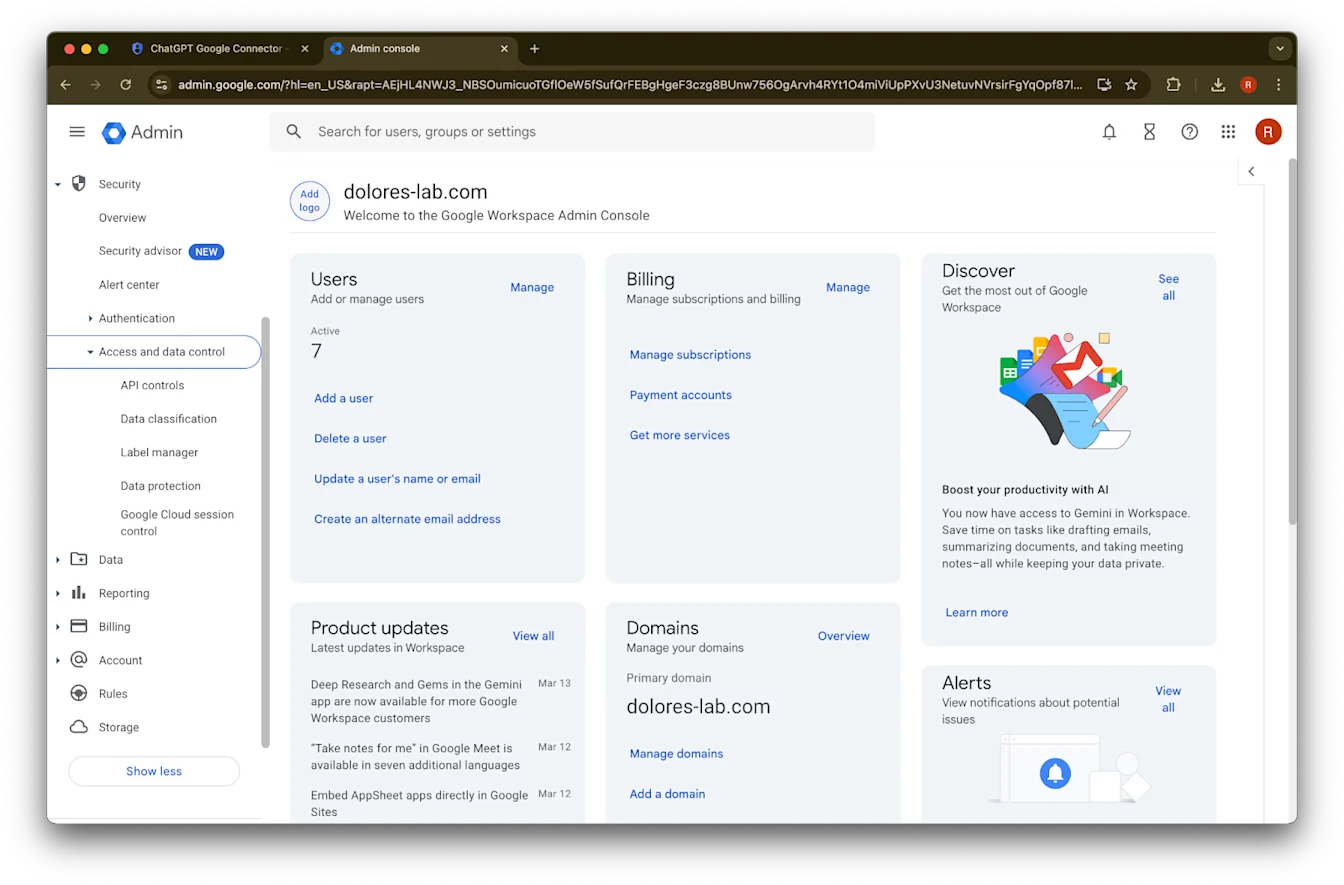
Security विभाग विस्तृत करा.
Access and data controls विभाग विस्तृत करा.
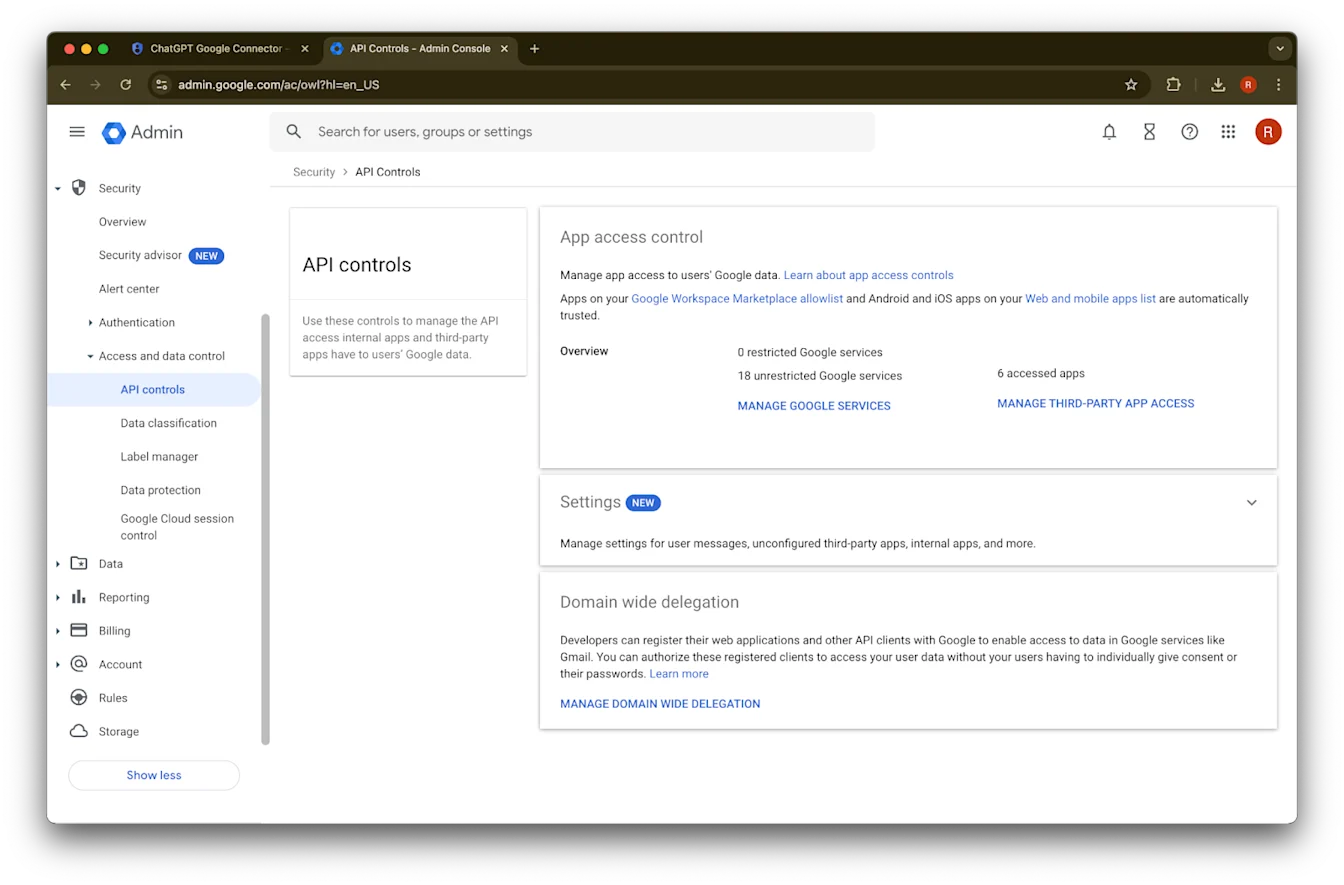
API controls विभागावर क्लिक करा.
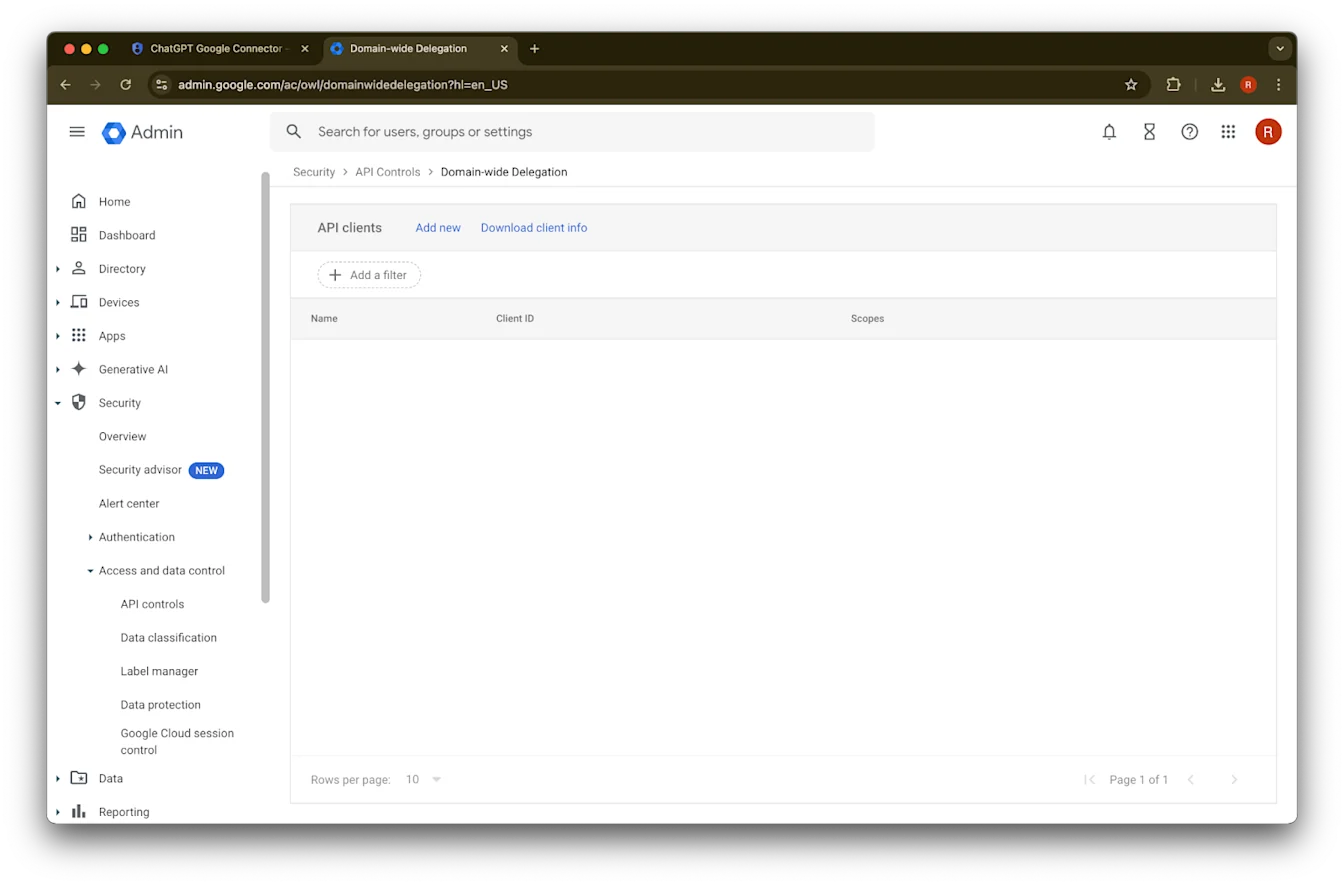
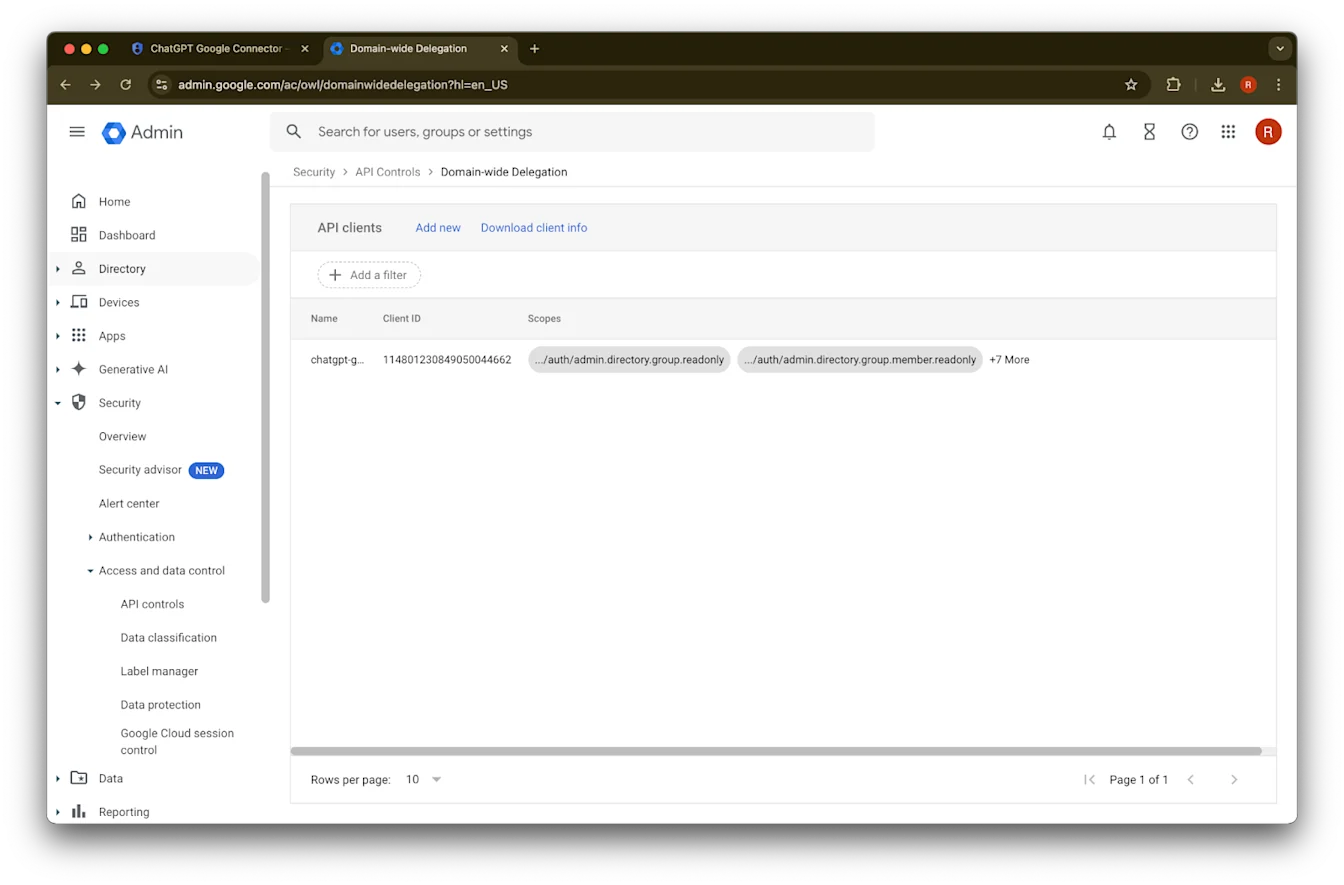
Manage Domain Wide Delegation वर क्लिक करा.
Add new वर क्लिक करा.
यापूर्वी नोंदवलेली Unique ID या Client ID साठी value म्हणून वापरा.
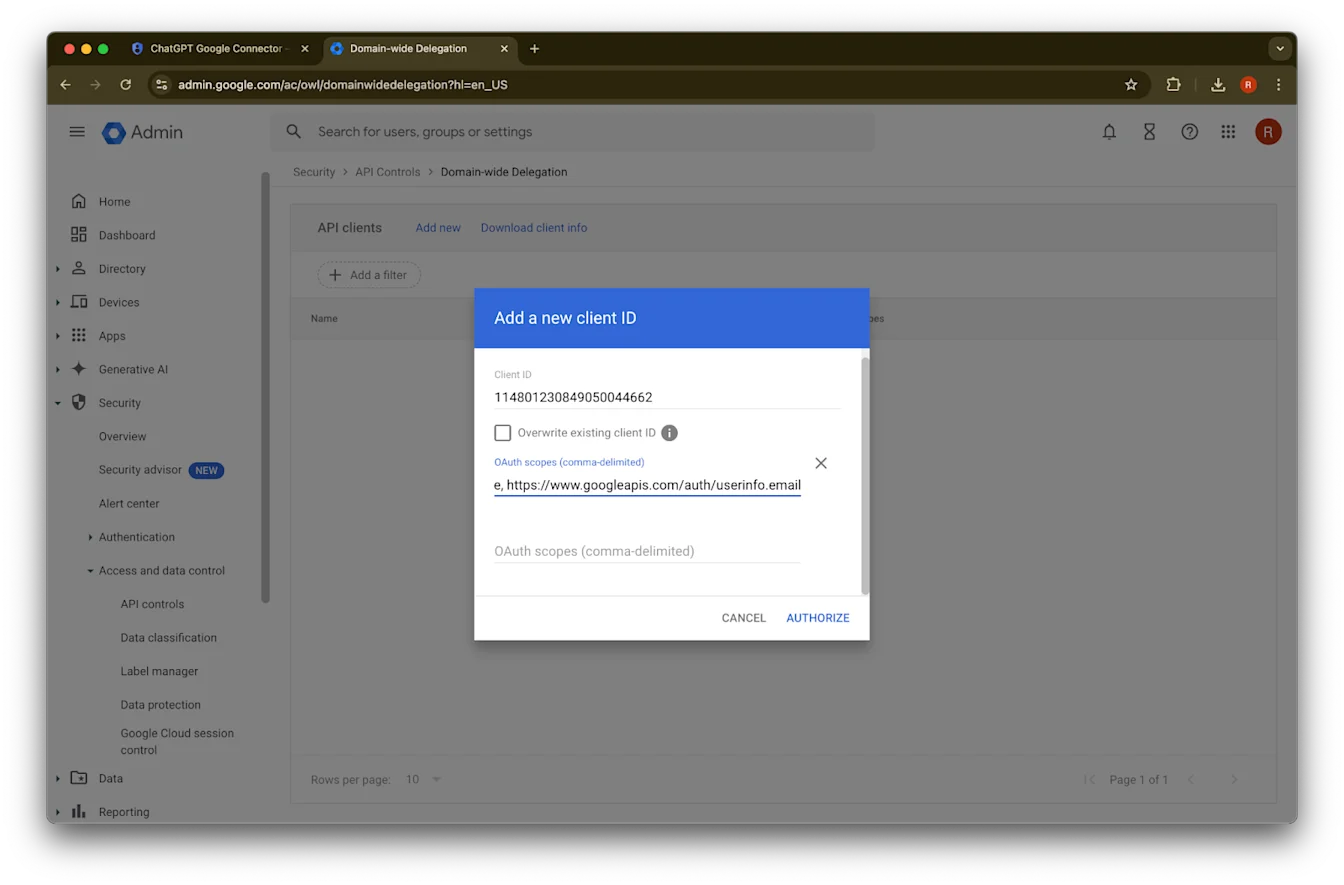
OAuth scopes साठी, तुम्हाला कॉपी आणि पेस्ट करायच्या खालील comma de-limited auth scopes values पहा.
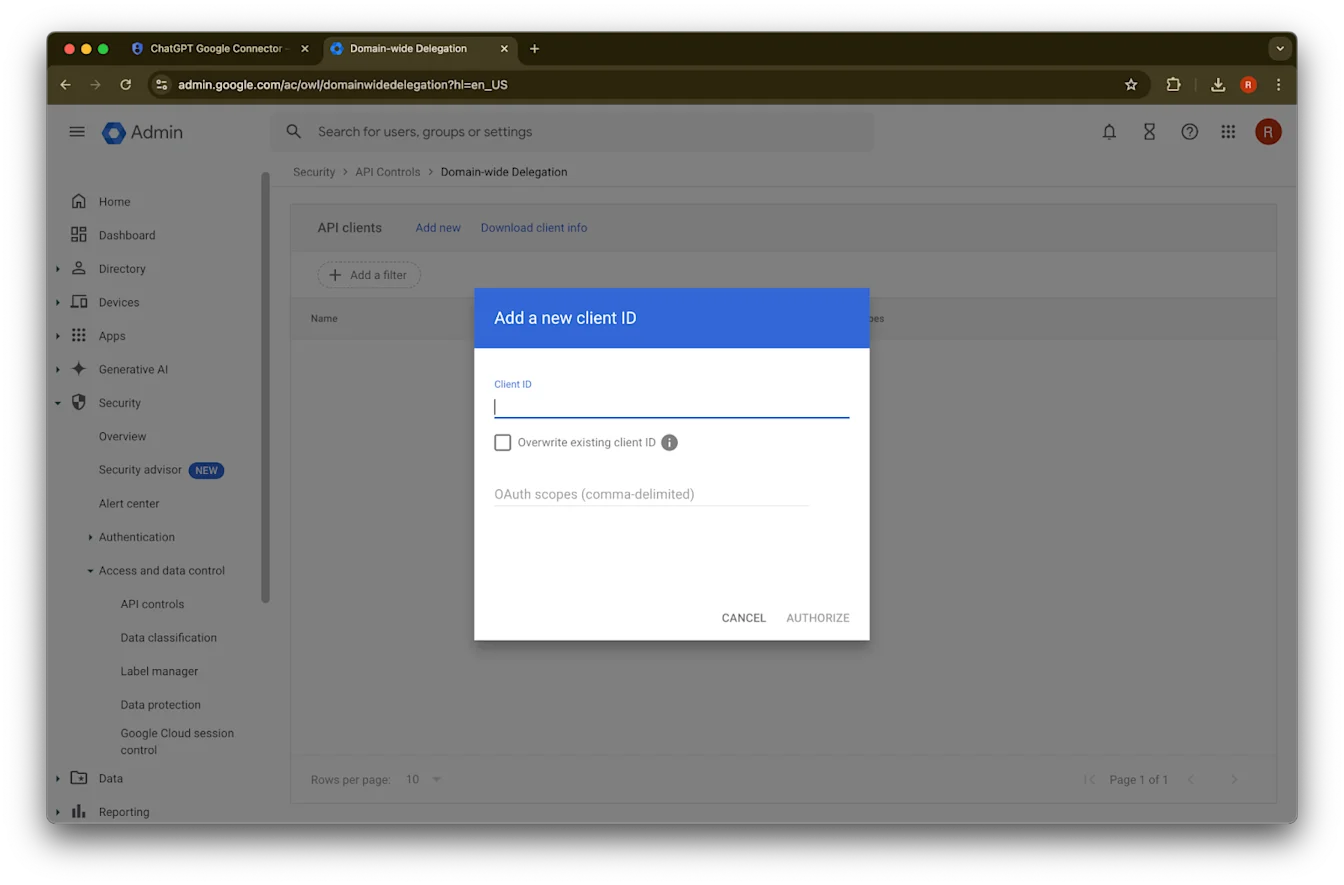
https://www.googleapis.com/auth/admin.directory.group.readonly, https://www.googleapis.com/auth/admin.directory.group.member.readonly, https://www.googleapis.com/auth/admin.directory.user.readonly, https://www.googleapis.com/auth/admin.directory.user.alias.readonly, https://www.googleapis.com/auth/drive.activity.readonly, https://www.googleapis.com/auth/drive.metadata.readonly, https://www.googleapis.com/auth/drive.readonly, https://www.googleapis.com/auth/userinfo.profile, https://www.googleapis.com/auth/userinfo.email| Scope | रीझनिंग |
| admin.directory.group.readonly | group-based permissions लागू करणे |
| admin.directory.group.member.readonly | group-based permissions लागू करणे |
| admin.directory.user.alias.readonly | युजरला alias द्वारे परवानगी दिली गेली असल्याच्या प्रकरणांचे हाताळणे |
| drive.activity.readonly | फाइल्समध्ये बदल झाल्यावर सूचना मिळण्यासाठी |
| drive.metadata.readonly | फाइल सामग्री आणि संबंधित metadata sync करणे (उदा. last modified date) |
| drive.readonly | फाइल सामग्री आणि संबंधित metadata sync करणे (उदा. last modified date) |
| userinfo.profile | आपण ज्या युजर्ससाठी फाइल्स sync करत आहोत ते ठरवणे |
| userinfo.email | आपण ज्या युजर्ससाठी फाइल्स sync करत आहोत ते ठरवणे |
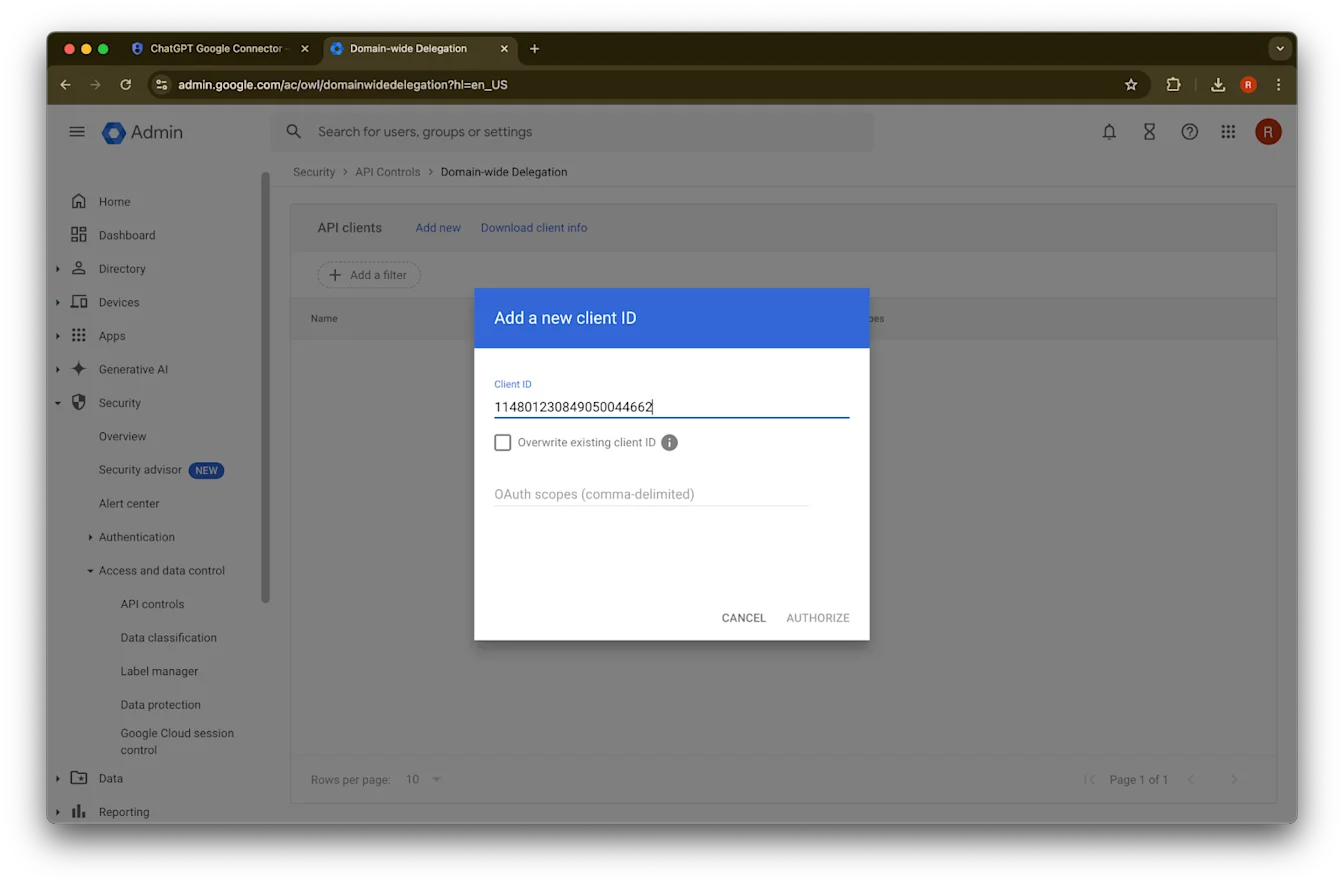
45. Authorize वर क्लिक करा.
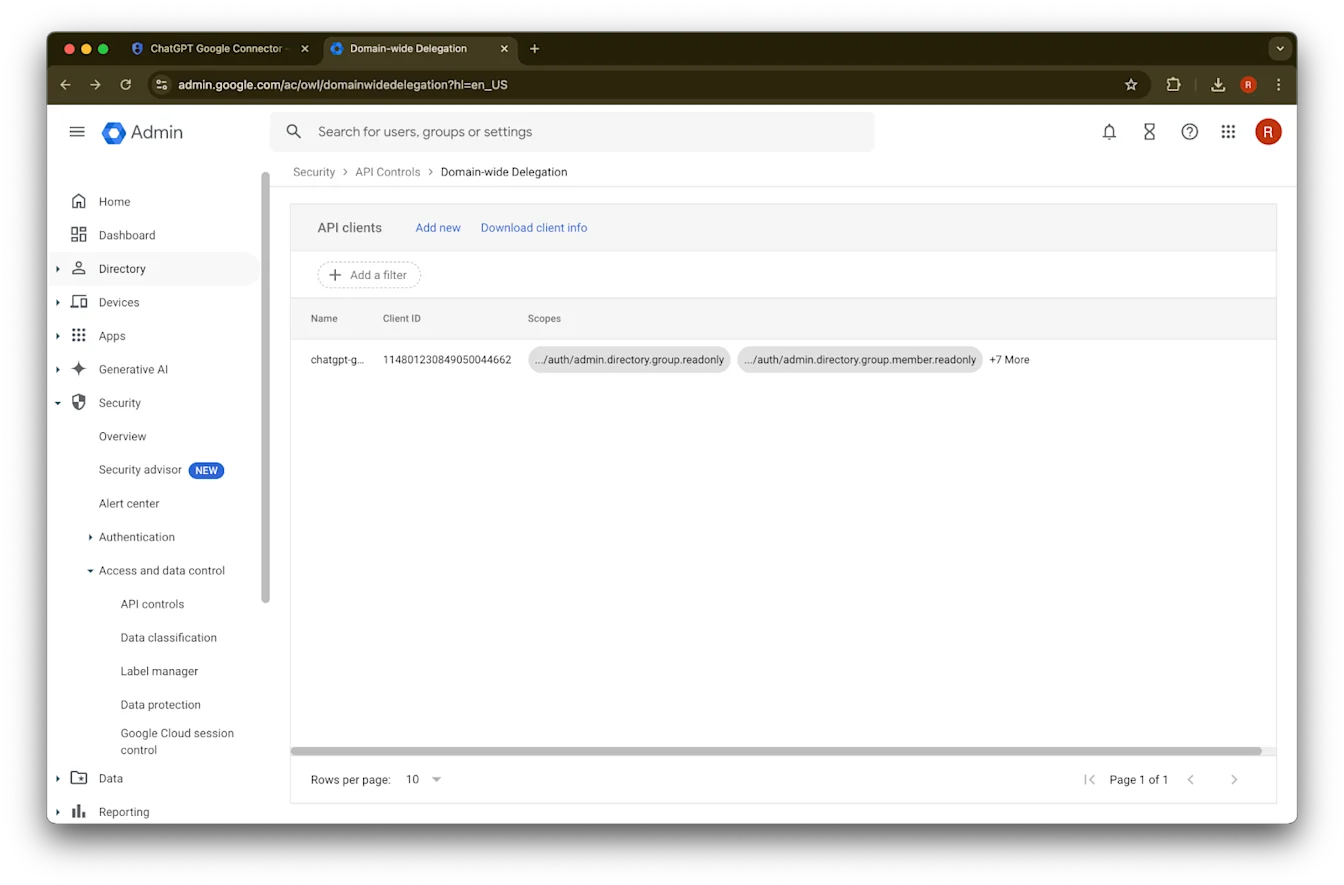
46. यशस्वी.
अॅडमिन खाते सेट करणे
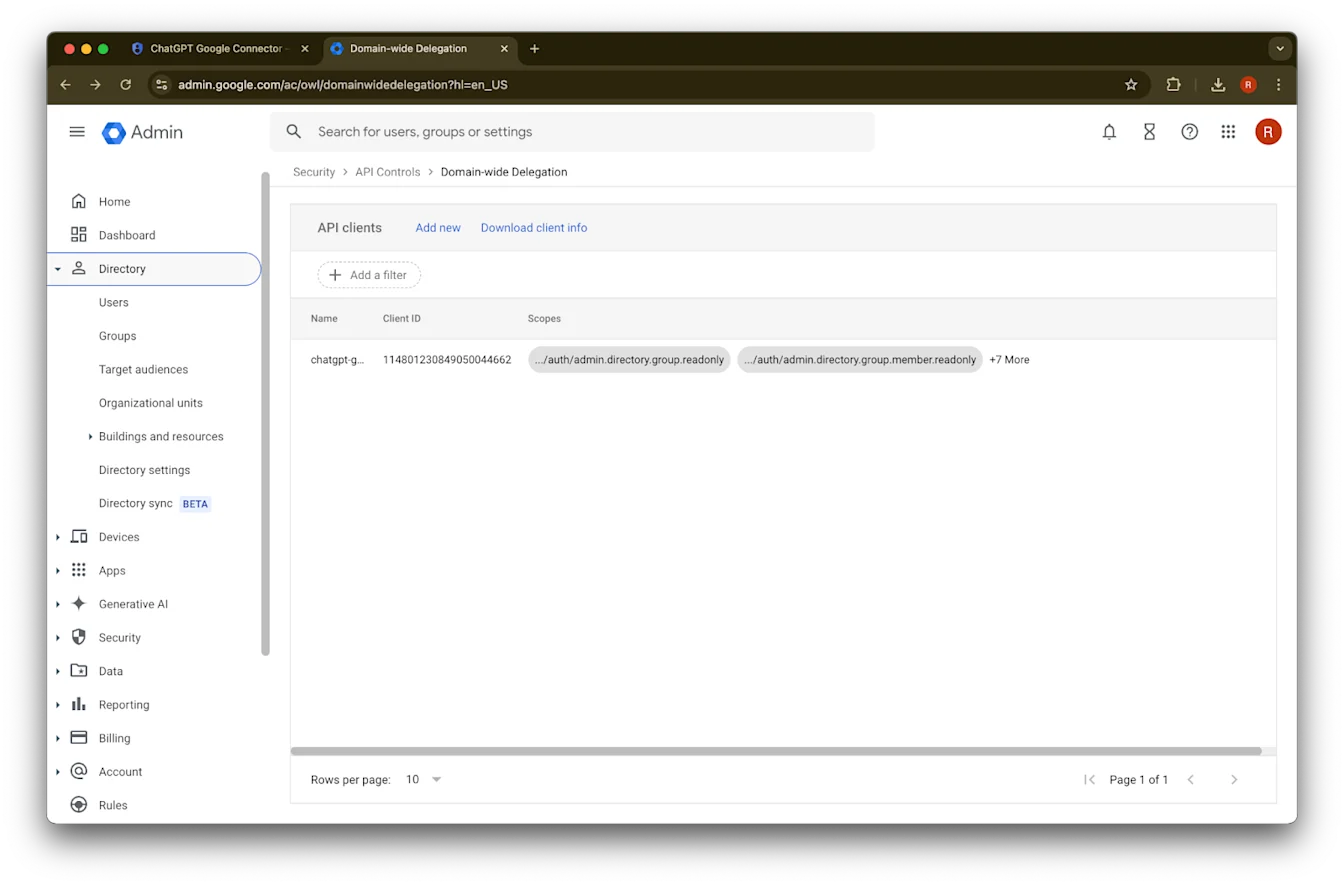
Directory विस्तृत करा.
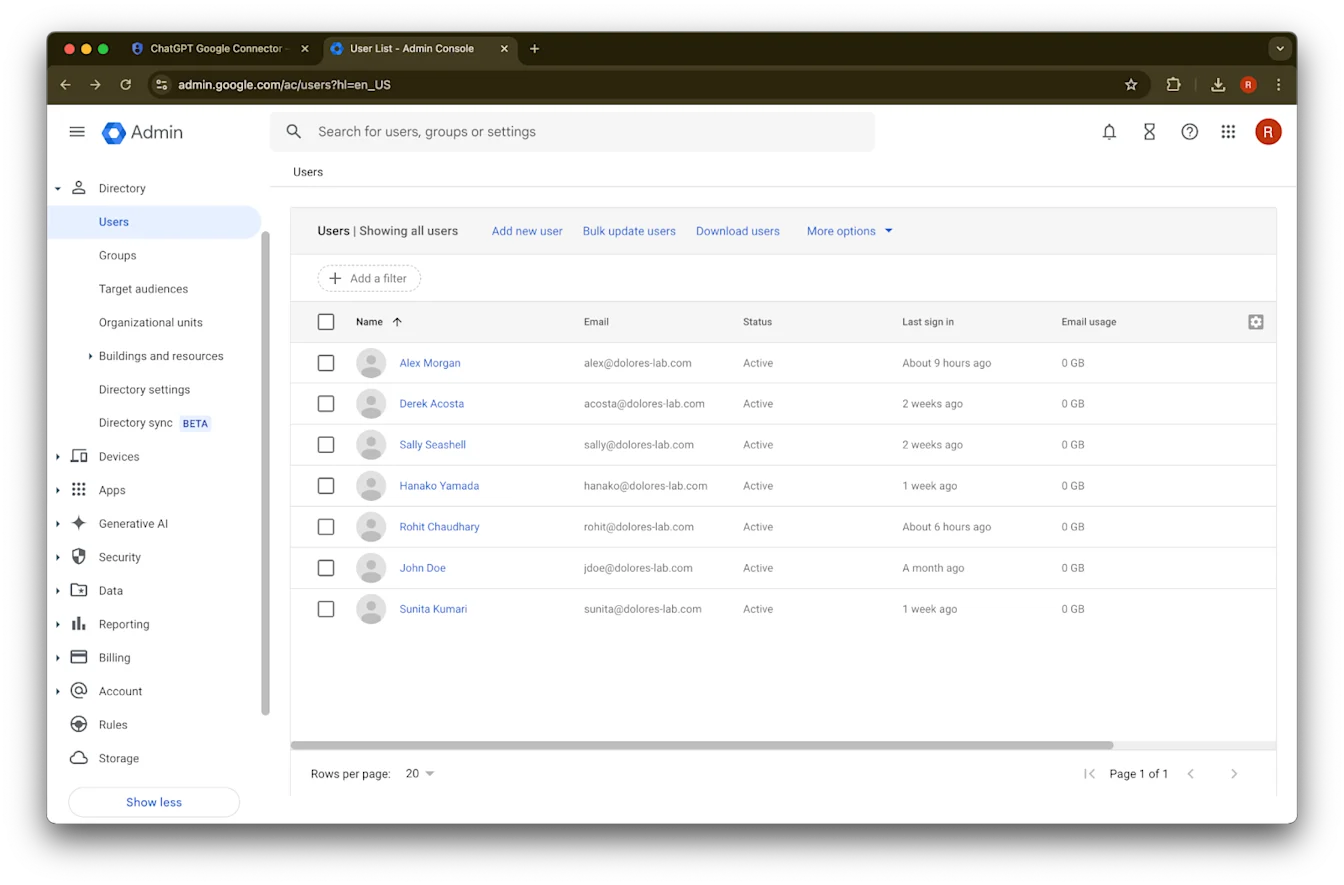
Users वर क्लिक करा.
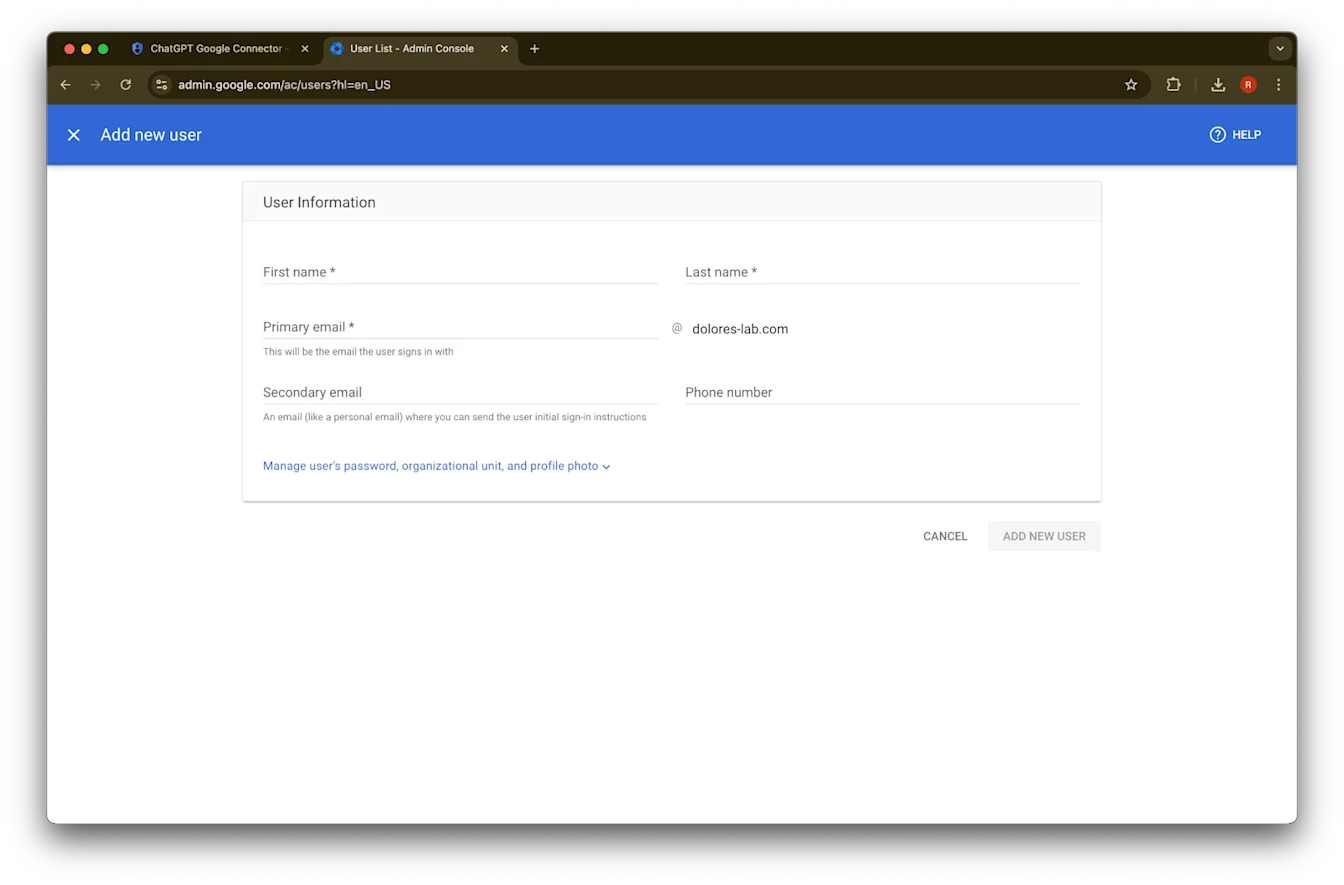
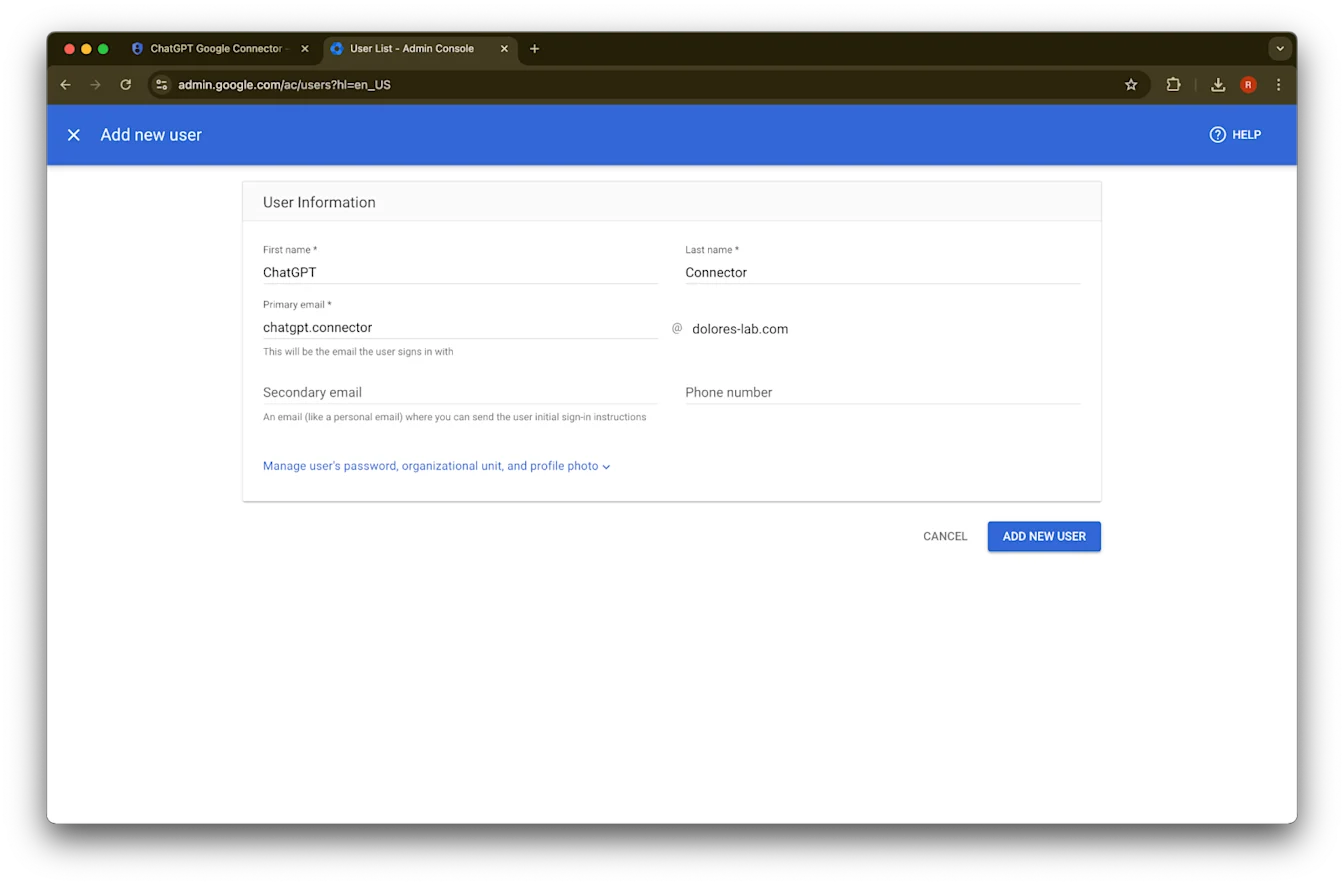
तुमच्या पसंतीचे first name, last name, आणि primary email address द्या.
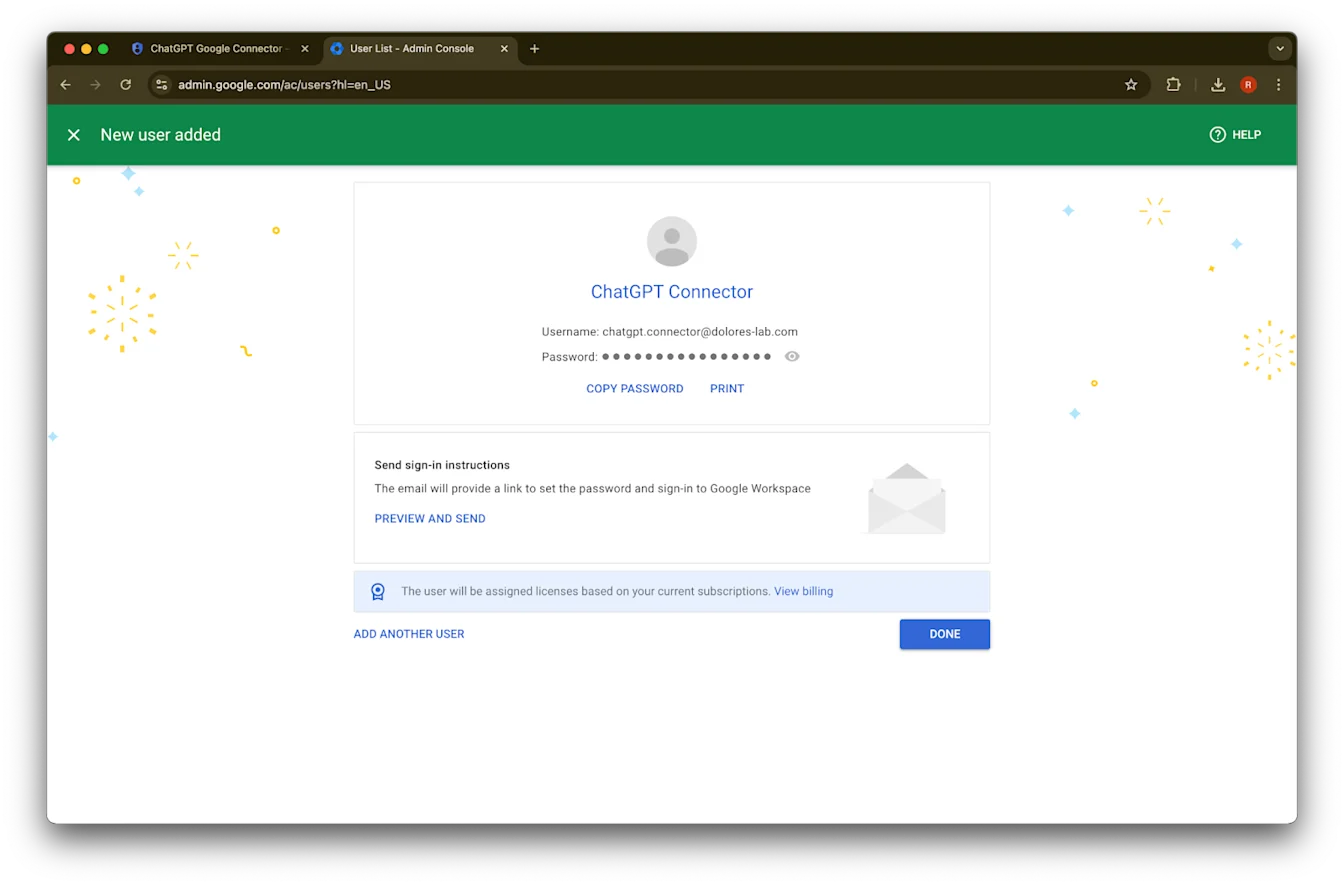
Add new user
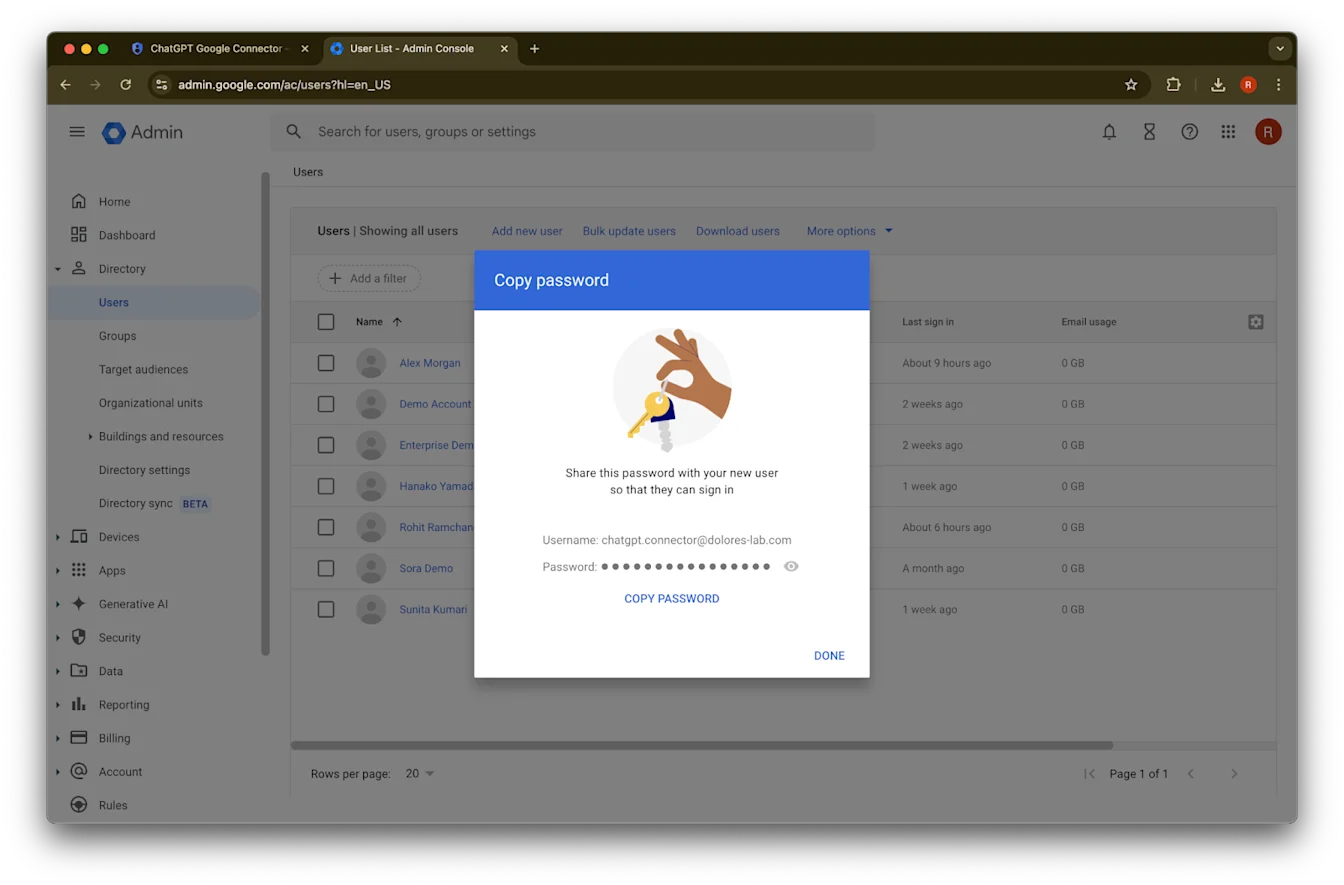
वर क्लिक करा.(Optional) ही credentials नोंदवून ठेवा. ChatGPT ला ही credentials लागत नाहीत.
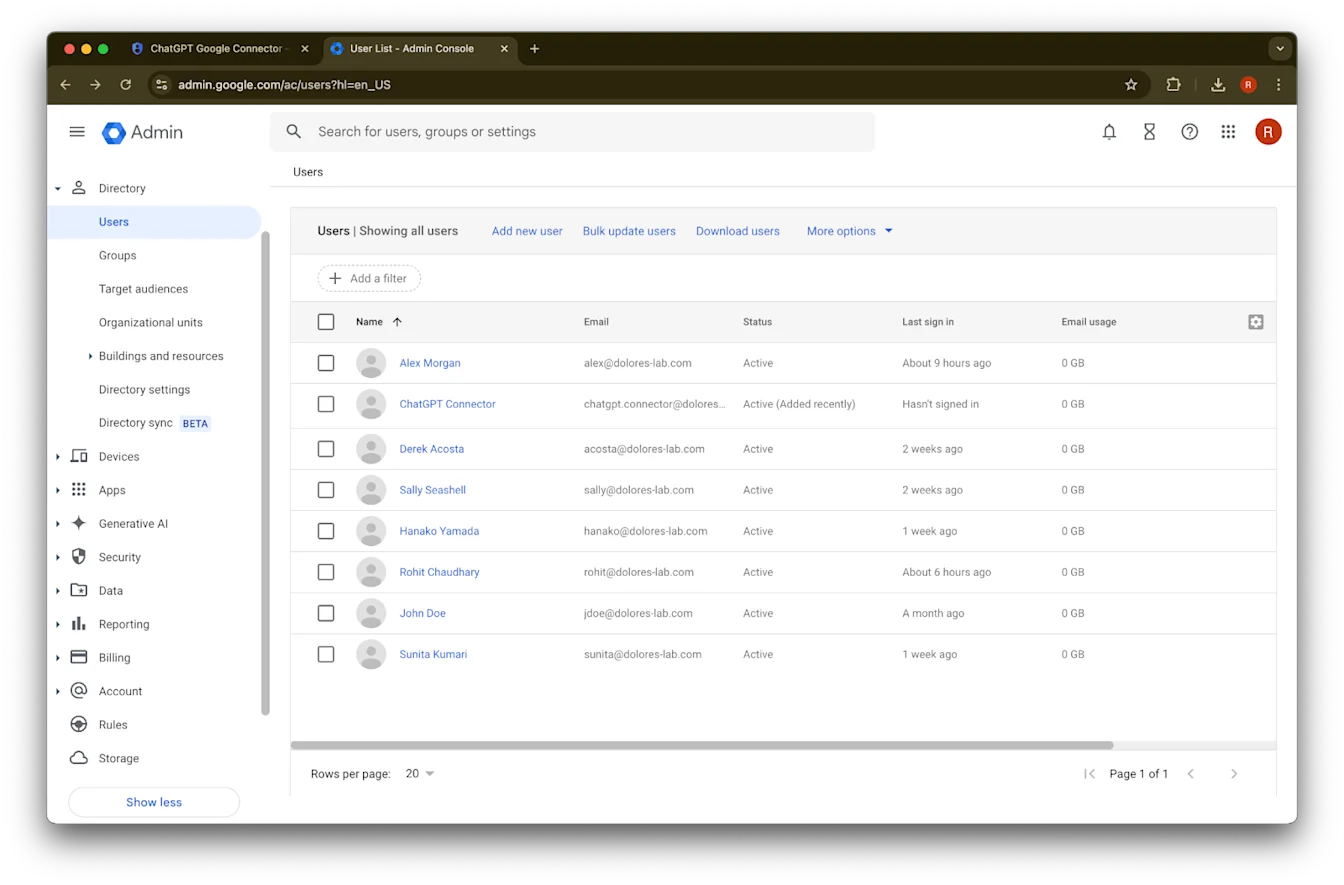
Done वर क्लिक करा.
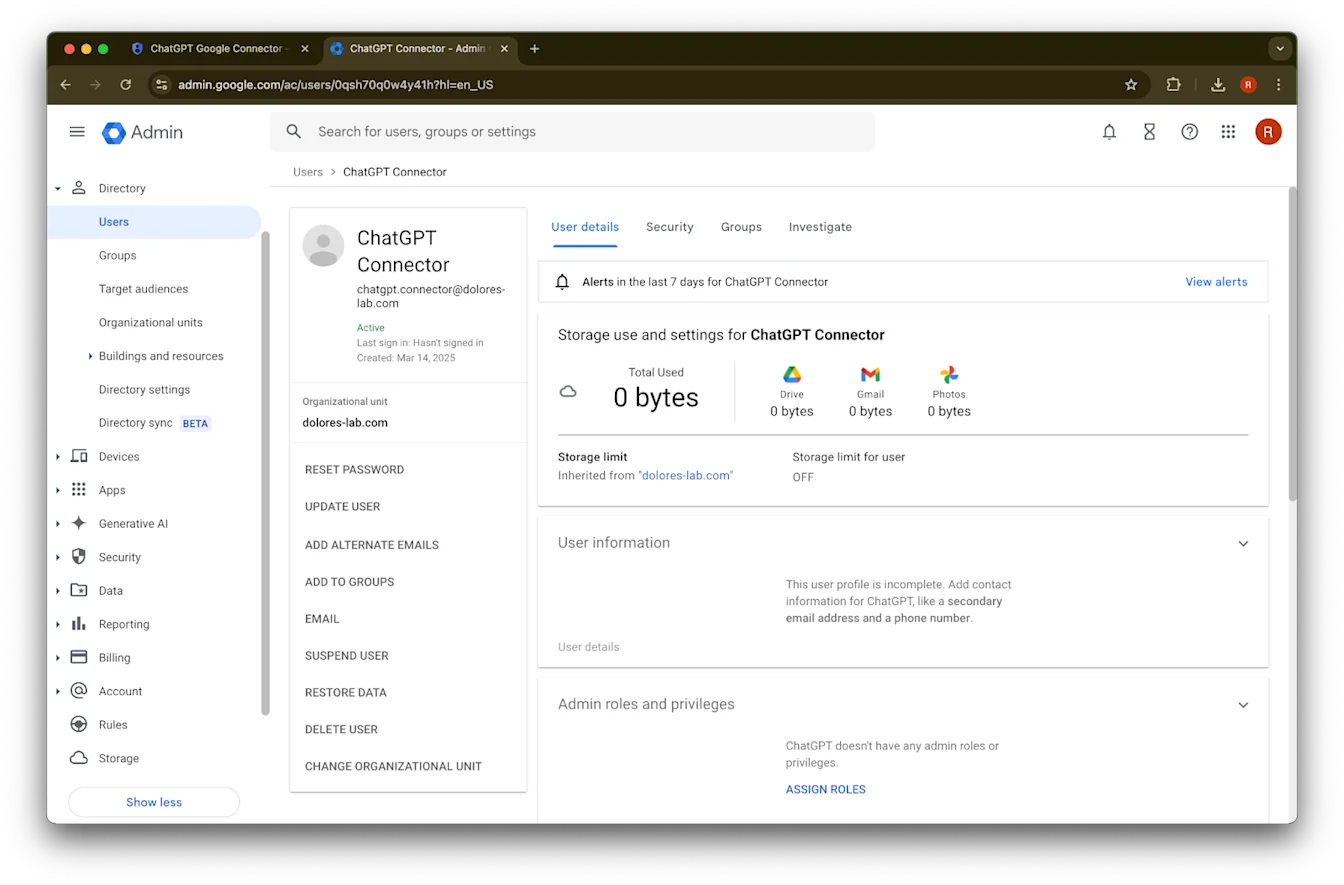
तुम्ही आत्ताच तयार केलेल्या account वर क्लिक करा. ते यादीत दिसत नसेल, तर पेज refresh करा किंवा cache आणि cookies clear करून पुन्हा प्रयत्न करा.
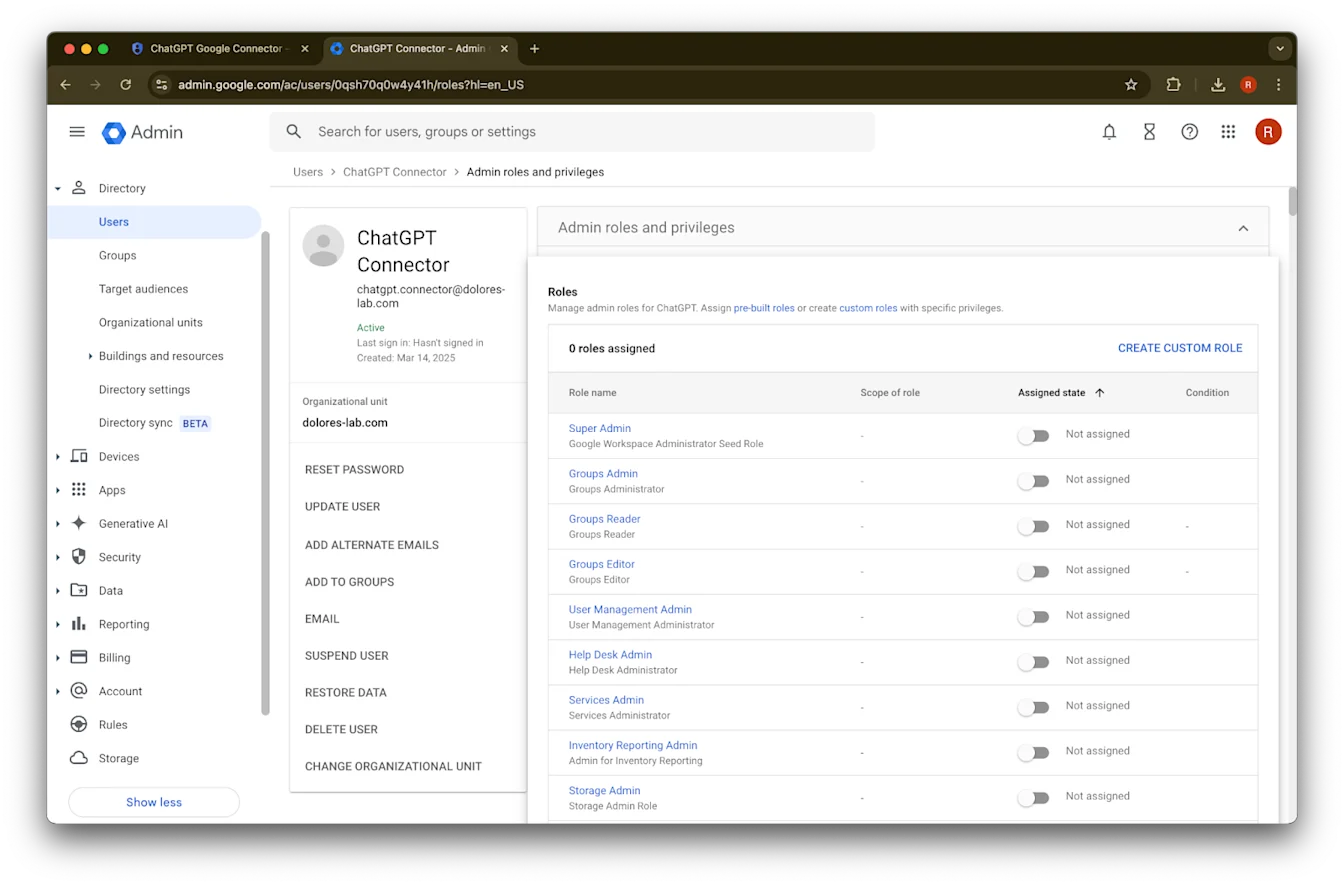
assign roles वर क्लिक करा.
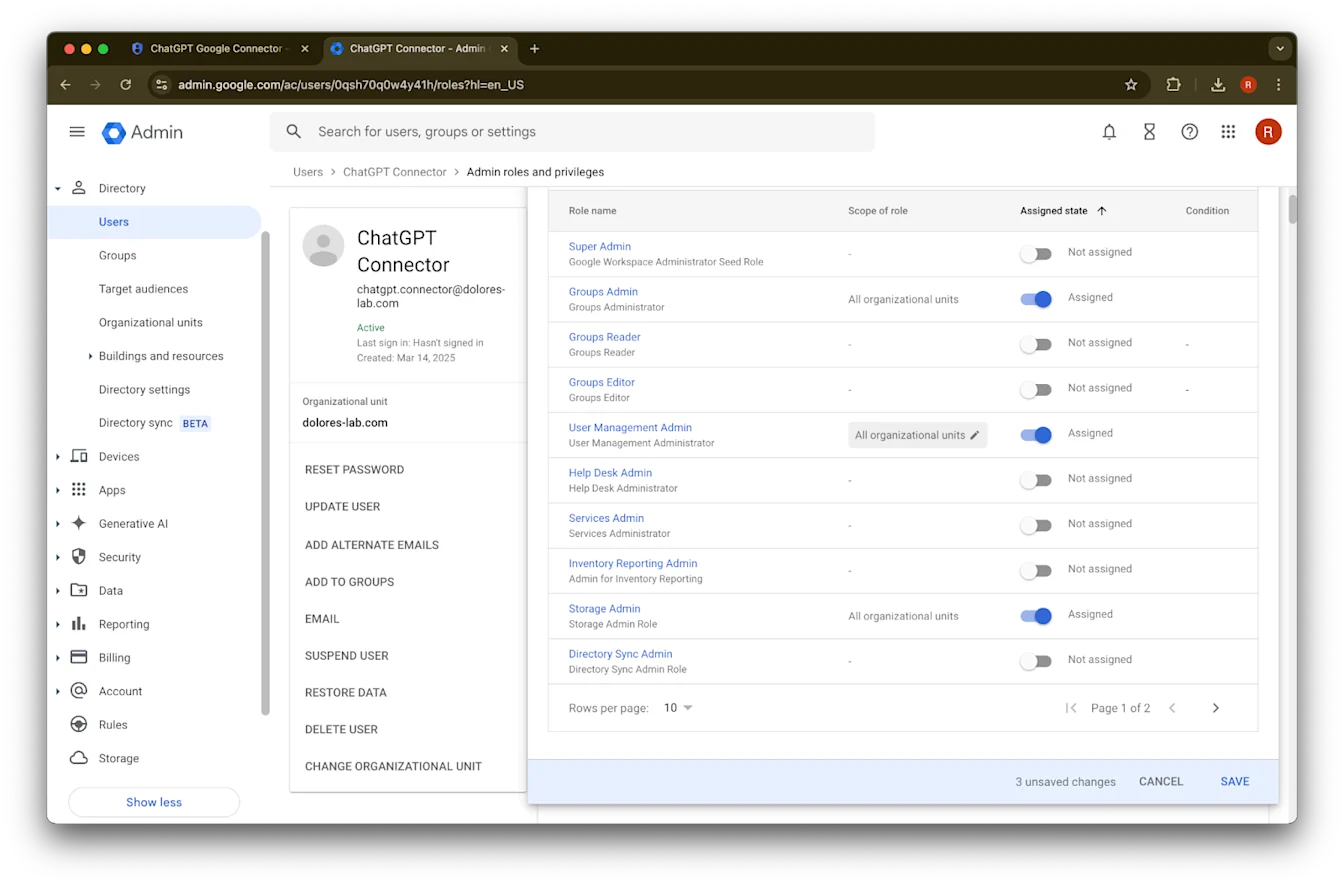
Groups Reader, User Management Admin, आणि Storage Admin roles चालू करा.
खाली स्क्रोल करा आणि Save. वर क्लिक करा. अॅडमिन खाते आता यशस्वीरीत्या तयार आणि configure झाले आहे.
ChatGPT अॅडमिन कन्सोलवर सेटअप पूर्ण करणे
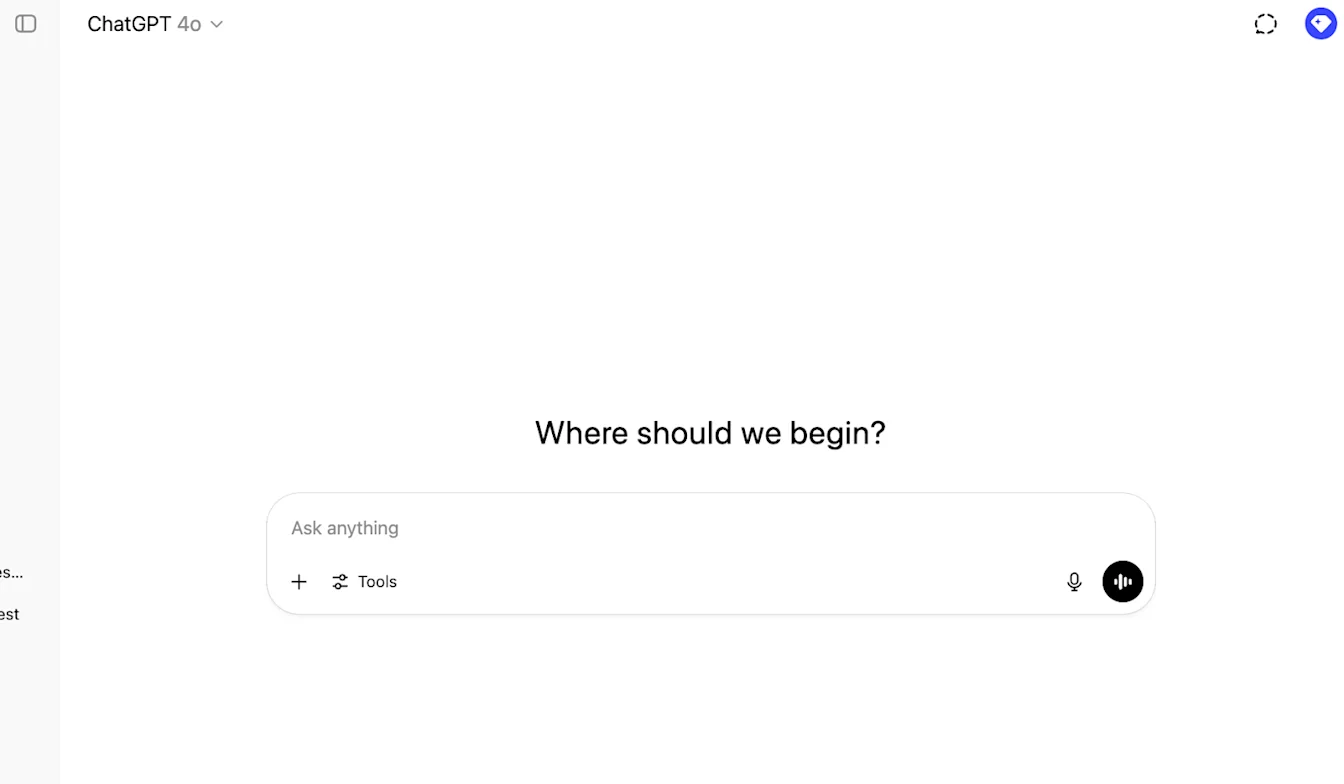
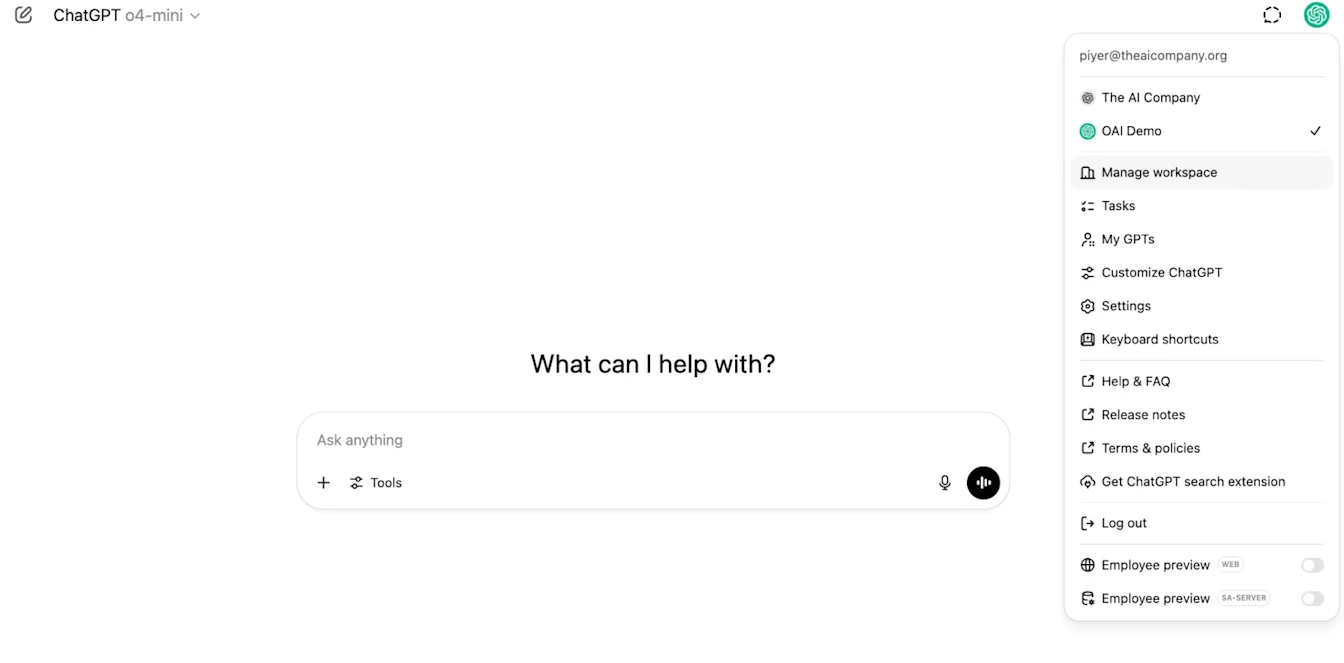
ChatGPT वर जा आणि पेजच्या वरच्या उजव्या कोपऱ्यातील प्रोफाइल आयकॉनवर क्लिक करा.
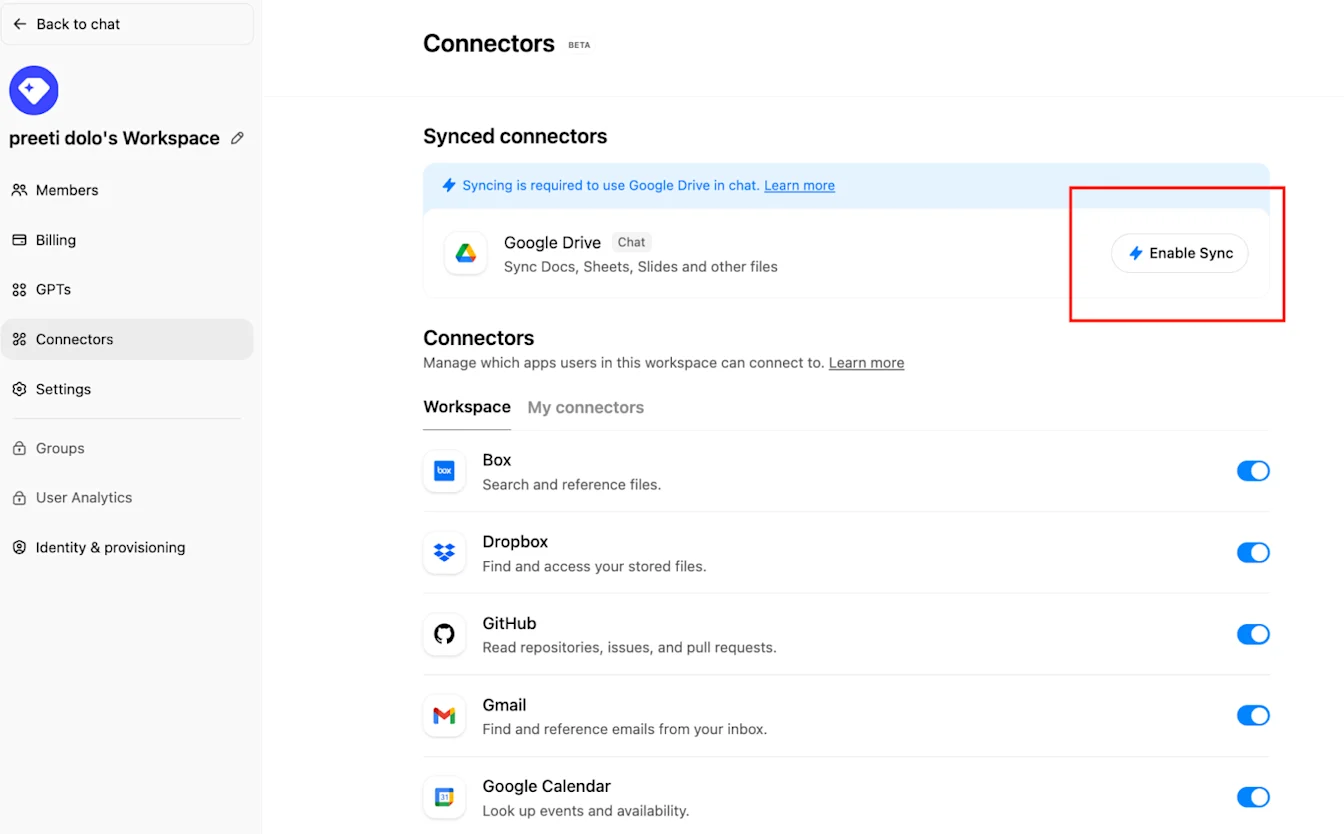
Manage workspace
वर क्लिक करा.Connections वर क्लिक करा आणि नंतर ‘Synced connectors’ अंतर्गत → Enable Sync वर क्लिक करा.
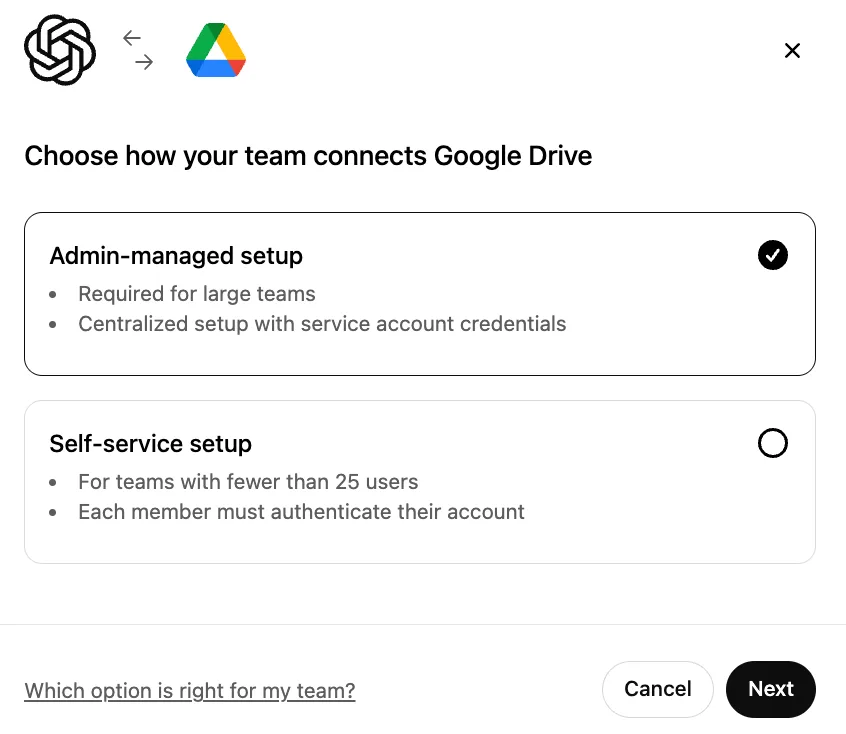
Admin-managed निवडलेले आहे याची खात्री करा आणि Next वर क्लिक करा.
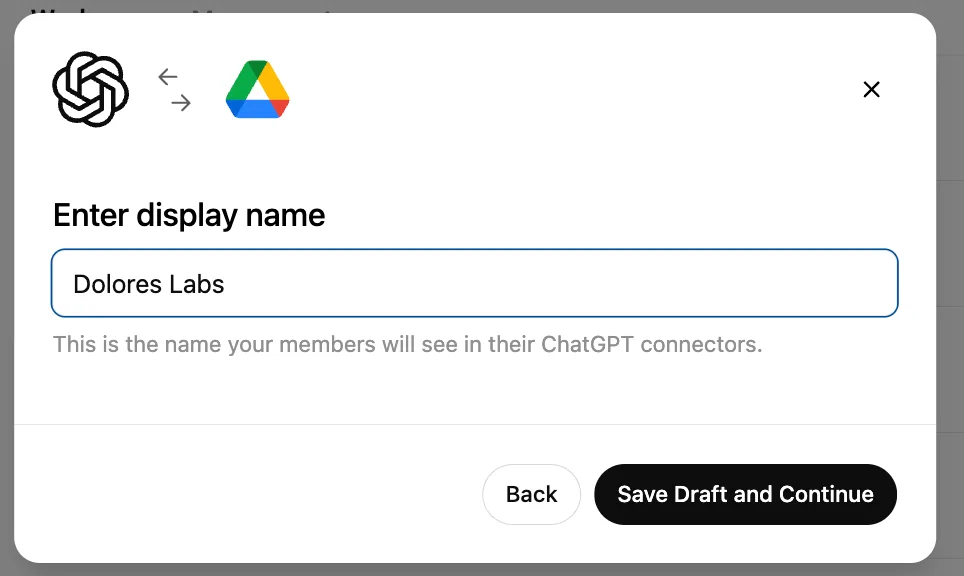
display name टाइप करा. आम्ही तुमच्या Google Workspace चे नाव वापरण्याची शिफारस करतो.
कृपया लक्षात घ्या की सध्या आम्ही तुमच्या connection चे नाव बदलण्यास समर्थन देत नाही.Save Draft and Continue वर क्लिक करा.
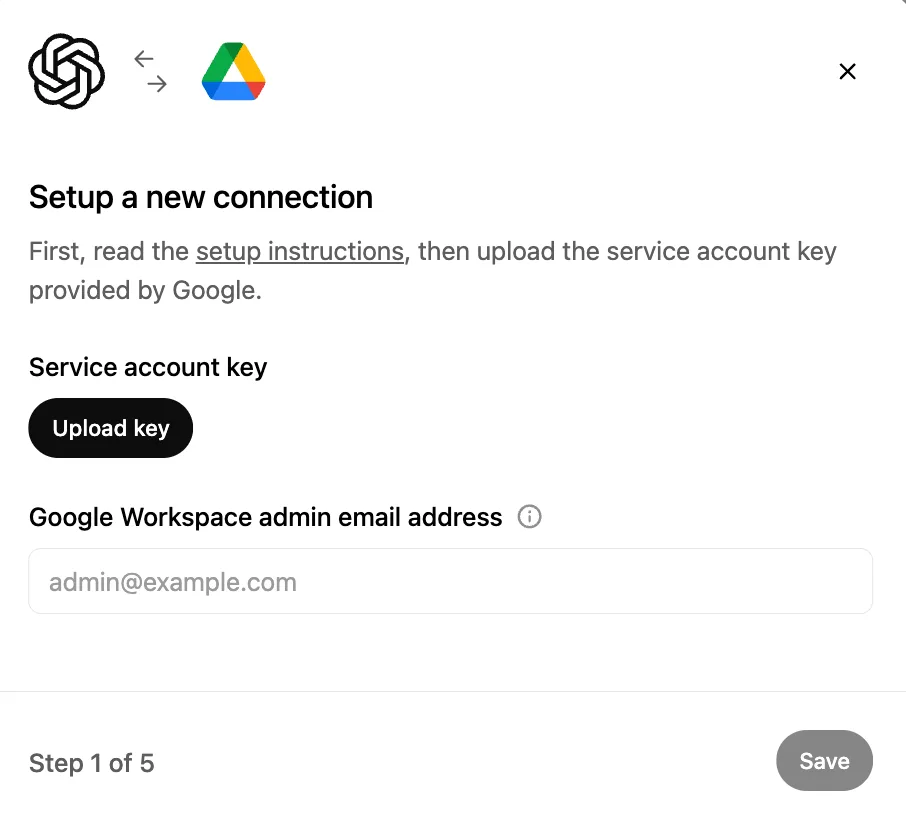
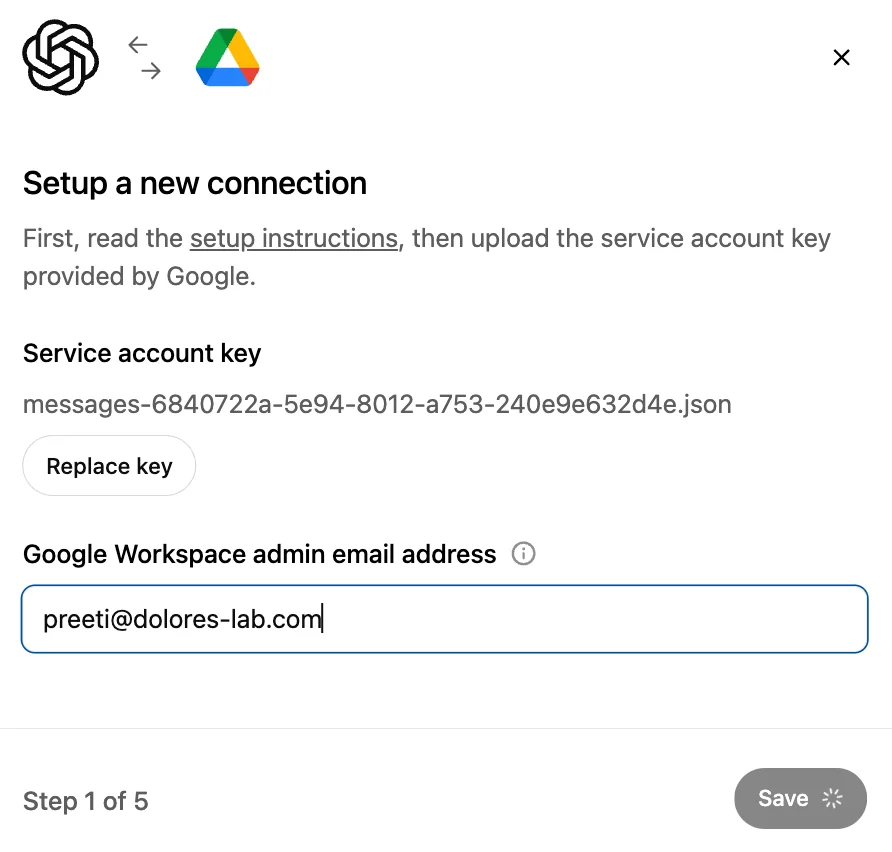
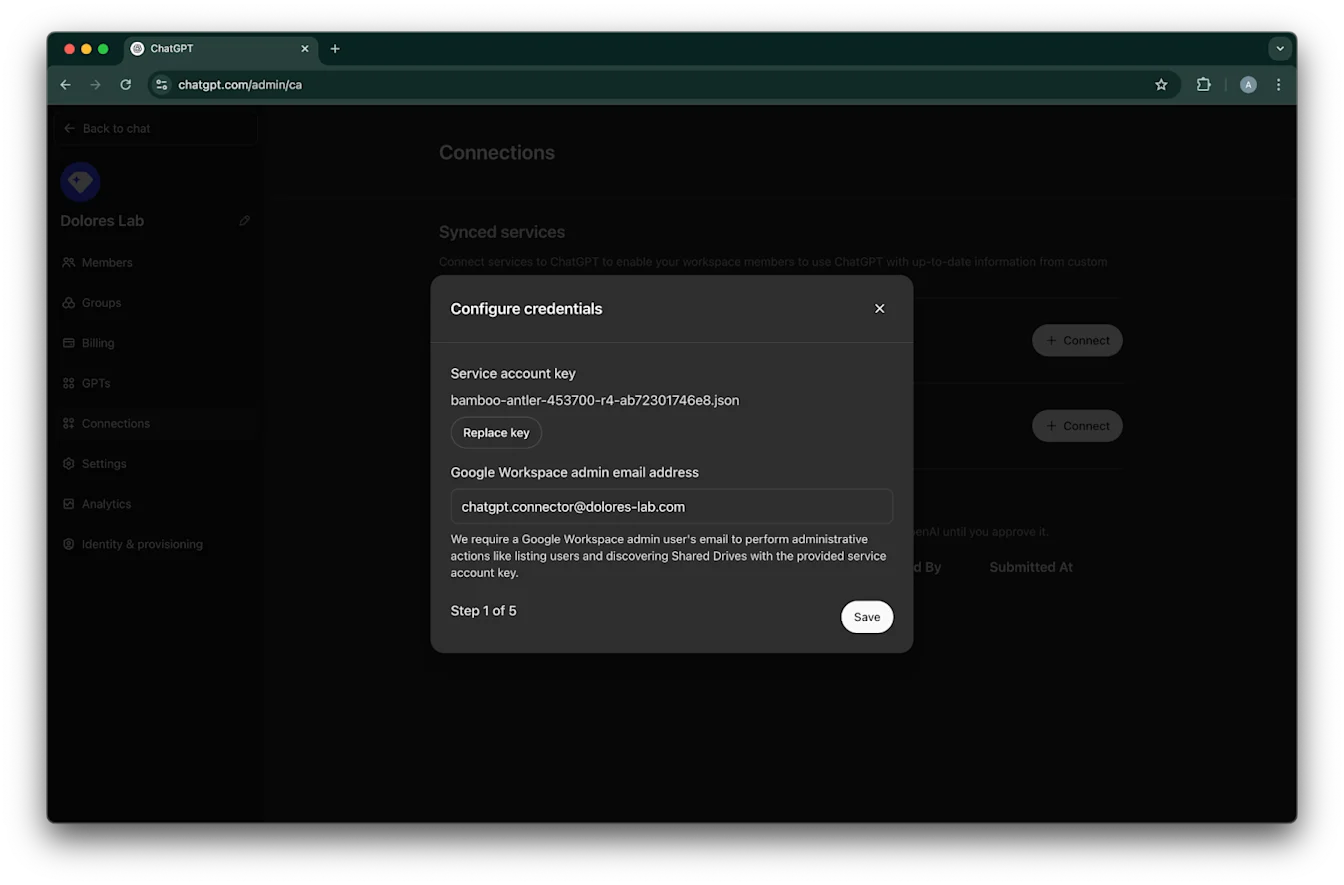
Upload key वर क्लिक करा. JSON फाइल निवडा, जी वर service account सेट करताना तुम्ही डाउनलोड केलेली key आहे. ही key अचूक आहे याची खात्री करा.
admin email address टाइप करा. हे तुम्ही यापूर्वी तयार केलेले अॅडमिन खाते आहे.
Save. वर क्लिक करा.
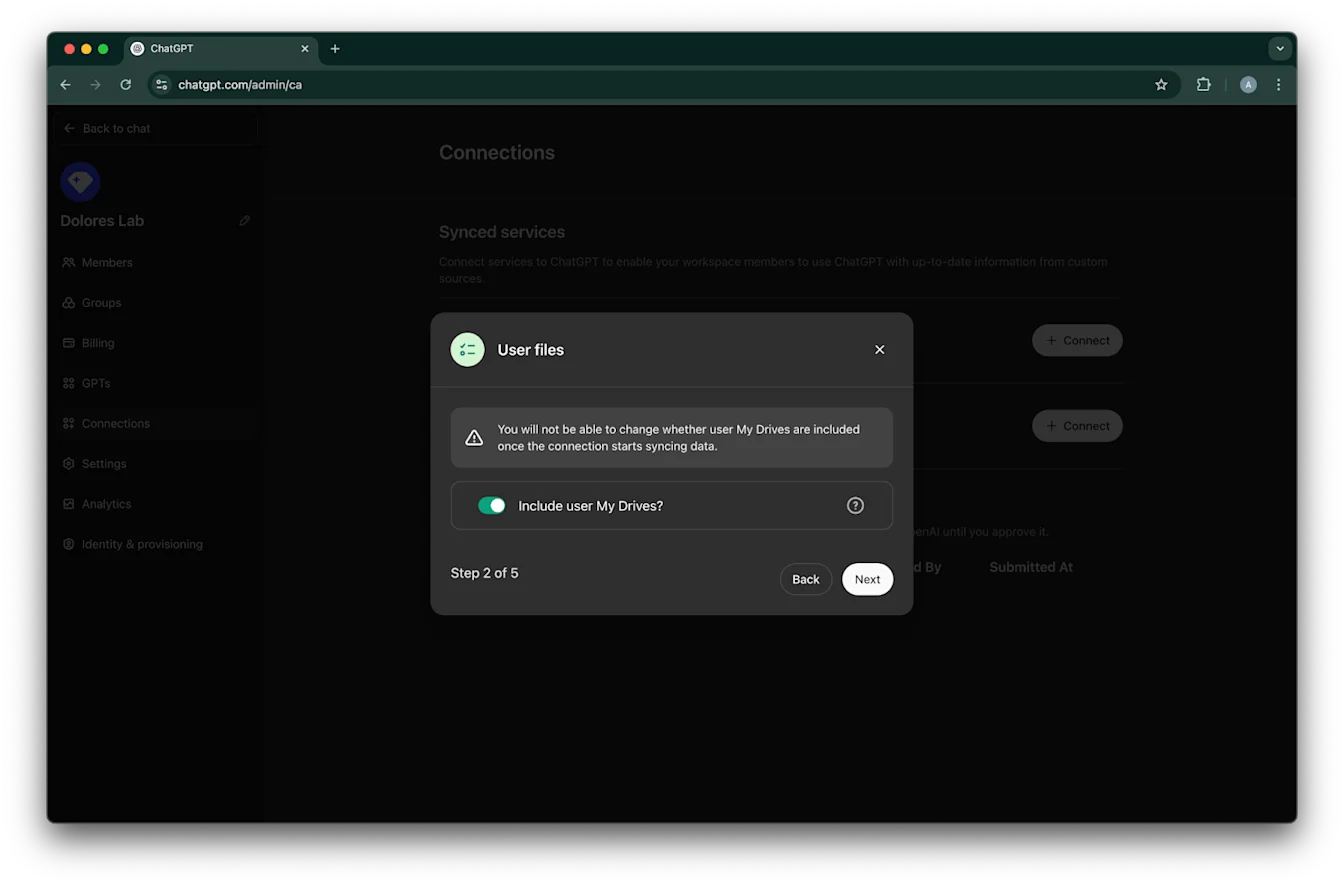
तुमच्या सर्व युजर्सच्या My Drives मधील फाइल्स समाविष्ट करायच्या आहेत की नाही ते निवडा.
Next वर क्लिक करा.
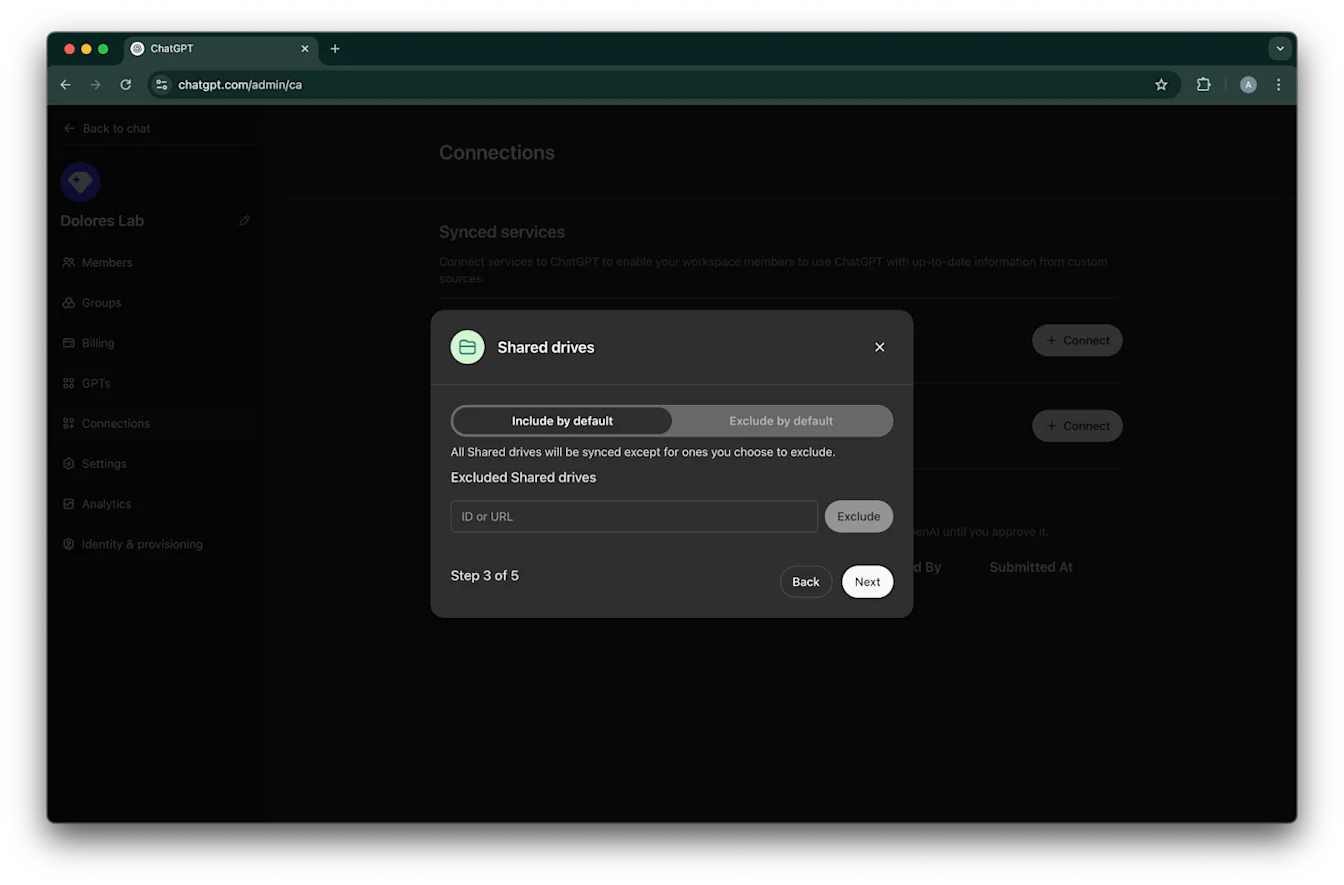
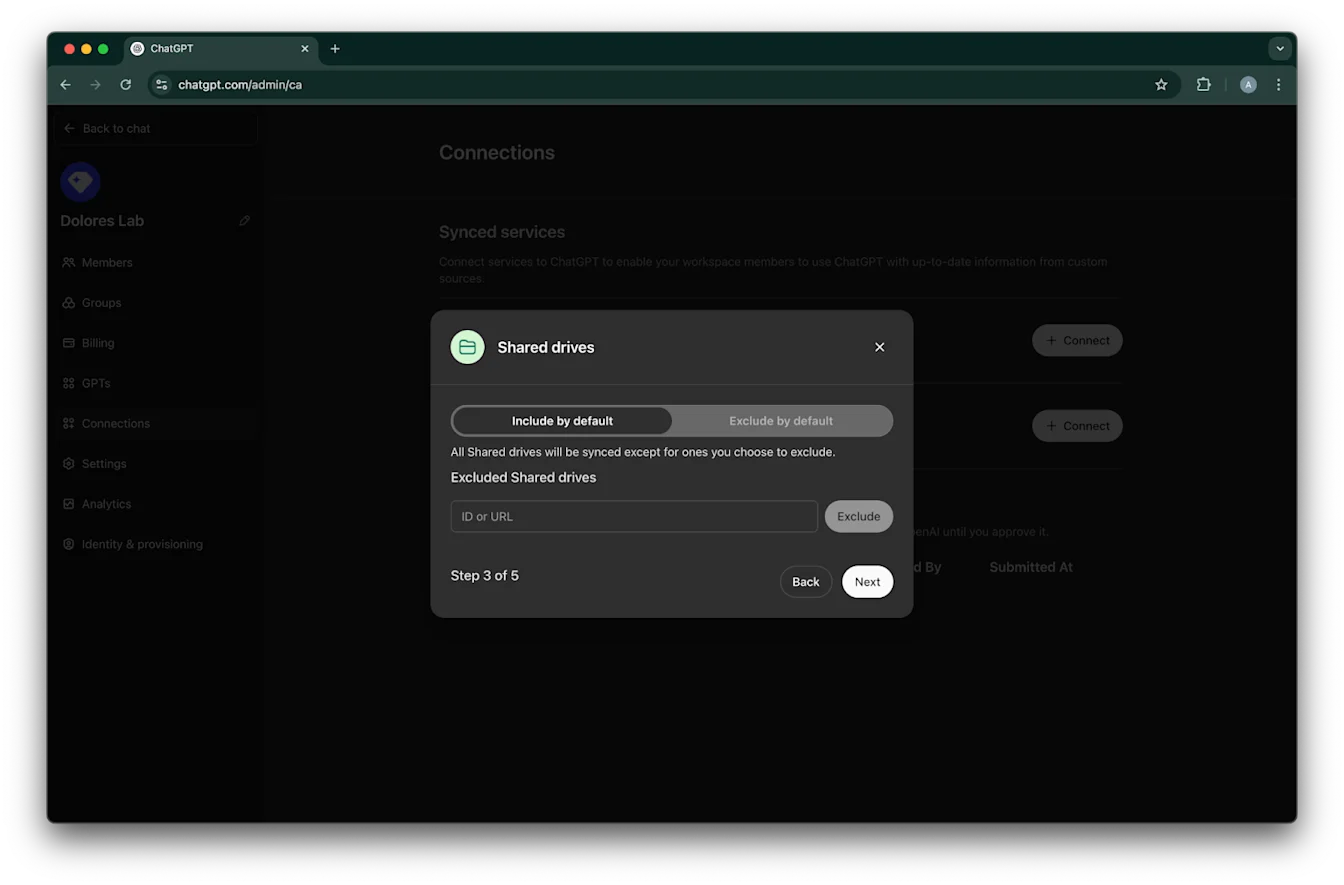
Shared drives कसे व्यवस्थापित करायचे ते निवडा. आम्ही खालील तीन परिस्थितींना समर्थन देतो.
जर तुम्हाला सर्व shared drives समाविष्ट करायचे असतील, तर Include by default निवडा आणि वगळायच्या shared drive IDs जोडू नका.
जर तुम्हाला बहुतेक shared drives समाविष्ट करायचे असतील, तर Include by default निवडा आणि वगळायच्या shared drives चे IDs जोडा.
जर तुम्हाला बहुतेक shared drives वगळायचे असतील, तर Exclude by default निवडा आणि समाविष्ट करायच्या shared drives चे IDs जोडा.
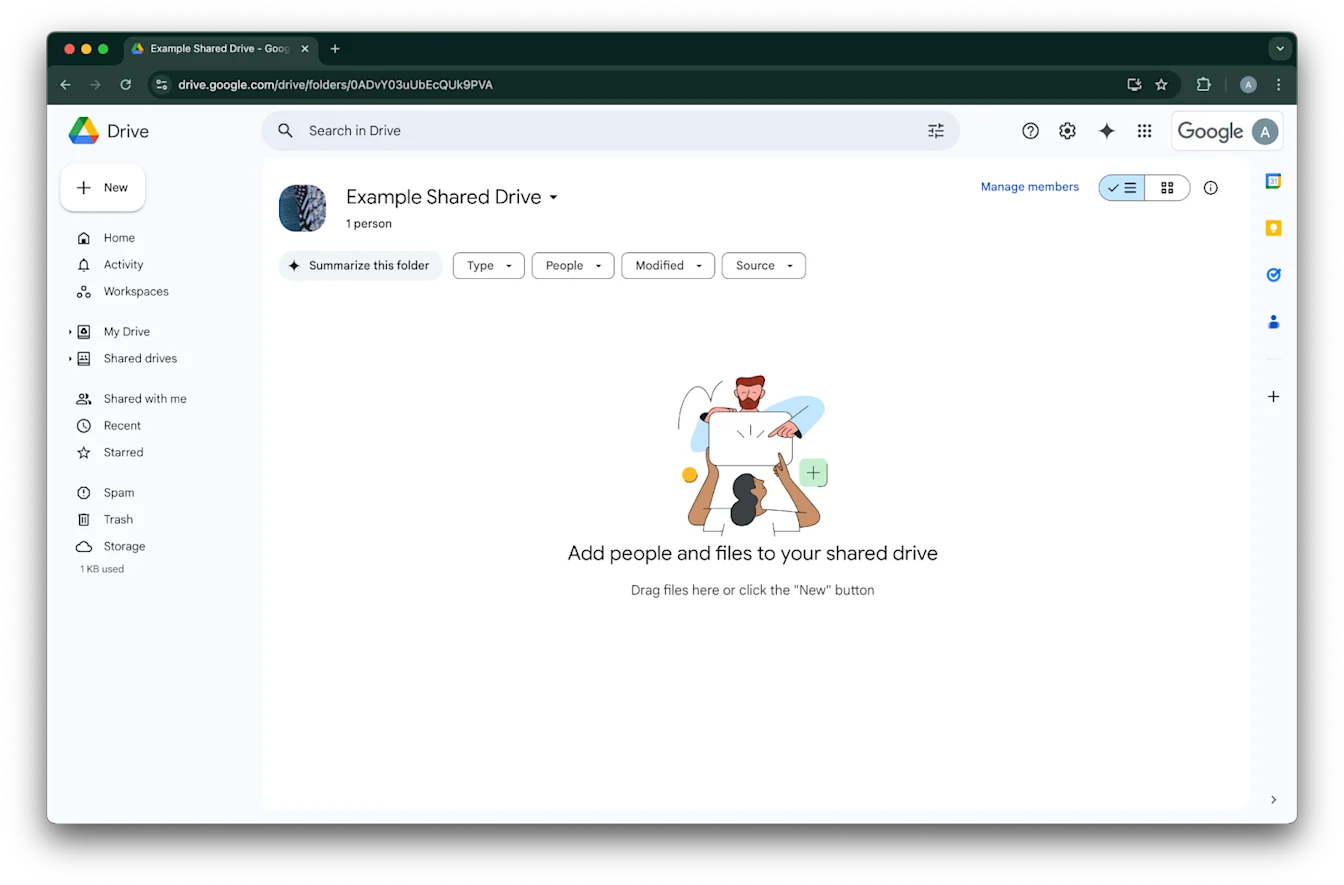
Shared drive साठी ID शोधण्यासाठी, वेब ब्राउझरमध्ये त्यावर जा. URL चा शेवटचा भाग हा shared drive ID असतो.
खालील उदाहरणात तो `0ADvY03uUbEcQUk9PVA` आहे.Next वर क्लिक करा.
Google Drive connection ला कोणाला प्रवेश द्यायचा ते निवडा. तुम्ही फक्त ChatGPT वर्कस्पेसच्या Admins ना निवडू शकता, किंवा सर्वांसाठी ते सक्षम करू शकता. सर्वांसाठी सक्षम केल्यास, वर्कस्पेसमध्ये जोडलेले नवीन युजर्स आपोआप समाविष्ट होतील.
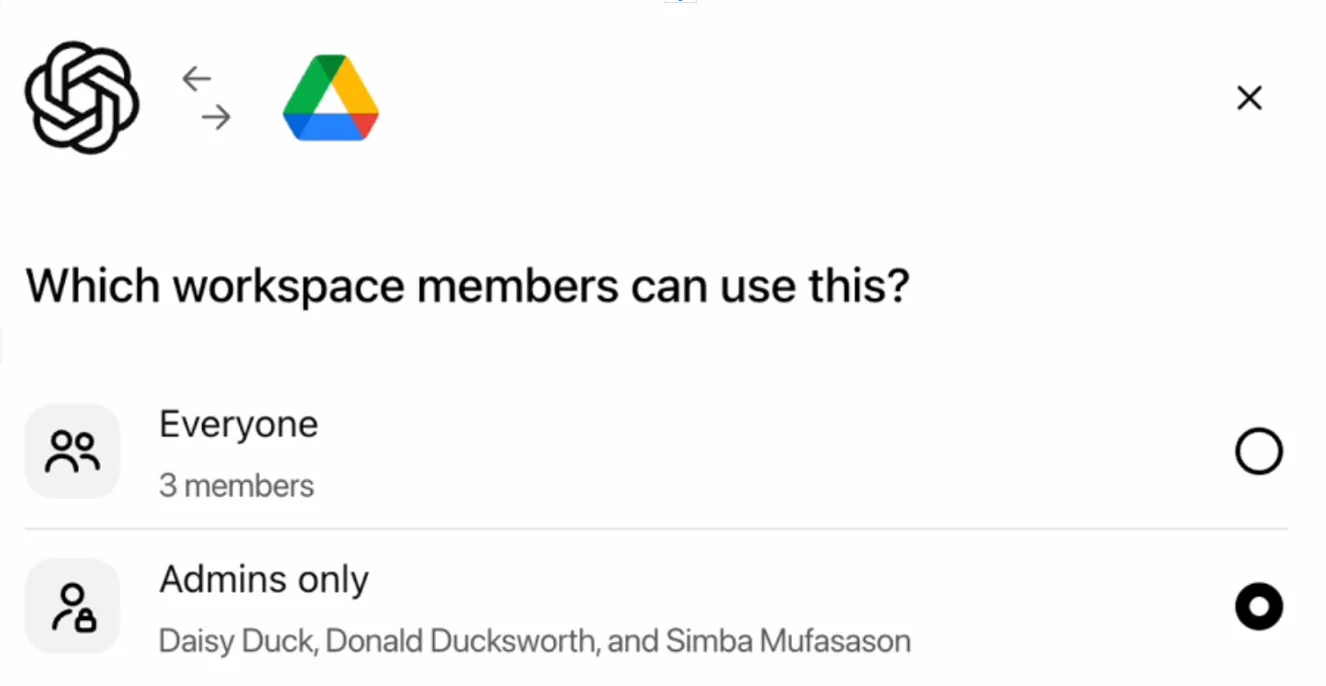
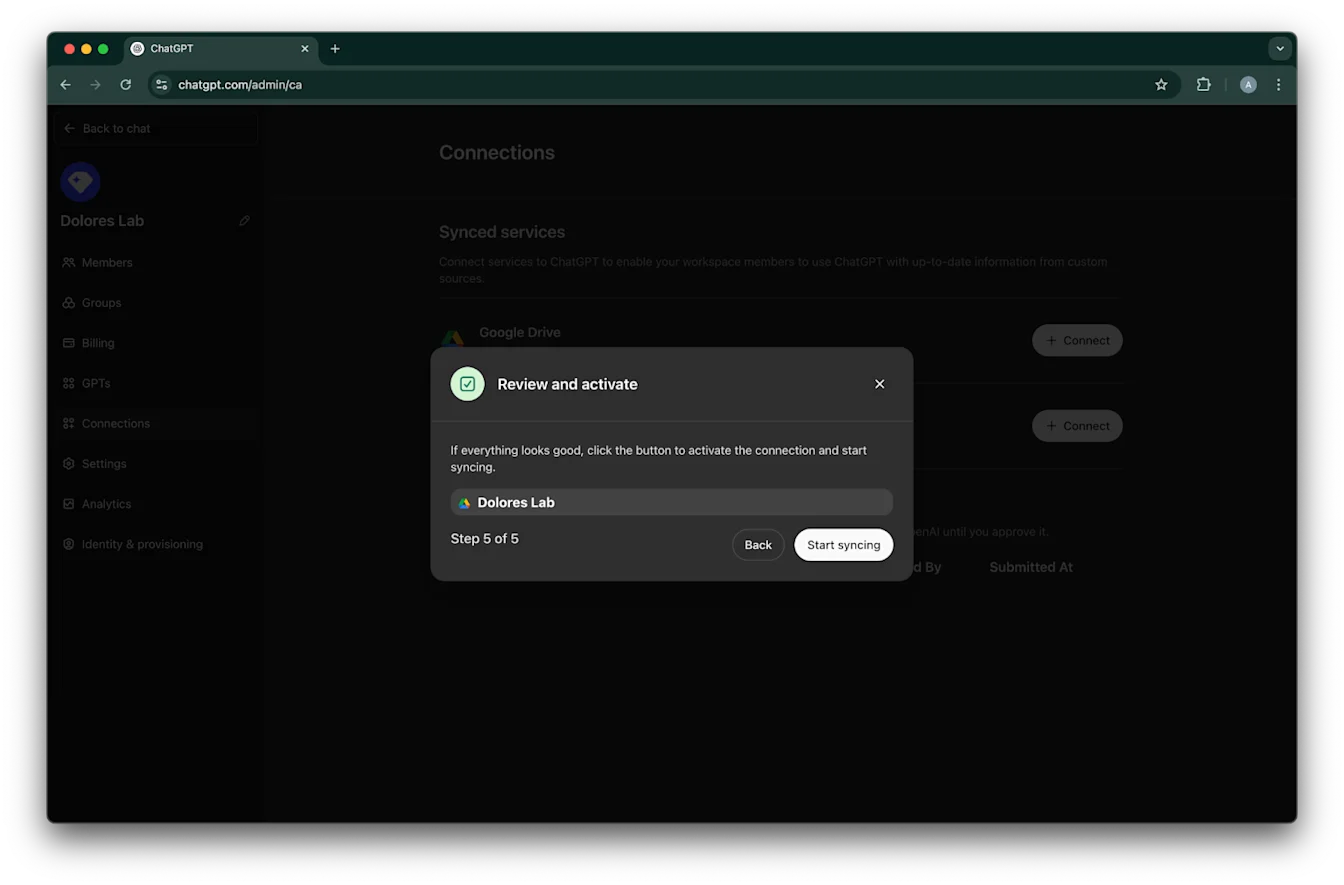
Start syncing वर क्लिक करा.
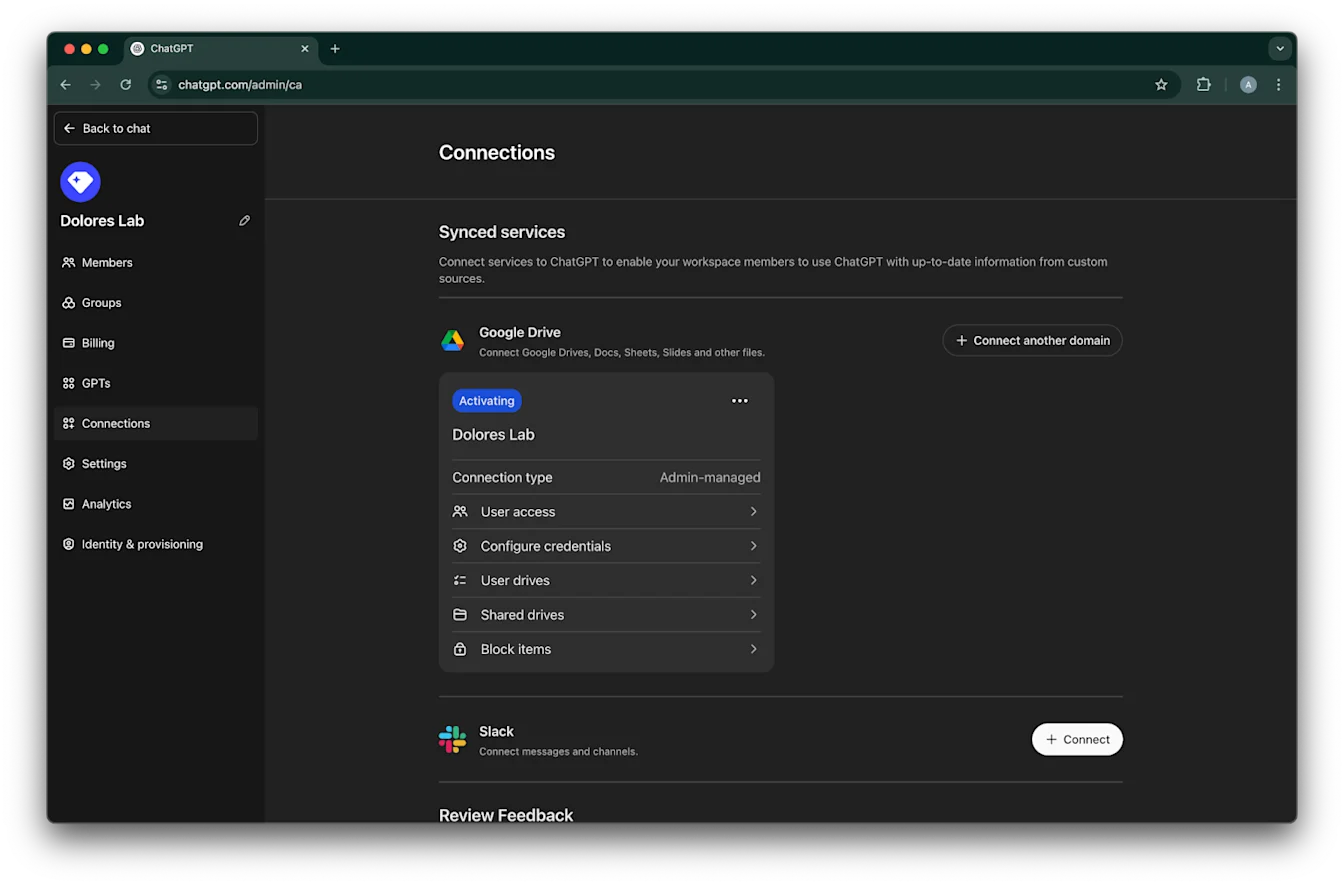
तुमचे Google Drive connection आता यशस्वीरीत्या तयार झाले आहे.
कृपया लक्षात घ्या की ते त्वरित sync होण्यास सुरुवात करेल, पण तुमच्या सेटिंग्जनुसार किती फाइल्स समाविष्ट केल्या आहेत यावर अवलंबून ते पूर्ण होण्यासाठी काही तासांपासून काही दिवस लागू शकतात.
मागील 30 दिवसांत जोडलेल्या किंवा संपादित केलेल्या फाइल्सचे syncing पूर्ण झाल्यावर, connector तुम्ही ज्यांच्यासाठी ते सक्षम केले आहे त्या युजर्सना उपलब्ध होईल.
Service account key creation सक्षम करणे
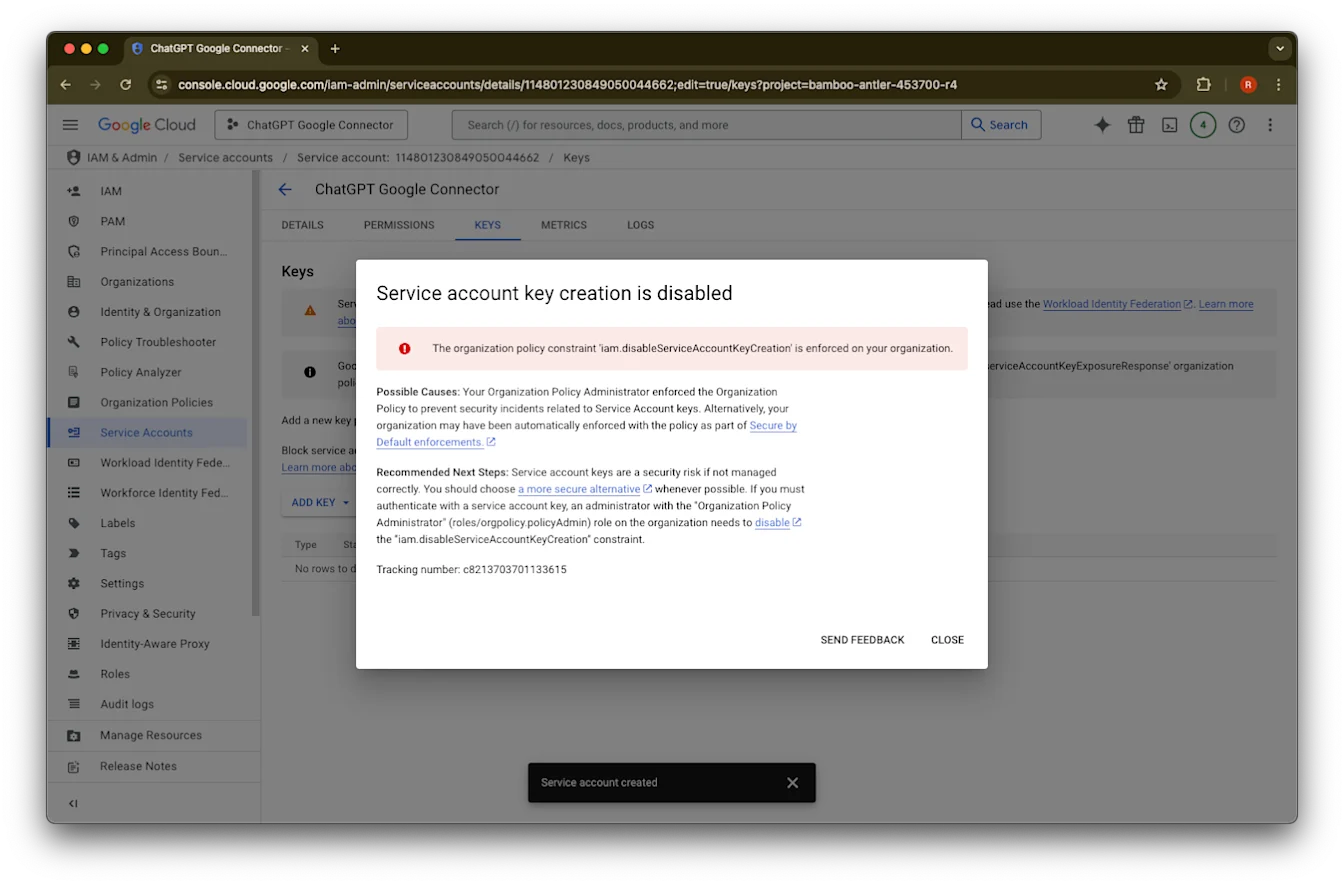
तुम्हाला खालील error मिळाल्यास, या विशिष्ट project साठी service account creation सक्षम करावे लागेल.
> तुमच्या संस्थेवर ‘iam.disableServiceAccountKeyCreation’ हे organization policy constraint लागू केले आहे.
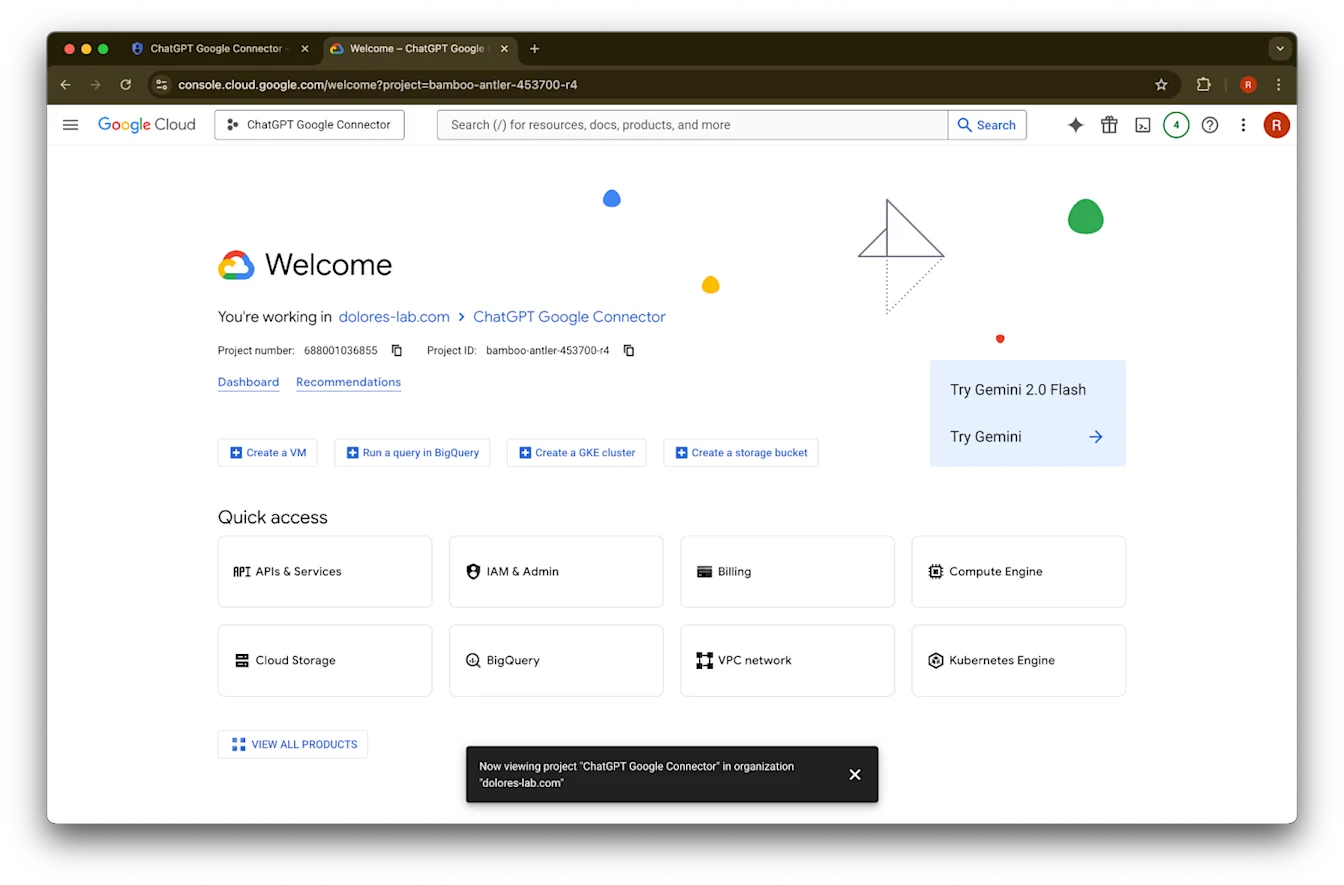
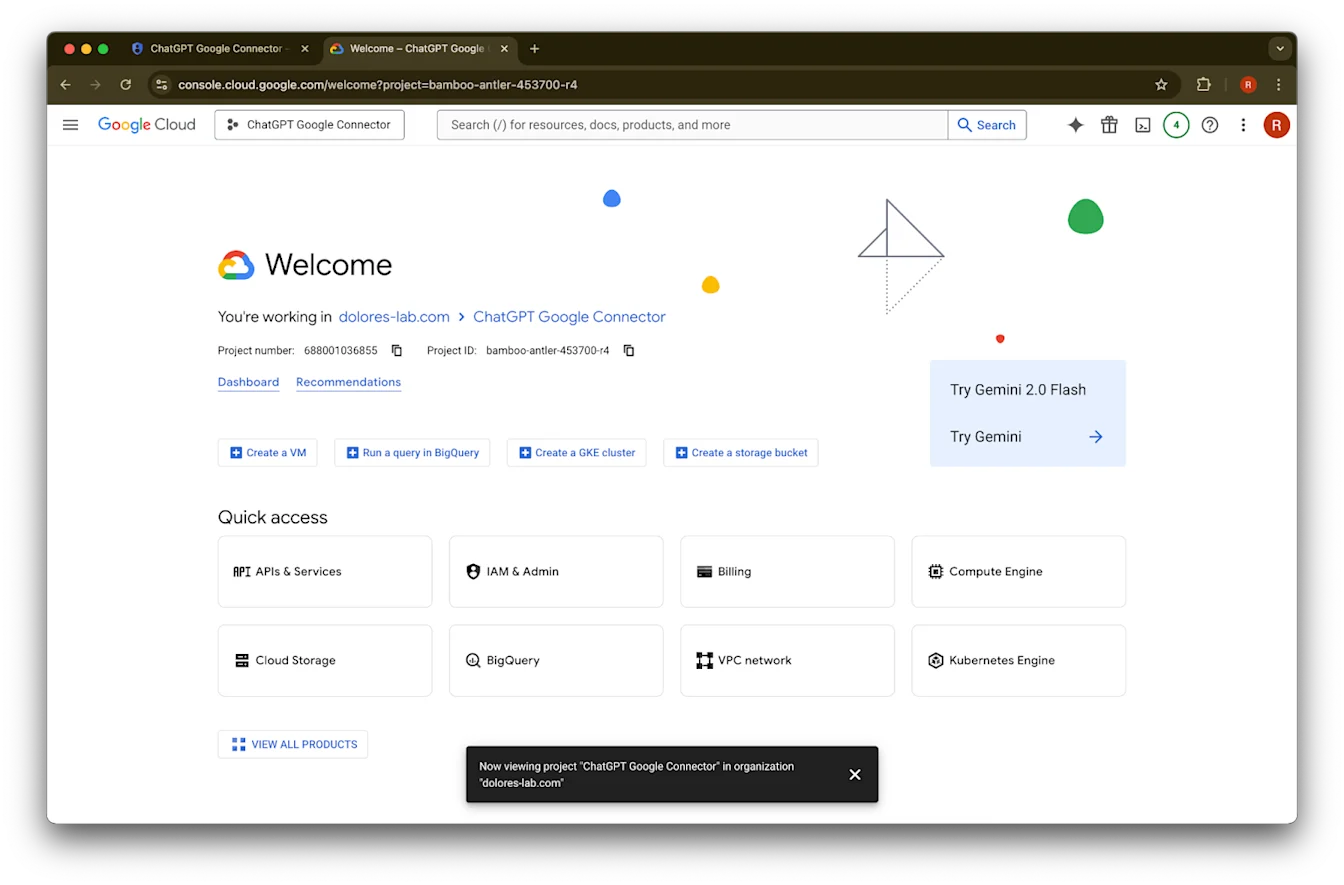
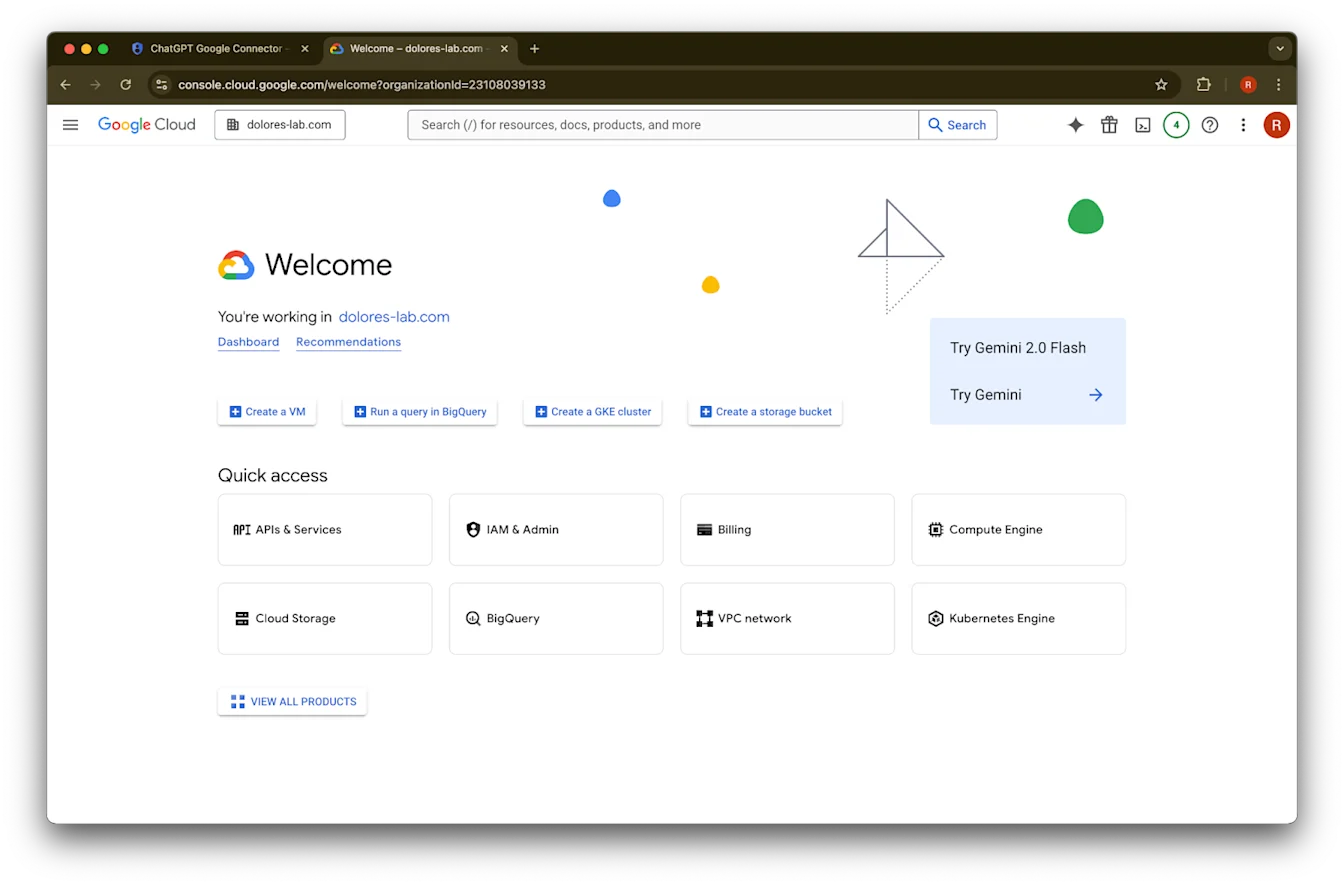
नवीन tab उघडा आणि console.cloud.google.com वर जा. निवडलेला project तोच आहे याची खात्री करा जो तुम्ही आधीच निवडला आहे.
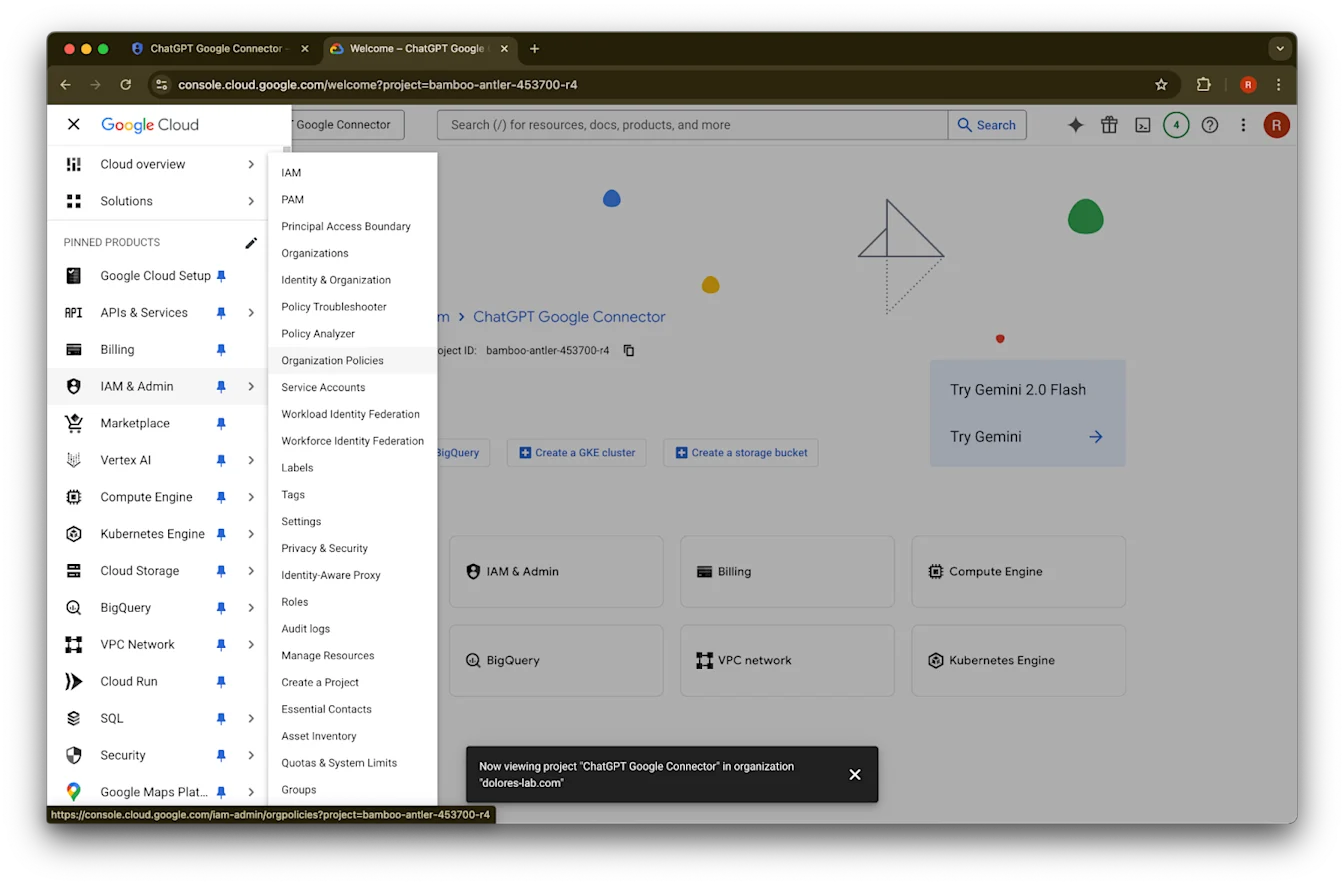
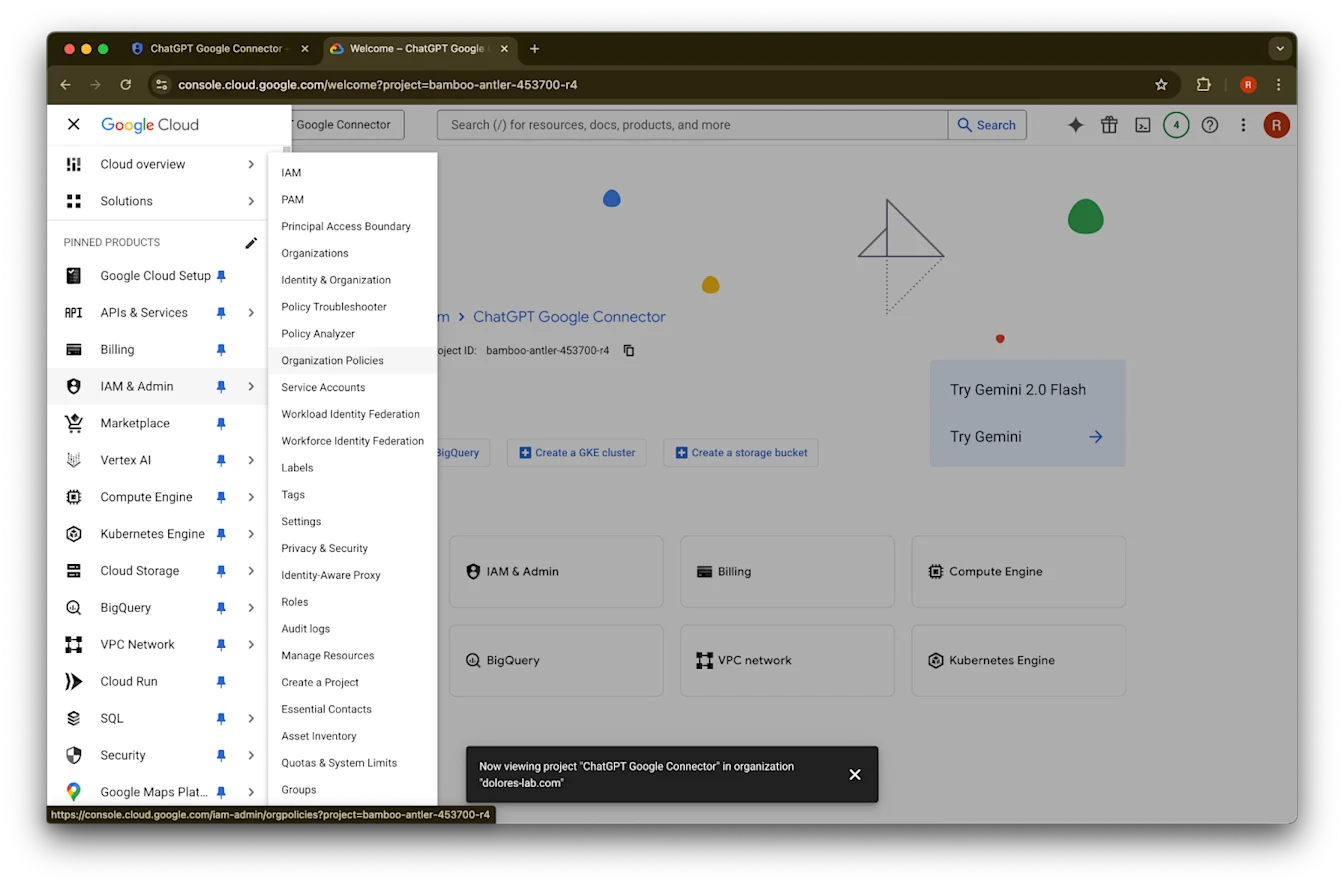
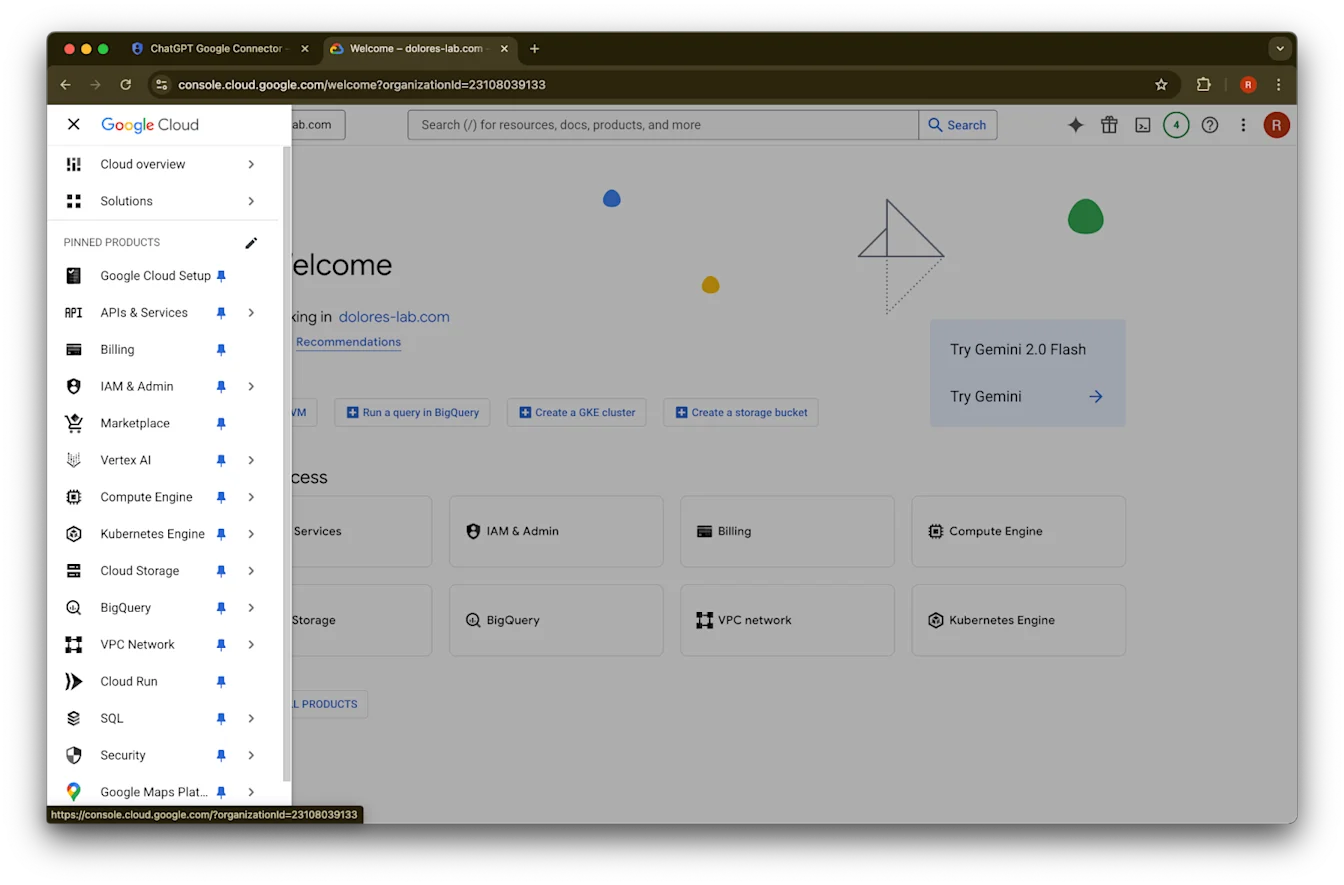
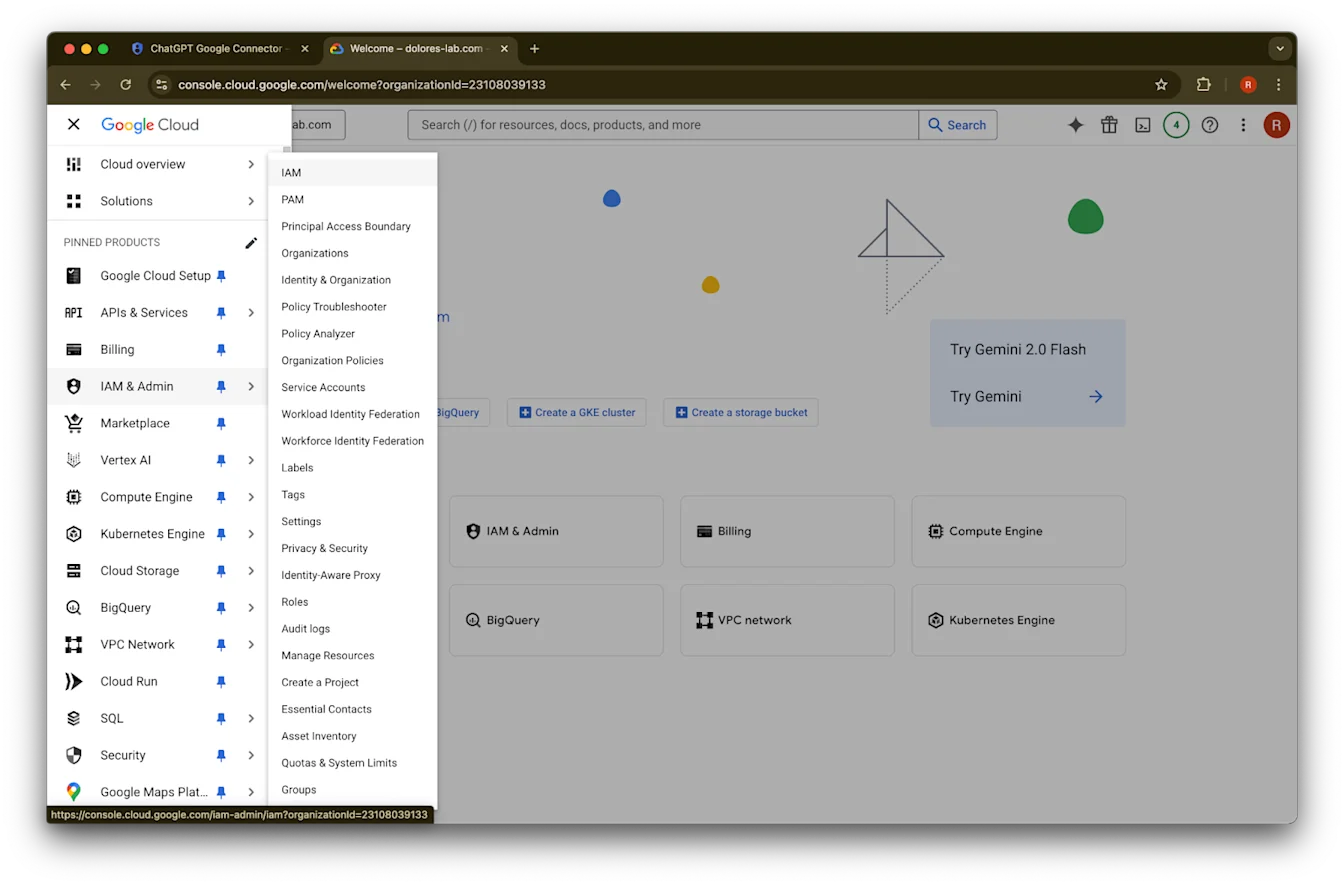
वरच्या डाव्या कोपऱ्यातील menu icon वर क्लिक करा.IAM & Admin वर hover करा.
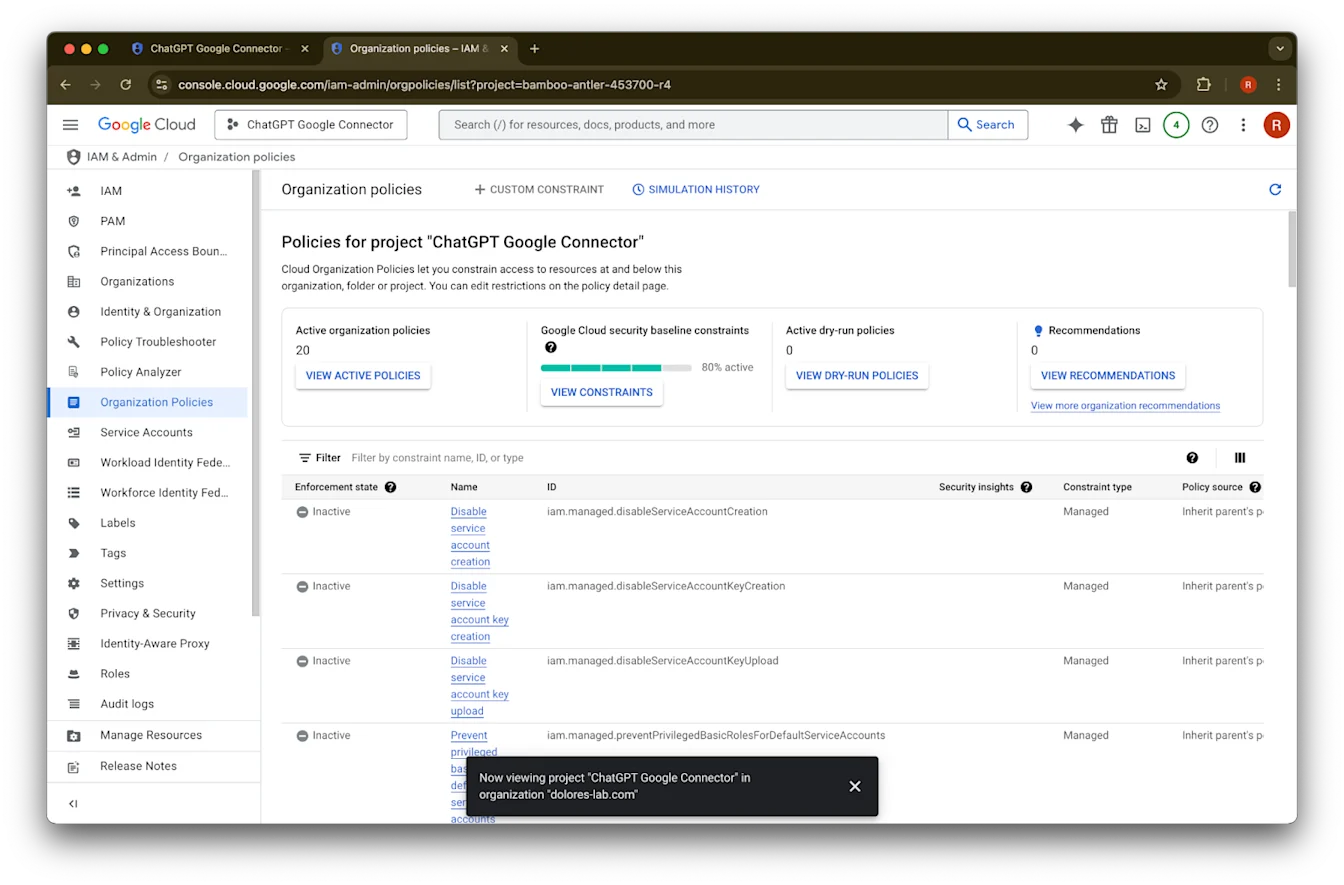
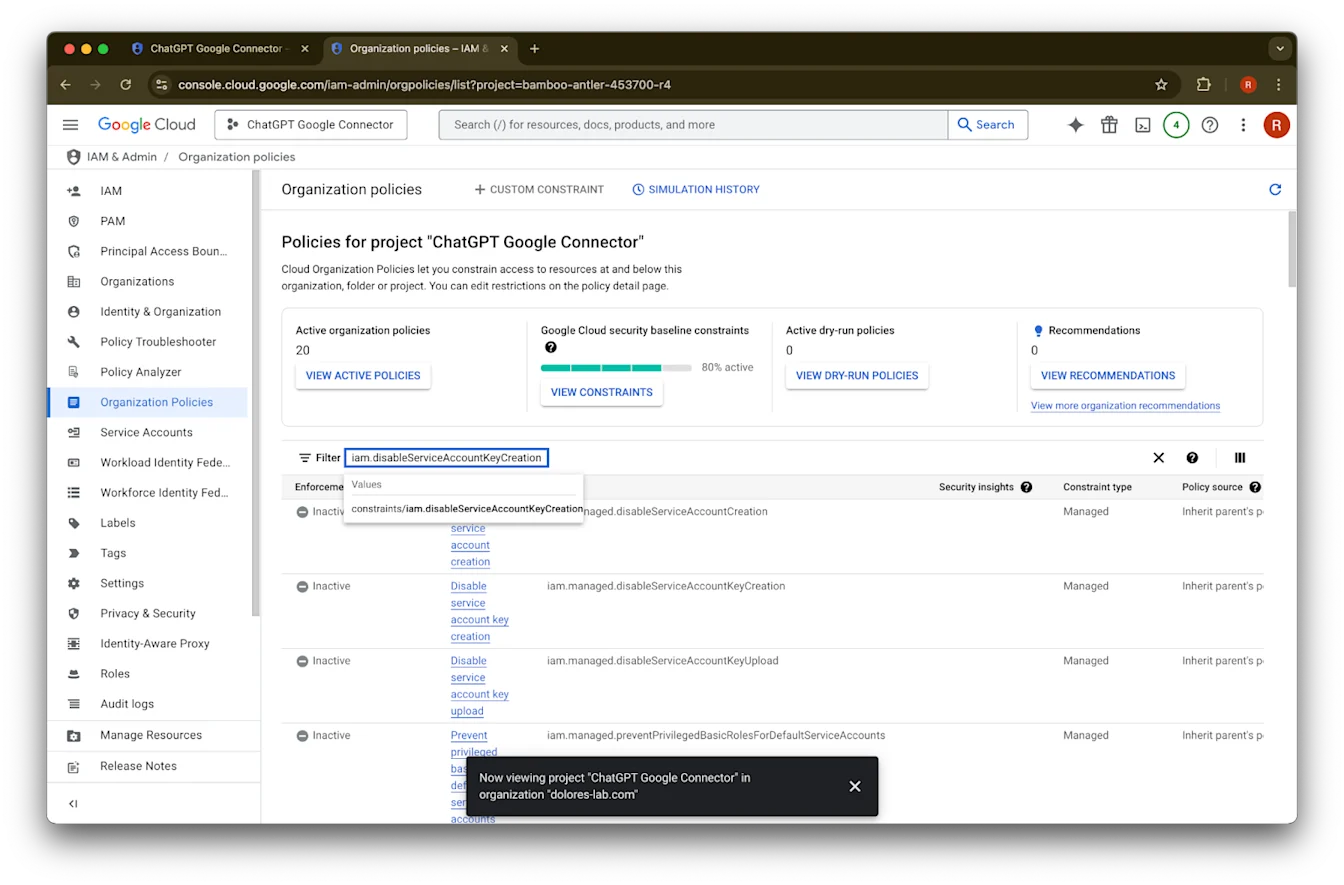
Organizational Policies वर क्लिक करा.
iam.disableServiceAccountKeyCreation
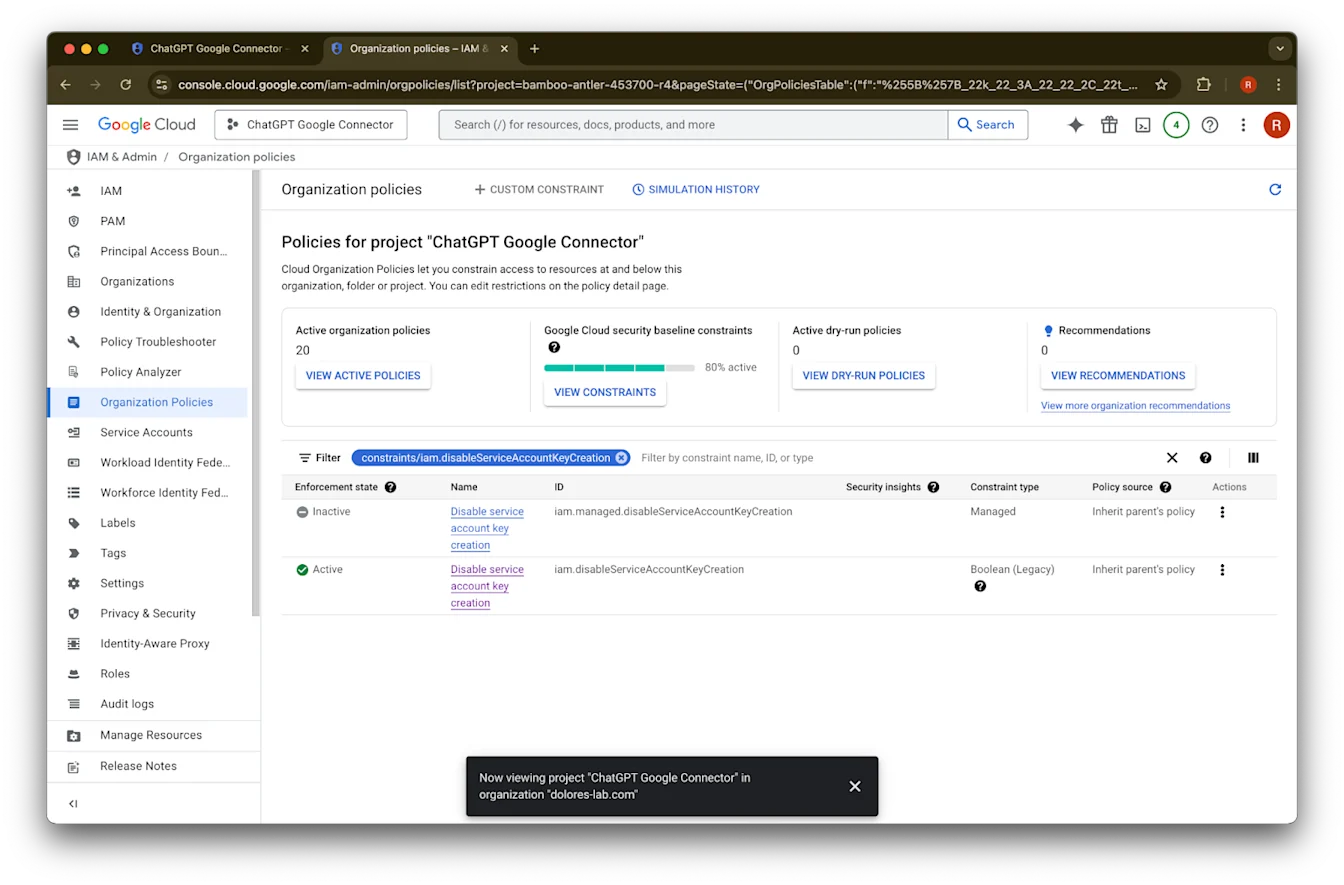
शोधा.constraints/iam.disableServiceAccountKeyCreation
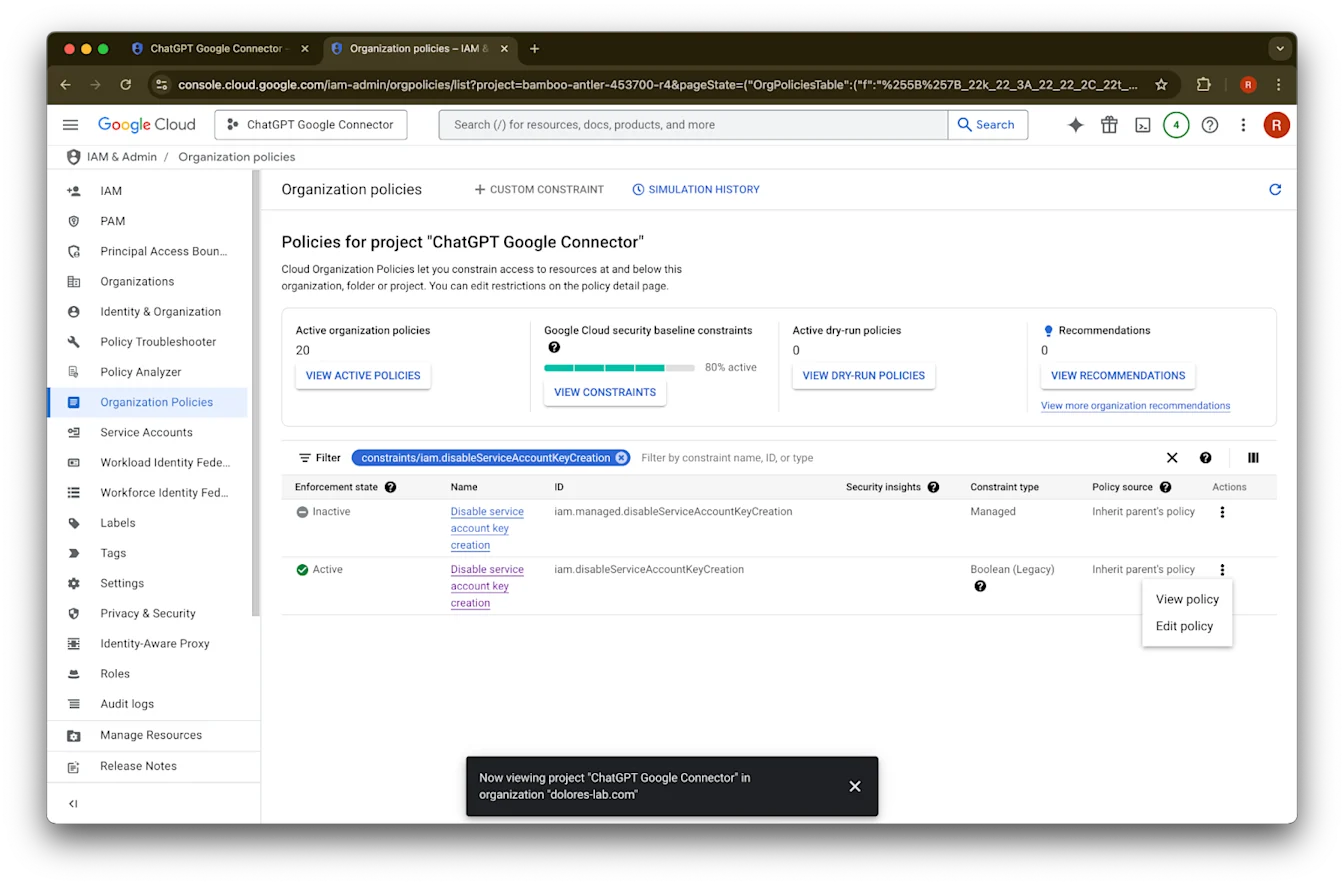
या result वर क्लिक करा.iam.disableServiceAccountKeyCreation
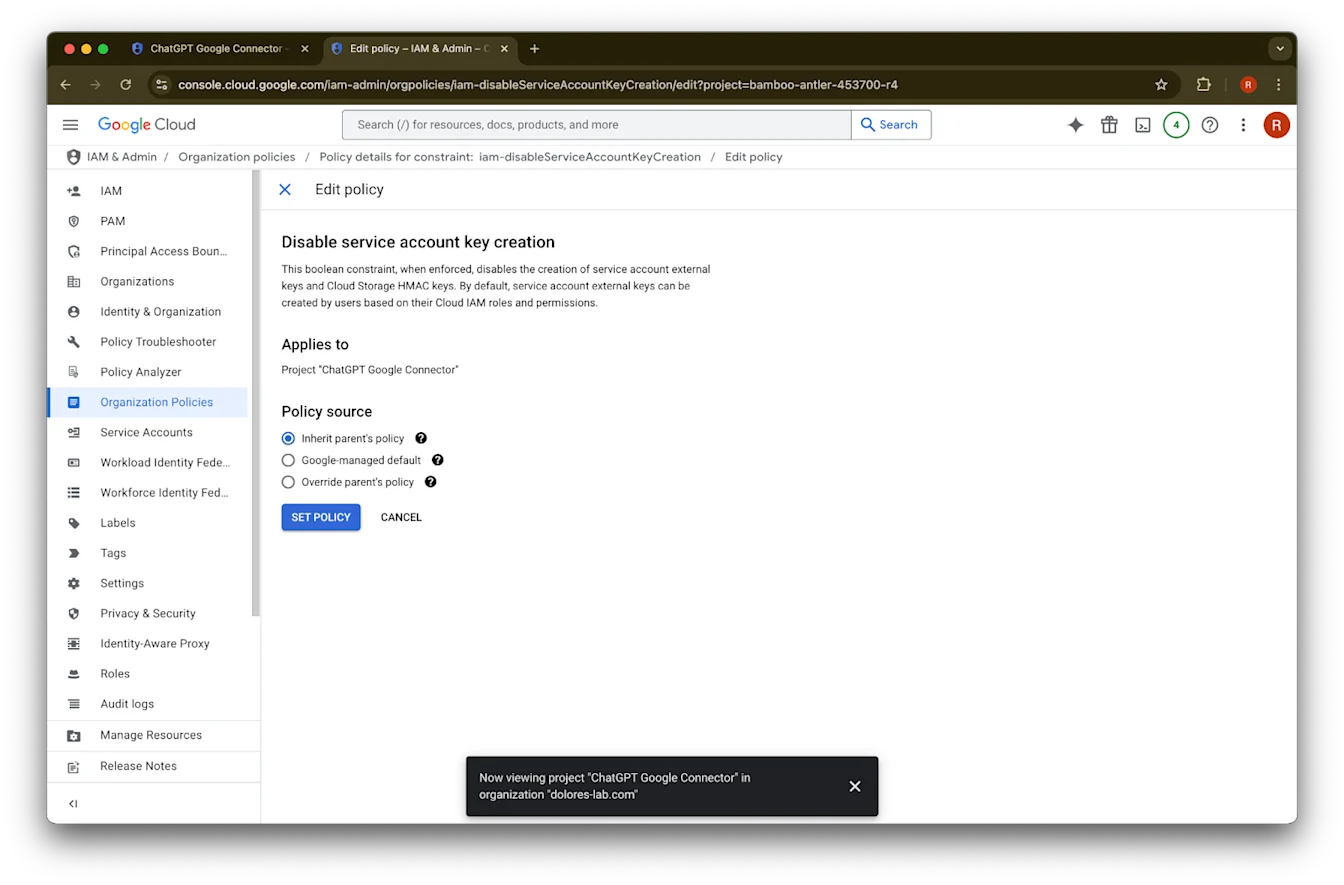
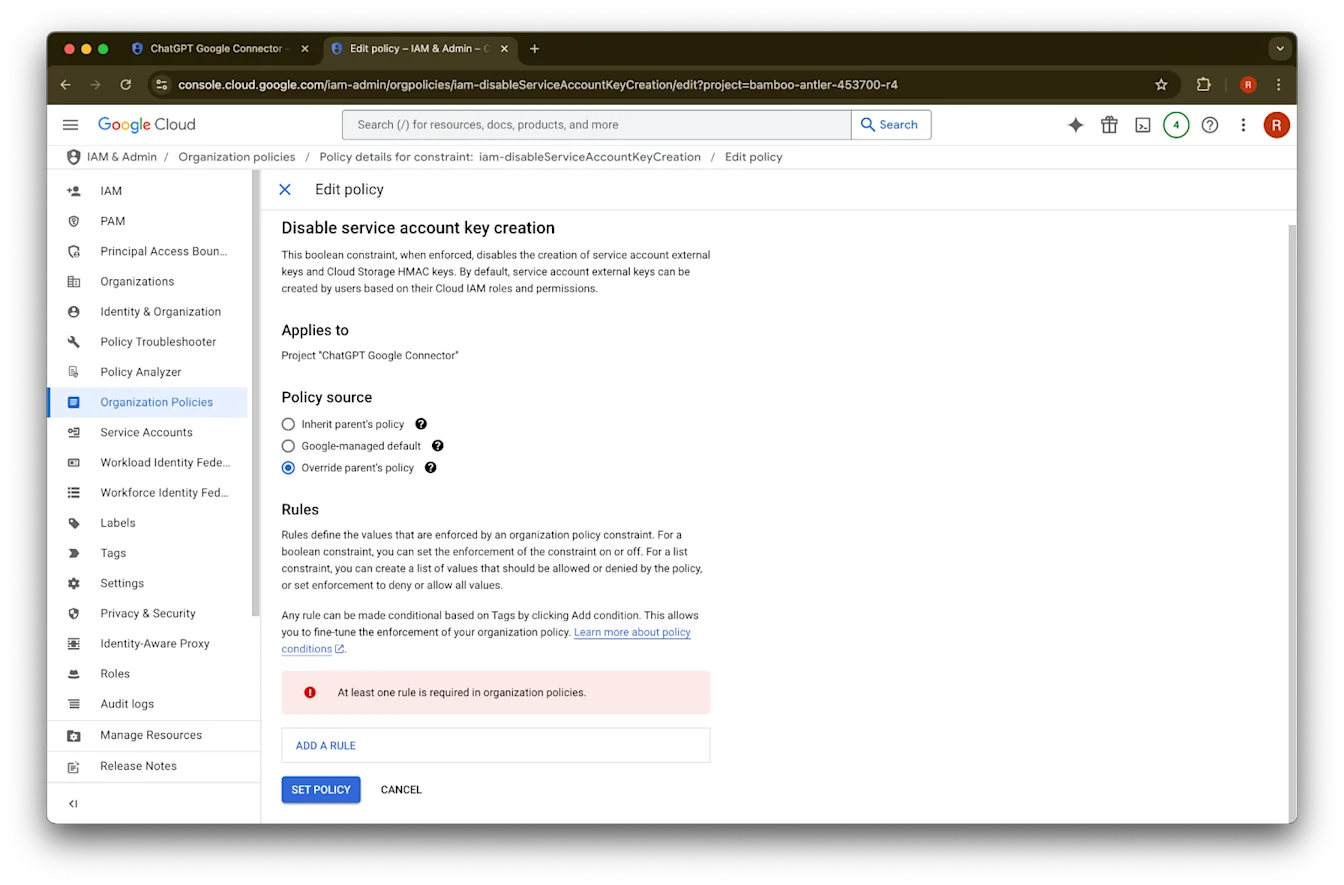
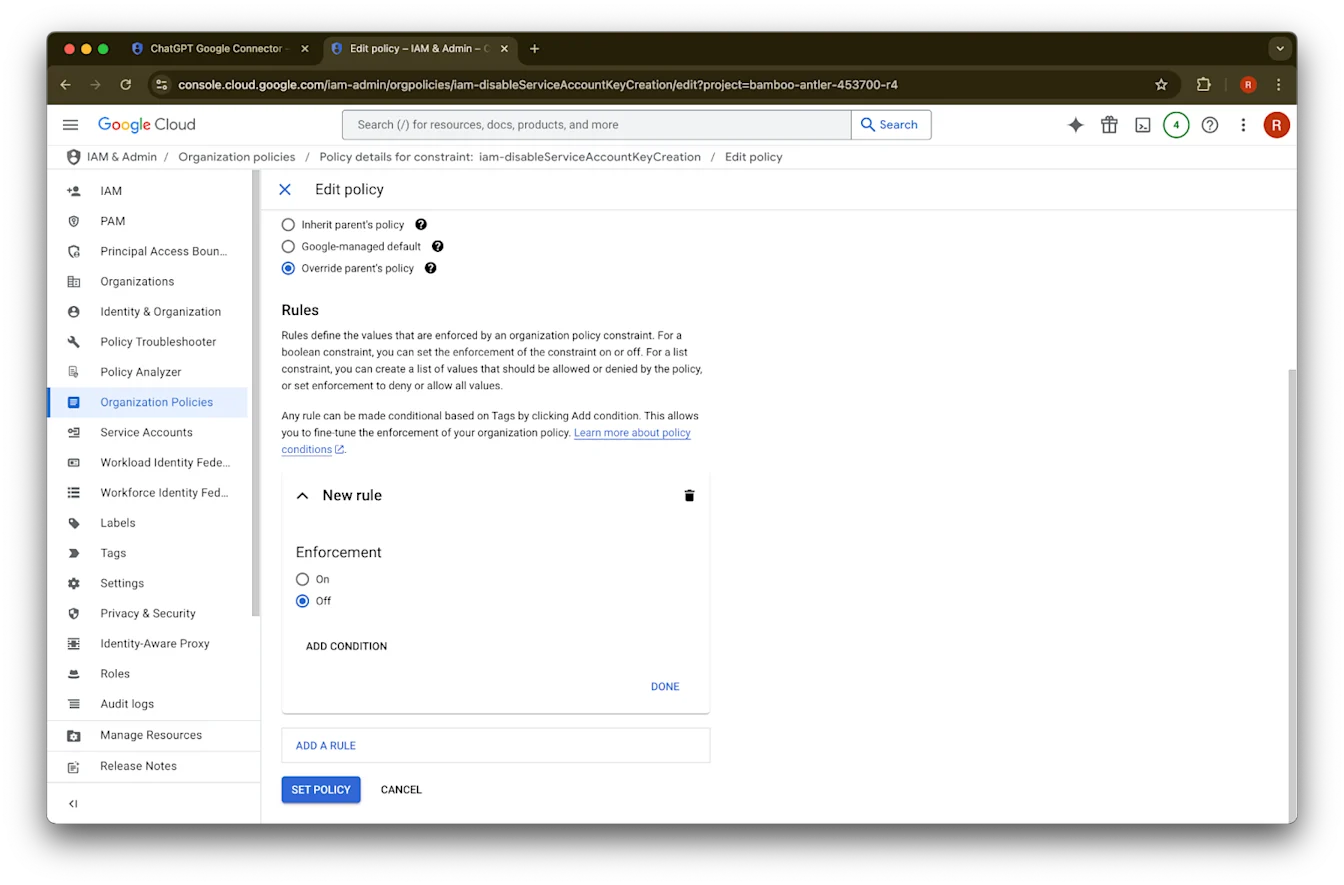
ID असलेल्या row साठी … वर क्लिक करा.Edit policy वर क्लिक करा. जर Edit policy disabled असेल, तर तुम्हाला Organization Policy Administrator व्हावे लागेल.
Override parent’s policy
वर क्लिक करा.Add a rule
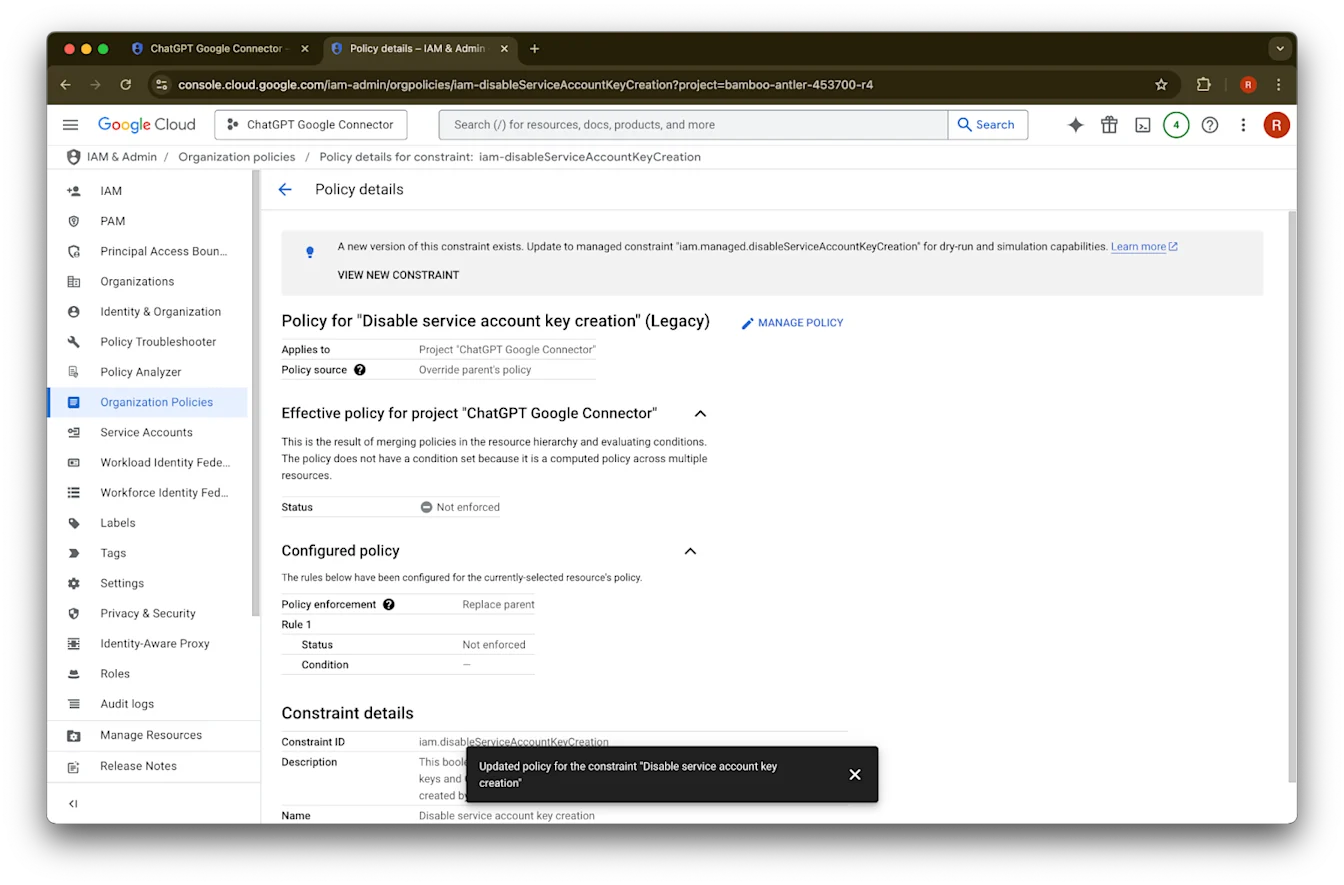
वर क्लिक करा.Set Policy
वर क्लिक करा.आता तुम्ही service account key तयार करू शकता. हे सक्षम होण्यासाठी काही मिनिटे लागू शकतात.
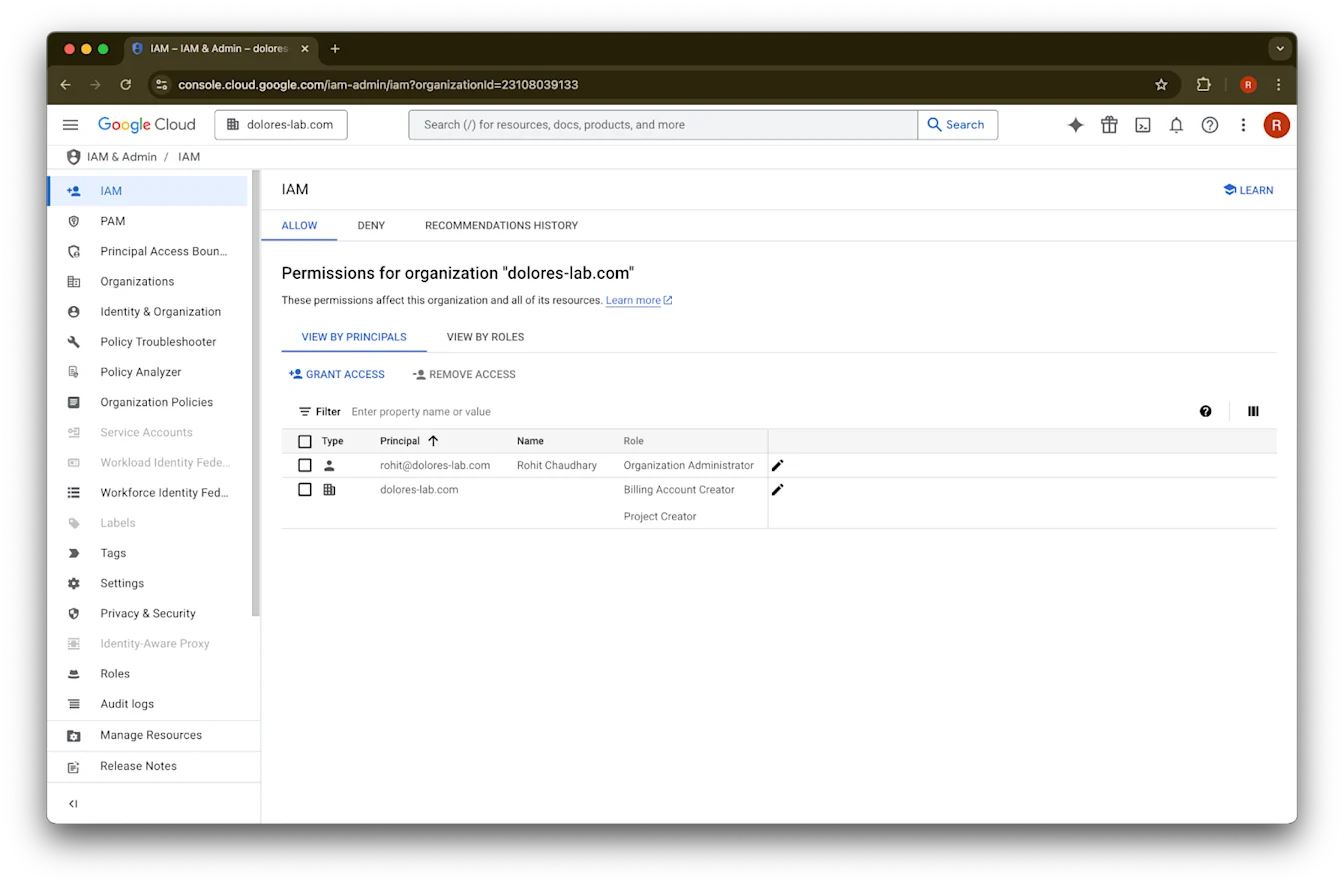
Organization Policy Administrator होणे
console.cloud.google.com वर जा आणि project/organization selector वर क्लिक करा.
your organization
वर क्लिक करा.वरच्या डाव्या कोपऱ्यातील menu icon वर क्लिक करा.
IAM & Admin
वर hover करा.IAM
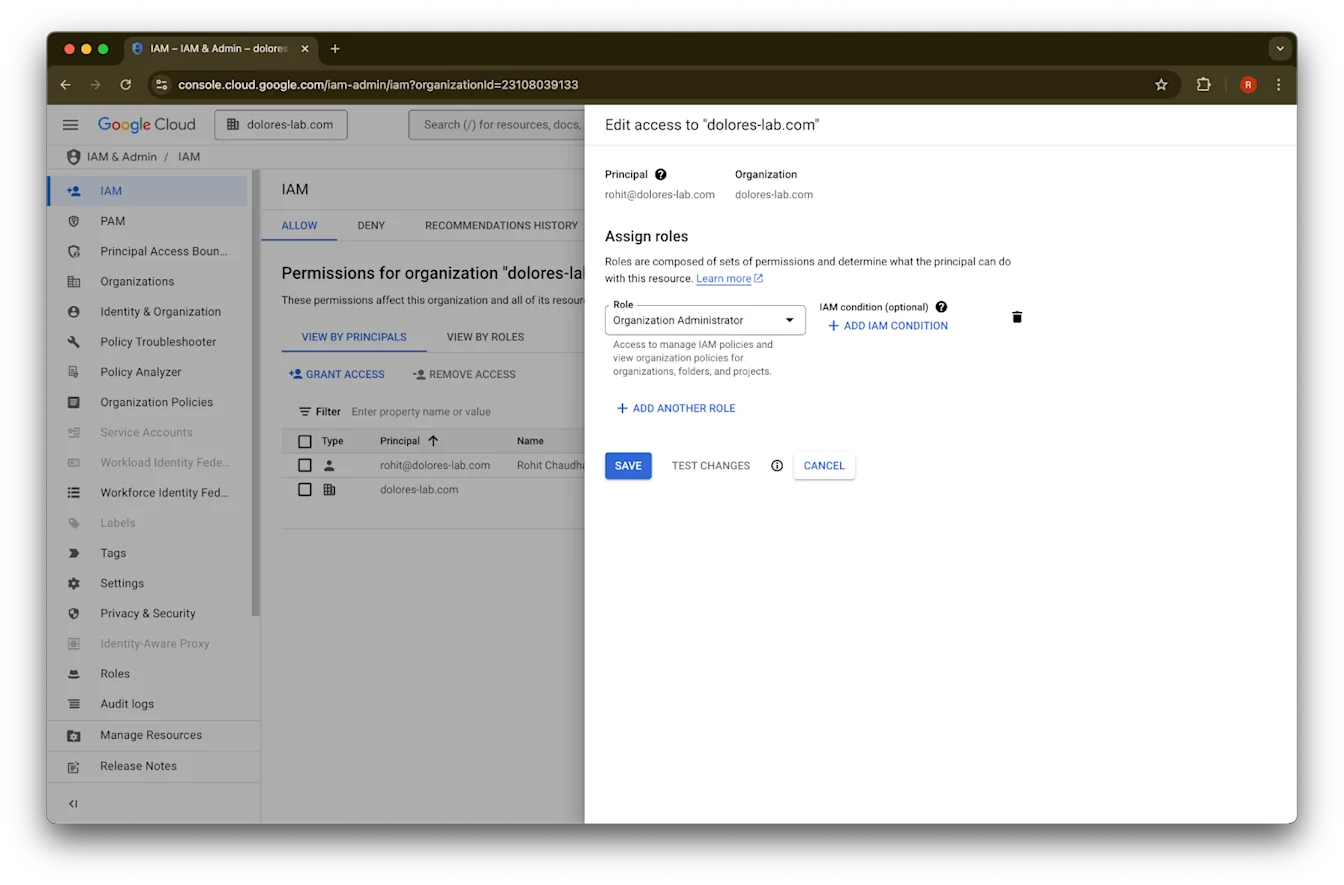
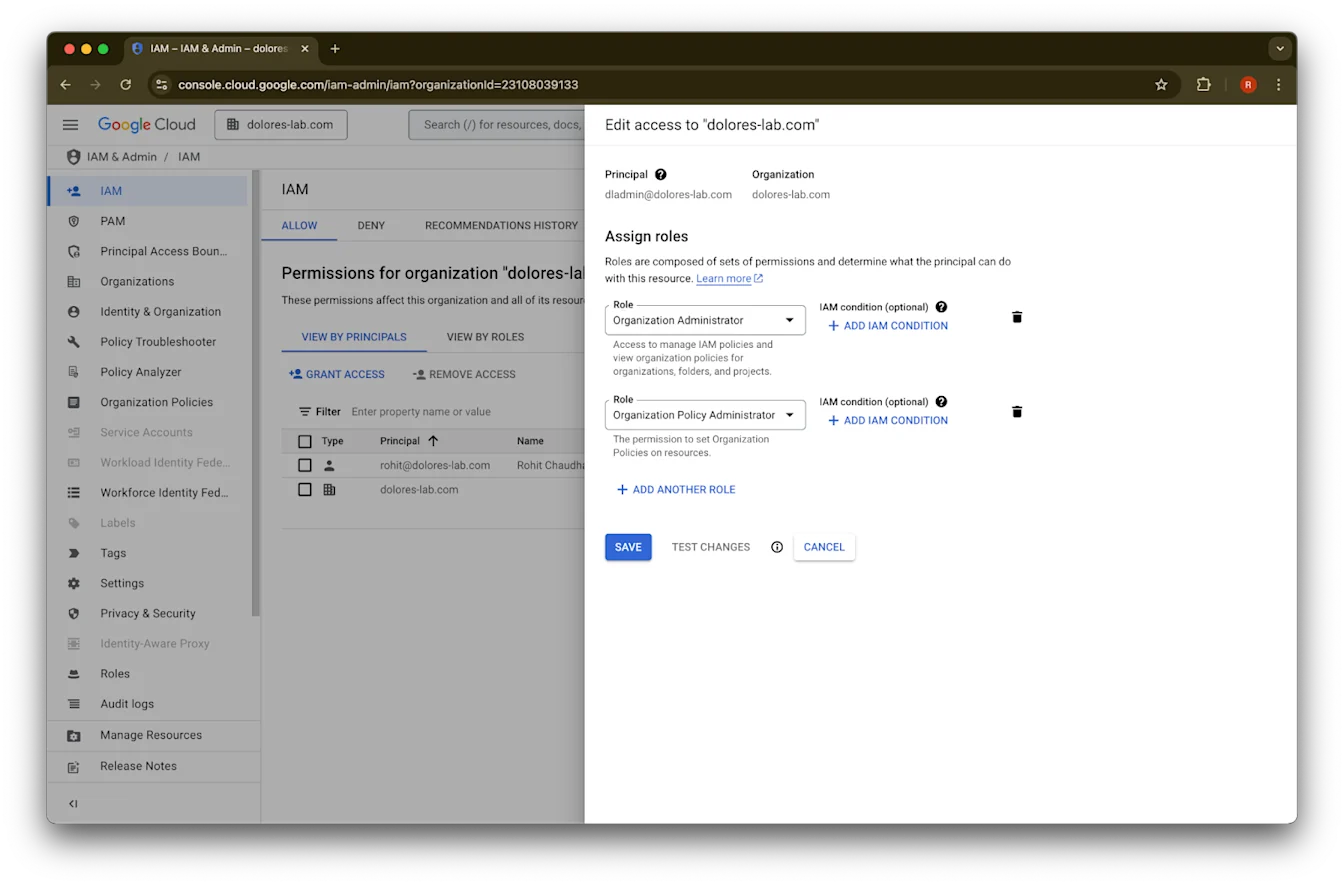
वर क्लिक करा.तुमच्या खात्यासाठी pencil वर क्लिक करा.
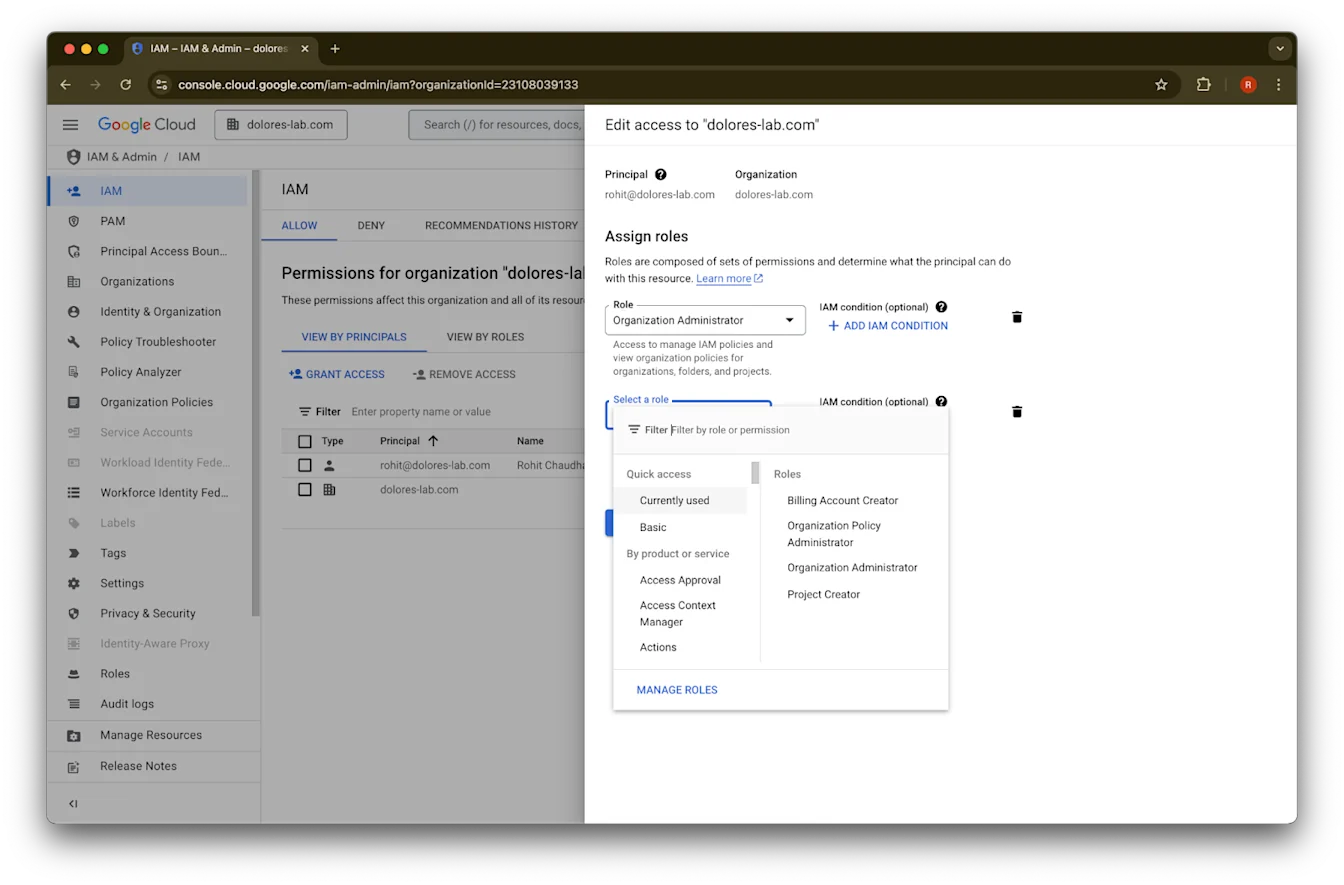
Add Another Role
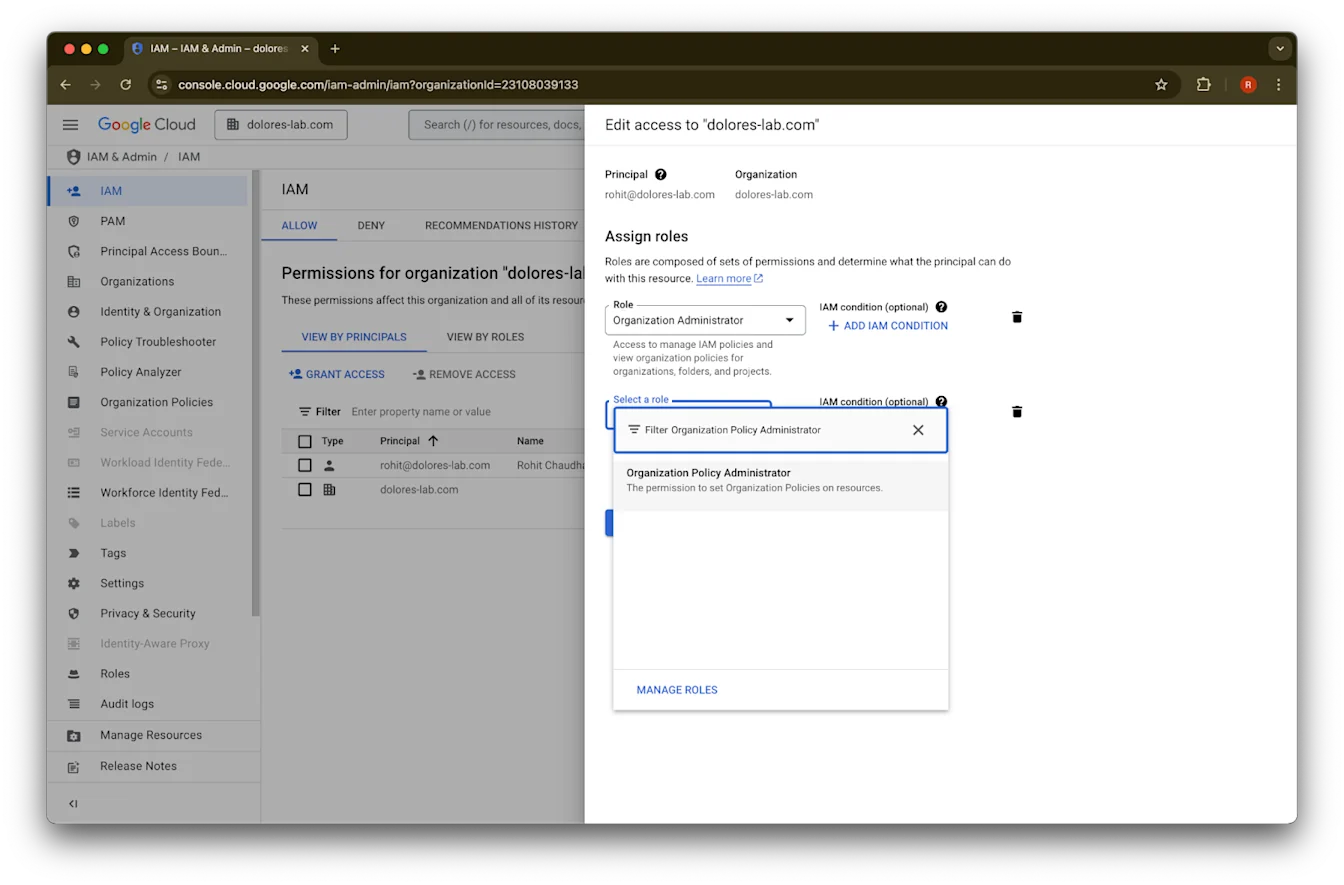
वर क्लिक करा.Organization Policy Administrator
शोधा.Organization Policy Administrator
वर क्लिक करा.Save वर क्लिक करा.
तुमच्या खात्याला आता service account key creation सक्षम करण्याची परवानगी आहे. हे लागू होण्यासाठी काही मिनिटे लागू शकतात.
Google Workspace आणि ChatGPT साठी वेगवेगळी ईमेल खाती ठेवण्यासाठी Google Email Alias वापरणे
जर तुम्ही Google Drive synced connectors साठी admin-managed setup वापरून तुमच्या ChatGPT वर्कस्पेसला Google Workspace शी जोडणारे अॅडमिन असाल, आणि तुमची संस्था ChatGPT आणि Google Workspace साठी वेगवेगळी email domains वापरत असेल, तर युजर्सना Google Drive synced connectors यशस्वीरीत्या access करता यावेत यासाठी तुम्हाला अतिरिक्त पायऱ्या घ्याव्या लागतील.
शिफारस: शक्य असल्यास, Google Workspace आणि ChatGPT खात्यांसाठी एकच primary email address वापरा.
हे शक्य नसेल, तर ChatGPT sign-in ईमेलशी जुळणारा Google Workspace ईमेल alias configure करण्यासाठी खालील सूचना फॉलो करा.
Google Workspace Alias जोडण्यासाठी पायऱ्या
प्रत्येक युजरचा ChatGPT ईमेल त्यांच्या Google Workspace खात्याशी लिंक होऊ शकतो याची खात्री करण्यासाठी Google Admin Console मध्ये या पायऱ्या फॉलो करा.
Admin Console वर जा. येथे जा: Directory > Users
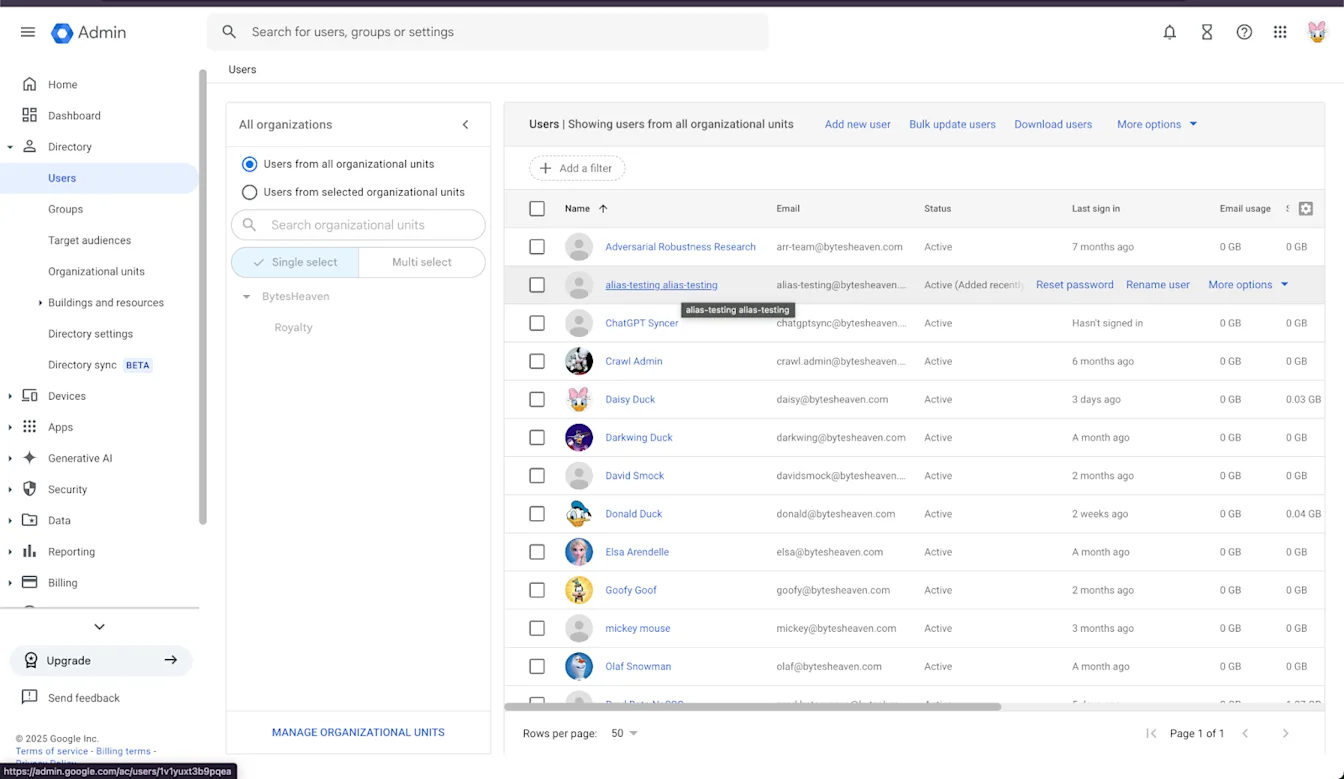
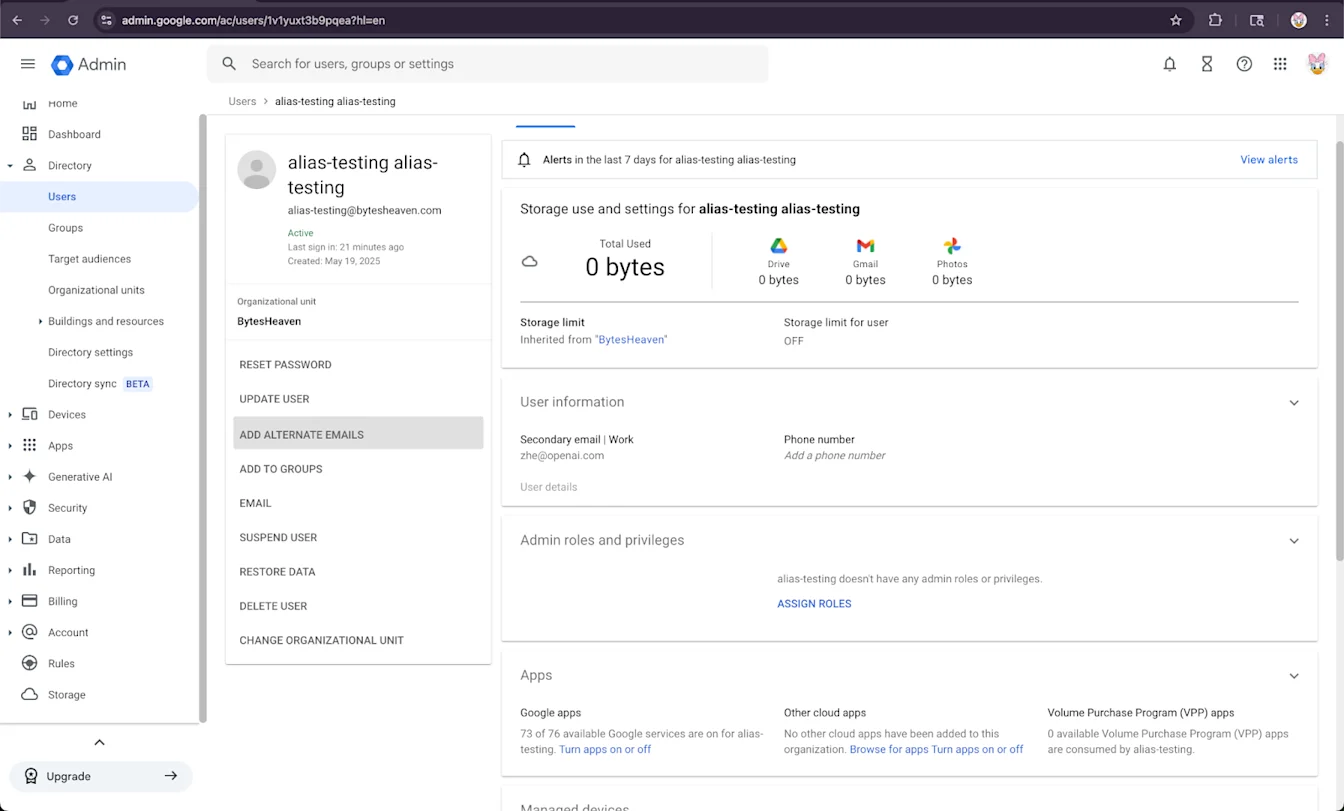
2. एक युजर निवडा, नंतर “ADD ALTERNATIVE EMAILS” निवडा.
3. एक Alternative Email जोडा. ते युजरच्या ChatGPT खात्याशी जुळते याची खात्री करा.
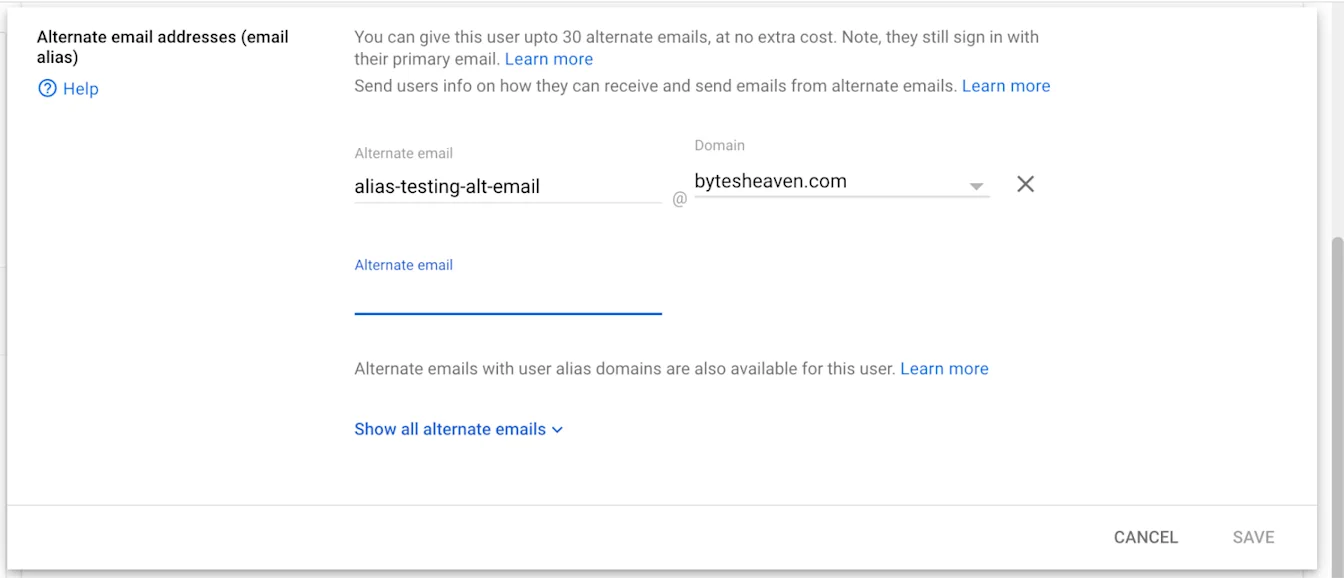
4. Save निवडा.
माहित असलेल्या मर्यादा
वैयक्तिक ईमेल पत्त्यांना समर्थन नाही
वैयक्तिक पत्ते वापरून ChatGPT साठी नोंदणी करणारे युजर्स, उदाहरणार्थ example@gmail.com, Google Workspace शी connect करू शकत नाहीत. हा सेटअप समर्थित नाही आणि सुरक्षा धोका निर्माण करतो, कारण तो संस्थेबाहेरून अंतर्गत डेटाला प्रवेश सक्षम करतो.
Gmail "+" aliases ला समर्थन नाही
Gmail युजर्सना त्यांच्या पत्त्याला "+" जोडून aliases तयार करण्याची परवानगी देते, उदाहरणार्थ user+alias@gmail.com. या प्रकारचे aliasing Google Drive synced connectors बरोबर काम करत नाही. Alias Google Workspace मध्ये स्पष्टपणे configure केलेले असणे आवश्यक आहे.
सामान्य एरर मेसेज
ईमेल पत्ते योग्यरित्या लिंक नसल्यास, युजर्सना हा संदेश दिसू शकतो: "We were unable to connect your account to Google Drive. अधिक जाणून घेण्यासाठी क्लिक करा."
युजर्सना हा संदेश मिळाल्यास, या दस्तऐवजातील पायऱ्यांचे पुनरावलोकन करा आणि त्या अचूकपणे फॉलो केल्या आहेत याची खात्री करा. अतिरिक्त मदत हवी असल्यास, कृपया आमच्या support team शी संपर्क साधा.