
admin-managed setup ఉపయోగించి మీ Google Workspace ను ChatGPT కు కనెక్ట్ చేయడానికి, ముందుగా Google యొక్క అడ్మిన్ కన్సోల్స్లో access ను కాన్ఫిగర్ చేస్తారు:
ఒక service account సృష్టించండి, దీనికి Google Drive, users, మరియు groups పై read-only access ఉంటుంది.
ఈ service account ను మీ ChatGPT Workspace కు అనుబంధించిన అదే Google account కింద సృష్టించడానికి బలంగా సిఫారసు చేయబడుతుంది. ChatGPT వర్క్స్పేస్లోని అకౌంట్లు Google Workspace లో ఉపయోగించిన డొమైన్తో భిన్నమైన ఇమెయిల్ డొమైన్ను ఉపయోగిస్తే, మీ వినియోగదారుల కోసం ఈ connector ను enable చేయడానికి మీరు అదనపు దశలను అనుసరించాలి.
ఒక admin account సృష్టించండి, దాని తరఫున service account పని చేస్తుంది.
తర్వాత, ChatGPT అడ్మిన్ కన్సోల్లో సెటప్ను పూర్తి చేయండి:
service account యొక్క private key ను అప్లోడ్ చేయండి (Google నుండి JSON ఫైల్)
admin account ను పేర్కొనండి (credentials అవసరం లేదు).
ఏ ఫైళ్లను sync చేయాలో ఎంచుకోండి మరియు connection కు access ఉండే వినియోగదారులను ఎంచుకోండి.
ఈ మార్గదర్శిని ఈ 6 దశలన్నింటిలో మీకు సహాయం చేస్తుంది.
సర్వీస్ అకౌంట్ సెటప్ చేయడం
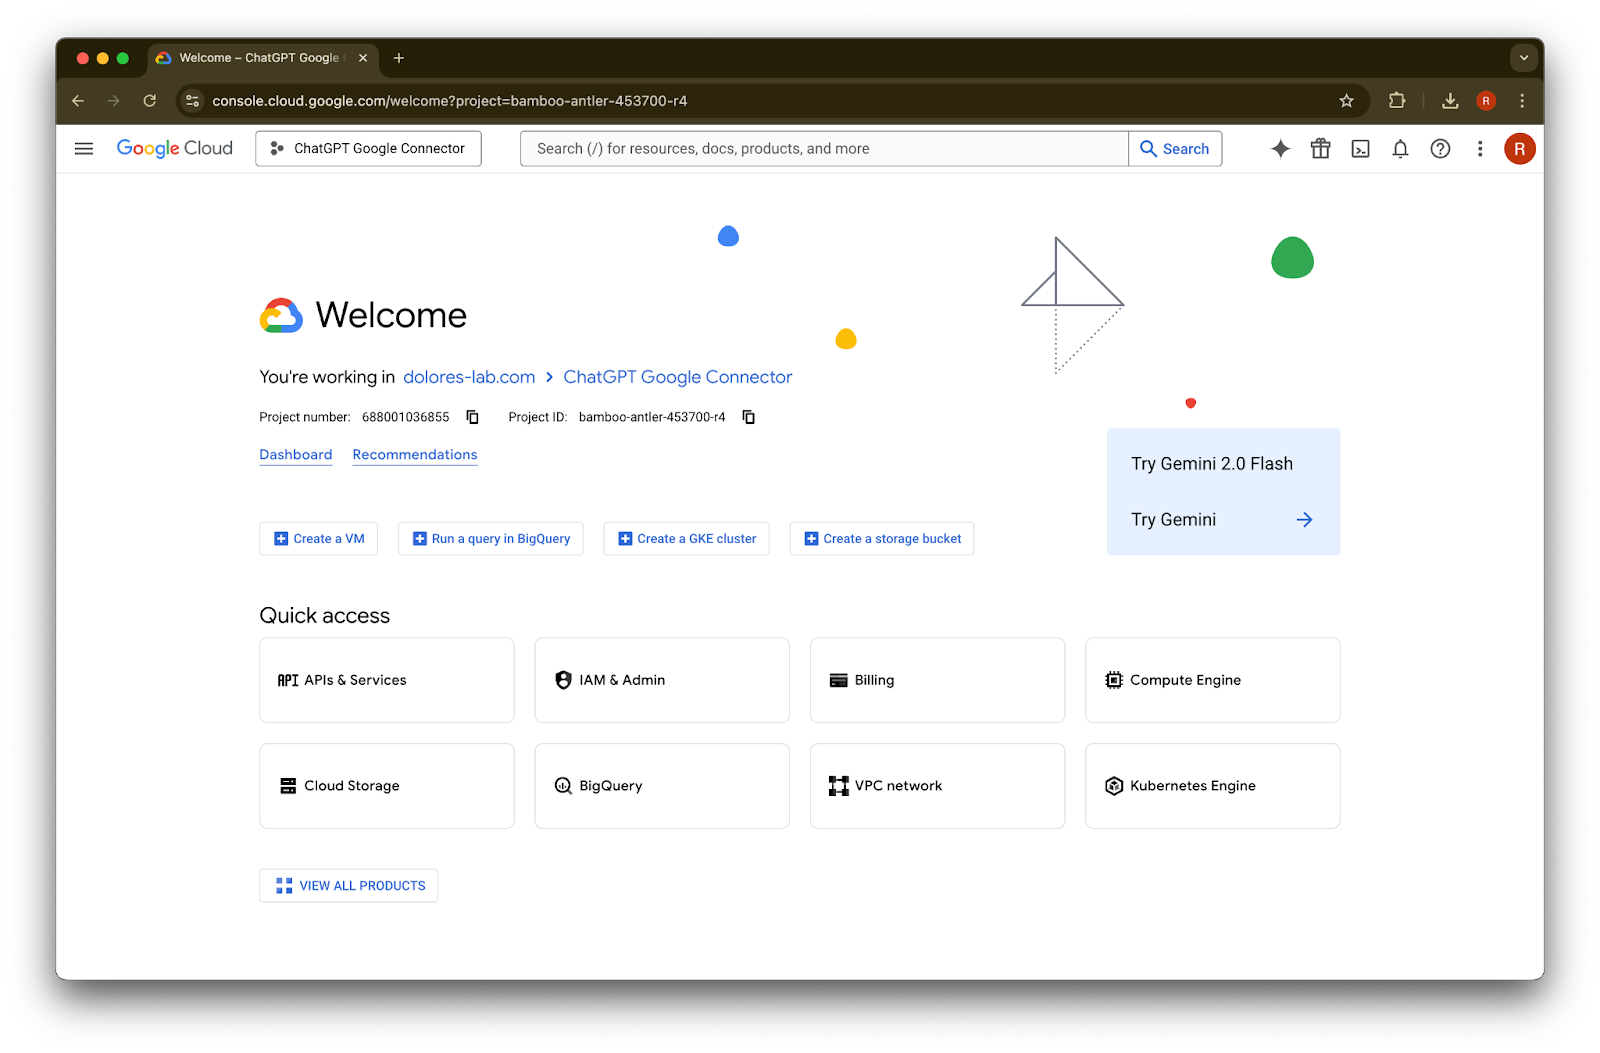
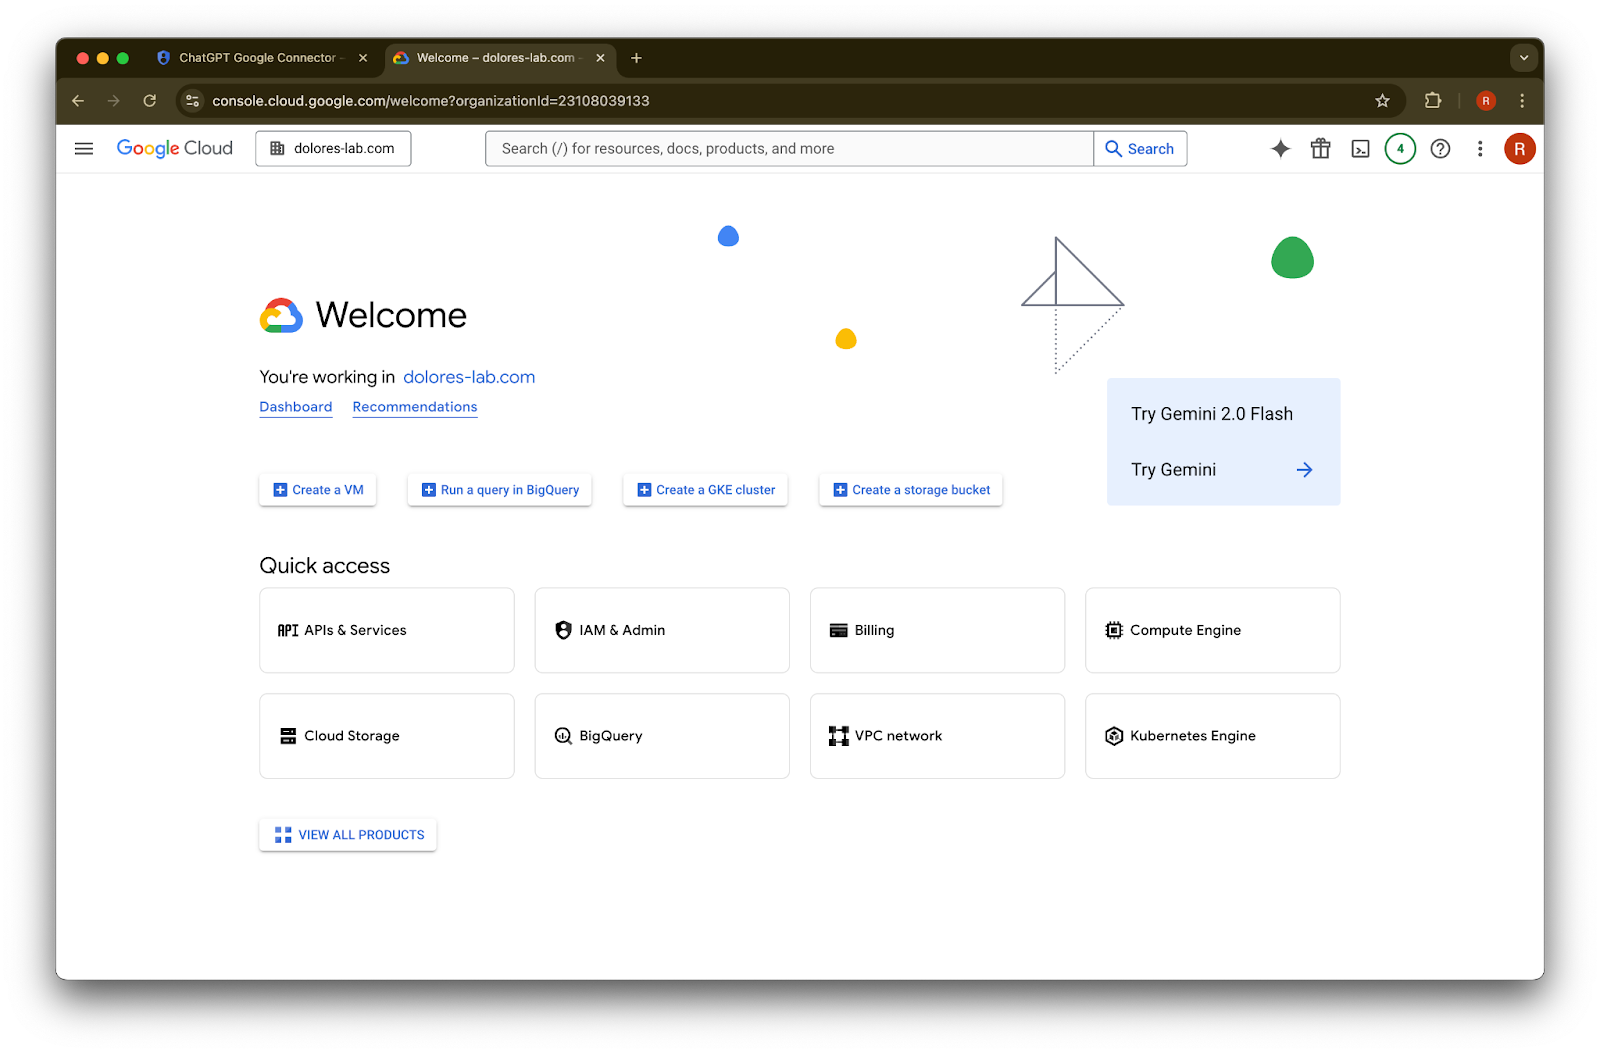
console.cloud.google.com కు వెళ్లండి.
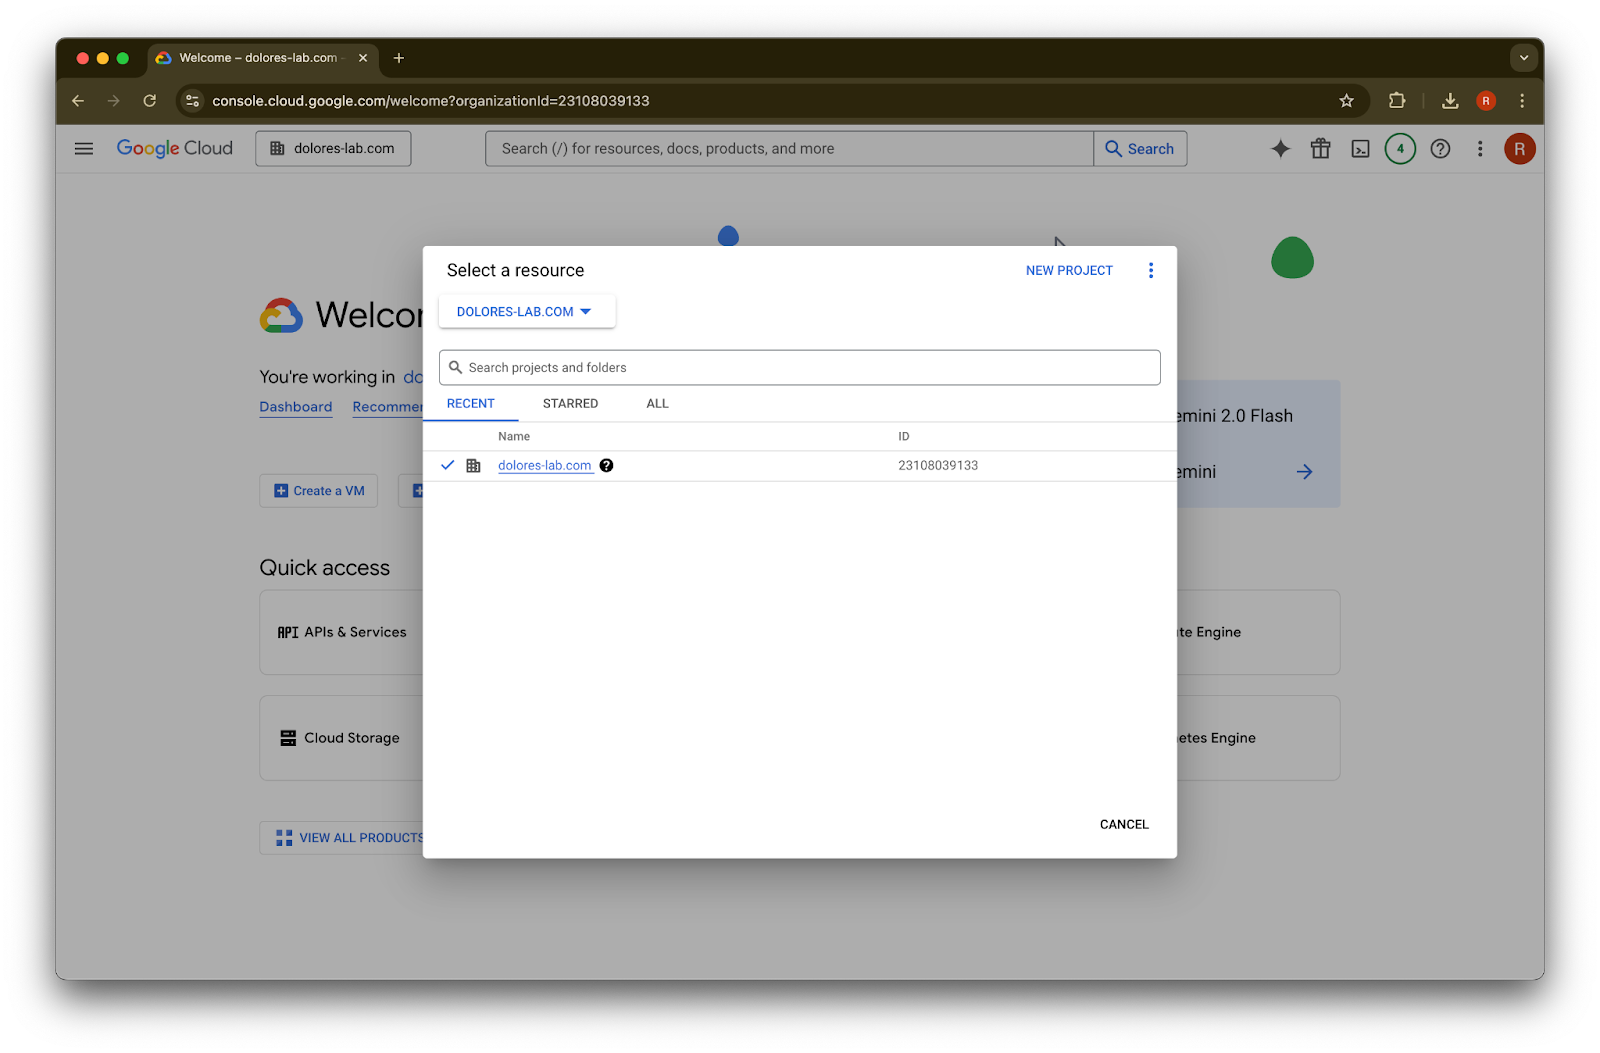
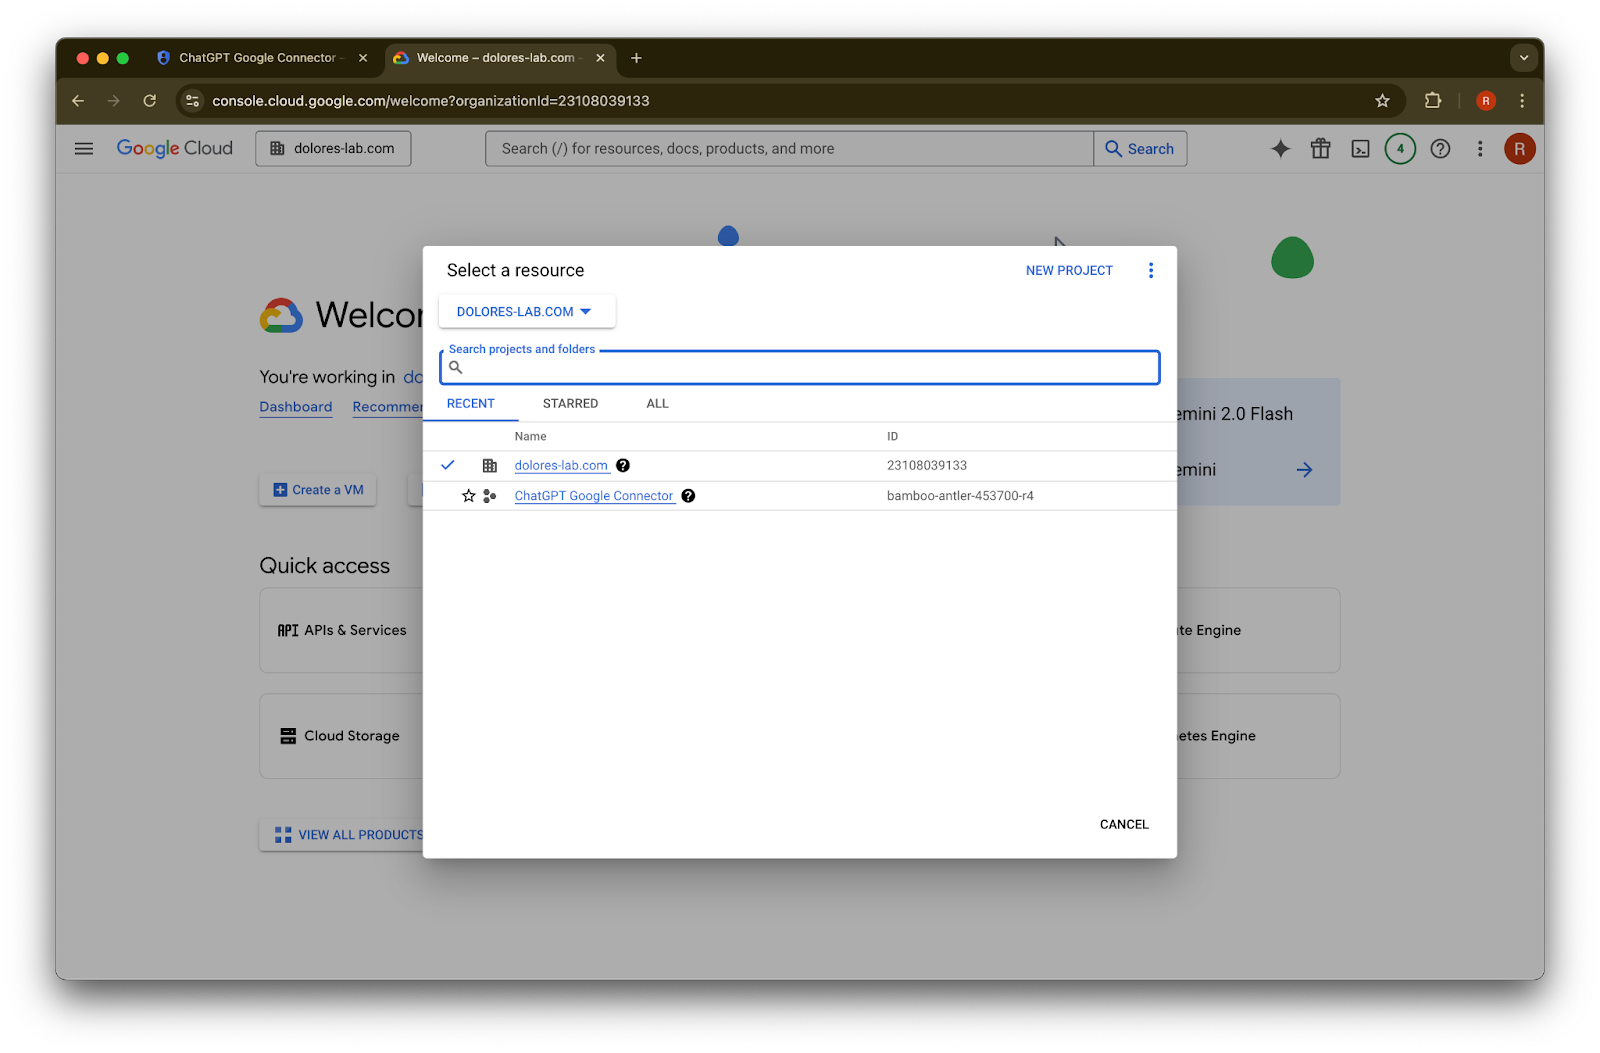
projects dropdown పై క్లిక్ చేయండి.Imageమీరు మీ ChatGPT వర్క్స్పేస్తో అనుబంధించిన అదే Google workspace లో లాగిన్ అయి ఉన్నారో నిర్ధారించుకోండి (మీ ChatGPT వర్క్స్పేస్కు అనుబంధించిన Google workspace లేకపోతే, మరియు ఈ రెండింటికీ వేర్వేరు ఇమెయిల్లు ఉంటే, మీరు అదనపు దశలను అనుసరించాలి, లేకపోతే మీ వినియోగదారులు Google Drive synced connectors ను ఉపయోగించలేకపోవచ్చు).
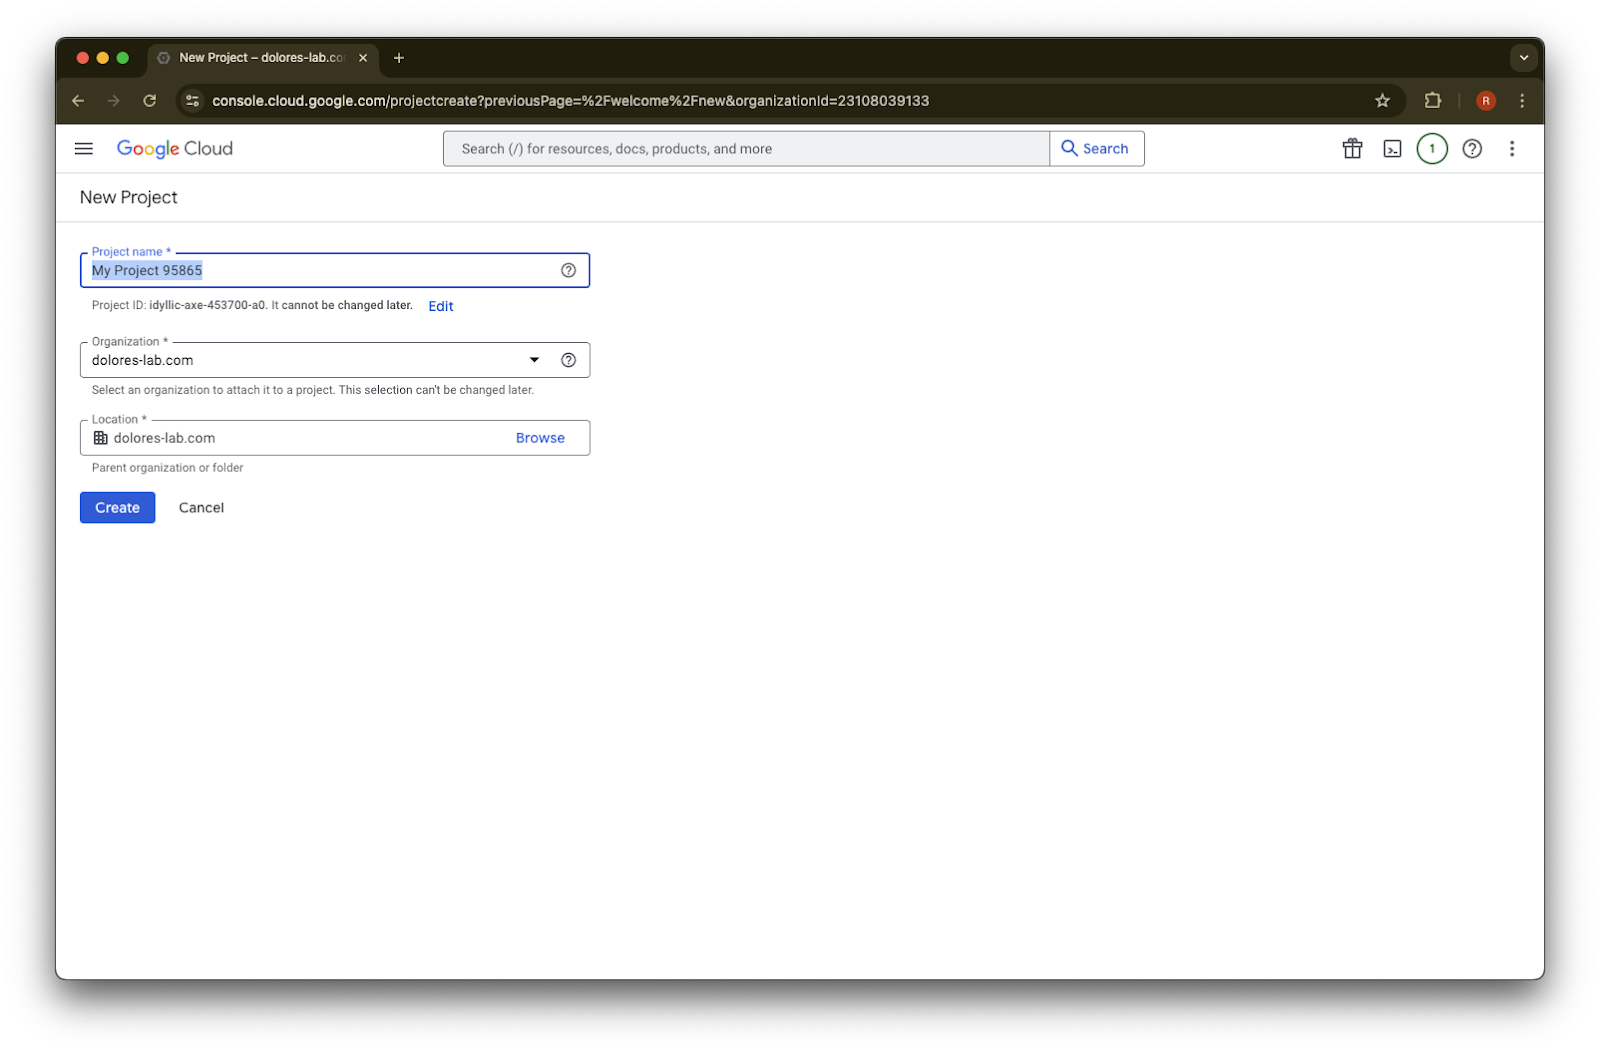
New Project ఎంచుకోండి.
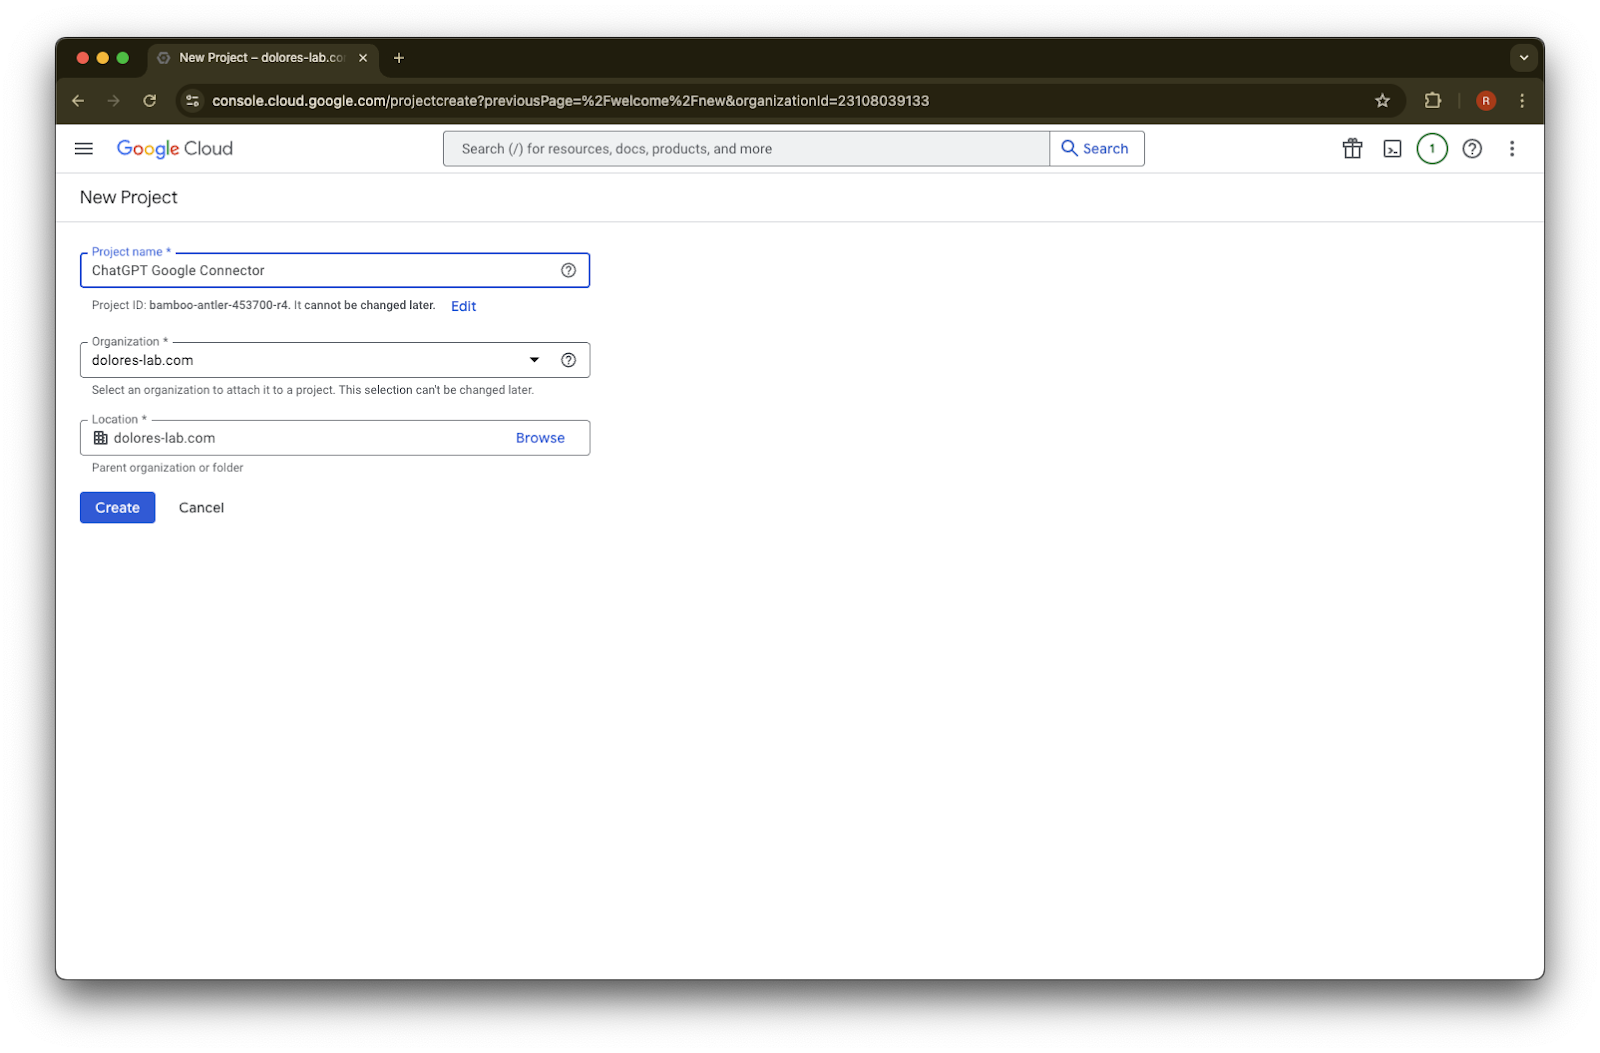
Project Name నమోదు చేయండి.
project ను సృష్టించండి.
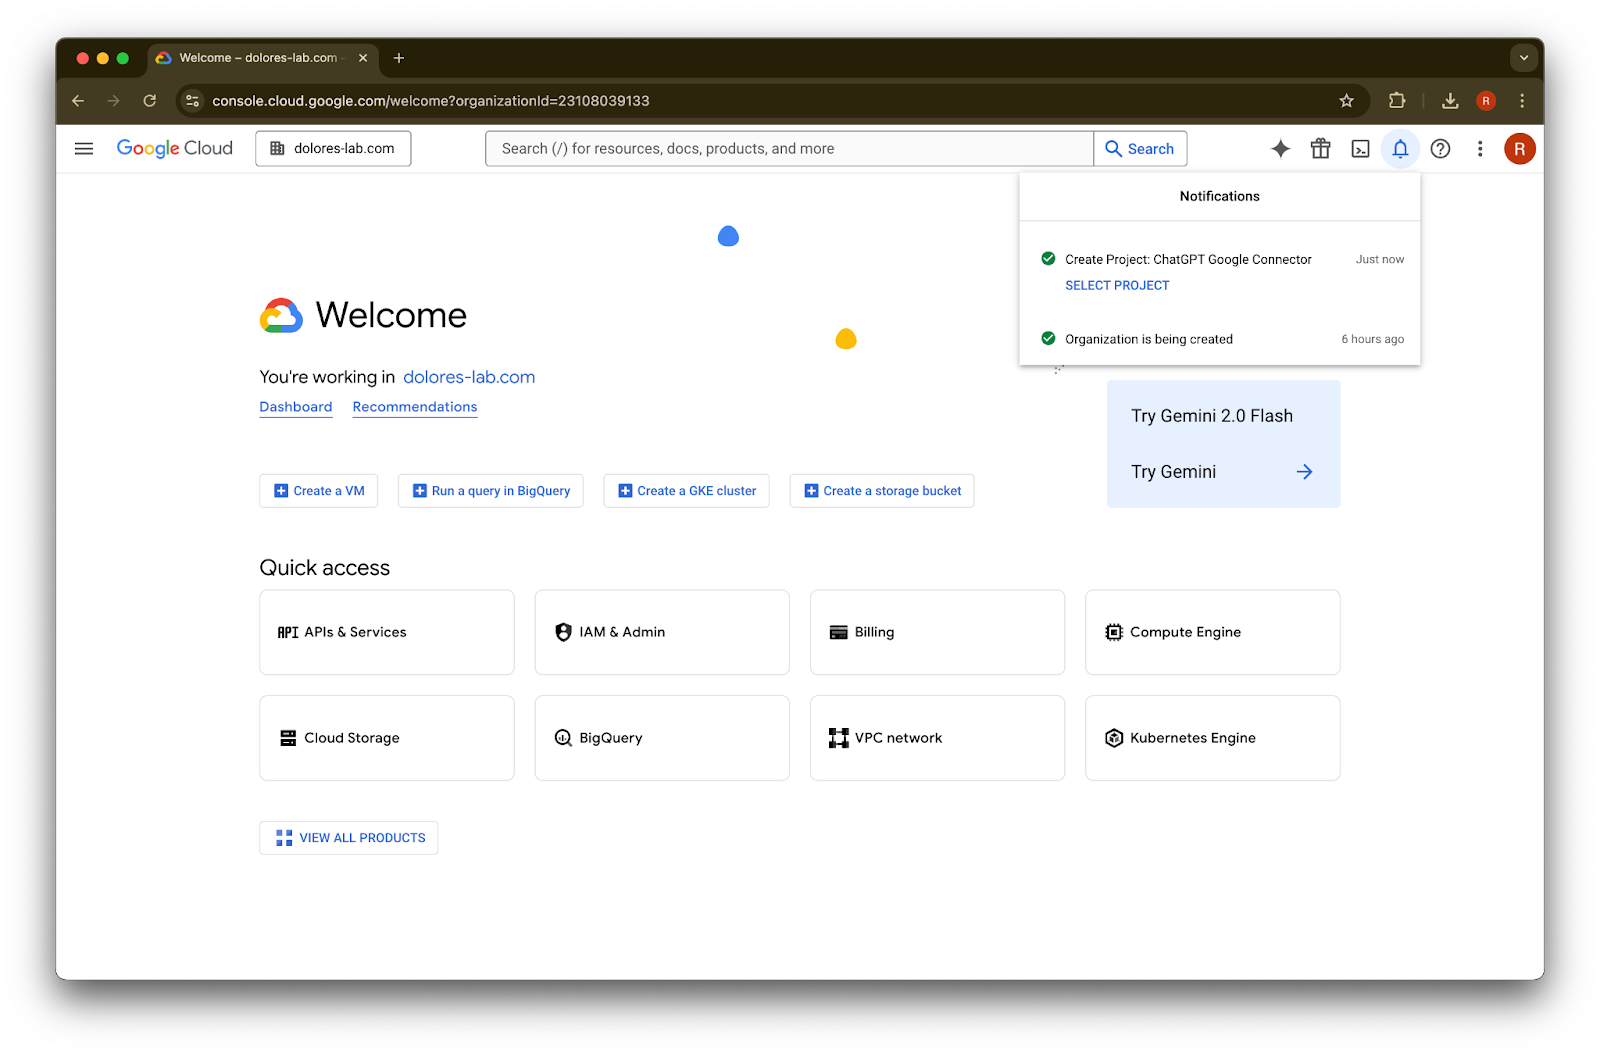
project సృష్టించబడే వరకు వేచి ఉండి, తర్వాత Select Project పై క్లిక్ చేయండి.
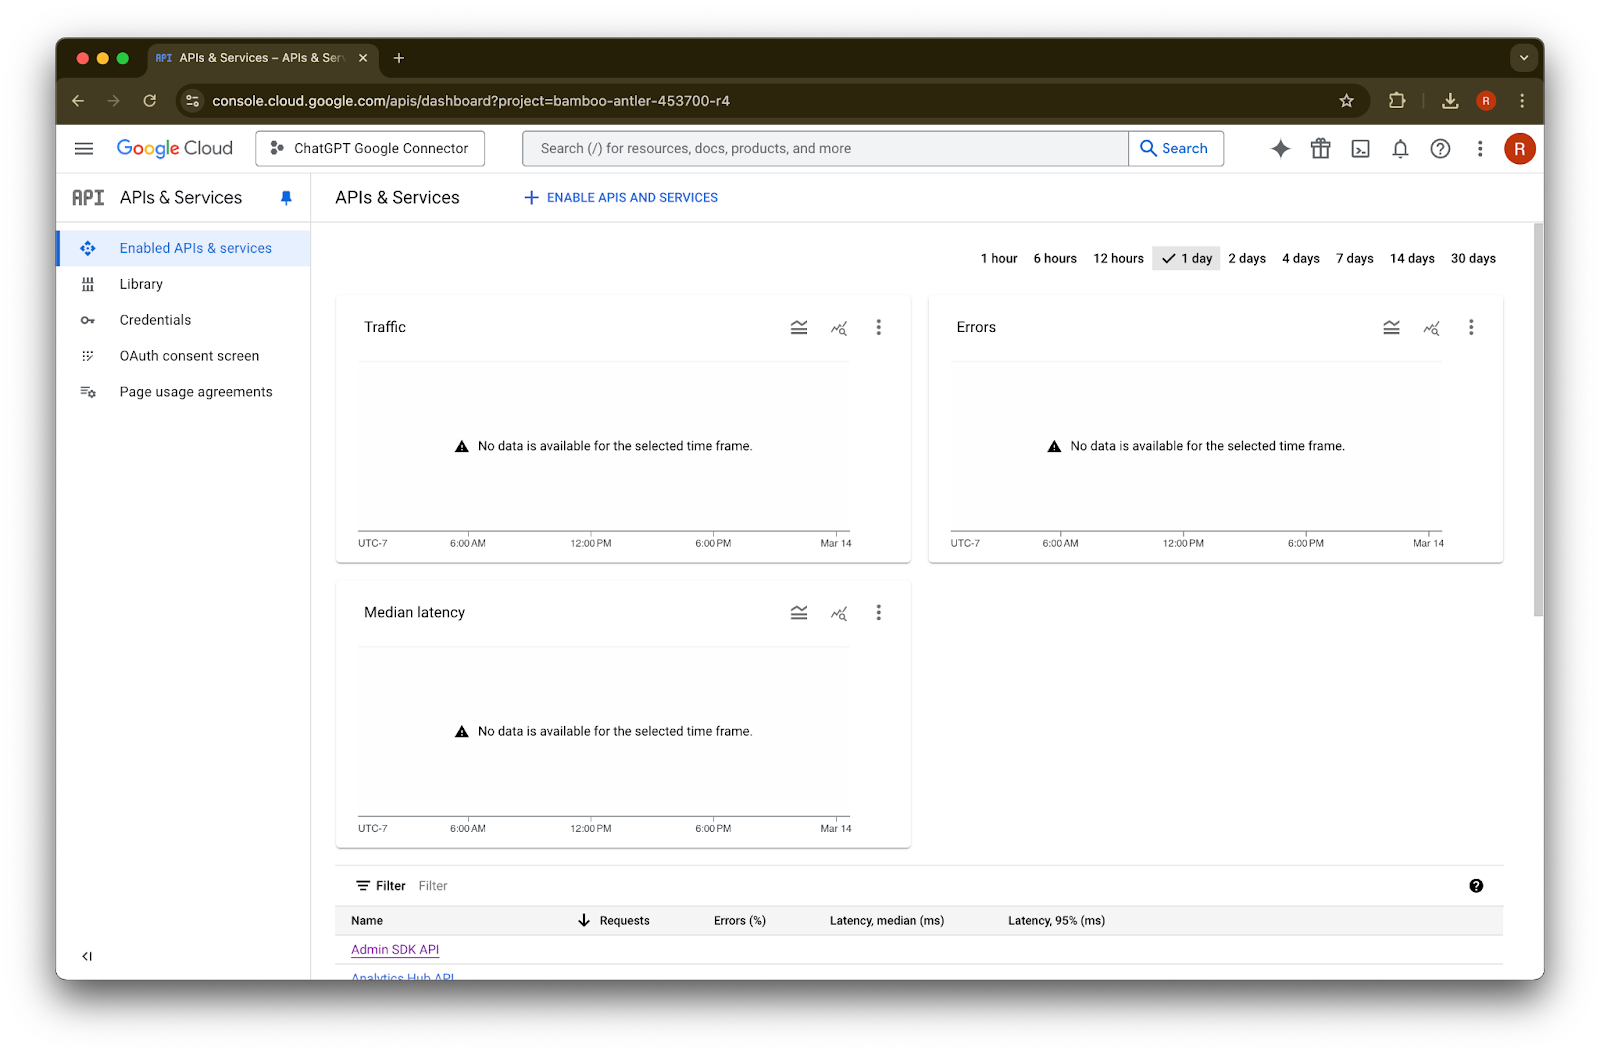
APIs & Services పై క్లిక్ చేయండి.
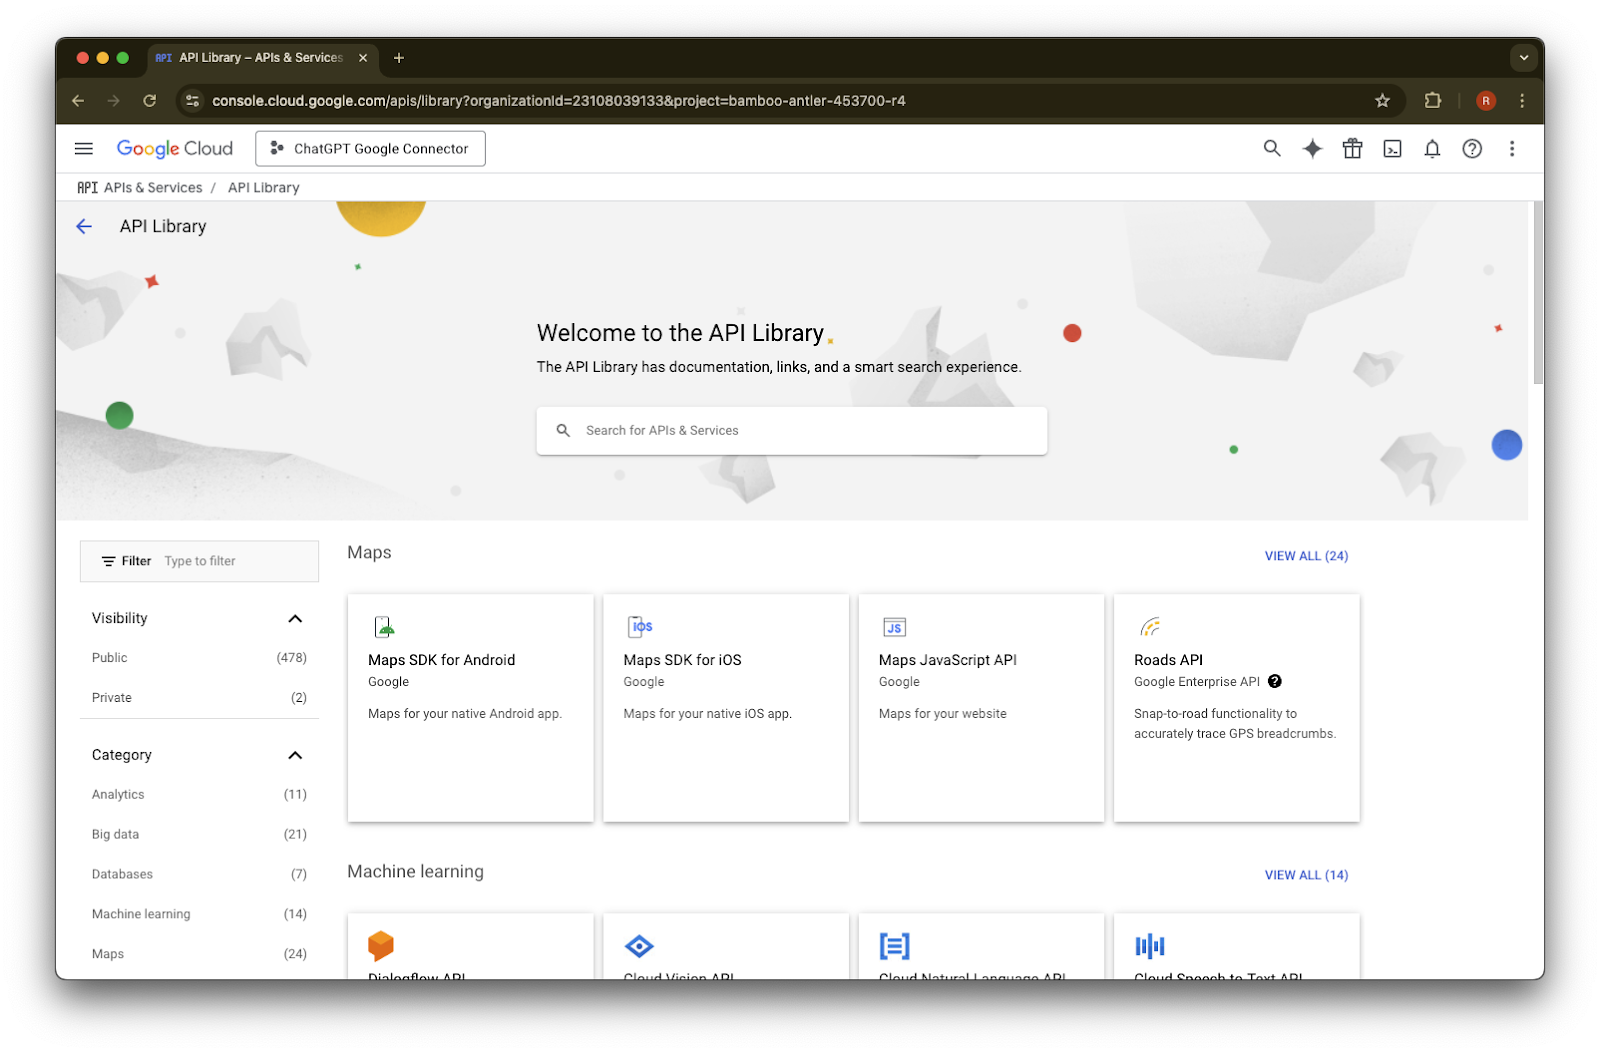
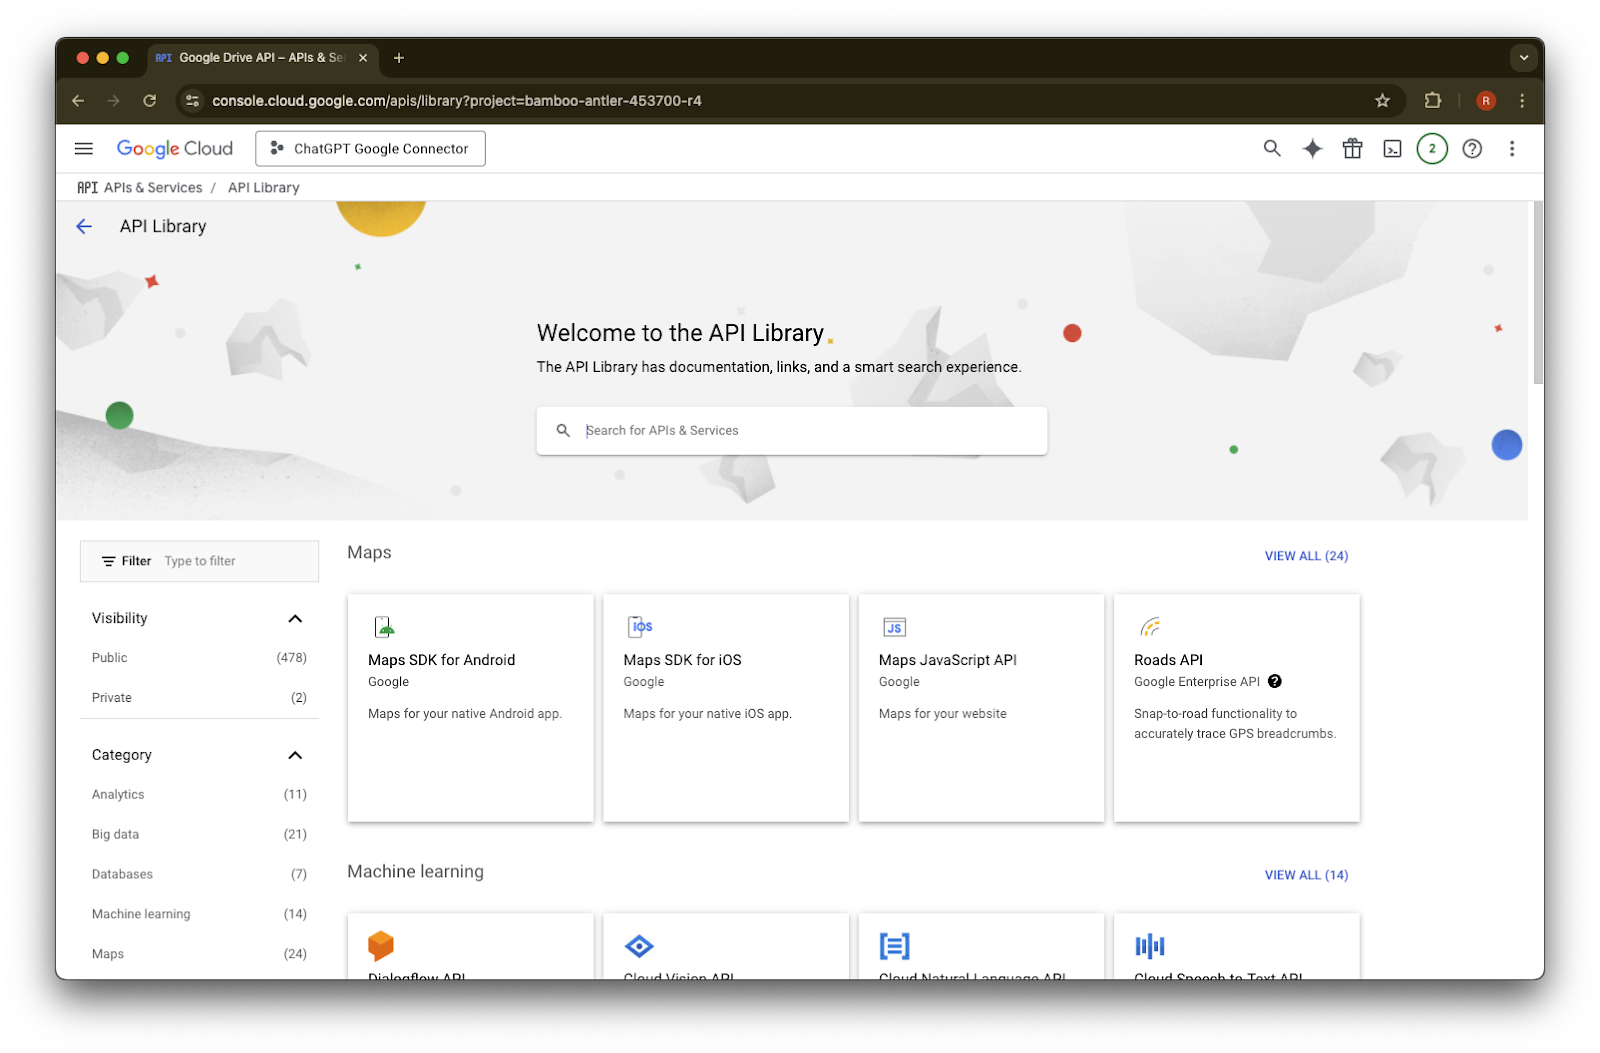
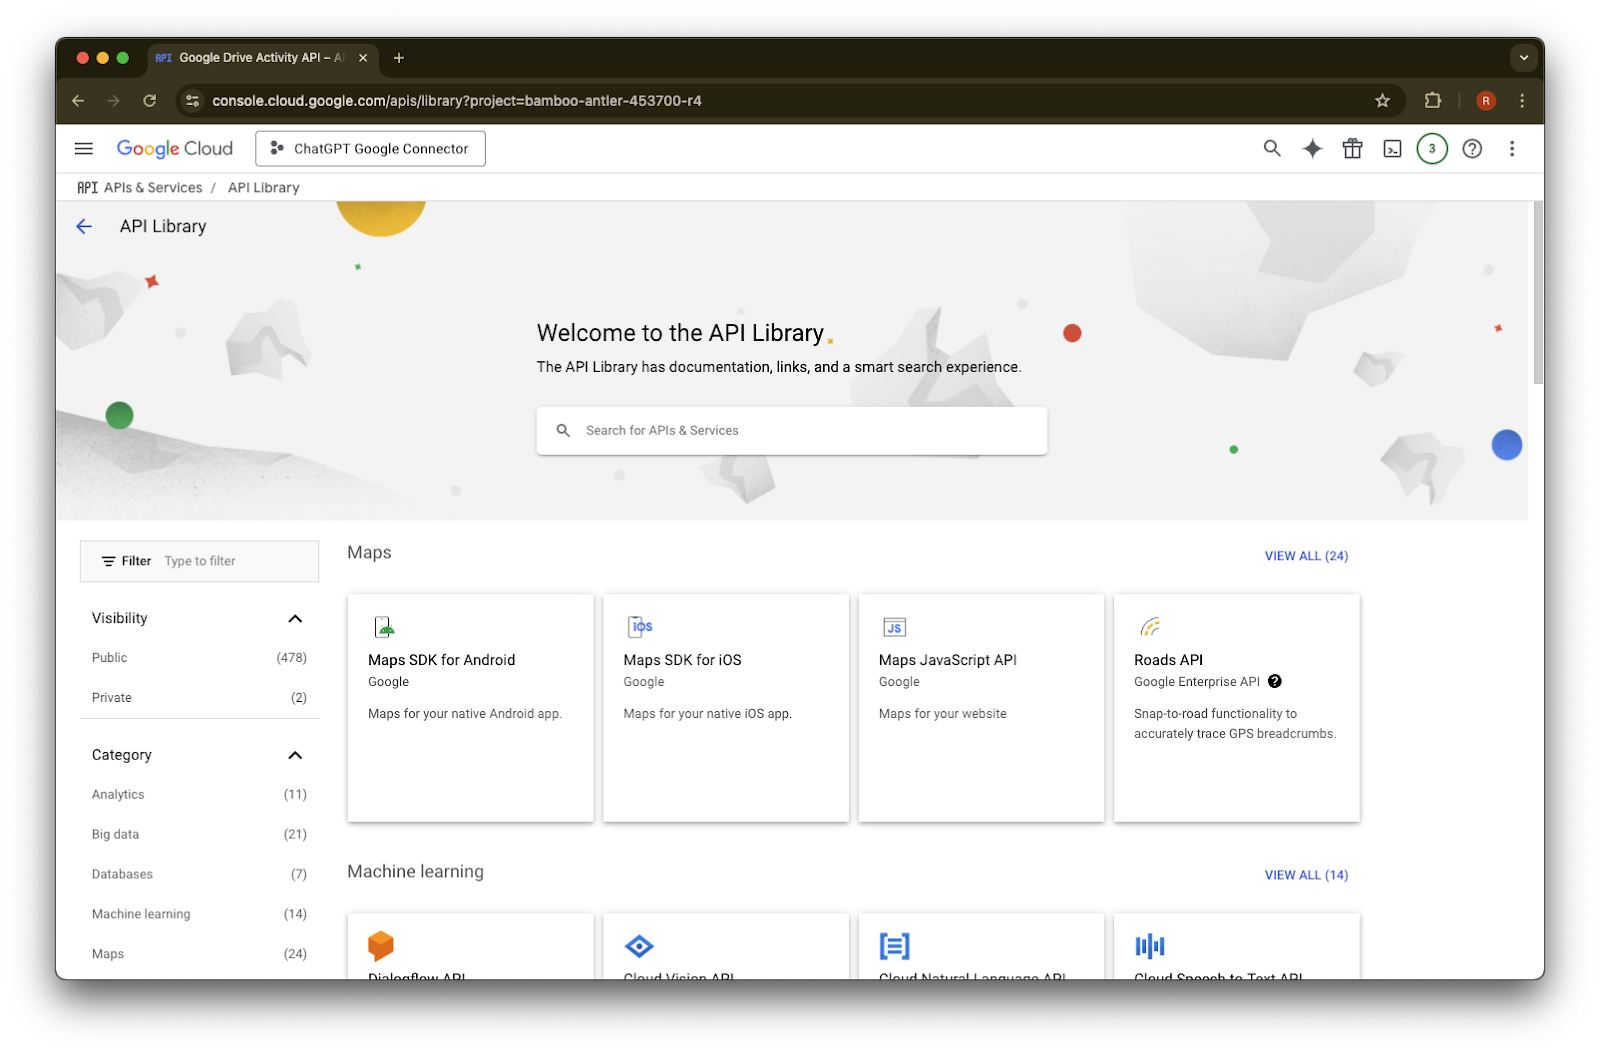
Library పై క్లిక్ చేయండి.
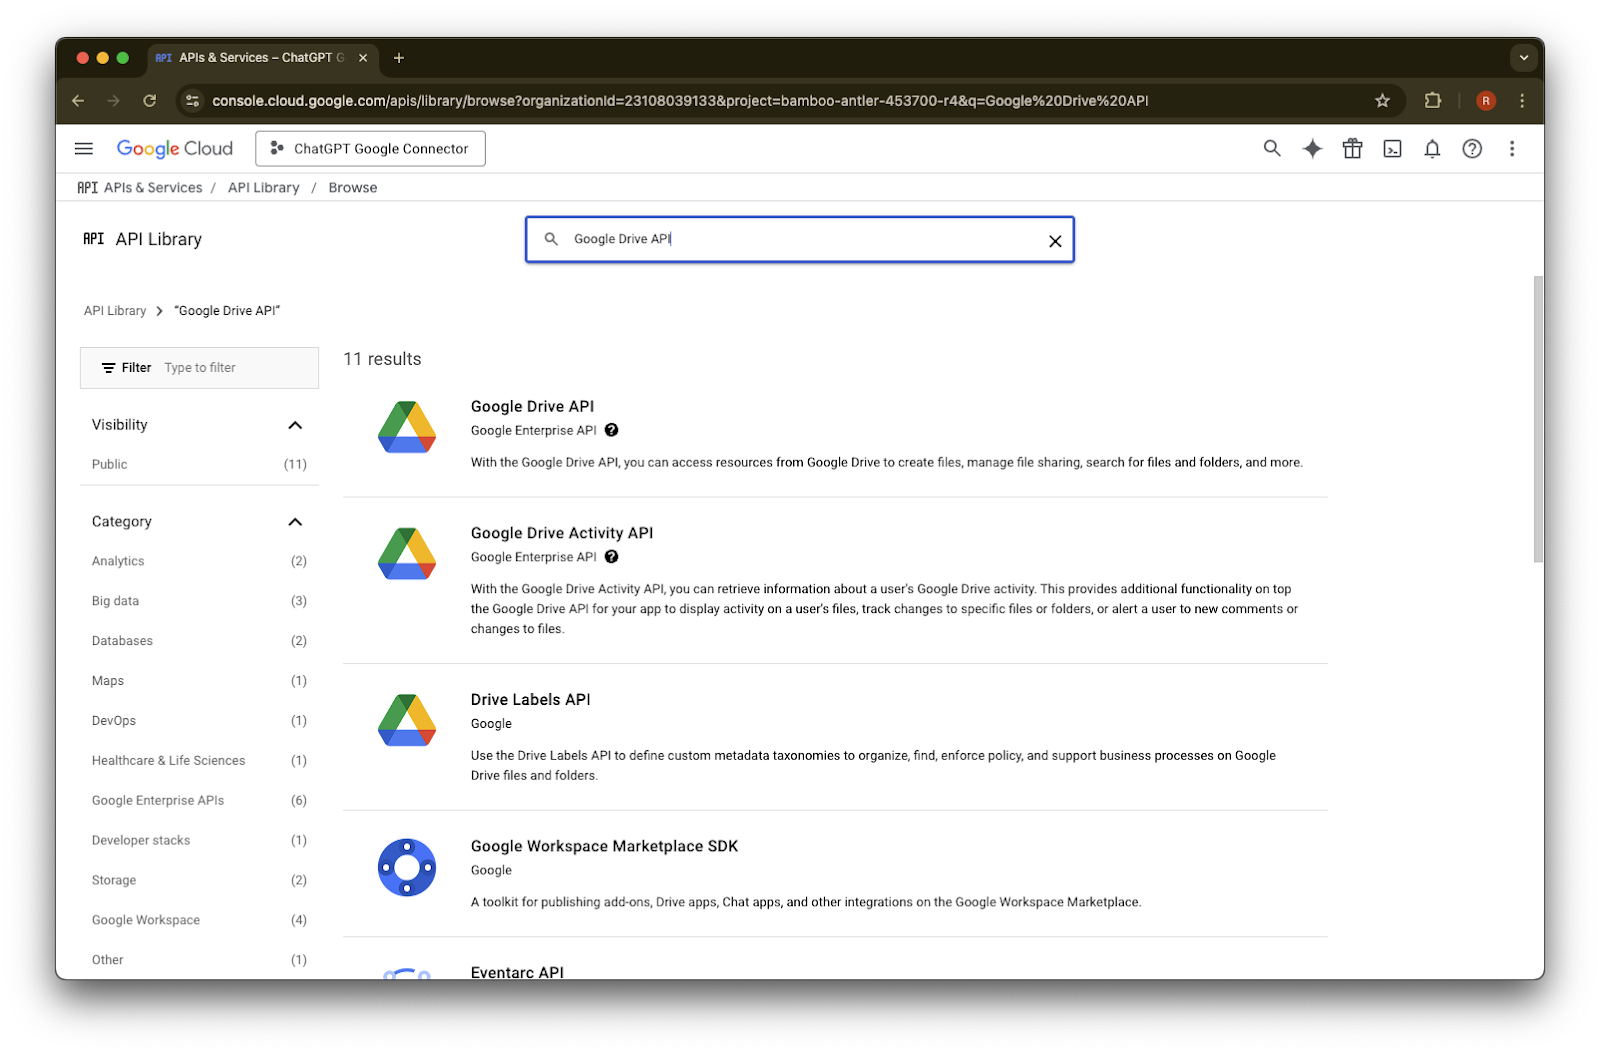
ఇప్పుడు మేము మూడు APIs ను జోడించబోతున్నాం. వాటిని కనుగొనడానికి search box ను ఉపయోగించండి.
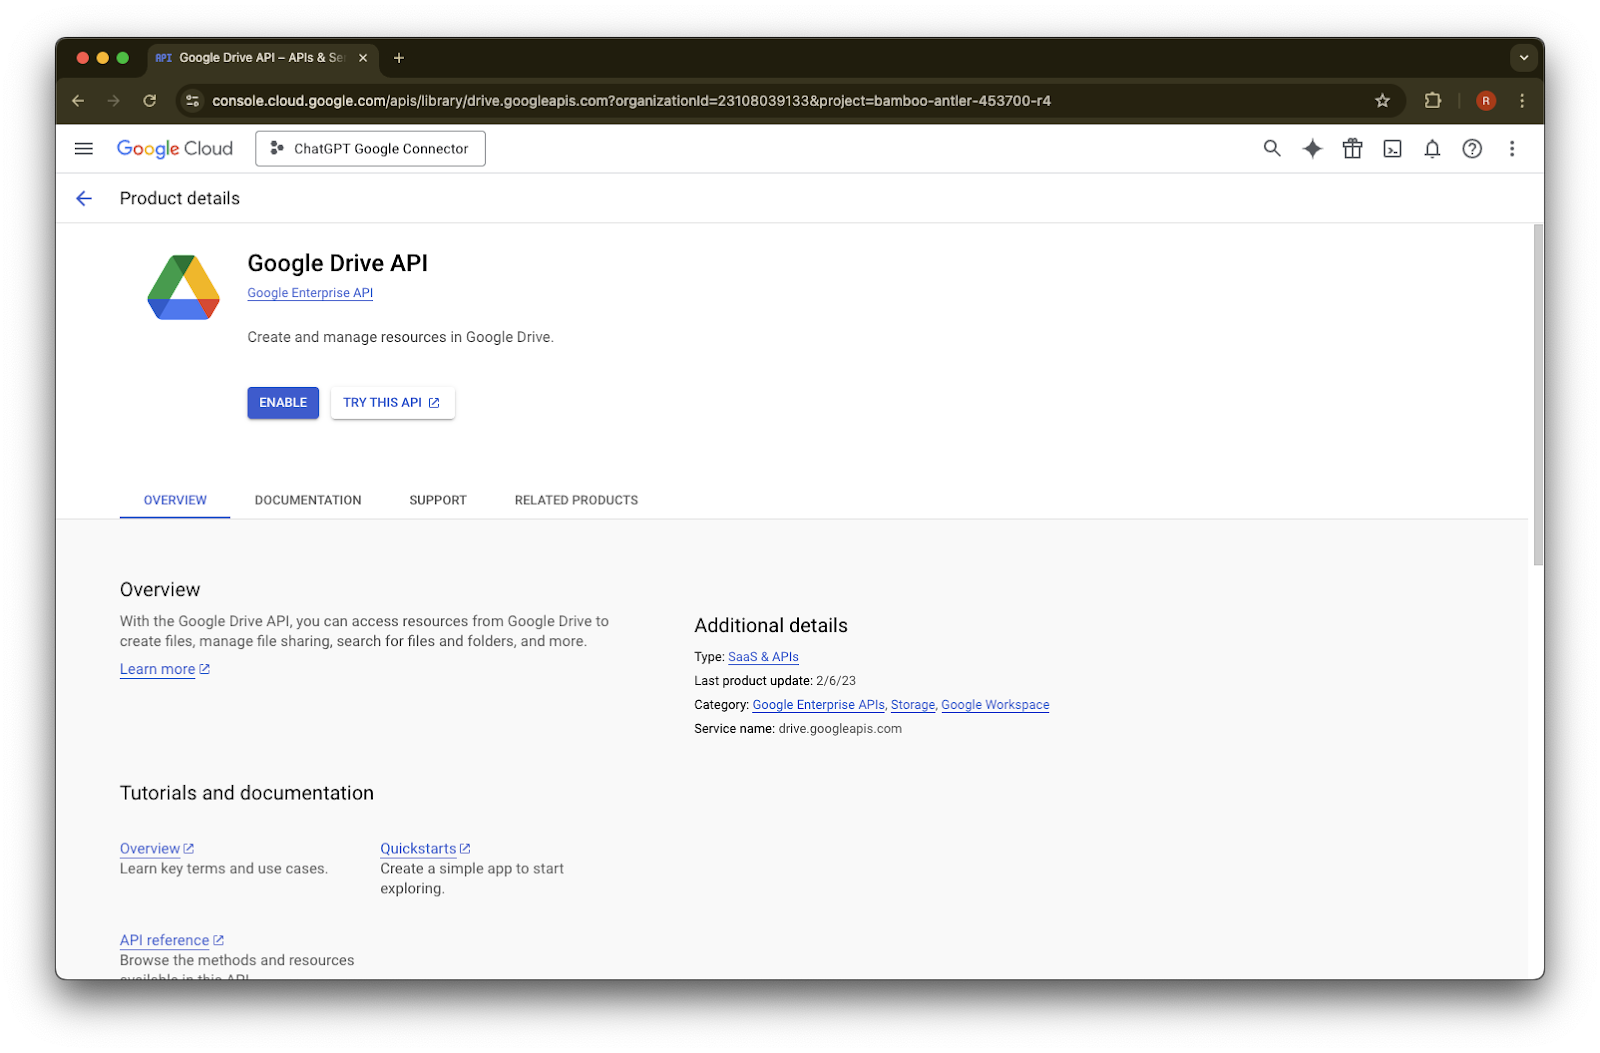
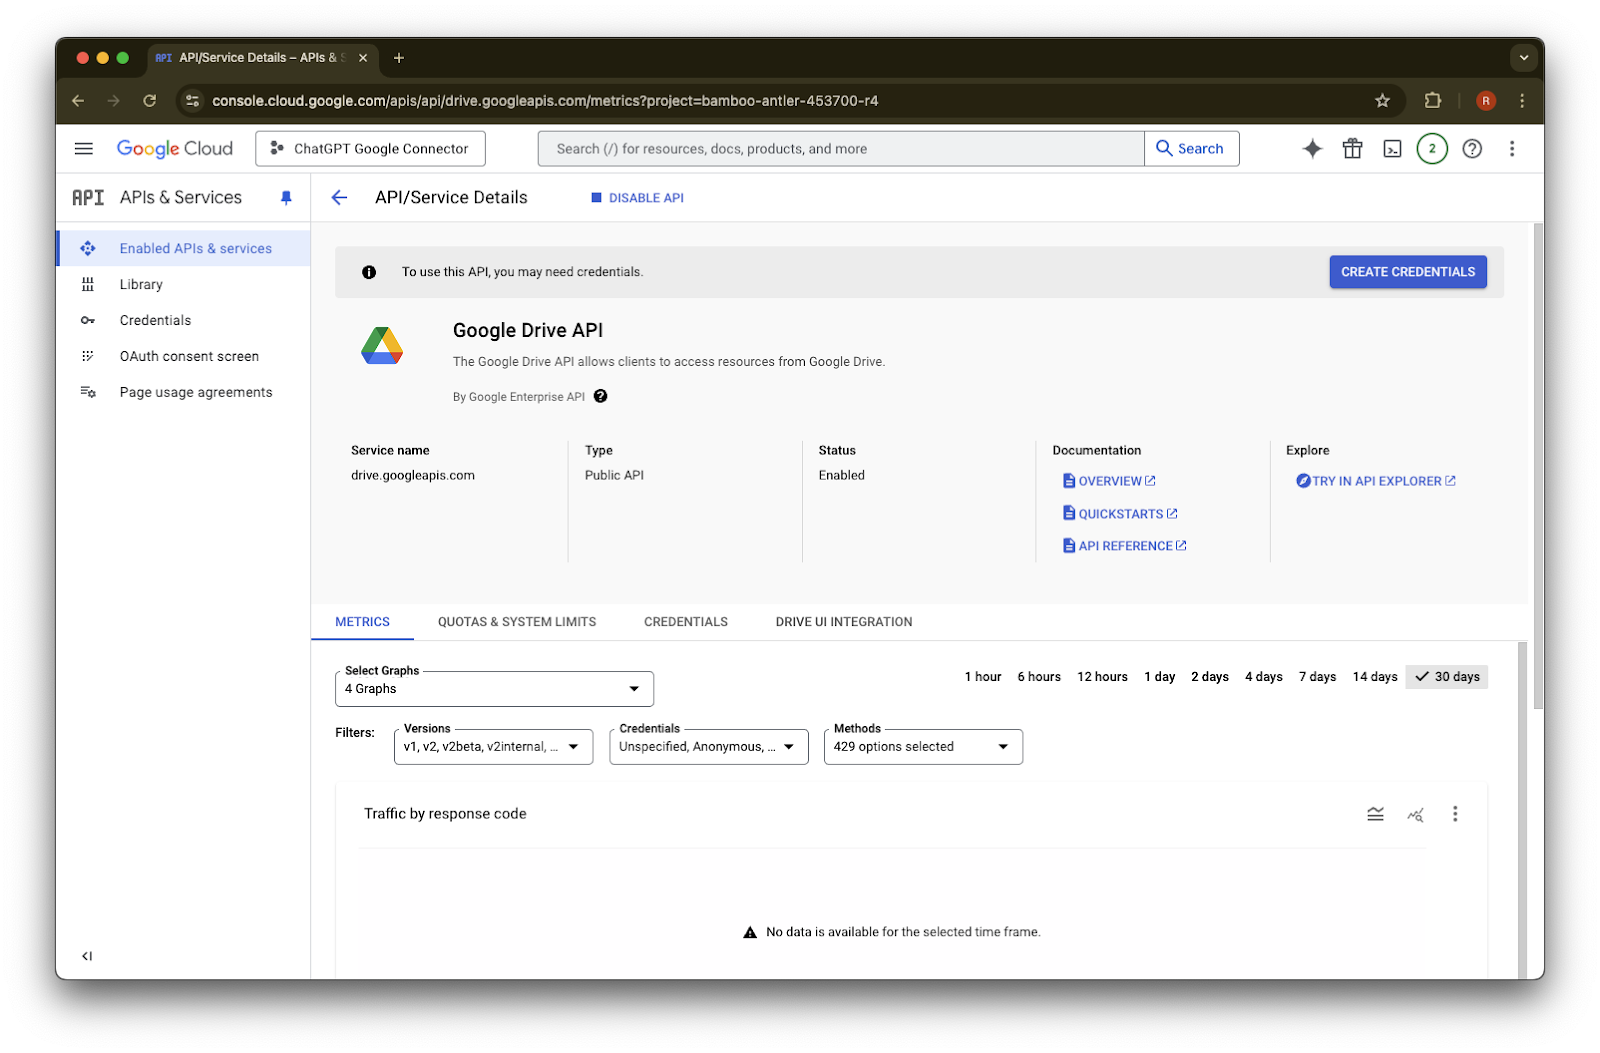
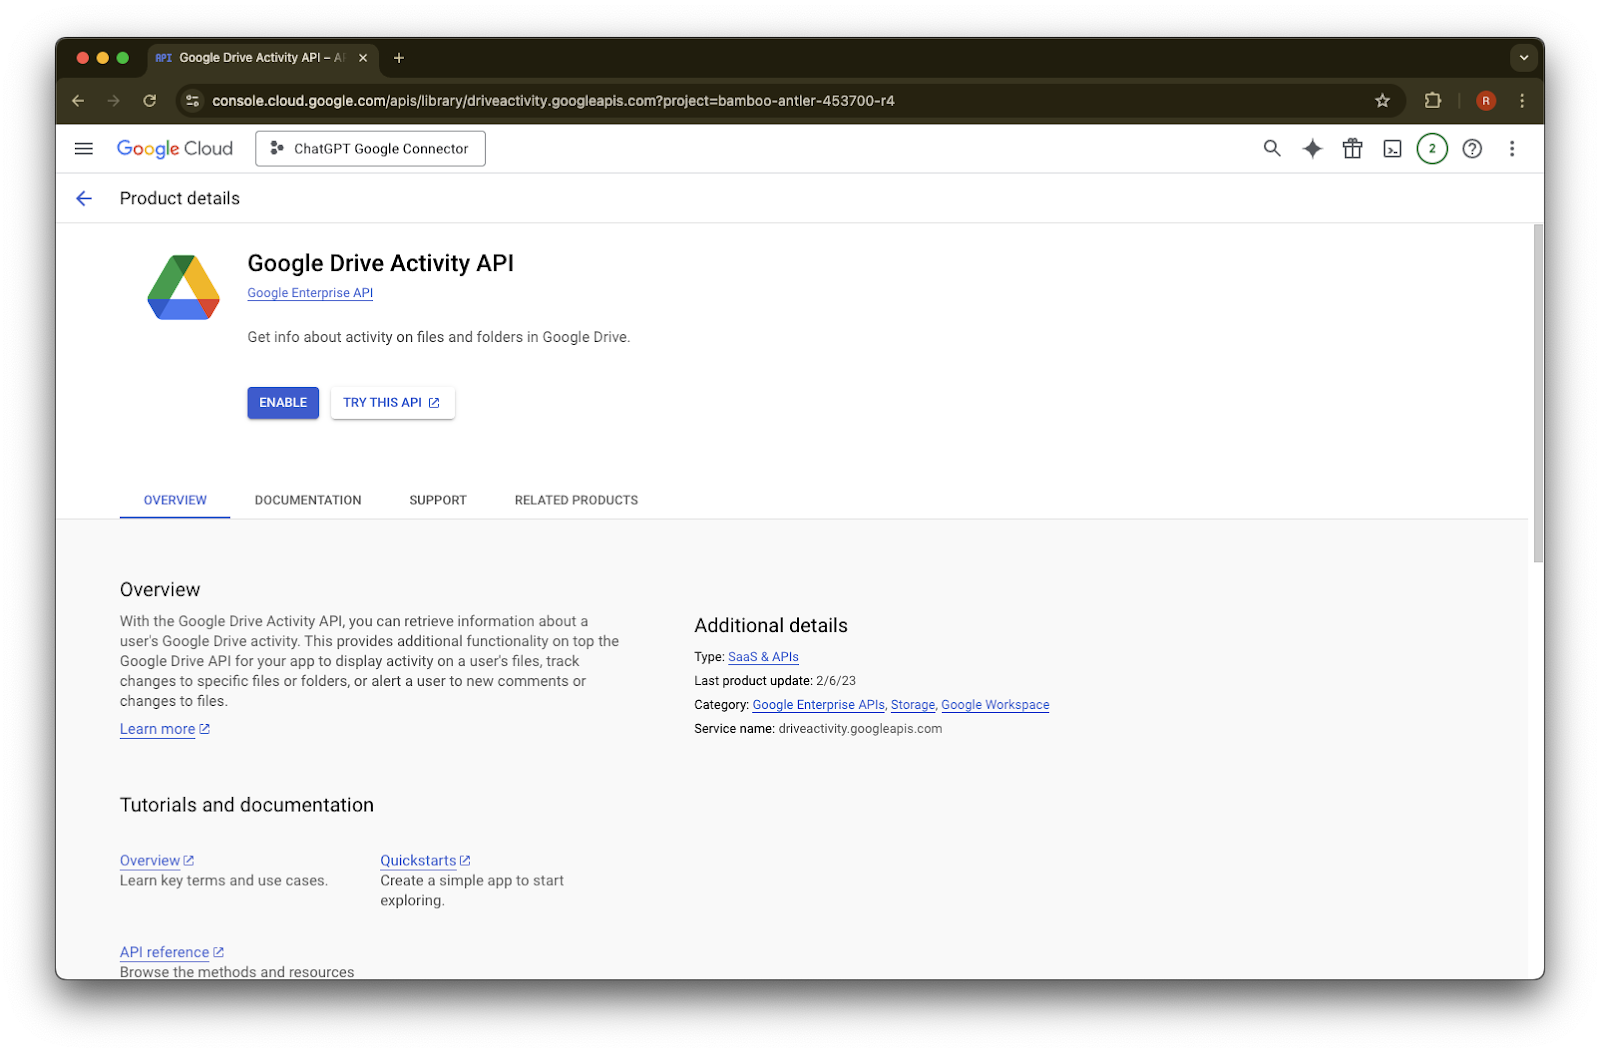
Google Drive API కోసం శోధించి దాన్ని ఎంచుకోండి.
Enable పై క్లిక్ చేయండి.
Library పై క్లిక్ చేయండి.
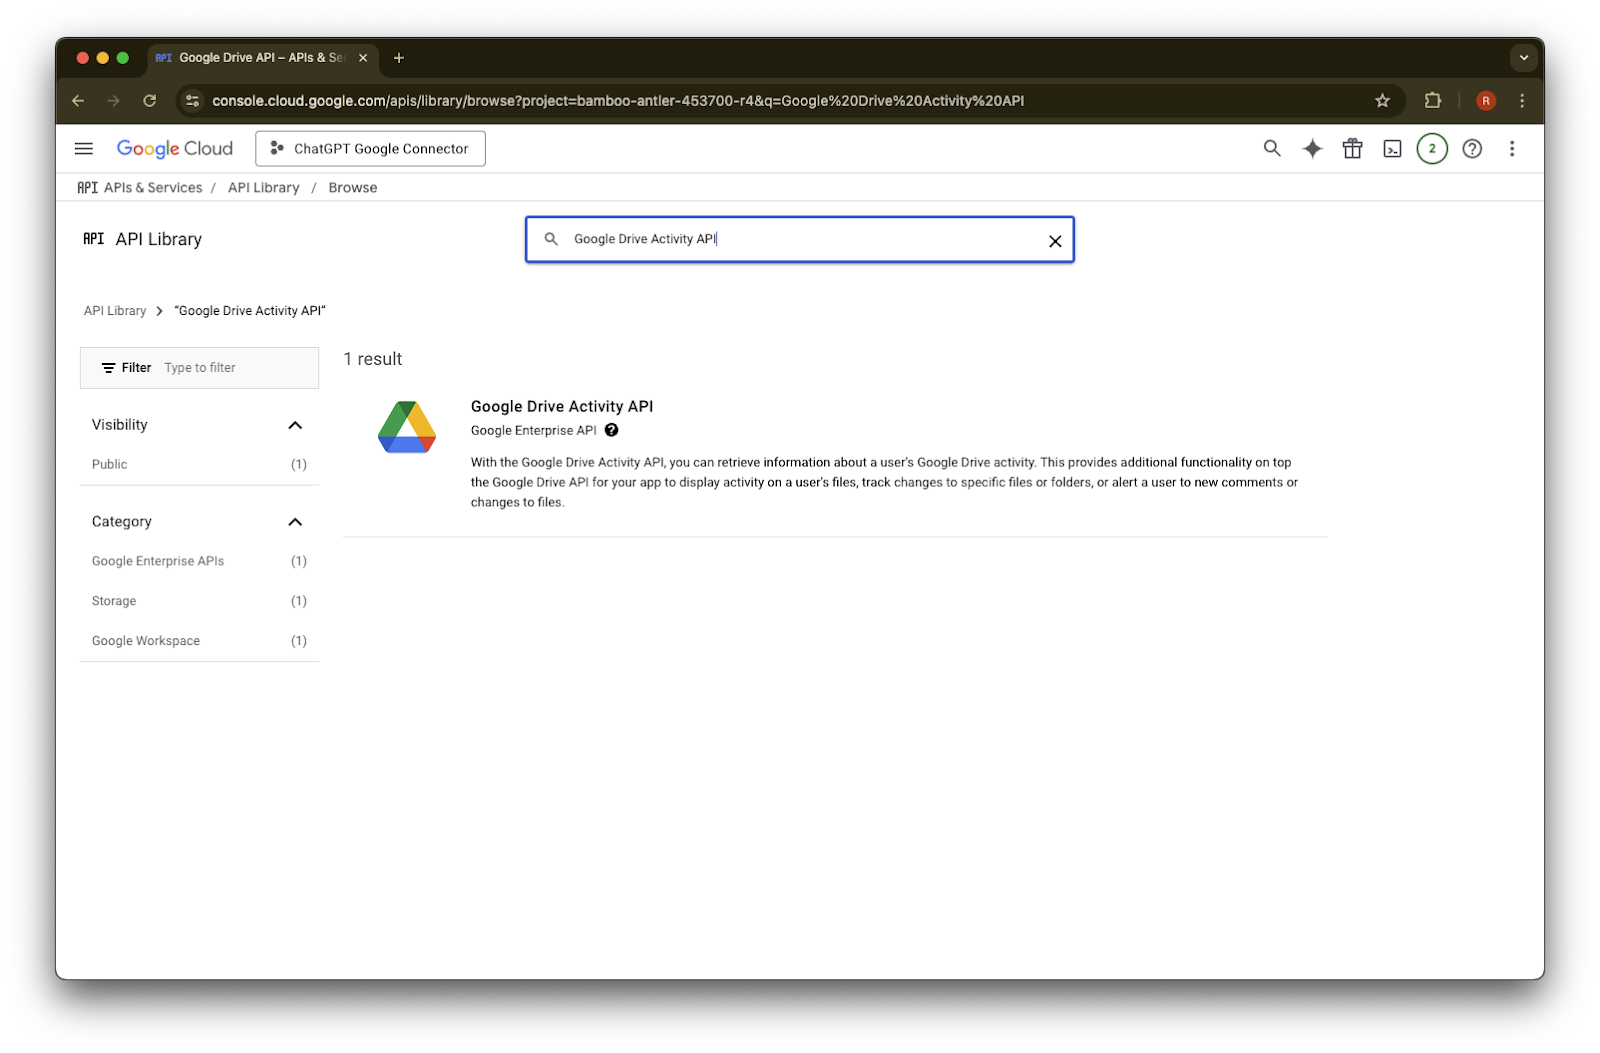
Google Drive Activity కోసం శోధించండి.
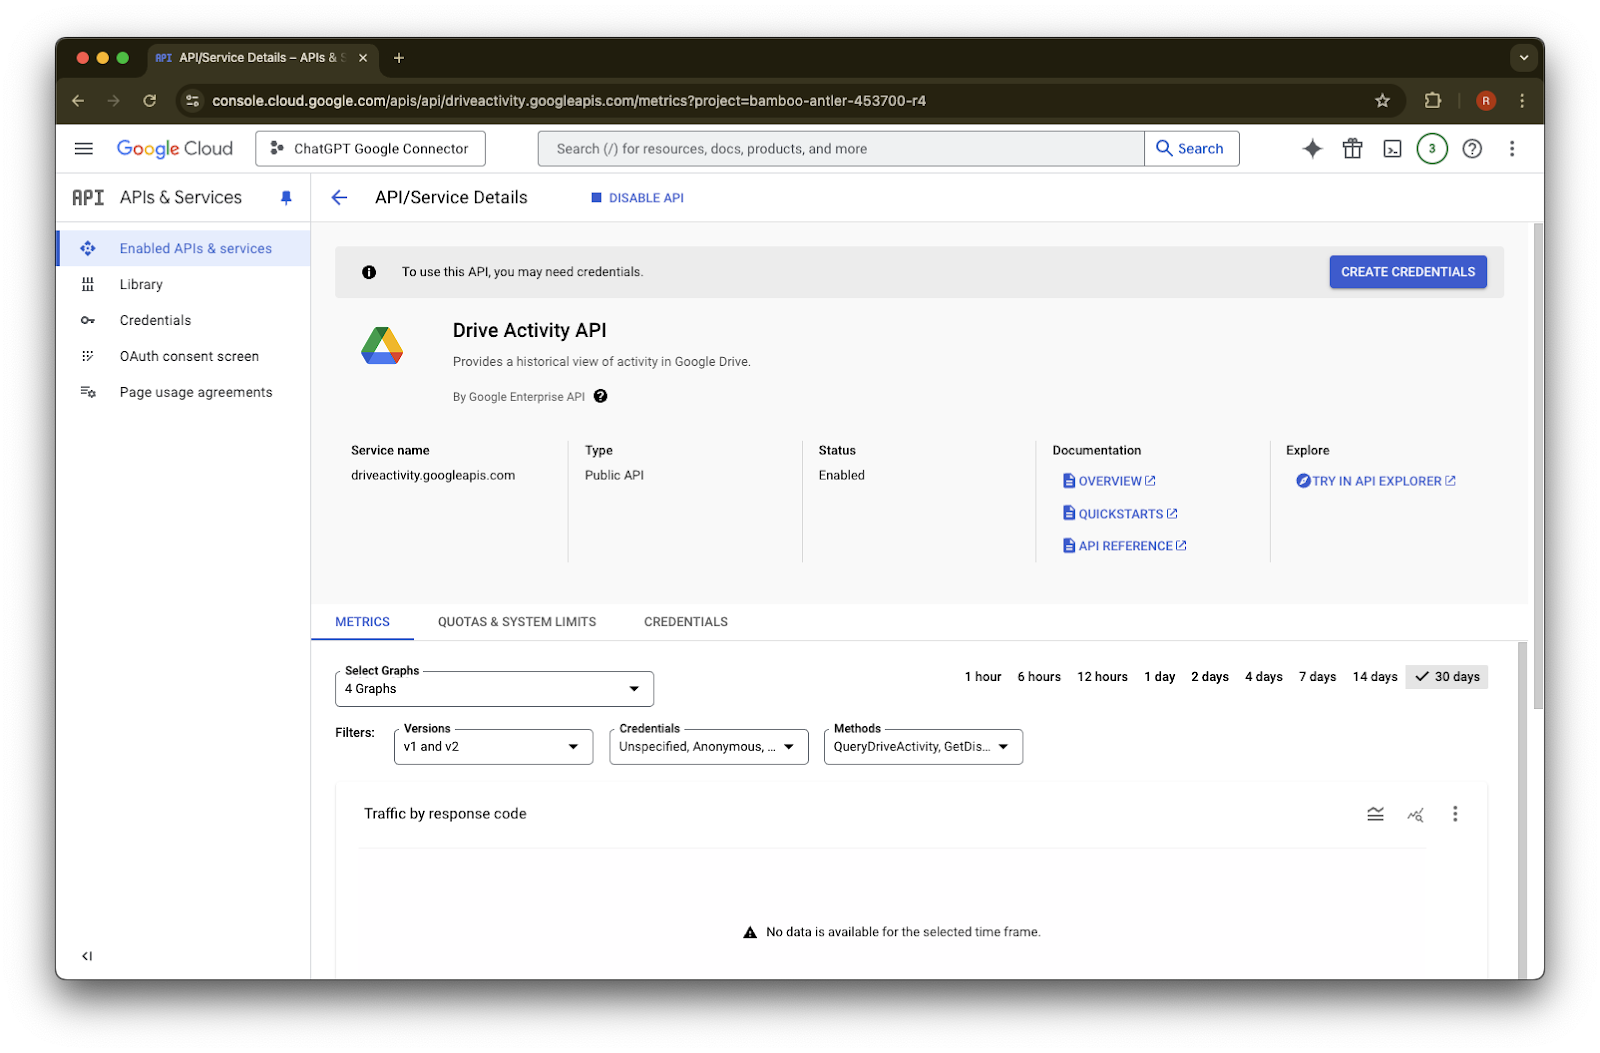
Google Drive Activity API ఎంచుకోండి.
Enable పై క్లిక్ చేయండి.
Library పై క్లిక్ చేయండి.
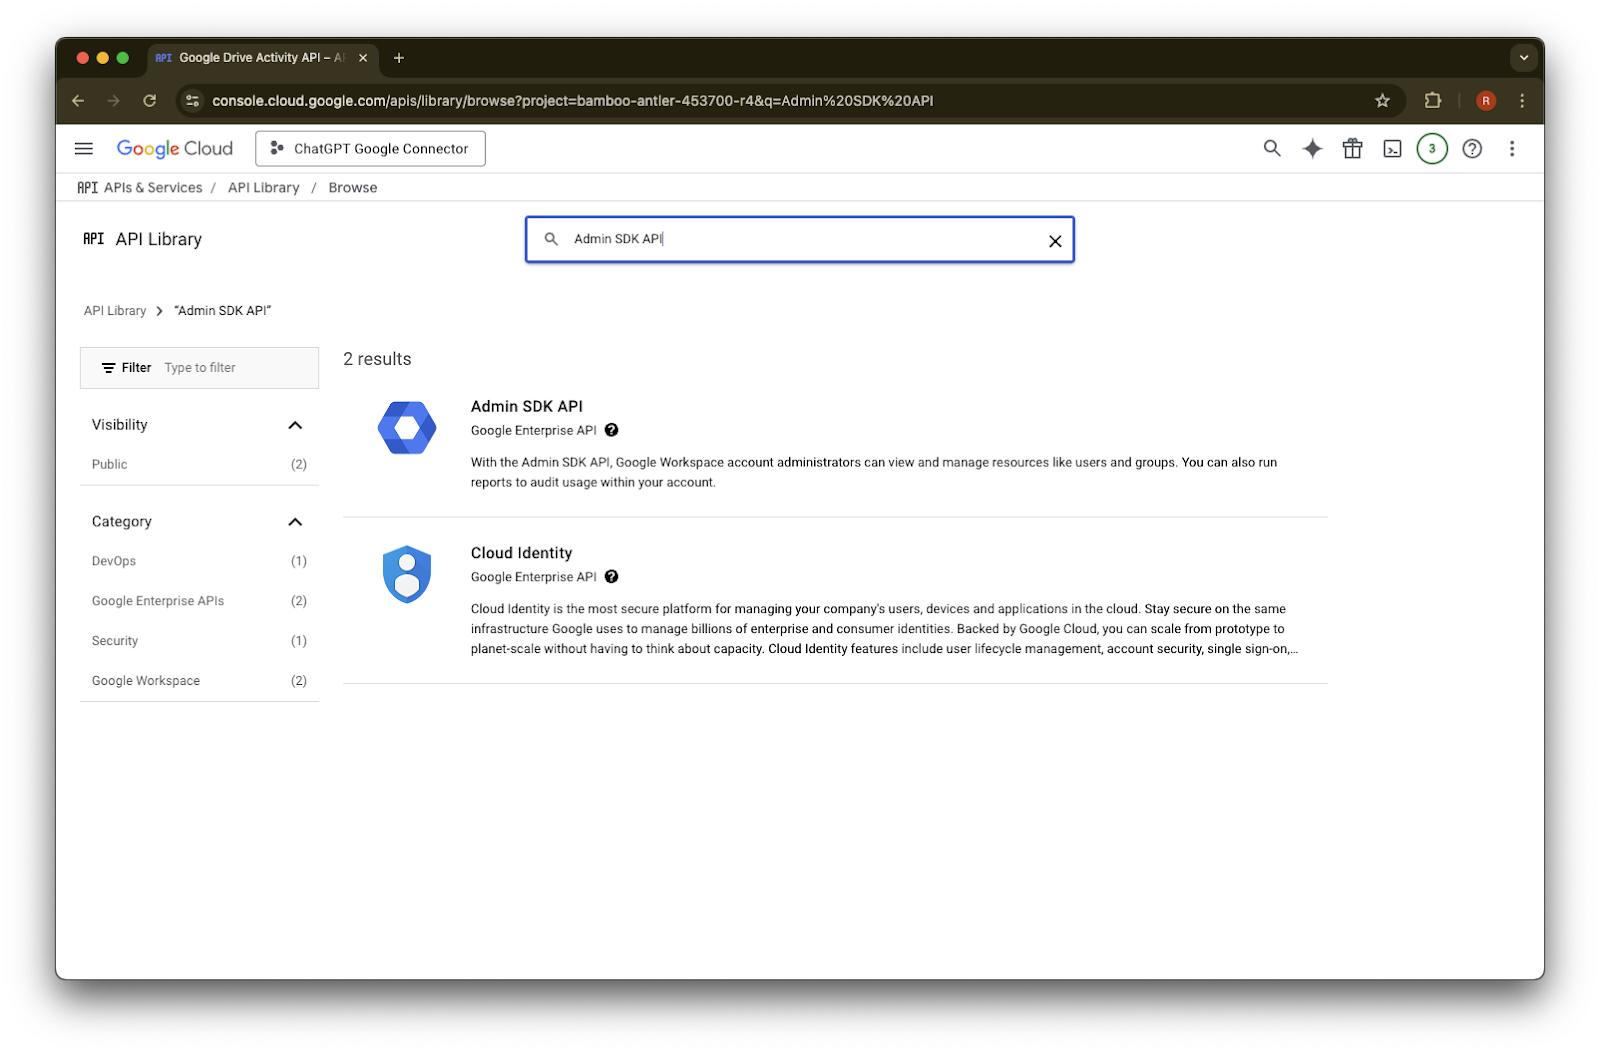
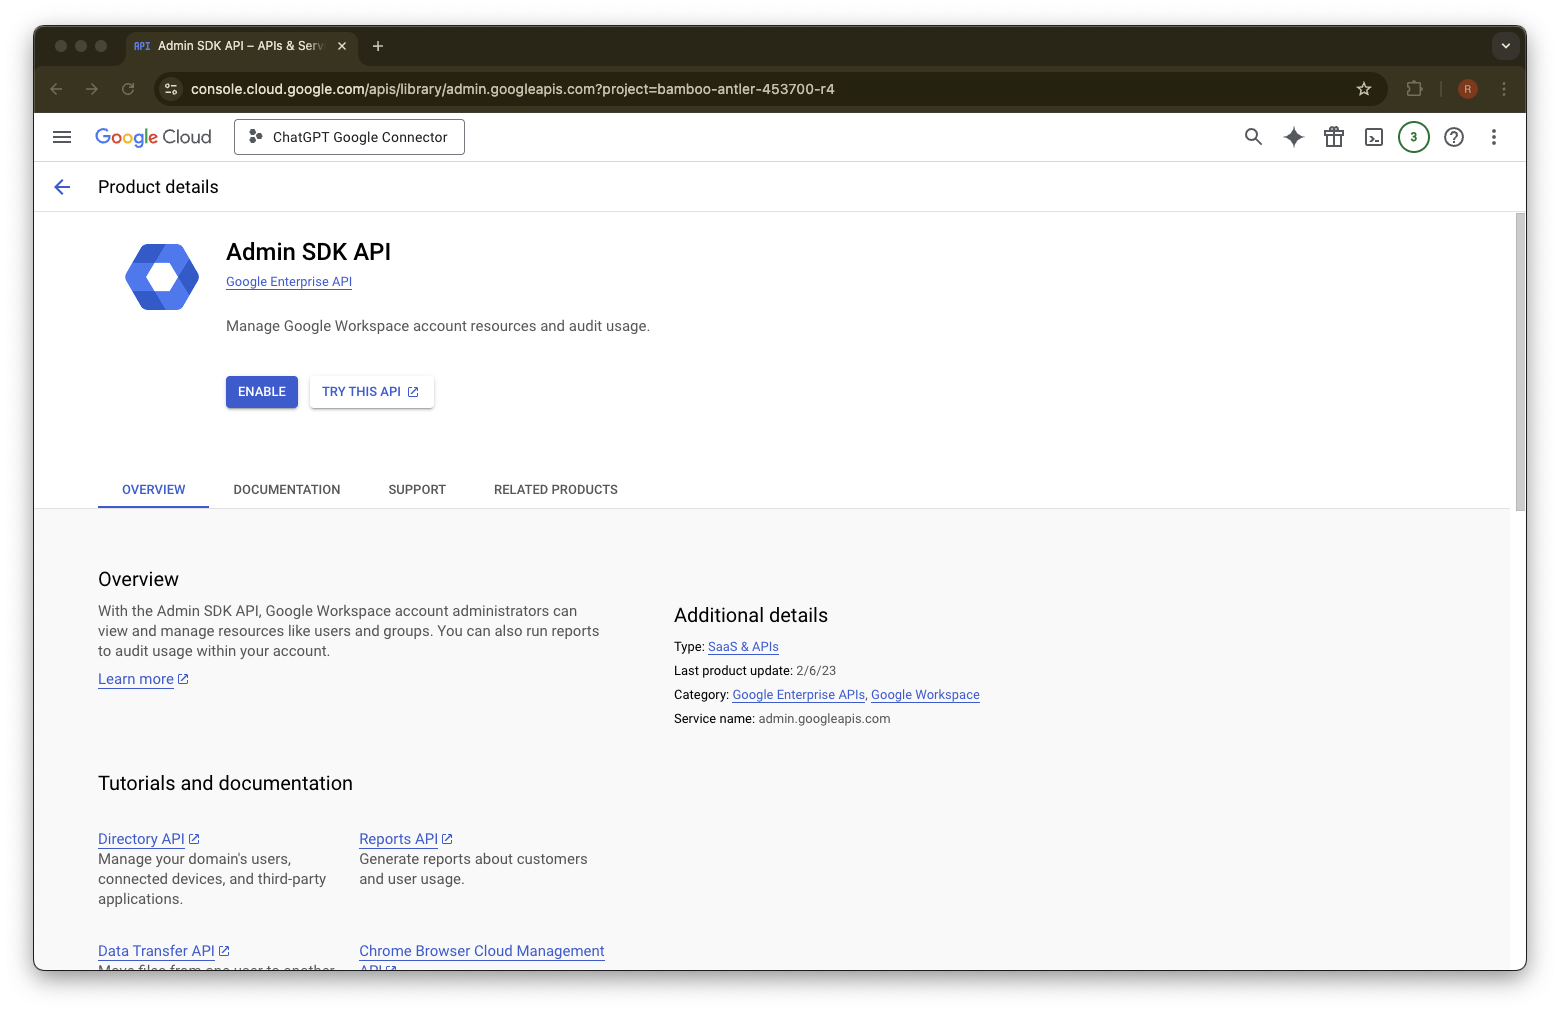
Admin SDK API కోసం శోధించండి.
Admin SDK API
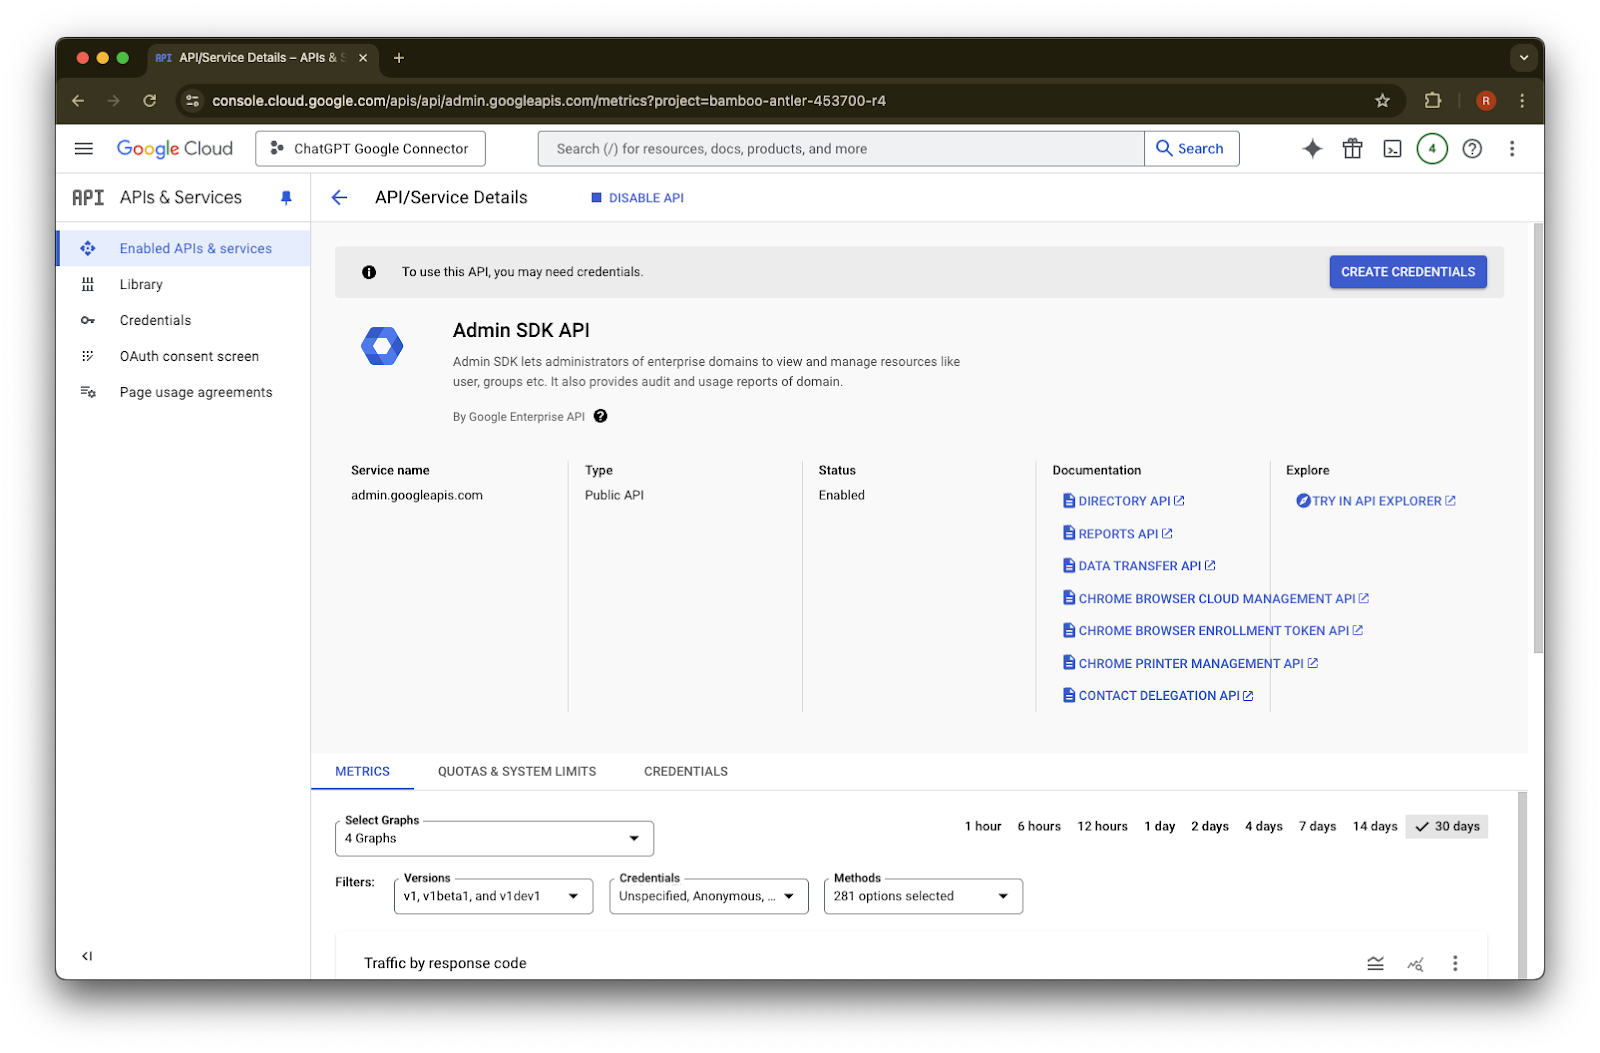
ఎంచుకోండి.Enable పై క్లిక్ చేయండి.
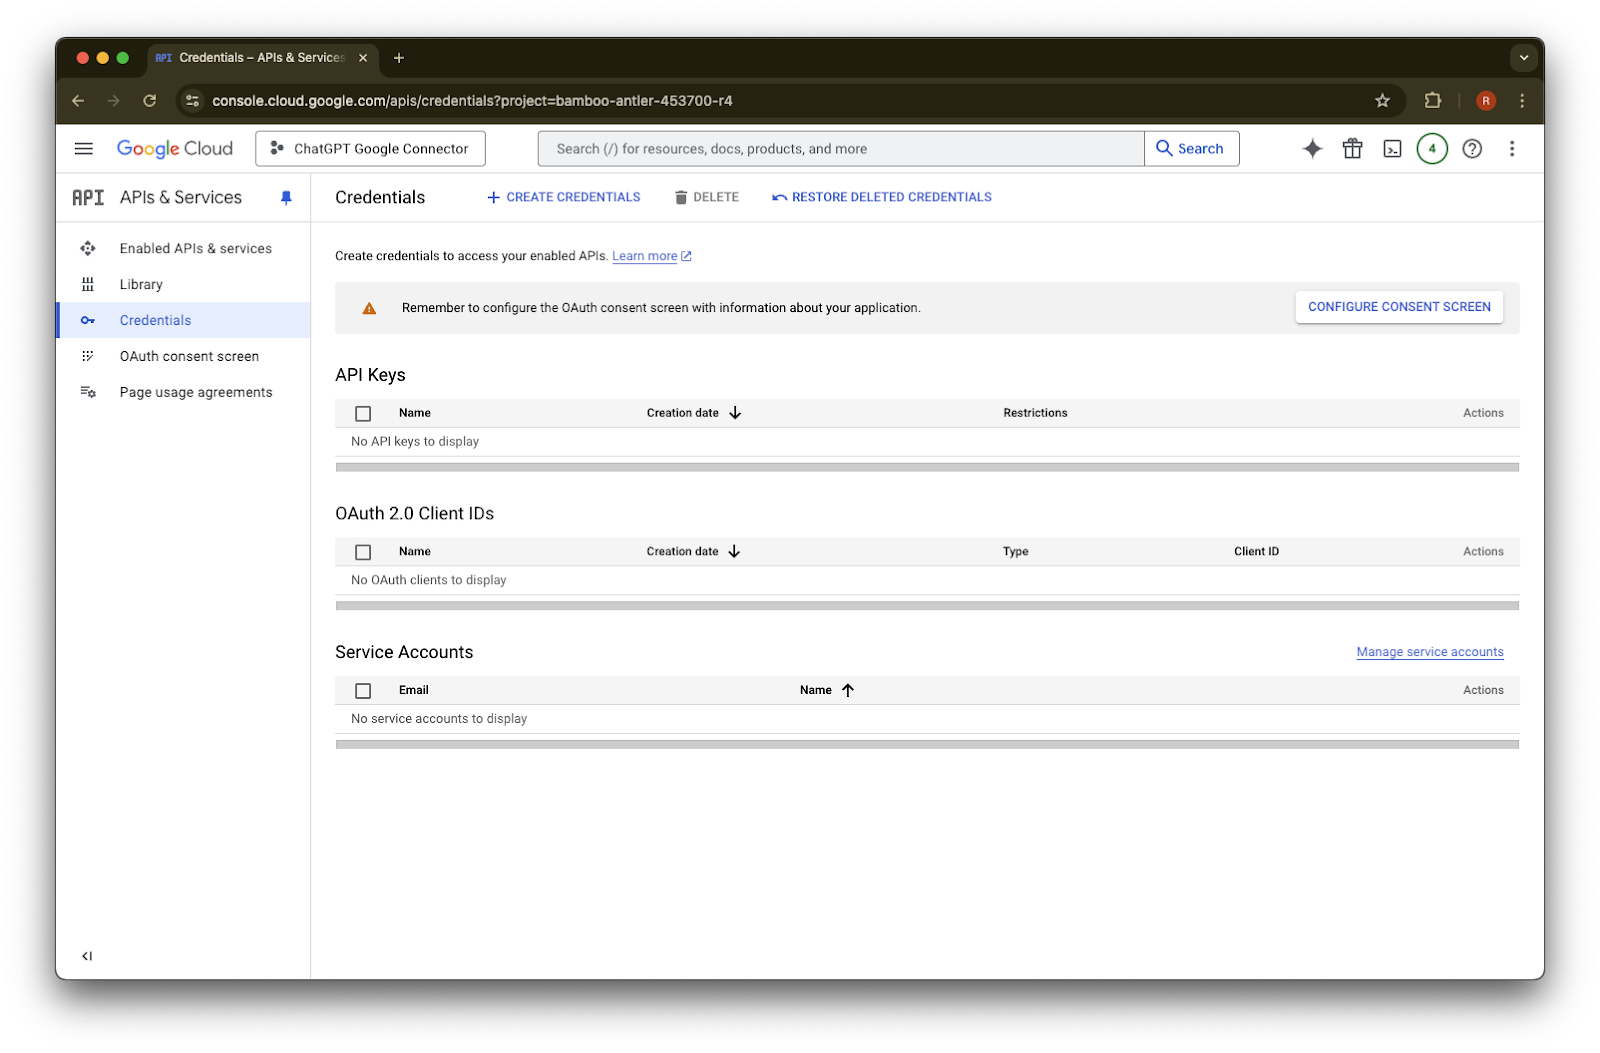
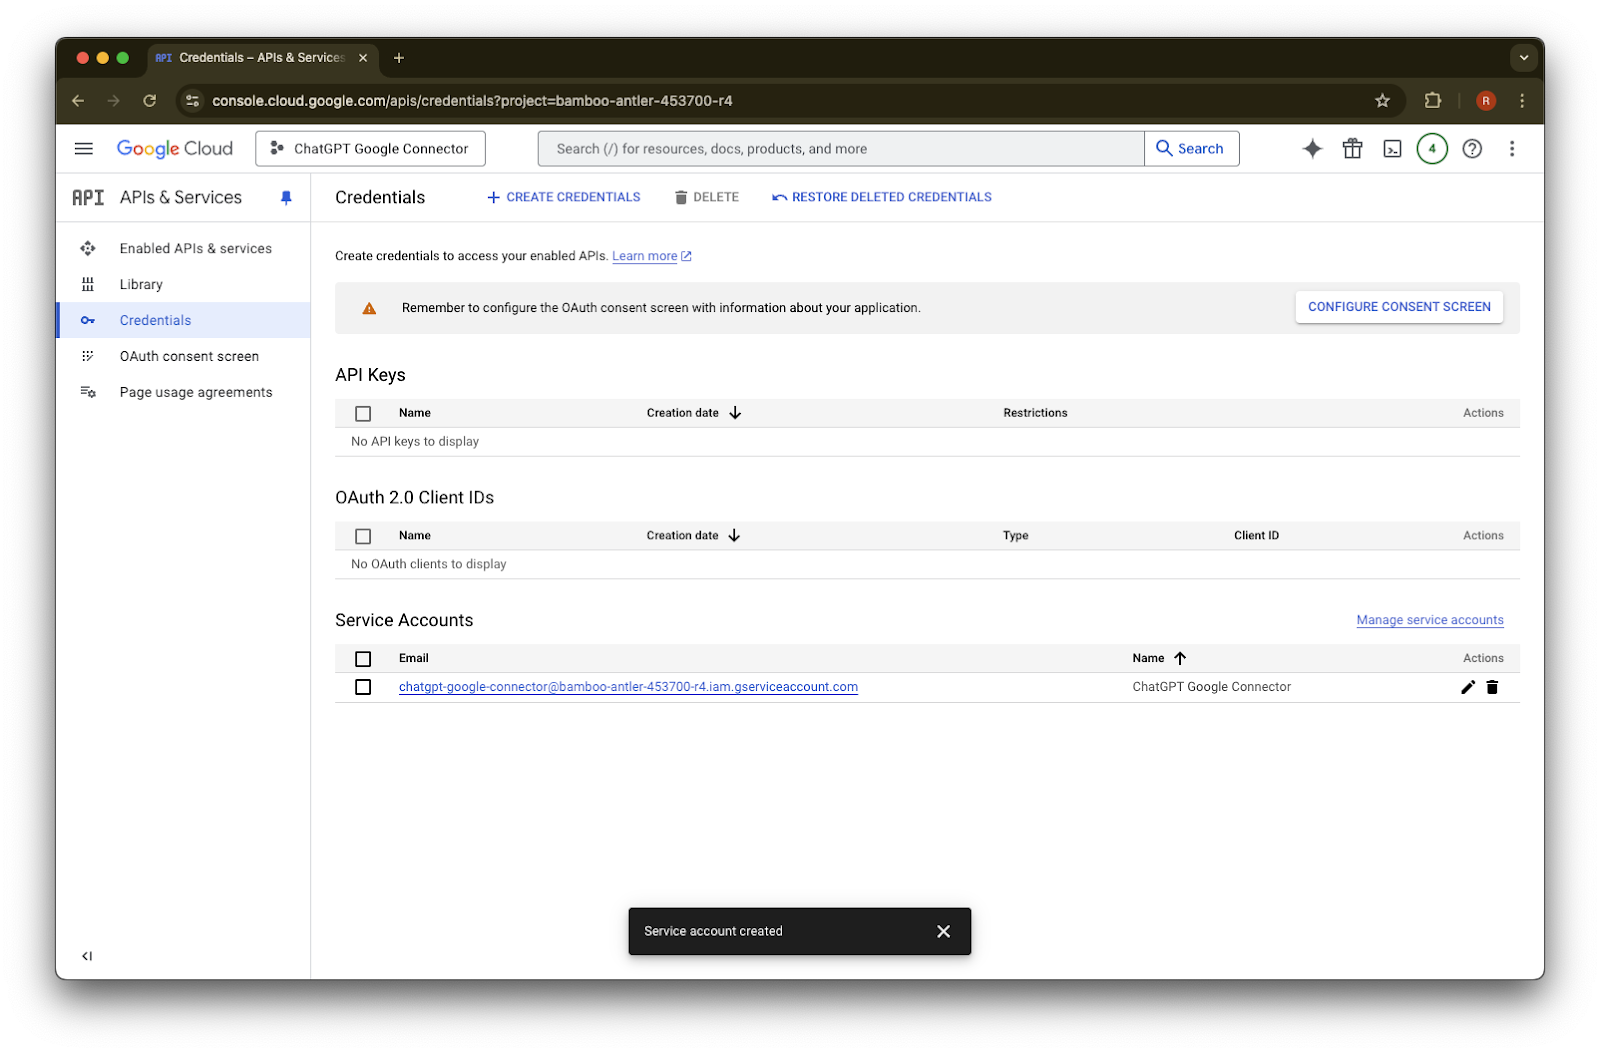
Credentials పై క్లిక్ చేయండి.
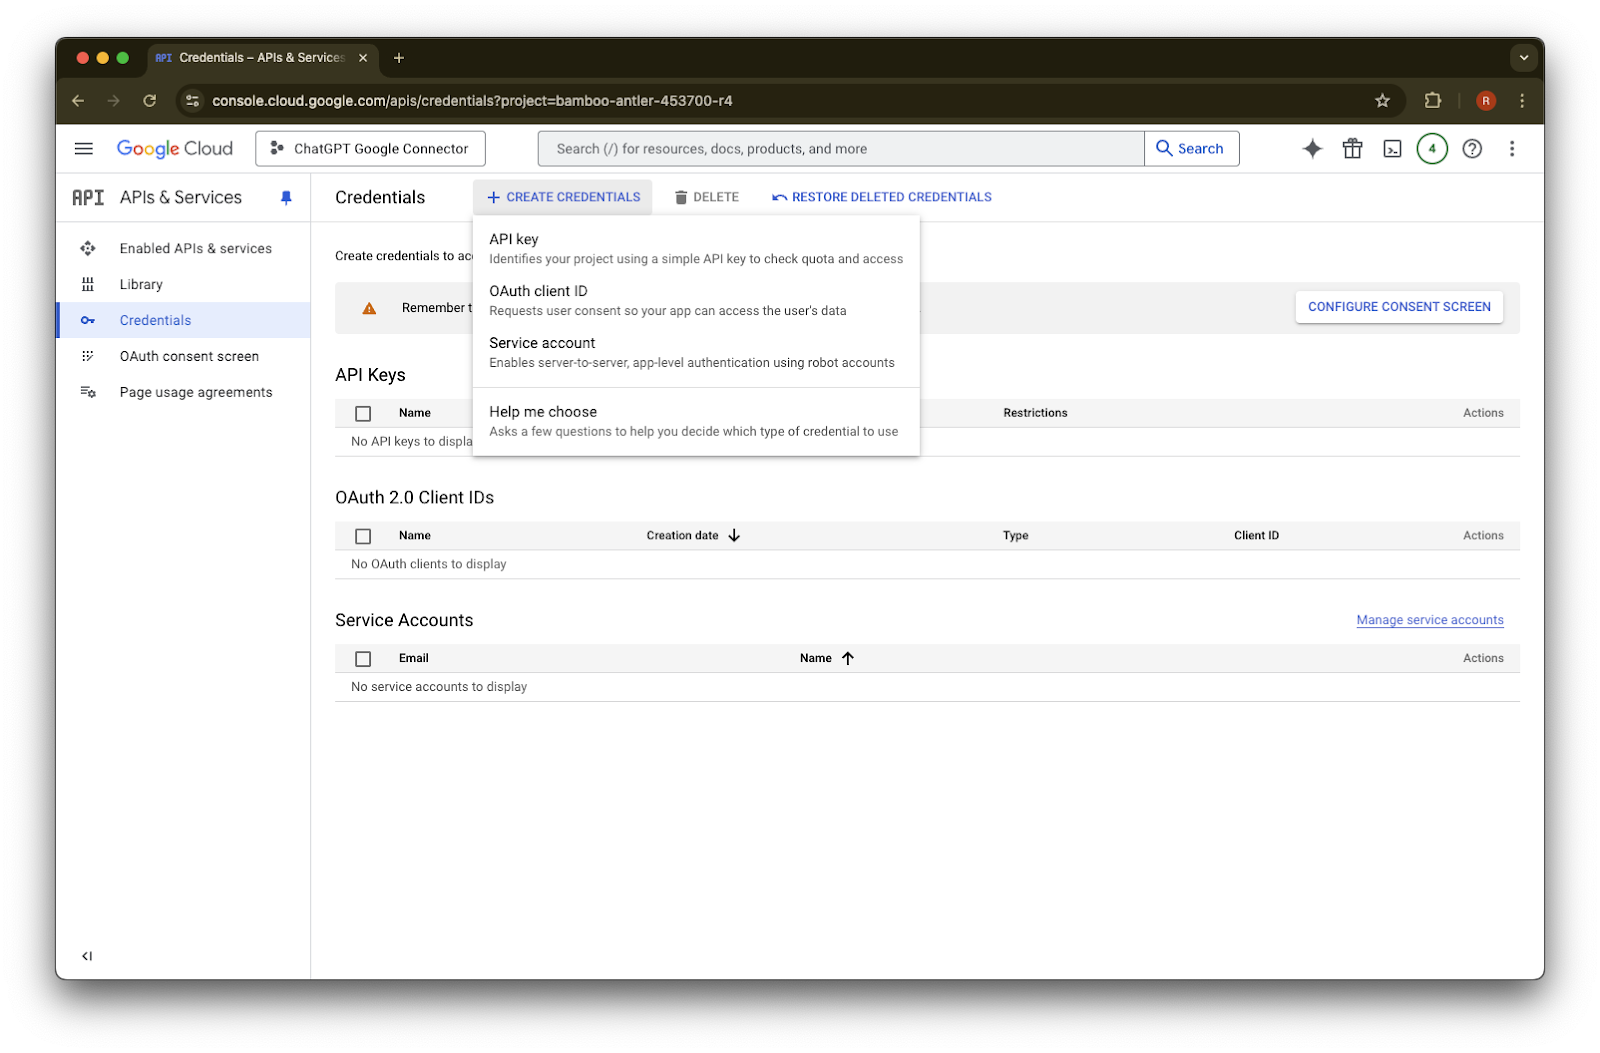
Create Credentials పై క్లిక్ చేయండి.
Service account పై క్లిక్ చేయండి.
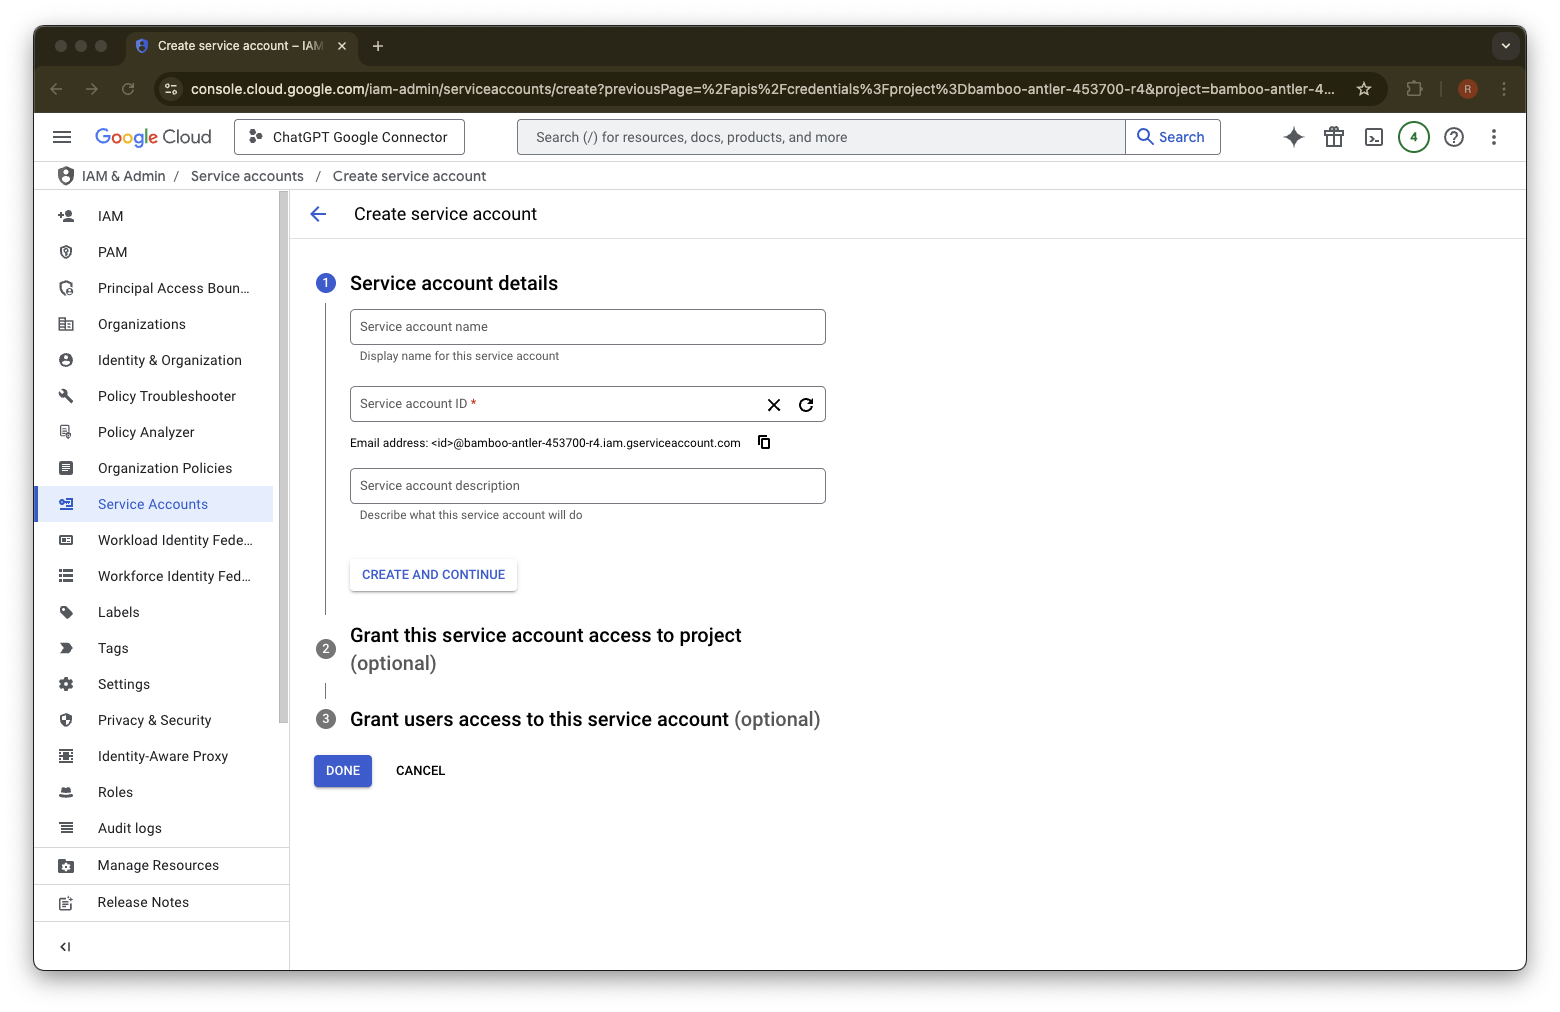
ఈ service account కోసం మీకు నచ్చిన name మరియు description ఇవ్వండి.
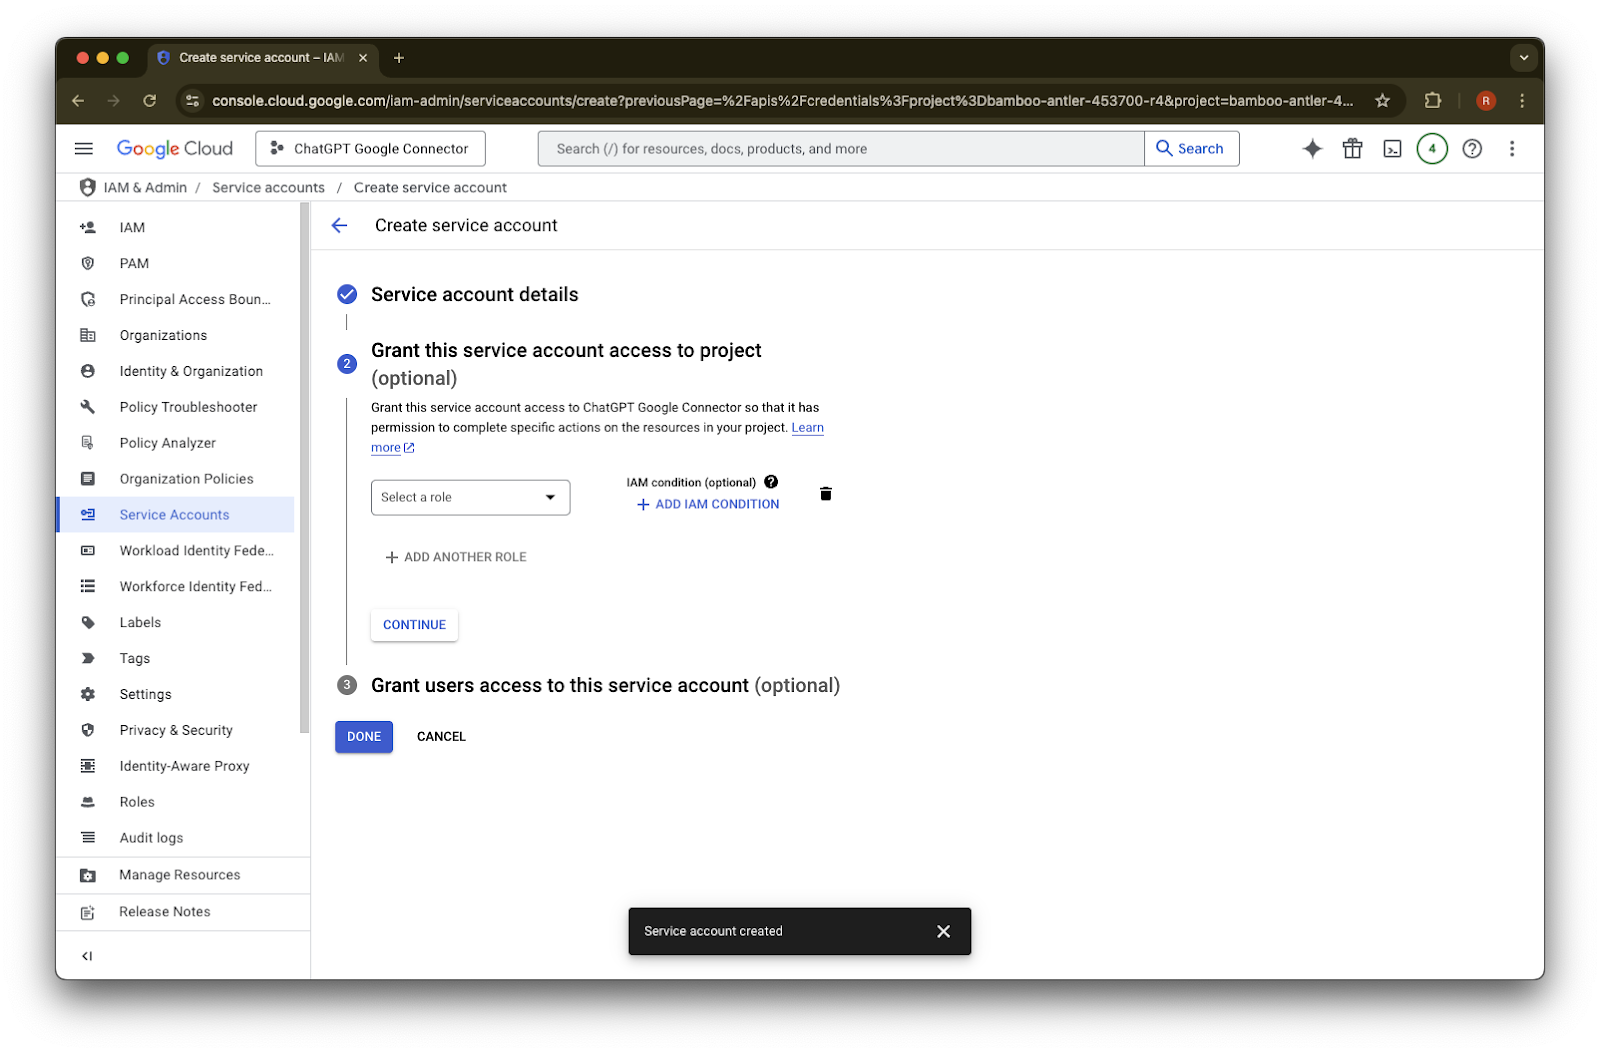
(Optional) మీరు ఒక role కేటాయించవచ్చు - ఇది ChatGPT కి అవసరం లేదు.
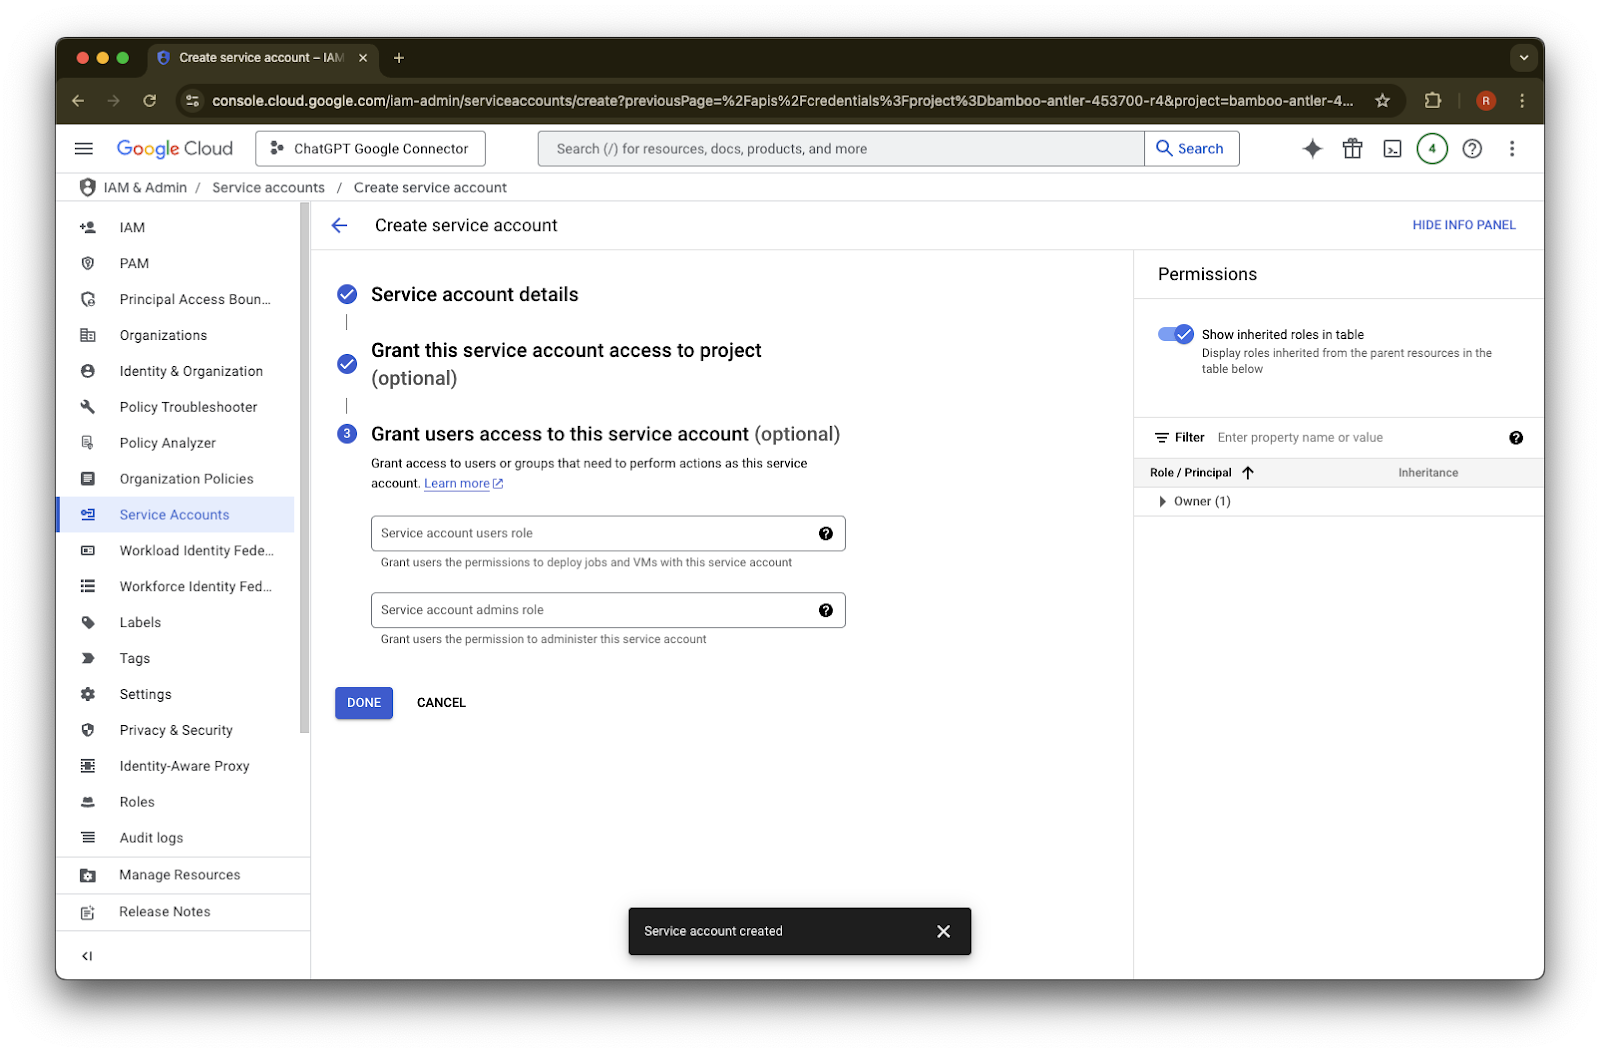
(Optional) మీరు service account కు access ఇవ్వవచ్చు - ఇది ChatGPT కి అవసరం లేదు.
Done పై క్లిక్ చేయండి.
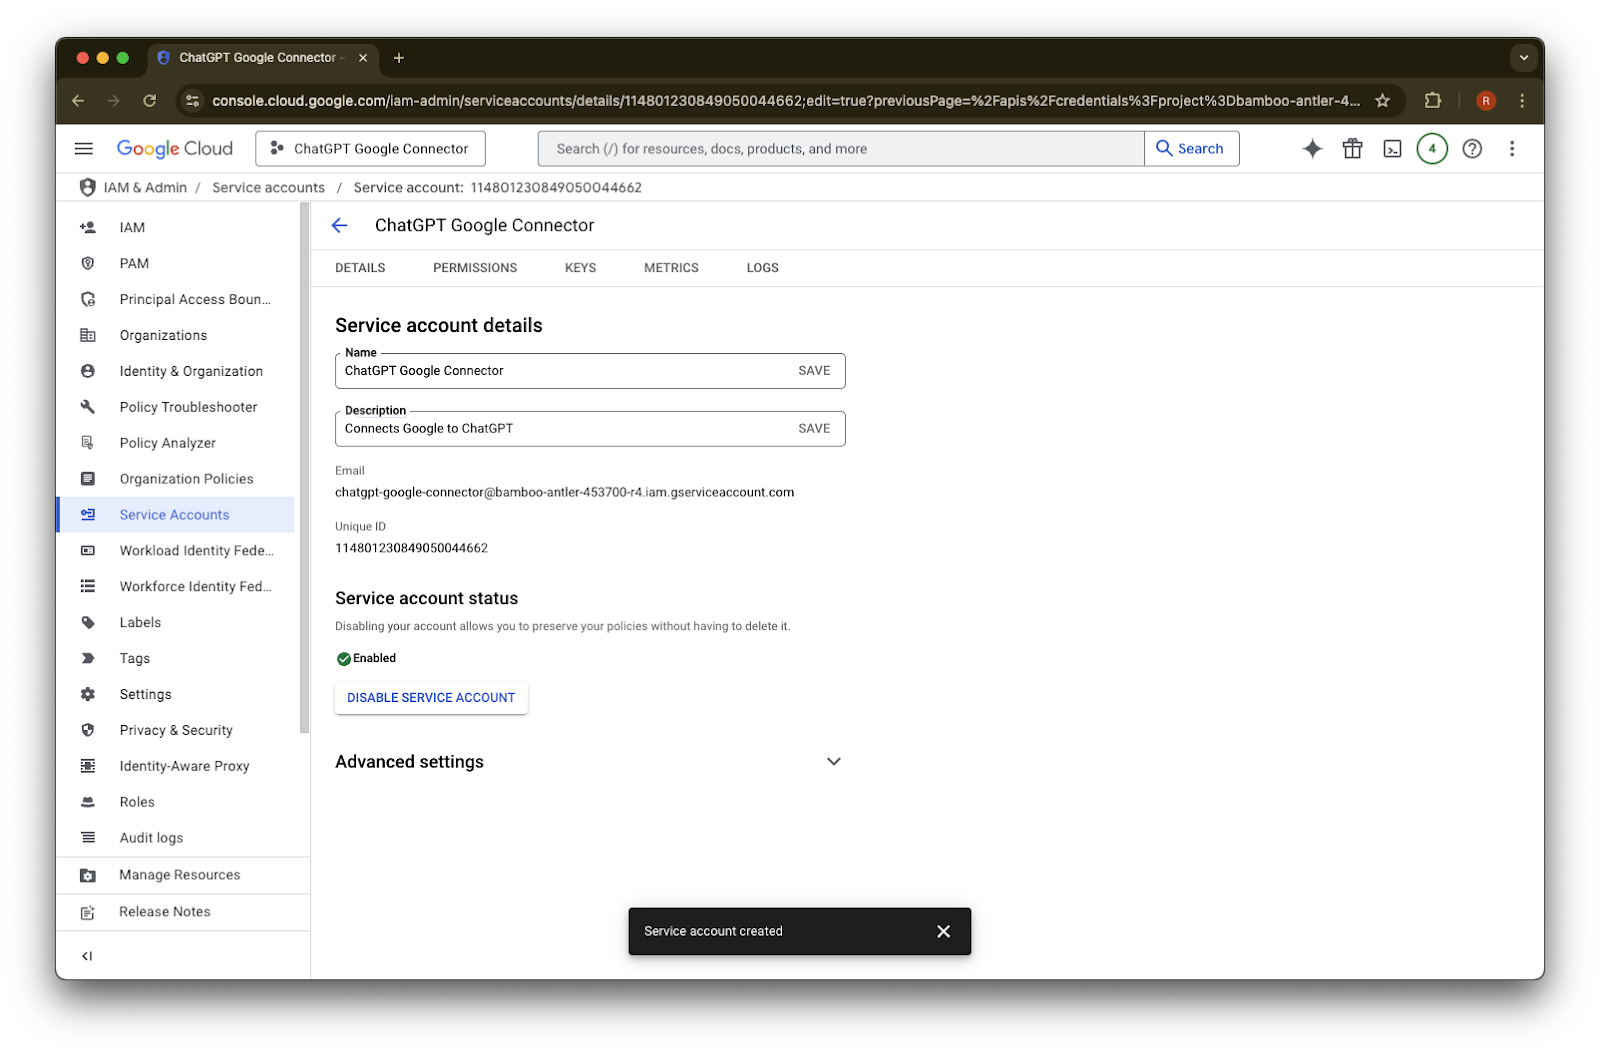
ఇప్పుడే సృష్టించిన service account పై క్లిక్ చేయండి.
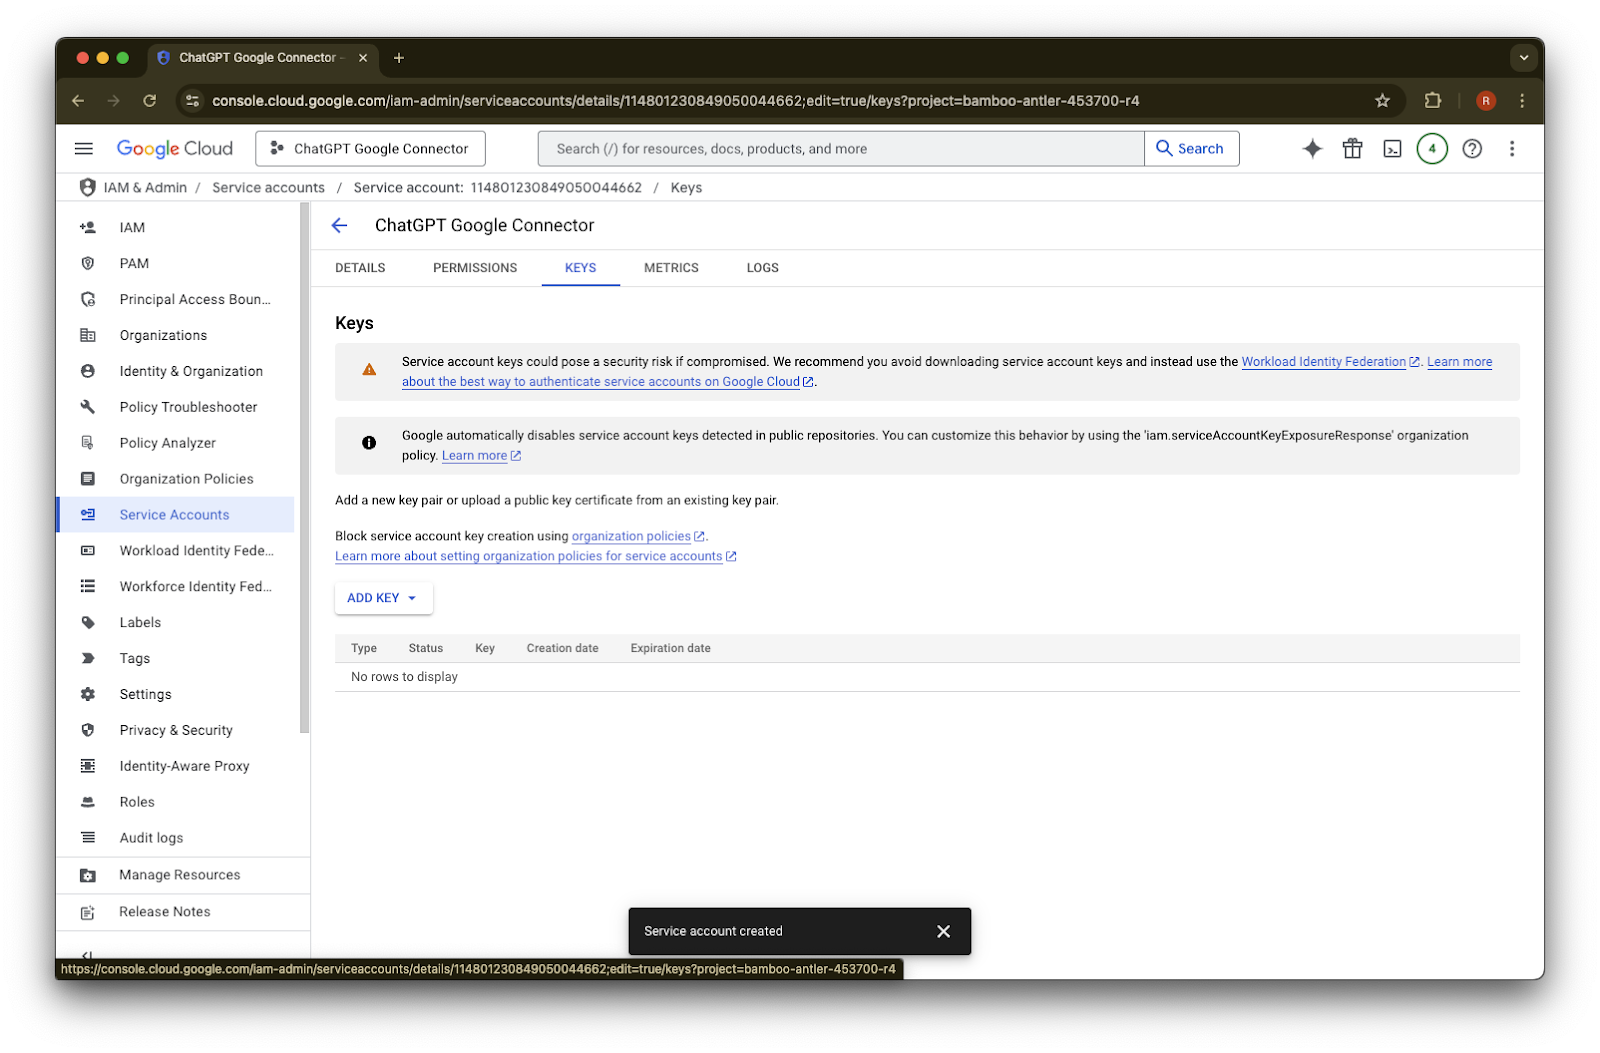
keys. పై క్లిక్ చేయండి.
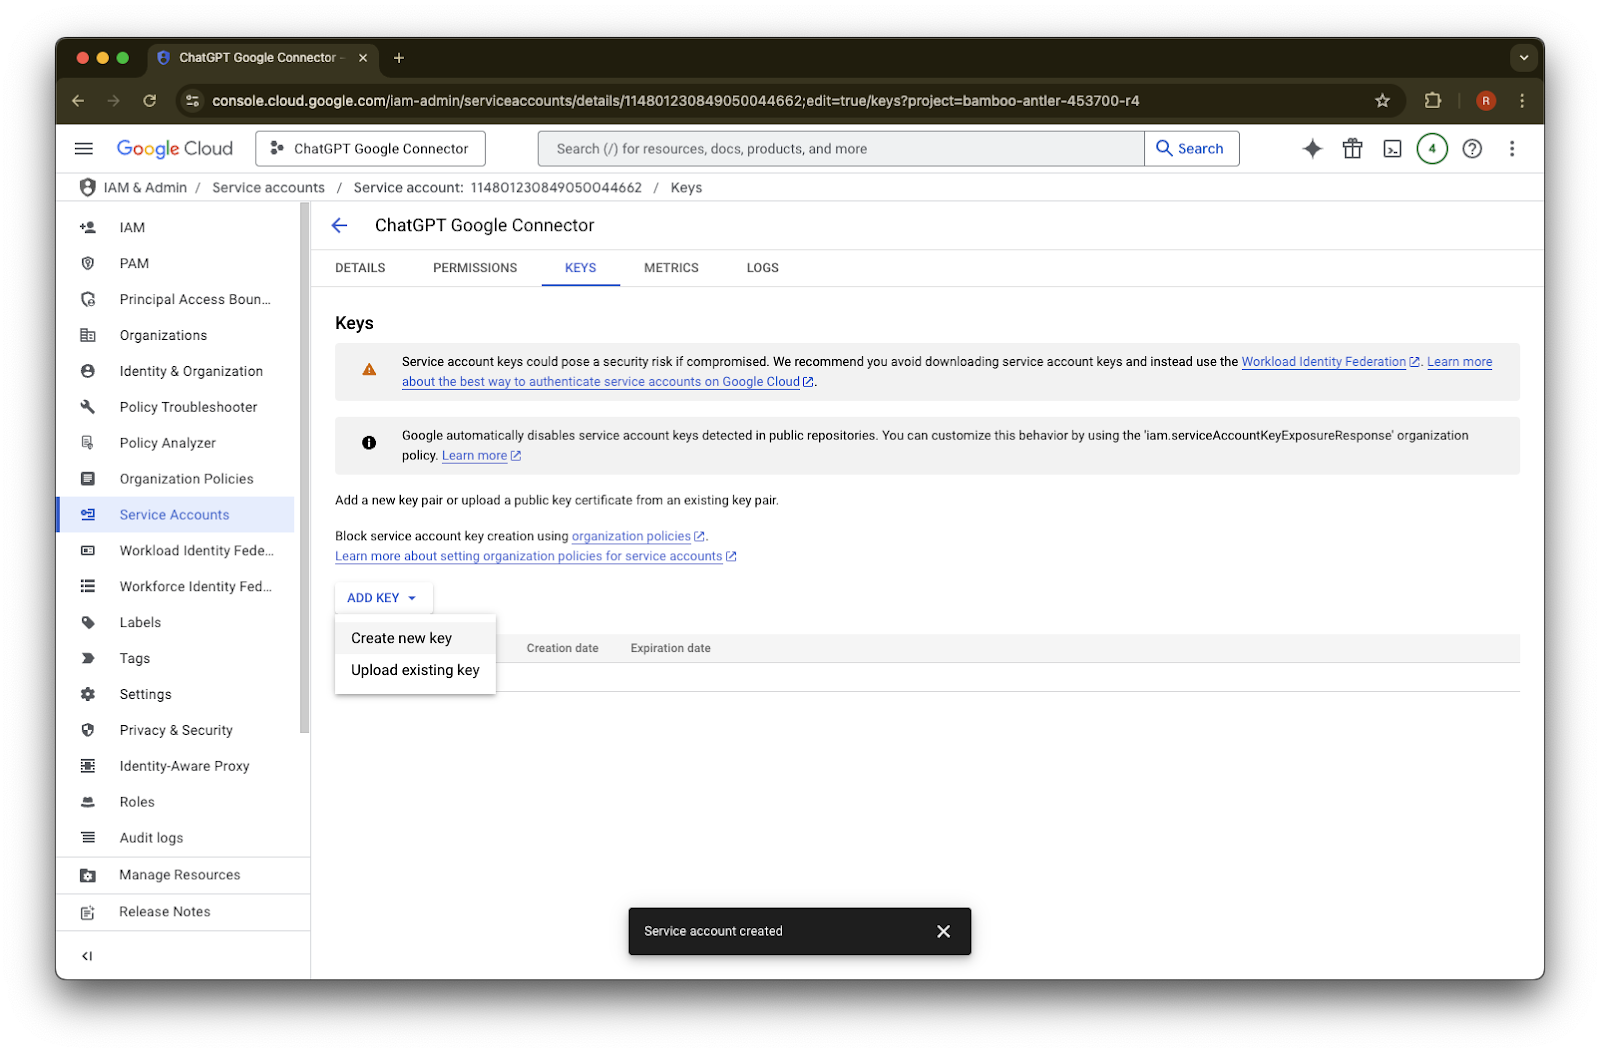
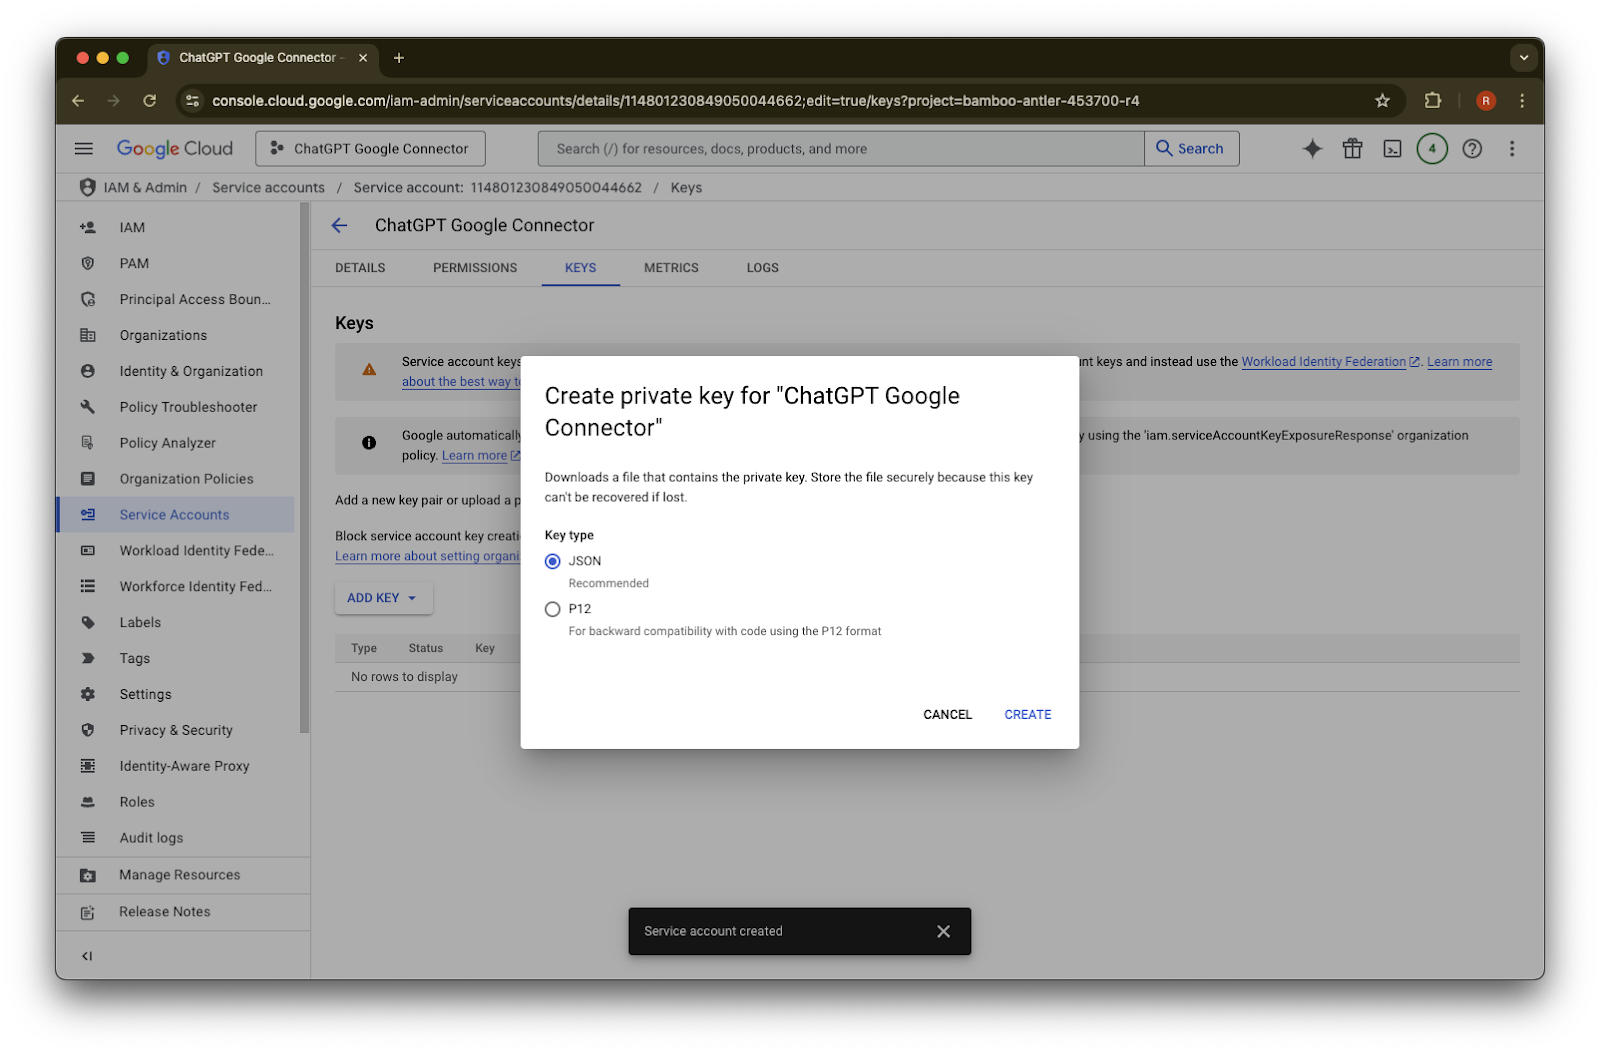
Add Key పై క్లిక్ చేయండి.
Create new key పై క్లిక్ చేయండి.
default JSON key type ను అలాగే ఉంచి Create పై క్లిక్ చేయండి.
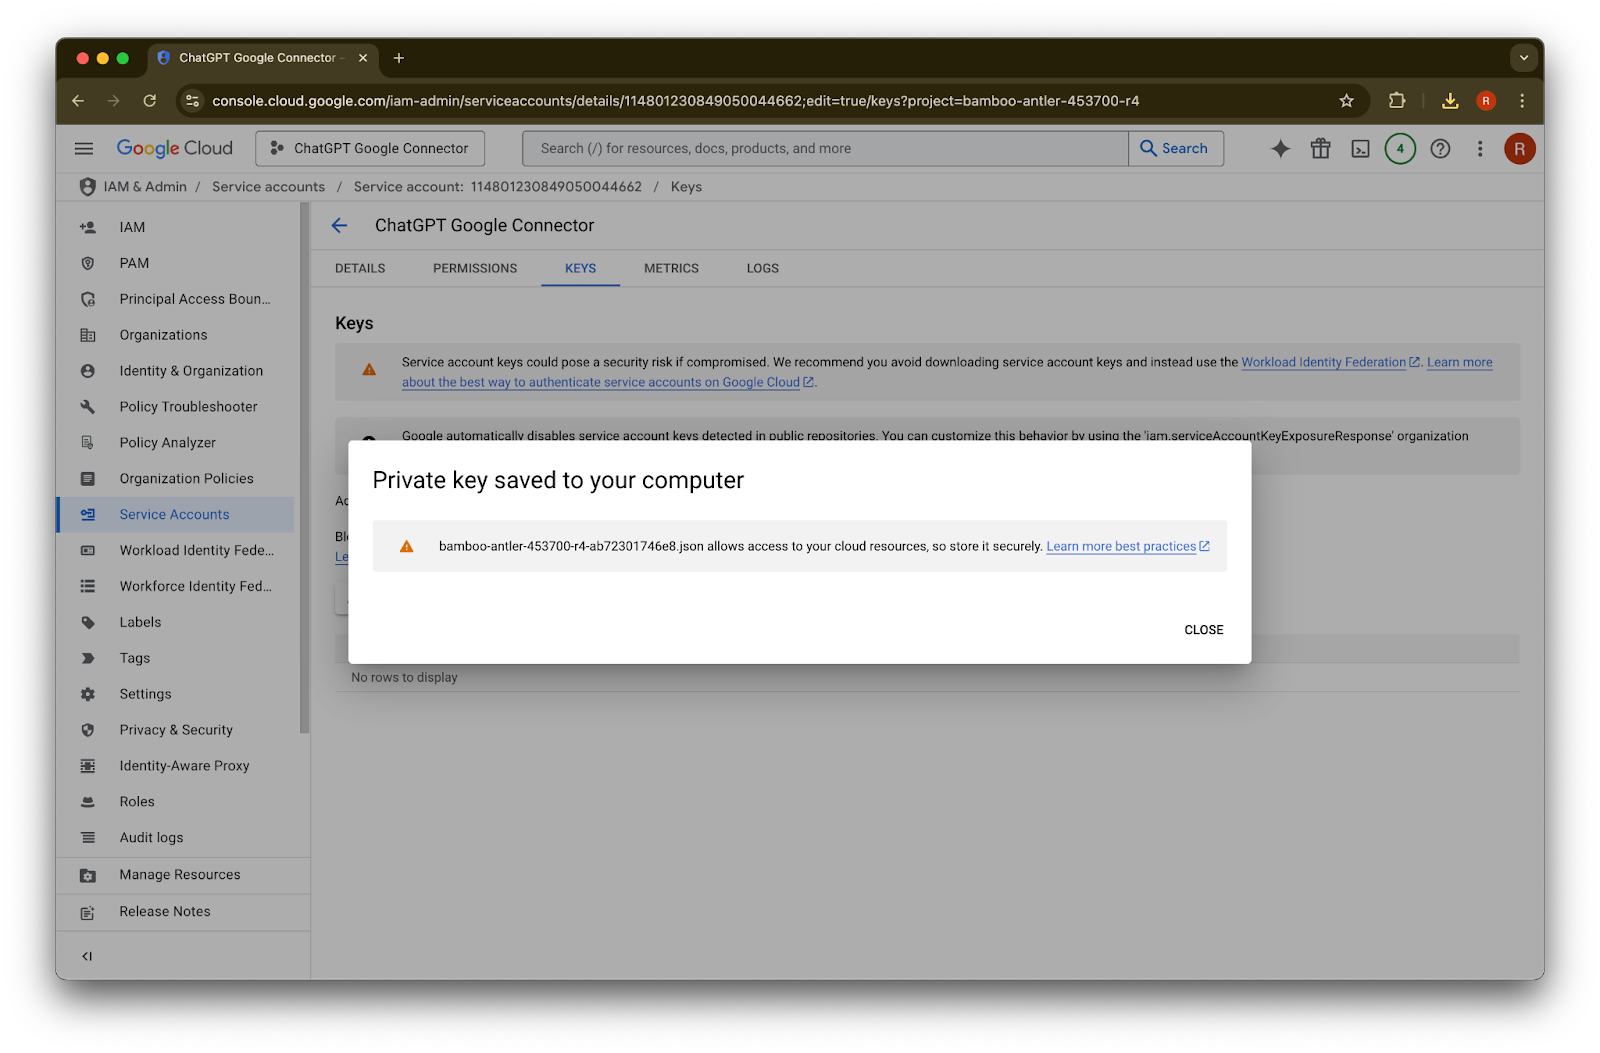
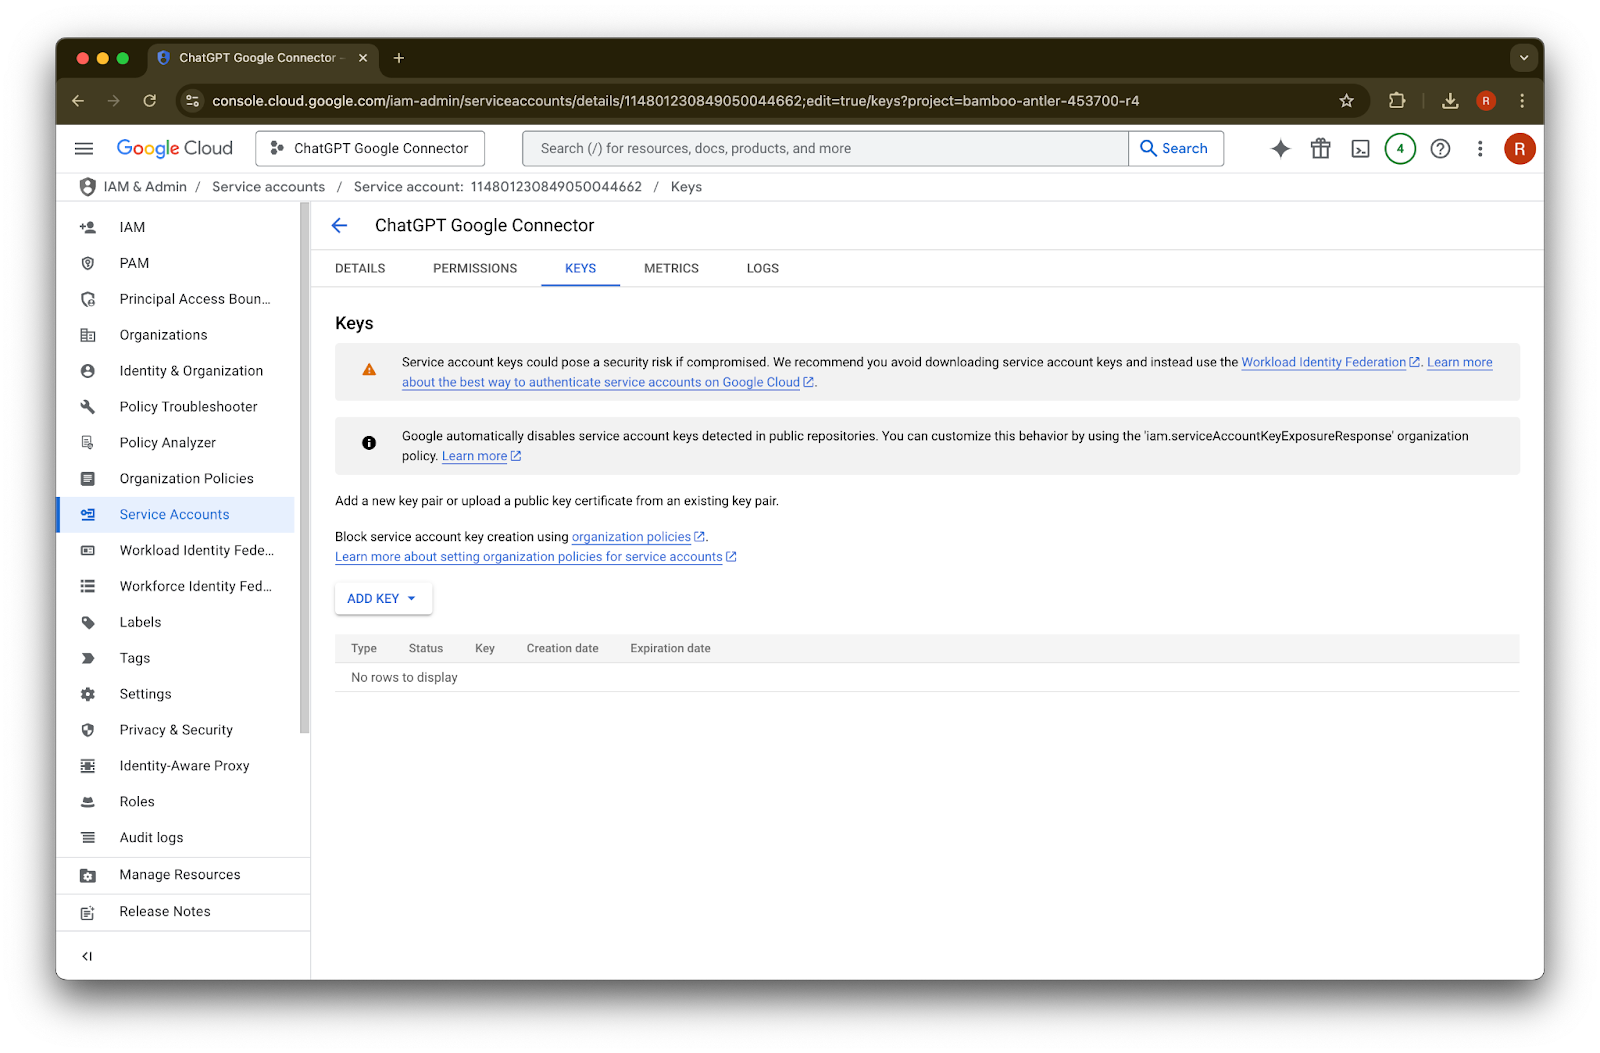
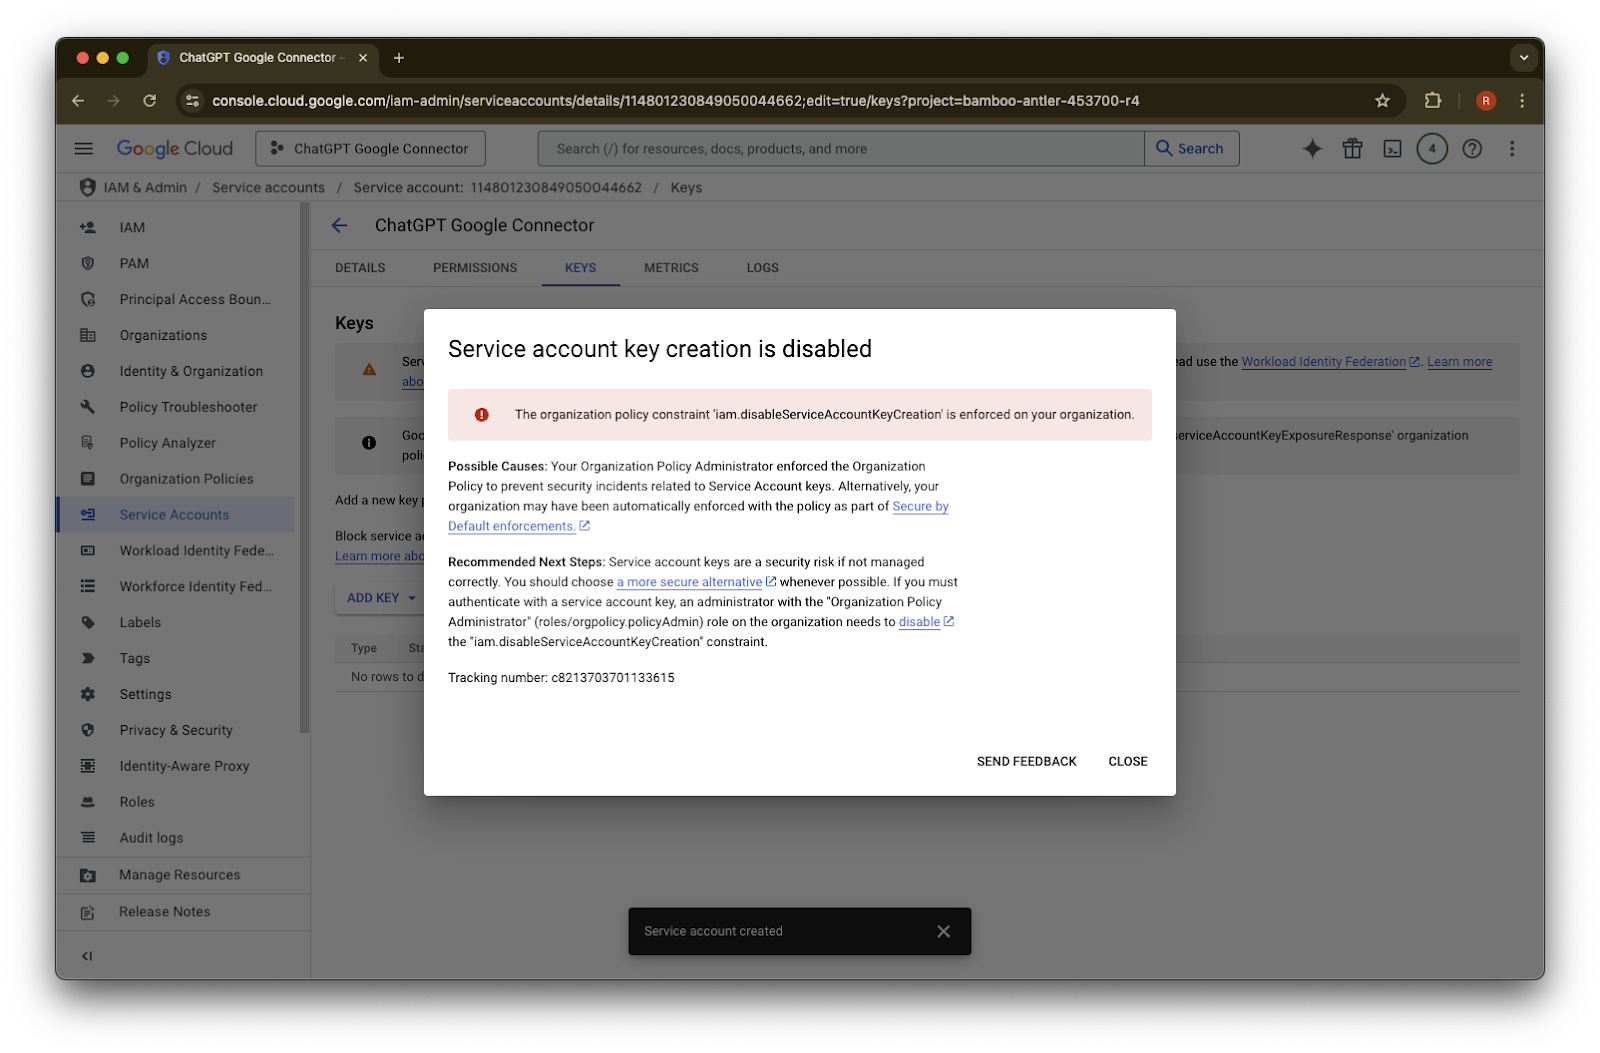
“Service account key creation is disabled” అని తెలిపే దోష సందేశం కనబడితే, creation ను enable చేయడానికి ఈ దశలను అనుసరించండి.Close పై క్లిక్ చేయండి. కీ ఇప్పుడు మీ కంప్యూటర్కు డౌన్లోడ్ అయింది. దీన్ని తర్వాత మీరు ChatGPT అడ్మిన్ కన్సోల్కు అప్లోడ్ చేస్తారు.
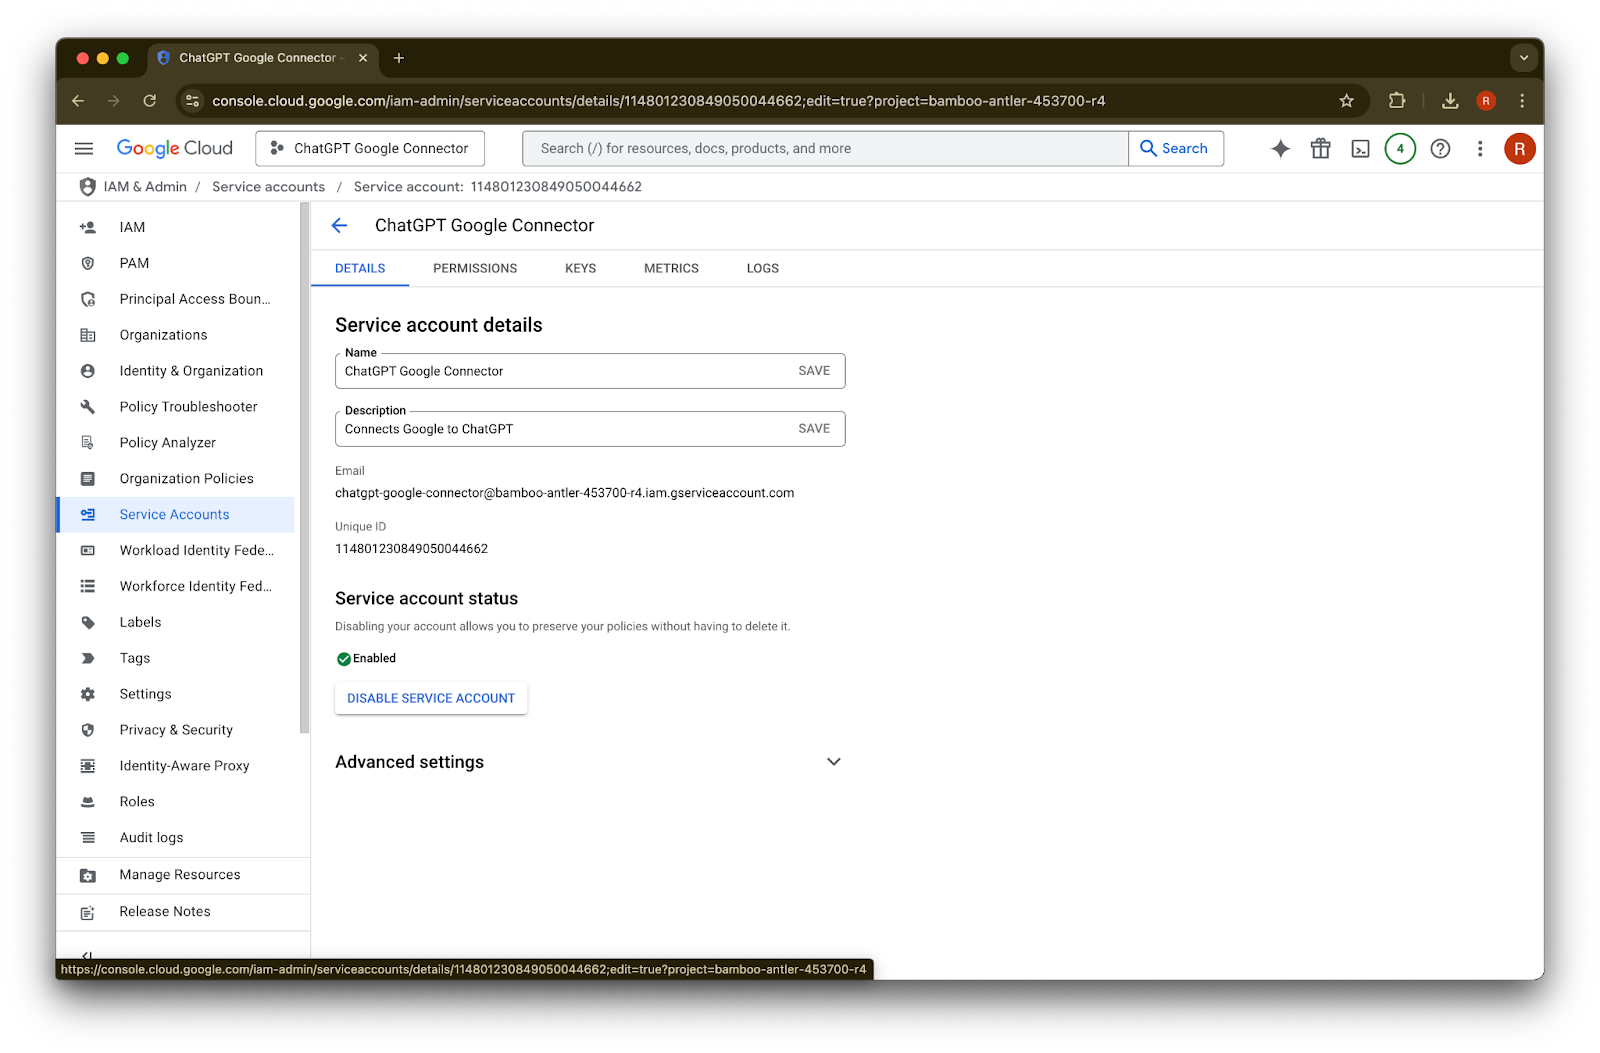
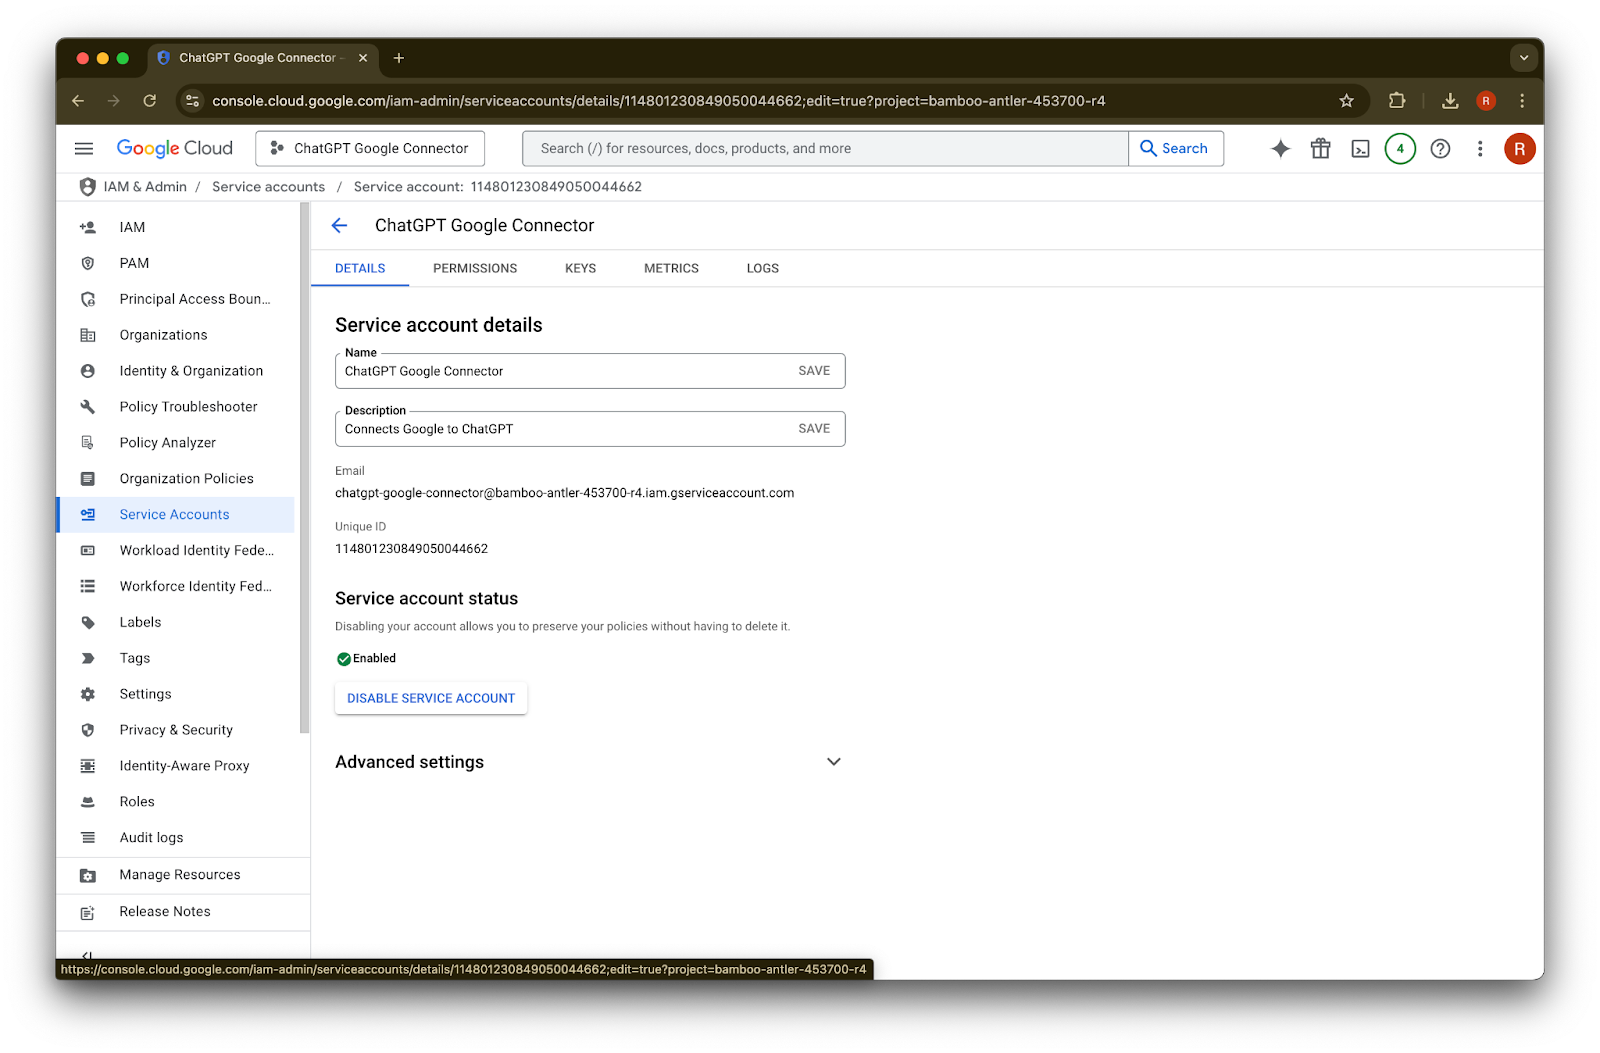
details పై క్లిక్ చేయండి.
Unique ID ను గమనించండి. ఇది Step 42 లో అవసరం అవుతుంది.
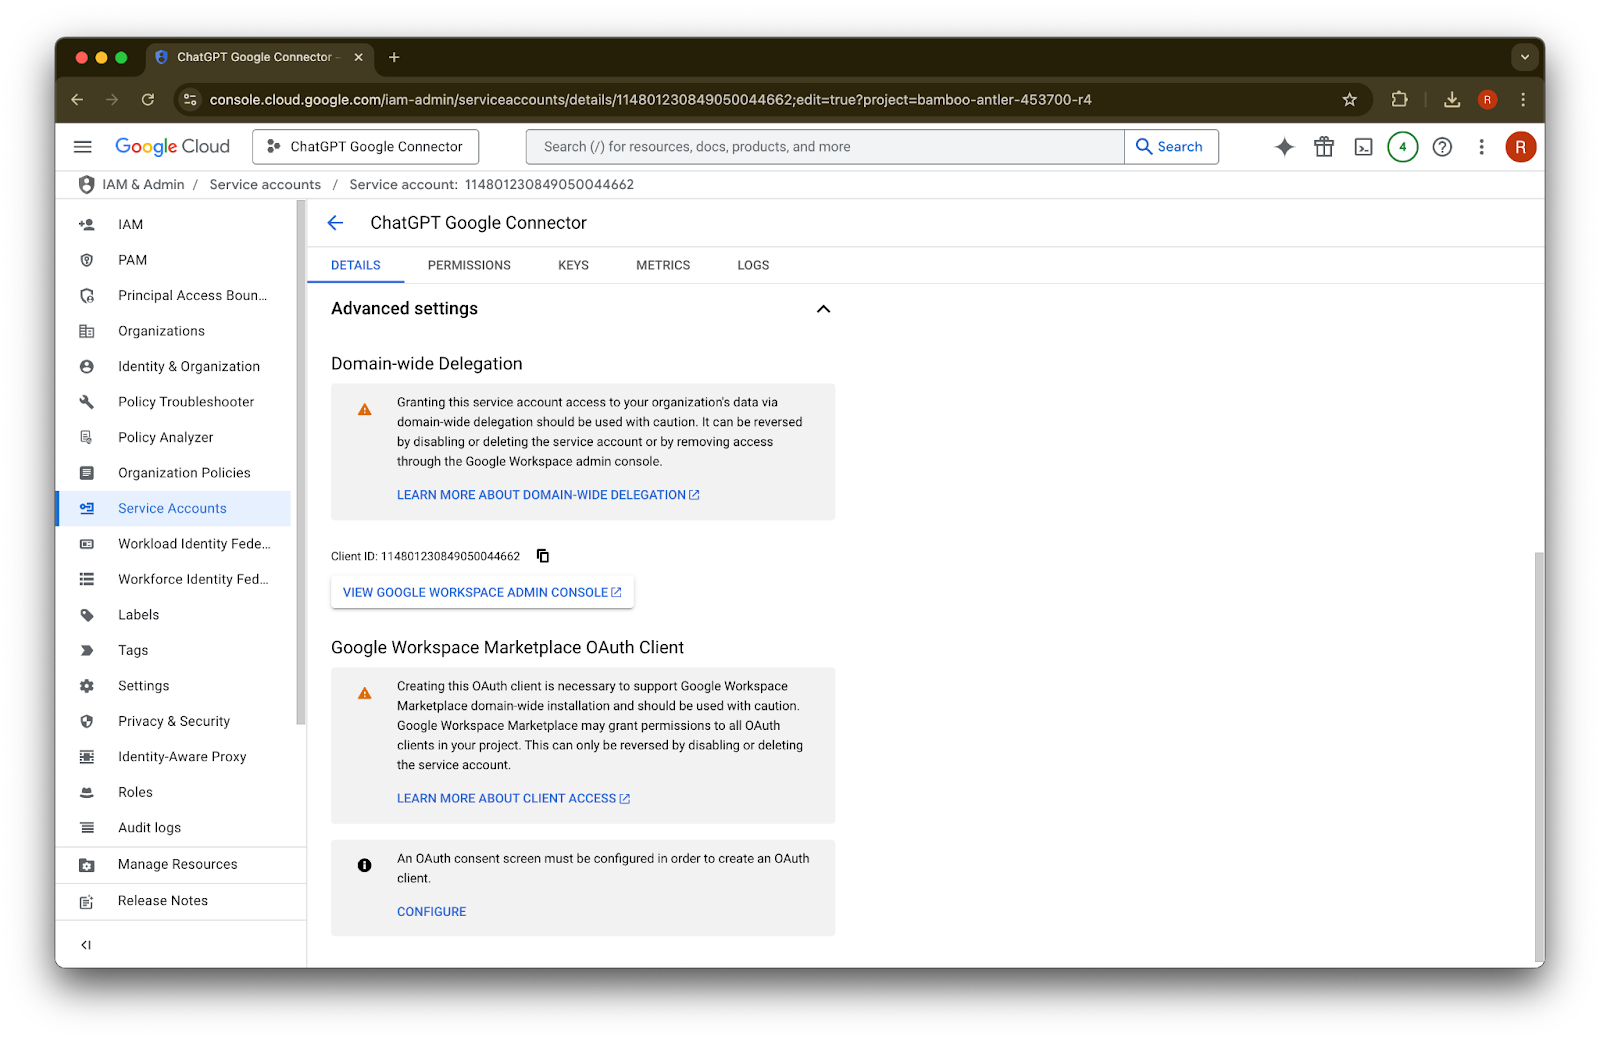
Advanced settings ను విస్తరించండి.
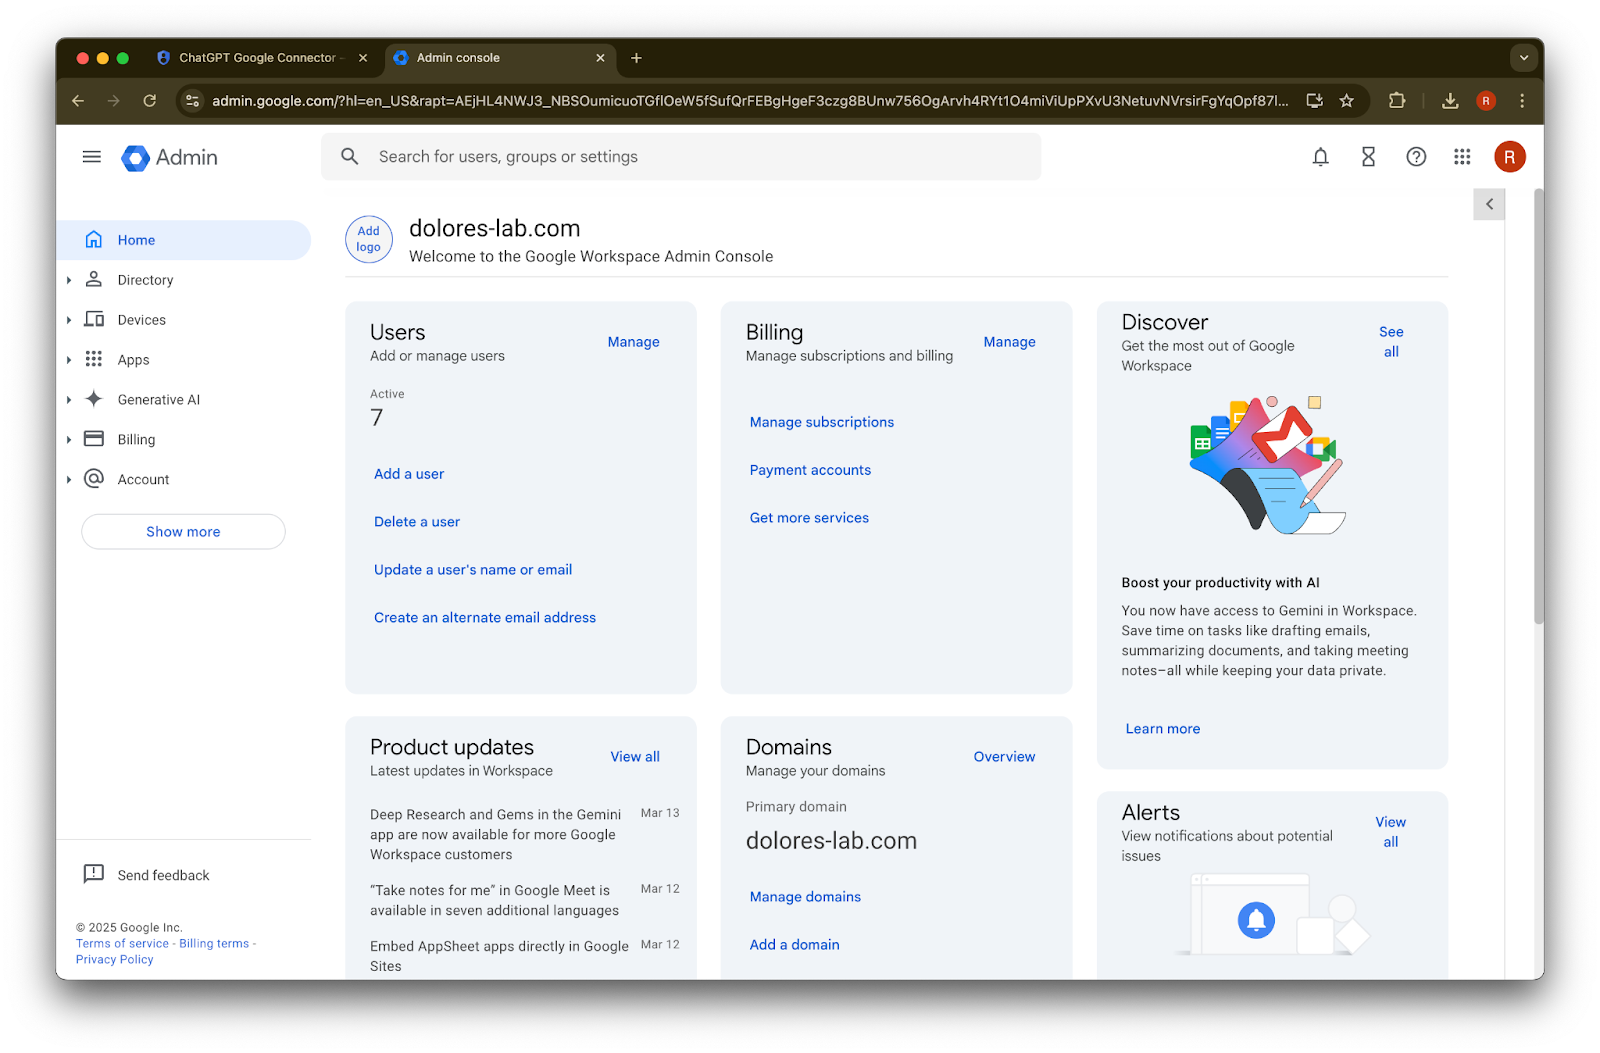
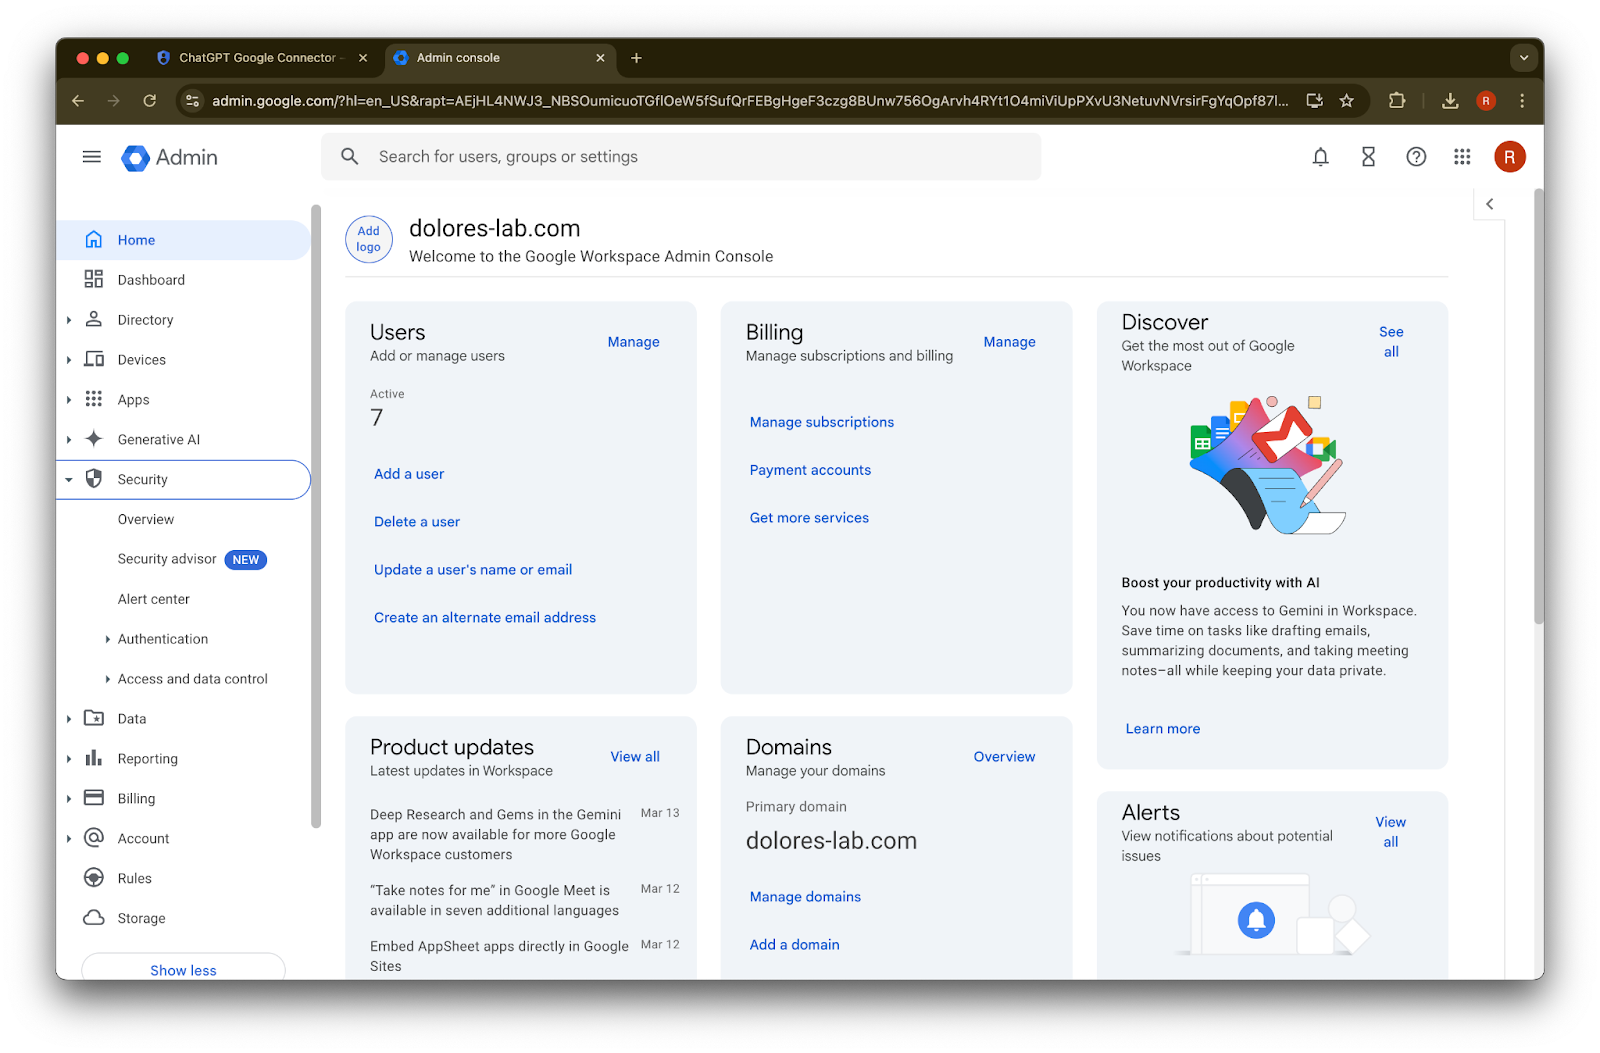
క్రిందికి స్క్రోల్ చేసి View Google Workspace Admin Console పై క్లిక్ చేయండి. Google Workspace console కొత్త tab లో తెరుచుకుంటుంది.
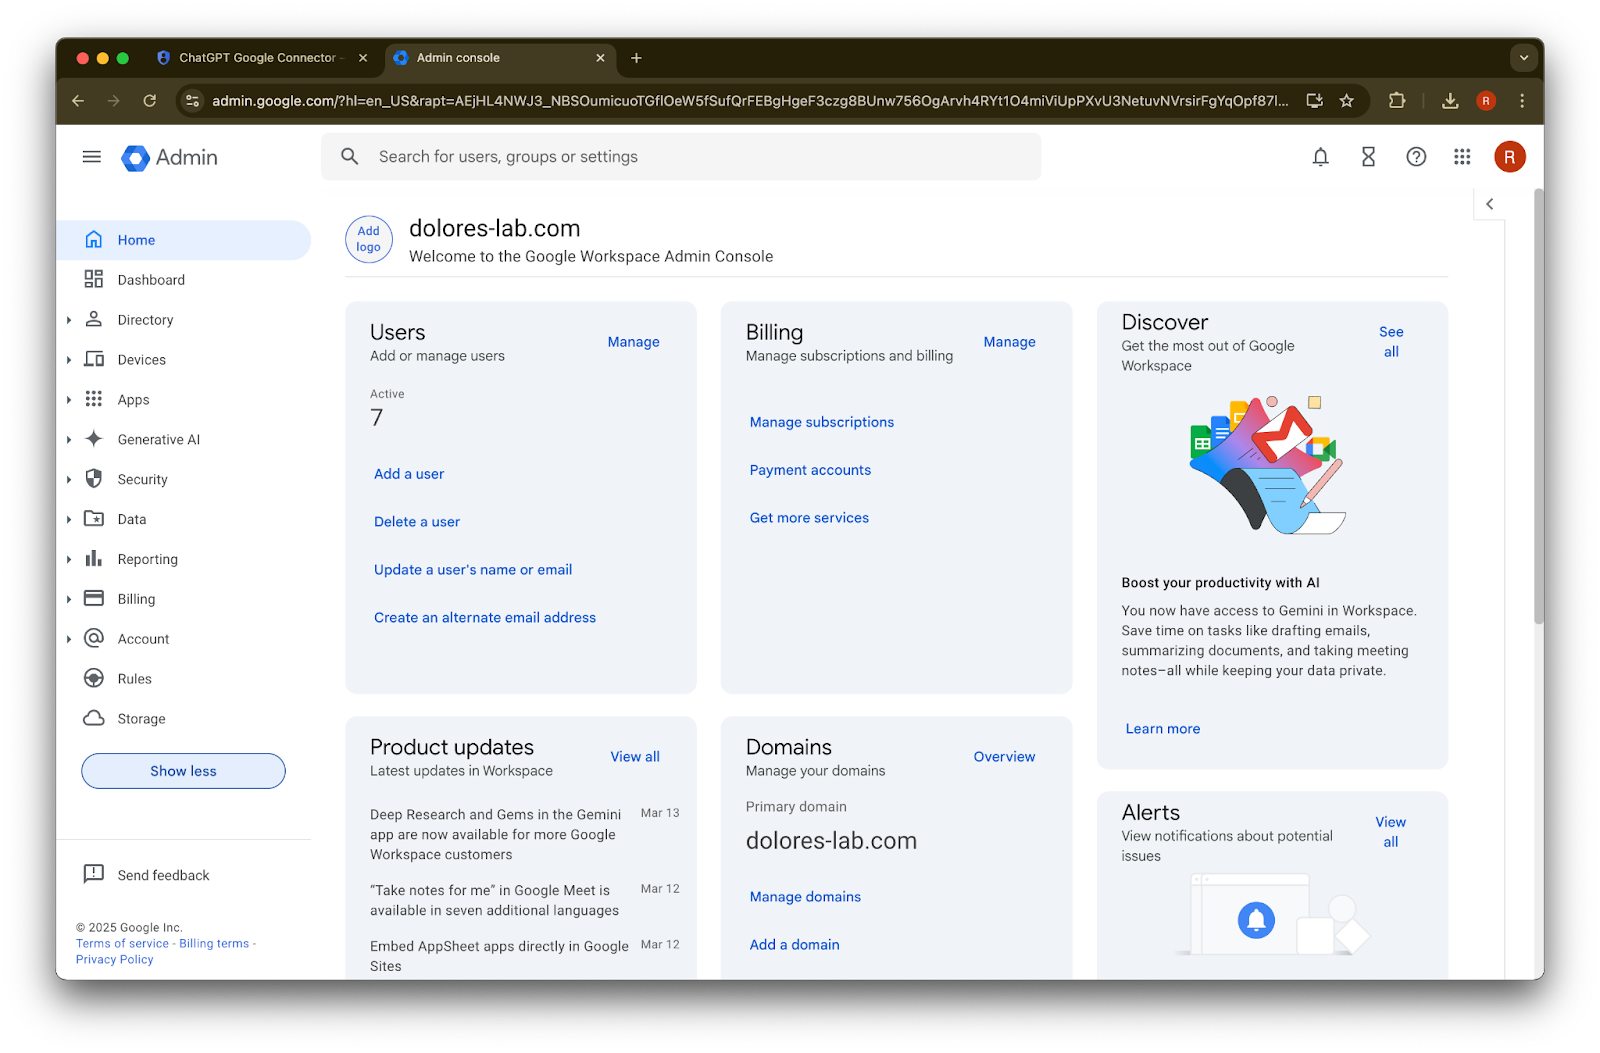
Show more పై క్లిక్ చేయండి.
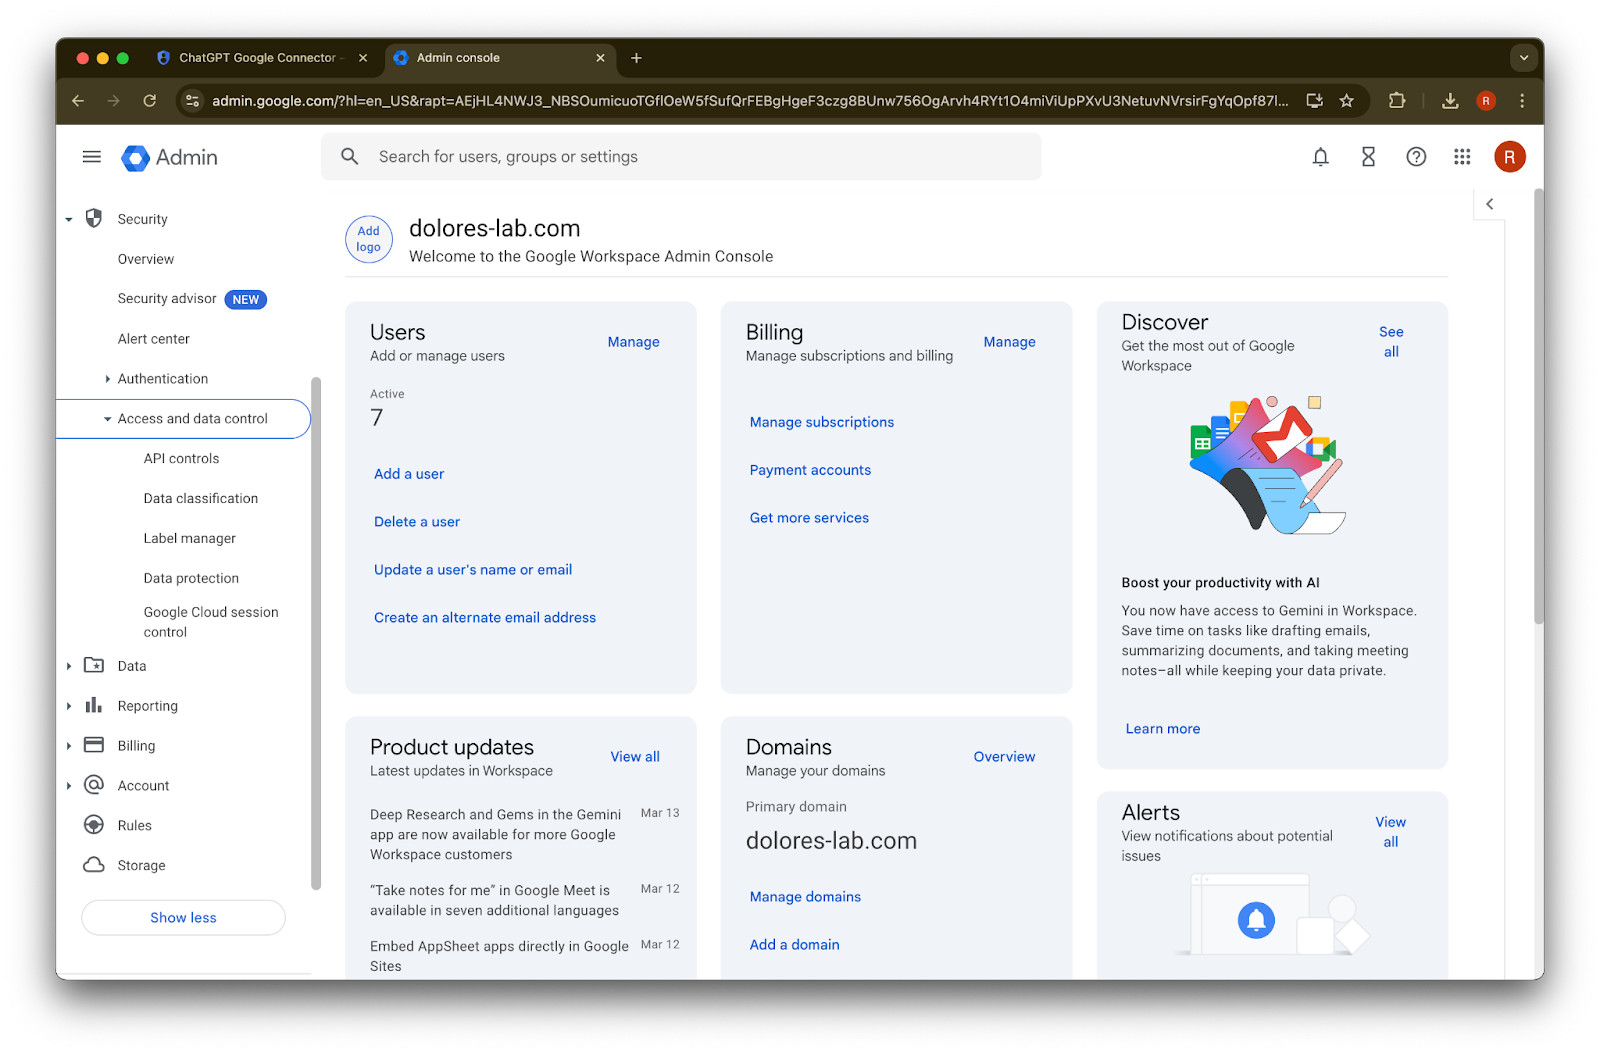
Security విభాగాన్ని విస్తరించండి.
Access and data controls విభాగాన్ని విస్తరించండి.
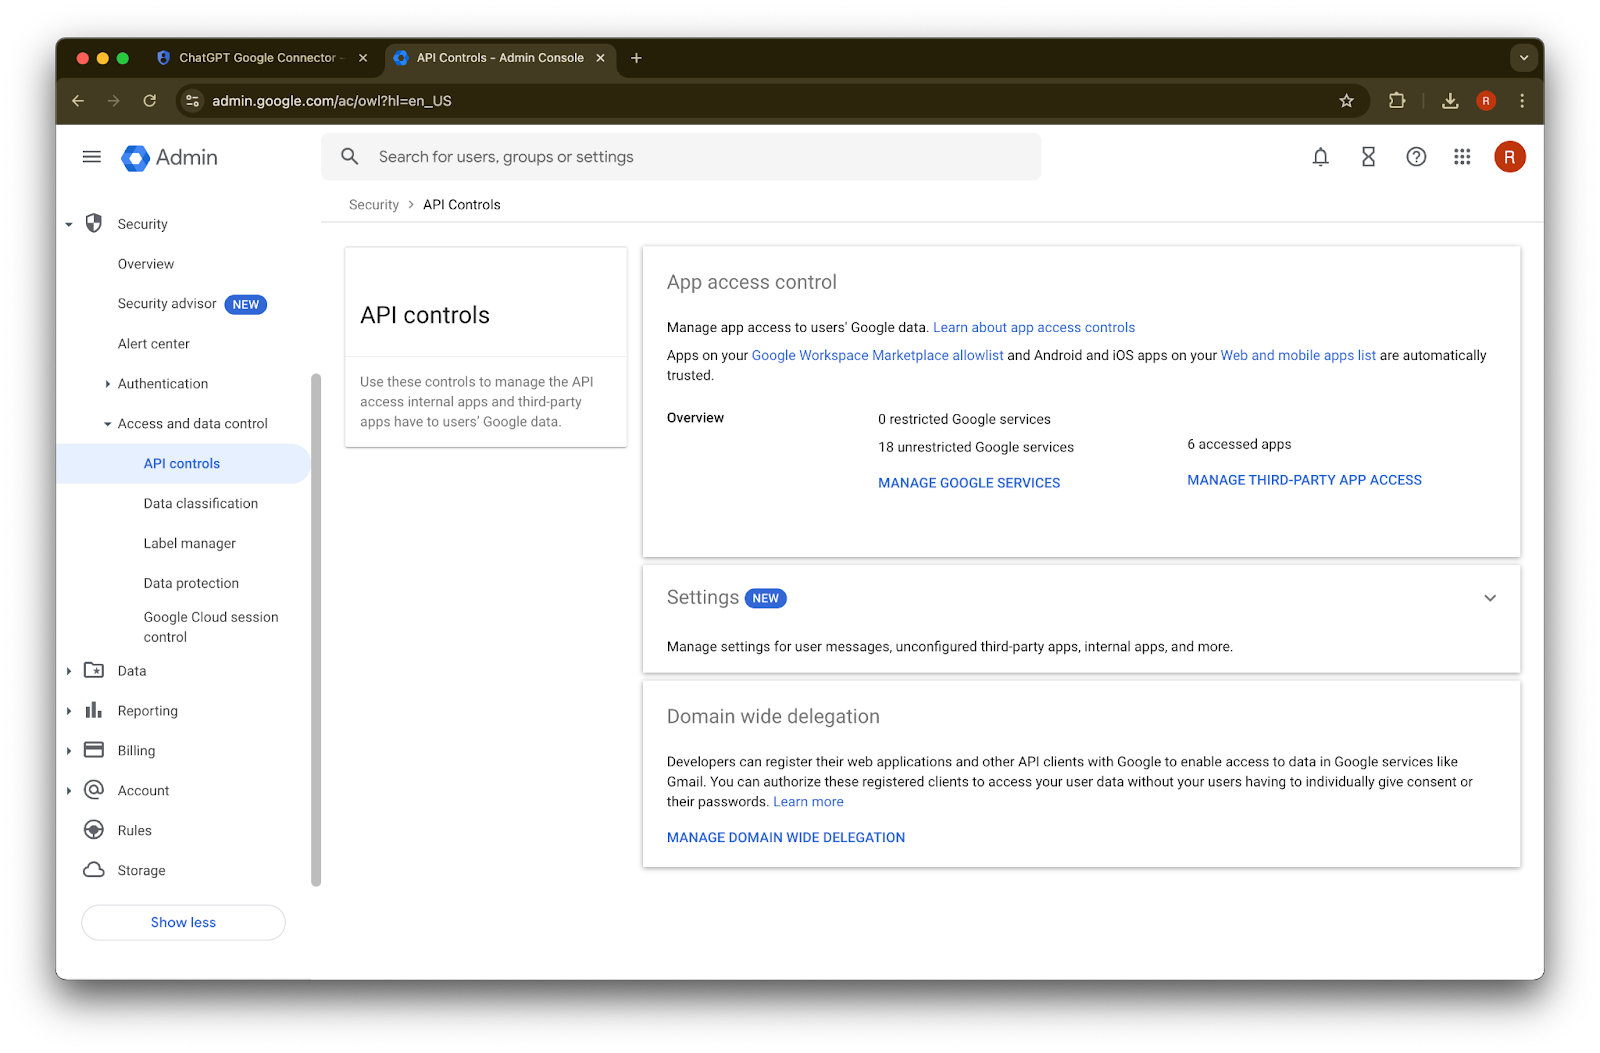
API controls విభాగంపై క్లిక్ చేయండి.
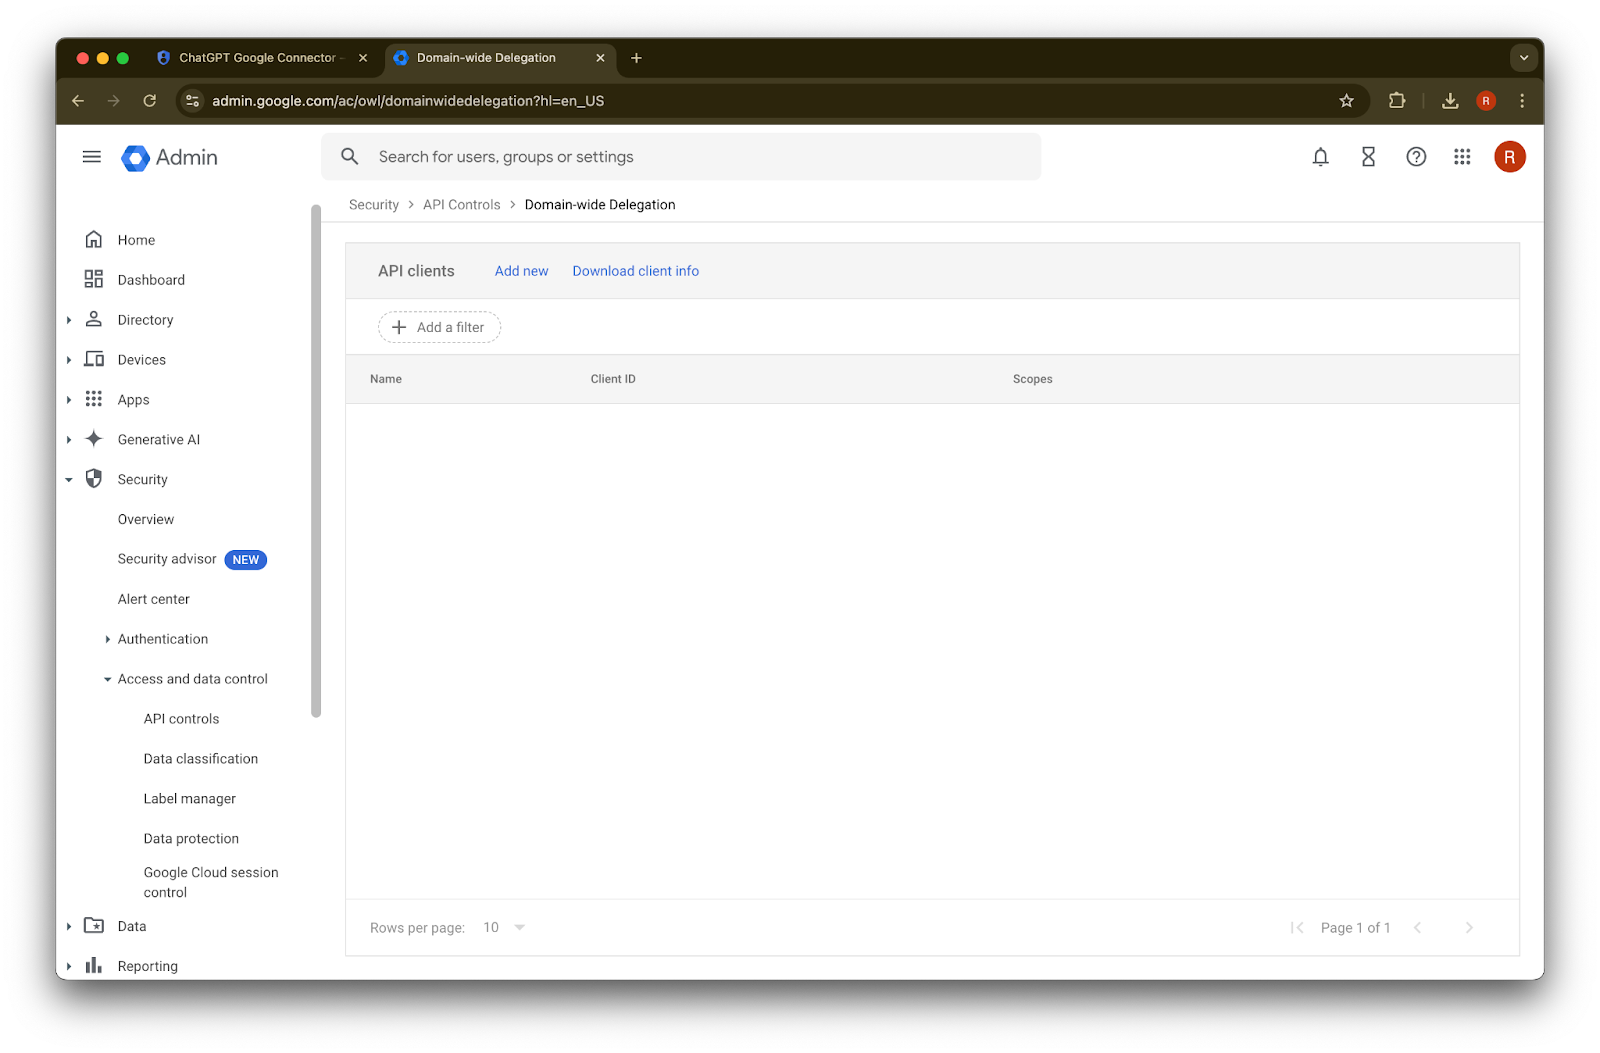
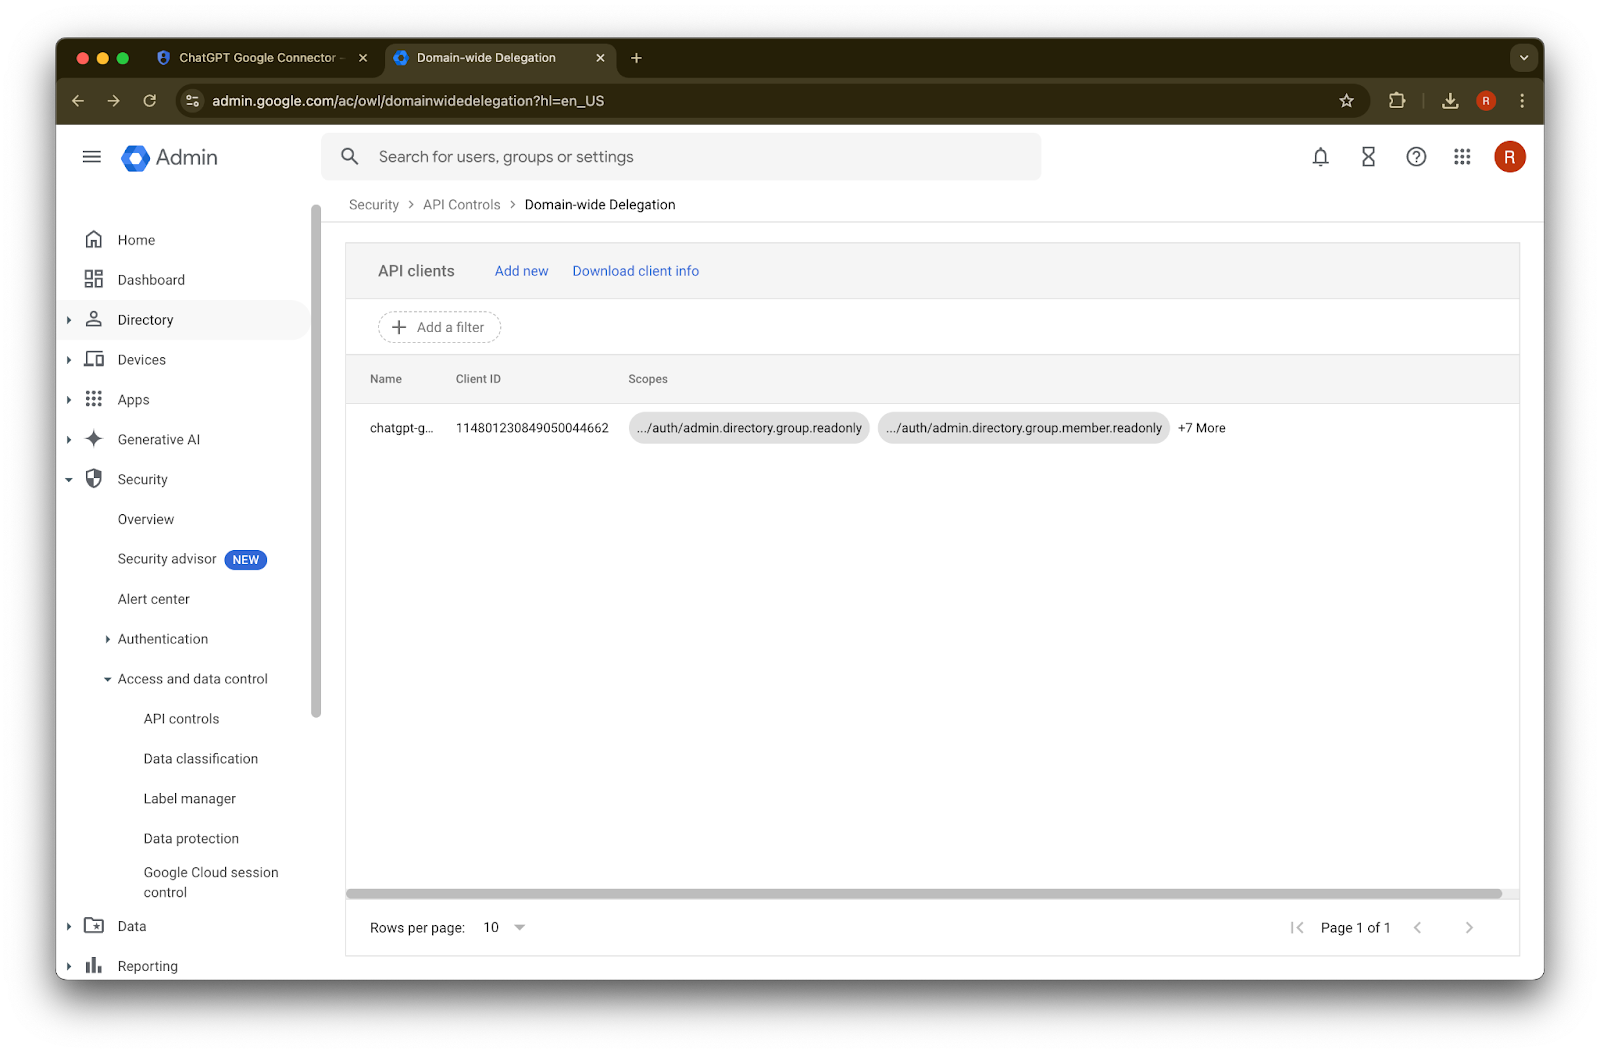
Manage Domain Wide Delegation పై క్లిక్ చేయండి.
Add new పై క్లిక్ చేయండి.
ముందుగా గమనించిన Unique ID ను ఈ Client ID కి విలువగా ఉపయోగించండి.
OAuth scopes కోసం, మీరు copy చేసి paste చేయాల్సిన క్రింది comma de-limited auth scopes విలువలను చూడండి:
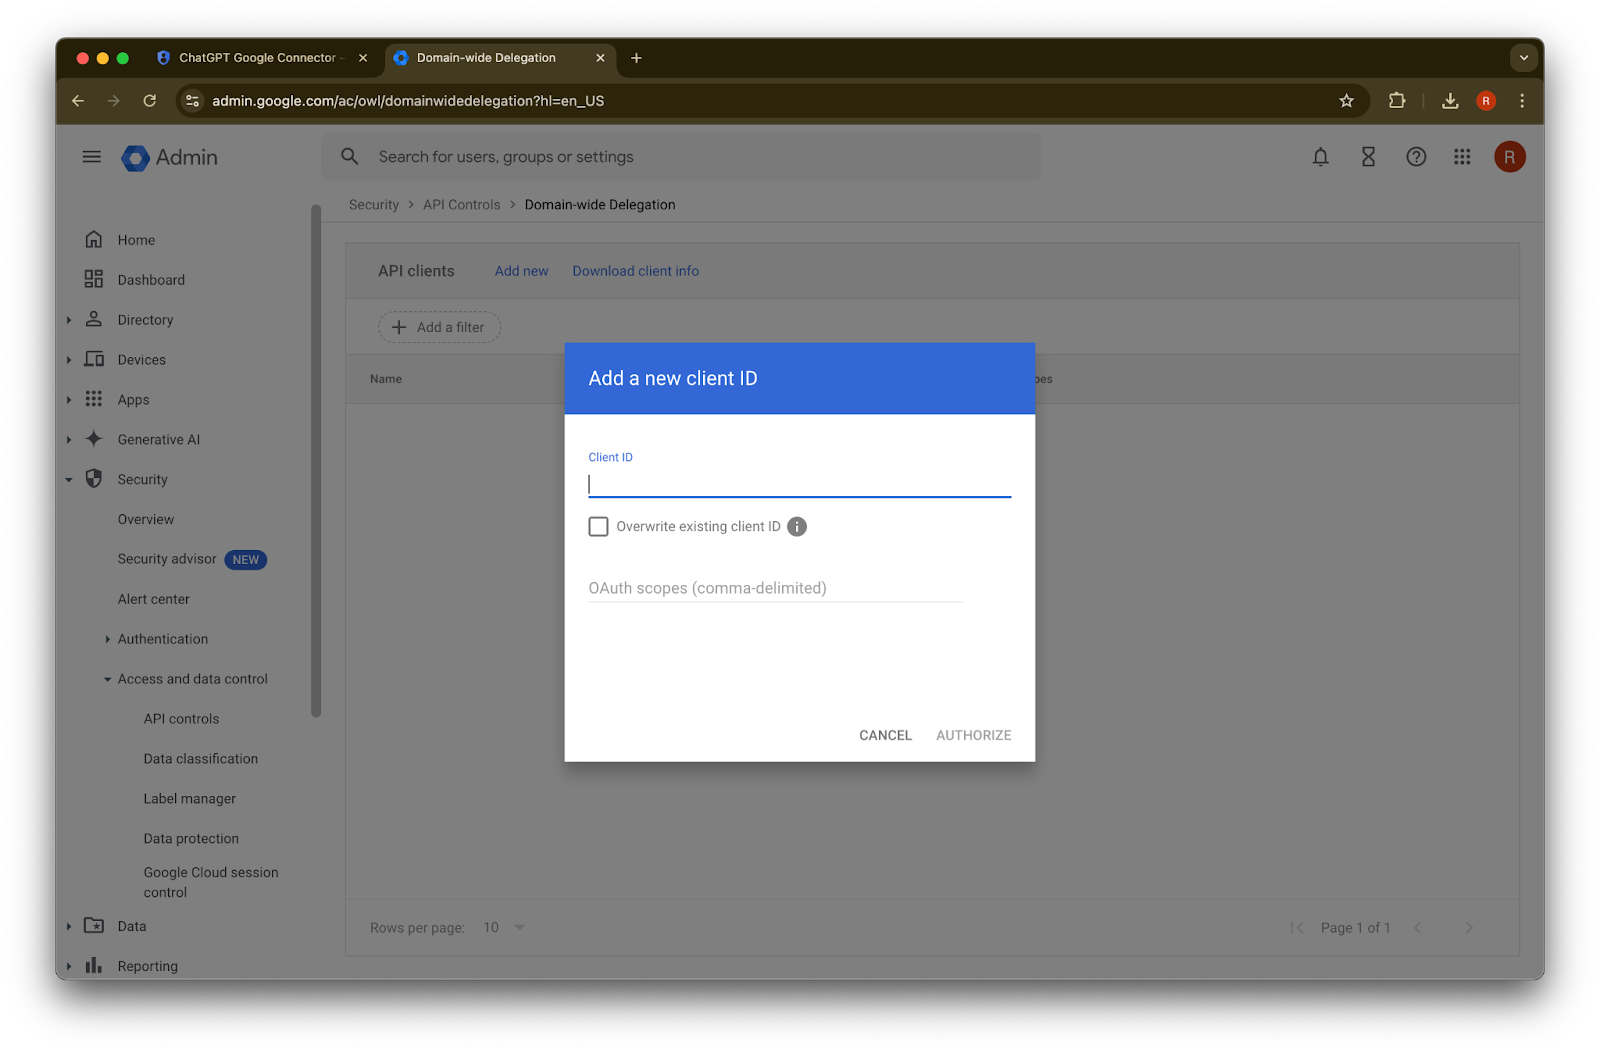
https://www.googleapis.com/auth/admin.directory.group.readonly, https://www.googleapis.com/auth/admin.directory.group.member.readonly, https://www.googleapis.com/auth/admin.directory.user.readonly, https://www.googleapis.com/auth/admin.directory.user.alias.readonly, https://www.googleapis.com/auth/drive.activity.readonly, https://www.googleapis.com/auth/drive.metadata.readonly, https://www.googleapis.com/auth/drive.readonly, https://www.googleapis.com/auth/userinfo.profile, https://www.googleapis.com/auth/userinfo.email| స్కోప్ | రిజనింగ్ |
| admin.directory.group.readonly | group-based permissions ను అమలు చేయడానికి |
| admin.directory.group.member.readonly | group-based permissions ను అమలు చేయడానికి |
| admin.directory.user.alias.readonly | వినియోగదారికి అలియాస్ ద్వారా అనుమతి ఇచ్చిన సందర్భాలను నిర్వహించడానికి |
| drive.activity.readonly | ఫైళ్లలో మార్పులు జరిగినప్పుడు తెలియజేయడానికి |
| drive.metadata.readonly | ఫైల్ కంటెంట్ మరియు అనుబంధ metadata ను sync చేయడానికి (ఉదా. last modified date) |
| drive.readonly | ఫైల్ కంటెంట్ మరియు అనుబంధ metadata ను sync చేయడానికి (ఉదా. last modified date) |
| userinfo.profile | ఎవరి కోసం మేము ఫైళ్లను sync చేస్తున్నామో నిర్ణయించడానికి |
| userinfo.email | ఎవరి కోసం మేము ఫైళ్లను sync చేస్తున్నామో నిర్ణయించడానికి |
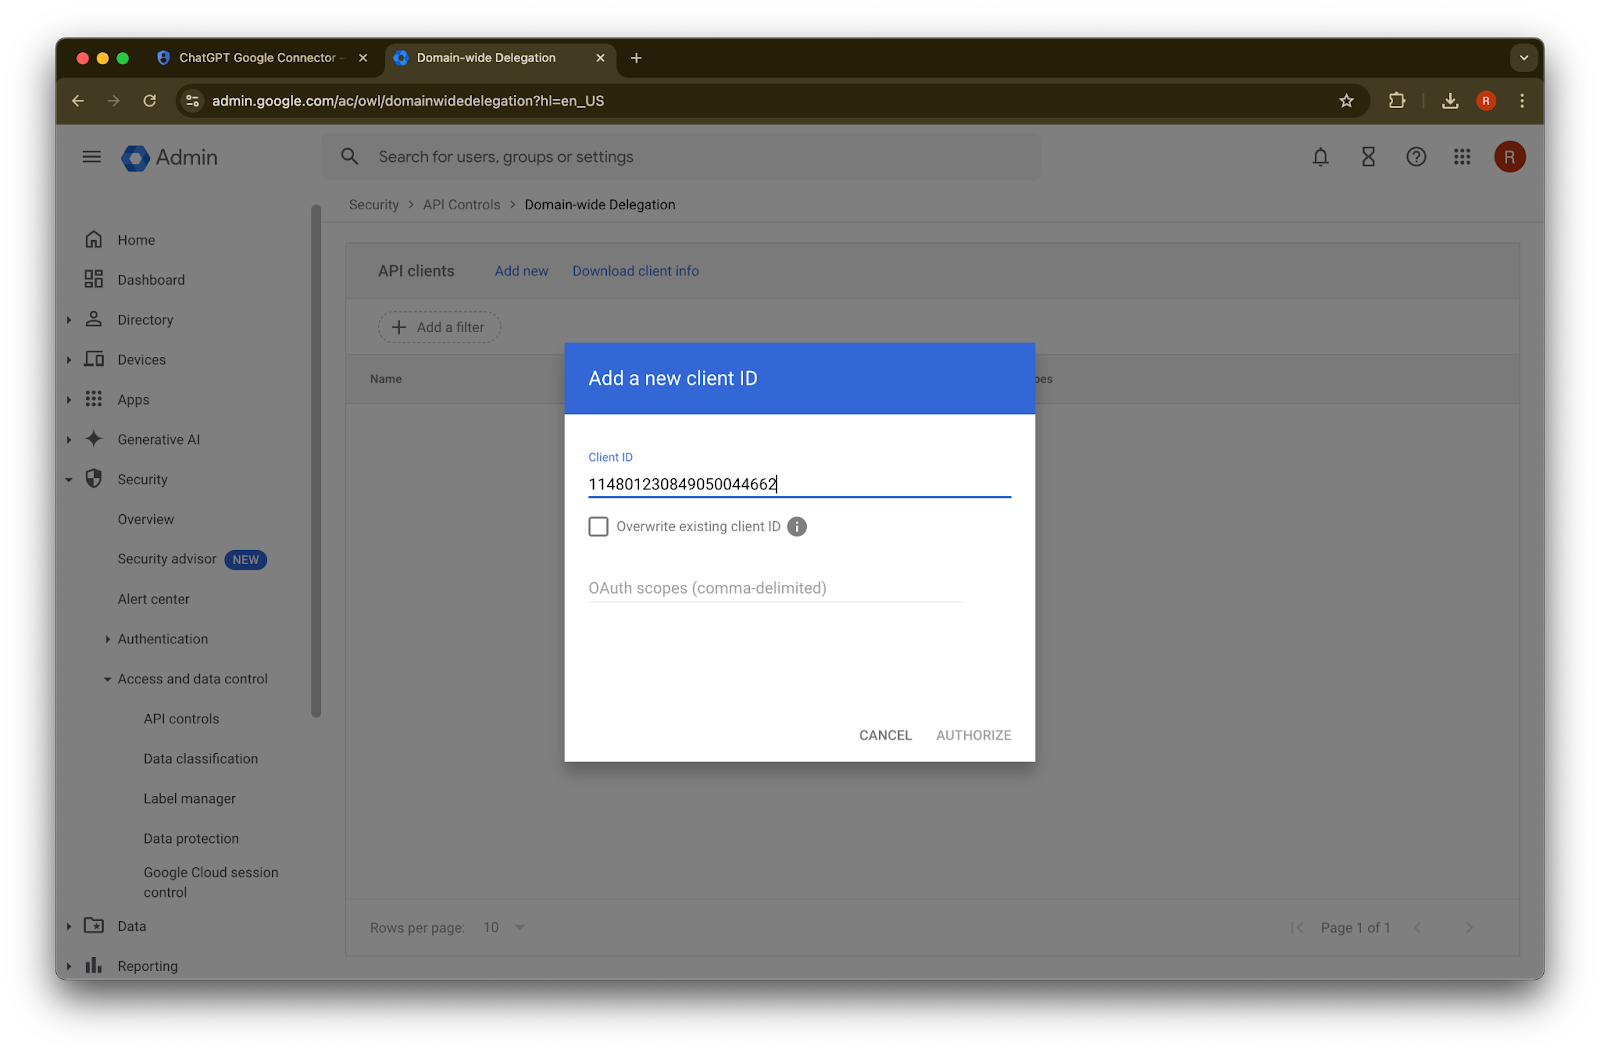
45. Authorize పై క్లిక్ చేయండి.
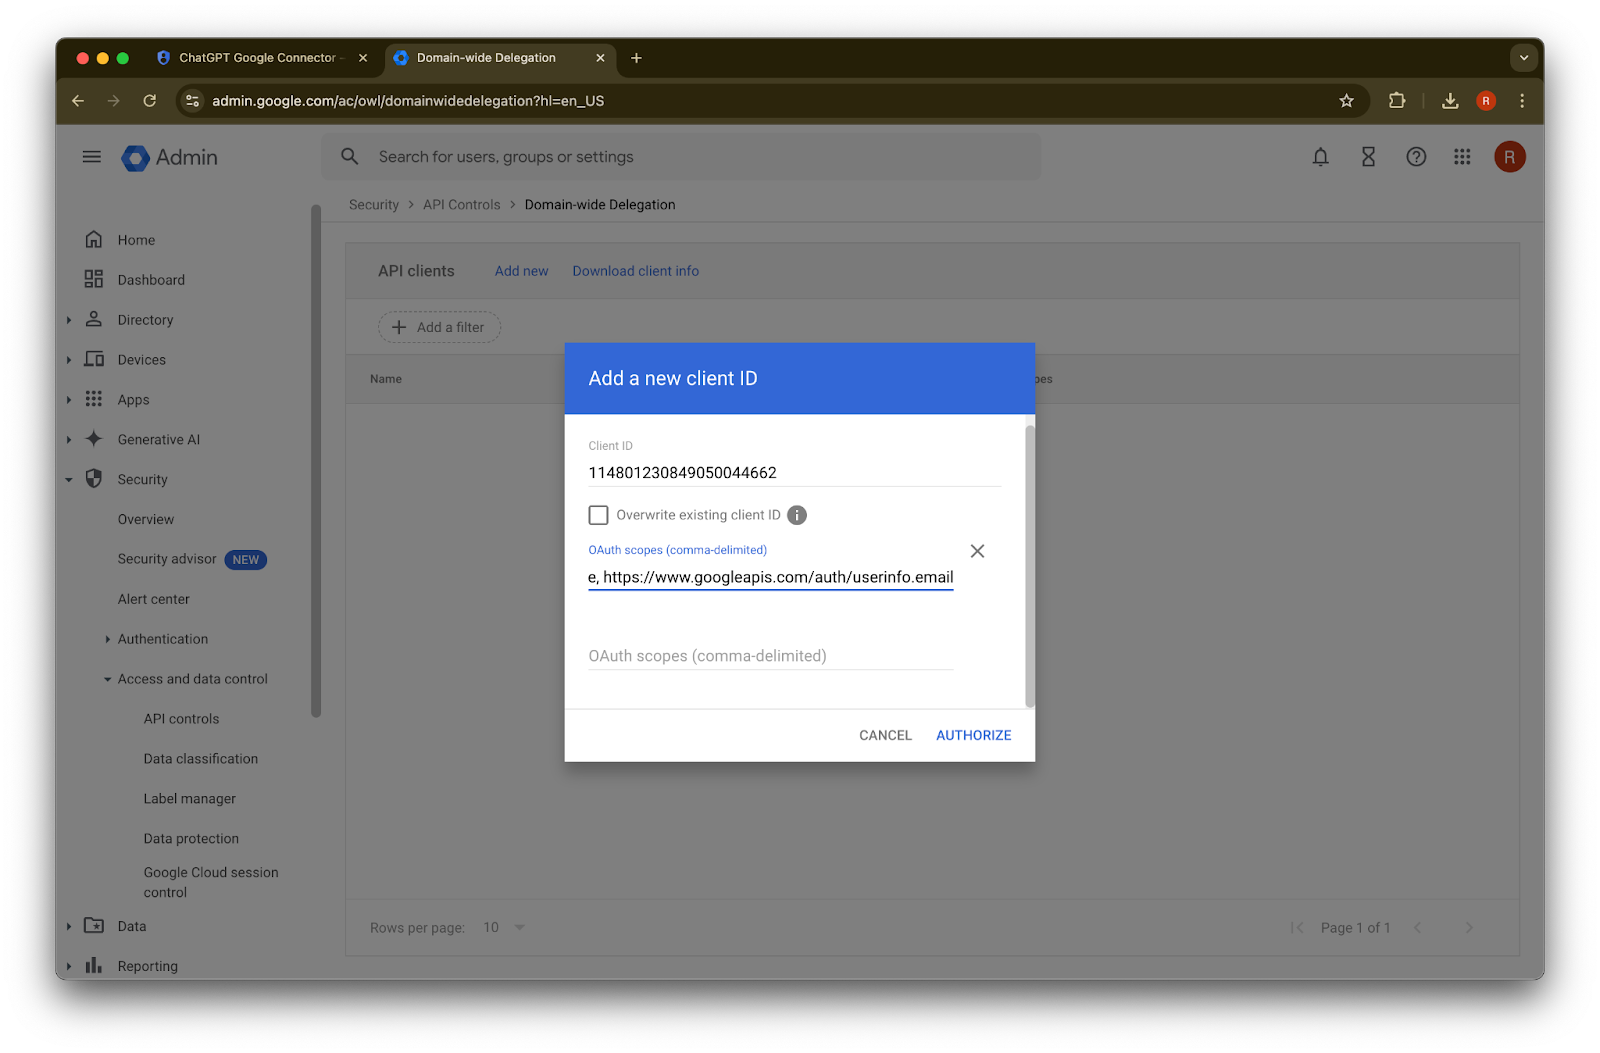
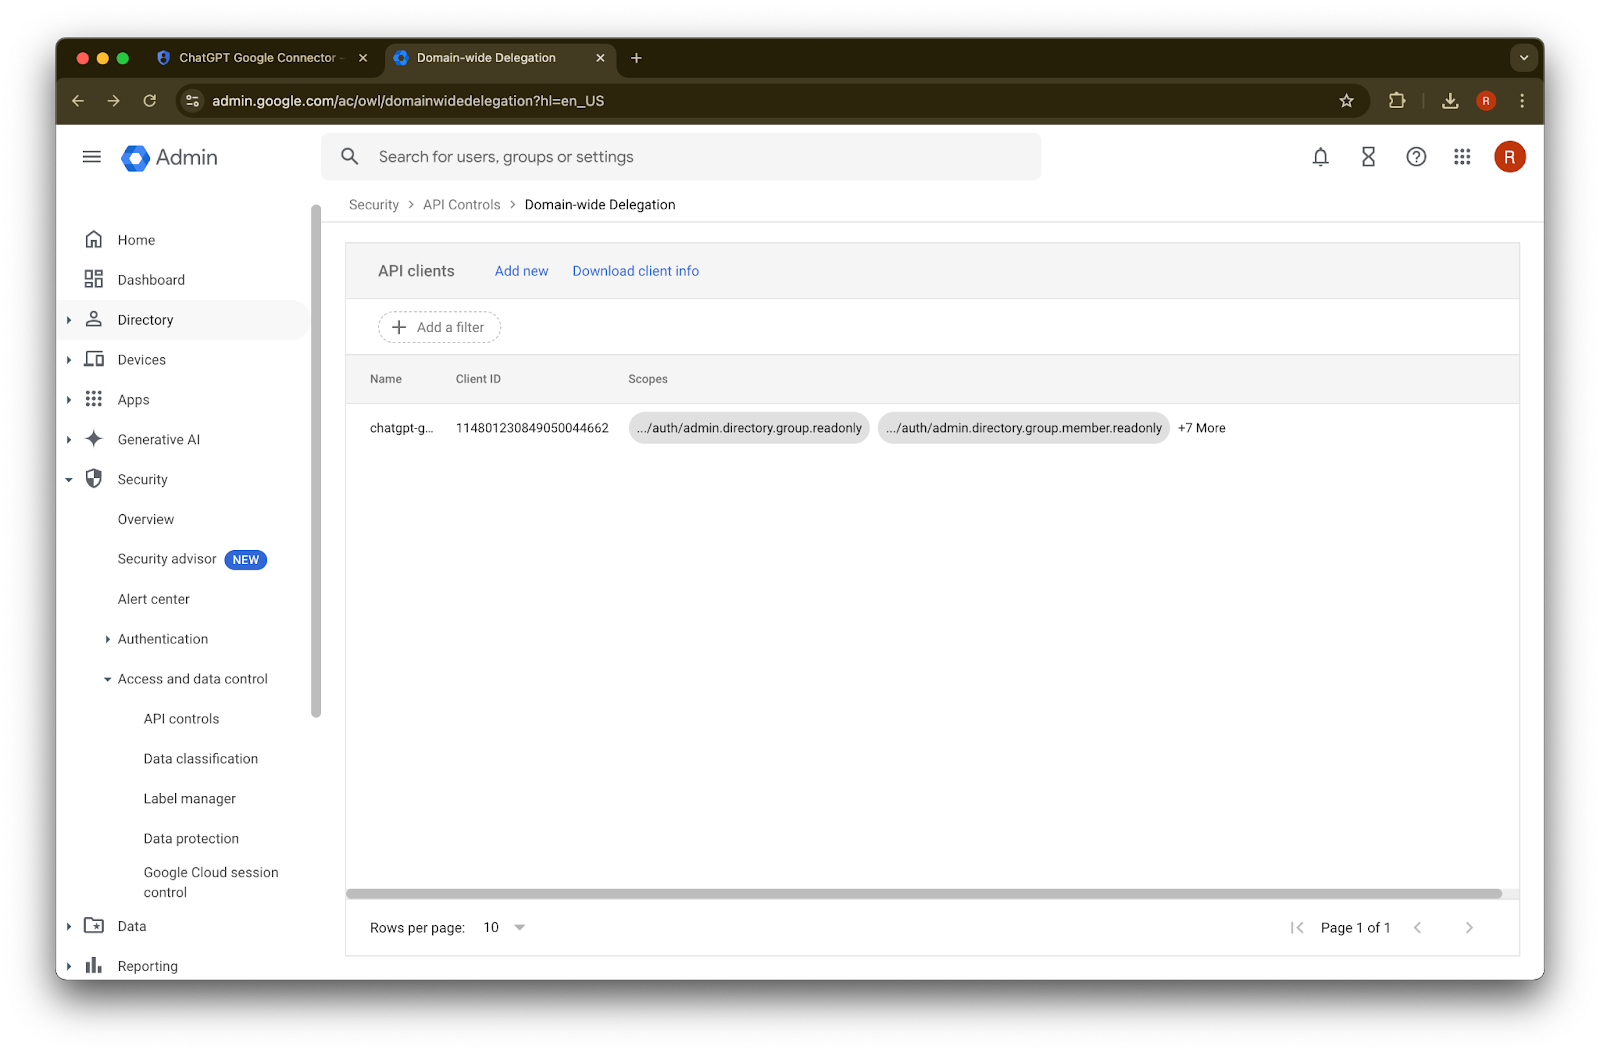
46. విజయవంతం అయింది.
అడ్మిన్ అకౌంట్ సెటప్ చేయడం
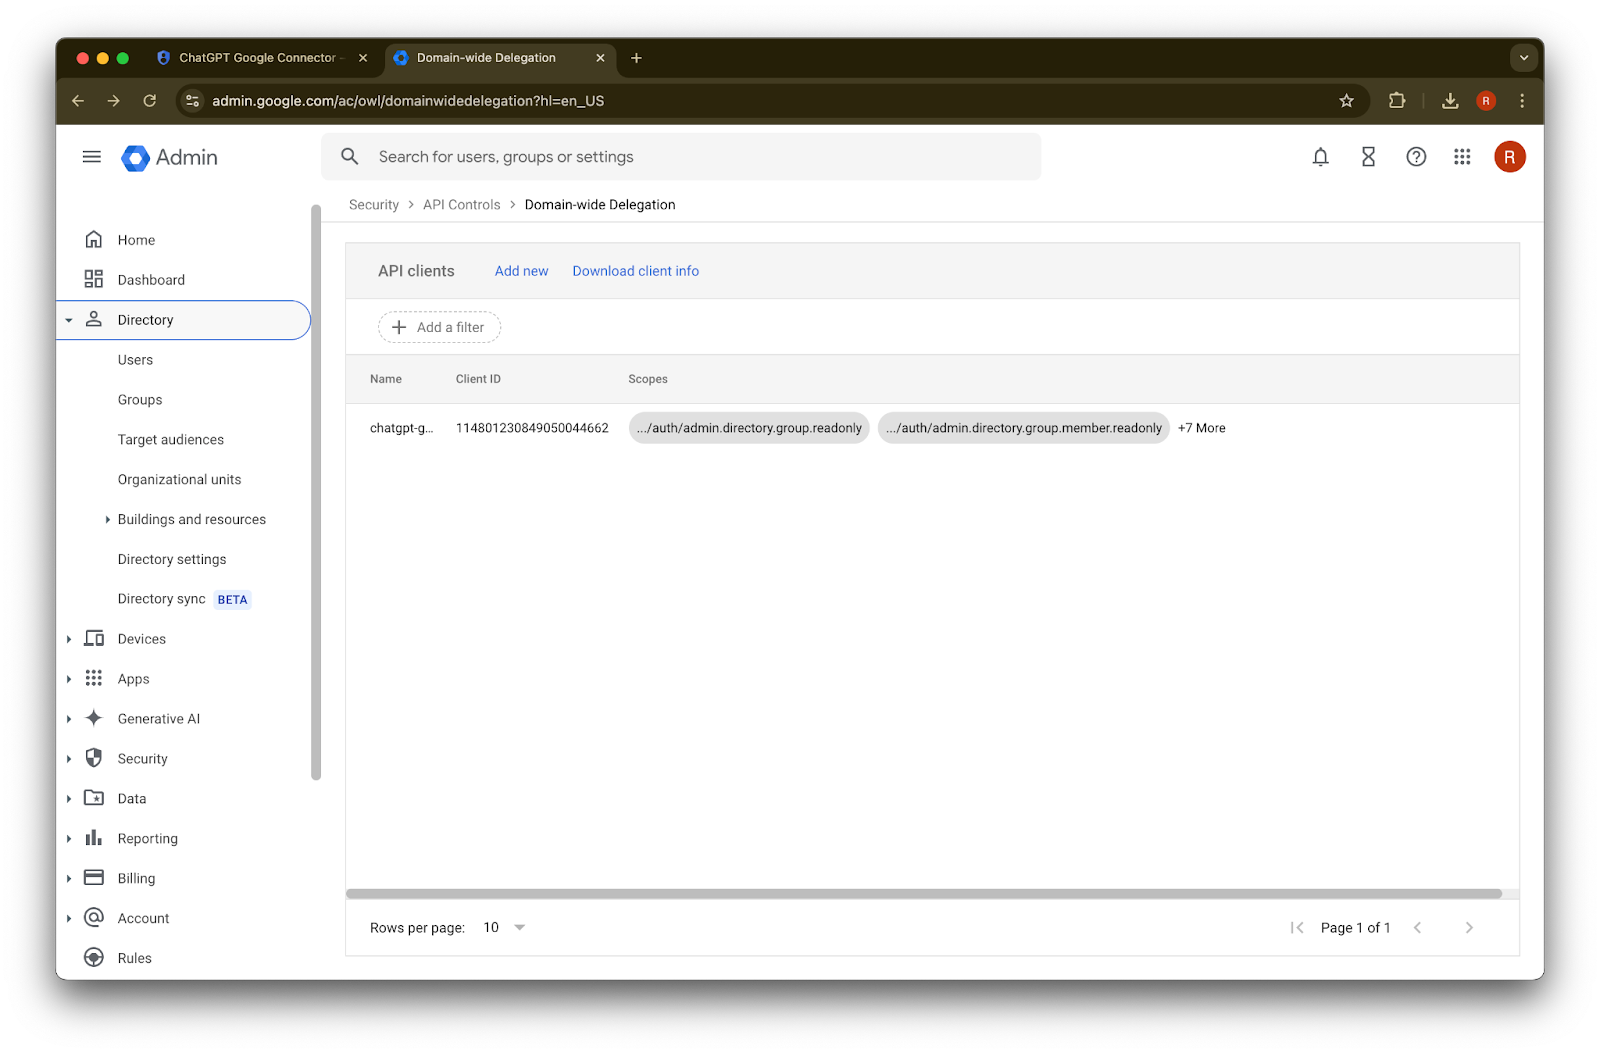
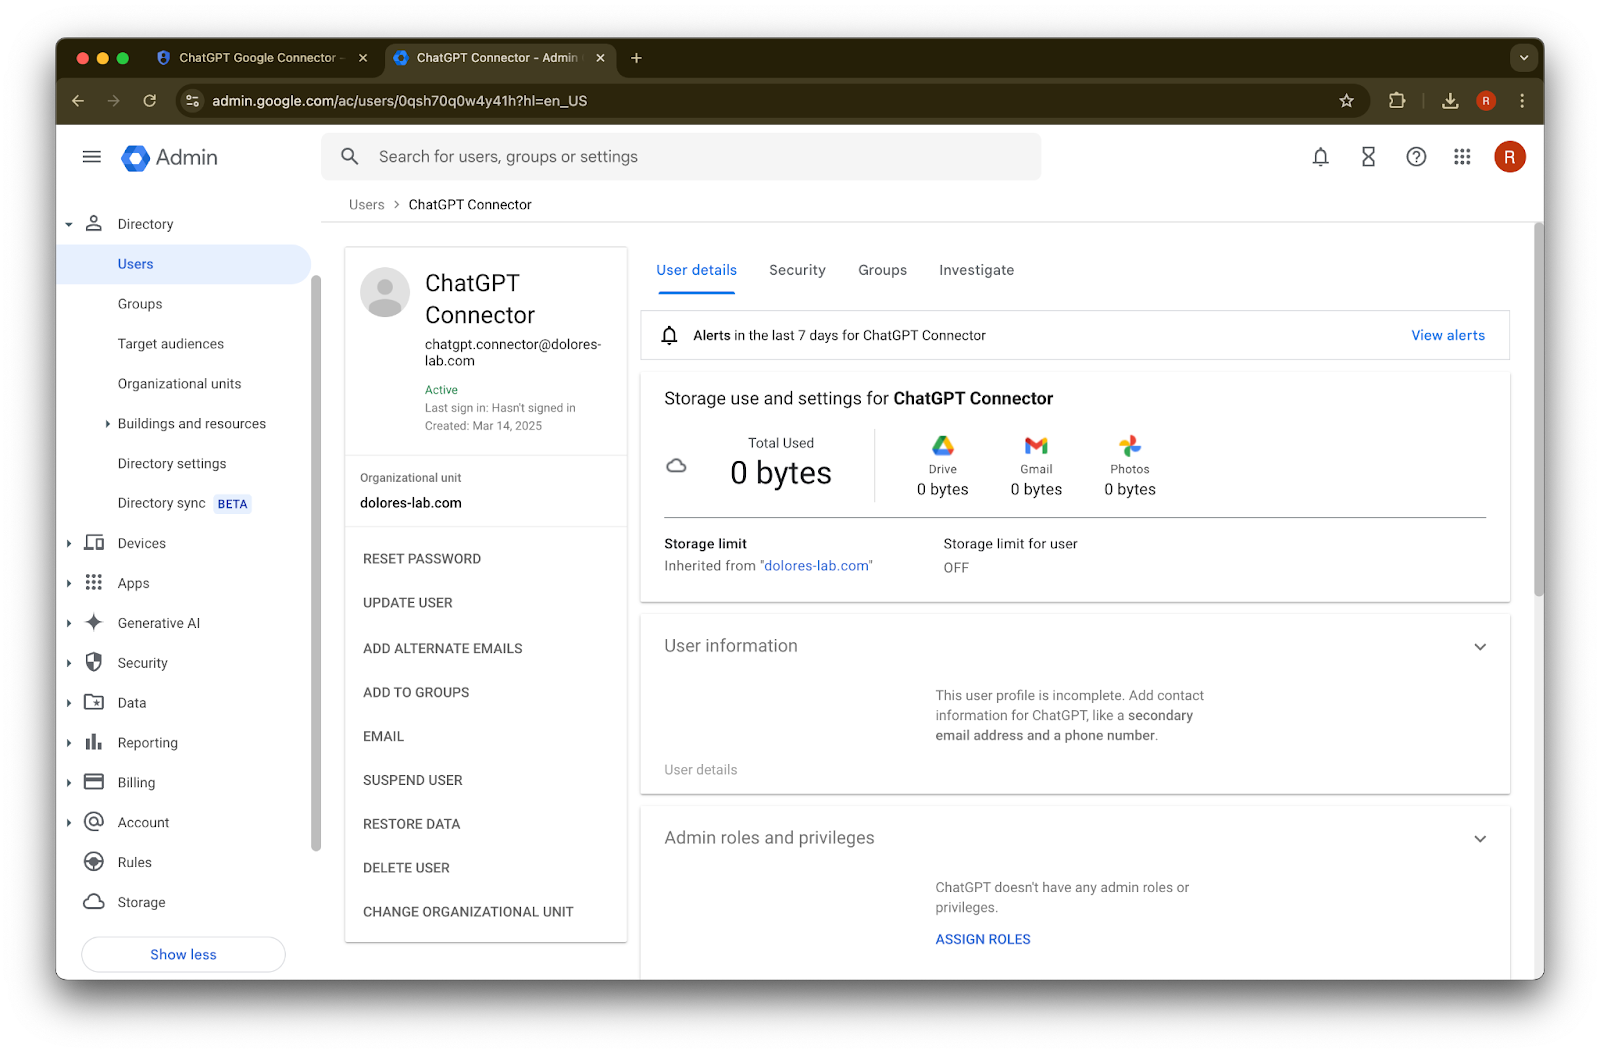
Directory ను విస్తరించండి.
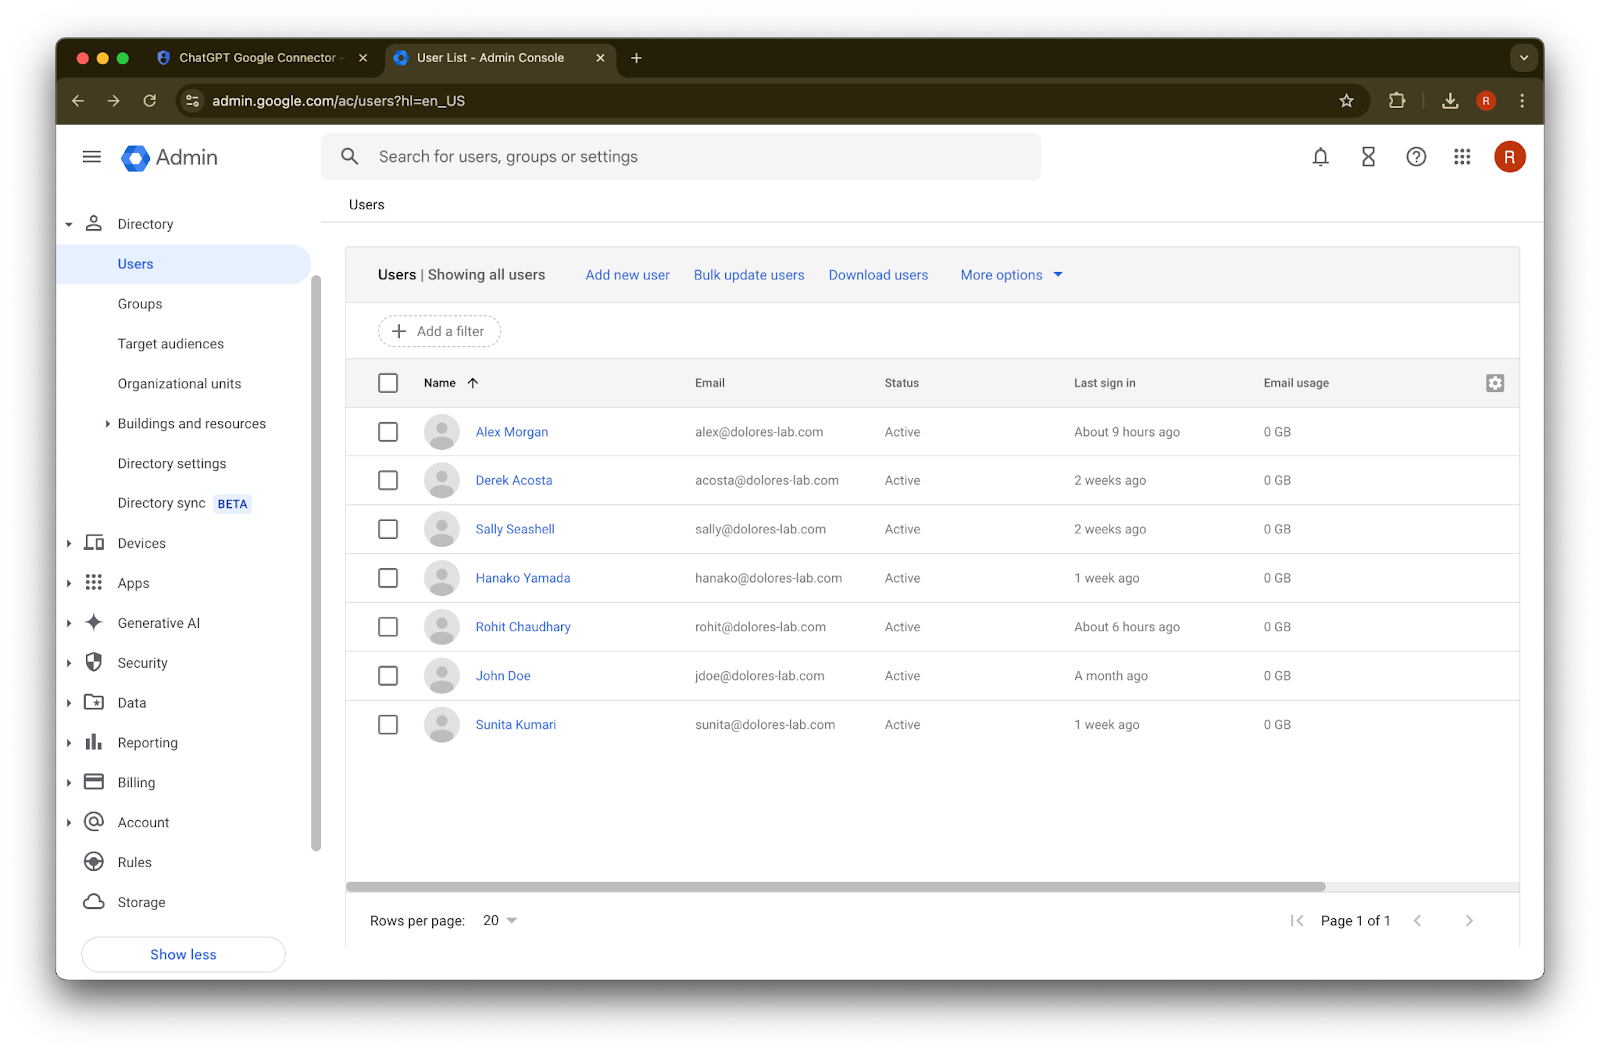
Users పై క్లిక్ చేయండి.
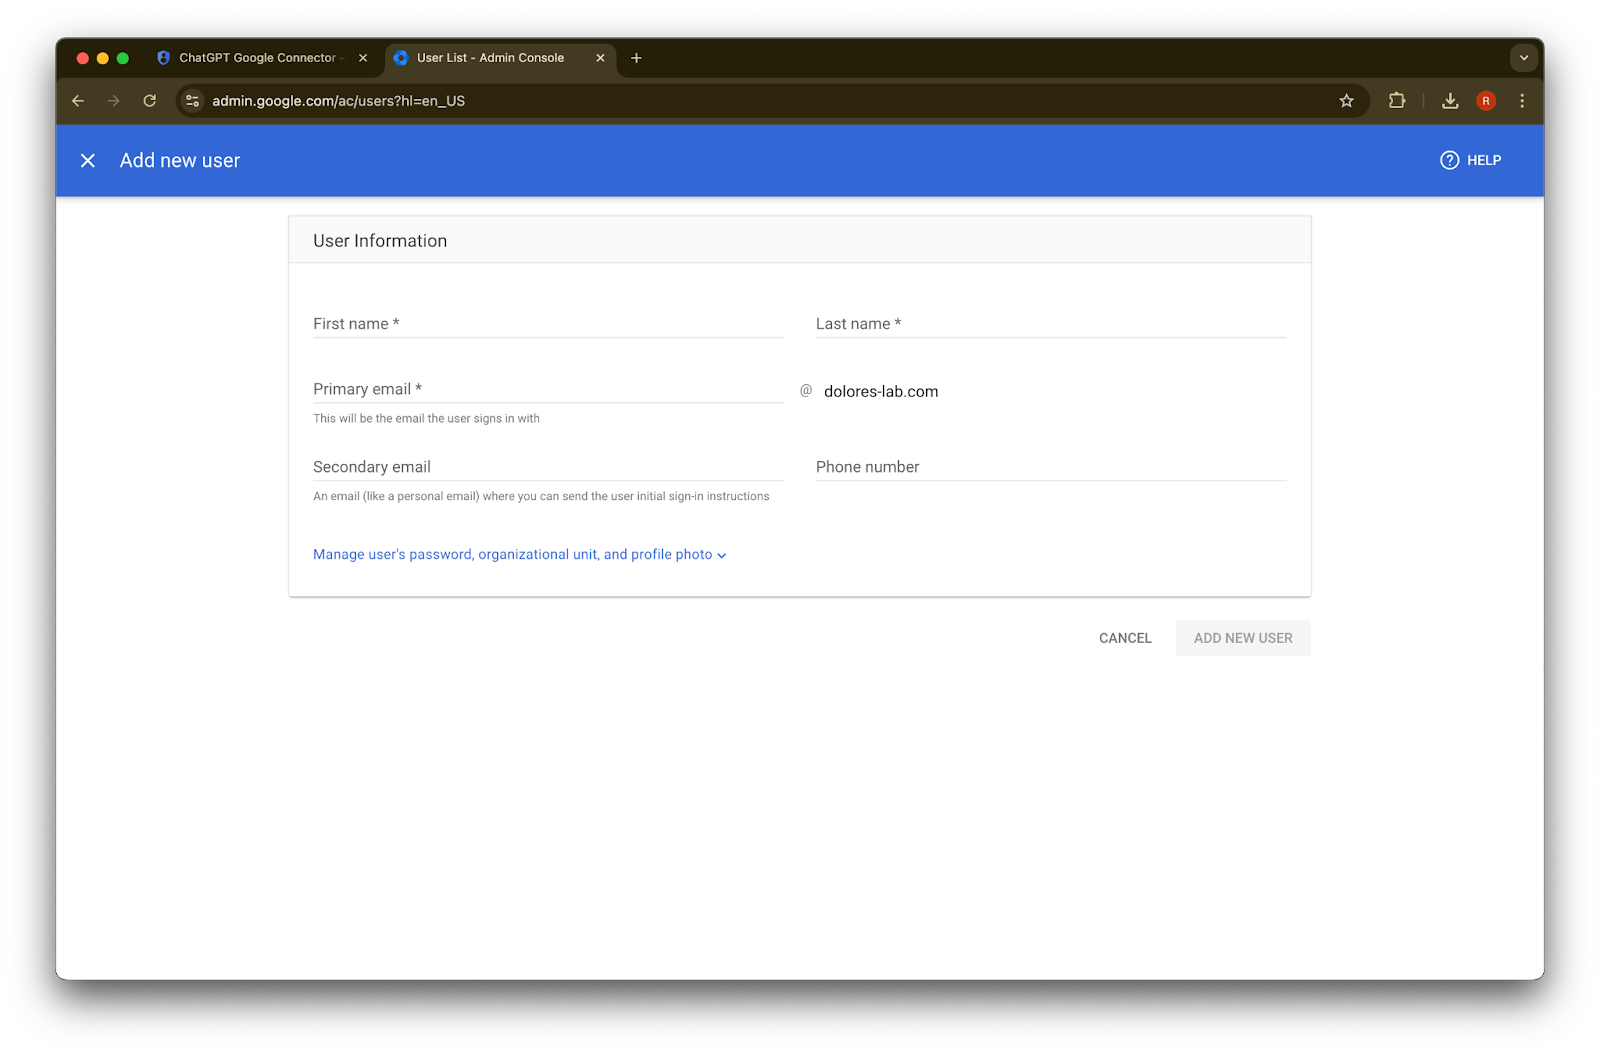
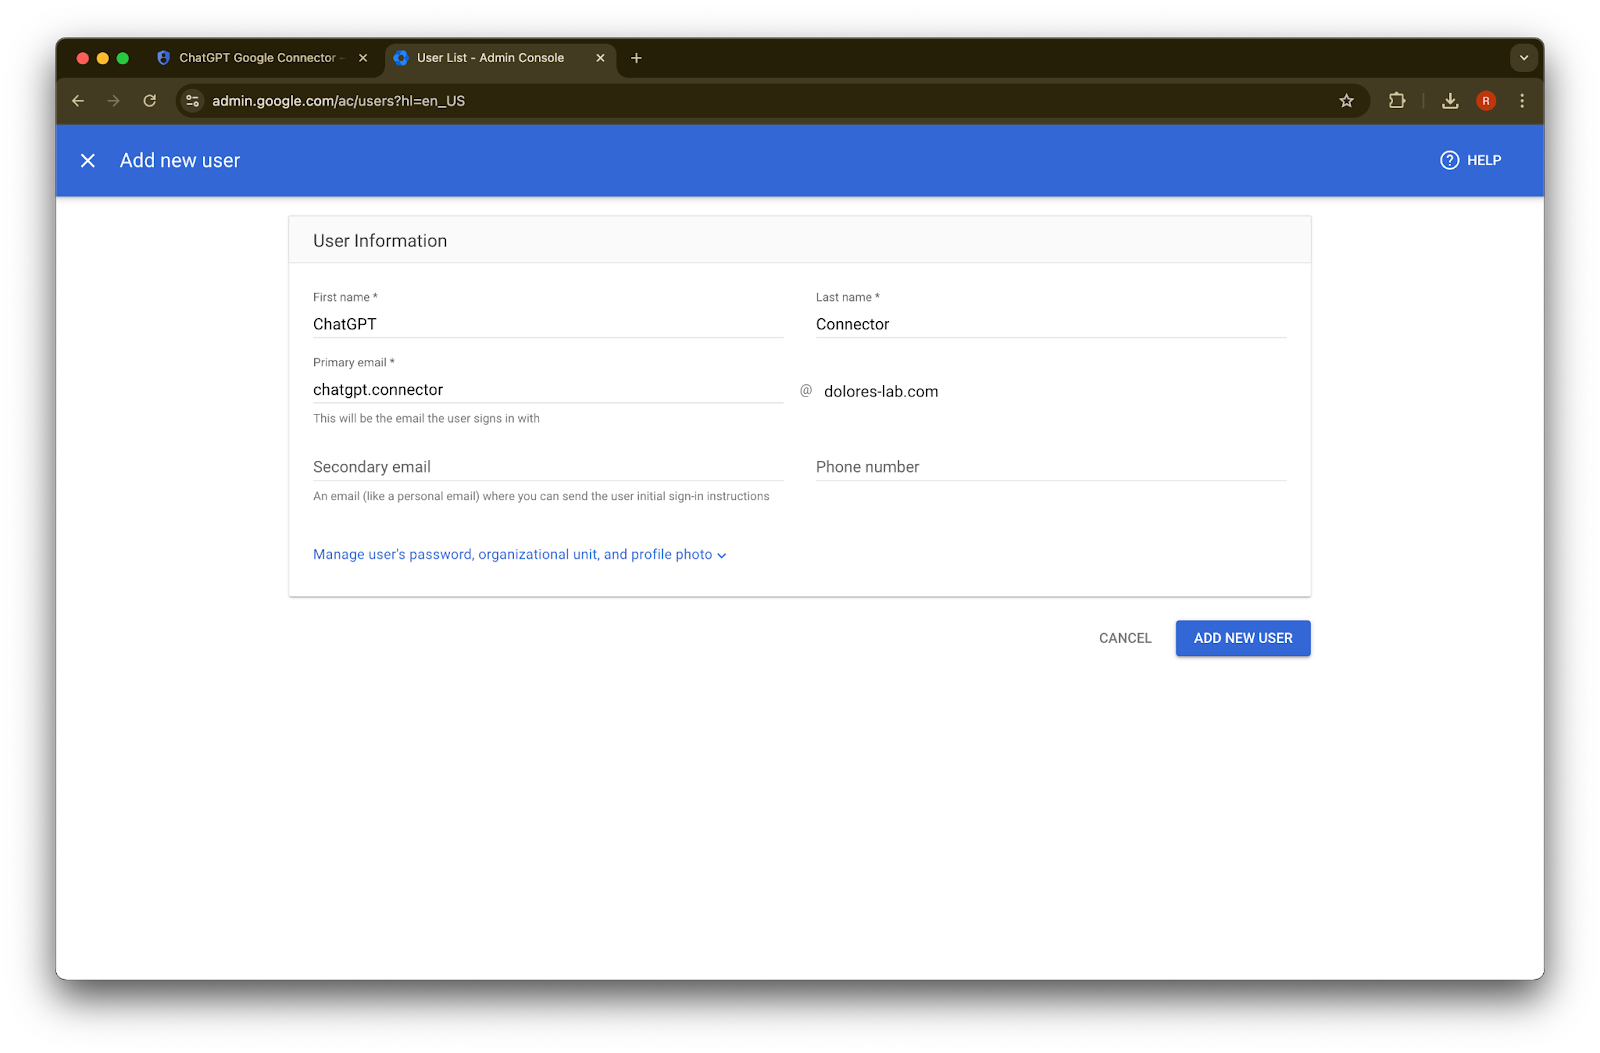
మీకు నచ్చిన first name, last name, మరియు primary email address ను ఇవ్వండి.
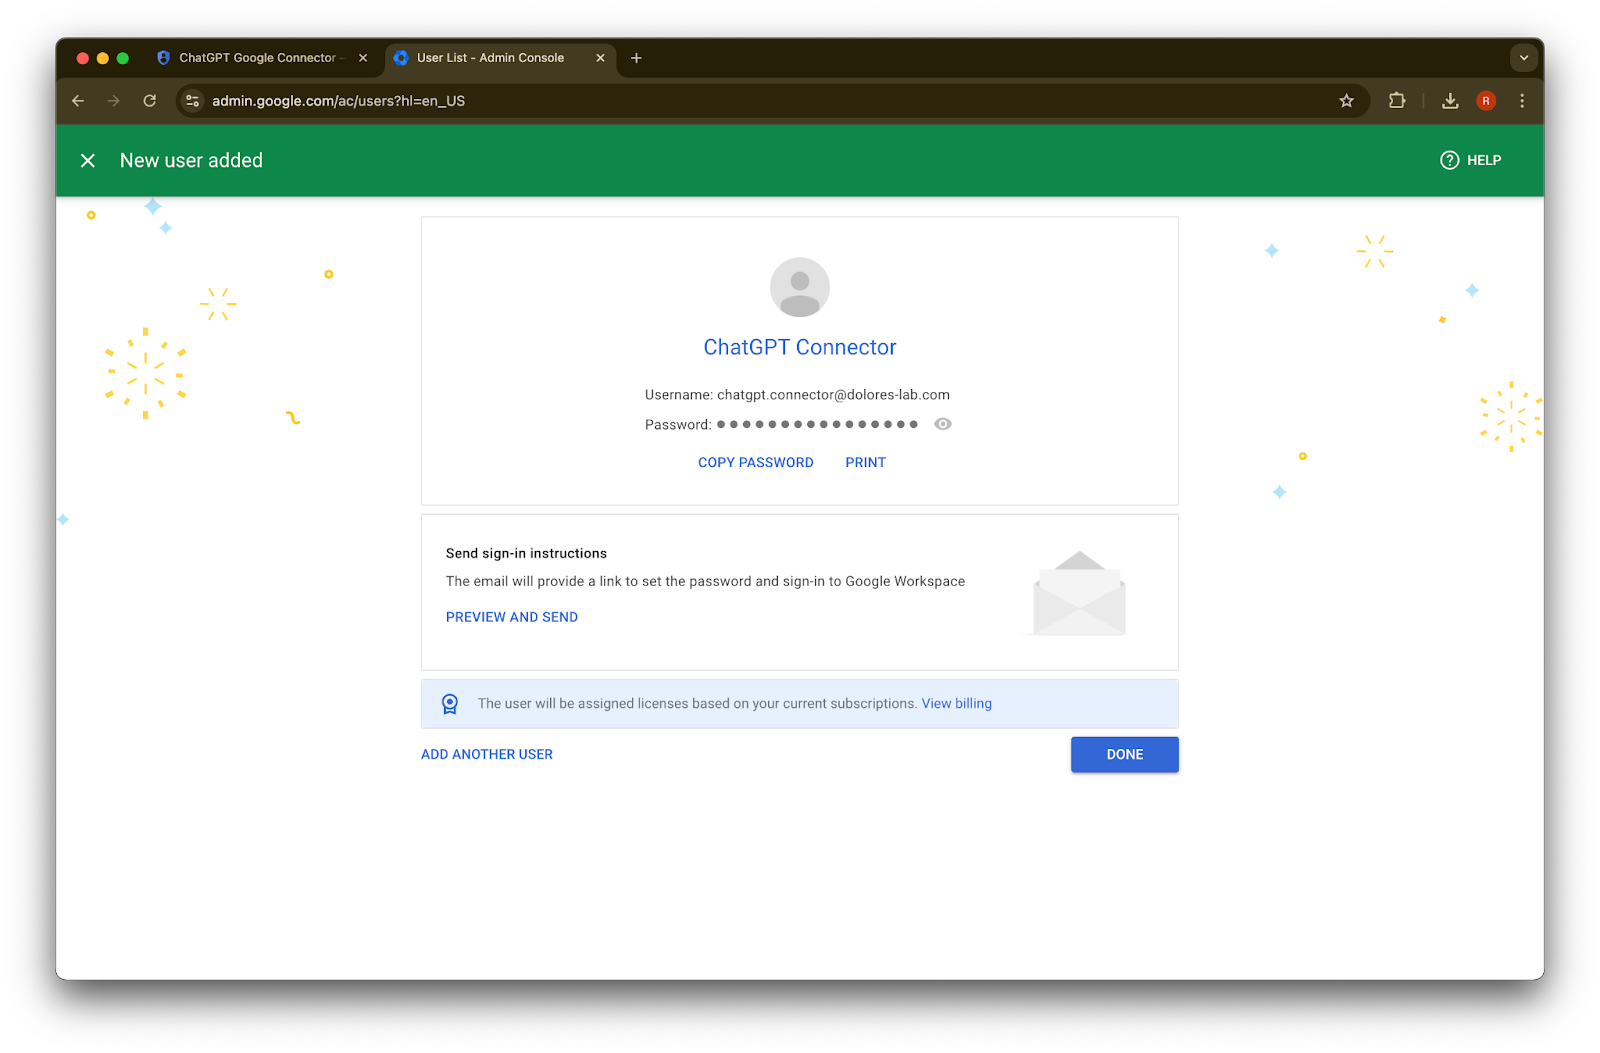
Add new user
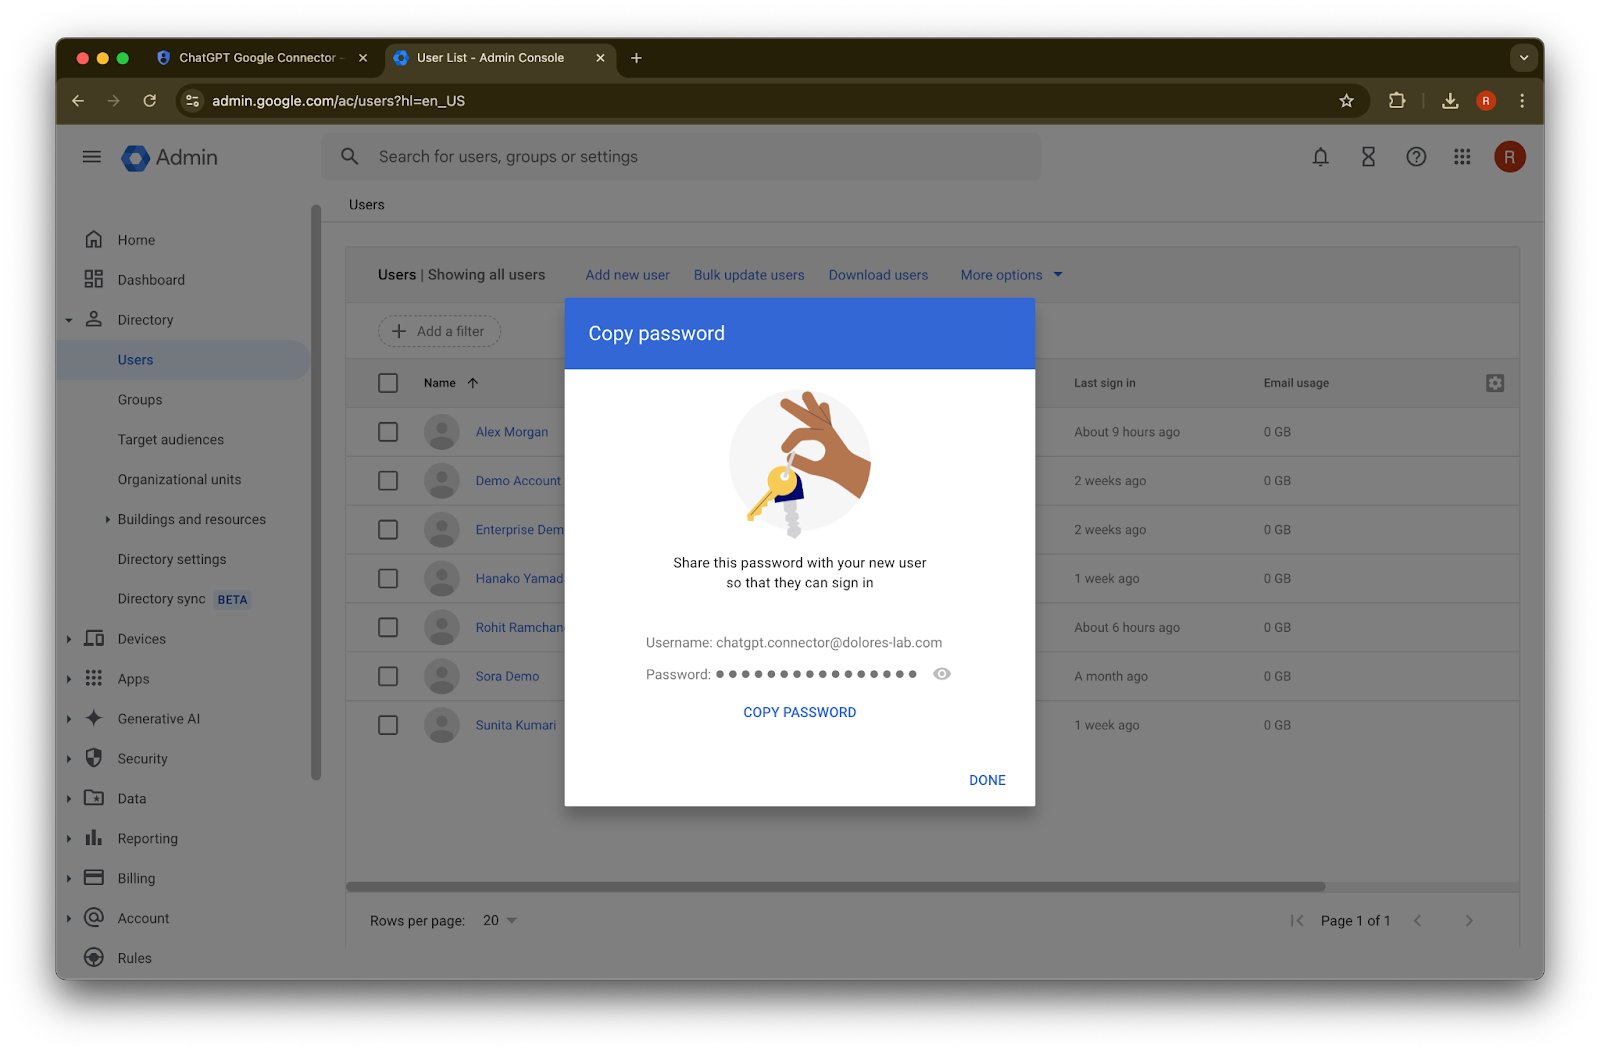
పై క్లిక్ చేయండి.(Optional) ఈ credentials ను నమోదు చేసుకోండి. ChatGPT కు ఈ credentials అవసరం లేదు.
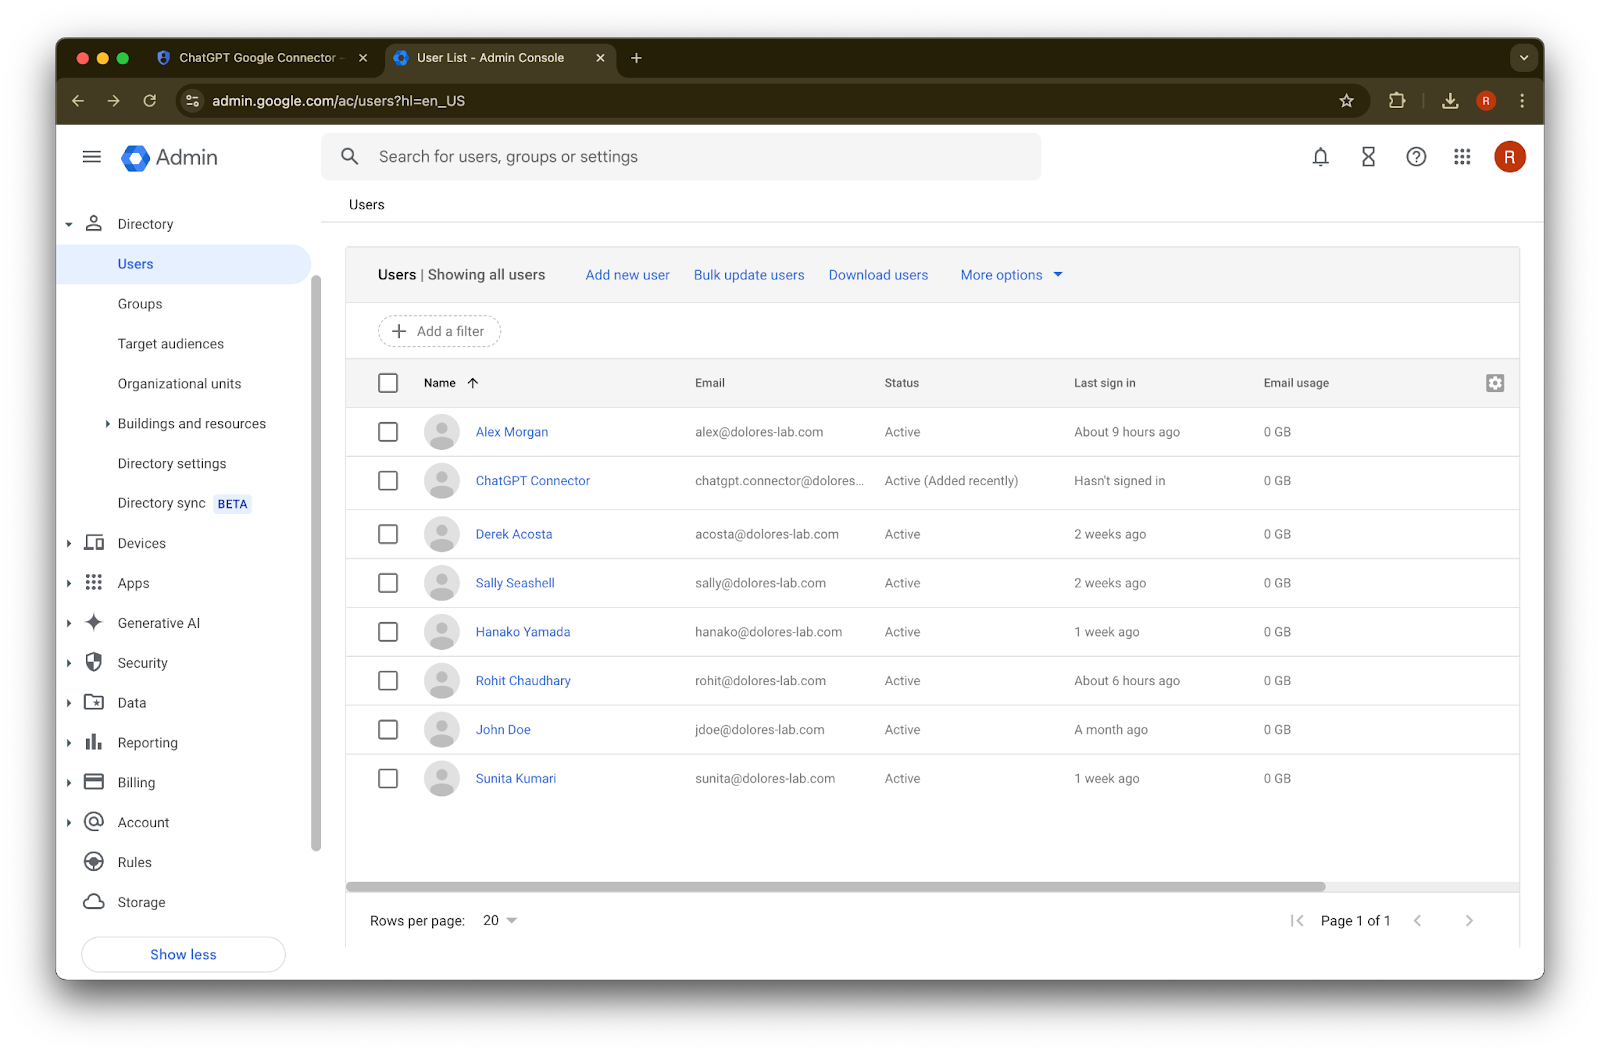
Done పై క్లిక్ చేయండి.
మీరు ఇప్పుడే సృష్టించిన account పై క్లిక్ చేయండి. అది జాబితాలో కనిపించకపోతే, పేజీని refresh చేయండి లేదా cache మరియు cookies ను clear చేసి మళ్లీ ప్రయత్నించండి.
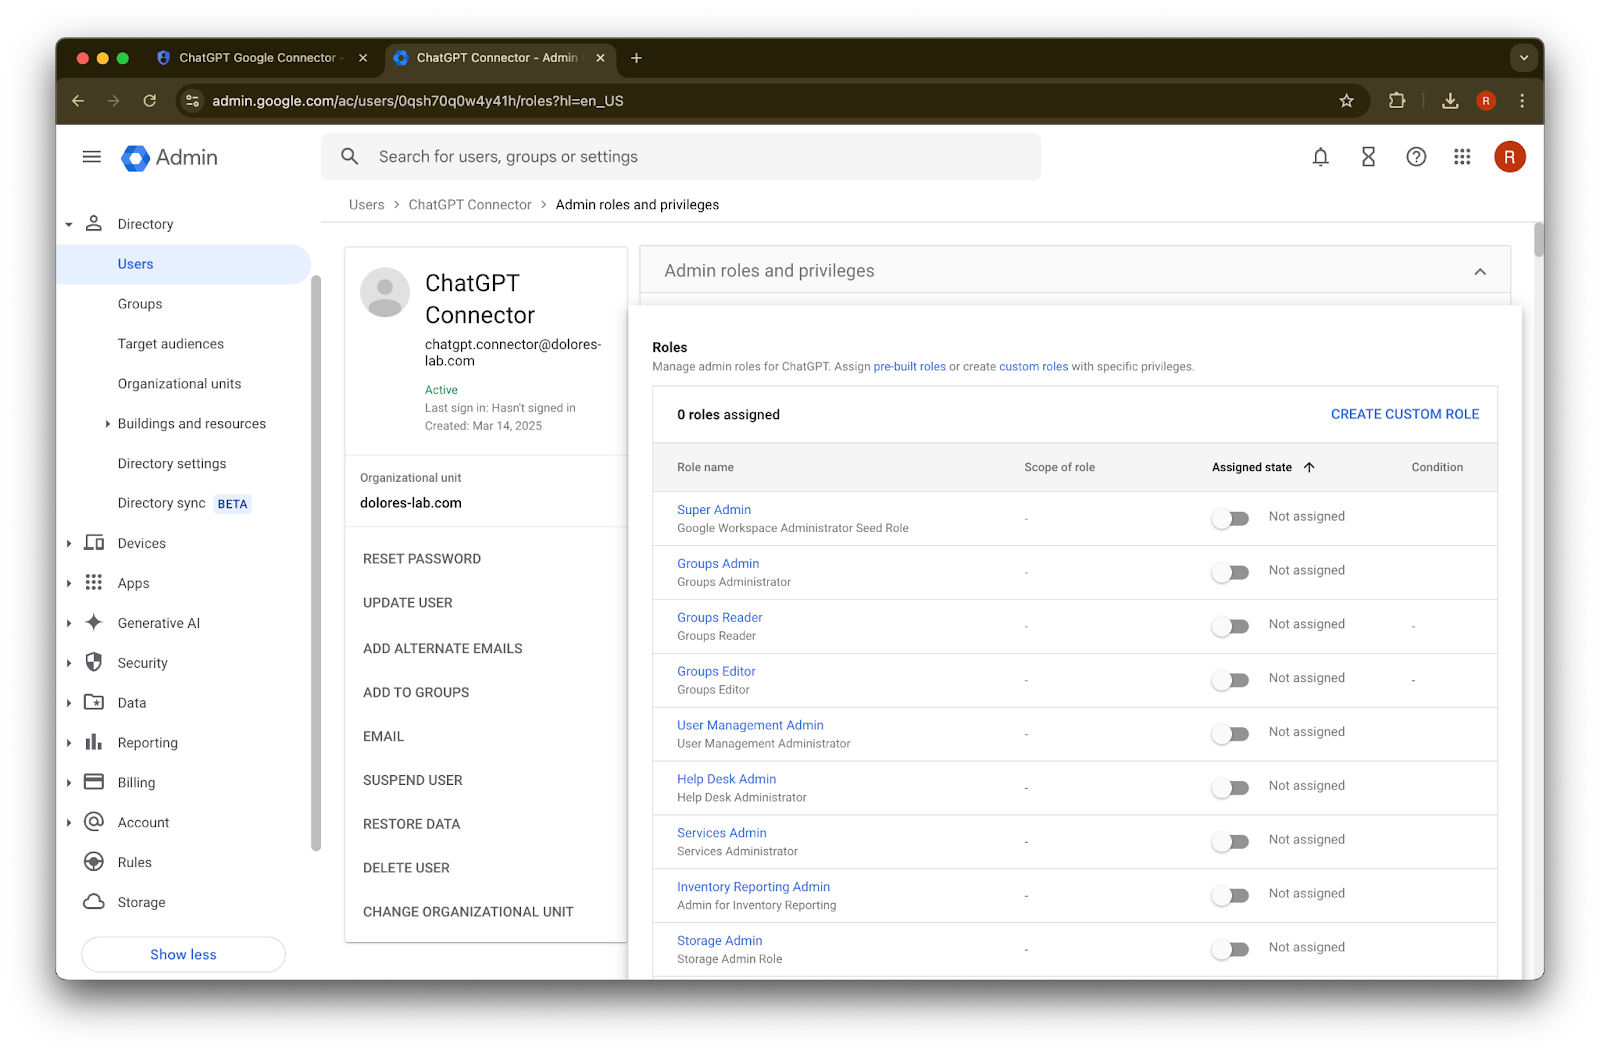
assign roles పై క్లిక్ చేయండి.
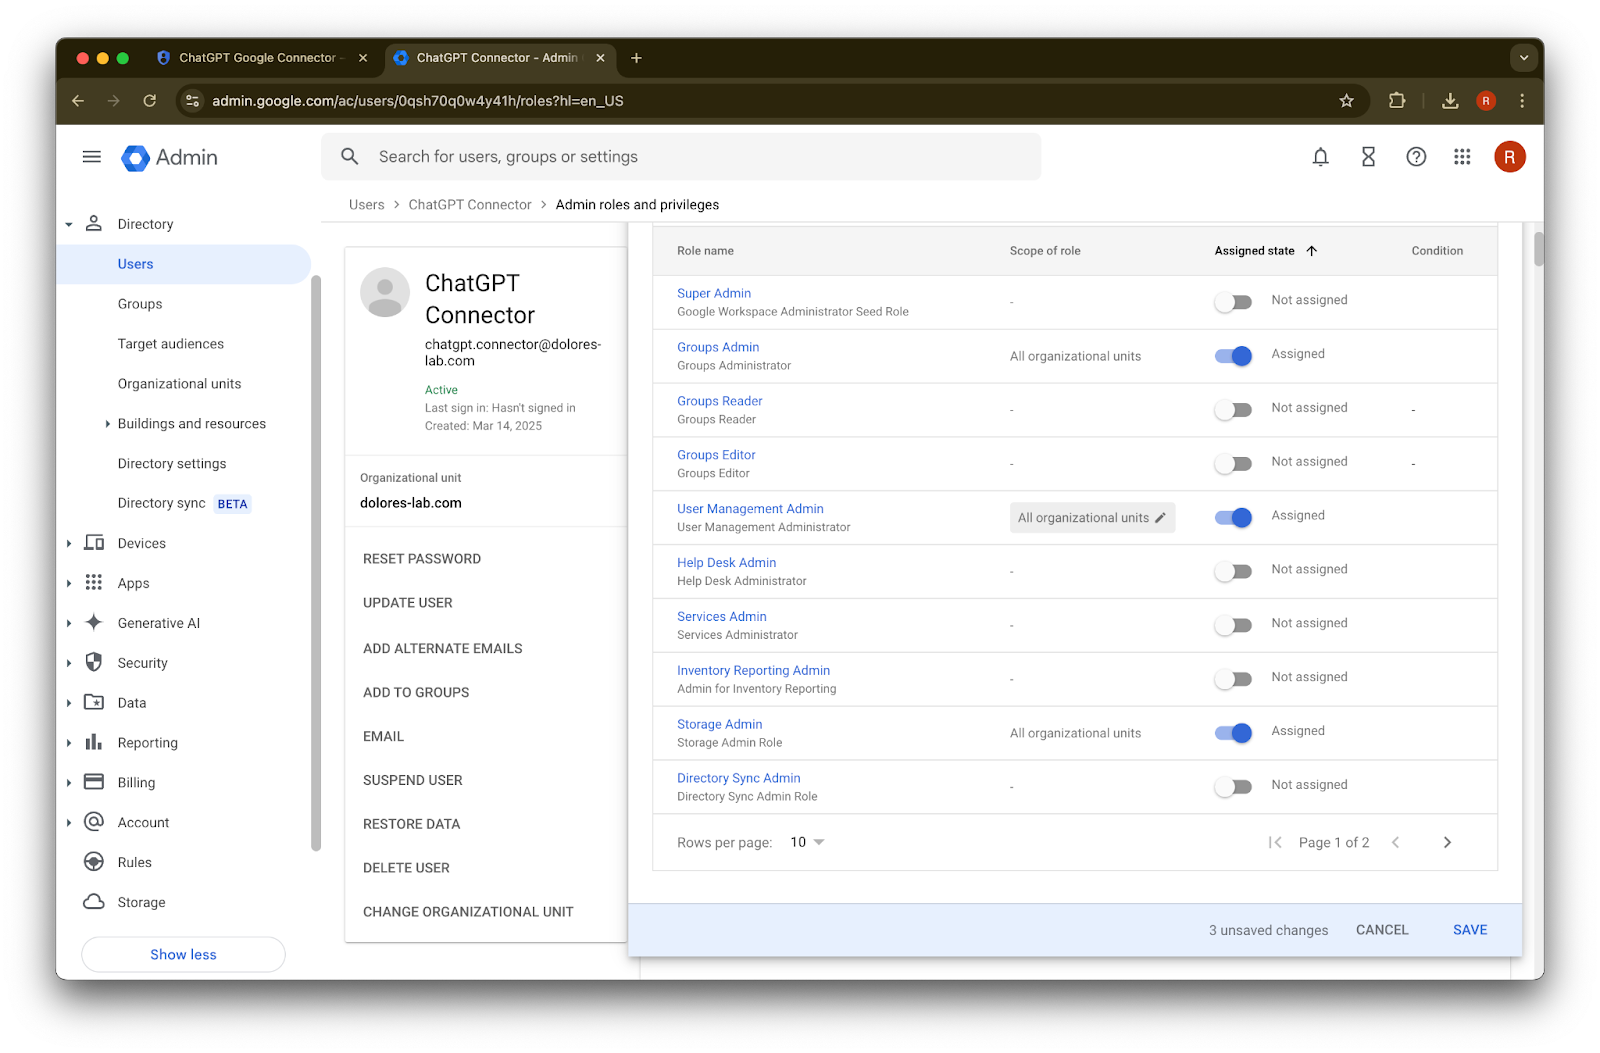
Groups Reader, User Management Admin, మరియు Storage Admin roles ను on చేయండి.
క్రిందికి స్క్రోల్ చేసి Save. పై క్లిక్ చేయండి. అడ్మిన్ అకౌంట్ ఇప్పుడు విజయవంతంగా సృష్టించబడి కాన్ఫిగర్ చేయబడింది.
ChatGPT అడ్మిన్ కన్సోల్లో సెటప్ పూర్తి చేయడం
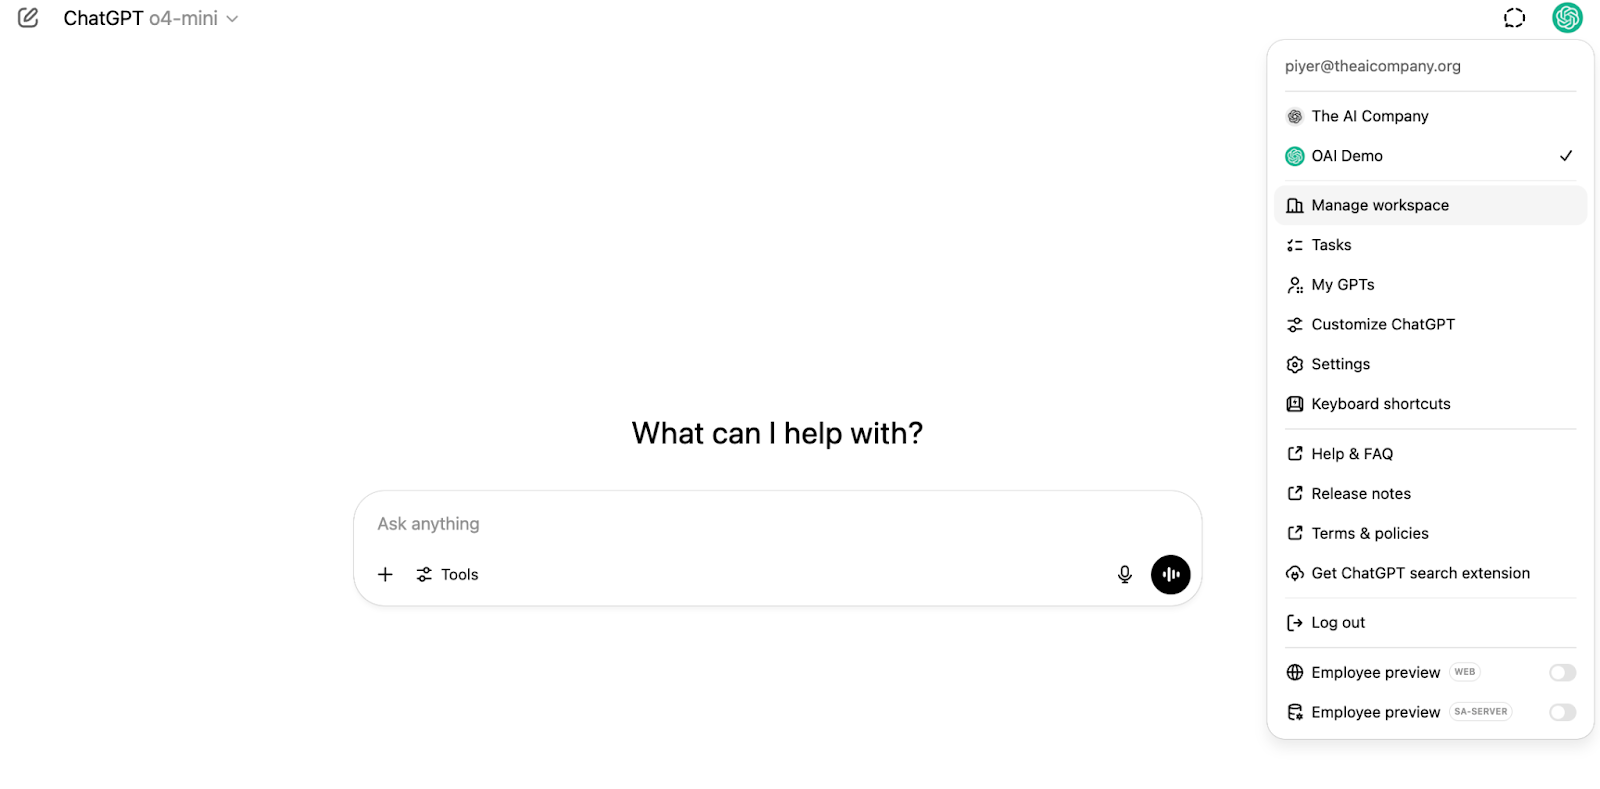
ChatGPT కు వెళ్లి, పేజీ పై కుడి మూలలో ఉన్న ప్రొఫైల్ ఐకాన్పై క్లిక్ చేయండి.
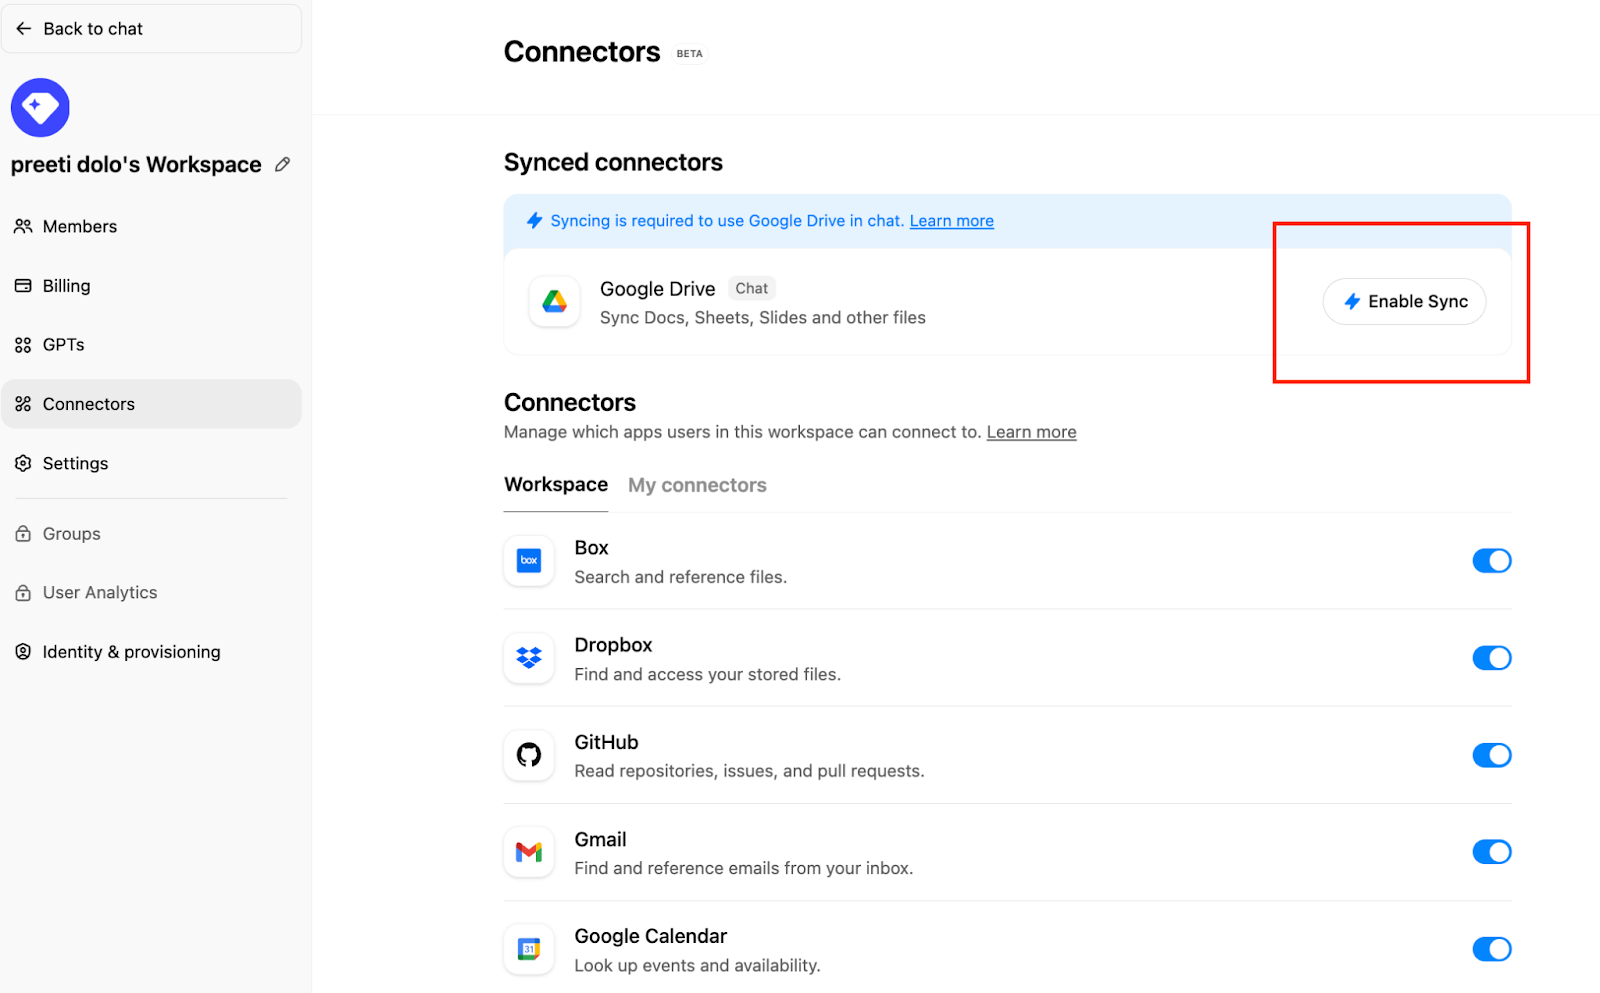
Manage workspace
పై క్లిక్ చేయండి.Connections పై క్లిక్ చేసి, తరువాత ‘Synced connectors’ కింద → Enable Sync పై క్లిక్ చేయండి.
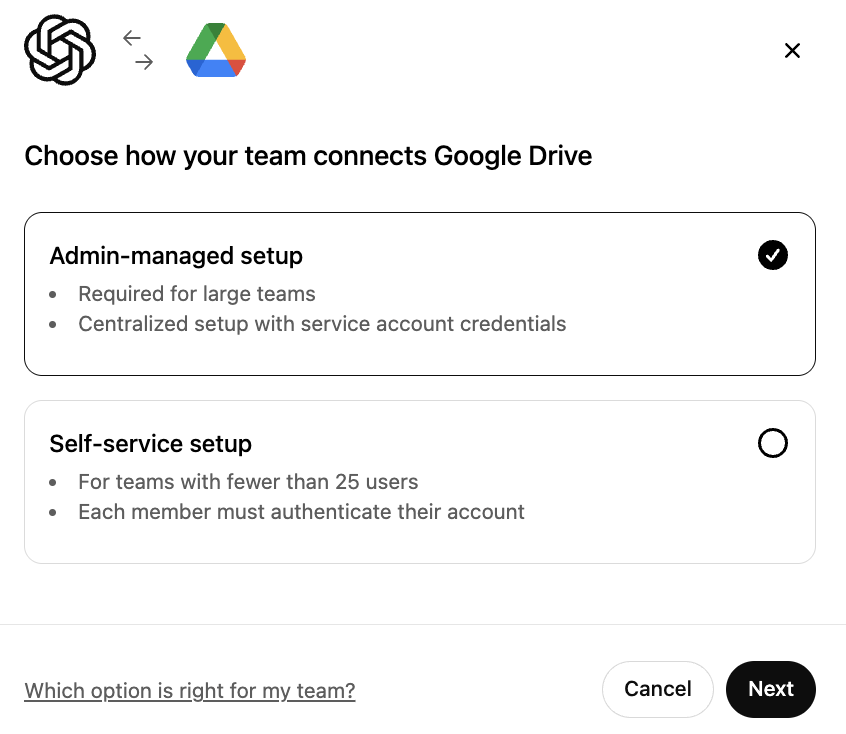
Admin-managed ఎంపికైందో నిర్ధారించుకుని, Nextపై క్లిక్ చేయండి.
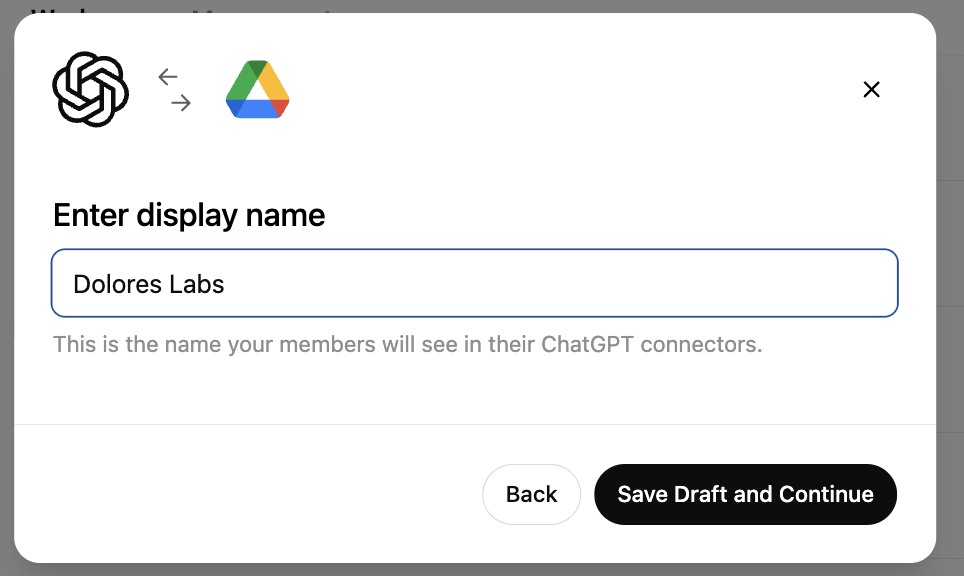
display name నమోదు చేయండి. మీ Google Workspace పేరును ఉపయోగించాలని మేము సిఫారసు చేస్తున్నాం.
దయచేసి గమనించండి, ప్రస్తుతం మీ connection పేరును మార్చడం మేము మద్దతు ఇవ్వడం లేదు.Save Draft and Continueపై క్లిక్ చేయండి.
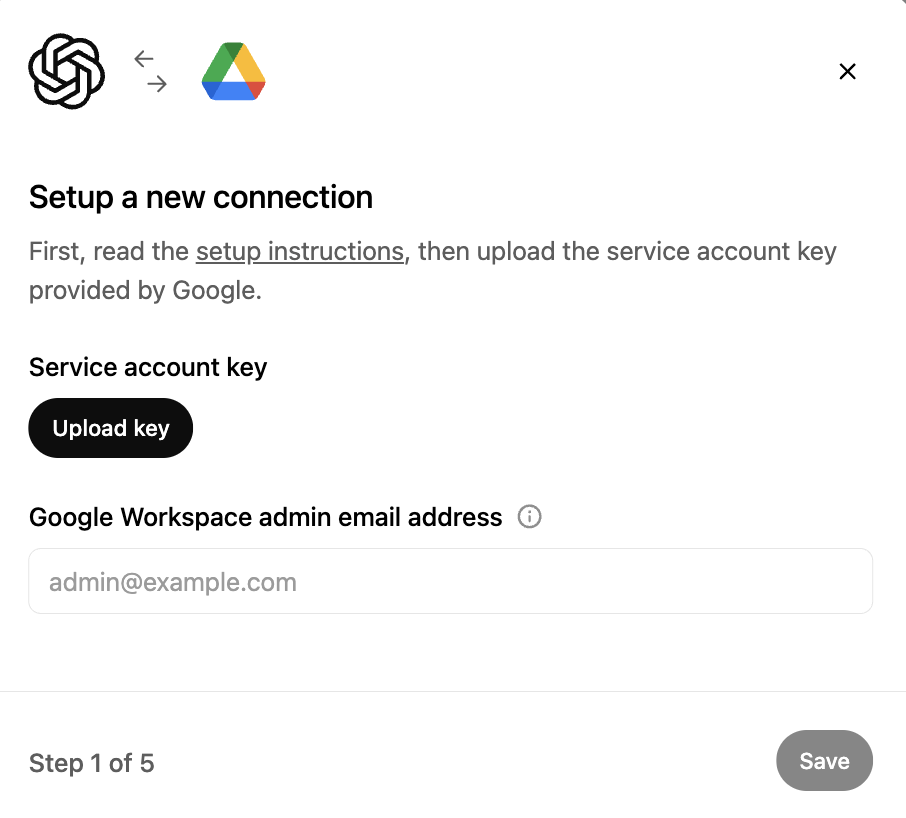
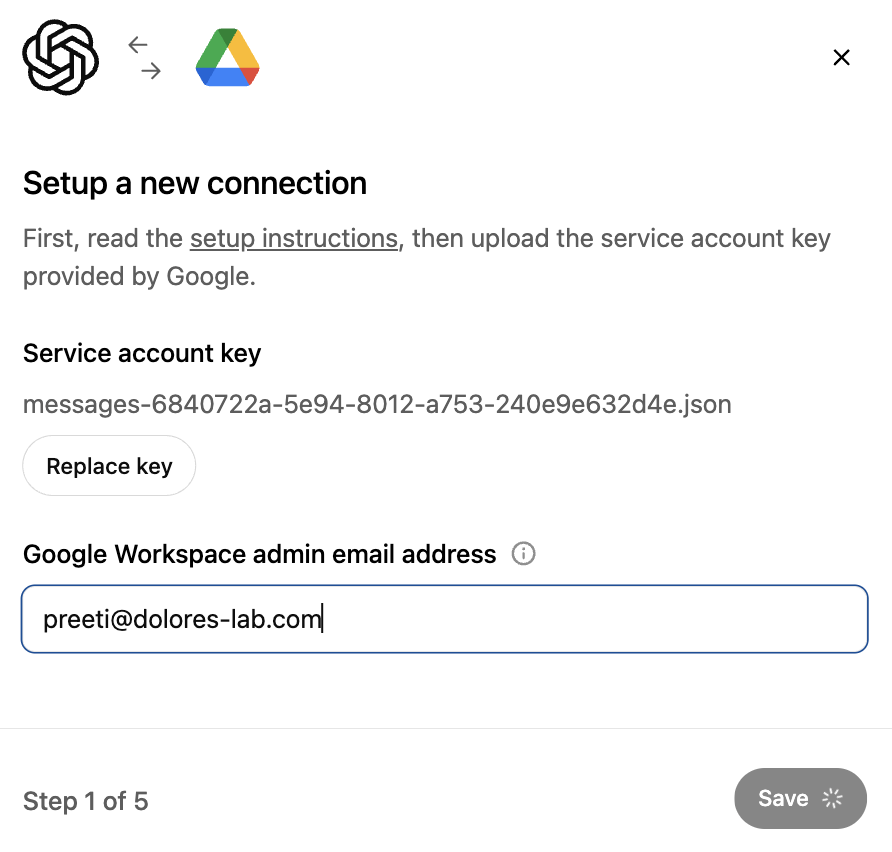
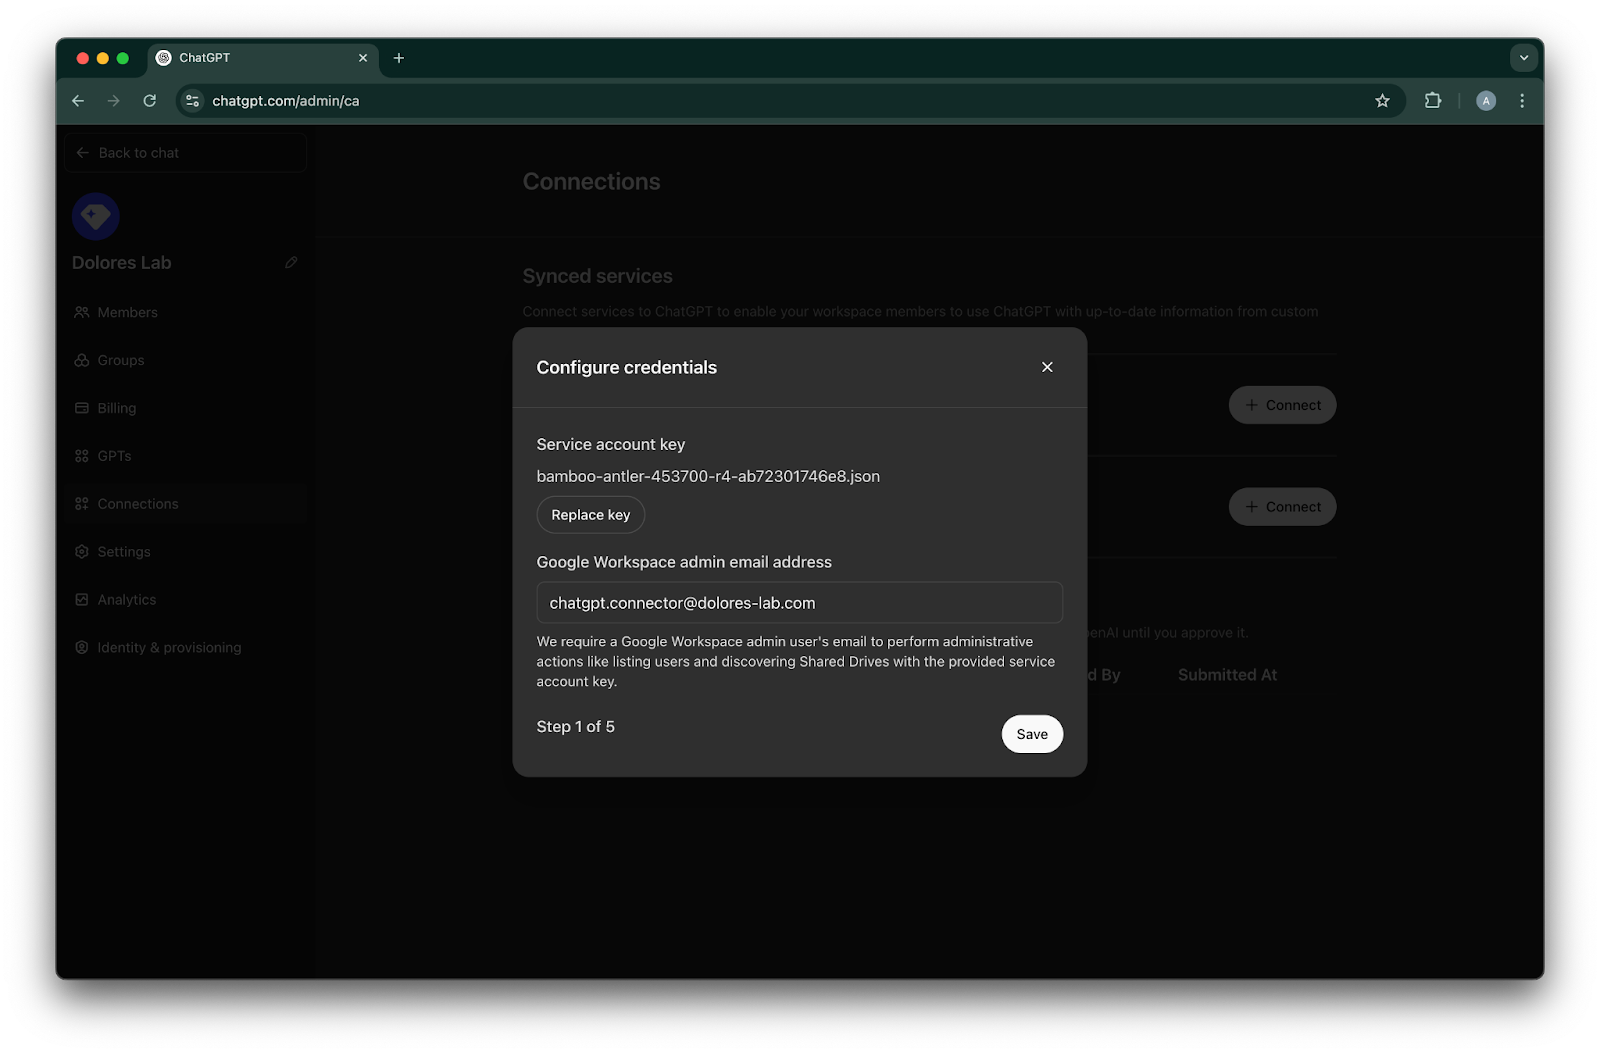
Upload keyపై క్లిక్ చేయండి. JSON ఫైల్ను ఎంచుకోండి; పైగా సర్వీస్ అకౌంట్ను సెటప్ చేసే సమయంలో మీరు డౌన్లోడ్ చేసిన కీ అదే. ఈ కీ సరైందని నిర్ధారించండి.
admin email address నమోదు చేయండి. ఇది మీరు ముందుగా సృష్టించిన అడ్మిన్ అకౌంట్.
Save.పై క్లిక్ చేయండి.
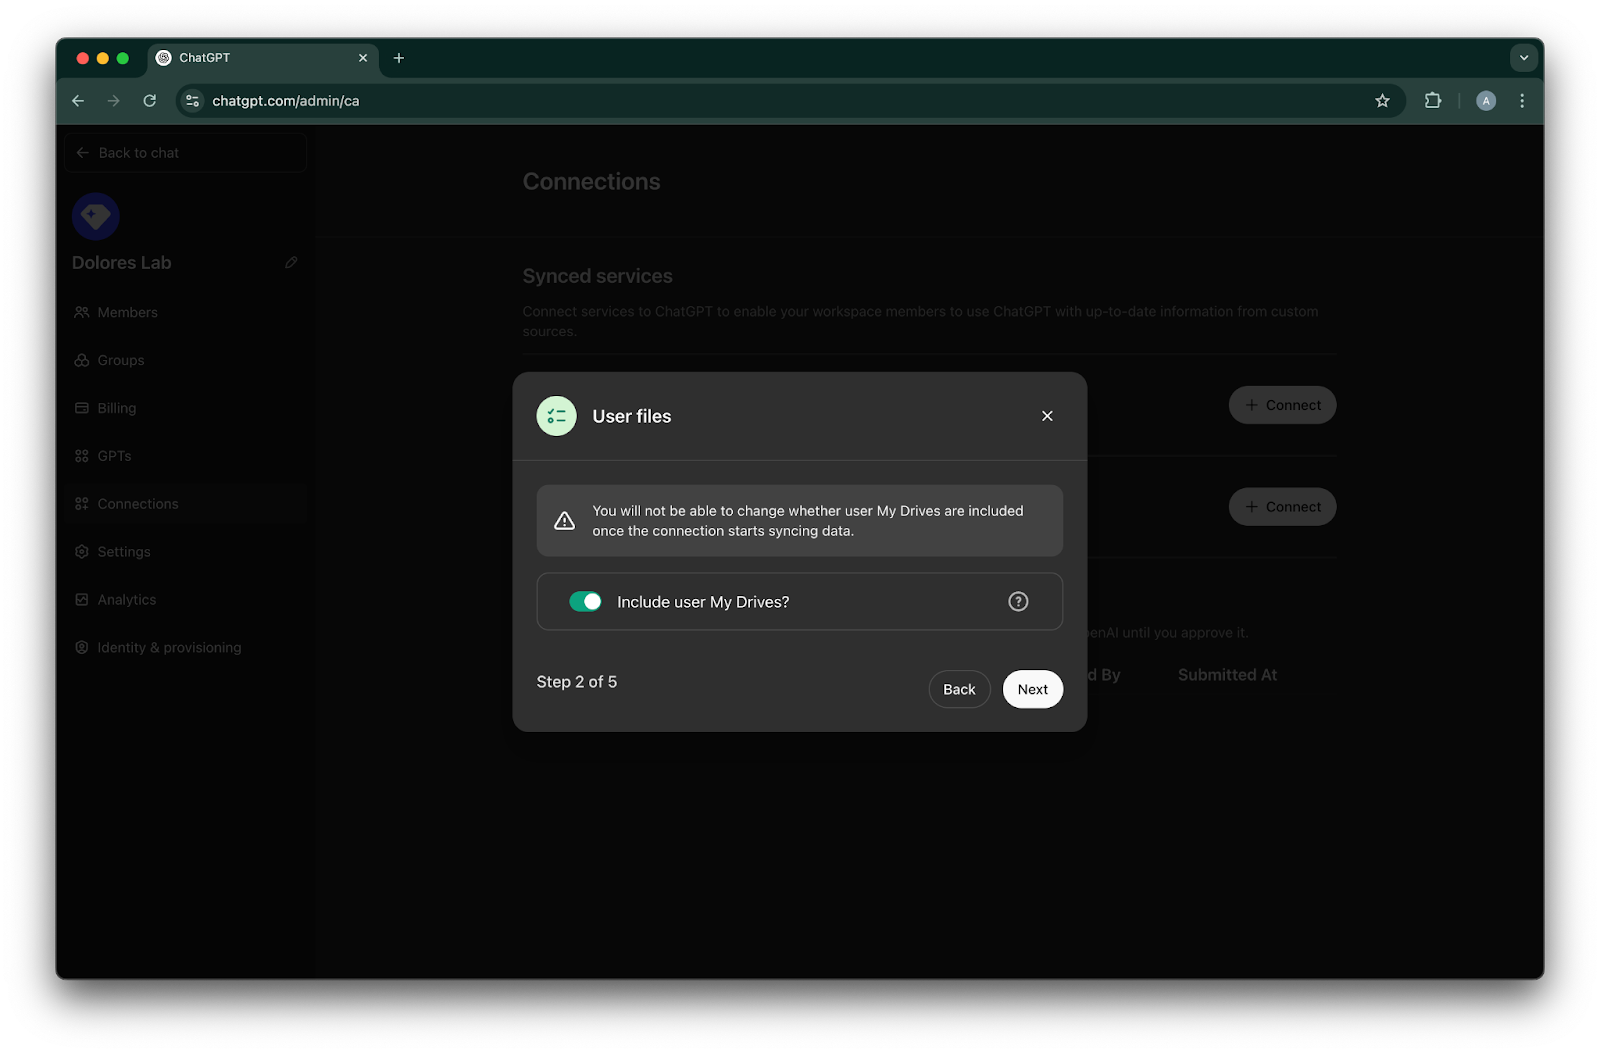
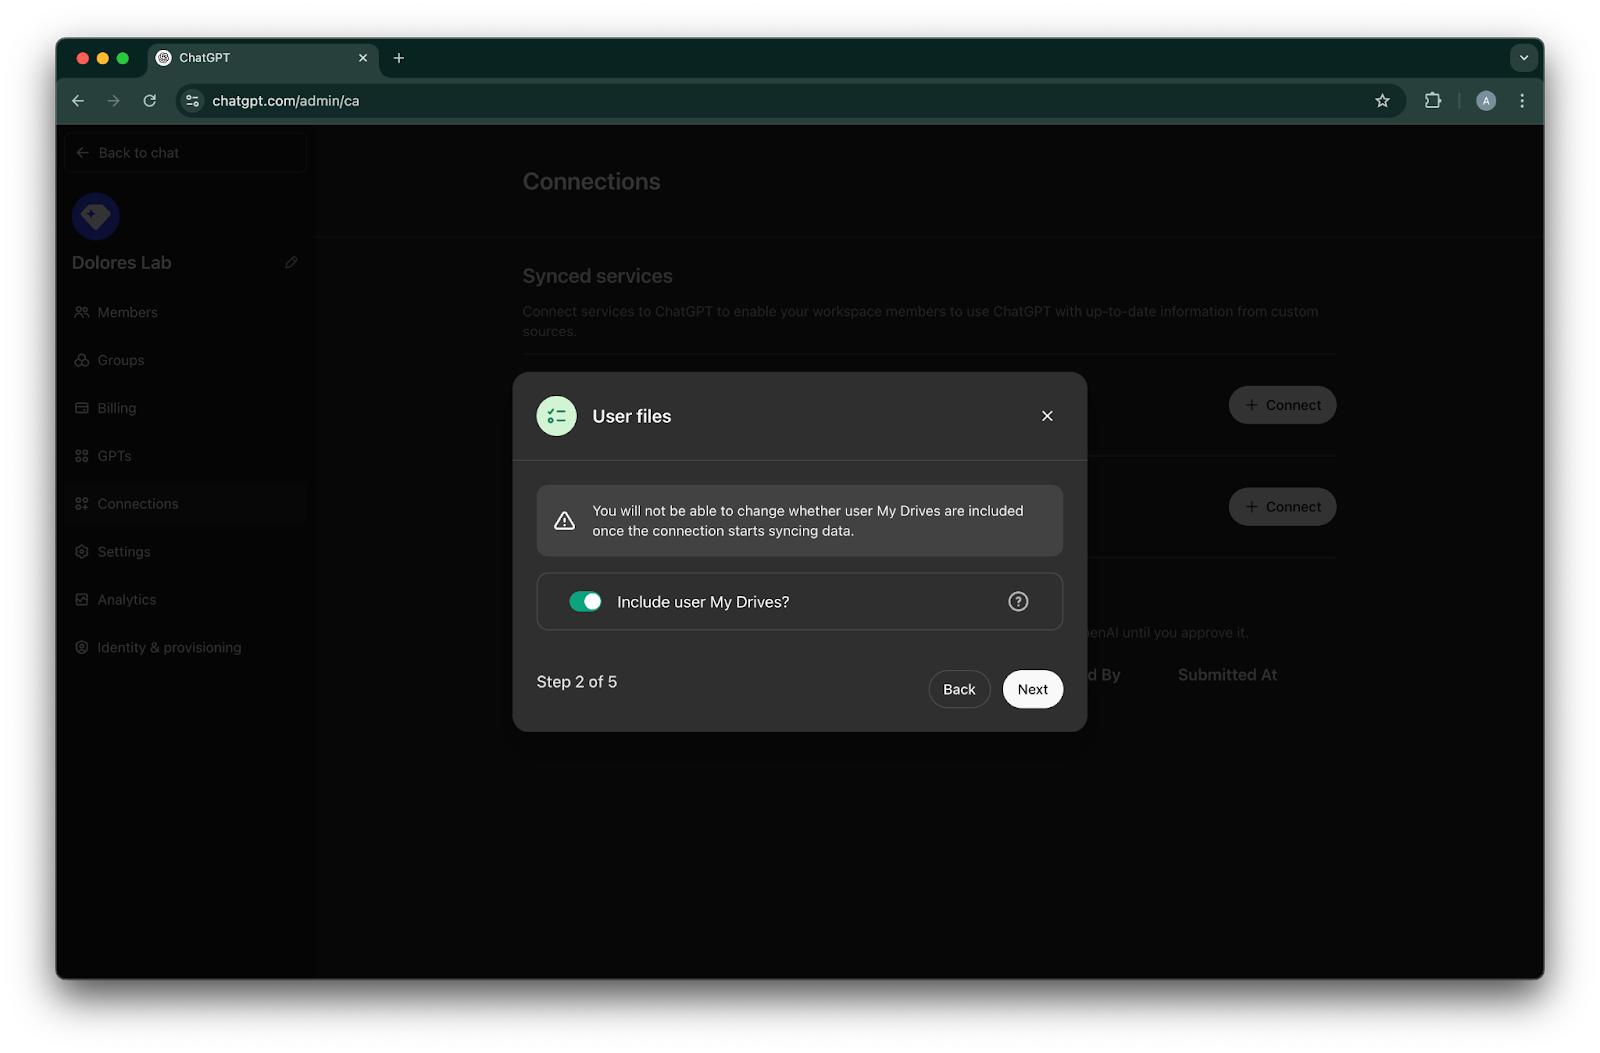
మీ అన్ని వినియోగదారుల My Drives లోని ఫైళ్లు చేర్చాలనుకుంటున్నారా లేదో ఎంచుకోండి.
Nextపై క్లిక్ చేయండి.
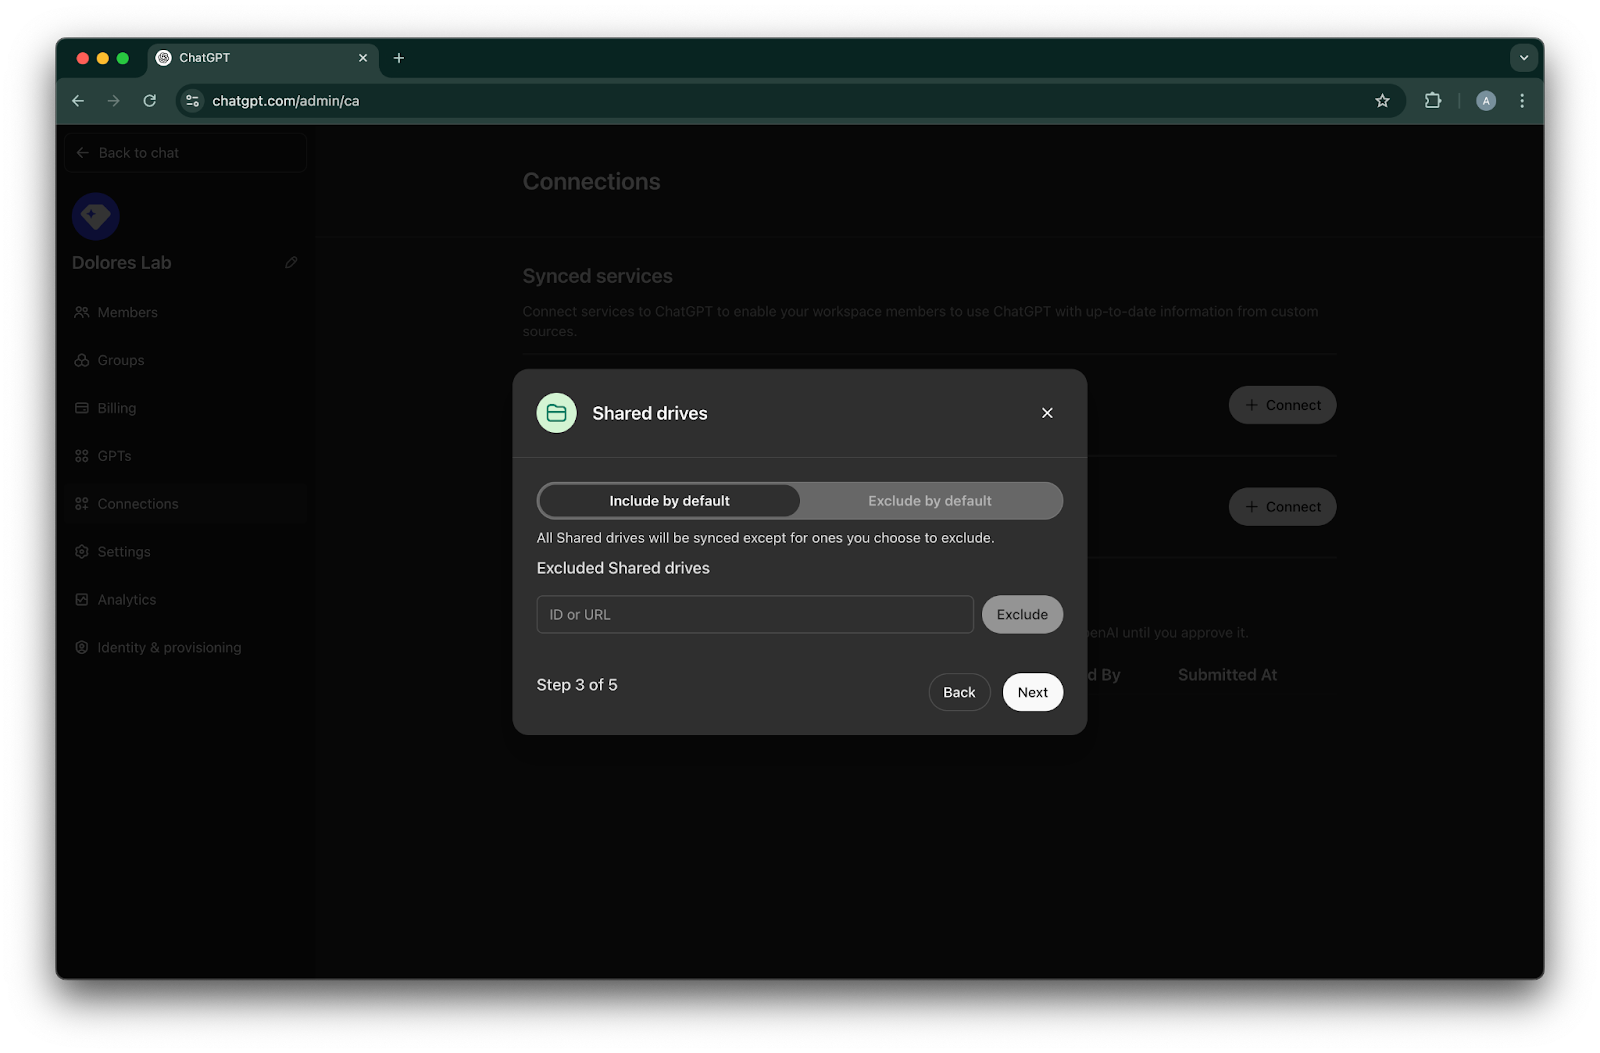
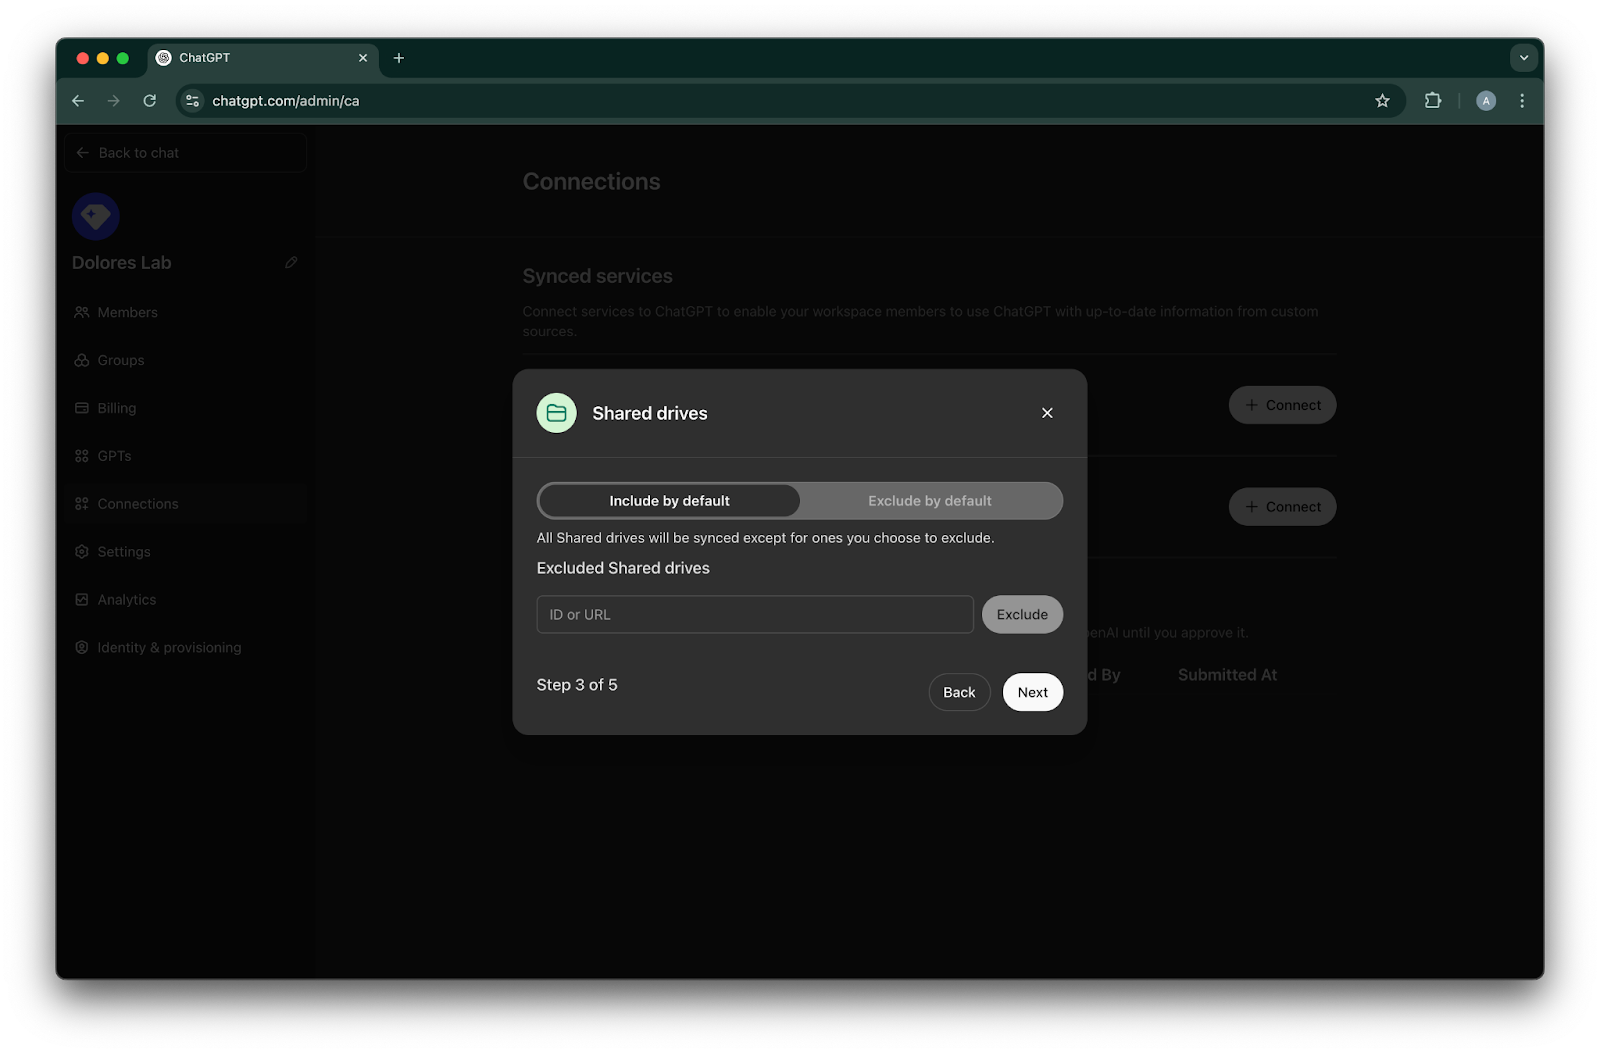
shared drives ను ఎలా నిర్వహించాలో ఎంచుకోండి. మేము క్రింది మూడు పరిస్థితులకు మద్దతు ఇస్తాము:
అన్ని shared drives ను చేర్చాలనుకుంటే, Include by default ఎంచుకుని, మినహాయించాల్సిన shared drive IDs ను జోడించవద్దు.
చాలా shared drives ను చేర్చాలనుకుంటే, Include by default ఎంచుకుని, మినహాయించాలనుకున్న shared drives యొక్క IDs ను జోడించండి.
చాలా shared drives ను మినహాయించాలనుకుంటే, Exclude by default ఎంచుకుని, చేర్చాలనుకున్న shared drives యొక్క IDs ను జోడించండి.
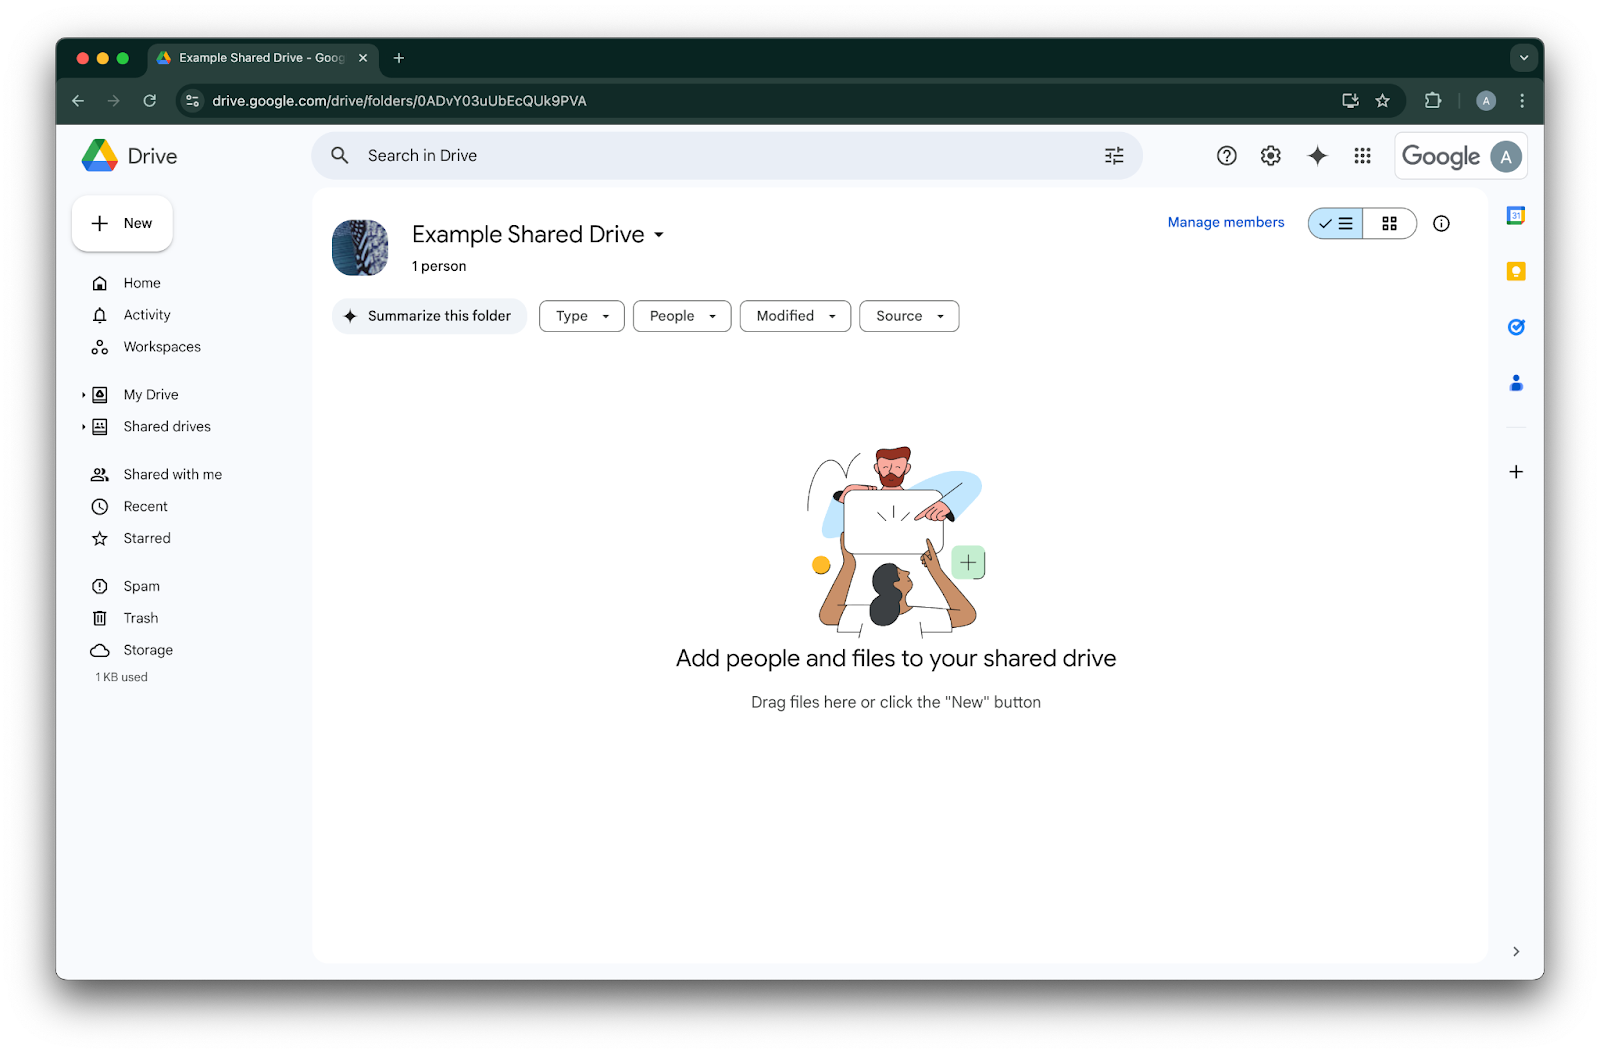
ఒక shared drive యొక్క ID తెలుసుకోవడానికి, వెబ్ బ్రౌజర్లో దానికి వెళ్లండి. URL యొక్క చివరి భాగం shared drive ID అవుతుంది.
క్రింది ఉదాహరణలో, అది `0ADvY03uUbEcQUk9PVA`'.Nextపై క్లిక్ చేయండి.
Google Drive connection కు ఎవరికి ప్రాప్యత ఉండాలో ఎంచుకోండి. మీరు ChatGPT వర్క్స్పేస్ యొక్క అడ్మిన్లకే పరిమితం చేయవచ్చు, లేదా అందరికీ ప్రారంభించవచ్చు. అందరికీ ప్రారంభిస్తే, వర్క్స్పేస్కు కొత్తగా జోడించిన వినియోగదారులు స్వయంచాలకంగా చేర్చబడతారు.
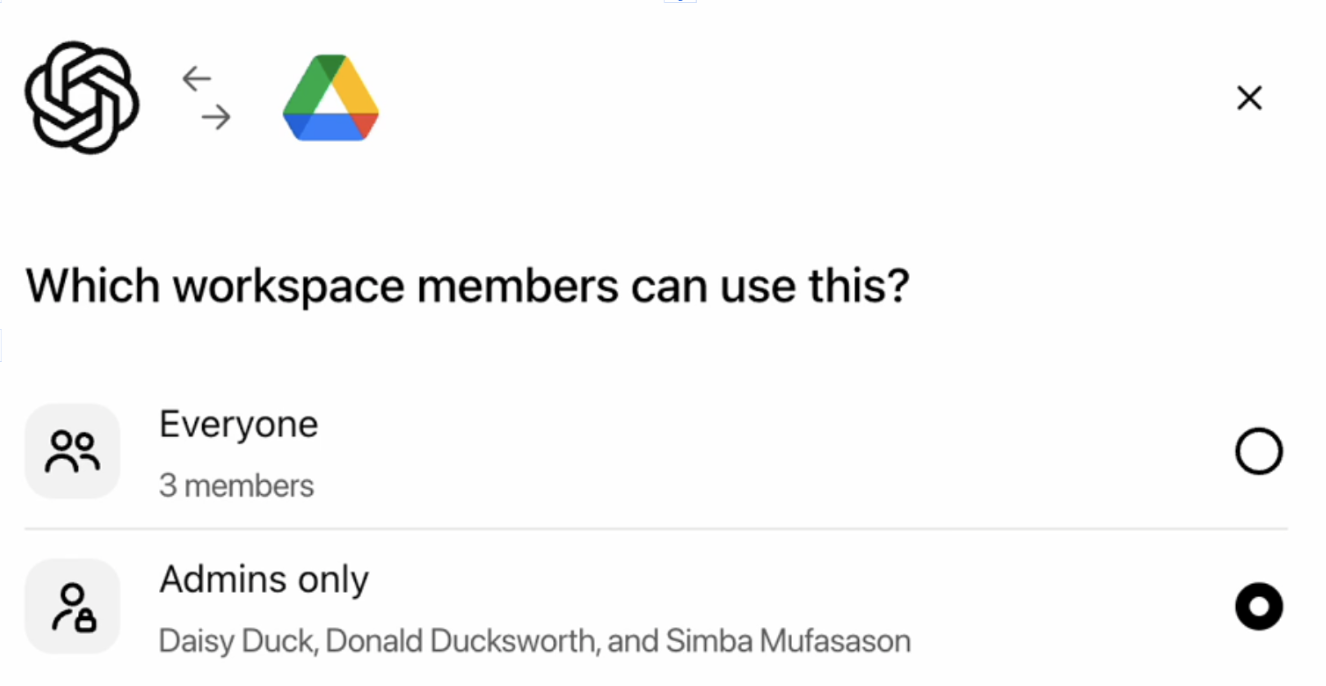
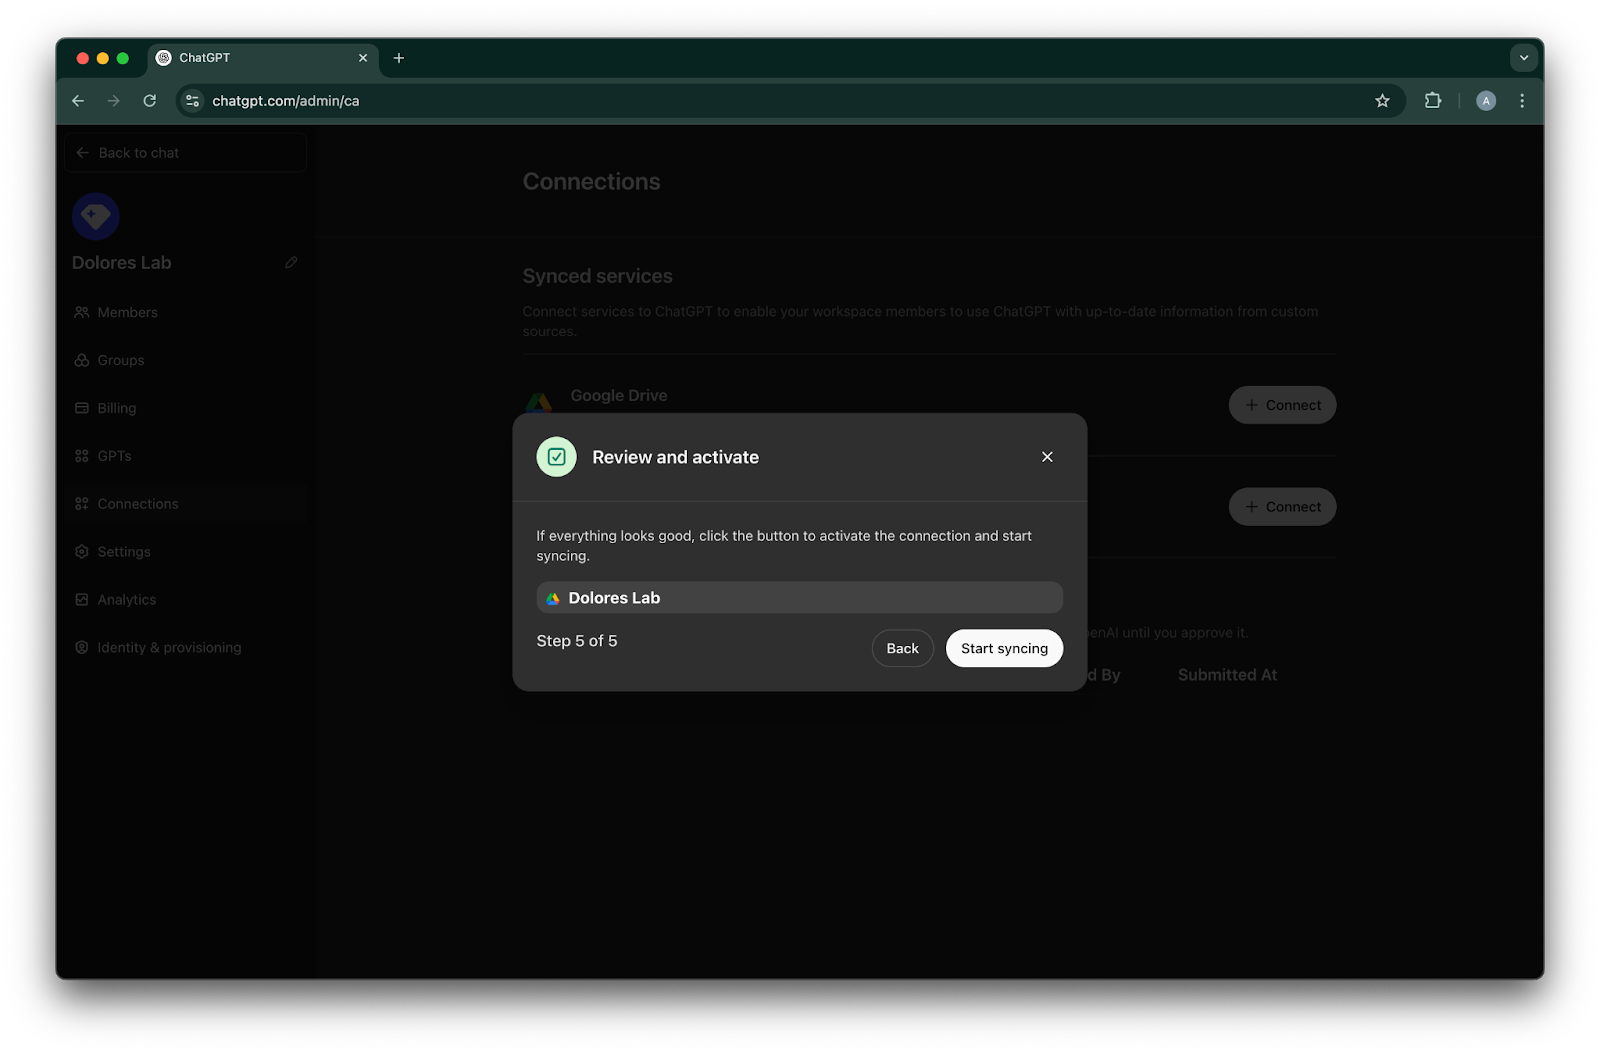
Start syncingపై క్లిక్ చేయండి.
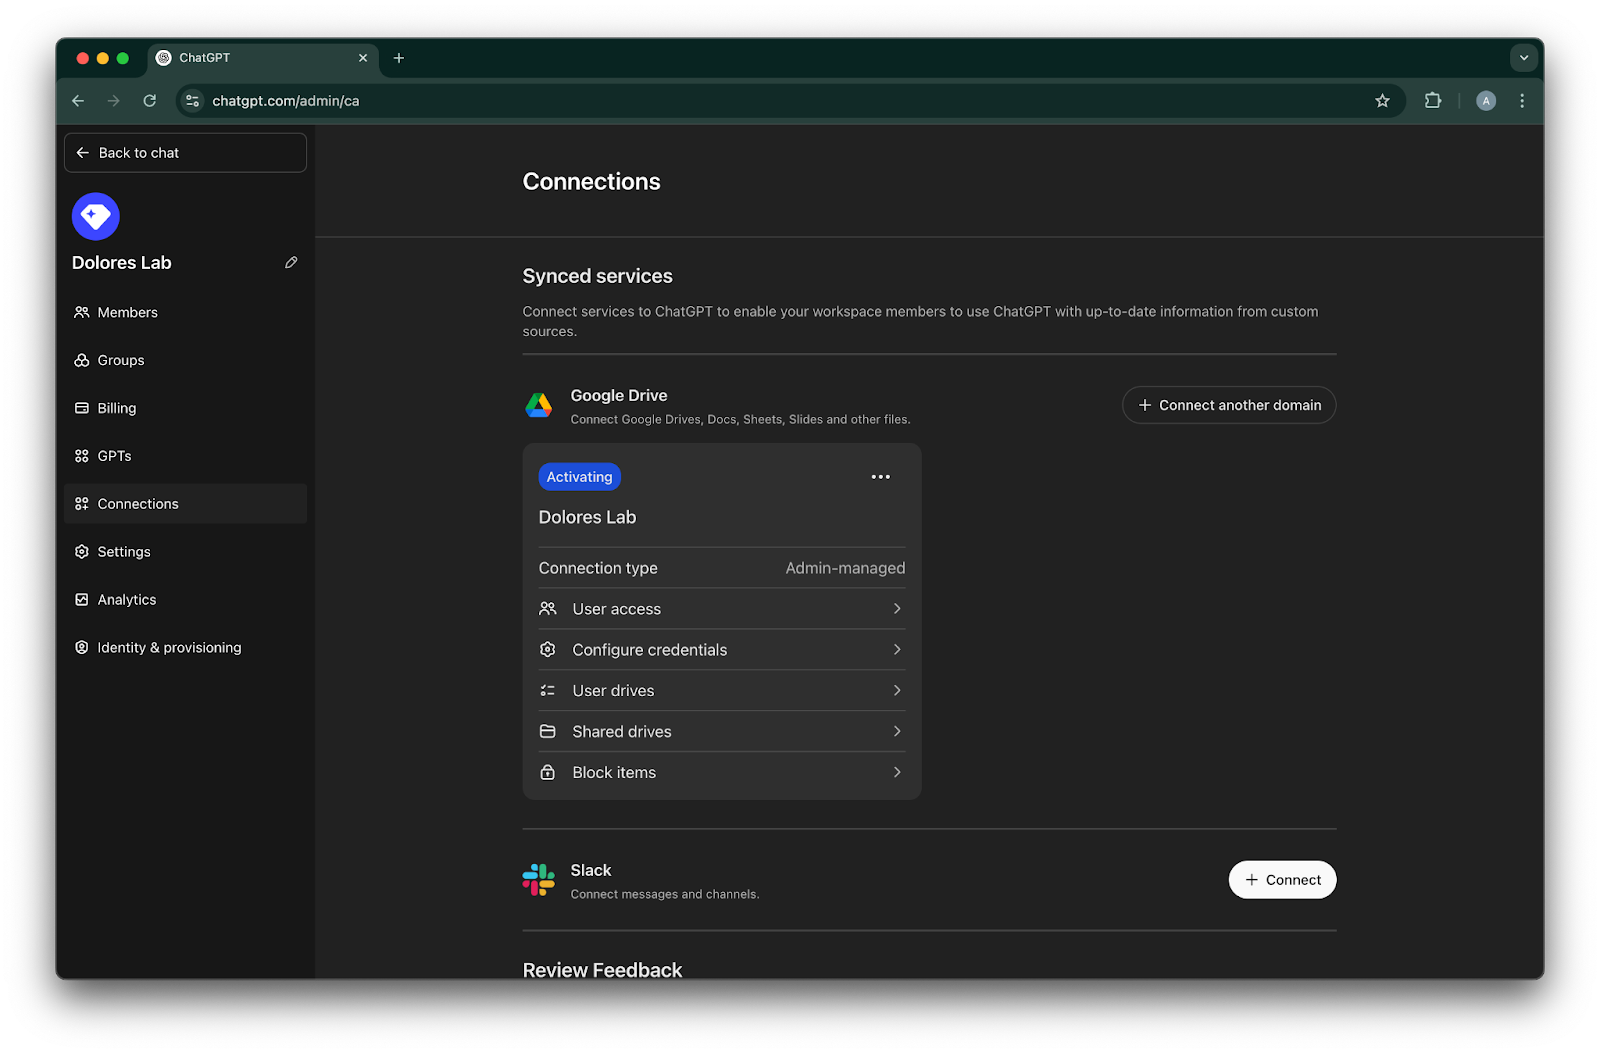
మీ Google Drive connection ఇప్పుడు విజయవంతంగా సృష్టించబడింది.
ఇది వెంటనే sync కావడం ప్రారంభించినా, మీ సెట్టింగ్ల ఆధారంగా ఎన్ని ఫైళ్లు చేర్చబడ్డాయో బట్టి పూర్తవడానికి కొన్ని గంటల నుంచి కొన్ని రోజులు పట్టవచ్చు.
గత 30 రోజులలో జోడించిన/సవరించిన ఫైళ్లు sync కావడం పూర్తయిన తర్వాత, మీరు ప్రారంభించిన వినియోగదారులకు ఈ connector అందుబాటులోకి వస్తుంది.
సర్వీస్ అకౌంట్ కీ సృష్టిని ప్రారంభించడం
మీకు క్రింది దోషం కనిపిస్తే, ఈ నిర్దిష్ట project కోసం service account creation ను enable చేయాలి:
> మీ సంస్థపై organization policy constraint ‘iam.disableServiceAccountKeyCreation’ అమల్లో ఉంది.
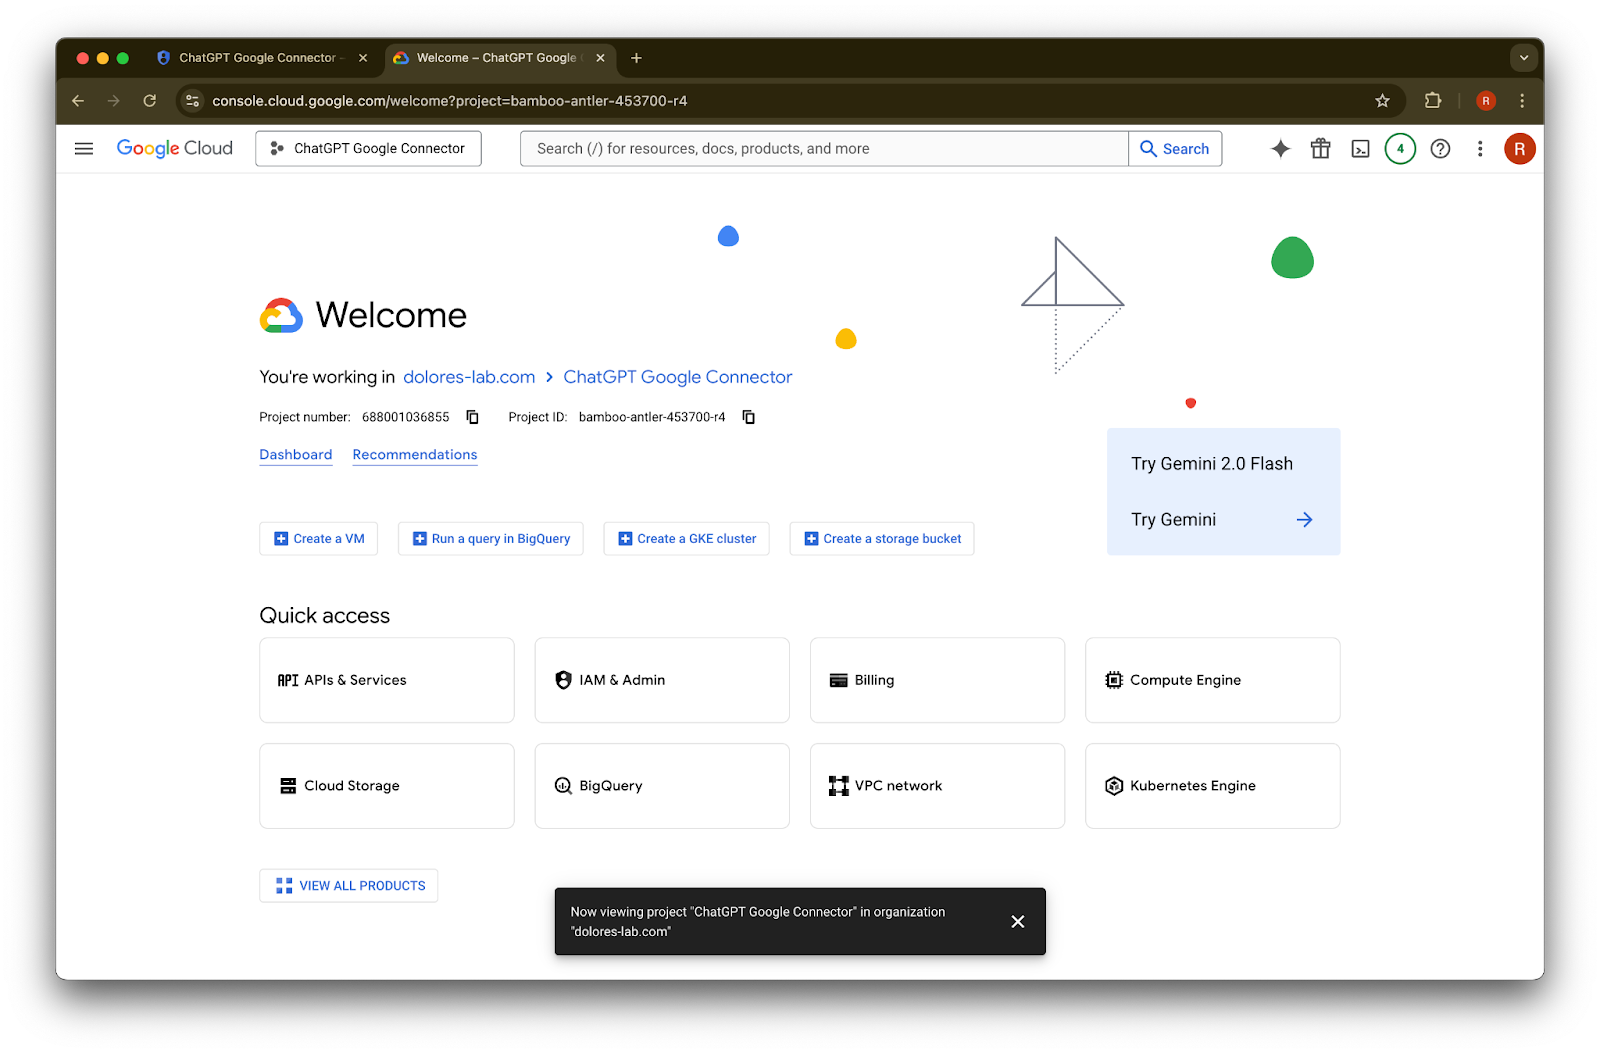
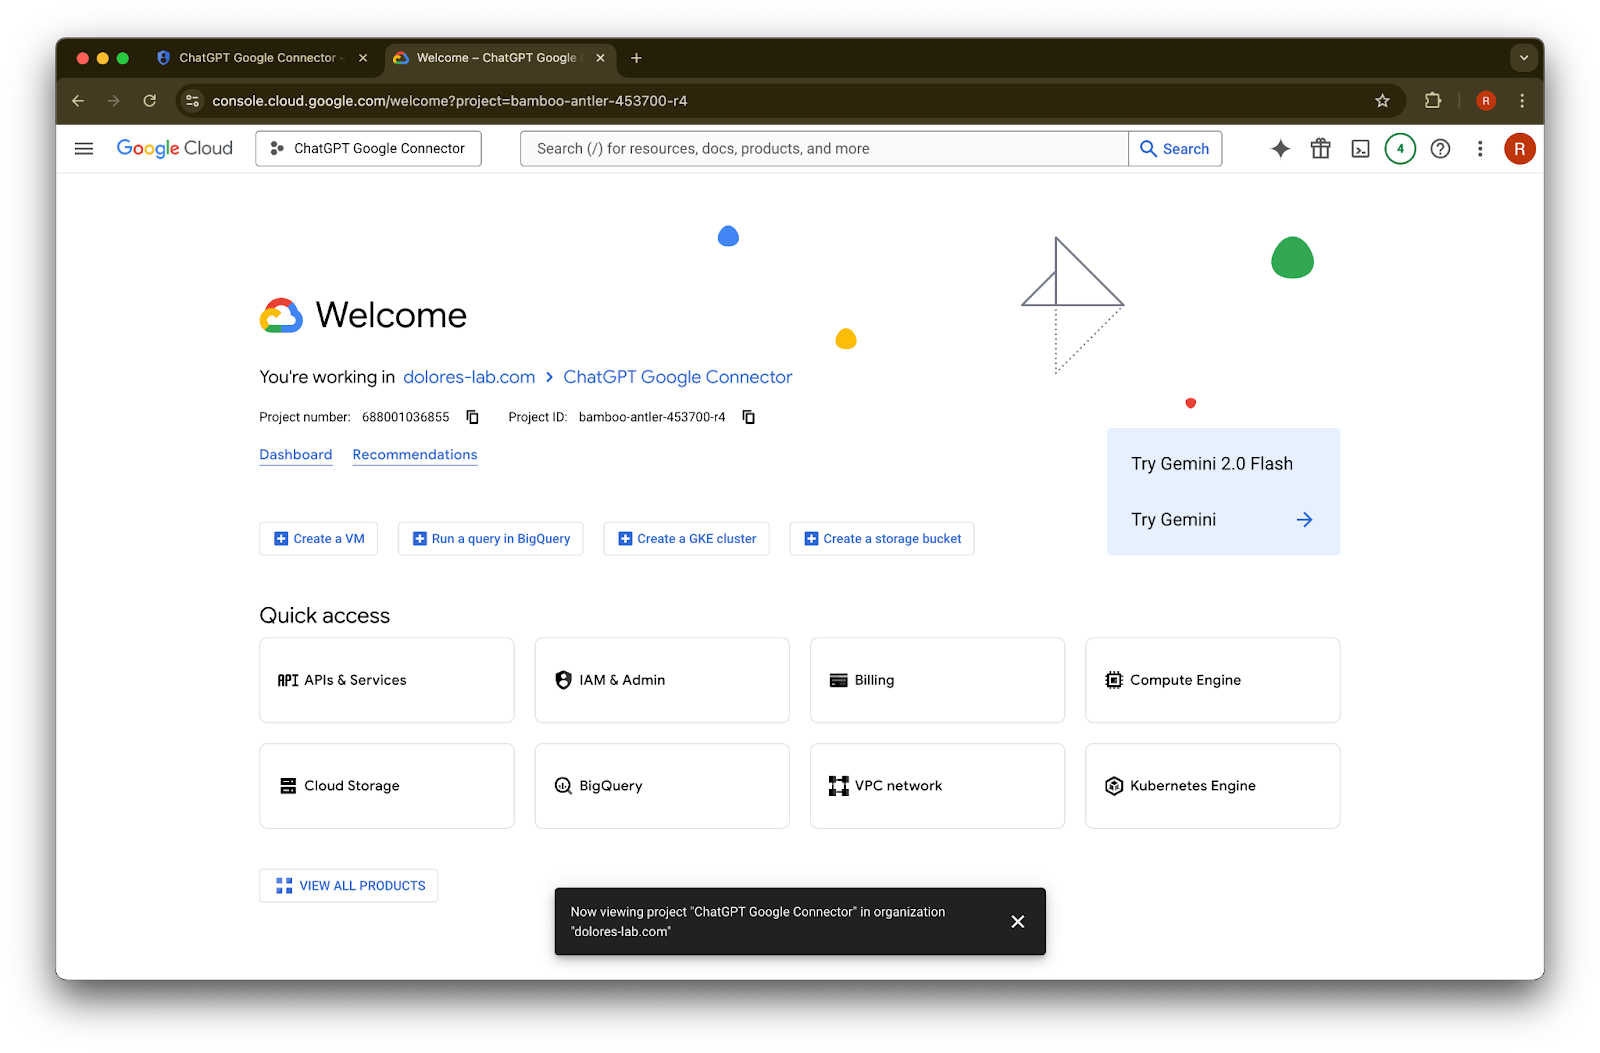
కొత్త tab తెరిచి console.cloud.google.com కు వెళ్లండి. ఎంచుకున్న project మీరు ఇప్పటికే ఎంచుకున్నదే అనేది నిర్ధారించుకోండి.
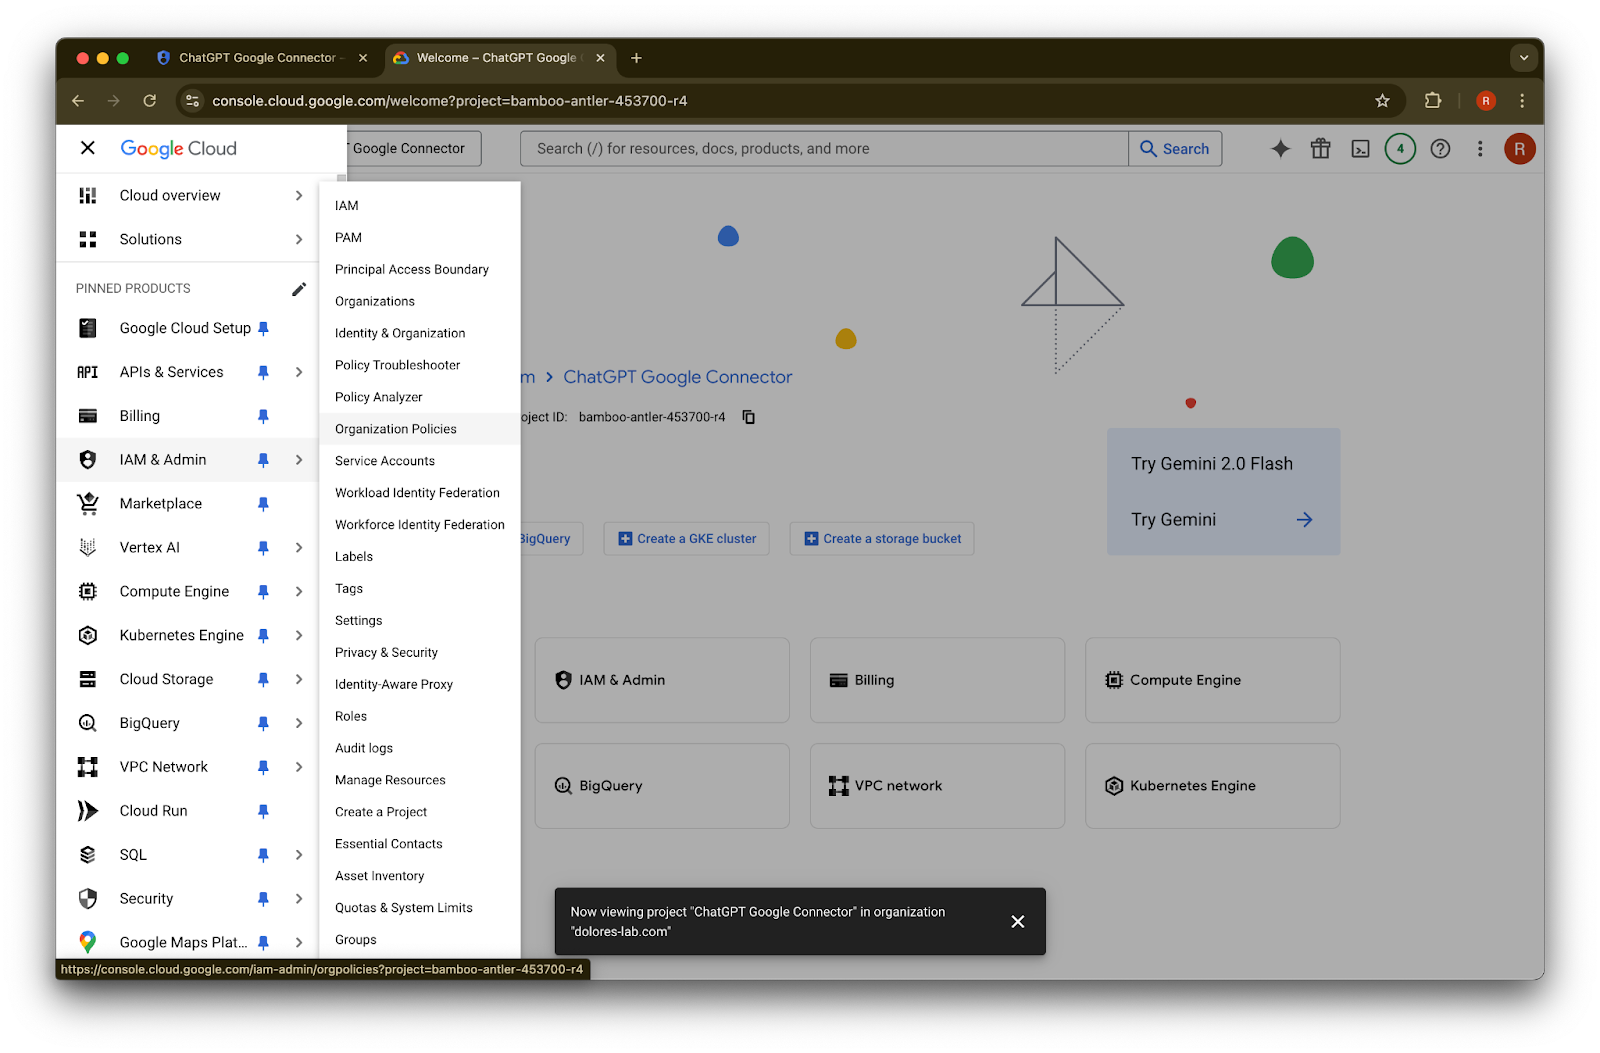
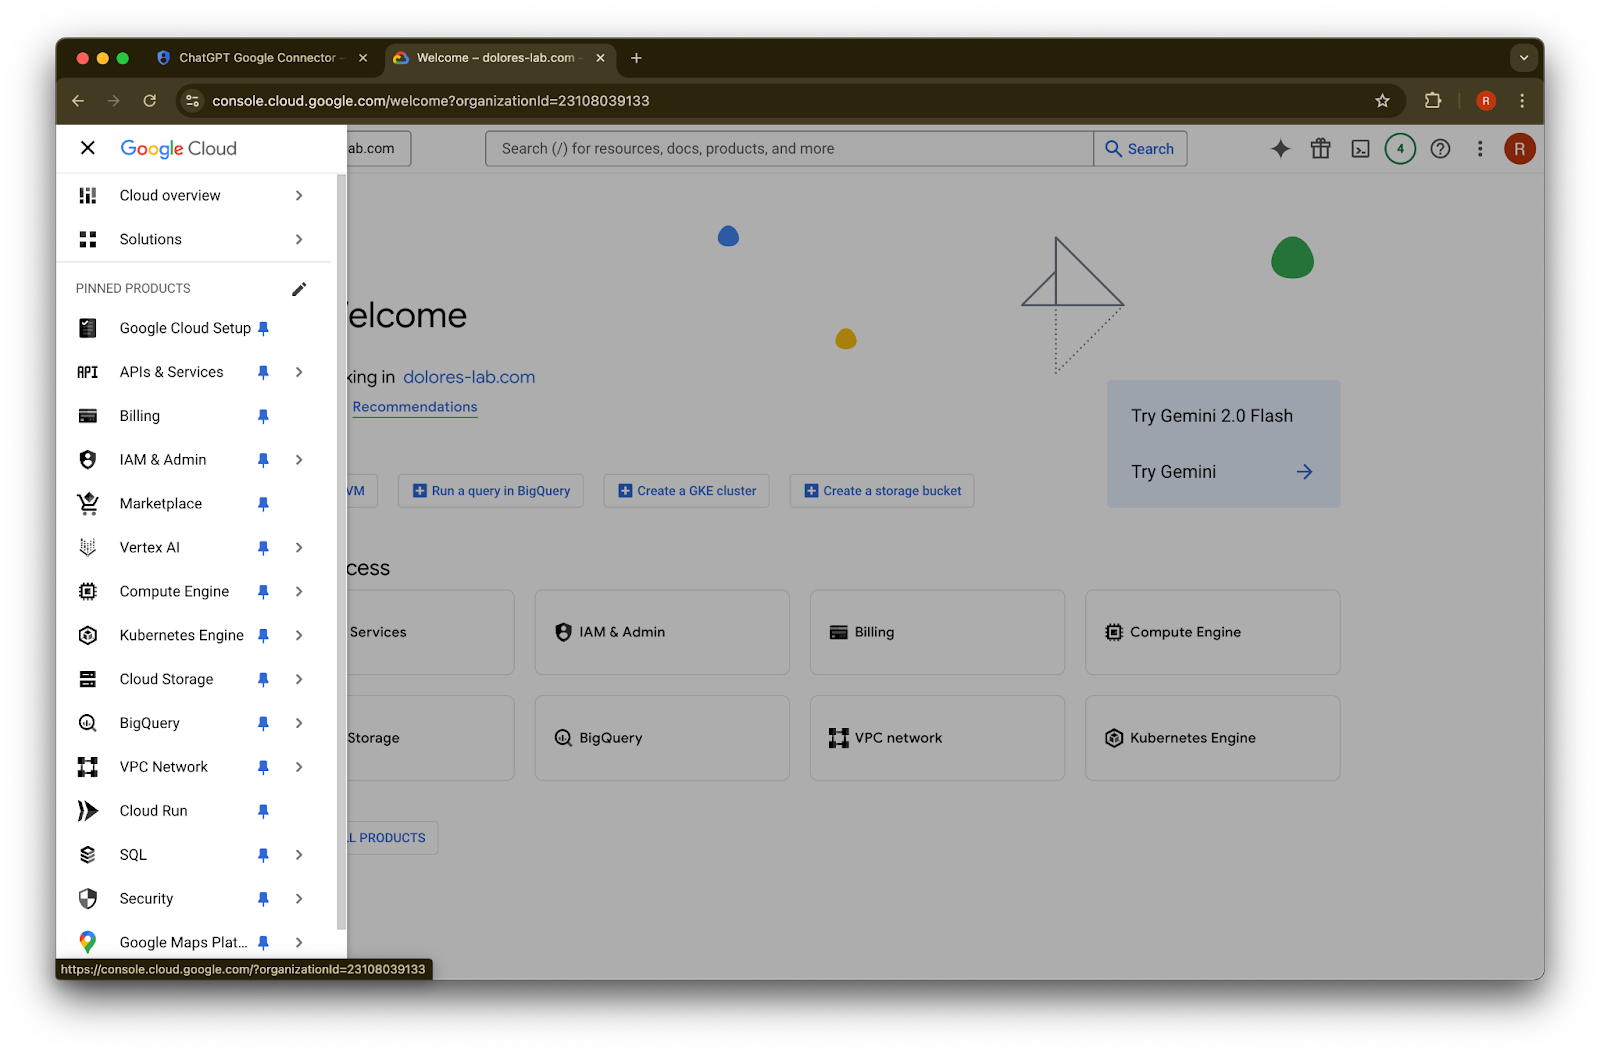
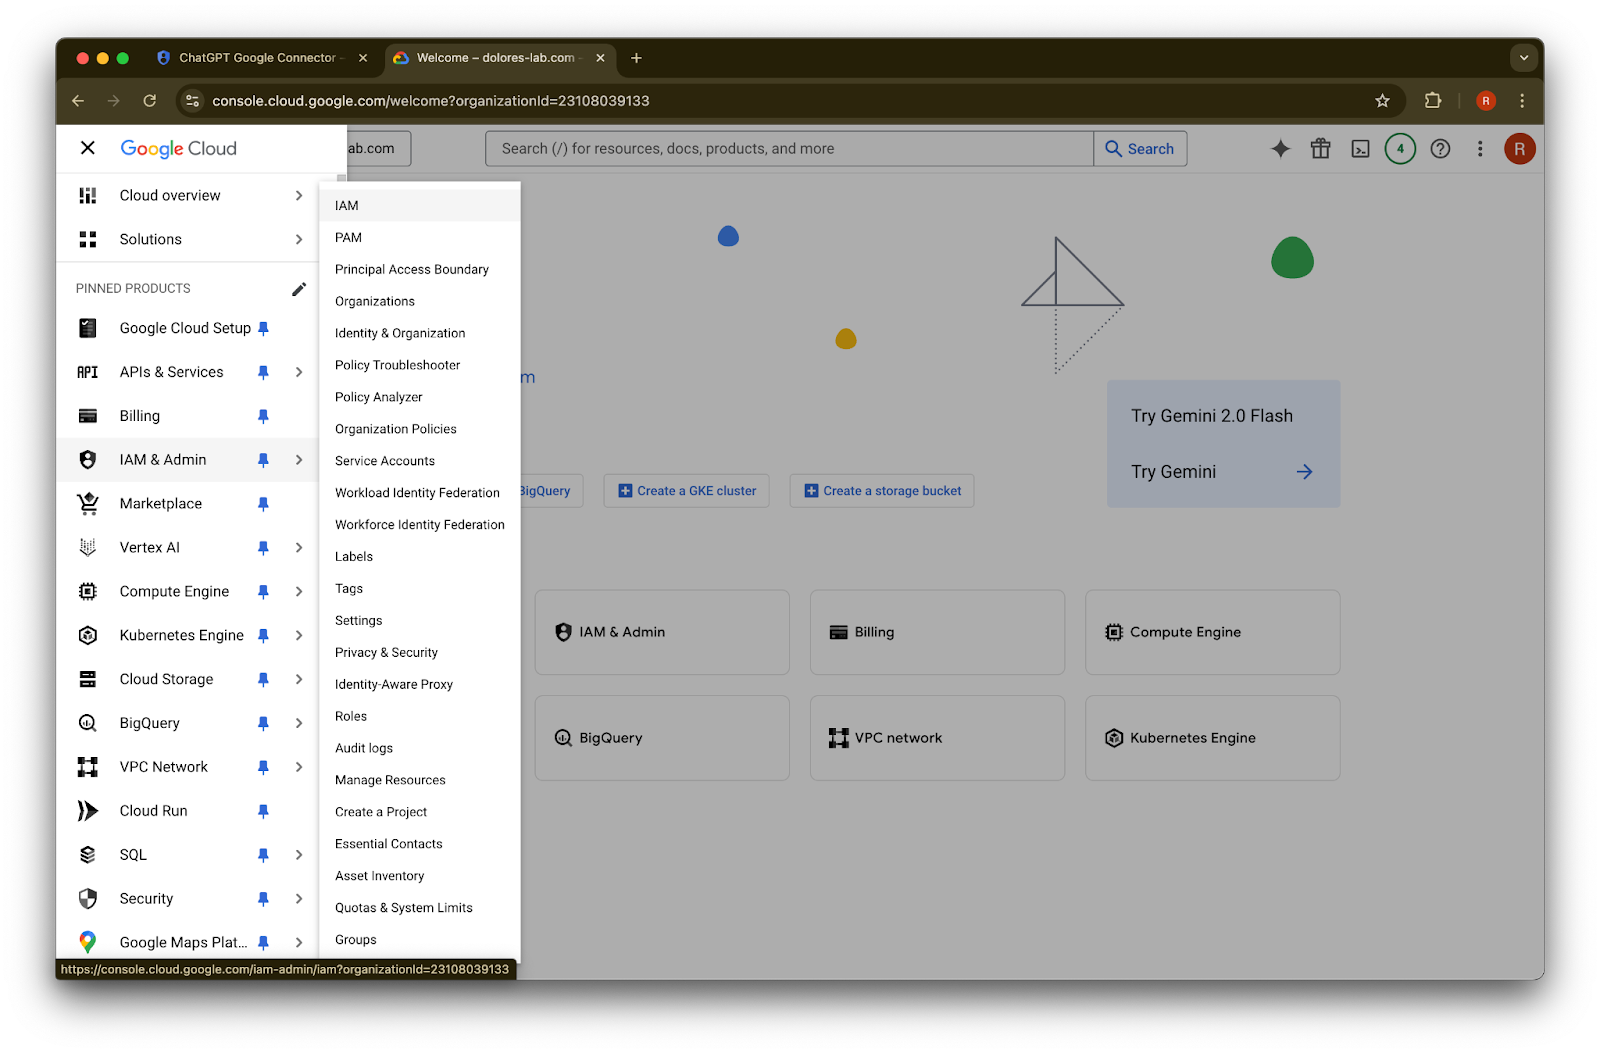
పై ఎడమ మూలలో ఉన్న menu icon పై క్లిక్ చేయండి.IAM & Admin పై hover చేయండి.
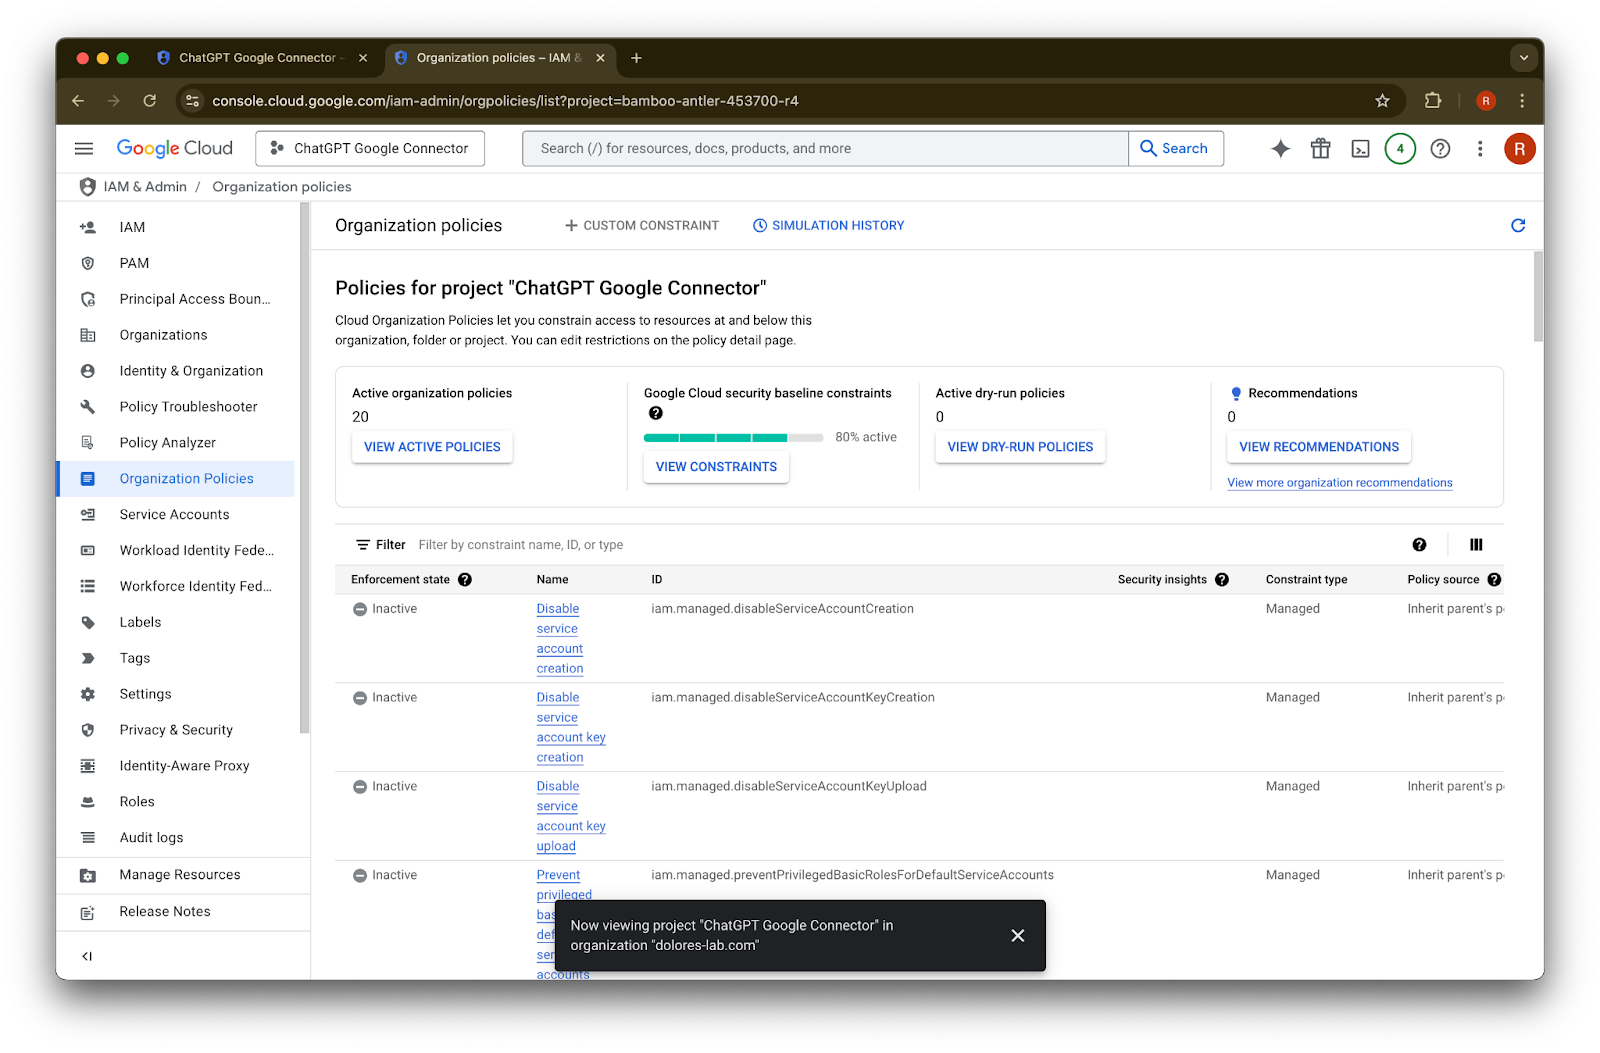
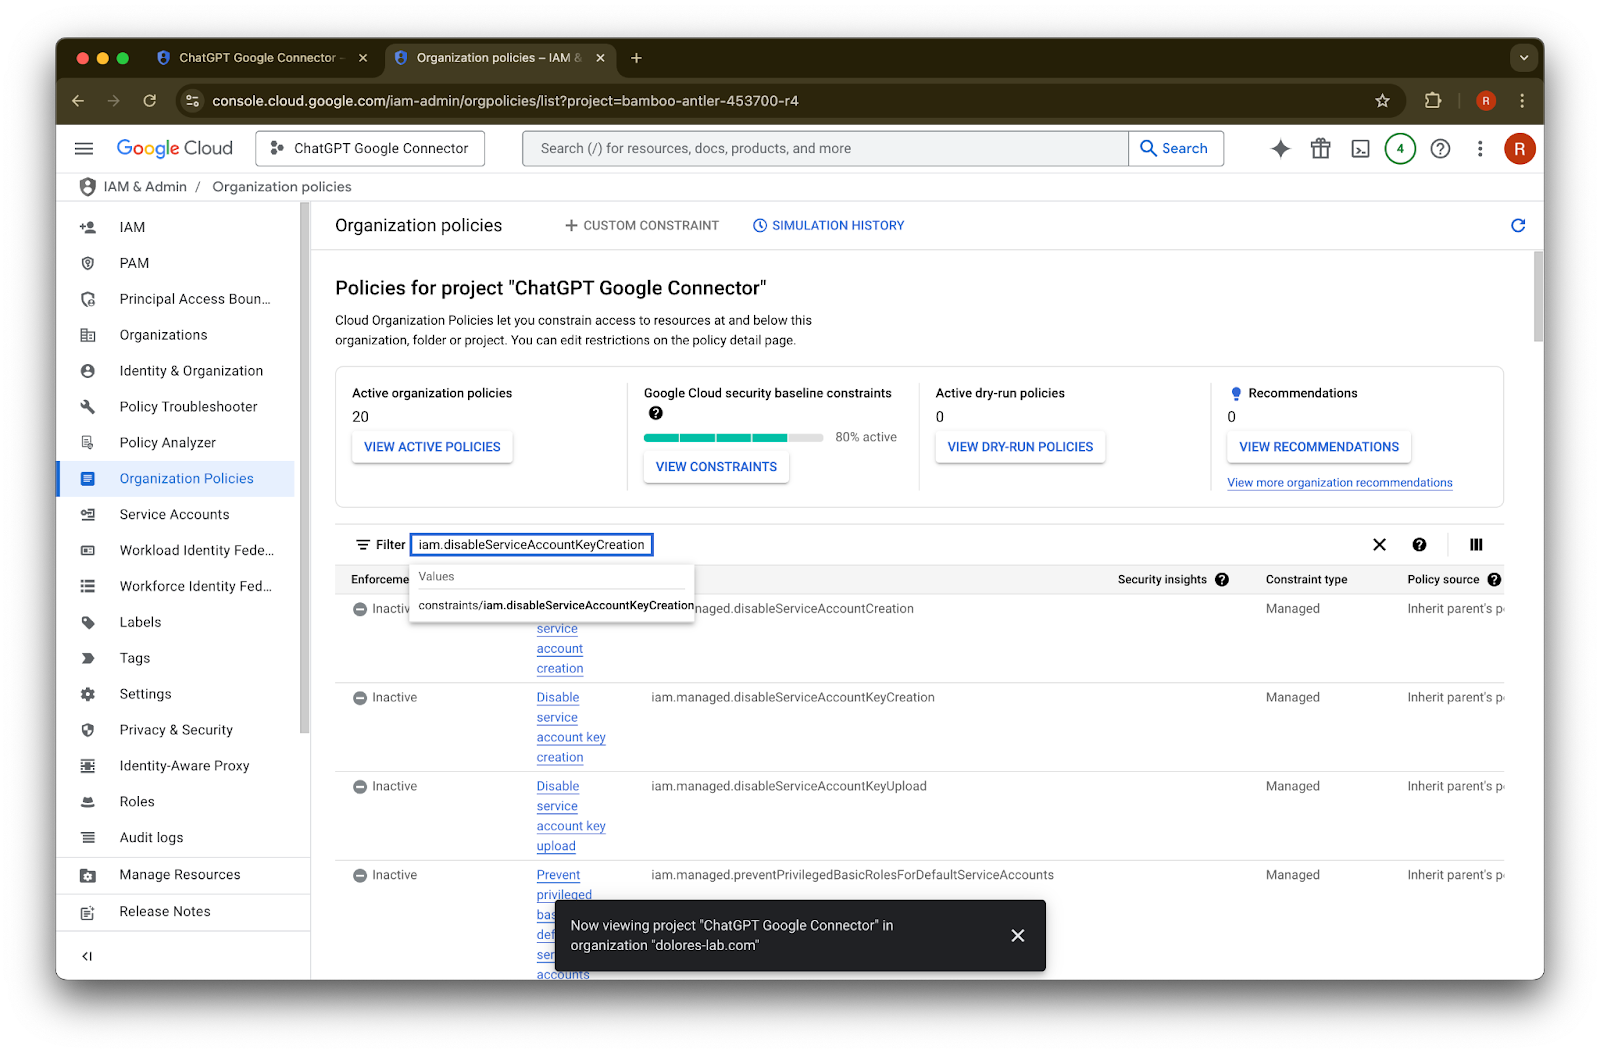
Organizational Policies పై క్లిక్ చేయండి.
iam.disableServiceAccountKeyCreation
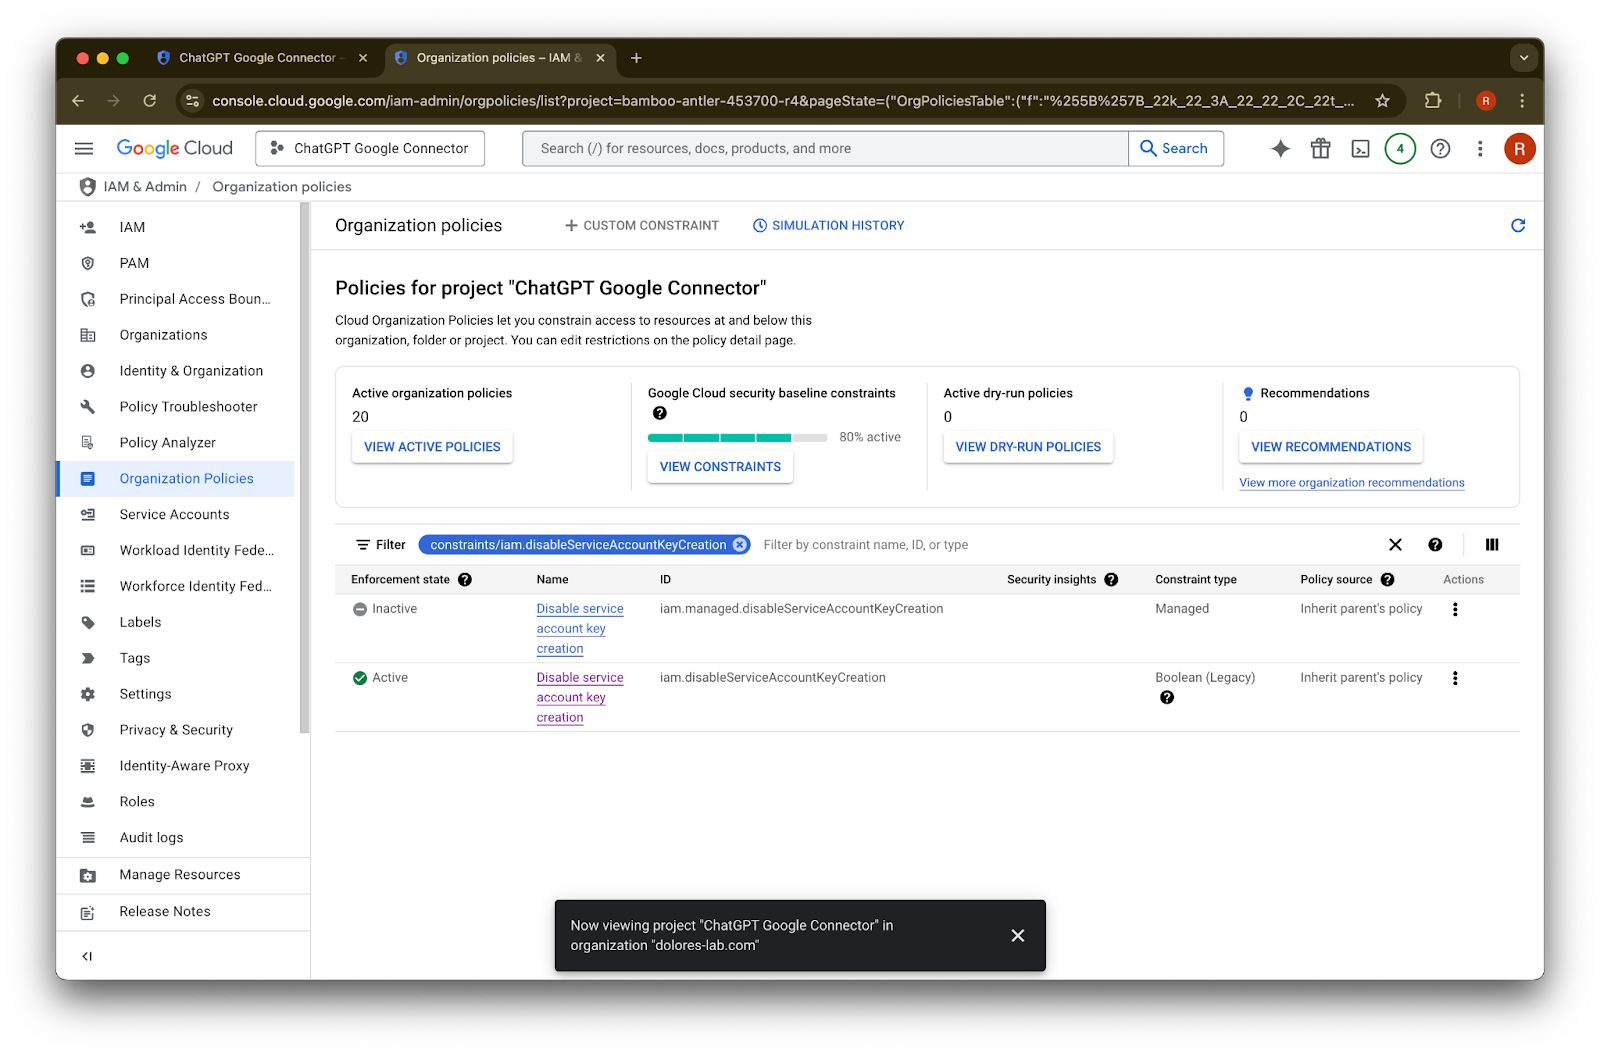
కోసం శోధించండి.constraints/iam.disableServiceAccountKeyCreation
కోసం వచ్చిన ఫలితంపై క్లిక్ చేయండి.iam.disableServiceAccountKeyCreation
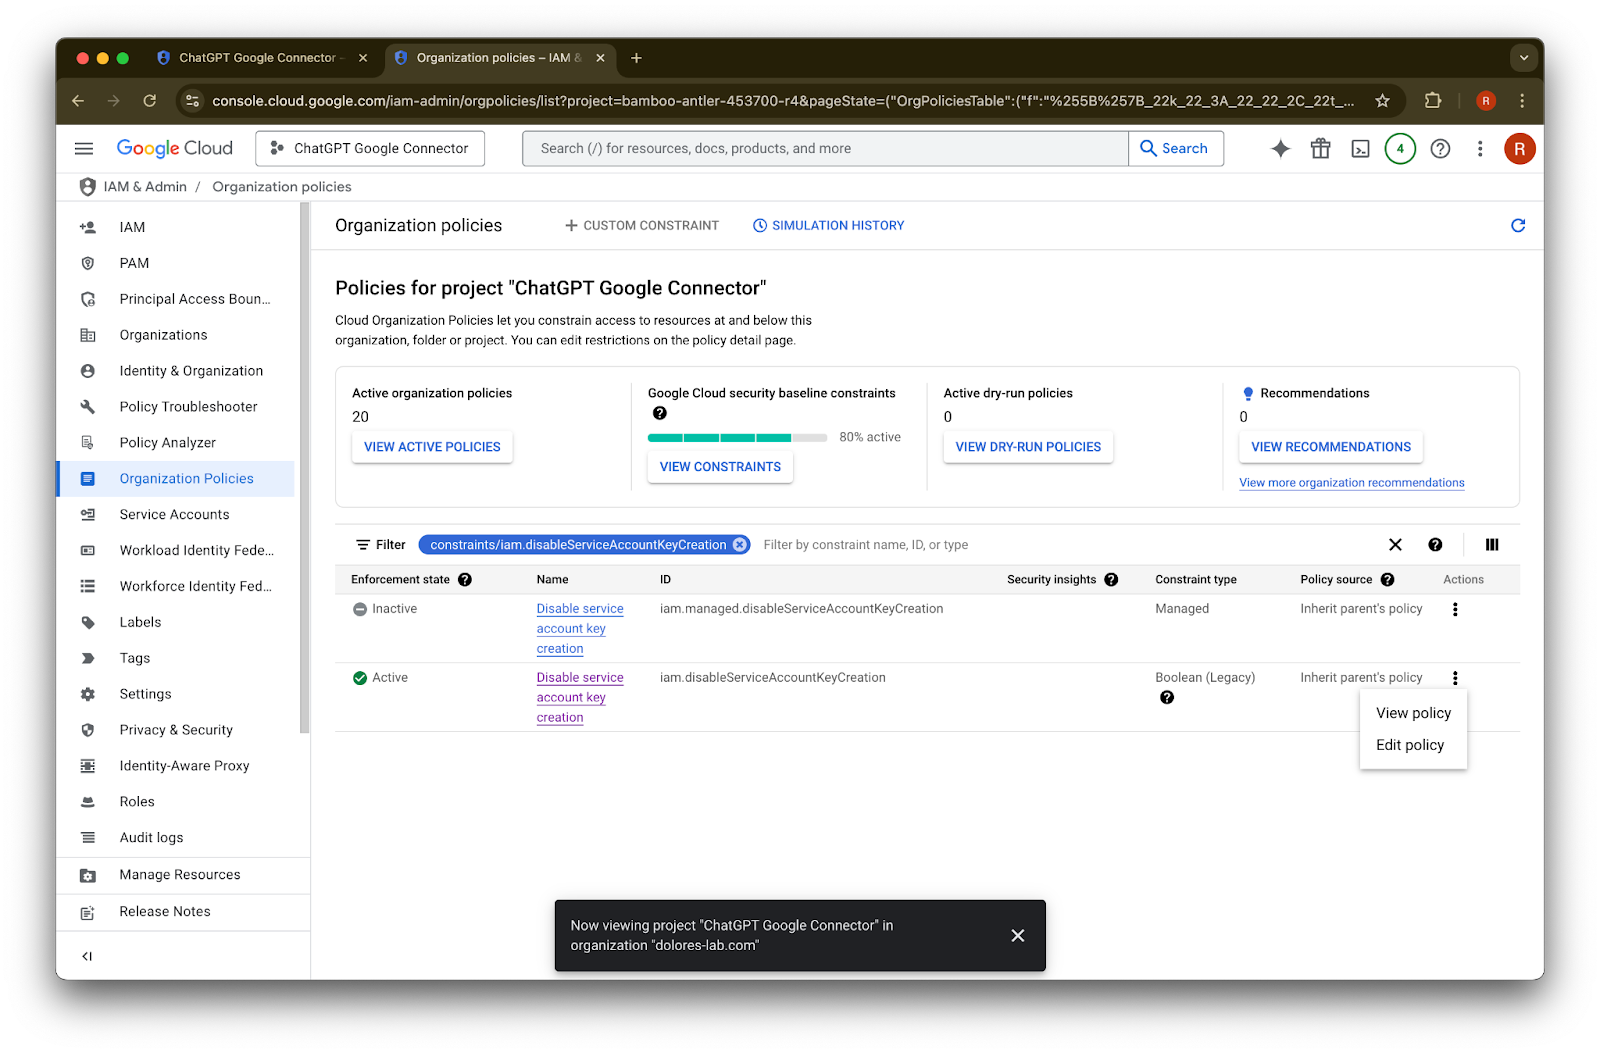
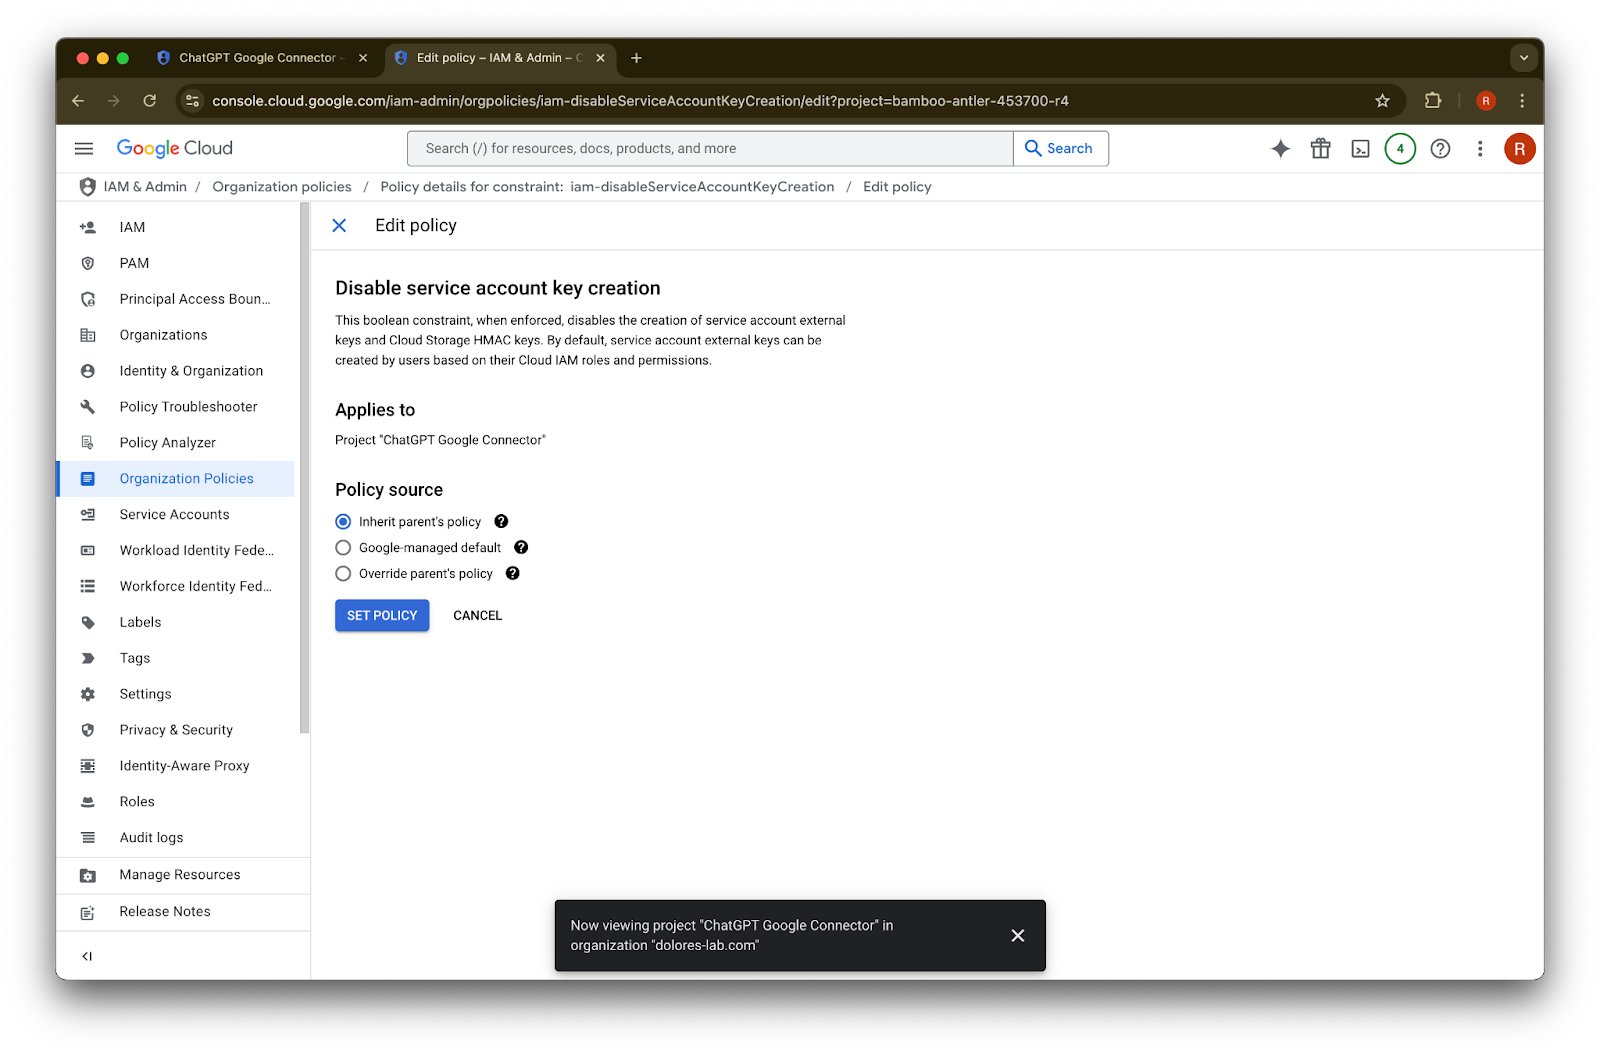
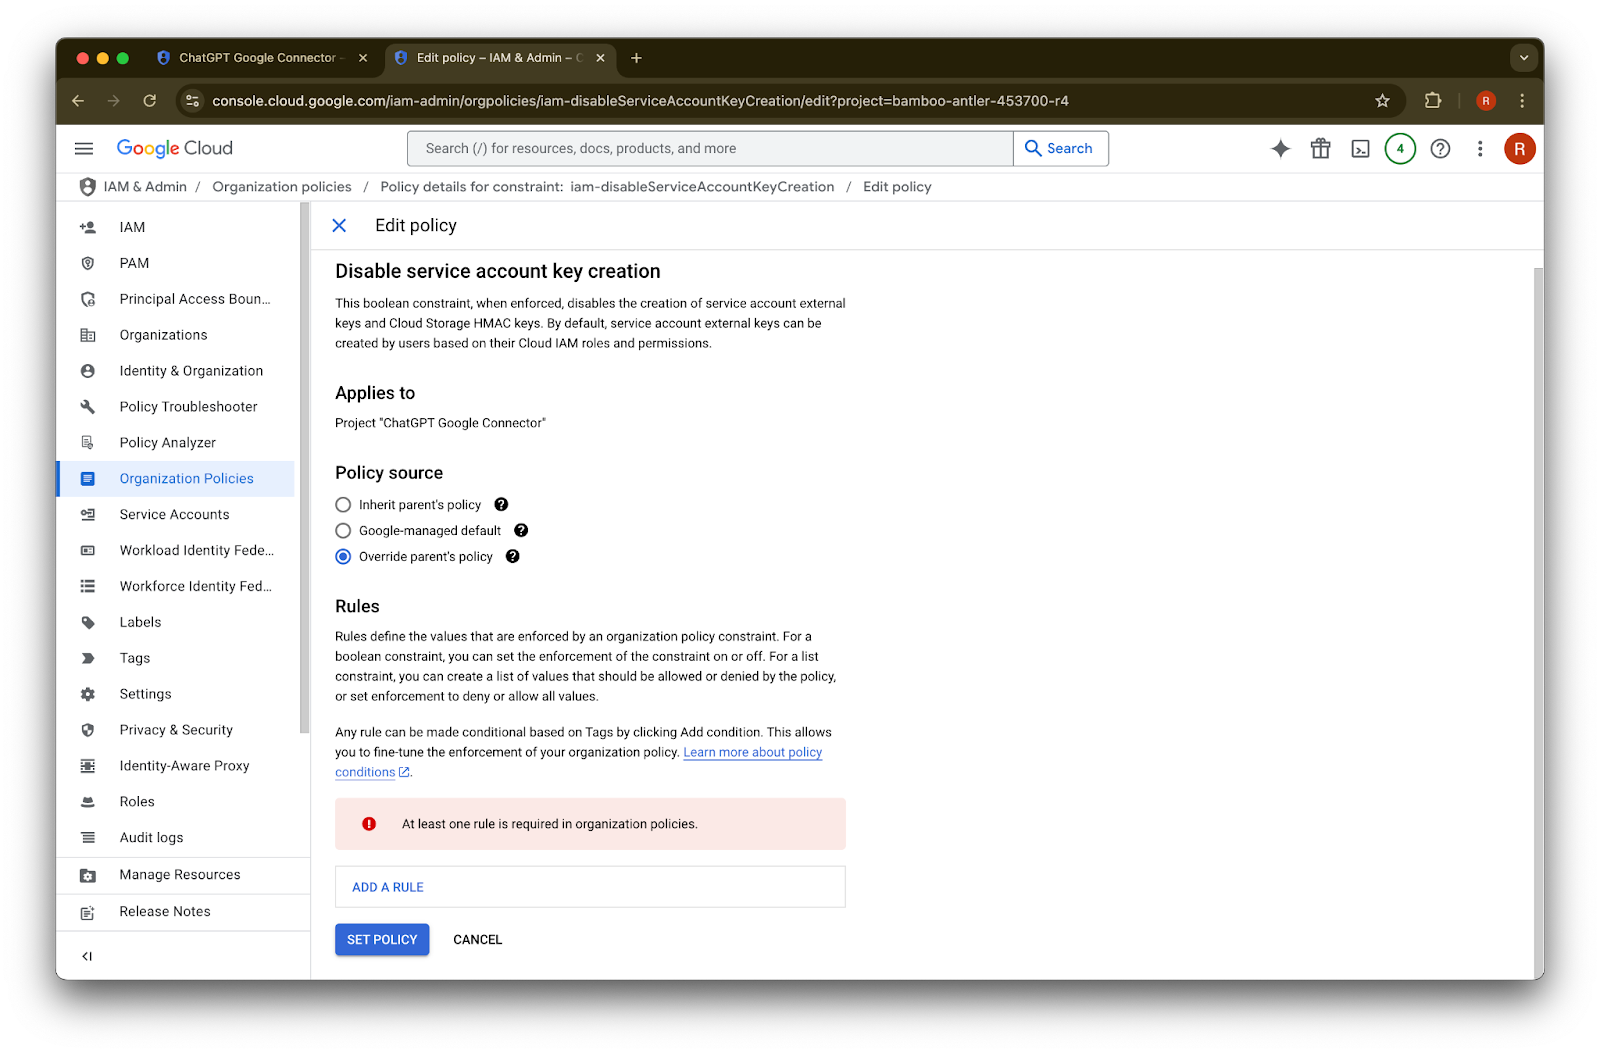
ID ఉన్న వరుసలో … పై క్లిక్ చేయండి.Edit policy పై క్లిక్ చేయండి. Edit policy disable అయి ఉంటే, మీరు Organization Policy Administrator కావాలి.
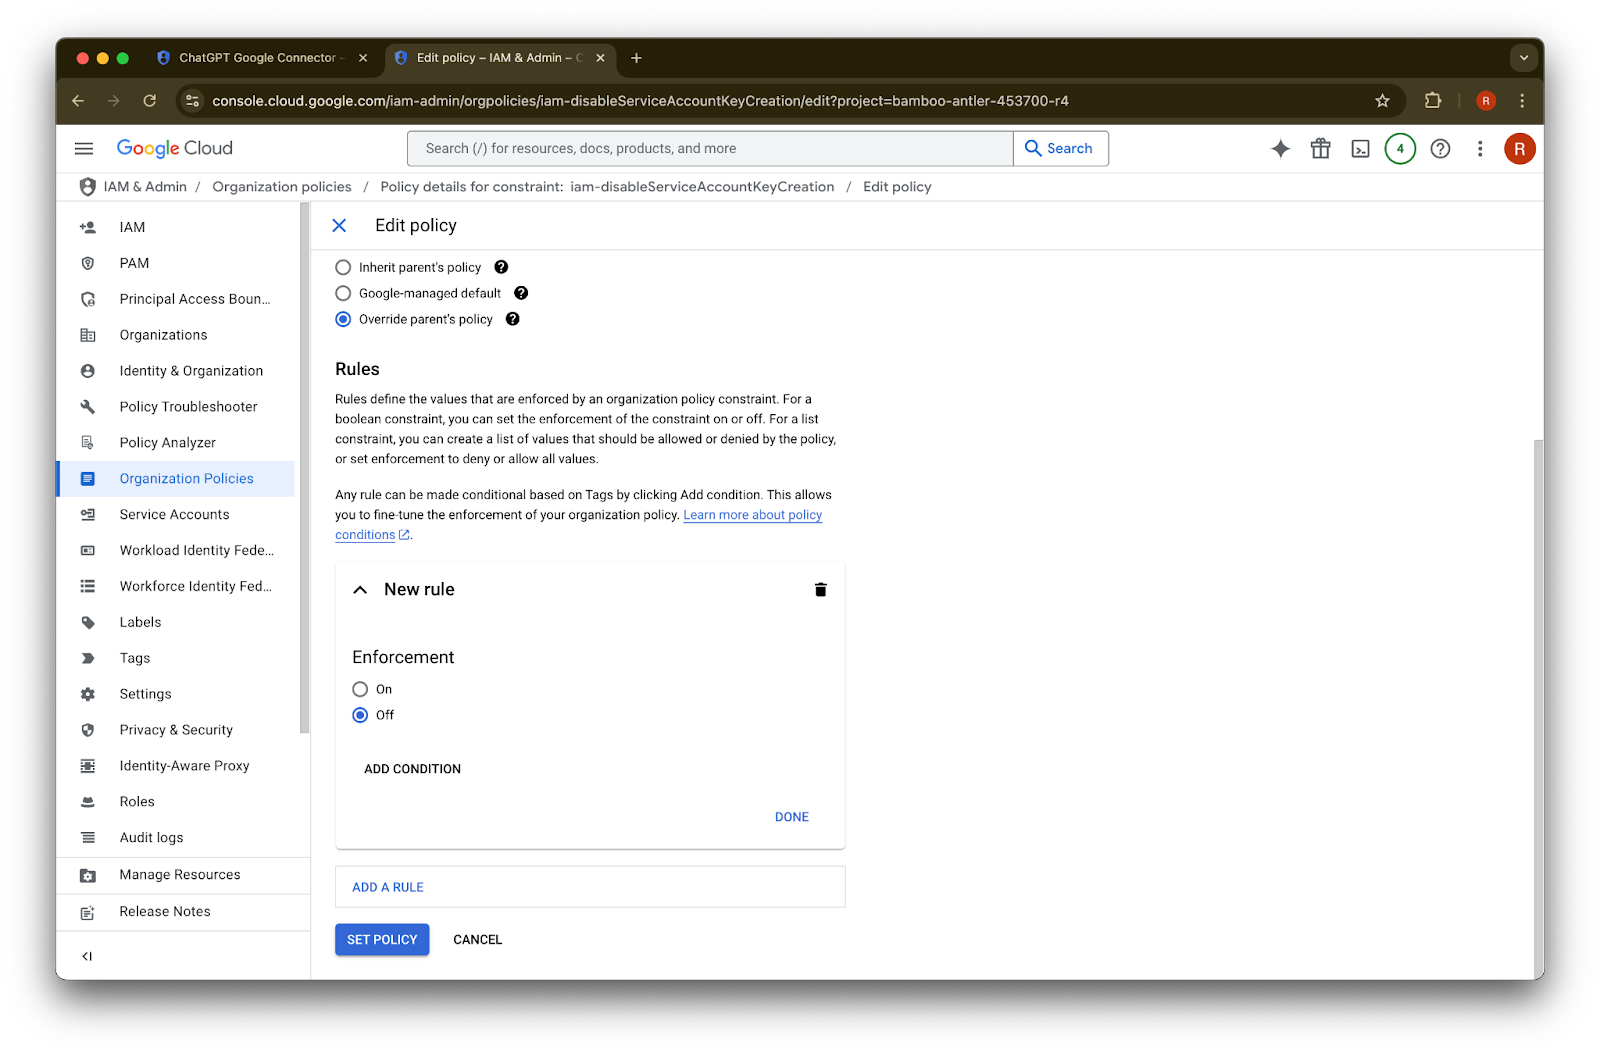
Override parent’s policy
పై క్లిక్ చేయండి.Add a rule
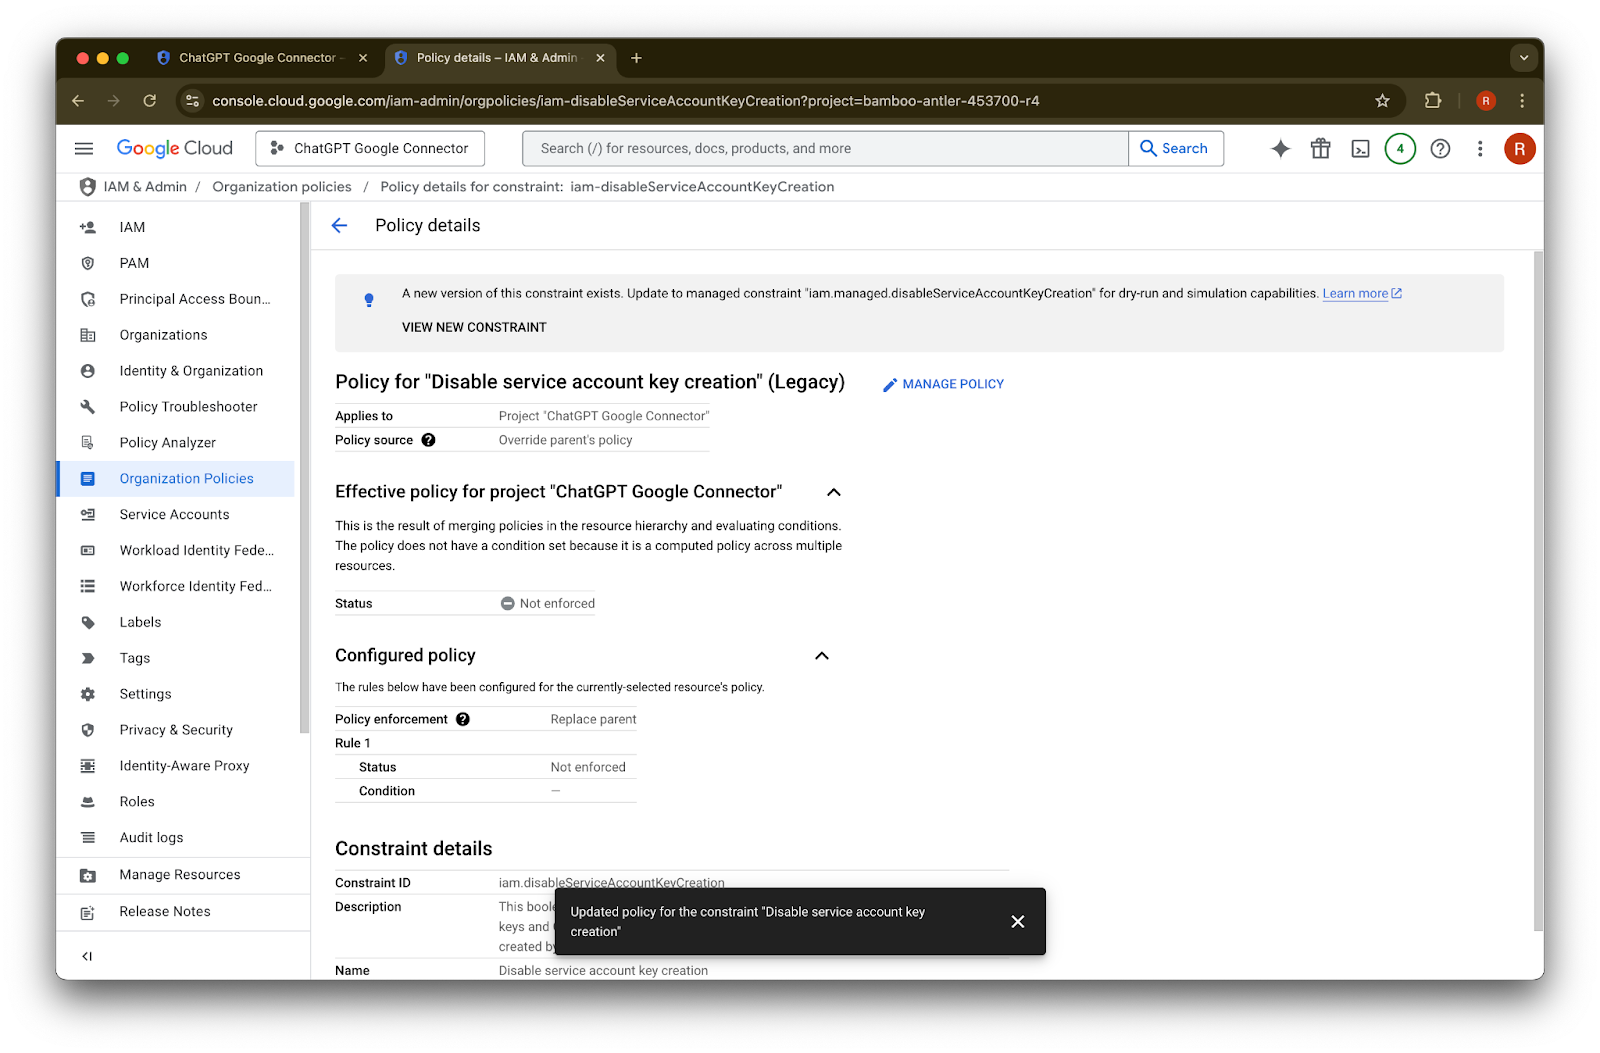
పై క్లిక్ చేయండి.Set Policy
పై క్లిక్ చేయండి.ఇప్పుడు మీరు service account key ను సృష్టించవచ్చు. ఈ enablement అమల్లోకి రావడానికి కొన్ని నిమిషాలు పట్టవచ్చు.
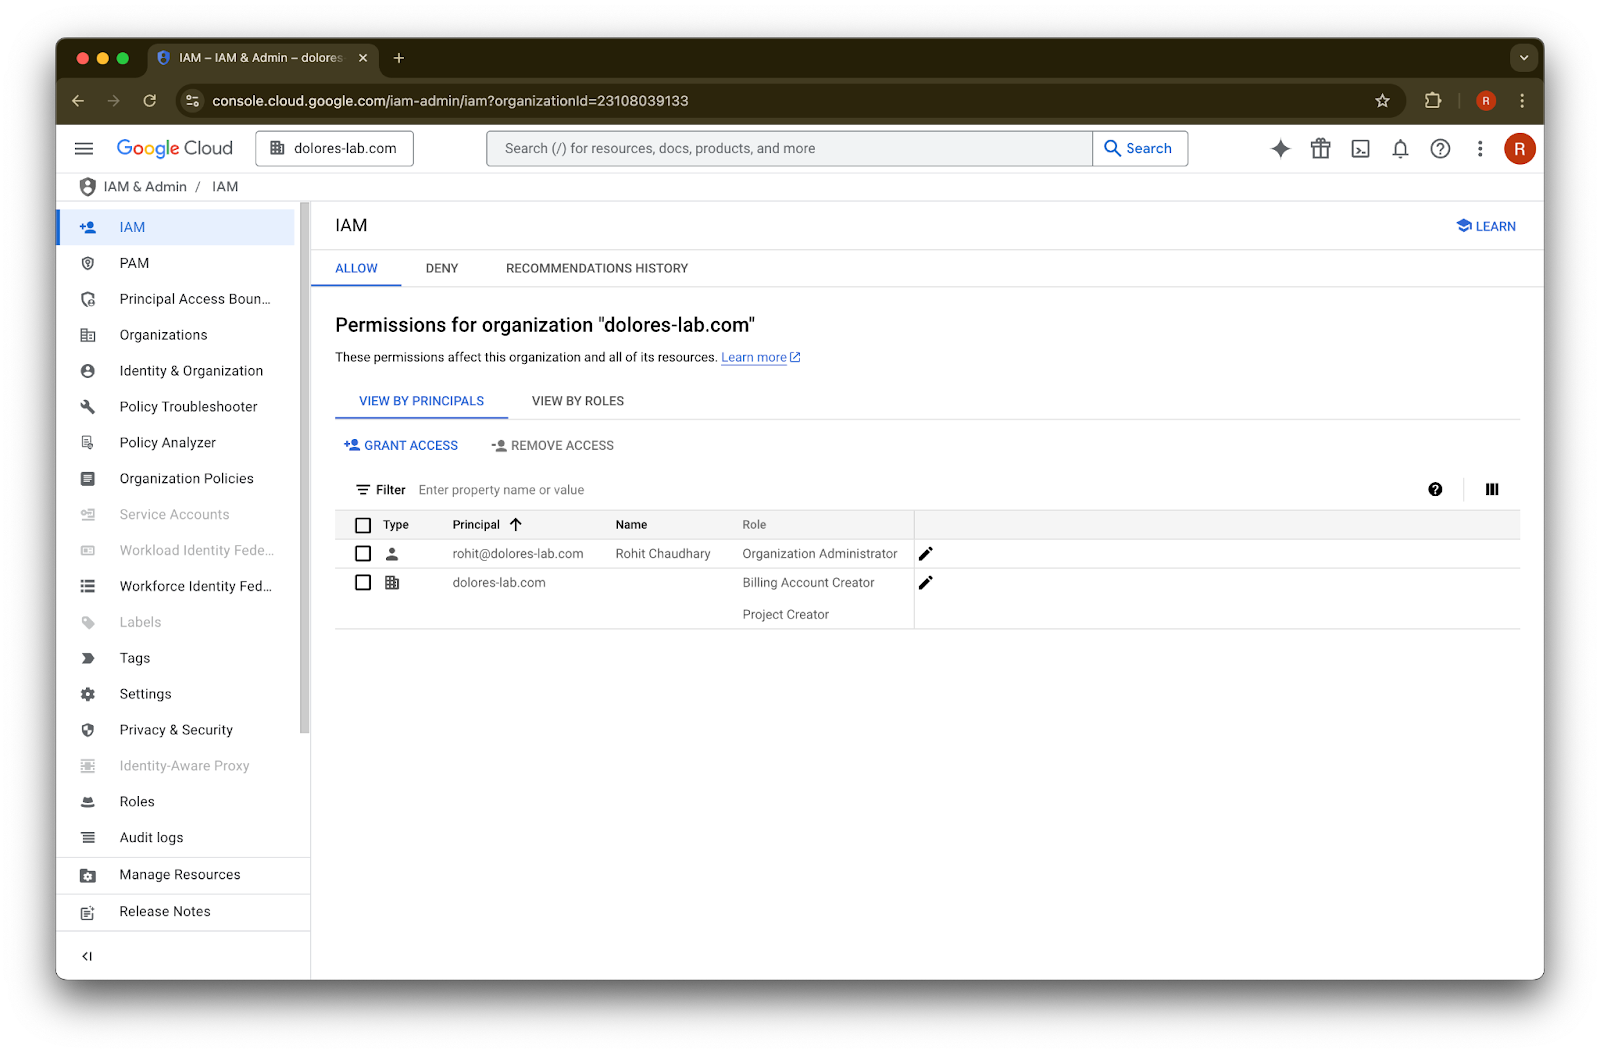
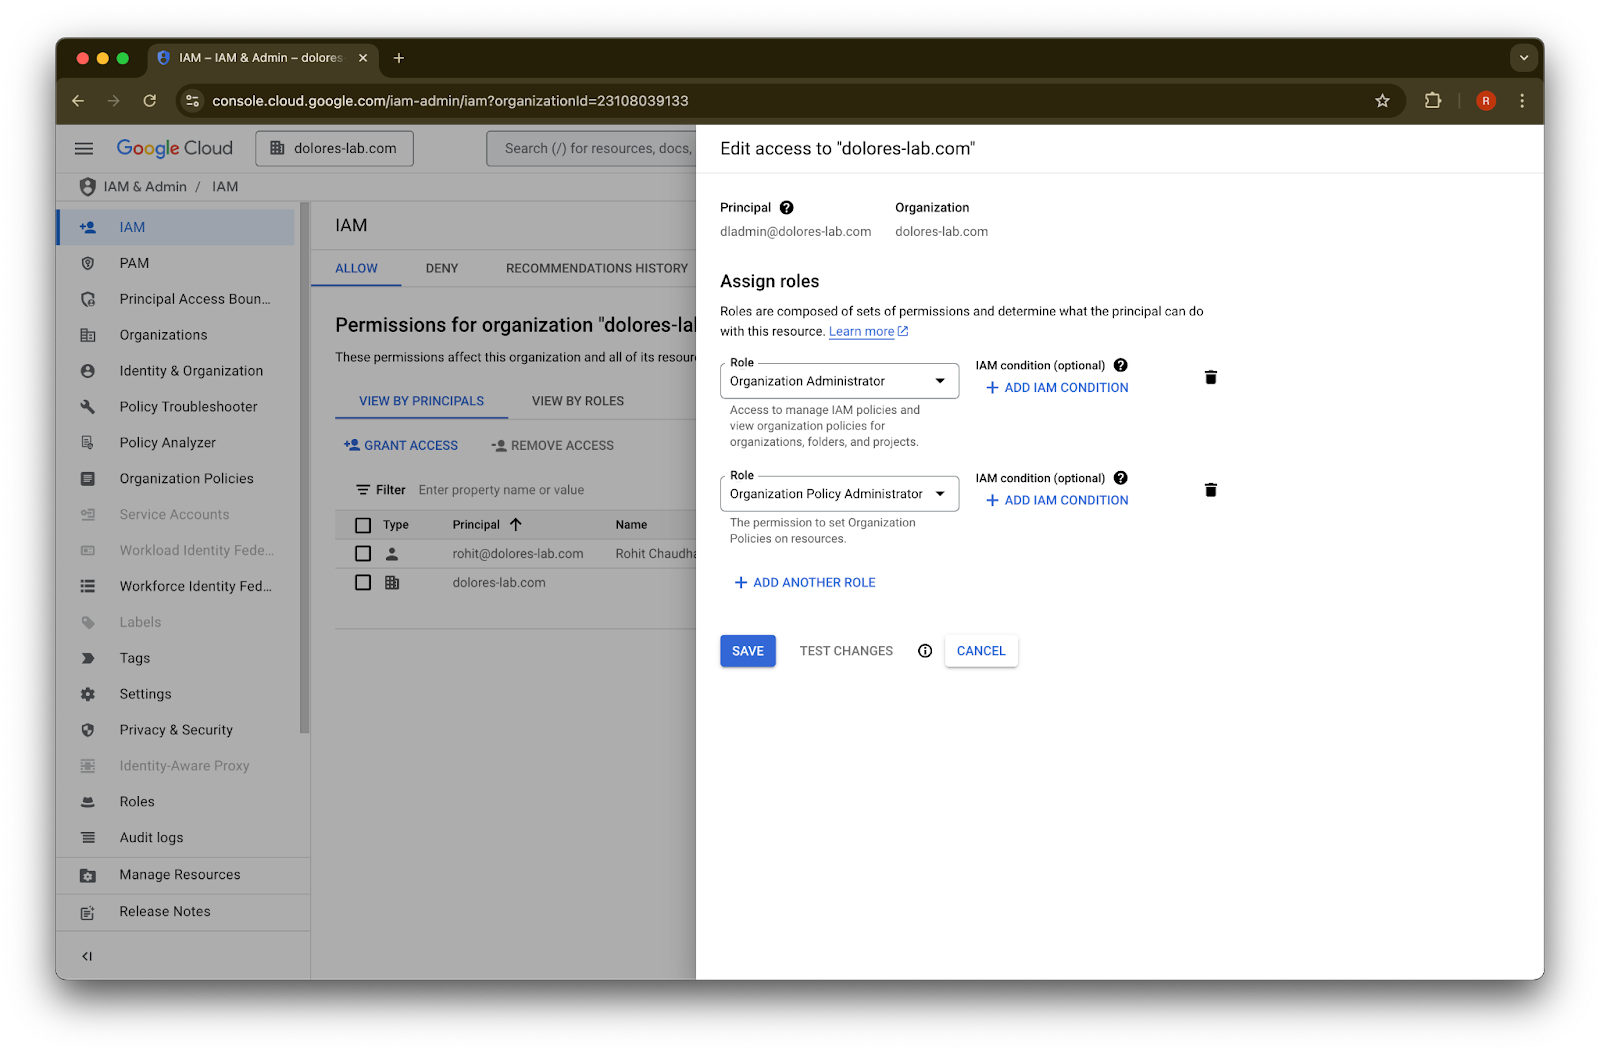
Organization Policy Administrator అవడం
console.cloud.google.com కు వెళ్లి project/organization selector పై క్లిక్ చేయండి.
your organization
పై క్లిక్ చేయండి.పై ఎడమ మూలలో ఉన్న menu icon పై క్లిక్ చేయండి.
IAM & Admin
పై hover చేయండి.IAM
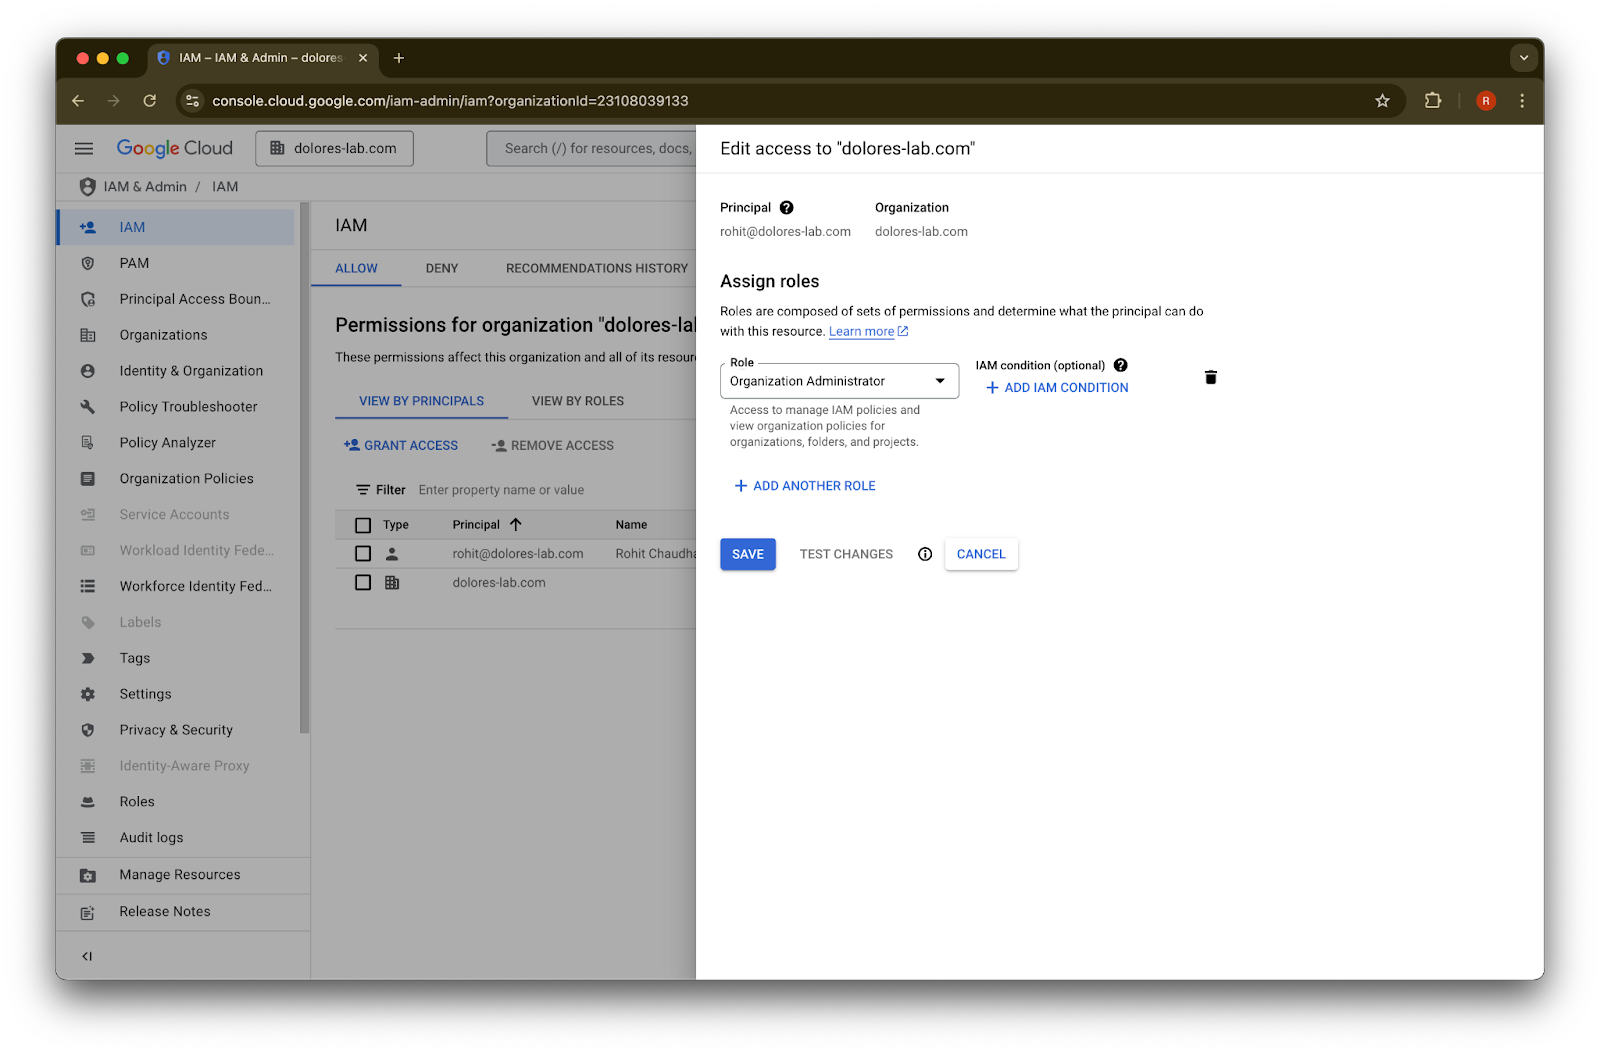
పై క్లిక్ చేయండి.మీ అకౌంట్ కోసం ఉన్న pencil పై క్లిక్ చేయండి.
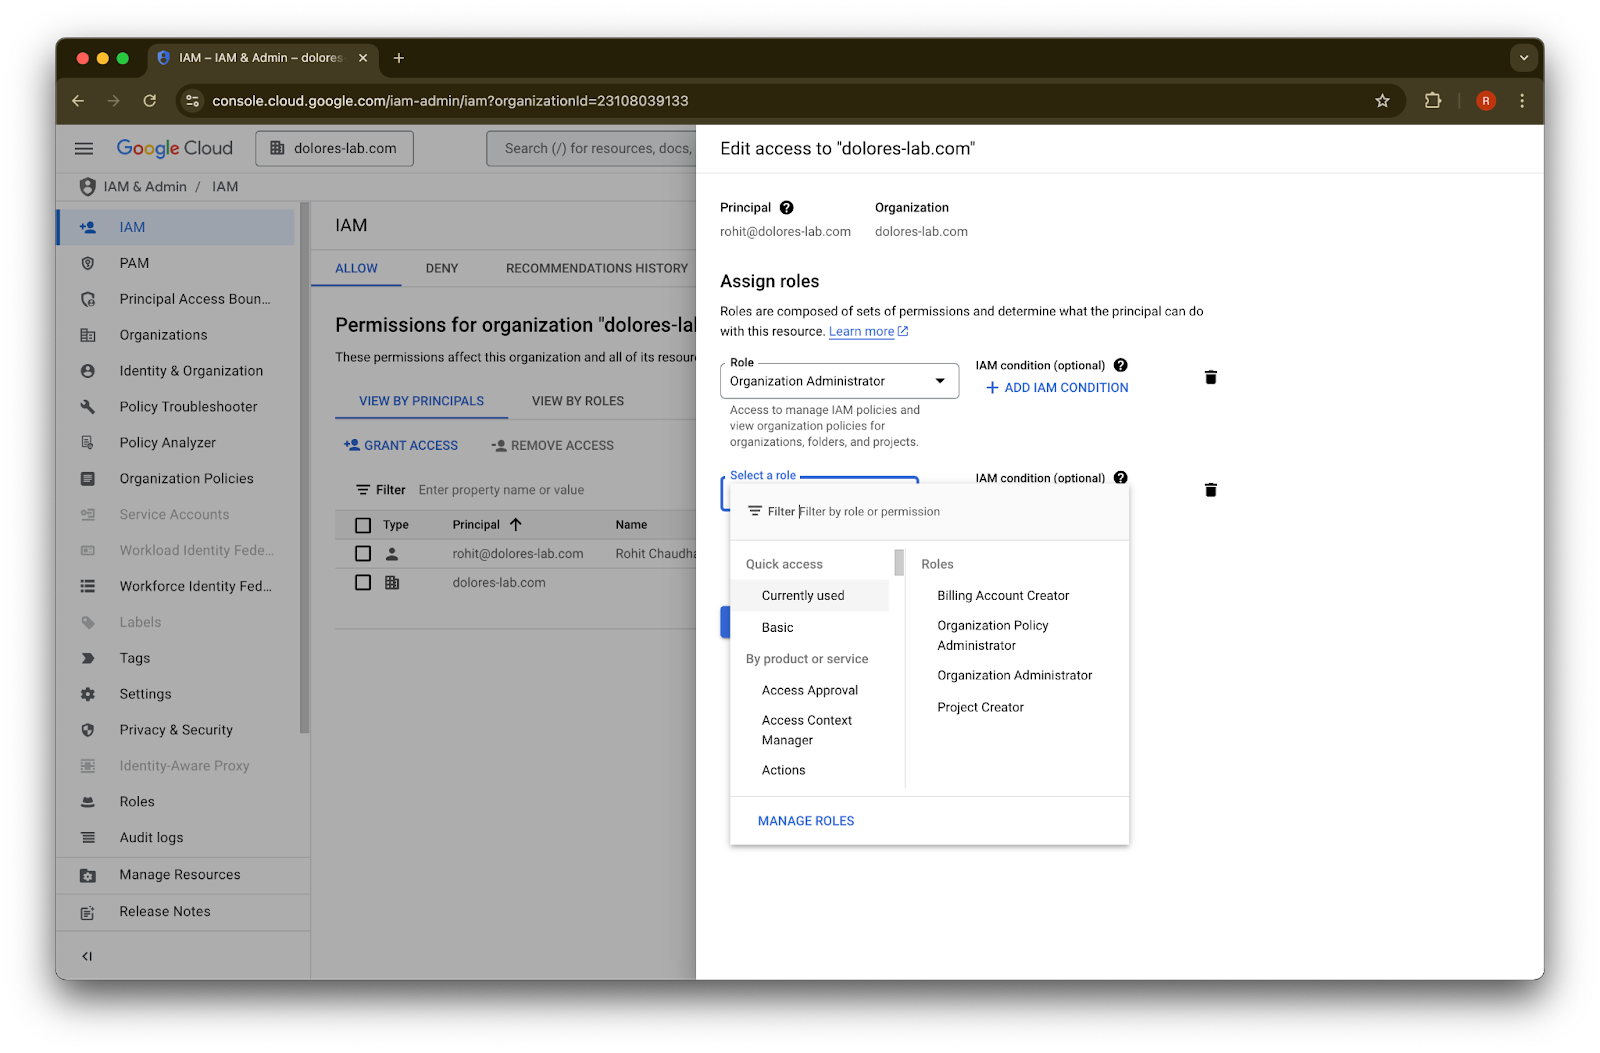
Add Another Role
పై క్లిక్ చేయండి.Organization Policy Administrator
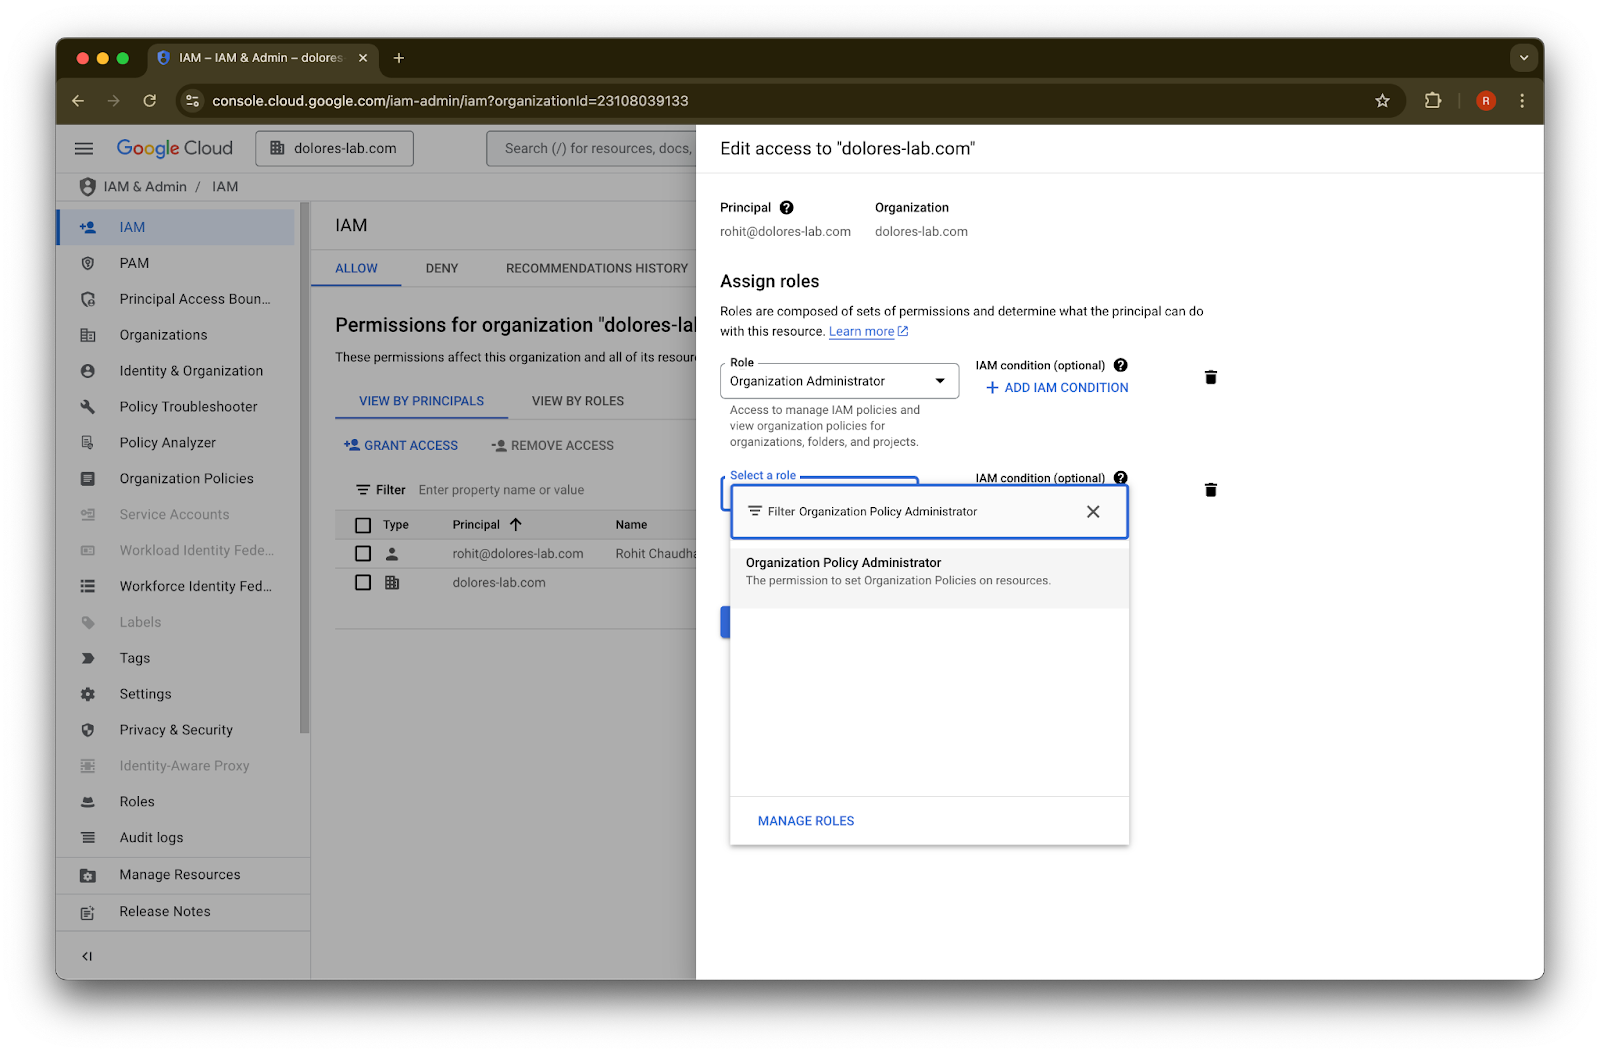
కోసం శోధించండి.Organization Policy Administrator
పై క్లిక్ చేయండి.Save పై క్లిక్ చేయండి.
ఇప్పుడు మీ అకౌంట్కు service account key creation ను enable చేయడానికి అనుమతి ఉంది. ఇది అమల్లోకి రావడానికి కొన్ని నిమిషాలు పట్టవచ్చు.
Google Workspace మరియు ChatGPT కోసం వేర్వేరు ఇమెయిల్ అకౌంట్లను నిర్వహించడానికి Google ఇమెయిల్ అలియాస్ ఉపయోగించడం
మీరు Google Drive synced connectors కోసం admin-managed setup ను ఉపయోగించి మీ ChatGPT వర్క్స్పేస్కు Google Workspace ను కనెక్ట్ చేస్తున్న అడ్మిన్ అయితే, మరియు మీ సంస్థ ChatGPT మరియు Google Workspace కోసం వేర్వేరు ఇమెయిల్ డొమైన్లును ఉపయోగిస్తే, వినియోగదారులు Google Drive synced connectors ను విజయవంతంగా యాక్సెస్ చేయగలిగేలా చేయడానికి మీరు అదనపు దశలు తీసుకోవాలి.
సిఫారసు: సాధ్యమైనప్పుడల్లా, Google Workspace మరియు ChatGPT అకౌంట్లకు ఒకే primary email addresses ను ఉపయోగించండి.
ఇది సాధ్యం కాకపోతే, ChatGPT సైన్-ఇన్ ఇమెయిల్కు సరిపోయే Google Workspace ఇమెయిల్ అలియాస్ను కాన్ఫిగర్ చేయడానికి క్రింది సూచనలను అనుసరించండి.
Google Workspace అలియాస్ జోడించే దశలు
ప్రతి వినియోగదారి ChatGPT ఇమెయిల్ను వారి Google Workspace అకౌంట్తో లింక్ చేయగలిగేలా ఉండేందుకు, Google Admin Consoleలో ఈ దశలను అనుసరించండి:
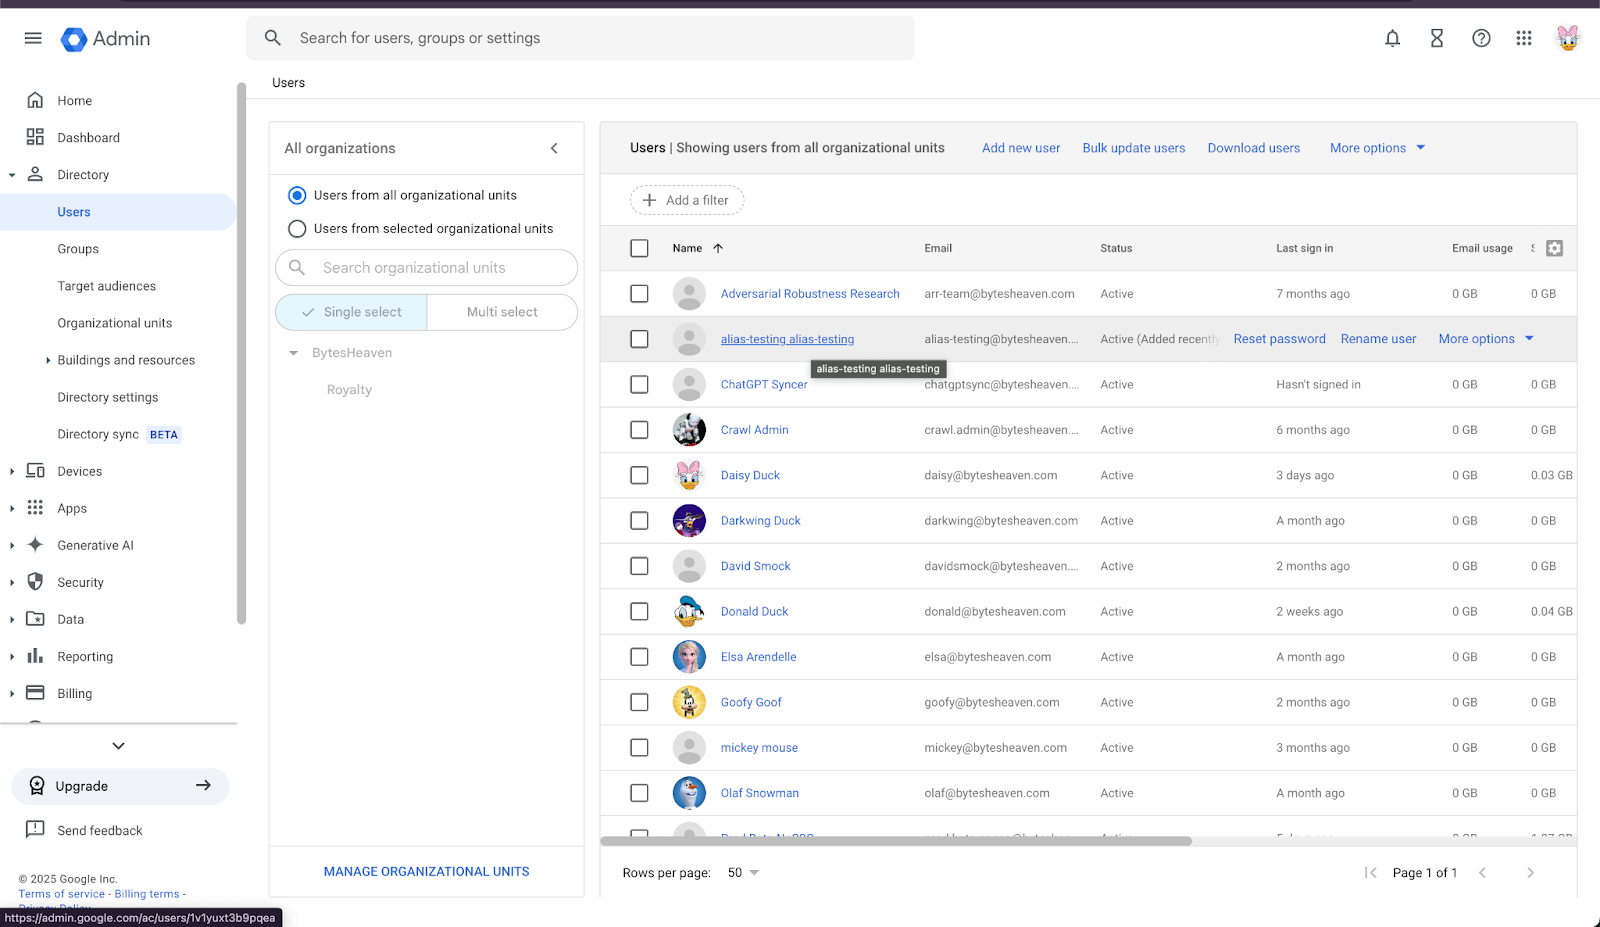
Admin Console కు వెళ్లండి. ఇక్కడికి వెళ్లండి: Directory > Users
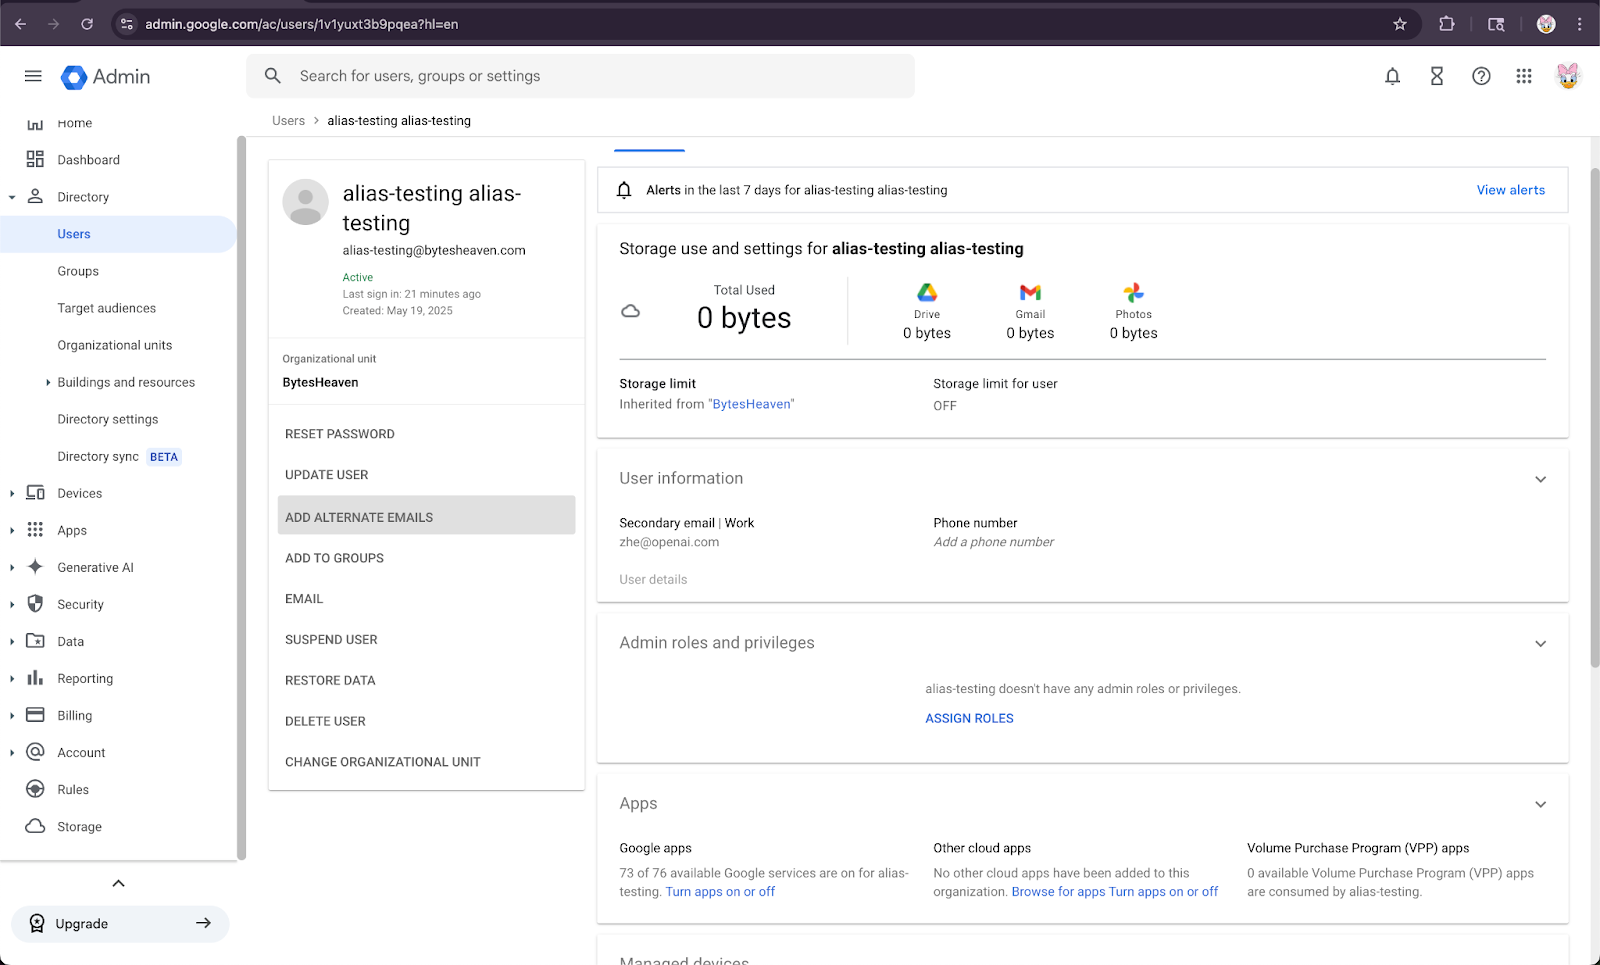
2. ఒక User ను ఎంచుకుని, తర్వాత “ADD ALTERNATIVE EMAILS” ను ఎంచుకోండి.
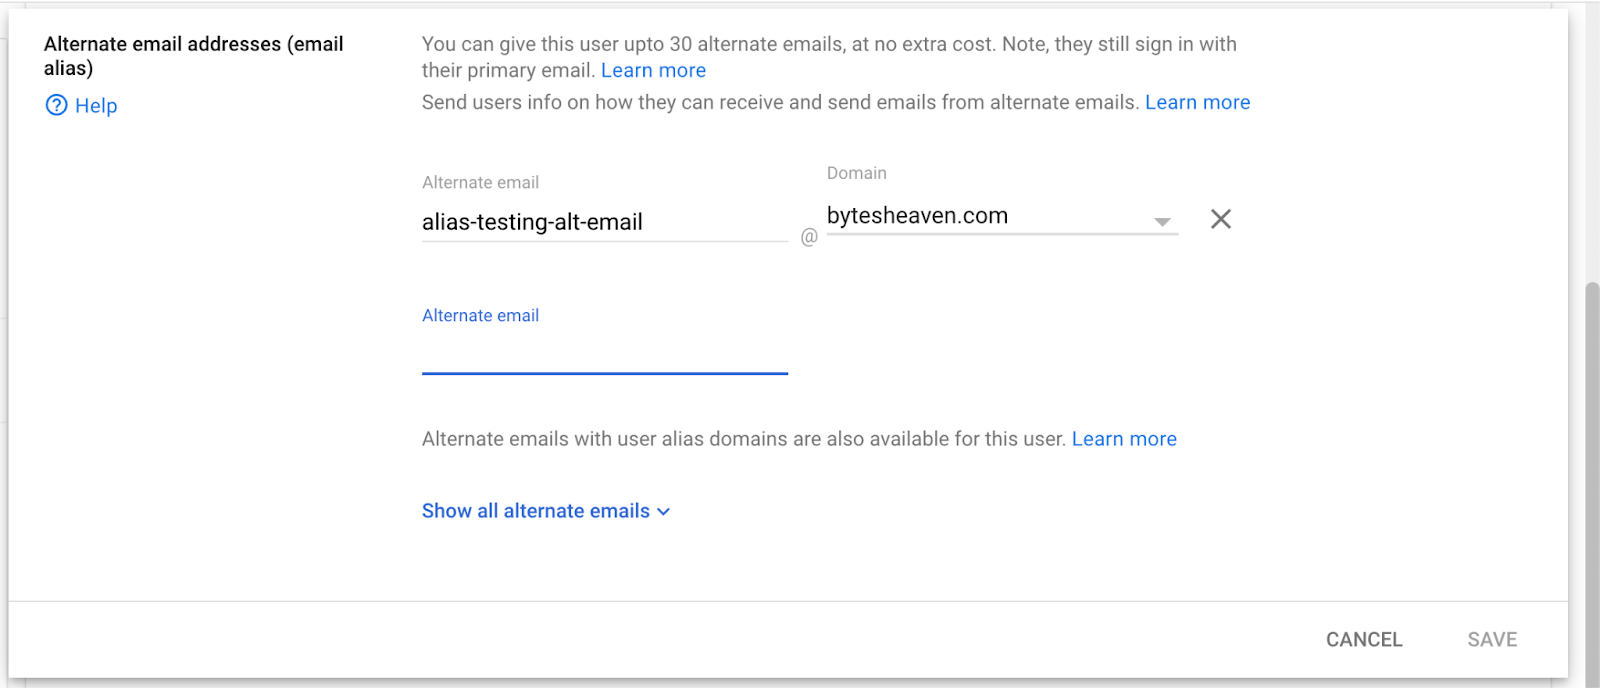
3. ఒక Alternative Email జోడించండి. అది వినియోగదారి ChatGPT అకౌంట్కు సరిపోతుందో నిర్ధారించండి.
4. Save ను ఎంచుకోండి.
తెలిసిన పరిమితులు
వ్యక్తిగత ఇమెయిల్ చిరునామాలకు మద్దతు లేదు
వ్యక్తిగత చిరునామాలతో (ఉదా., example@gmail.com) ChatGPT కు నమోదు చేసుకున్న వినియోగదారులు Google Workspace కు కనెక్ట్ కాలేరు. ఈ సెటప్కు మద్దతు లేదు మరియు ఇది భద్రతా ప్రమాదాన్ని కలిగిస్తుంది, ఎందుకంటే ఇది సంస్థ వెలుపల నుండి అంతర్గత డేటాకు ప్రాప్యతను అనుమతిస్తుంది.
Gmail "+" అలియాస్లకు మద్దతు లేదు
Gmail లో వినియోగదారులు తమ చిరునామాకు "+" ను జోడించి అలియాస్లను సృష్టించవచ్చు (ఉదా., user+alias@gmail.com). ఈ రకం aliasing Google Drive synced connectors తో పనిచేయదు. అలియాస్ను Google Workspace లో స్పష్టంగా కాన్ఫిగర్ చేయాలి.
సాధారణ దోష సందేశం
ఇమెయిల్ చిరునామాలు సరిగా లింక్ కాకపోతే, వినియోగదారులు ఈ సందేశాన్ని చూడవచ్చు: "మీ అకౌంట్ను Google Drive కు కనెక్ట్ చేయలేకపోయాము. మరింత తెలుసుకోవడానికి క్లిక్ చేయండి."
వినియోగదారులకు ఈ సందేశం వస్తే, ఈ పత్రంలోని దశలను సమీక్షించి అవి కచ్చితంగా అనుసరించబడ్డాయో నిర్ధారించండి. అదనపు సహాయం అవసరమైతే, దయచేసి మా support team ను సంప్రదించండి.