
اپنے Google Workspace کو admin-managed setup استعمال کرتے ہوئے ChatGPT سے connect کرنے کے لیے، پہلے آپ Google کے admin consoles میں access configure کریں گے:
ایک service account بنائیں جسے Google Drive، users، اور groups تک صرف read-only رسائی حاصل ہو۔
سختی سے سفارش کی جاتی ہے کہ یہ service account اسی Google اکاؤنٹ کے تحت بنایا جائے جو آپ کے ChatGPT Workspace سے منسلک ہے۔ اگر ChatGPT ورک اسپیس کے اکاؤنٹس کا ای میل ڈومین Google Workspace میں استعمال ہونے والے ڈومین سے مختلف ہے، تو اپنے صارفین کے لیے اس connector کو فعال کرنے کے لیے آپ کو اضافی مراحل فالو کرنے ہوں گے۔
ایک admin account بنائیں جس کی جانب سے service account کام کرے گا۔
پھر، ChatGPT admin console میں setup مکمل کریں:
service account کی private key اپ لوڈ کریں (Google کی طرف سے ایک JSON فائل)
admin account مشخص کریں (credentials درکار نہیں)۔
منتخب کریں کہ کن فائلوں کو sync کرنا ہے اور ان صارفین کا انتخاب کریں جنہیں اس connection تک رسائی ہوگی۔
یہ گائیڈ آپ کو ان 6 مراحل میں سے ہر ایک سے گزارتی ہے۔
Service Account سیٹ اپ کرنا
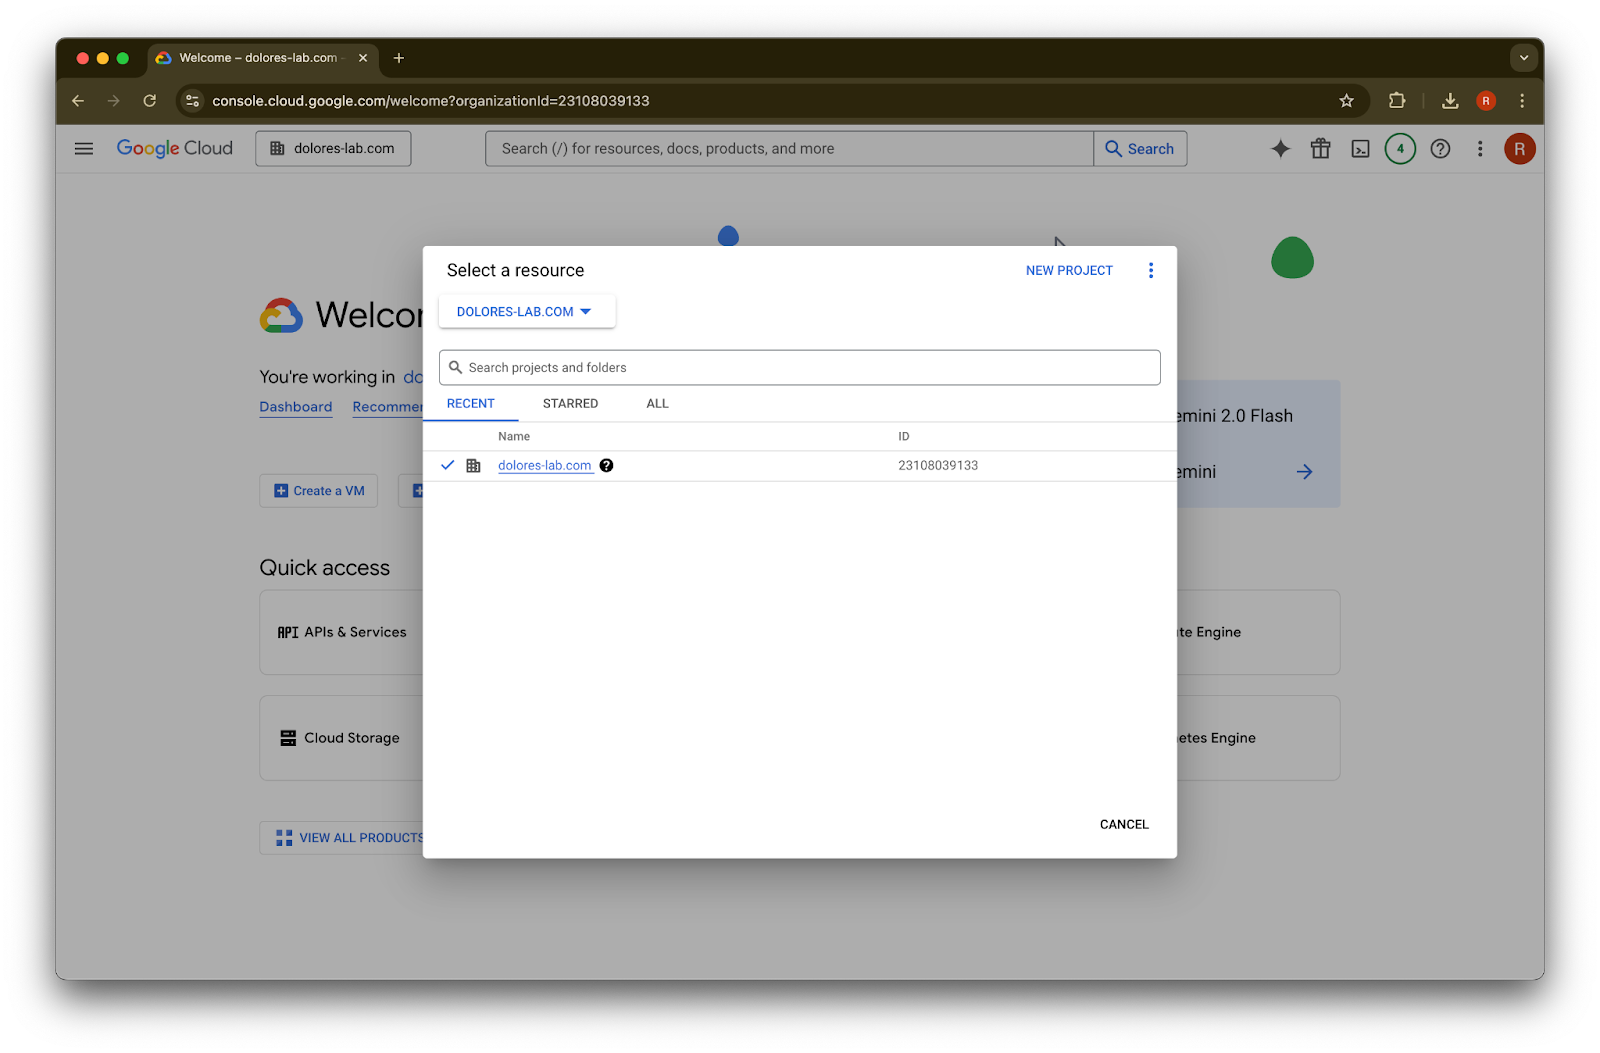
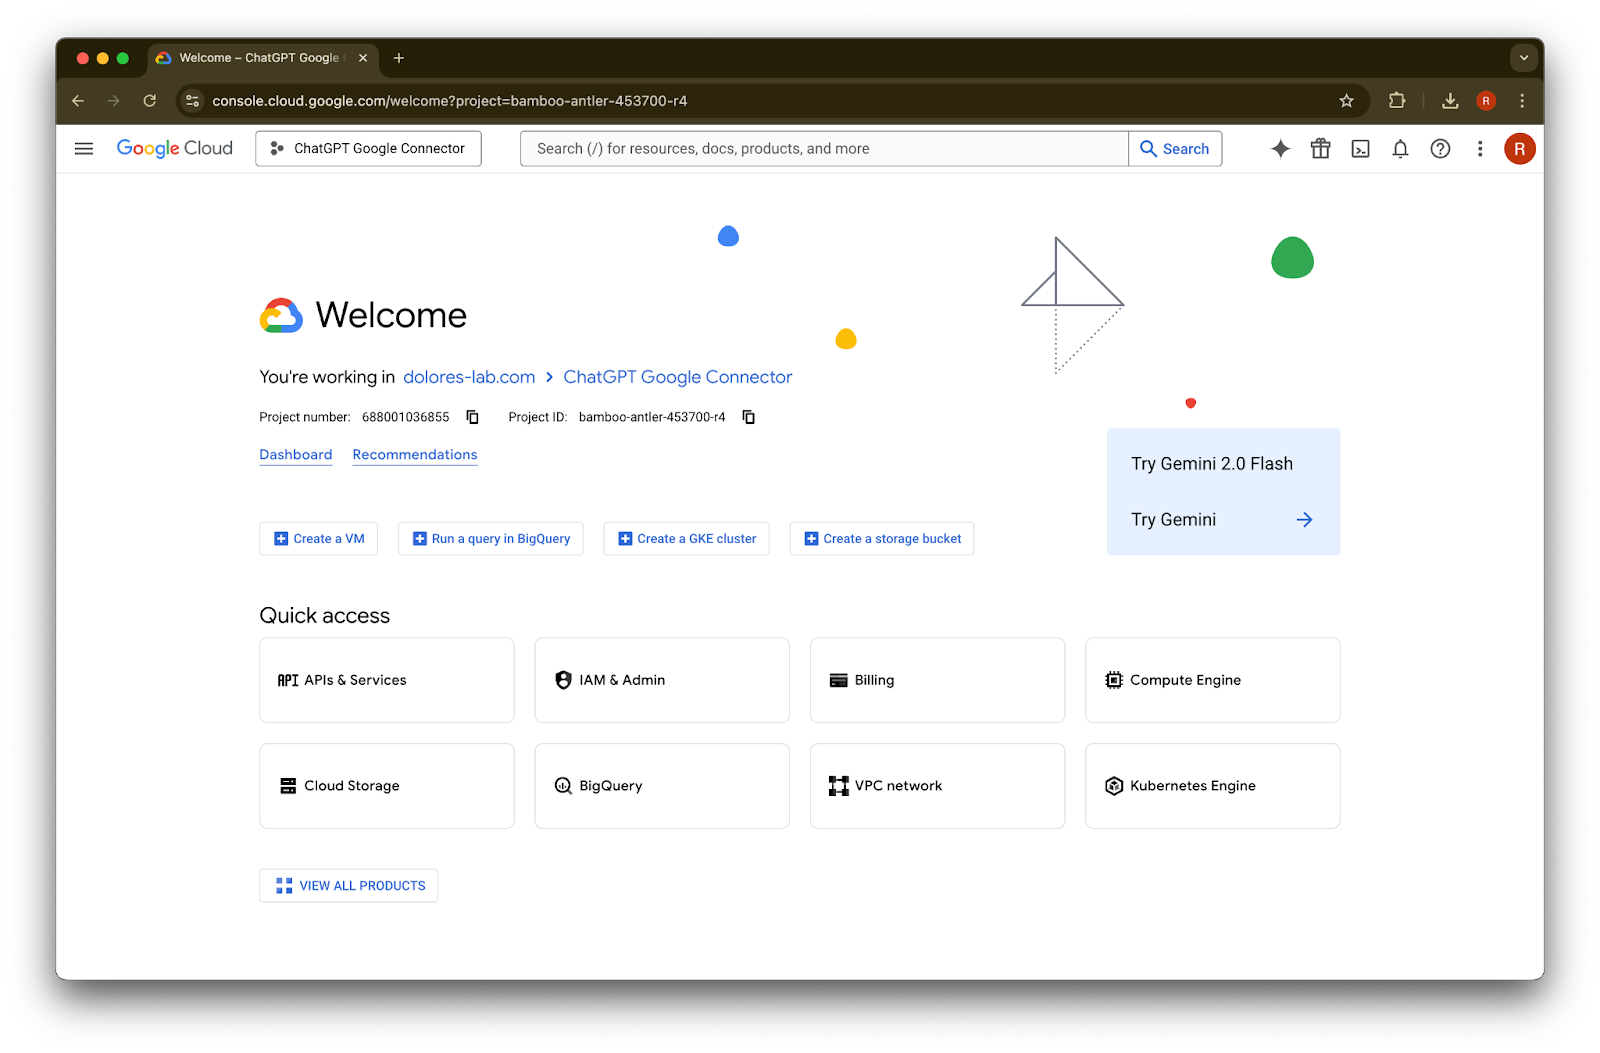
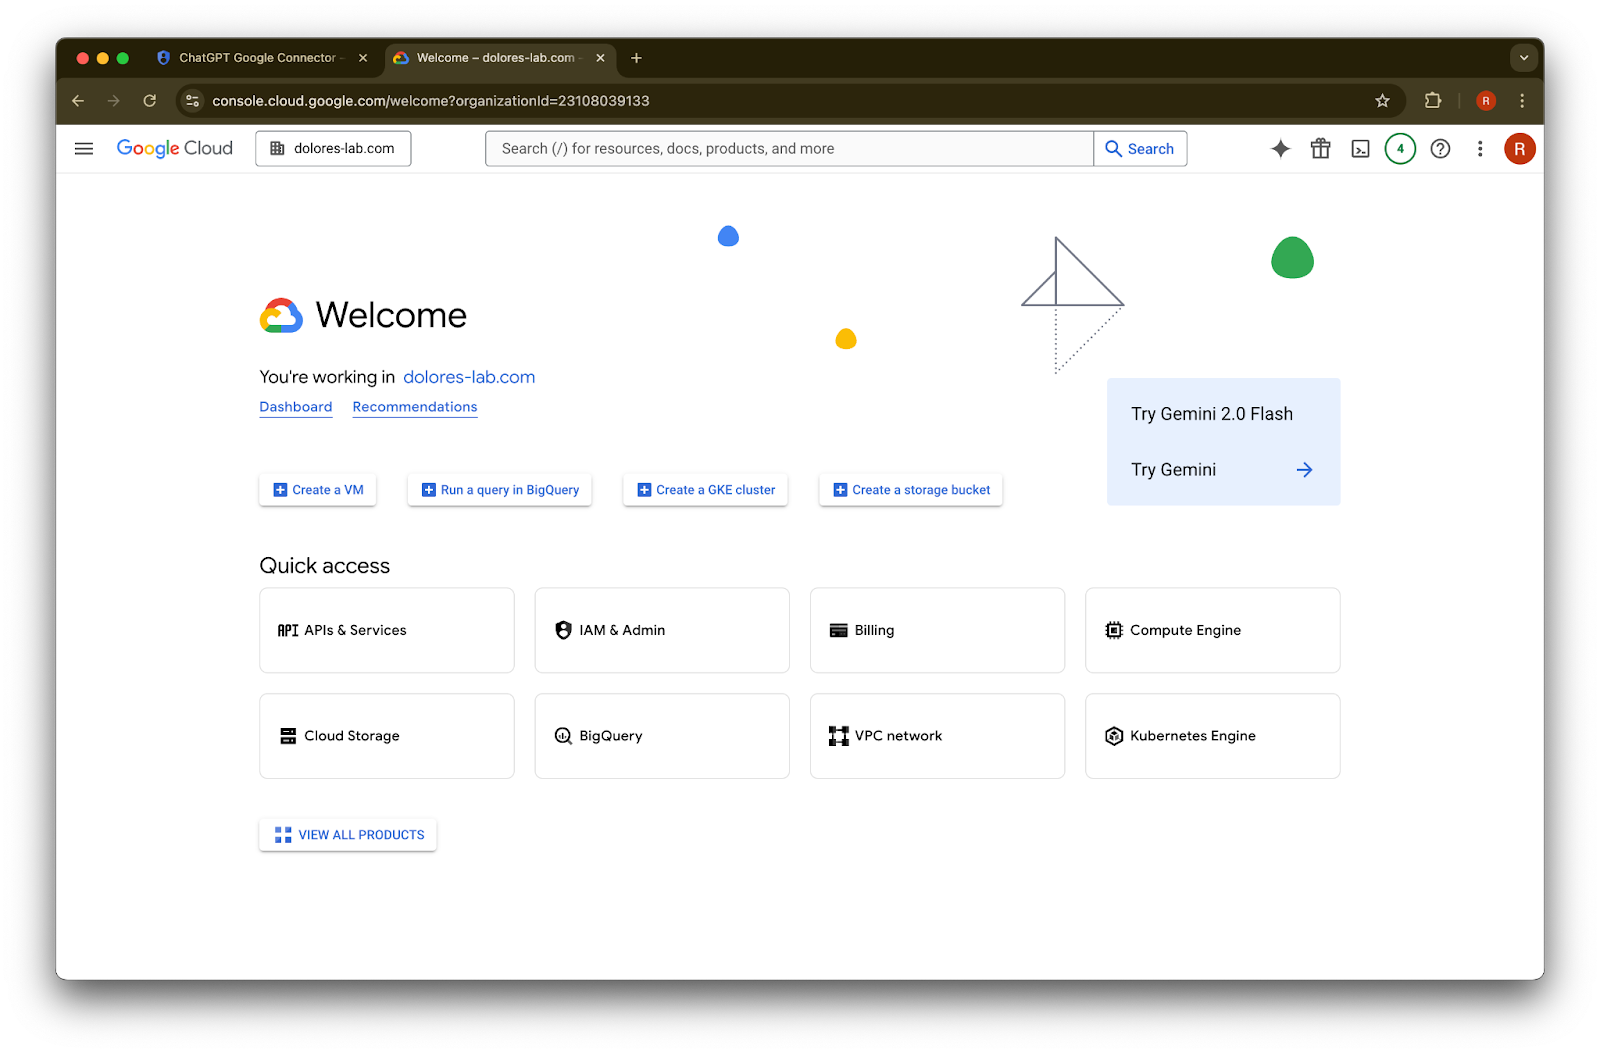
console.cloud.google.com پر جائیں۔
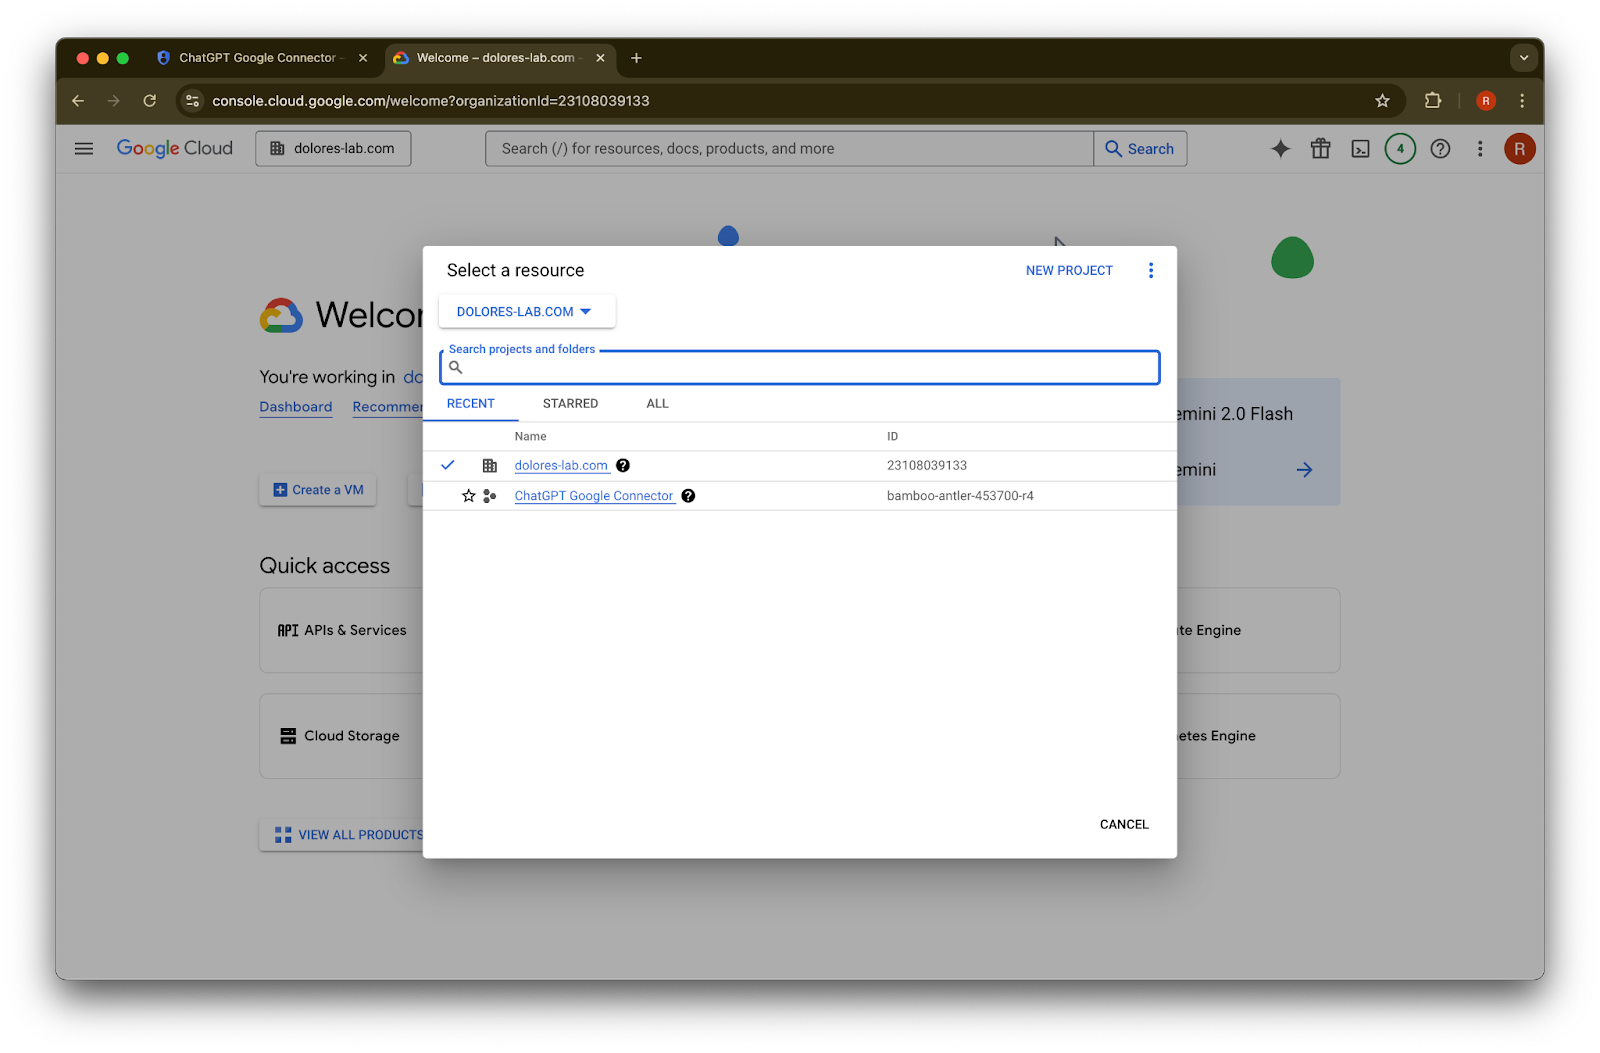
projects dropdown پر کلک کریں۔Imageیقینی بنائیں کہ آپ اسی Google ورک اسپیس میں لاگ اِن ہیں جو آپ کے ChatGPT ورک اسپیس سے منسلک ہے (اگر آپ کے ChatGPT ورک اسپیس سے کوئی Google ورک اسپیس منسلک نہیں ہے اور دونوں کے ای میل مختلف ہیں، تو آپ کو اضافی مراحل فالو کرنے ہوں گے، ورنہ آپ کے صارفین Google Drive synced connectors استعمال نہیں کر سکیں گے)۔
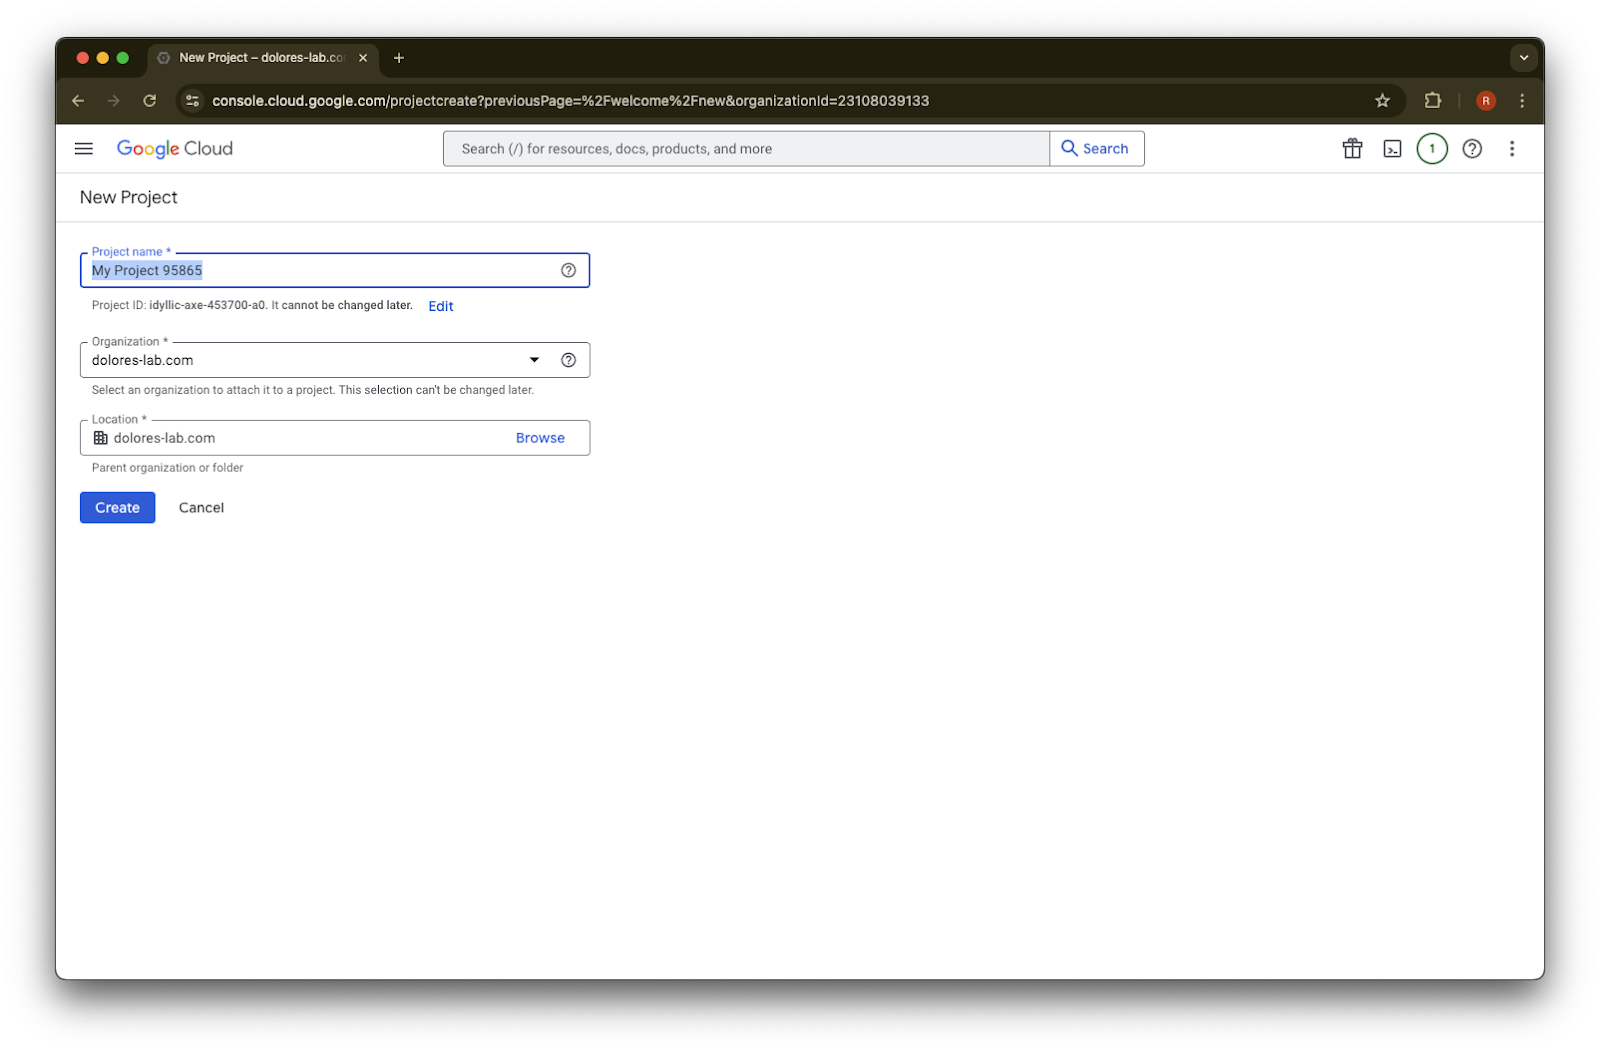
New Project منتخب کریں
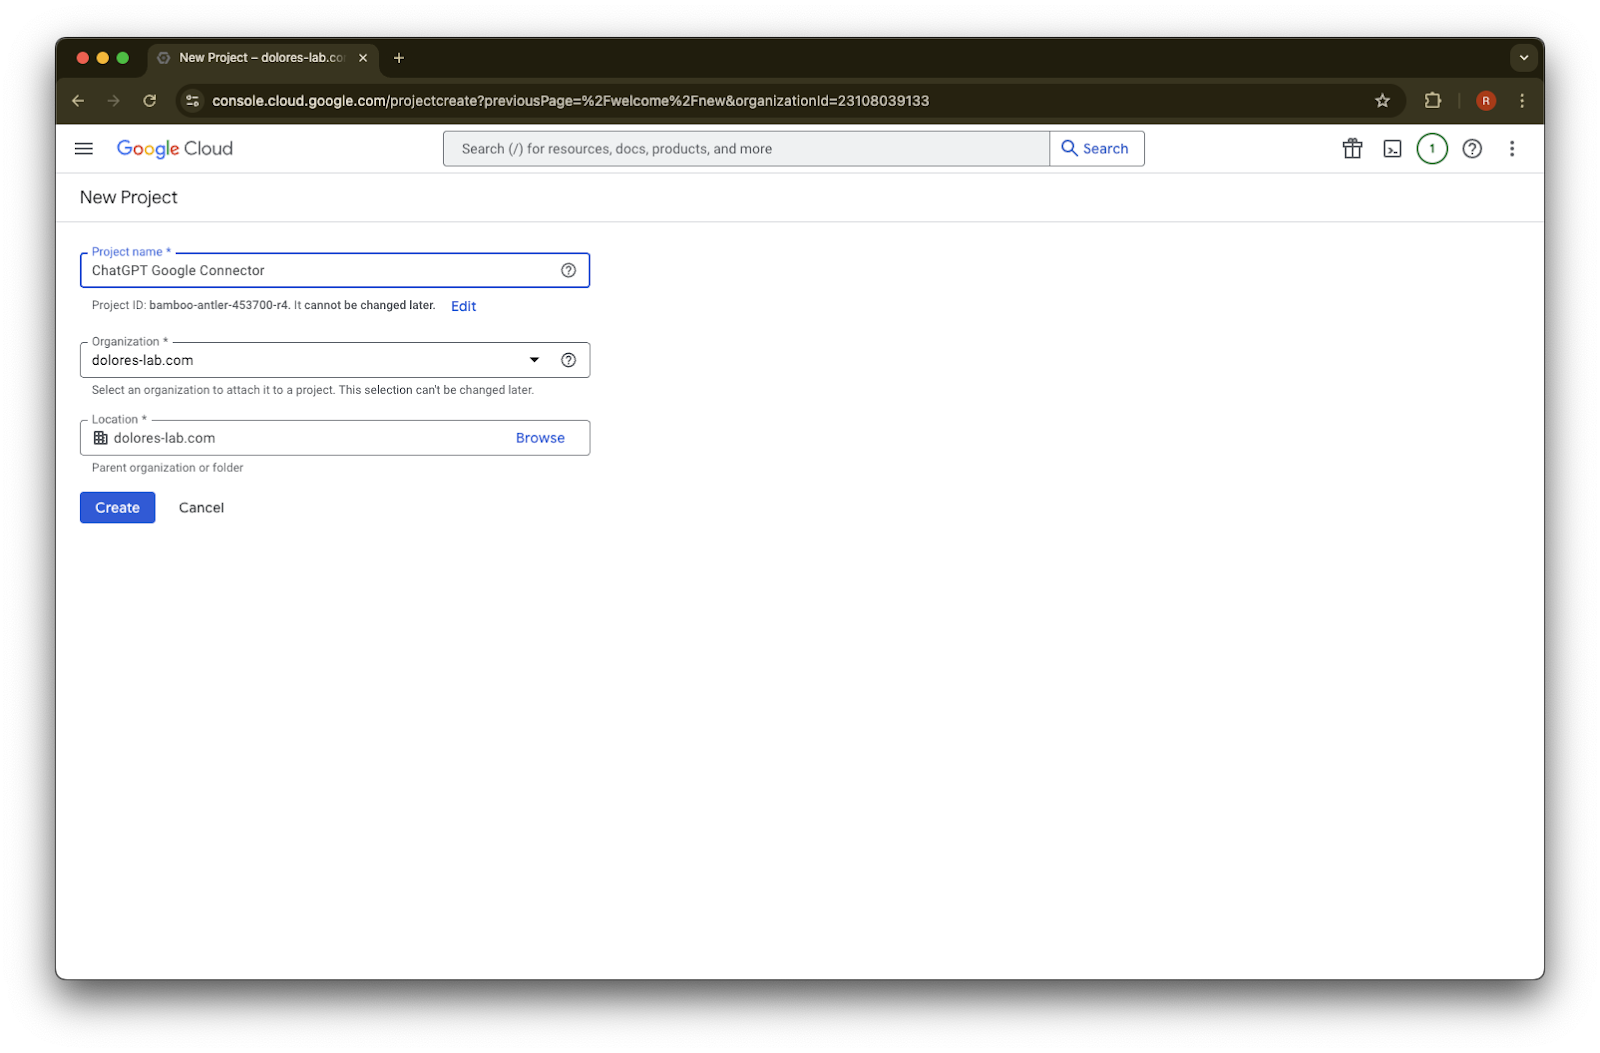
Project Name درج کریں
پروجیکٹ بنائیں
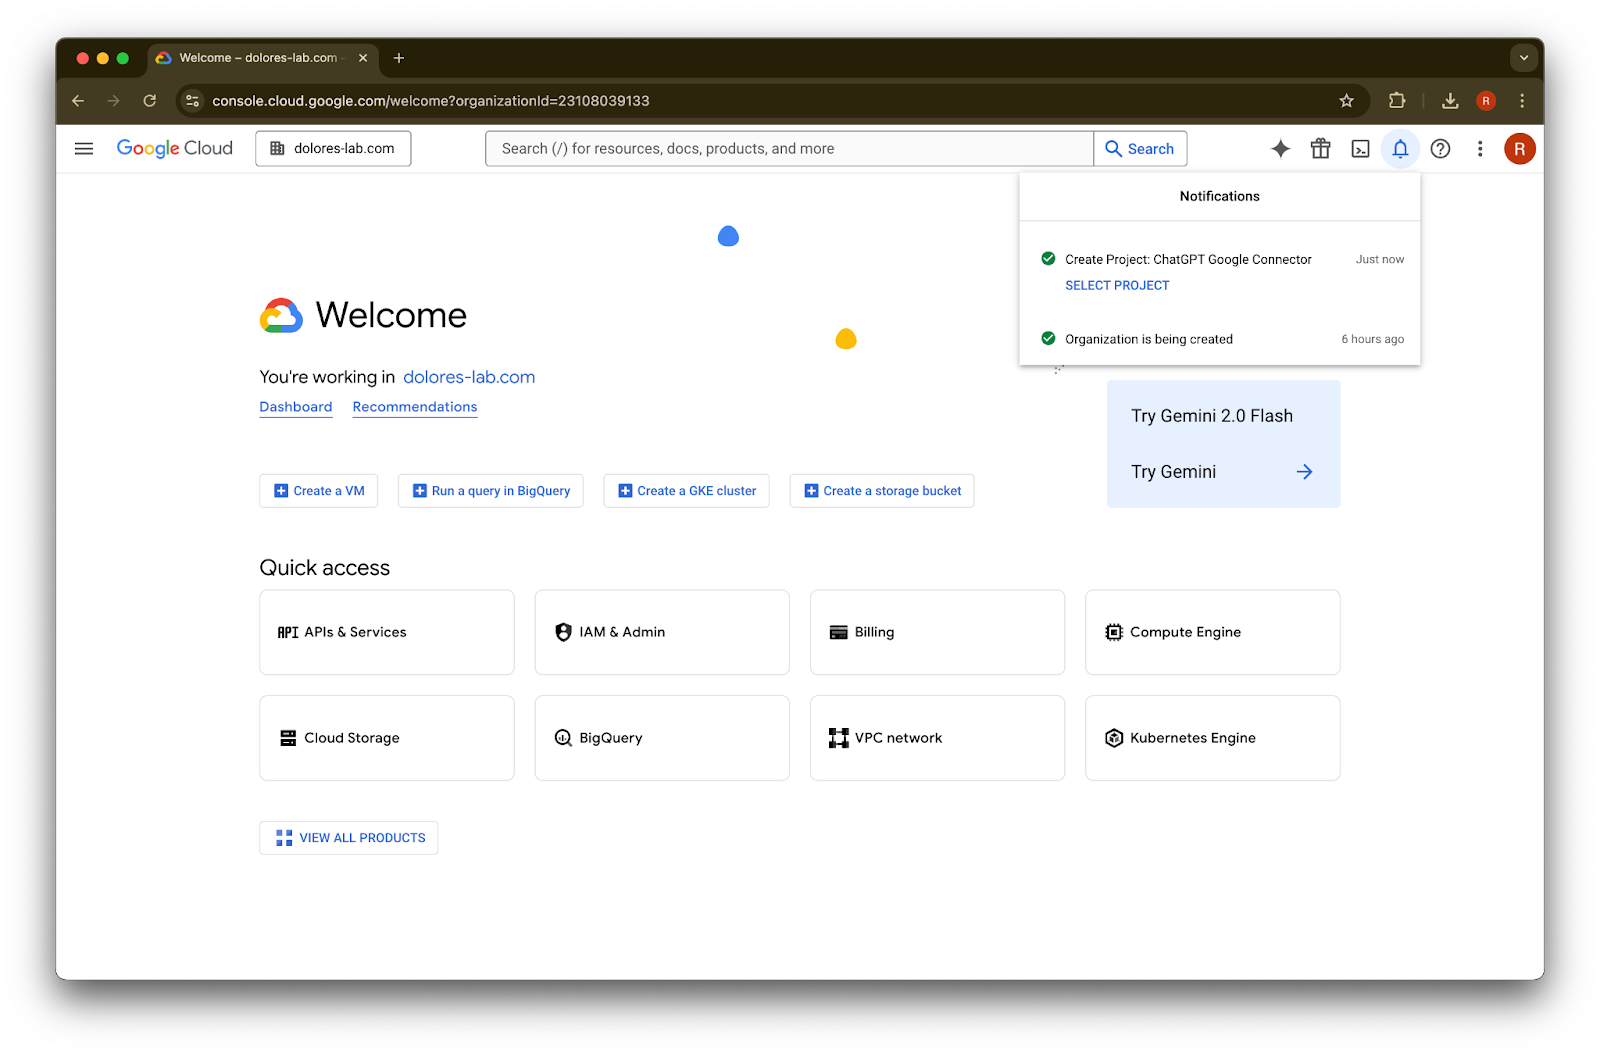
پروجیکٹ بننے تک انتظار کریں، پھر Select Project پر کلک کریں
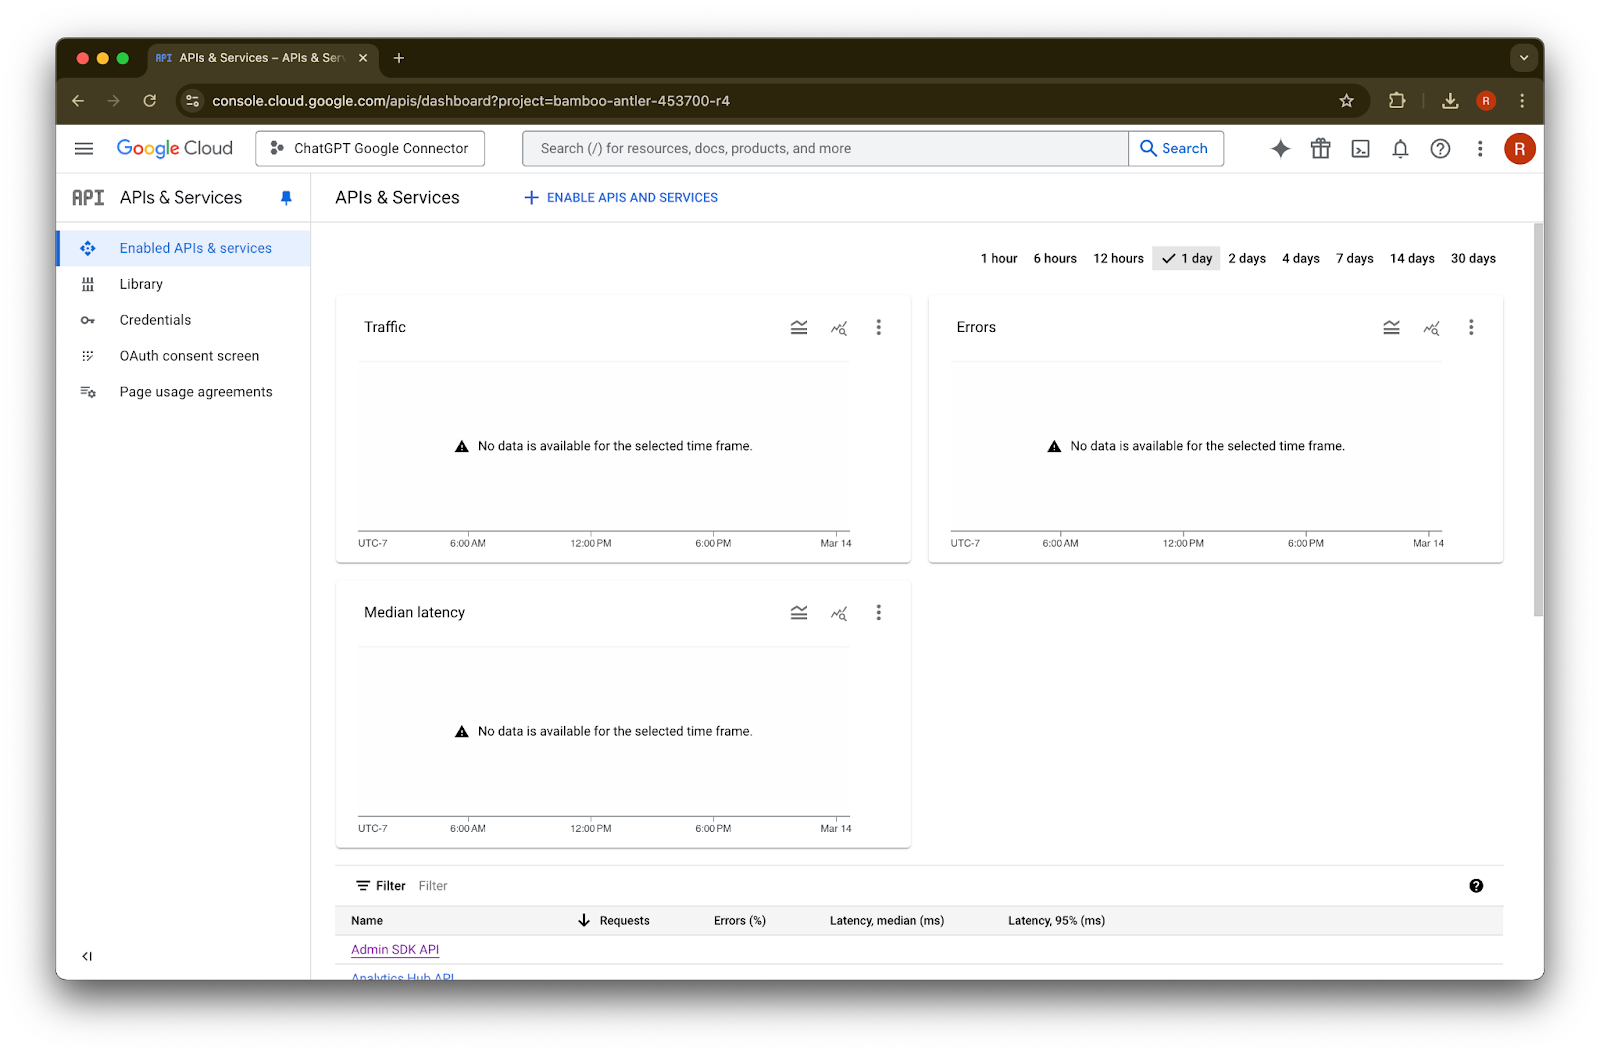
APIs & Services پر کلک کریں
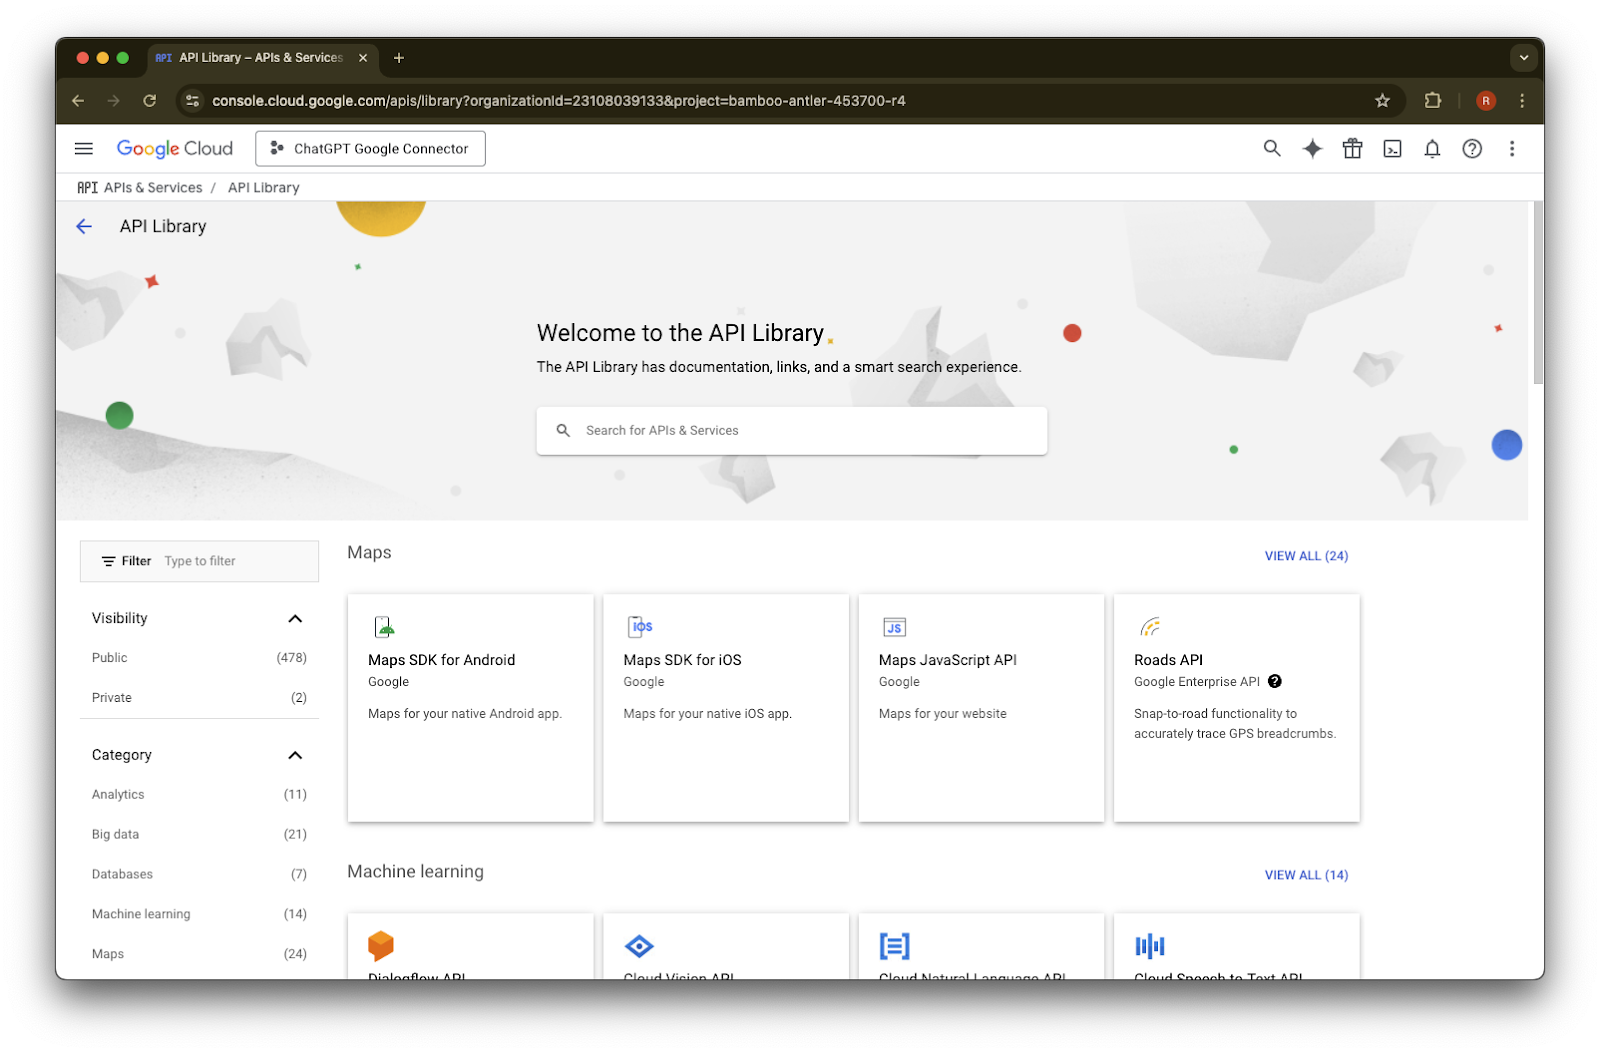
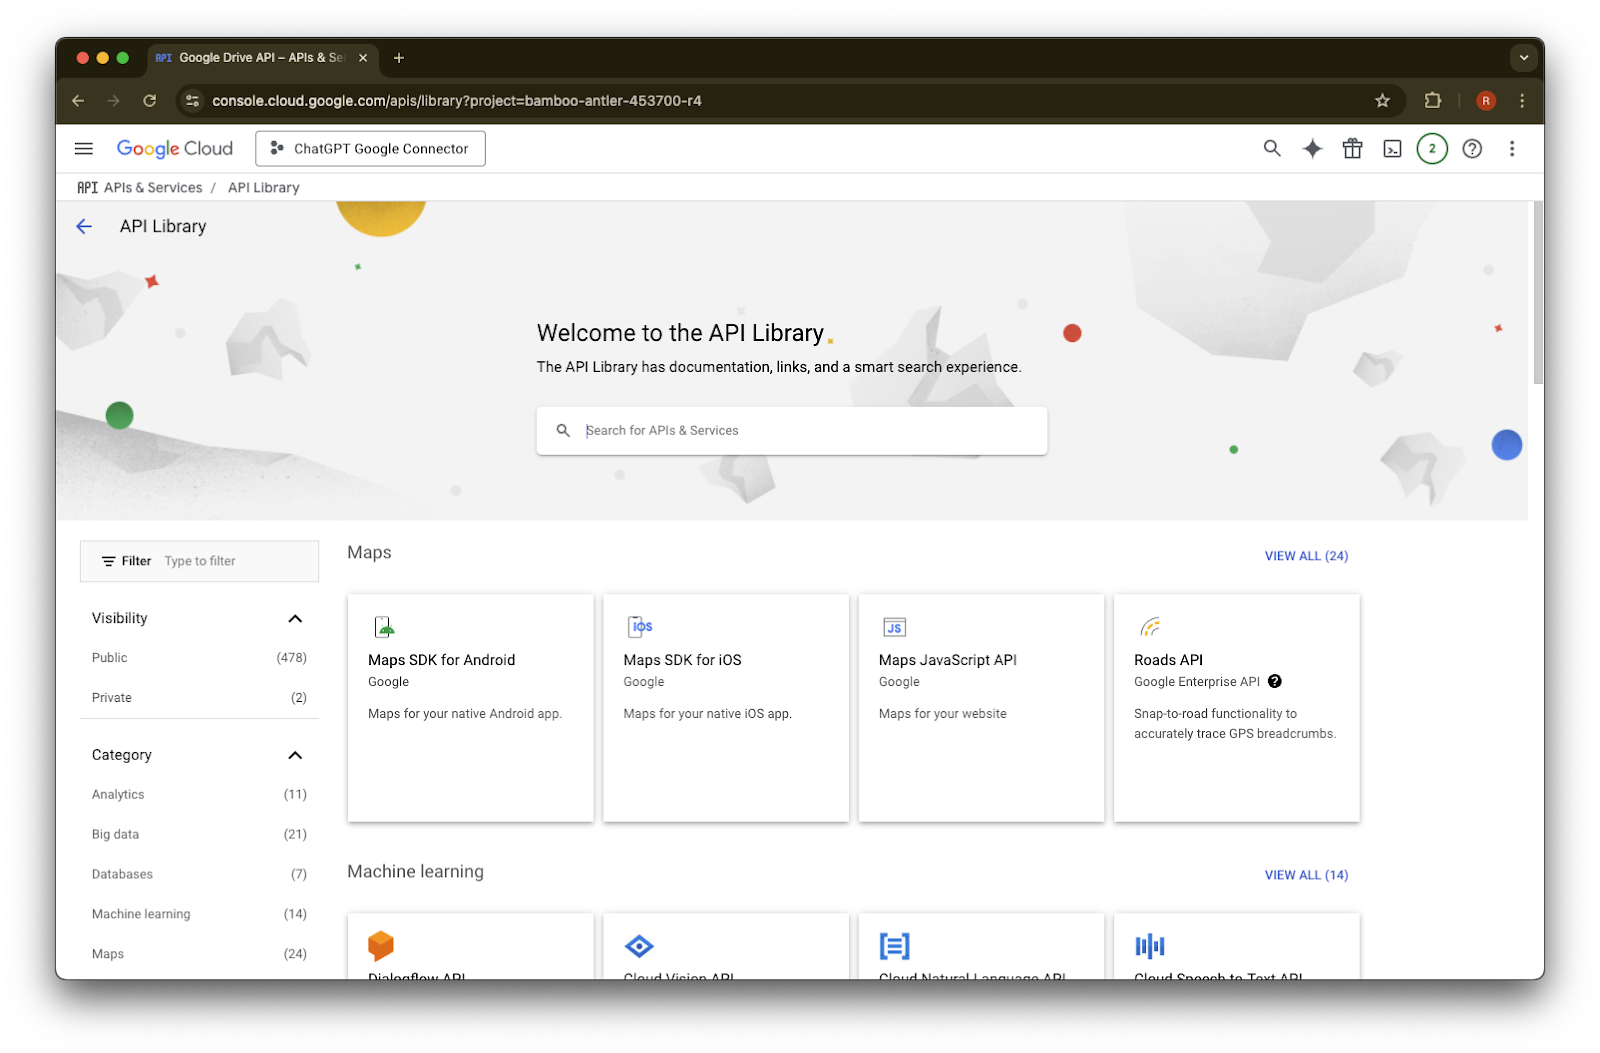
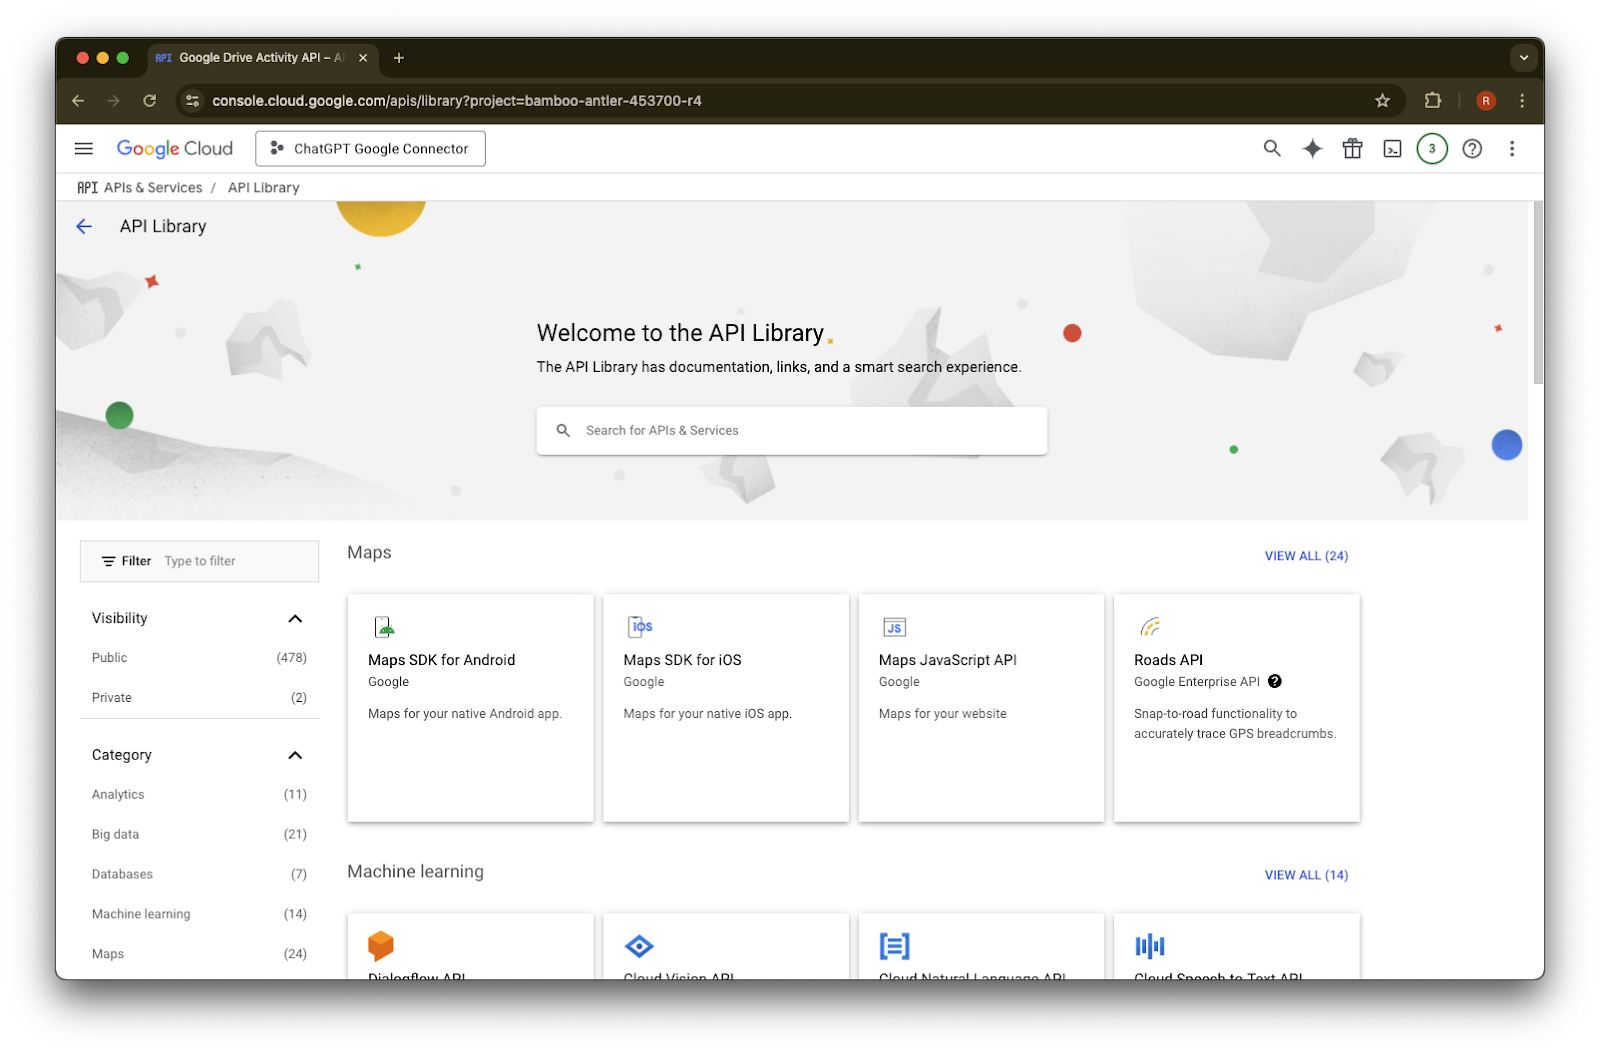
Library پر کلک کریں
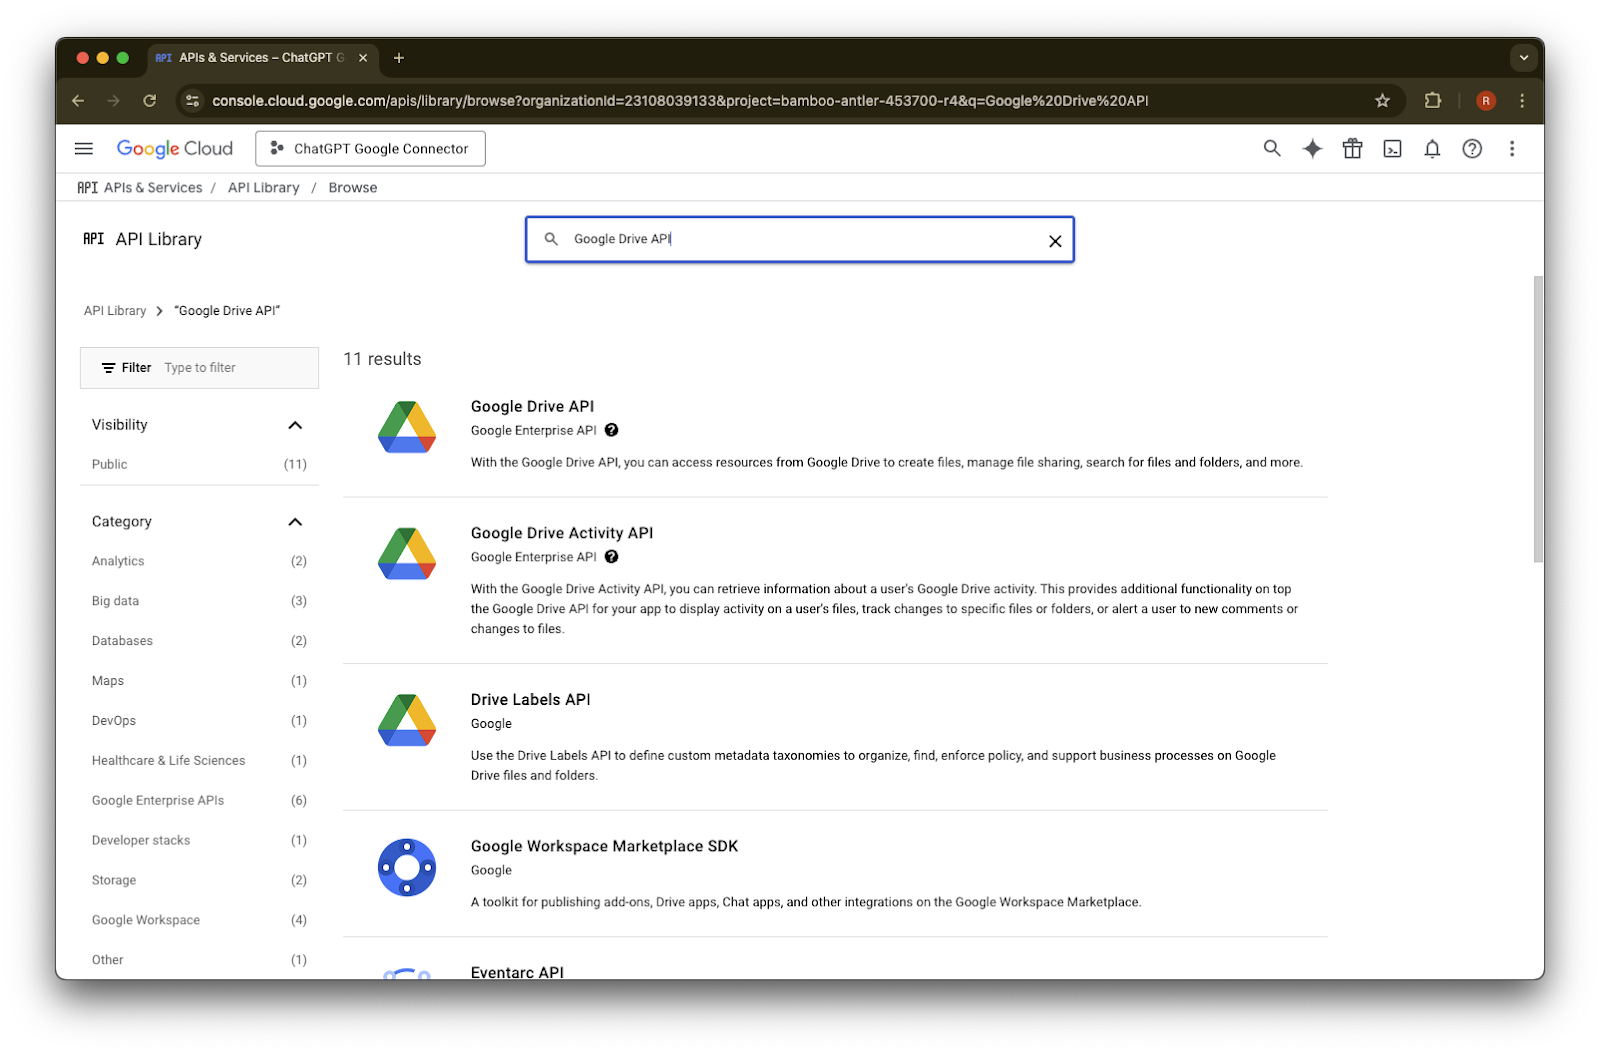
اب ہم تین APIs شامل کریں گے، انہیں تلاش کرنے کے لیے search box استعمال کریں گے
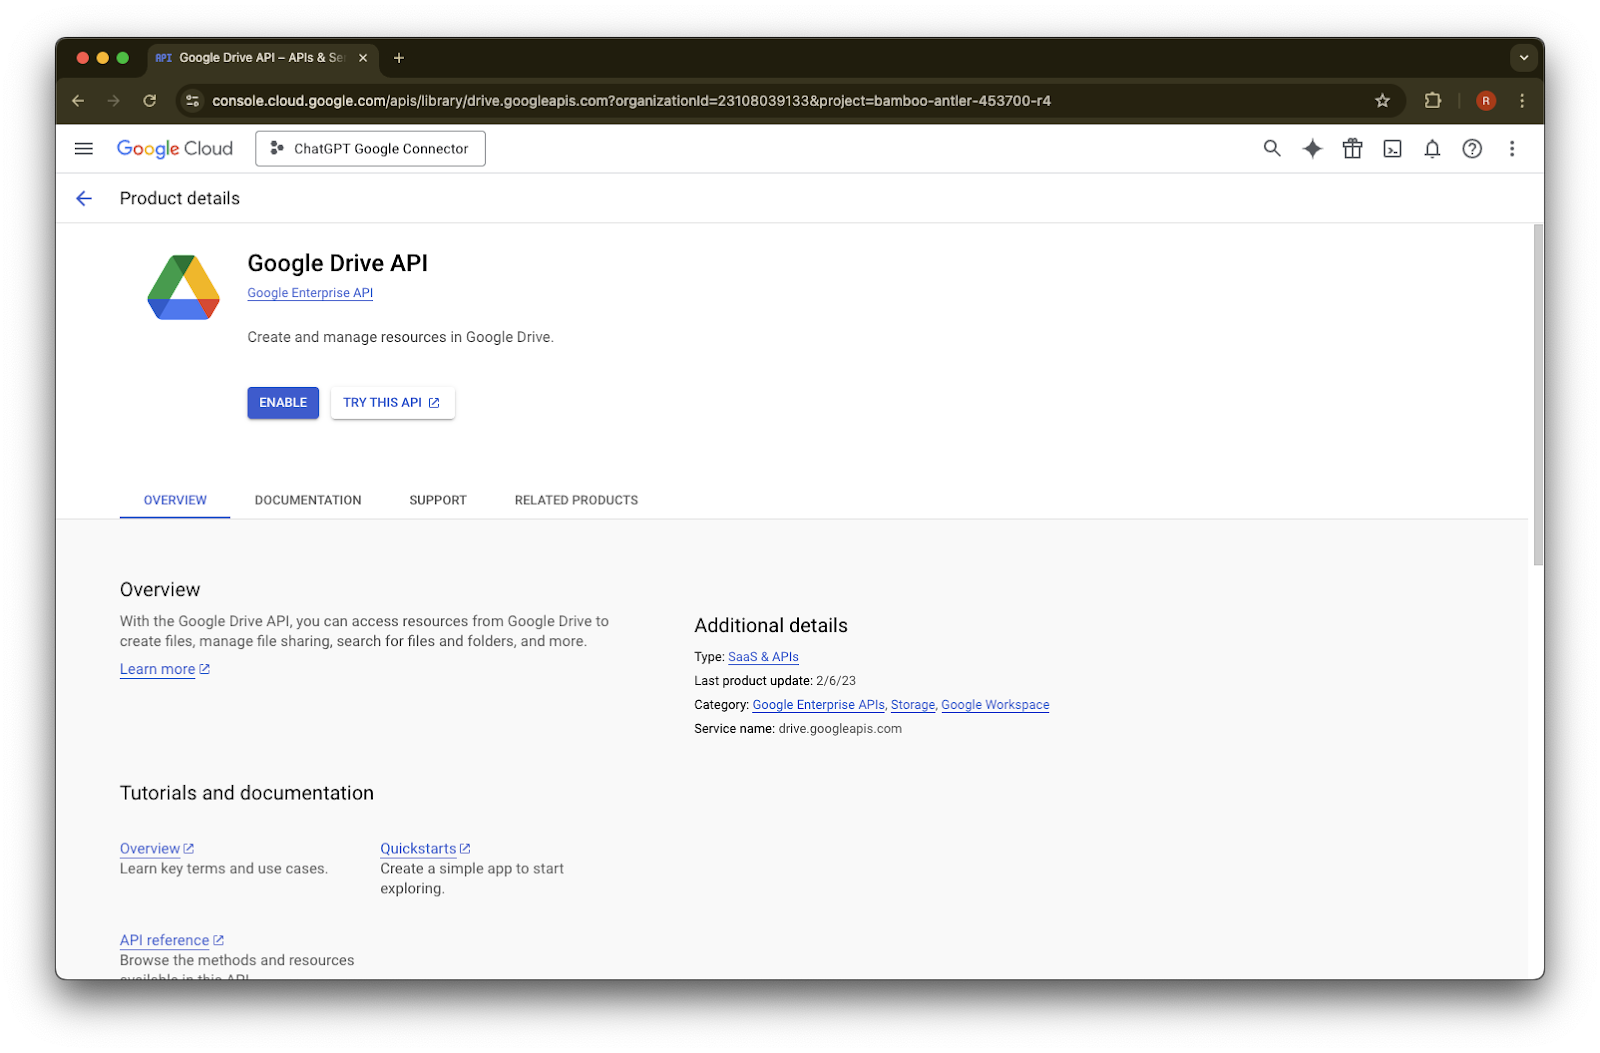
تلاش کریں اور Google Drive API منتخب کریں
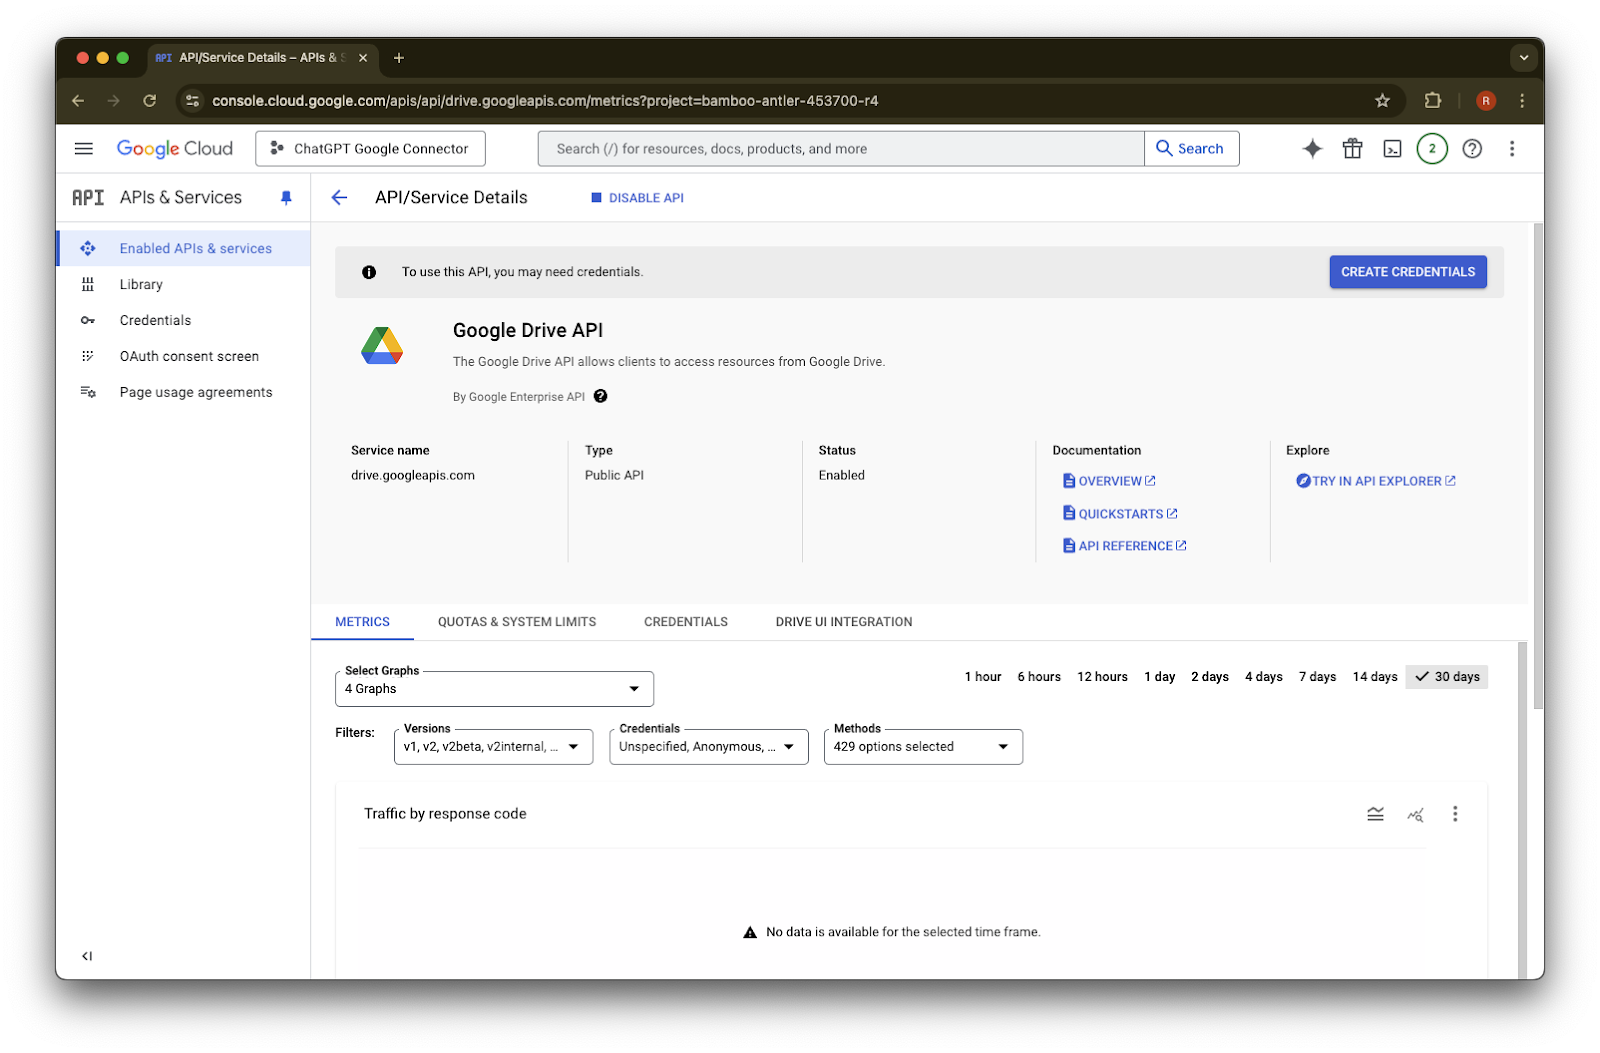
Enable پر کلک کریں
Library پر کلک کریں
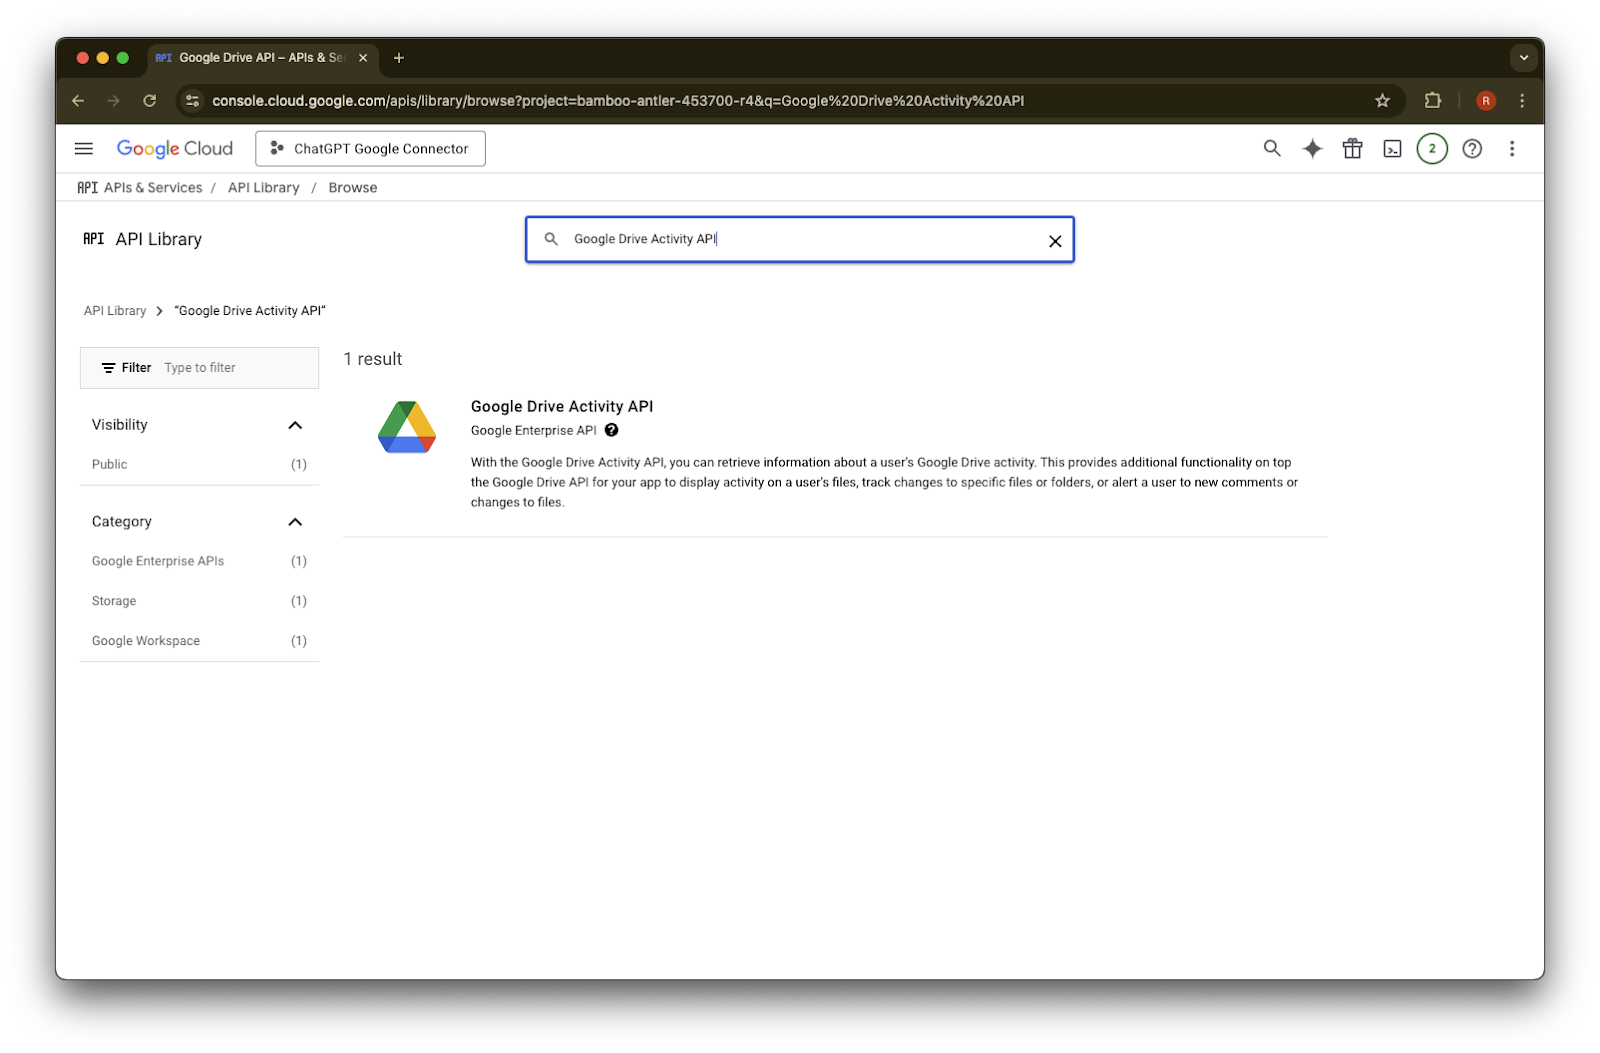
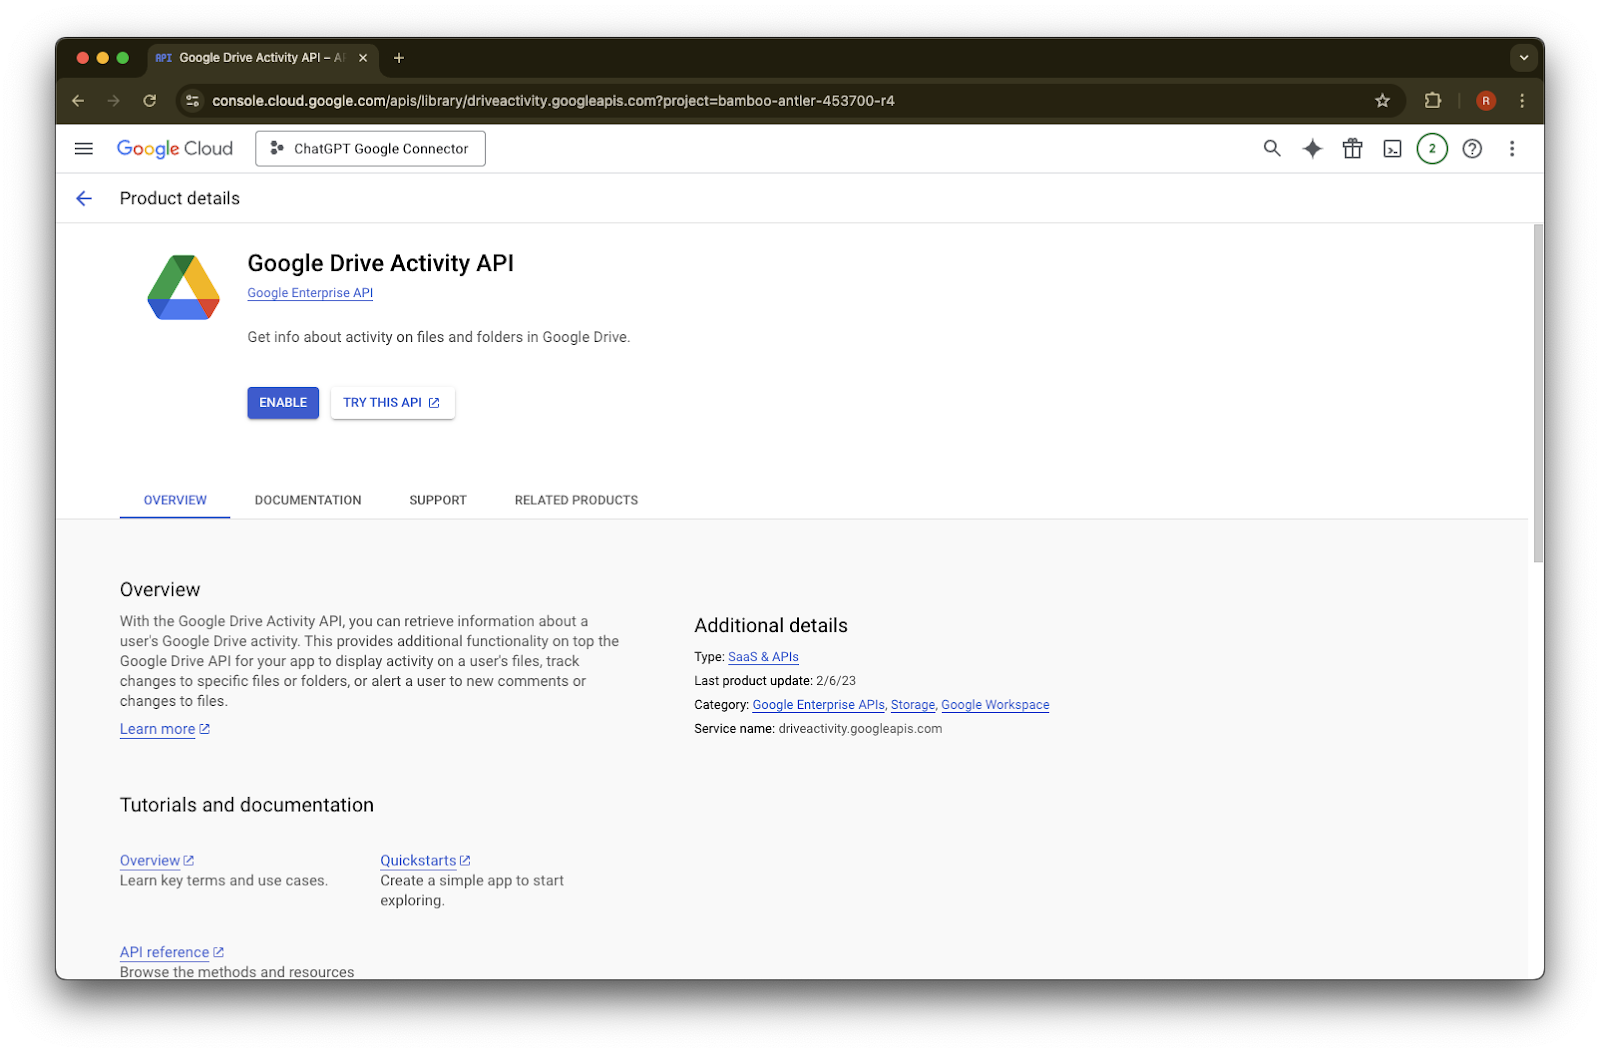
Google Drive Activity تلاش کریں
Google Drive Activity API منتخب کریں
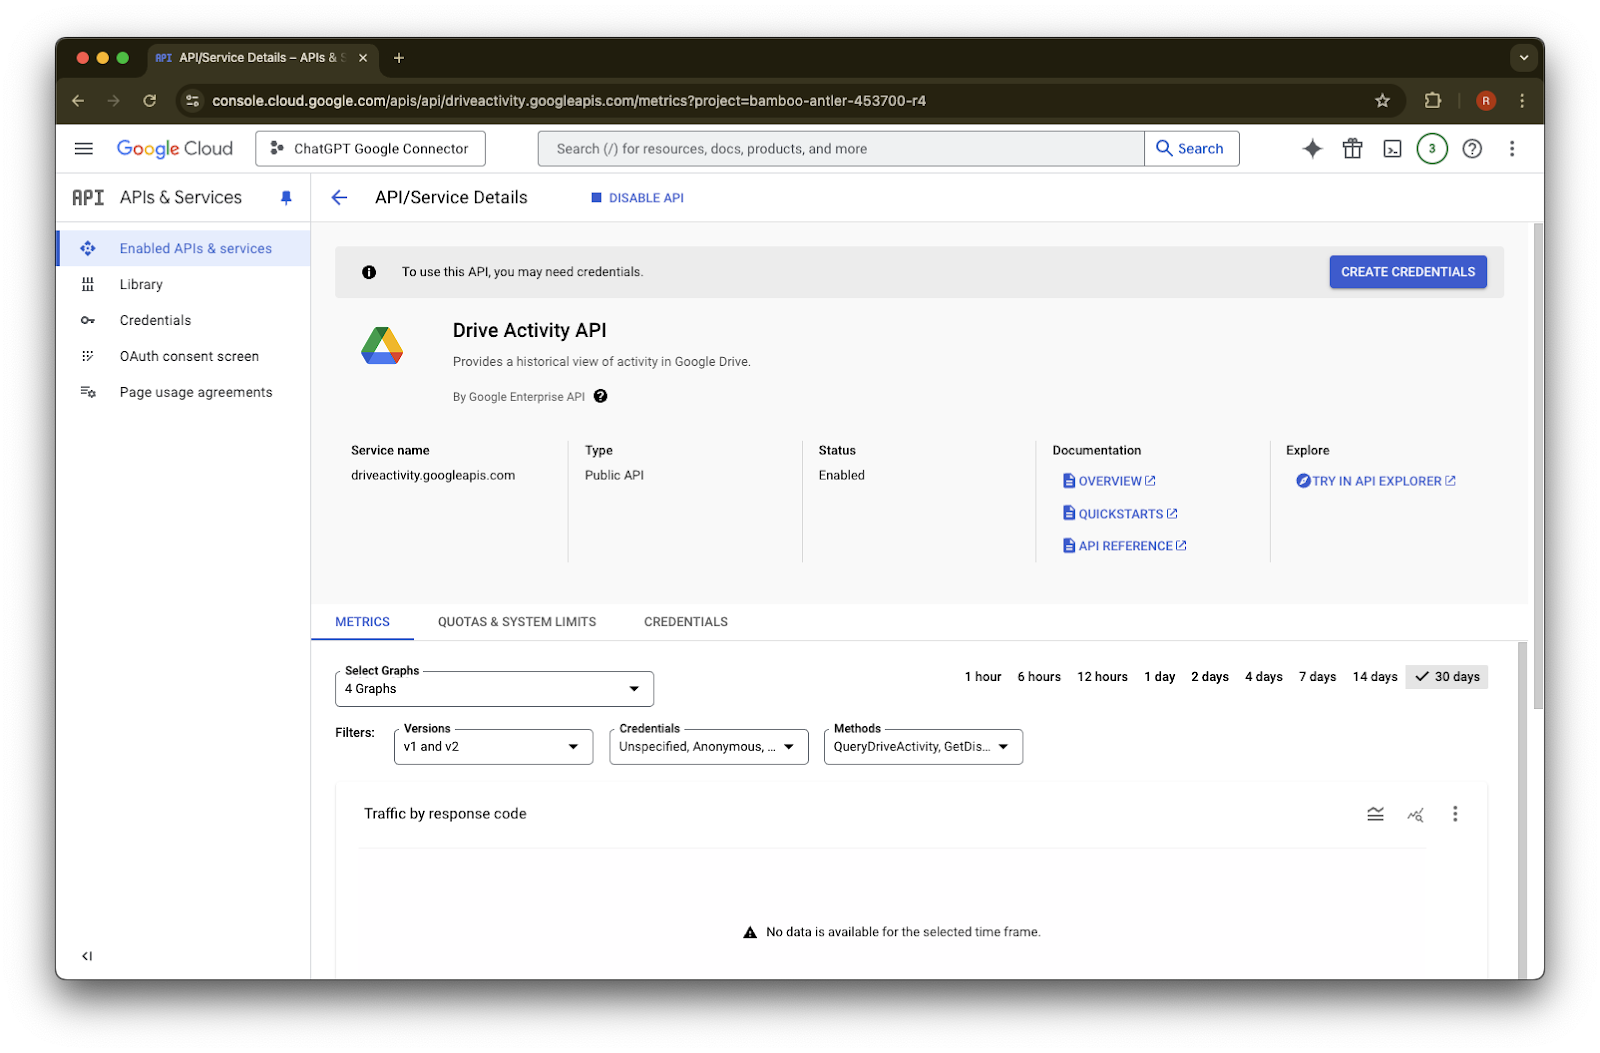
Enable پر کلک کریں
Library پر کلک کریں
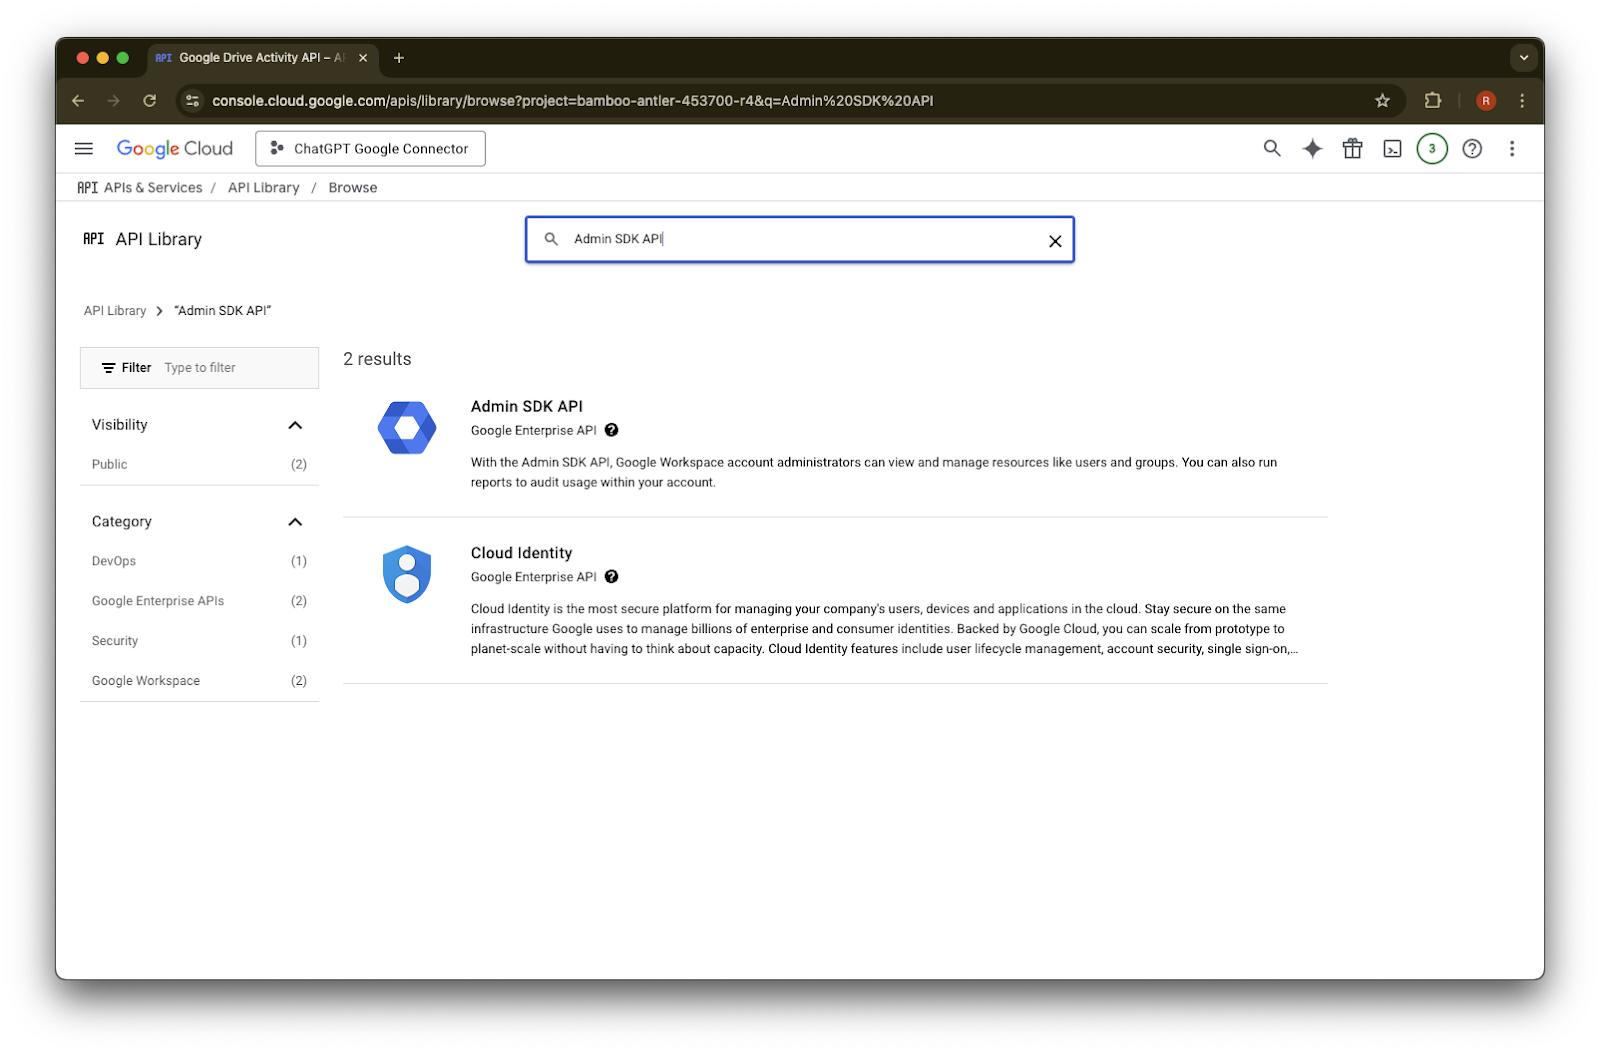
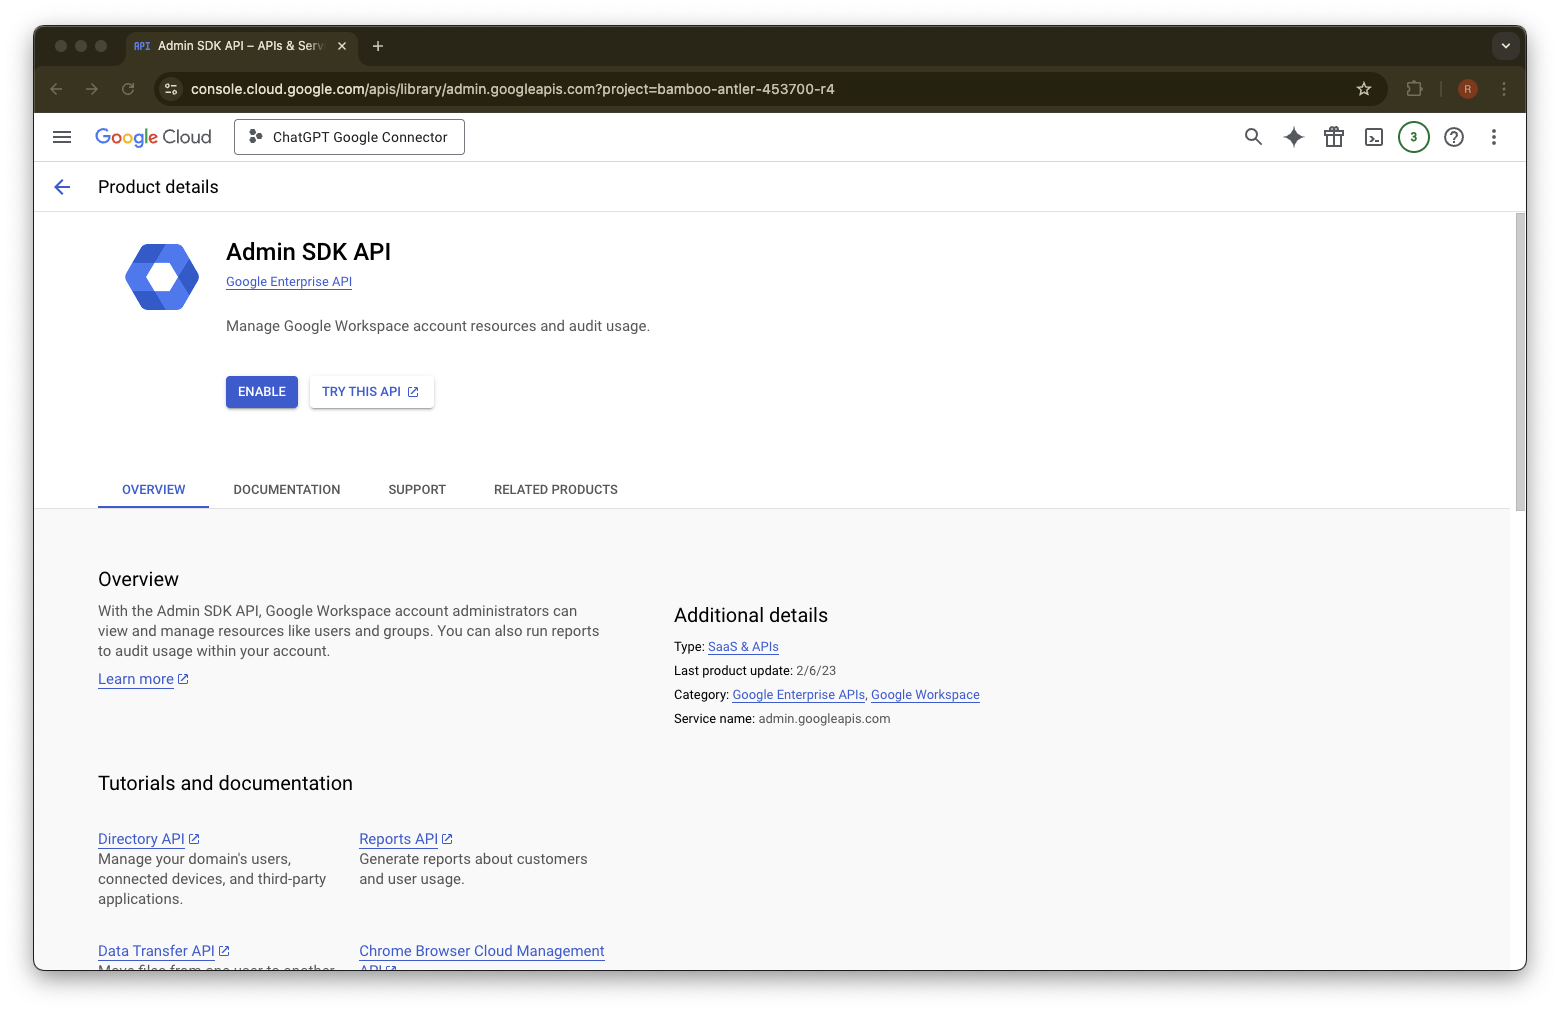
Admin SDK API تلاش کریں
Admin SDK API منتخب کریں
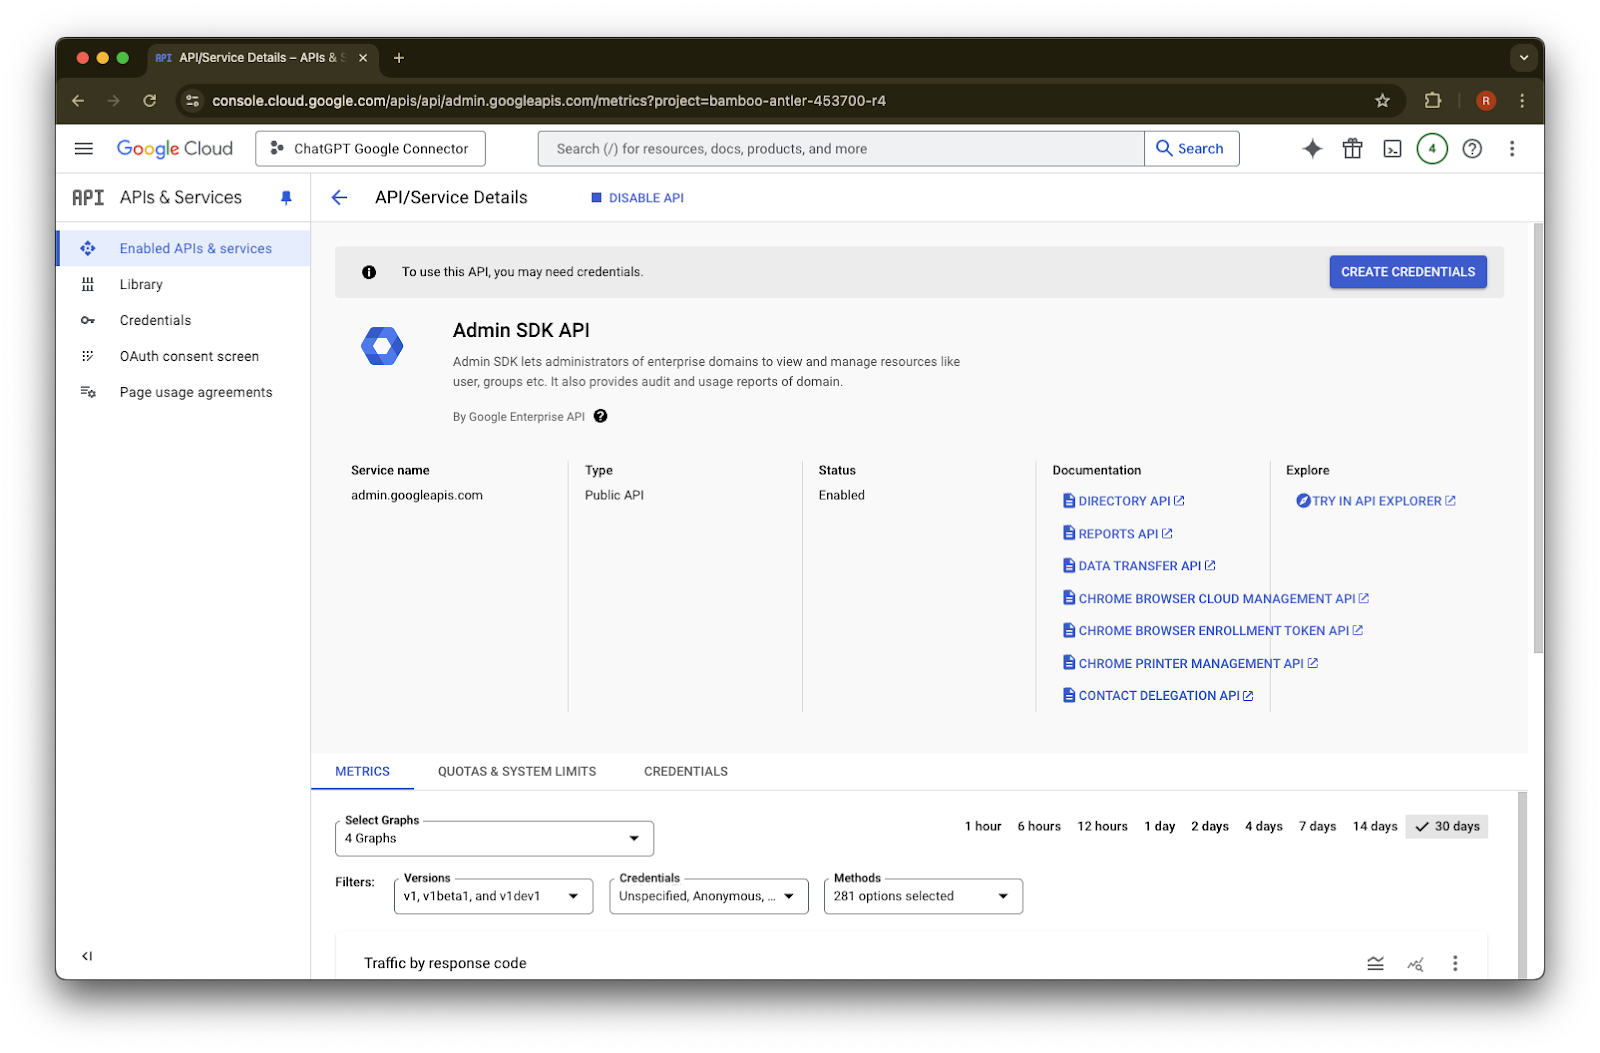
Enable پر کلک کریں
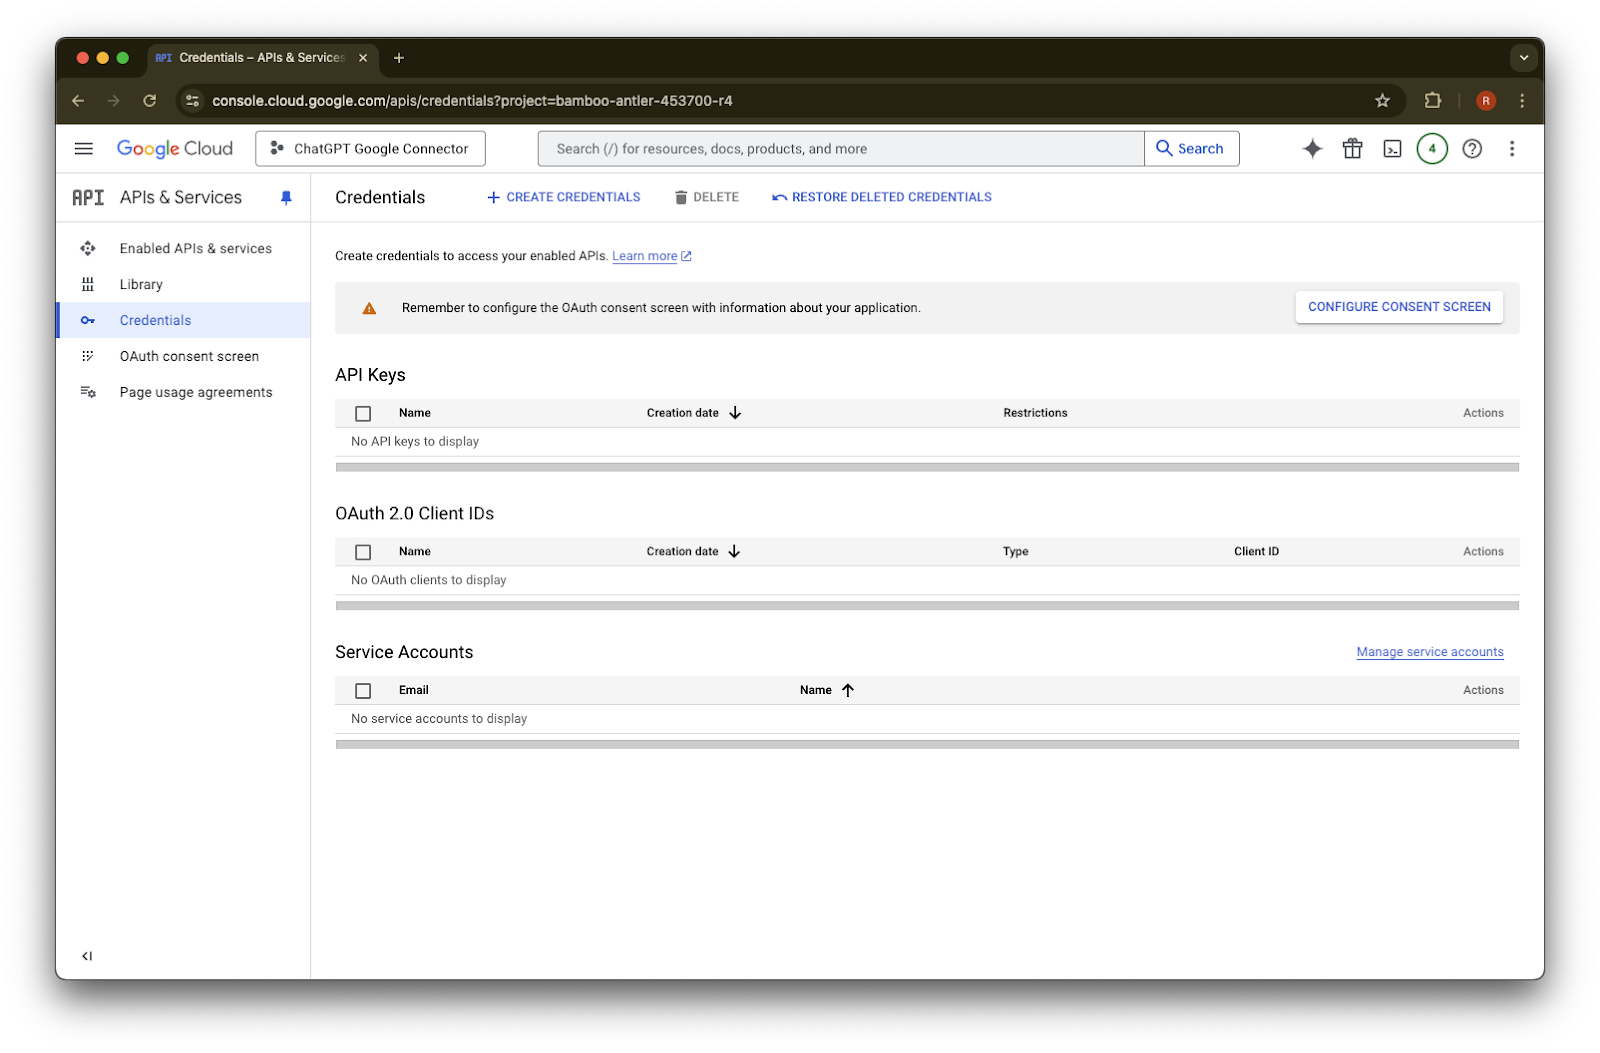
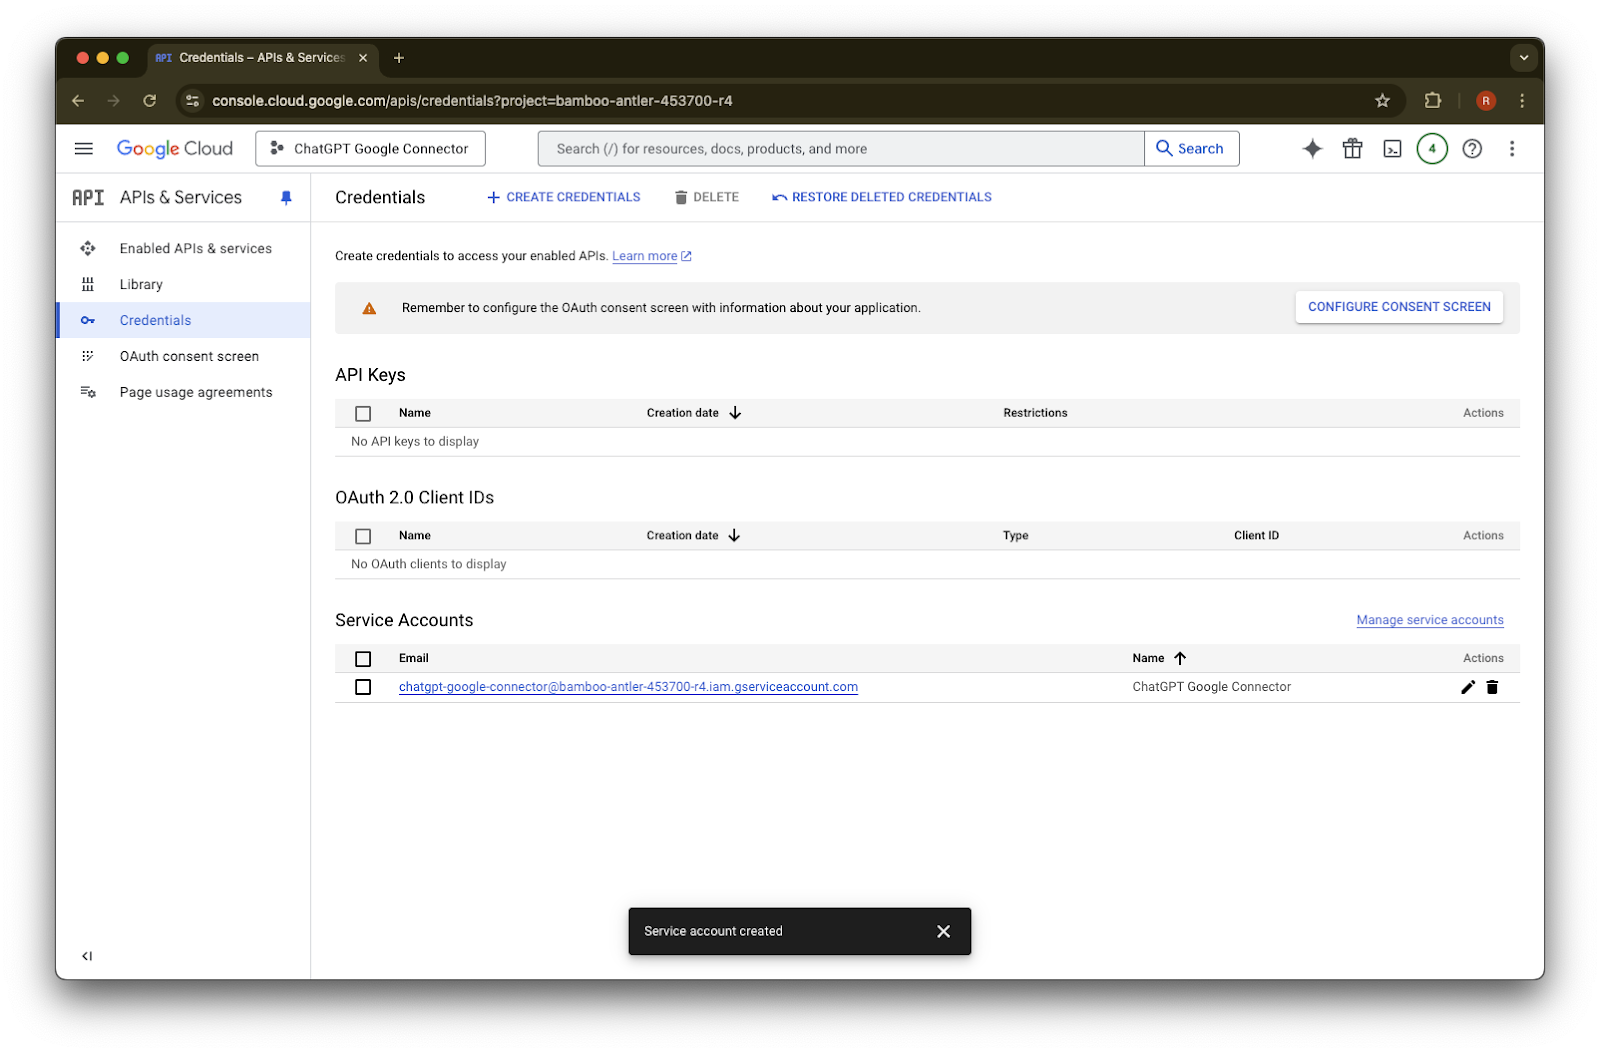
Credentials پر کلک کریں
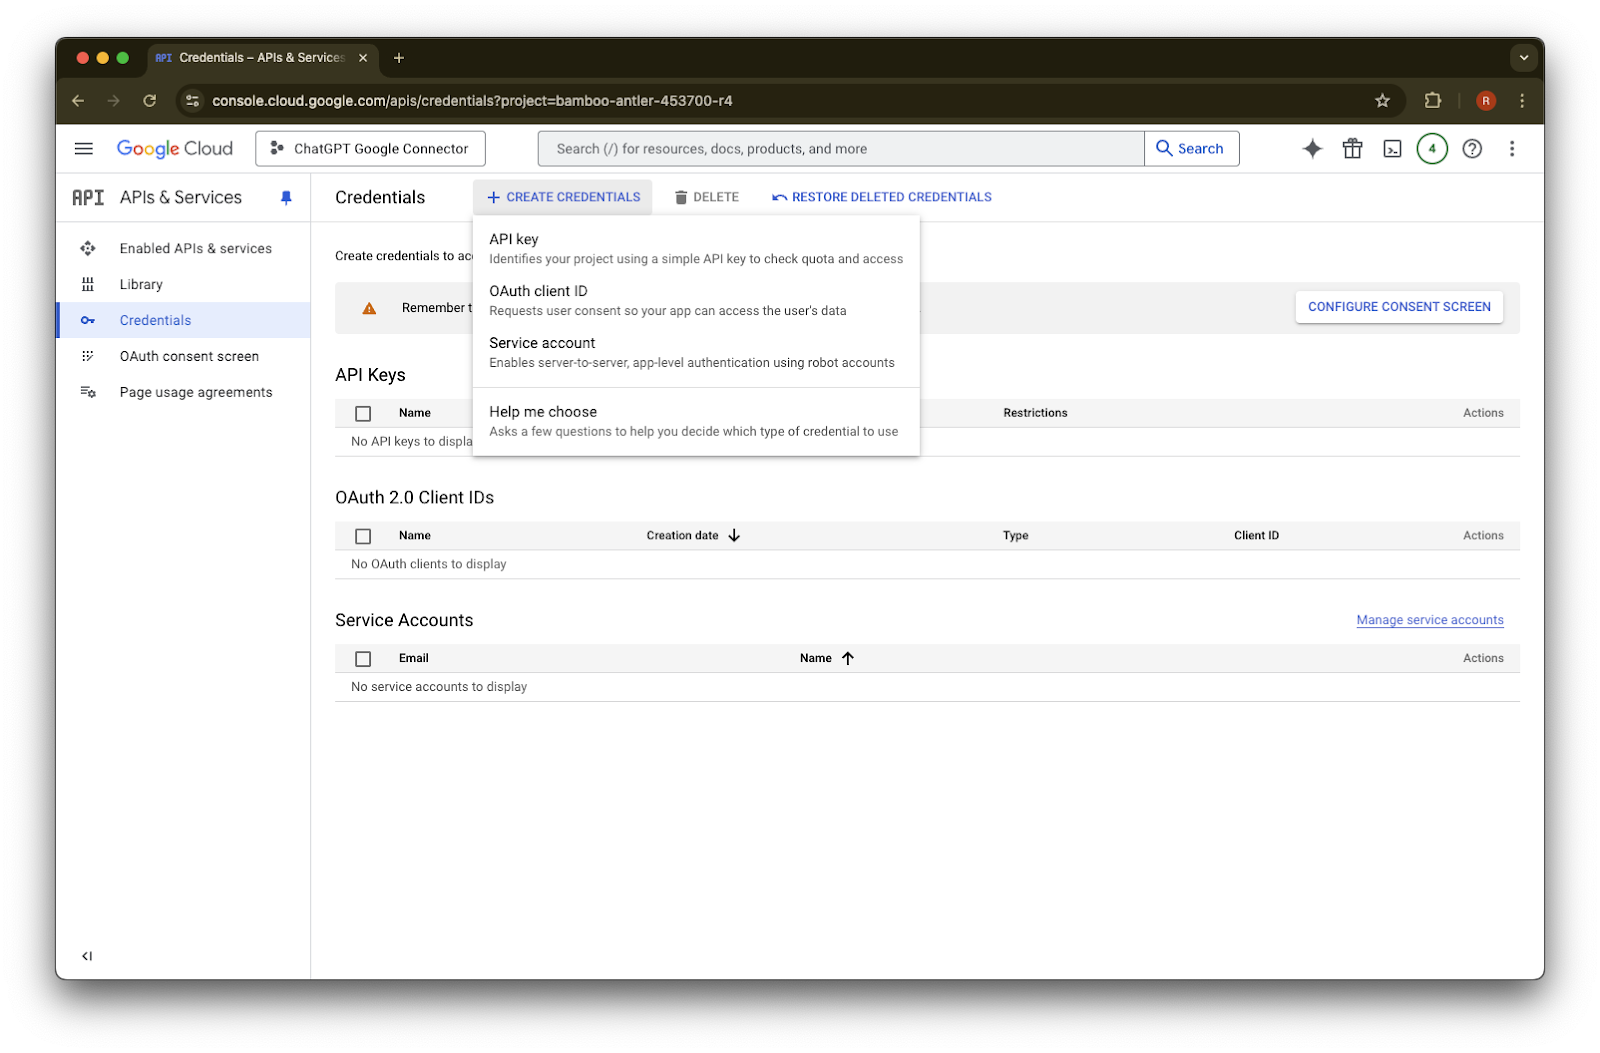
Create Credentials پر کلک کریں
Service account پر کلک کریں
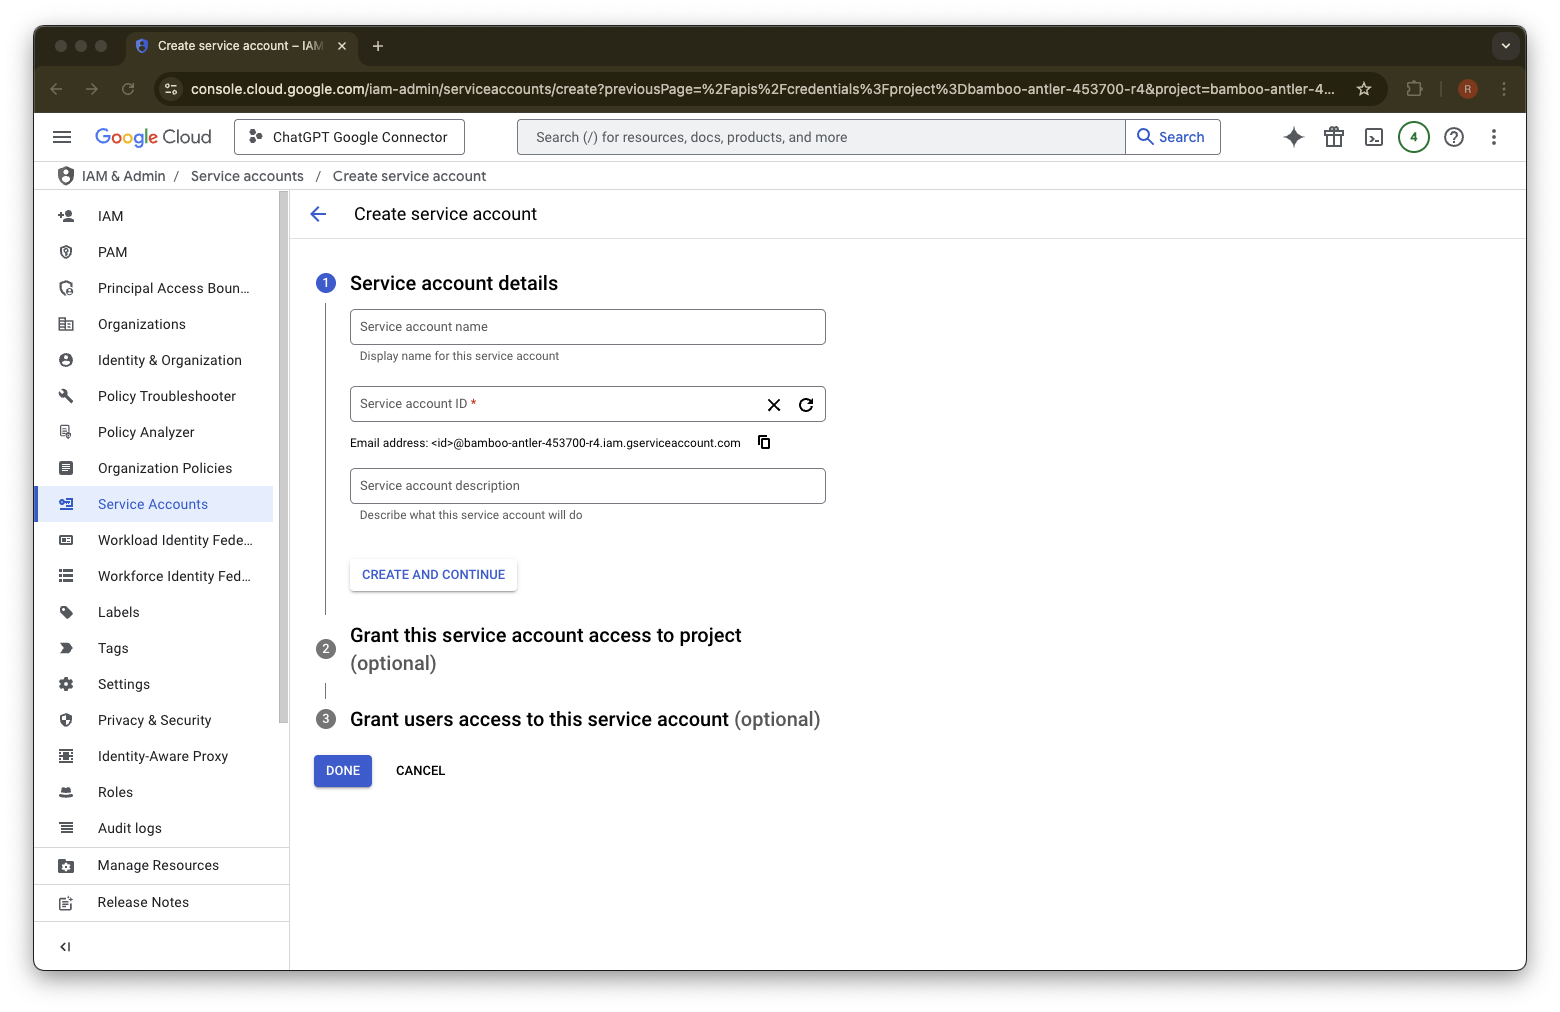
اس service account کے لیے اپنی پسند کا name اور description دیں
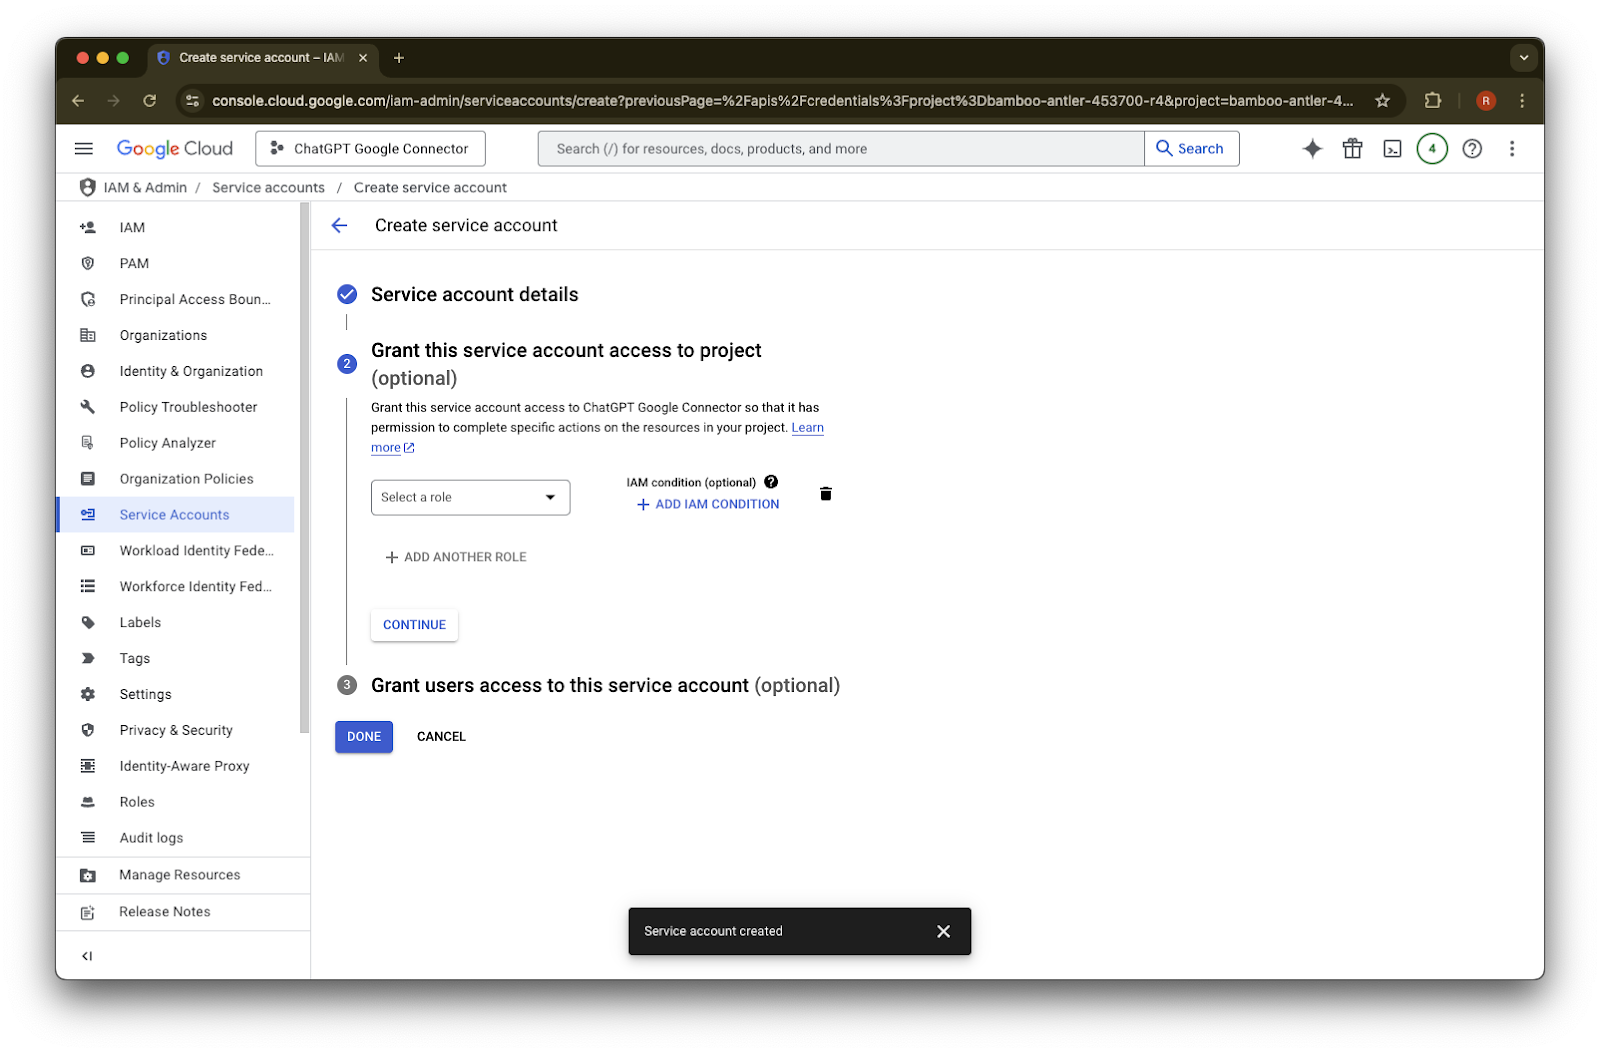
(Optional) آپ ایک role تفویض کر سکتے ہیں - ChatGPT کو اس کی ضرورت نہیں ہے۔
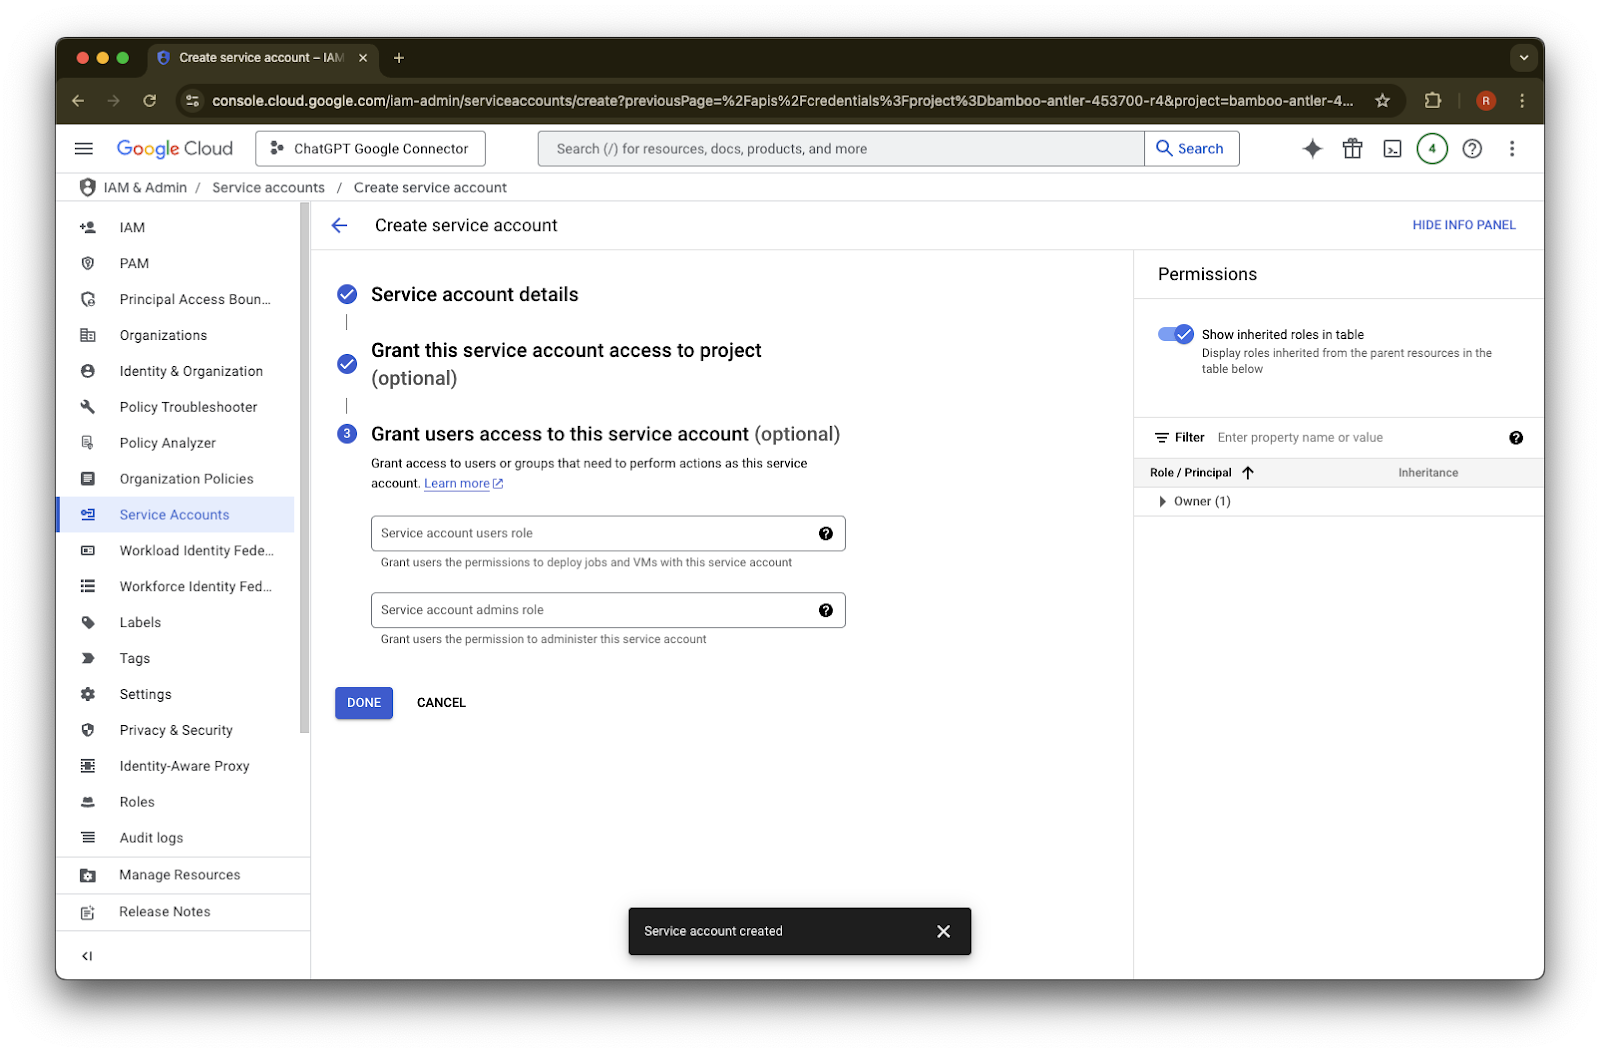
(Optional) آپ service account کو رسائی دے سکتے ہیں - ChatGPT کو اس کی ضرورت نہیں ہے۔
Done پر کلک کریں۔
اس service account پر کلک کریں جو اب بن چکا ہے۔
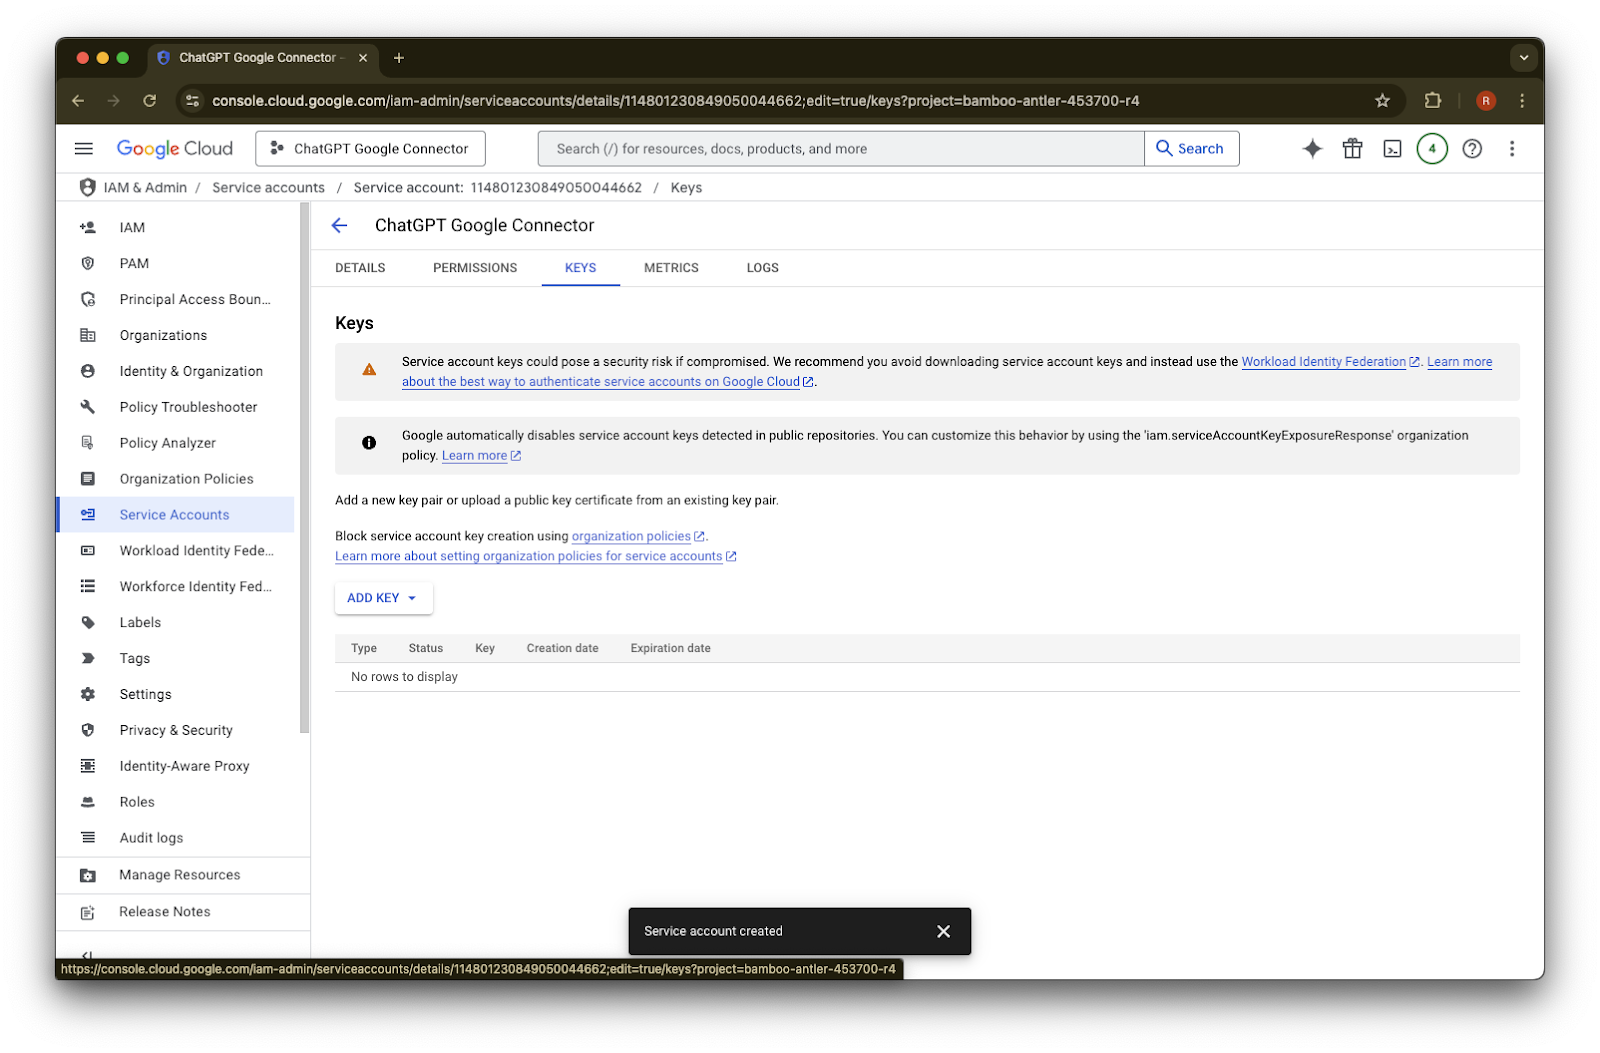
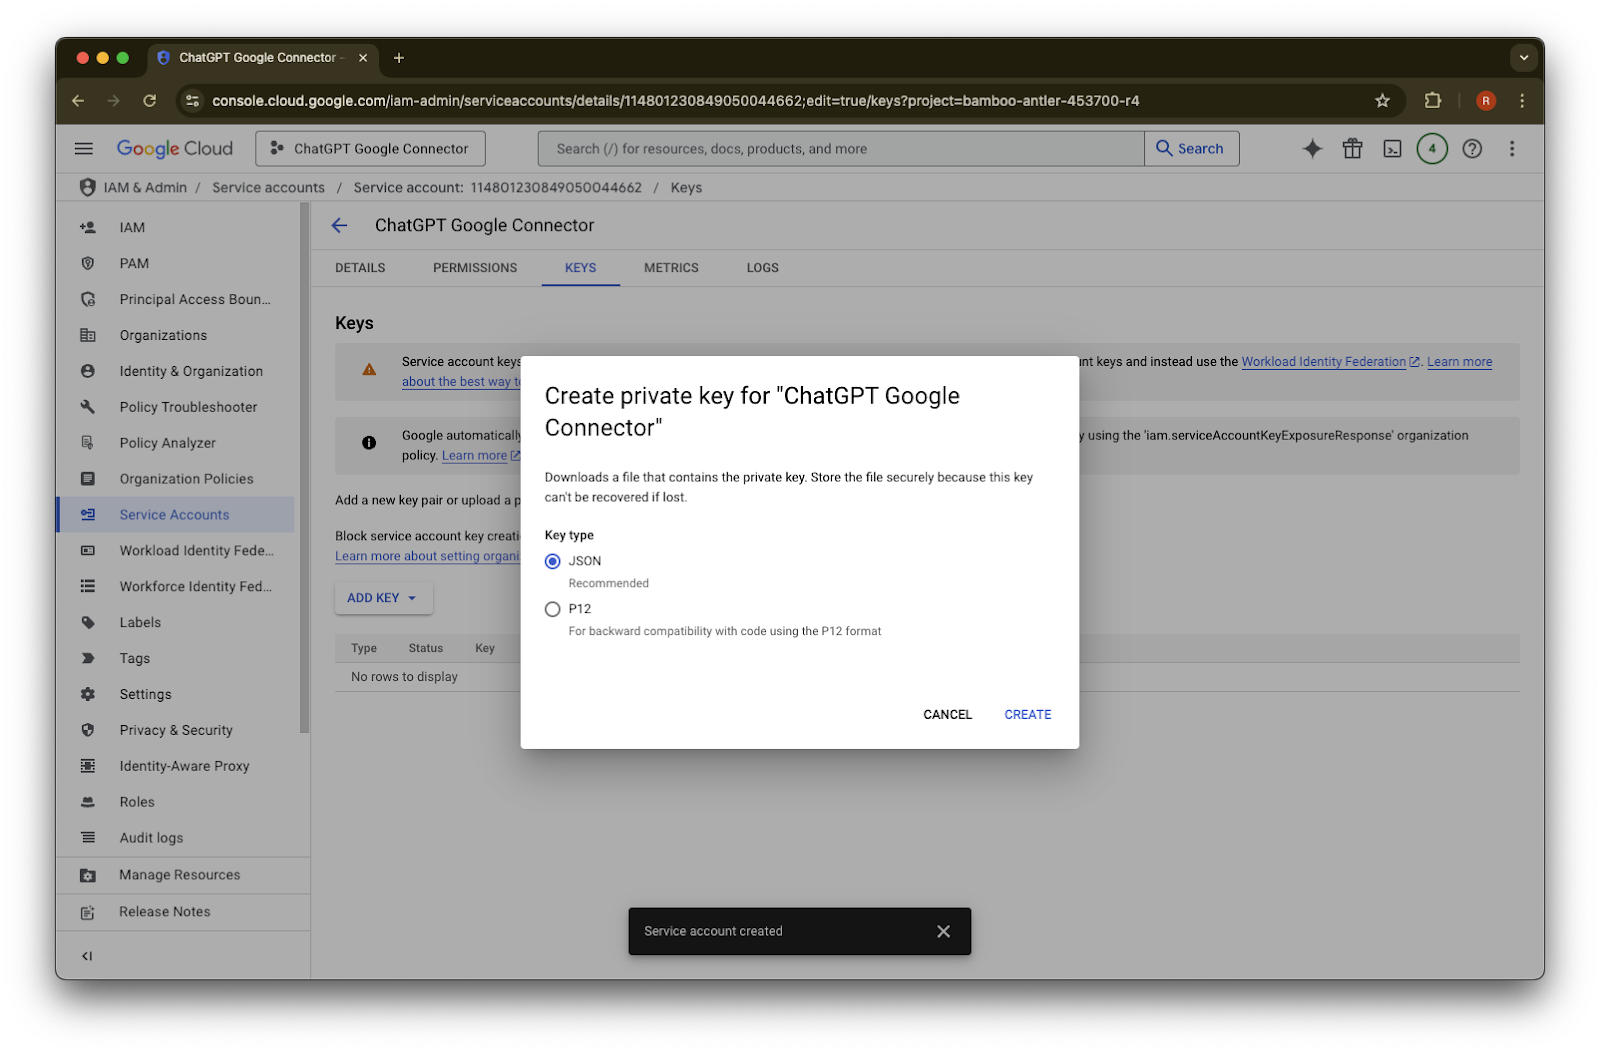
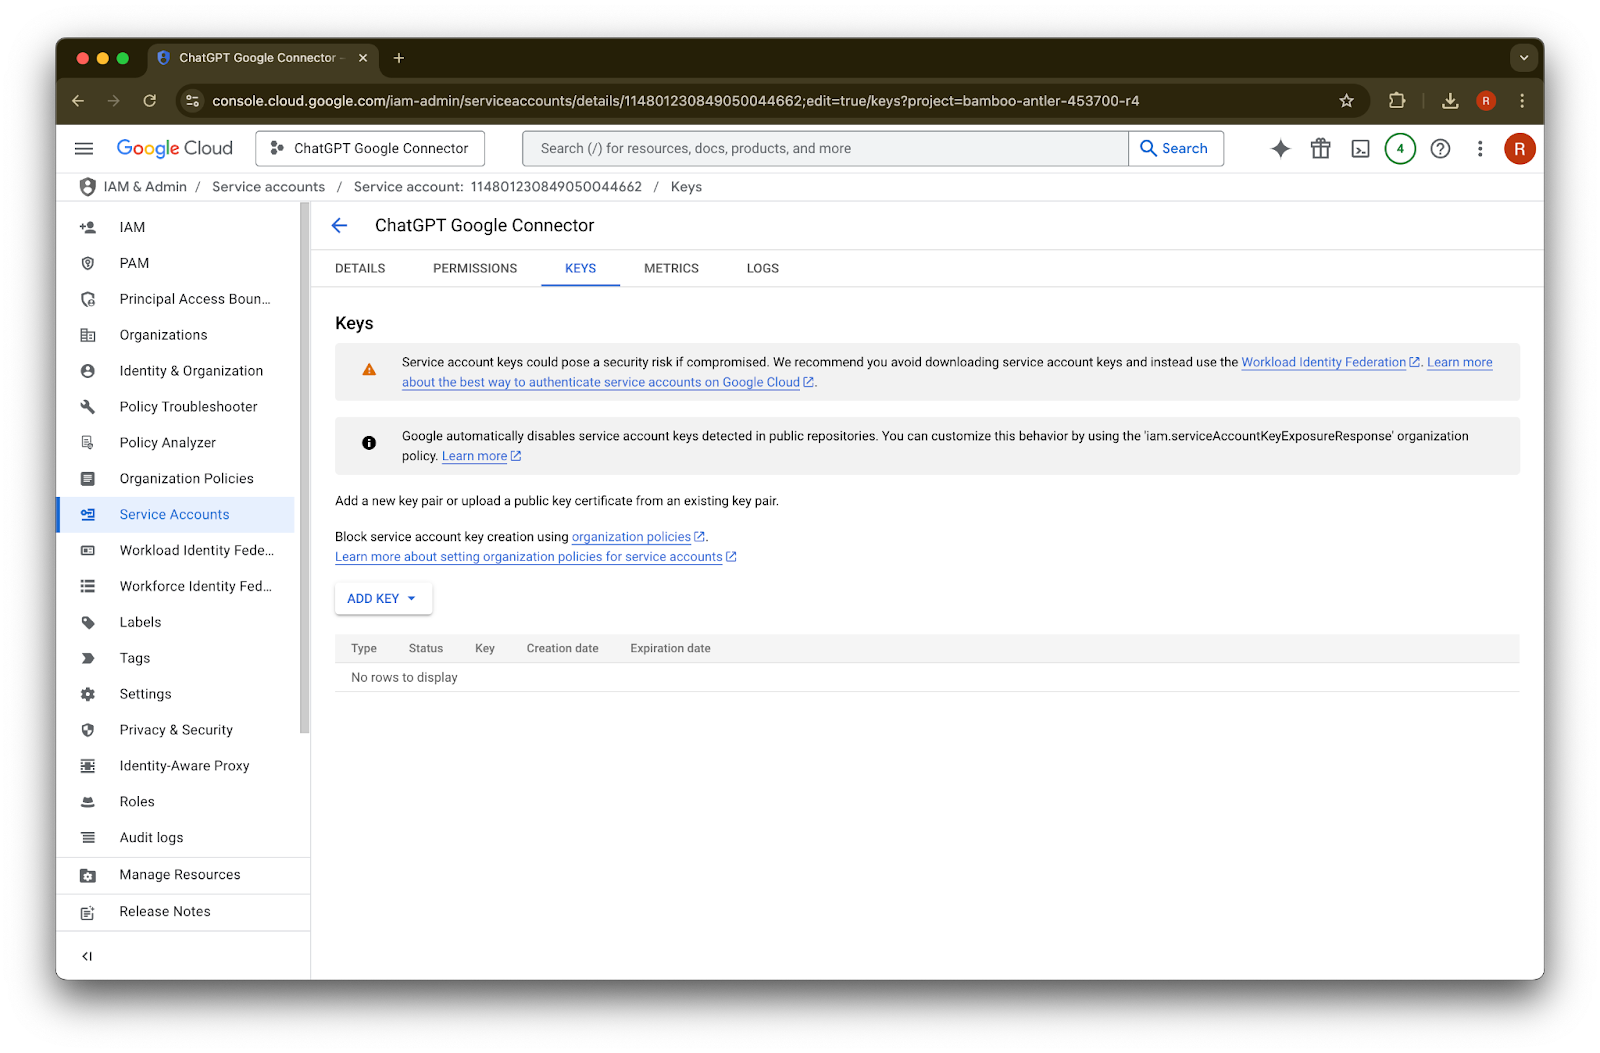
keys. پر کلک کریں
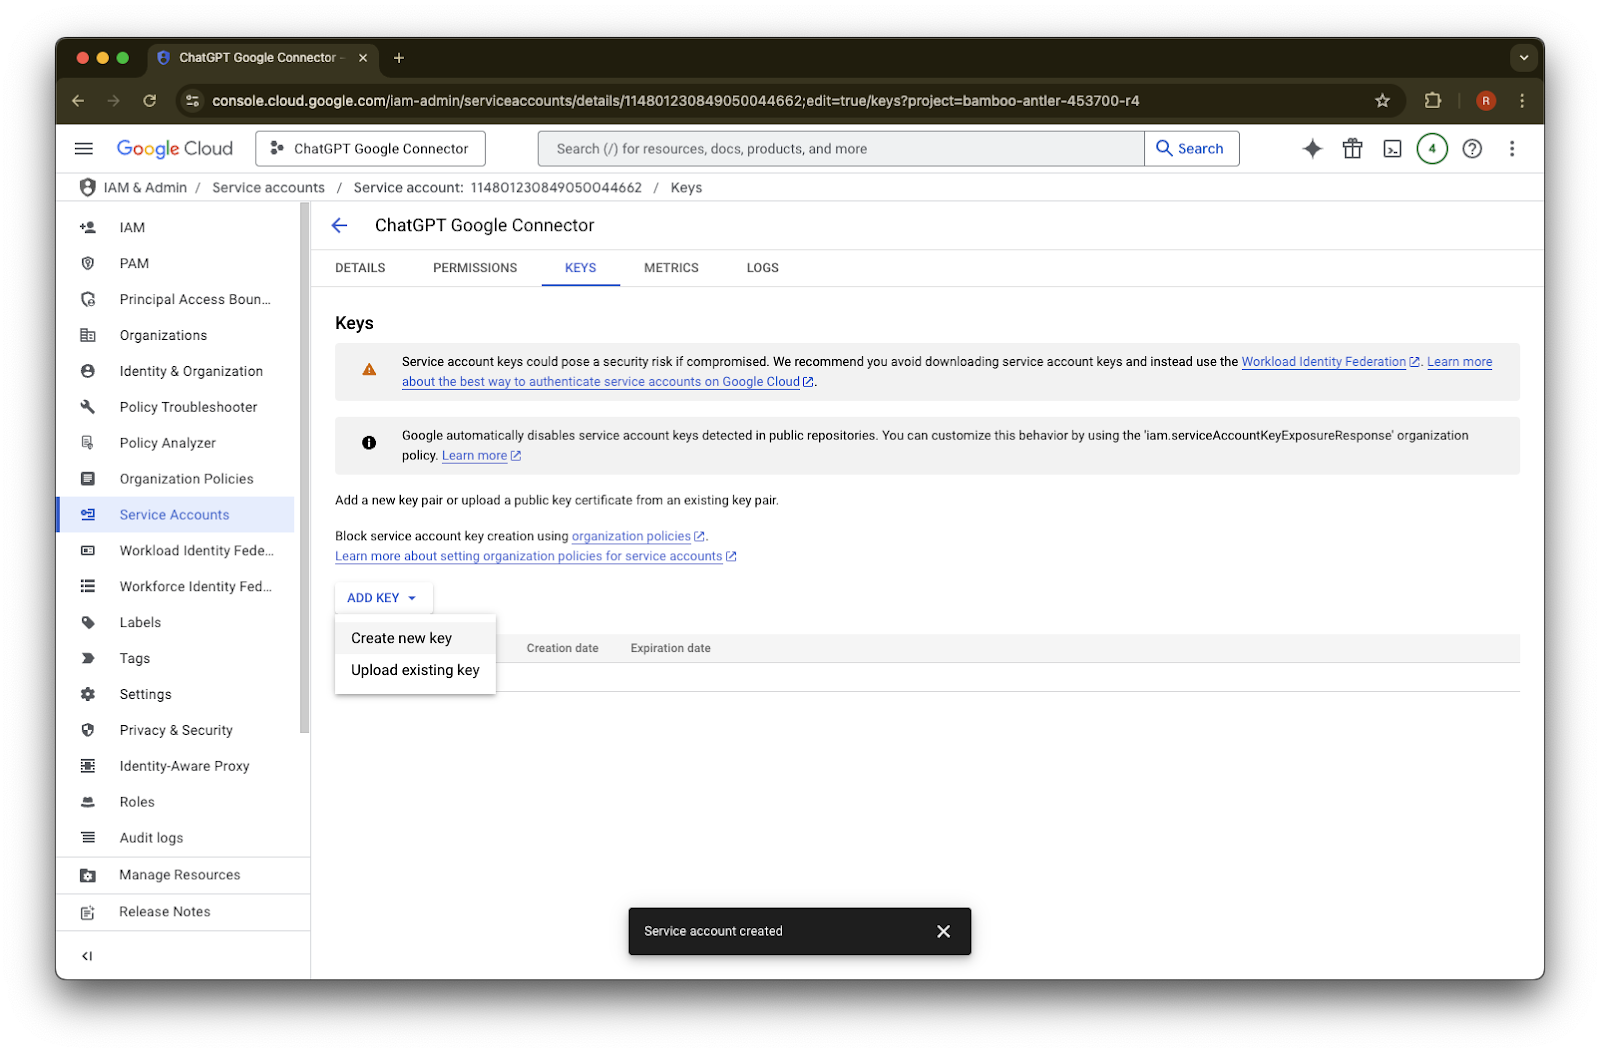
Add Key پر کلک کریں
Create new key پر کلک کریں
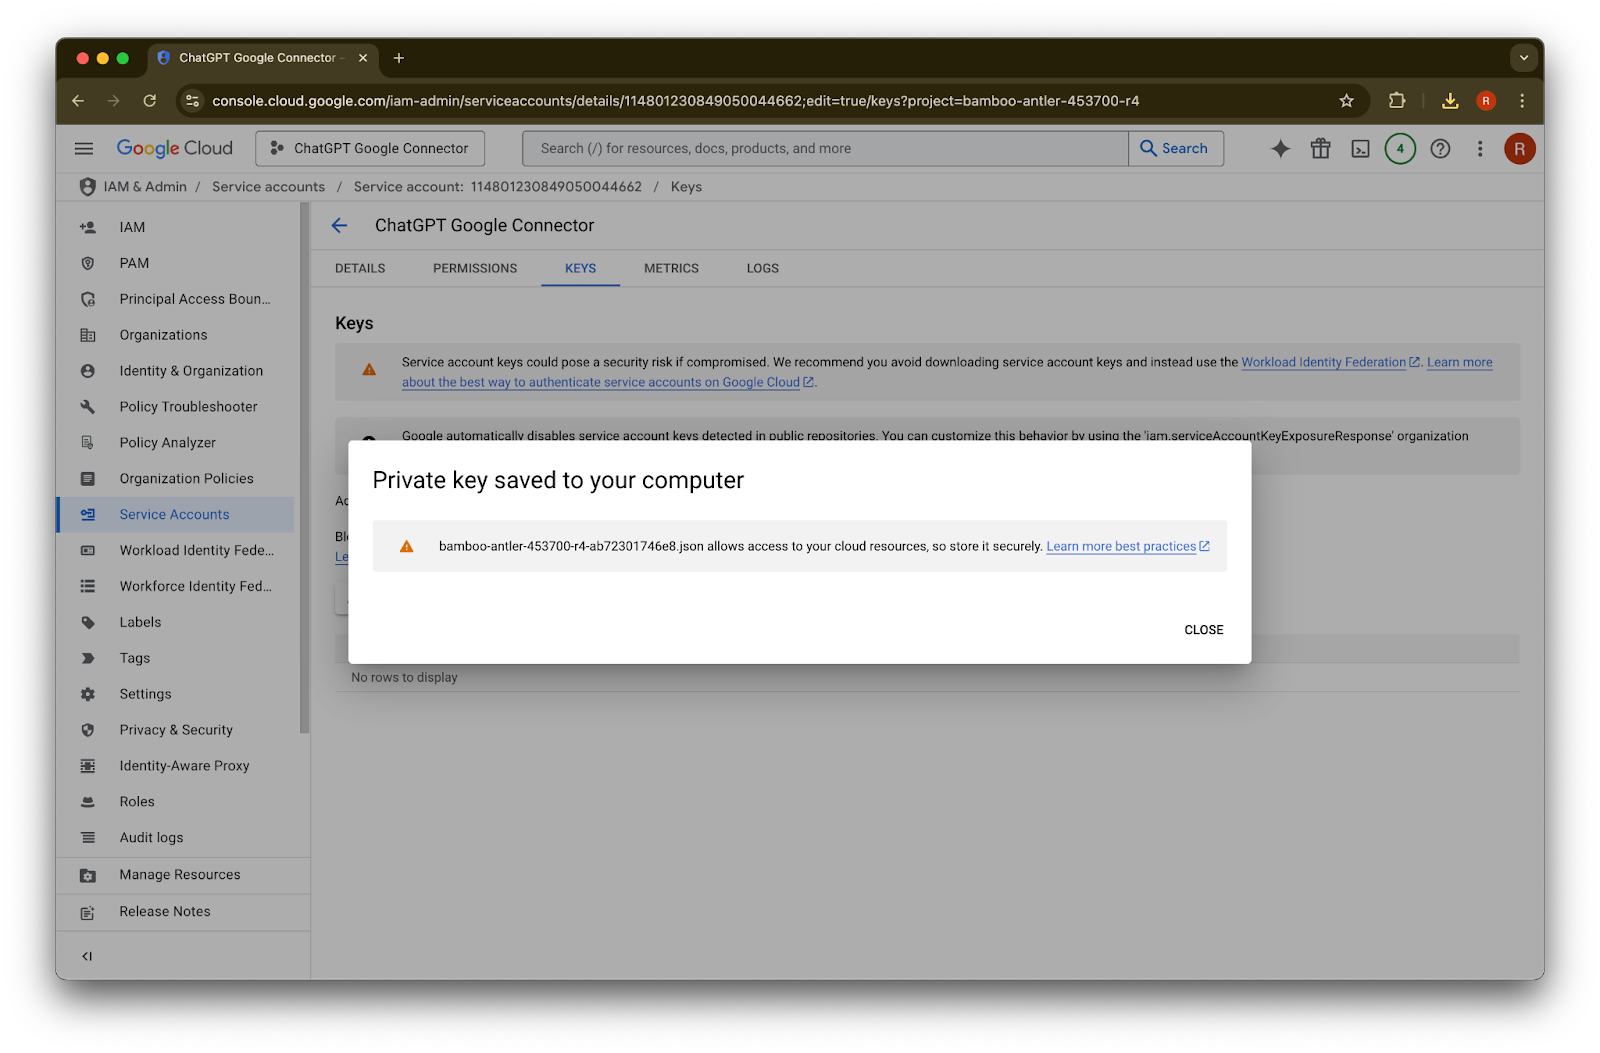
ڈیفالٹ JSON key type رکھیں اور Create پر کلک کریں
اگر آپ کو یہ error message نظر آئے کہ “Service account key creation is disabled” تو creation فعال کرنے کے لیے یہ مراحل فالو کریں۔Close پر کلک کریں۔ key اب آپ کے کمپیوٹر پر ڈاؤن لوڈ ہو چکی ہے۔ بعد میں آپ اسے ChatGPT admin console میں اپ لوڈ کریں گے۔
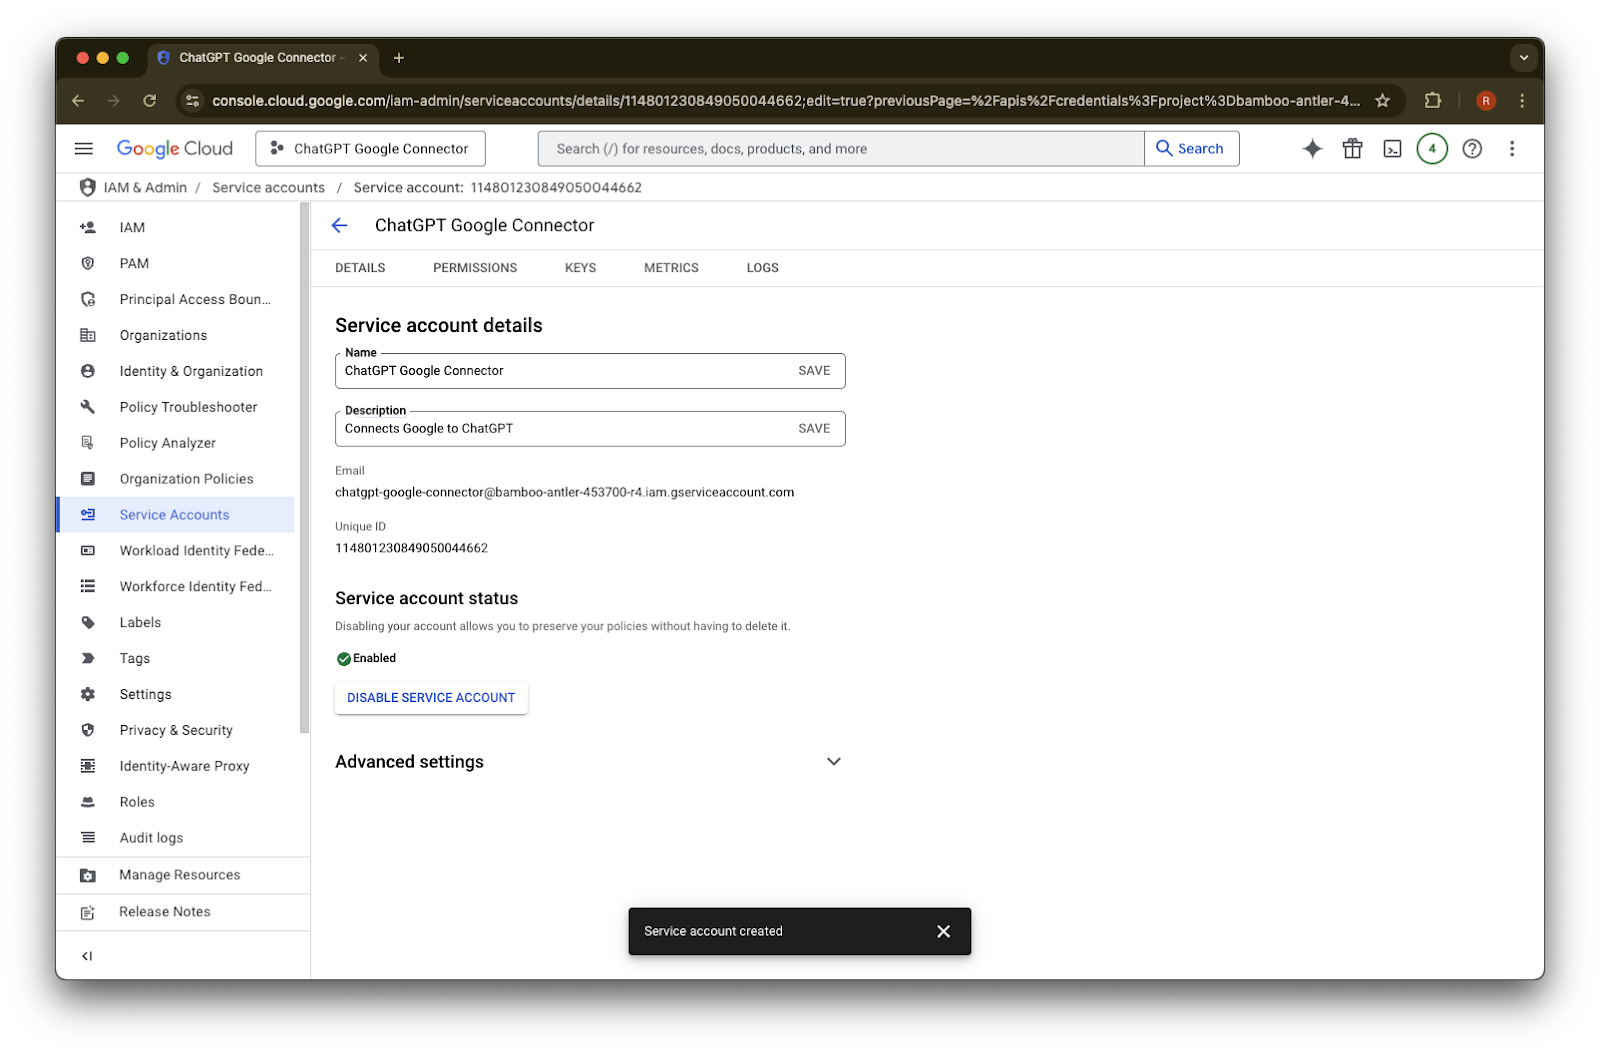
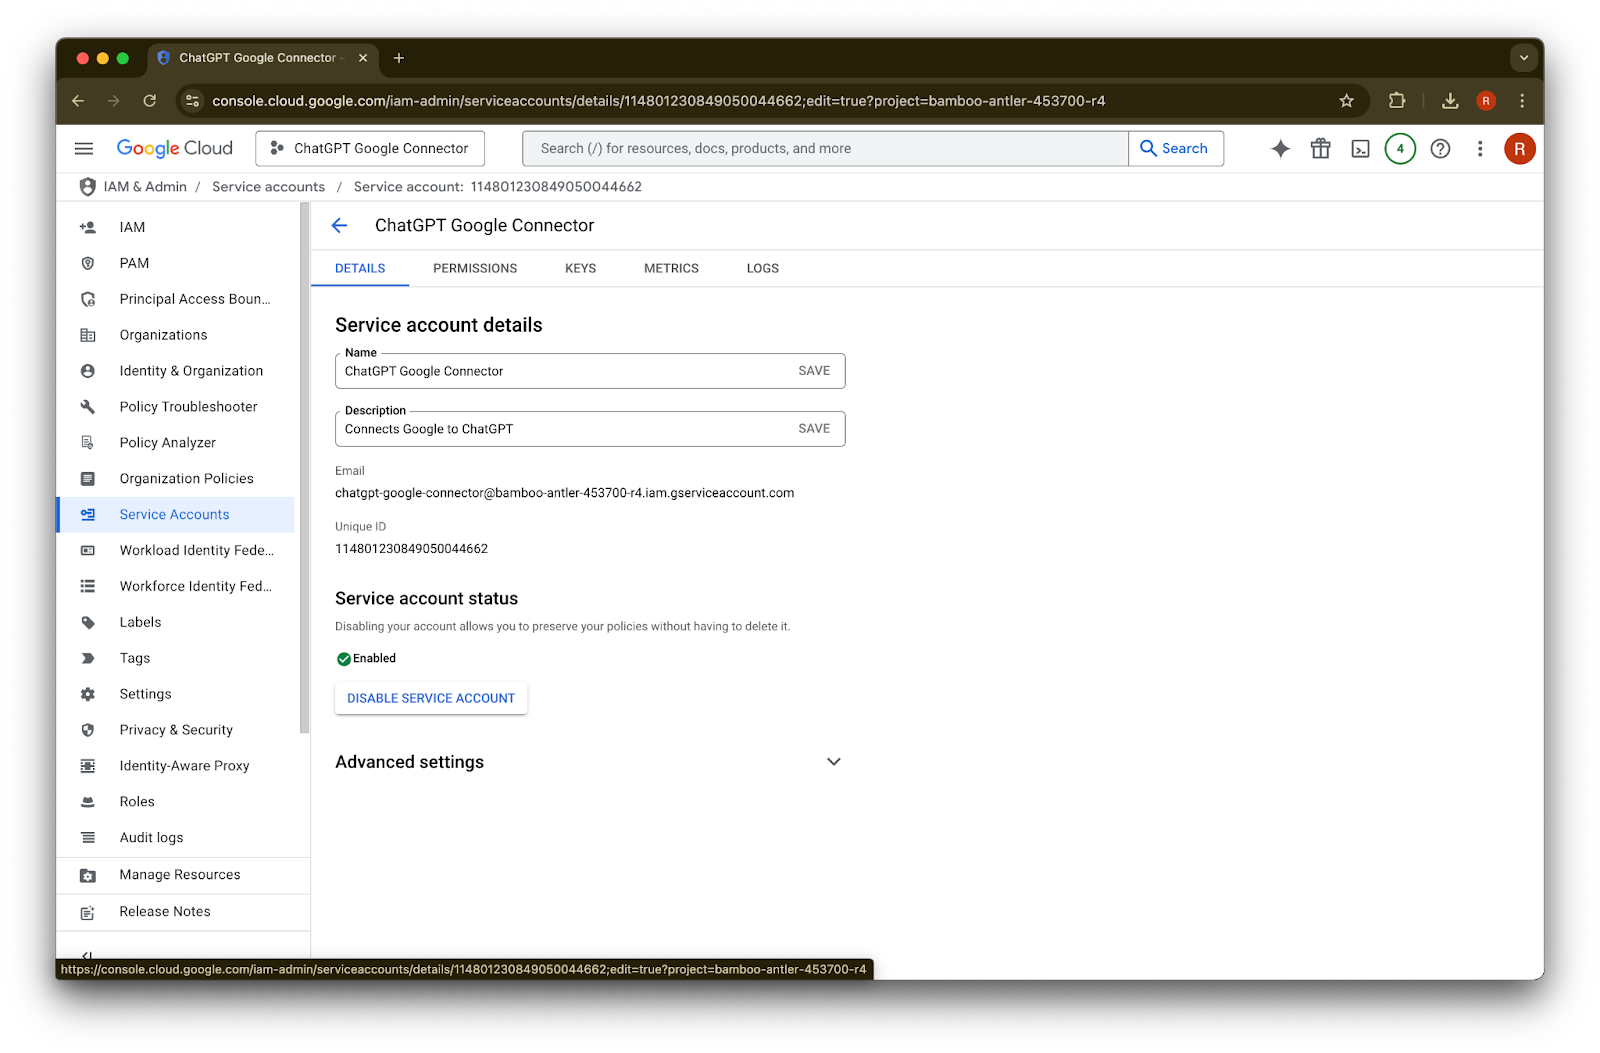
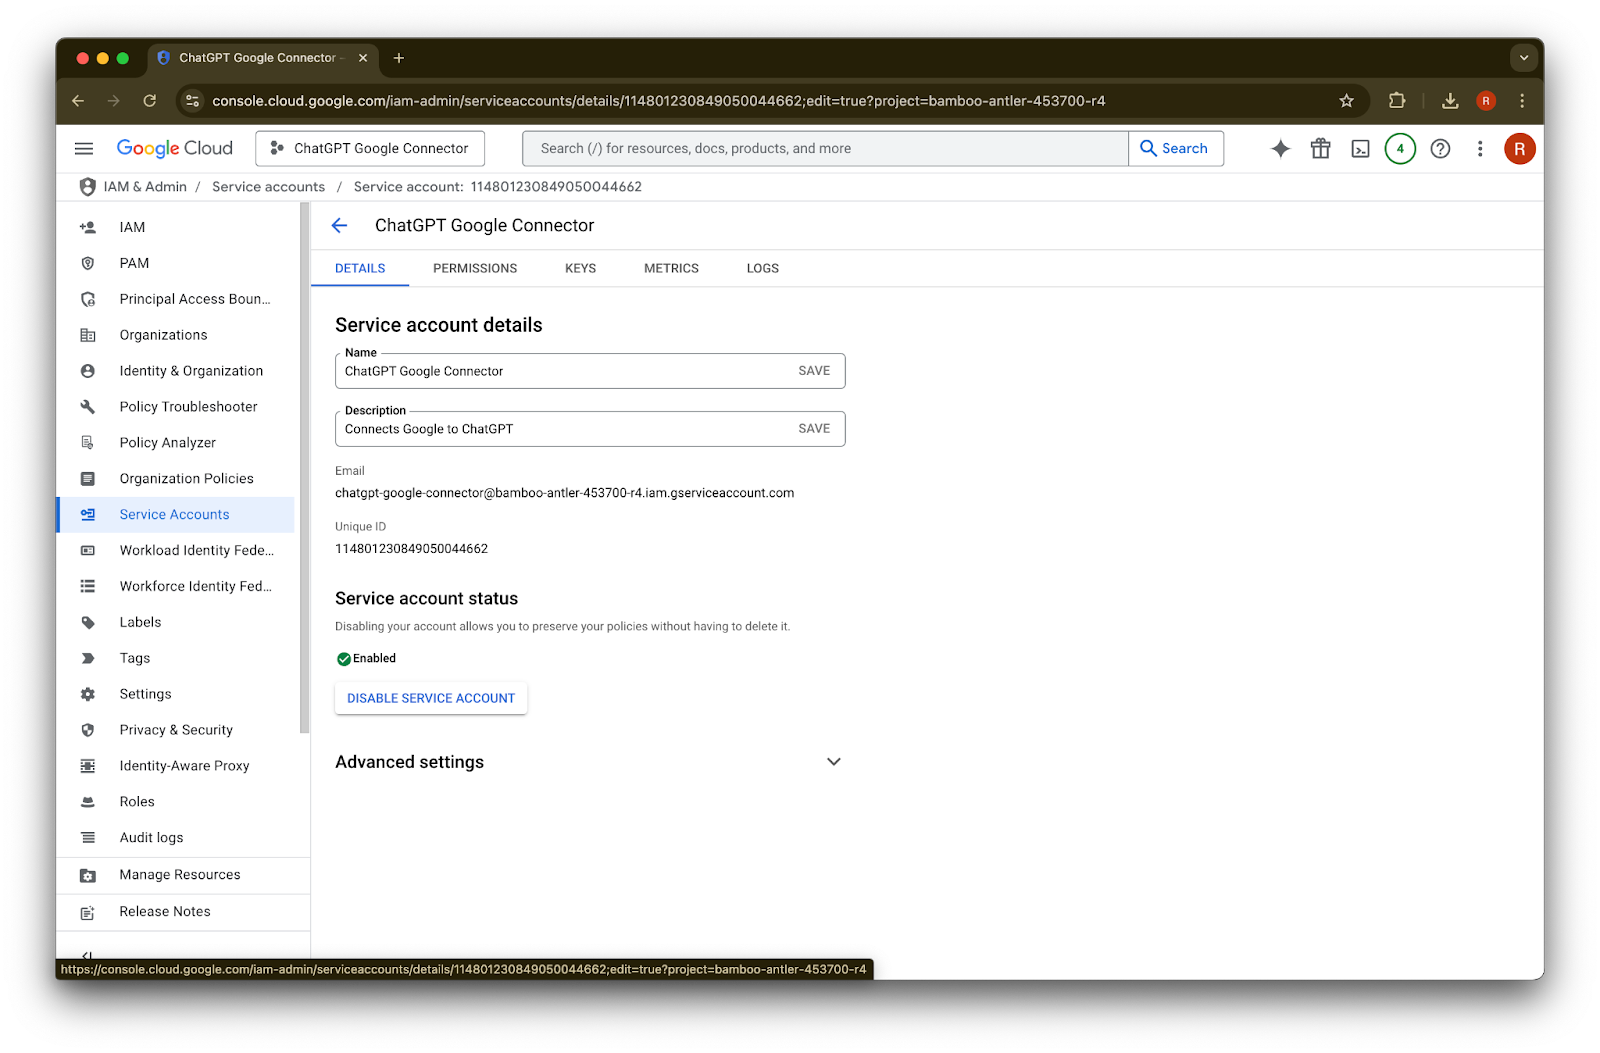
details پر کلک کریں
Unique ID نوٹ کر لیں۔ یہ Step 42 میں درکار ہوگی۔
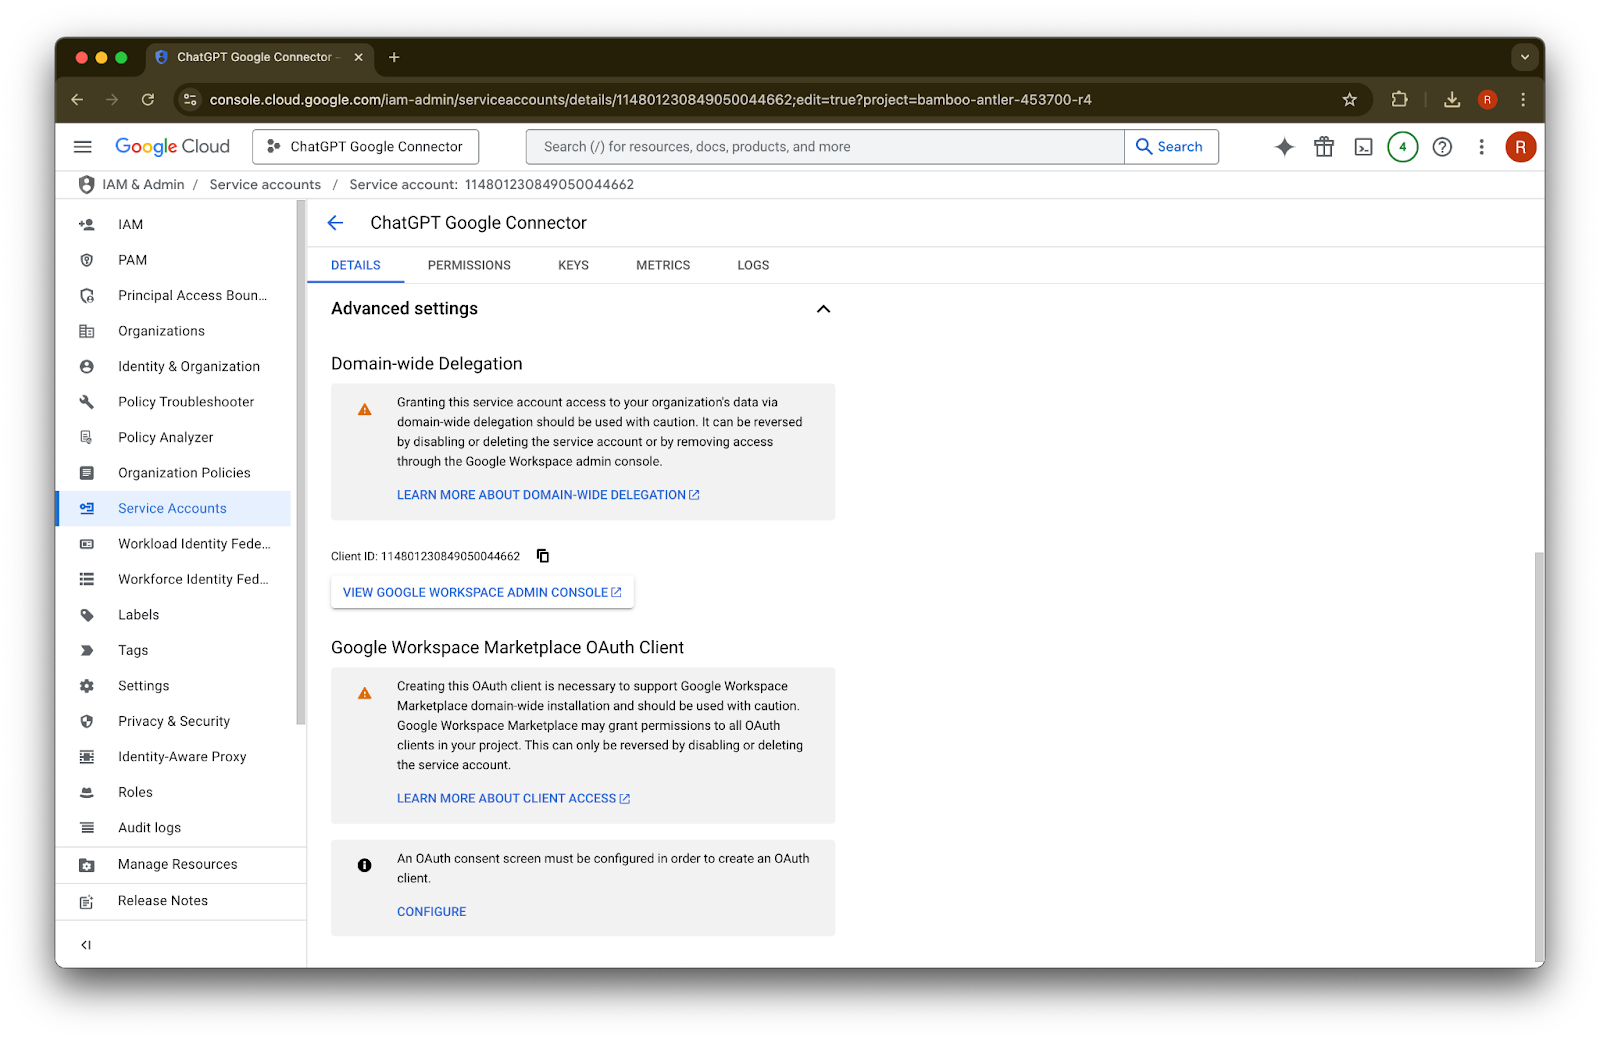
Advanced settings کو کھولیں
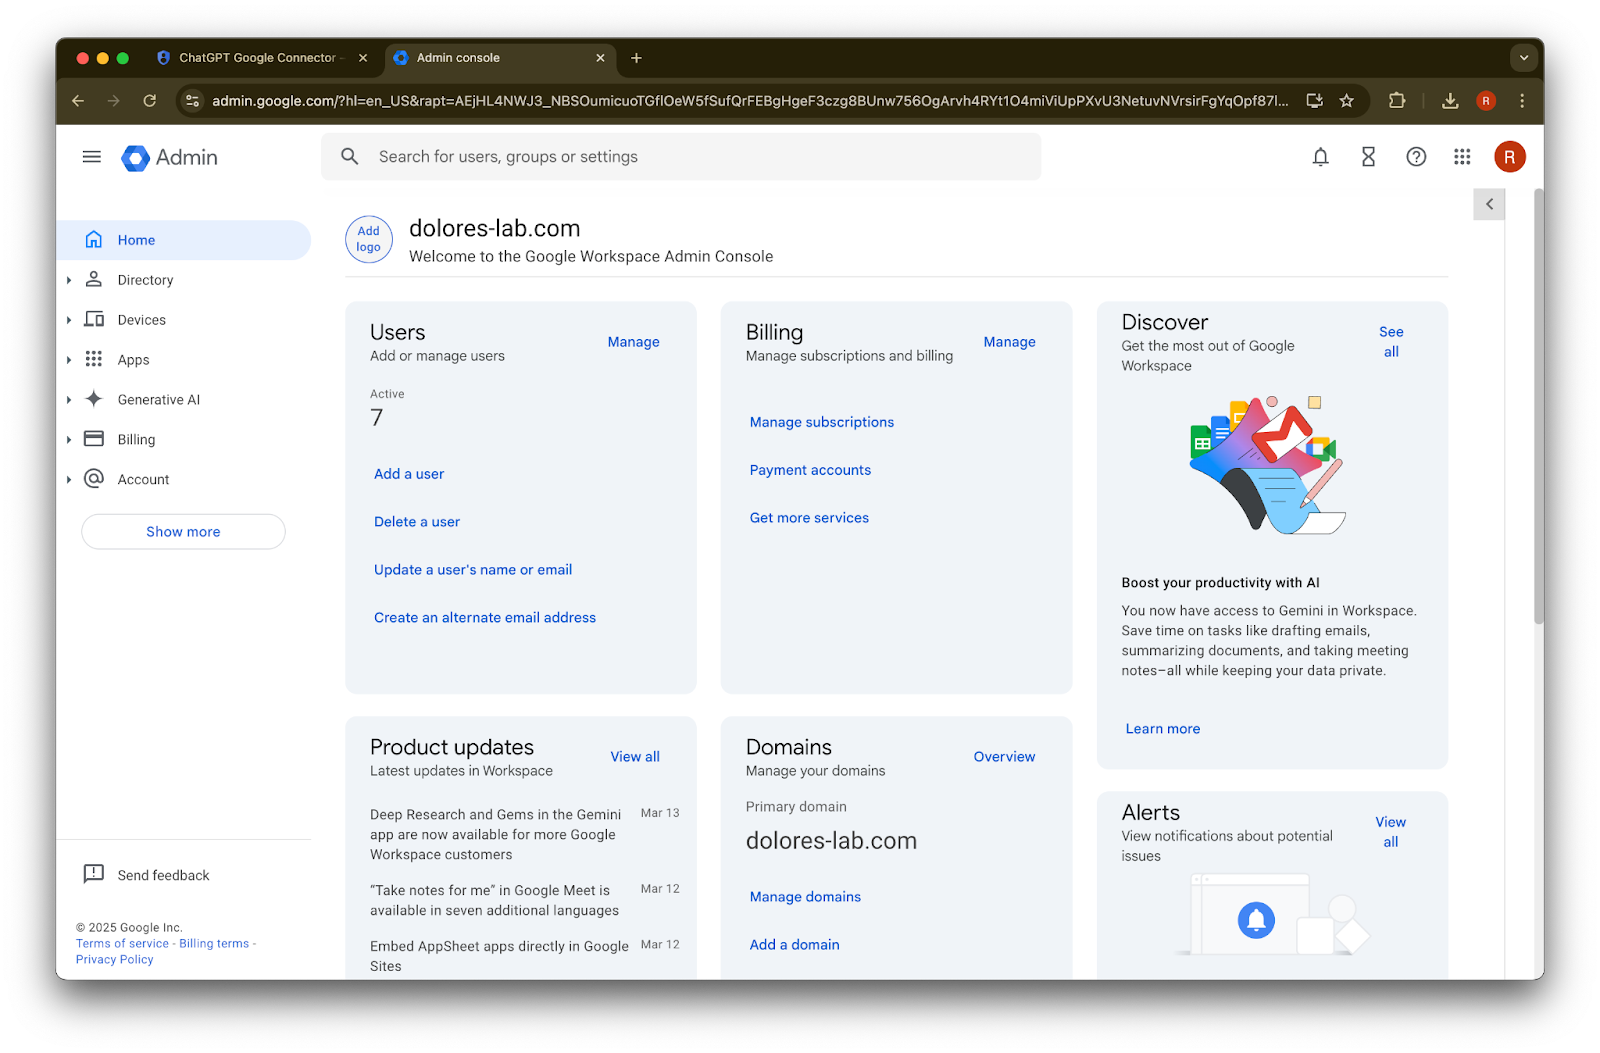
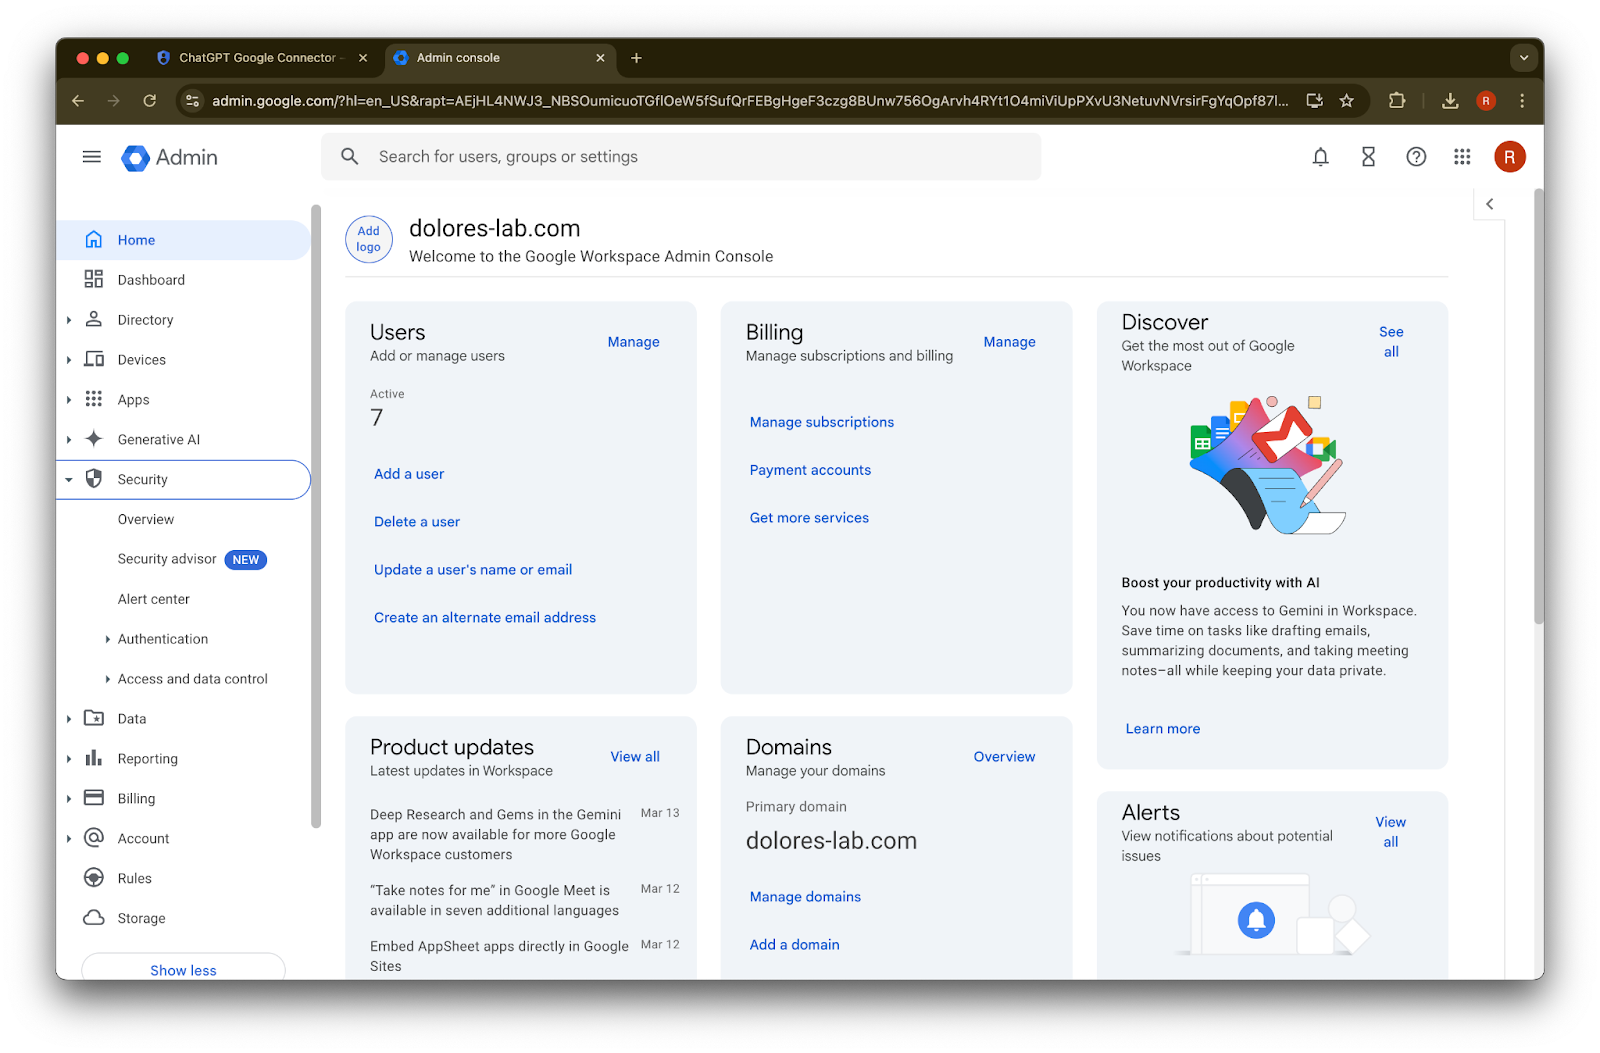
نیچے اسکرول کریں اور View Google Workspace Admin Console پر کلک کریں۔ Google Workspace console نئے tab میں کھلے گا۔
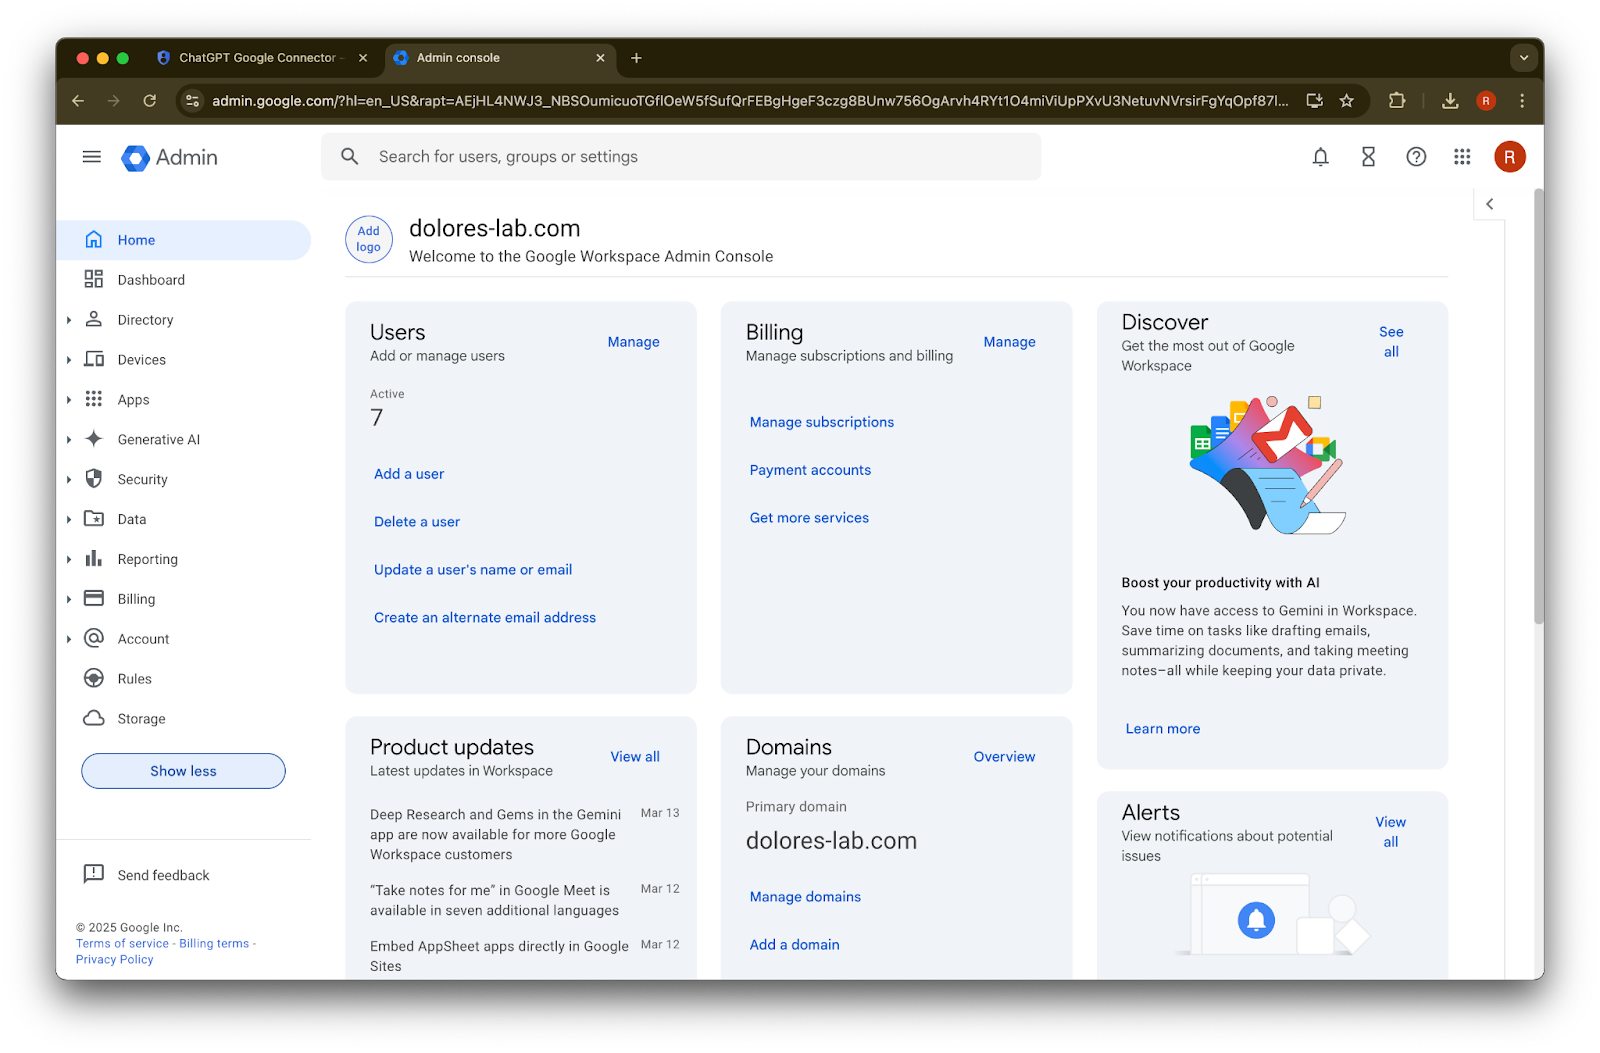
Show more پر کلک کریں
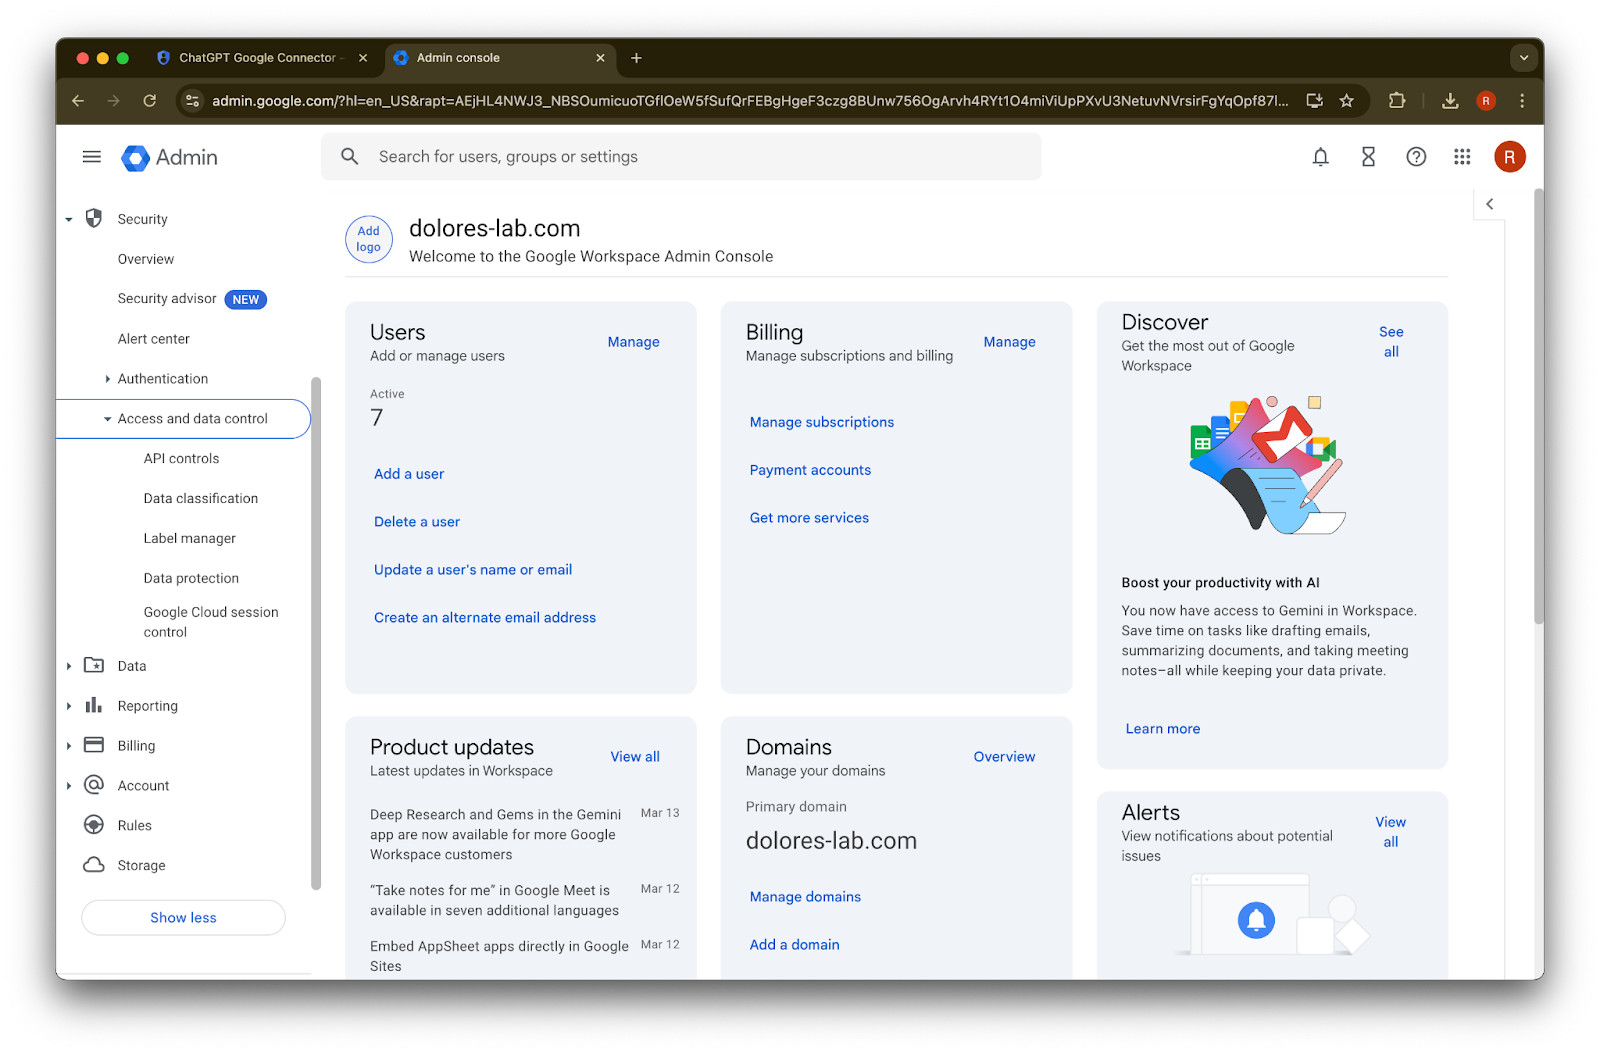
Security سیکشن کو کھولیں
Access and data controls سیکشن کو کھولیں
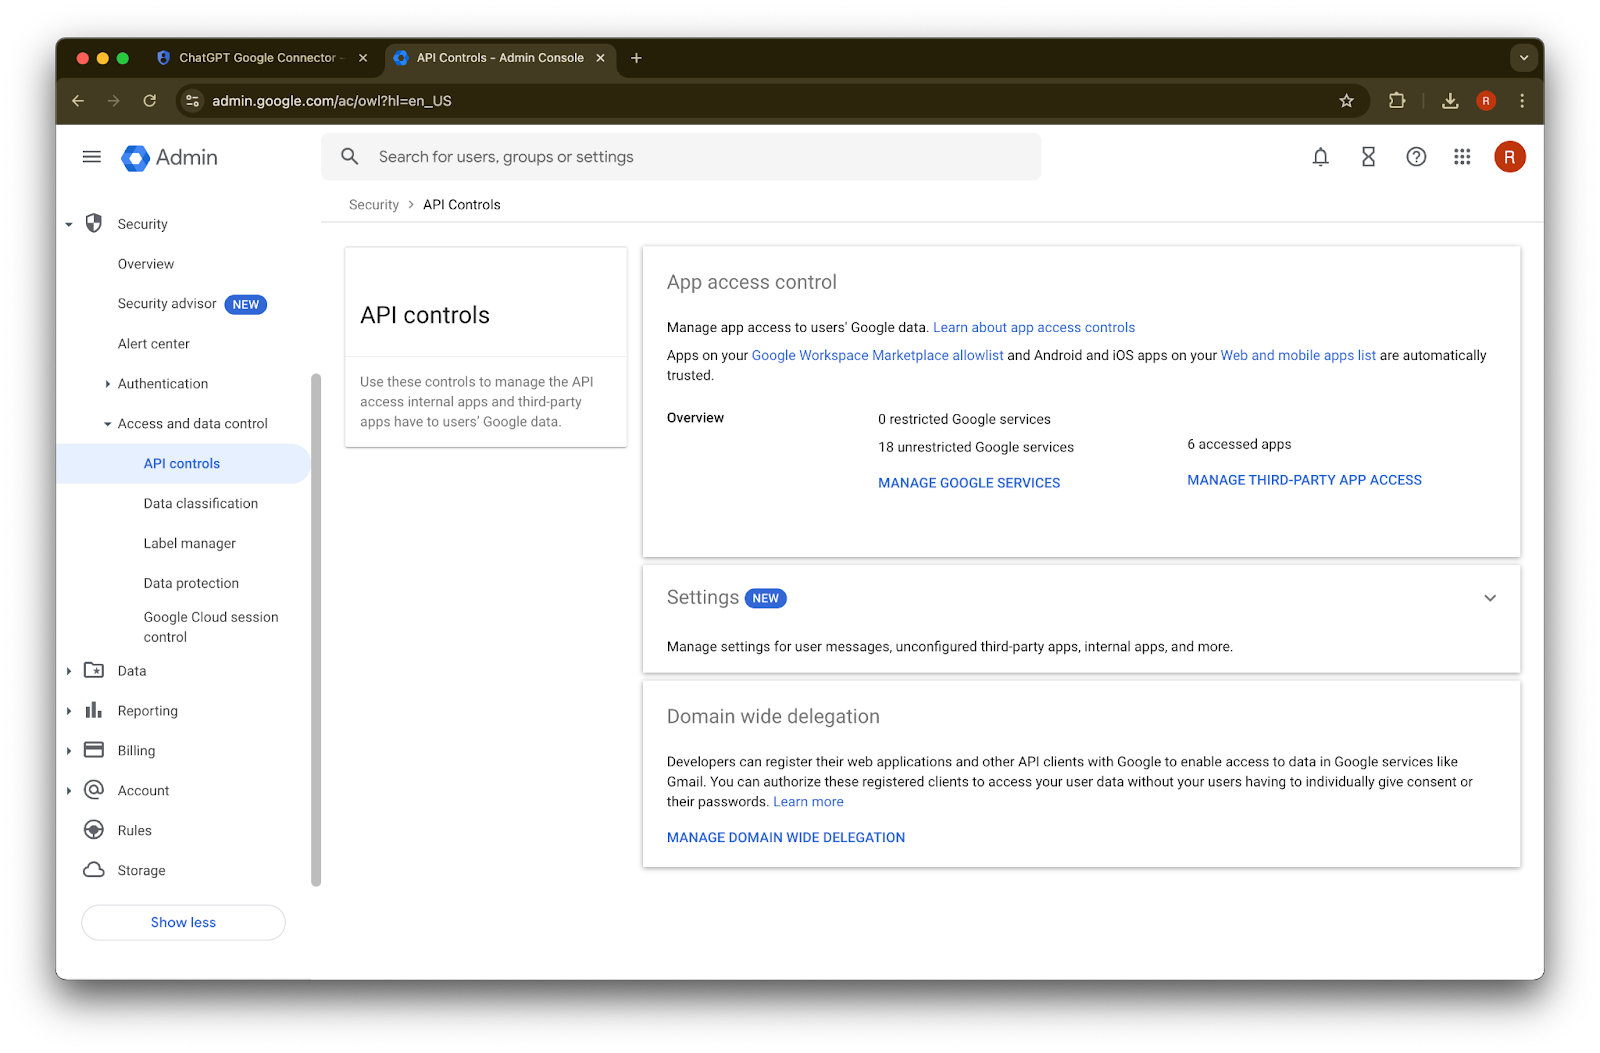
API controls سیکشن پر کلک کریں
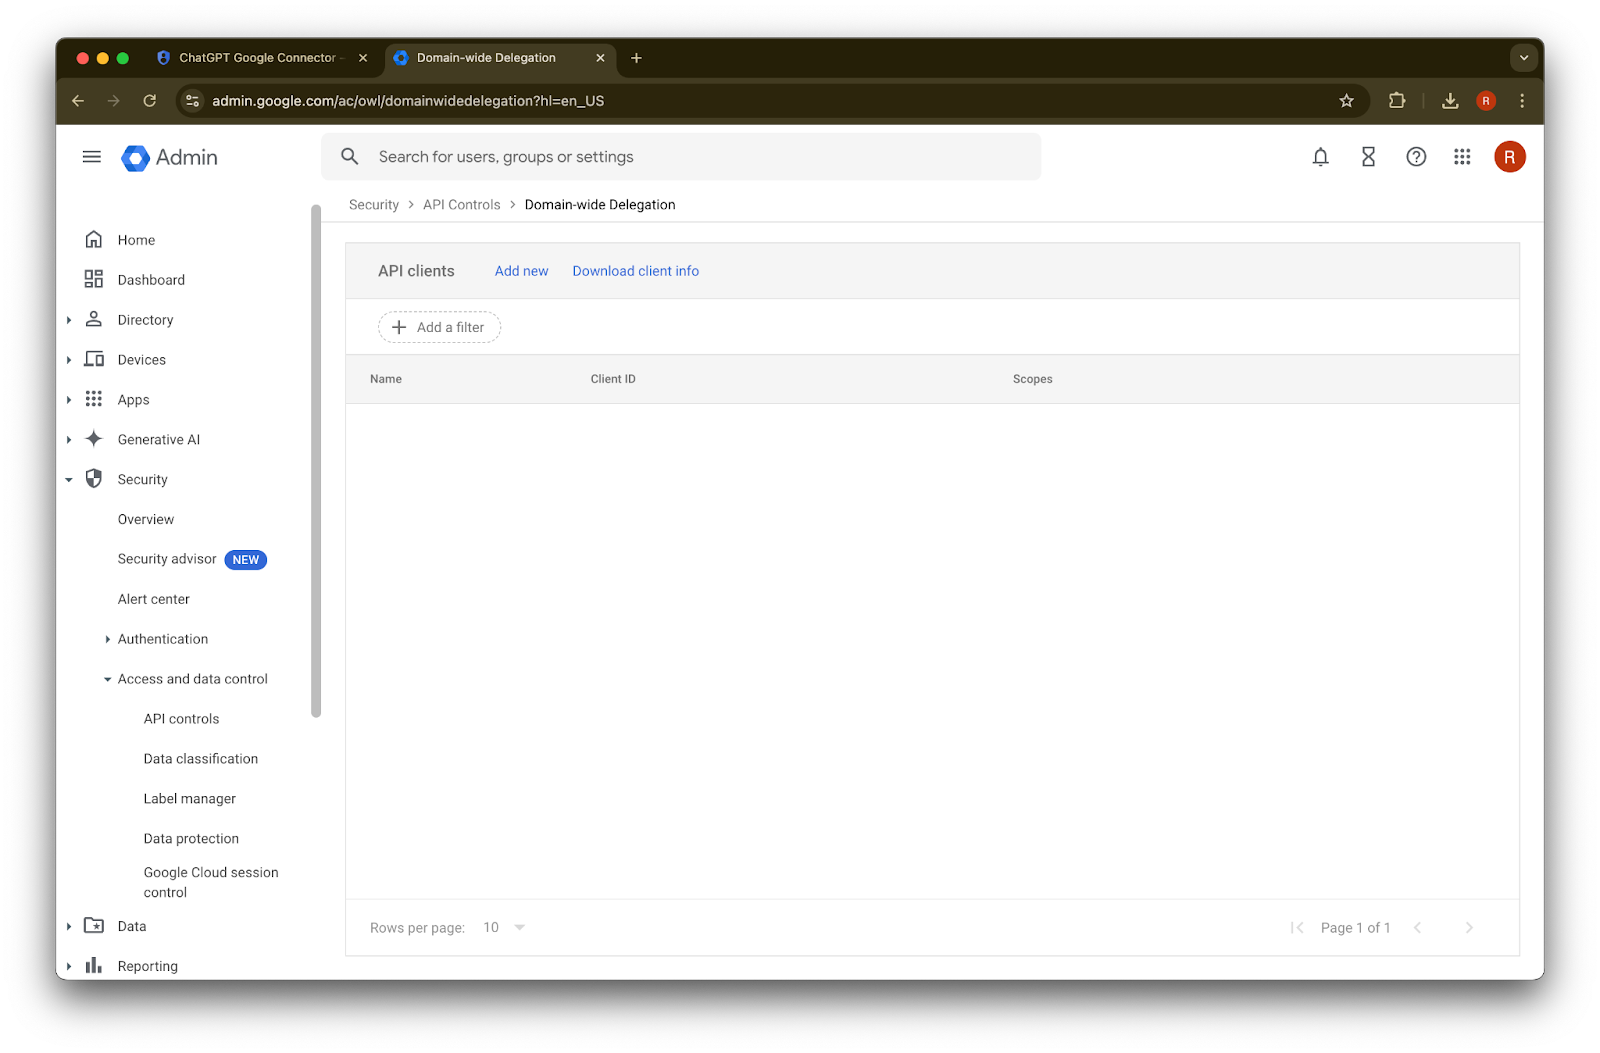
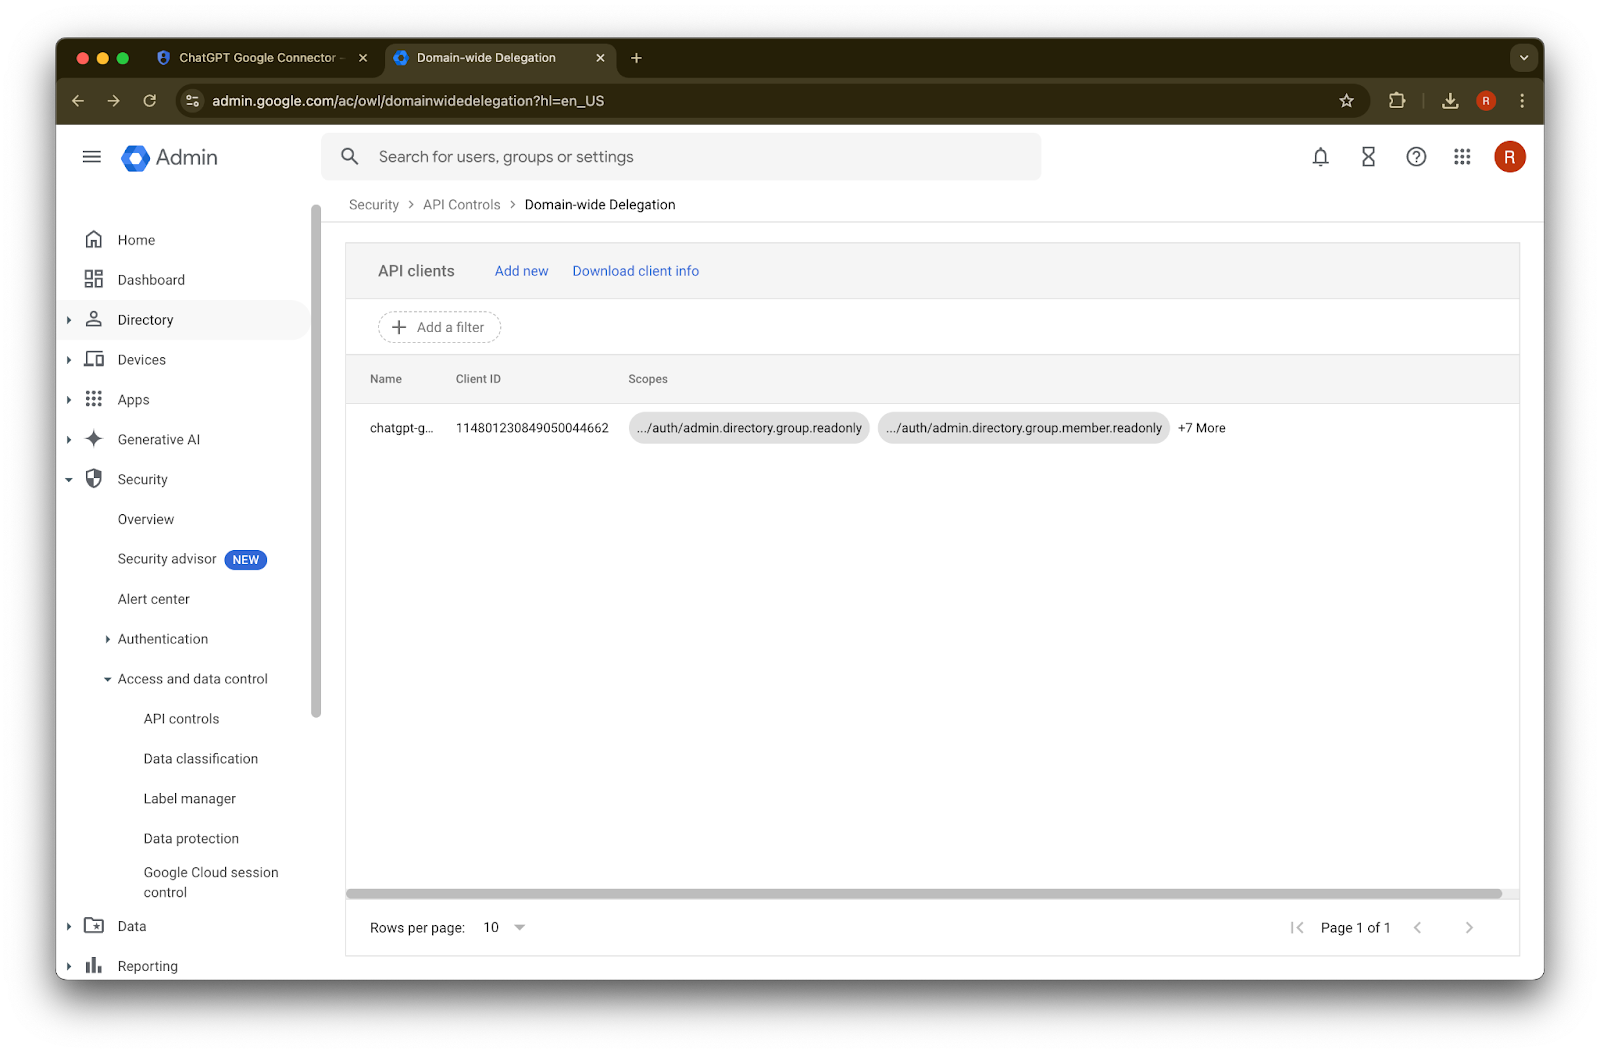
Manage Domain Wide Delegation پر کلک کریں
Add new پر کلک کریں
پہلے نوٹ کی گئی Unique ID کو اس Client ID کی value کے طور پر استعمال کریں
OAuth scopes کے لیے، درج ذیل comma de-limited auth scopes values دیکھیں جنہیں آپ کو copy اور paste کرنا ہوگا:
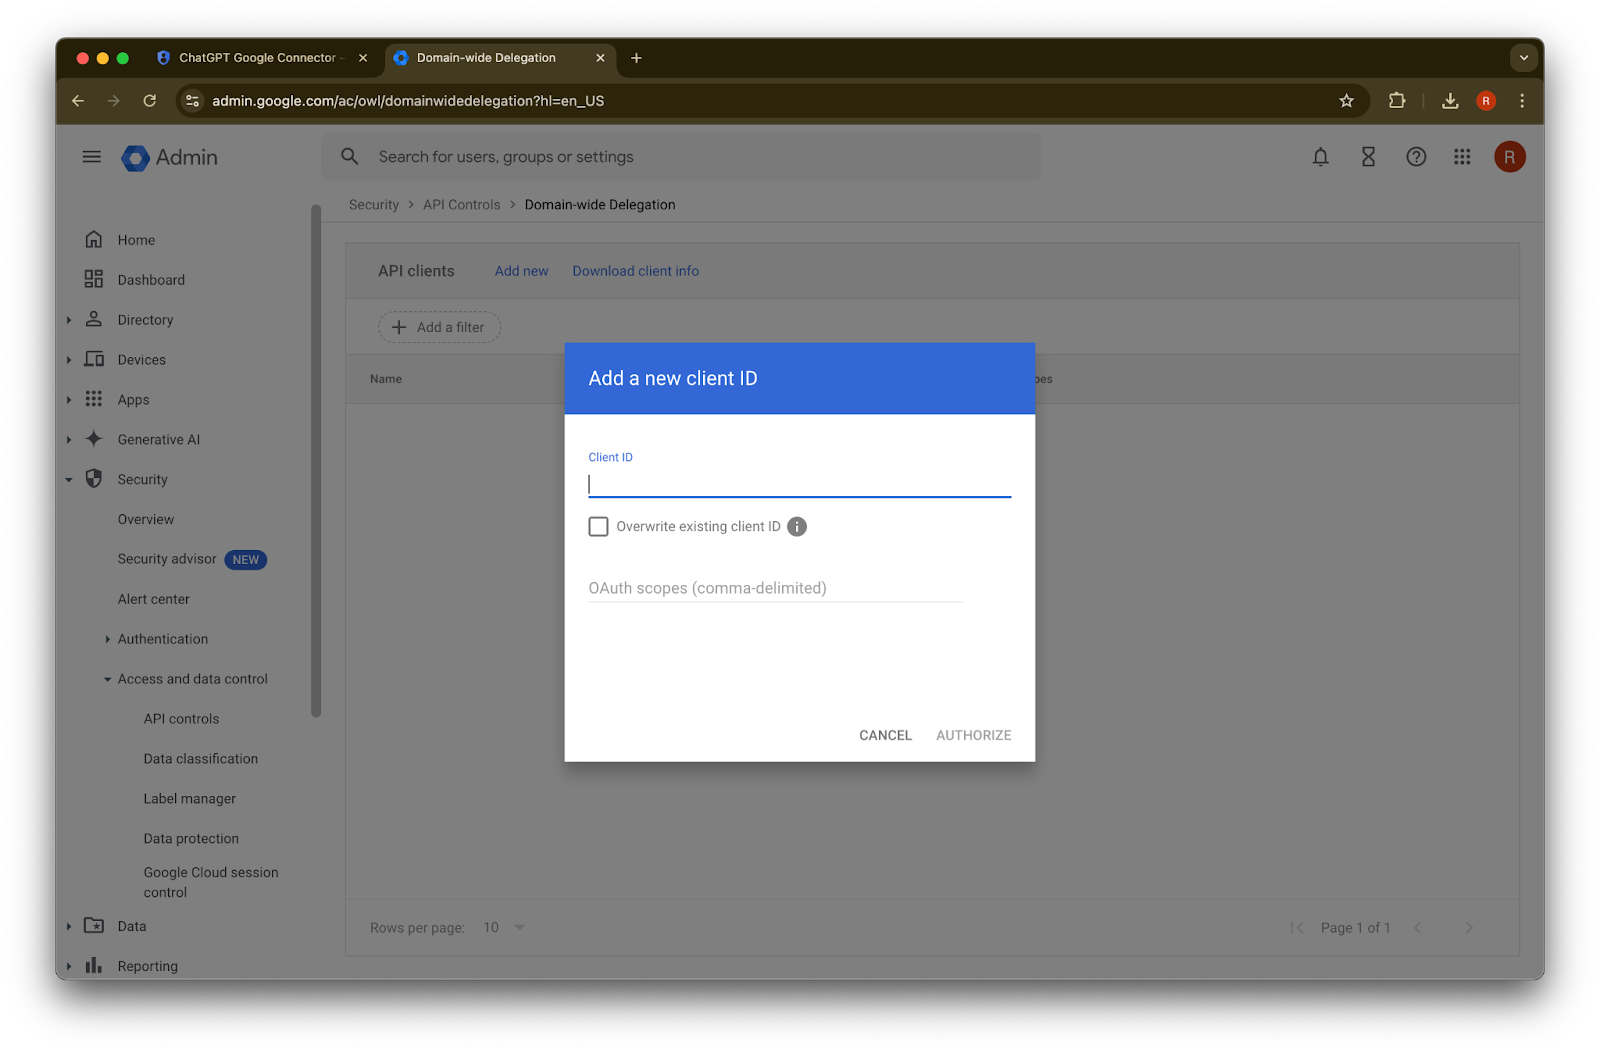
https://www.googleapis.com/auth/admin.directory.group.readonly, https://www.googleapis.com/auth/admin.directory.group.member.readonly, https://www.googleapis.com/auth/admin.directory.user.readonly, https://www.googleapis.com/auth/admin.directory.user.alias.readonly, https://www.googleapis.com/auth/drive.activity.readonly, https://www.googleapis.com/auth/drive.metadata.readonly, https://www.googleapis.com/auth/drive.readonly, https://www.googleapis.com/auth/userinfo.profile, https://www.googleapis.com/auth/userinfo.email| Scope | ریزننگ |
| admin.directory.group.readonly | group-based permissions نافذ کرنے کے لیے |
| admin.directory.group.member.readonly | group-based permissions نافذ کرنے کے لیے |
| admin.directory.user.alias.readonly | ایسے معاملات سنبھالنے کے لیے جہاں صارف کو alias کے ذریعے permission دی گئی ہو |
| drive.activity.readonly | فائلوں میں تبدیلی ہونے پر اطلاع ملنے کے لیے |
| drive.metadata.readonly | فائل کا مواد اور متعلقہ metadata sync کرنے کے لیے (مثلاً آخری ترمیم کی تاریخ) |
| drive.readonly | فائل کا مواد اور متعلقہ metadata sync کرنے کے لیے (مثلاً آخری ترمیم کی تاریخ) |
| userinfo.profile | یہ معلوم کرنے کے لیے کہ ہم کن صارفین کے لیے فائلیں sync کر رہے ہیں |
| userinfo.email | یہ معلوم کرنے کے لیے کہ ہم کن صارفین کے لیے فائلیں sync کر رہے ہیں |
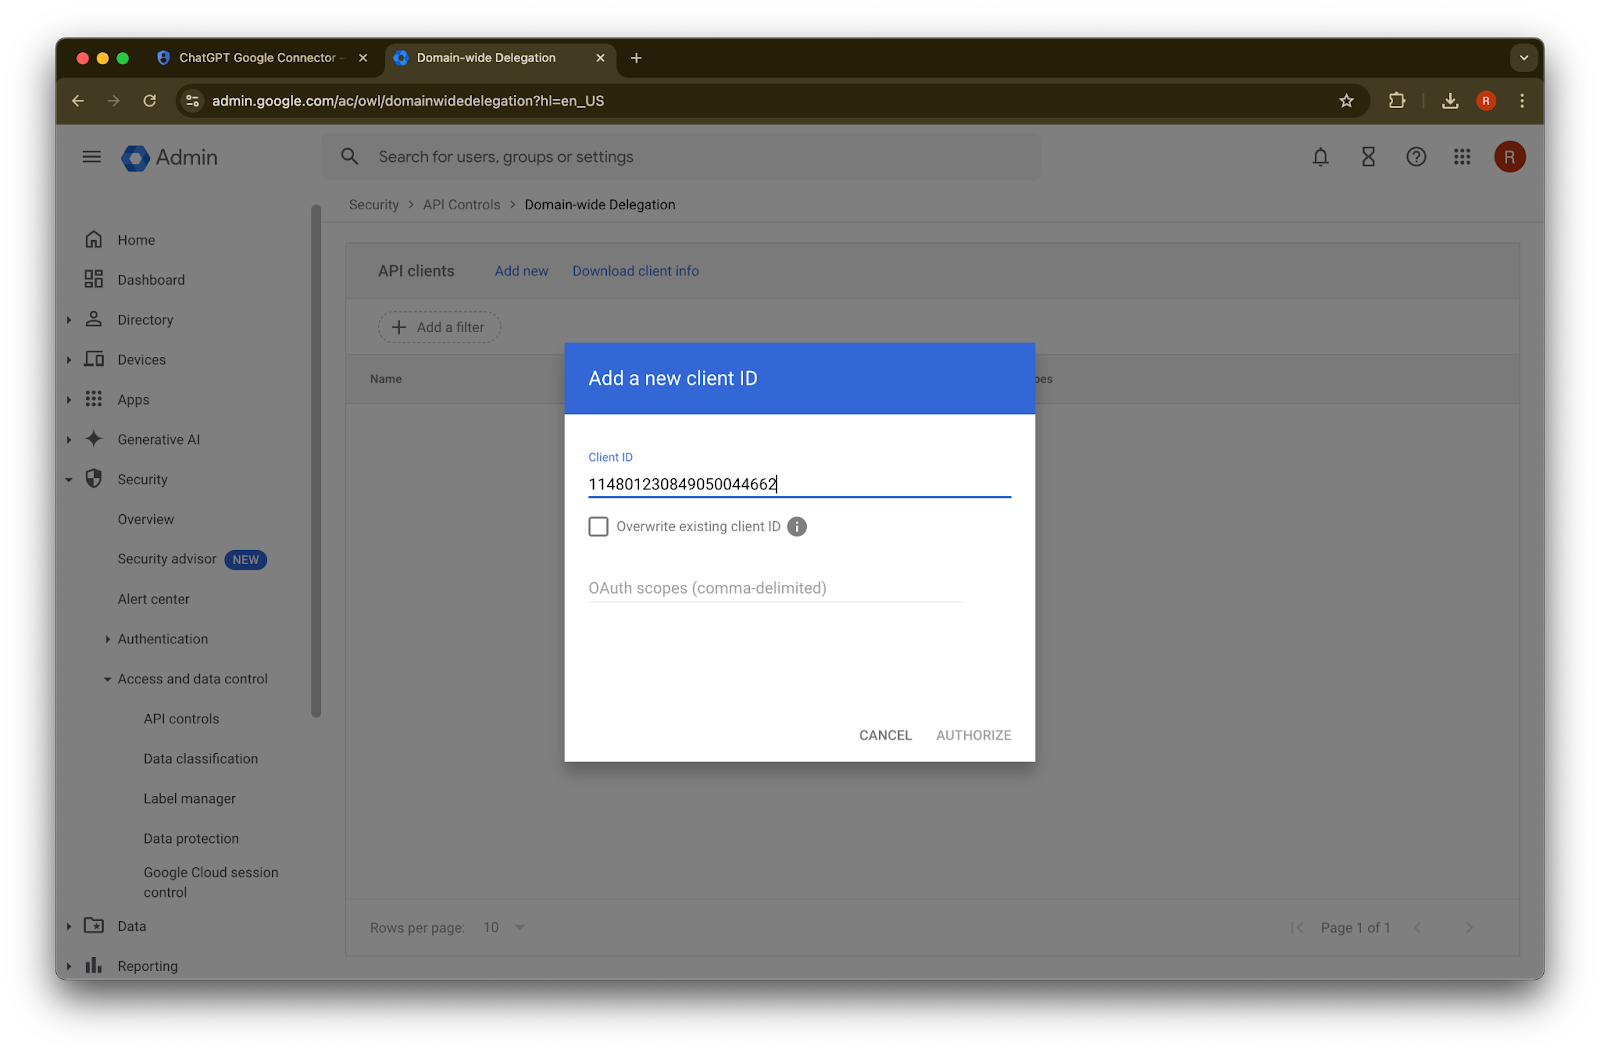
45. Authorize پر کلک کریں
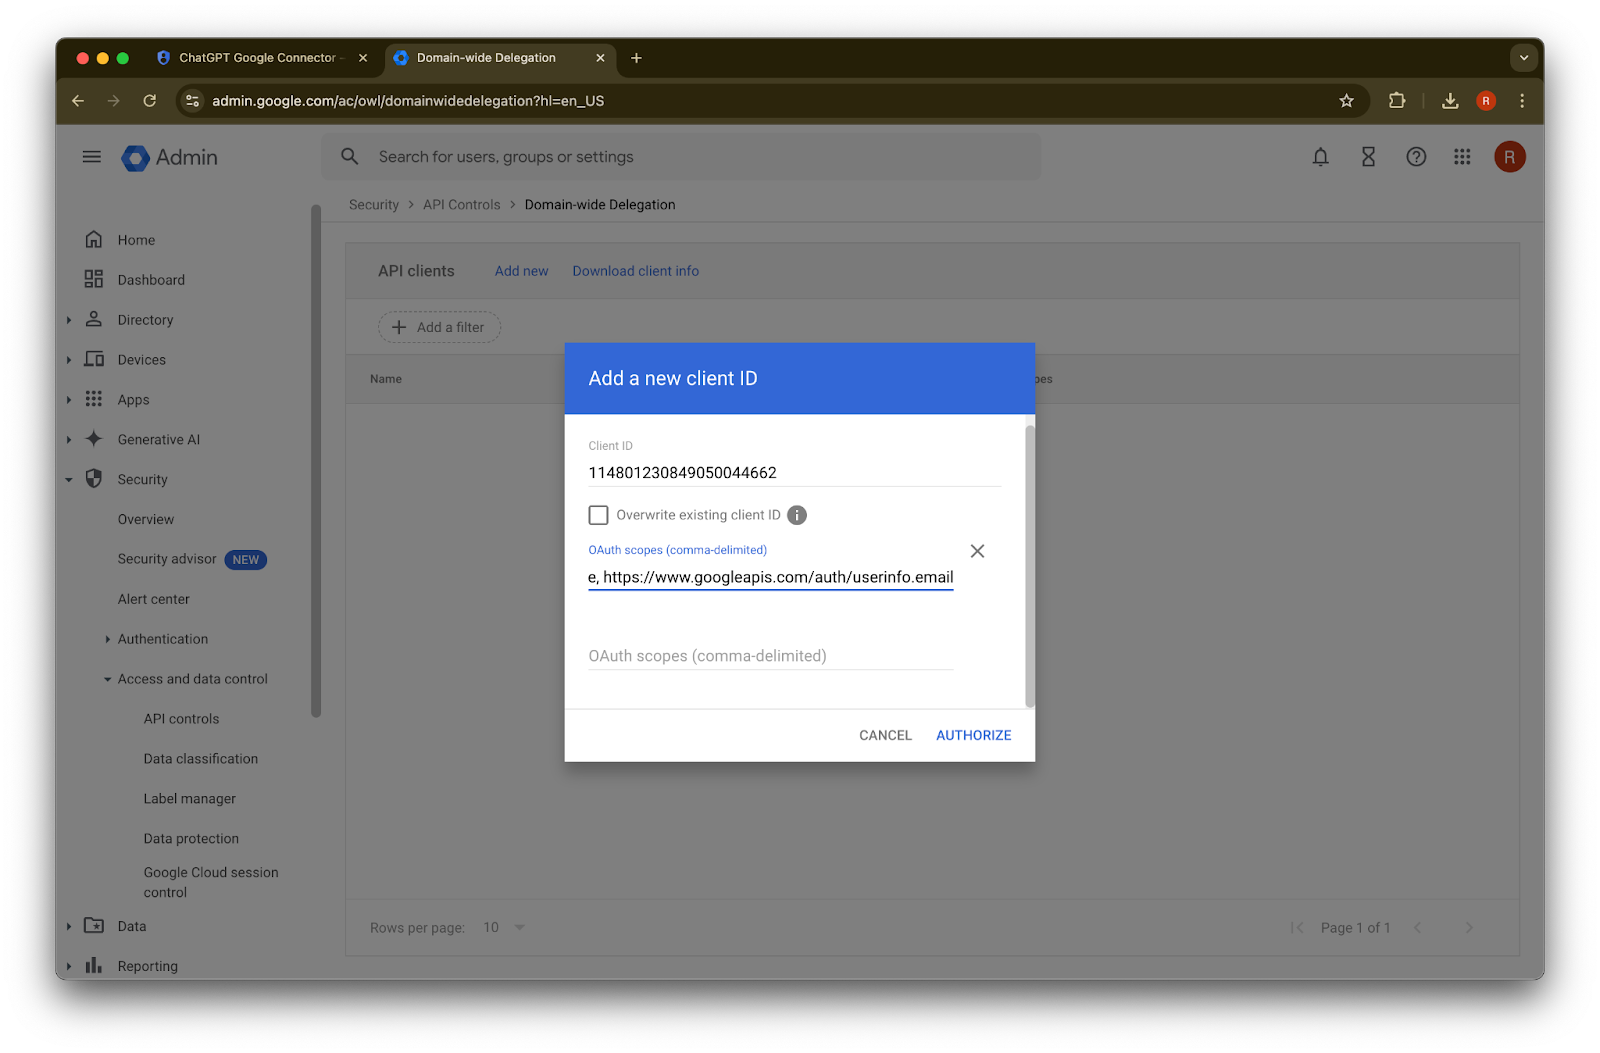
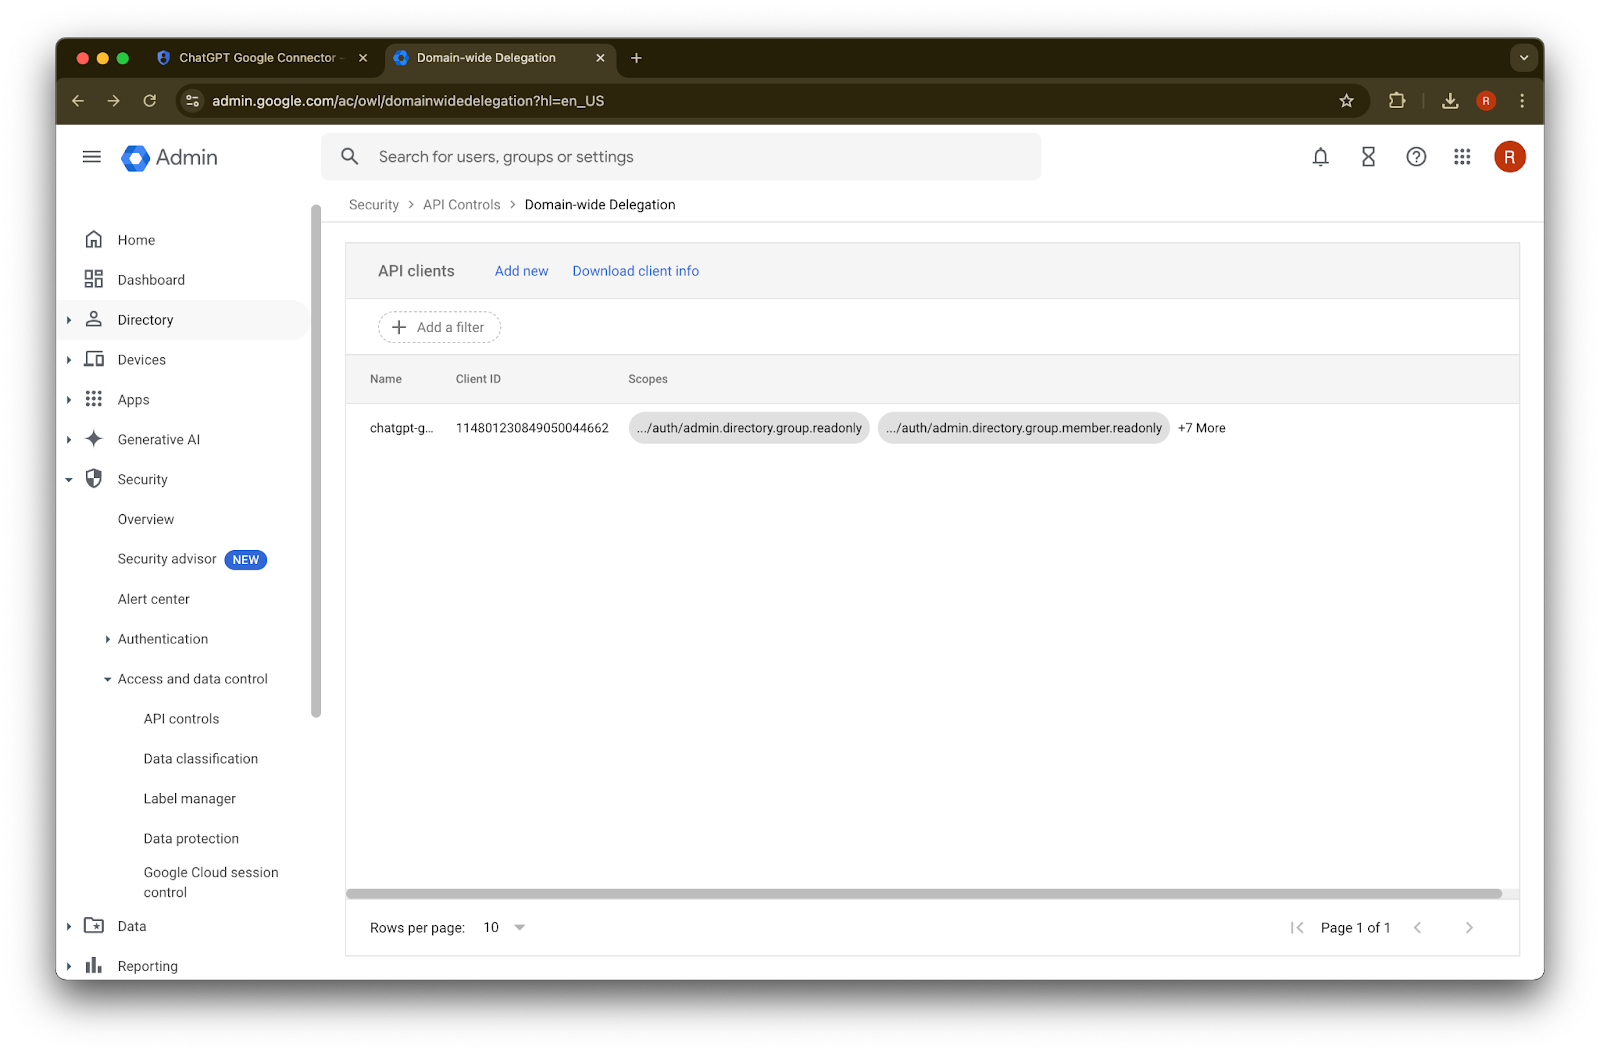
46. کامیابی!
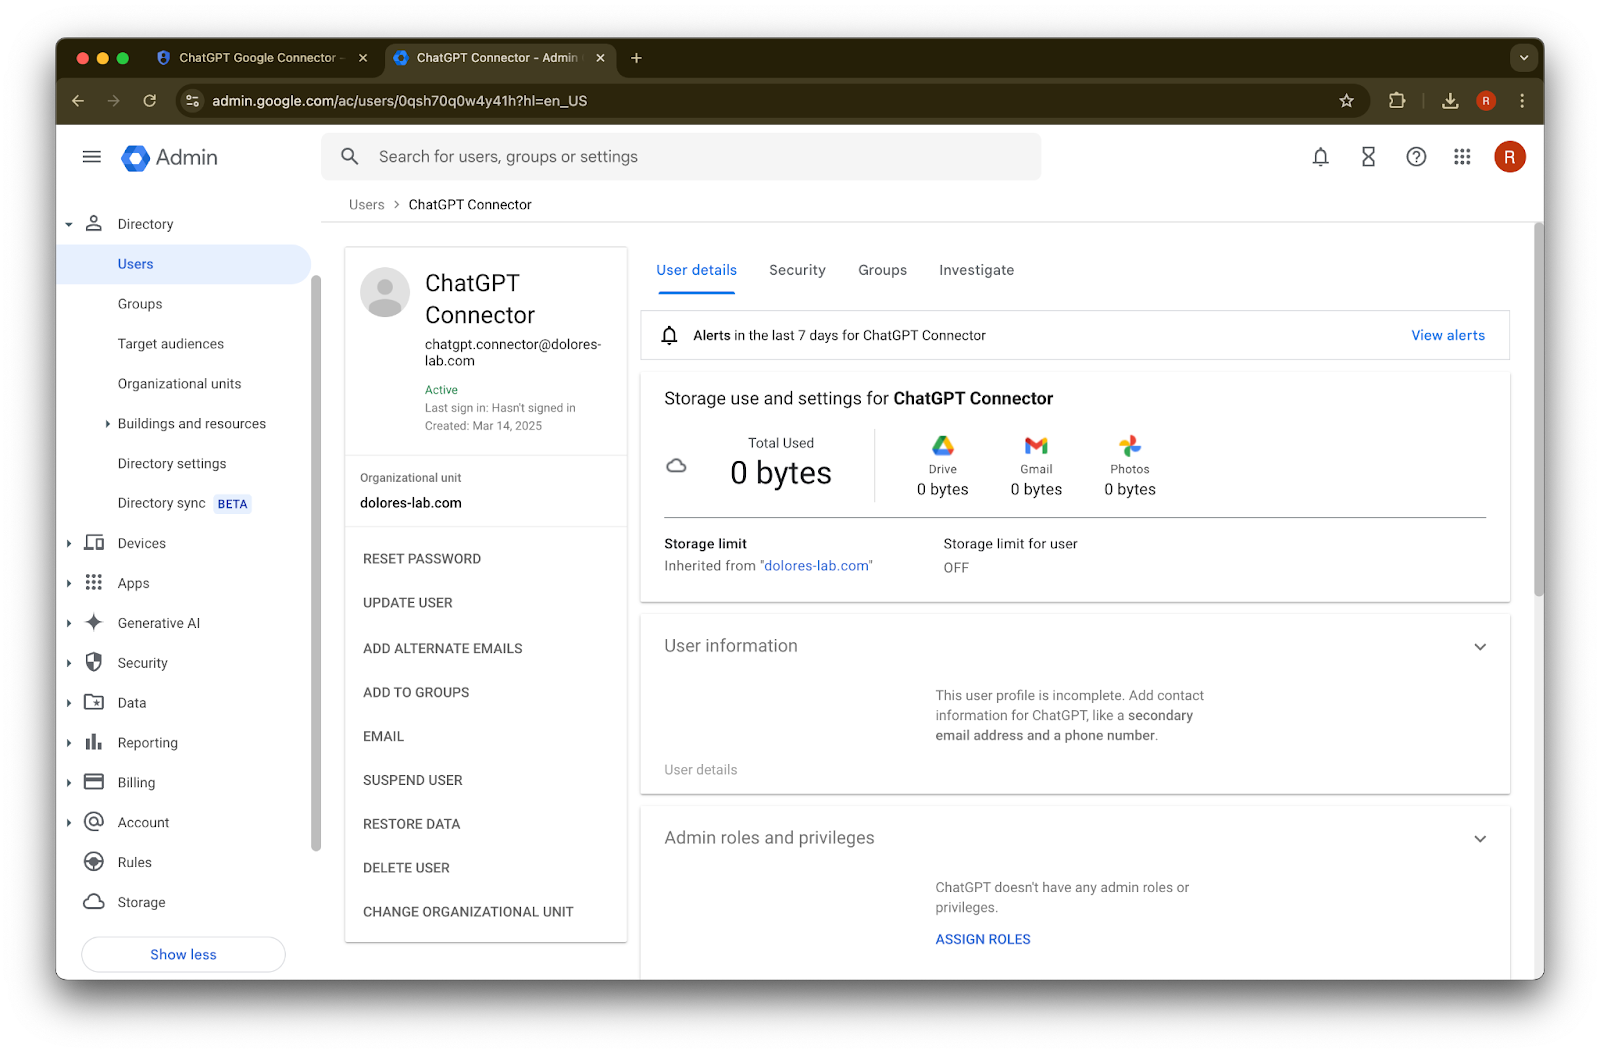
Admin Account سیٹ اپ کرنا
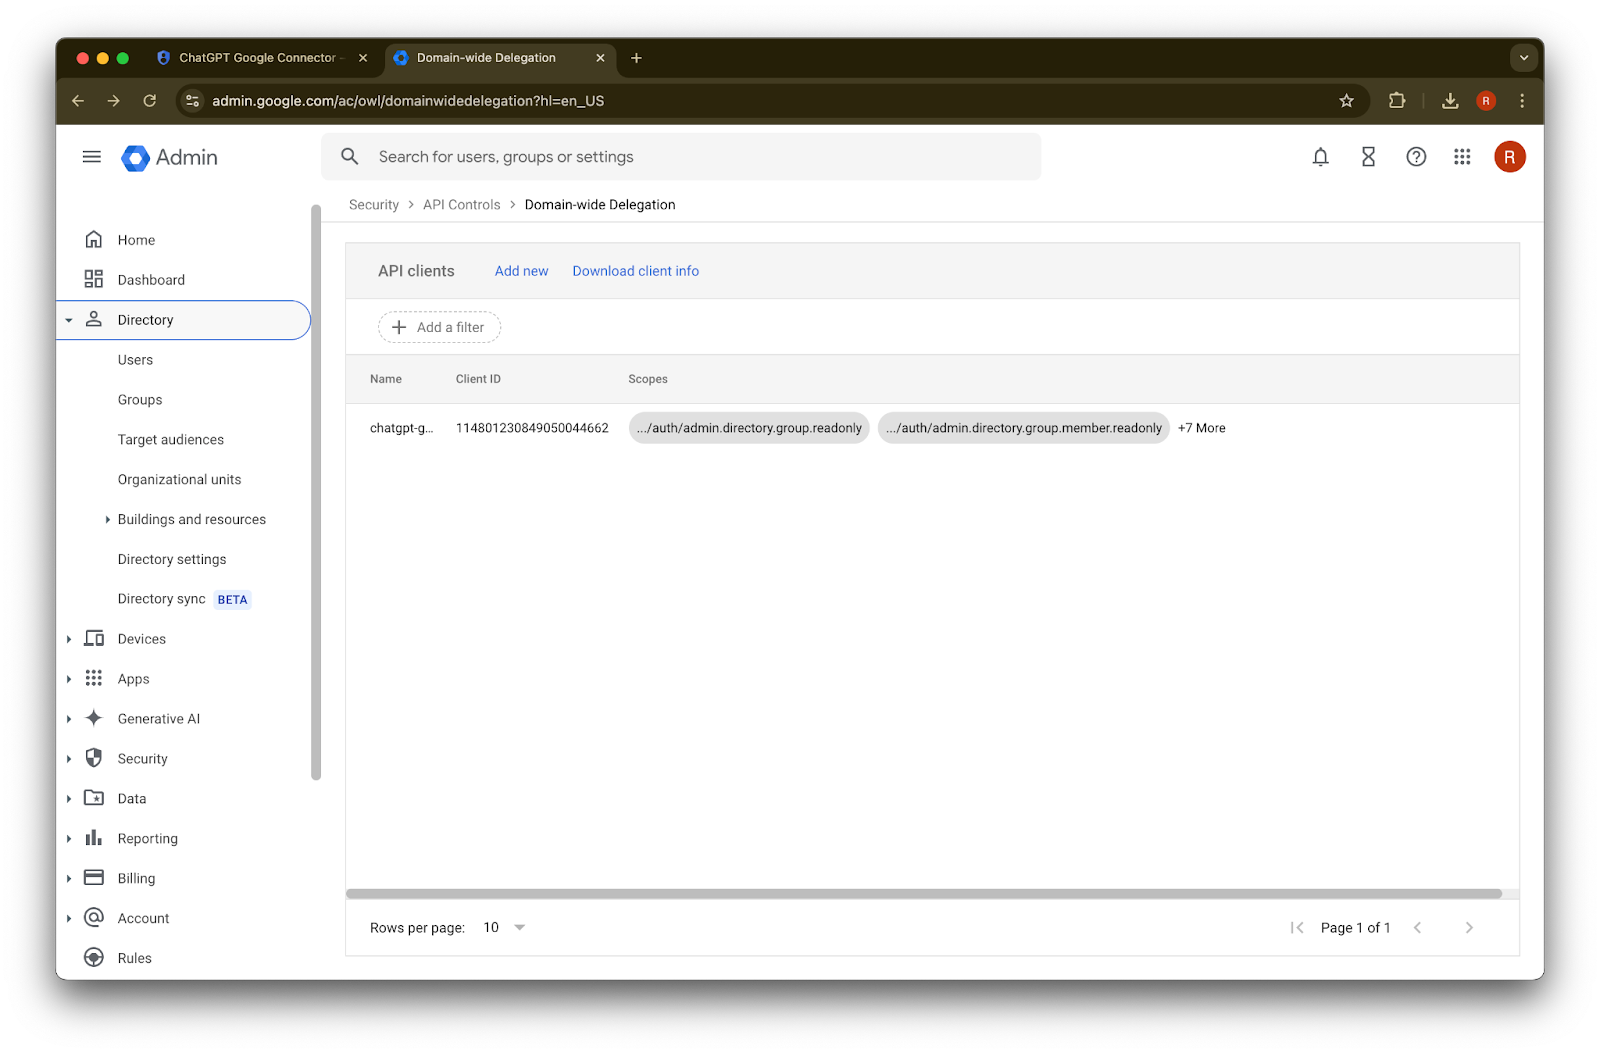
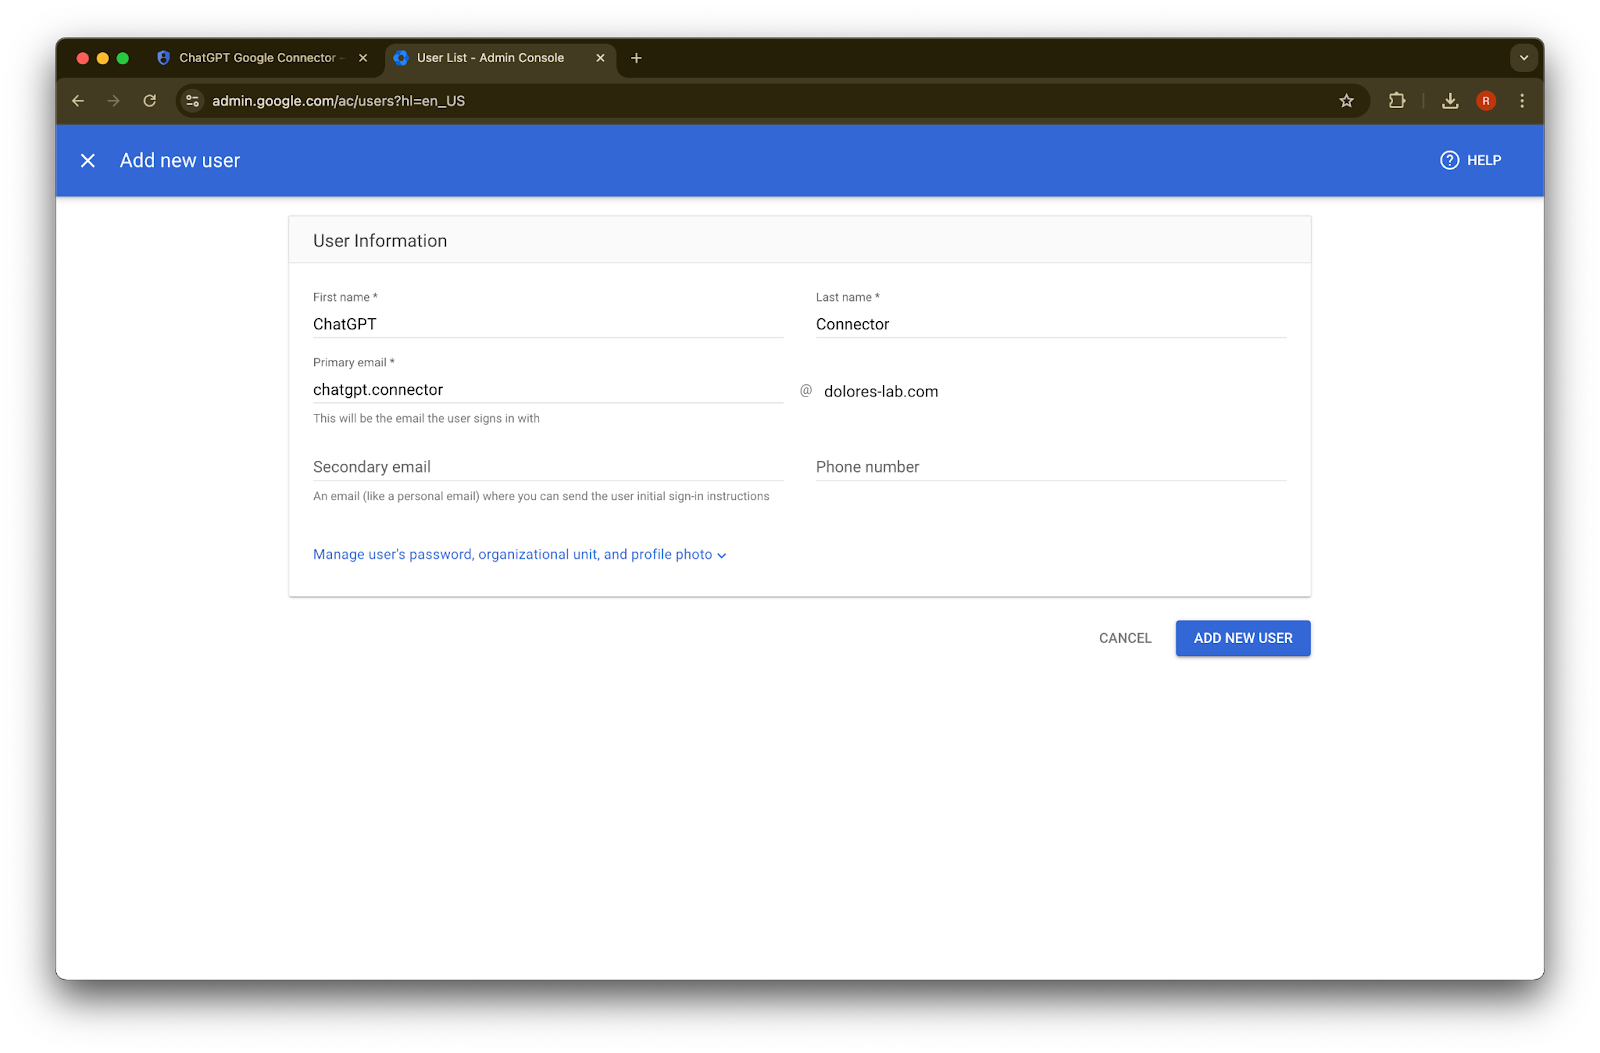
Directory کو کھولیں
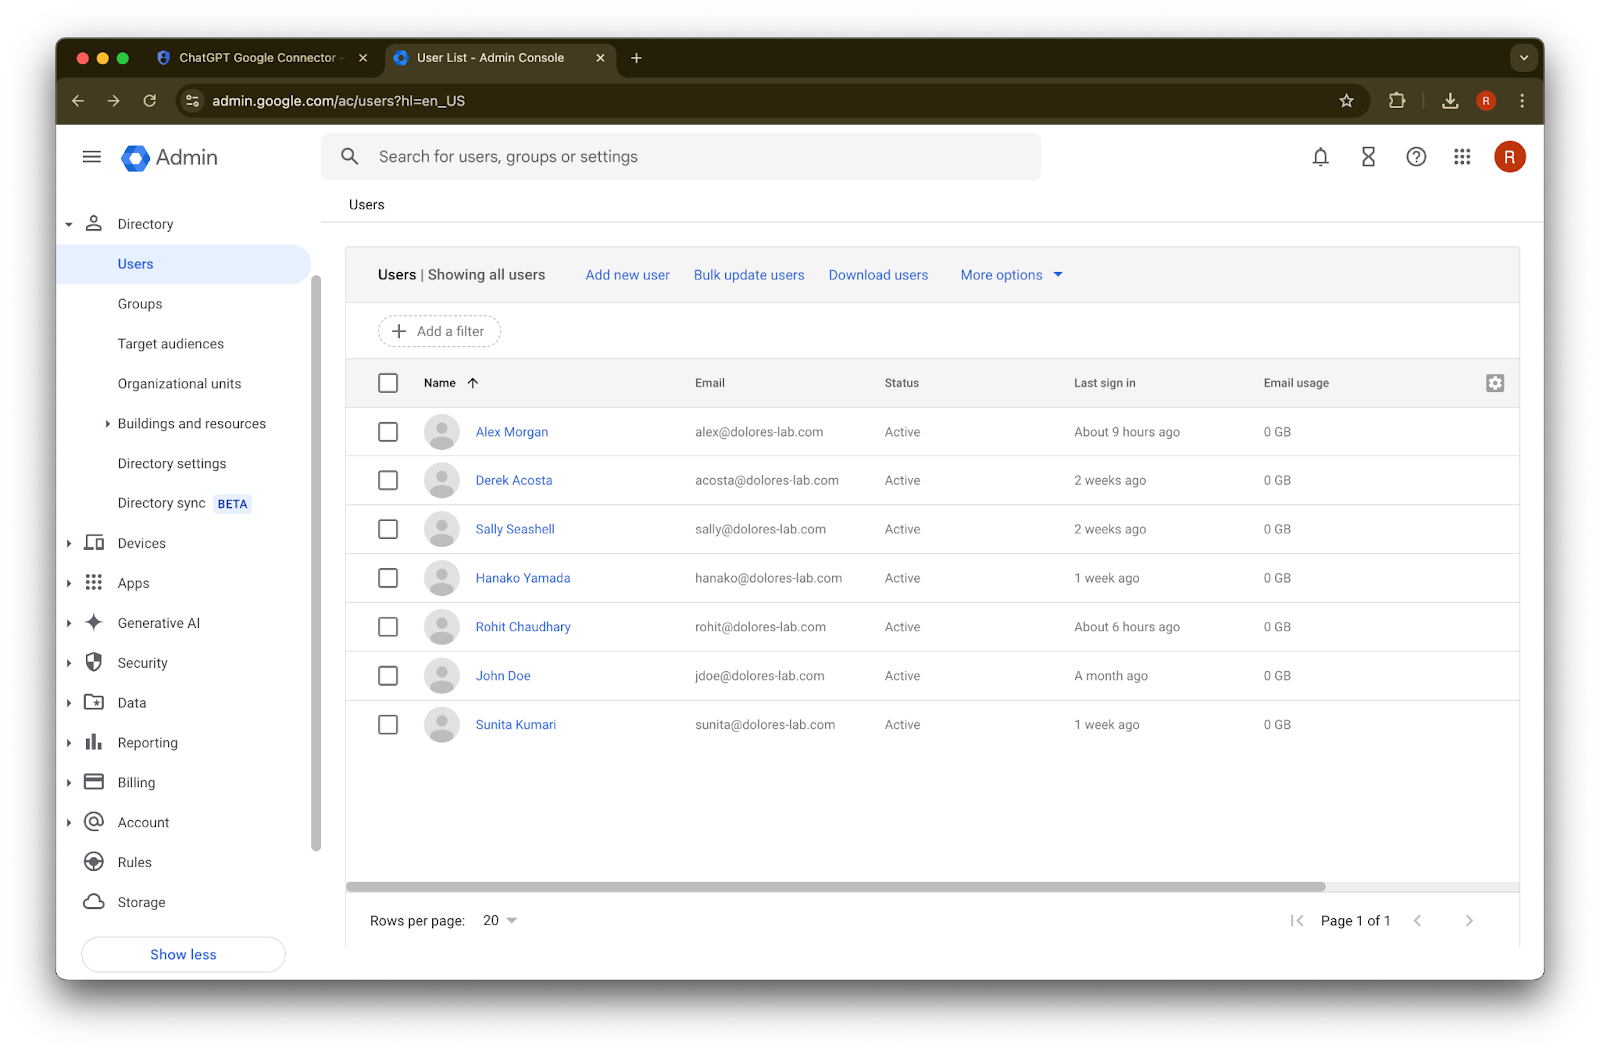
Users پر کلک کریں
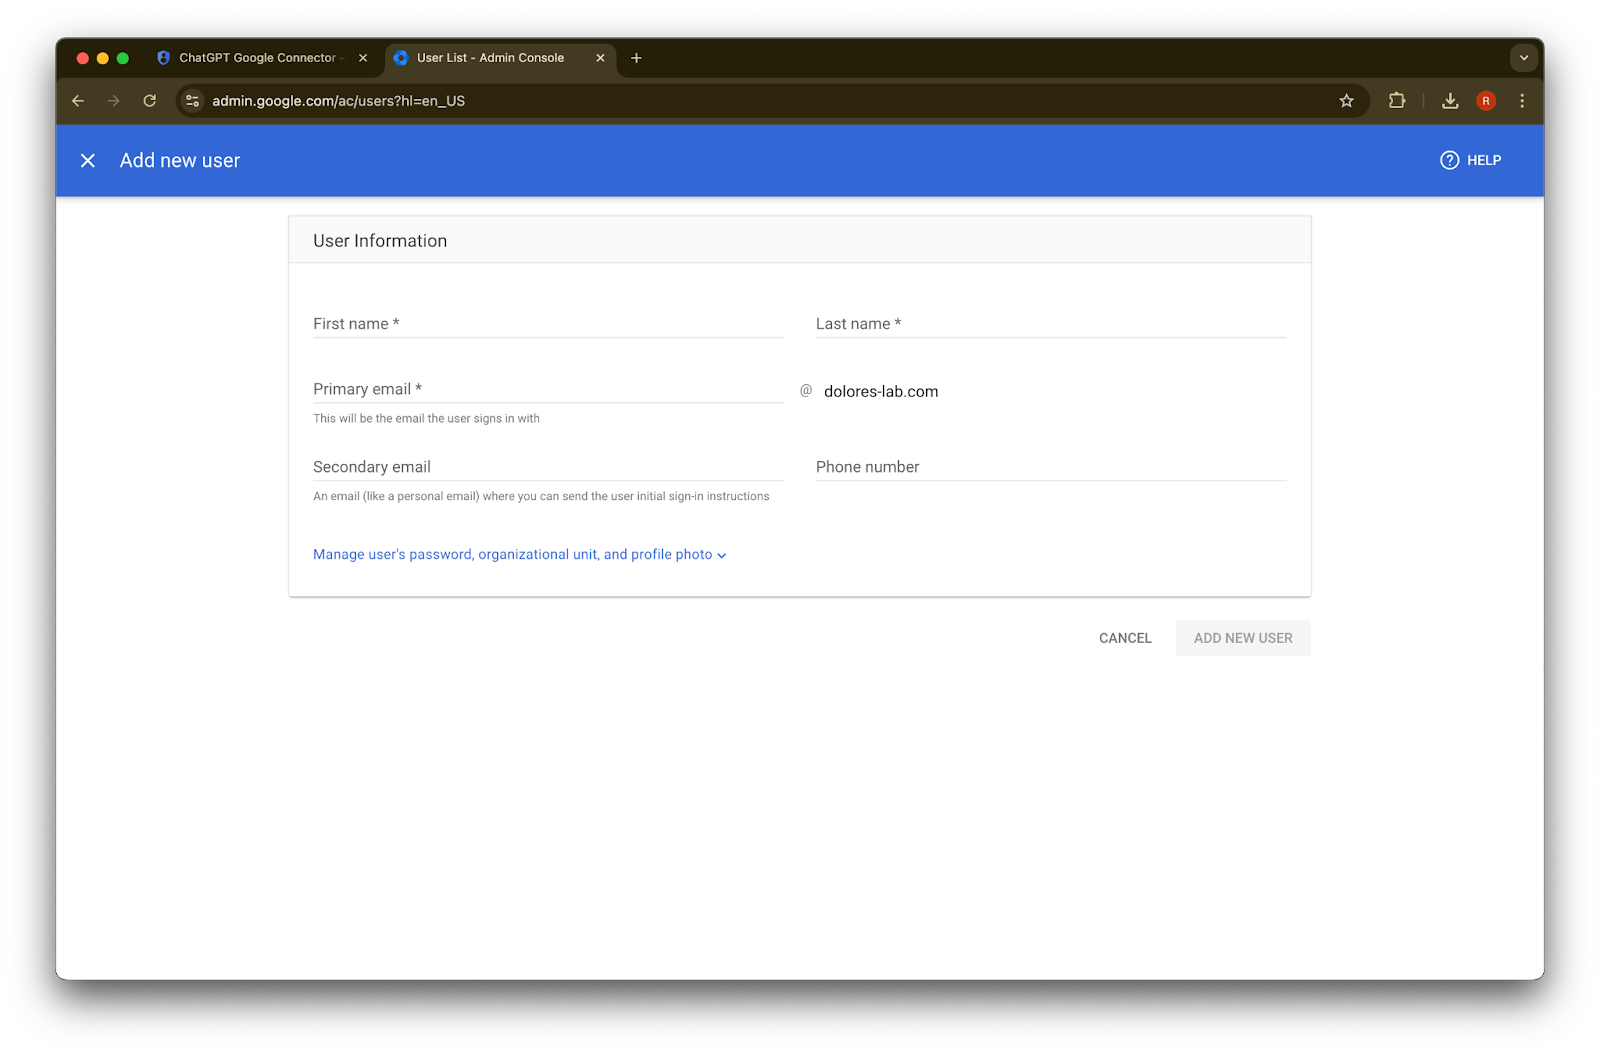
اپنی پسند کا first name، last name، اور primary email address فراہم کریں
Add new user پر کلک کریں
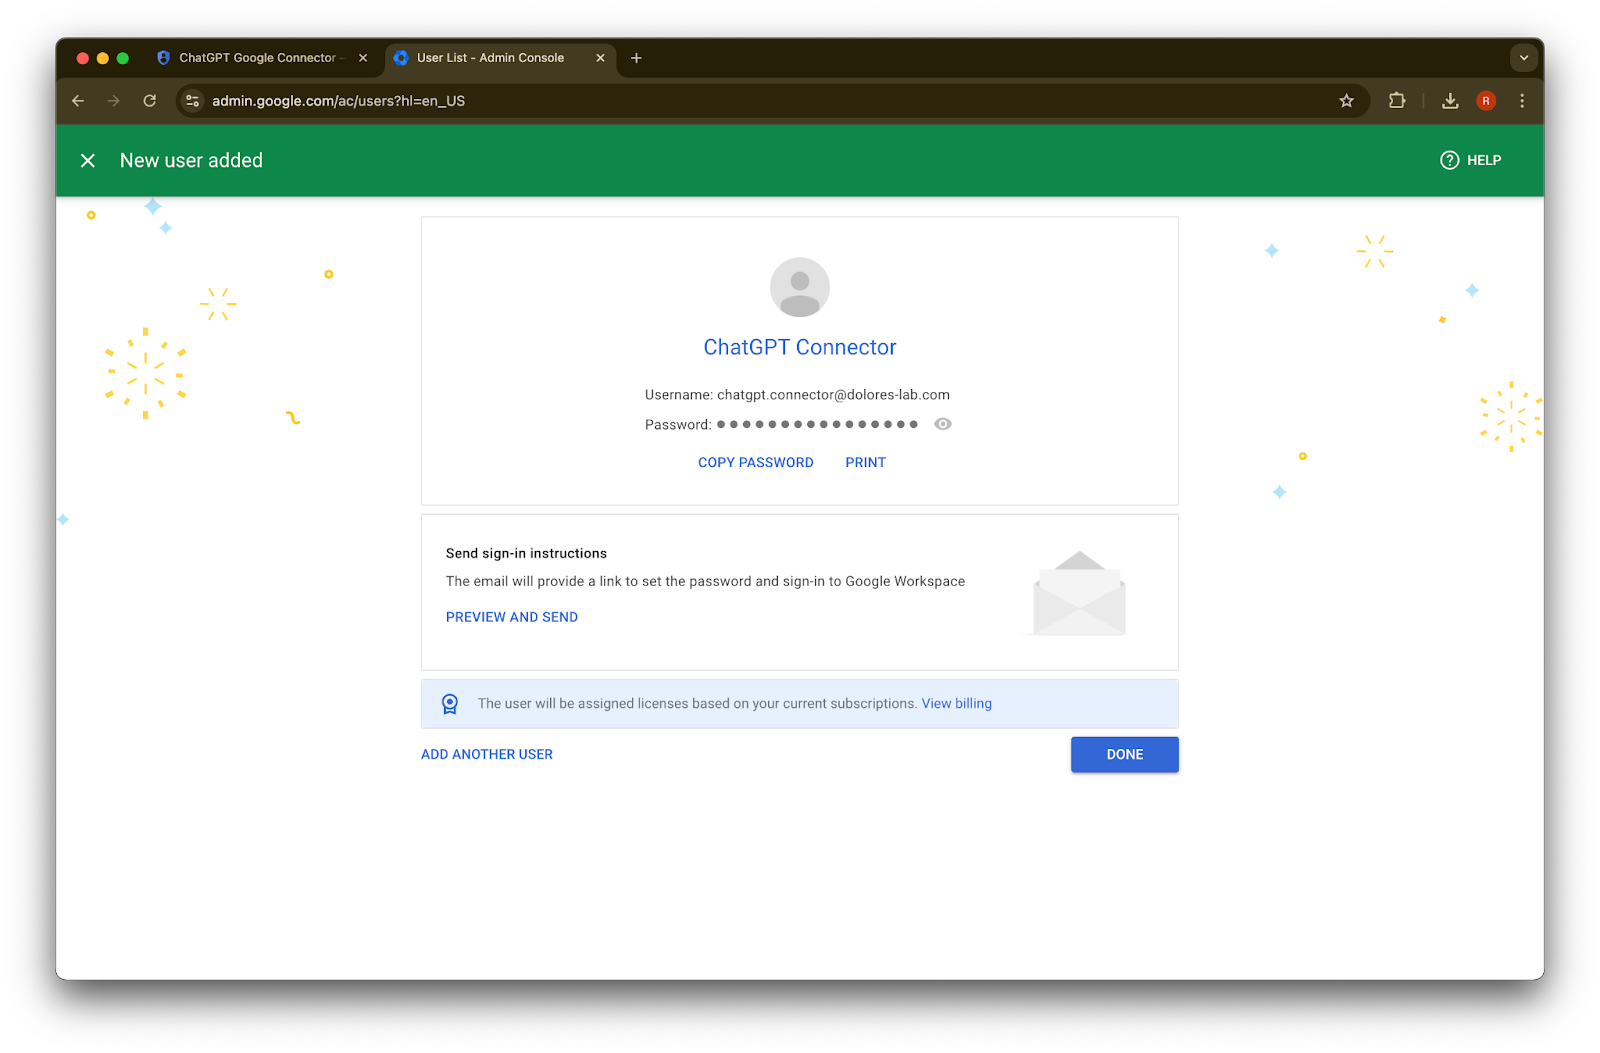
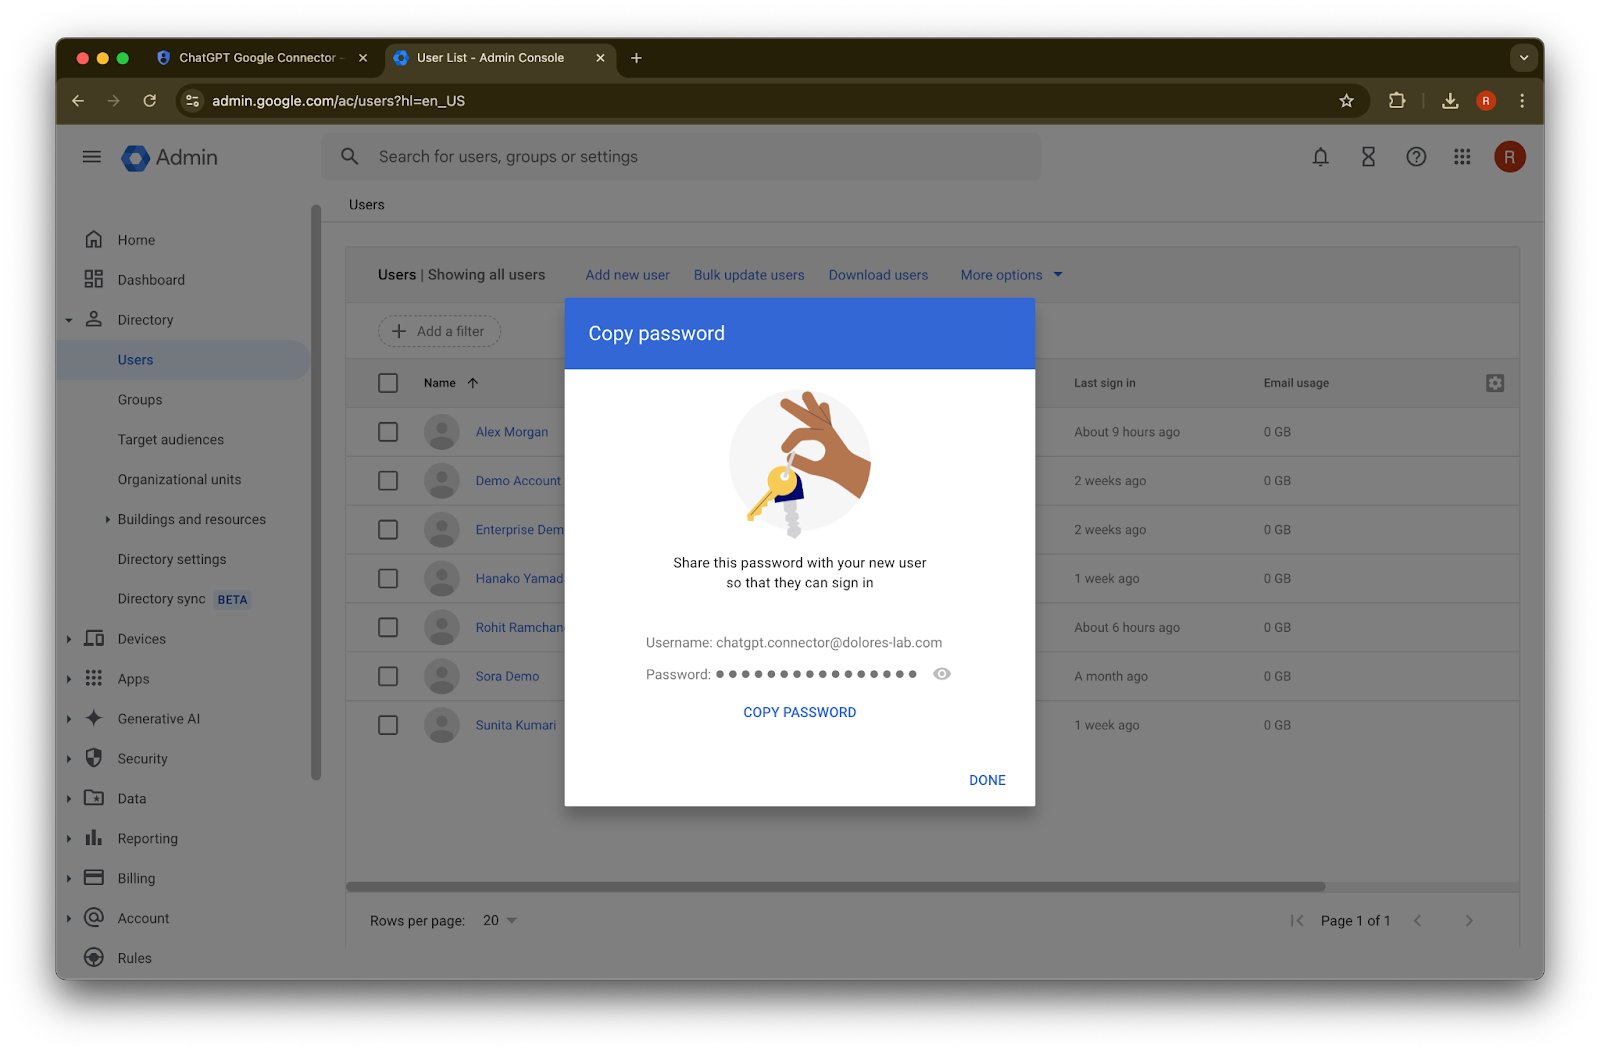
(Optional) ان credentials کو ریکارڈ کر لیں۔ ChatGPT کو ان credentials کی ضرورت نہیں ہے۔
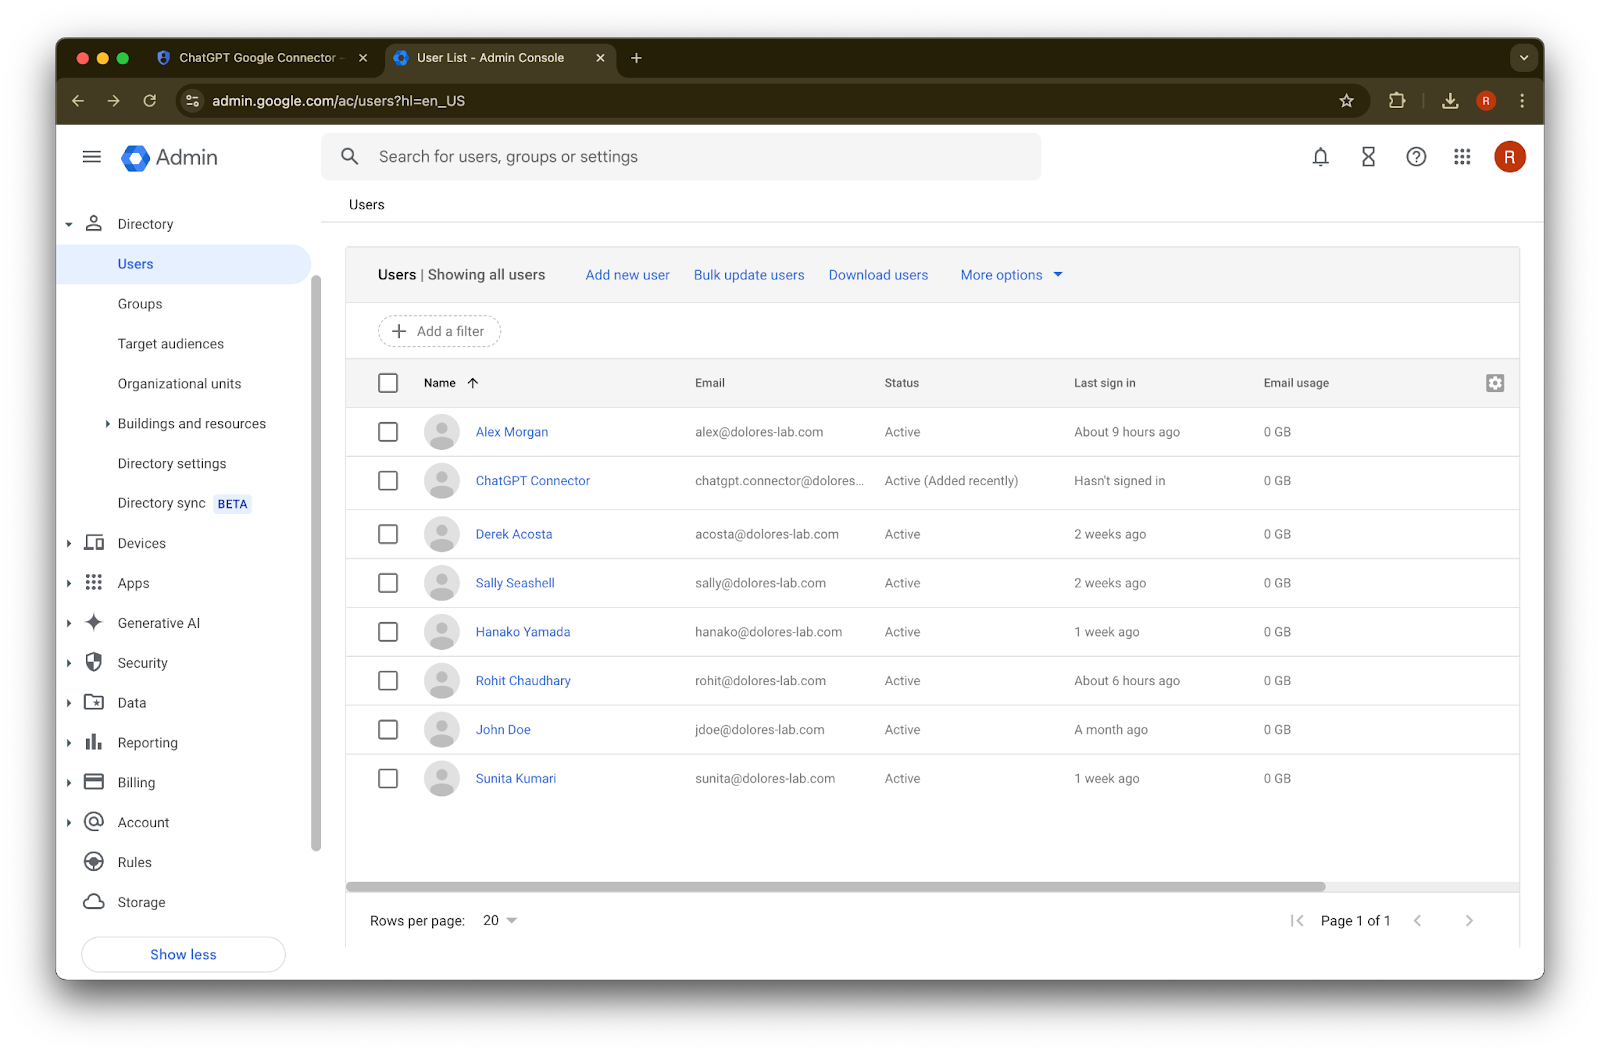
Done پر کلک کریں۔
ابھی بنائے گئے account پر کلک کریں۔ اگر یہ فہرست میں نظر نہ آئے، تو صفحہ refresh کریں یا اپنا cache اور cookies صاف کر کے دوبارہ کوشش کریں۔
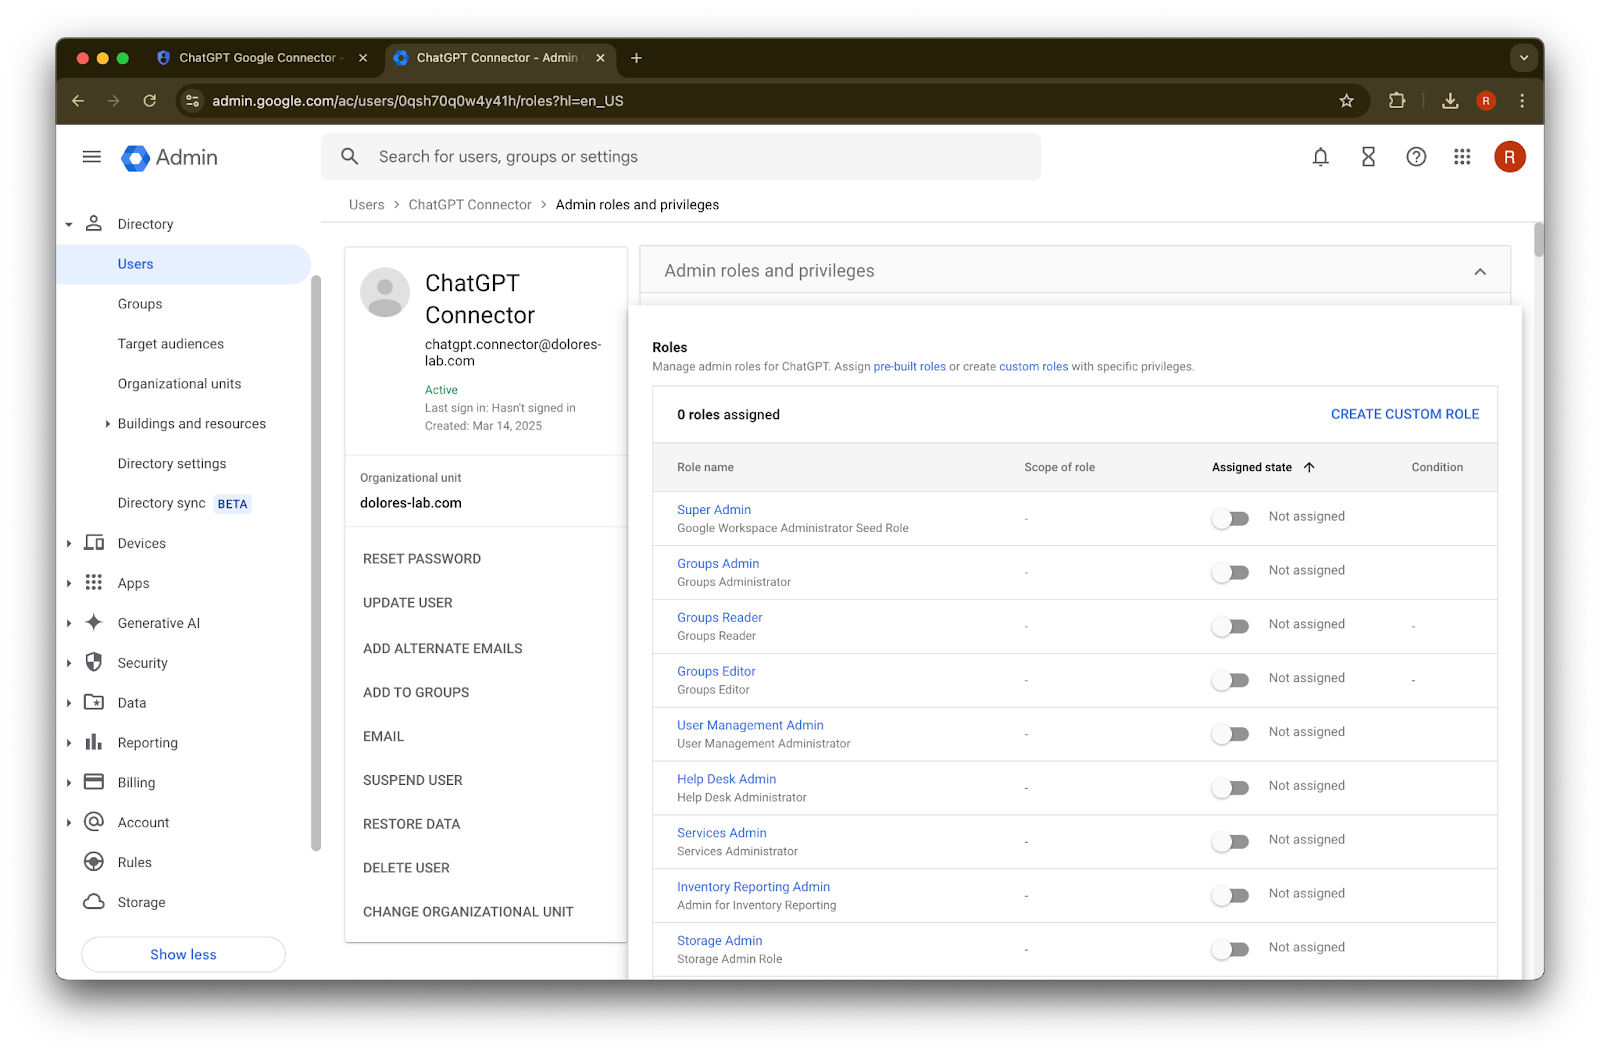
assign roles پر کلک کریں۔
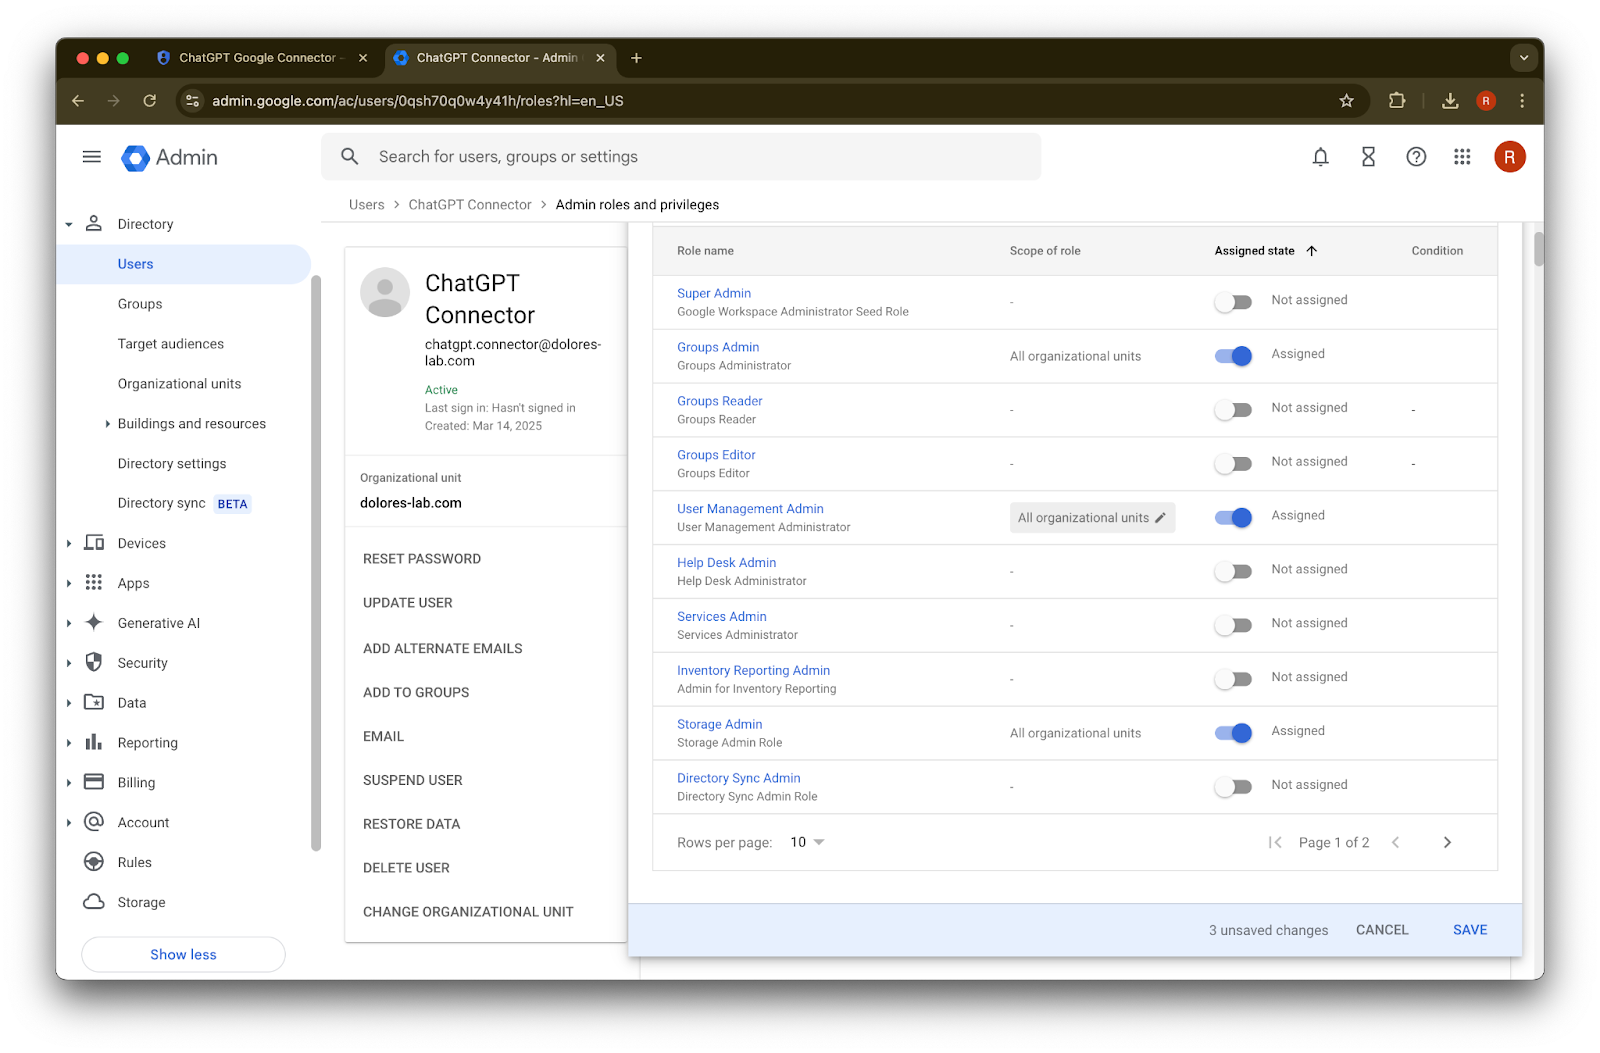
Groups Reader, User Management Admin, اور Storage Admin roles کو آن کریں۔
نیچے اسکرول کریں اور Save. پر کلک کریں۔ admin account اب کامیابی سے بنا اور configure ہو چکا ہے۔
ChatGPT ایڈمن کنسول میں سیٹ اپ مکمل کرنا
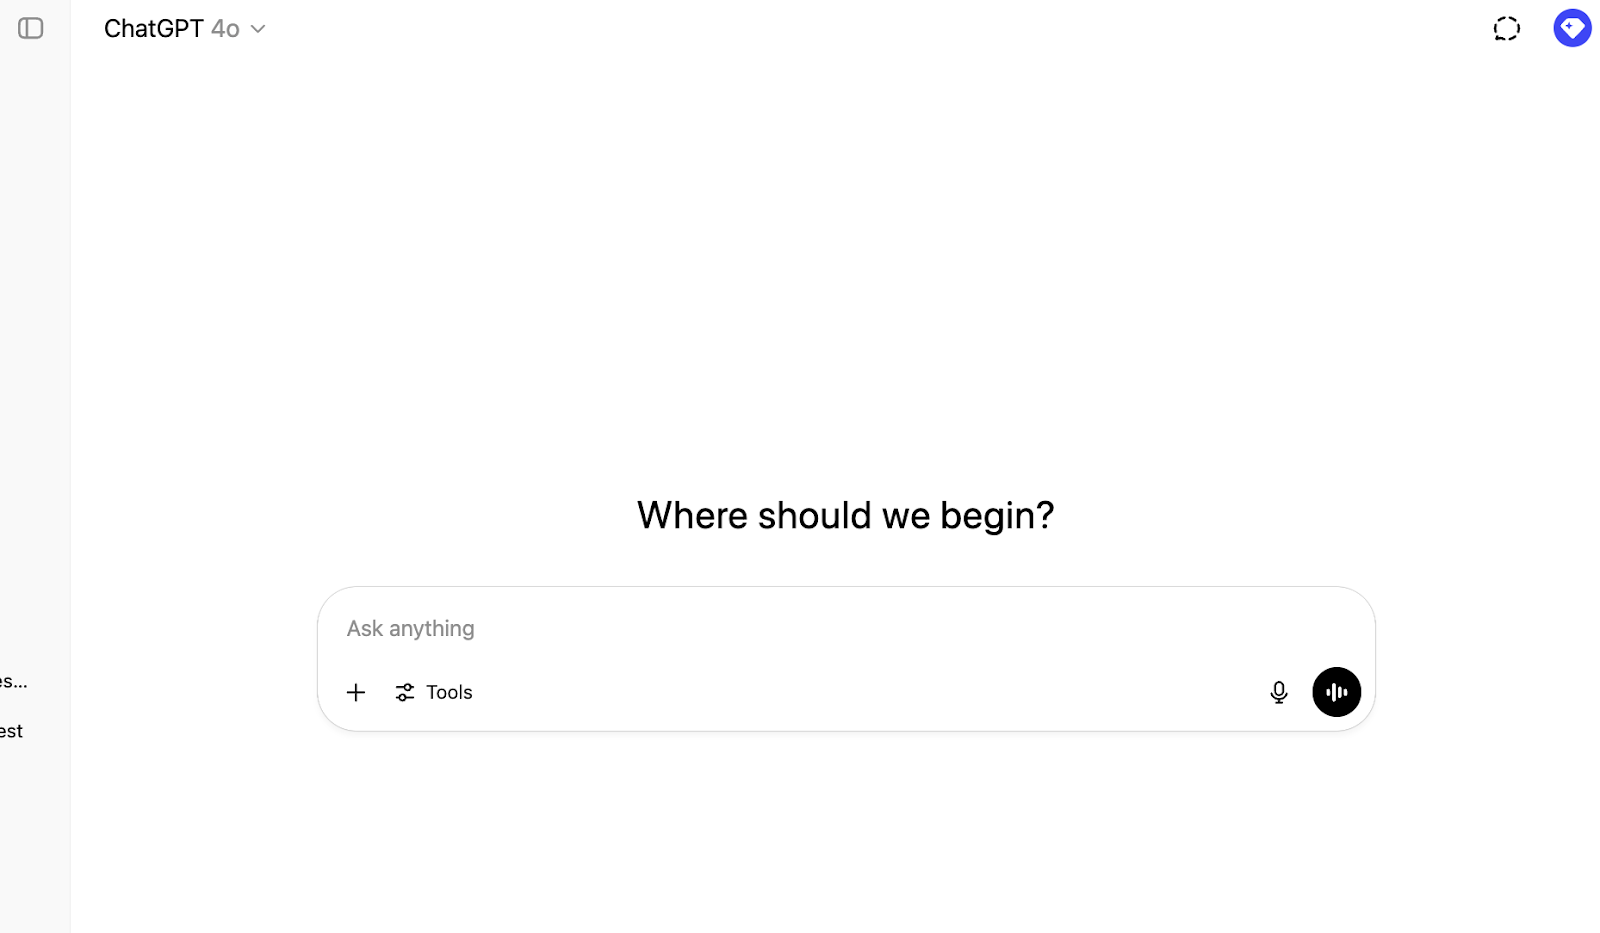
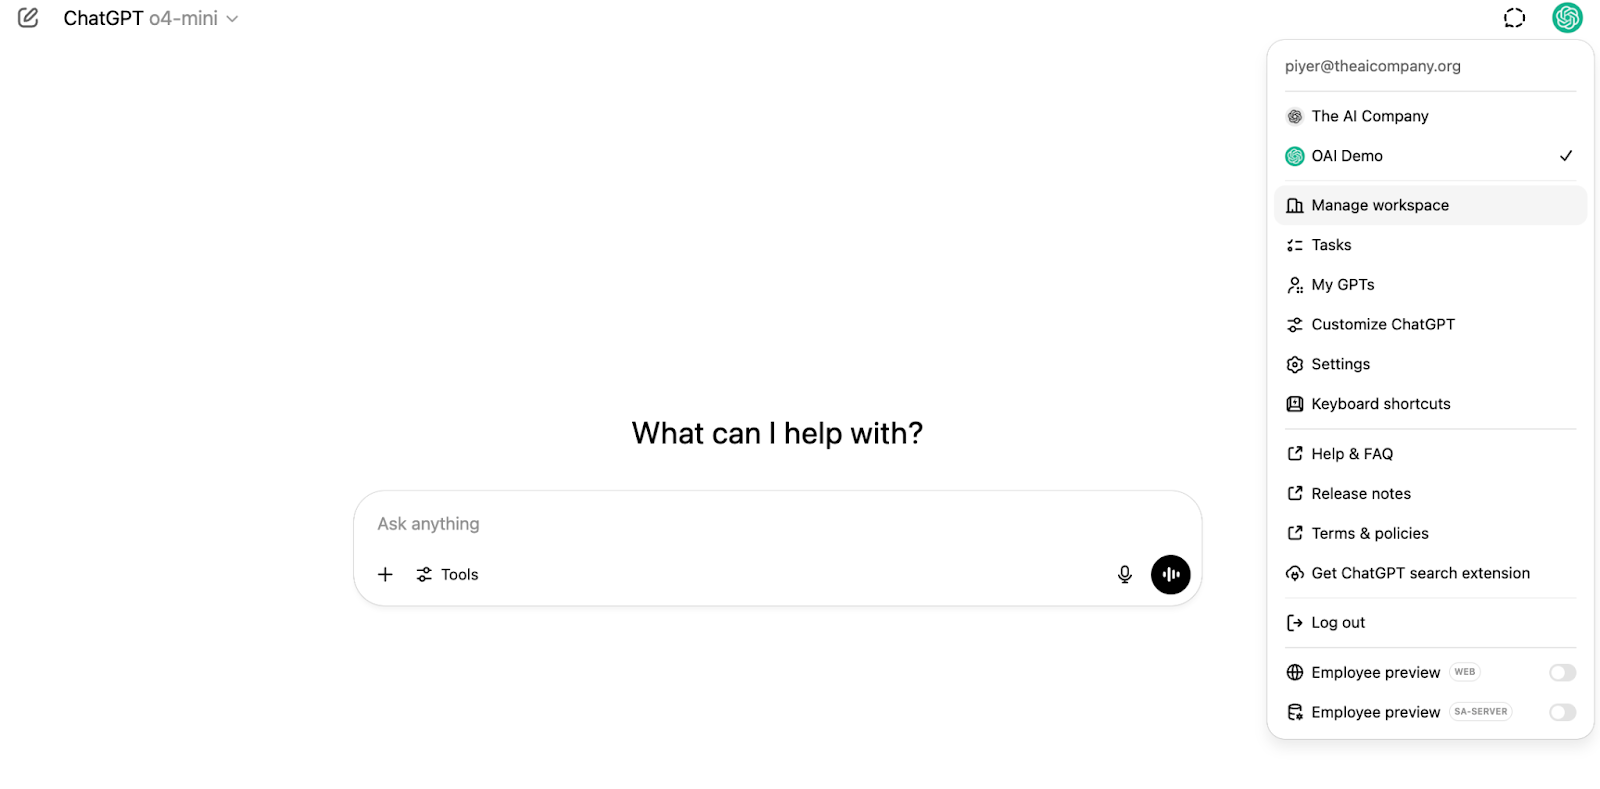
ChatGPT پر جائیں اور صفحے کے اوپری دائیں کونے میں پروفائل آئیکن پر کلک کریں۔
Manage workspace پر کلک کریں
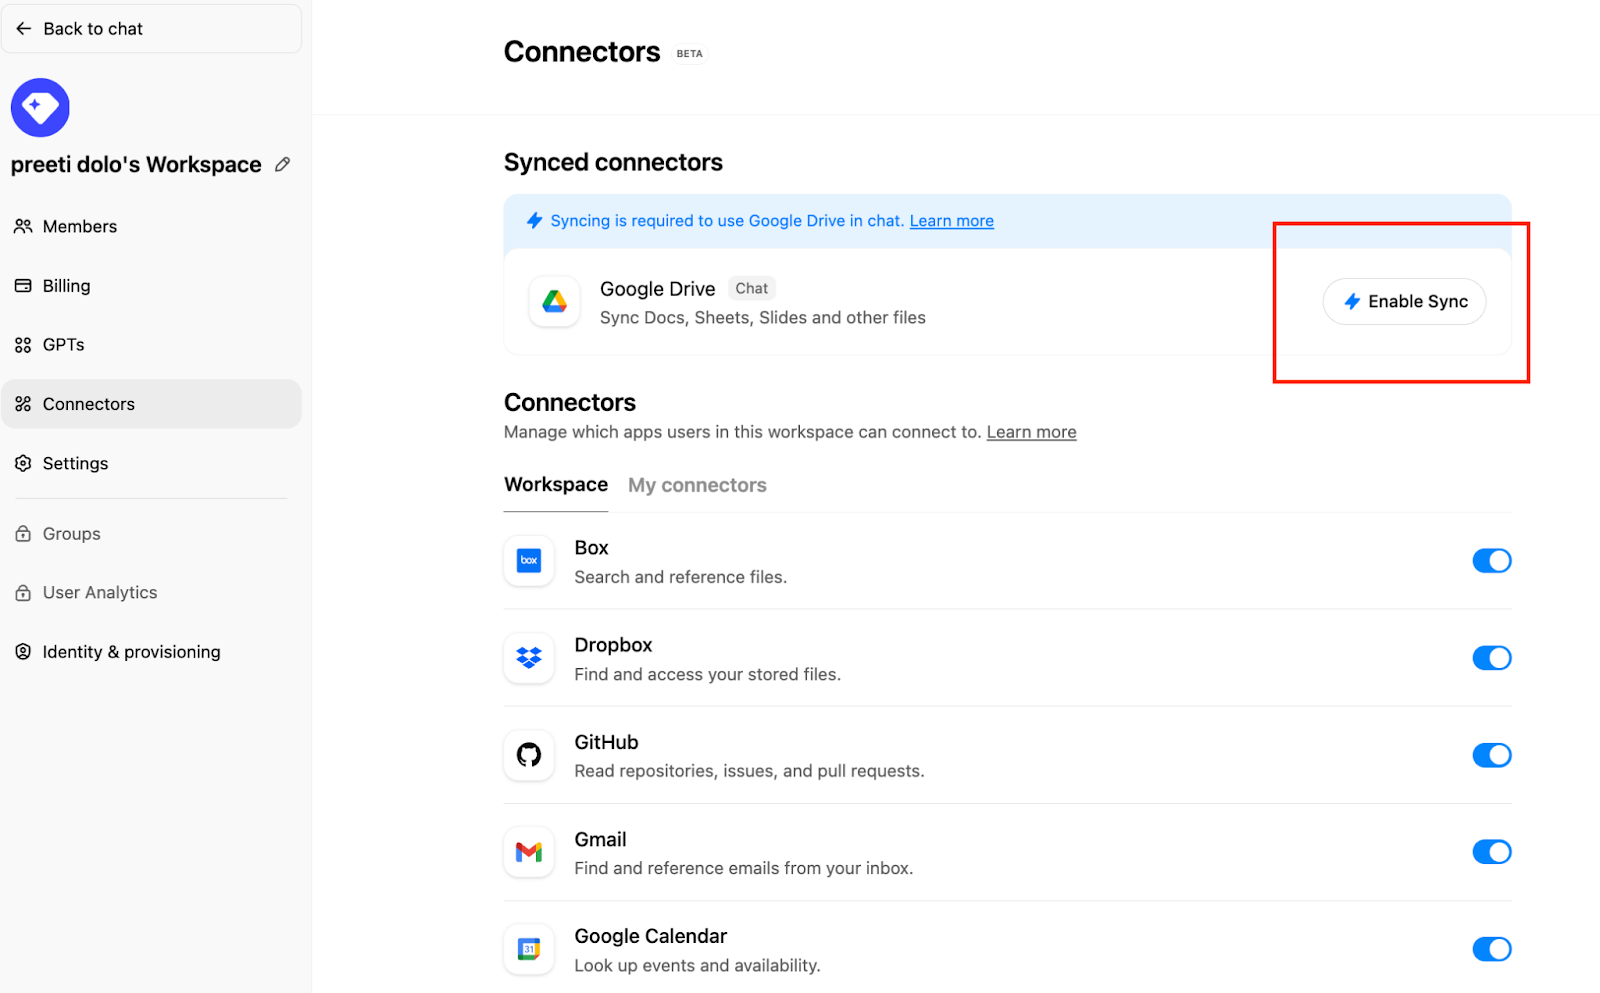
Connections پر کلک کریں اور پھر ‘Synced connectors’ کے تحت → Enable Sync
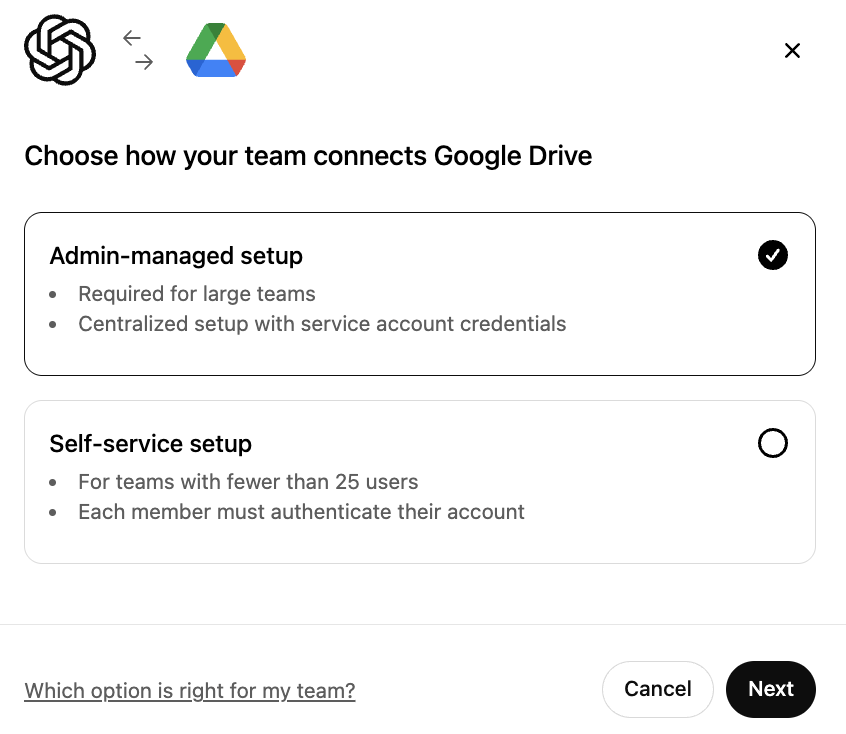
یقینی بنائیں کہ Admin-managed منتخب ہے اور Next پر کلک کریں
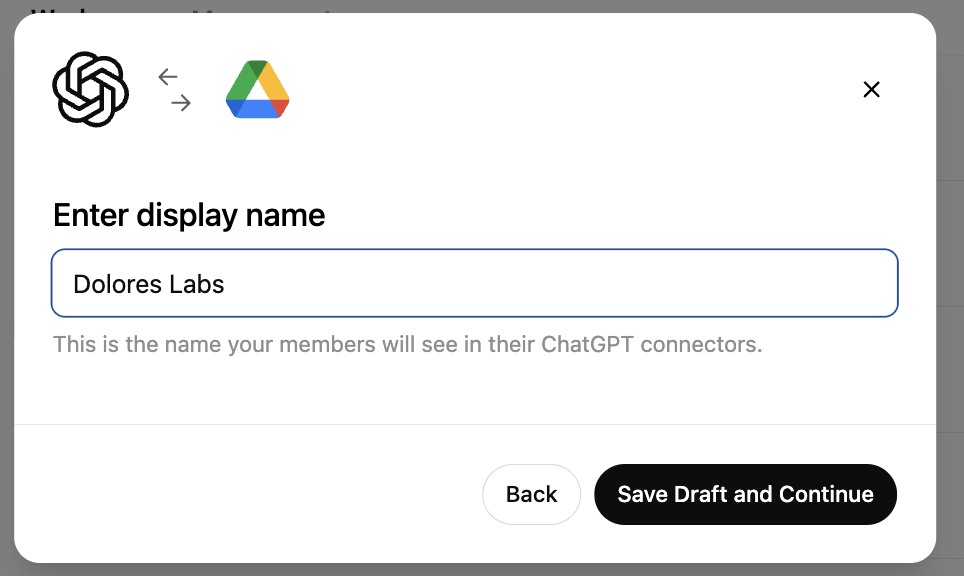
ایک display name درج کریں۔ ہم آپ کے Google Workspace کا نام استعمال کرنے کی سفارش کرتے ہیں۔
براہ کرم نوٹ کریں کہ فی الحال ہم آپ کے کنکشن کا نام تبدیل کرنے کی سپورٹ نہیں کرتے۔Save Draft and Continue پر کلک کریں
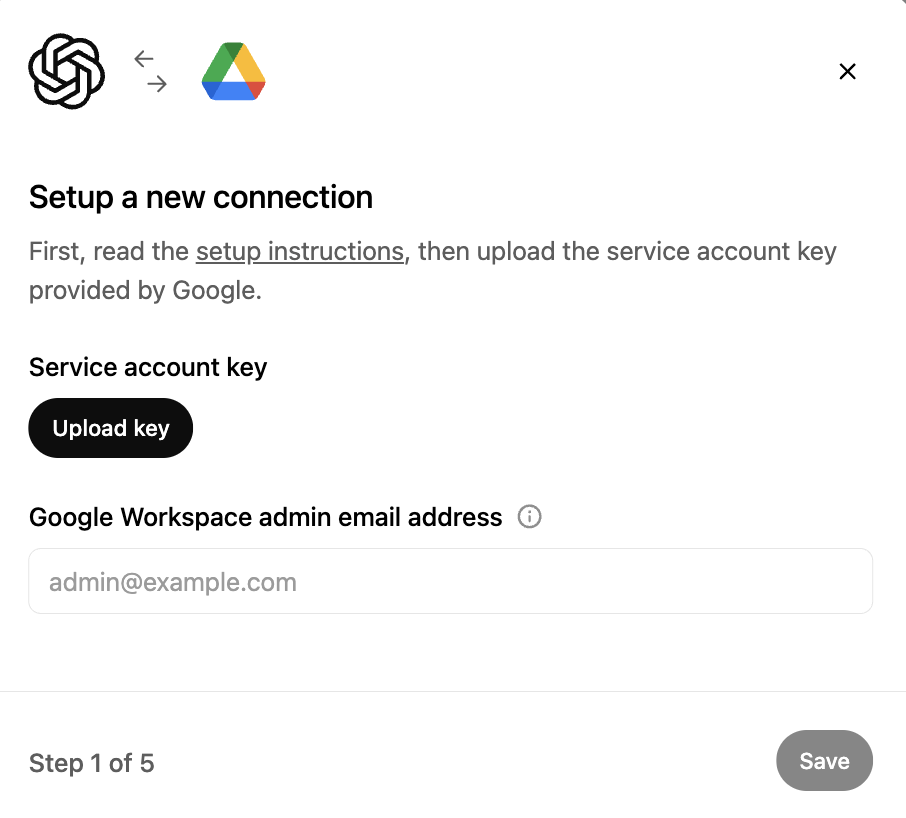
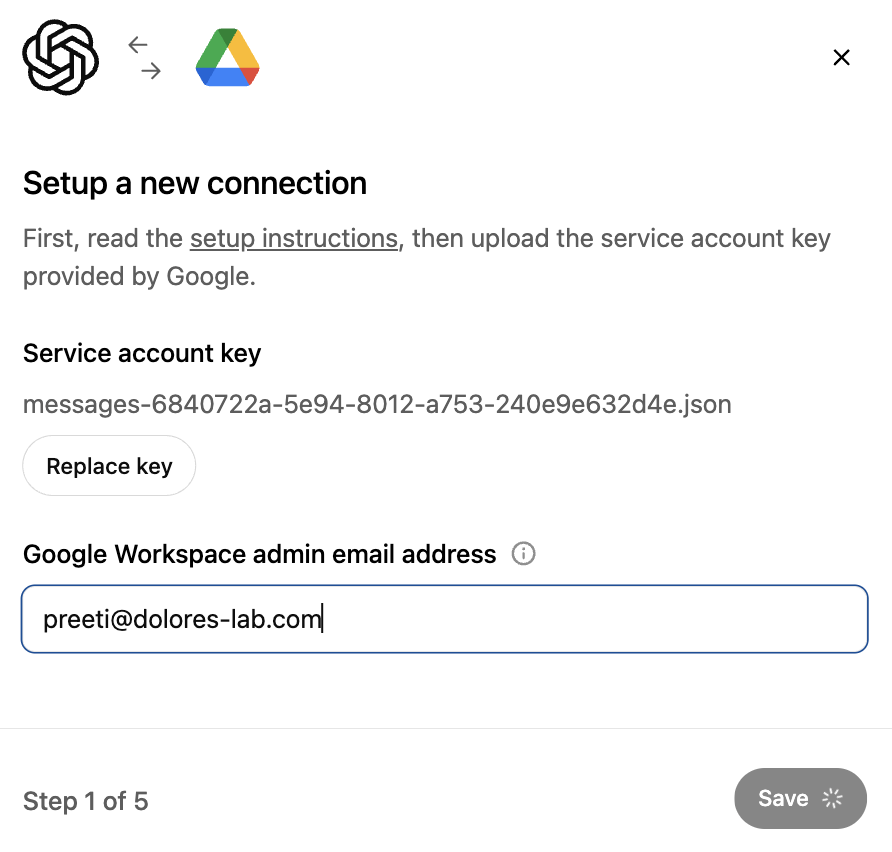
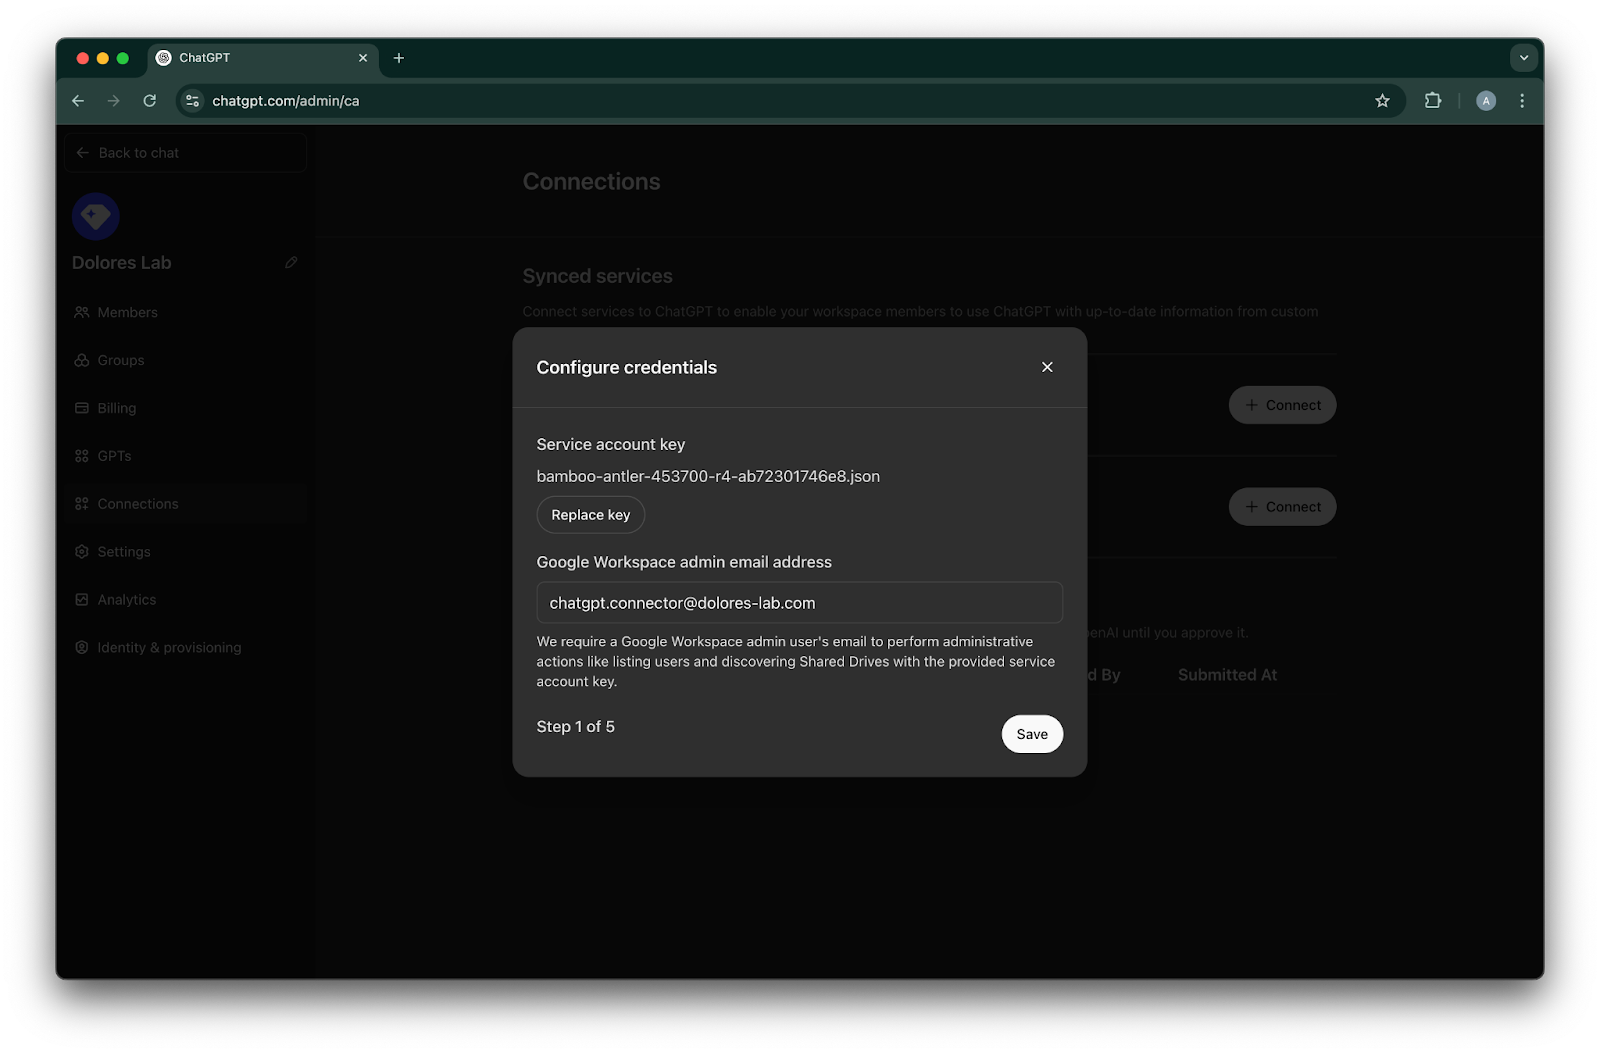
Upload key پر کلک کریں۔ JSON فائل منتخب کریں، جو وہ key ہے جسے آپ نے اوپر service account سیٹ اپ کرتے وقت ڈاؤن لوڈ کیا تھا۔ یقینی بنائیں کہ یہ key درست ہے
admin email address درج کریں۔ یہ وہ ایڈمن اکاؤنٹ ہے جو آپ نے پہلے بنایا تھا۔
Save. پر کلک کریں
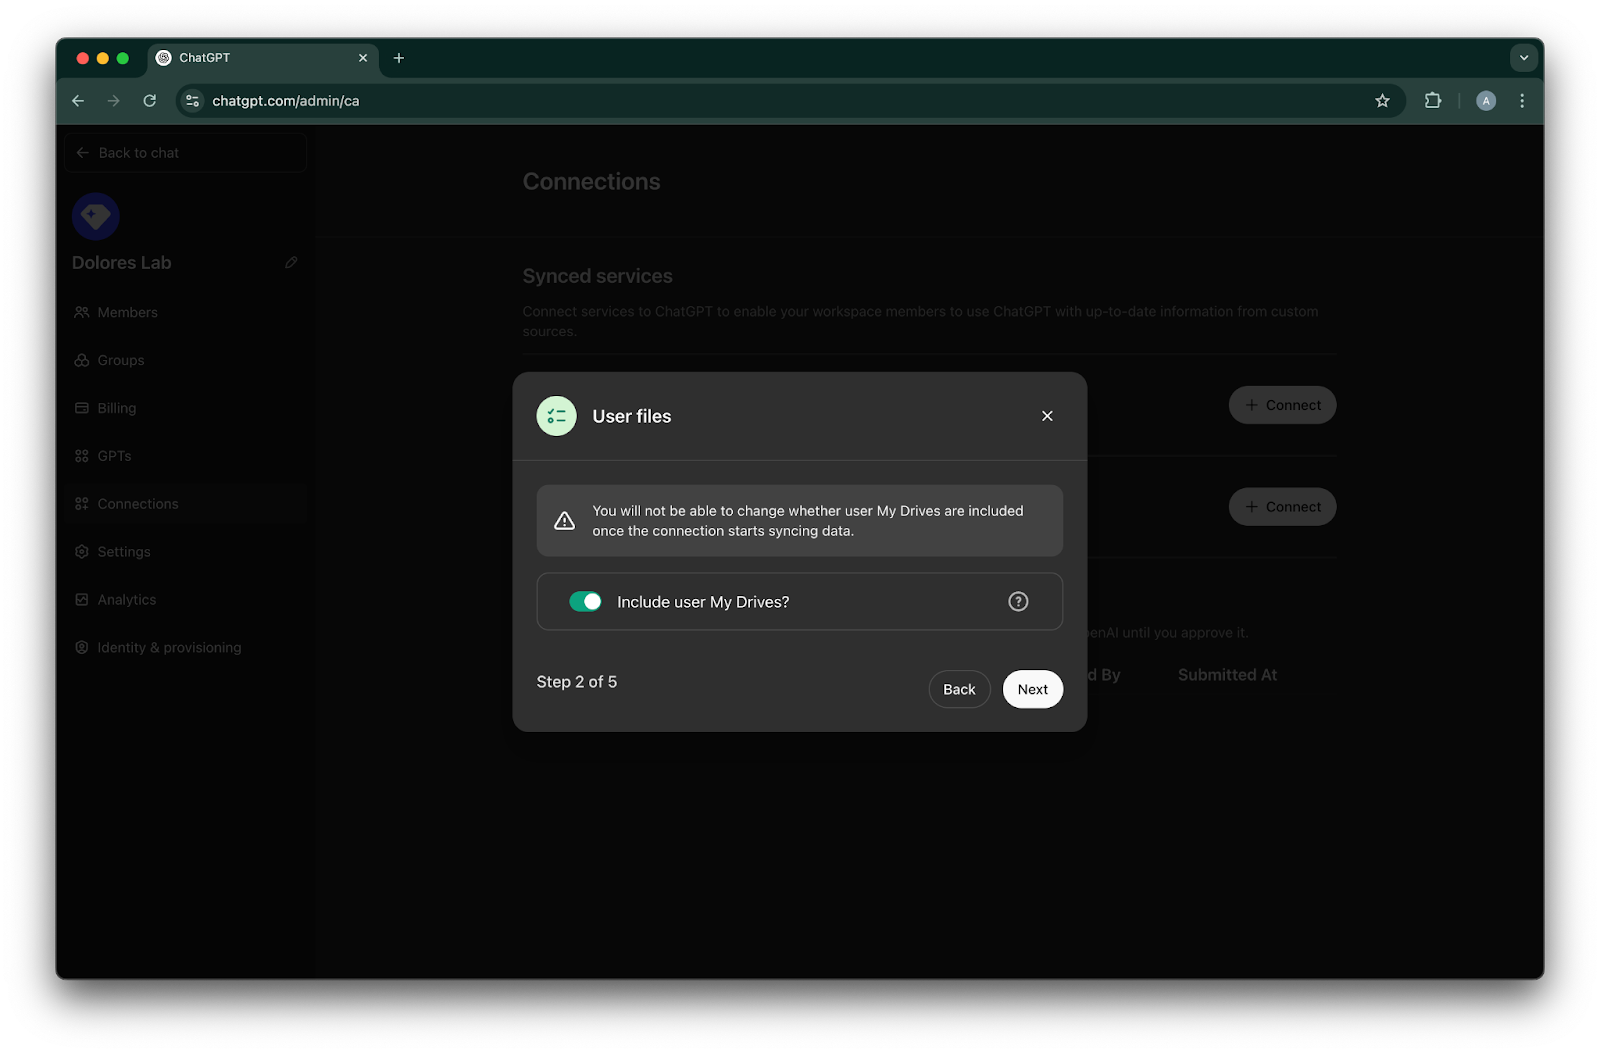
منتخب کریں کہ آیا آپ چاہتے ہیں کہ آپ کے تمام صارفین کے My Drives میں موجود فائلیں شامل ہوں۔
Next پر کلک کریں
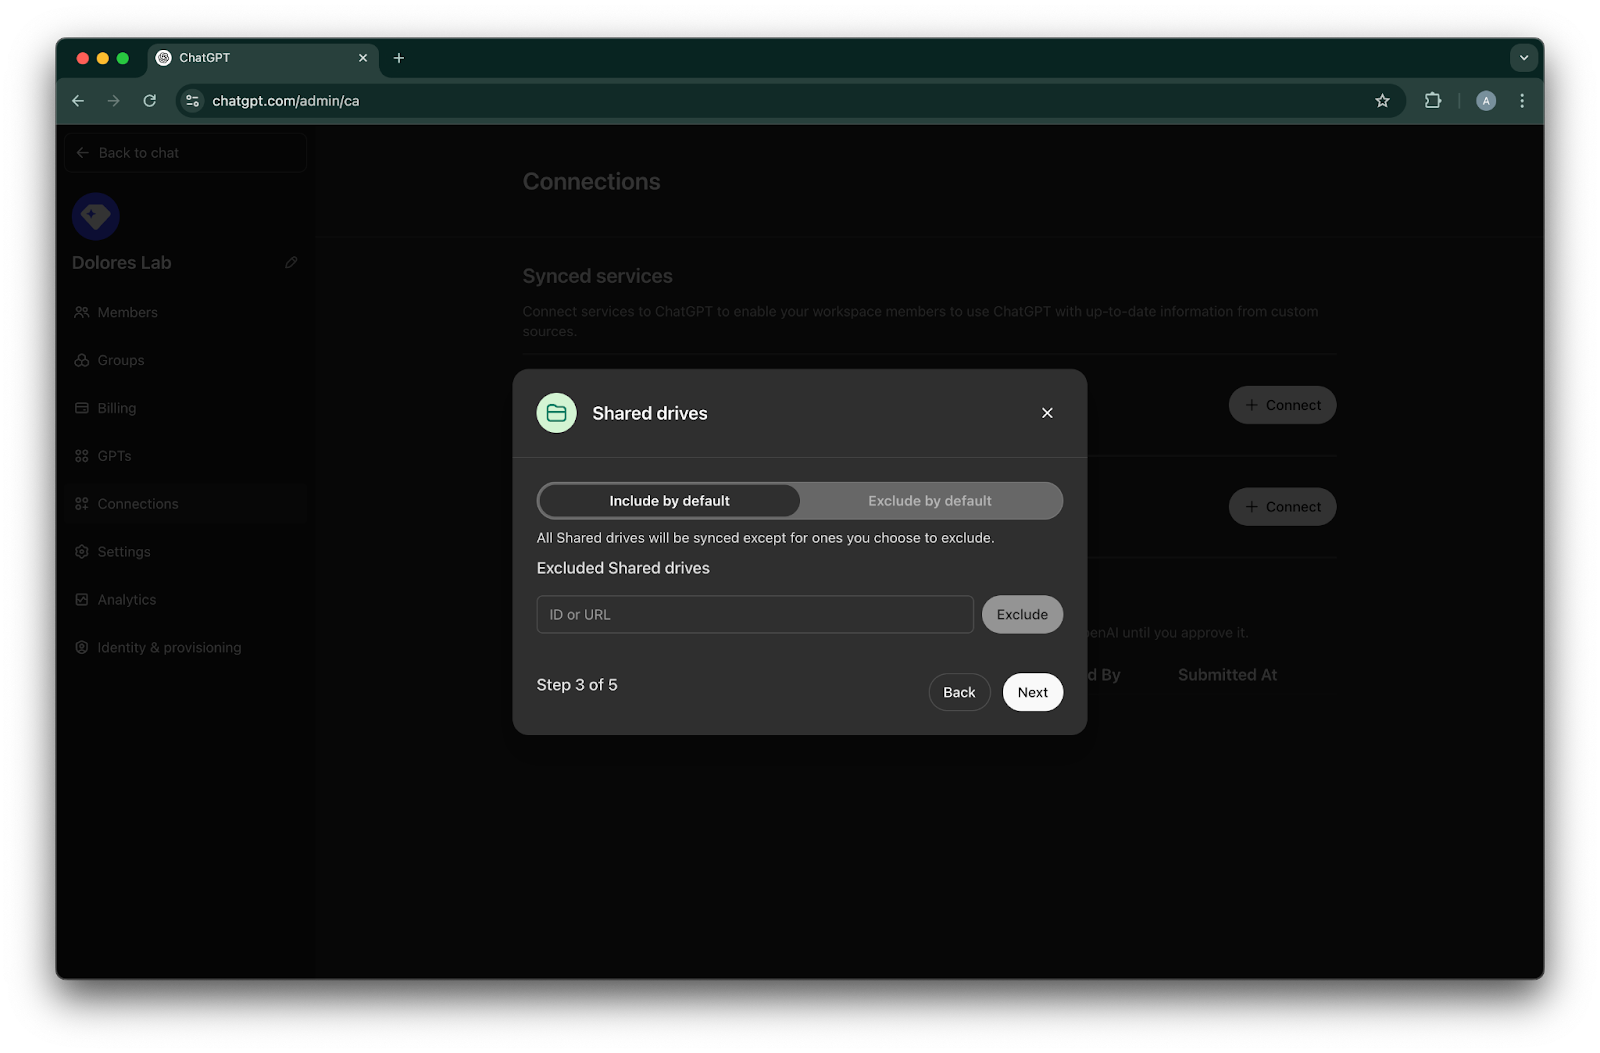
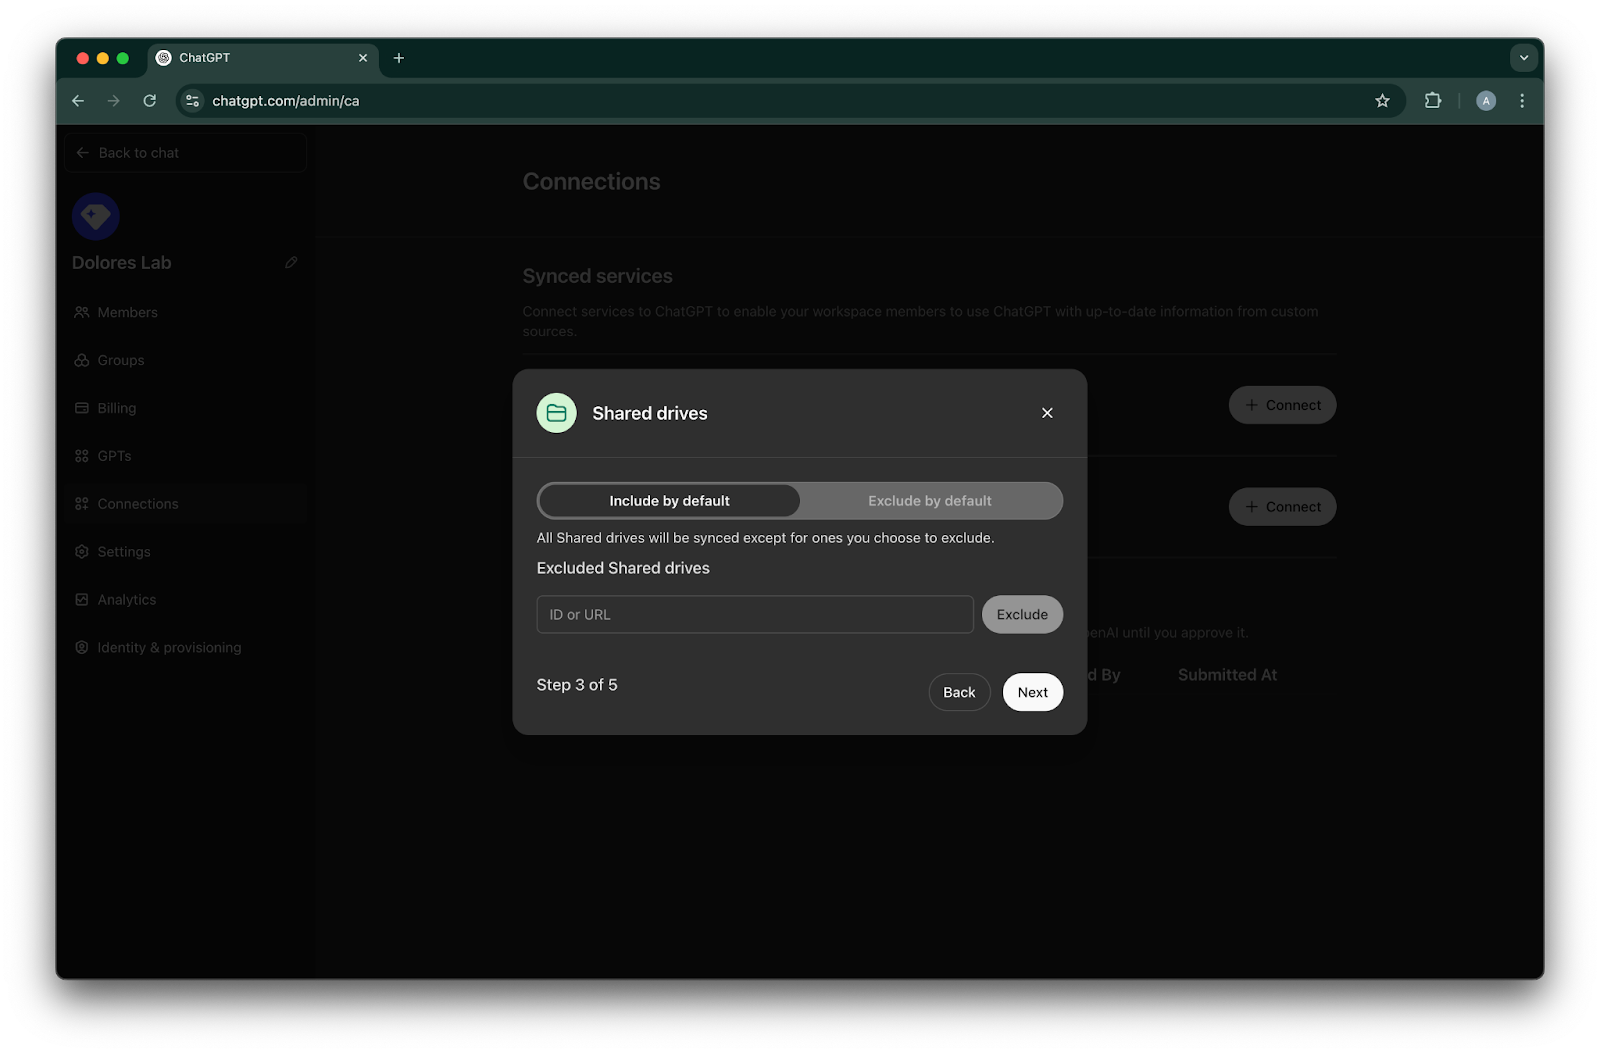
منتخب کریں کہ shared drives کو کیسے مینیج کرنا ہے۔ ہم درج ذیل تین صورتِ حال کو سپورٹ کرتے ہیں:
اگر آپ تمام shared drives شامل کرنا چاہتے ہیں، تو Include by default منتخب کریں اور خارج کرنے کے لیے shared drive IDs شامل نہ کریں
اگر آپ زیادہ تر shared drives شامل کرنا چاہتے ہیں، تو Include by default منتخب کریں اور اُن shared drives کی IDs شامل کریں جنہیں آپ خارج کرنا چاہتے ہیں
اگر آپ زیادہ تر shared drives خارج کرنا چاہتے ہیں، تو Exclude by default منتخب کریں اور اُن shared drives کی IDs شامل کریں جنہیں آپ شامل کرنا چاہتے ہیں
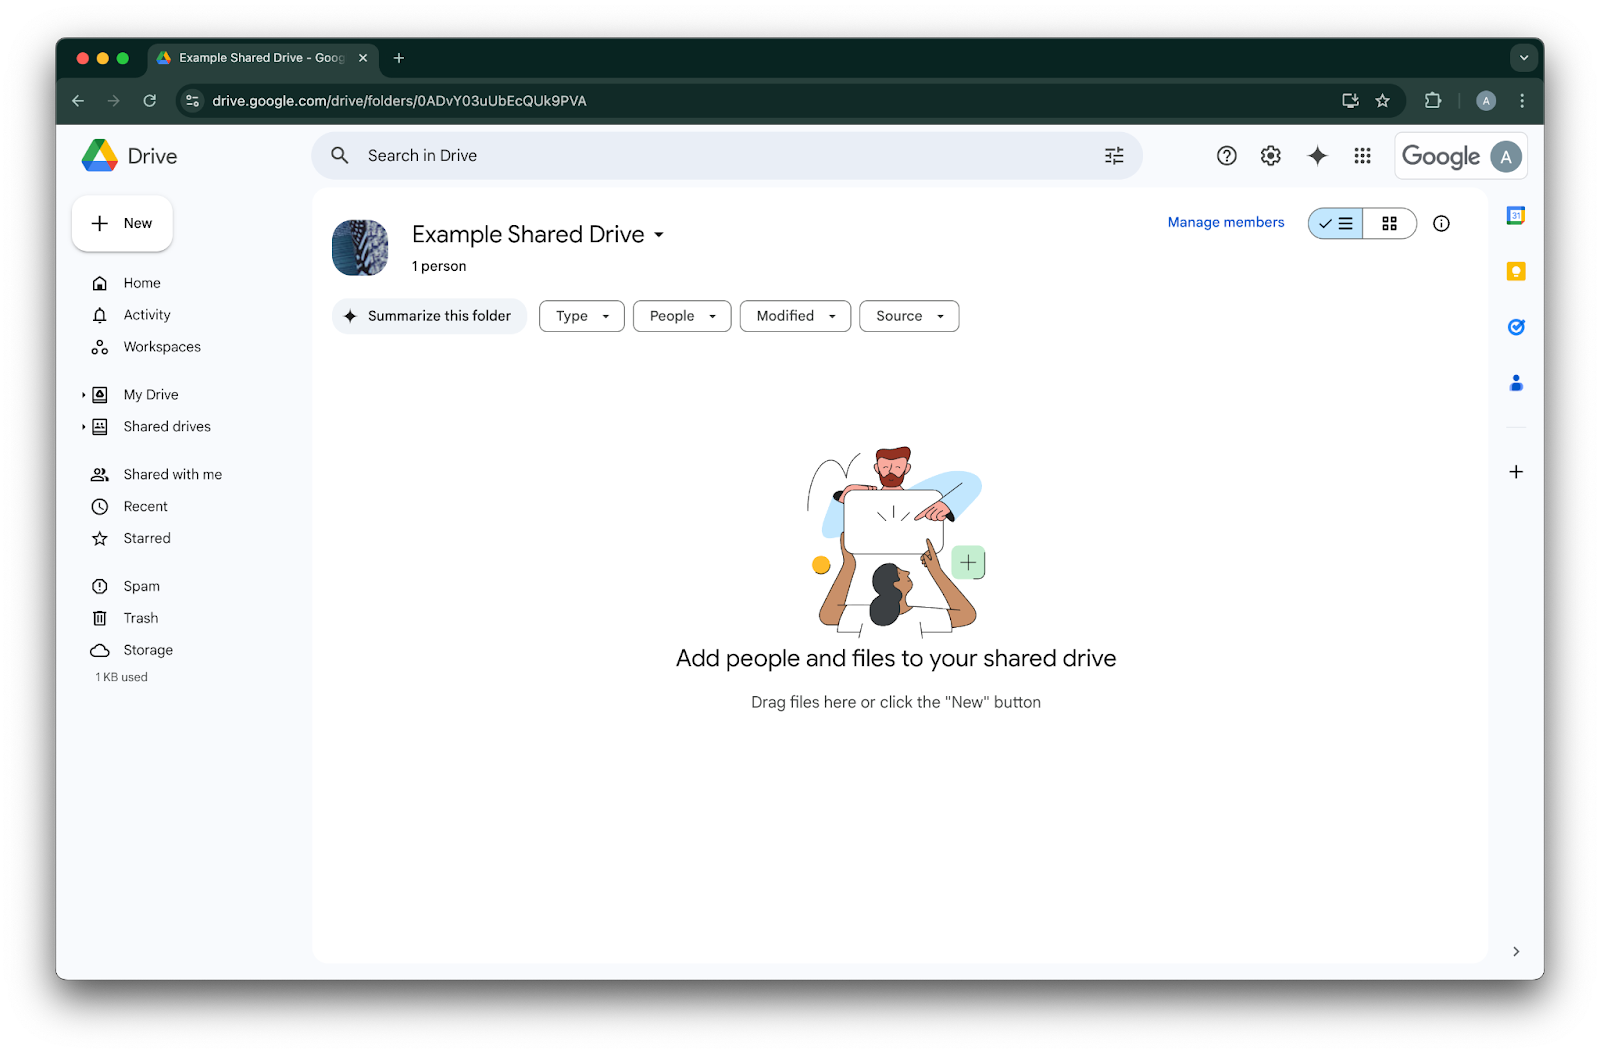
کسی shared drive کی ID معلوم کرنے کے لیے، ویب براؤزر میں اس پر جائیں۔ URL کا آخری حصہ shared drive ID ہوتا ہے۔
درج ذیل مثال میں، یہ `0ADvY03uUbEcQUk9PVA`' ہےNext پر کلک کریں
منتخب کریں کہ Google Drive کنکشن تک کس کی رسائی ہونی چاہیے۔ آپ یا تو صرف ChatGPT ورک اسپیس کے Admins کو منتخب کر سکتے ہیں، یا اسے سب کے لیے فعال کر سکتے ہیں۔ اگر سب کے لیے فعال ہو، تو ورک اسپیس میں شامل کیے گئے نئے صارفین خود بخود شامل ہو جائیں گے۔
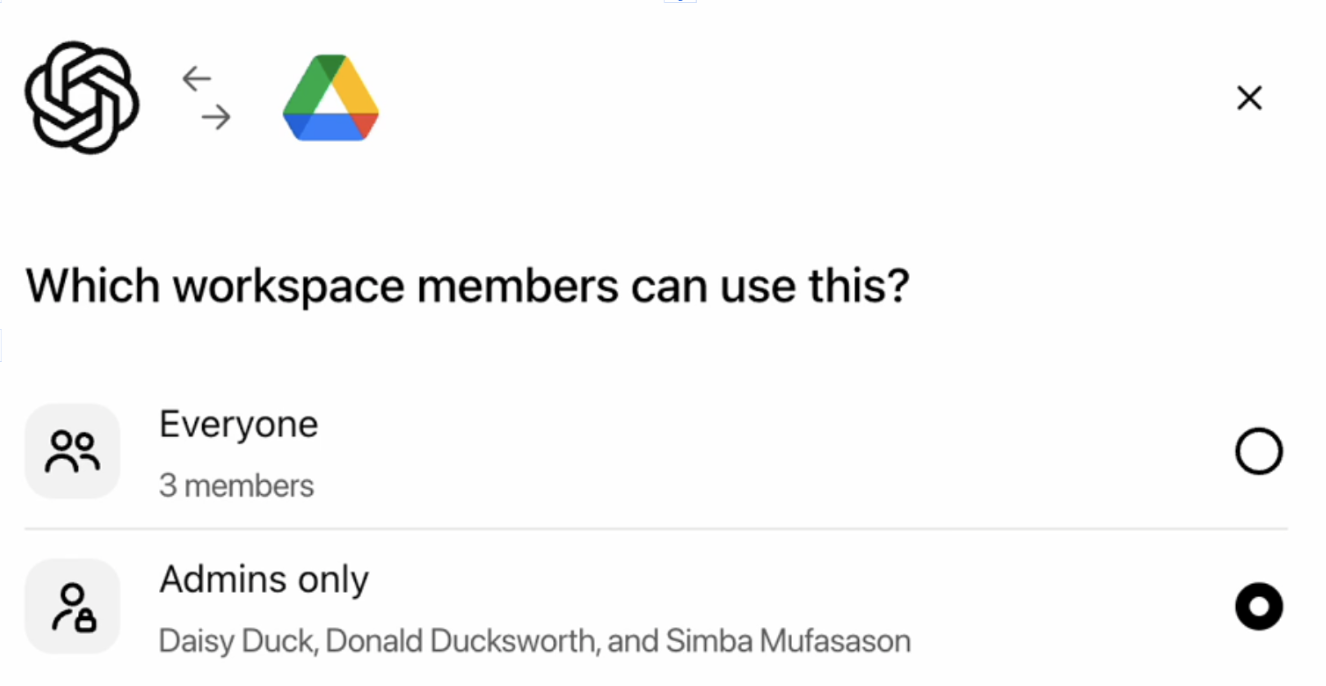
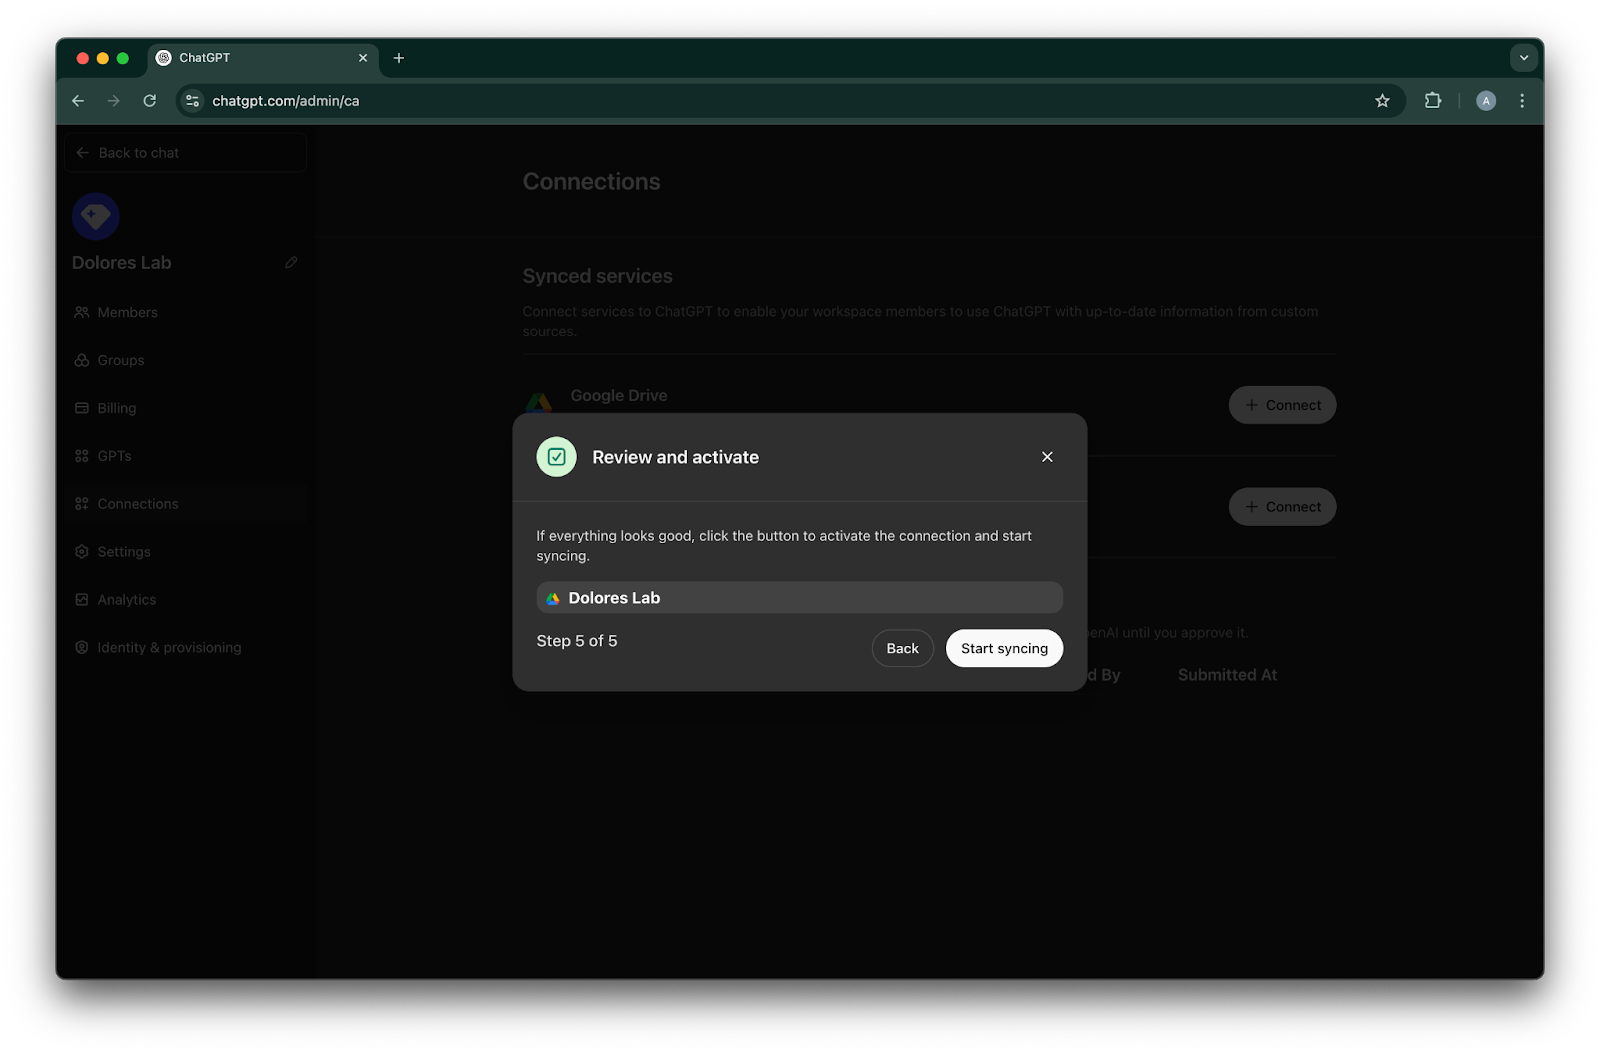
Start syncing پر کلک کریں
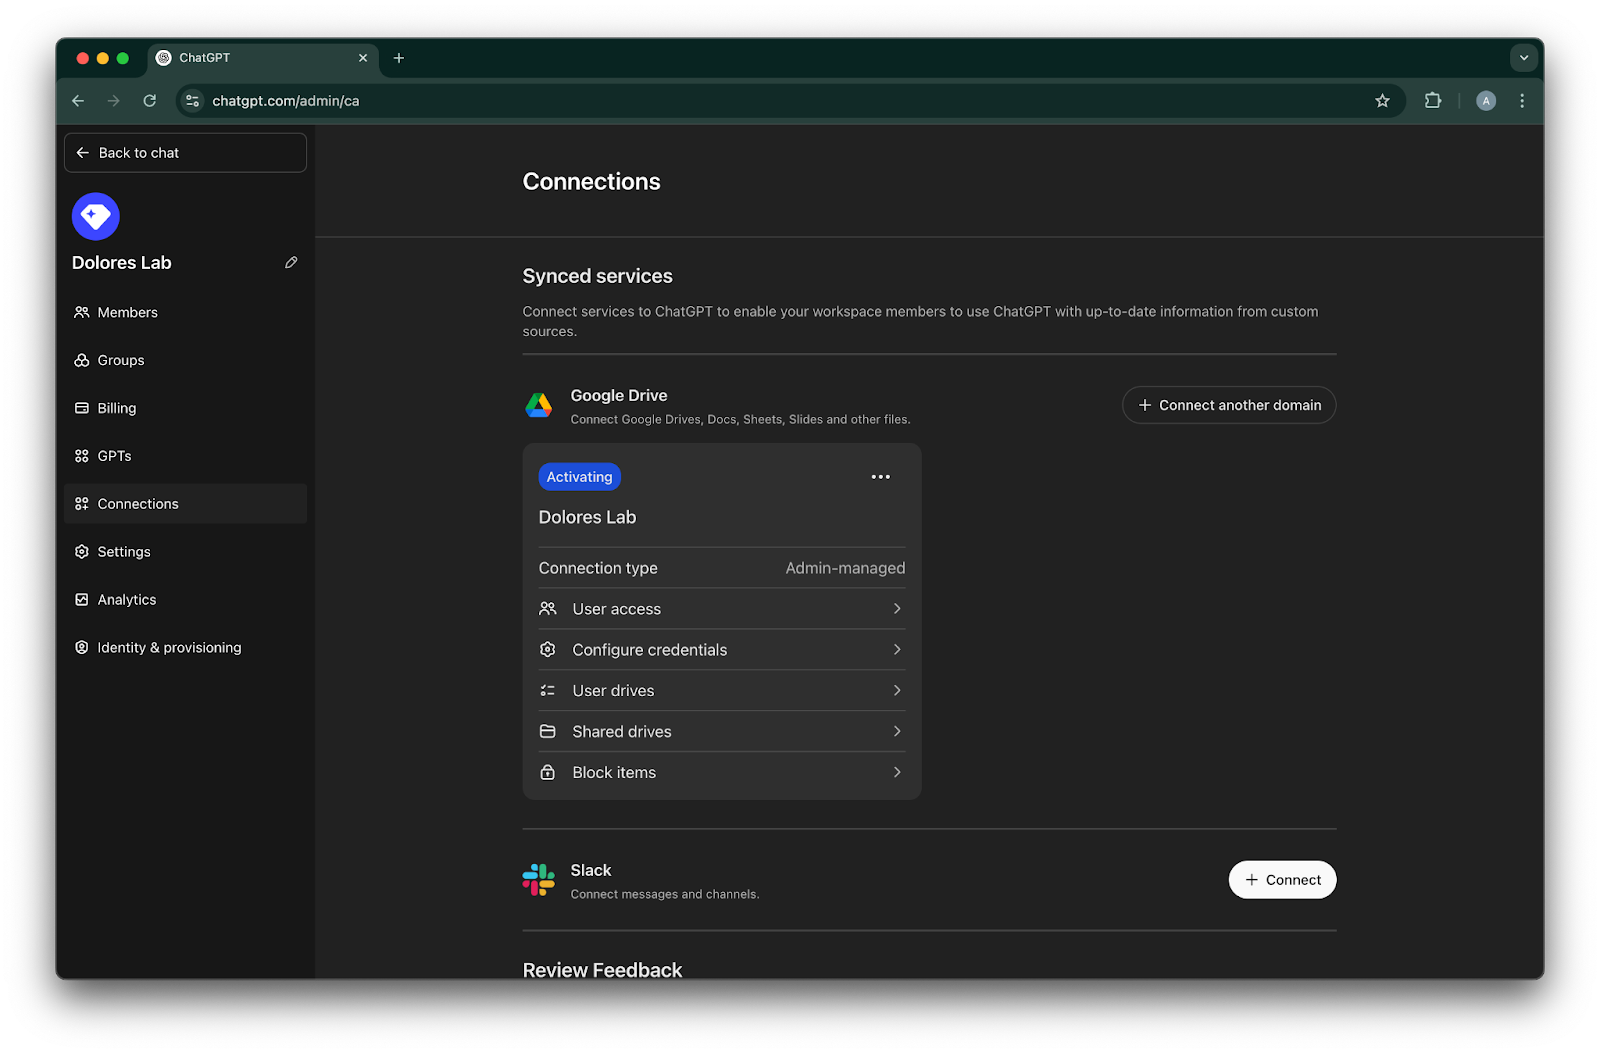
آپ کا Google Drive کنکشن اب کامیابی سے بن چکا ہے!
براہ کرم نوٹ کریں کہ اگرچہ syncing فوراً شروع ہو جائے گی، لیکن آپ کی settings کے مطابق کتنی فائلیں شامل کی گئی ہیں، اس پر منحصر ہے کہ مکمل ہونے میں گھنٹوں سے دن لگ سکتے ہیں۔
جب پچھلے 30 دنوں میں شامل/ترمیم شدہ فائلوں کی syncing مکمل ہو جائے گی، تو connector اُن صارفین کے لیے دستیاب ہو جائے گا جن کے لیے آپ نے اسے فعال کیا ہے۔
service account key creation فعال کرنا
اگر آپ کو درج ذیل error موصول ہو، تو آپ کو اس مخصوص project کے لیے service account creation فعال کرنی ہوگی:
> organization policy constraint ‘iam.disableServiceAccountKeyCreation’ آپ کی organization پر نافذ ہے۔
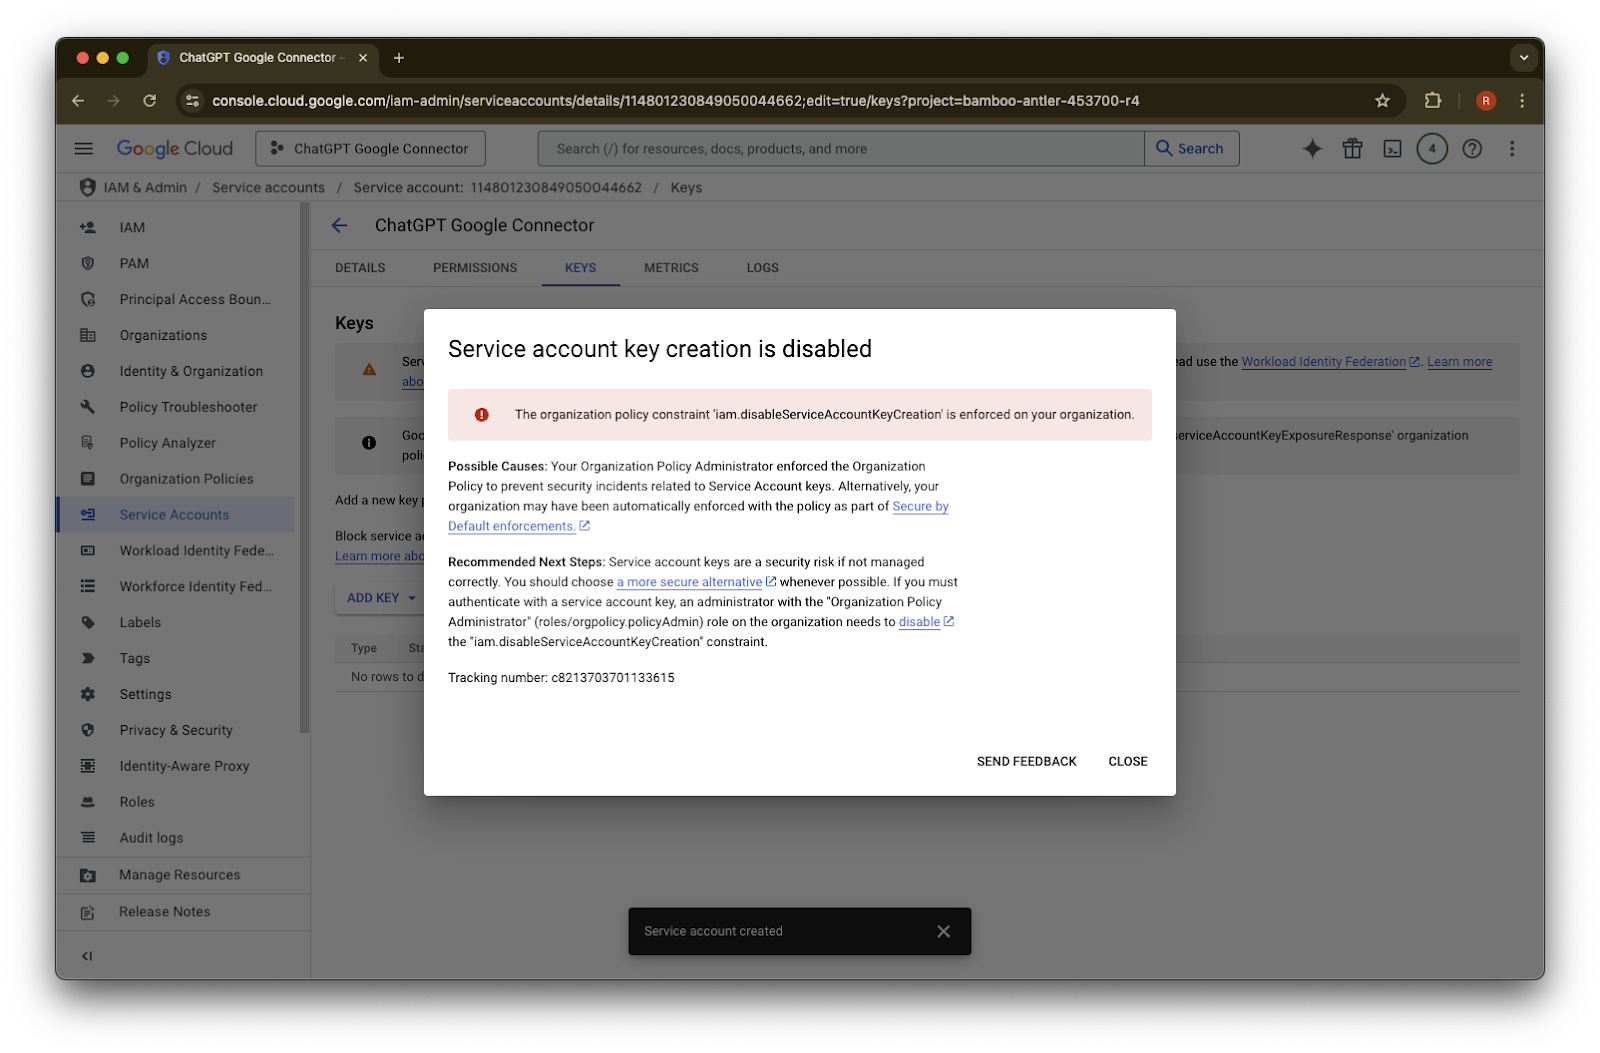
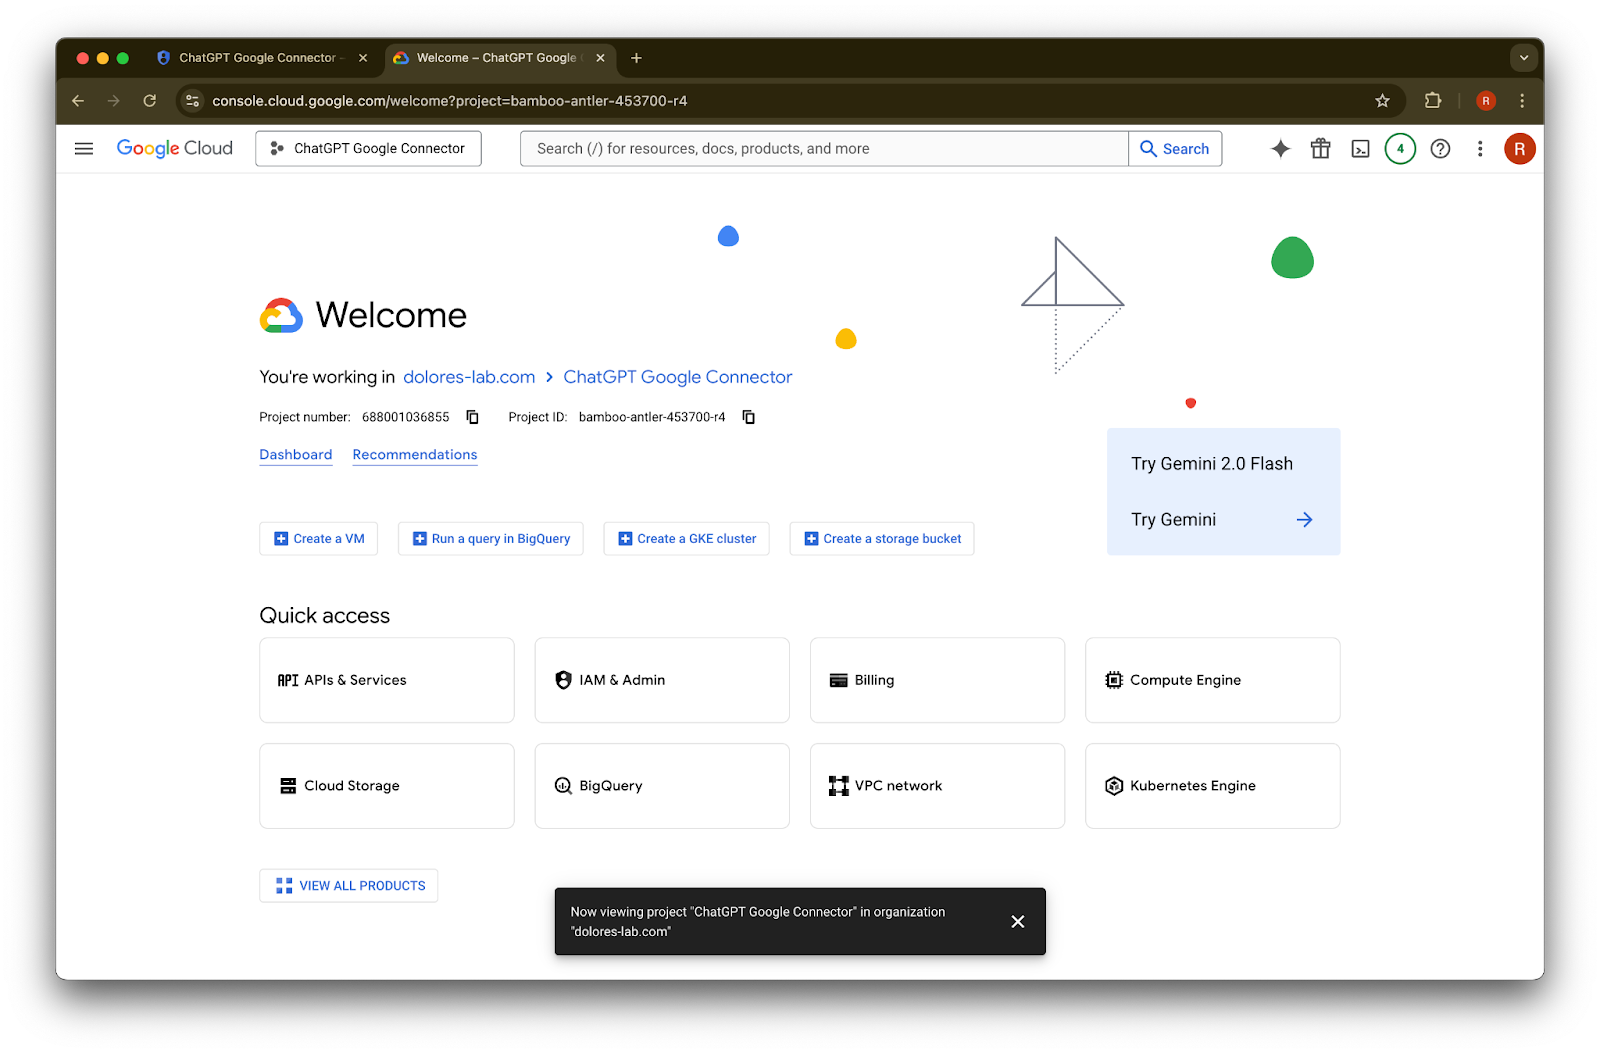
ایک نیا tab کھولیں اور console.cloud.google.com پر جائیں۔ یقینی بنائیں کہ منتخب project وہی ہے جو آپ پہلے ہی منتخب کر چکے ہیں۔
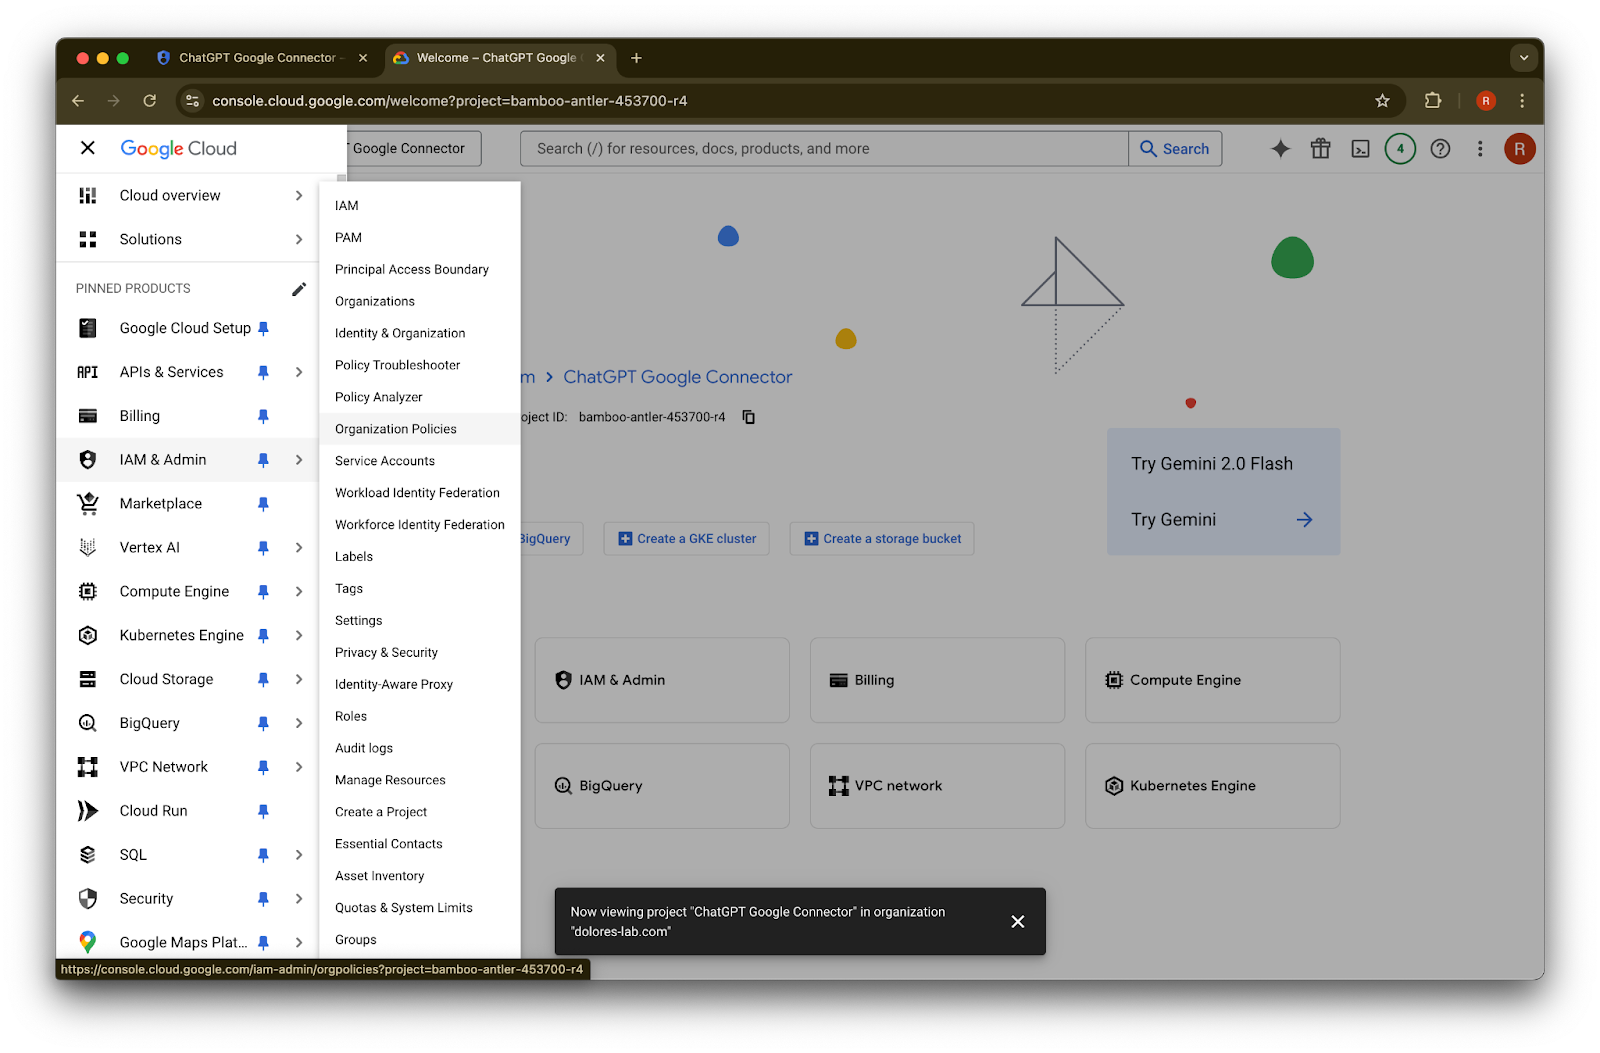
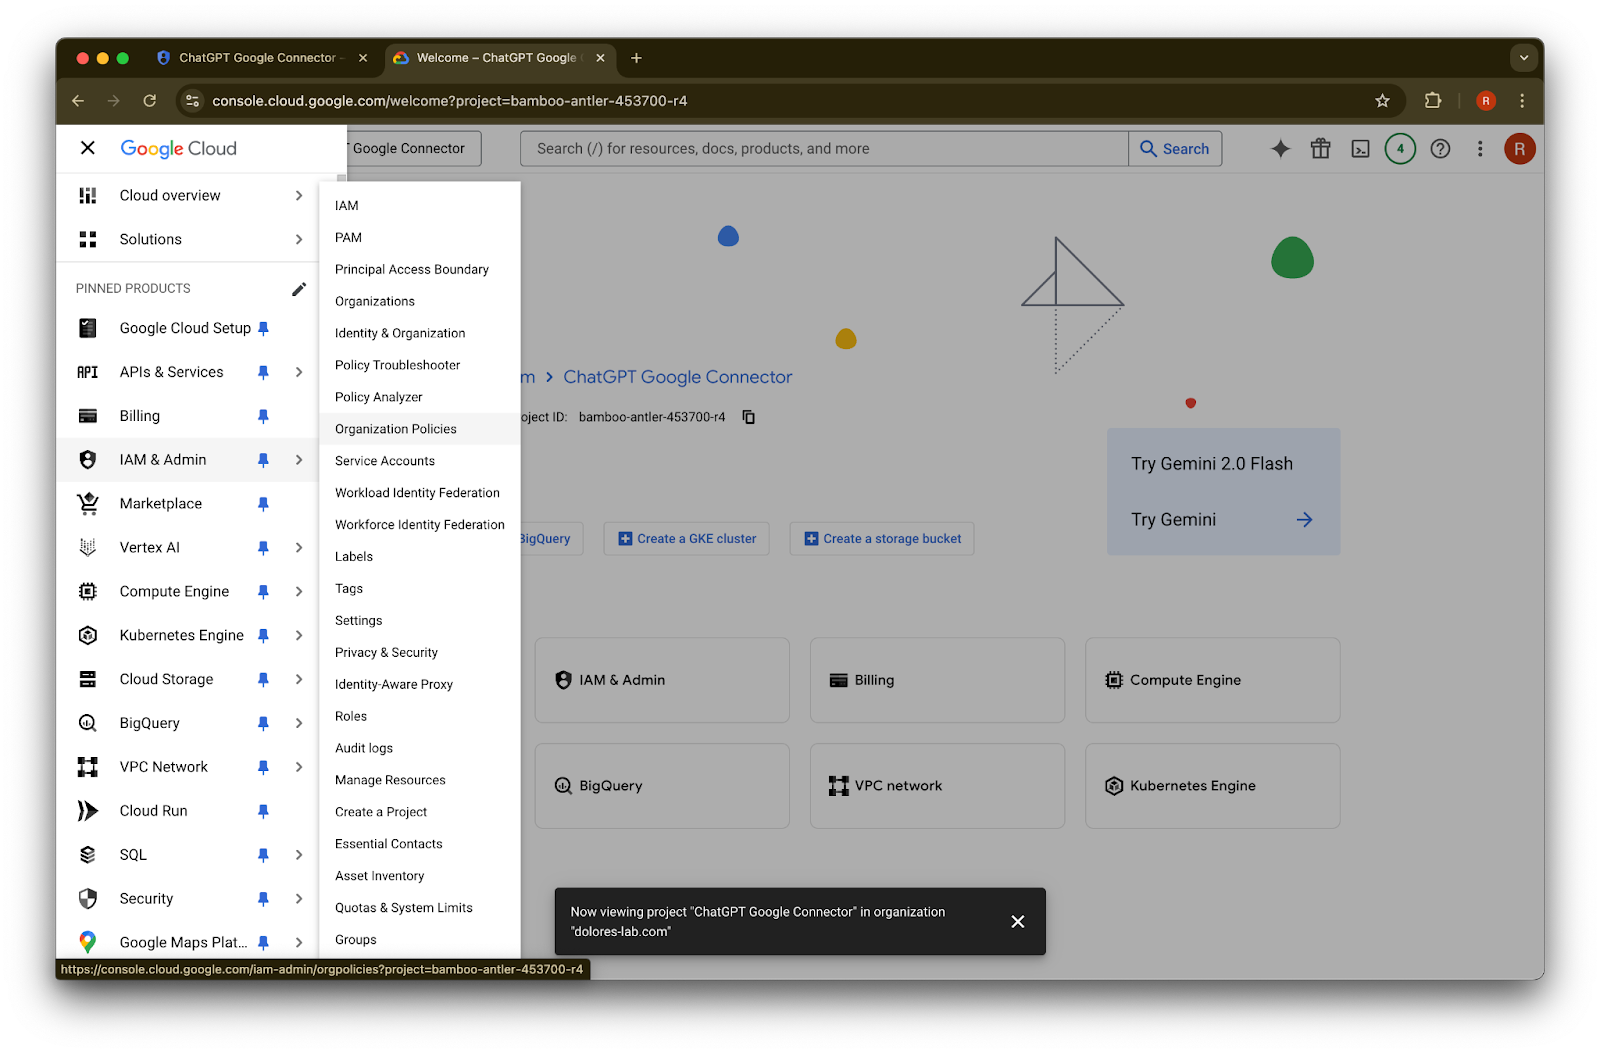
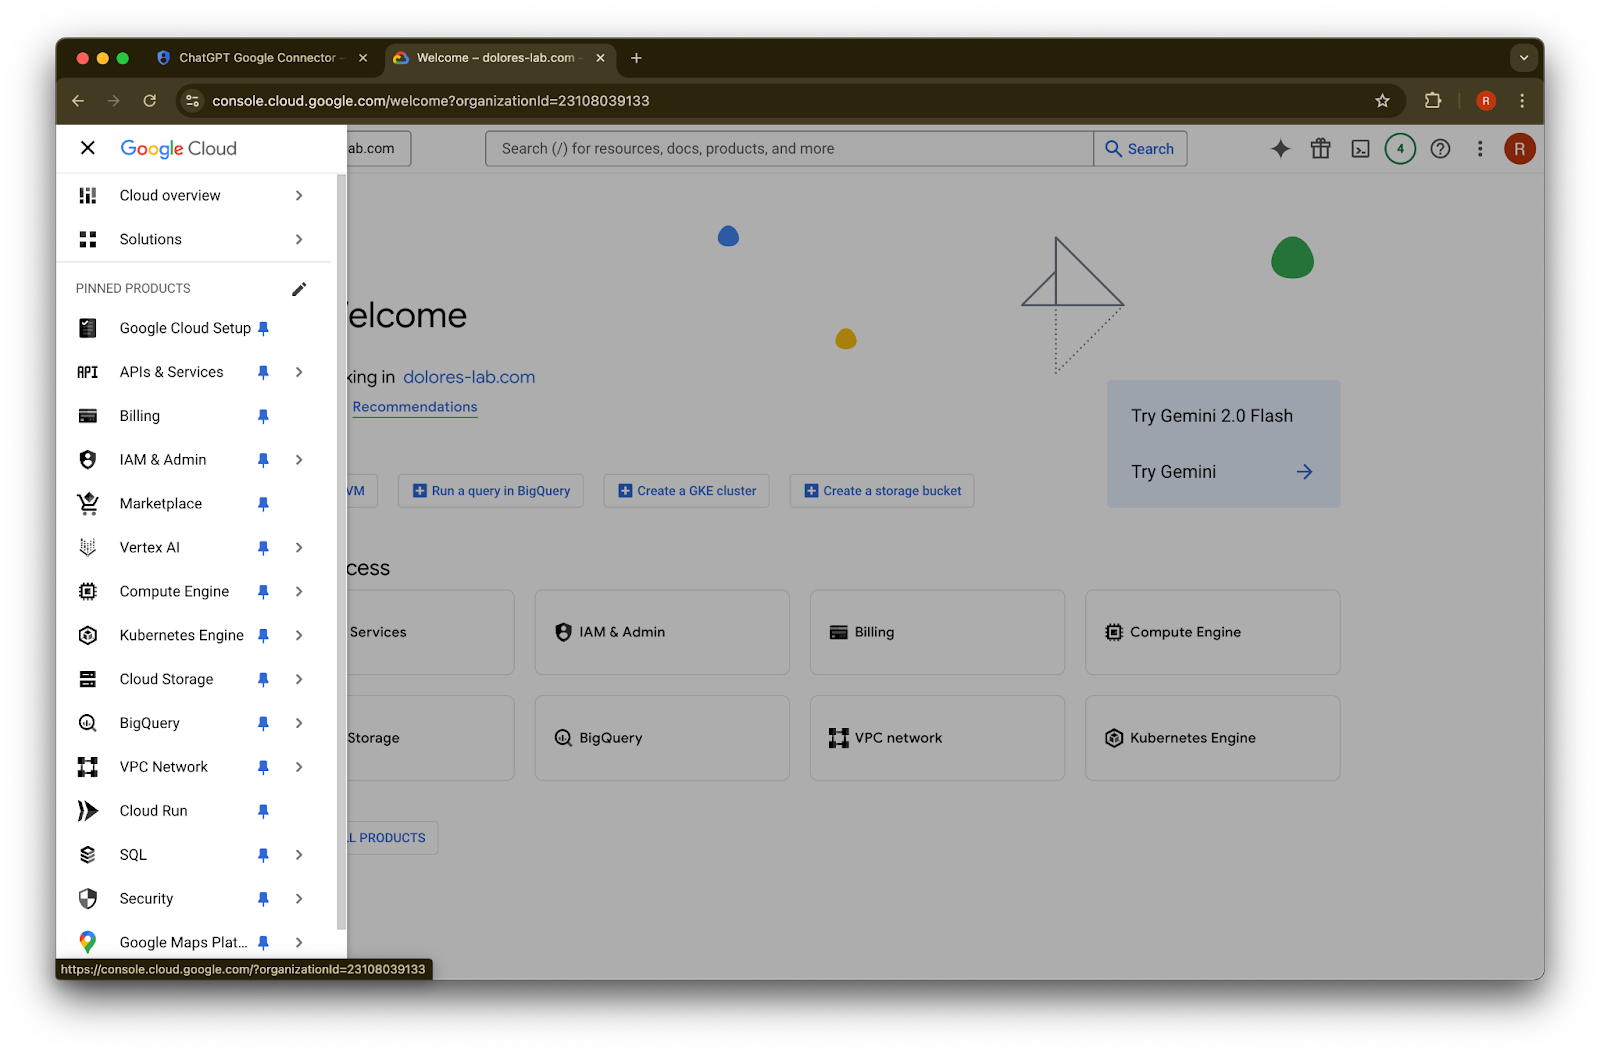
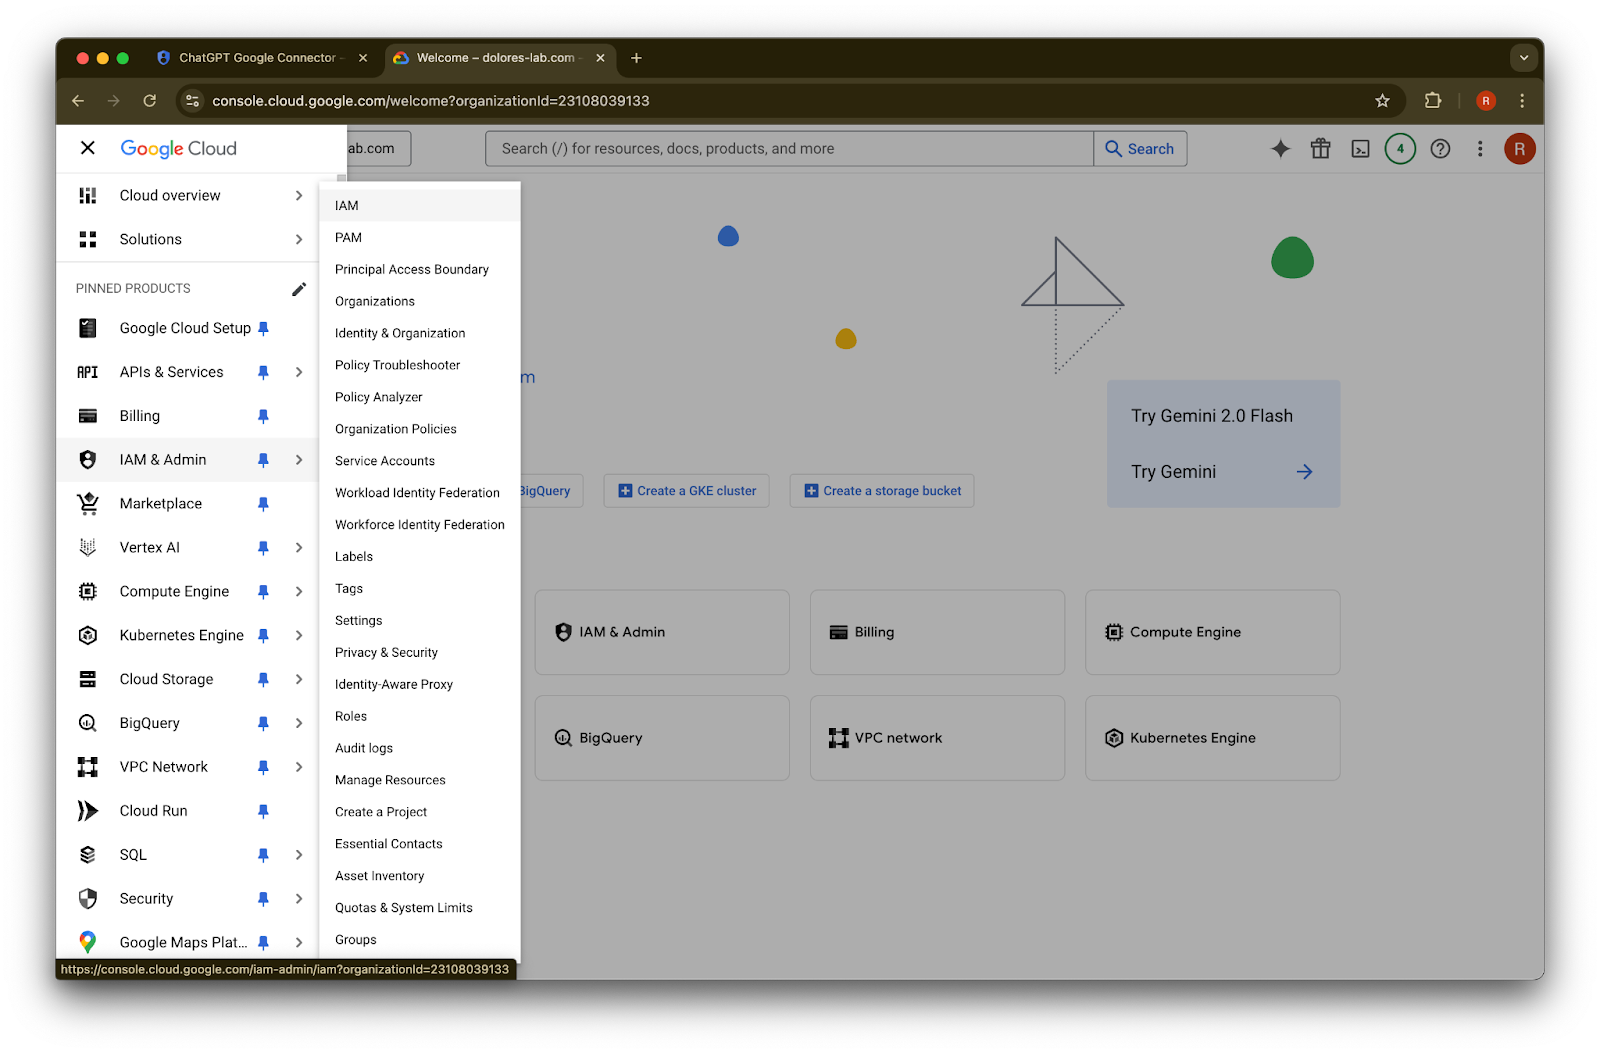
اوپری بائیں کونے میں menu icon پر کلک کریں۔IAM & Admin پر hover کریں
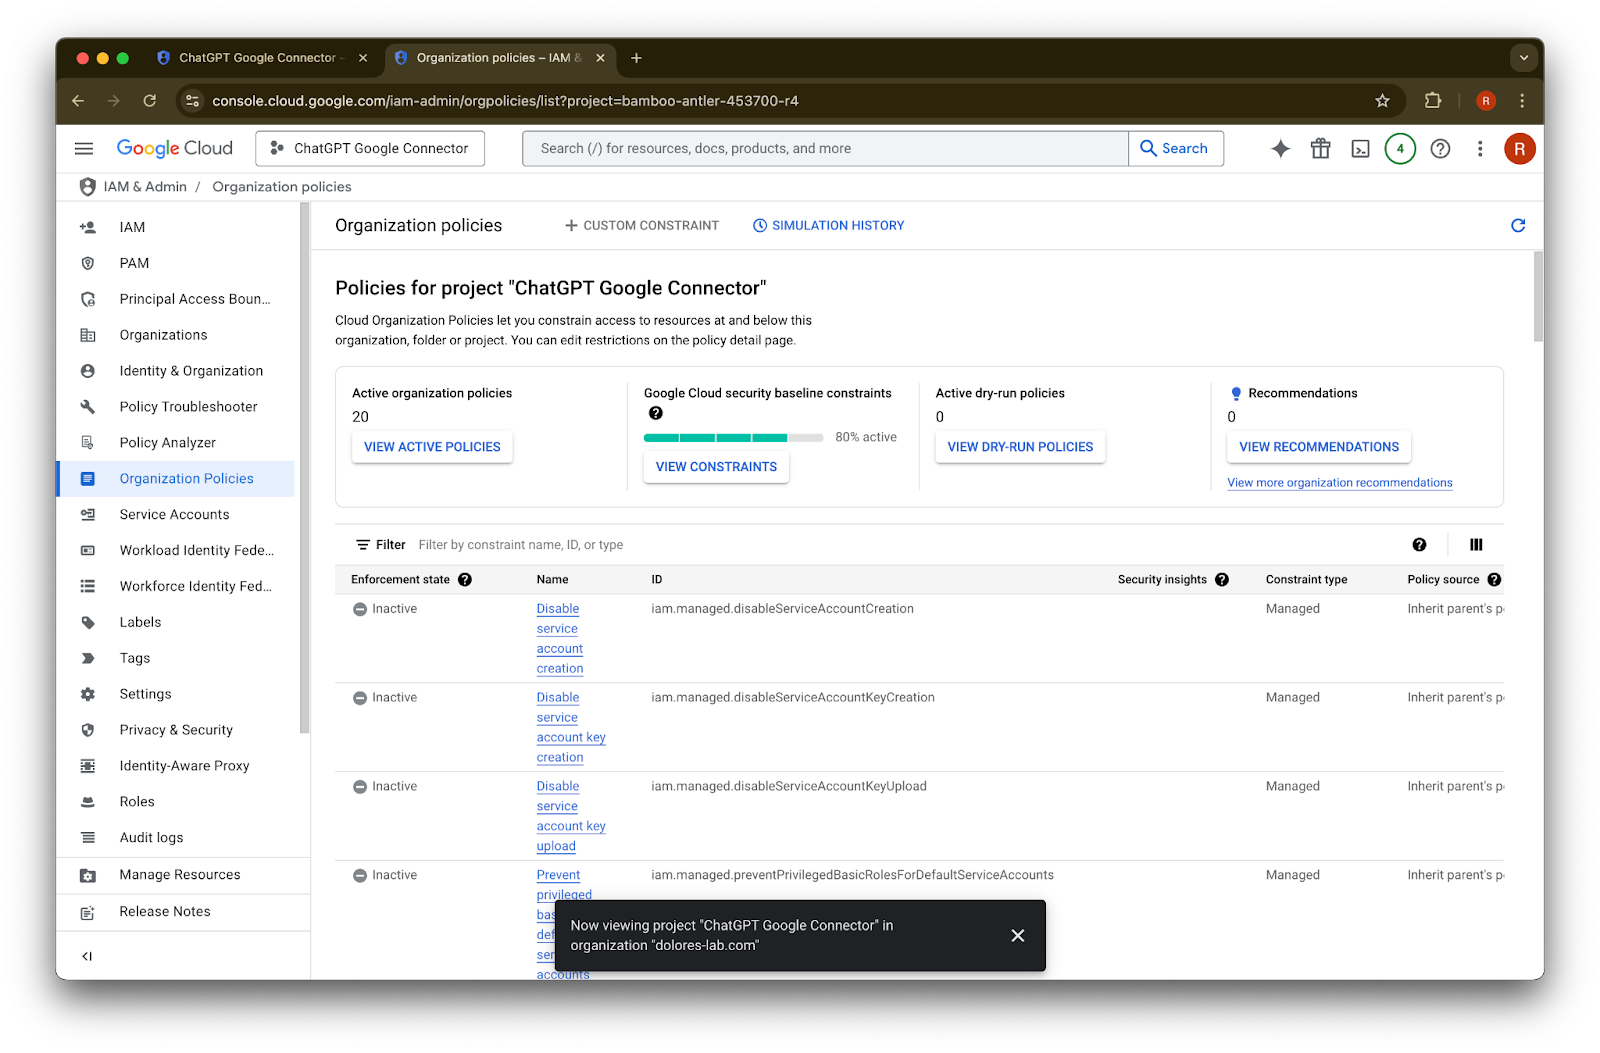
Organizational Policies پر کلک کریں
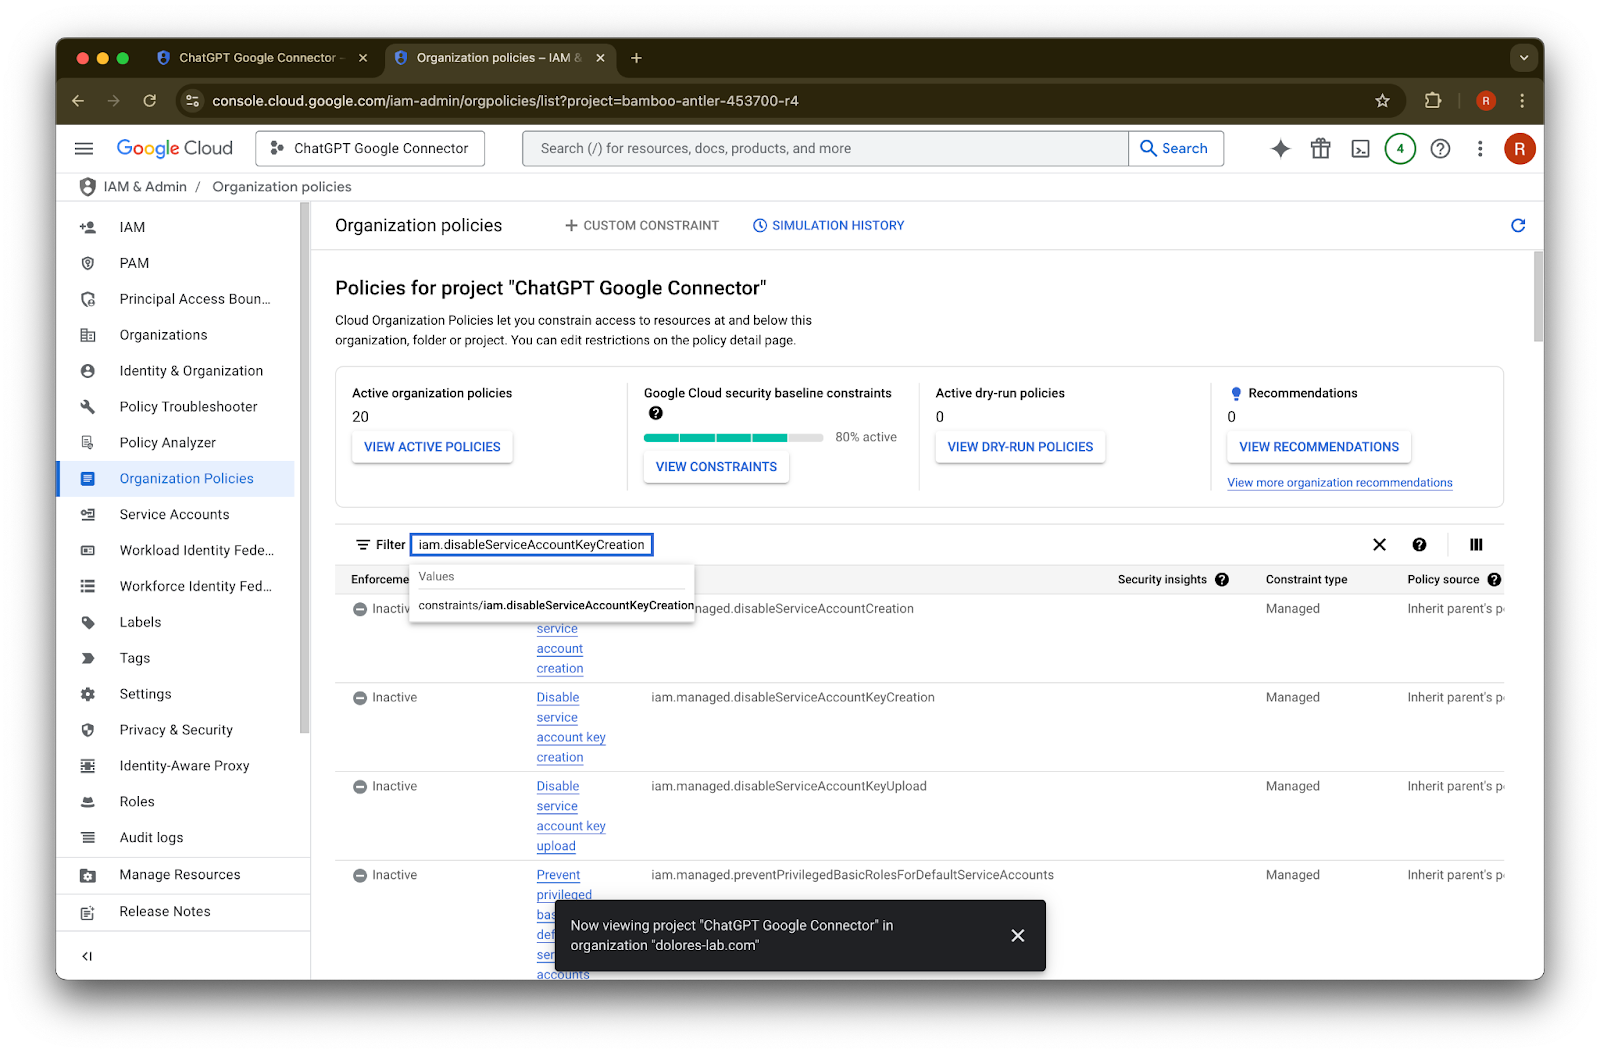
iam.disableServiceAccountKeyCreation تلاش کریں
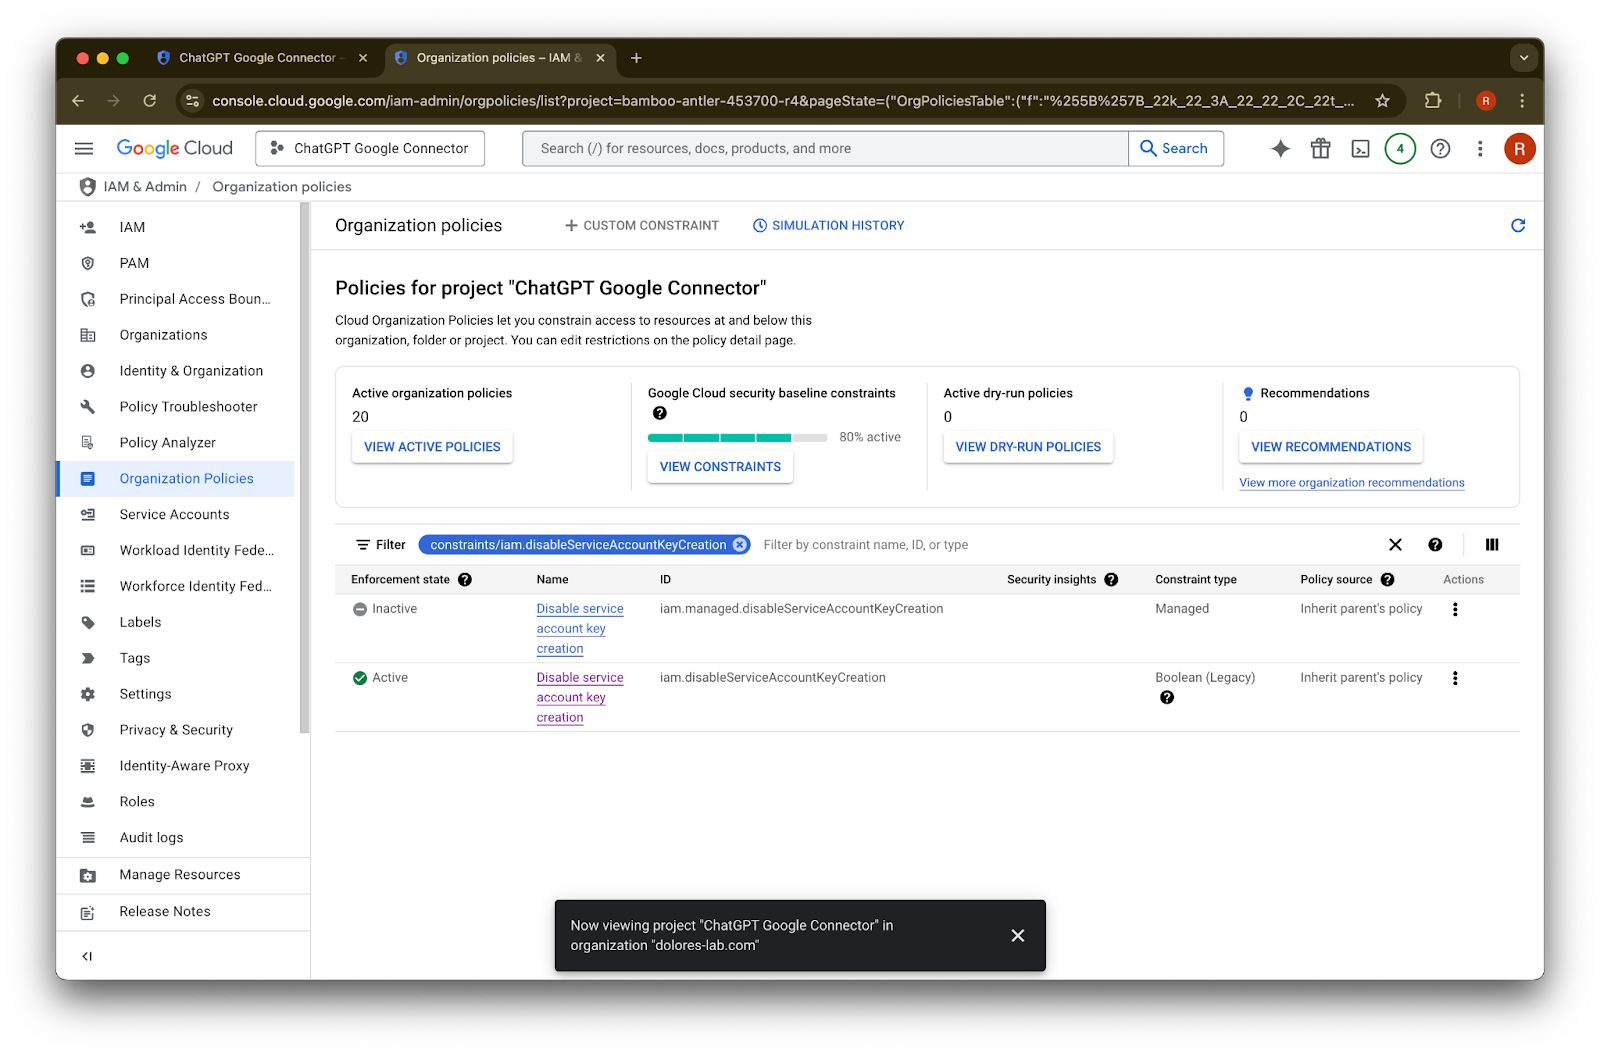
constraints/iam.disableServiceAccountKeyCreation کے result پر کلک کریں
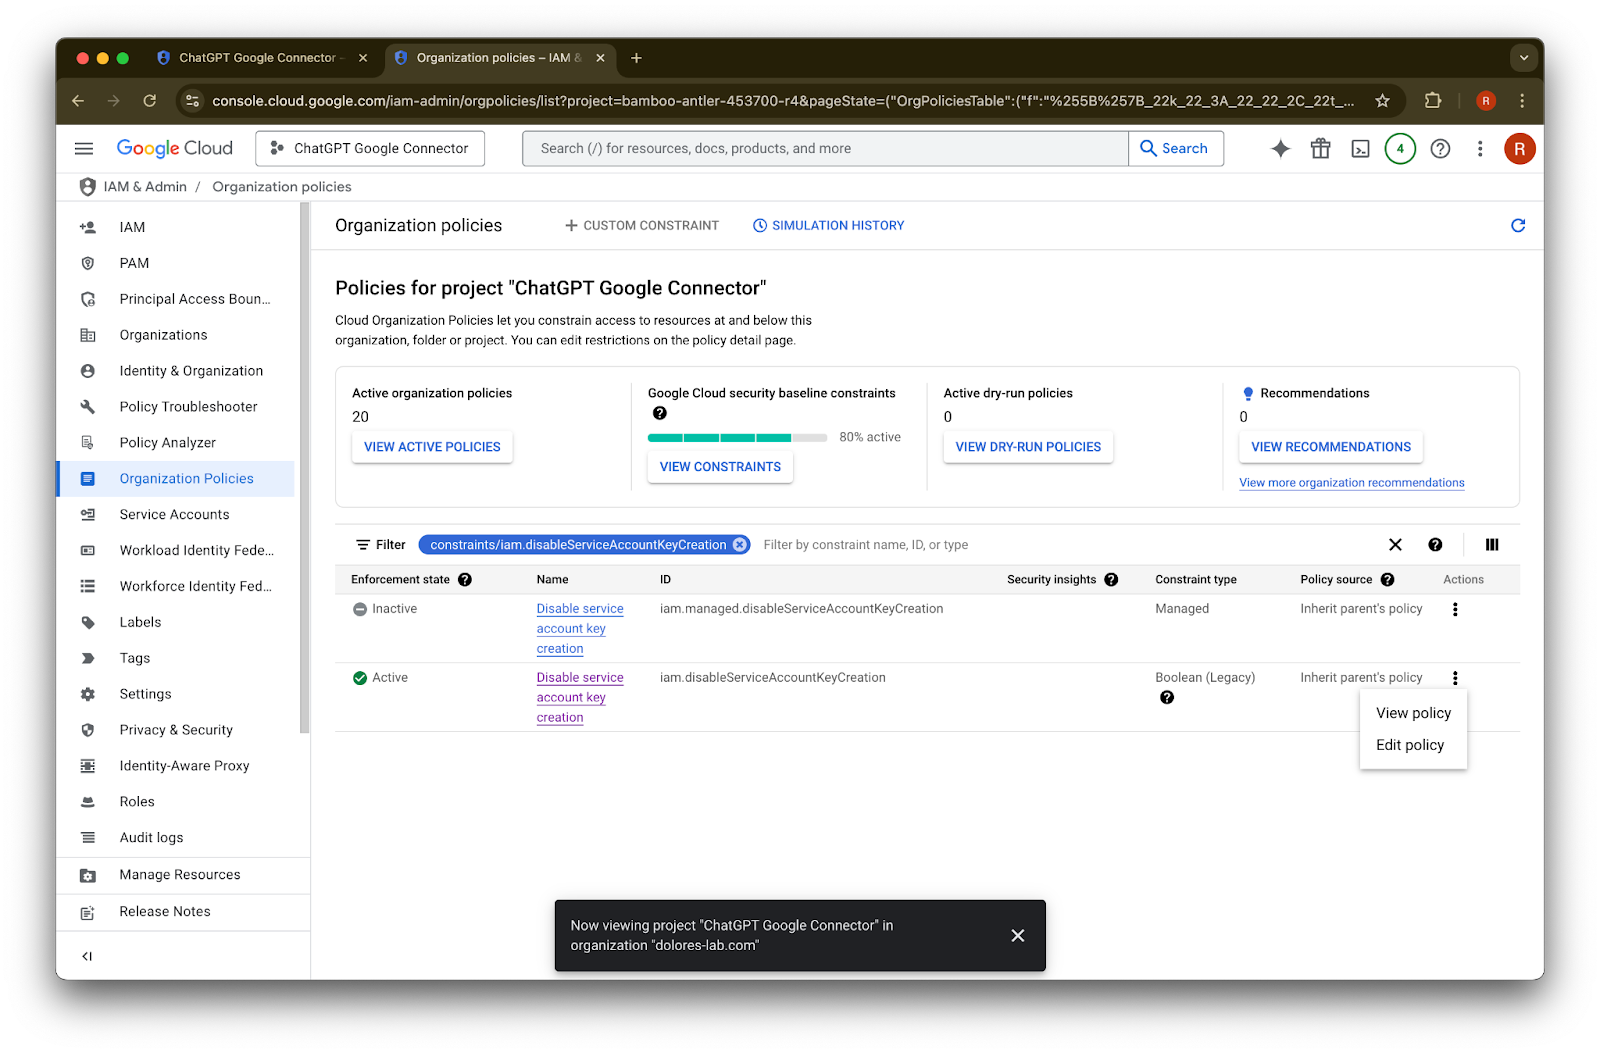
اس row کے … پر کلک کریں جس کی ID iam.disableServiceAccountKeyCreation ہے
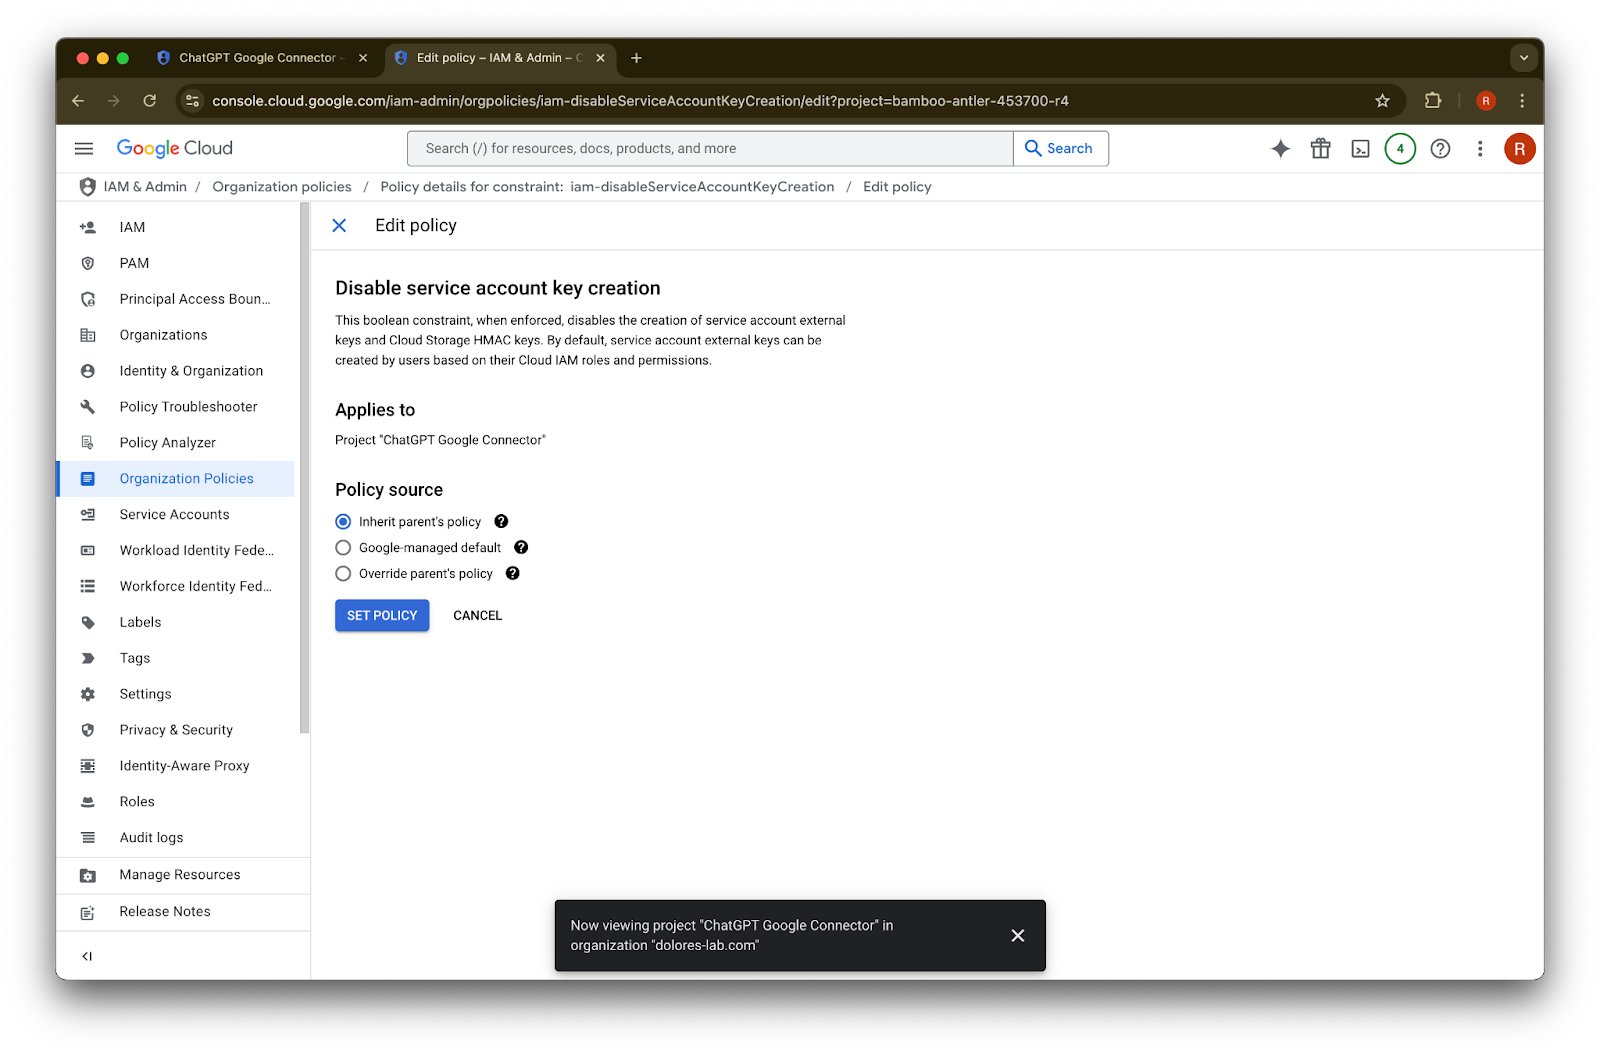
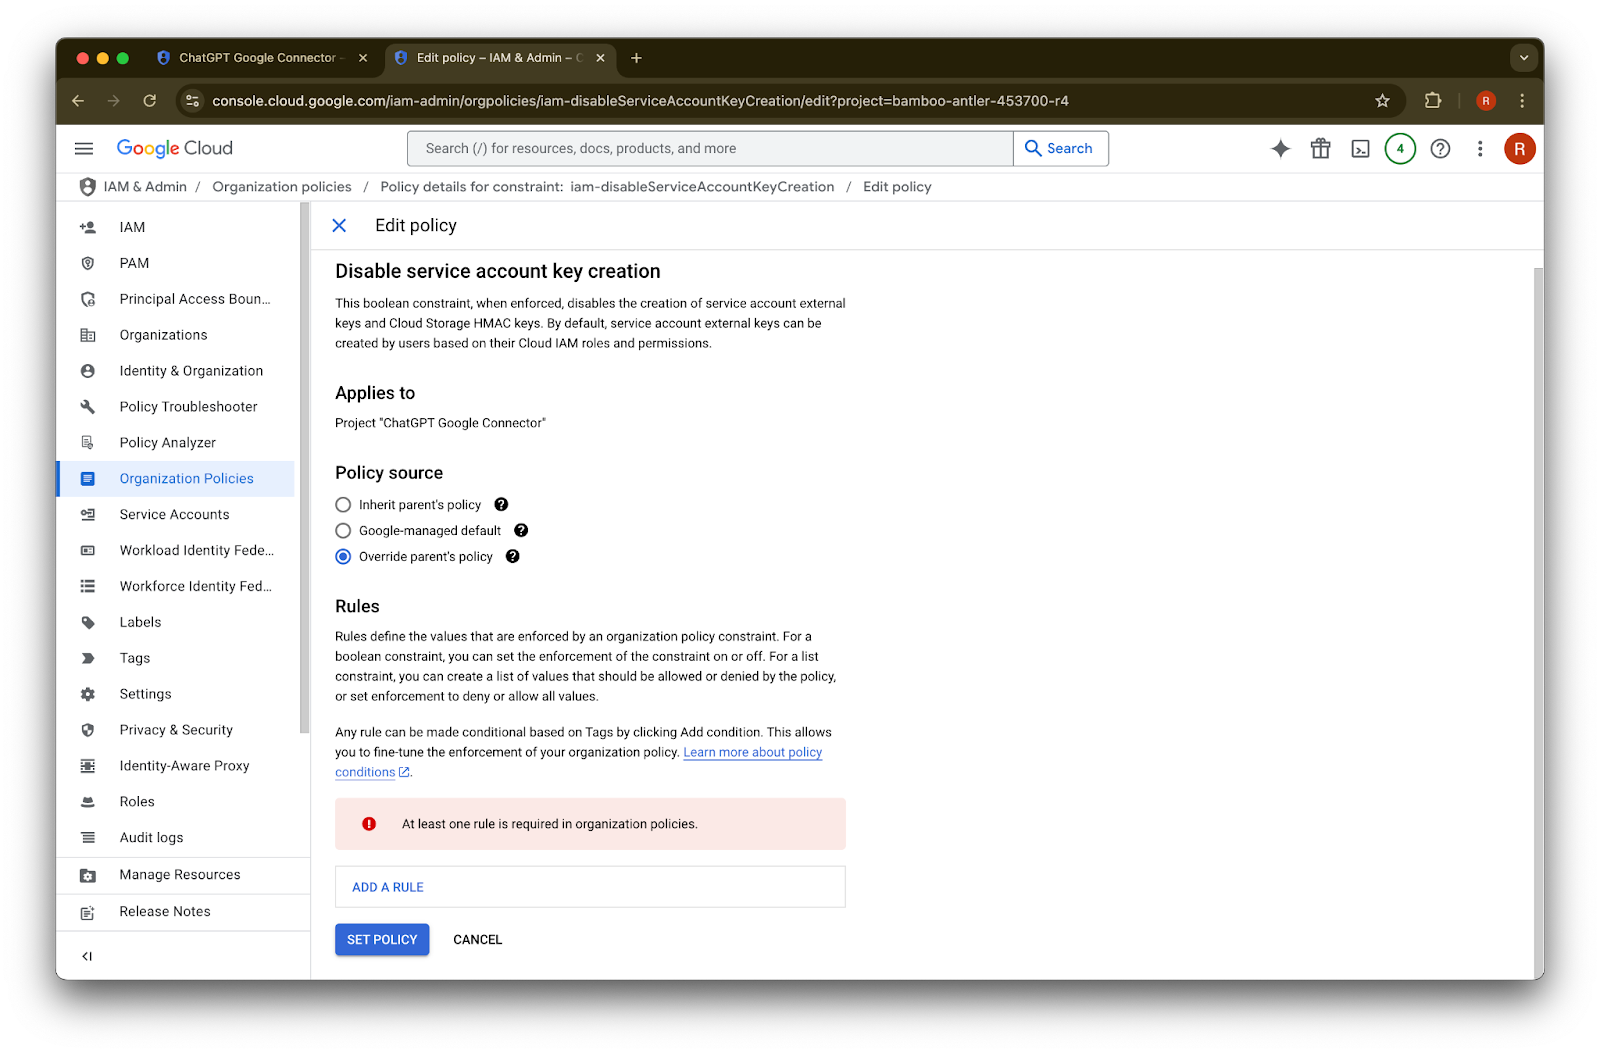
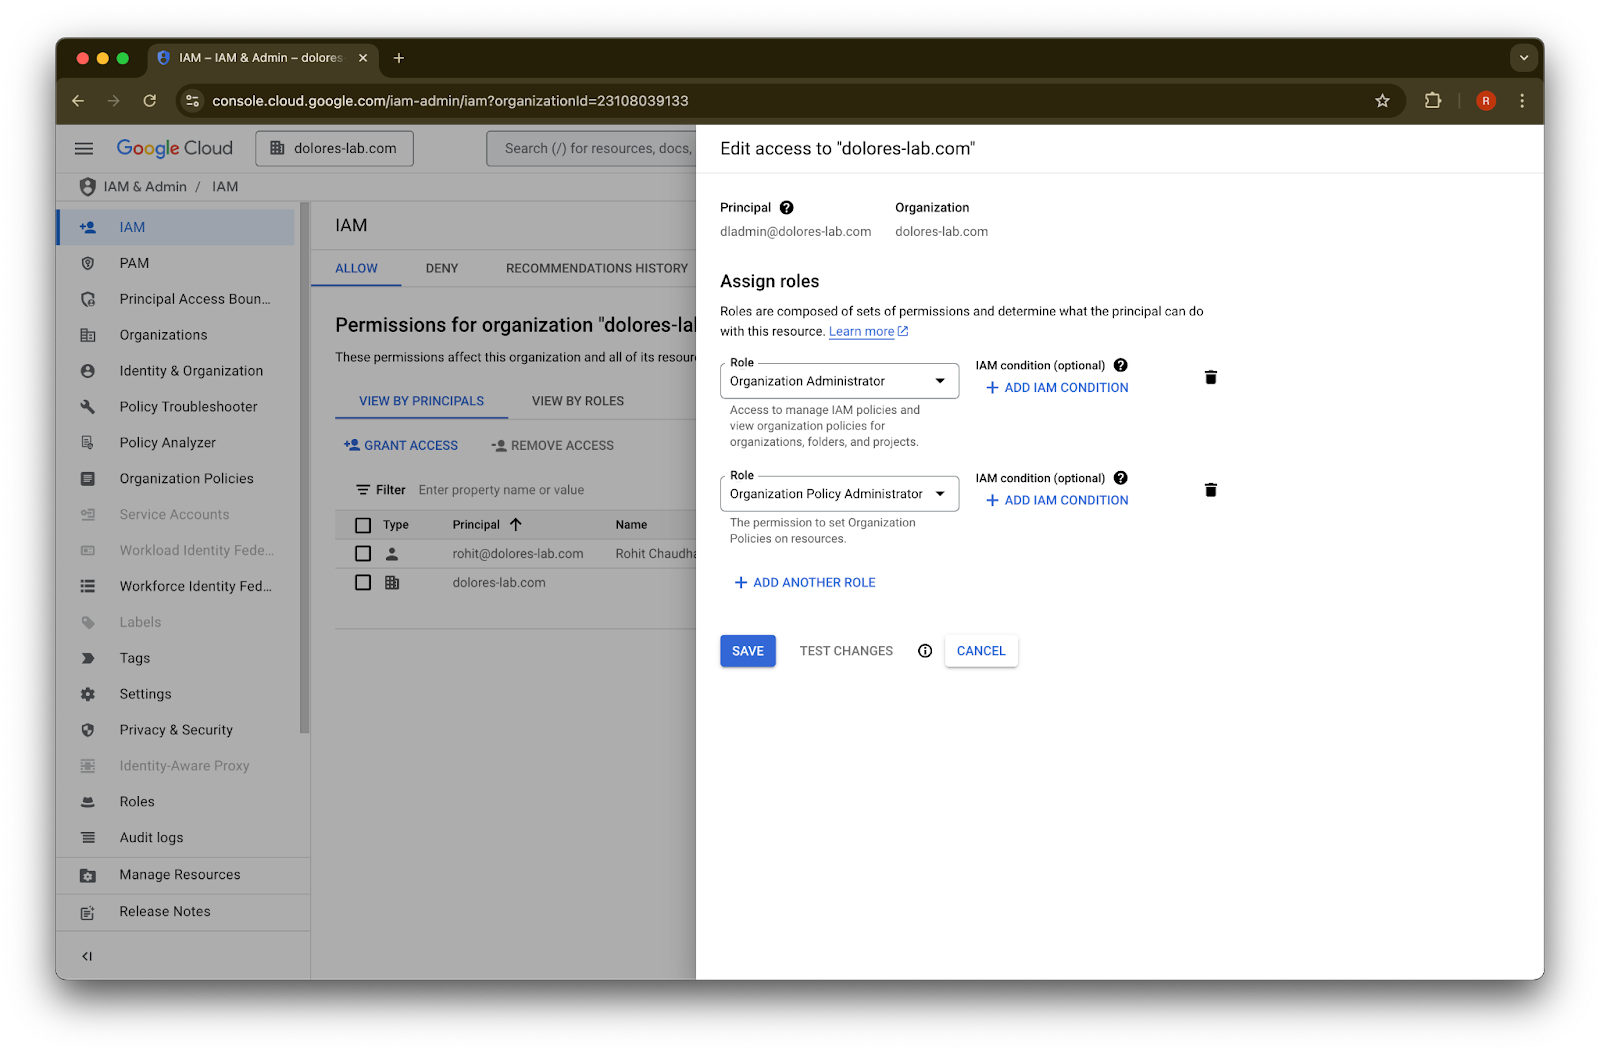
Edit policy پر کلک کریں۔ اگر Edit policy غیر فعال ہو، تو آپ کو Organization Policy Administrator بننا ہوگا۔
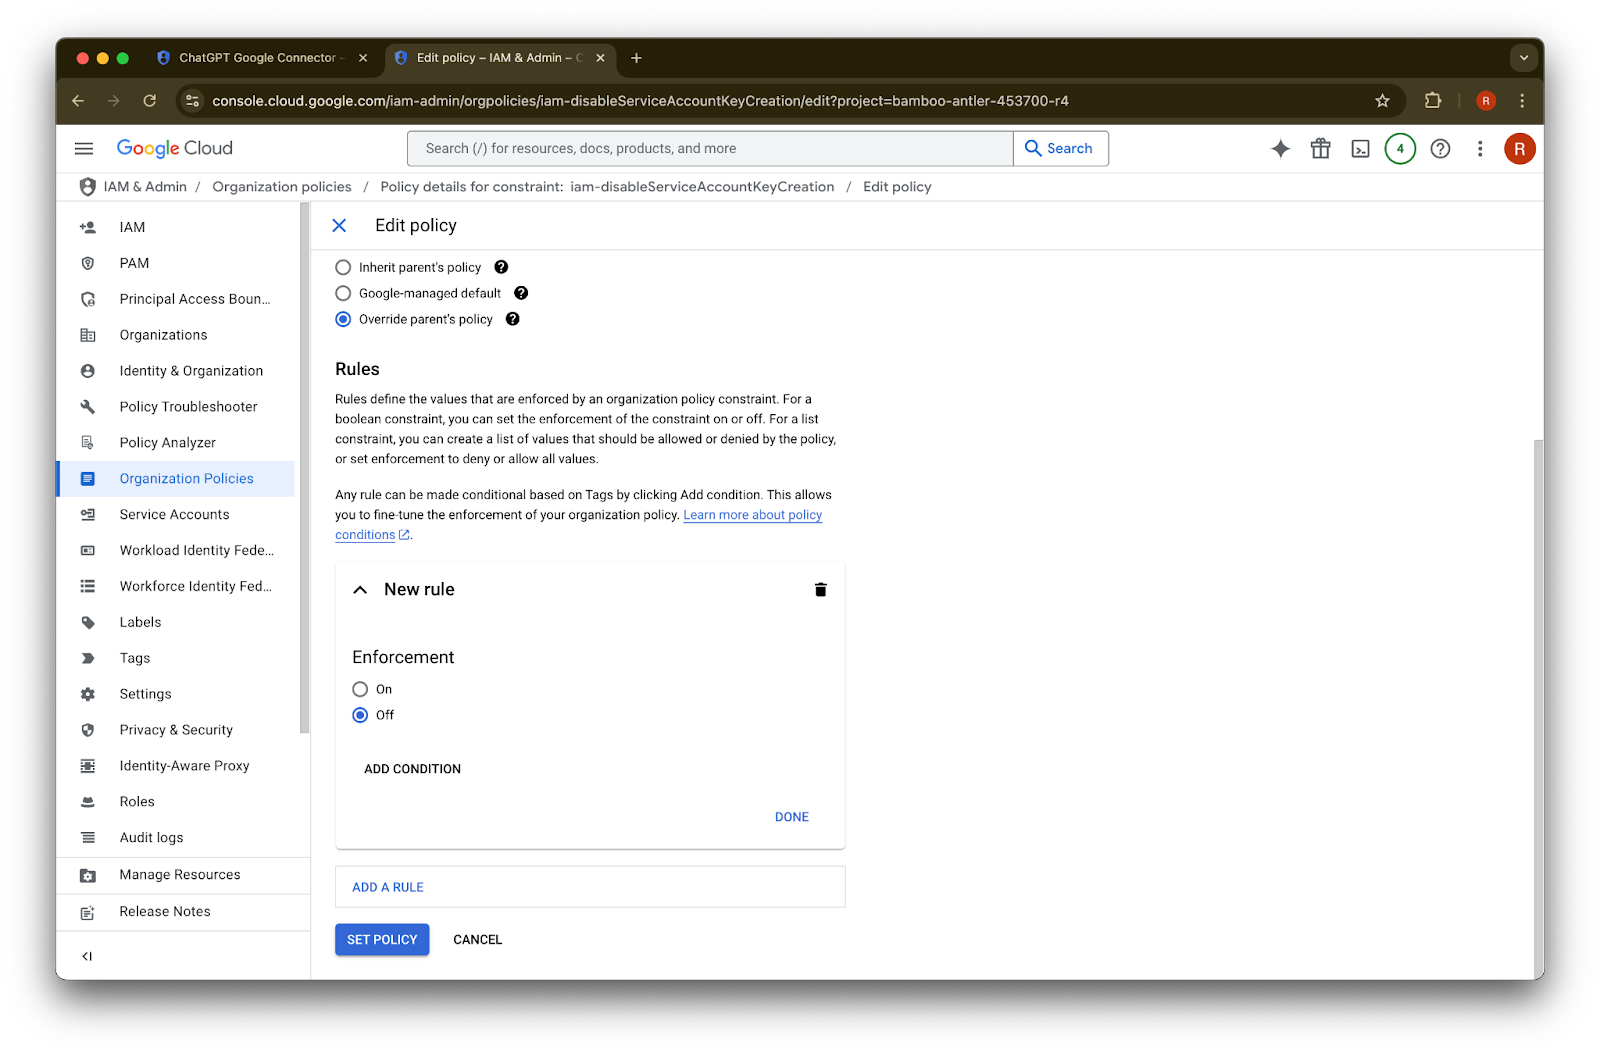
Override parent’s policy پر کلک کریں
Add a rule پر کلک کریں
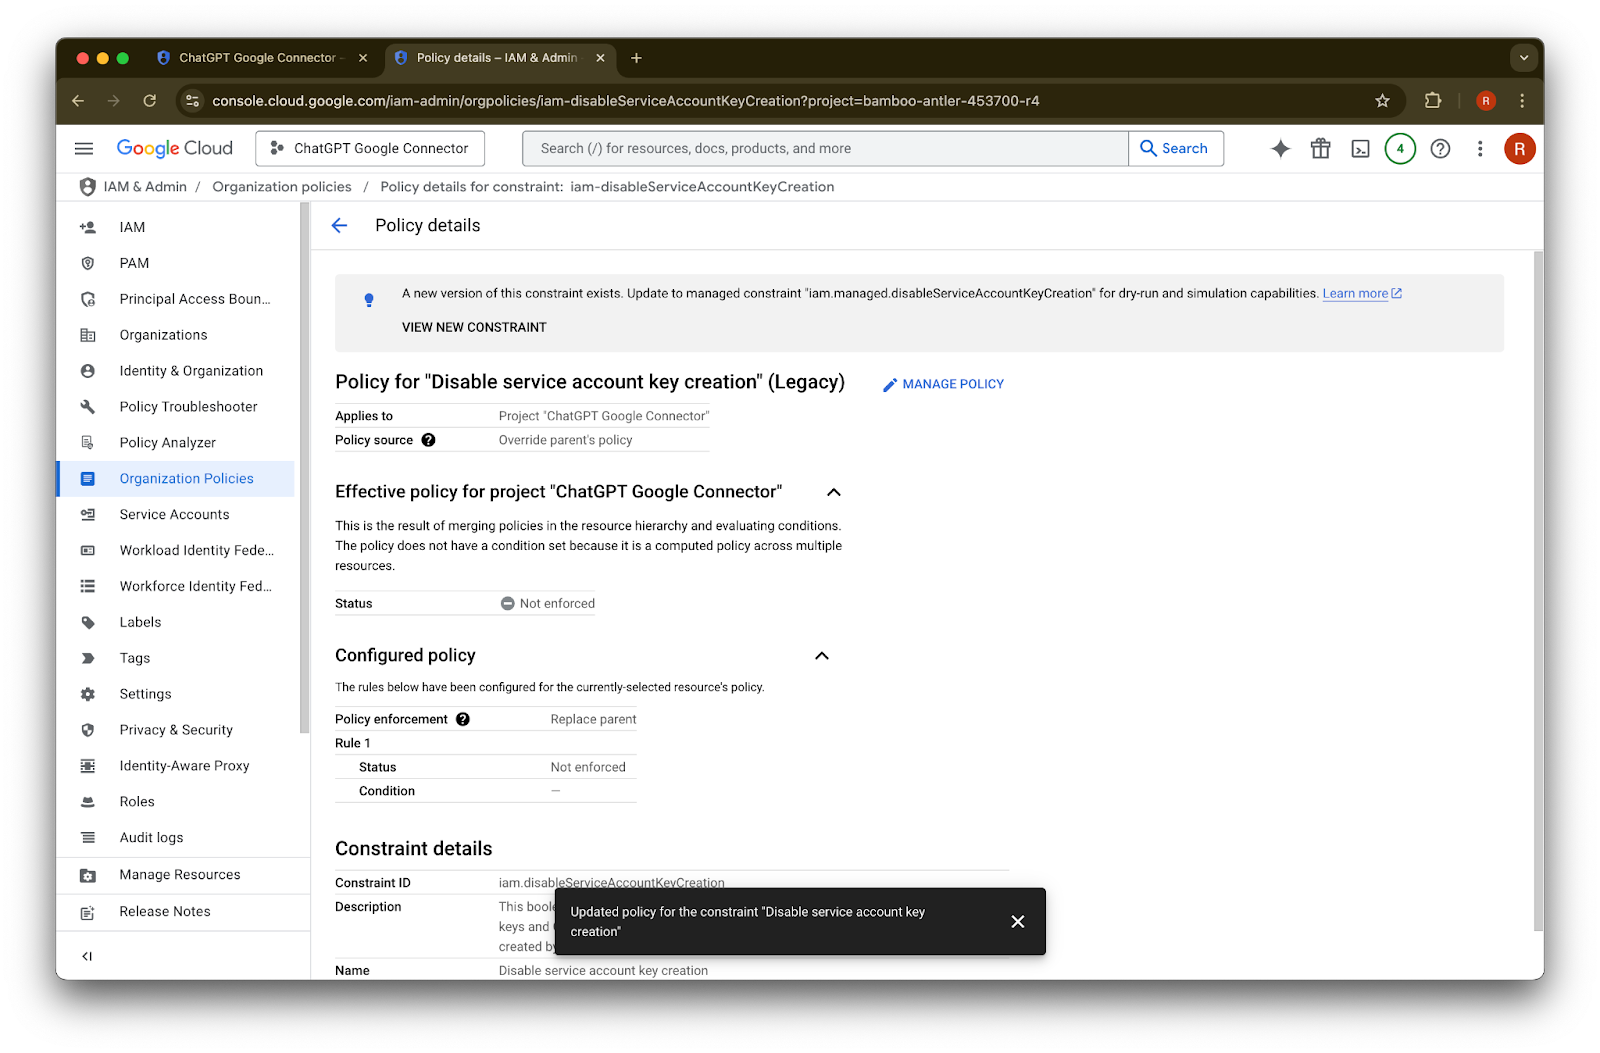
Set Policy پر کلک کریں
اب آپ service account key بنا سکتے ہیں۔ اس فعال ہونے میں کئی منٹ لگ سکتے ہیں۔
Organization Policy Administrator بننا
console.cloud.google.com پر جائیں اور project/organization selector پر کلک کریں
اپنی organization پر کلک کریں
اوپری بائیں کونے میں menu icon پر کلک کریں
IAM & Admin پر hover کریں
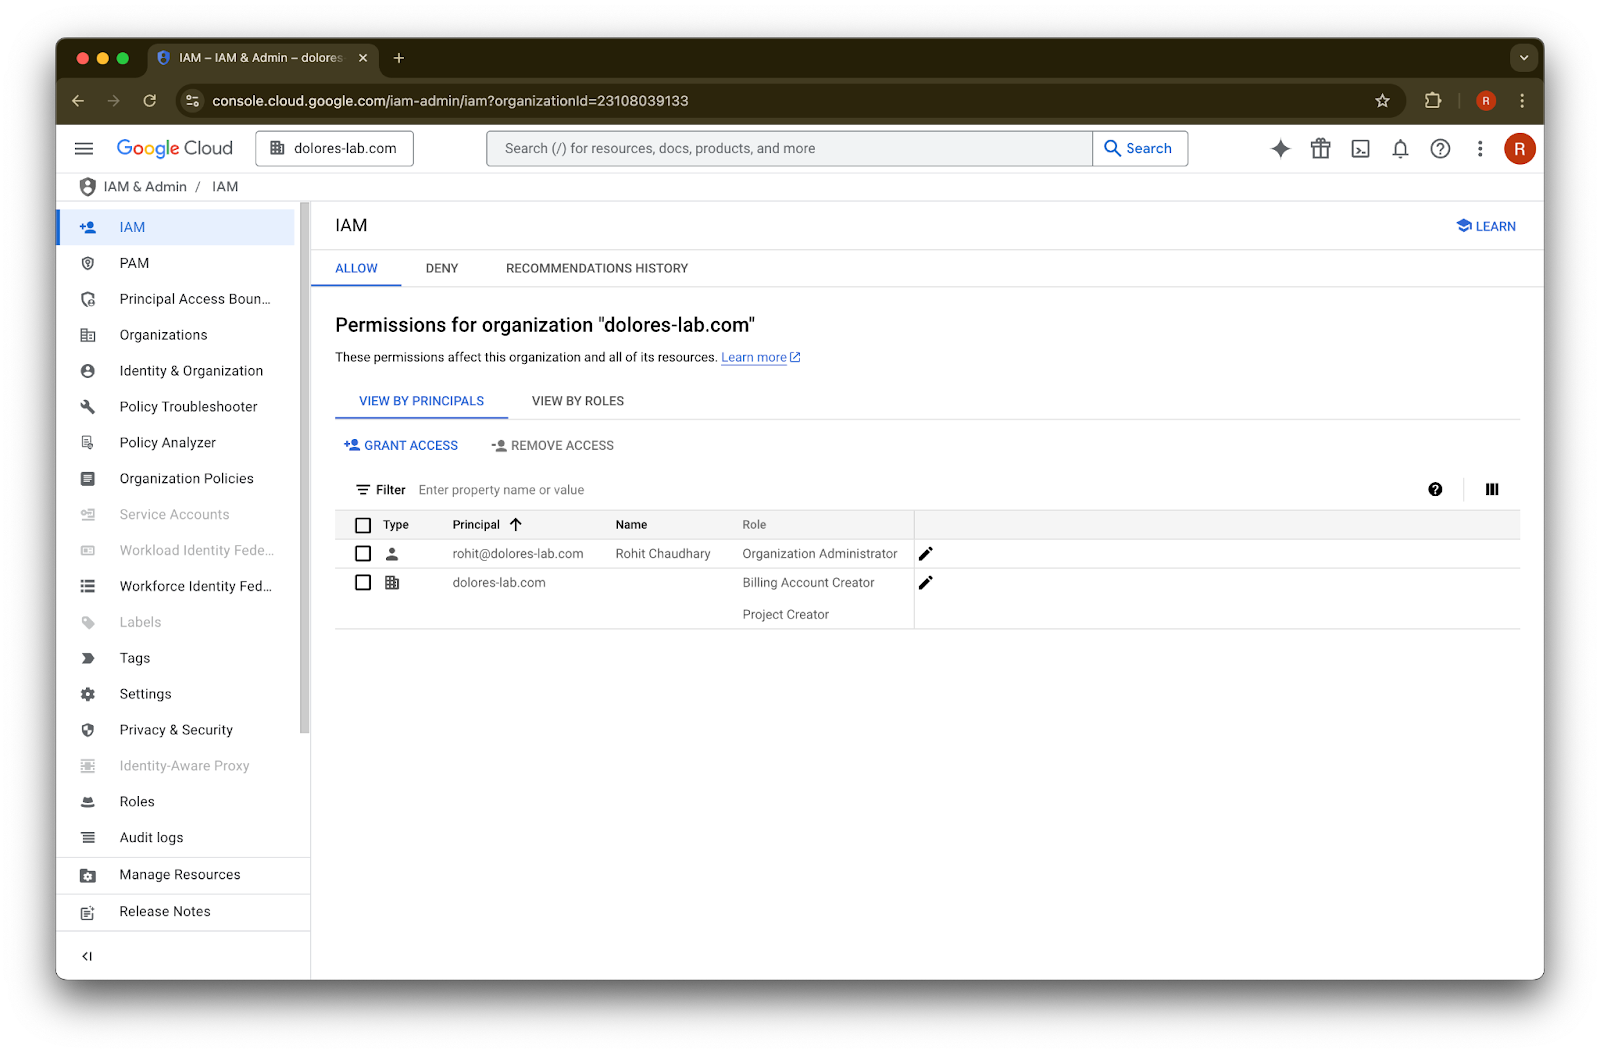
IAM پر کلک کریں
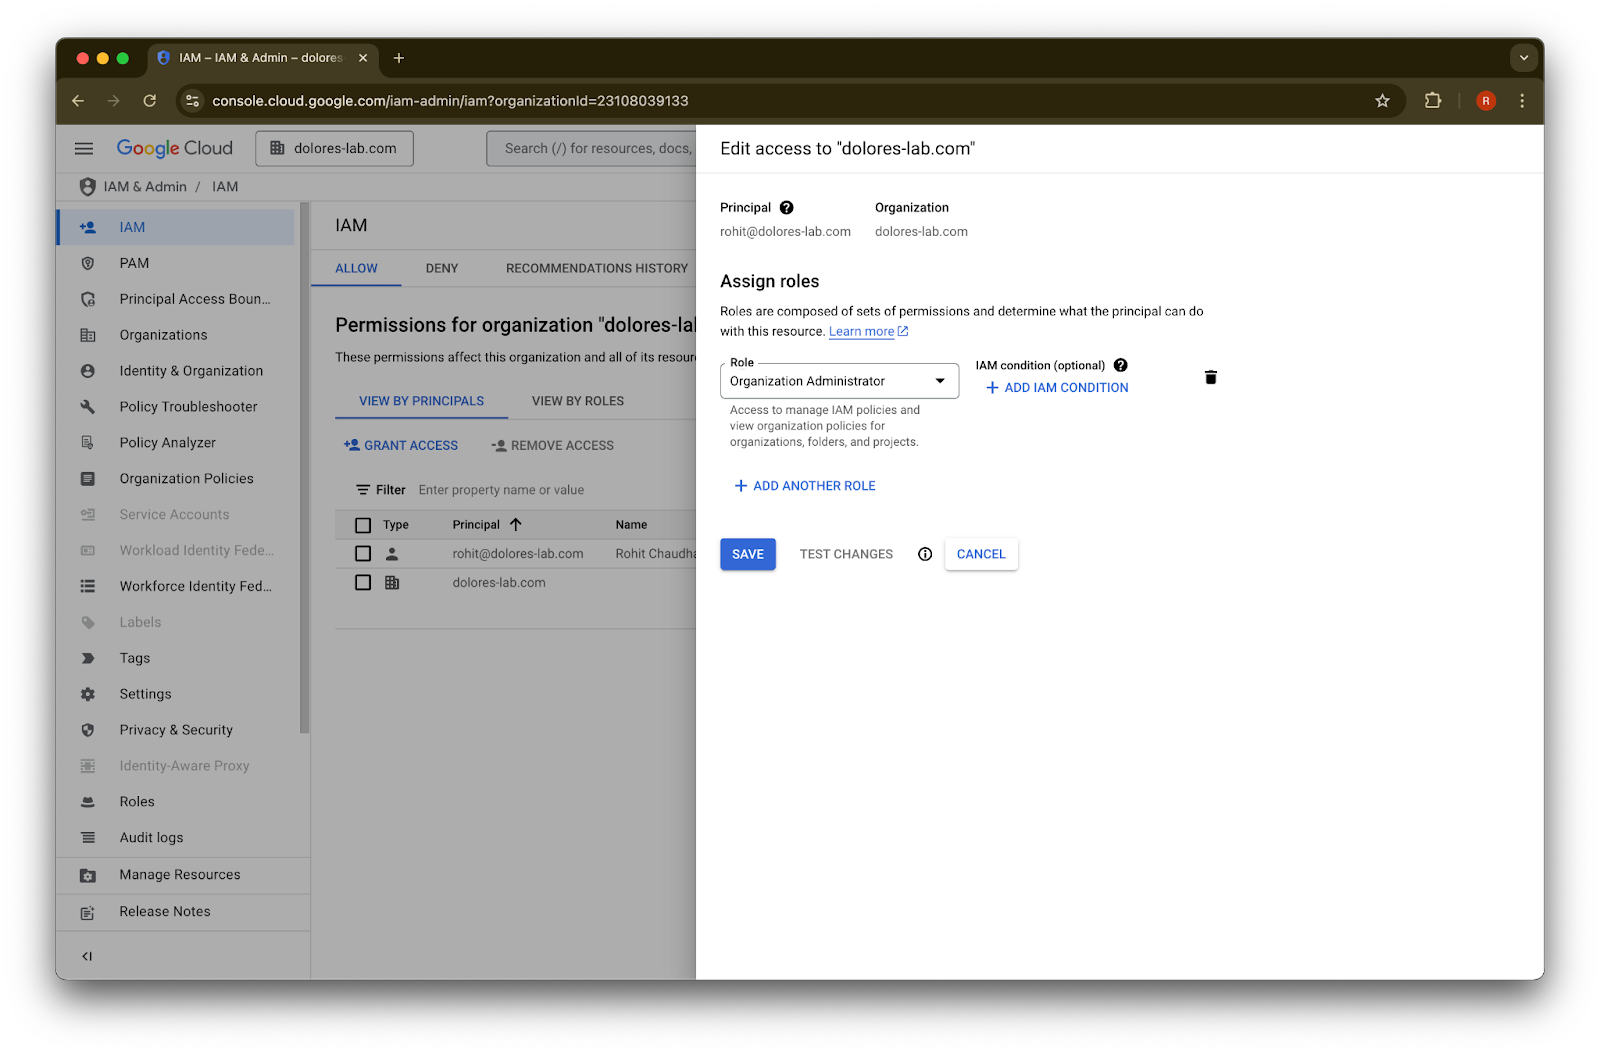
اپنے account کے لیے pencil پر کلک کریں
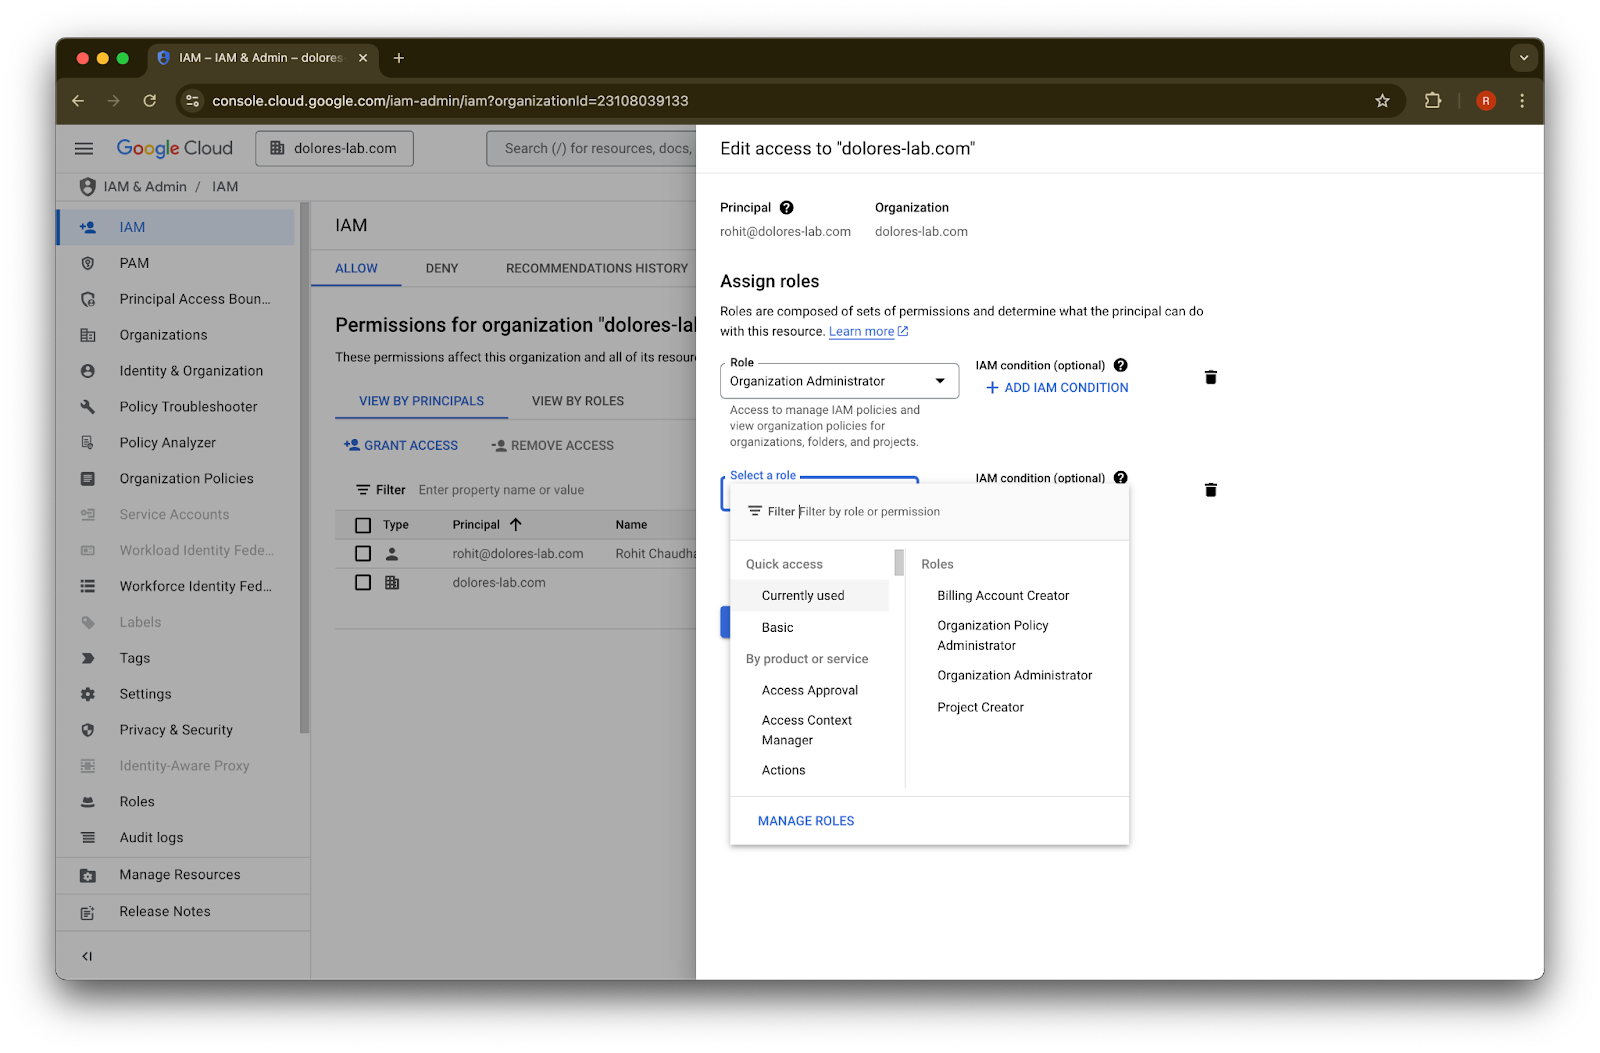
Add Another Role پر کلک کریں
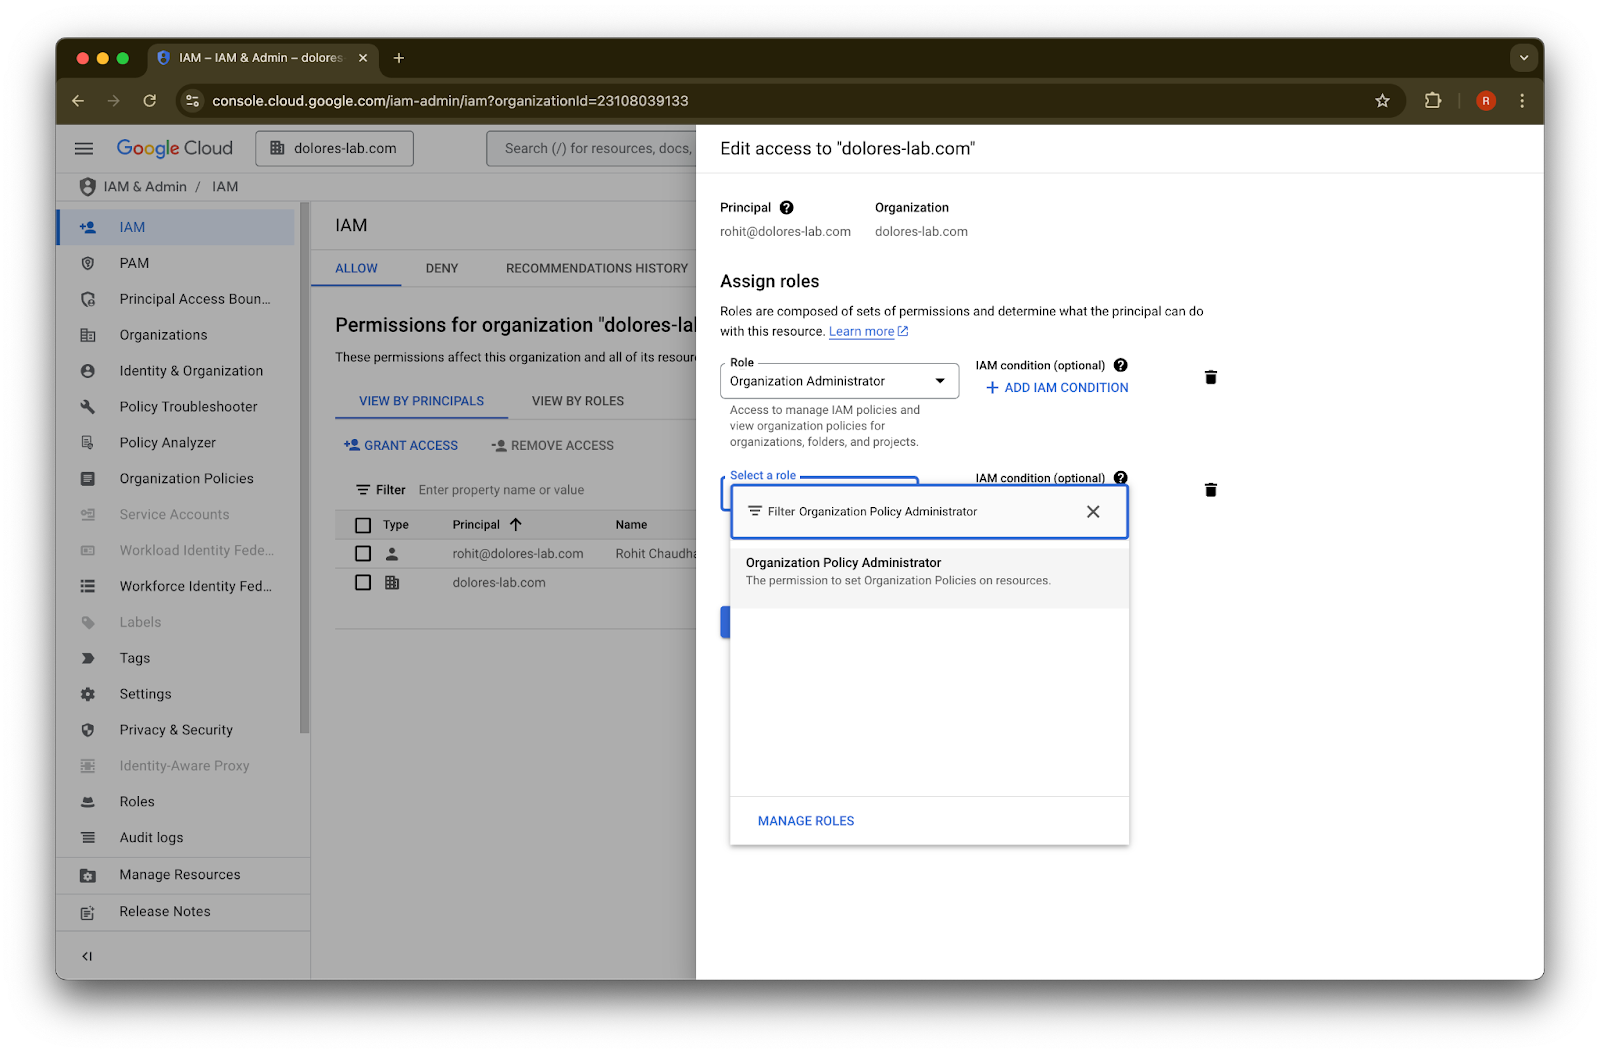
Organization Policy Administrator تلاش کریں
Organization Policy Administrator پر کلک کریں
Save پر کلک کریں
اب آپ کے account کو service account key creation فعال کرنے کی اجازت حاصل ہے۔ اس کے اثر میں آنے میں کئی منٹ لگ سکتے ہیں۔
Google Workspace اور ChatGPT کے لیے مختلف ای میل اکاؤنٹس برقرار رکھنے کو Google Email Alias استعمال کرنا
اگر آپ Google Drive synced connectors کے لیے admin-managed setup استعمال کرتے ہوئے اپنے ChatGPT ورک اسپیس سے Google Workspace کو connect کرنے والے ایڈمن ہیں، اور آپ کی تنظیم ChatGPT اور Google Workspace کے لیے مختلف ای میل ڈومینز استعمال کرتی ہے، تو آپ کو یہ یقینی بنانے کے لیے اضافی اقدامات کرنے ہوں گے کہ صارفین کامیابی سے Google Drive synced connectors تک رسائی حاصل کر سکیں۔
سفارش: جہاں بھی ممکن ہو، Google Workspace اور ChatGPT اکاؤنٹس دونوں کے لیے ایک ہی بنیادی ای میل ایڈریس استعمال کریں۔
اگر یہ ممکن نہ ہو، تو ChatGPT sign-in email سے میل کھاتا Google Workspace email alias configure کرنے کے لیے نیچے دی گئی ہدایات پر عمل کریں۔
Google Workspace Alias شامل کرنے کے مراحل
یہ مراحل Google Admin Console میں فالو کریں تاکہ ہر صارف کے ChatGPT ای میل کو ان کے Google Workspace اکاؤنٹ سے لنک کیا جا سکے:
Admin Console پر جائیں۔ یہاں جائیں: Directory > Users
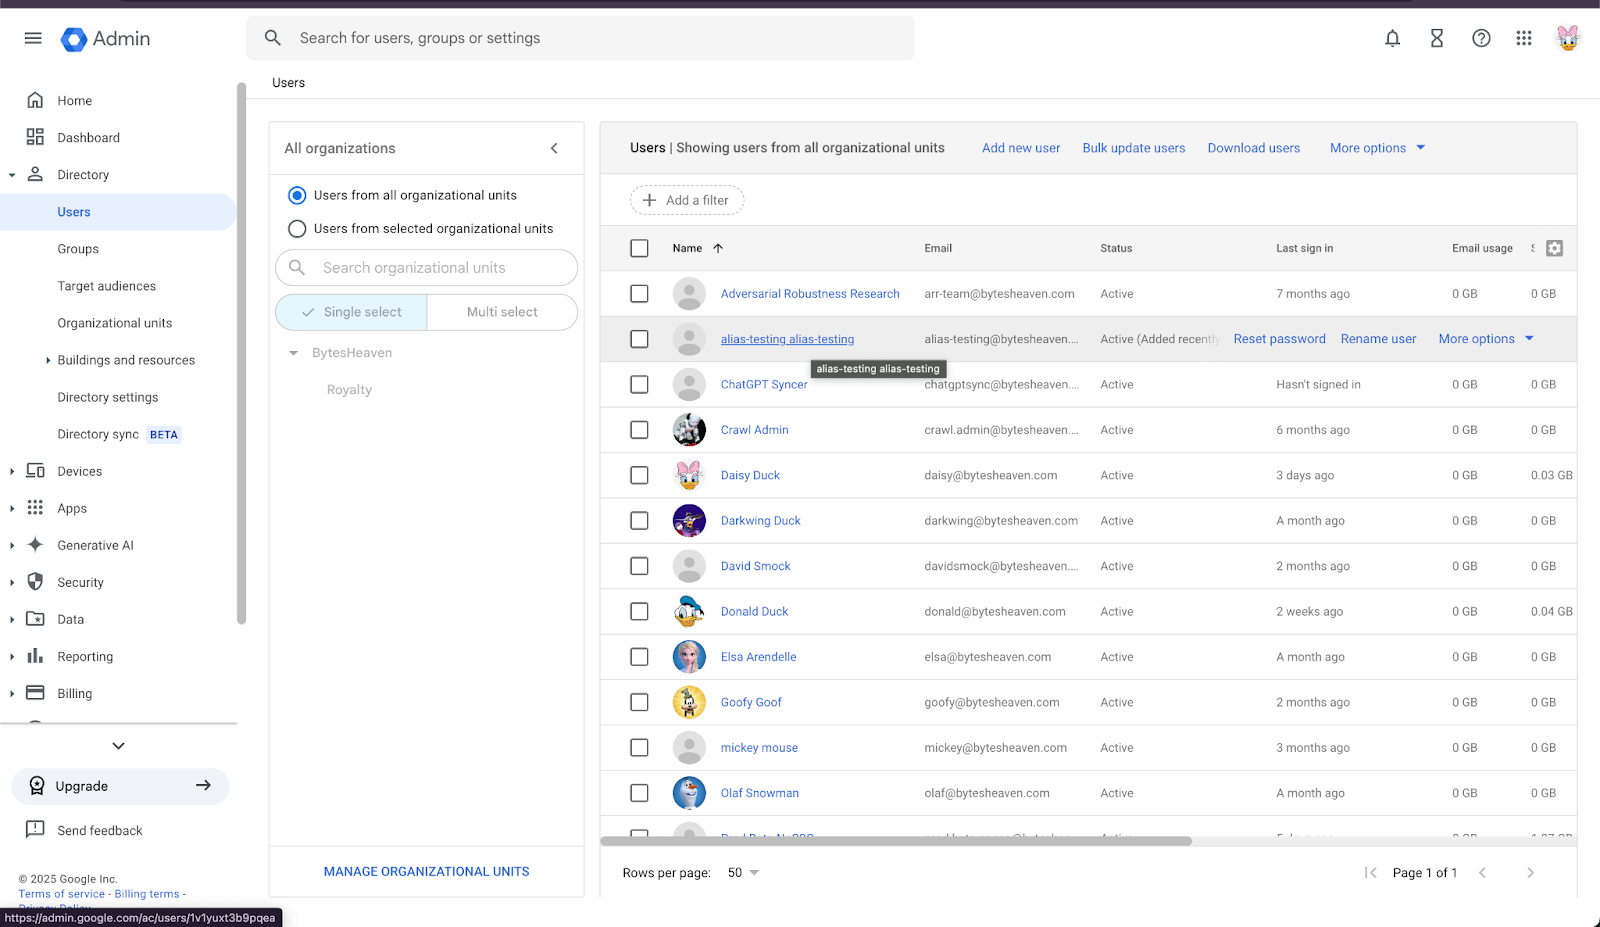
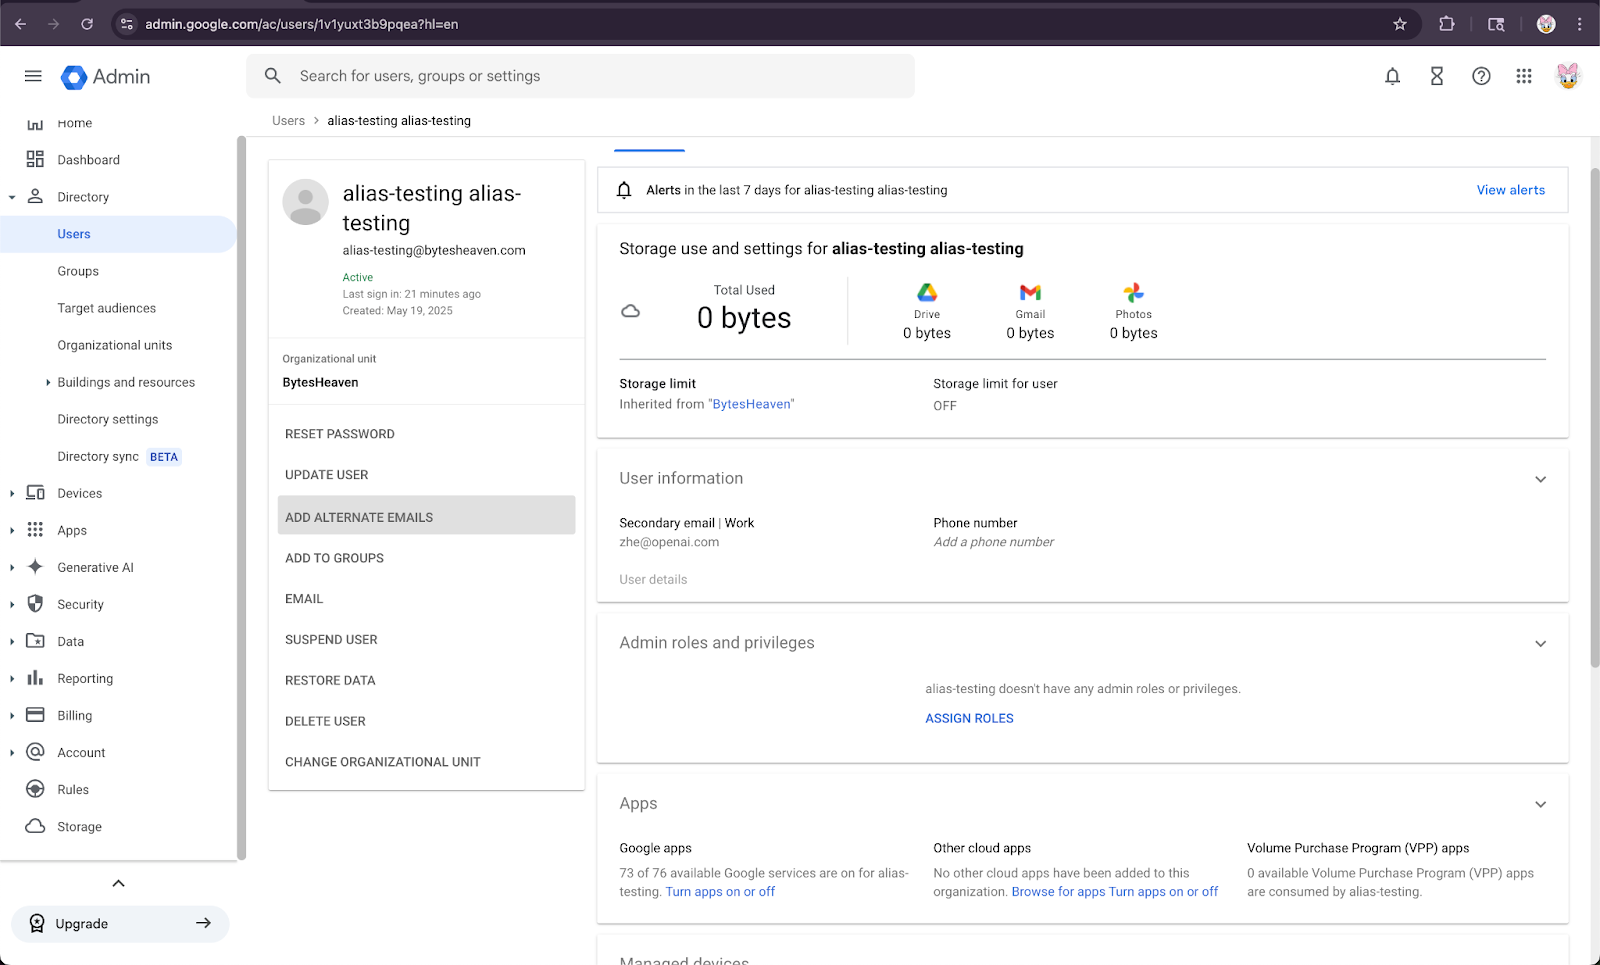
2. کسی صارف کو منتخب کریں، پھر “ADD ALTERNATIVE EMAILS”۔
3. ایک Alternative Email شامل کریں۔ یقینی بنائیں کہ یہ صارف کے ChatGPT اکاؤنٹ سے مطابقت رکھتی ہو۔
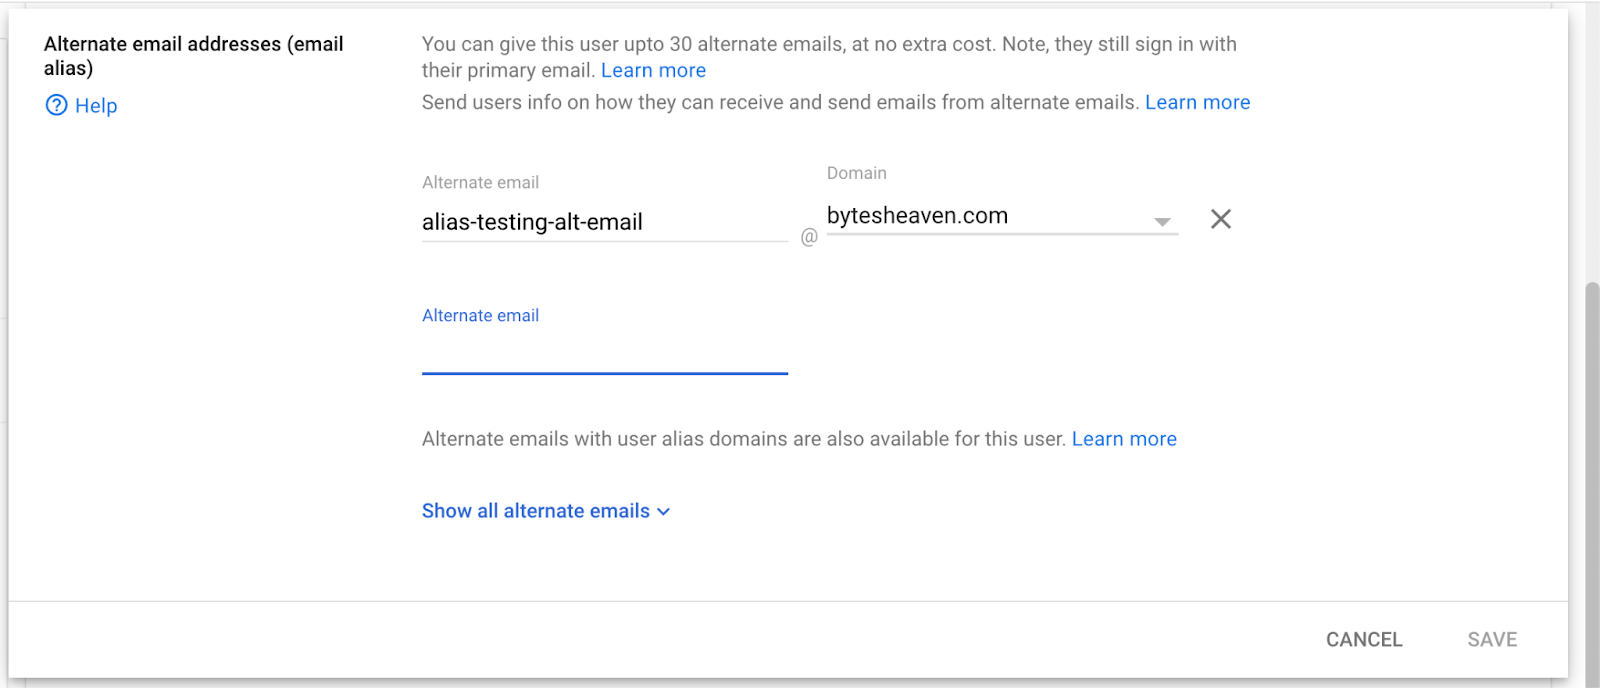
4. Save منتخب کریں
معلوم حدود
ذاتی ای میل ایڈریس سپورٹ نہیں ہوتے
جو صارفین ذاتی ایڈریسز (مثلاً example@gmail.com) استعمال کر کے ChatGPT کے لیے رجسٹر کرتے ہیں، وہ Google Workspace سے connect نہیں کر سکتے۔ یہ setup سپورٹڈ نہیں ہے اور سیکیورٹی خطرہ بھی پیدا کرتا ہے، کیونکہ اس سے تنظیم کے باہر سے اندرونی ڈیٹا تک رسائی ممکن ہو جاتی ہے۔
Gmail "+" aliases سپورٹ نہیں ہوتے
Gmail صارفین کو اپنے ایڈریس میں "+" شامل کر کے aliases بنانے کی اجازت دیتا ہے (مثلاً user+alias@gmail.com)۔ اس قسم کی aliasing Google Drive synced connectors کے ساتھ کام نہیں کرتی۔ alias کو Google Workspace میں واضح طور پر configure کرنا ضروری ہے۔
عام Error Message
اگر ای میل ایڈریس درست طریقے سے لنک نہ ہوں، تو صارفین کو یہ پیغام مل سکتا ہے: "ہم آپ کے account کو Google Drive سے connect نہیں کر سکے۔ مزید جاننے کے لیے کلک کریں."
اگر صارفین کو یہ پیغام ملے، تو اس دستاویز میں دیے گئے مراحل کا جائزہ لیں اور یقینی بنائیں کہ ان پر درست طریقے سے عمل کیا گیا ہے۔ اگر مزید مدد درکار ہو، تو براہ کرم ہماری سپورٹ ٹیم سے رابطہ کریں۔