
એડમિન-મેનેજ્ડ સેટઅપનો ઉપયોગ કરીને તમારા Google Workspaceને ChatGPT સાથે કનેક્ટ કરવા માટે, તમે પહેલા Googleના એડમિન કન્સોલ્સમાં ઍક્સેસ કન્ફિગર કરશો:
Google Drive, વપરાશકર્તાઓ અને જૂથો માટે ફક્ત વાંચવાની ઍક્સેસ સાથે સર્વિસ એકાઉન્ટ બનાવો.
આ સર્વિસ એકાઉન્ટ તમારા ChatGPT વર્કસ્પેસ સાથે સંકળાયેલા તે જ Google એકાઉન્ટ હેઠળ બનાવવાની મજબૂત ભલામણ છે. જો ChatGPT વર્કસ્પેસમાંના એકાઉન્ટ્સનો ઇમેઇલ ડોમેન Google Workspaceમાં વપરાતા ડોમેનથી અલગ હોય, તો તમારા વપરાશકર્તાઓ માટે આ કનેક્ટર સક્ષમ કરવા માટે તમારે વધારાના પગલાં અનુસરવા પડશે.
સર્વિસ એકાઉન્ટ જેના વતી કાર્ય કરશે તે એડમિન એકાઉન્ટ બનાવો.
પછી, ChatGPT એડમિન કન્સોલમાં સેટઅપ પૂર્ણ કરો:
સર્વિસ એકાઉન્ટની ખાનગી કી અપલોડ કરો (Googleની JSON ફાઇલ)
એડમિન એકાઉન્ટ નિર્દિષ્ટ કરો (ક્રેડેન્શિયલ્સ જરૂરી નથી).
કઈ ફાઇલો સિંક કરવી તે પસંદ કરો અને કનેક્શનની ઍક્સેસ ધરાવતા વપરાશકર્તાઓ પસંદ કરો.
આ માર્ગદર્શિકા આ 6 પગલાંમાંથી દરેક સમજાવે છે.
સર્વિસ એકાઉન્ટ સેટઅપ કરવું
console.cloud.google.com પર જાઓ.
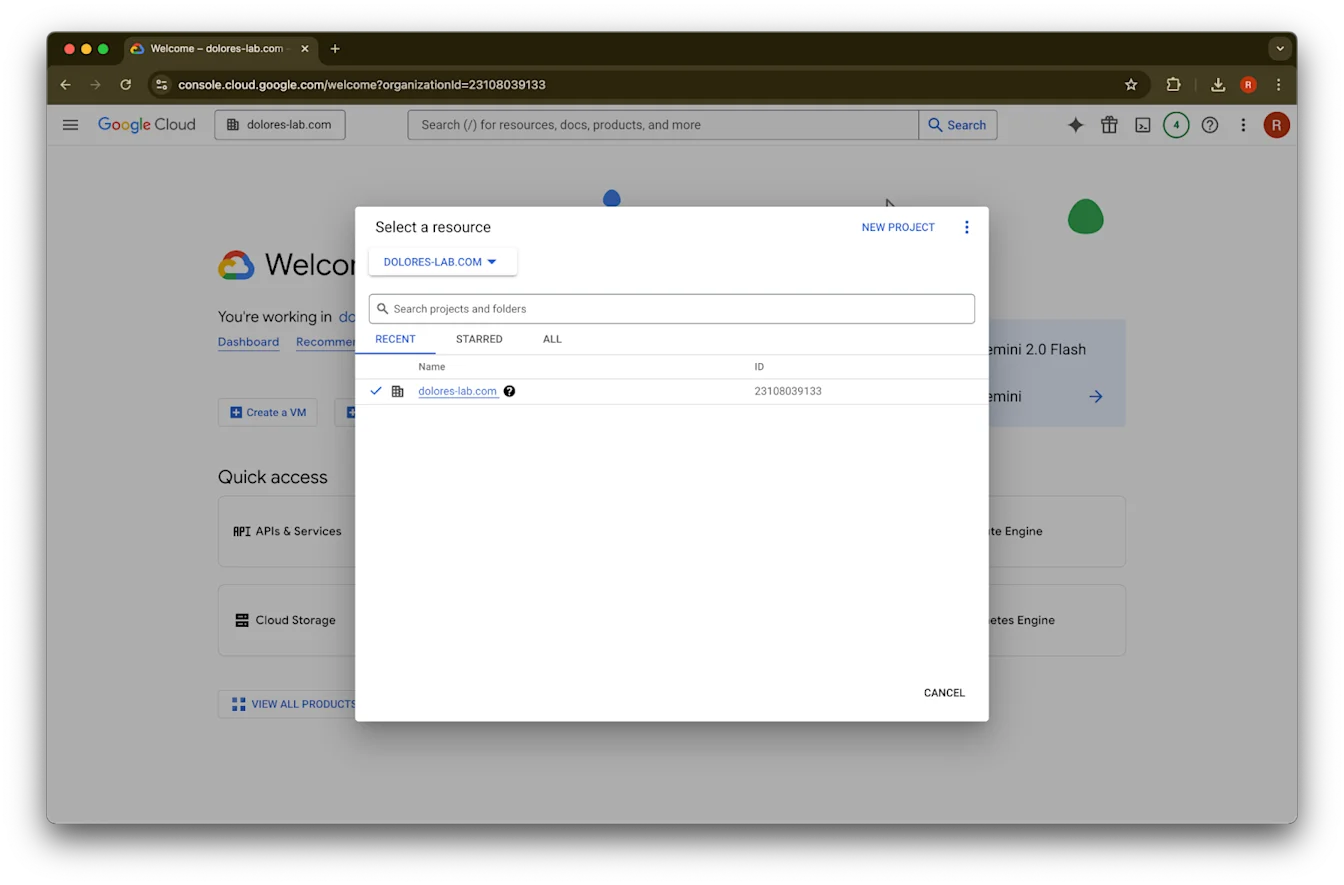
પ્રોજેક્ટ્સ ડ્રોપડાઉન પર ક્લિક કરો.છબીખાતરી કરો કે તમે તમારા ChatGPT વર્કસ્પેસ સાથે સંકળાયેલ Google workspaceમાં જ લૉગ ઇન છો (જો તમારા ChatGPT વર્કસ્પેસ સાથે કોઈ Google workspace સંકળાયેલ નથી અને બંને વચ્ચે અલગ ઇમેઇલ્સ છે, તો તમારે વધારાના પગલાં અનુસરવા પડશે, નહીં તો તમારા વપરાશકર્તાઓ Google Drive સિંક કરેલા કનેક્ટર્સનો ઉપયોગ કરી શકશે નહીં).
નવો પ્રોજેક્ટ પસંદ કરો
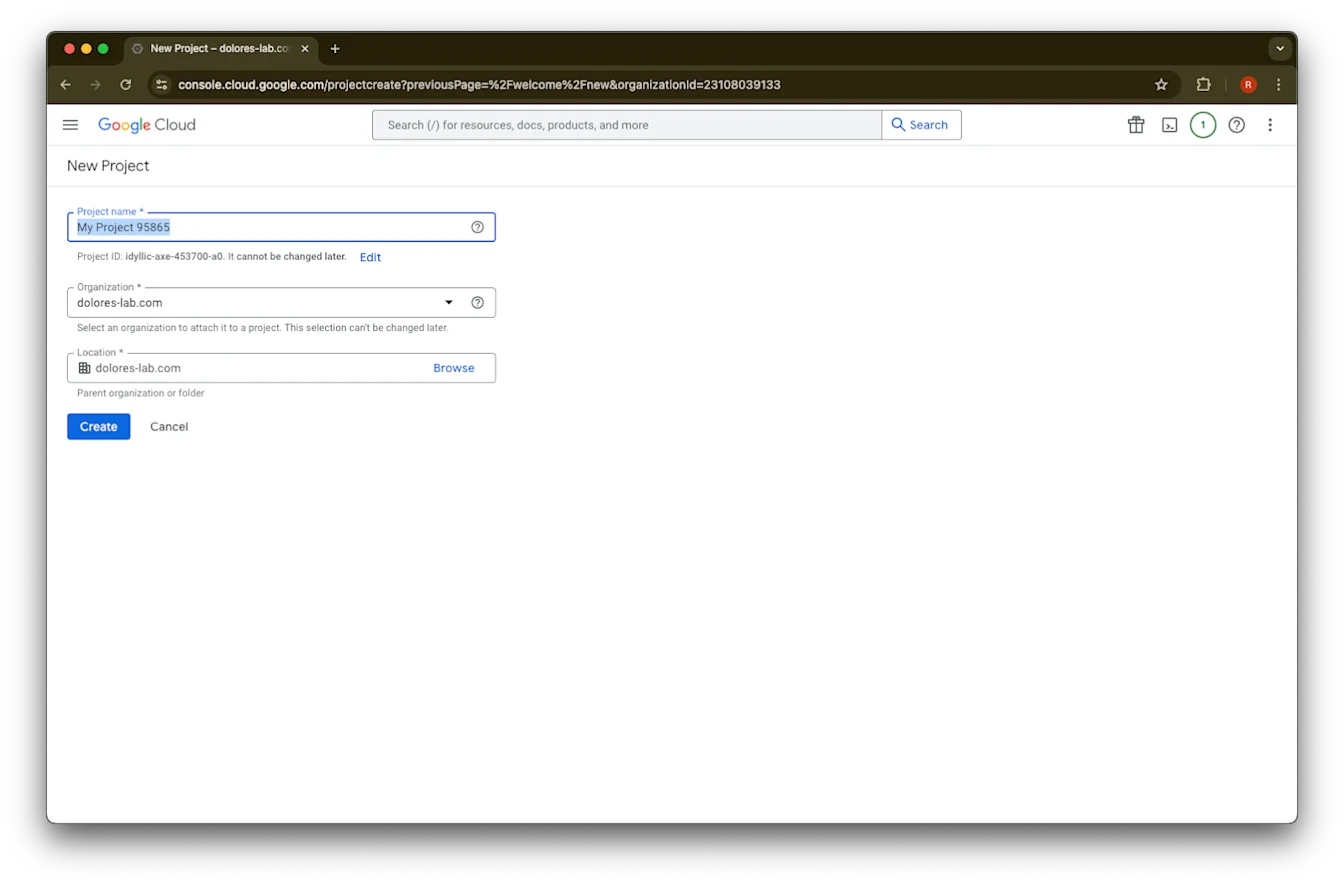
પ્રોજેક્ટનું નામ દાખલ કરો
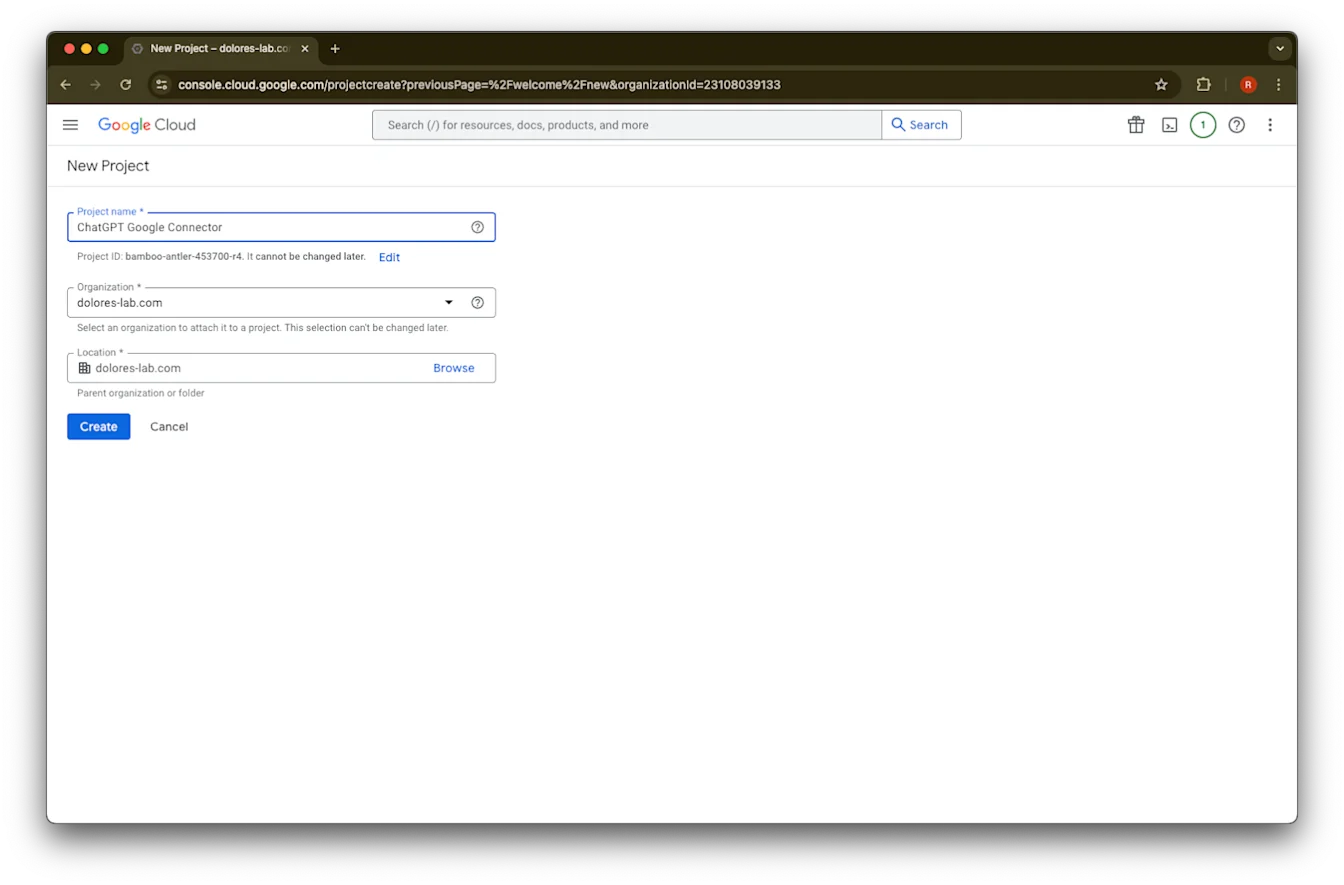
પ્રોજેક્ટ બનાવો
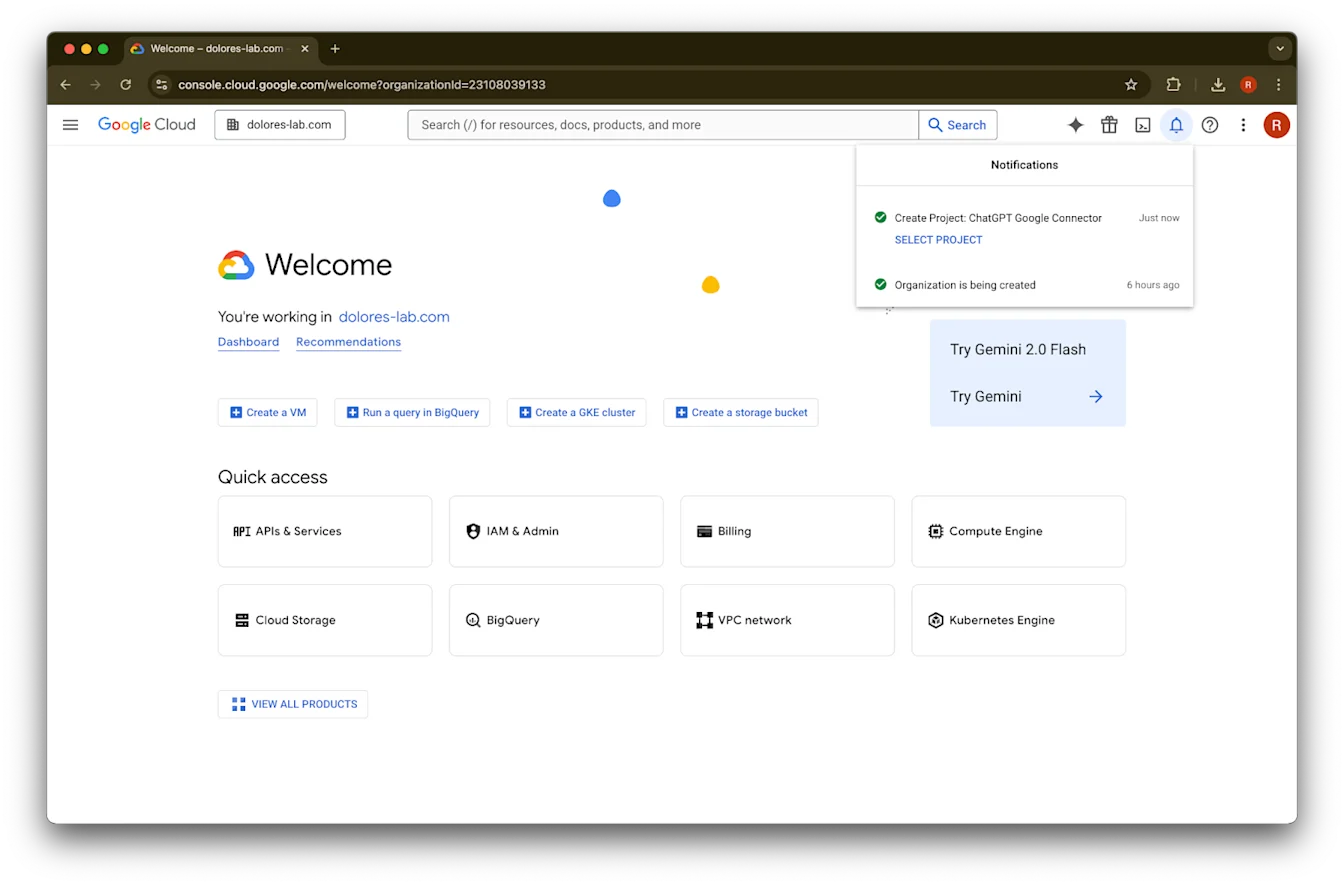
પ્રોજેક્ટ બની જાય ત્યાં સુધી રાહ જુઓ, પછી પ્રોજેક્ટ પસંદ કરો પર ક્લિક કરો
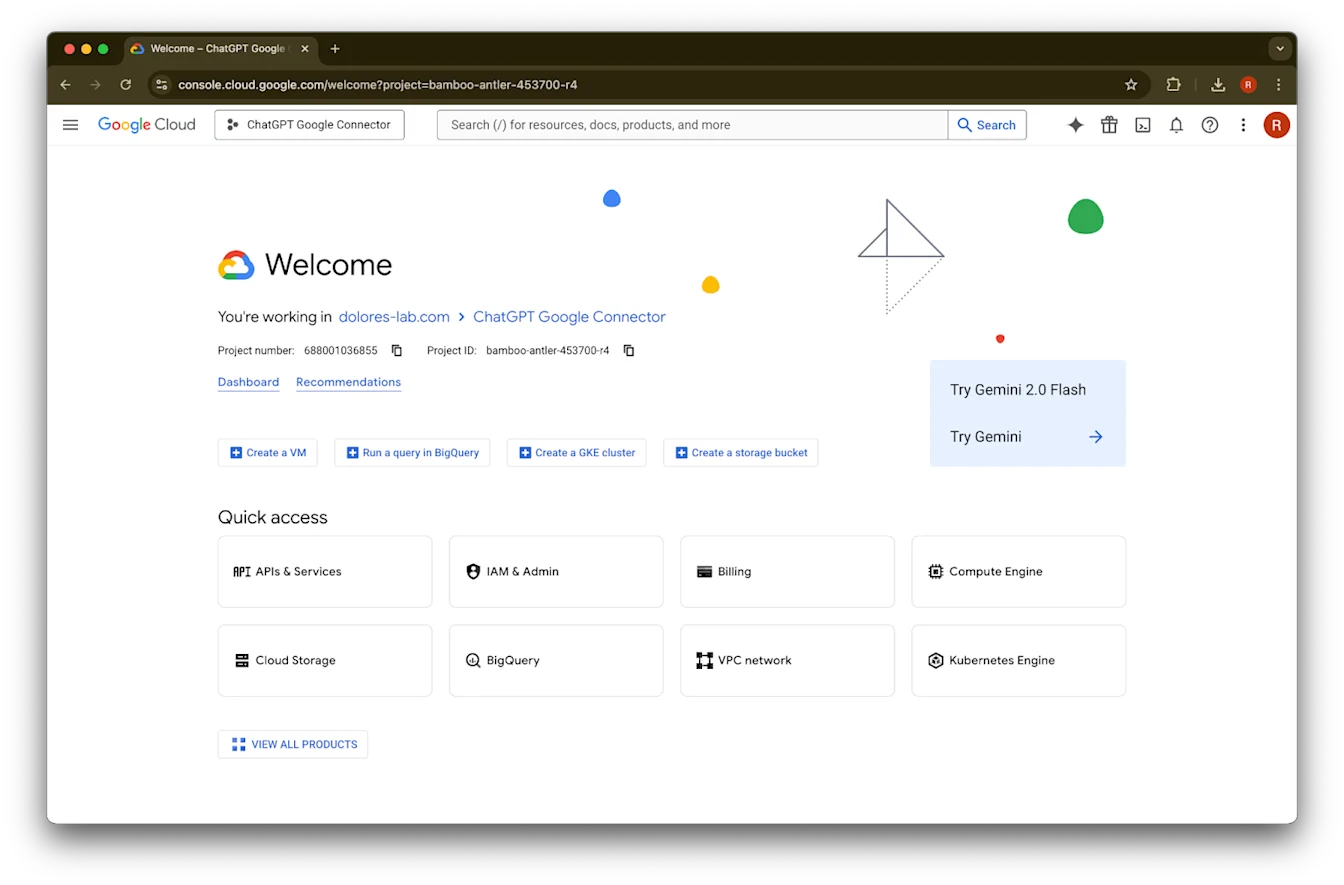
APIs અને સેવાઓ પર ક્લિક કરો
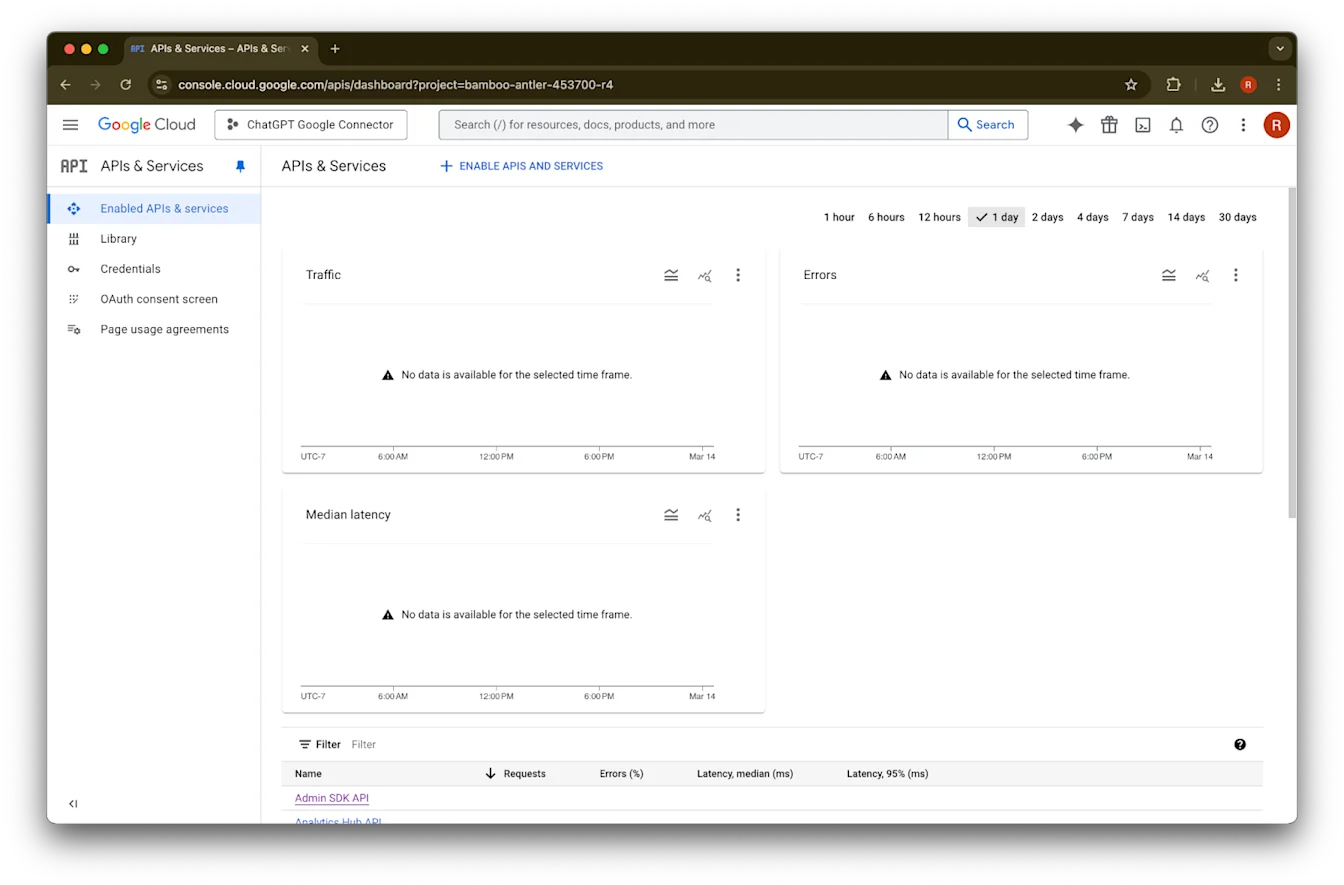
લાઇબ્રેરી પર ક્લિક કરો
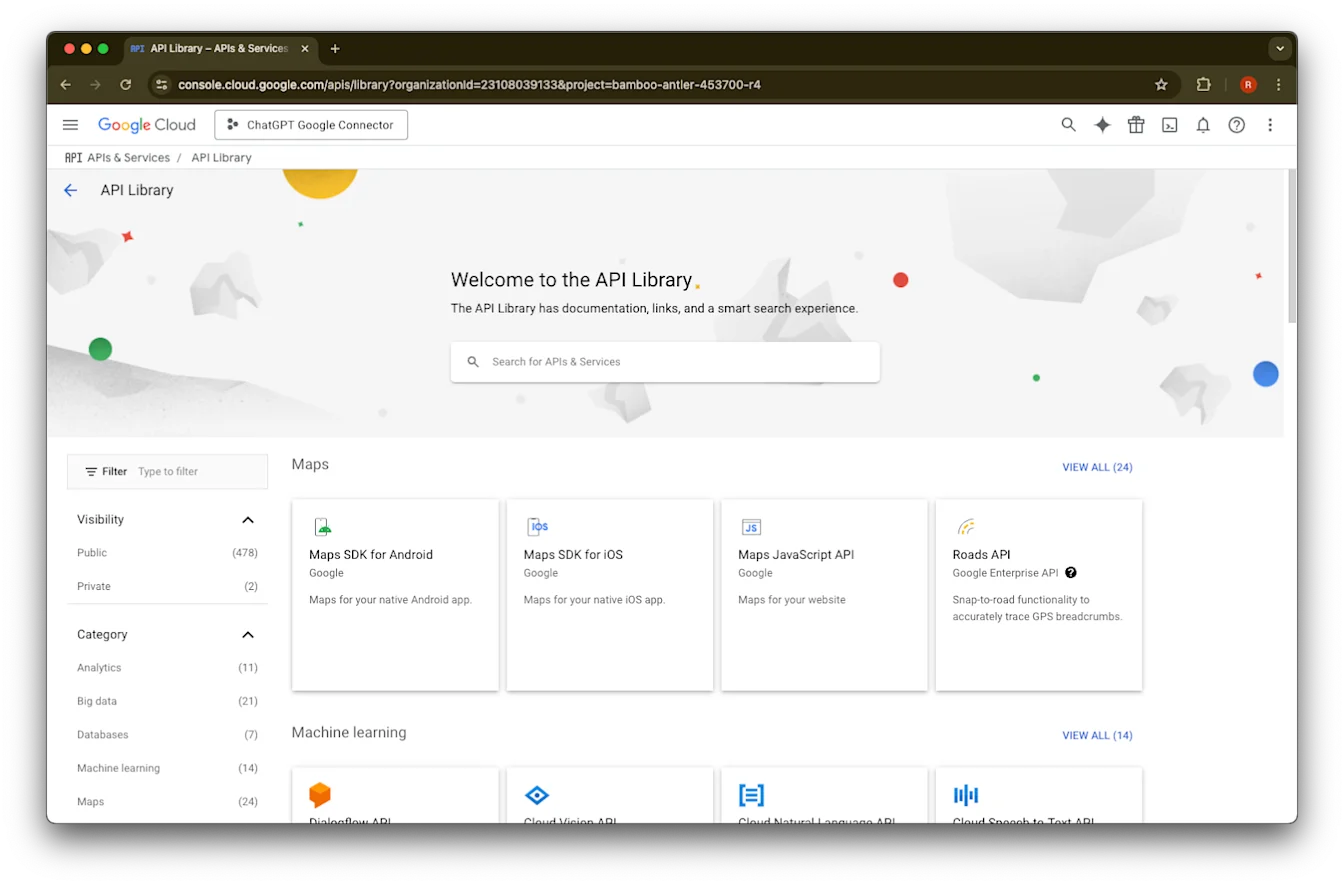
હવે અમે તેમને શોધવા માટે શોધ બોક્સનો ઉપયોગ કરીને ત્રણ APIs ઉમેરવાના છીએ
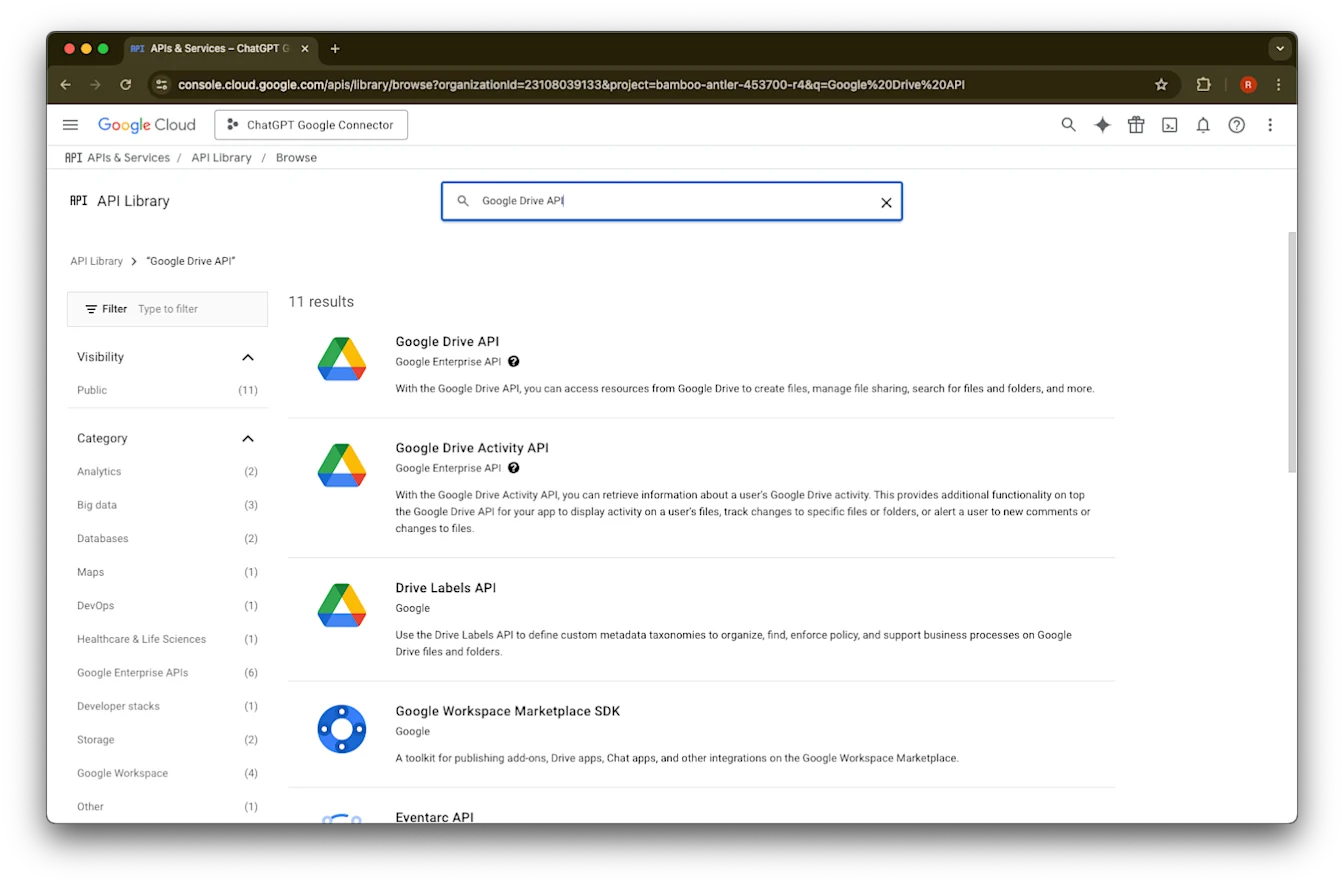
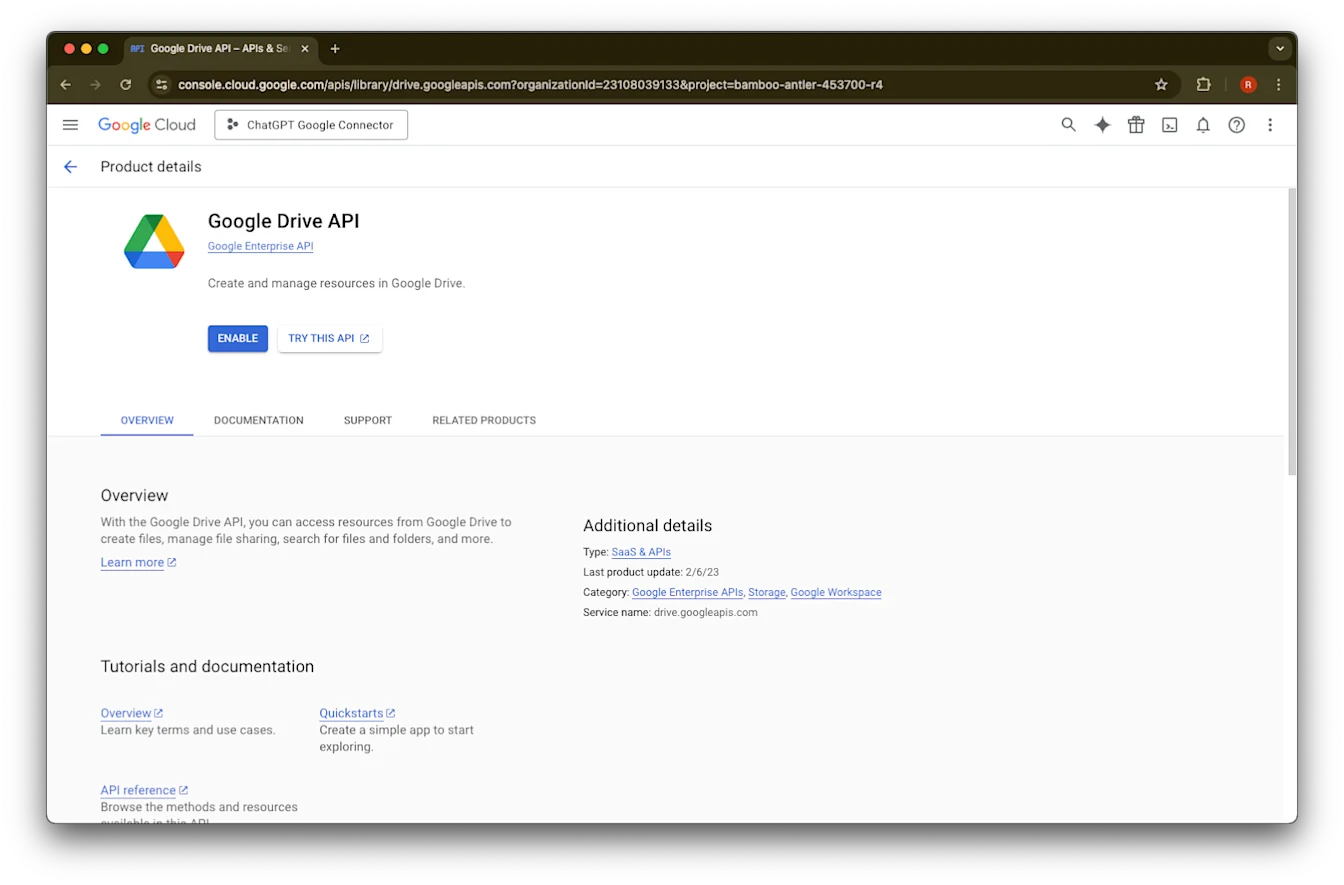
Google Drive API શોધો અને પસંદ કરો
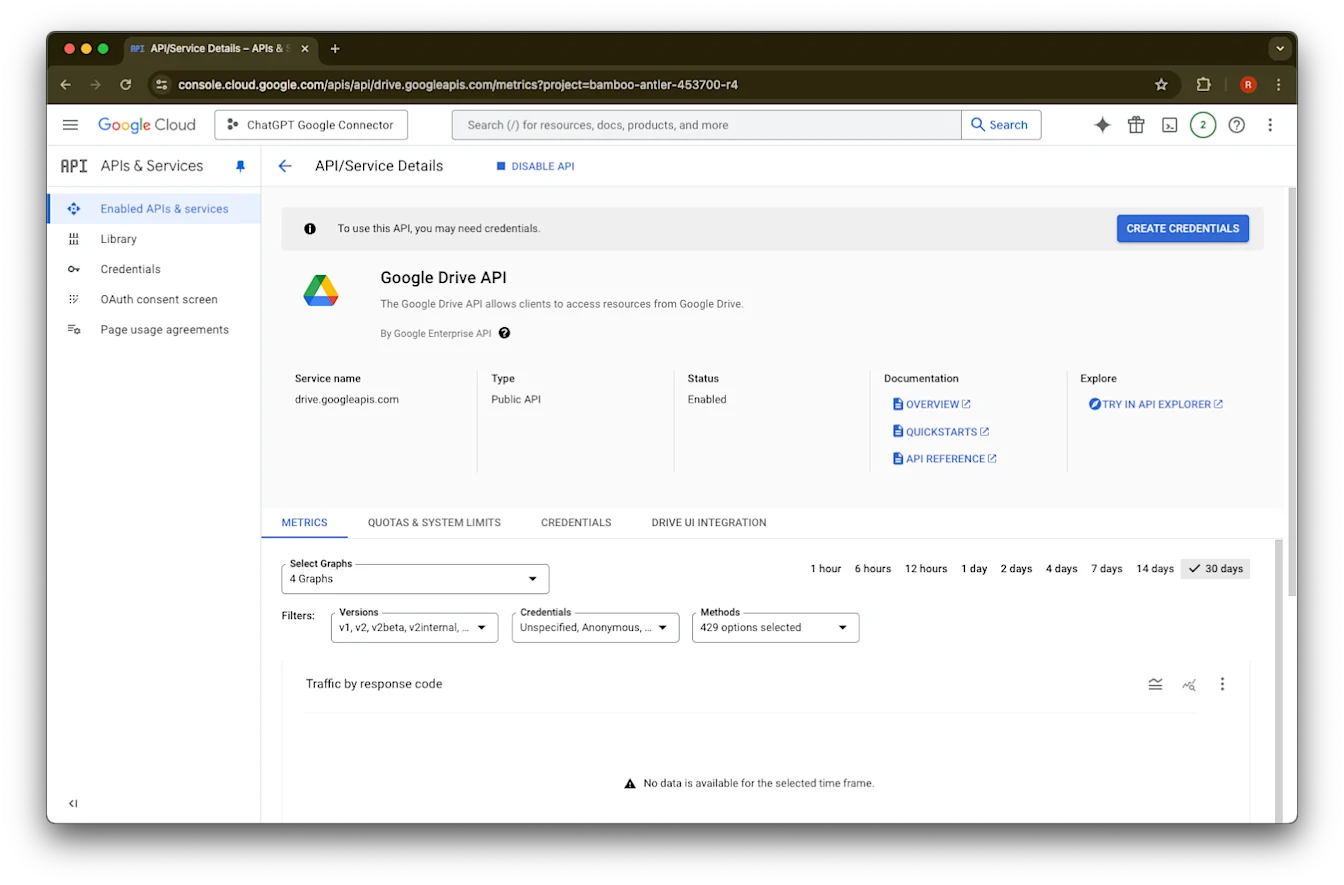
સક્ષમ કરો પર ક્લિક કરો
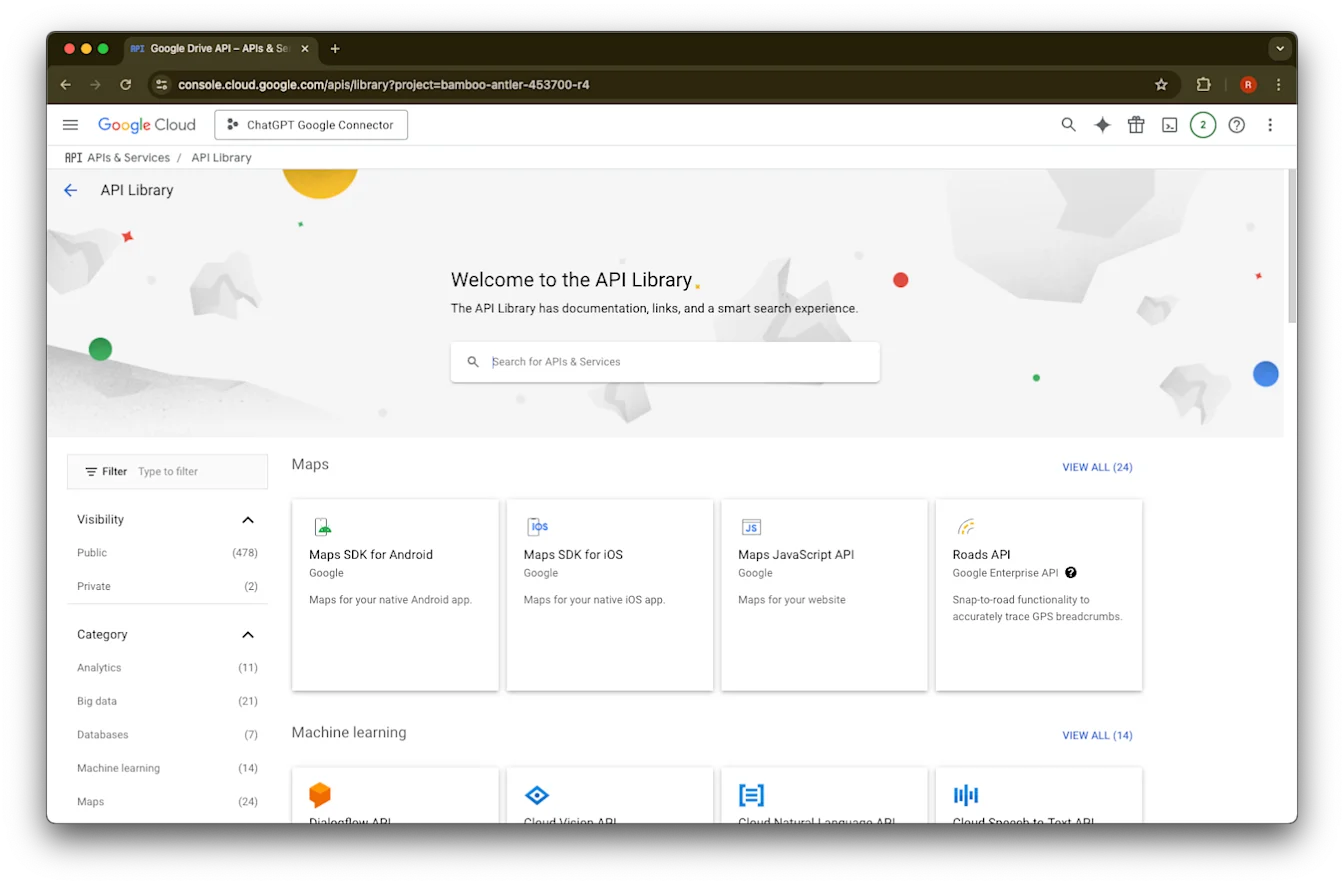
લાઇબ્રેરી પર ક્લિક કરો
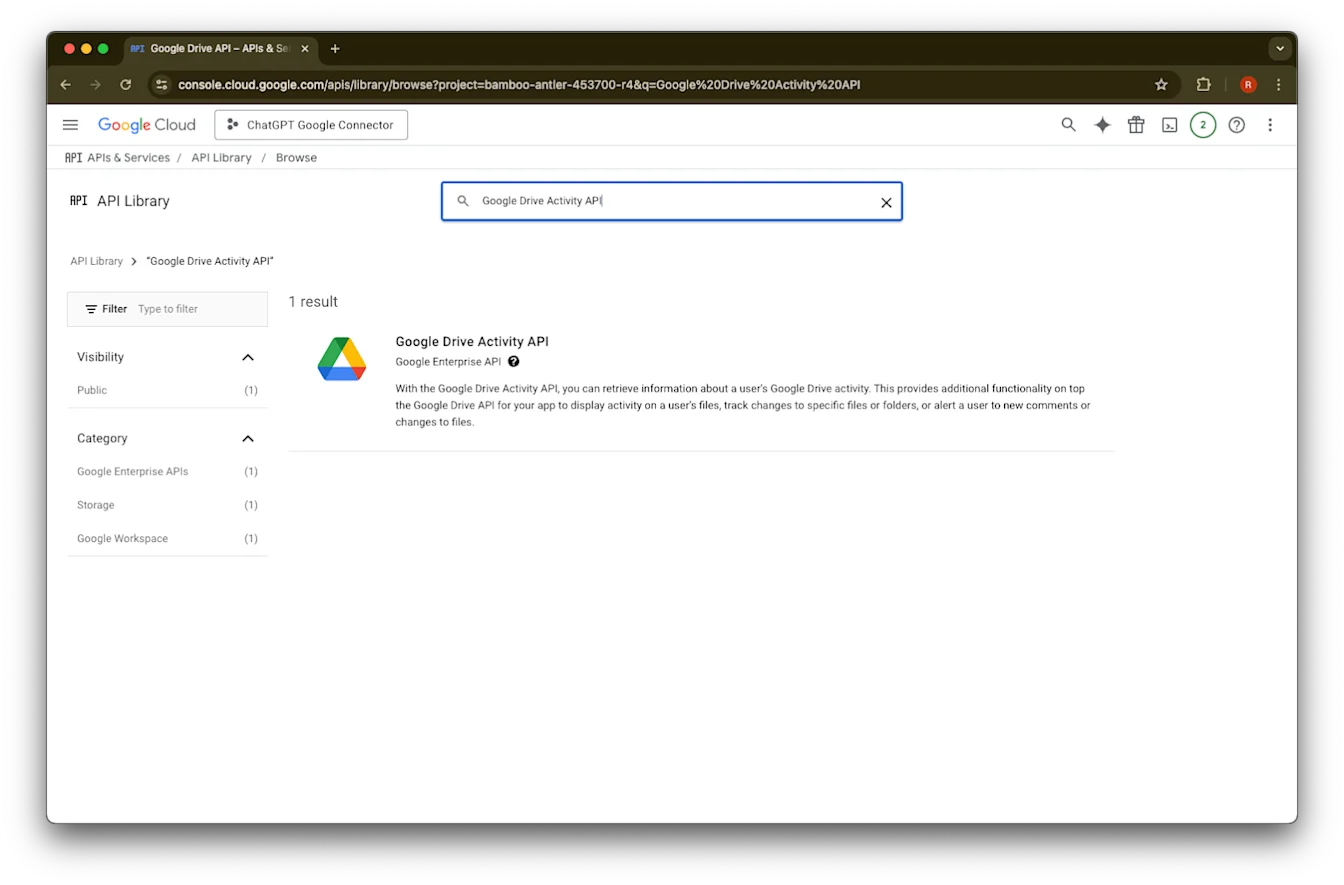
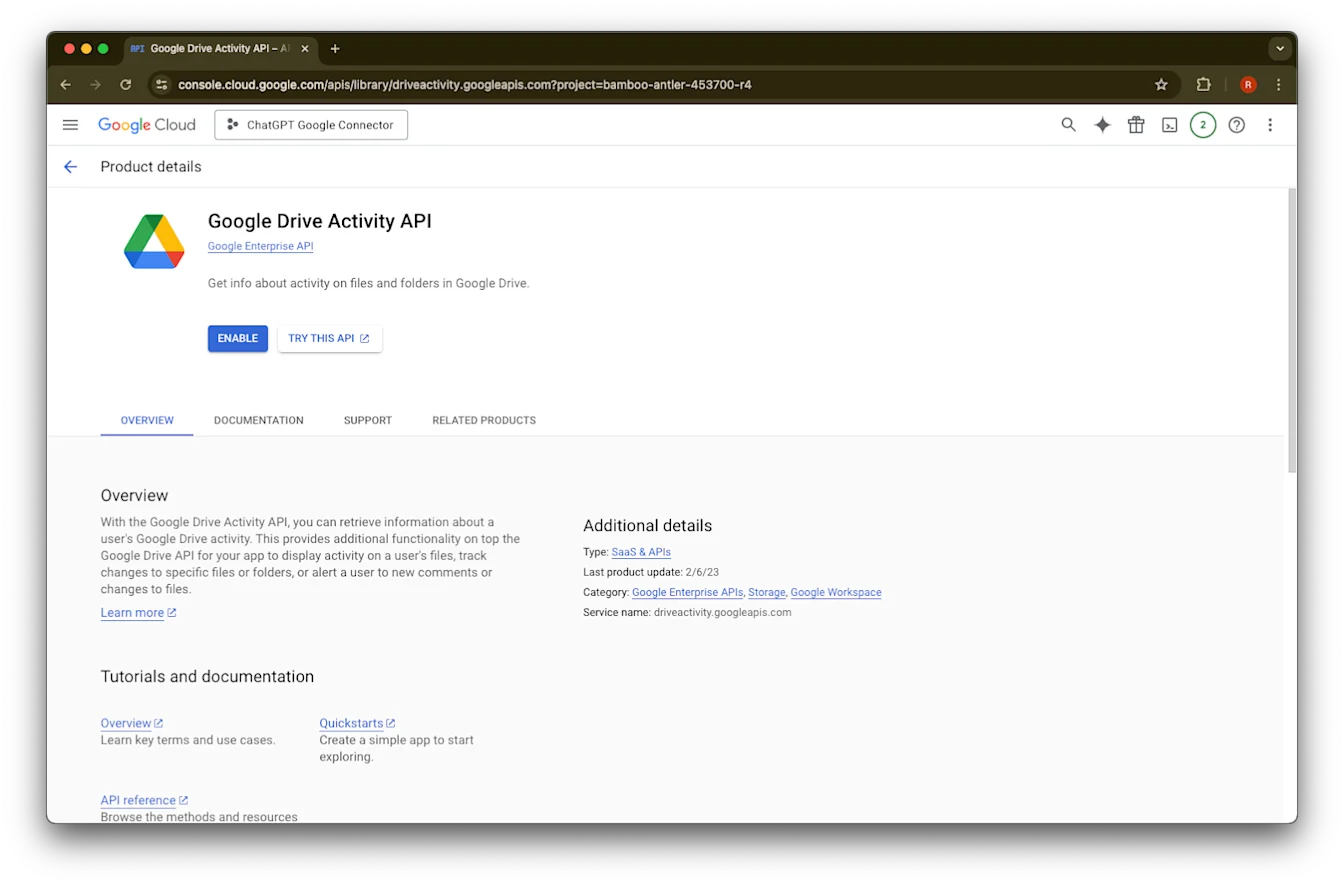
Google Drive Activity શોધો
Google Drive Activity API પસંદ કરો
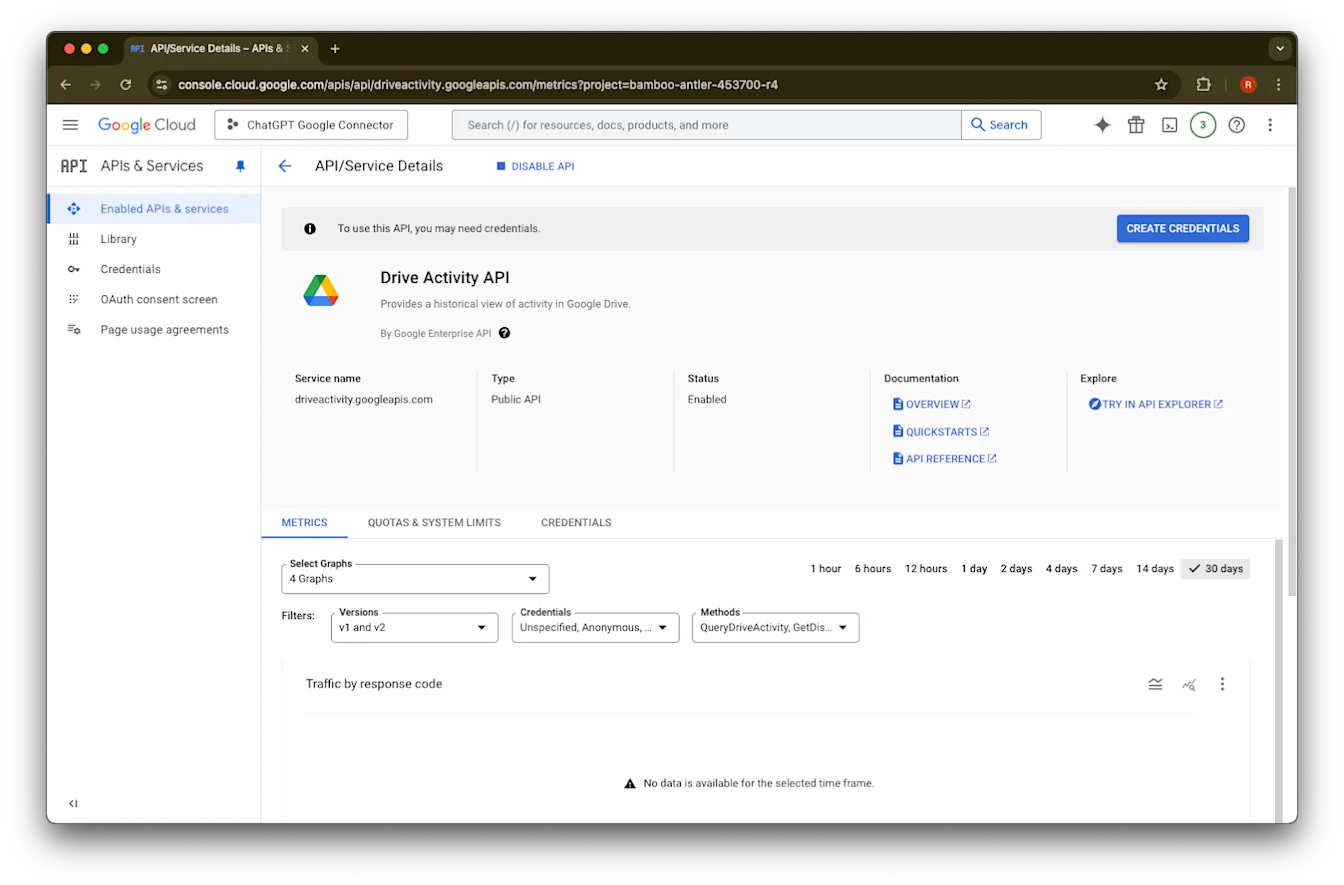
સક્ષમ કરો પર ક્લિક કરો
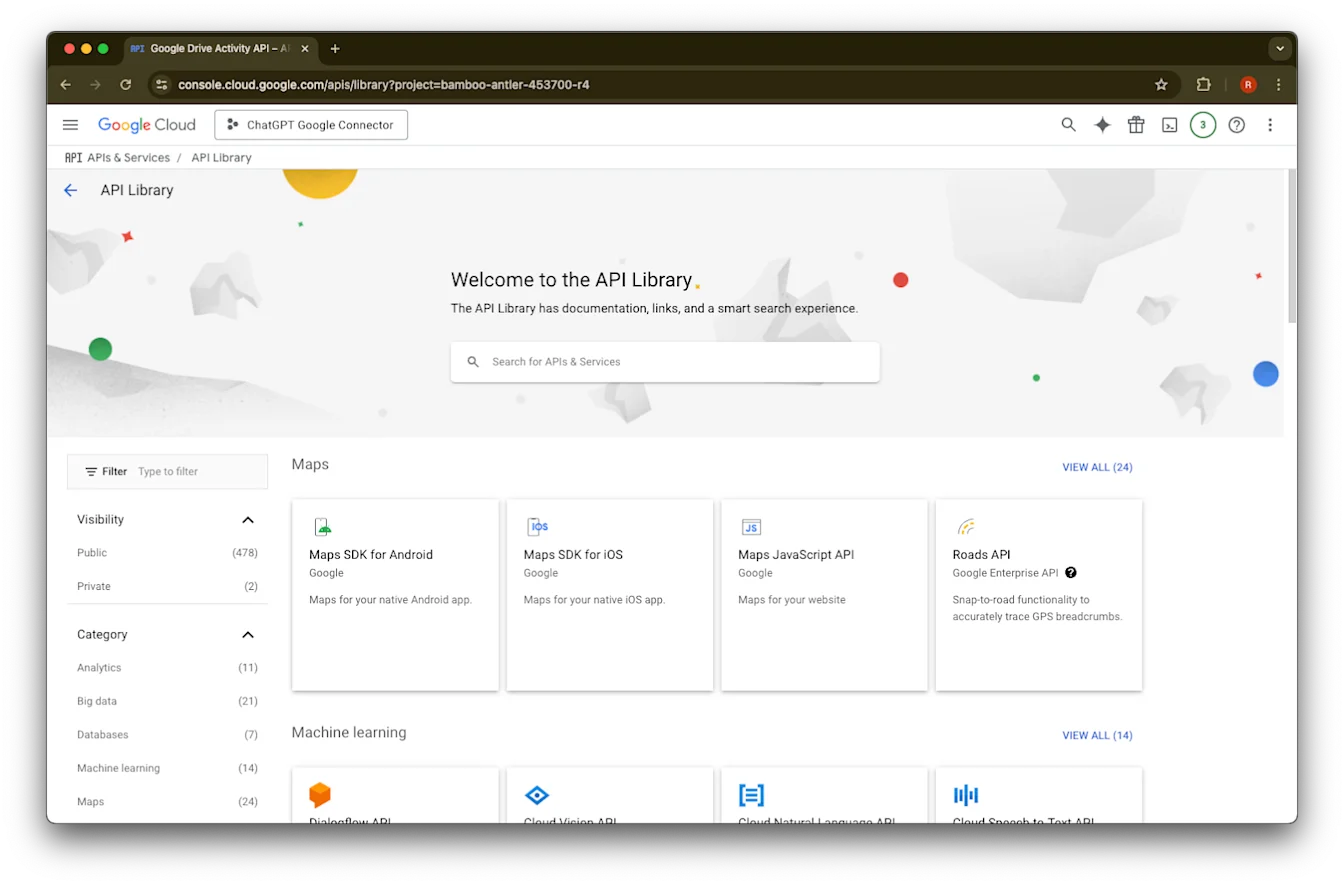
લાઇબ્રેરી પર ક્લિક કરો
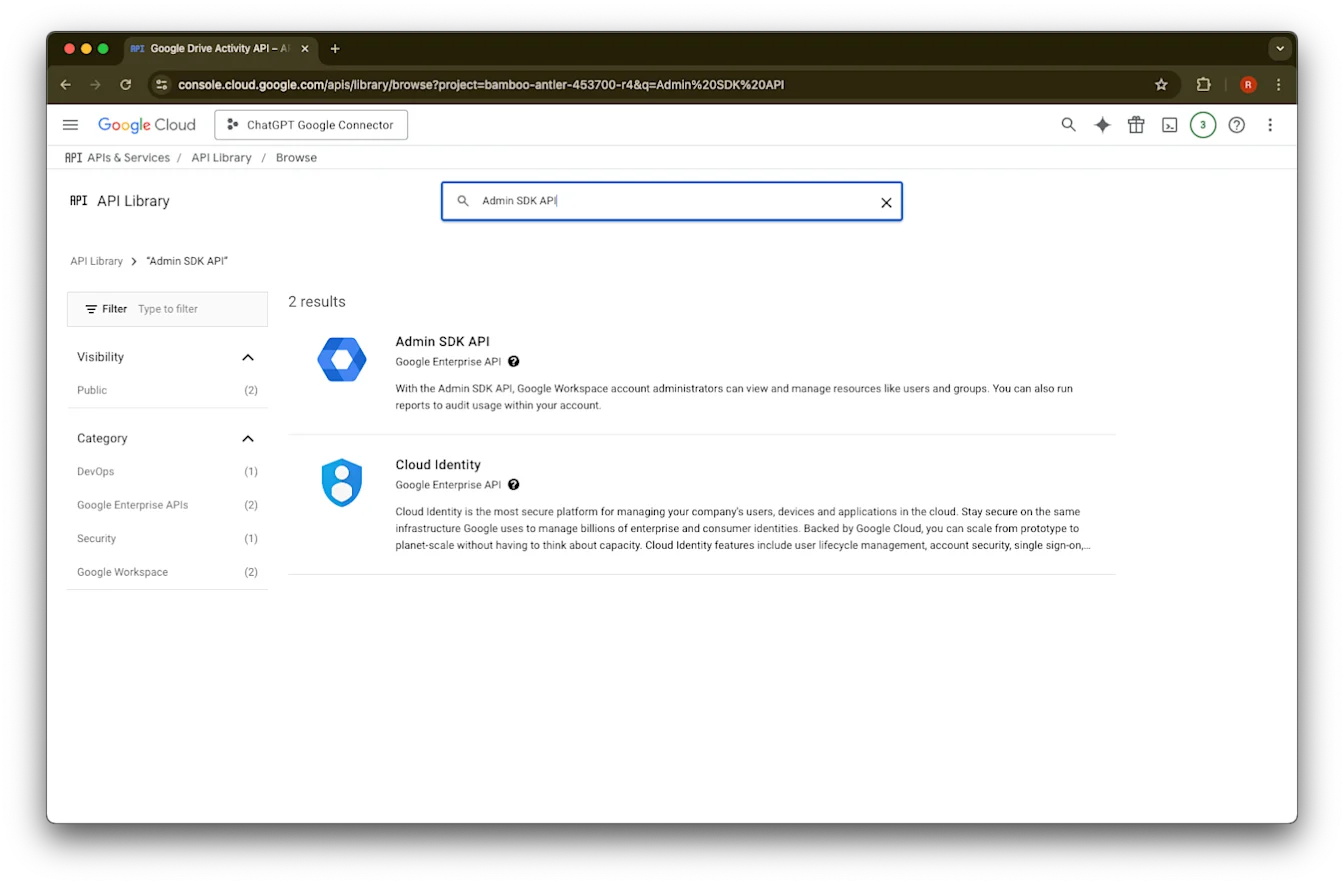
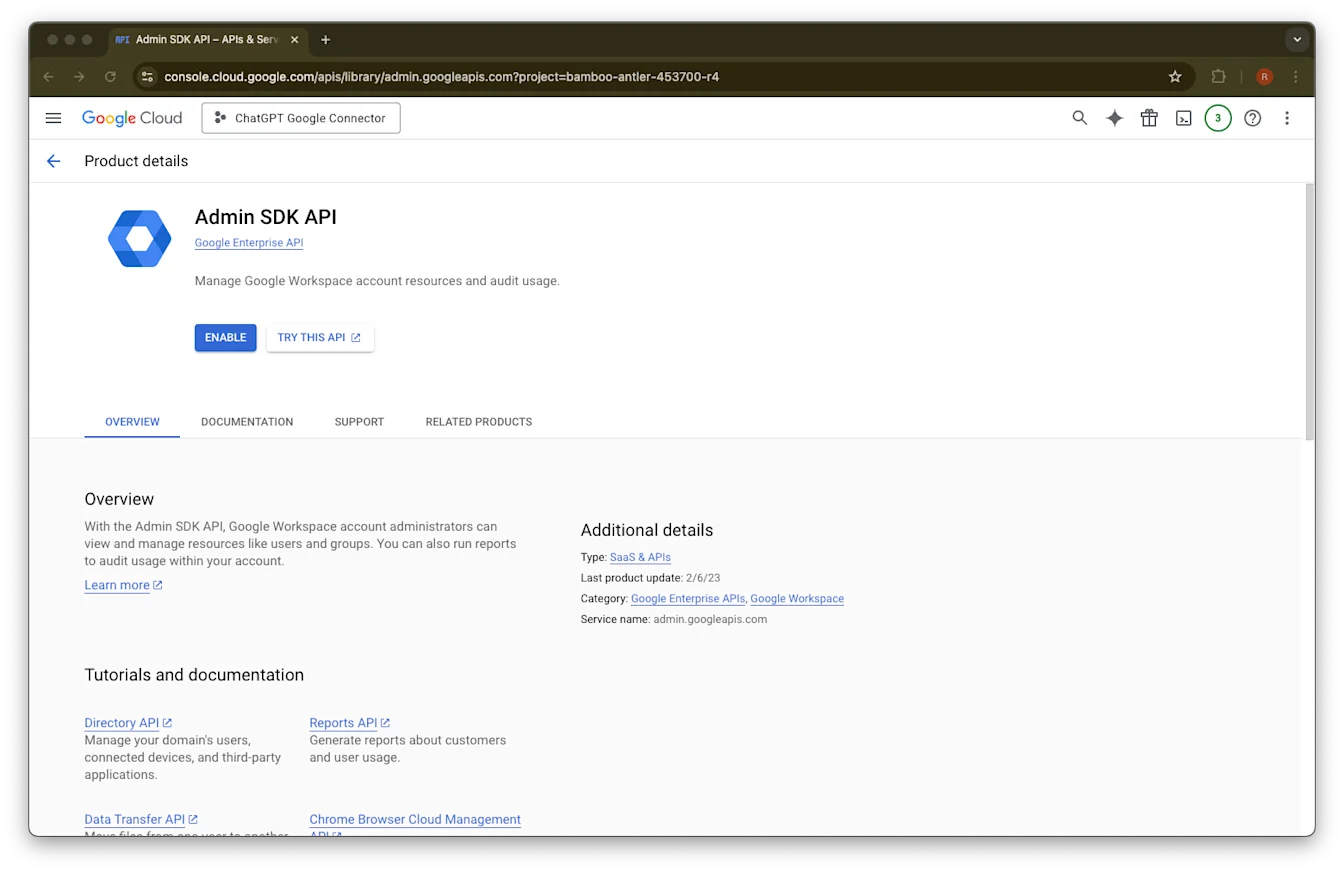
Admin SDK API શોધો
Admin SDK API પસંદ કરો
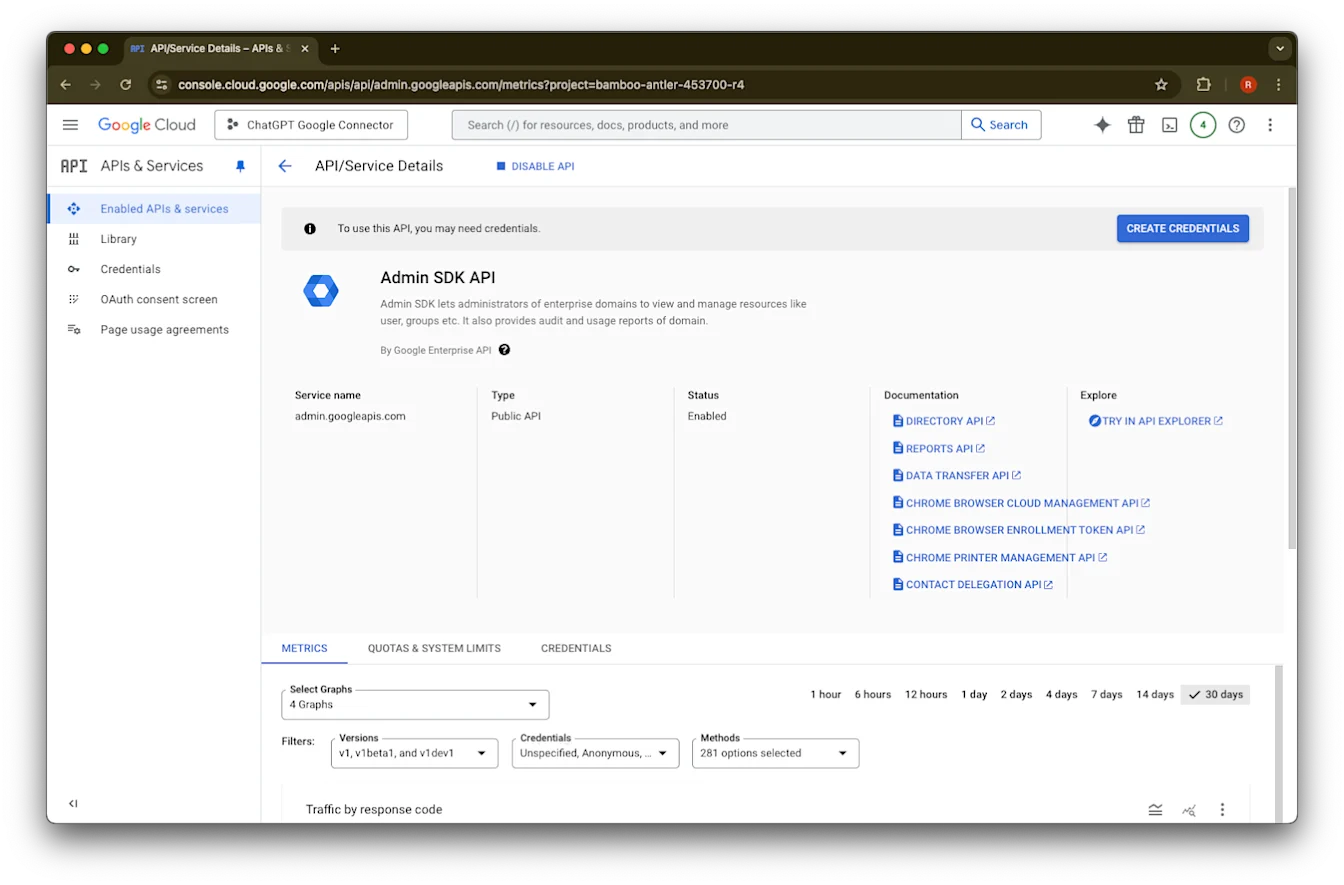
સક્ષમ કરો પર ક્લિક કરો
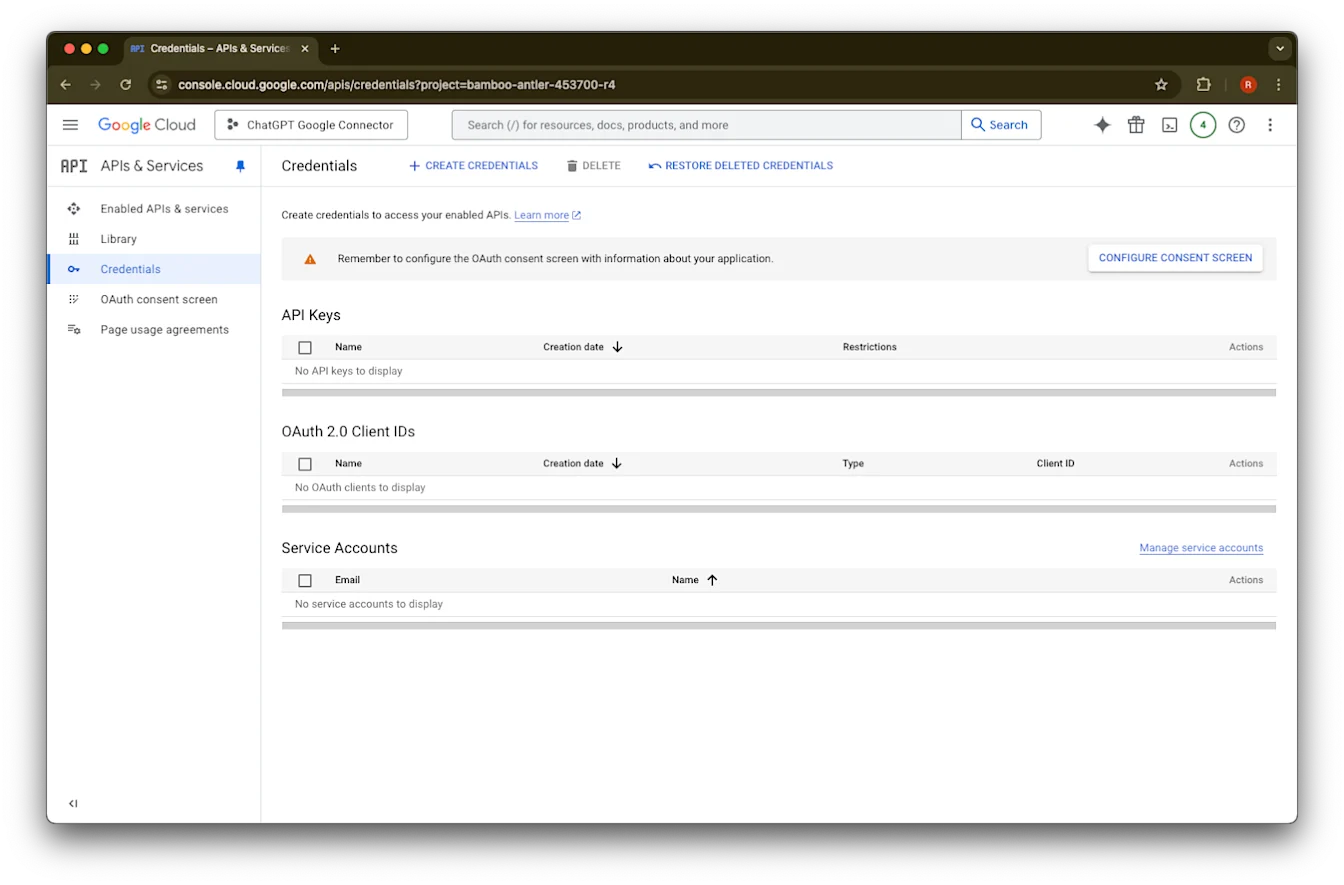
ક્રેડેન્શિયલ્સ પર ક્લિક કરો
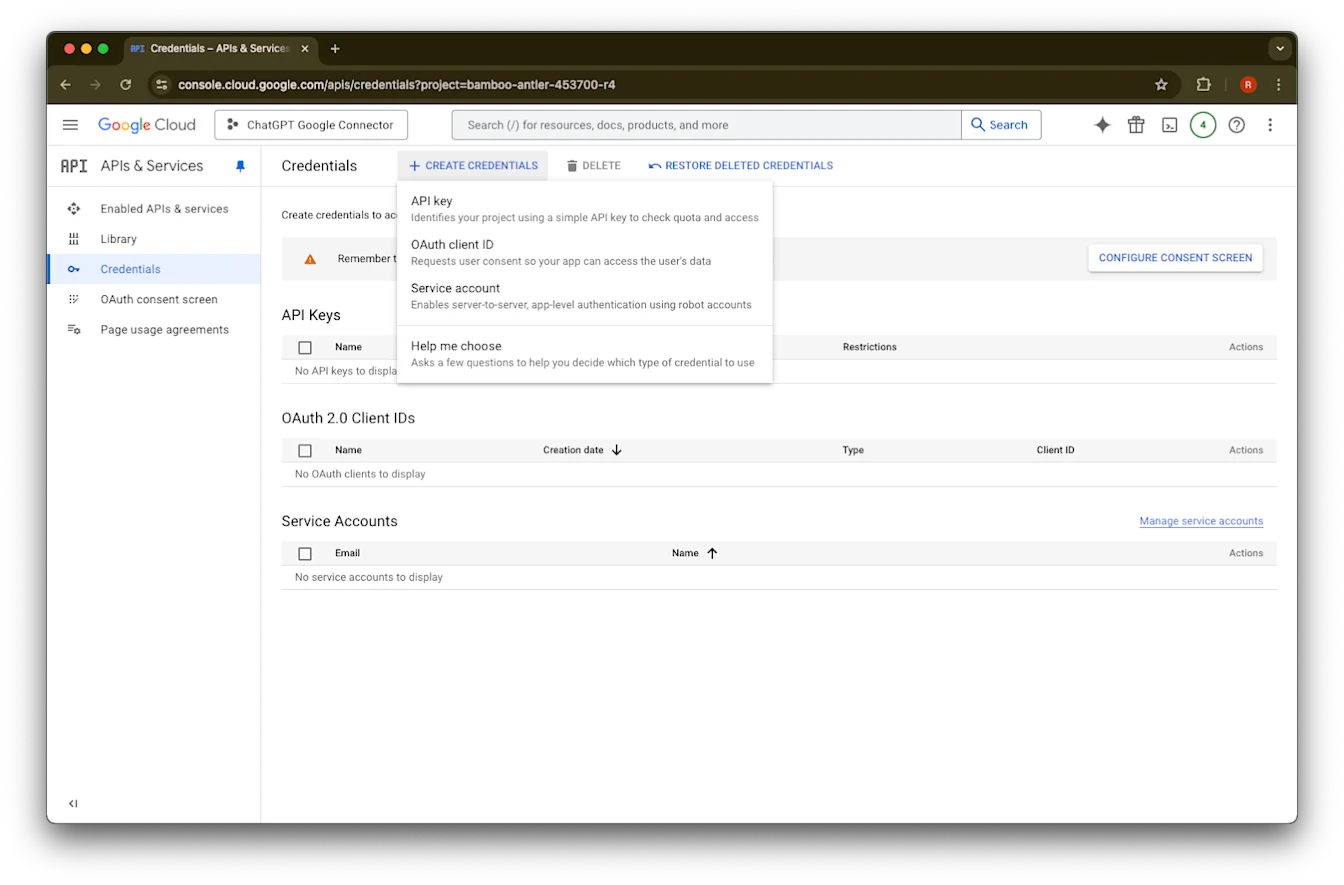
ક્રેડેન્શિયલ્સ બનાવો પર ક્લિક કરો
સર્વિસ એકાઉન્ટ પર ક્લિક કરો
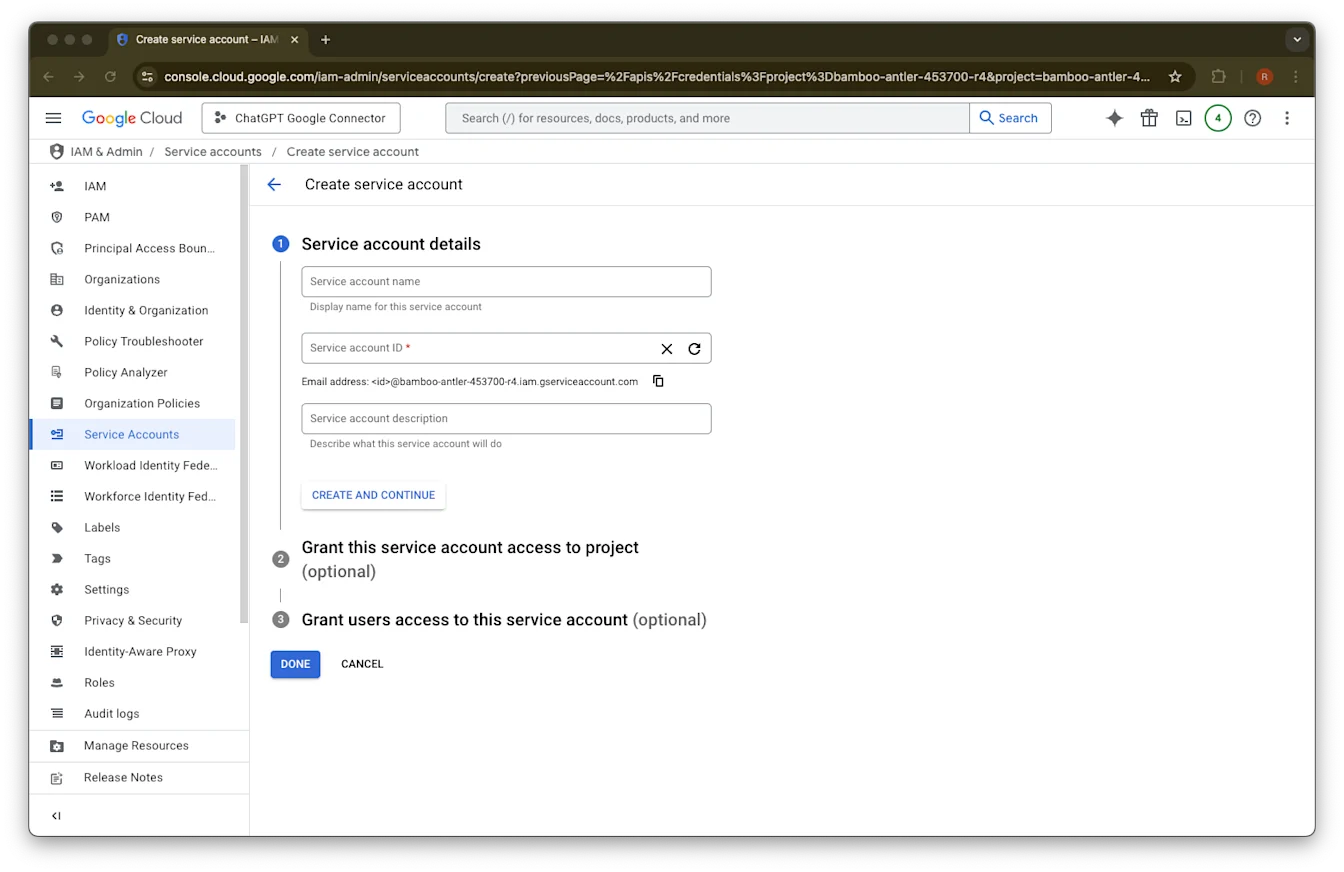
આ સર્વિસ એકાઉન્ટ માટે તમારી પસંદગીનું નામ અને વર્ણન આપો
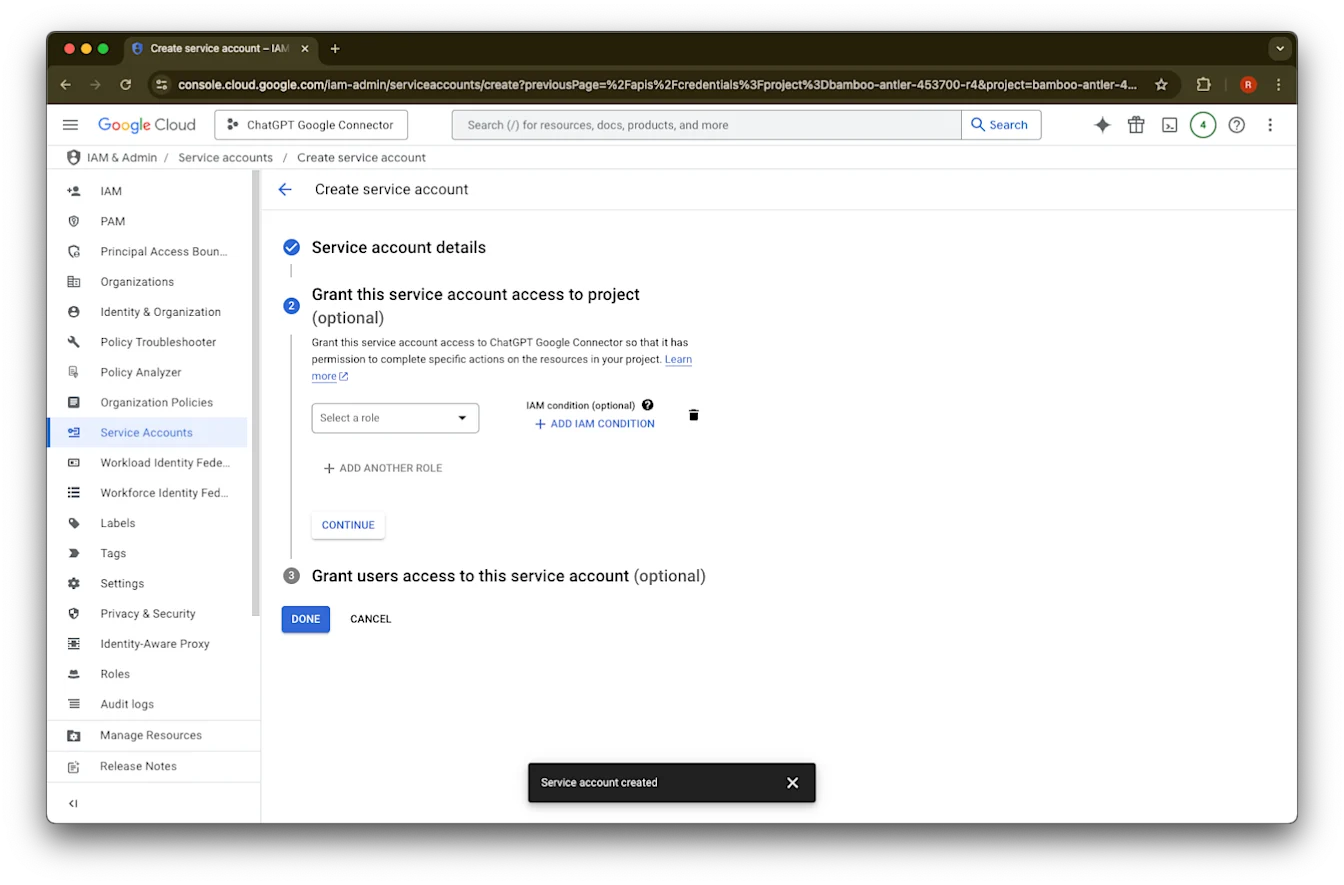
(વૈકલ્પિક) તમે ભૂમિકા અસાઇન કરી શકો છો - ChatGPT માટે આ જરૂરી નથી.
(વૈકલ્પિક) તમે સર્વિસ એકાઉન્ટને ઍક્સેસ આપી શકો છો - ChatGPT માટે આ જરૂરી નથી.
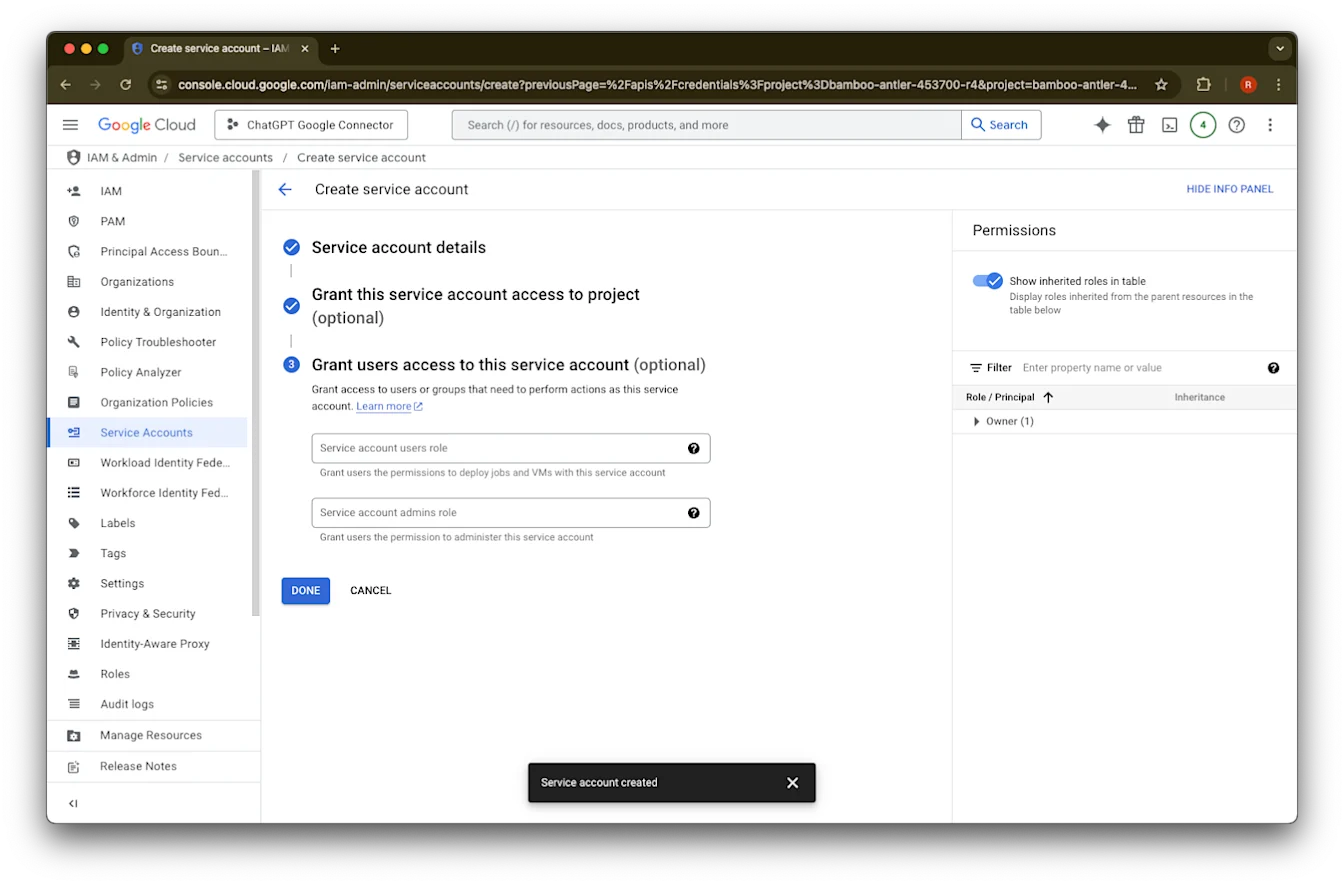
પૂર્ણ પર ક્લિક કરો.
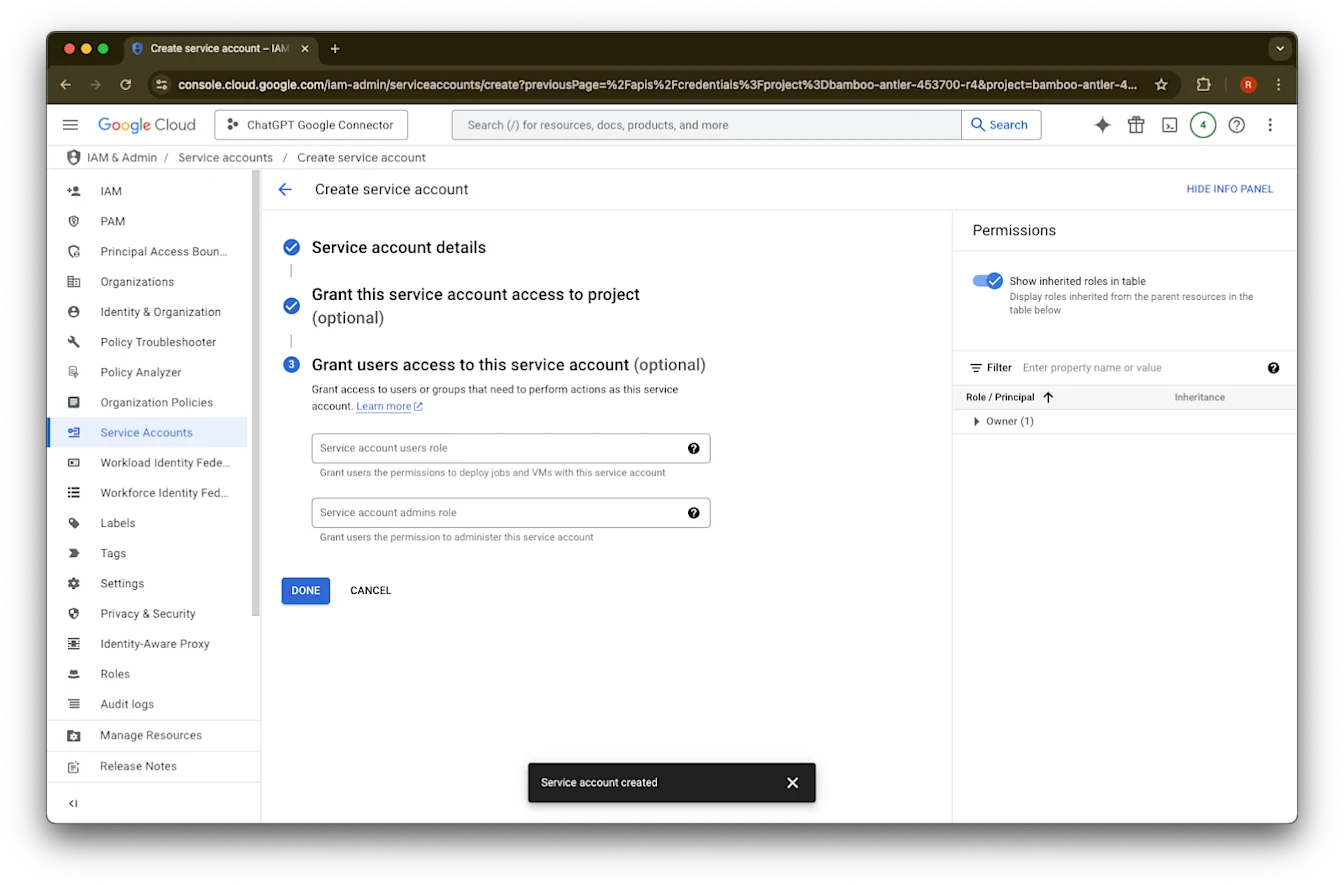
હવે બનાવવામાં આવેલા સર્વિસ એકાઉન્ટ પર ક્લિક કરો.
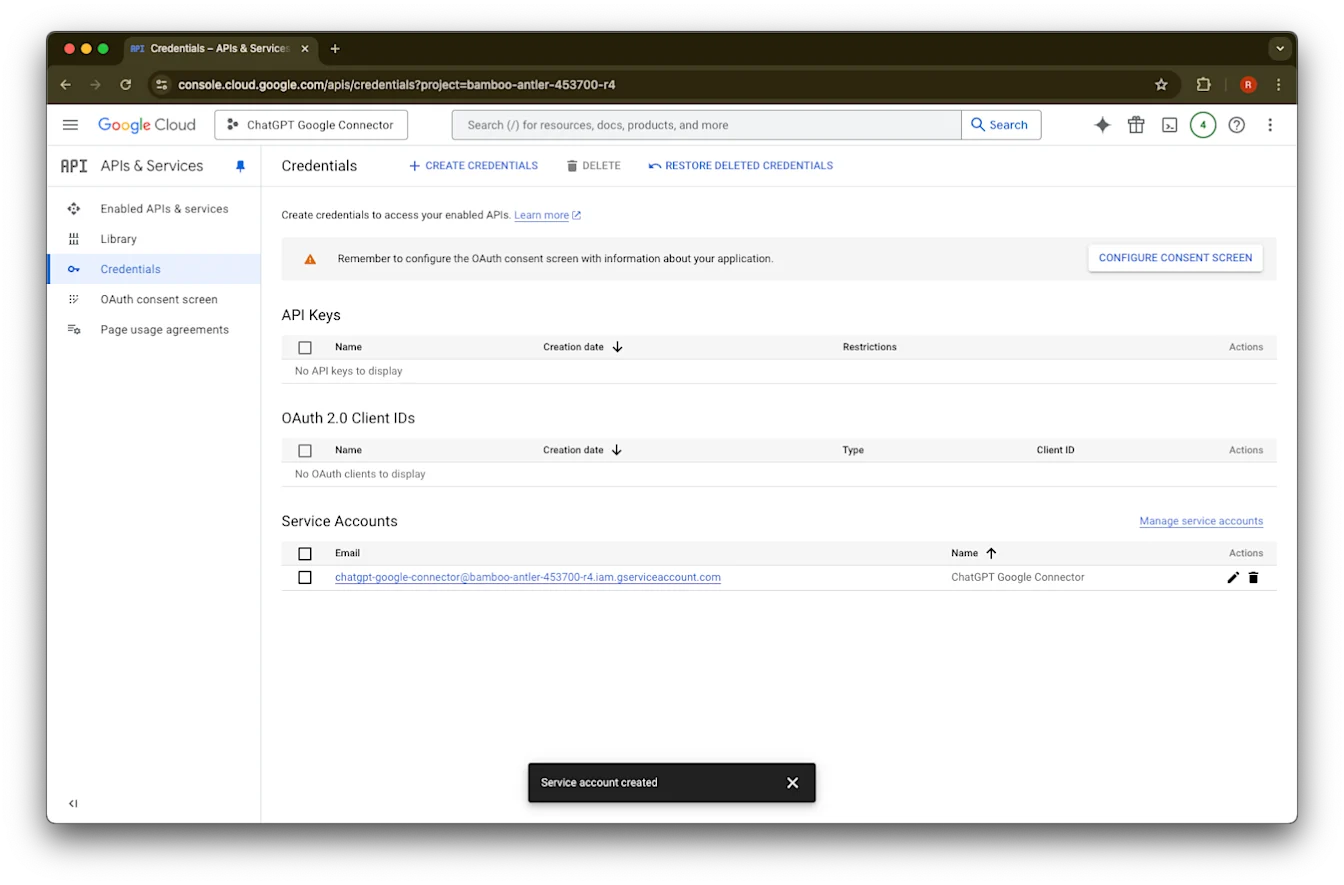
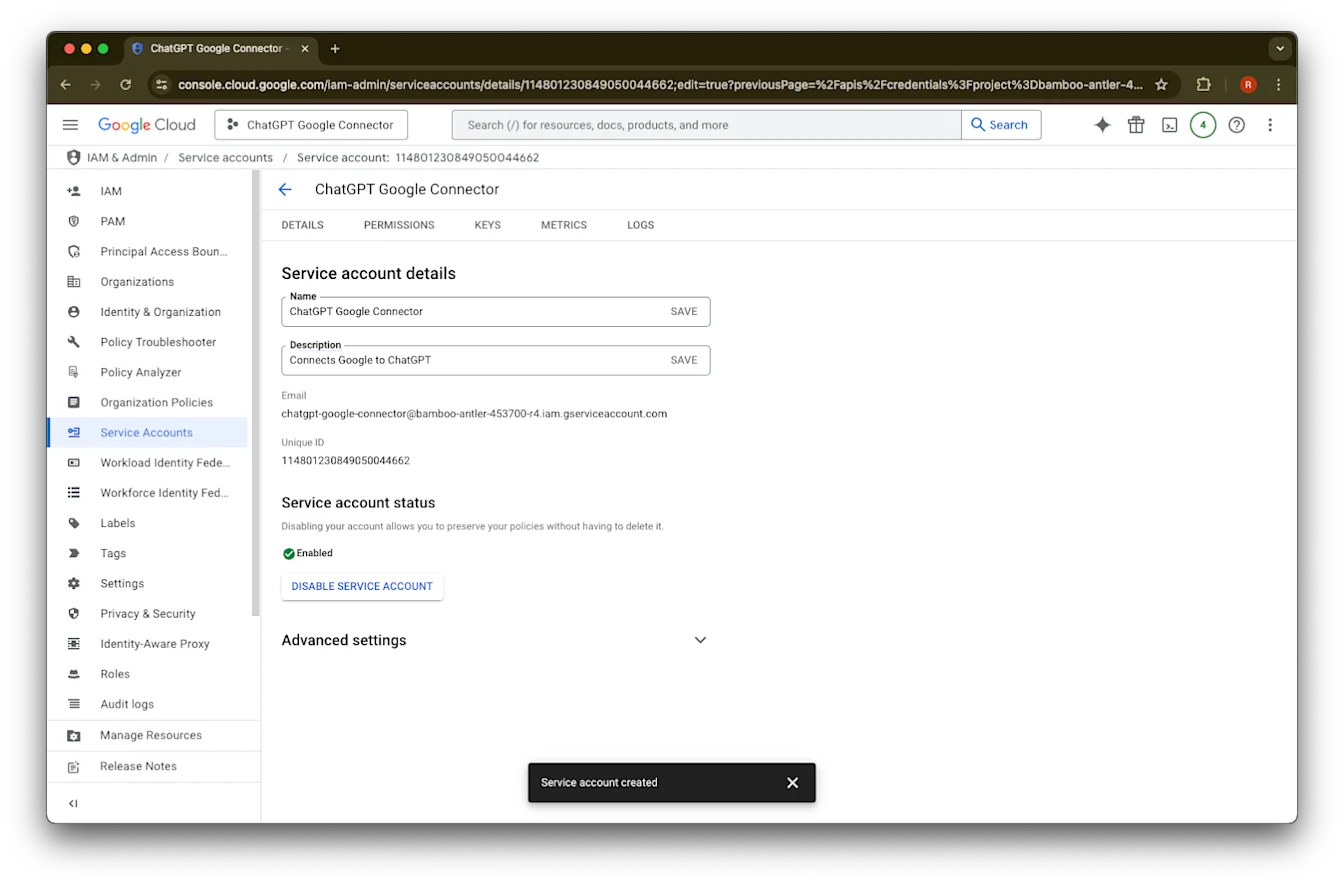
કીઓ. પર ક્લિક કરો
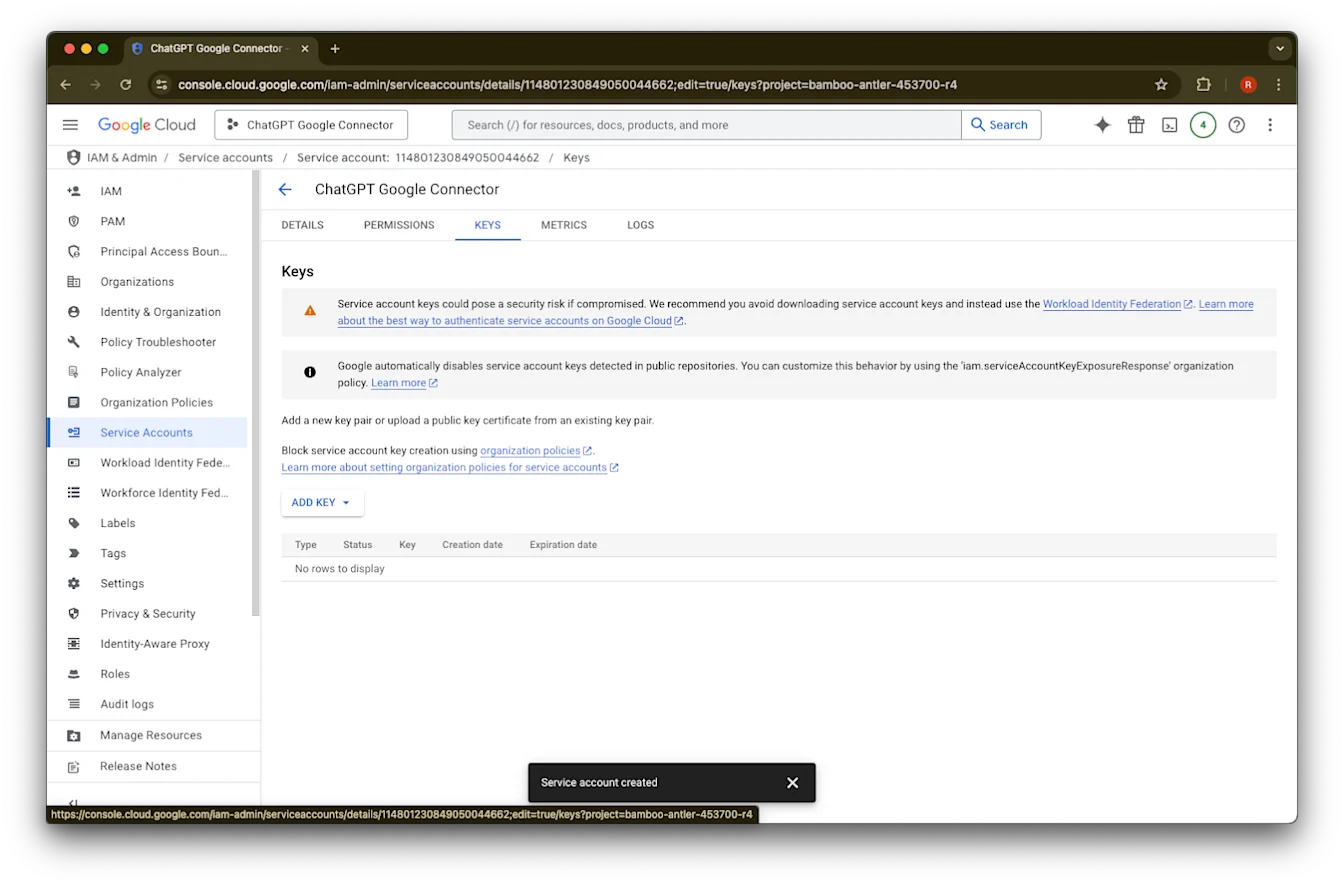
કી ઉમેરો પર ક્લિક કરો
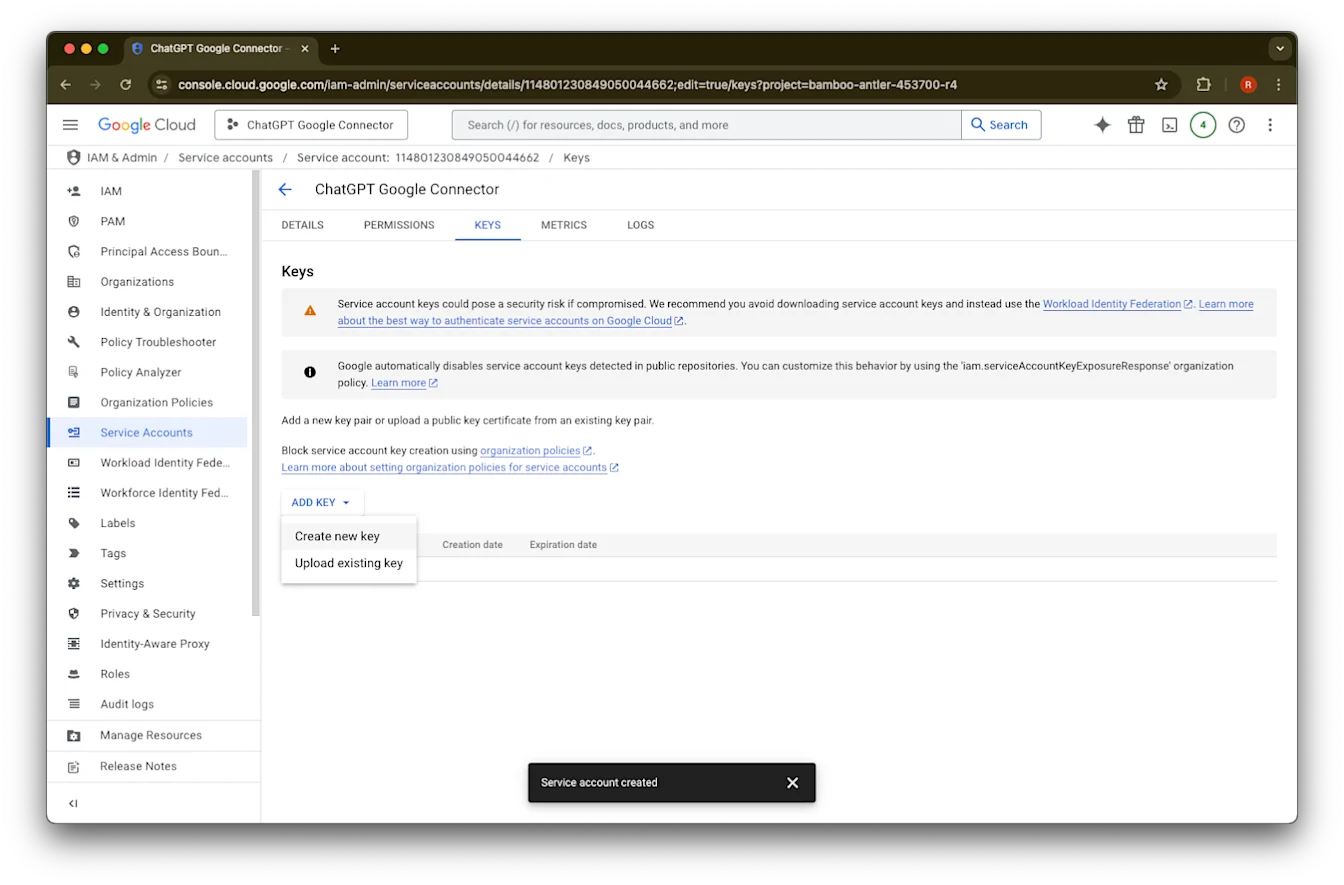
નવી કી બનાવો પર ક્લિક કરો
ડિફોલ્ટ JSON કી પ્રકાર રાખો અને બનાવો પર ક્લિક કરો
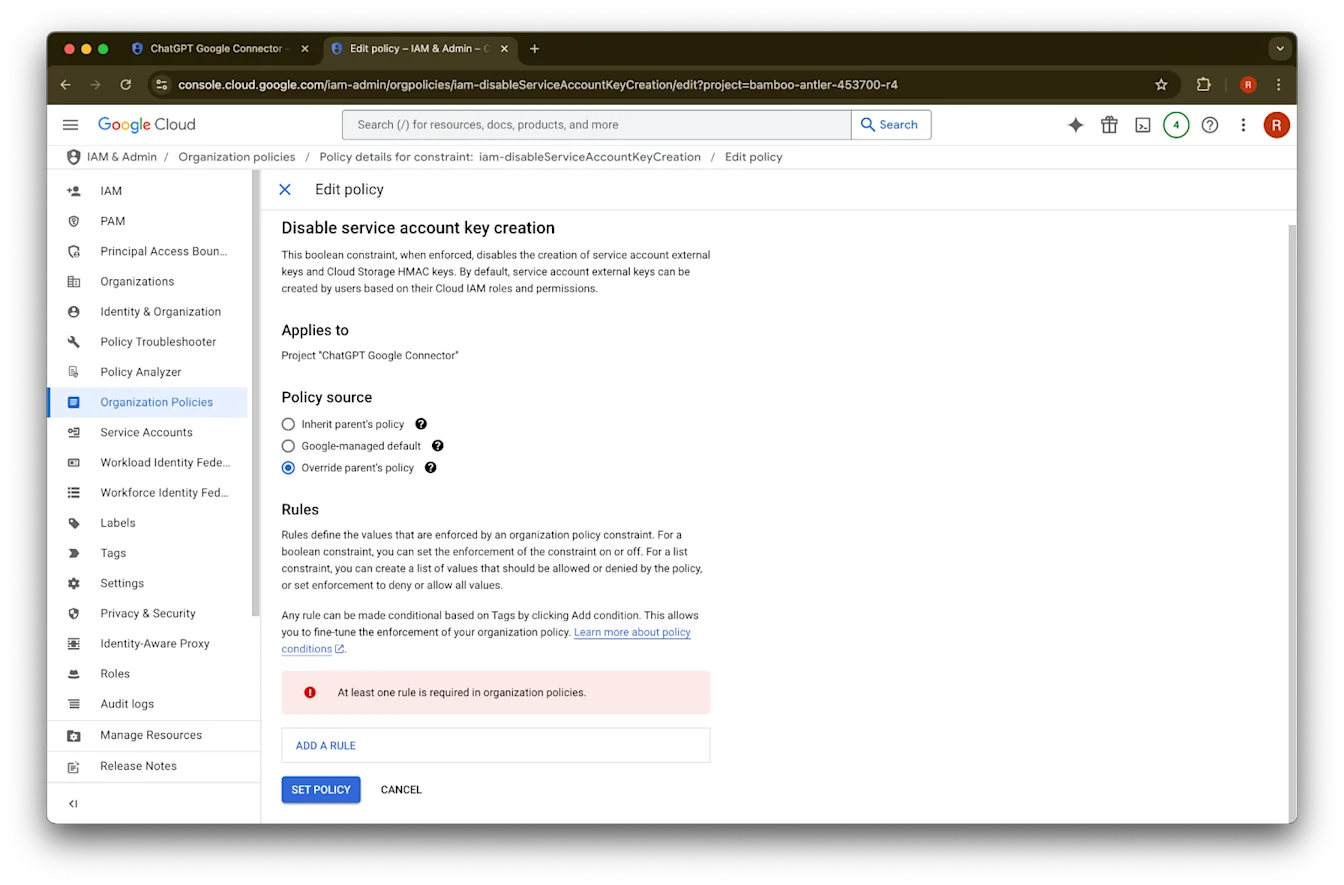
જો તમને “સર્વિસ એકાઉન્ટ કી બનાવવાનું અક્ષમ છે” એવો ભૂલ સંદેશ દેખાય, તો બનાવવાનું સક્ષમ કરવા માટે આ પગલાં અનુસરો.
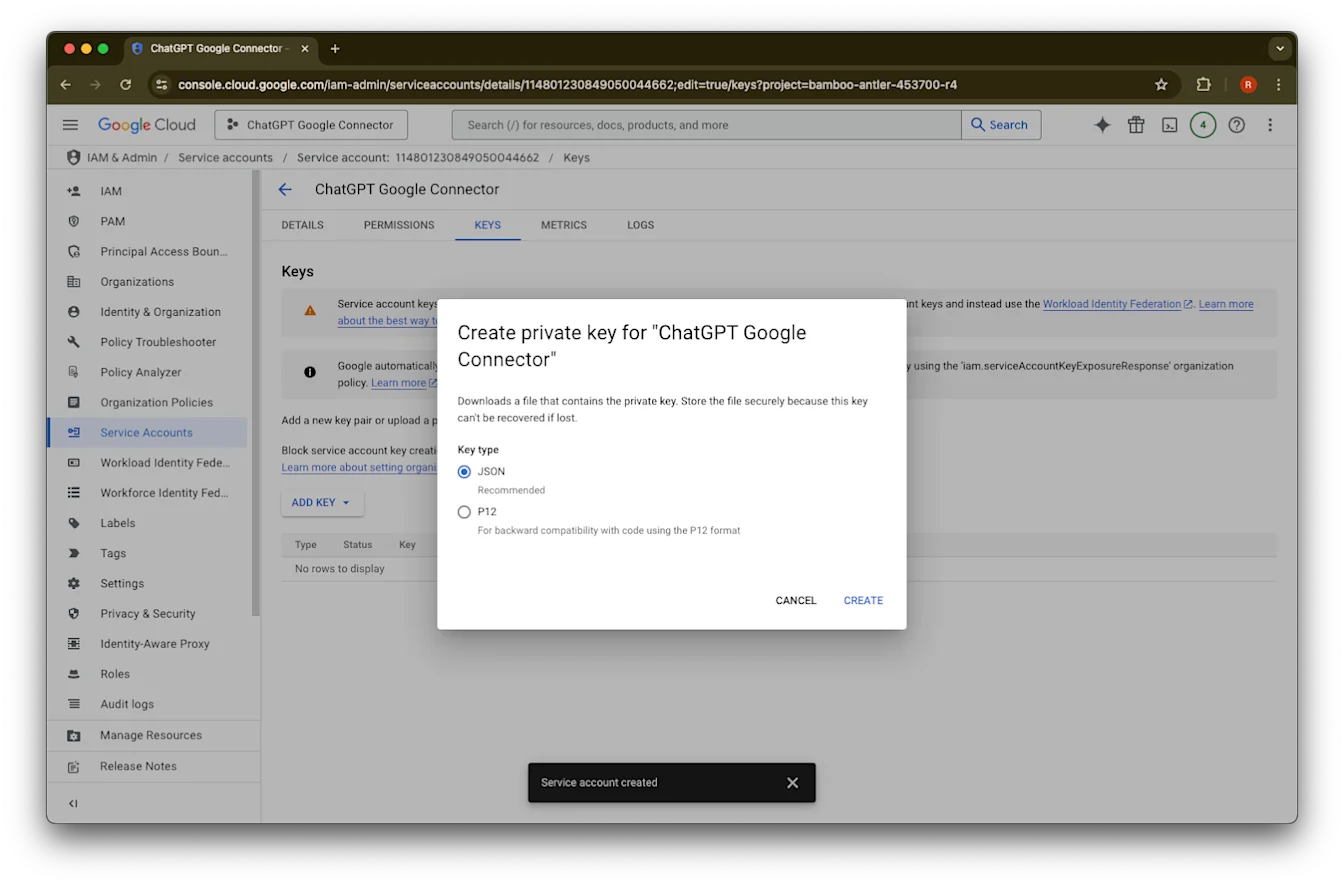
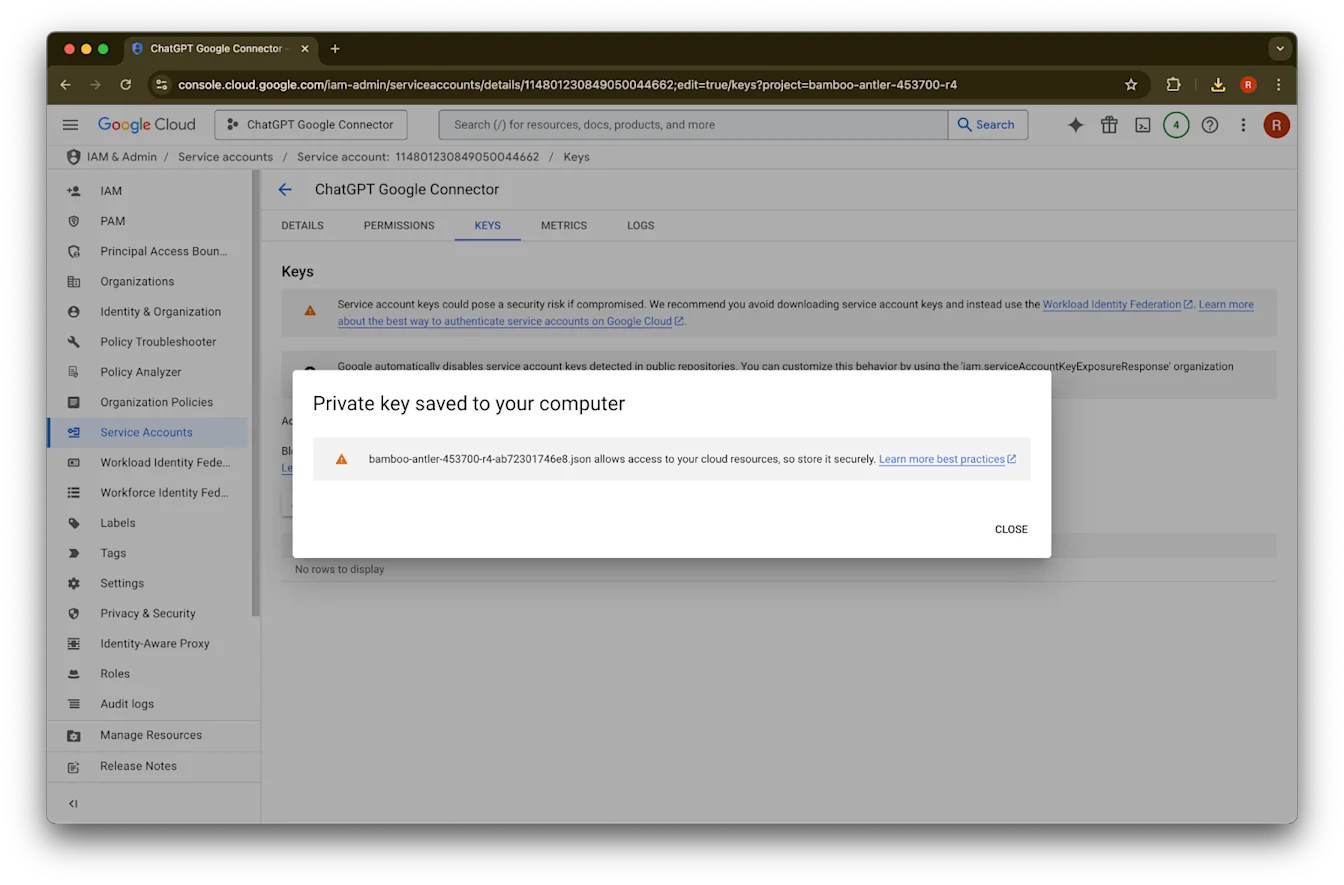
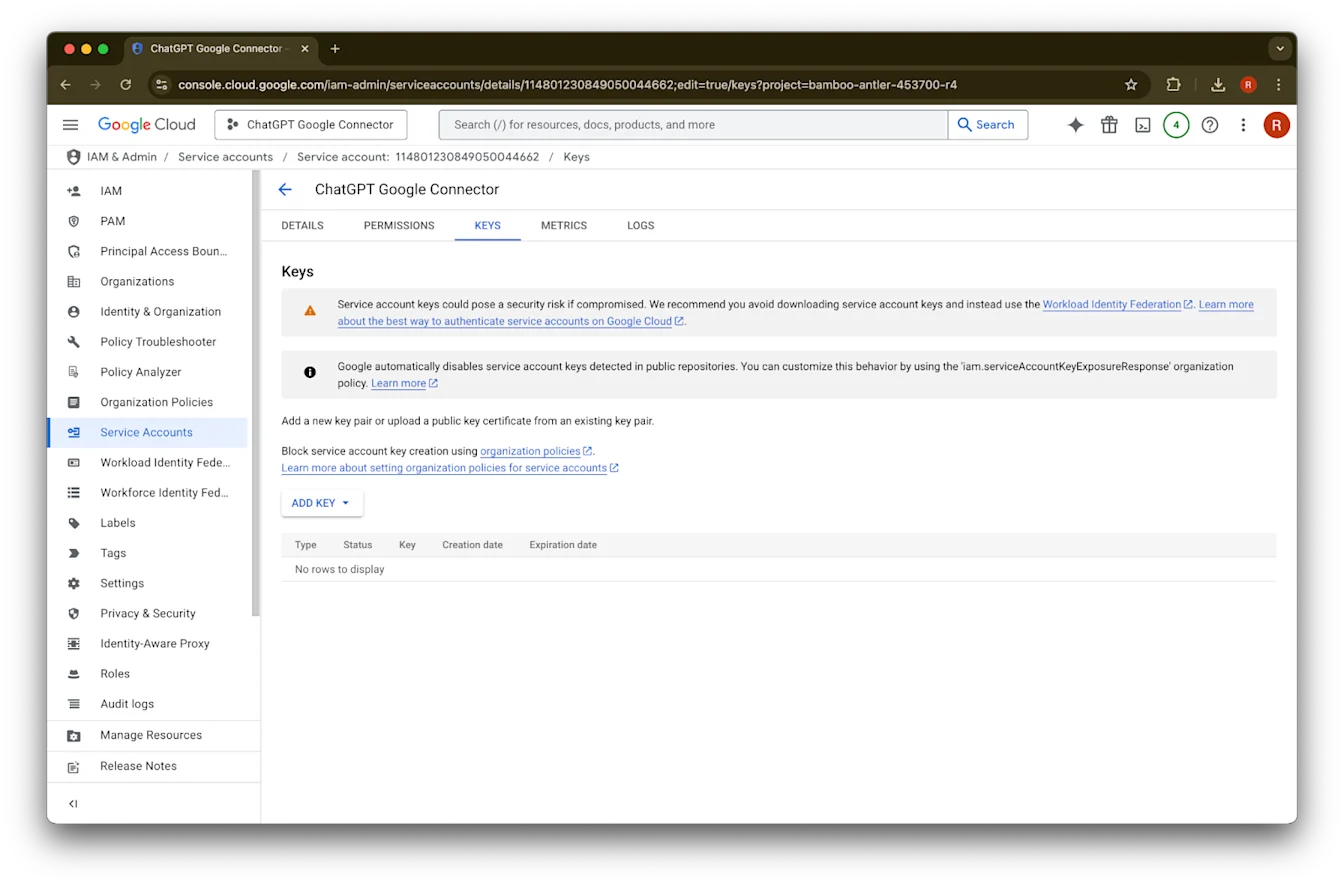
બંધ કરો પર ક્લિક કરો. કી હવે તમારા કમ્પ્યુટર પર ડાઉનલોડ થઈ ગઈ છે. તમે પછીથી આને ChatGPT એડમિન કન્સોલ પર અપલોડ કરશો.
વિગતો પર ક્લિક કરો
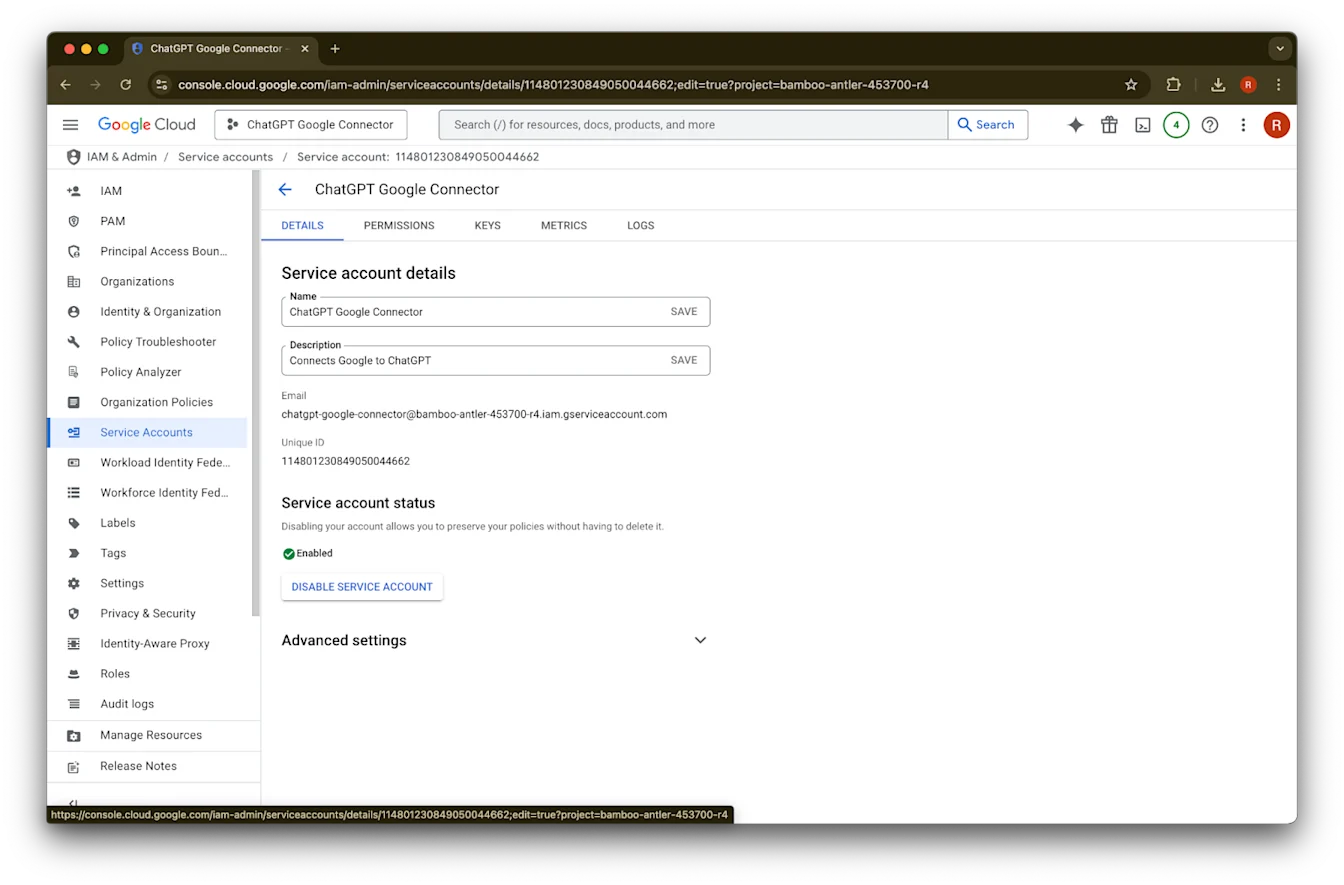
યુનિક ID નોંધો. પગલું 42માં આની જરૂર પડશે.
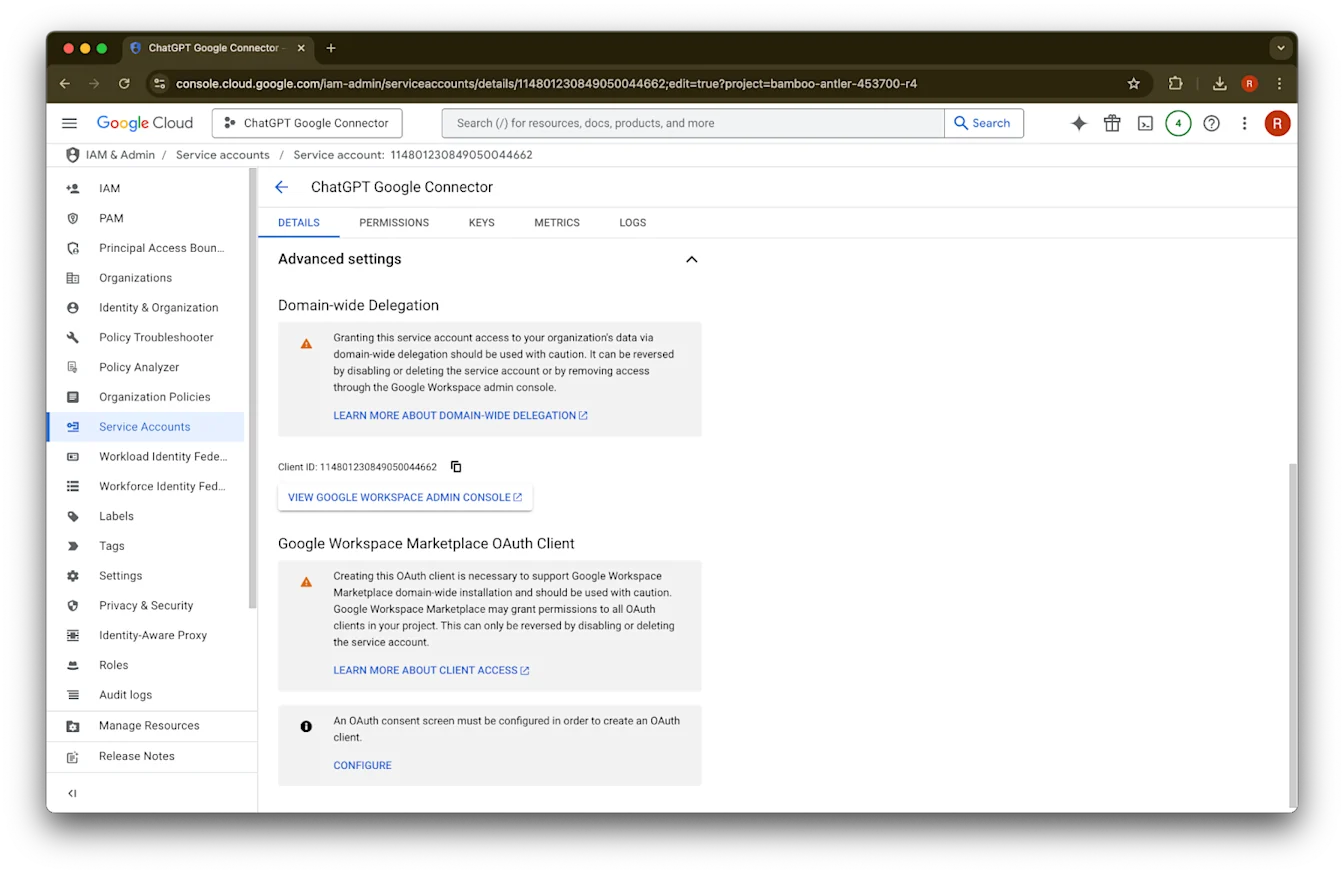
અદ્યતન સેટિંગ્સ વિસ્તૃત કરો
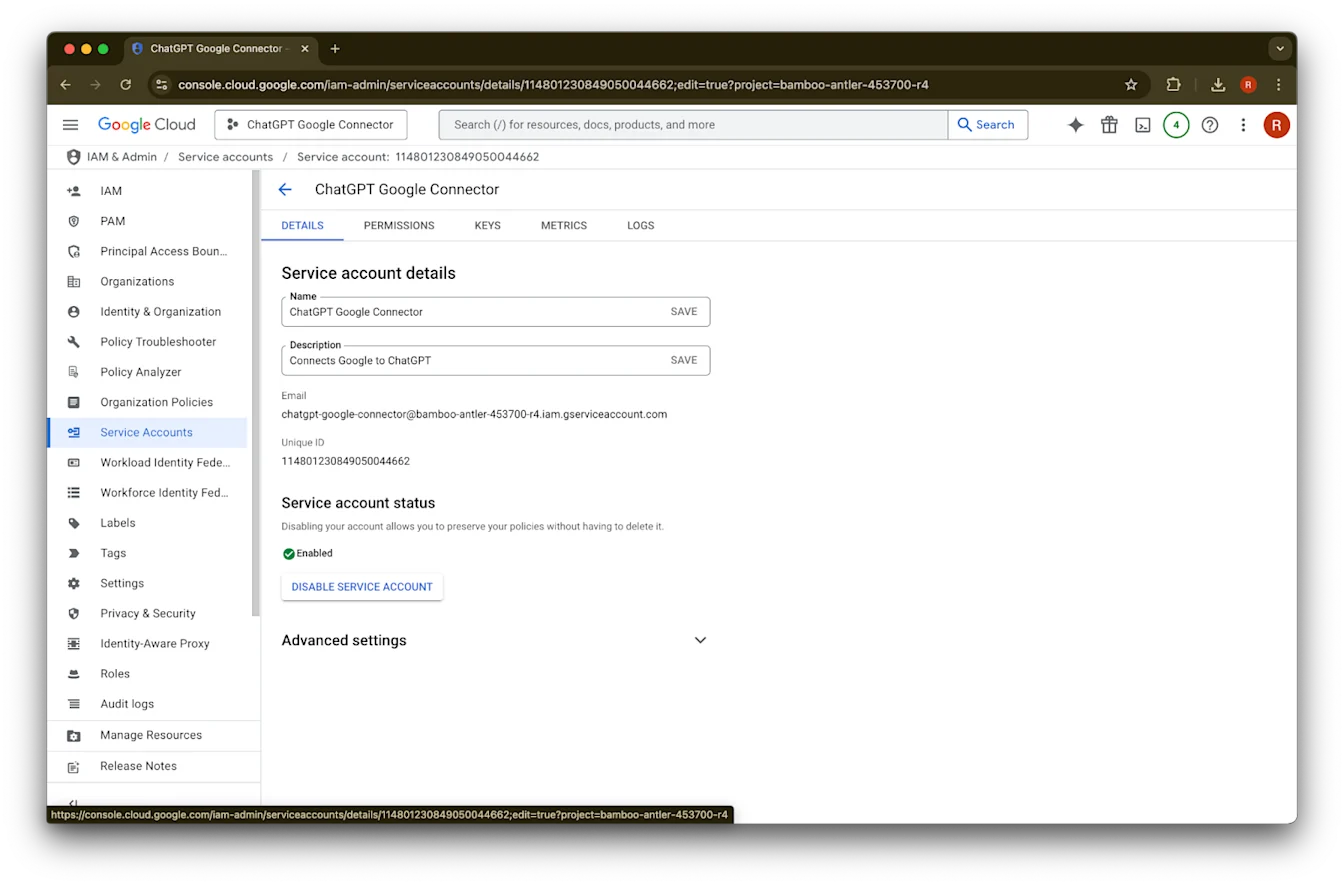
નીચે સ્ક્રોલ કરો અને Google Workspace એડમિન કન્સોલ જુઓ પર ક્લિક કરો. Google Workspace કન્સોલ નવા ટૅબમાં ખુલશે.
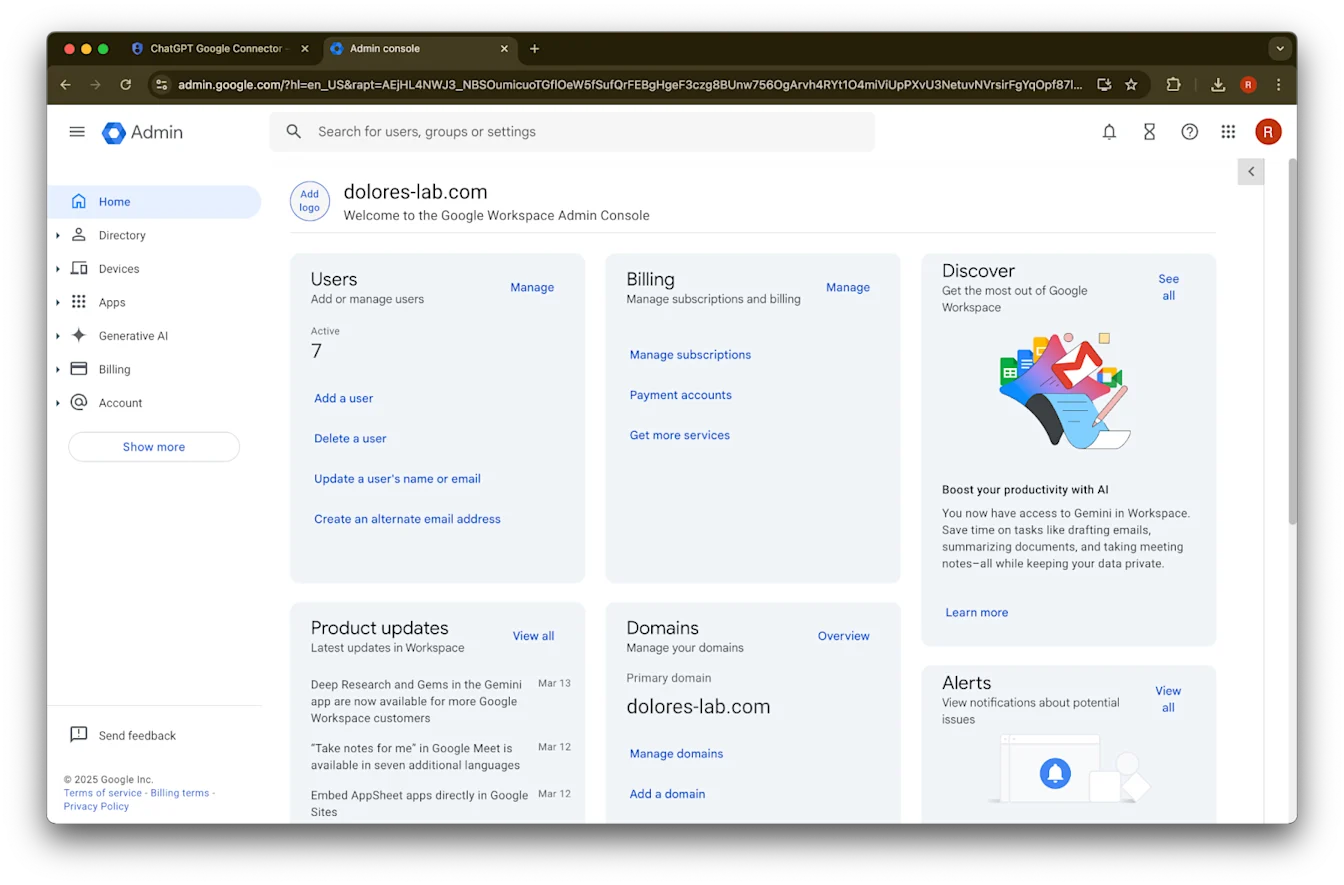
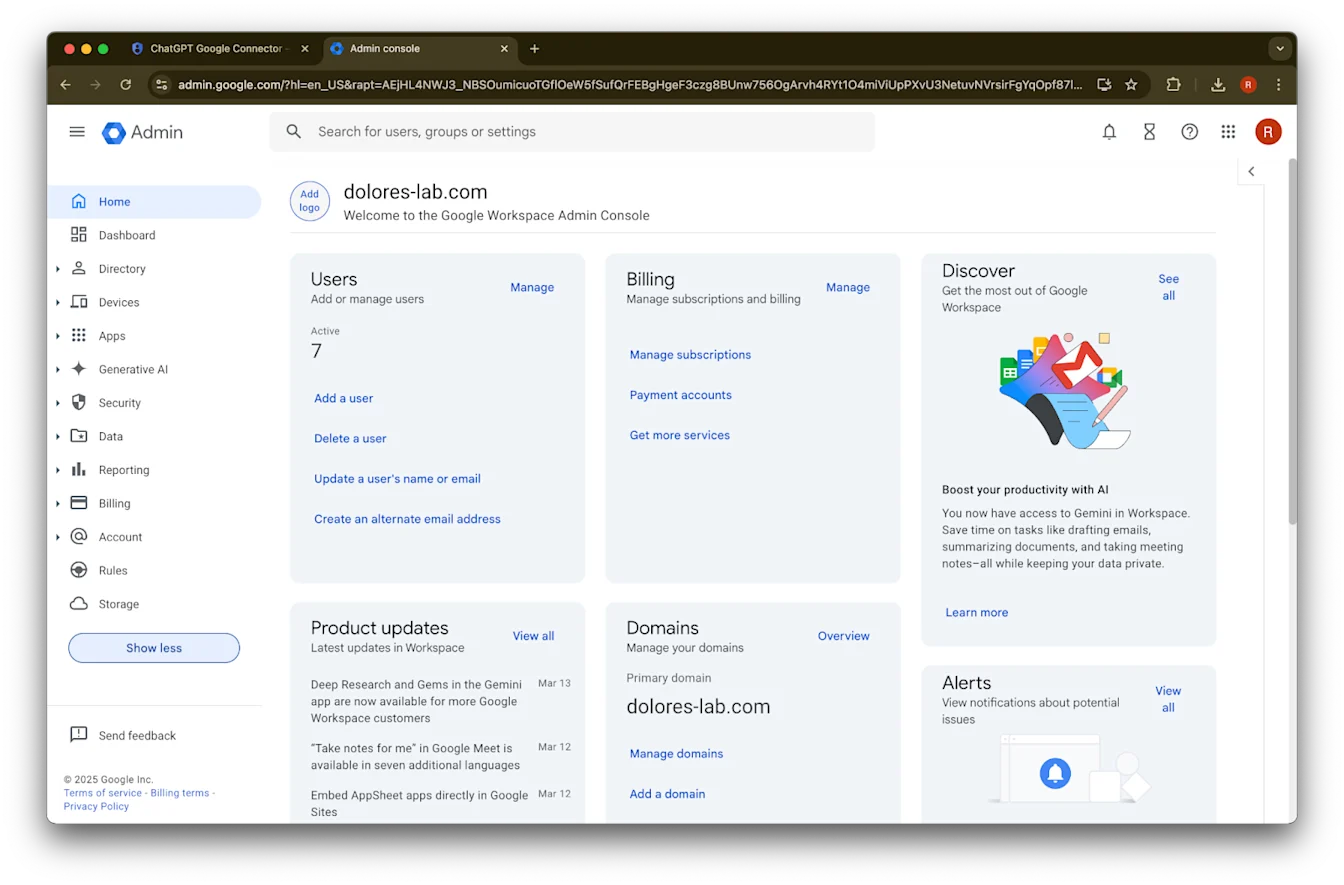
વધુ બતાવો પર ક્લિક કરો
સુરક્ષા વિભાગ વિસ્તૃત કરો
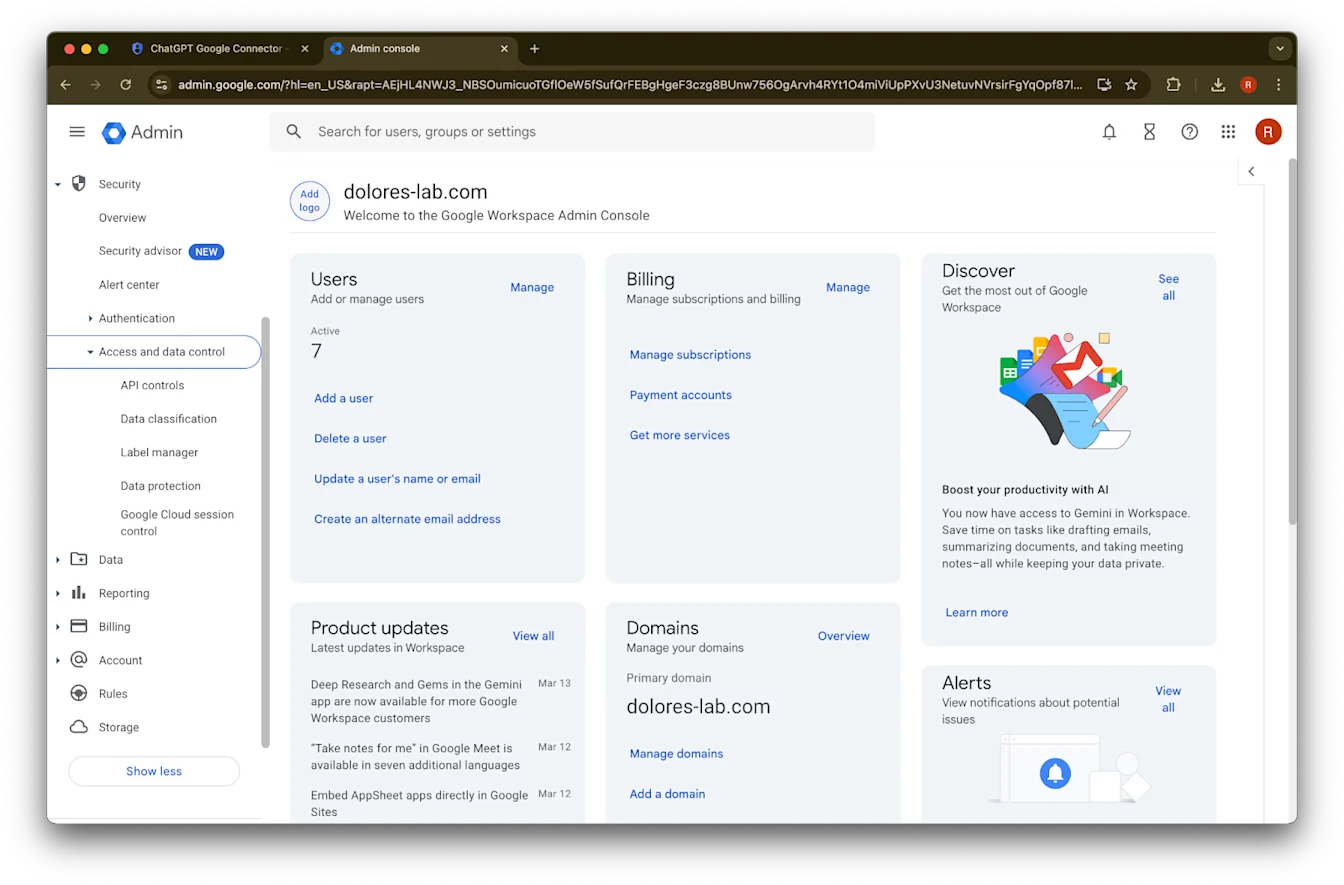
ઍક્સેસ અને ડેટા નિયંત્રણો વિભાગ વિસ્તૃત કરો
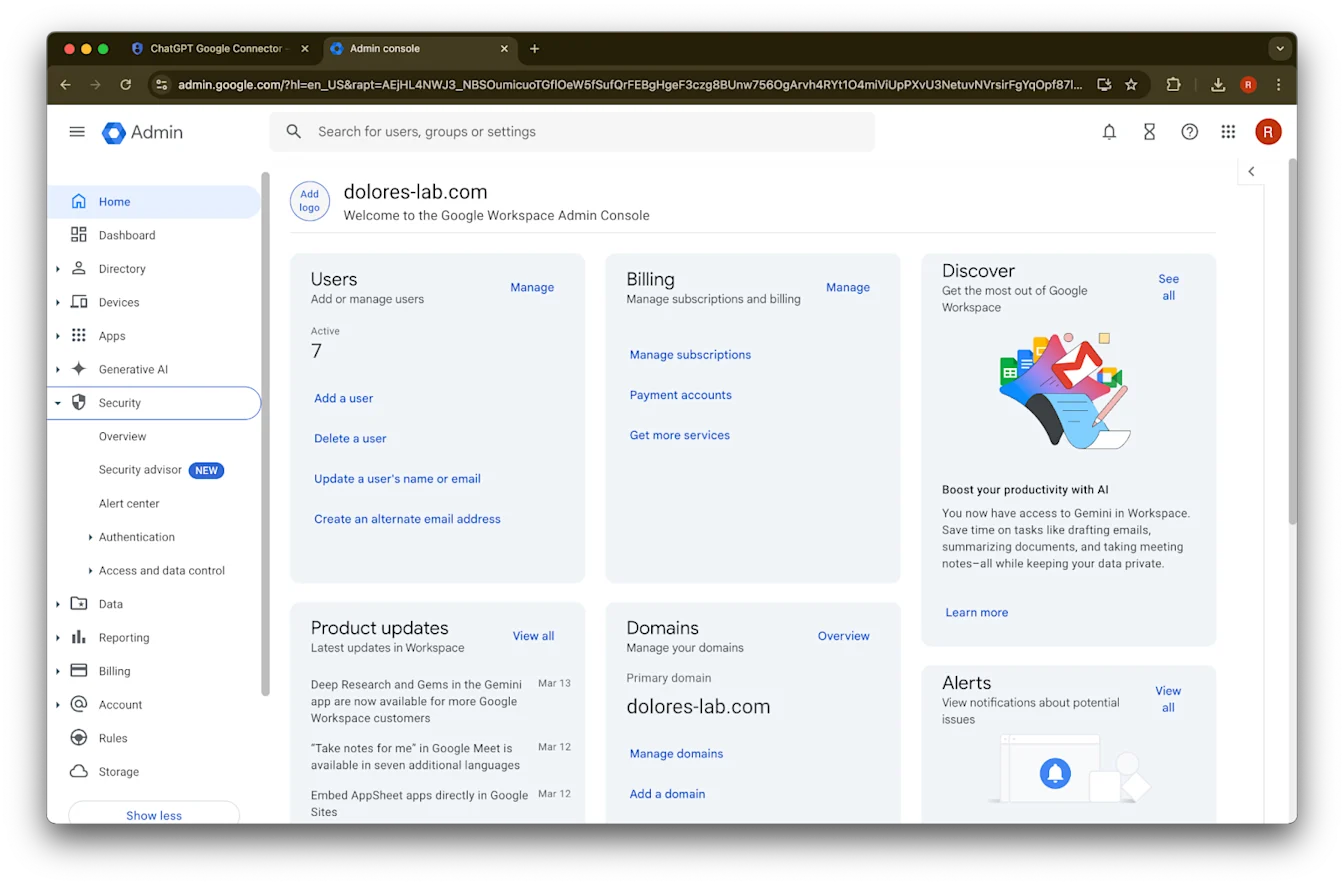
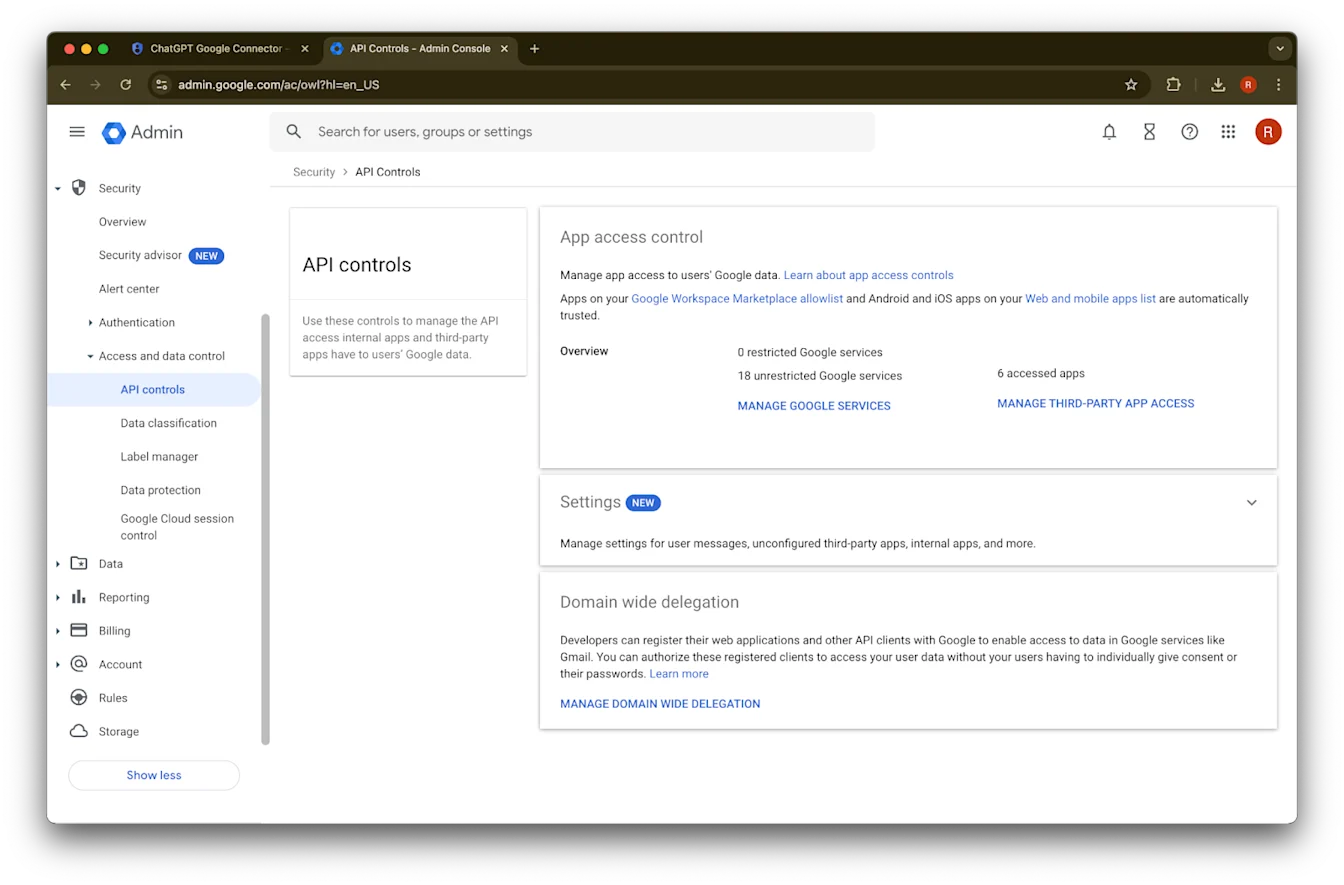
API નિયંત્રણો વિભાગ પર ક્લિક કરો
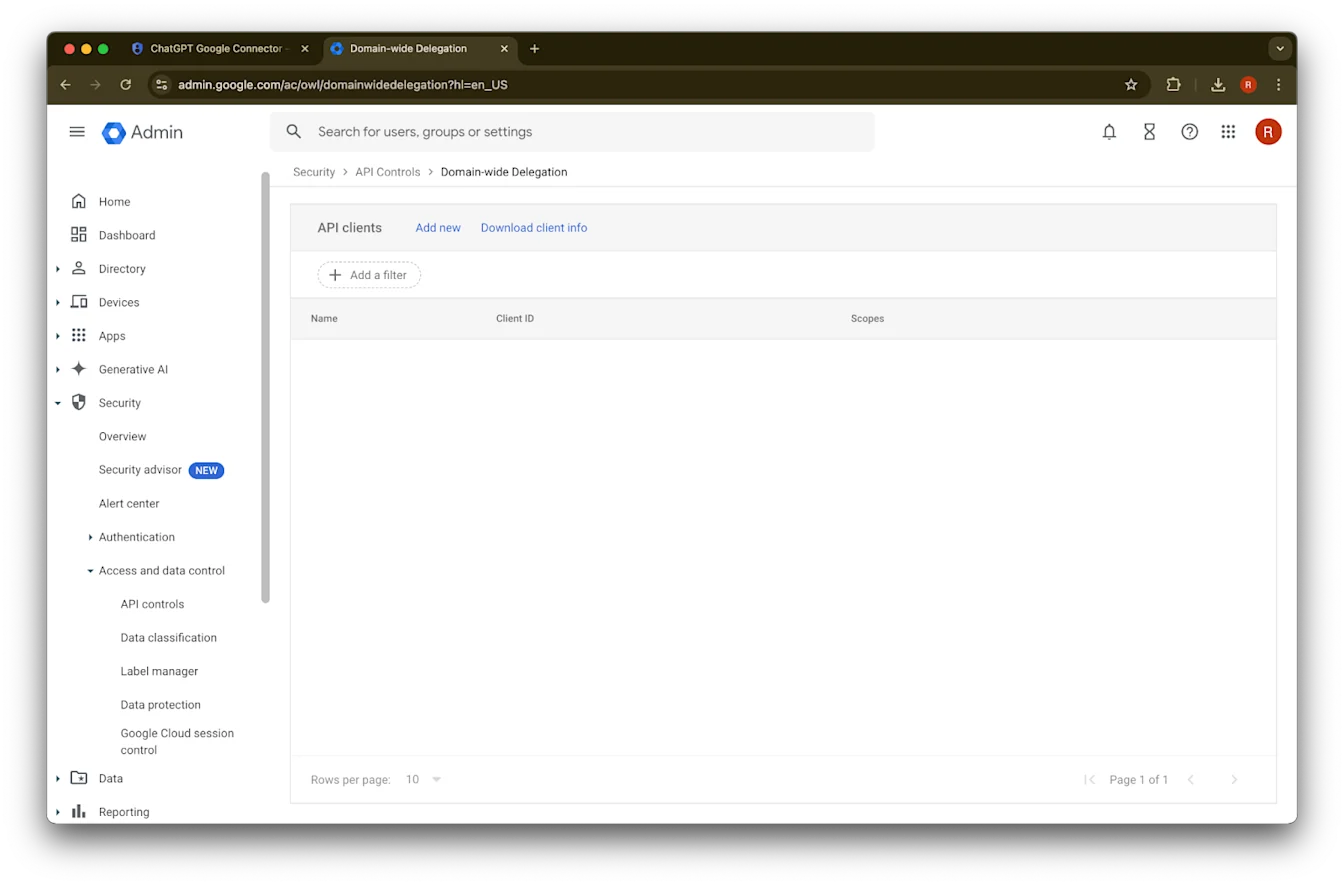
ડોમેન-વાઇડ ડેલિગેશન મેનેજ કરો પર ક્લિક કરો
નવું ઉમેરો પર ક્લિક કરો
આ ક્લાયન્ટ ID માટે મૂલ્ય તરીકે અગાઉ નોંધેલું યુનિક ID વાપરો
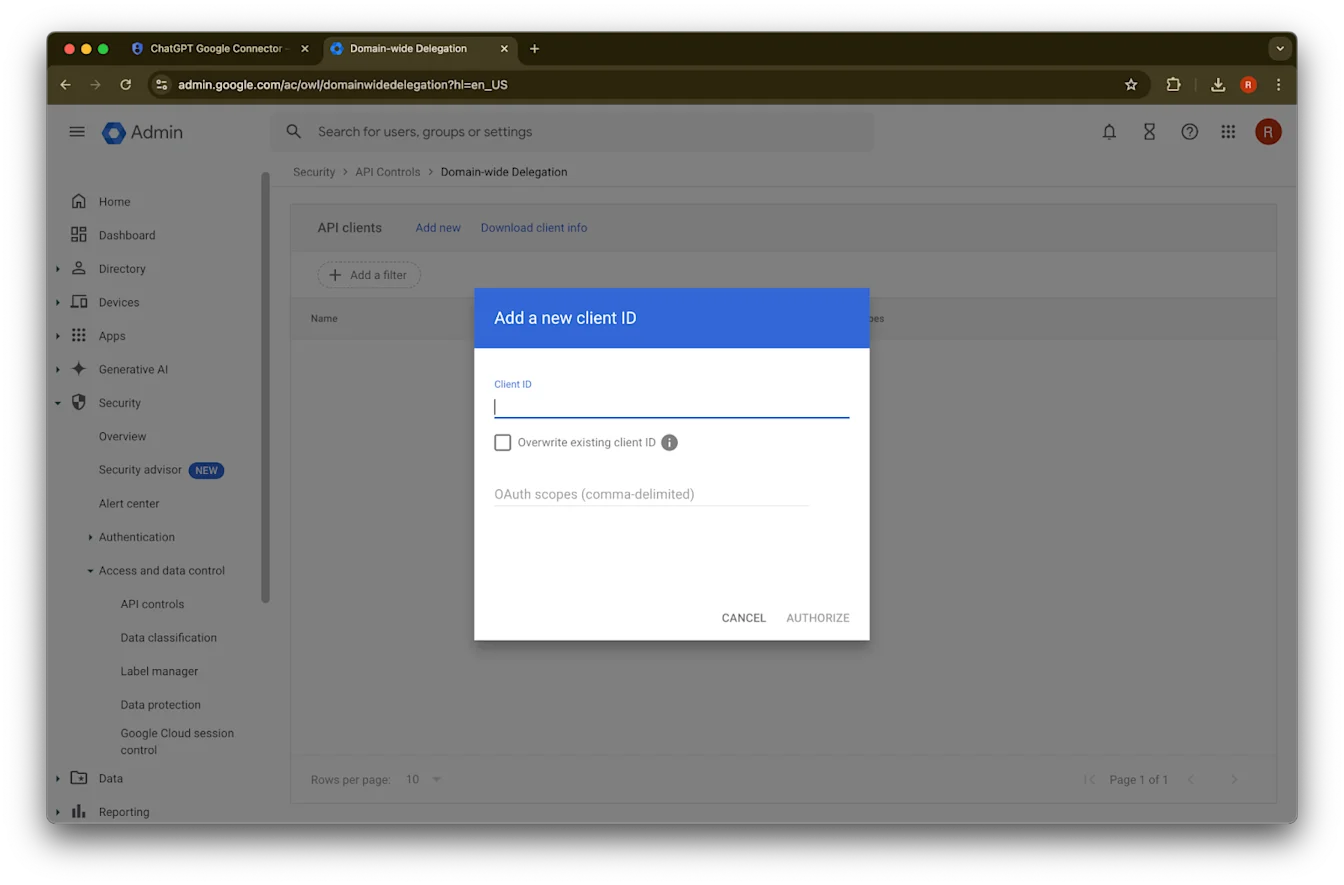
OAuth સ્કોપ્સ માટે, નીચે આપેલા અલ્પવિરામથી વિભાજિત auth scopes મૂલ્યોનો સંદર્ભ લો, જેને તમારે કૉપિ અને પેસ્ટ કરવાની જરૂર પડશે:
https://www.googleapis.com/auth/admin.directory.group.readonly, https://www.googleapis.com/auth/admin.directory.group.member.readonly, https://www.googleapis.com/auth/admin.directory.user.readonly, https://www.googleapis.com/auth/admin.directory.user.alias.readonly, https://www.googleapis.com/auth/drive.activity.readonly, https://www.googleapis.com/auth/drive.metadata.readonly, https://www.googleapis.com/auth/drive.readonly, https://www.googleapis.com/auth/userinfo.profile, https://www.googleapis.com/auth/userinfo.email| સ્કોપ | રિઝનિંગ |
| admin.directory.group.readonly | જૂથ-આધારિત પરવાનગીઓ લાગુ કરો |
| admin.directory.group.member.readonly | જૂથ-આધારિત પરવાનગીઓ લાગુ કરો |
| admin.directory.user.alias.readonly | જ્યાં વપરાશકર્તાને ઉપનામ મારફતે પરવાનગી આપવામાં આવી હોય તે કિસ્સાઓ હેન્ડલ કરો |
| drive.activity.readonly | ફાઇલોમાં ફેરફાર થાય ત્યારે સૂચના મેળવવા માટે |
| drive.metadata.readonly | ફાઇલ સામગ્રી અને સંકળાયેલ મેટાડેટા સિંક કરો (દા.ત. છેલ્લે ફેરફાર કરેલી તારીખ) |
| drive.readonly | ફાઇલ સામગ્રી અને સંકળાયેલ મેટાડેટા સિંક કરો (દા.ત. છેલ્લે ફેરફાર કરેલી તારીખ) |
| userinfo.profile | અમે જેમના માટે ફાઇલો સિંક કરી રહ્યા છીએ તે વપરાશકર્તાઓ નક્કી કરો |
| userinfo.email | અમે જેમના માટે ફાઇલો સિંક કરી રહ્યા છીએ તે વપરાશકર્તાઓ નક્કી કરો |
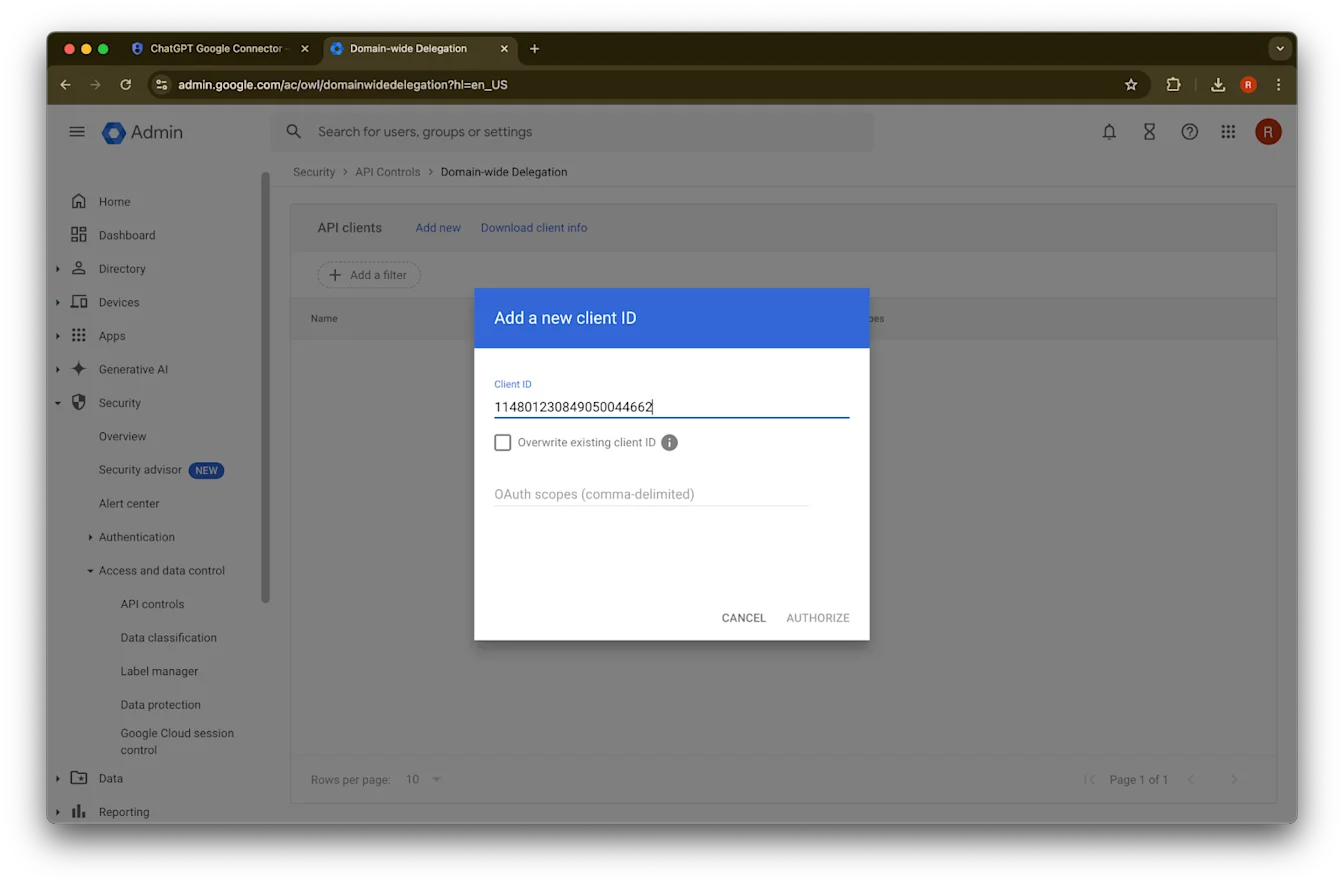
45. અધિકૃત કરો પર ક્લિક કરો
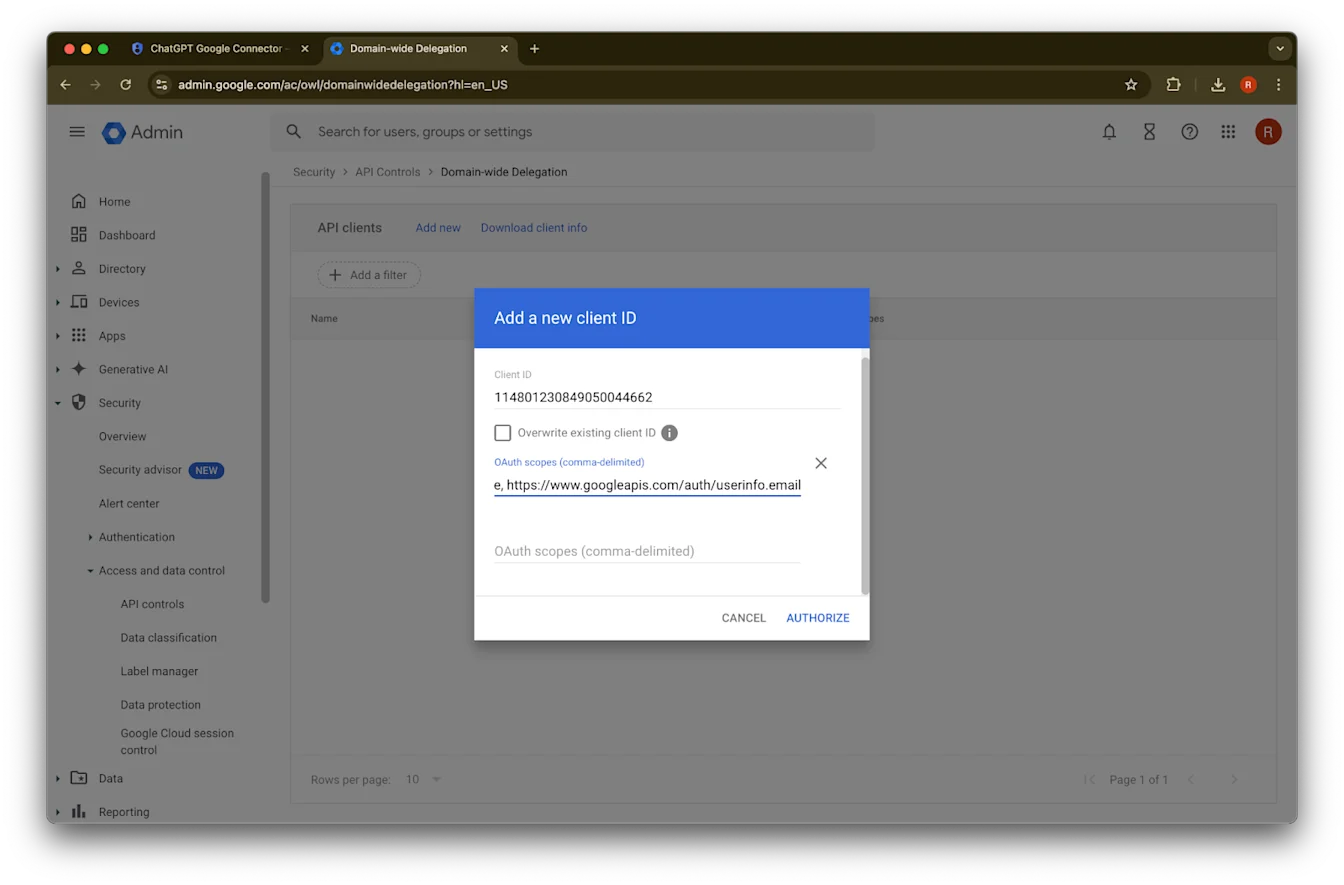
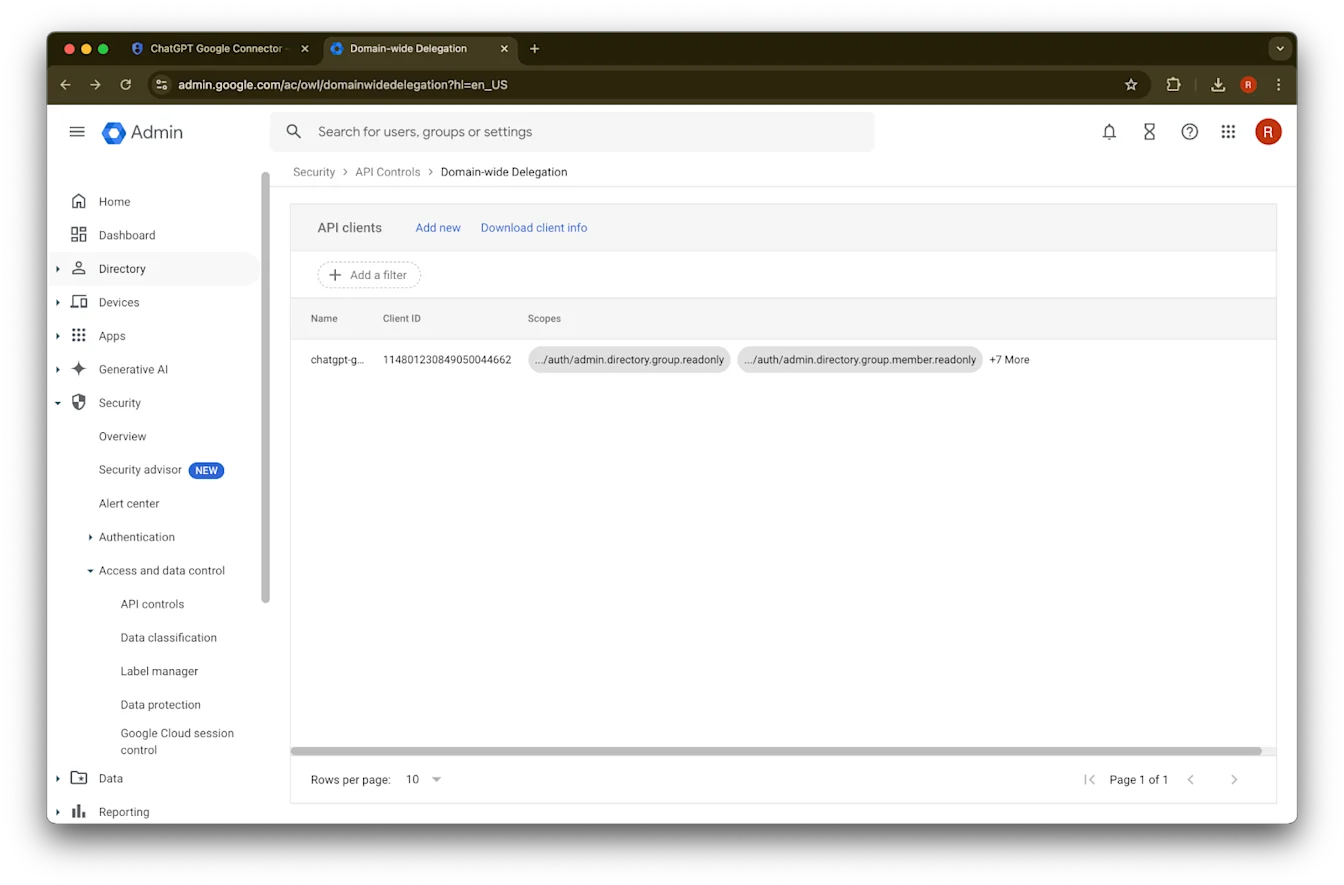
46. સફળતા!
એડમિન એકાઉન્ટ સેટઅપ કરવું
ડિરેક્ટરી વિસ્તૃત કરો
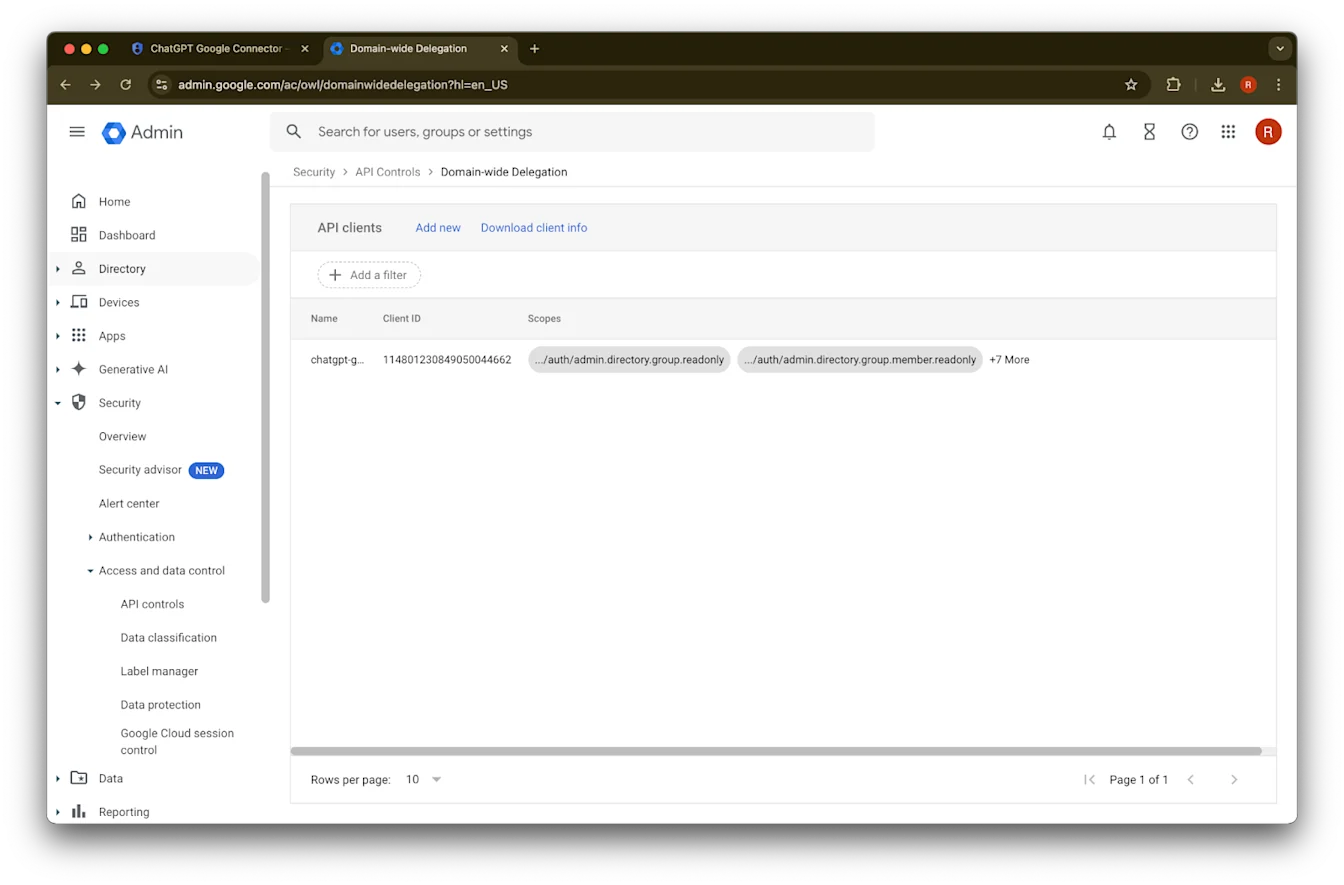
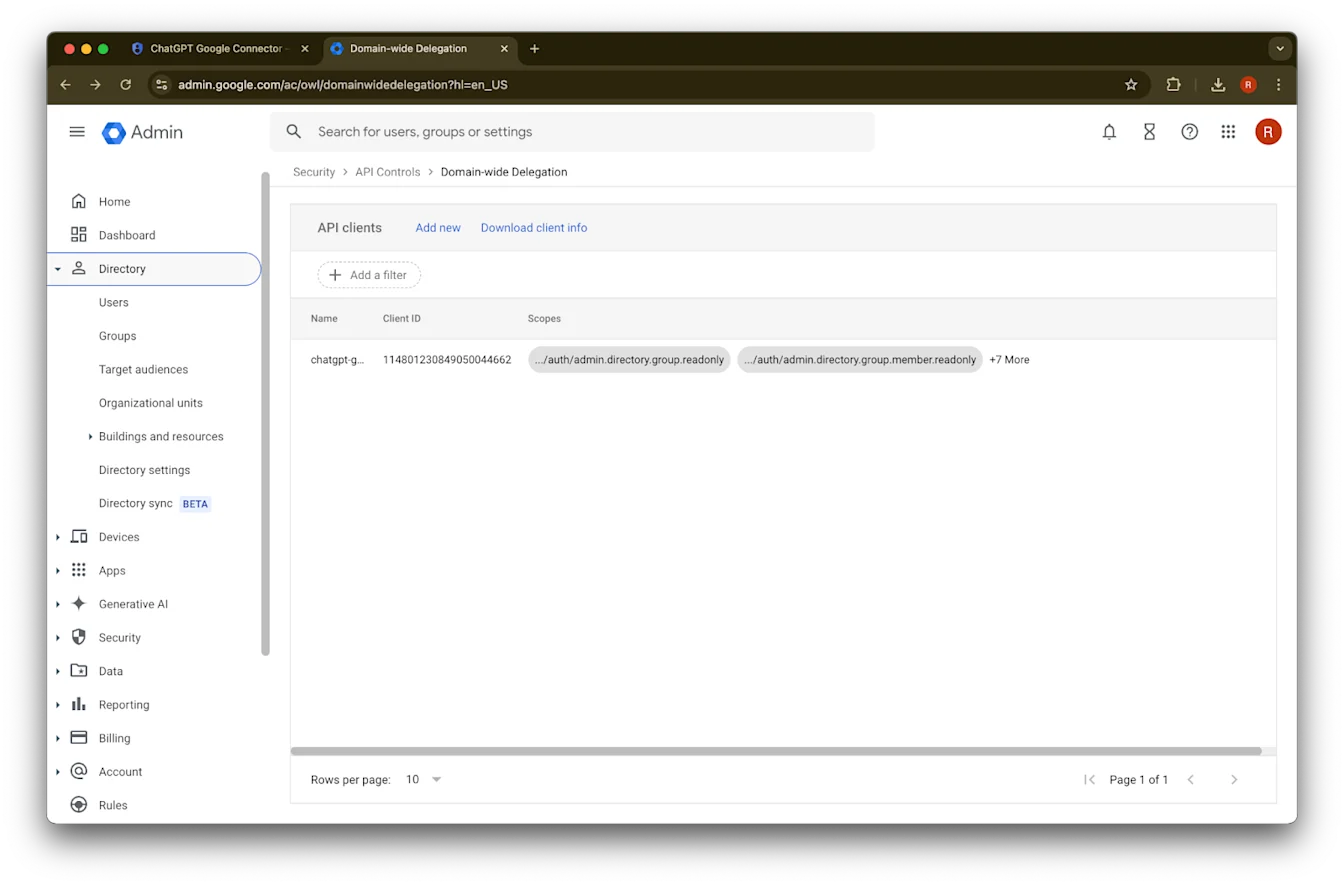
વપરાશકર્તાઓ પર ક્લિક કરો
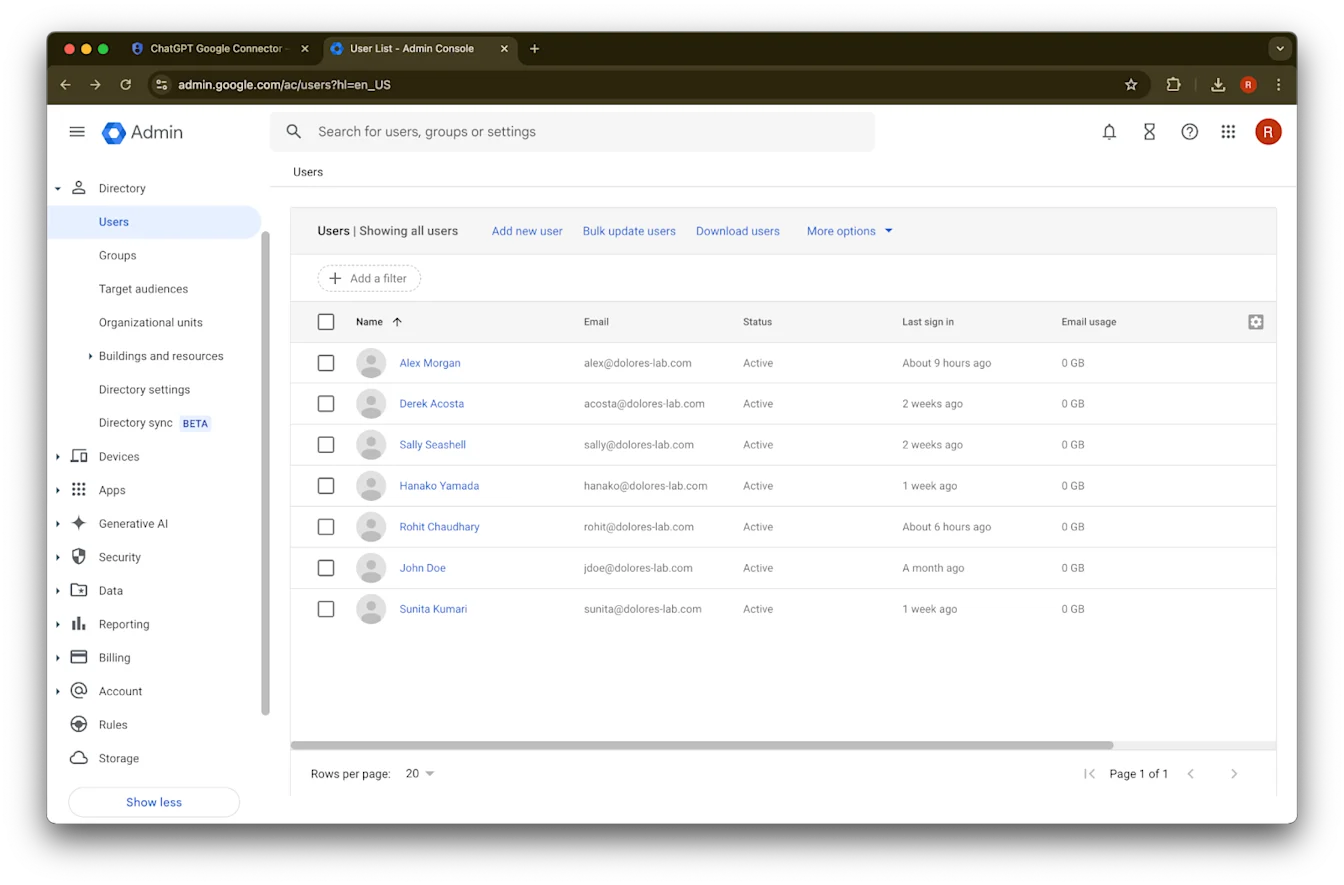
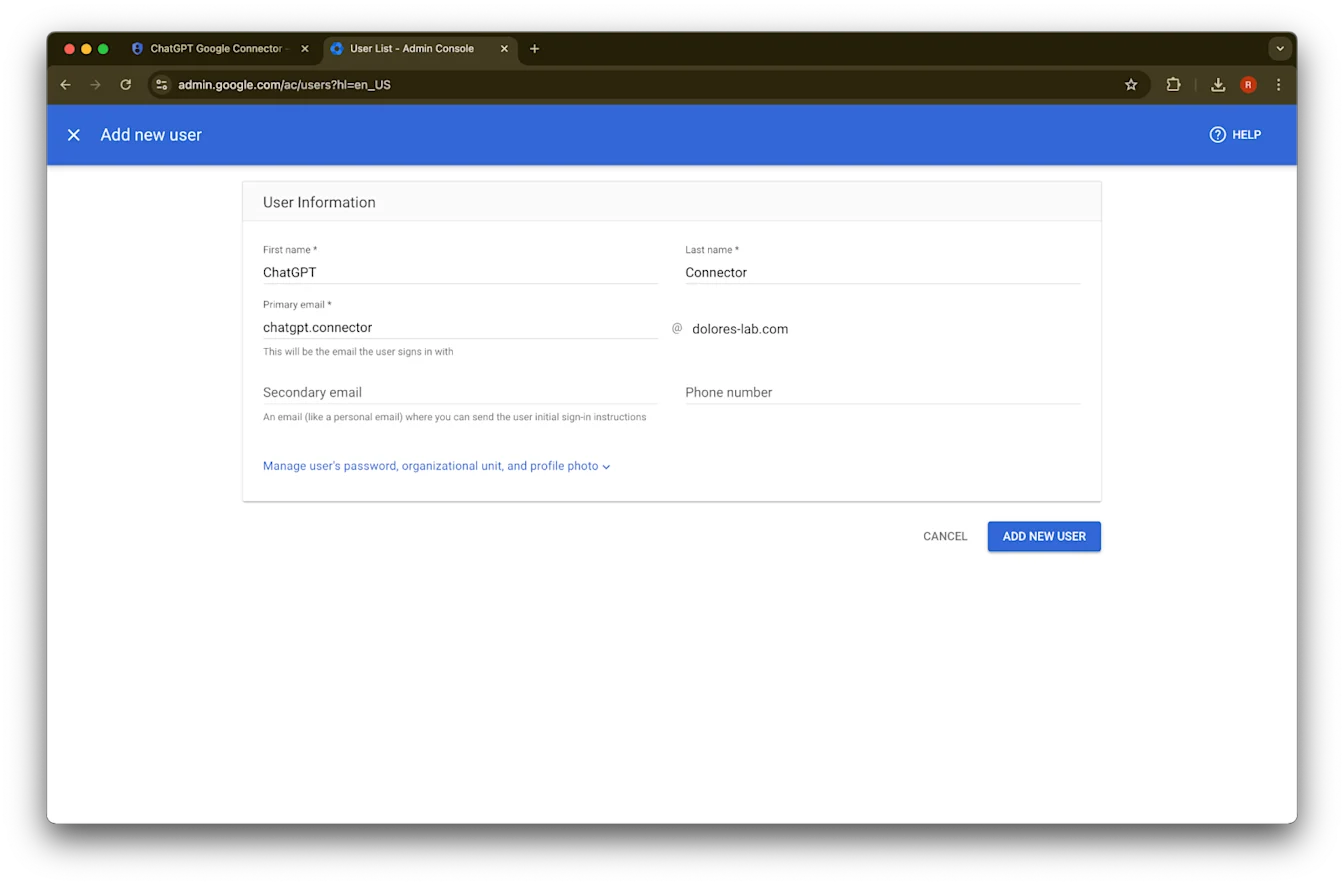
તમારી પસંદગીનું પ્રથમ નામ, છેલ્લું નામ અને પ્રાથમિક ઇમેઇલ સરનામું આપો
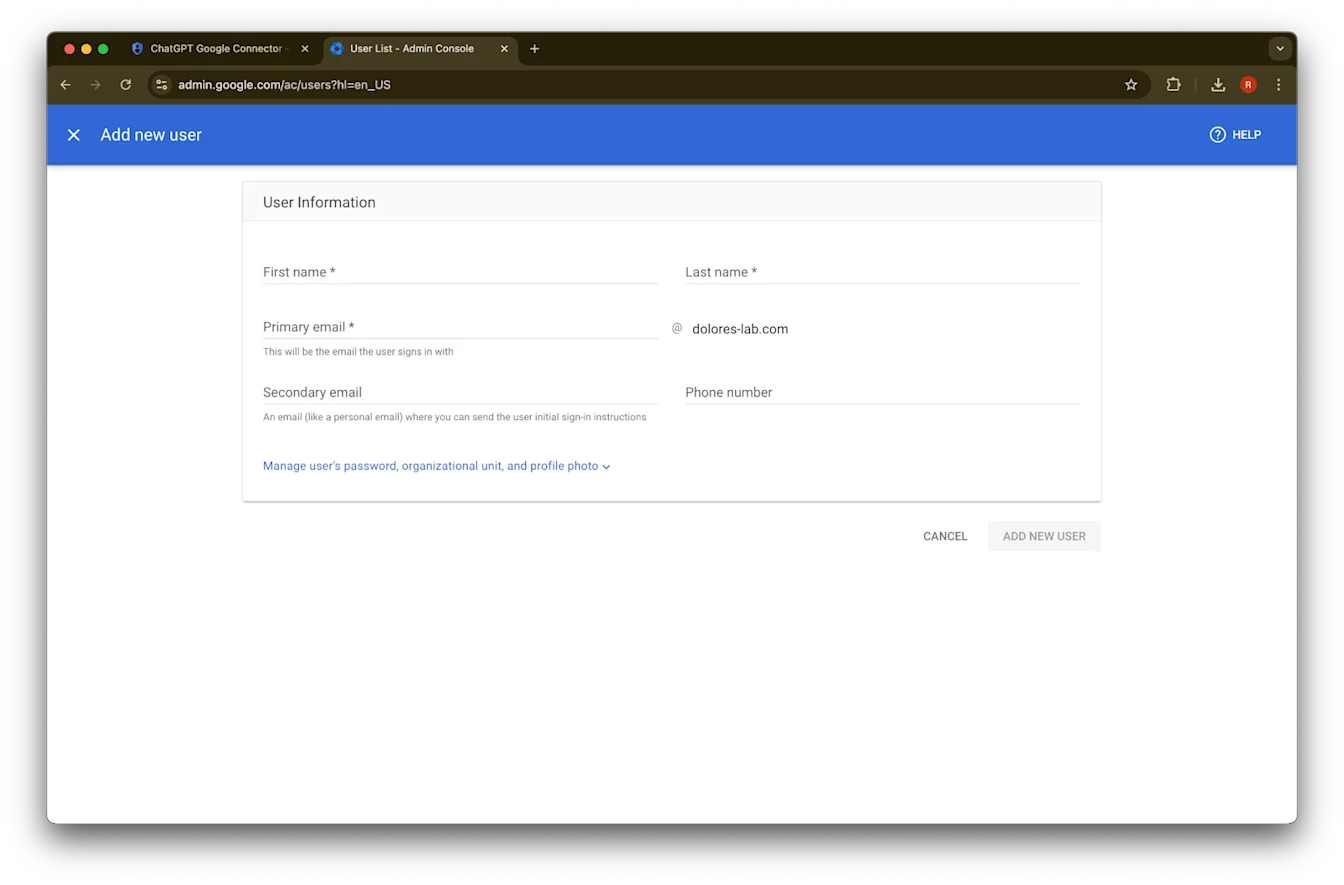
નવો વપરાશકર્તા ઉમેરો પર ક્લિક કરો
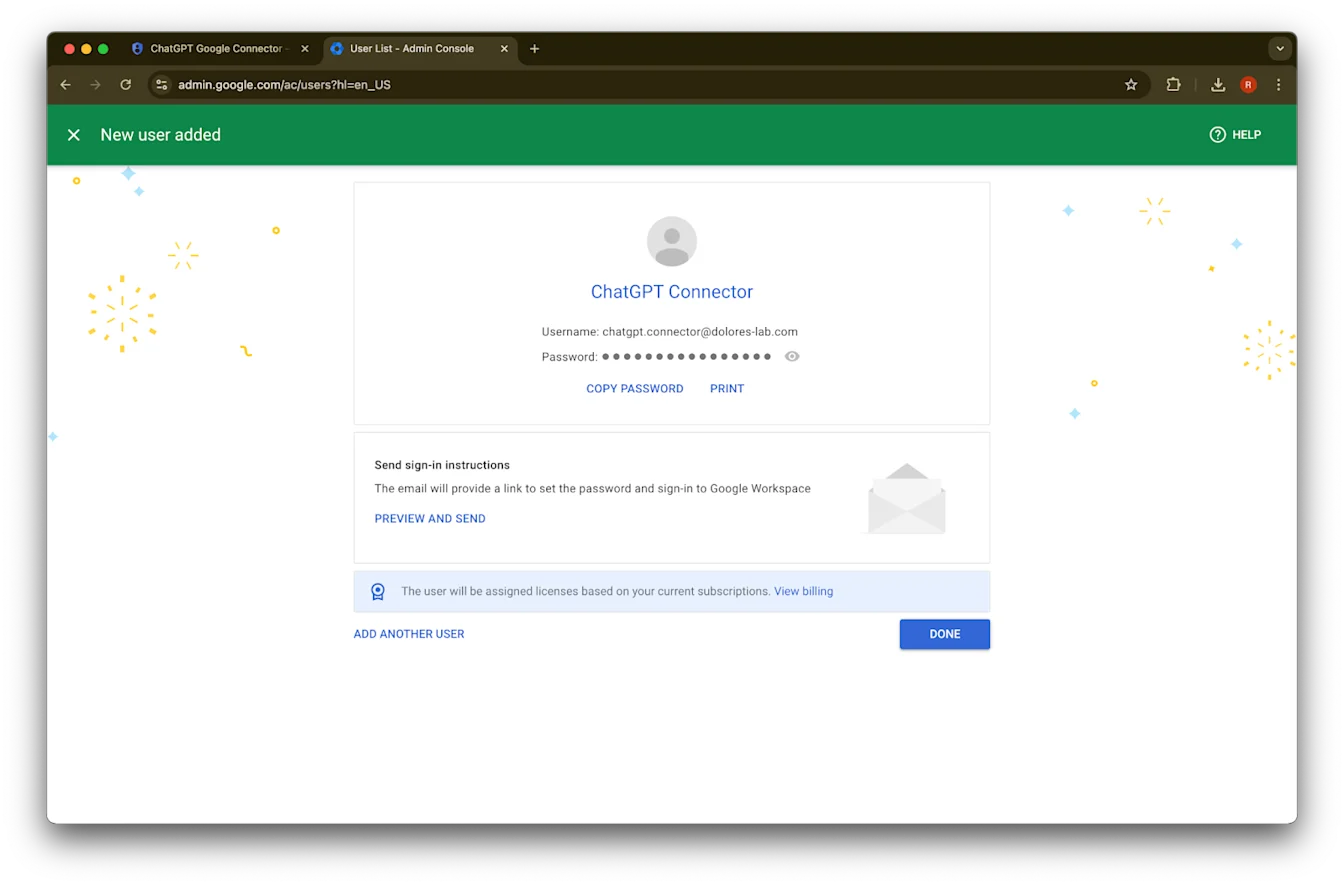
(વૈકલ્પિક) આ ક્રેડેન્શિયલ્સ નોંધો. ChatGPTને આ ક્રેડેન્શિયલ્સની જરૂર નથી.
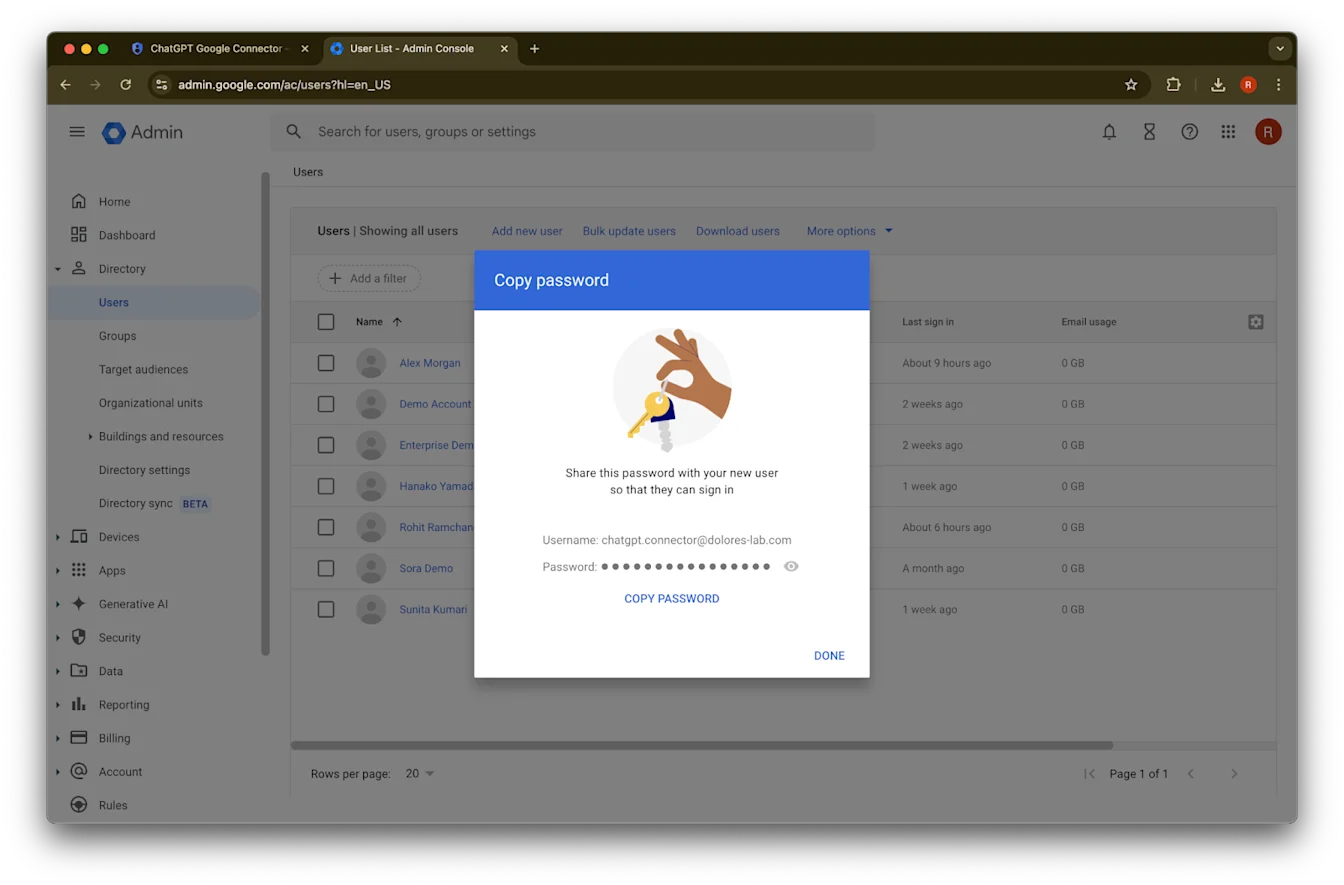
પૂર્ણ પર ક્લિક કરો.
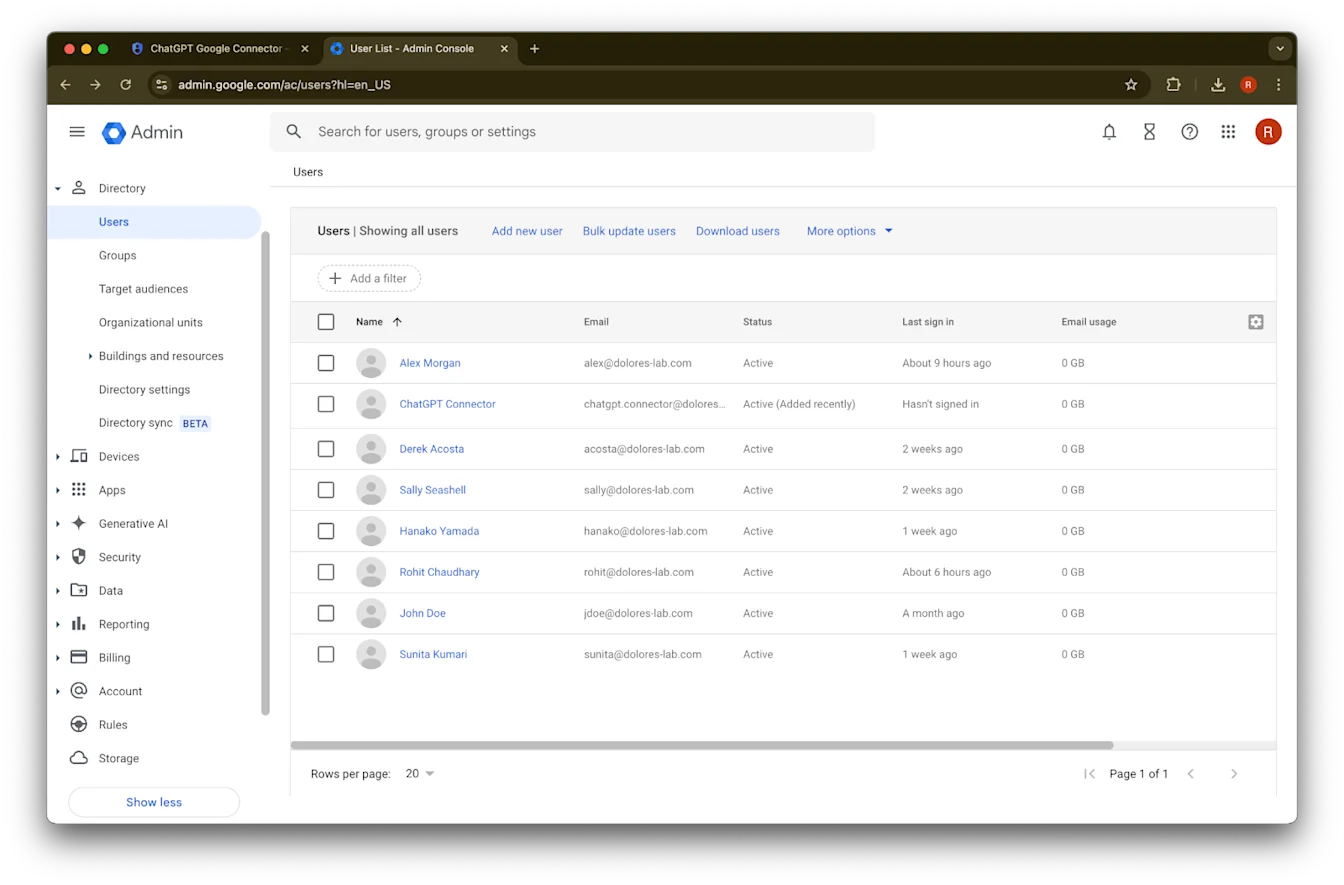
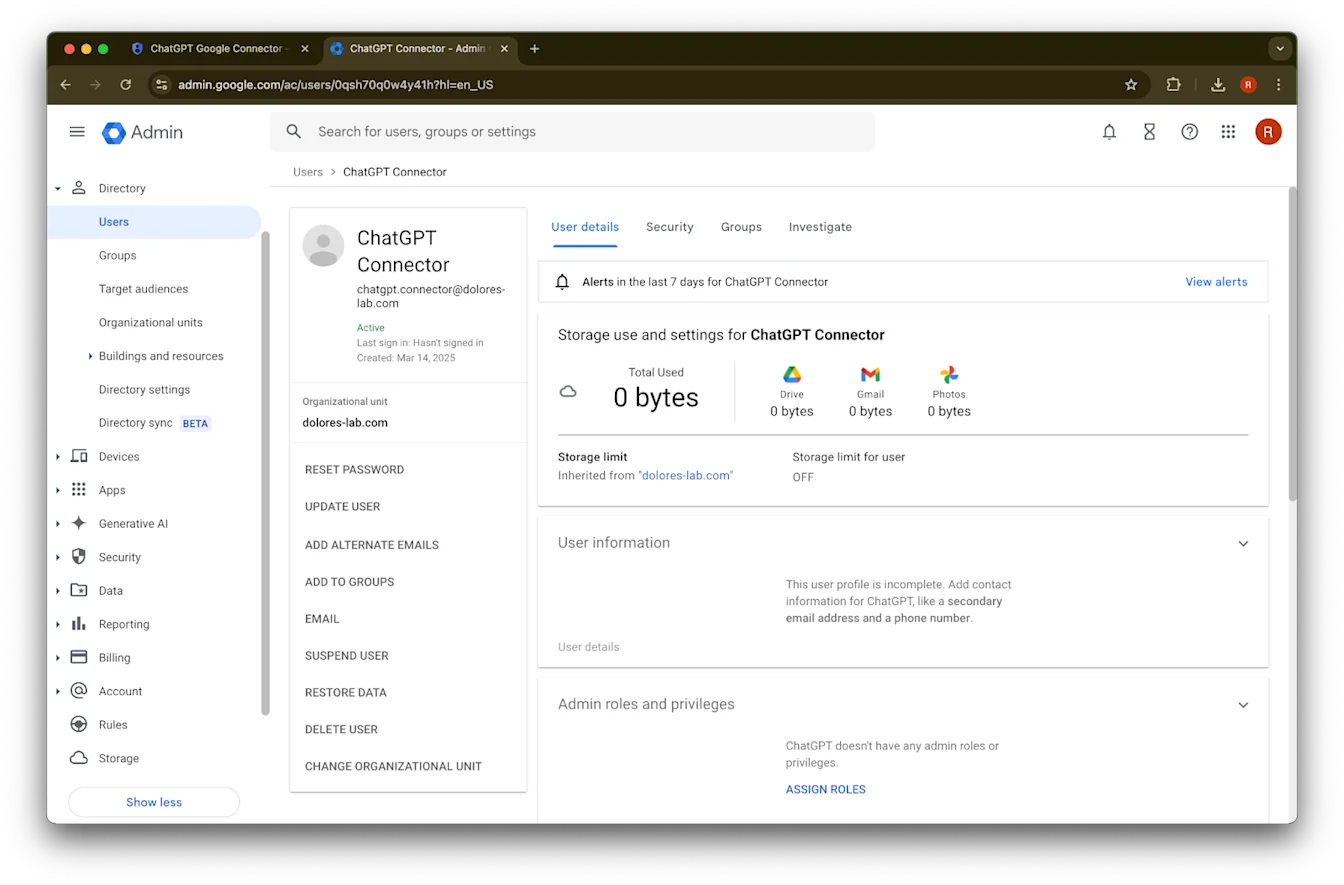
તમે હમણાં બનાવેલા એકાઉન્ટ પર ક્લિક કરો. જો તે સૂચિમાં દેખાતું નથી, તો પેજ રિફ્રેશ કરો અથવા તમારી કૅશ અને કૂકીઝ સાફ કરો અને ફરી પ્રયાસ કરો.
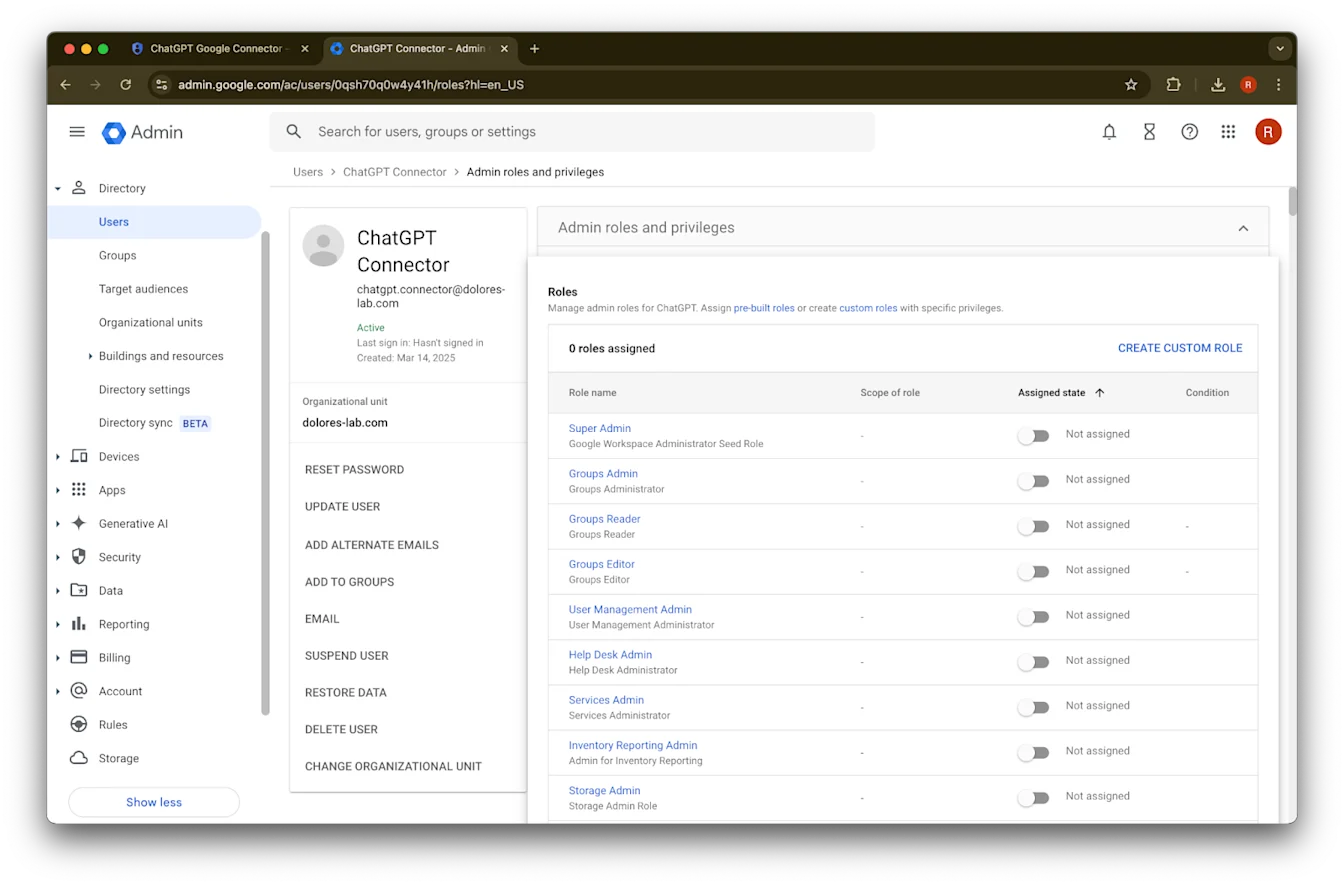
ભૂમિકાઓ અસાઇન કરો પર ક્લિક કરો.
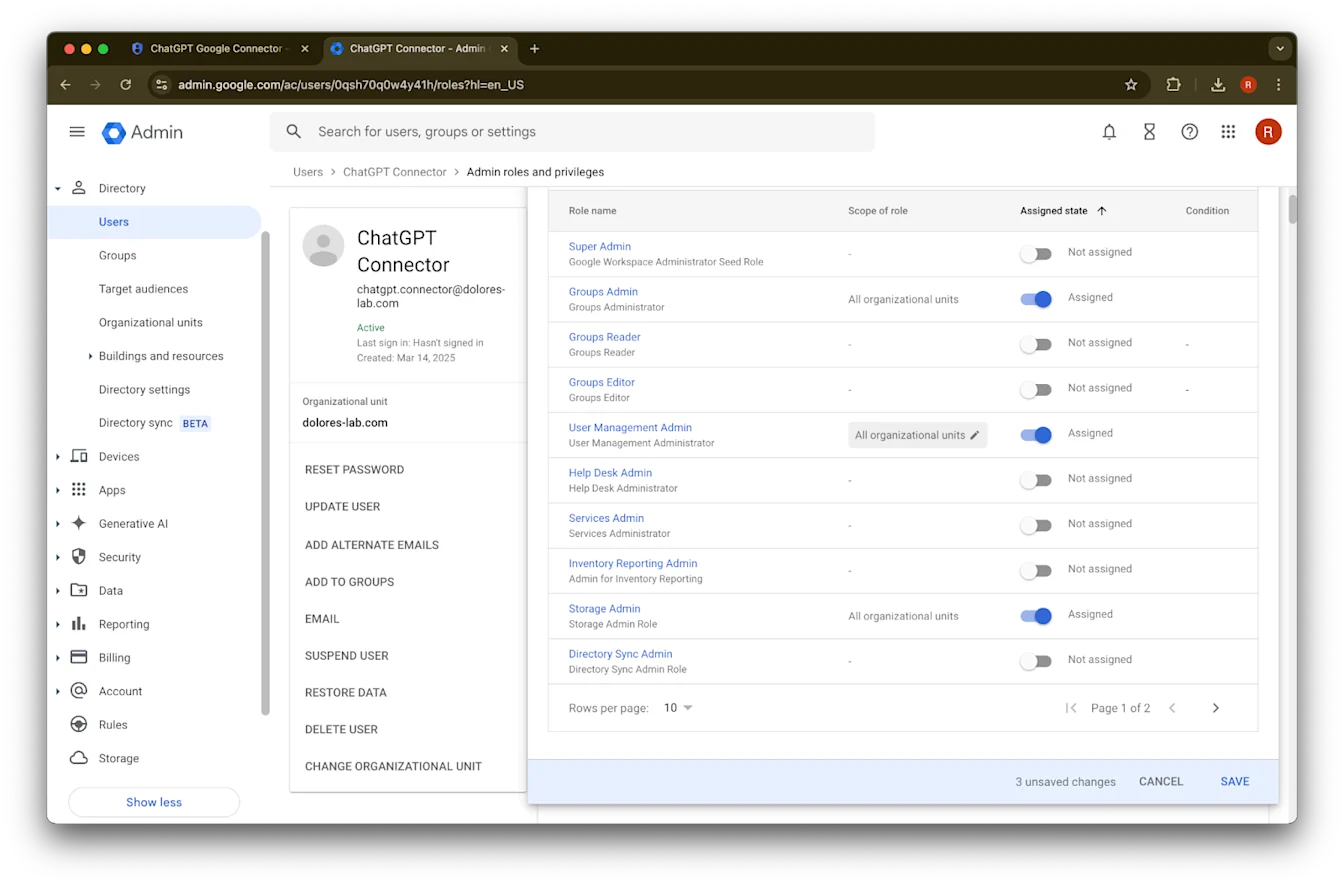
Groups Reader, User Management Admin, અને Storage Admin ભૂમિકાઓ ચાલુ કરો.
નીચે સ્ક્રોલ કરો અને સાચવો. પર ક્લિક કરો એડમિન એકાઉન્ટ હવે સફળતાપૂર્વક બનાવવામાં અને કન્ફિગર કરવામાં આવ્યું છે.
ChatGPT એડમિન કન્સોલ પર સેટઅપ પૂર્ણ કરવું
ChatGPT પર જાઓ અને પેજના ઉપરના જમણા ખૂણામાં પ્રોફાઇલ આઇકન પર ક્લિક કરો.
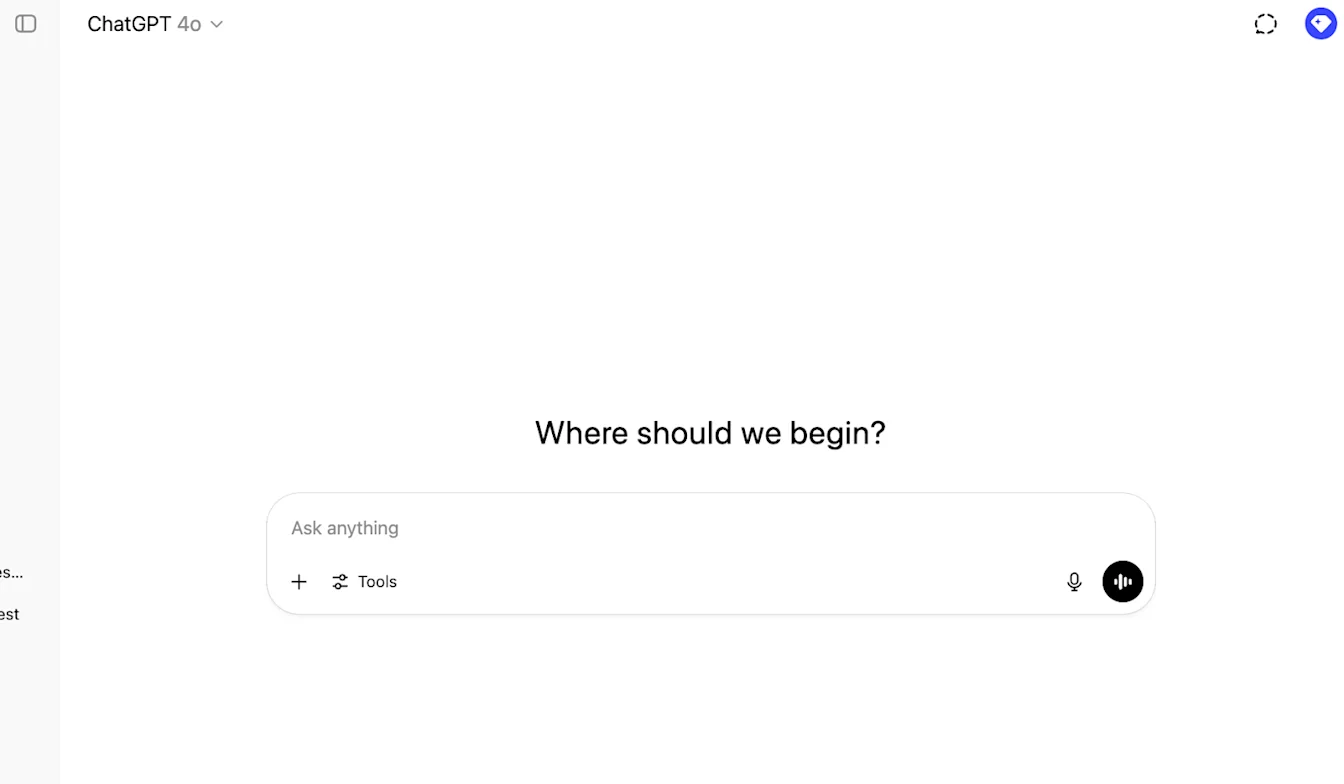
વર્કસ્પેસ મેનેજ કરો પર ક્લિક કરો
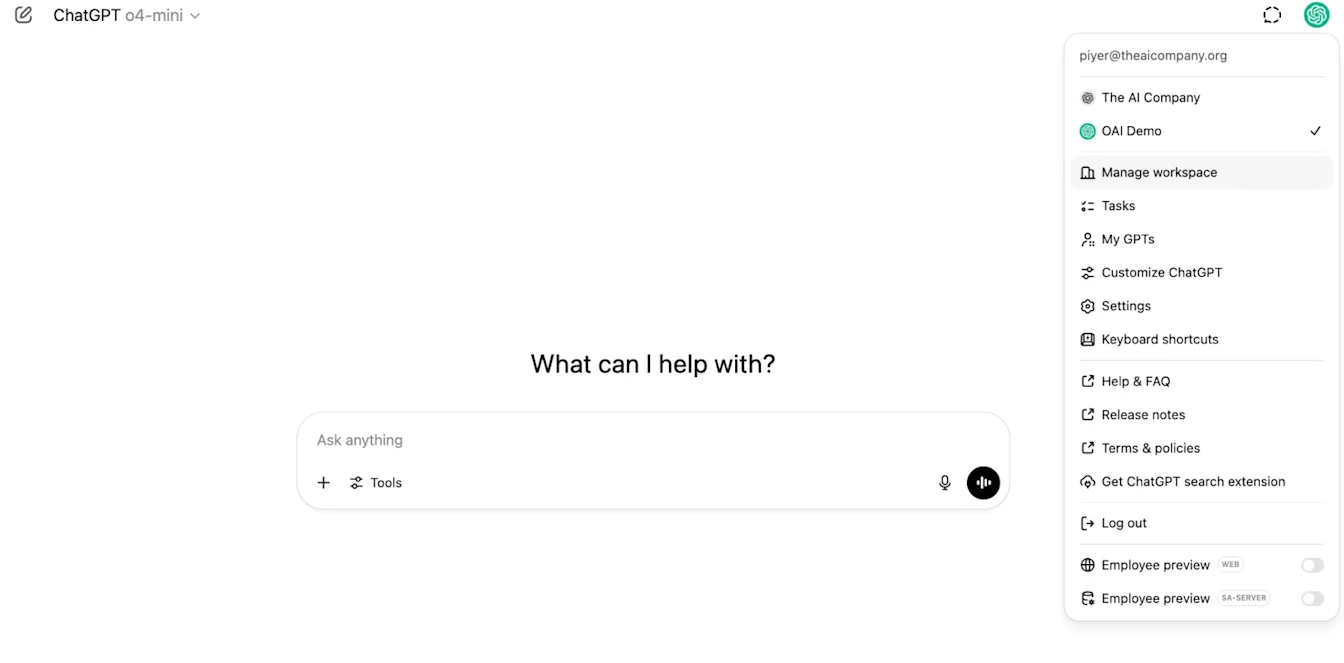
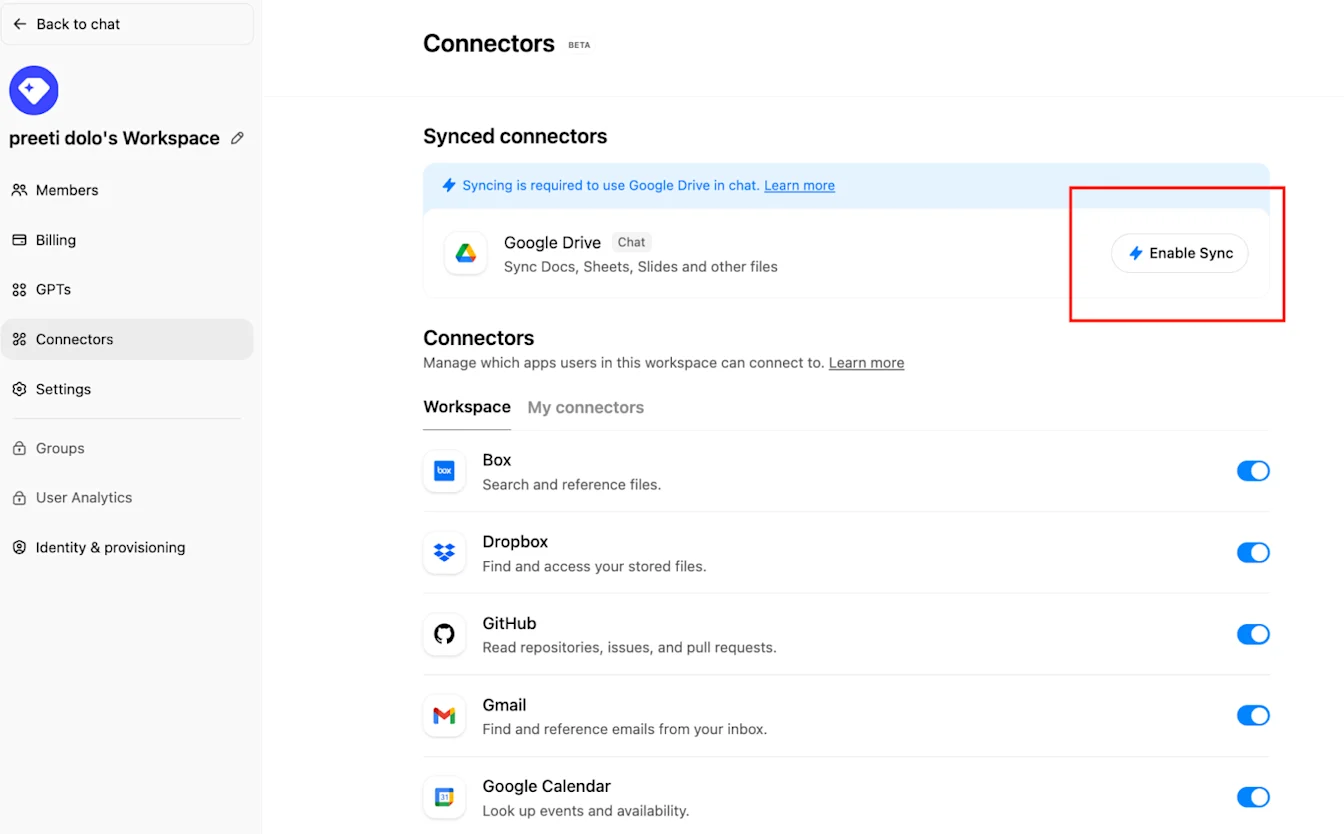
કનેક્શન પર ક્લિક કરો અને પછી ‘સિંક કરેલા કનેક્ટર્સ’ હેઠળ → સિંક સક્ષમ કરો
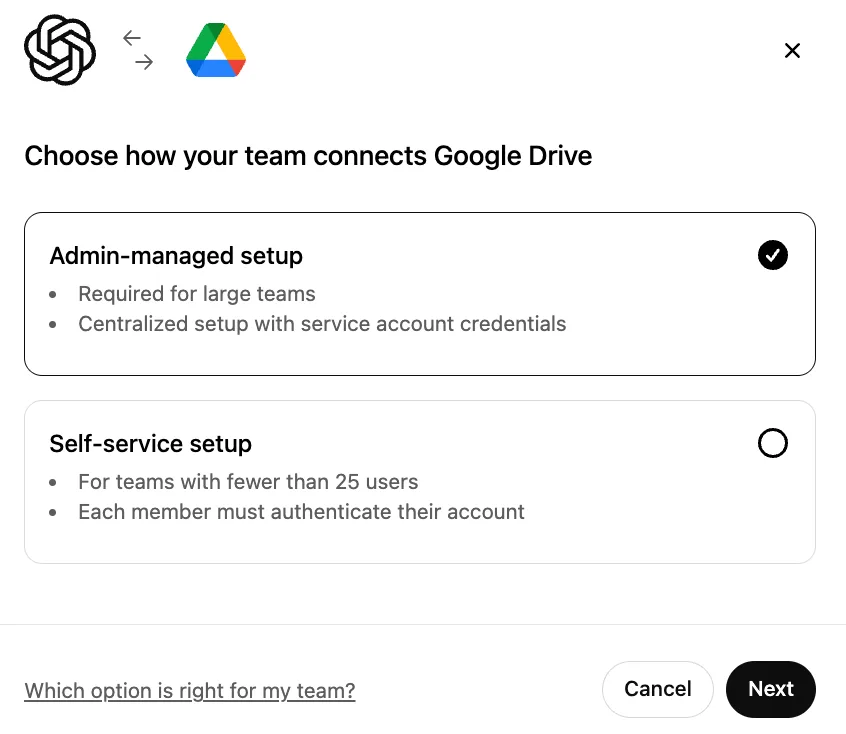
એડમિન-મેનેજ્ડ પસંદ થયેલું છે તેની ખાતરી કરો અને આગળ પર ક્લિક કરો
પ્રદર્શન નામ લખો. અમે તમારા Google Workspaceના નામનો ઉપયોગ કરવાની ભલામણ કરીએ છીએ.
કૃપા કરીને નોંધો કે હાલમાં અમે તમારા કનેક્શનનું નામ બદલવાનું સપોર્ટ કરતા નથી.
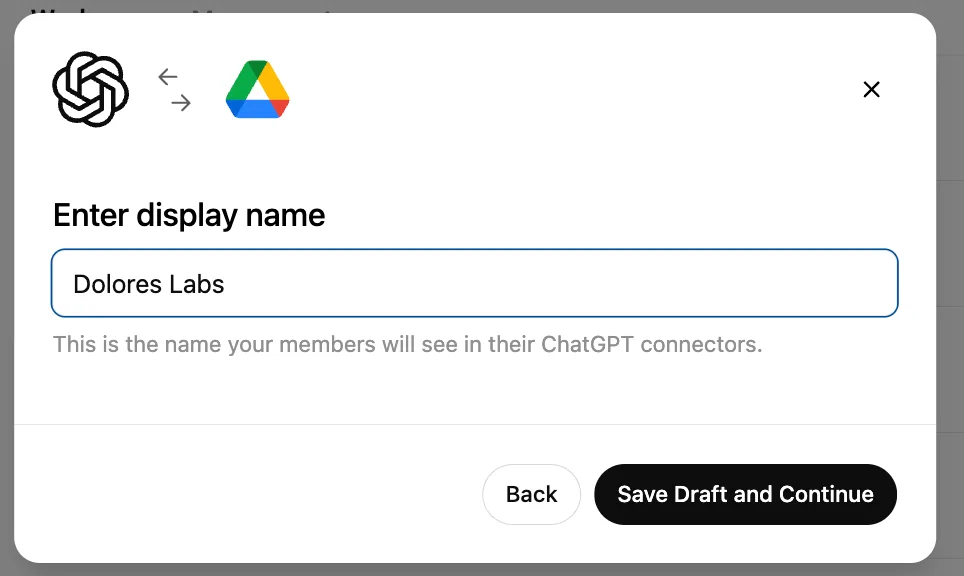
ડ્રાફ્ટ સાચવો અને ચાલુ રાખો પર ક્લિક કરો
કી અપલોડ કરો પર ક્લિક કરો. JSON ફાઇલ પસંદ કરો, જે તમે ઉપર સર્વિસ એકાઉન્ટ સેટઅપ કરતી વખતે ડાઉનલોડ કરેલી કી છે. ખાતરી કરો કે આ કી સચોટ છે
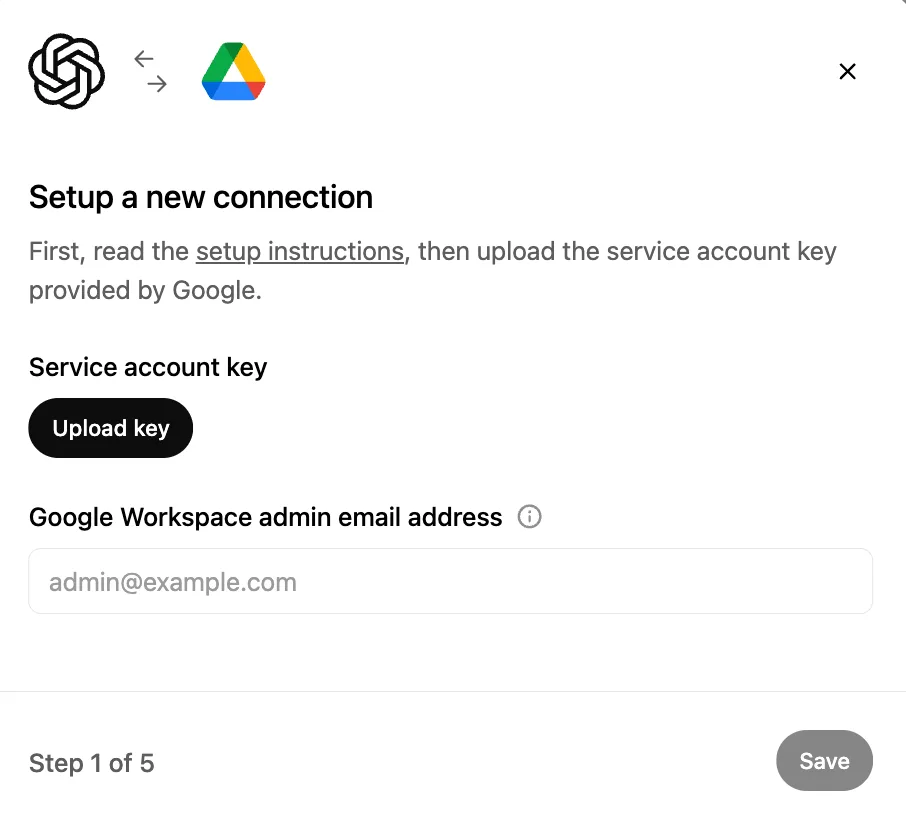
એડમિન ઇમેઇલ સરનામું લખો. આ એ એડમિન એકાઉન્ટ છે જે તમે અગાઉ બનાવ્યું હતું.
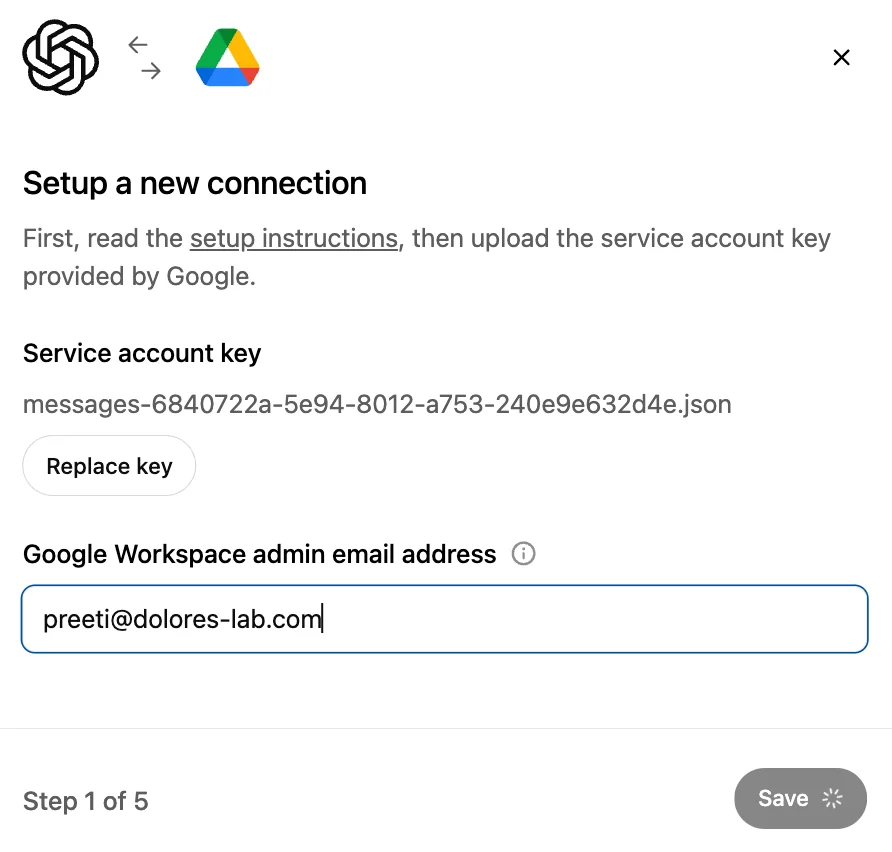
સાચવો. પર ક્લિક કરો
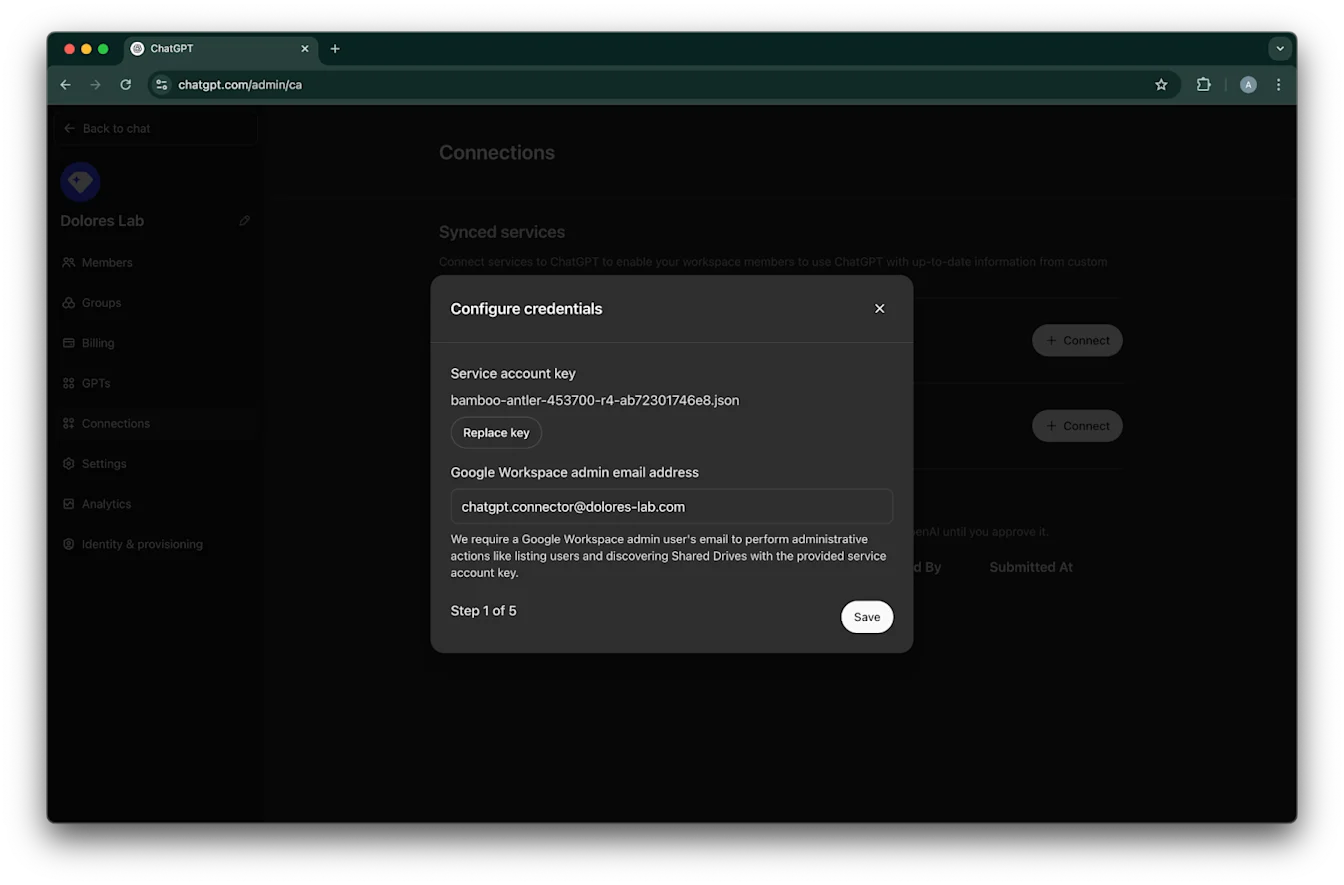
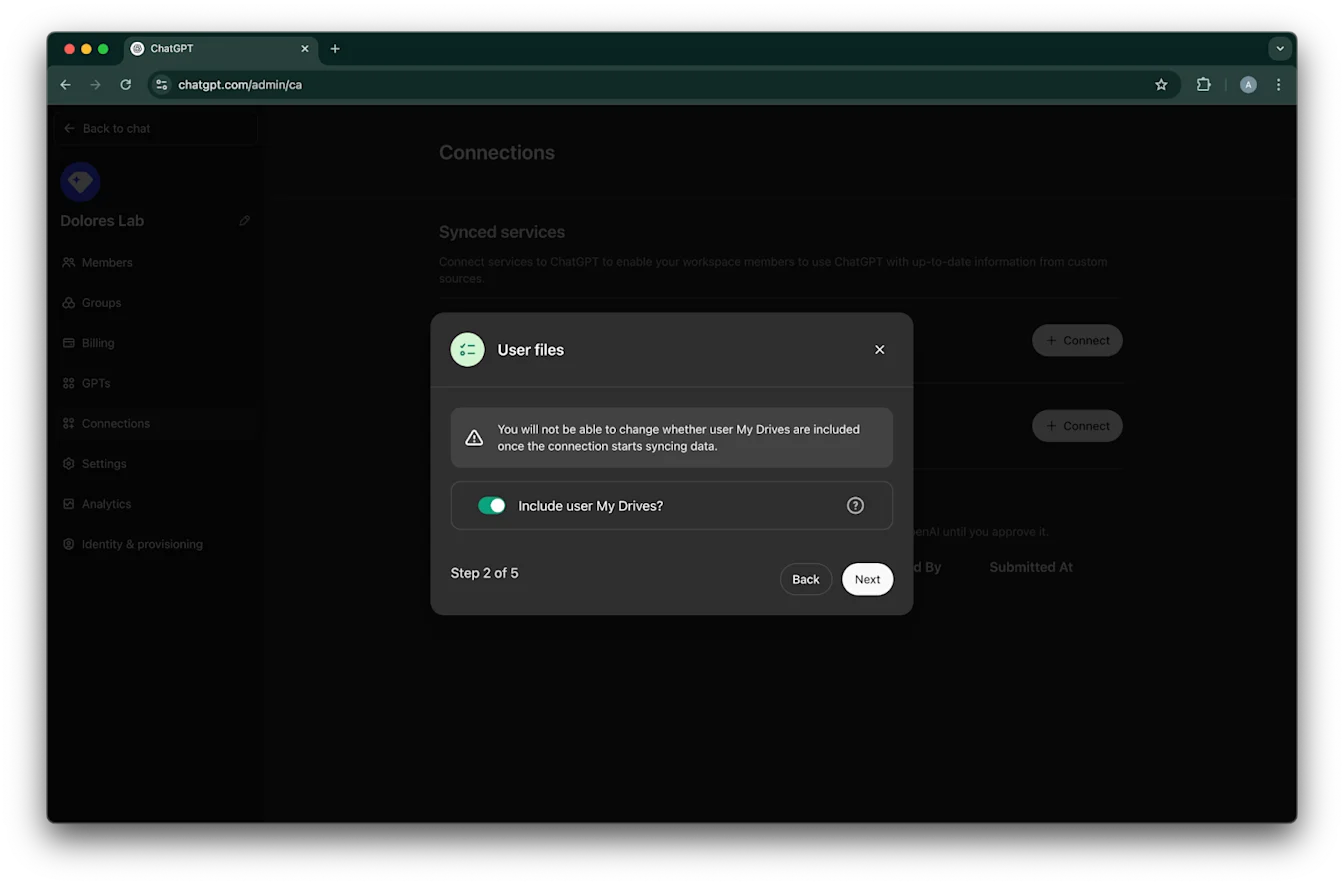
તમારા બધા વપરાશકર્તાઓના My Drivesમાંની ફાઇલો સામેલ કરવી છે કે નહીં તે પસંદ કરો.
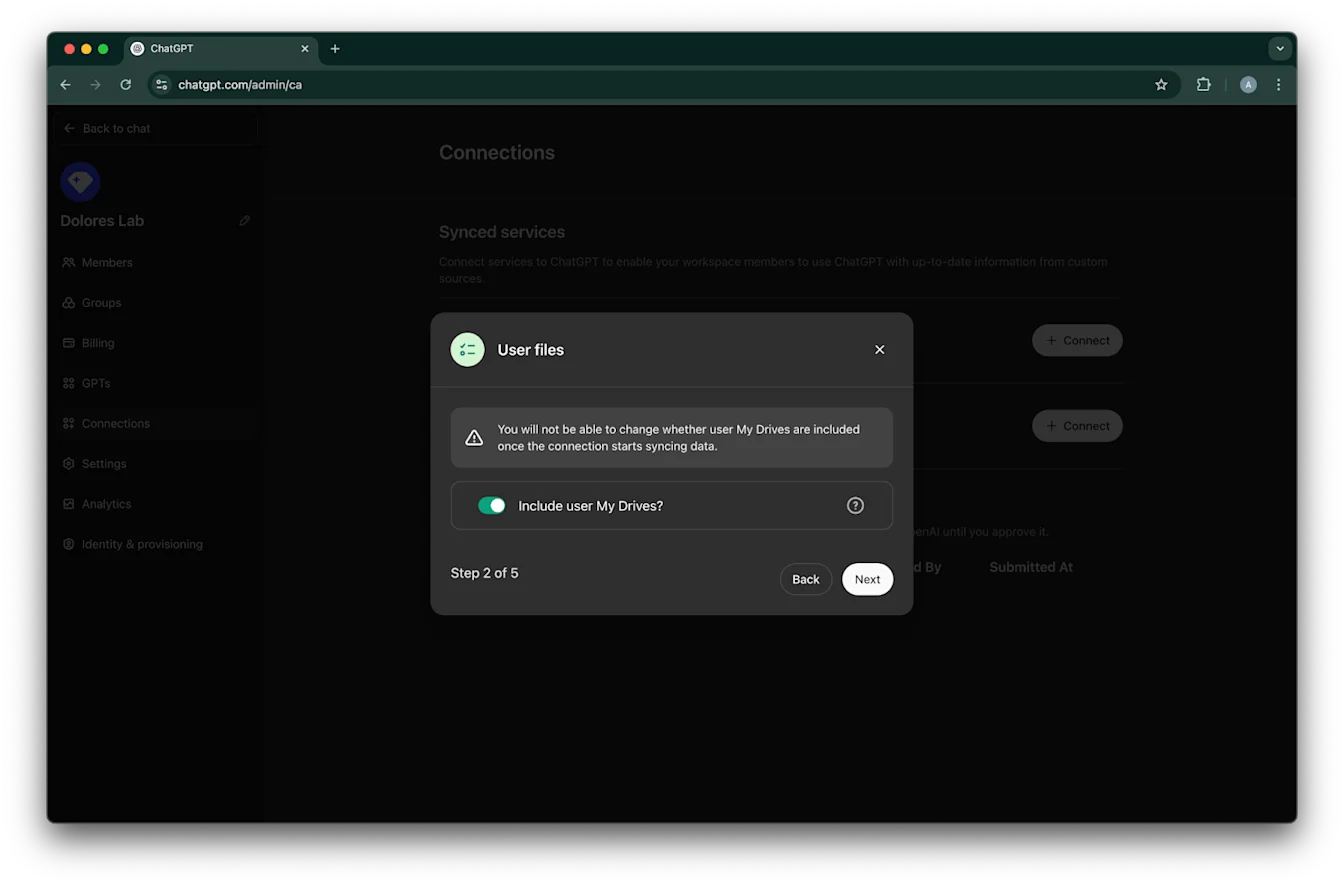
આગળ પર ક્લિક કરો
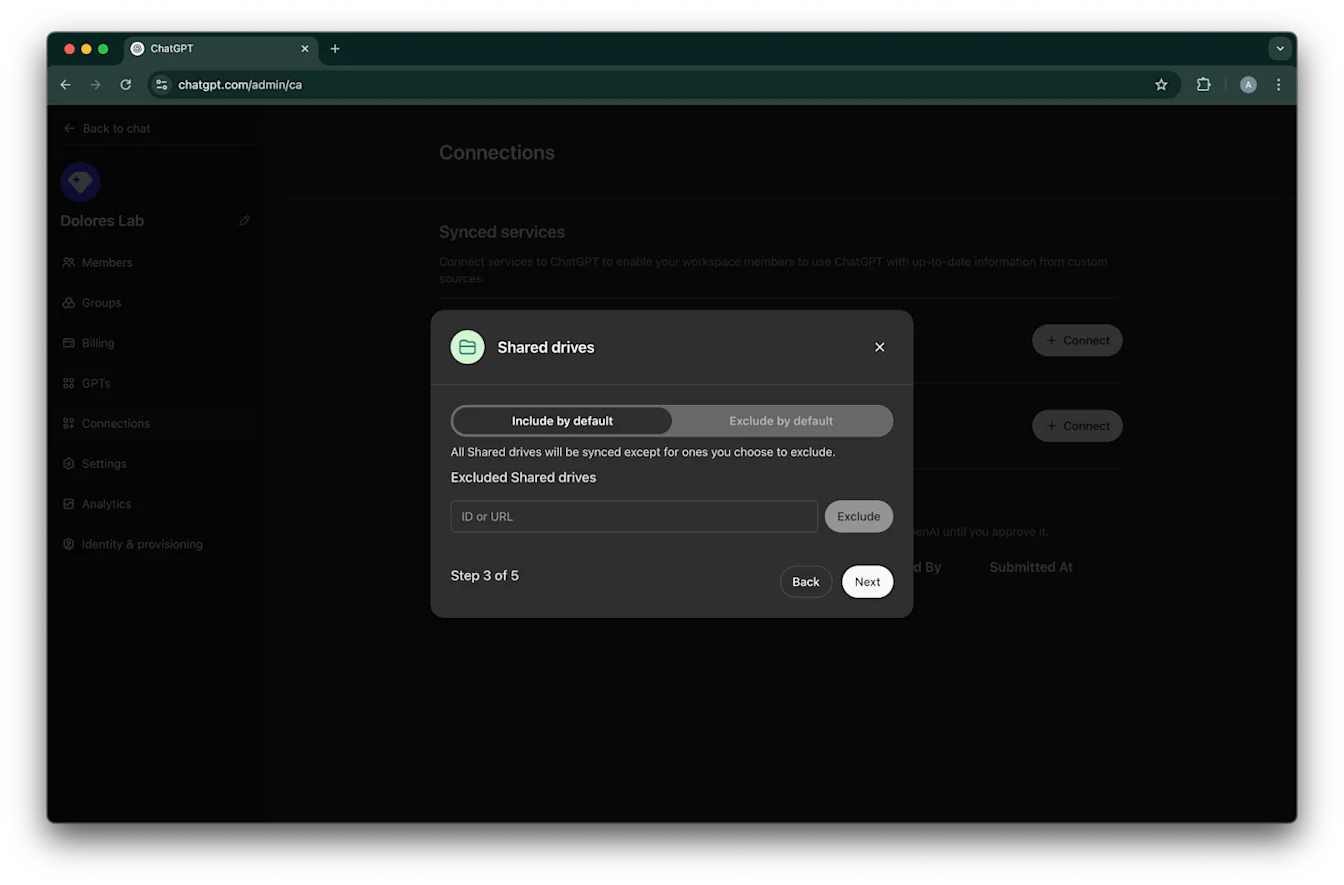
શેર્ડ ડ્રાઇવ્સ કેવી રીતે મેનેજ કરવી તે પસંદ કરો. અમે નીચેના ત્રણ પરિદૃશ્યોને સપોર્ટ કરીએ છીએ:
જો તમે બધી શેર્ડ ડ્રાઇવ્સ સામેલ કરવા માંગતા હો, તો મૂળભૂત રીતે સામેલ કરો પસંદ કરો અને બાકાત રાખવાની શેર્ડ ડ્રાઇવ IDs ઉમેરશો નહીં
જો તમે મોટાભાગની શેર્ડ ડ્રાઇવ્સ સામેલ કરવા માંગતા હો, તો મૂળભૂત રીતે સામેલ કરો પસંદ કરો અને તમે બાકાત રાખવા માંગો છો તે શેર્ડ ડ્રાઇવ્સ માટે IDs ઉમેરો
જો તમે મોટાભાગની શેર્ડ ડ્રાઇવ્સ બાકાત રાખવા માંગતા હો, તો મૂળભૂત રીતે બાકાત રાખો પસંદ કરો અને તમે સામેલ કરવા માંગો છો તે શેર્ડ ડ્રાઇવ્સ માટે IDs ઉમેરો
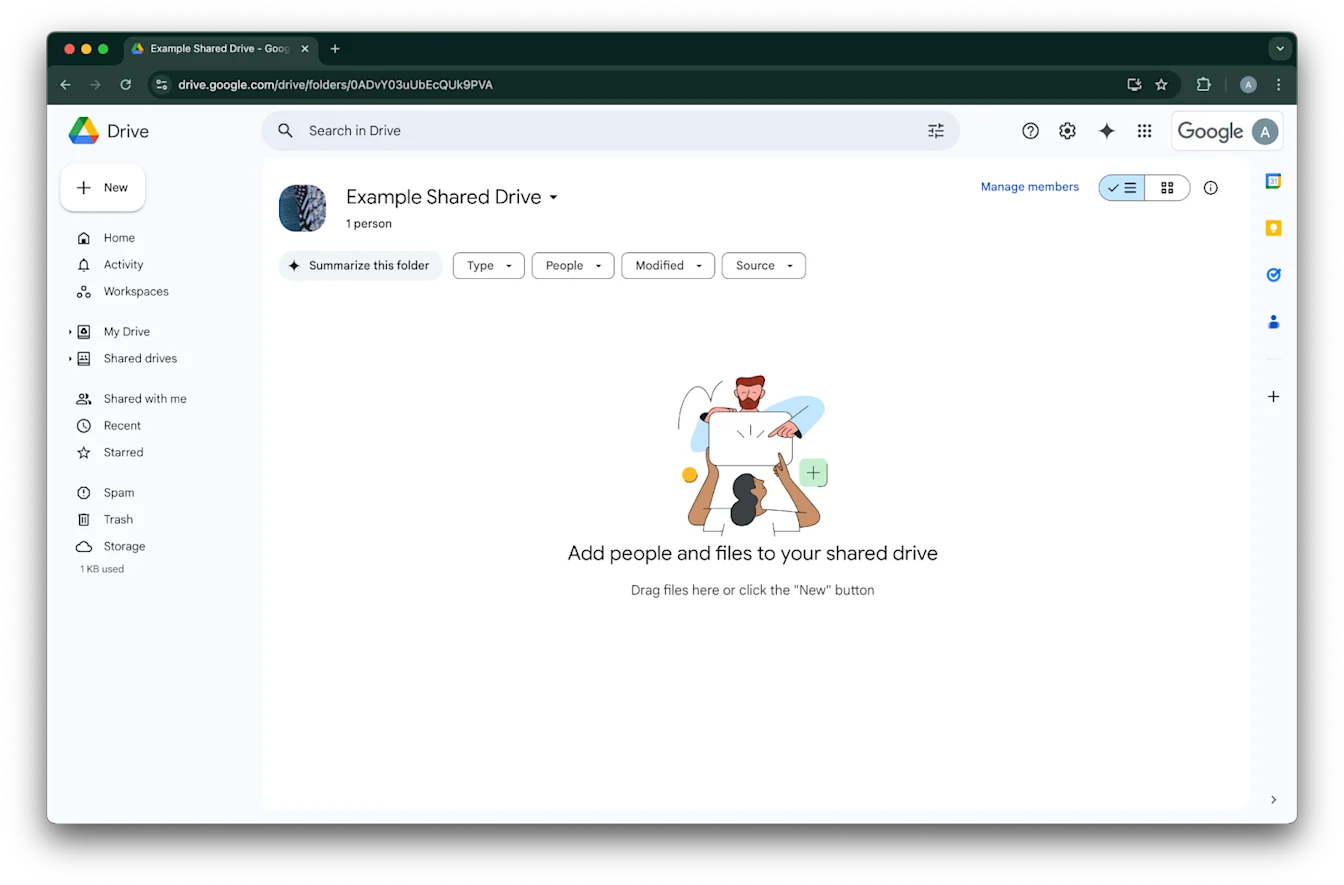
શેર્ડ ડ્રાઇવ માટે ID શોધવા માટે, વેબ બ્રાઉઝરમાં તેના પર જાઓ. URLનો છેલ્લો ભાગ શેર્ડ ડ્રાઇવ ID છે.
નીચેના ઉદાહરણમાં, તે 0ADvY03uUbEcQUk9PVA છે.
આગળ પર ક્લિક કરો
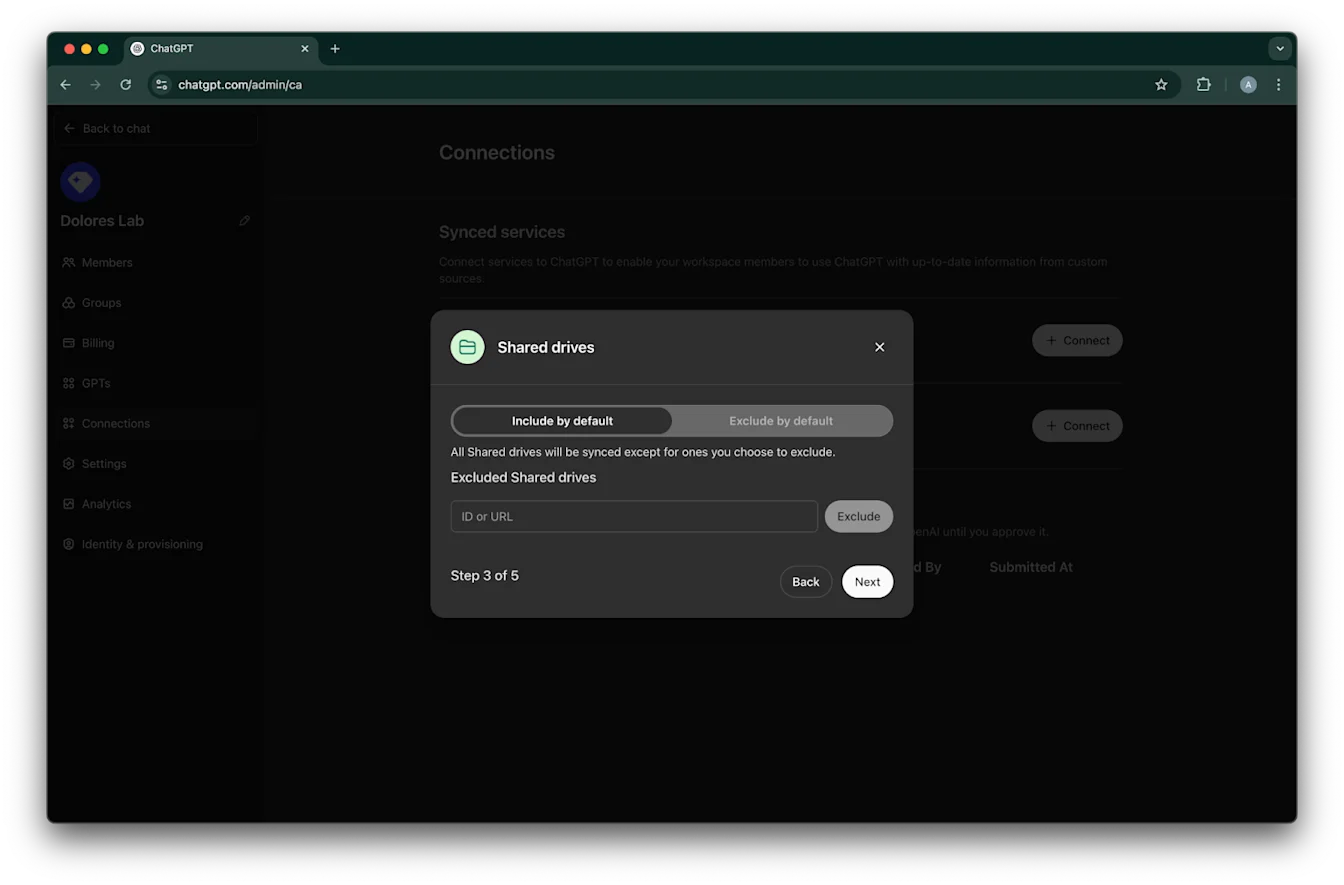
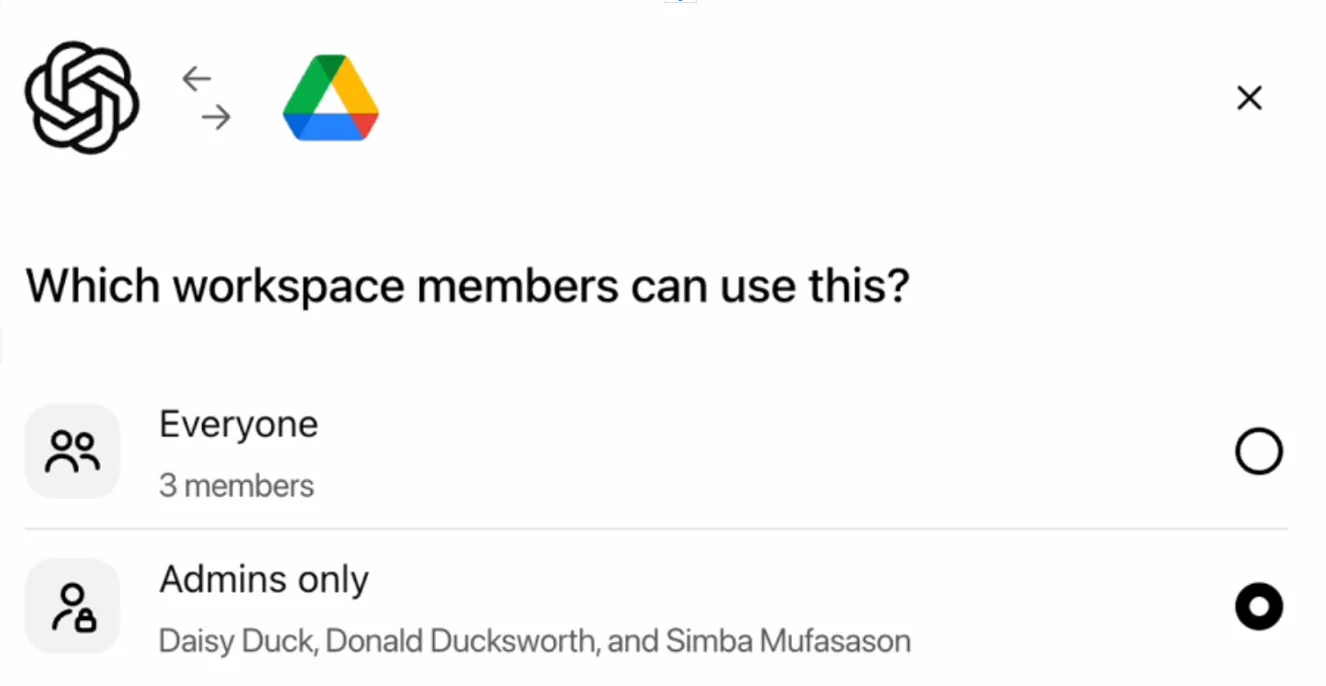
Google Drive કનેક્શનની ઍક્સેસ કોને હોવી જોઈએ તે પસંદ કરો. તમે ફક્ત ChatGPT વર્કસ્પેસના એડમિન્સ પસંદ કરી શકો છો અથવા તેને દરેક માટે સક્ષમ કરી શકો છો. જો દરેક માટે સક્ષમ કરેલ હોય, તો વર્કસ્પેસમાં ઉમેરાયેલા નવા વપરાશકર્તાઓ આપમેળે સામેલ થશે.
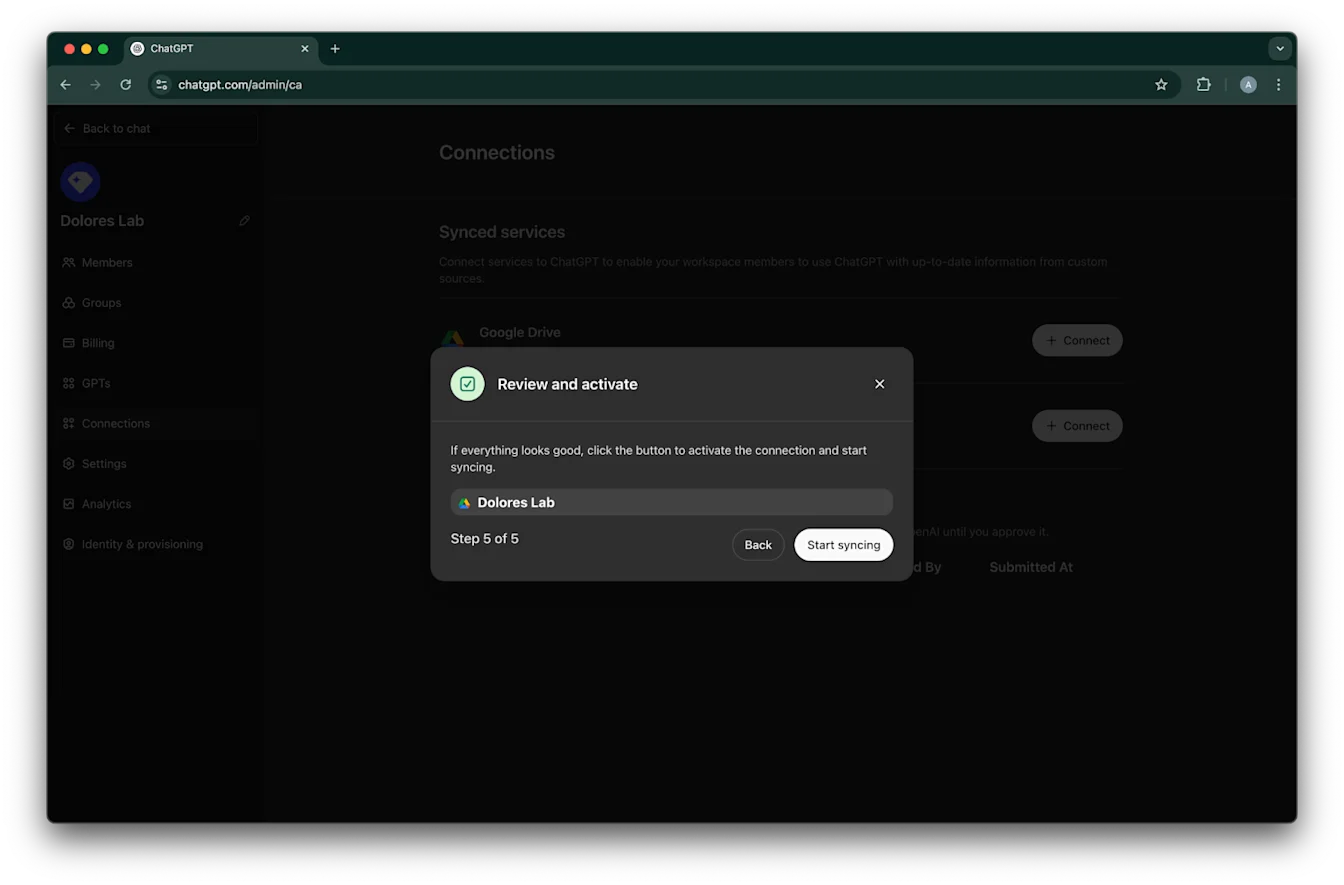
સિંક કરવાનું શરૂ કરો પર ક્લિક કરો
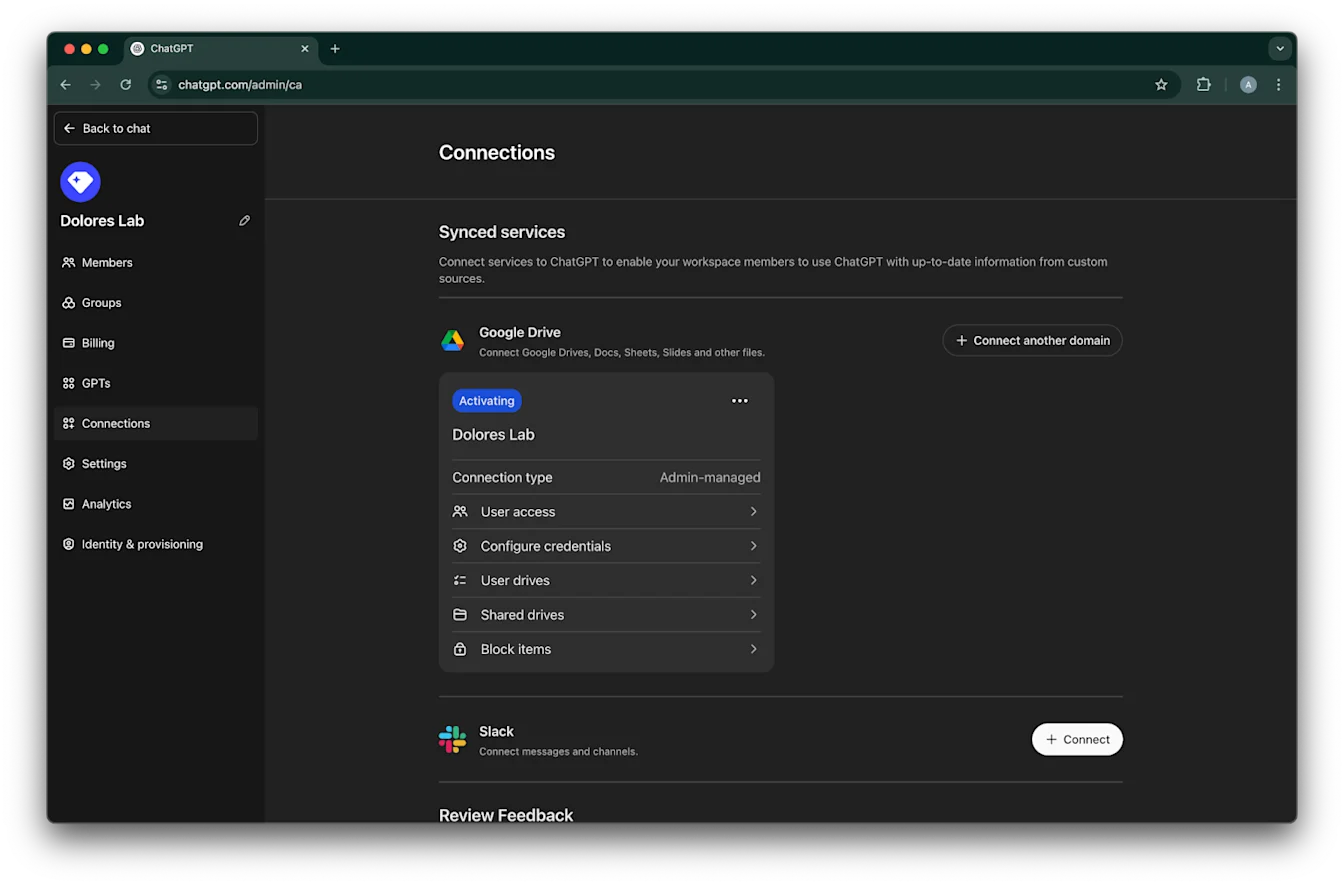
તમારું Google Drive કનેક્શન હવે સફળતાપૂર્વક બનાવવામાં આવ્યું છે!
કૃપા કરીને નોંધો કે, તે તરત જ સિંક કરવાનું શરૂ કરશે, છતાં તમારી સેટિંગ્સના આધારે કેટલી ફાઇલો સામેલ કરવામાં આવી છે તેના પર નિર્ભર રહીને પૂર્ણ થવામાં કલાકોથી દિવસો લાગી શકે છે. પાછલા 30 દિવસમાં ઉમેરેલી/સંપાદિત કરેલી ફાઇલોનું સિંકિંગ પૂર્ણ થઈ જાય પછી, કનેક્ટર તમે જેને માટે સક્ષમ કર્યું છે તે વપરાશકર્તાઓ માટે ઉપલબ્ધ થશે.
સર્વિસ એકાઉન્ટ કી બનાવવાનું સક્ષમ કરવું
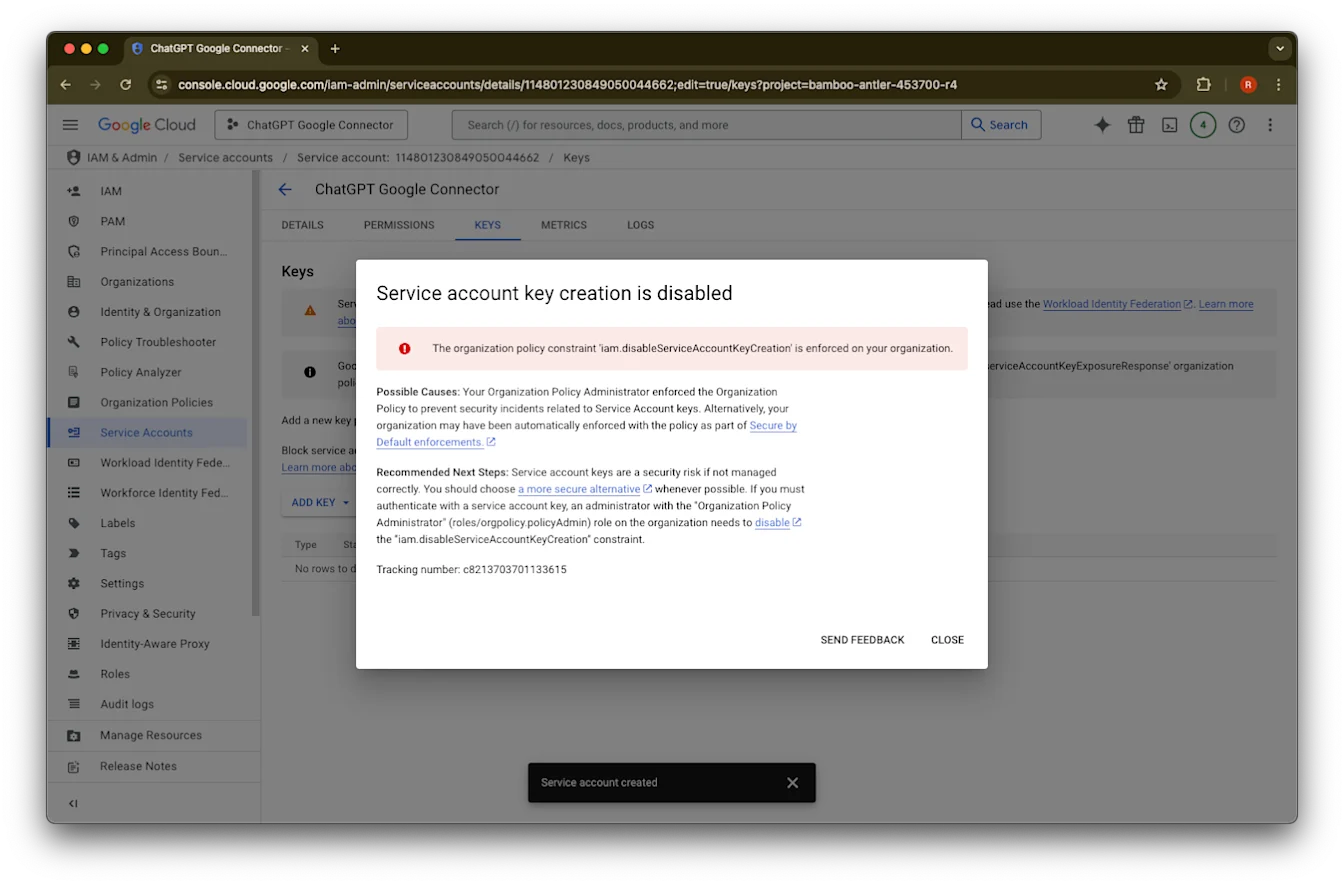
જો તમને નીચેની ભૂલ મળે, તો તમારે આ ચોક્કસ પ્રોજેક્ટ માટે સર્વિસ એકાઉન્ટ બનાવવાનું સક્ષમ કરવું પડશે:
સંસ્થા નીતિ નિયંત્રણ ‘iam.disableServiceAccountKeyCreation’ તમારી સંસ્થા પર લાગુ છે.
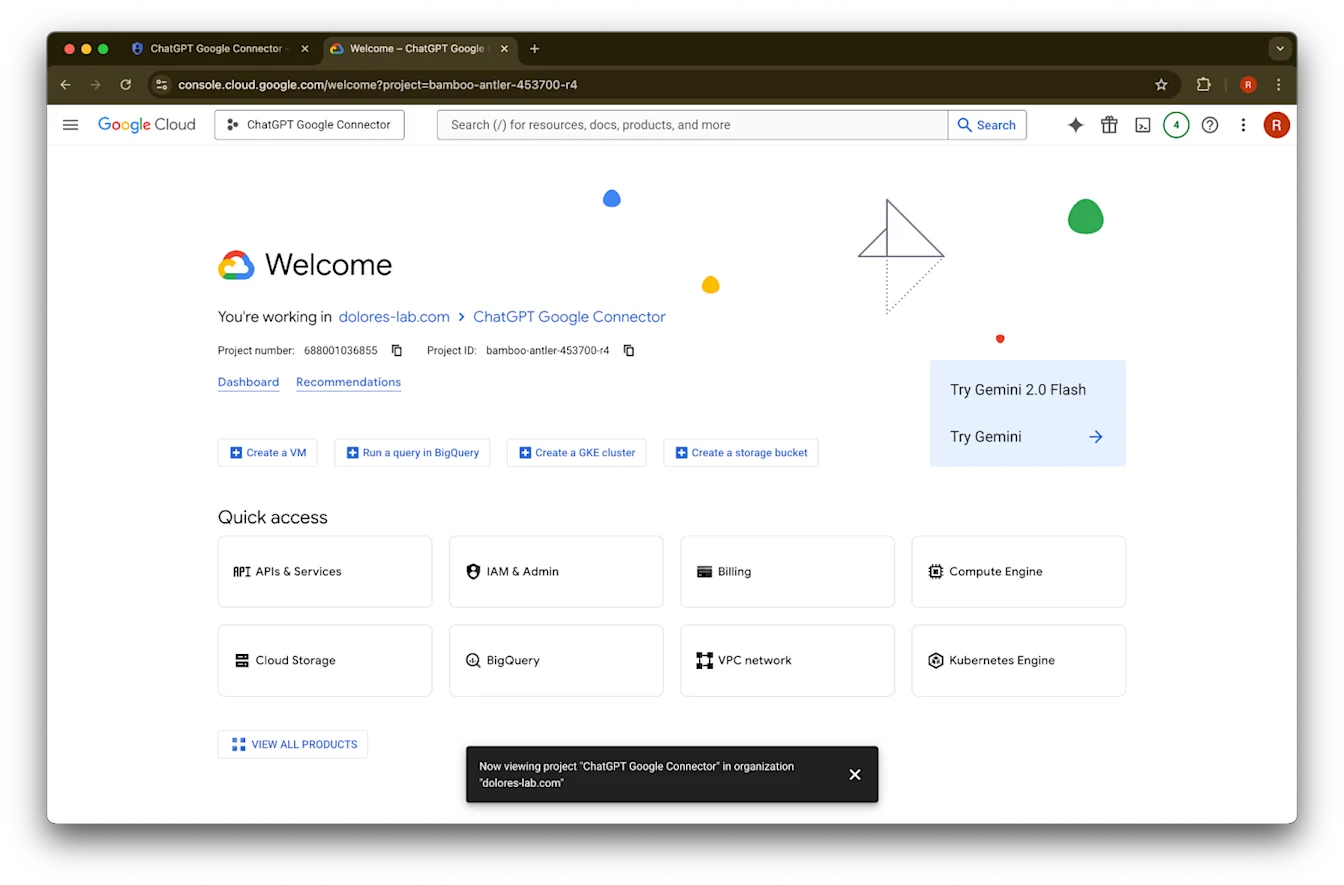
નવું ટૅબ ખોલો અને console.cloud.google.com પર જાઓ. ખાતરી કરો કે પસંદ કરેલો પ્રોજેક્ટ એ જ છે જે તમે પહેલેથી પસંદ કર્યો છે.
ઉપરના ડાબા ખૂણામાં મેનૂ આઇકન પર ક્લિક કરો.
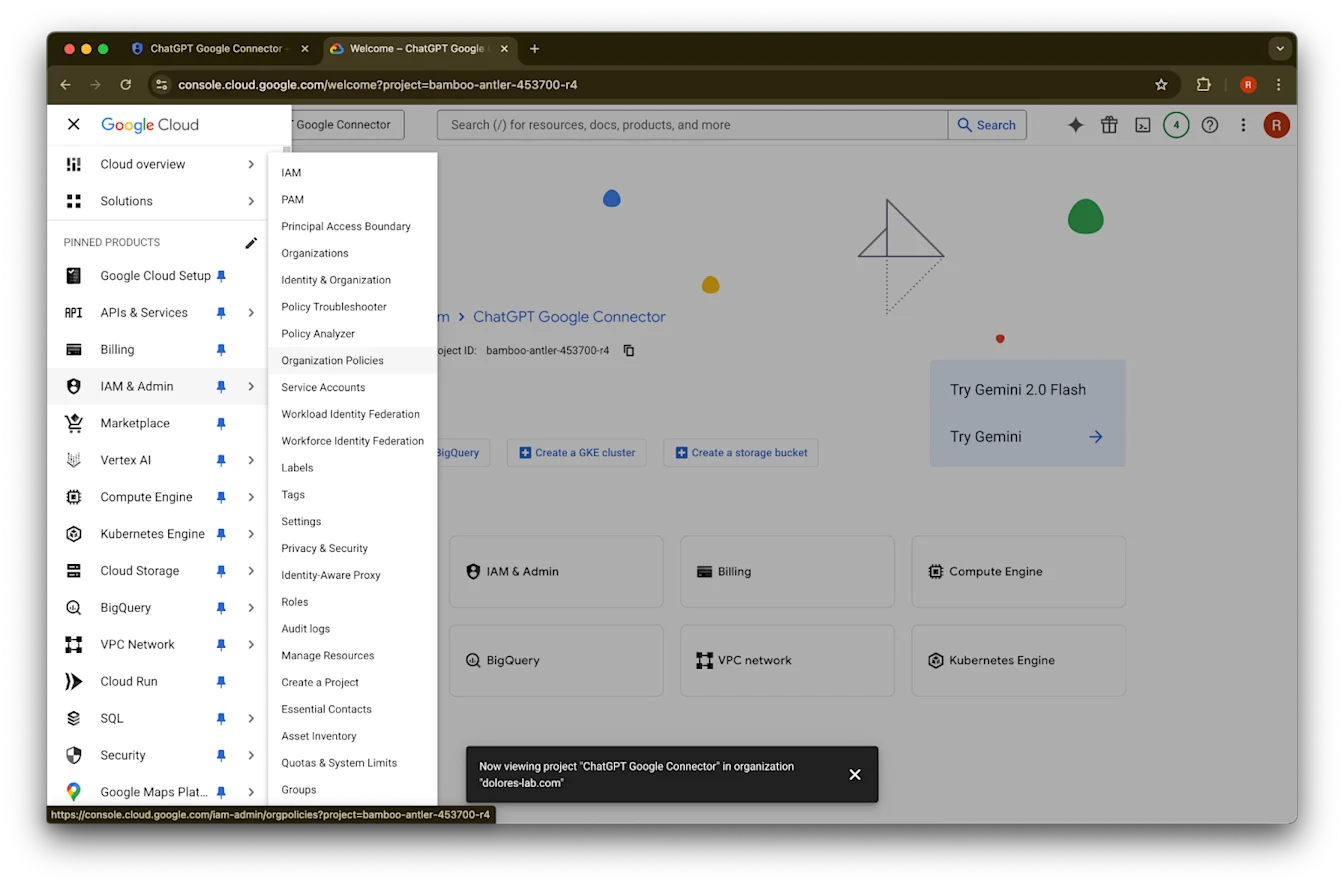
IAM અને એડમિન પર હોવર કરો
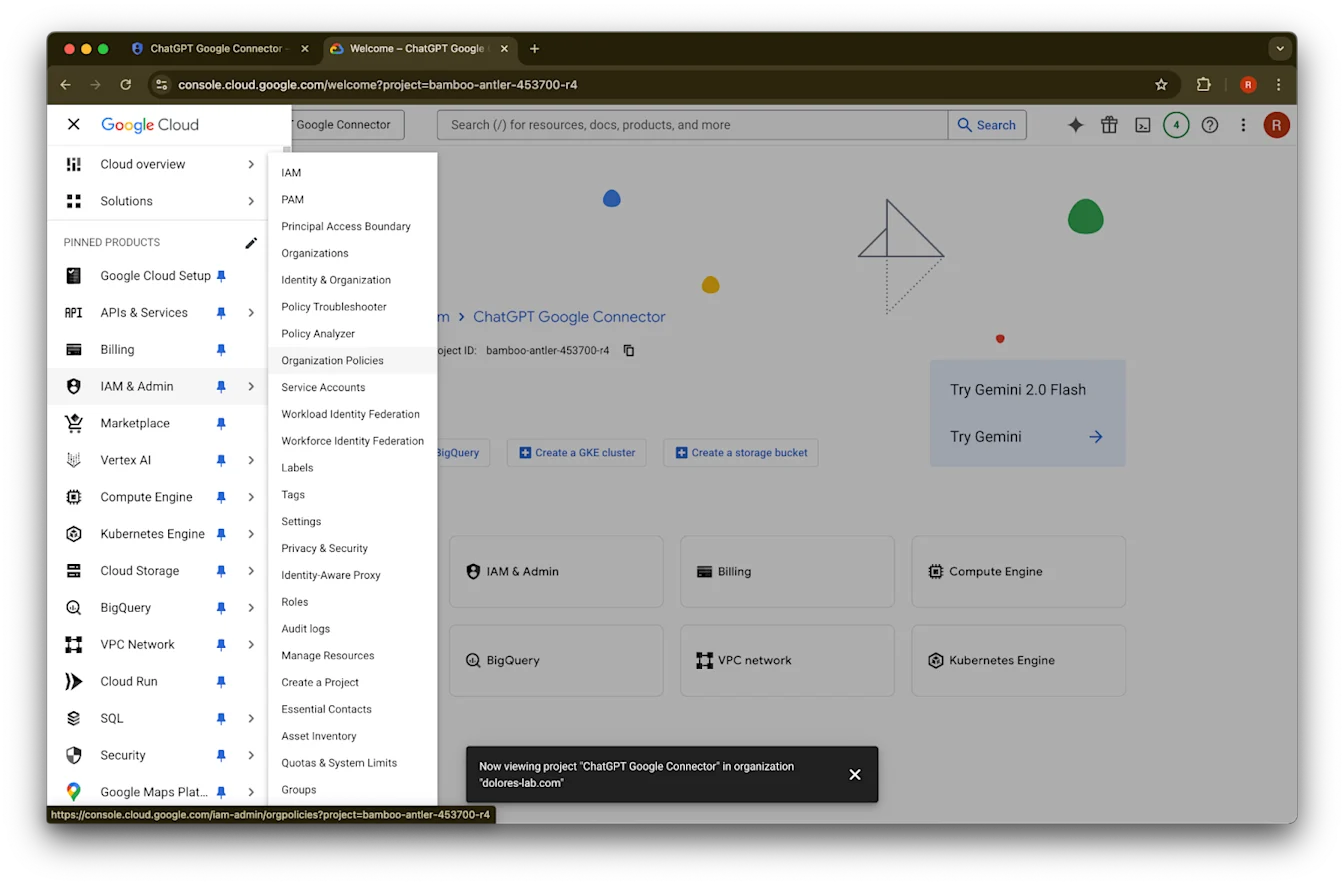
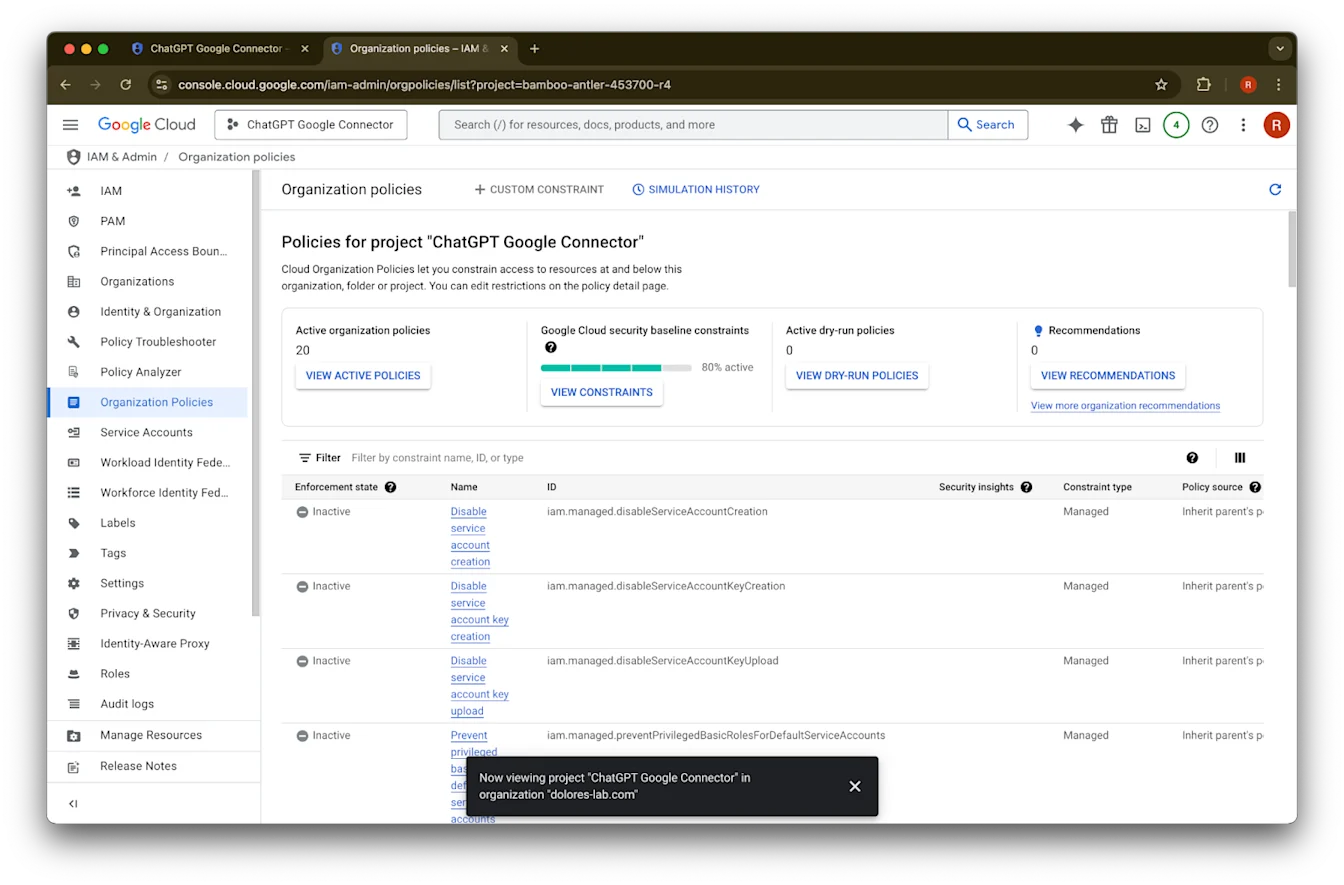
સંસ્થાકીય નીતિઓ પર ક્લિક કરો
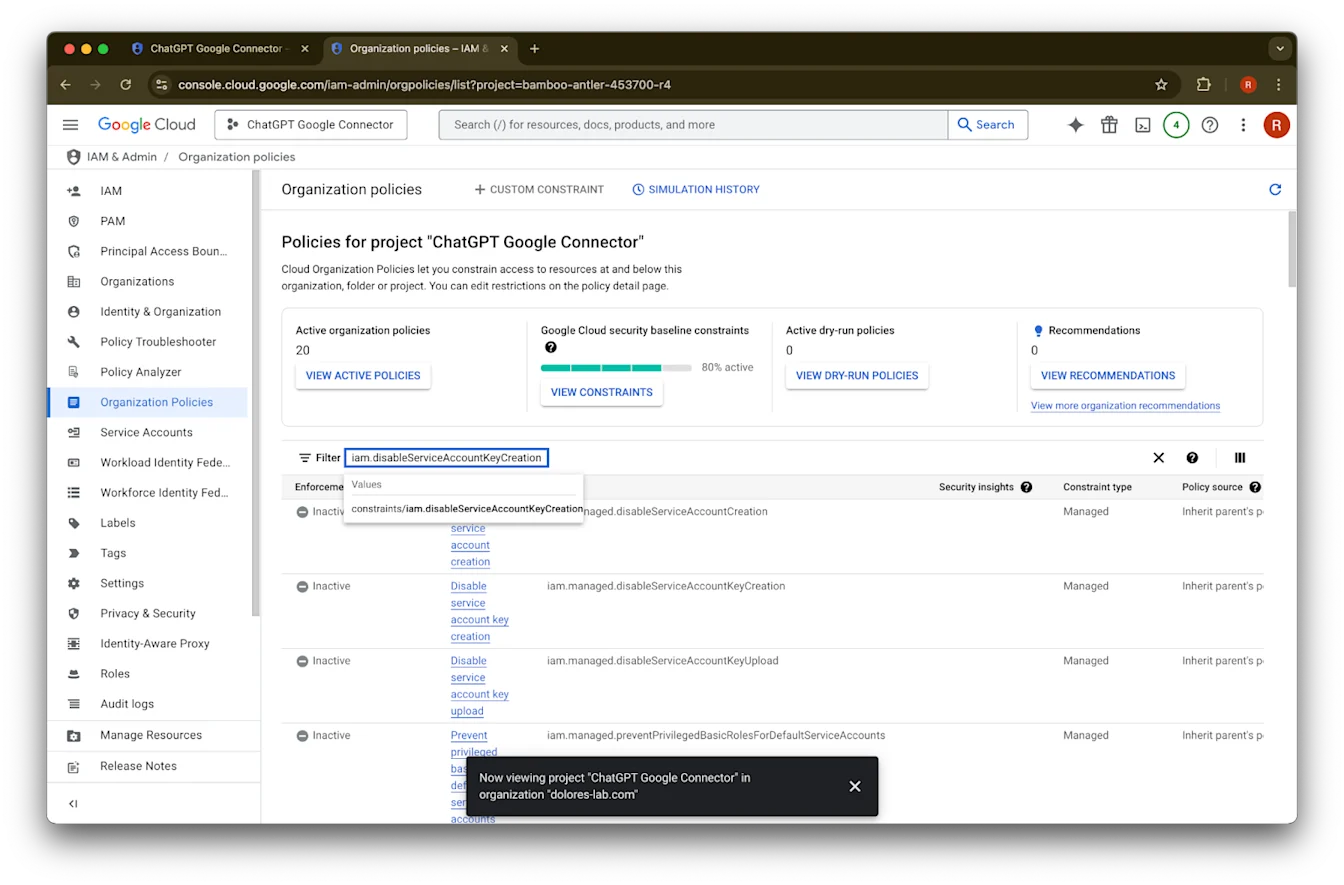
iam.disableServiceAccountKeyCreation શોધો
constraints/iam.disableServiceAccountKeyCreation માટેના પરિણામ પર ક્લિક કરો
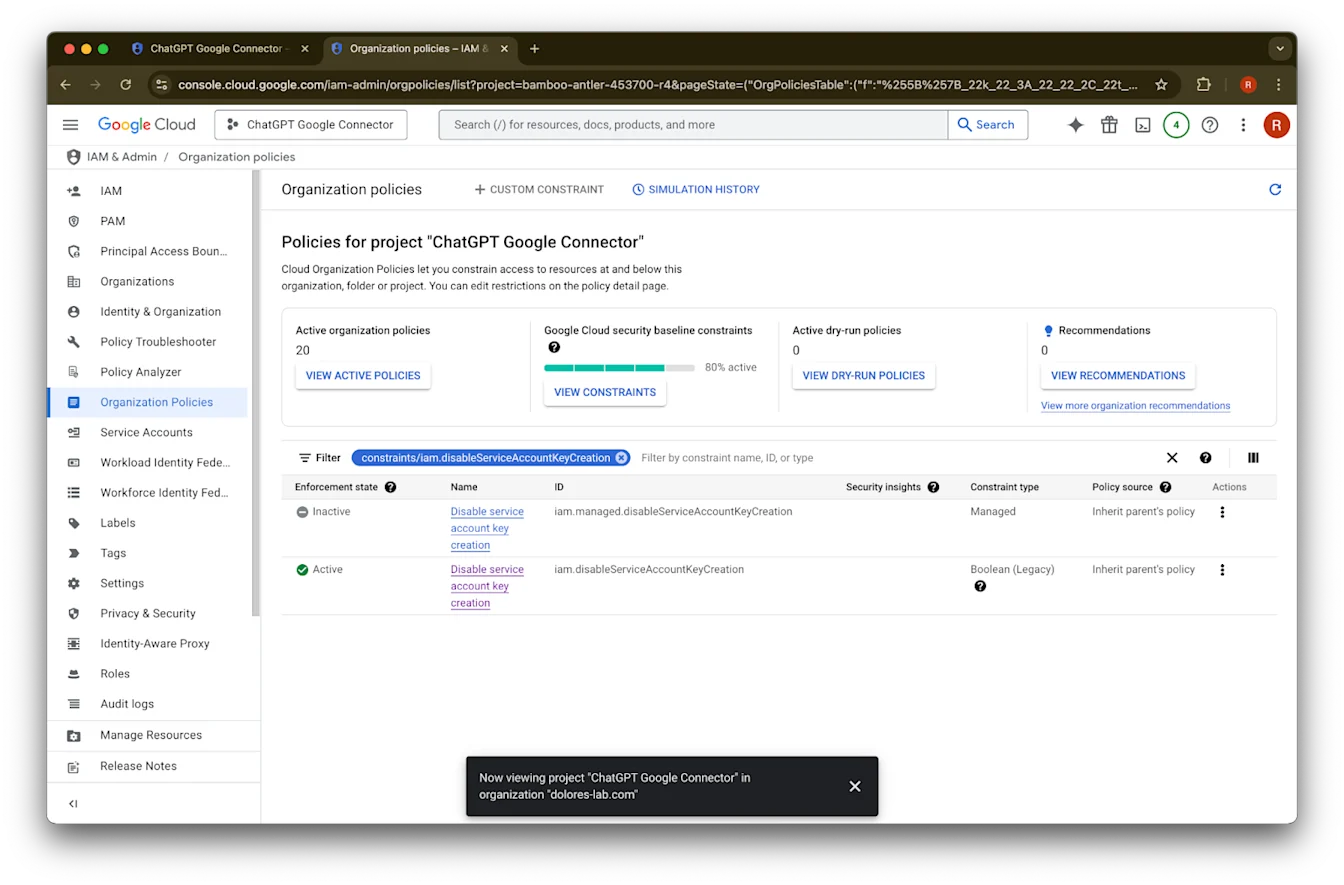
iam.disableServiceAccountKeyCreation ID ધરાવતી પંક્તિ માટે … પર ક્લિક કરો
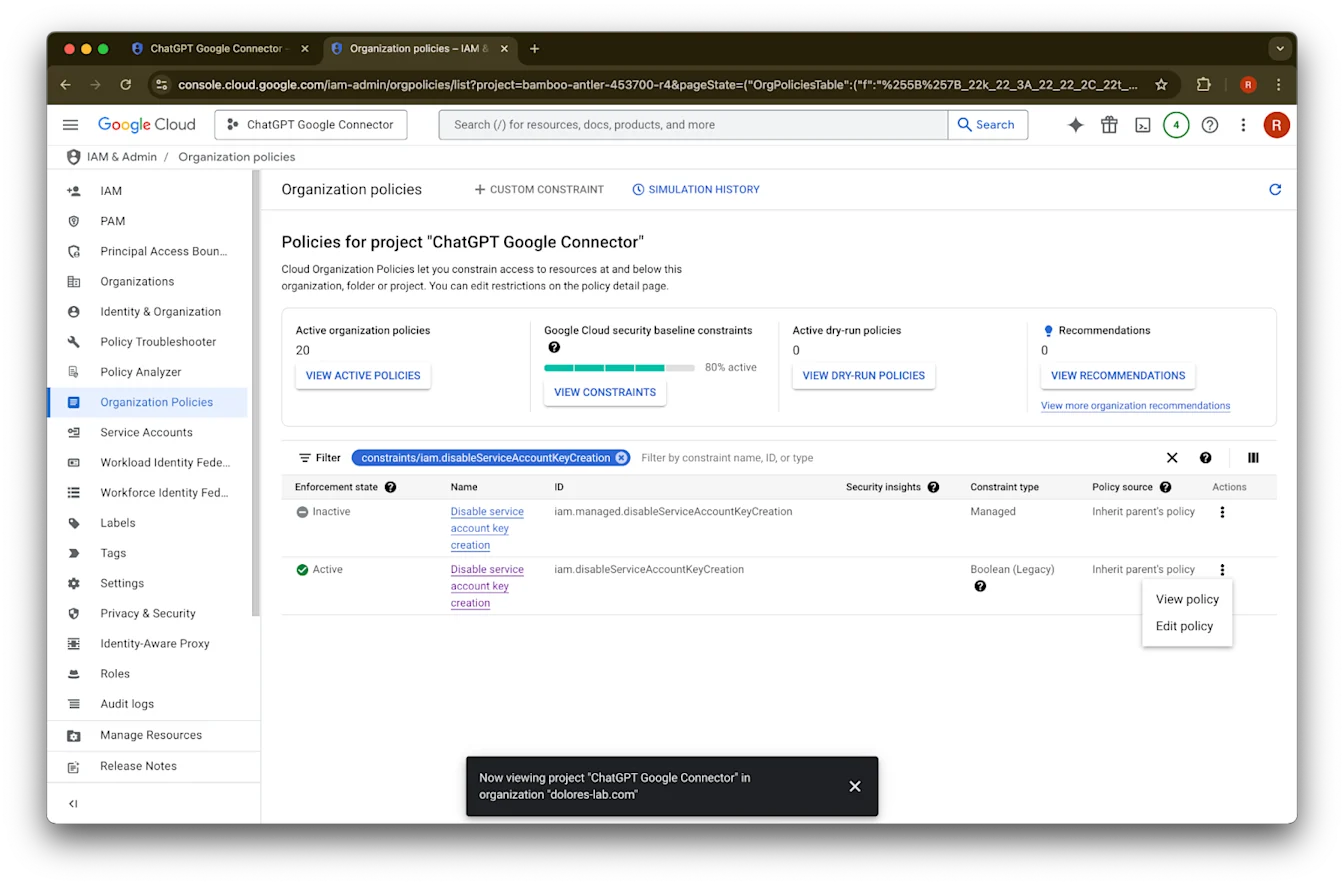
નીતિ સંપાદિત કરો પર ક્લિક કરો. જો નીતિ સંપાદિત કરો અક્ષમ હોય, તો તમારે સંસ્થા નીતિ એડમિનિસ્ટ્રેટર બનવું પડશે.
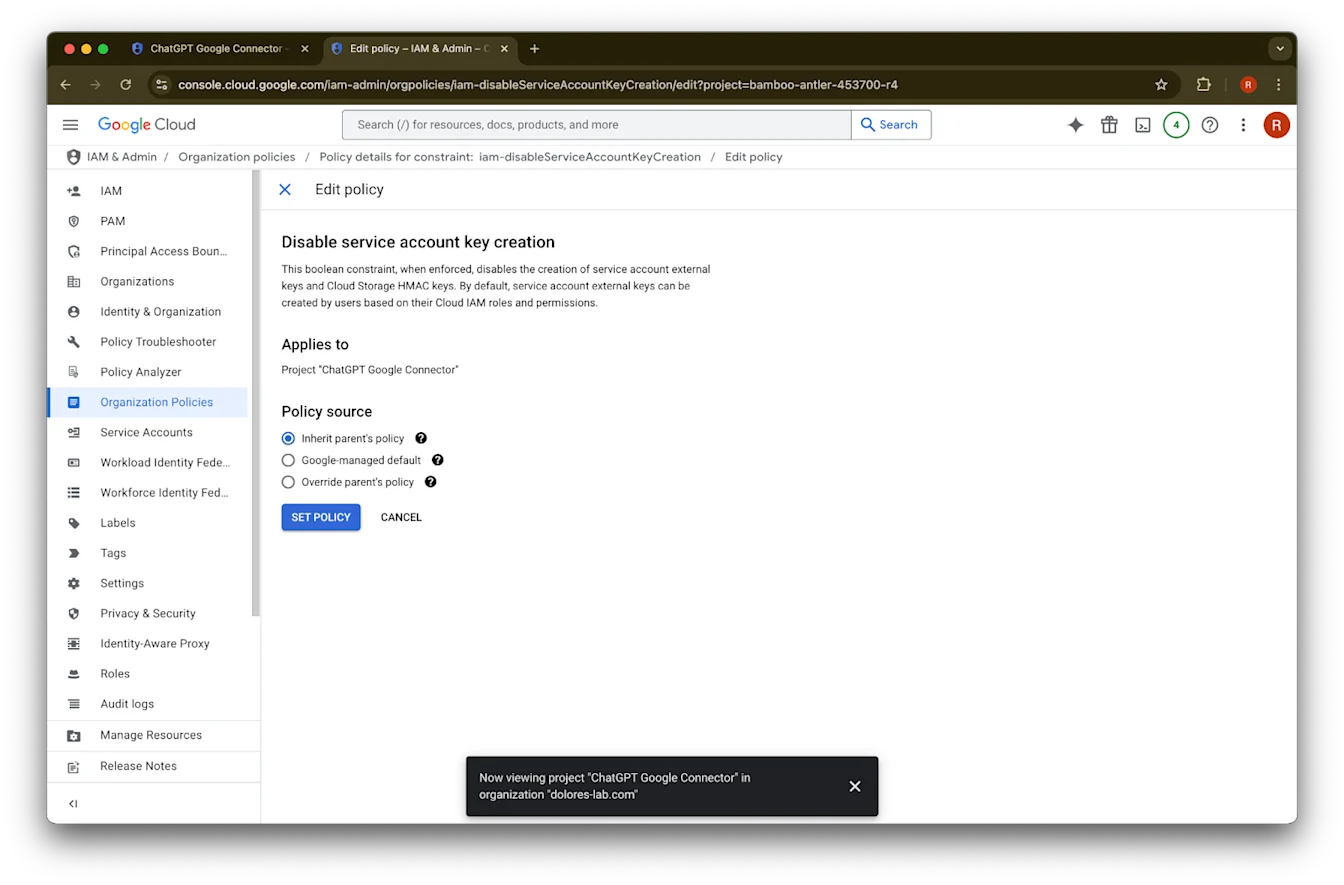
પેરેન્ટની નીતિ ઓવરરાઇડ કરો પર ક્લિક કરો
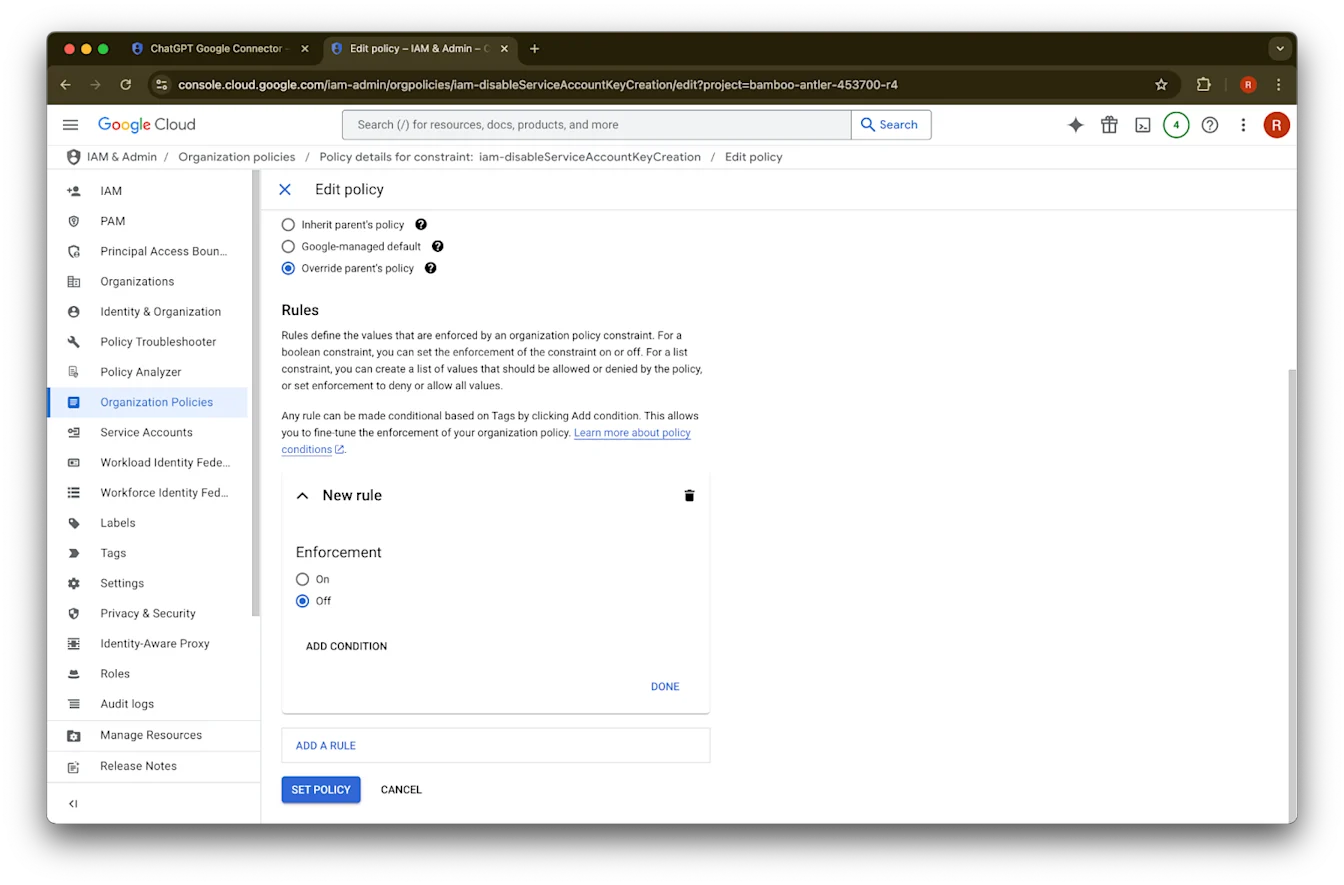
નિયમ ઉમેરો પર ક્લિક કરો
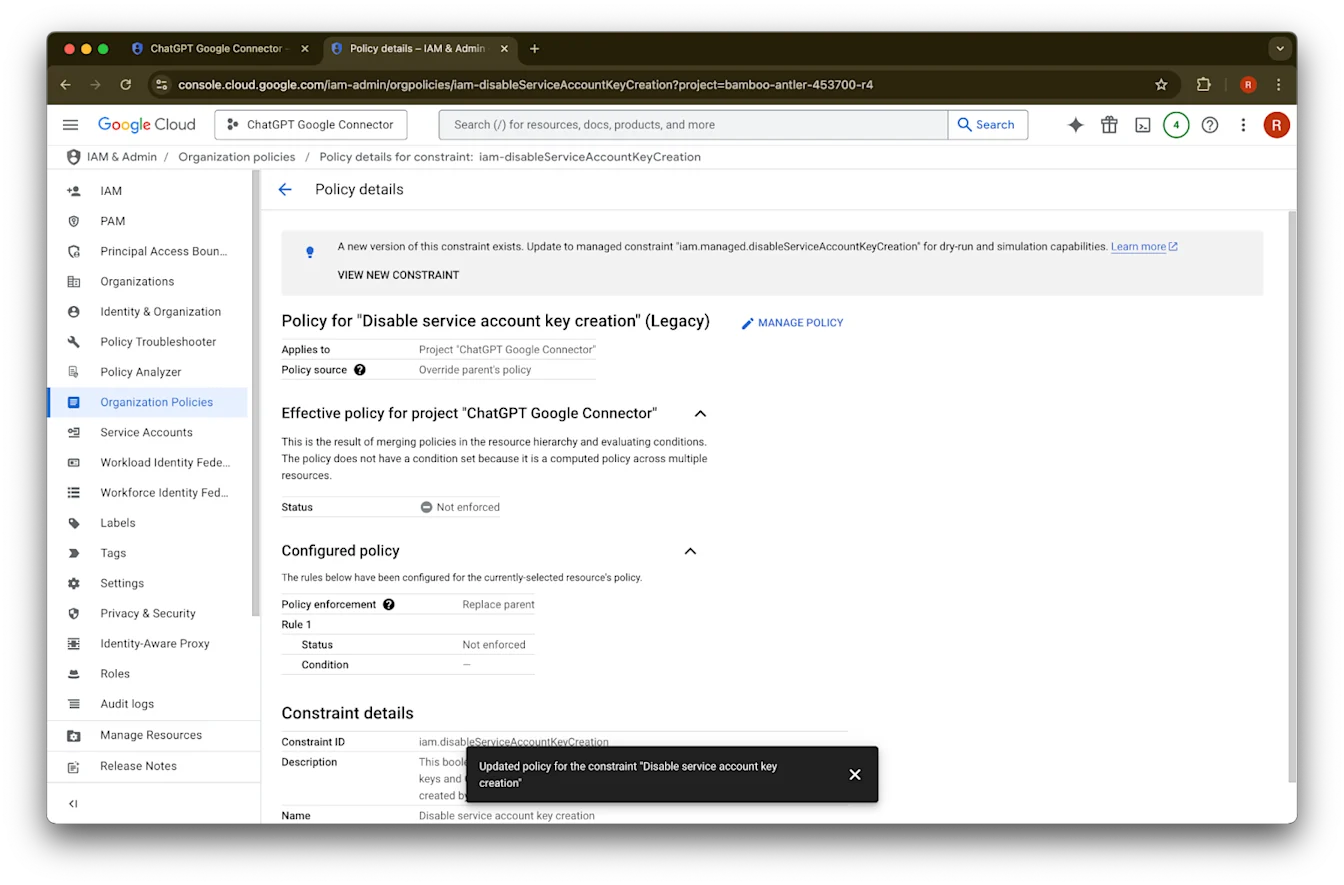
નીતિ સેટ કરો પર ક્લિક કરો
હવે તમે સર્વિસ એકાઉન્ટ કી બનાવી શકો છો. આ સક્ષમતા અમલમાં આવવામાં અનેક મિનિટ લાગી શકે છે.
સંસ્થા નીતિ એડમિનિસ્ટ્રેટર બનવું
console.cloud.google.com પર જાઓ અને પ્રોજેક્ટ/સંસ્થા સિલેક્ટર પર ક્લિક કરો
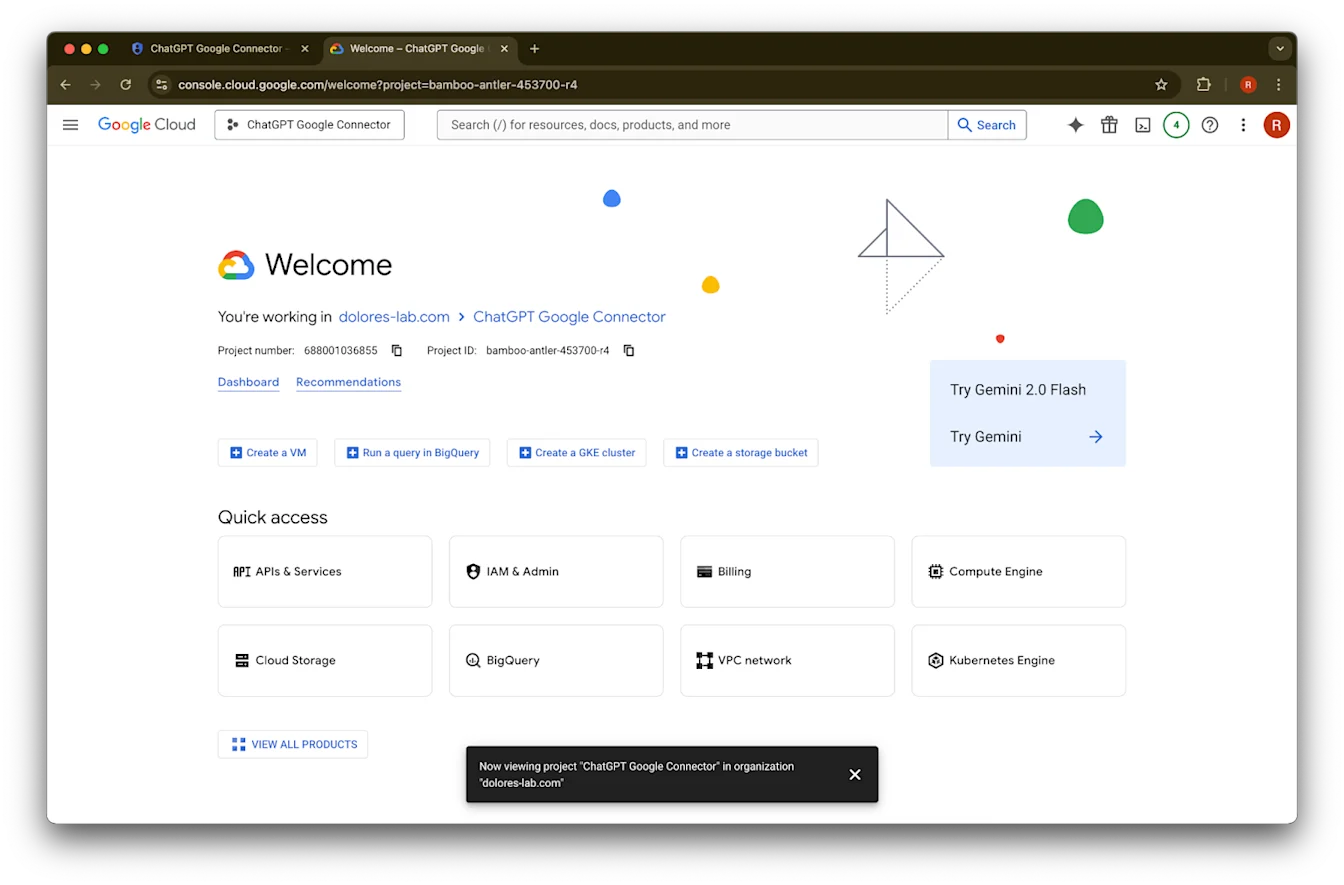
તમારી સંસ્થા પર ક્લિક કરો
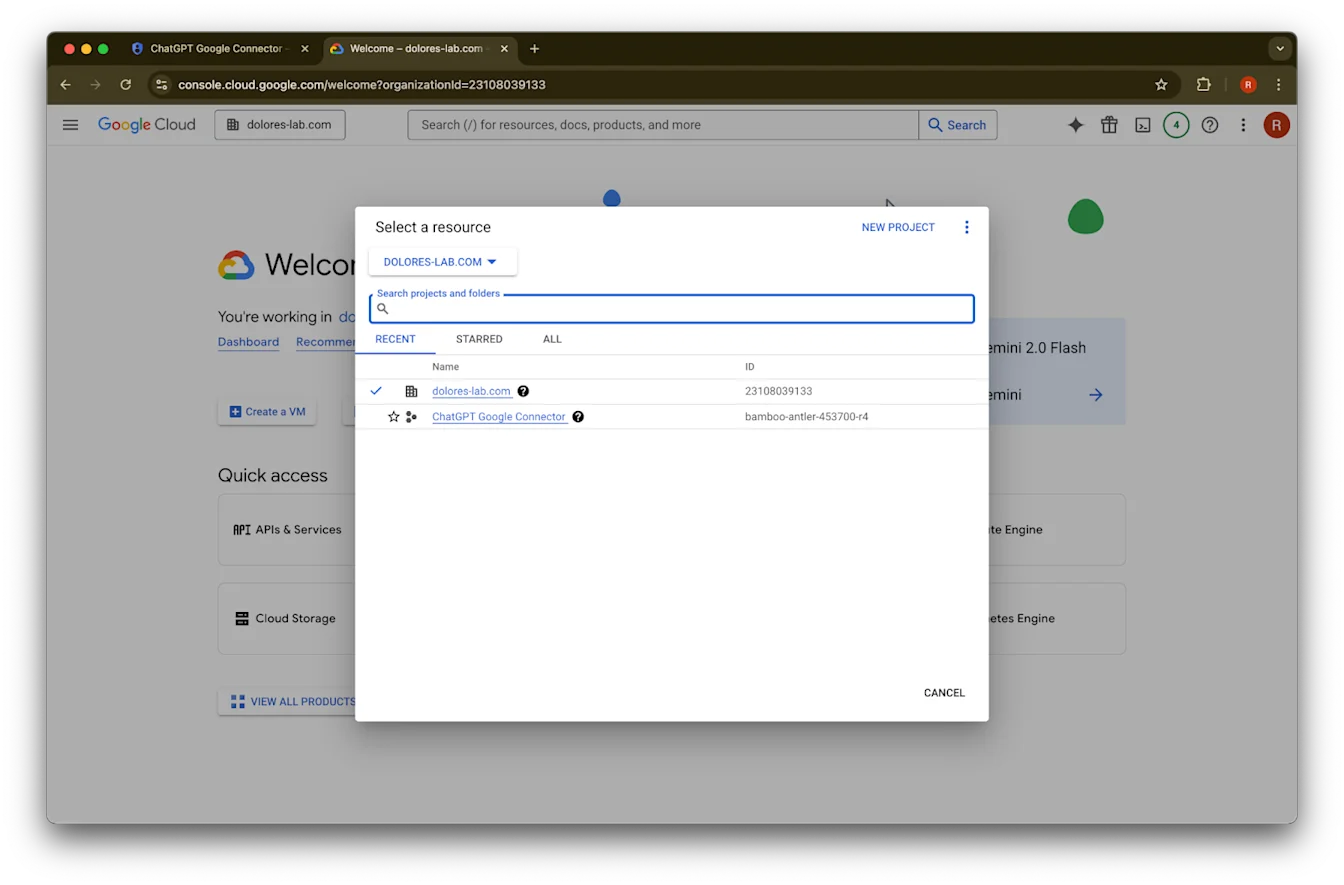
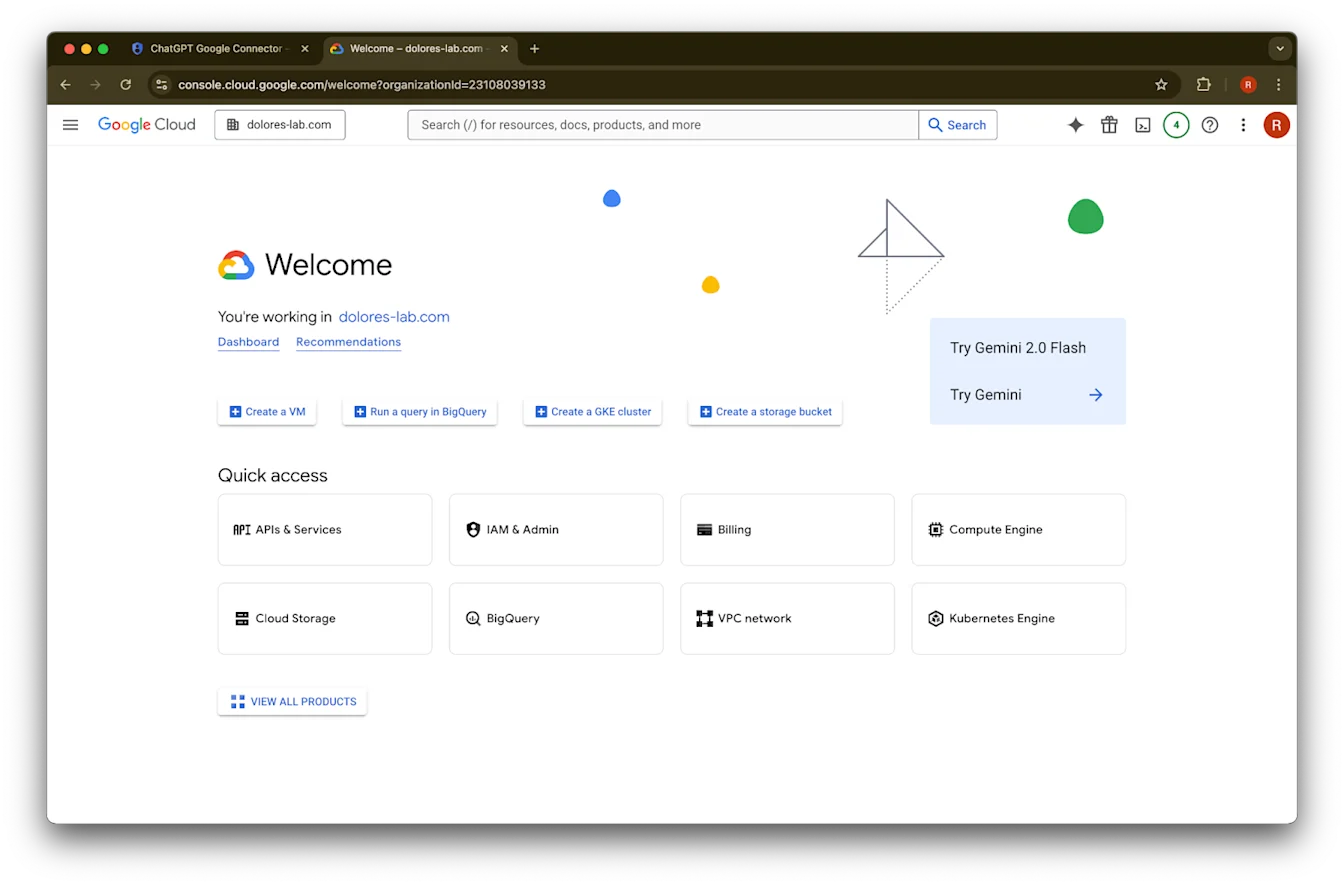
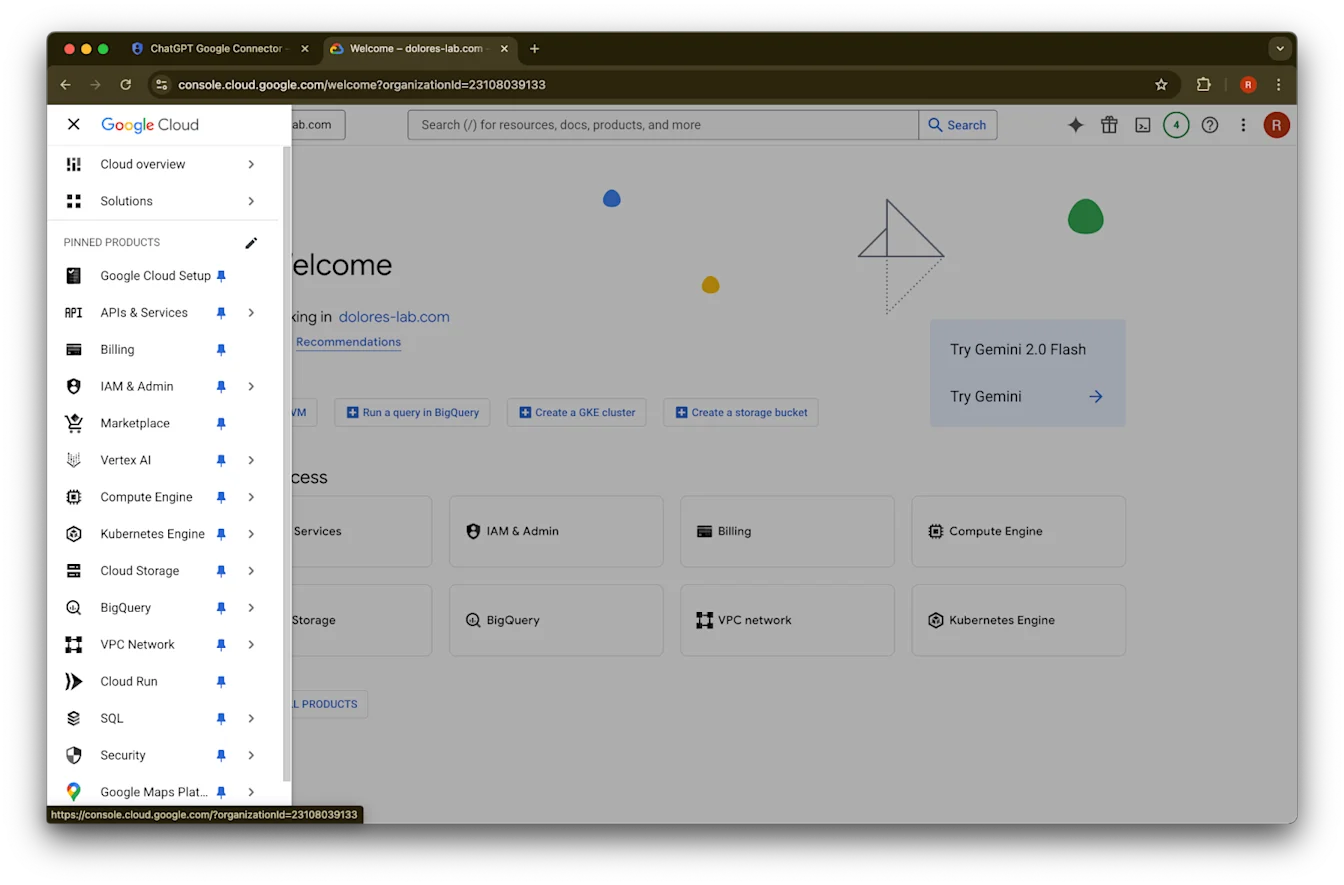
ઉપરના ડાબા ખૂણામાં મેનૂ આઇકન પર ક્લિક કરો
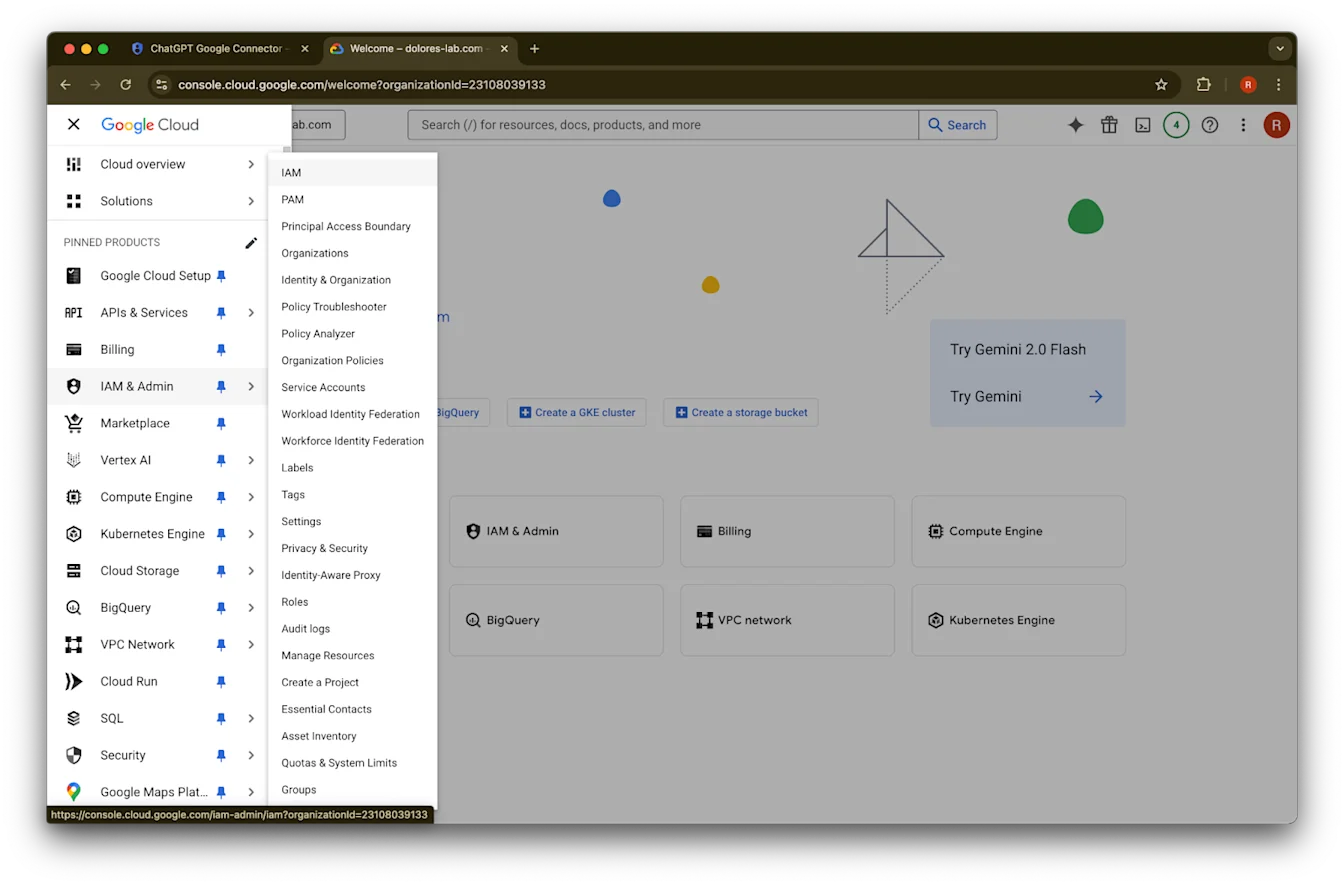
IAM અને એડમિન પર હોવર કરો
IAM પર ક્લિક કરો
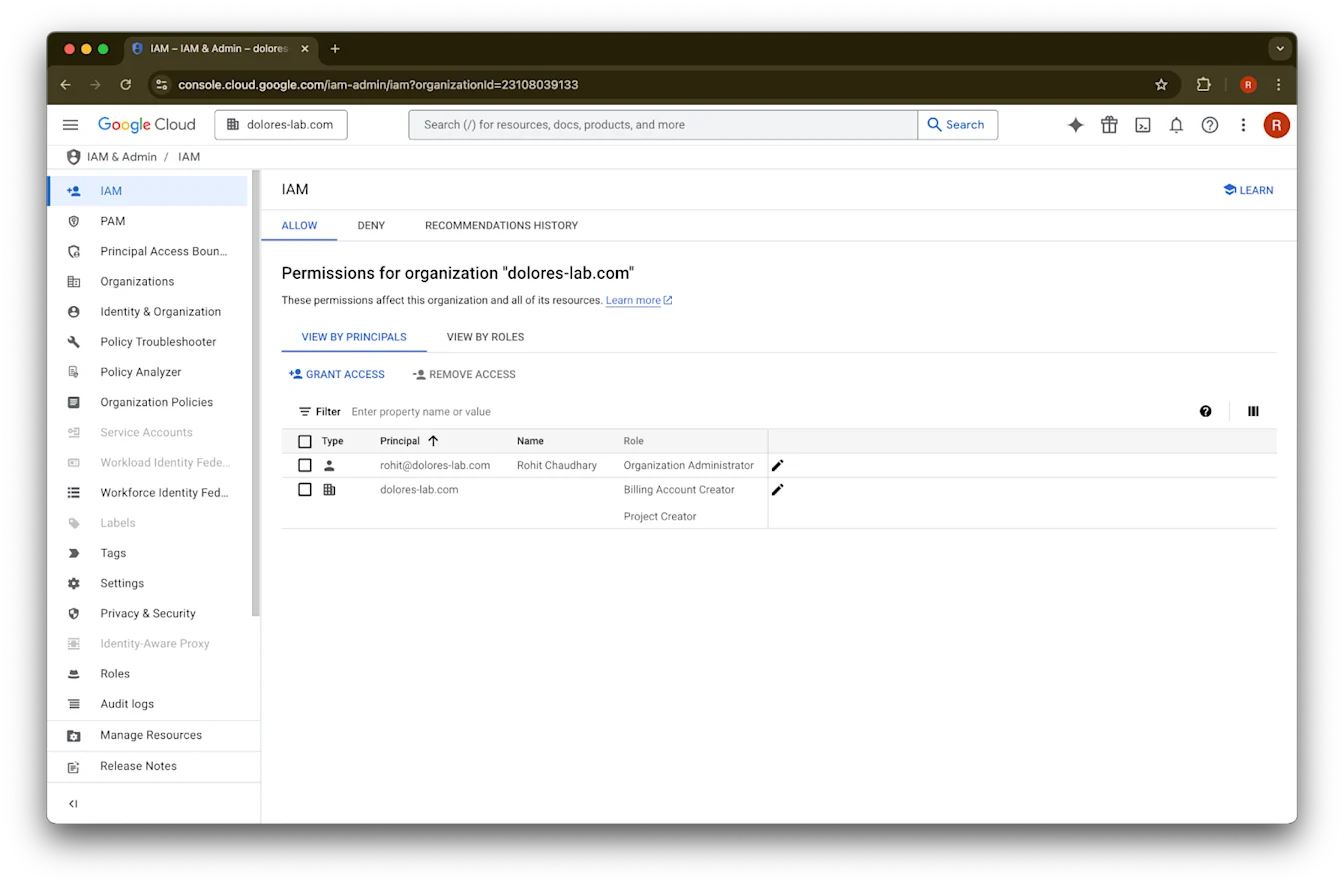
તમારા એકાઉન્ટ માટેના પેન્સિલ પર ક્લિક કરો
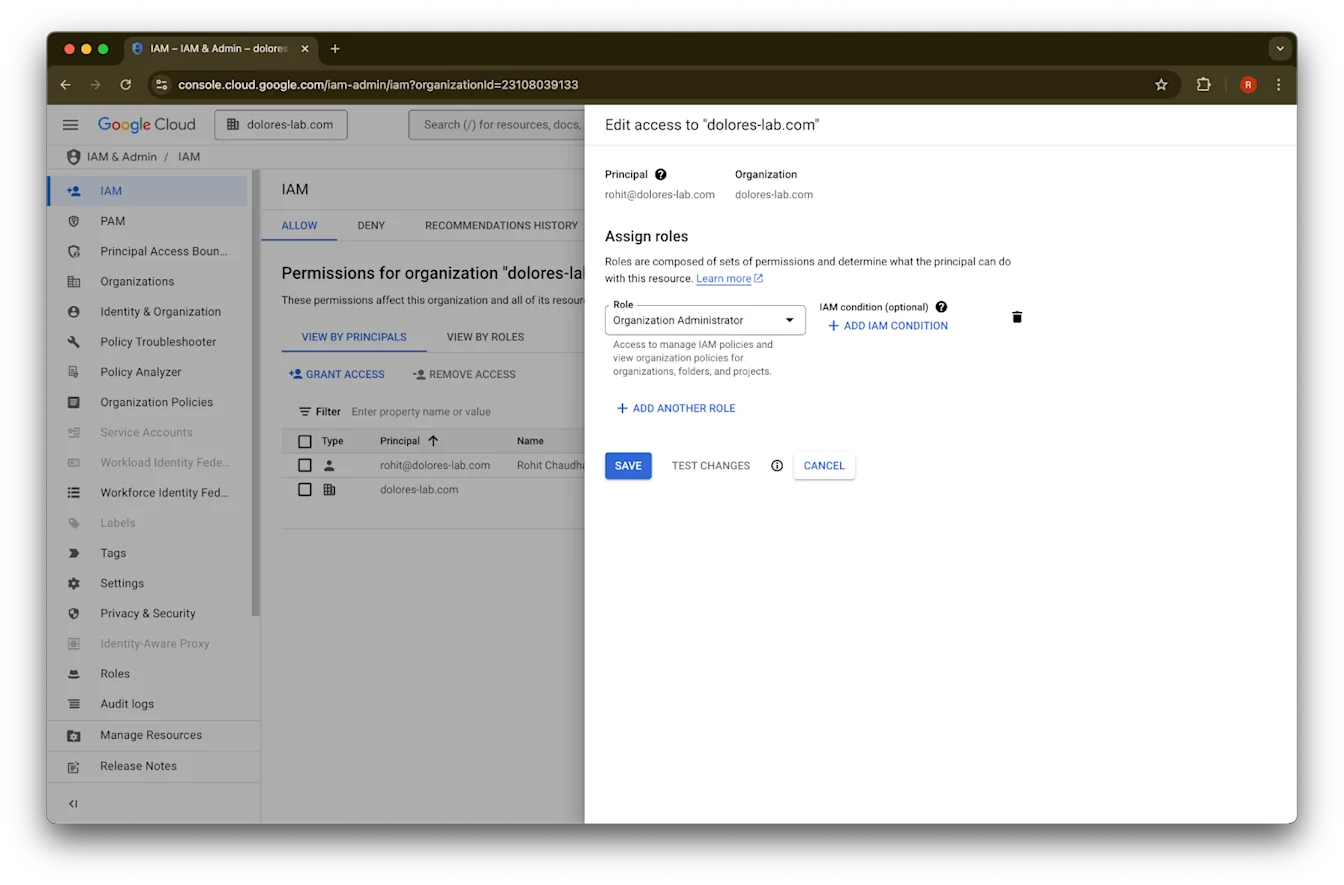
બીજી ભૂમિકા ઉમેરો પર ક્લિક કરો
Organization Policy Administrator શોધો
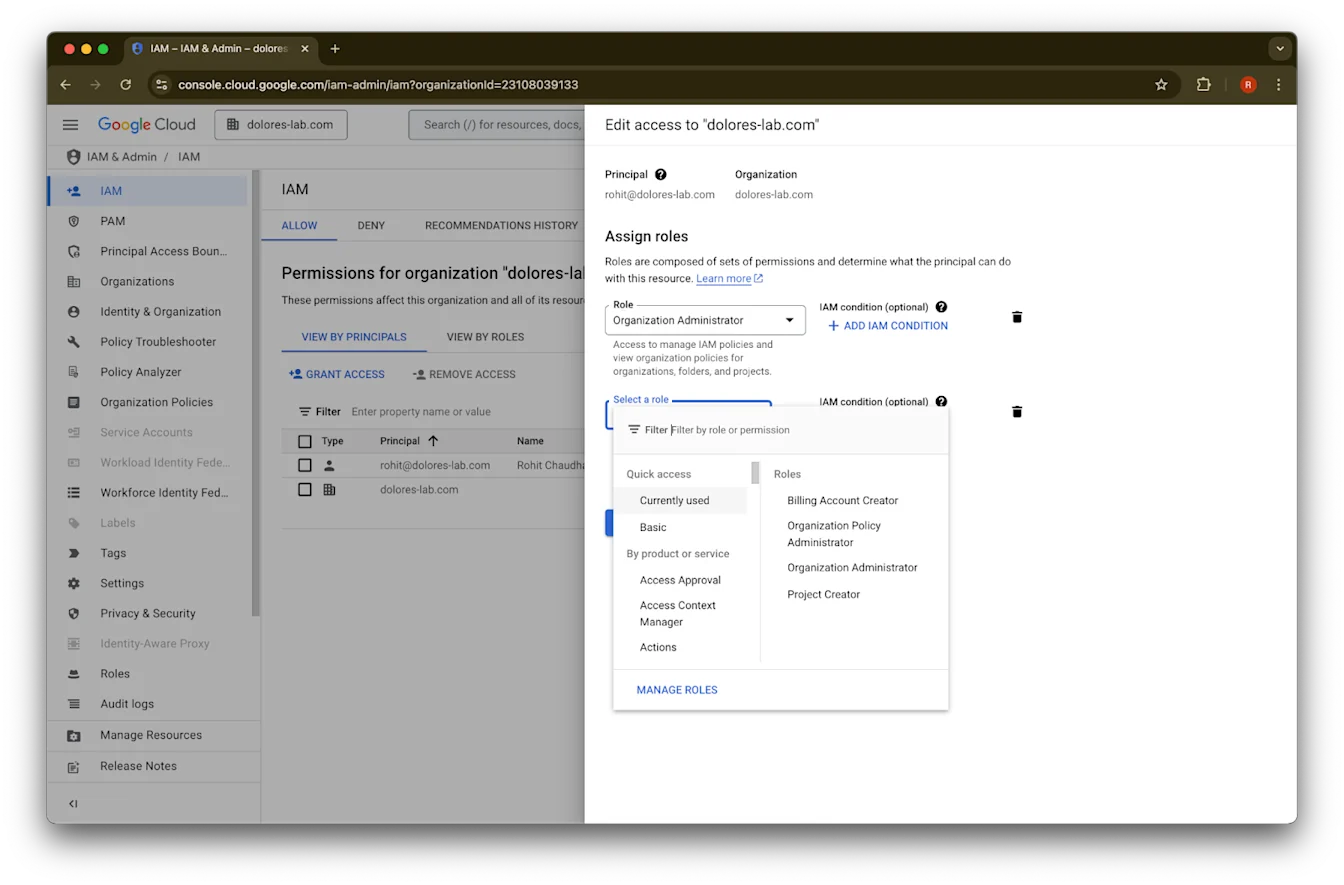
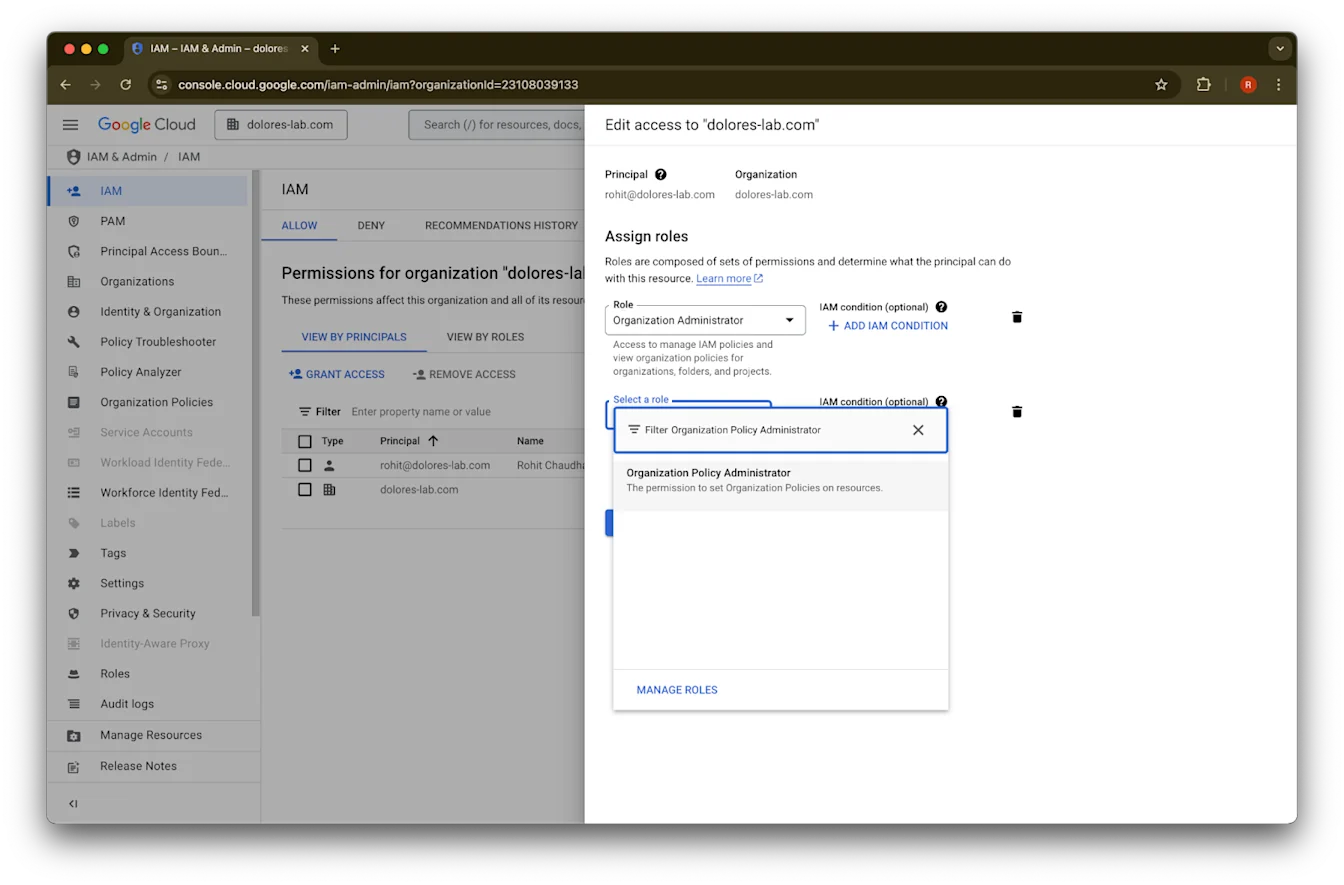
Organization Policy Administrator પર ક્લિક કરો
સાચવો પર ક્લિક કરો
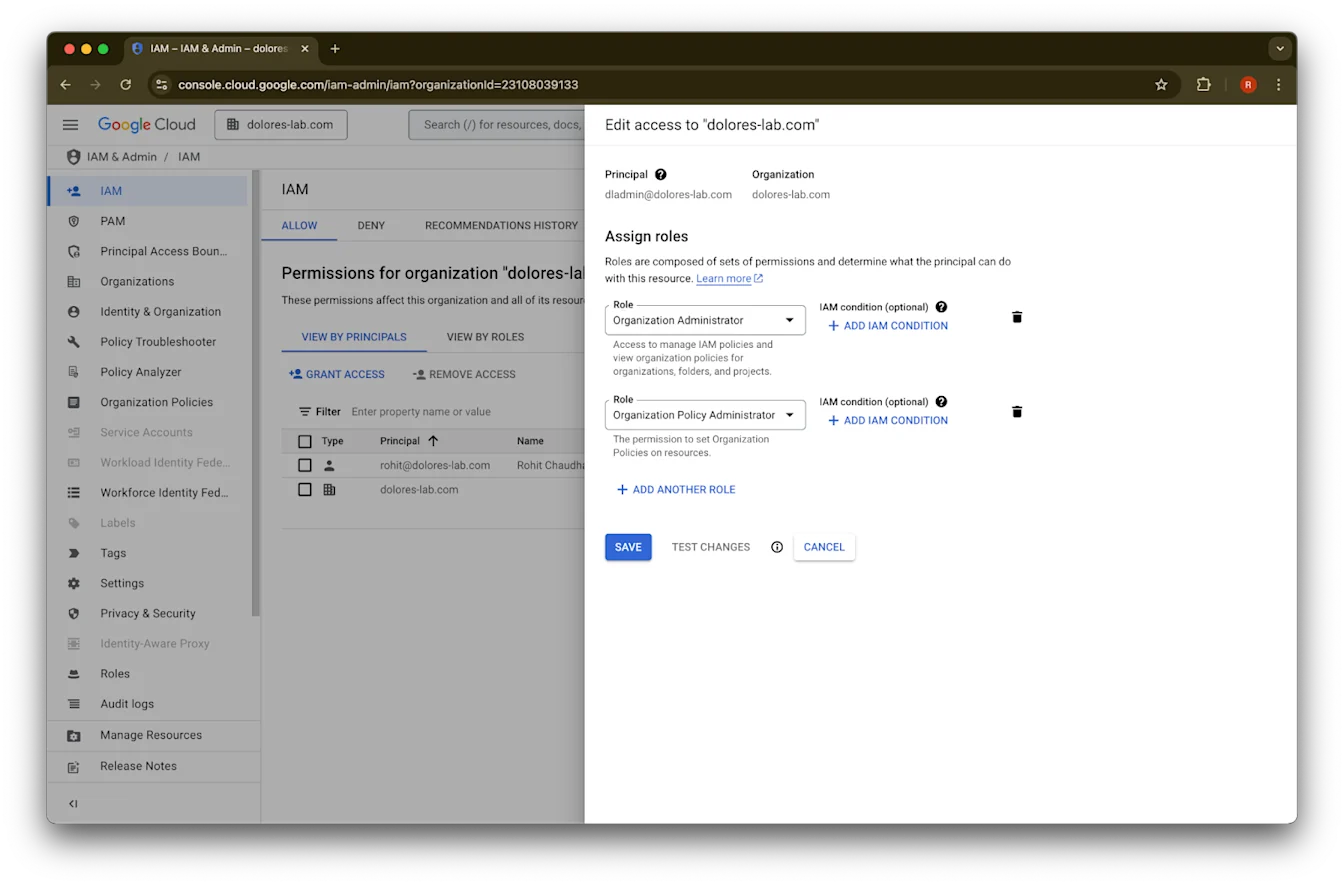
તમારા એકાઉન્ટ પાસે હવે સર્વિસ એકાઉન્ટ કી બનાવવાનું સક્ષમ કરવાની પરવાનગી છે. આ અમલમાં આવવામાં અનેક મિનિટ લાગી શકે છે.
Google Workspace અને ChatGPT માટે અલગ ઇમેઇલ એકાઉન્ટ્સ જાળવવા માટે Google ઇમેઇલ ઉપનામનો ઉપયોગ કરવો
જો તમે Google Drive સિંક કરેલા કનેક્ટર્સ માટે એડમિન-મેનેજ્ડ સેટઅપનો ઉપયોગ કરીને Google Workspaceને તમારા ChatGPT વર્કસ્પેસ સાથે કનેક્ટ કરતા એડમિન છો, અને તમારી સંસ્થા ChatGPT અને Google Workspace માટે અલગ ઇમેઇલ ડોમેન્સનો ઉપયોગ કરે છે, તો વપરાશકર્તાઓ Google Drive સિંક કરેલા કનેક્ટર્સને સફળતાપૂર્વક ઍક્સેસ કરી શકે તેની ખાતરી કરવા માટે તમારે વધારાના પગલાં લેવા પડશે.
ભલામણ: શક્ય હોય ત્યારે Google Workspace અને ChatGPT એકાઉન્ટ બંને માટે એકસરખા primary email addresses નો ઉપયોગ કરો.
જો આ શક્ય ન હોય, તો ChatGPT sign-in email સાથે મેળ ખાતો Google Workspace email alias કન્ફિગર કરવા માટે નીચેની સૂચનાઓ અનુસરો.
Google Workspace ઉપનામ ઉમેરવાના પગલાં
દરેક વપરાશકર્તાનું ChatGPT ઇમેઇલ તેમના Google Workspace એકાઉન્ટ સાથે લિંક થઈ શકે તેની ખાતરી કરવા માટે Google એડમિન કન્સોલમાં આ પગલાં અનુસરો:
એડમિન કન્સોલ પર જાઓ. અહીં નેવિગેટ કરો: ડિરેક્ટરી > વપરાશકર્તાઓ
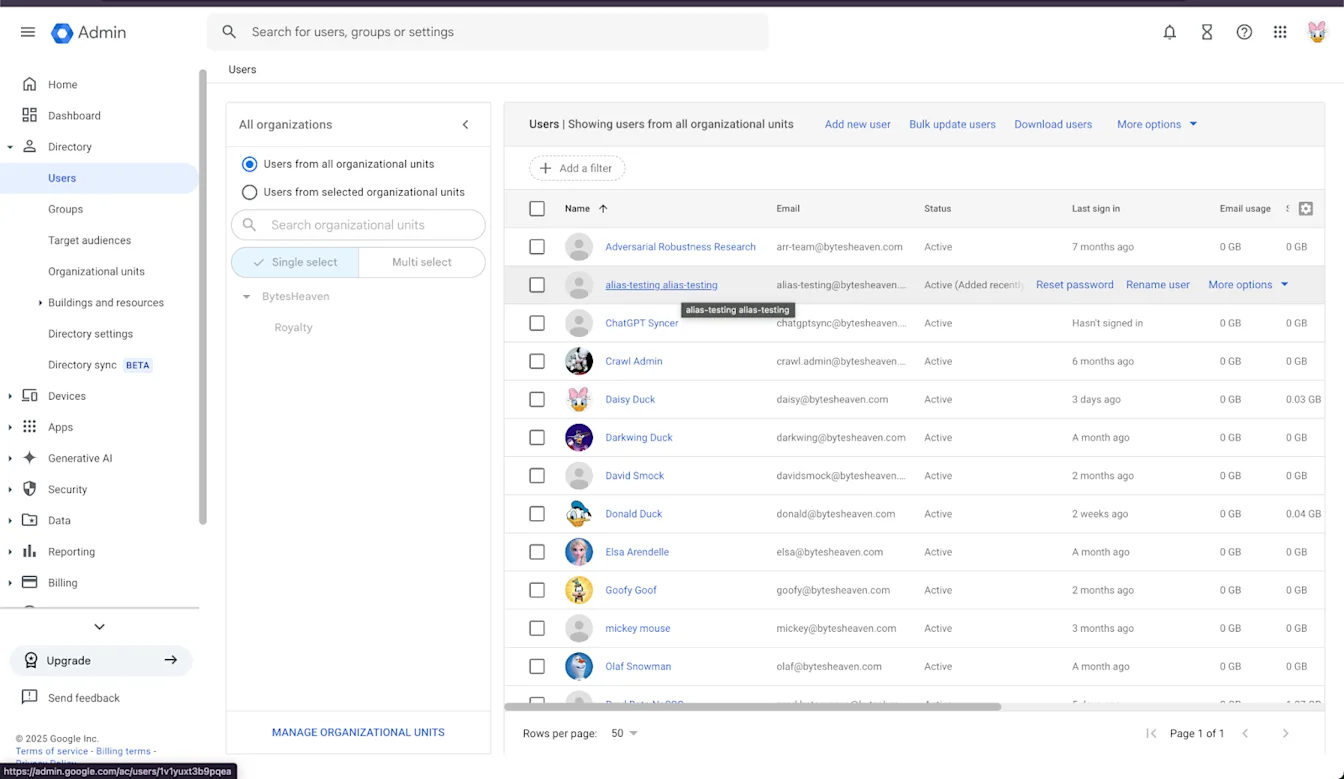
વપરાશકર્તા પસંદ કરો, પછી “વૈકલ્પિક ઇમેઇલ્સ ઉમેરો”.
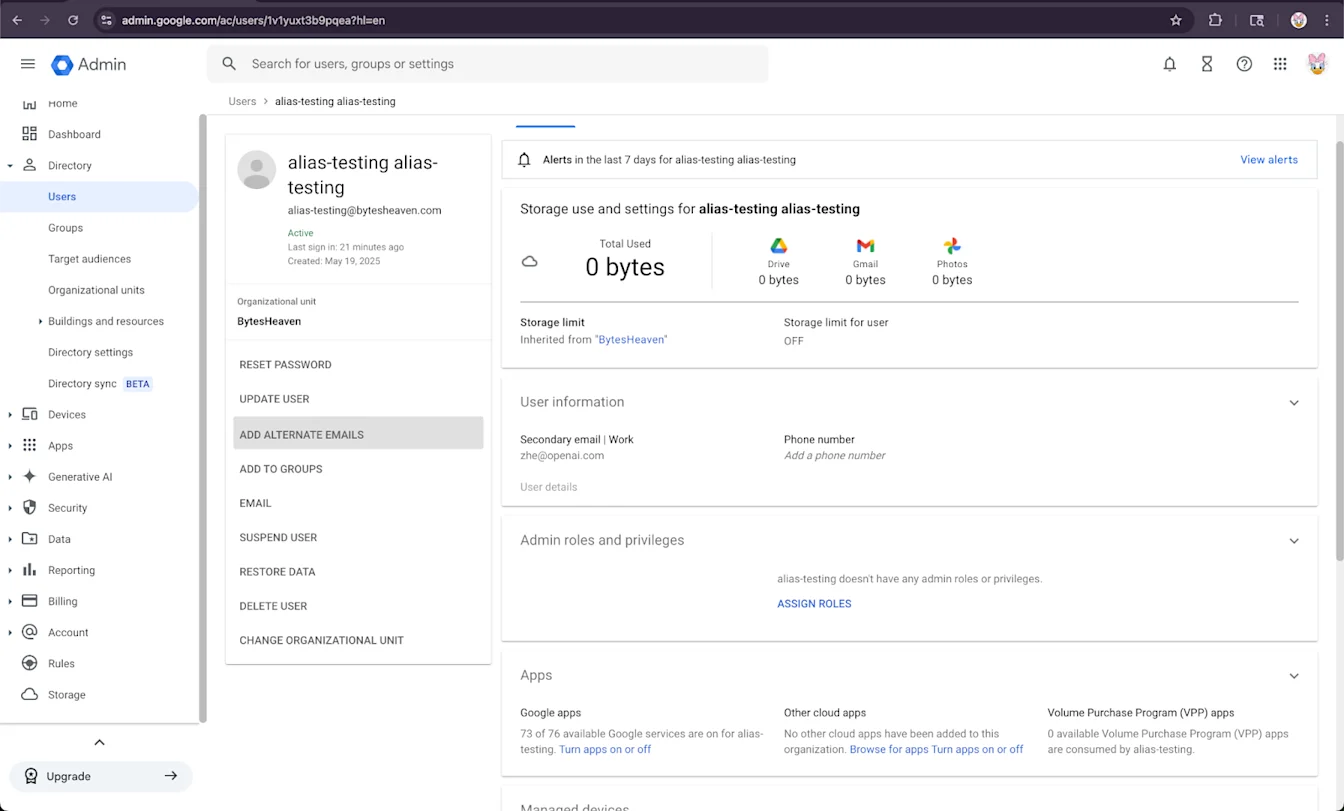
વૈકલ્પિક ઇમેઇલ ઉમેરો. ખાતરી કરો કે તે વપરાશકર્તાના ChatGPT એકાઉન્ટને અનુરૂપ છે.
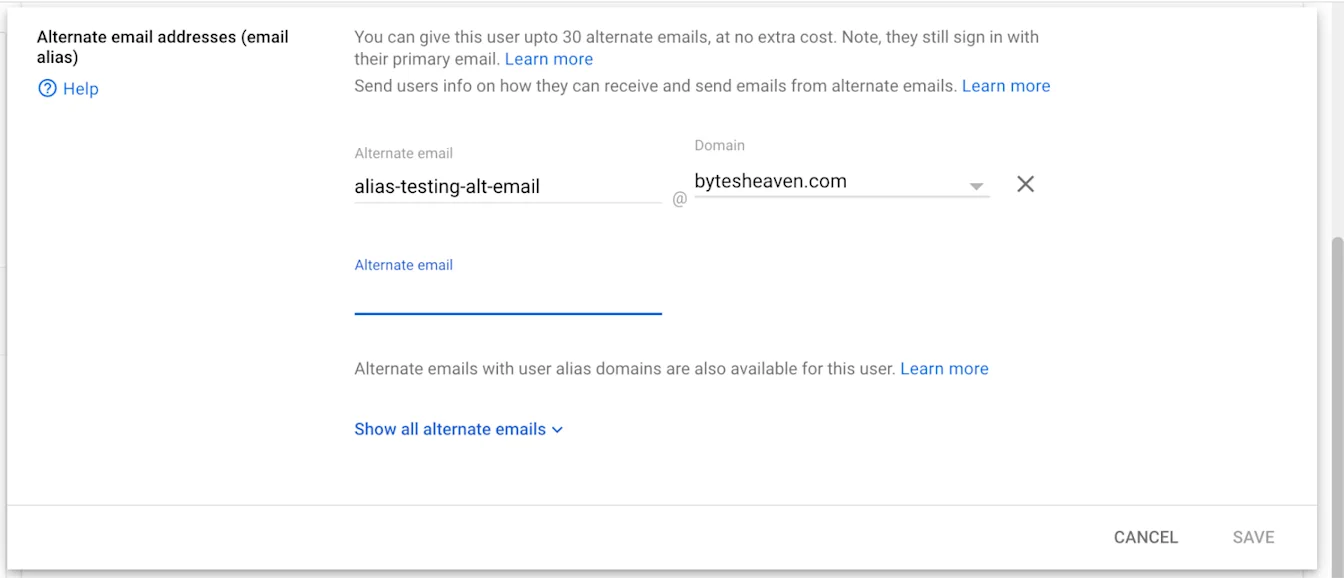
સાચવો પસંદ કરો
---
જાણીતી મર્યાદાઓ
વ્યક્તિગત ઇમેલ સરનામાઓ સપોર્ટેડ નથી
જે યુઝર્સ ChatGPT માટે વ્યક્તિગત સરનામાંઓનો ઉપયોગ કરીને રજીસ્ટર કરે છે (દા.ત., example@gmail.com), તેઓ Google Workspace સાથે જોડાઈ શકતા નથી. આ સેટઅપ સપોર્ટેડ નથી અને સુરક્ષા જોખમ ઊભું કરે છે, કારણ કે તે સંસ્થાની બહારથી આંતરિક ડેટા ઍક્સેસને સક્ષમ બનાવે છે.
Gmail "+" aliases સપોર્ટેડ નથી
Gmail યુઝર્સને તેમના સરનામે "+" ઉમેરીને aliases બનાવવાની મંજૂરી આપે છે (દા.ત., user+alias@gmail.com). આ પ્રકારનું aliasing Google Drive synced connectors સાથે કામ કરતું નથી. alias Google Workspaceમાં સ્પષ્ટ રીતે કન્ફિગર કરેલું હોવું જોઈએ.
સામાન્ય ભૂલ સંદેશ
જો ઇમેઇલ સરનામાં યોગ્ય રીતે લિંક ન હોય, તો વપરાશકર્તાઓને આ સંદેશ મળી શકે છે: “અમે તમારા એકાઉન્ટને Google Drive સાથે કનેક્ટ કરી શક્યા નથી. વધુ જાણવા ક્લિક કરો.”
જો વપરાશકર્તાઓને આ સંદેશ મળે, તો આ દસ્તાવેજમાંના પગલાંની સમીક્ષા કરો અને ખાતરી કરો કે તેઓ સચોટ રીતે અનુસરવામાં આવ્યા છે. જો વધારાની સહાયની જરૂર હોય, તો કૃપા કરીને અમારી સપોર્ટ ટીમનો સંપર્ક કરો.